Last week, I showed you how to draft in-seam pockets (and included a pattern for your downloading pleasure if you want a pocket quickly). In-seam pockets are perfect if you don't want to make a feature of your pockets, but want them for their function.
Why side pockets?
If you would prefer to make more of a feature of your pockets, you may prefer to try out side pockets (which are suitable for skirts and trousers) or patch pockets (which are suitable for almost any garment).
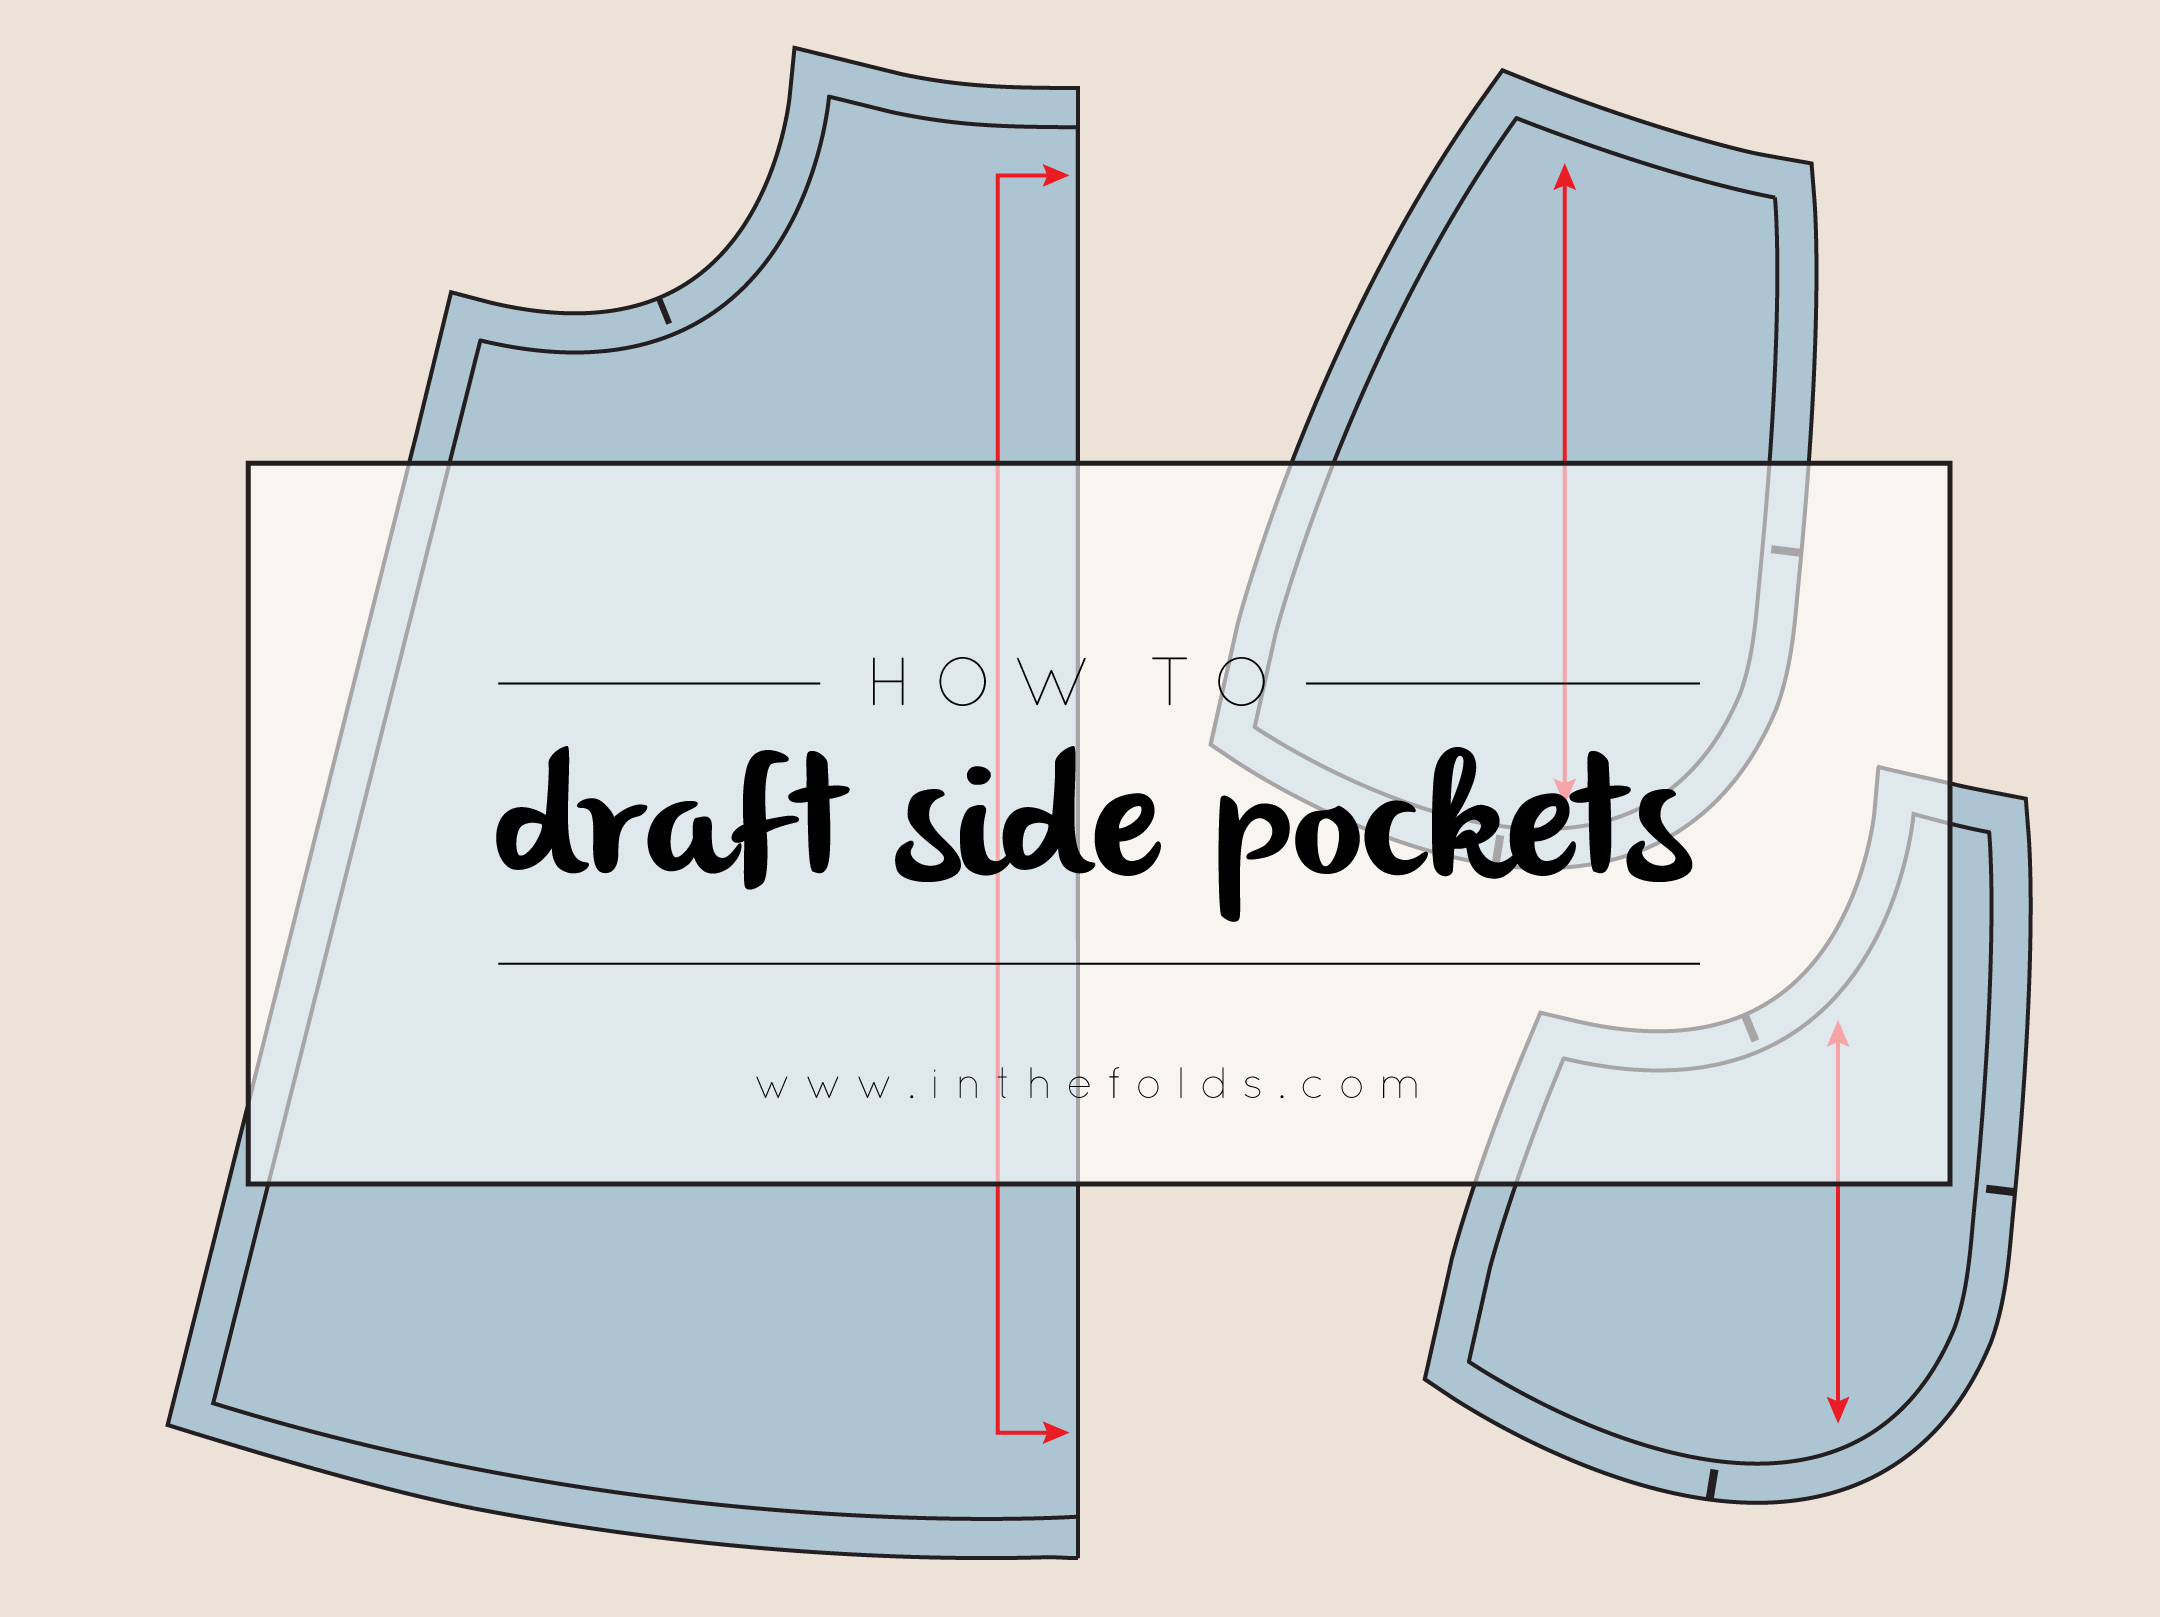
In today's post I am going to show you how to draft side pockets, and then next week I'll get onto patch pockets.
Getting started
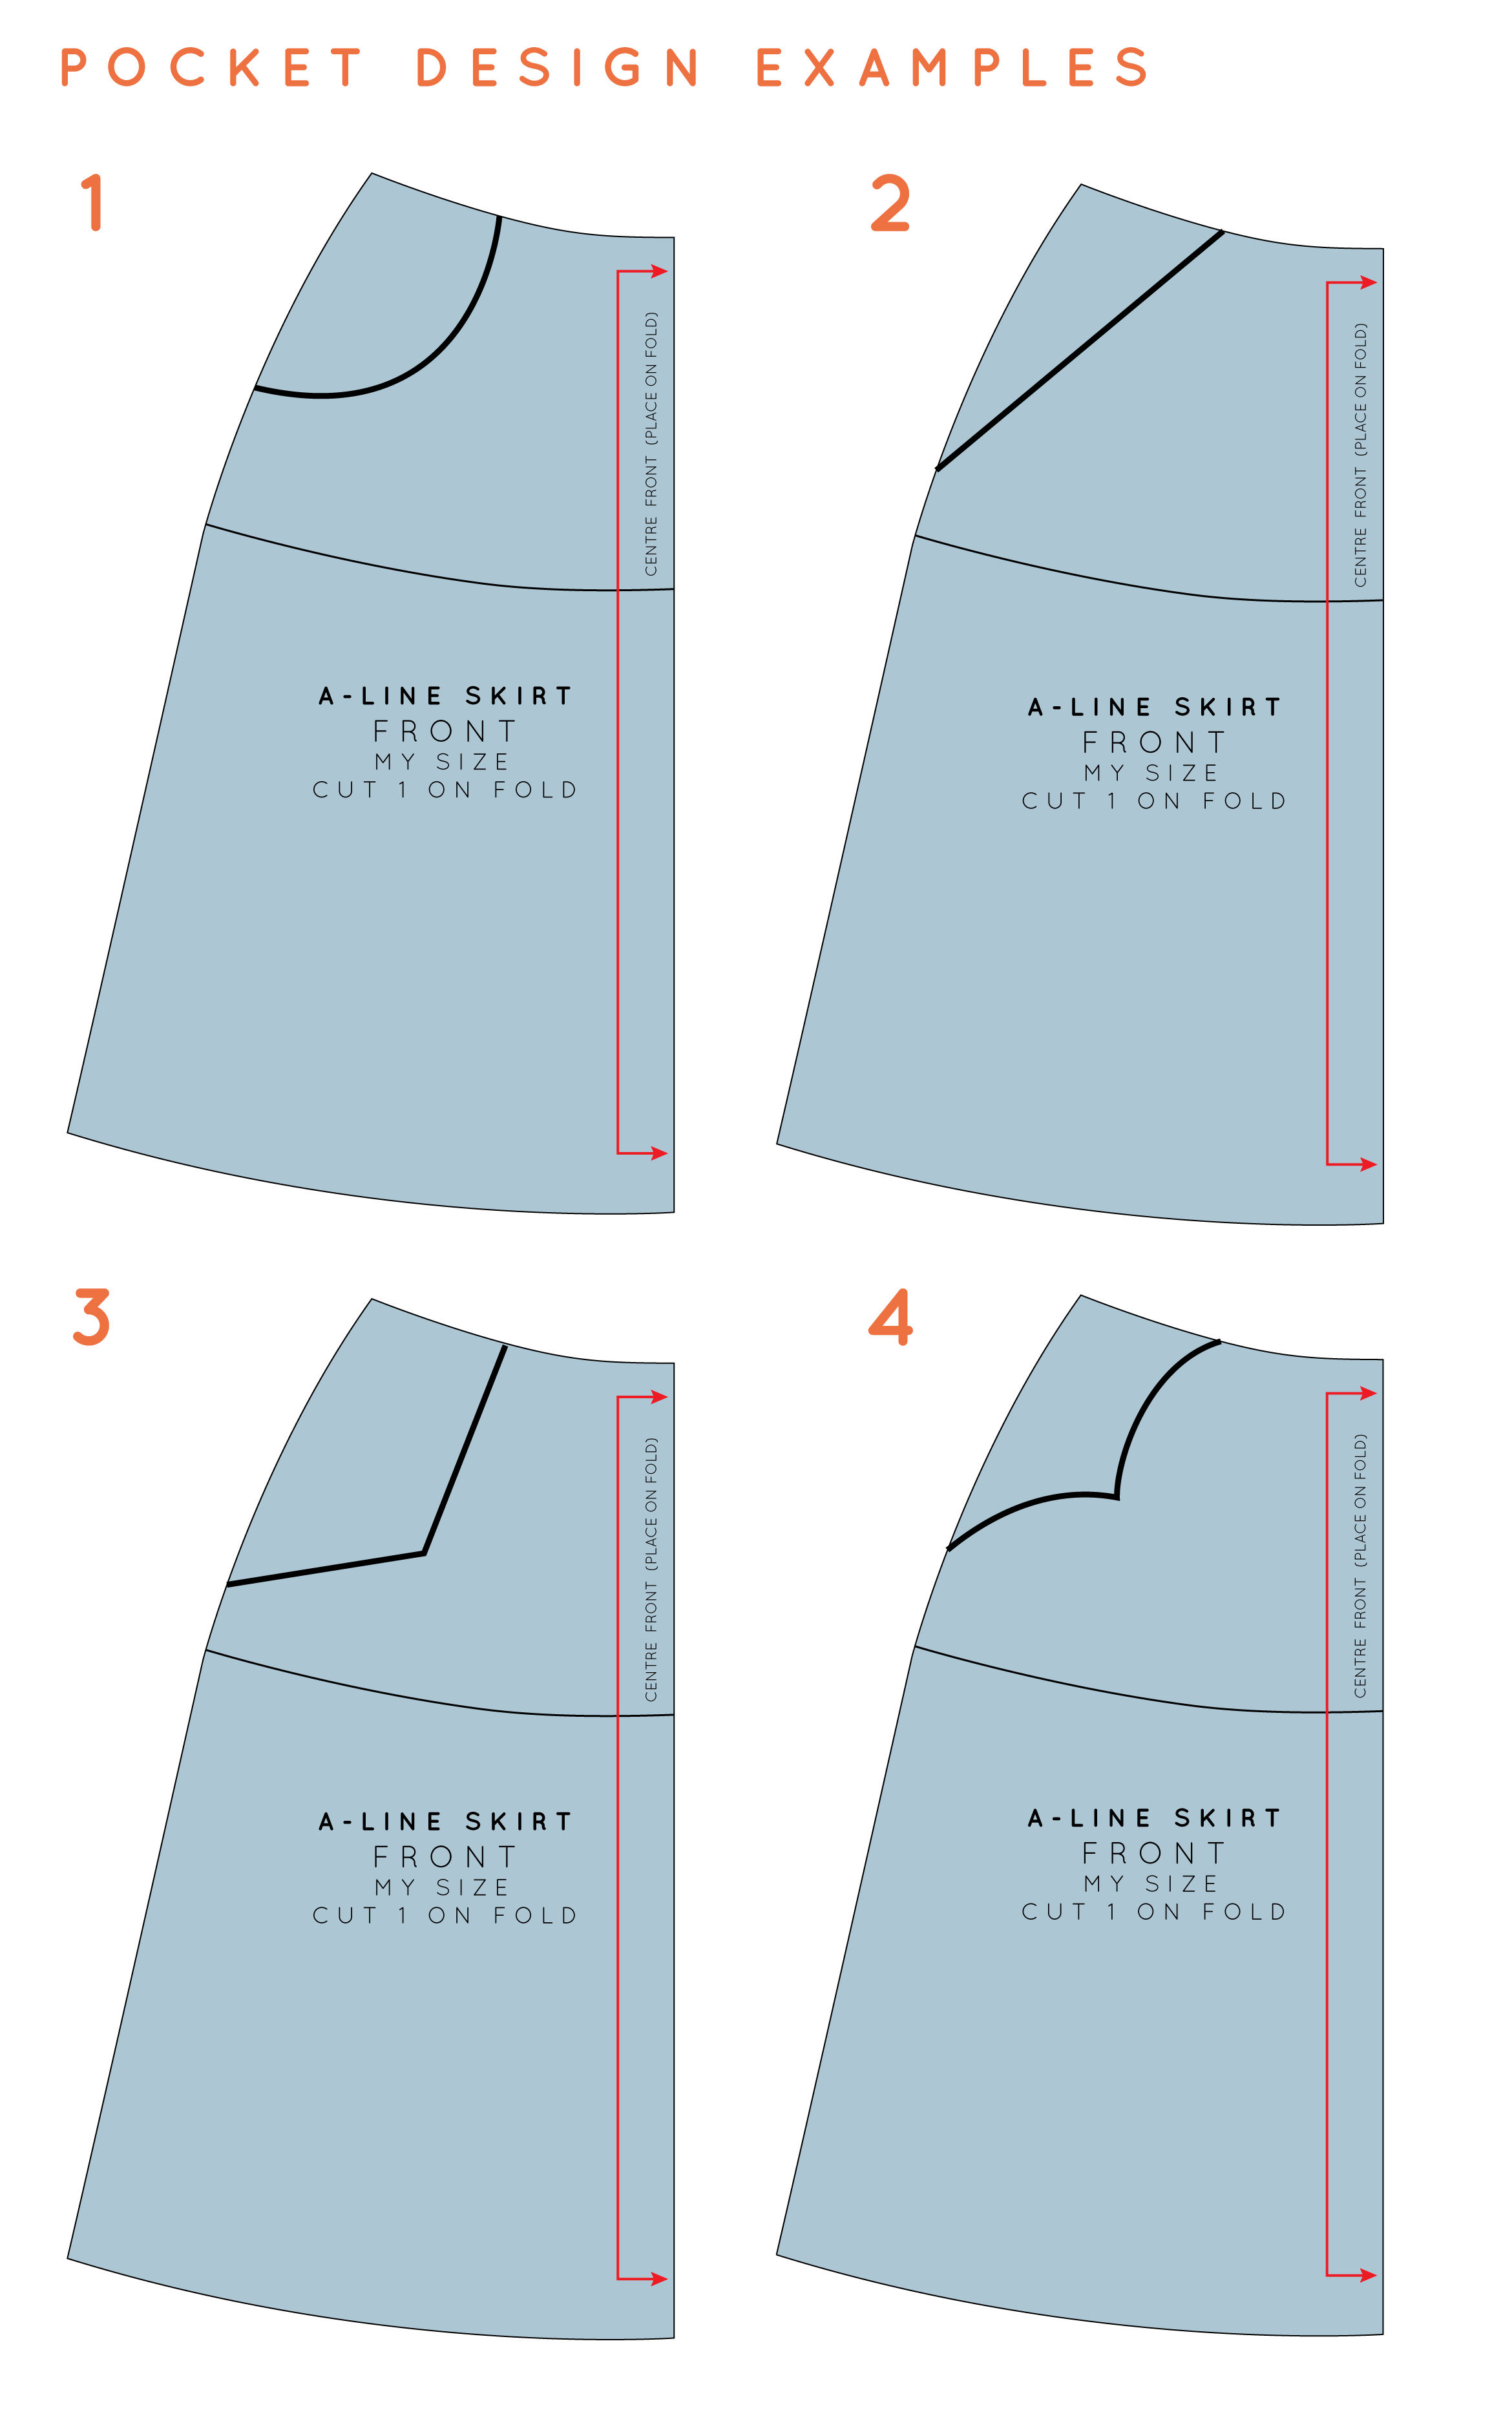
To start, have a think about what shape you would like to make your pocket opening. You can go with the standard curved pocket opening (1), the slanted pocket (2), the corner pocket (3) or something more unconventional (4). Look to your ready-to-wear garments for inspiration, or if you are struggling, have a look online.
For this tutorial, I am going to create a curved pocket (1), but the principle is the same for other shapes.
Taking measurments
Have a think about how big you would like your pocket opening to be. There are several ways you can do this:
1. Take meausrements from a pocket on a piece of ready-to-wear clothing that you feel is a good size
2. Put your skirt toile on and mark your pockets on the toile. This way you can mark your ideal pocket shape on the toile and get an idea of how it will look when it is made up
3. Place your hand on the skirt block and mark in the pocket width and depth, in relation to the size of your hand.
I would suggest making your pocket opening at least 10cm wide (4 inches) at the waist and at least 10cm (4 inches) deep at the side seam.
Draw pocket opening
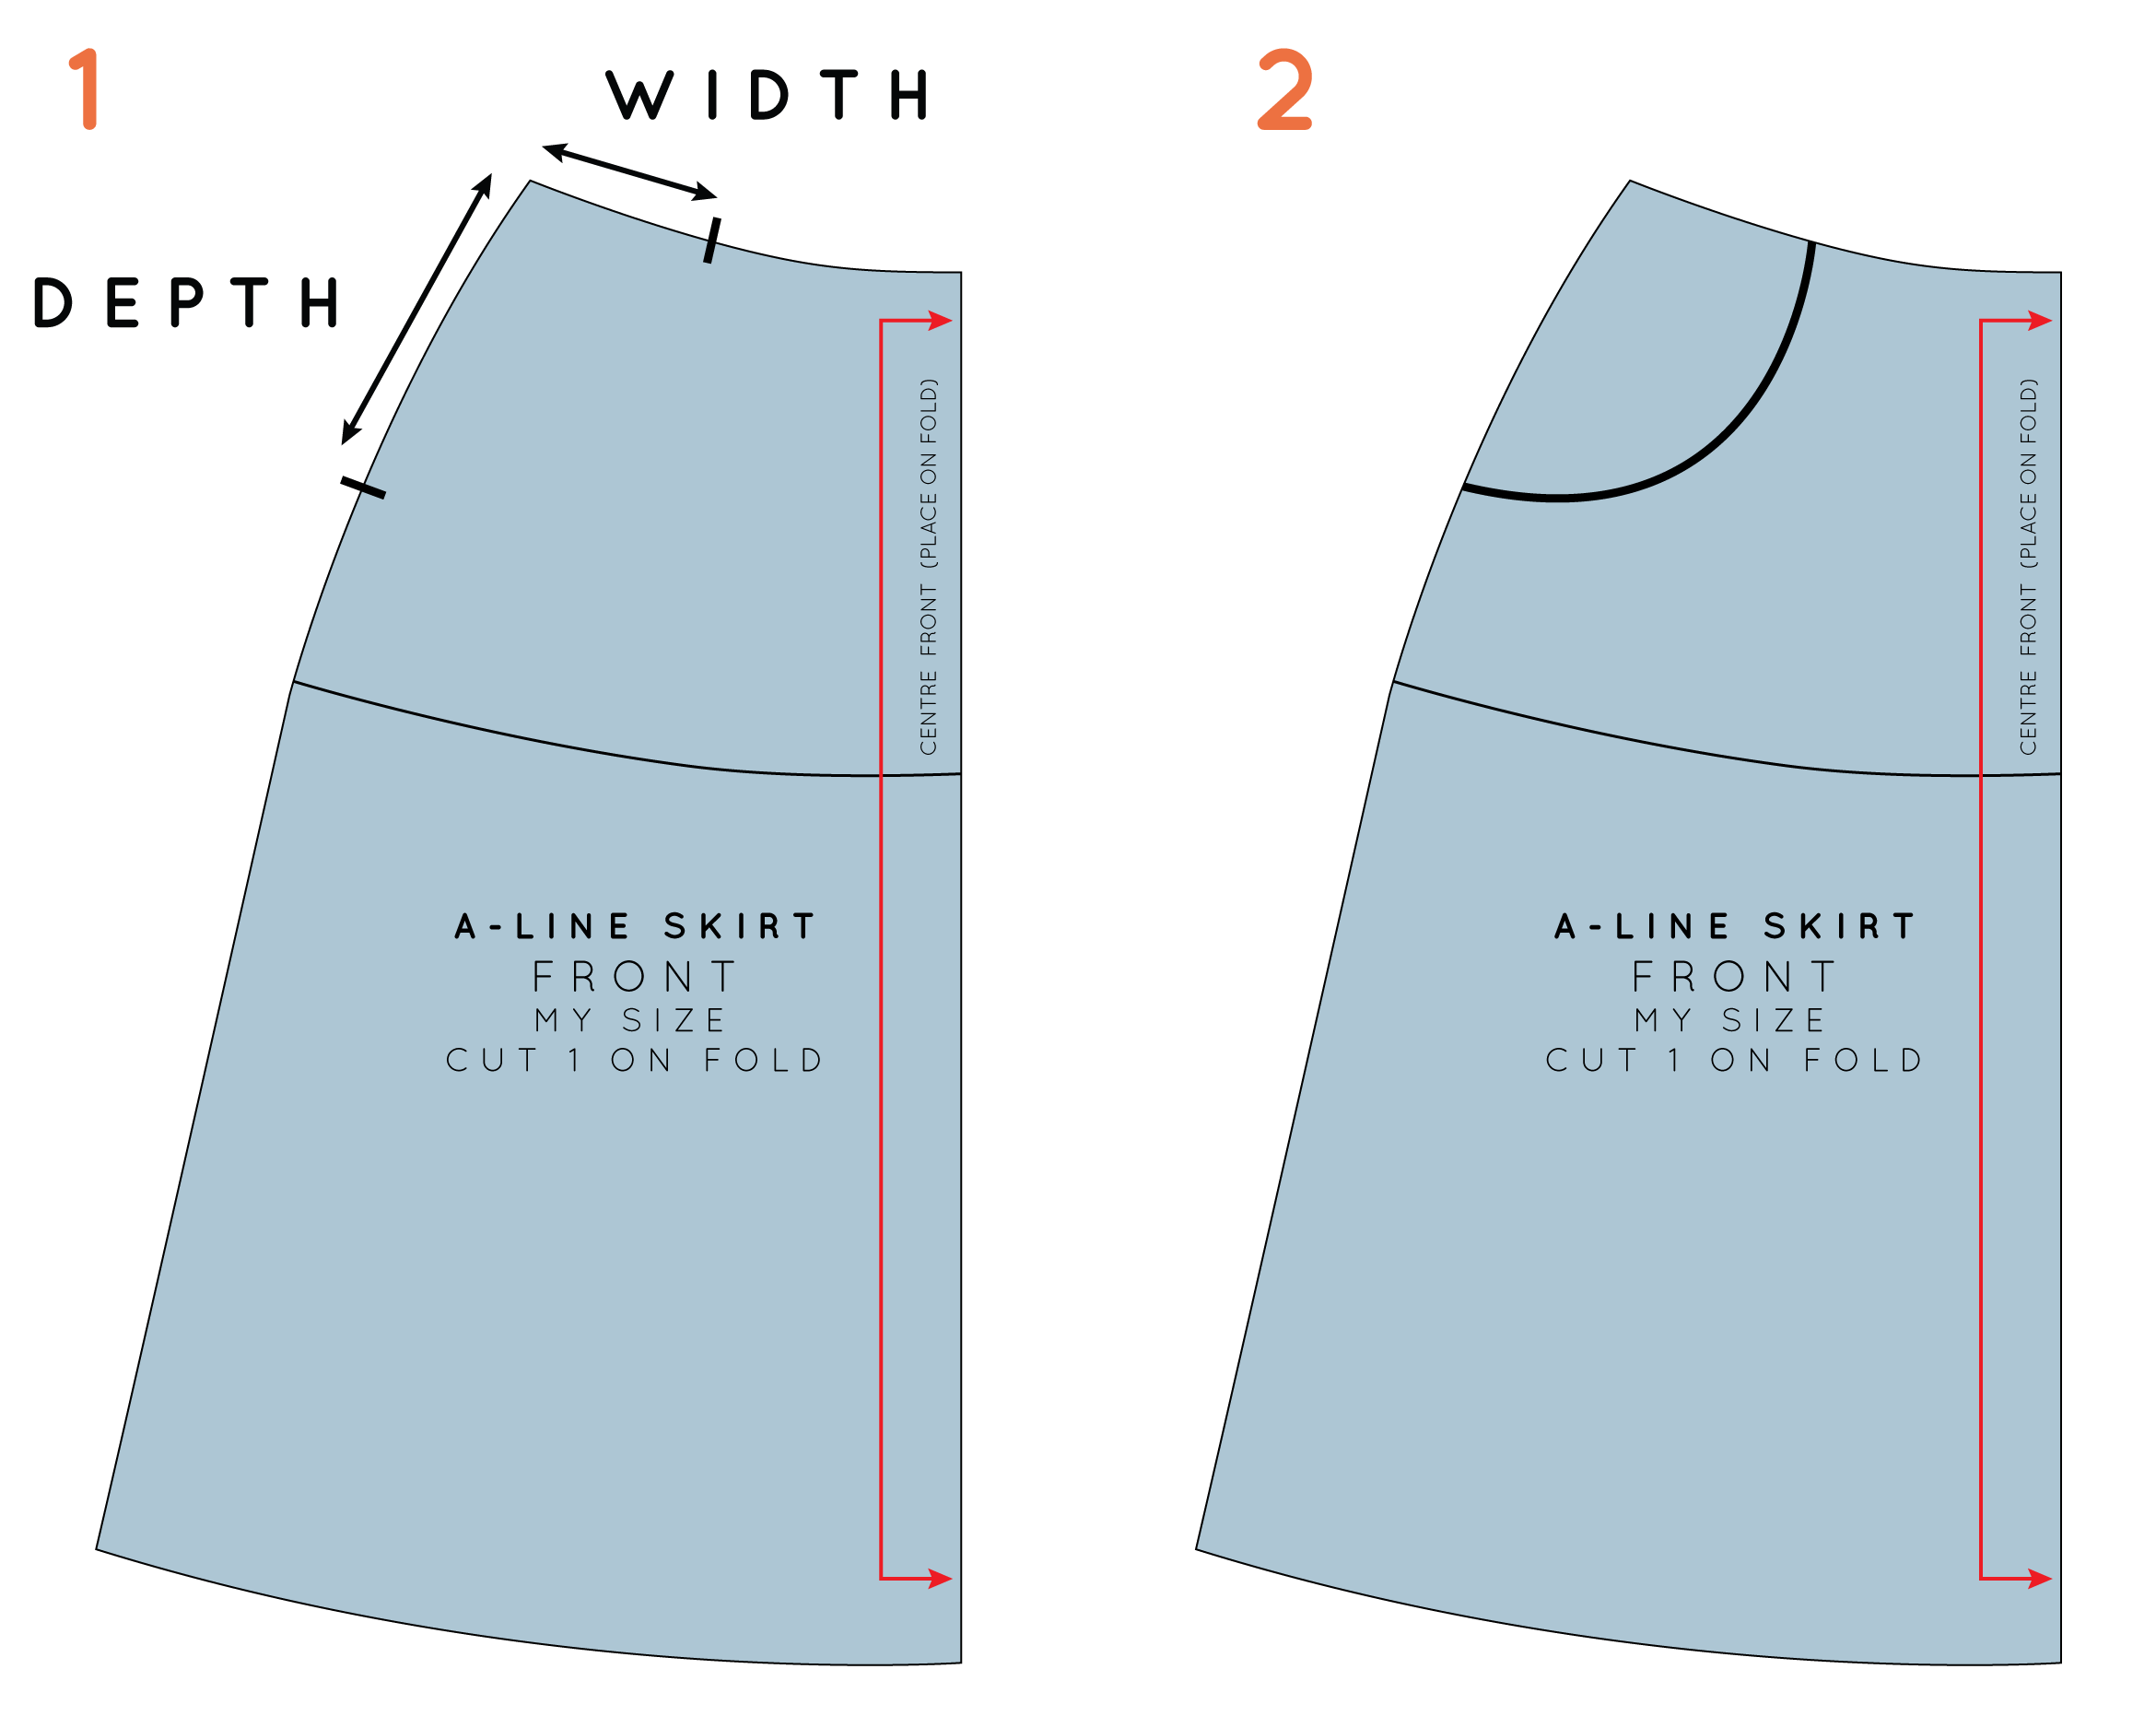
1. When you have decided on the width and depth of your pocket, you can mark these measurements on your pattern (I am using a basic A-line skirt for the example). If your pattern has seam allowance, be sure to mark these points on the stitch line, and not on the edge of the pocket (my pattern doesn't have seam allowance included).
2. Join these two points with a smooth curve (or a straight line - depending on what shape pocket you would like to make).
Draw the pocket bag
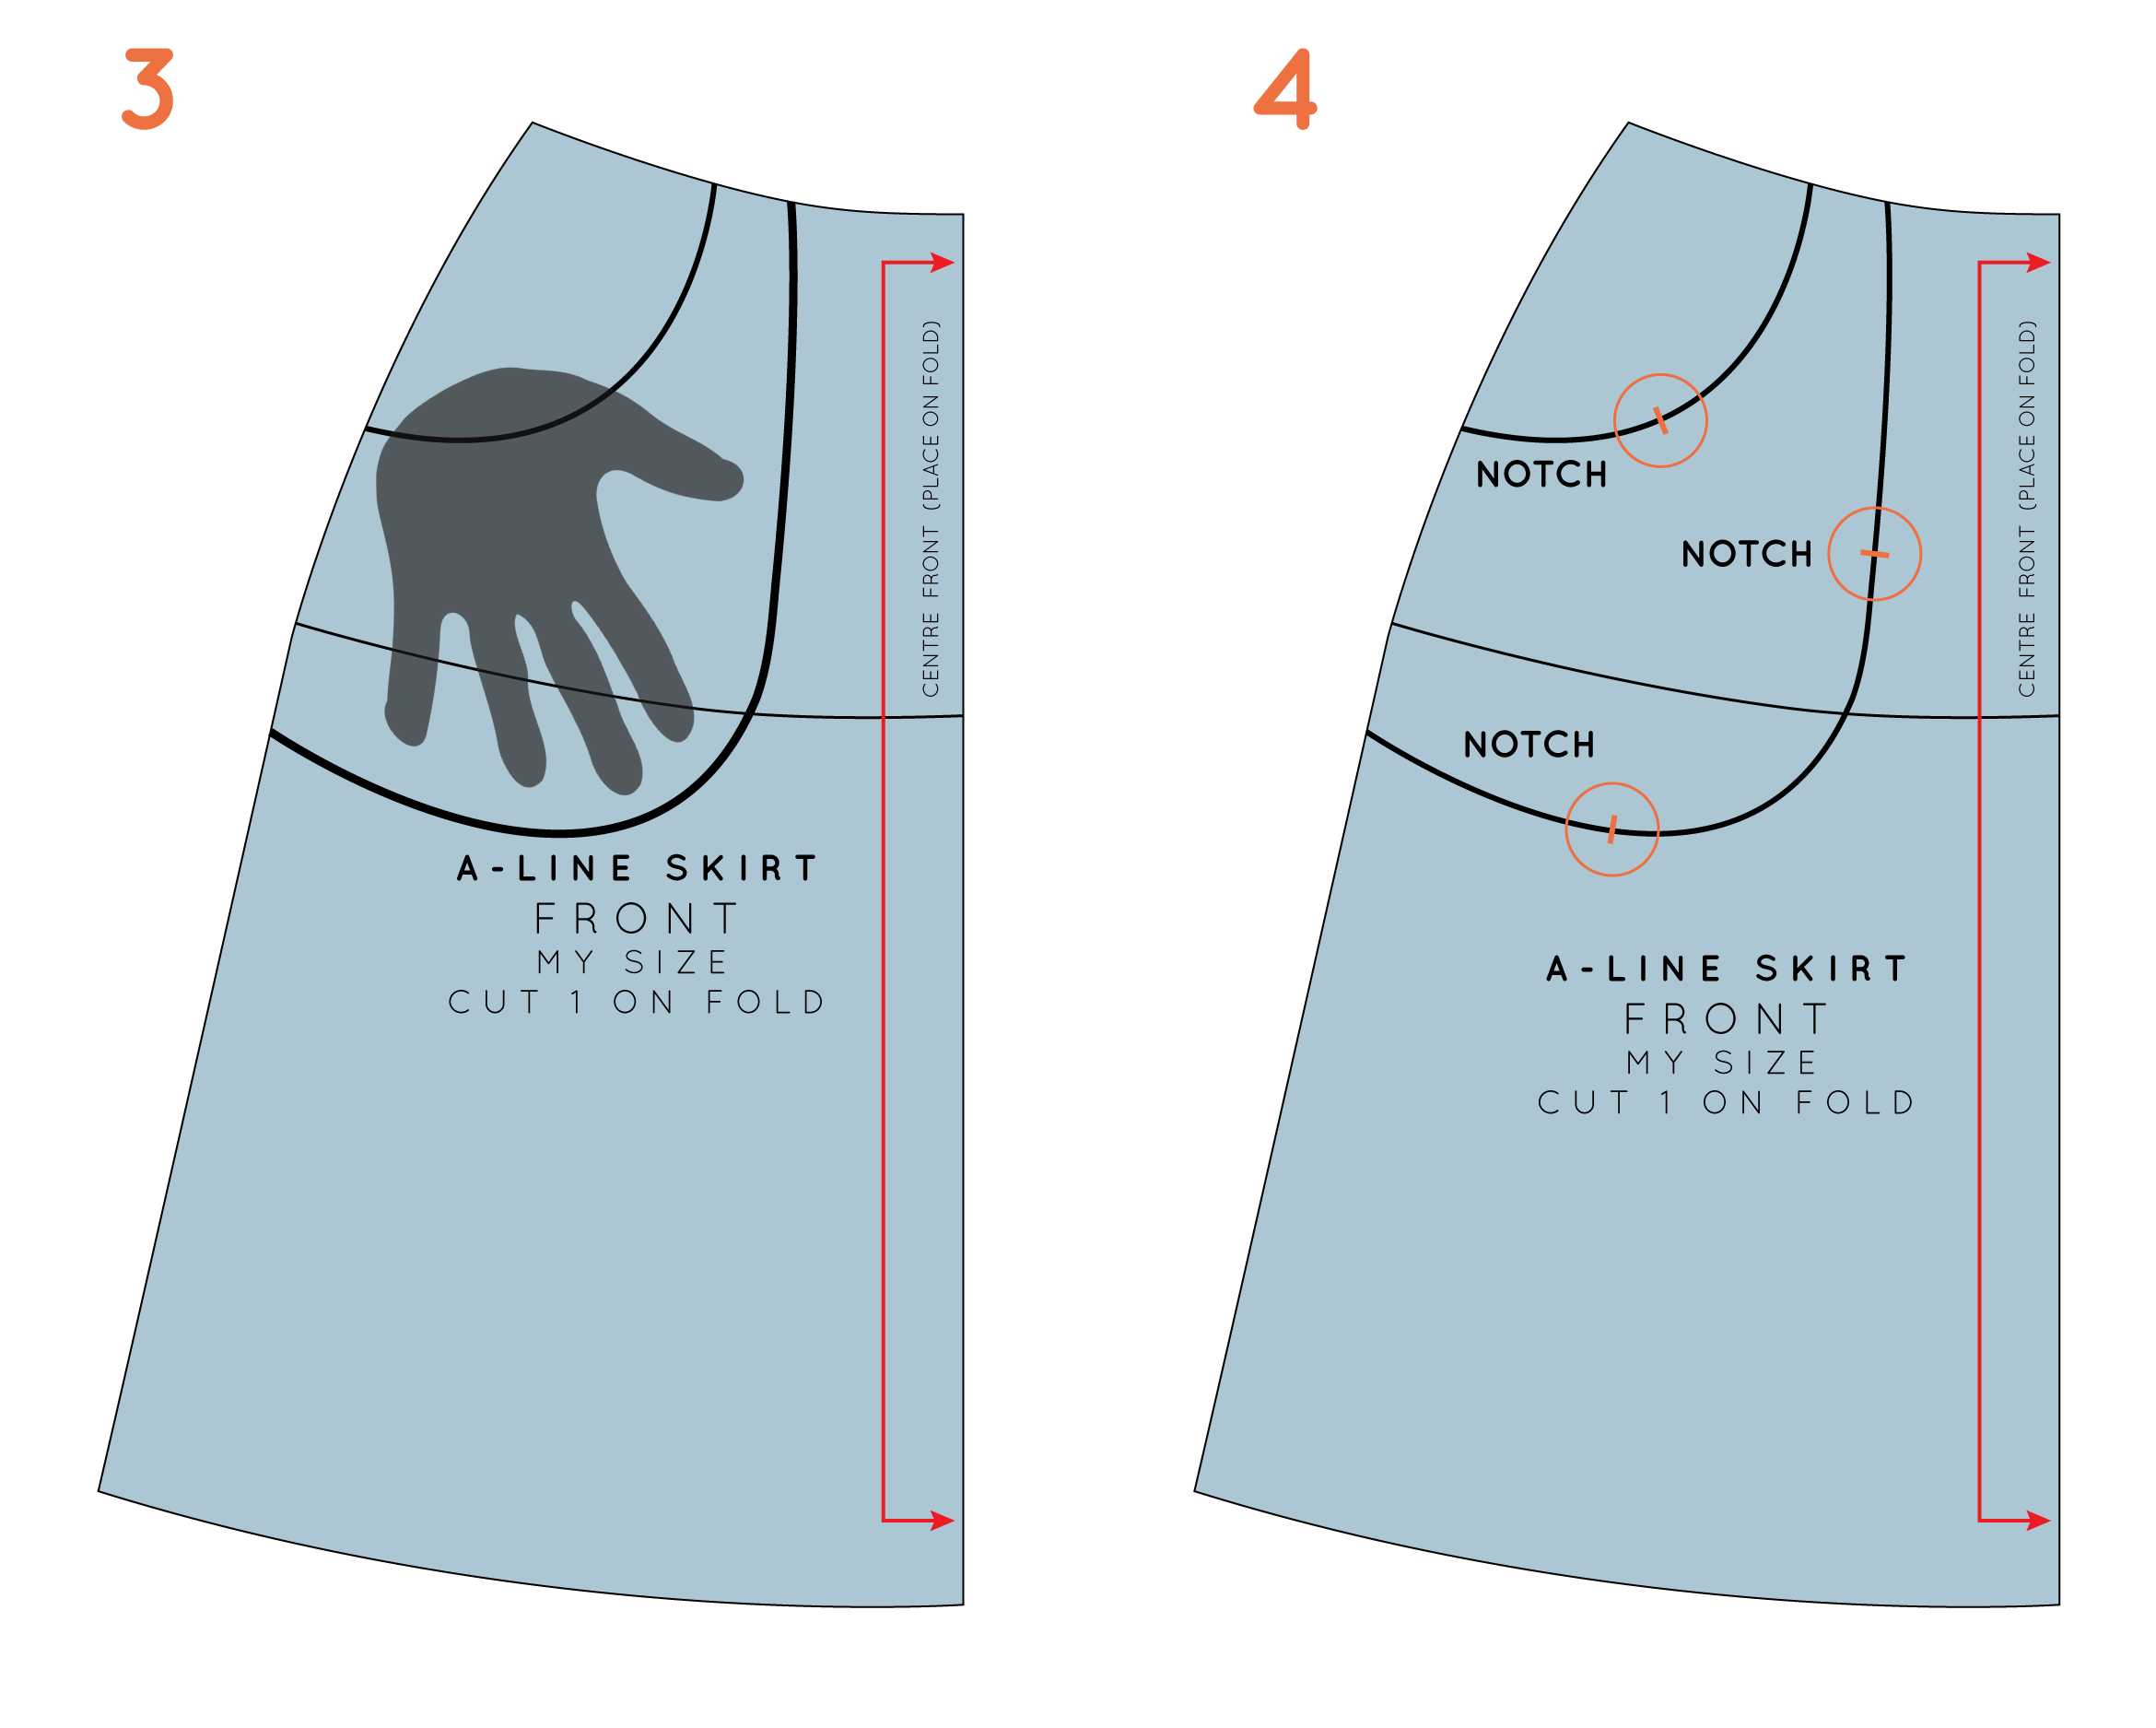
3. Just like when we drafted an in-seam pocket, you can use your hand as a guide to the size and shape of your pocket bag. To do this, place your hand on your pattern, as if it was inside the pocket, and draw around it in the rough shape of a pocket bag (have a look at the in-seam pockets of some of your own clothes if you're not sure about the shape). You don't want it to be too tight around your hand, so leave a little bit of space between your hand and the line you draw.
4. Mark a couple of notches on the curve of your pocket bag. These will help when it comes to sewing the pocket bag to the pocket lining. Also mark a notch on the pocket opening, so that the front of the skirt can easily be joined to the pocket lining.
Trace the pocket pieces
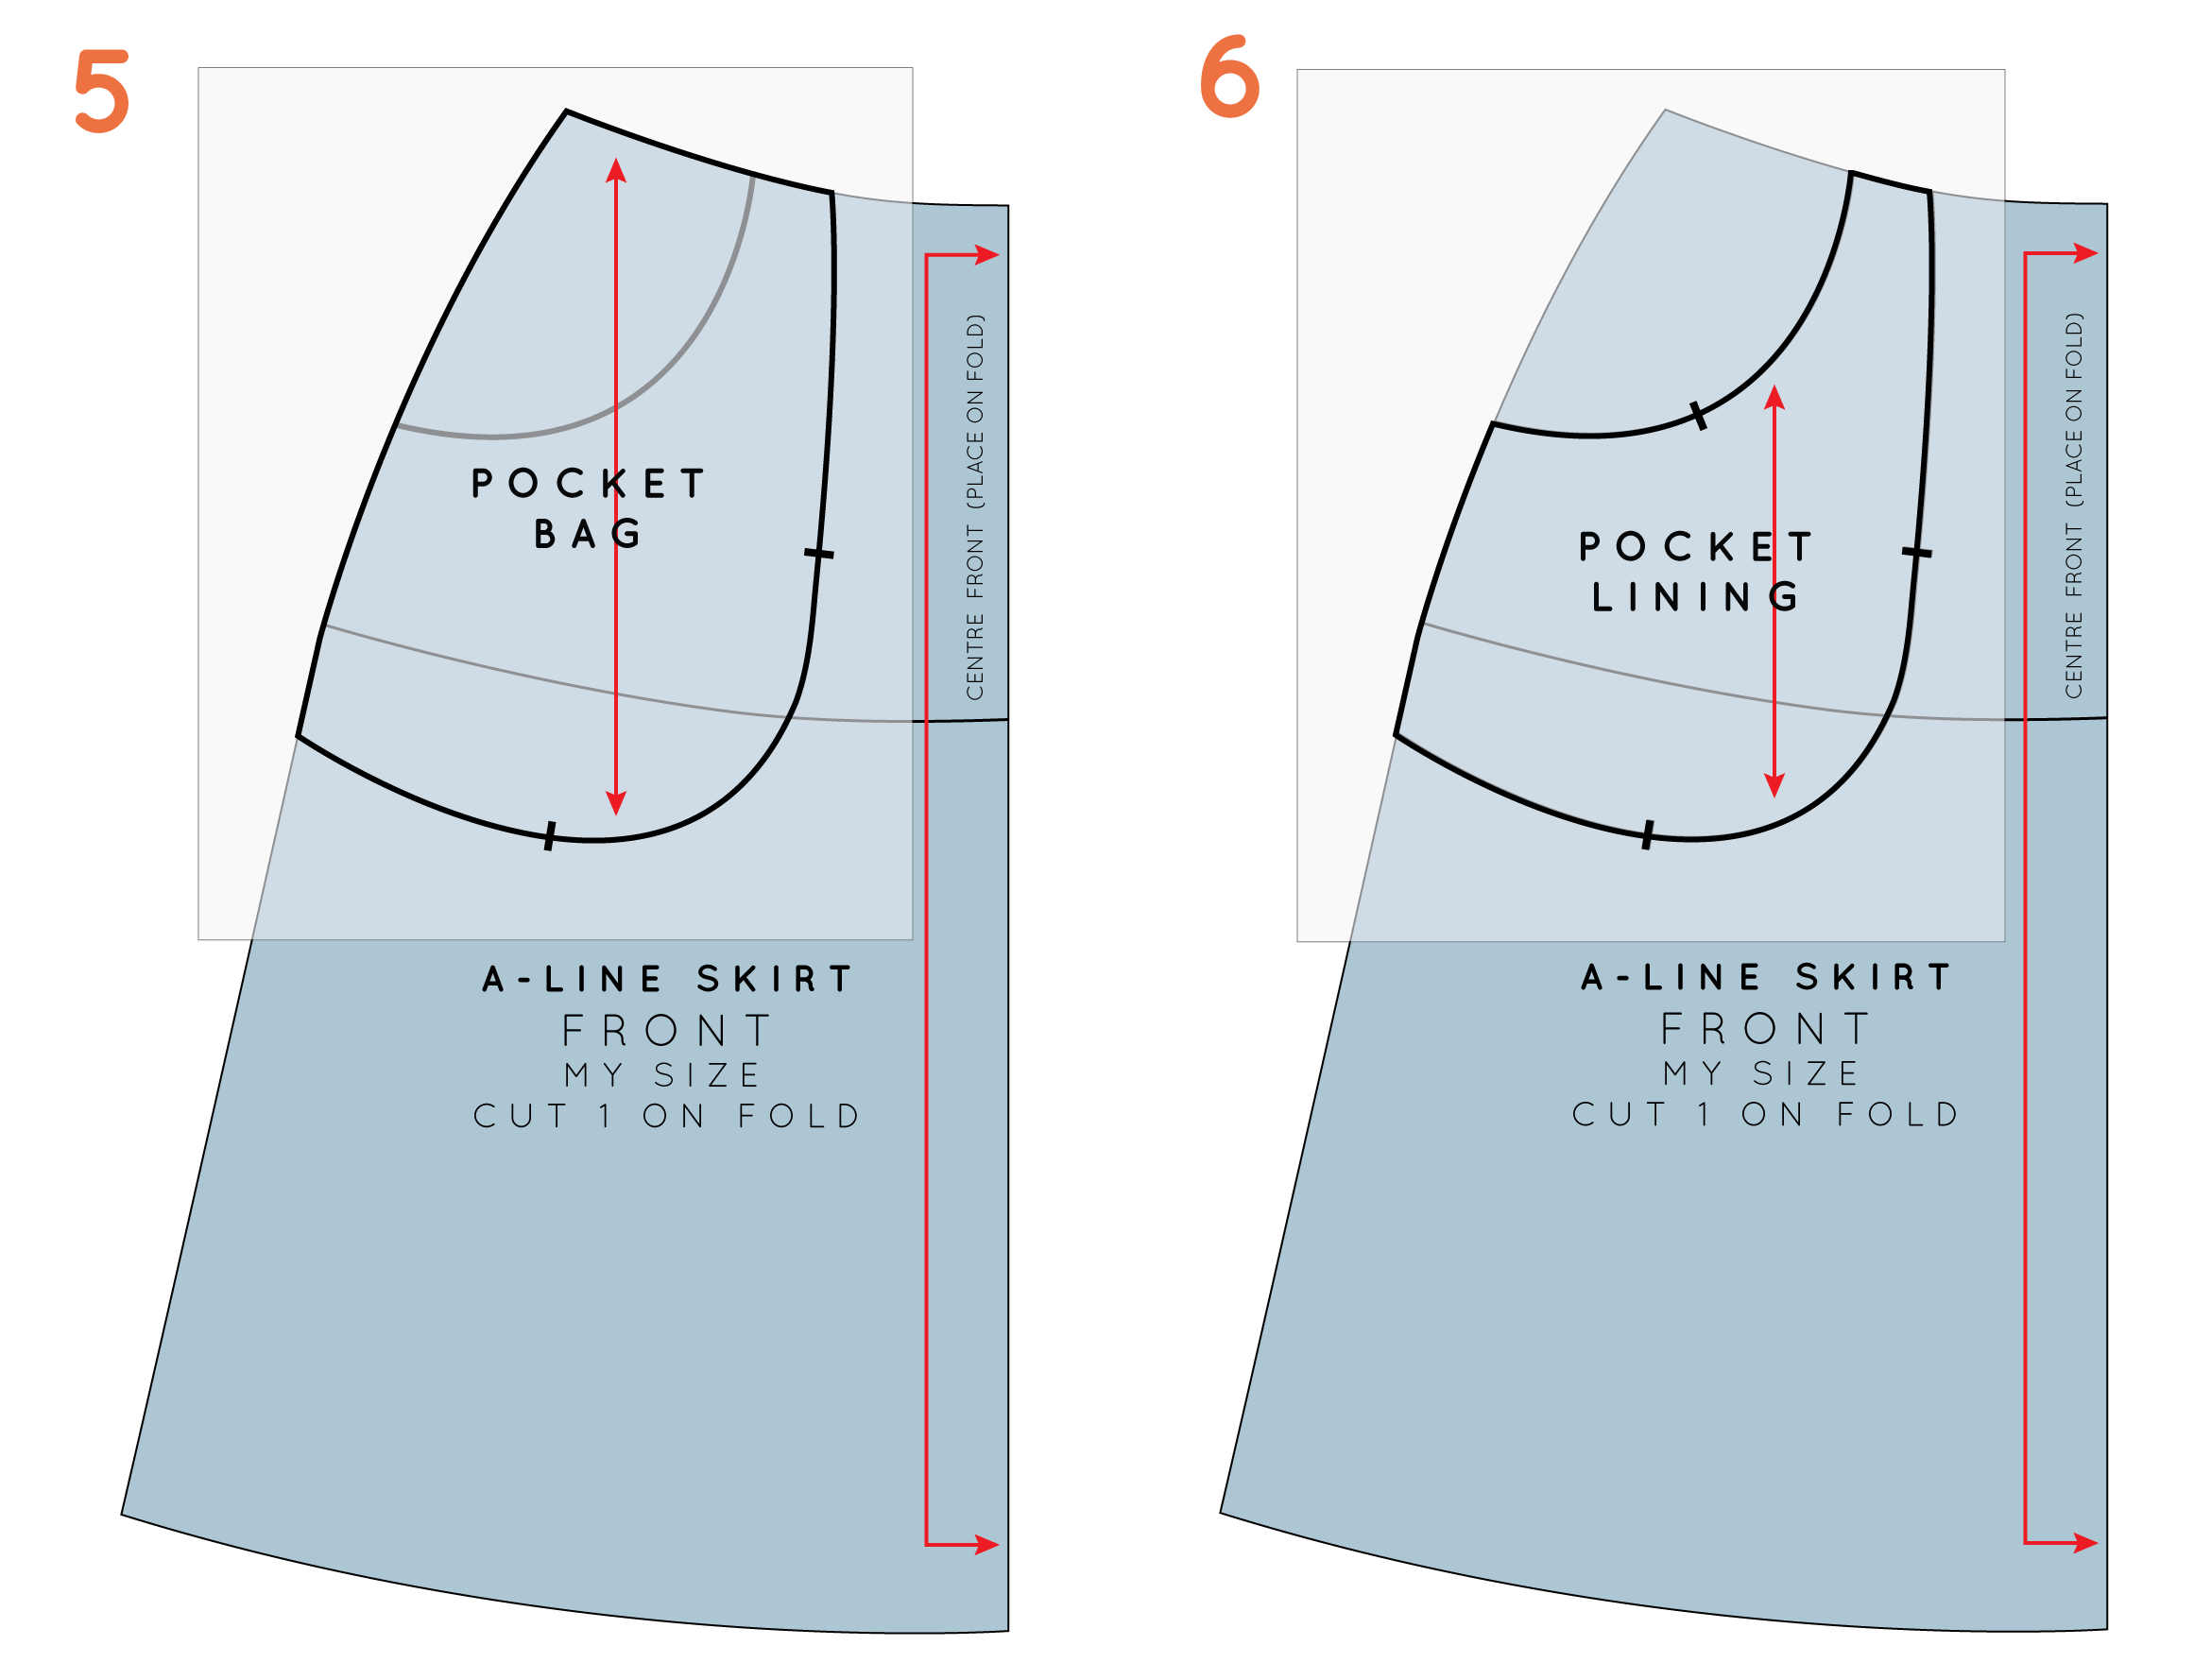
5. Take a separate piece of pattern paper and trace the outline of the pocket bag, being sure to also transfer the notches and grainline.
6. Take another piece of pattern paper and trace the pocket lining piece. Again, be sure to also transfer the notches and grainline.
Trace the front pattern piece
7. Take another piece of pattern paper and trace the front pattern piece, remembering to trace the notch on the pocket opening. Mark the grainline on your new pattern piece.
Add seam allowance and cutting instructions
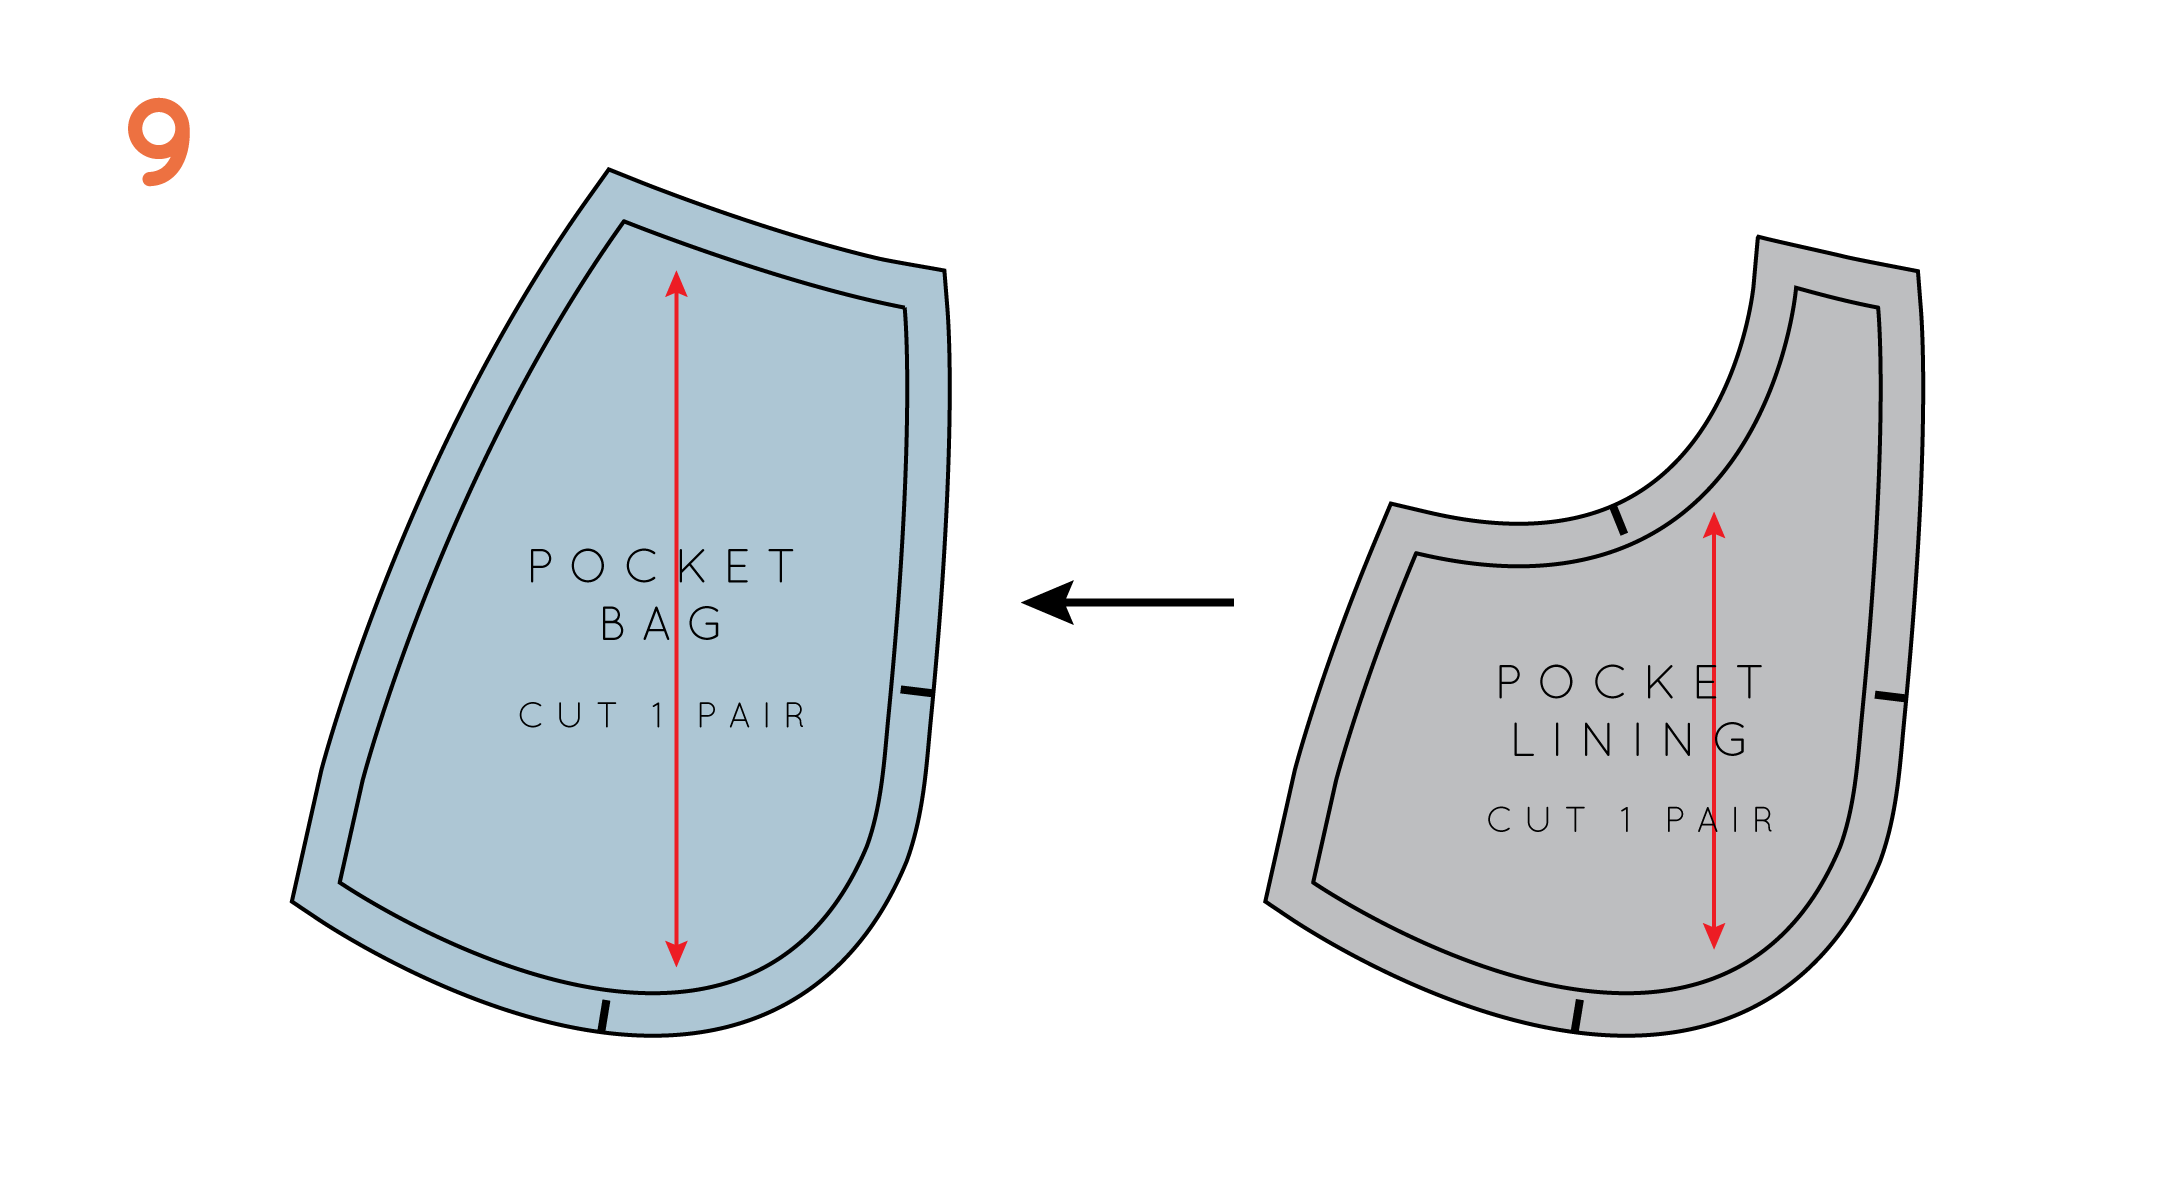
8. Add seam allowance to each pattern piece. I suggest adding 1.5 cm (1/2in) to the side seam and waistband, and 6mm - 1cm around the curves (1/4in - 3/8in) to ensure a nice finish. Add cutting instructions.
Fabric for pockets
Depending on what fabric you will be making the garment from, you may choose to cut the pocket pieces from something different to the fabric you are working with for the body of the garment. For example, if you are using a printed fabric, you may choose to use a plain fabric for the pocket lining, so that the print doesn't show through from underneath. If you are using something quite thick or bulky, you may choose to cut your pocket lining from something lighter.
Working with denim
Look inside the pocket of your favourite jeans. You will notice that the pockets are not cut from denim, but normally a lightweight cotton. This is to ensure the pockets don't create any extra bulk. If you are making pockets for jeans, or a denim skirt (or something similar) you should consider creating a pocket shield and then cutting your pockets from cotton.
A pocket shield is a way to disguise that the pockets are cut from a different fabric.
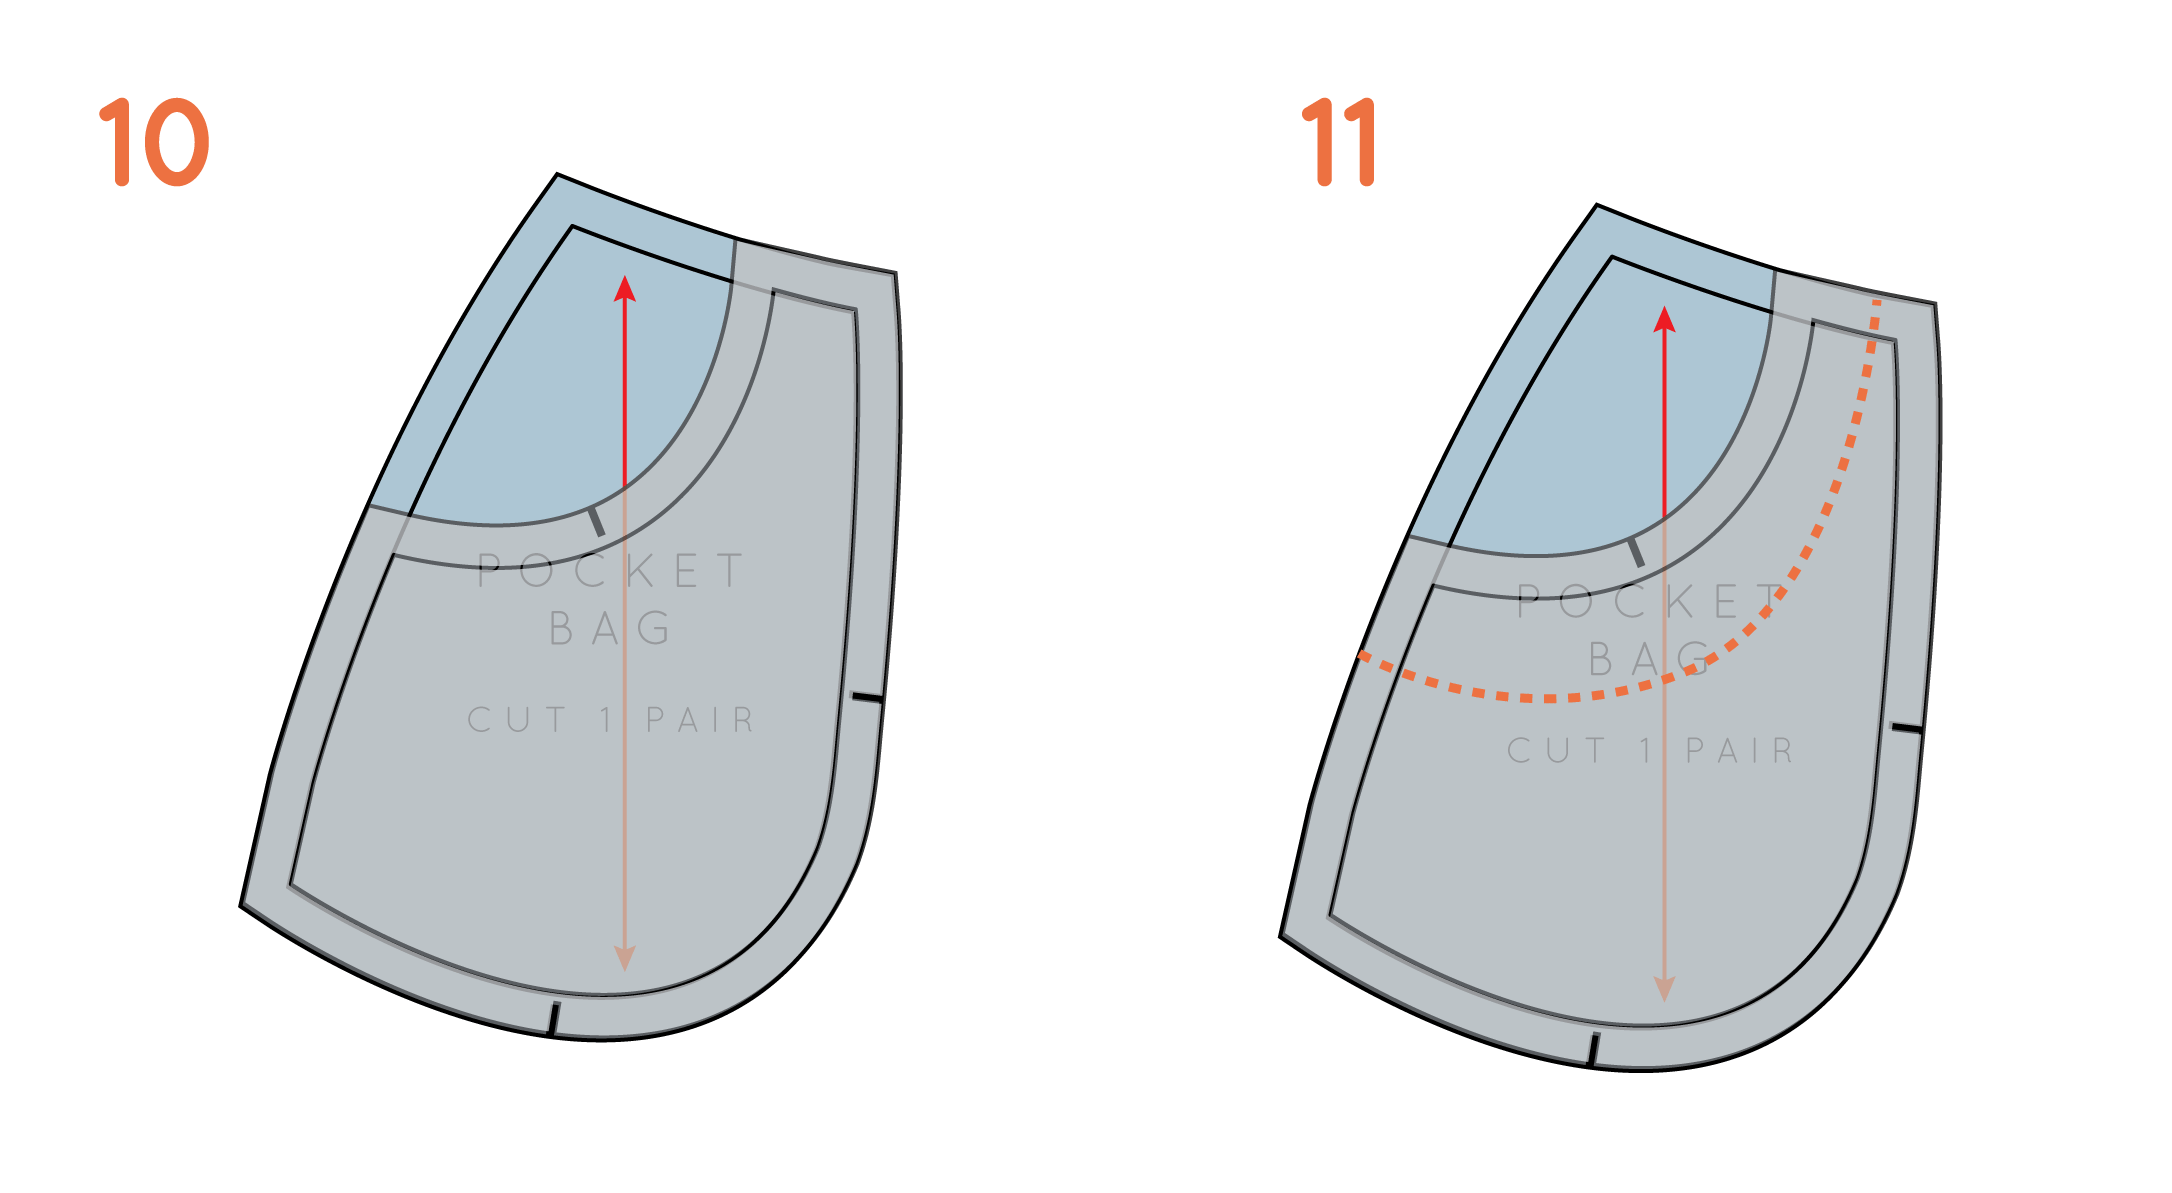
9. To create a pattern piece for a pocket shield, take the pocket bag and pocket lining pattern pieces that you created in the previous steps.
10. Place the pocket lining on top of the pocket bag, matching up the notches to ensure the pieces are aligned correctly (as if they have been sewn together).
11. Draw a line, the same shape as the pocket opening, about 2.5 - 3cm (1in) in from the edge on the pocket opening. This will ensure that the edge of the pocket shield won't be exposed.
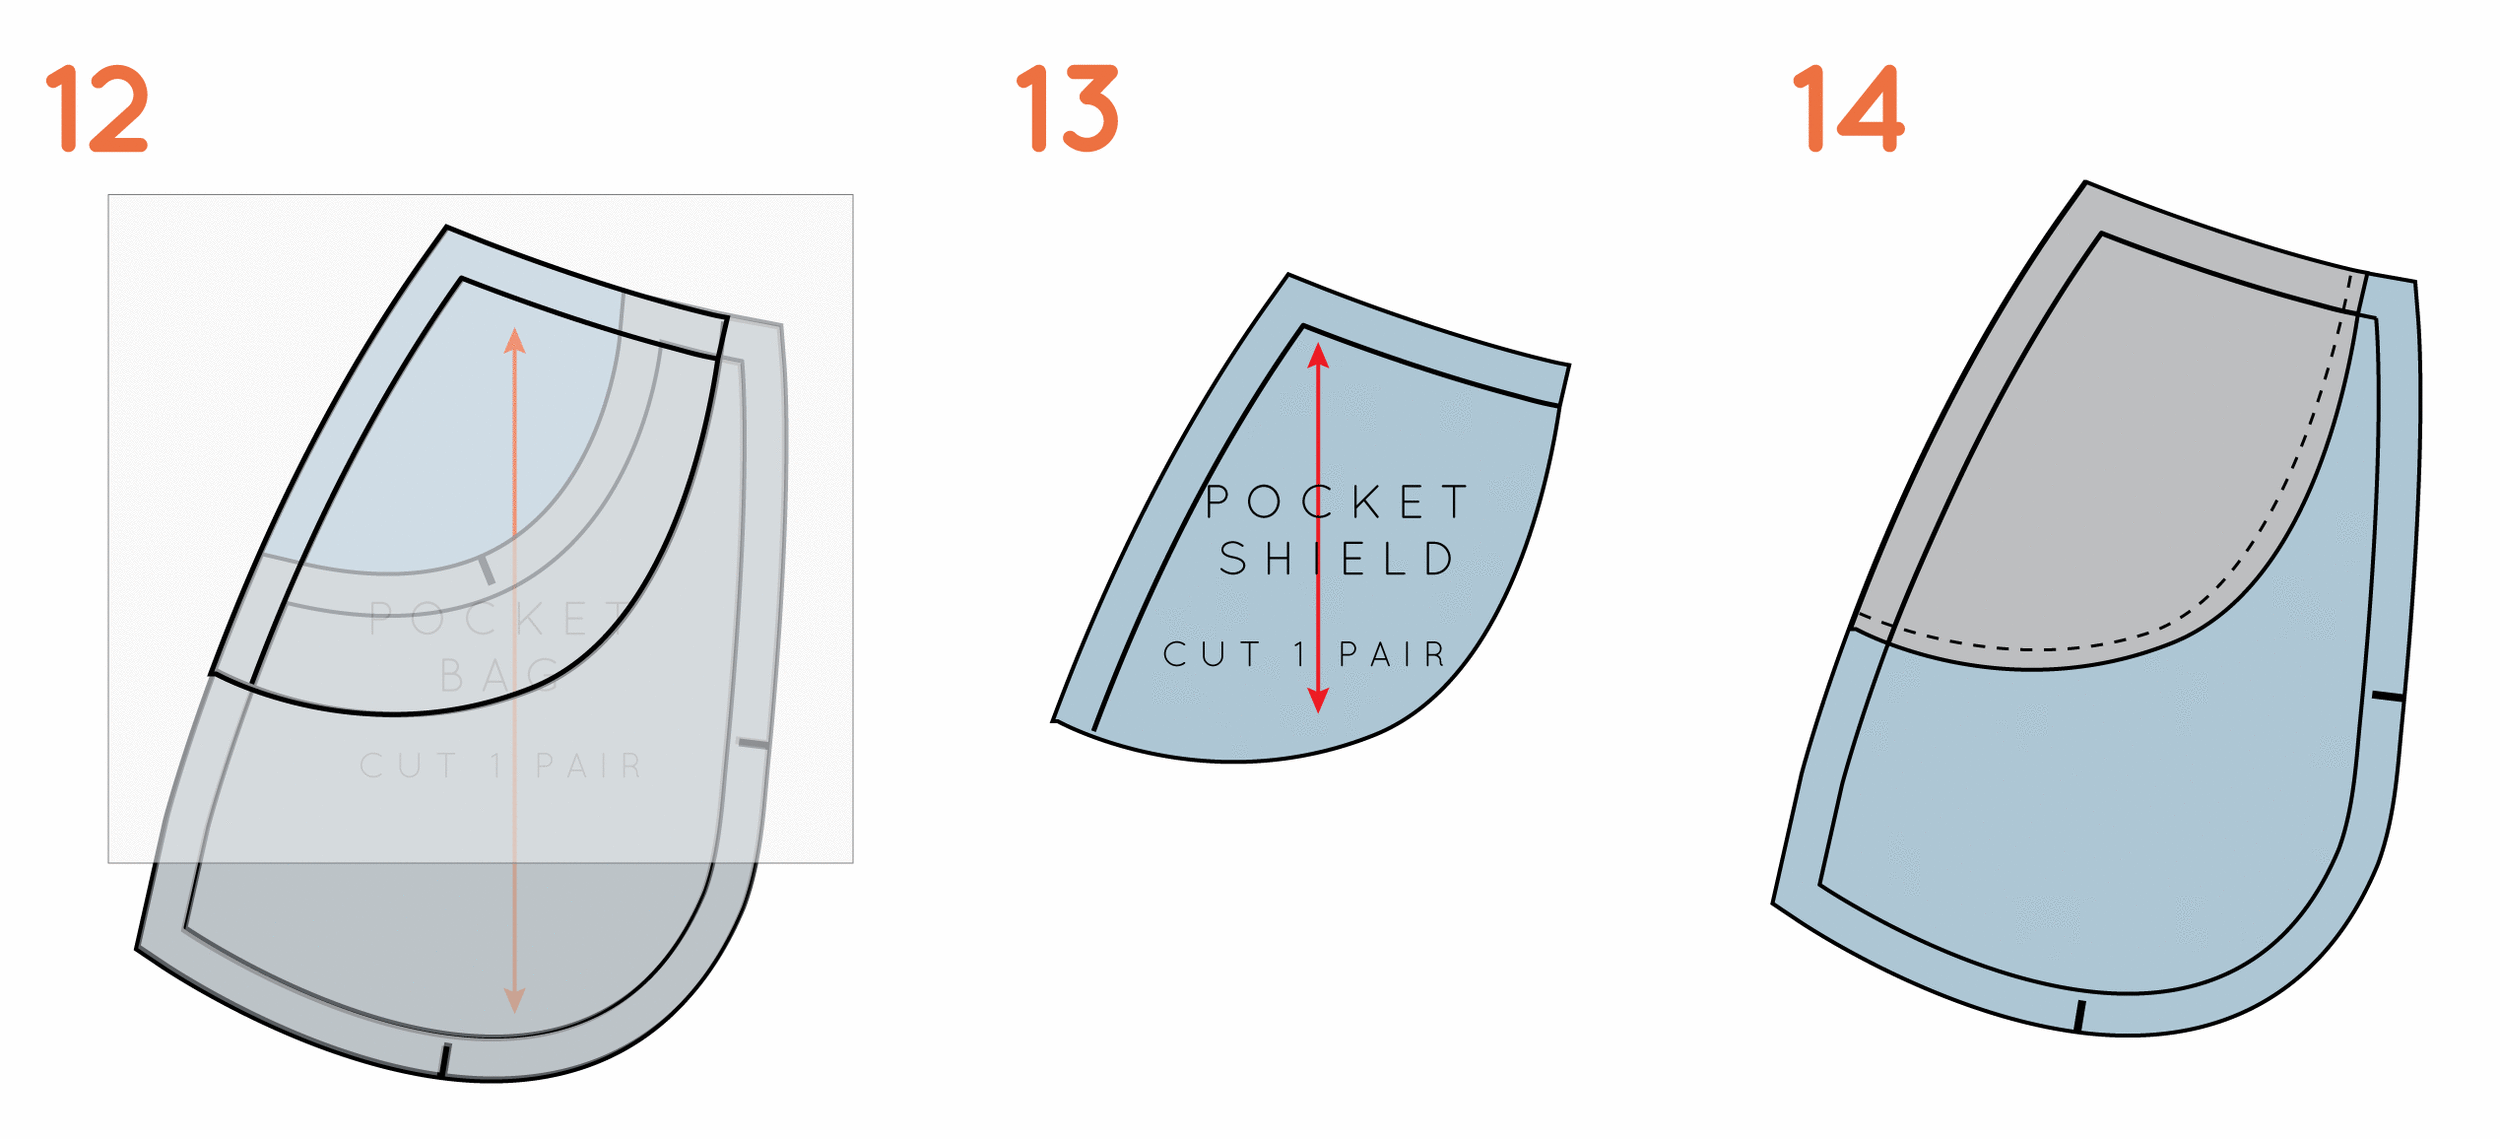
12. Take a piece of pattern paper and trace the pocket shield, being sure to also transfer the grainline.
13. Add cutting instructions.
14. When it comes to constructing the pocket, you will just need to finish the edge of the pocket shield (with overlocking or zig-zag stitch) and then stitching on top of the pocket bag, before constructing the pocket as usual.

