
There are many sewists in the world who have a love/hate relationship with sewing clothes, and often it’s because their expectations exceed their skills. When it comes down to it, we all expect to wear clothes that make us feel good. Nobody goes about their life expecting to wear clothes that make them feel yuck. (That would just be a bit strange!)
But what does this actually mean? What is it specifically about our favourite garments that we love so much? What expectations are they meeting?
In many cases, the reason we fall head over heels for some garments and not others is to do with the way they fit our bodies and how we feel when we wear them. Poorly fitted garments can make us feel terrible. Anyone who’s worn a top that cuts in at the armpits for more than an hour will know exactly what we mean.
On the other hand, a garment that fits well can make us feel great. We might love how it looks on our unique body shape because we find it hard to get clothes to fit a certain part of our body the way we like. Maybe it’s something more specific, like not having excess fabric sitting in places we don’t want it to. Perhaps it doesn’t choke us at the neckline or slide off our sloping shoulders.
However you look at it, there’s no denying that learning how to fit clothes to your body measurements and shape is a great step towards meeting your garment wearing expectations. But what do you do when you’re sewing your own clothes and your skills don’t allow you to meet those expectations?
When we see a member making the absolute most of the full value of our membership (patterns, resources AND sewing mentorship in our private community) we have to share it. Rachael’s journey is the perfect example of someone who is doing what is needed to make her skills meet her expectations.
get to know rachael

“Hi all, I’m getting back into sewing after about a 25 year hiatus. I stopped back then because I kept running into fit issues I didn’t know how to address and I’m so excited by all the resources available to help us with those issues now! I thought joining here would help me work on things I might otherwise avoid due to complexity and potential issues. I am hoping the support offered here will help me get over those humps!”
Rachel began her journey of skill-building when she joined Curated by ITF in 2023, and since then has become one of our most active members, fitting and hacking her way from an advanced beginner to just-plain-advanced in only 8 months!
Rachael’s Cartwright dress fitting and toiling process
Rachael dived straight into our Cartwright dress and top pattern and Fit Kit, and with input from the In the Folds team, began working through the step-by-step tutorials, the process of toiling and making fit adjustments. She posted her toile updates regularly in the community and asked questions to help her continue to improve.
Toile #1

Looks likes I need a FBA (hmmm, right?), so I made a dart in the armscye, moved it to the side seam and ended up here.
Toile #3

...Did a little more reading and decided that it might make more sense to start with a size in between my upper bust and full bust, do a broad back adjustment for the back… I started with size D, graded down to C for the waist and hips front and back, added a total of 1.5” to the back, removed a total of 1.75" from the center front along the fold line, then pinched out a dart in the underarm and rotated that to the side seam.
Toile #5

I think I am moving in the right direction. I see a few things and have a few questions.
Does it look like the back shoulder (not the back, the actual shoulder where the sleeve meets at the top back) is too wide? It looks a bit baggy. Or is that just the nature of this slightly oversized top?
It is a bit tight now across the upper bust in the front, and across the bicep when I move in specific directions. This is not a tight bicep right? The bicep itself is not tight. Assuming it's actually the bustline, I could add 1/2" back to the top center and taper down to the full 1.5" removed - if I did that would I still be able to cut it on the fold or would I have to put in a center seam? Here is a photo that demonstrates where it feels tight.
I feel really close here, and I totally acknowledge that I could sew this up as is and it would fit me better than things I've purchased RTW!!
Join Curated by ITF - find your new community!
If you're looking to be supported, motivated and inspired through your sewing journey our Curated by ITF subscription might be just what you're looking for.
As well as a monthly sewing project, you’ll gain access to our private member platform where you can receive feedback and advice from the ITF team and other experienced makers, participate in sew-alongs and make sewing besties all over the world!
But that wasn’t good enough for Rachael! She was in it for the long haul (and to get it right!).
Toile #(who’s counting?)
One final tweak to get the bust darts better aligned and here is the version of the Cartwright that I'm going to make a block out of. My first pattern block, very exciting! (It took me 8 weeks from my first attempt, hopefully I've learned enough that it will never take that long again!)
RACHAEL’S BEAUTIFULLY FITTED WARDROBE
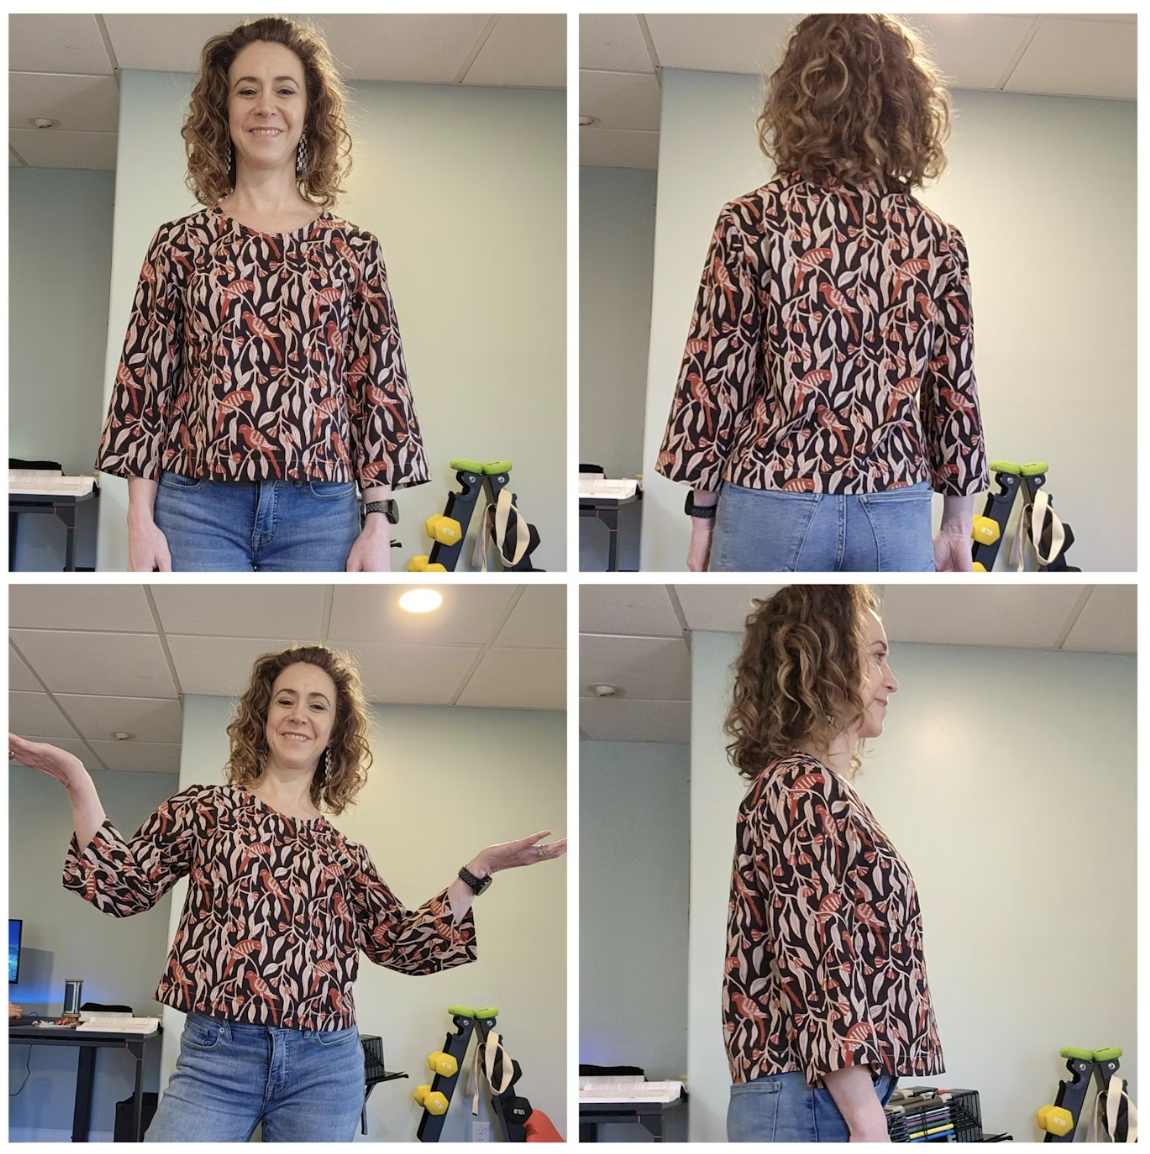
Since then, Rachael has used her new fitting skills to create a number of garments that fit her just right. This button-up shirt was designed using her Cartwright dress block and the Cartwright dress Hack Kit.

This teal shell top was created using the Neale jumpsuit pattern and Hack Kit. (Would you check out that amazing fit!)

The fit of Rachael’s best RTW shirt compared to handmade
One of the things we love about Rachael’s journey is that all her hard work has taught her how to identify ‘problem’ areas when fitting, and has also given her a strong foundation on which to start her fitting process.
Here are some learnings Rachael shared in the community.
Here is my best fitting RTW button up. (Facial expressions included for the entertainment value of a before and after photo).

I mean, yikes, right?
Armed with my new understanding of fit, here is what I see wrong in the RTW fit.
1. My shoulders are too broad for the shirt and are pulling horizontally from the neck. You can also see that the seam line is actually up on my shoulder instead of at the very outside edge of my shoulder. (I had no idea I had broad shoulders!)
2. Stress wrinkles all around the bust indicating that I need an FBA.
3. Too big in the waist and hips making me look heavier in that area than I am.

I guess I've been buying the middle size, in which I could *sort of* move my arms and shoulders and it didn't drown the rest of me, which meant I was wearing at least one size too small for my upper body and a size too big from the waist down.
And looking at my Cartwright hack…

Is it perfect? Not even a little bit. And yet, it's SO MUCH BETTER than the RTW. Not even in the same universe of fit descriptors.
I am SO HAPPY you guys! I feel like I just won a contest! I owe so much of this to the help this group so generously provided when I was trying to fit the Cartwright. I feel like - LOOK AT ME MOM! LOOK WHAT I DID!!!! (And she has seen all these photos too, and she of course knows about my fit issues, so she is thrilled for me :).)
I hope this has given you some insight into what you can expect to find when you join our Curated by ITF subscription. Learning with the support of a community means you not only get the mentorship of the In the Folds team, but you get the combined experience of hundreds of other sewists who want to see you succeed like they have.
If we’ve peaked your interest you can find out more about this month’s project here. May is a great month to join because YOU get to choose your project from entire catalogue.
We’d love to see you in there!
Happy sewing!
Emily

