
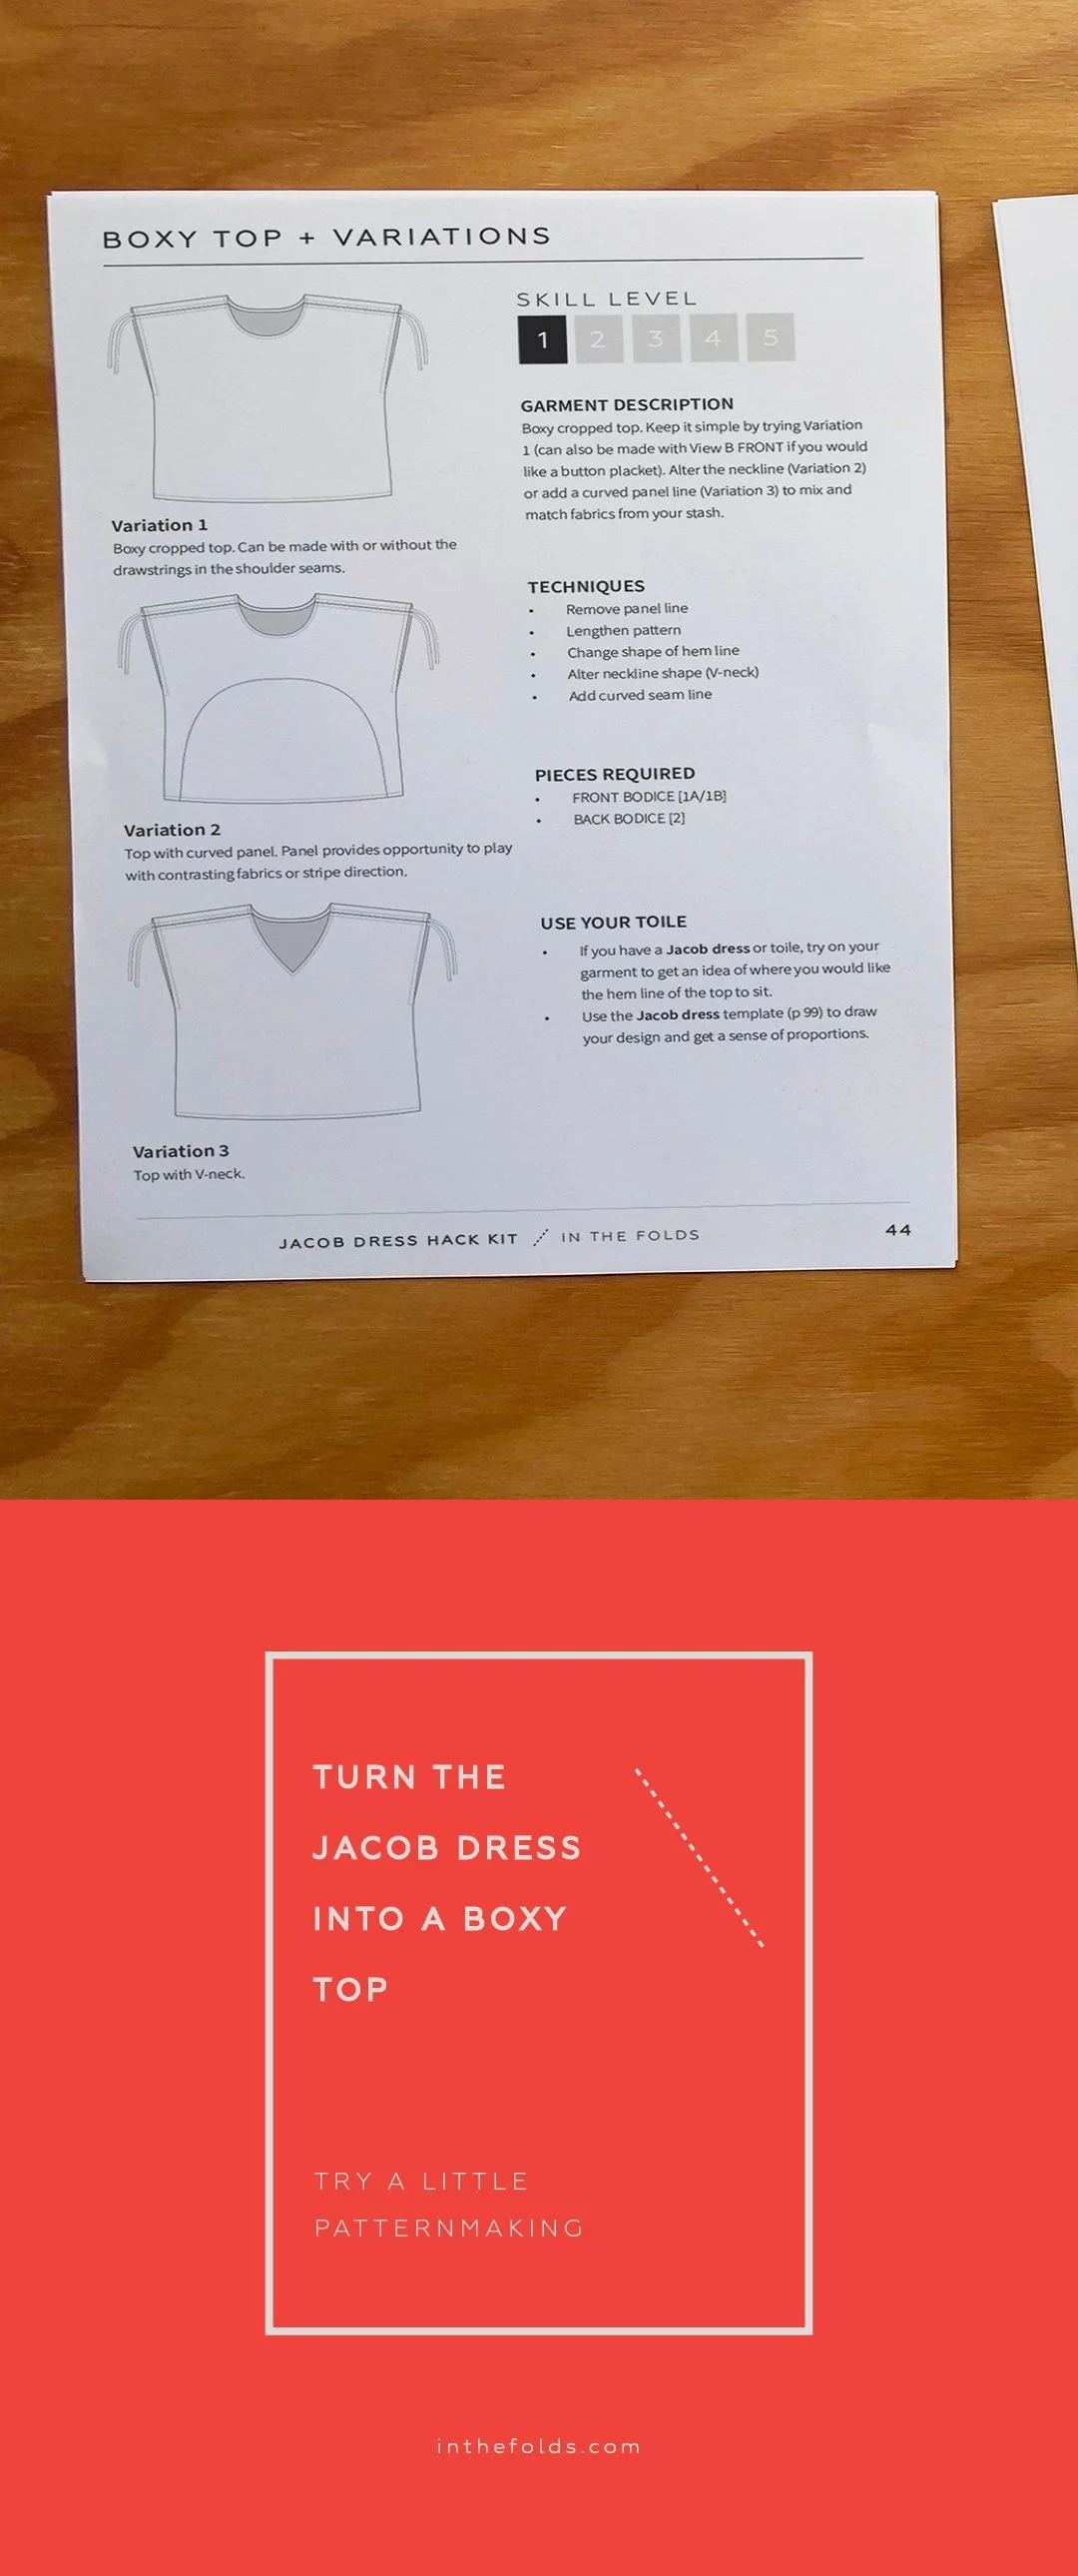
Have you ever wanted to try patternmaking, but felt a little intimidated by the idea of making changes to a full-size sewing pattern?
Perhaps you've looked at a sewing pattern and wondered what would happen if you changed the neckline, moved a seam or turned a dress into a top. The good news is that you don't need to know how to draft a pattern from scratch to start experimenting. In fact, one of my favourite ways to learn patternmaking is through pattern hacking.
Pattern hacking involves taking an existing sewing pattern and making changes to create something new. You might make a small adjustment, like changing a neckline, or something more substantial, like turning a dress into separates.
And although we call it pattern hacking, what you're actually doing is patternmaking. You're just learning it with a little bit of scaffolding.
Let's try a little patternmaking experiment
To celebrate the release of the Jacob dress and its accompanying Hack Kit, I thought it would be fun to share one of the exercises so you can give patternmaking a go for yourself.
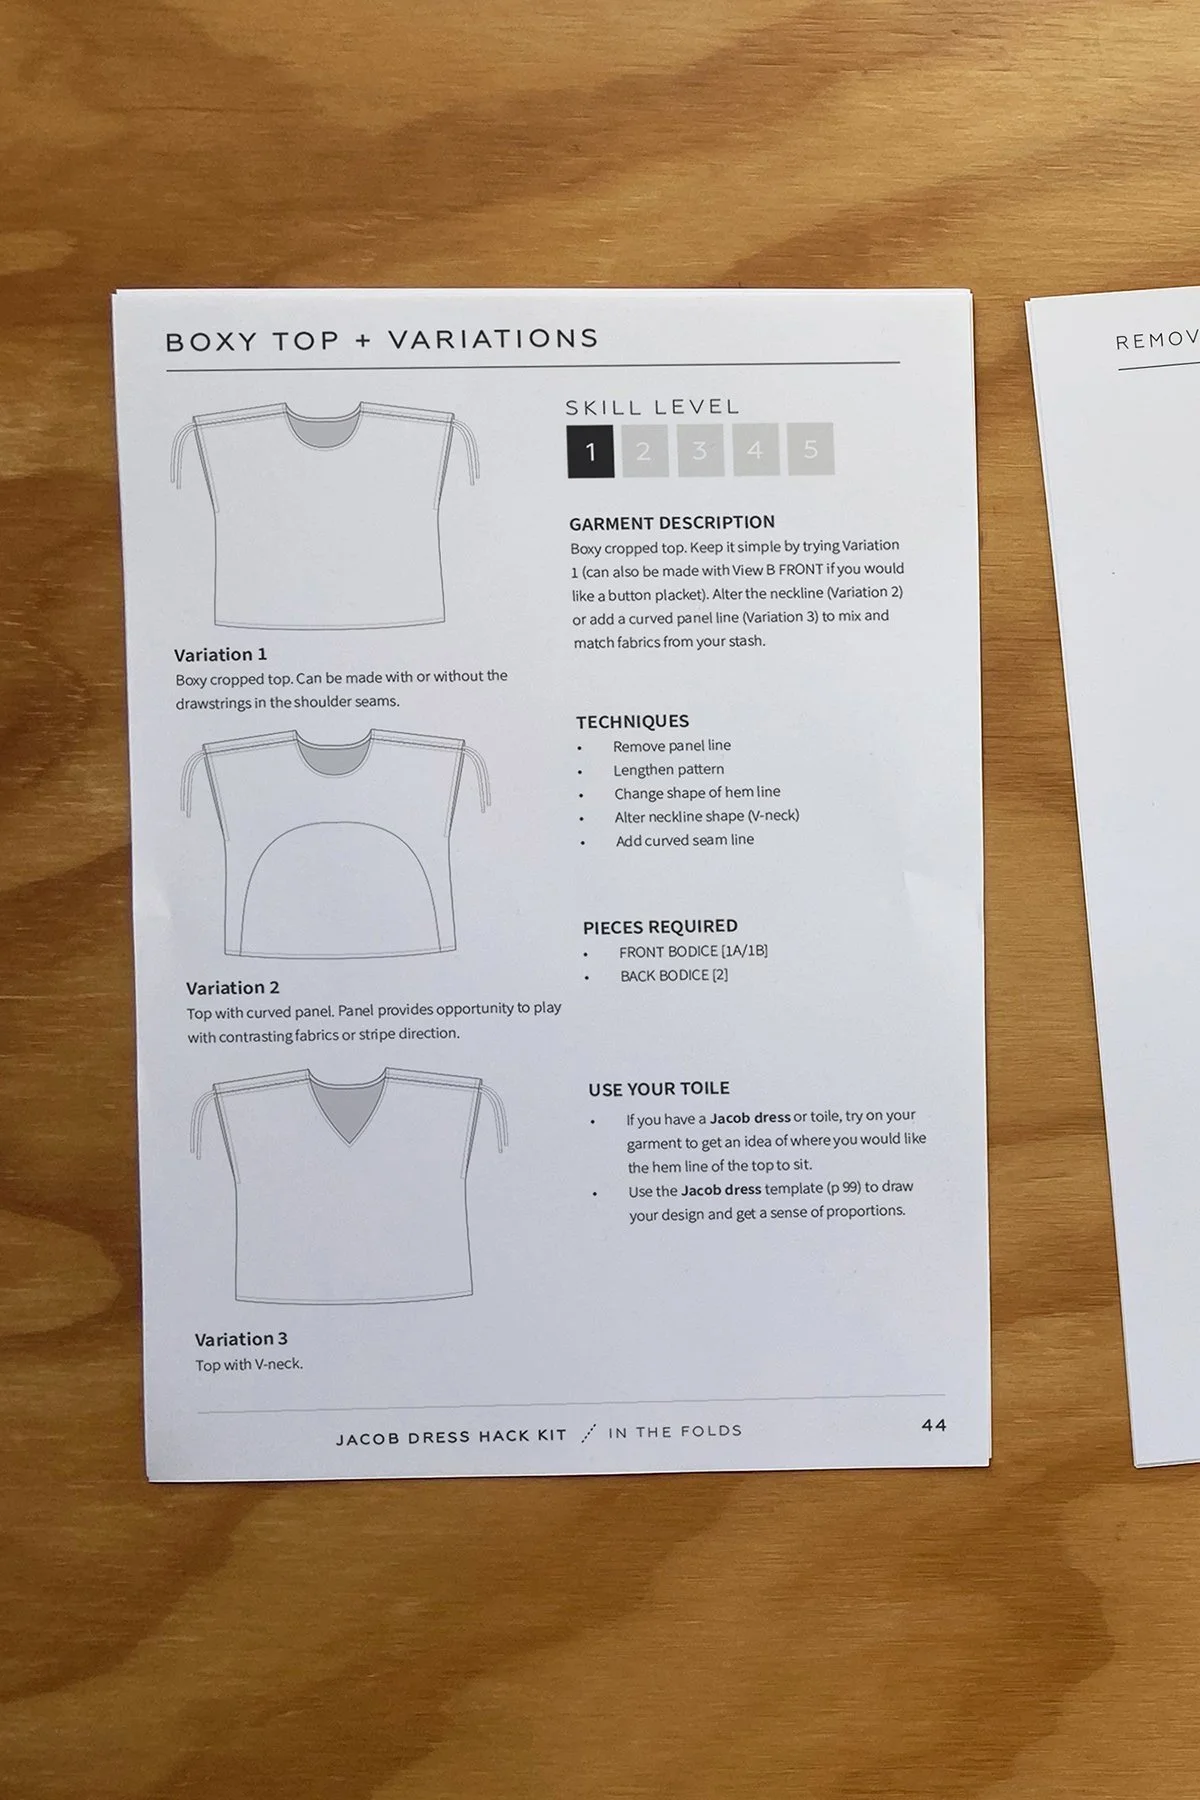
We're going to take the Jacob dress pattern and turn it into a simple boxy top. But here's the thing: you don't need to make a garment.
I've included a free small-scale version of the Jacob pattern so you can practise the technique without using metres of pattern paper or cutting into your precious fabric.
The idea is to experiment, understand how the pattern pieces work together and hopefully finish feeling a little more confident about making changes to a full-size sewing pattern. There's no pressure to turn your experiment into anything more than a little paper pattern.
What will you learn?
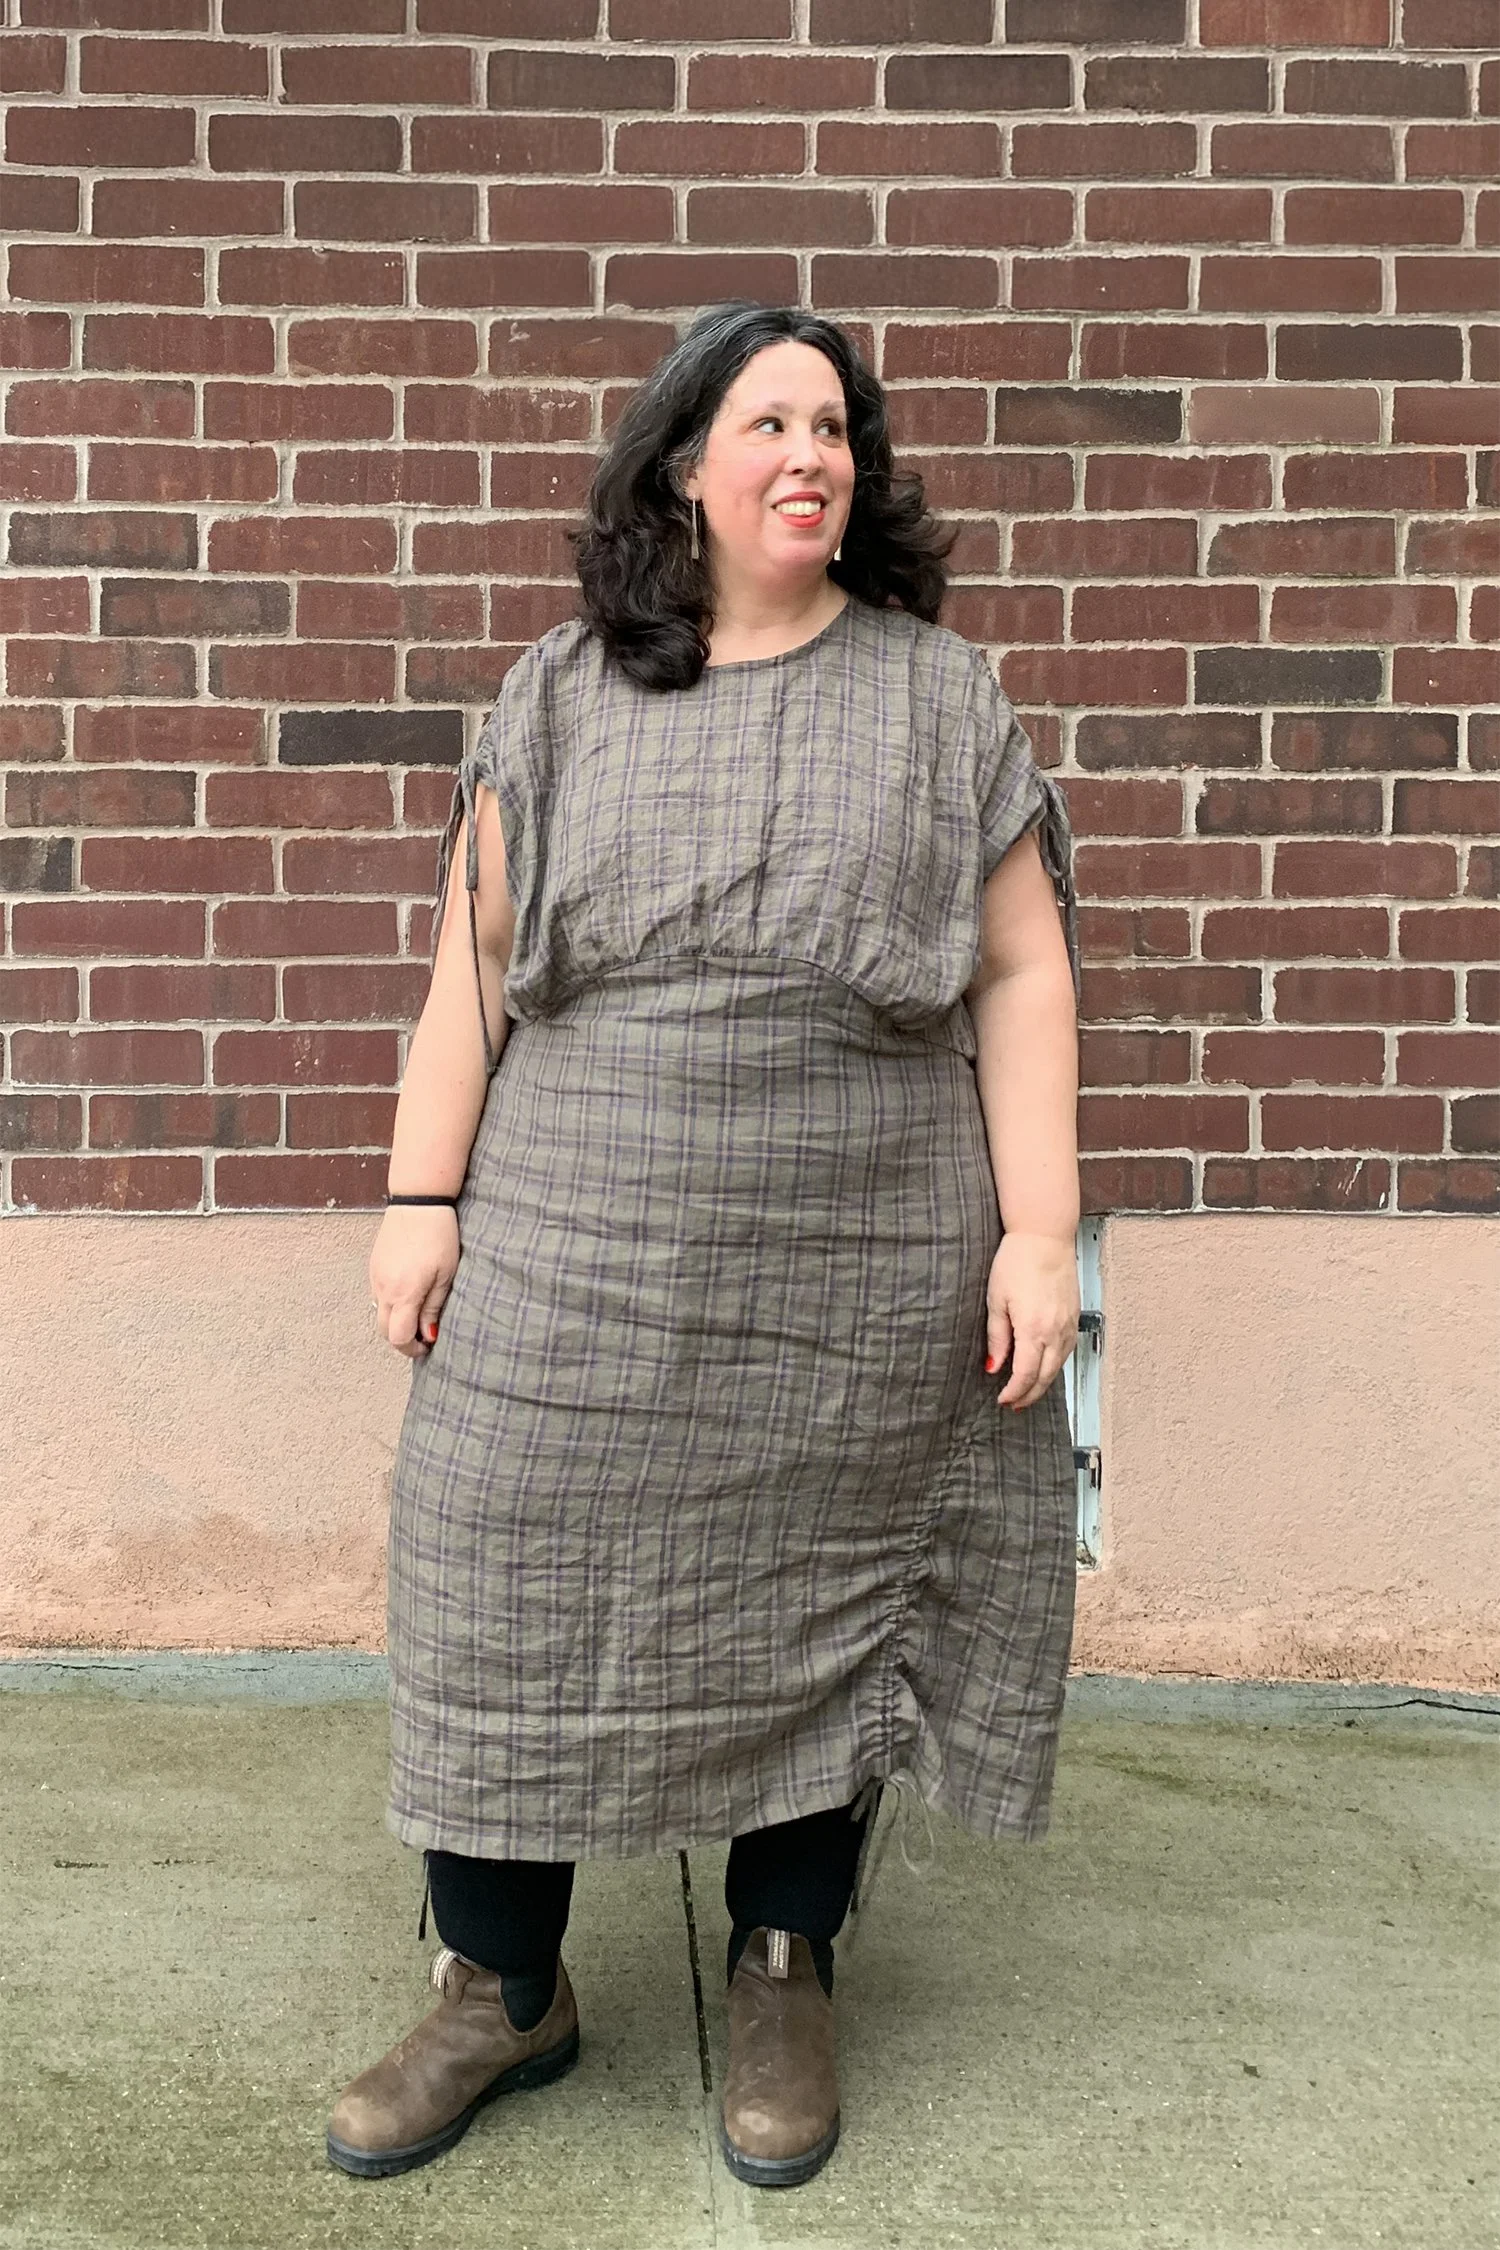
In this exercise, we'll be taking the upper section of the Jacob dress and extending it to create a top.
Along the way, you'll learn how to:
Remove a panel line from an existing pattern.
Extend a pattern to create a new garment length.
Draft a new hemline.
Check that your front and back pattern pieces work together.
Add seam allowance and notches to finalise your pattern.
These are all techniques that can be transferred to other patterns.
And that's what makes pattern hacking such a useful way to learn. You're not just learning how to make one particular design. You're building a collection of skills that you can use again and again.
What you'll need
You don't need any fancy patternmaking equipment for this exercise. Just gather:
The free small-scale Jacob pattern pieces
Pattern paper or tracing paper
A pencil
A ruler
Paper scissors
Masking tape
Pattern weights or pins (or a tin of tomatoes from the cupboard)
A tracing wheel (optional)
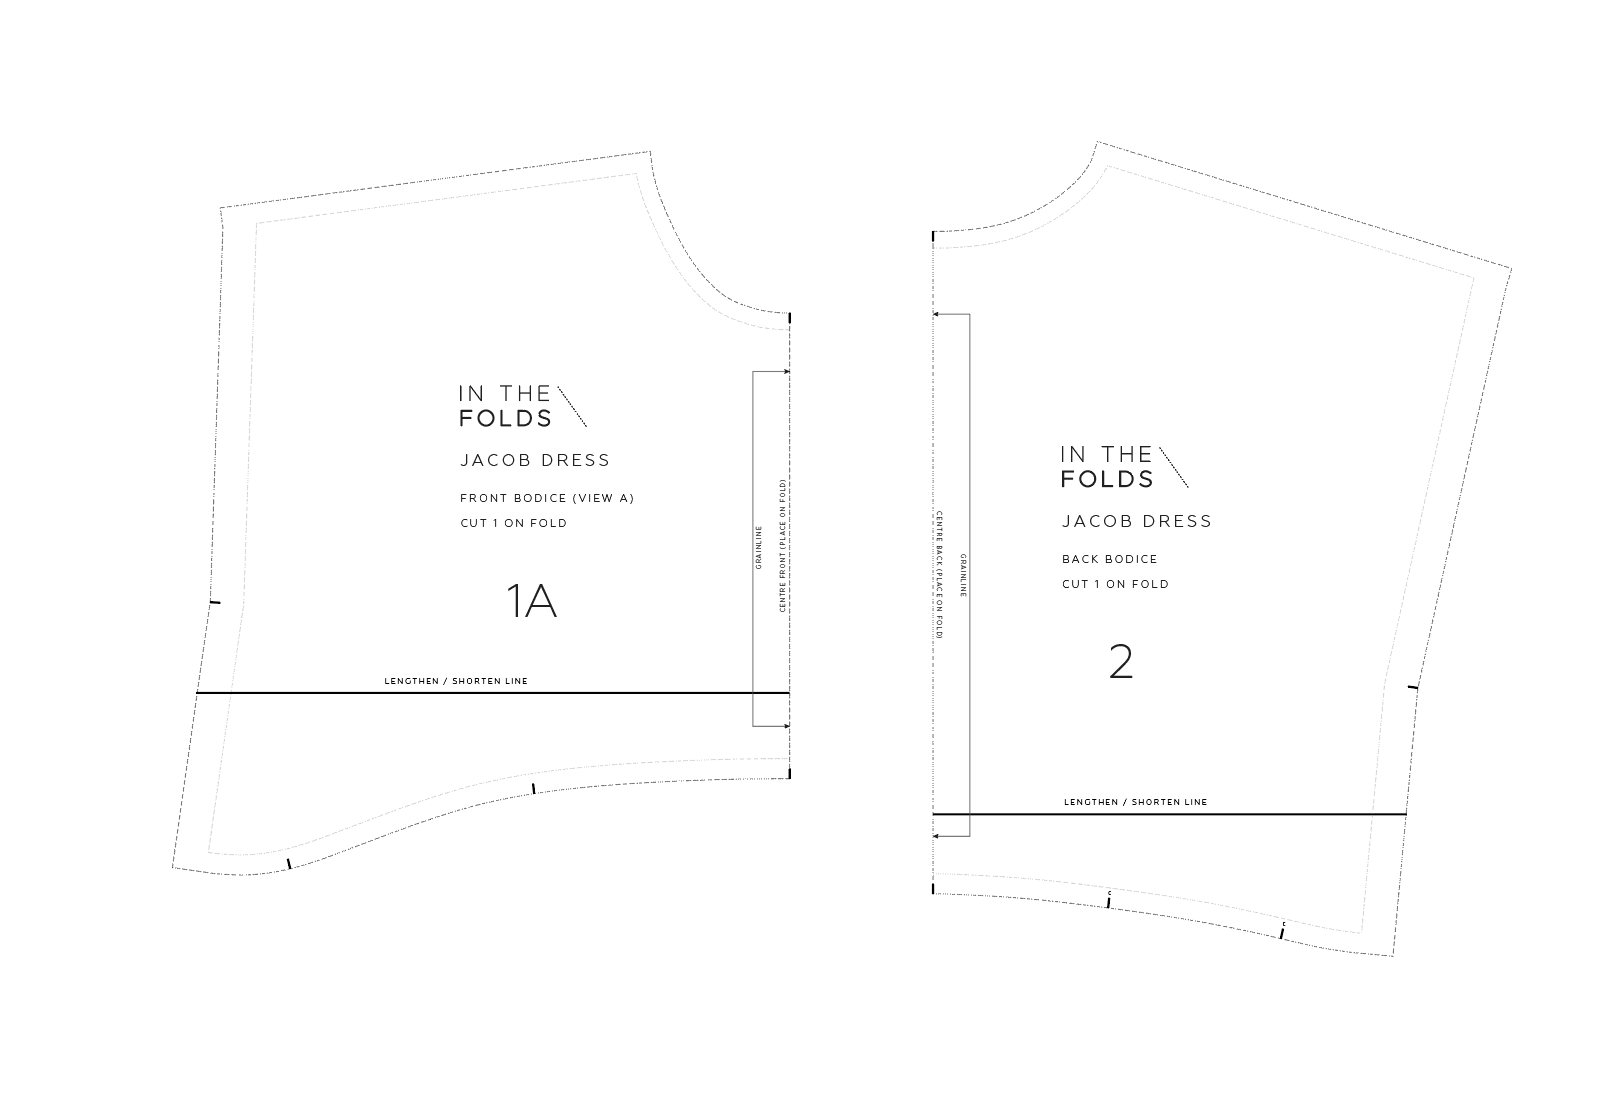
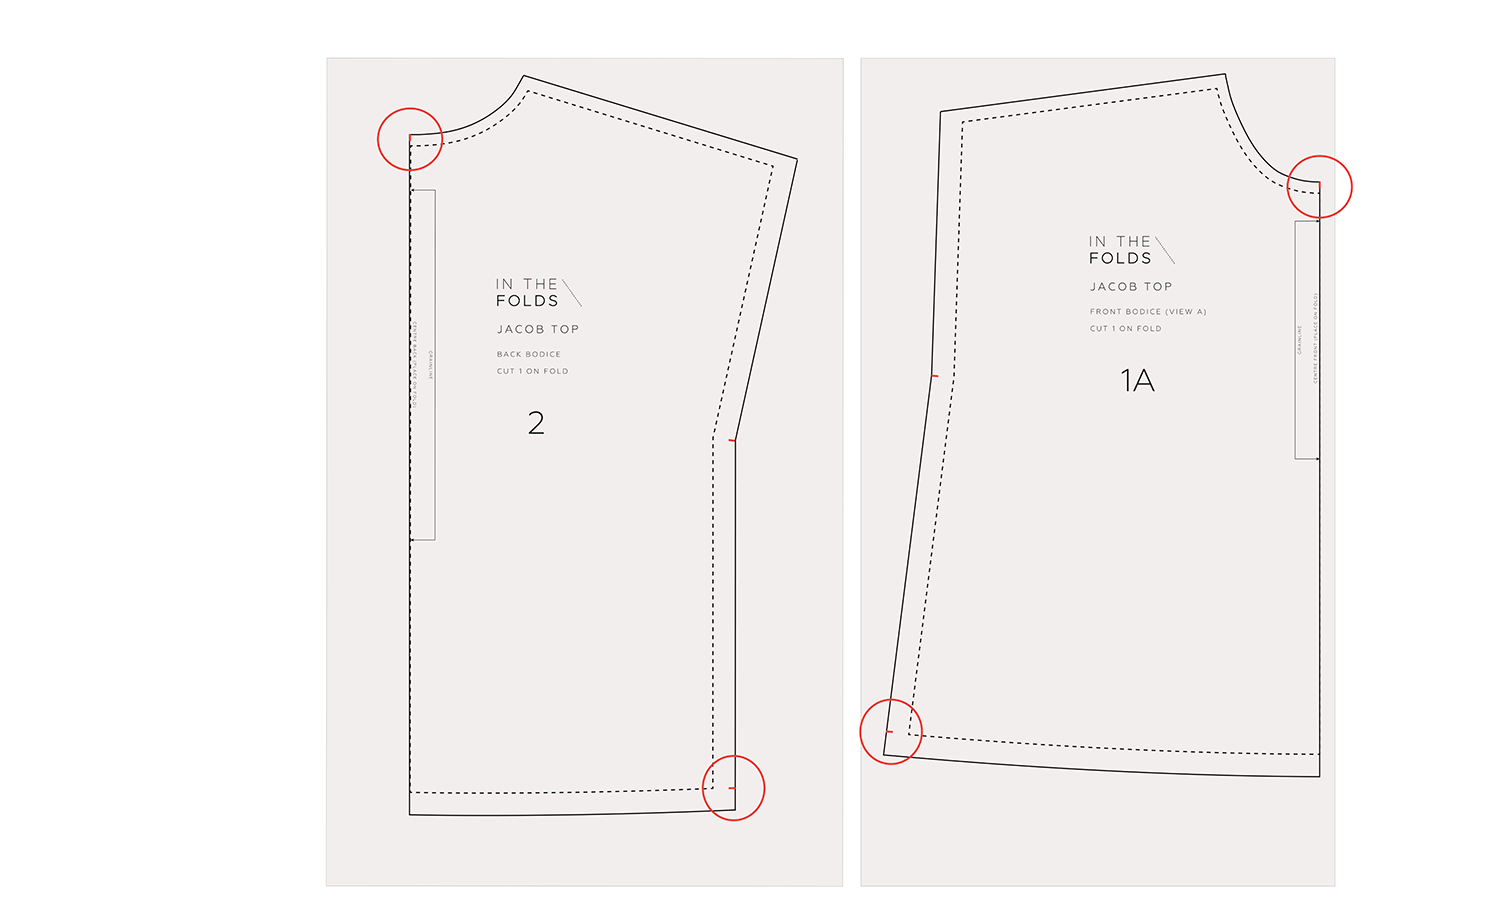
We'll be working with the FRONT BODICE [1A] and BACK BODICE [2] from the Jacob dress. If you're new to patternmaking, don't worry if some of the terminology is unfamiliar. We'll explain the important concepts as we go.
Before we begin: A note about working in small scale
Patternmakers often work with small-scale patterns when experimenting with a design idea or trying to solve a problem.
Working at a smaller scale uses less paper, takes less time and makes it easier to try something new without feeling too precious about the outcome. The same principles apply whether you're working with a small-scale pattern or a full-size one.
We would normally work in third or quarter scale, but in this case we thought it would be easiest to just ensure the pattern pieces fit on an A4 piece of paper.
The main difference is that any measurements you use will need to be scaled down.
For example, if you want to add 3cm to a full-size pattern, you'd add 1cm to a third-scale version. For this exercise, don't worry too much about creating a top that's exactly the right length for your body. We're concentrating on understanding the technique.
Ready? Let's get started!
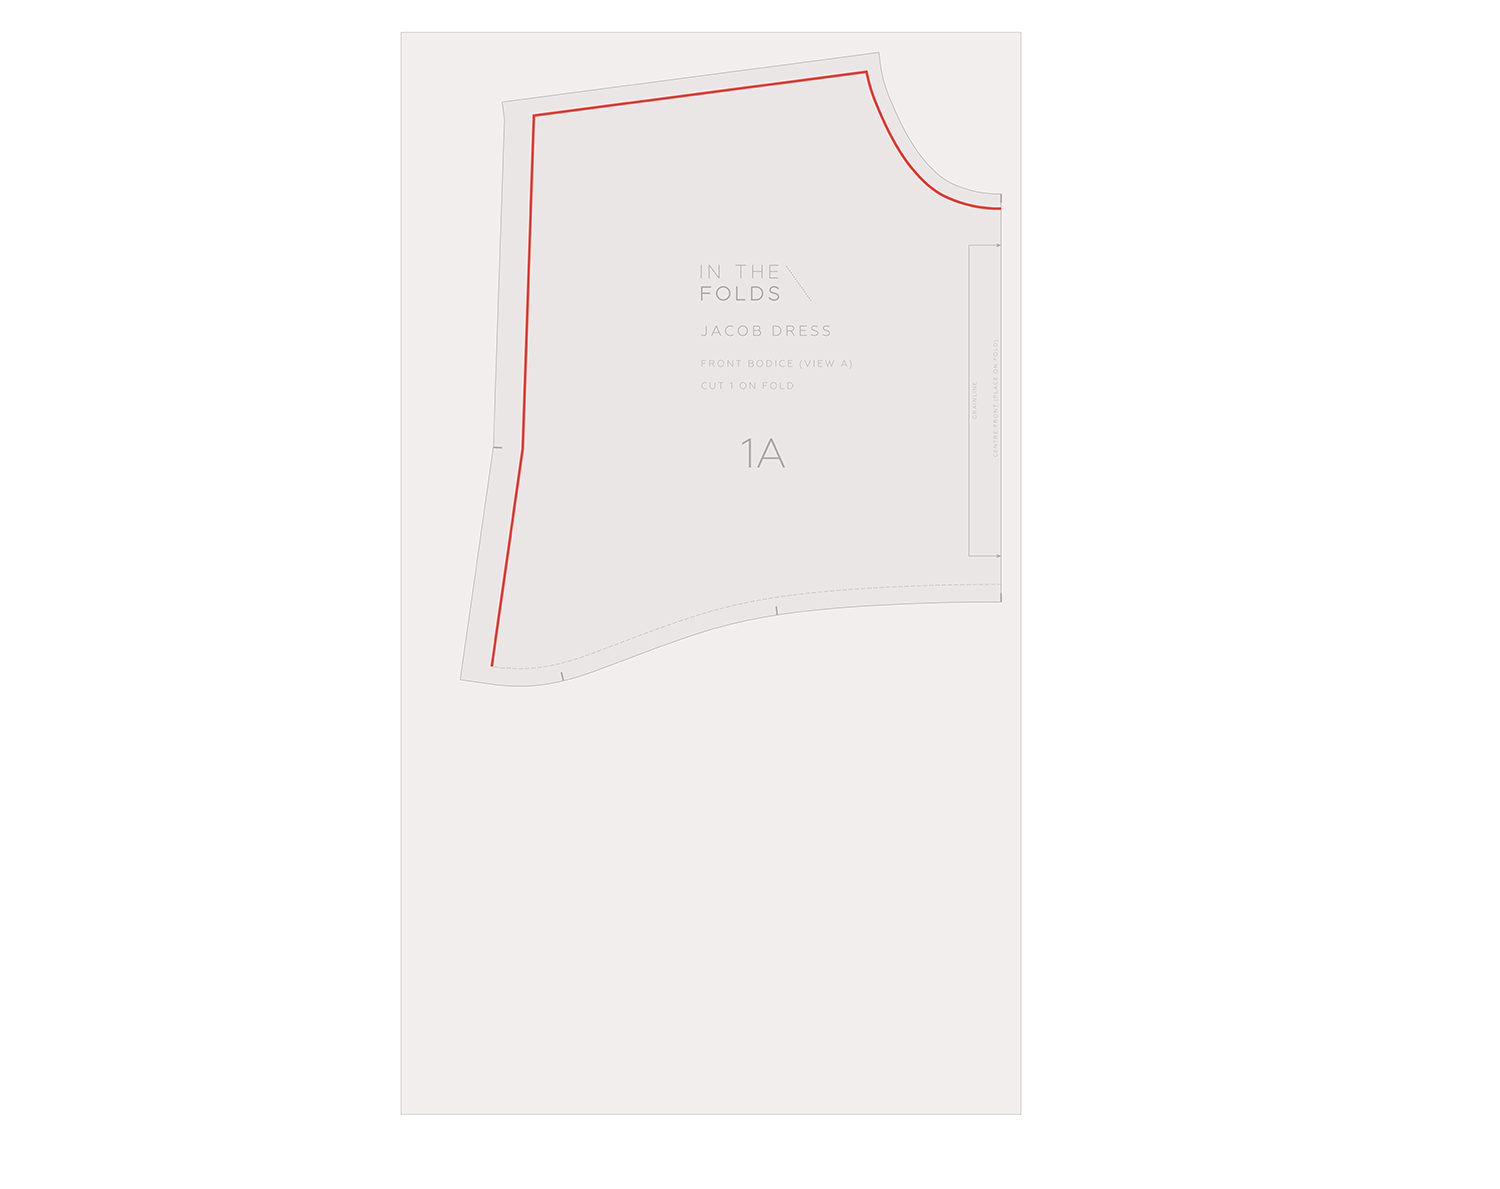
Step 1: Trace the front bodice
Start with the FRONT BODICE [1A] pattern piece.
Take a piece of pattern paper that is longer than the original bodice piece. You'll need enough room to extend the pattern to create your top.
Place the paper over the FRONT BODICE and hold it in place with pattern weights or pins.
Trace the neckline, shoulder, armhole and side seam stitch lines.
The stitch line is the line where the fabric will be sewn, rather than the outer edge where it will be cut.
When we're making changes to a pattern, it's often easier to work with the stitch lines first and add the seam allowance once we're happy with the new shape.
Step 2: Decide how long you'd like your top to be
Now we're going to extend the pattern to create the body of the top.
On a full-size pattern, you could work out your preferred length by measuring from your neck to where you'd like the hem to sit, or by measuring a top you already own. For our small-scale experiment, you can simply choose a length that looks good to you.
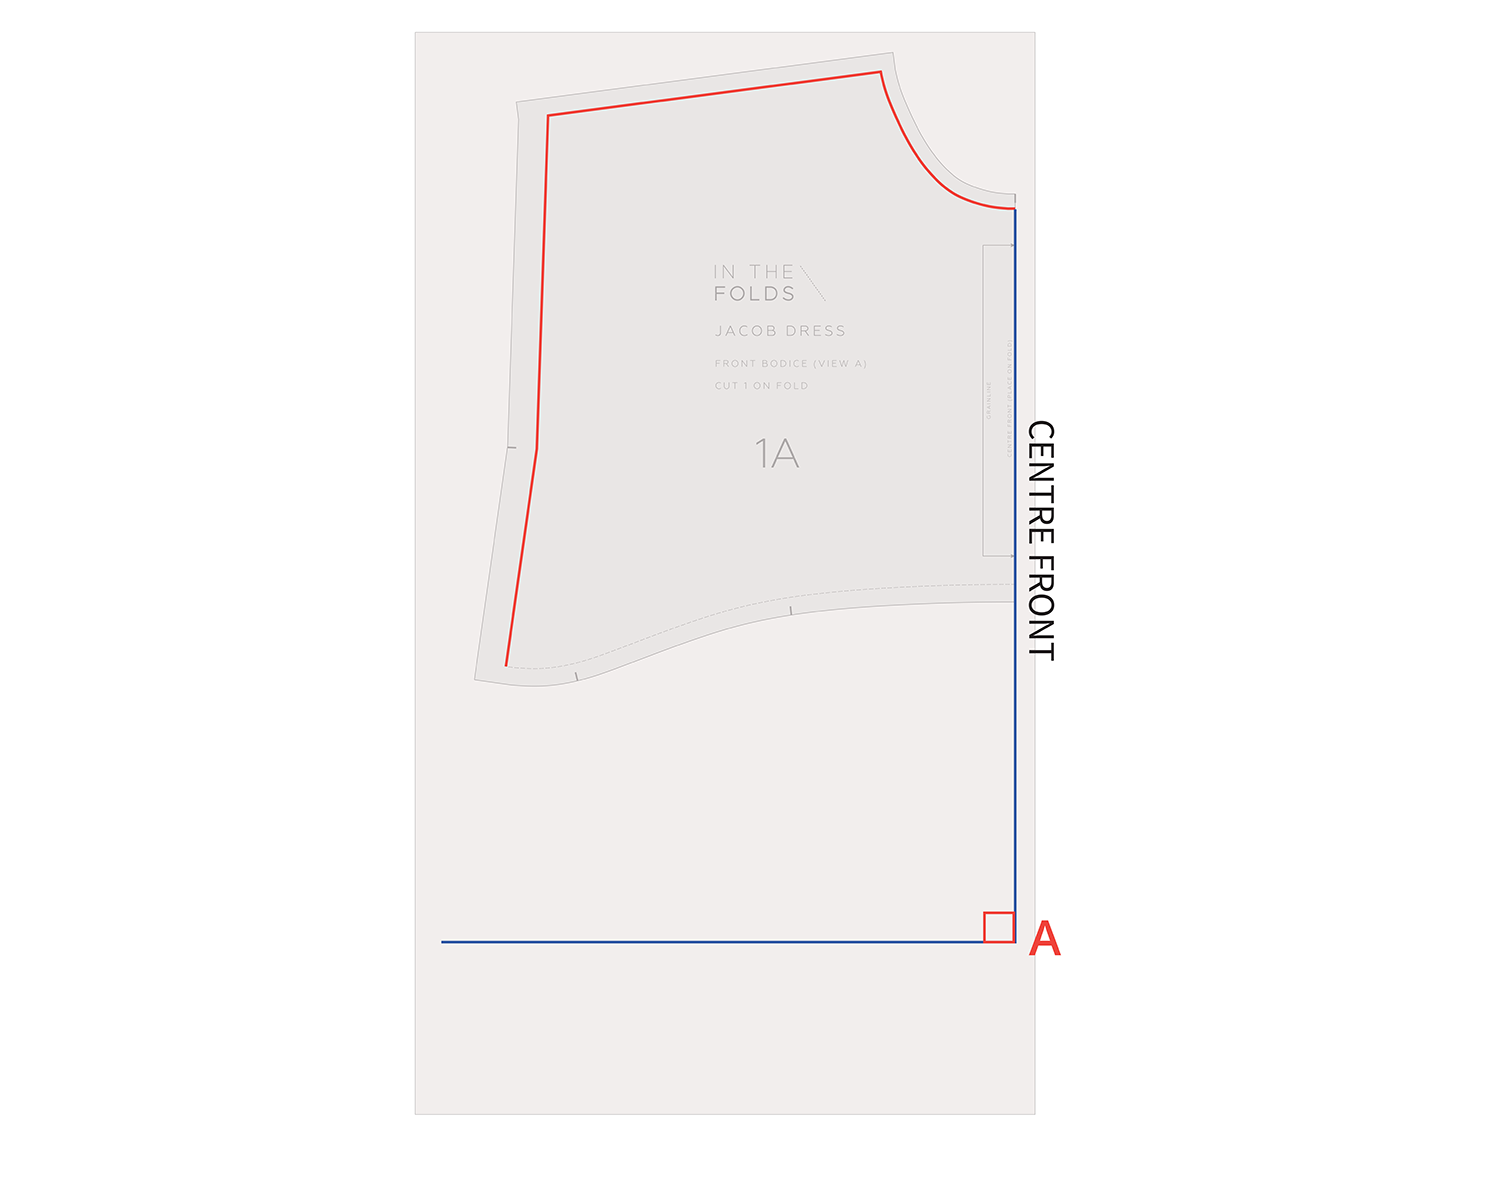
Extend the CENTRE FRONT line down from the neckline to your chosen length. Mark the bottom of this line as point A.
From point A, draw a horizontal line across the paper, making sure it meets the CENTRE FRONT at a right angle.
Why is the right angle important?
The centre front of this pattern will be cut on the fold. By making sure the hem meets the centre front at a right angle, we can create a smooth, continuous hemline when the fabric is unfolded, rather than an unwanted point.
Step 3: Extend the side seam
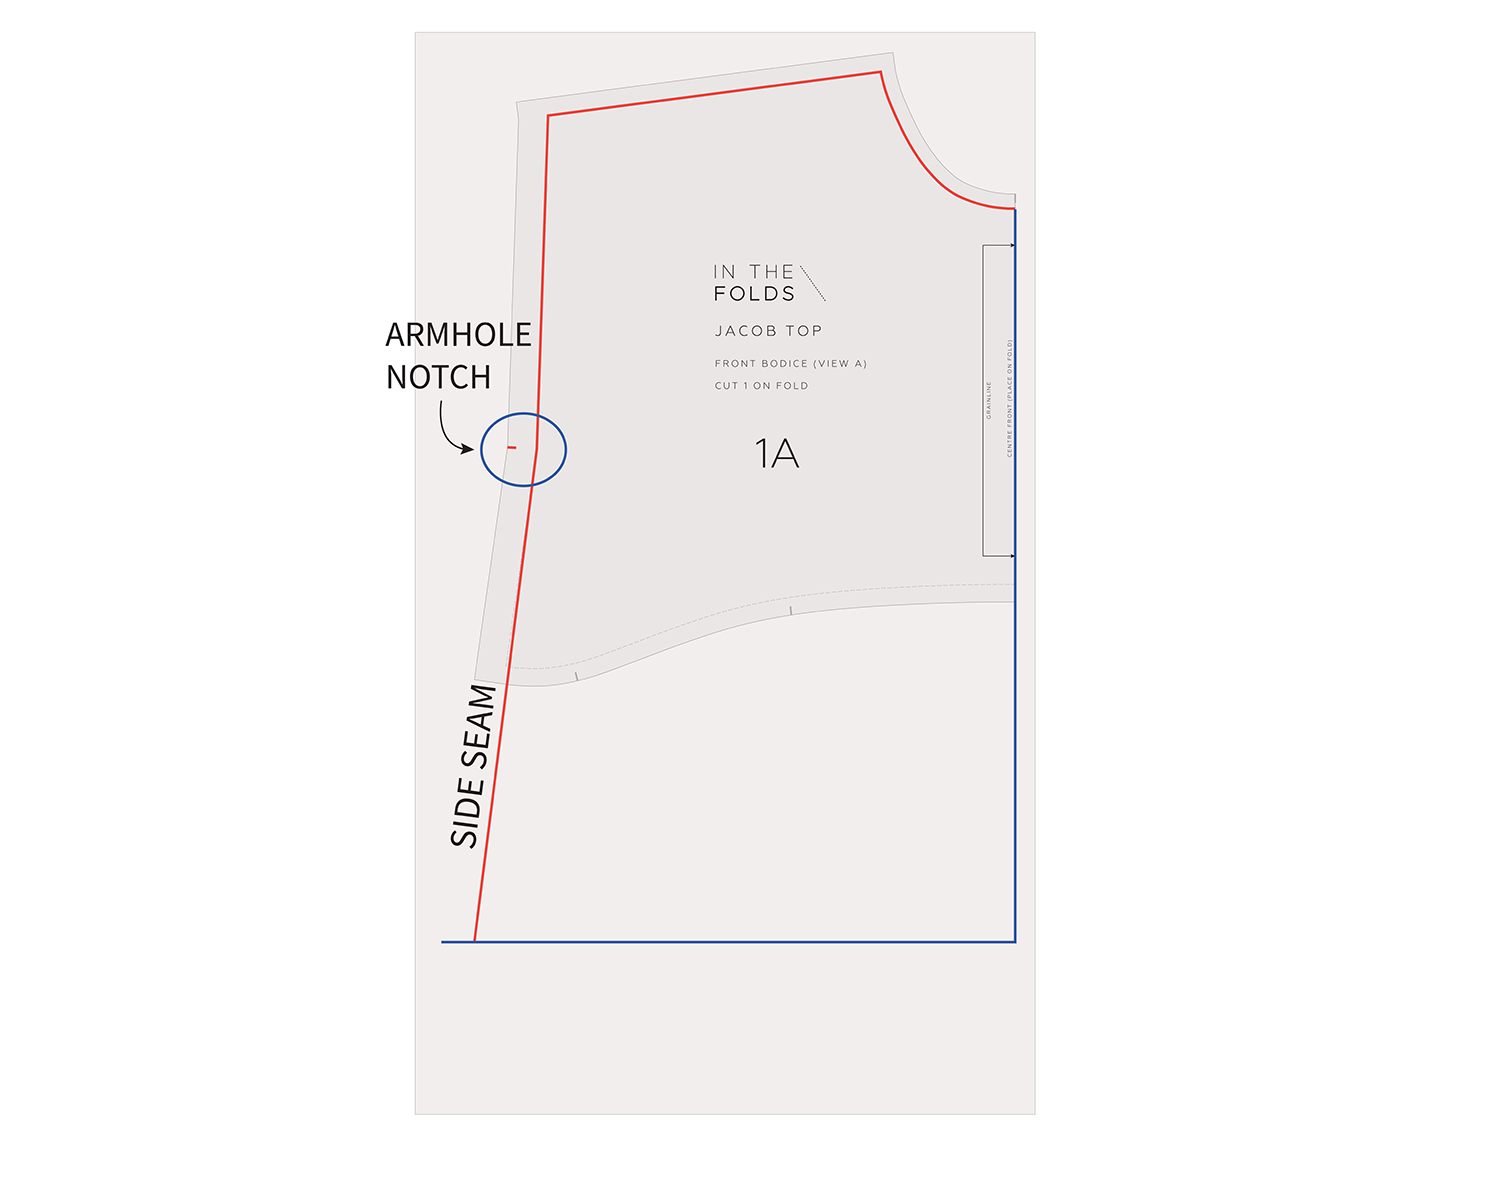
Next, extend the side seam down in a straight line until it meets the hemline you just drew. You've now created the basic shape of your new front pattern piece.
Transfer the armhole notch from the original pattern onto your new pattern.
Notches are small markings on sewing patterns that help us line up corresponding pieces when sewing. We'll use the armhole notch in a moment to help align the front and back pattern pieces.
Label your new pattern piece with the pattern name, piece name, grainline and cutting instructions.
You can call it the Jacob top!
Step 4: Prepare the back bodice
Now it's time to work on the BACK BODICE [2].
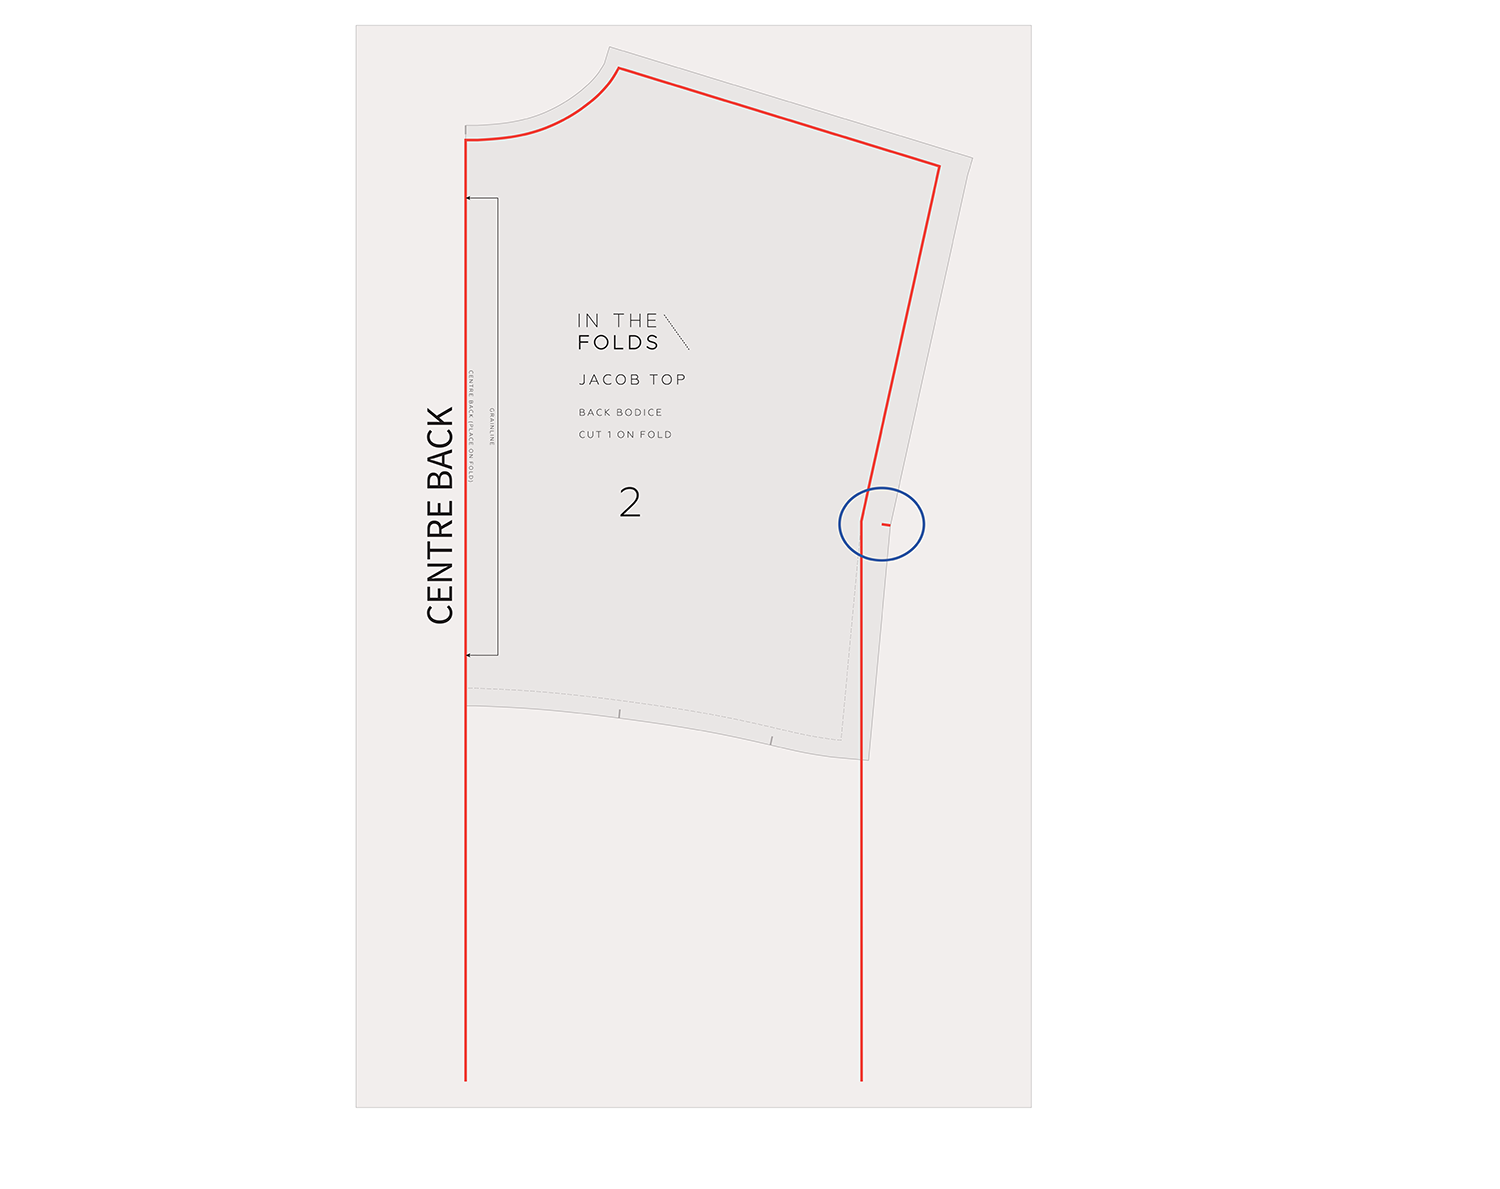
Place another piece of pattern paper over the back bodice and trace the stitch lines, just as you did for the front.
Extend the CENTRE BACK and side seam lines downwards.
Don't worry about deciding exactly where the back hem will finish just yet. We're going to work that out in relation to the front pattern. Make sure you transfer the armhole notch onto your new back pattern piece.
Step 5: Draft the hemline
This is where things get interesting!
We now have two extended pattern pieces, but we need to make sure they work together.
After all, when we sew a garment, the front and back pieces need to join correctly at the side seams.
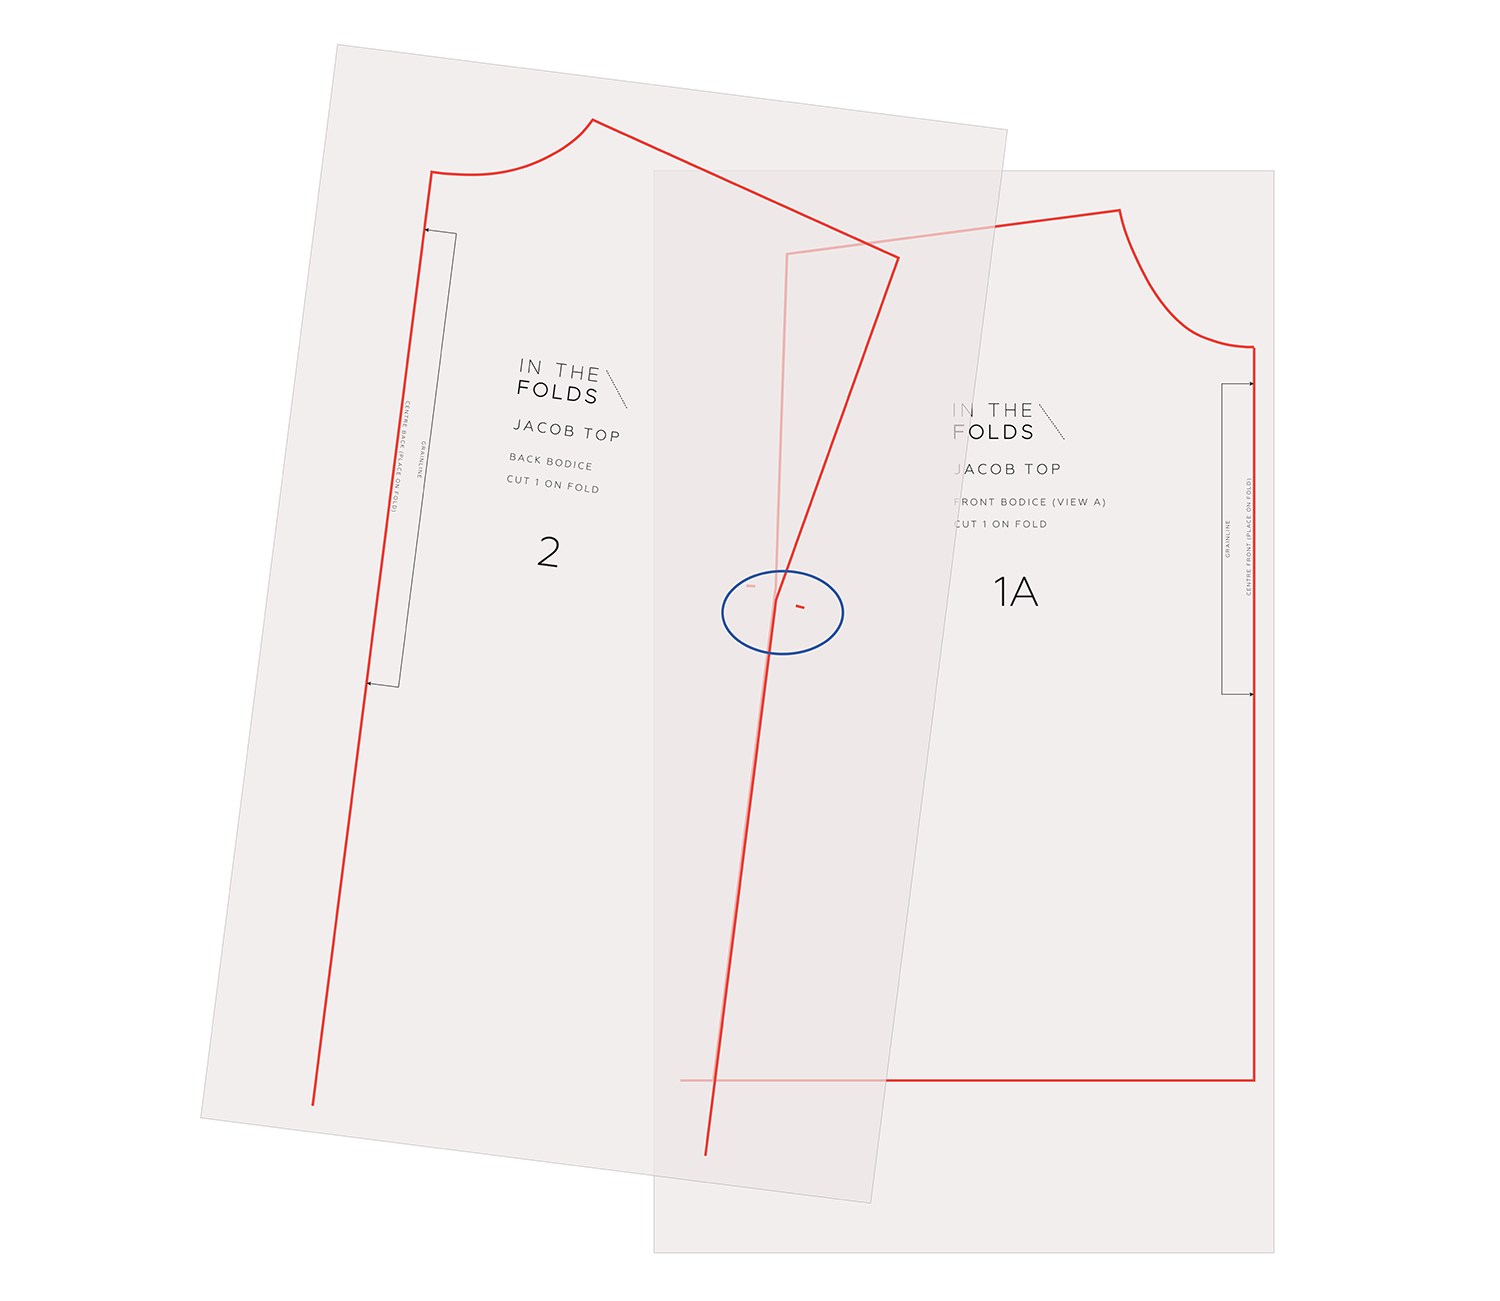
A. Line up the side seams
Place the front and back pattern pieces together, aligning the side seams at the bottom of the armhole using the notches.
You might notice that the side seam and armhole meet at a slight angle. Use the notches to help you find the correct point. Hold the pieces in place with pins or pattern weights.
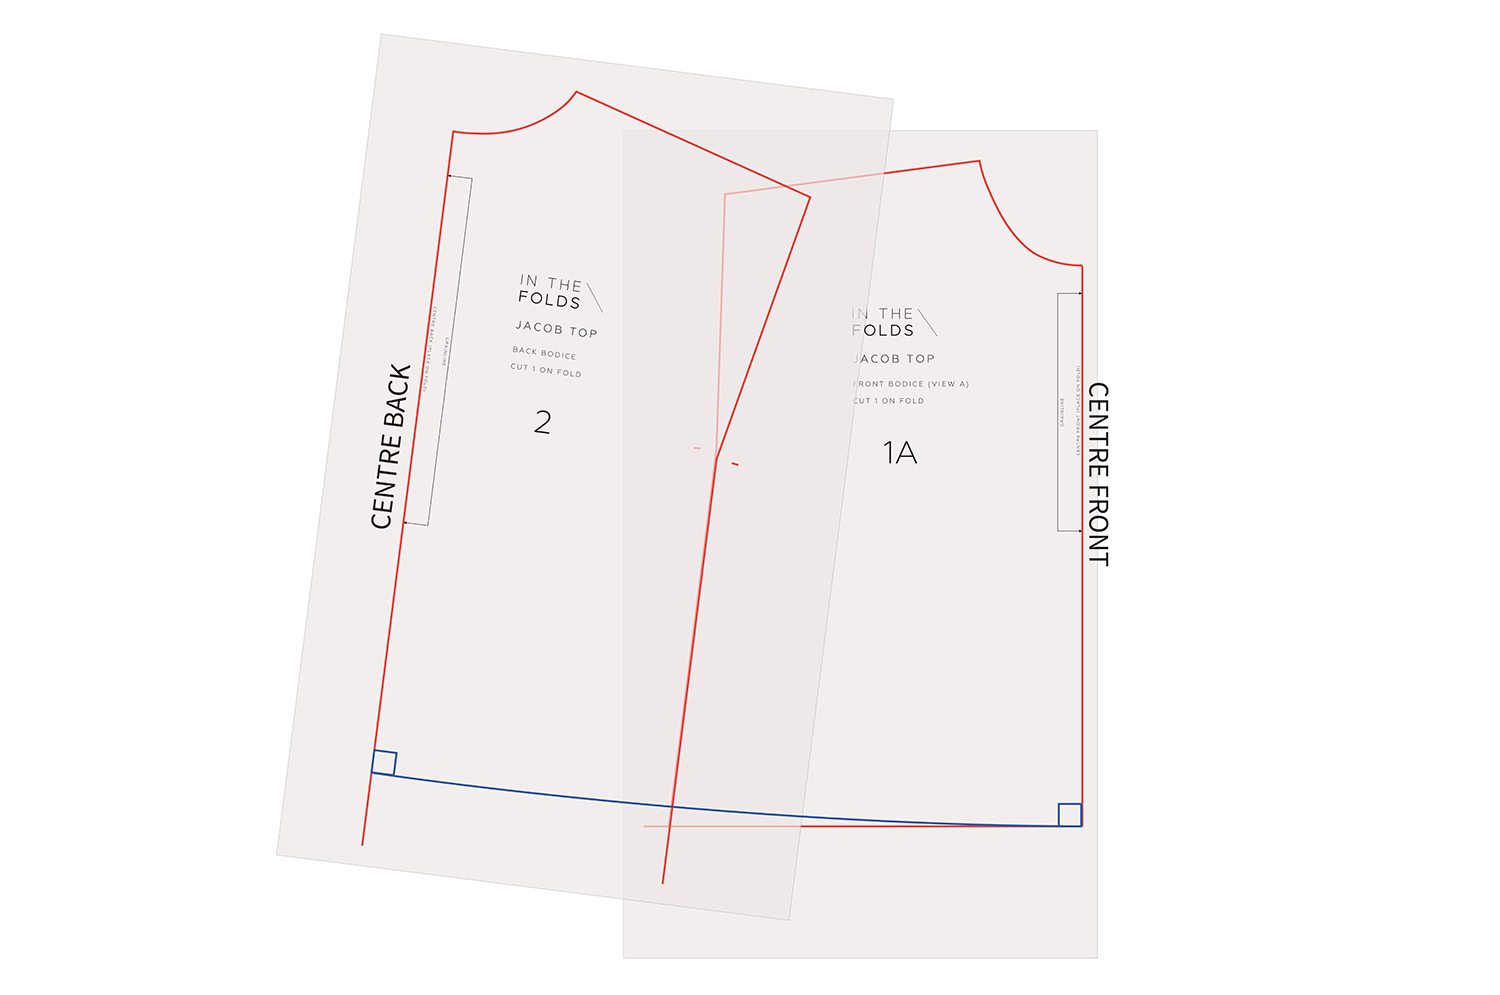
B. Draw the new hemline
With the pieces overlapping, draw a smooth curve from the CENTRE FRONT hem to the CENTRE BACK.
The curve should meet both the CENTRE FRONT and CENTRE BACK at right angles. This will give us a smooth hemline that flows from the front of the garment to the back.
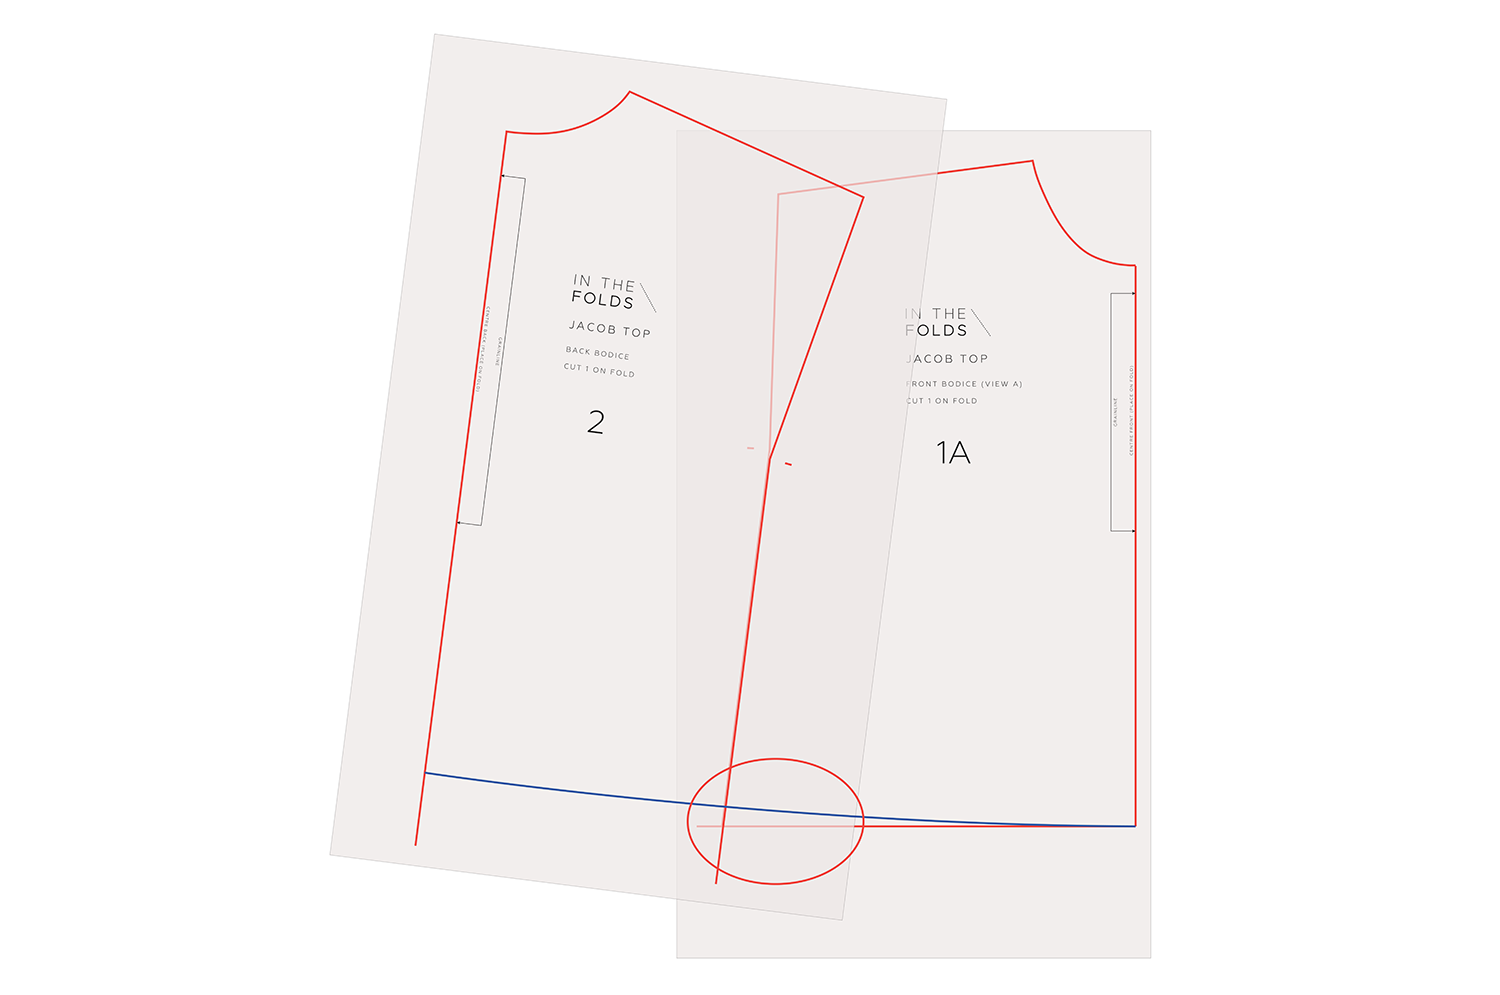
C. Transfer the hemline
Use a tracing wheel to transfer the hem shaping onto the overlapping section of pattern paper.
You should now have a front and back pattern piece with a continuous hemline.
What have we just learned?
Rather than drafting the front and back hems separately and hoping they'll work together, we've used the pattern pieces to establish a continuous shape. This is an important part of patternmaking: thinking about how the individual pieces will work together once they're sewn into a garment.
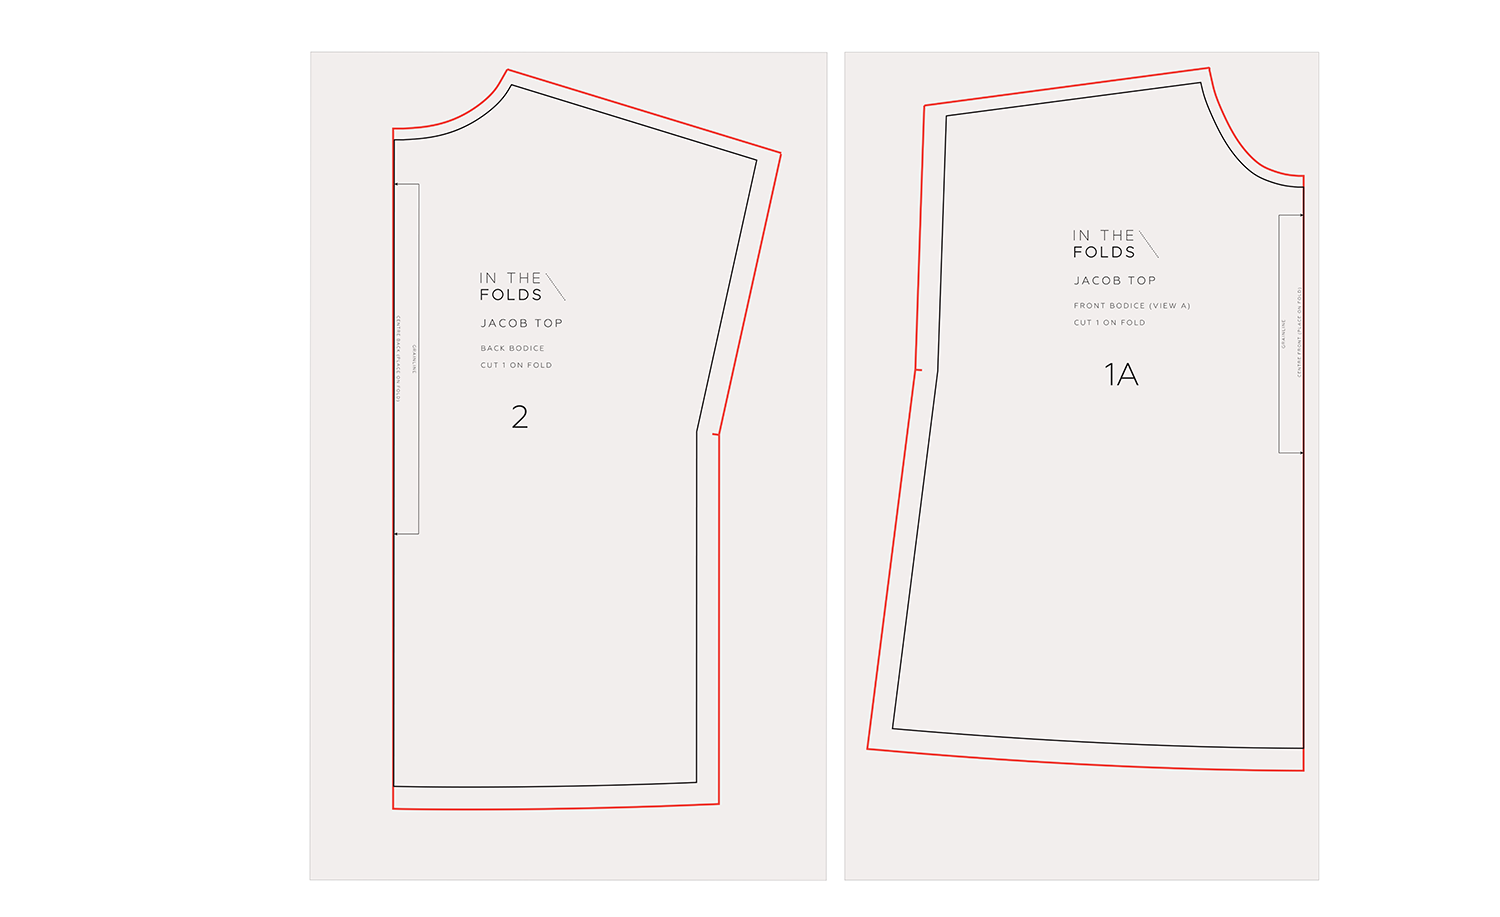
Step 6: Add seam allowance
Now that we're happy with the shape of our top, it's time to add seam allowance.
Seam allowance is the space between the stitch line and the cut edge of the fabric.
In the full-size Jacob Hack Kit tutorial, we use the following seam allowances:
Seam
Full-size allowance
Shoulder -1.2cm (½in)
Side seam / armhole - 2cm (¾in)
Neckline - 1cm (⅜in)
Hem - 2cm (¾in)
Centre front / centre back - None — cut on the fold
As these numbers get very tiny in small scale, you can just eye ball it, as what you are making isn’t a real pattern anyway.
You can use a transparent ruler to add seam allowance around your new pattern pieces. Don't worry if this takes a little practice. Drawing accurate seam allowances, particularly around curves, is a skill in itself.
Step 7: Add your notches
We're almost there!
The final step is to add any notches that will help when sewing the garment. Add notches at the CENTRE FRONT and CENTRE BACK necklines.
You may also like to add notches at the side seams to indicate the hem allowance. Check that your pattern pieces are labelled correctly and that you've transferred any important markings.
And that's it! You've just taken an existing dress pattern and used it to draft a new top pattern.
Before you put your scissors away…
Take a moment to look at the pattern pieces you've created. You've started with a dress pattern and turned it into something different.
Along the way, you've practised tracing a pattern, extending seam lines, creating a new hemline and checking that your pieces work together. These are exactly the same techniques you'd use if you were working with a full-size pattern.
And hopefully, having tried them on a smaller scale, the idea of making these changes to a full-size pattern feels a little less intimidating.
Here are a few questions to think about:
Was there anything that surprised you as you worked through the steps?
Can you see why we needed to align the front and back pattern pieces before drafting the hemline?
Is there another pattern in your stash that you could imagine turning into a top?
What else could you change about the Jacob top?
Perhaps you'd like to alter the neckline, add a curved panel line or change the proportions.
You don't need to do any of those things today. For now, I hope you've enjoyed having a little play with patternmaking and can see how a few simple changes can open up all sorts of possibilities.
Want to keep experimenting?
This exercise is taken from our new Jacob dress Hack Kit, which is designed to help you build your patternmaking skills one technique at a time. The complete Hack Kit includes a collection of patternmaking tutorials that show you how to turn the Jacob dress into different tops, a shirt with a collar, skirts and more.
It also includes guidance on essential patternmaking techniques such as checking and truing patterns, rotating darts, adding seam allowance and making toiles, along with design templates and small-scale patterns to help you experiment.