Photo from Corey, one of my lovely pattern testers
I love pockets. I really do. I like to put pockets anywhere I can as they are oh so handy for phones and keys, but also very comfortable for hands!
This is a tutorial to help you with "in-seam" pockets - a pocket that is hidden... surprise, surprise... in a seam of your garment (normally the side seam). Yesterday I showed you how to sew in-seam pockets (with french seams), so today I thought I'd show you how to draft the pattern piece as it is a very quick and easy process (both pattern cutting the pockets and sewing them) and once you have a pattern you are happy with, you will be able to use it over and over again, with minimal changes.
Tools
For this tutorial you will need the pattern of the garment you are adding pockets to, as well as some basic pattern cutting equipment: a transparent ruler, a pacer (or pencil), some scissors and a small piece of pattern paper (just bigger than your hand).
LET'S GO!
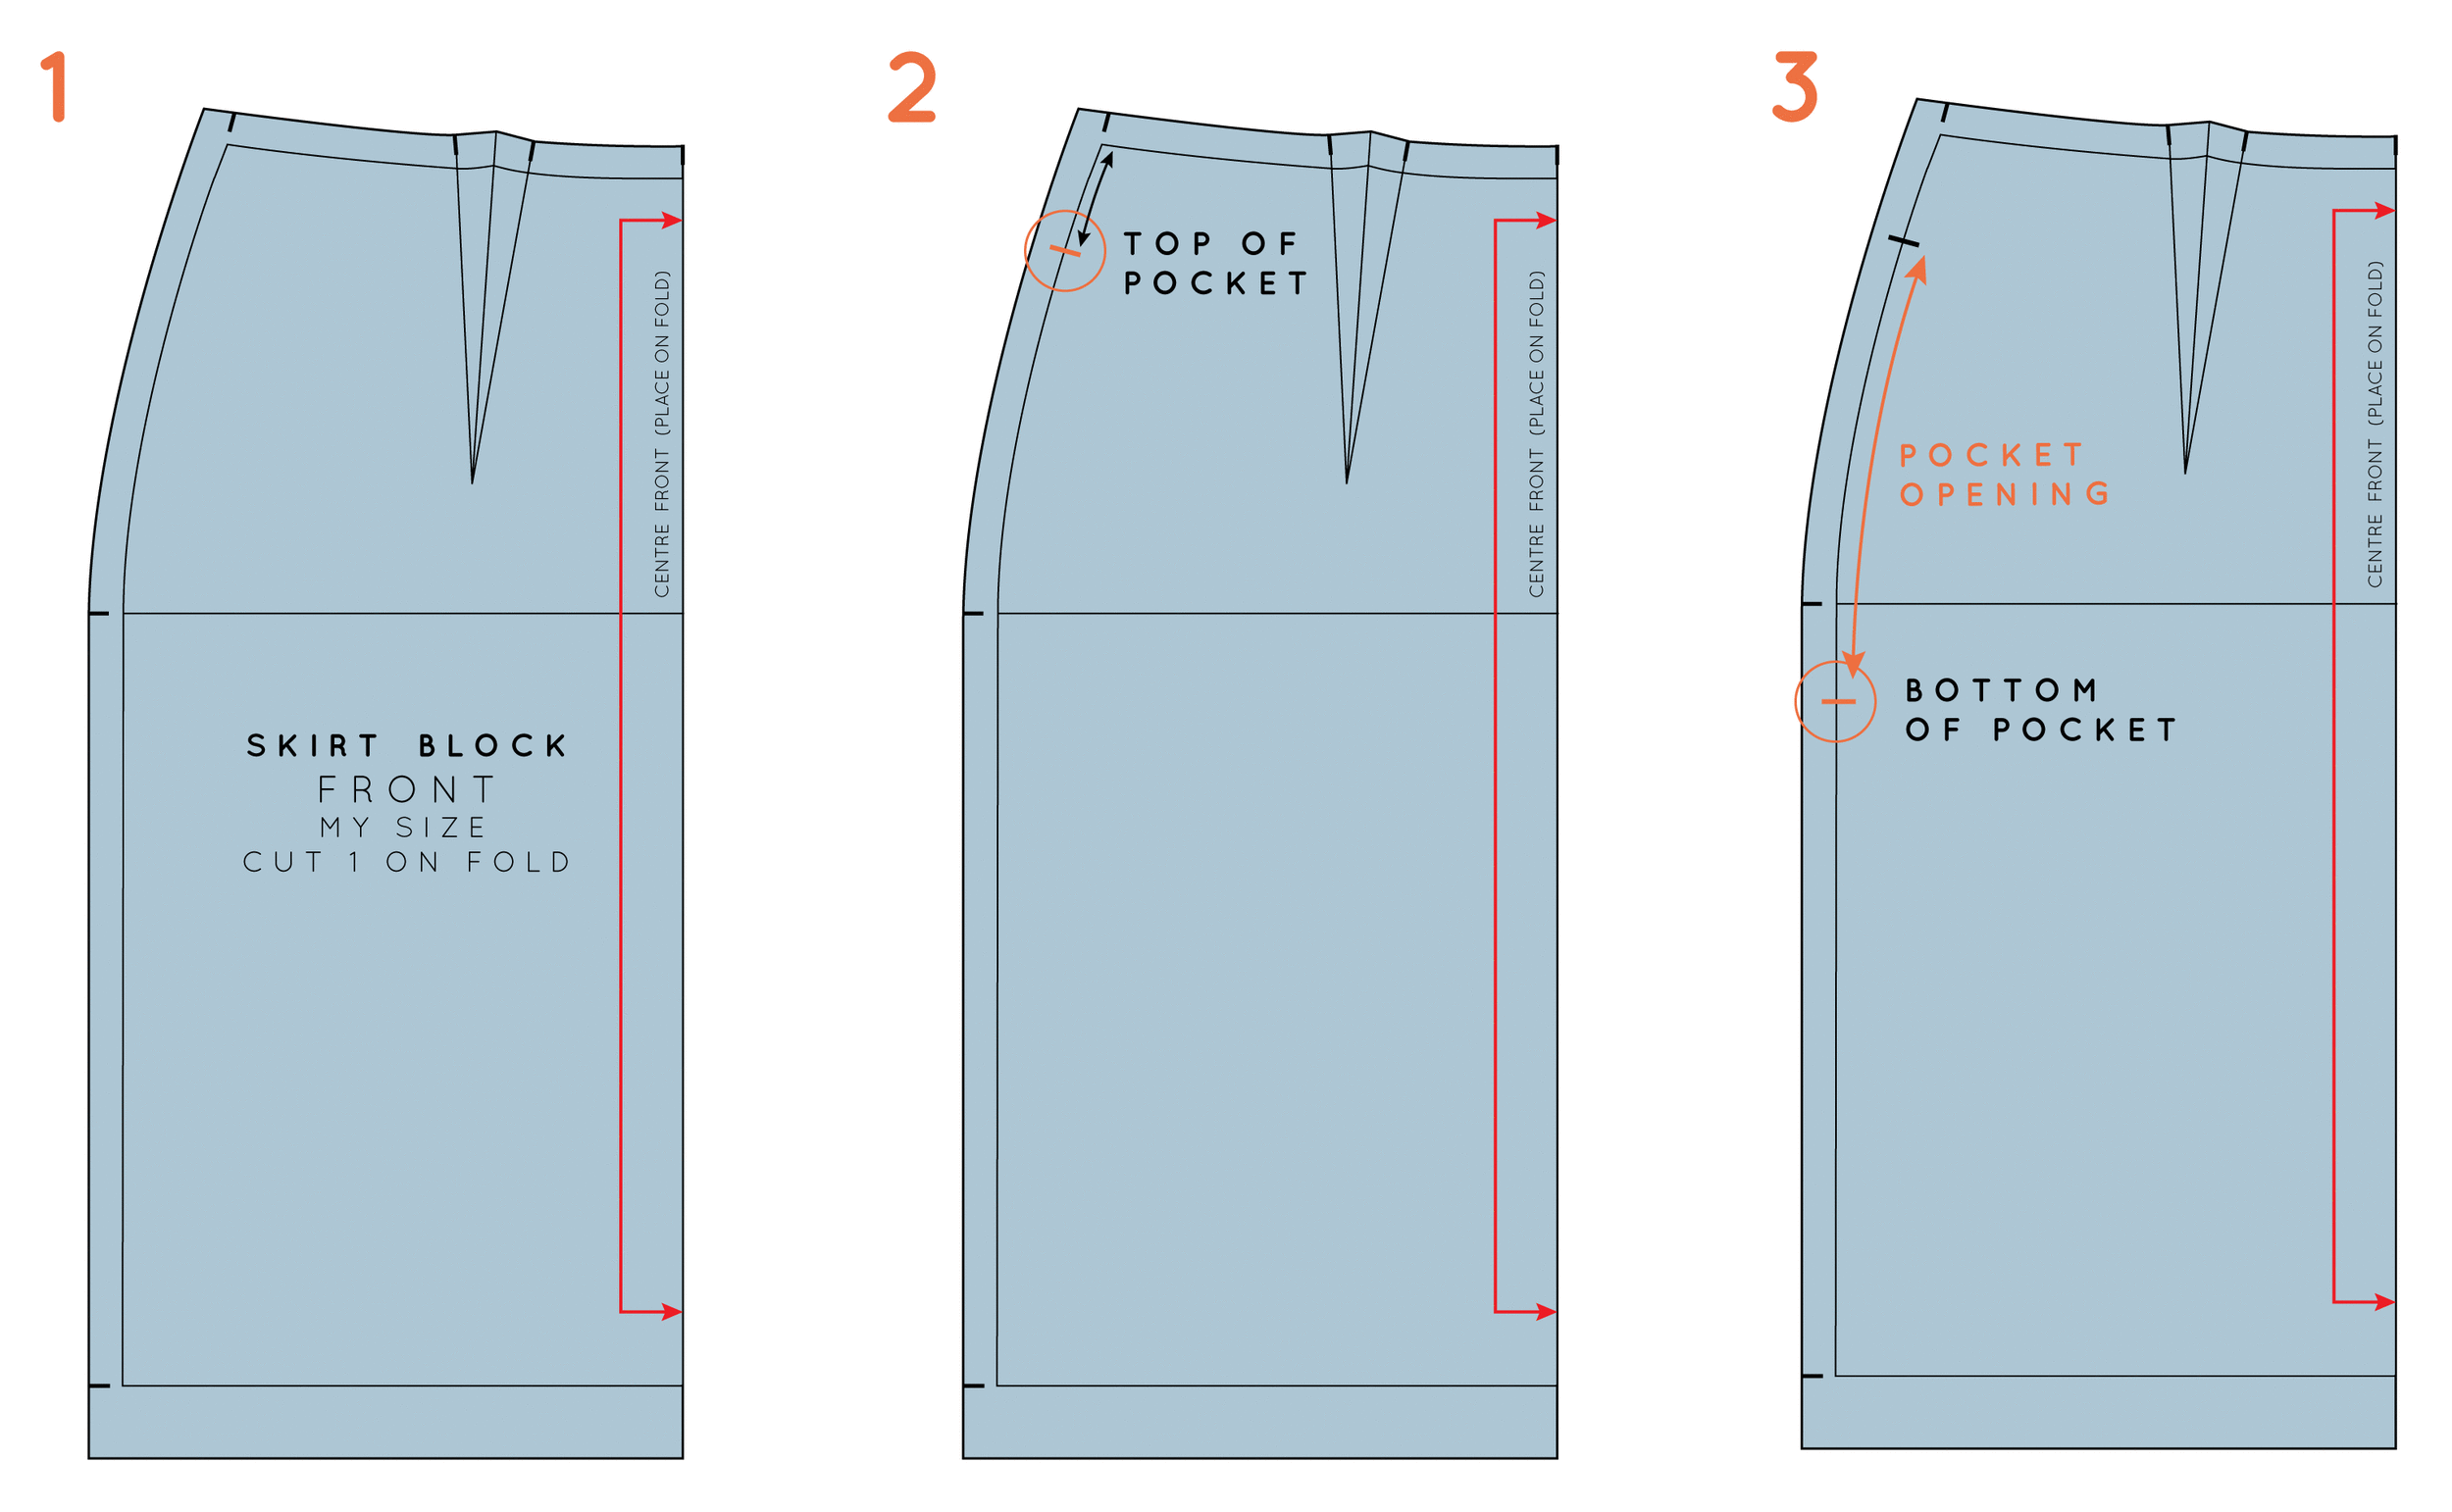
1. Take the front piece of the pattern you are making pockets for. I will be using the basic skirt block (as we are in the middle of The Skirt Series) as an example, but you can use this same method to add in-seam pockets to any garment that has a side seam.
2. Think about where you would like your pattern to sit. A good way to do this is to put on your toile and put your hands where the pockets would feel comfortable. Mark the location with a pin.
If you don't have a toile, you can just measure down from your waist to work out a good spot. For me, if I am adding a pocket to a waisted garment, I will place the pocket 9 - 10cm (3 1/2 - 4in) down from the waist.
Mark this point on your pattern piece.
3. Now think about how big you would like the opening to your pocket to be. I suggest around 15-20cm (6 - 8in). Measuring along your stitch line, down from the point you marked in the previous step (the top of the pocket), indicate the bottom of the opening with another notch.
Draw the pocket bag
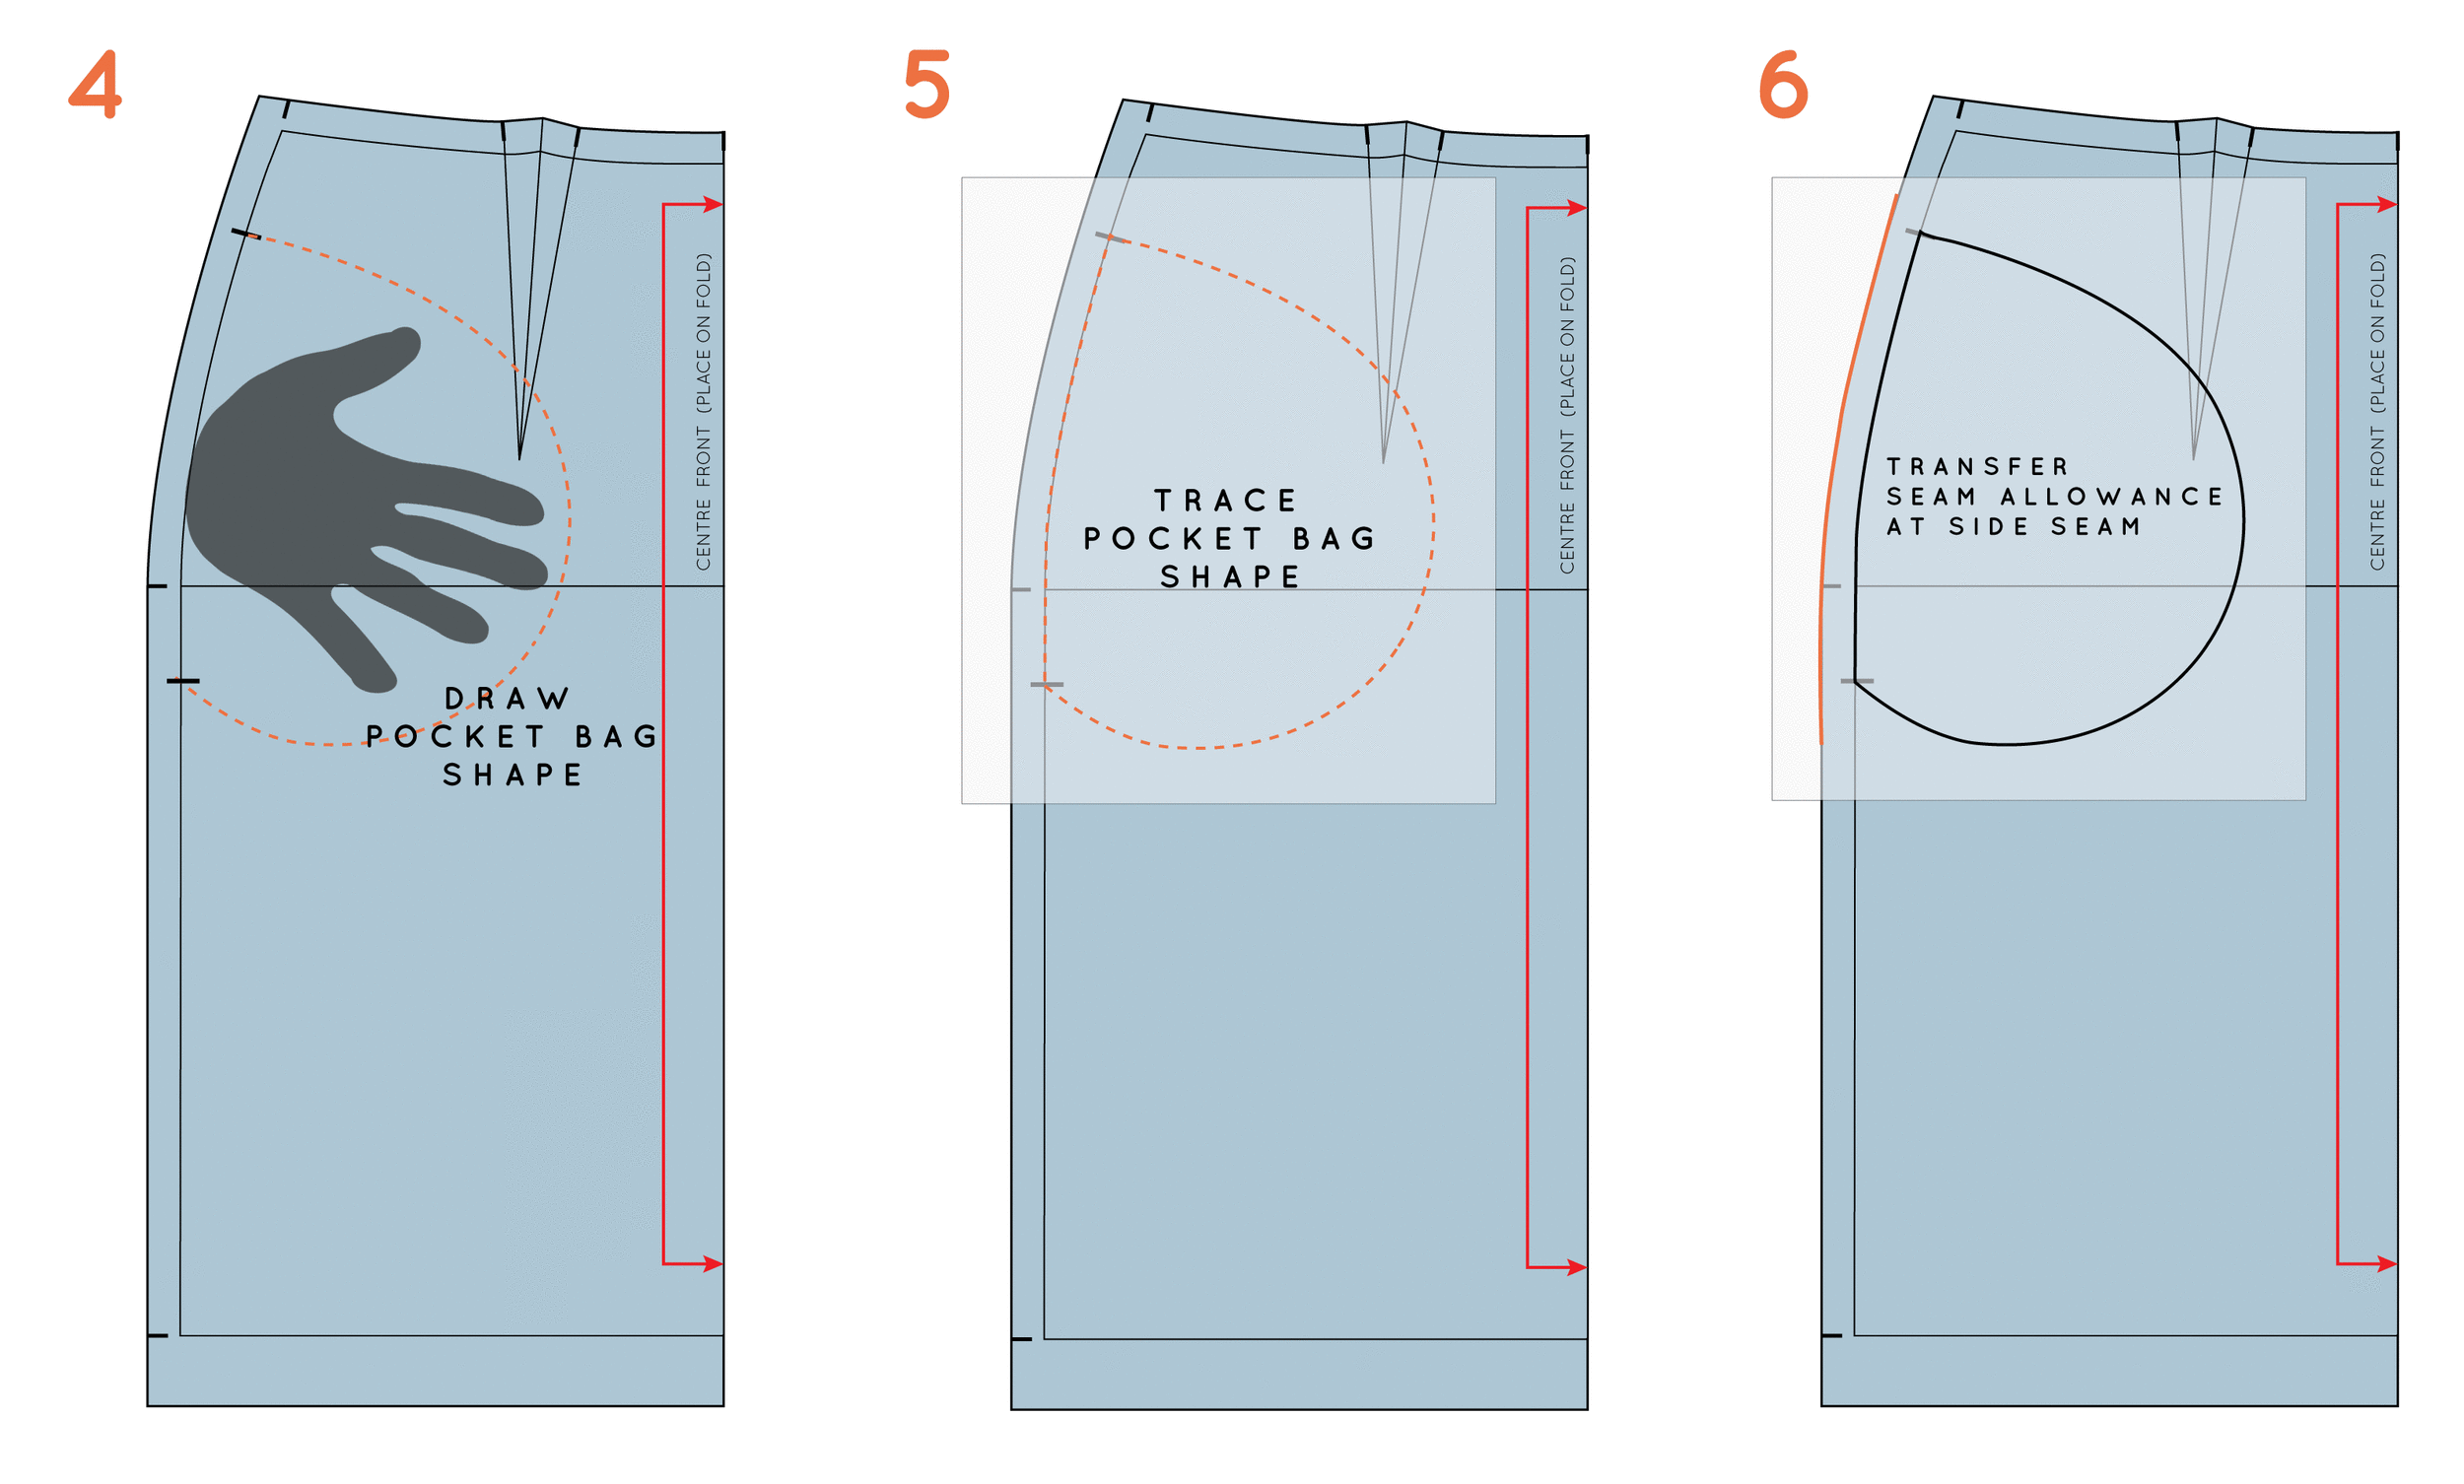
4. I think the easiest way to get a good pocket shape, is by tracing roughly around my hand. To do this, place your hand on your pattern, as if it was in a pocket, and draw around it in the rough shape of a pocket bag (have a look at the in-seam pockets of some of your own clothes if you're not sure about the shape). You don't want it to be too tight around your hand, so leave a little bit of space between your hand and the line you draw.
5. Take a separate piece of pattern paper and, using a weight to hold the pattern in place, trace the shape of the pocket (leaving enough space around it to add seam allowance).
6. While you are tracing the shape of the pocket, you can also trace the seam allowance at the side seam.
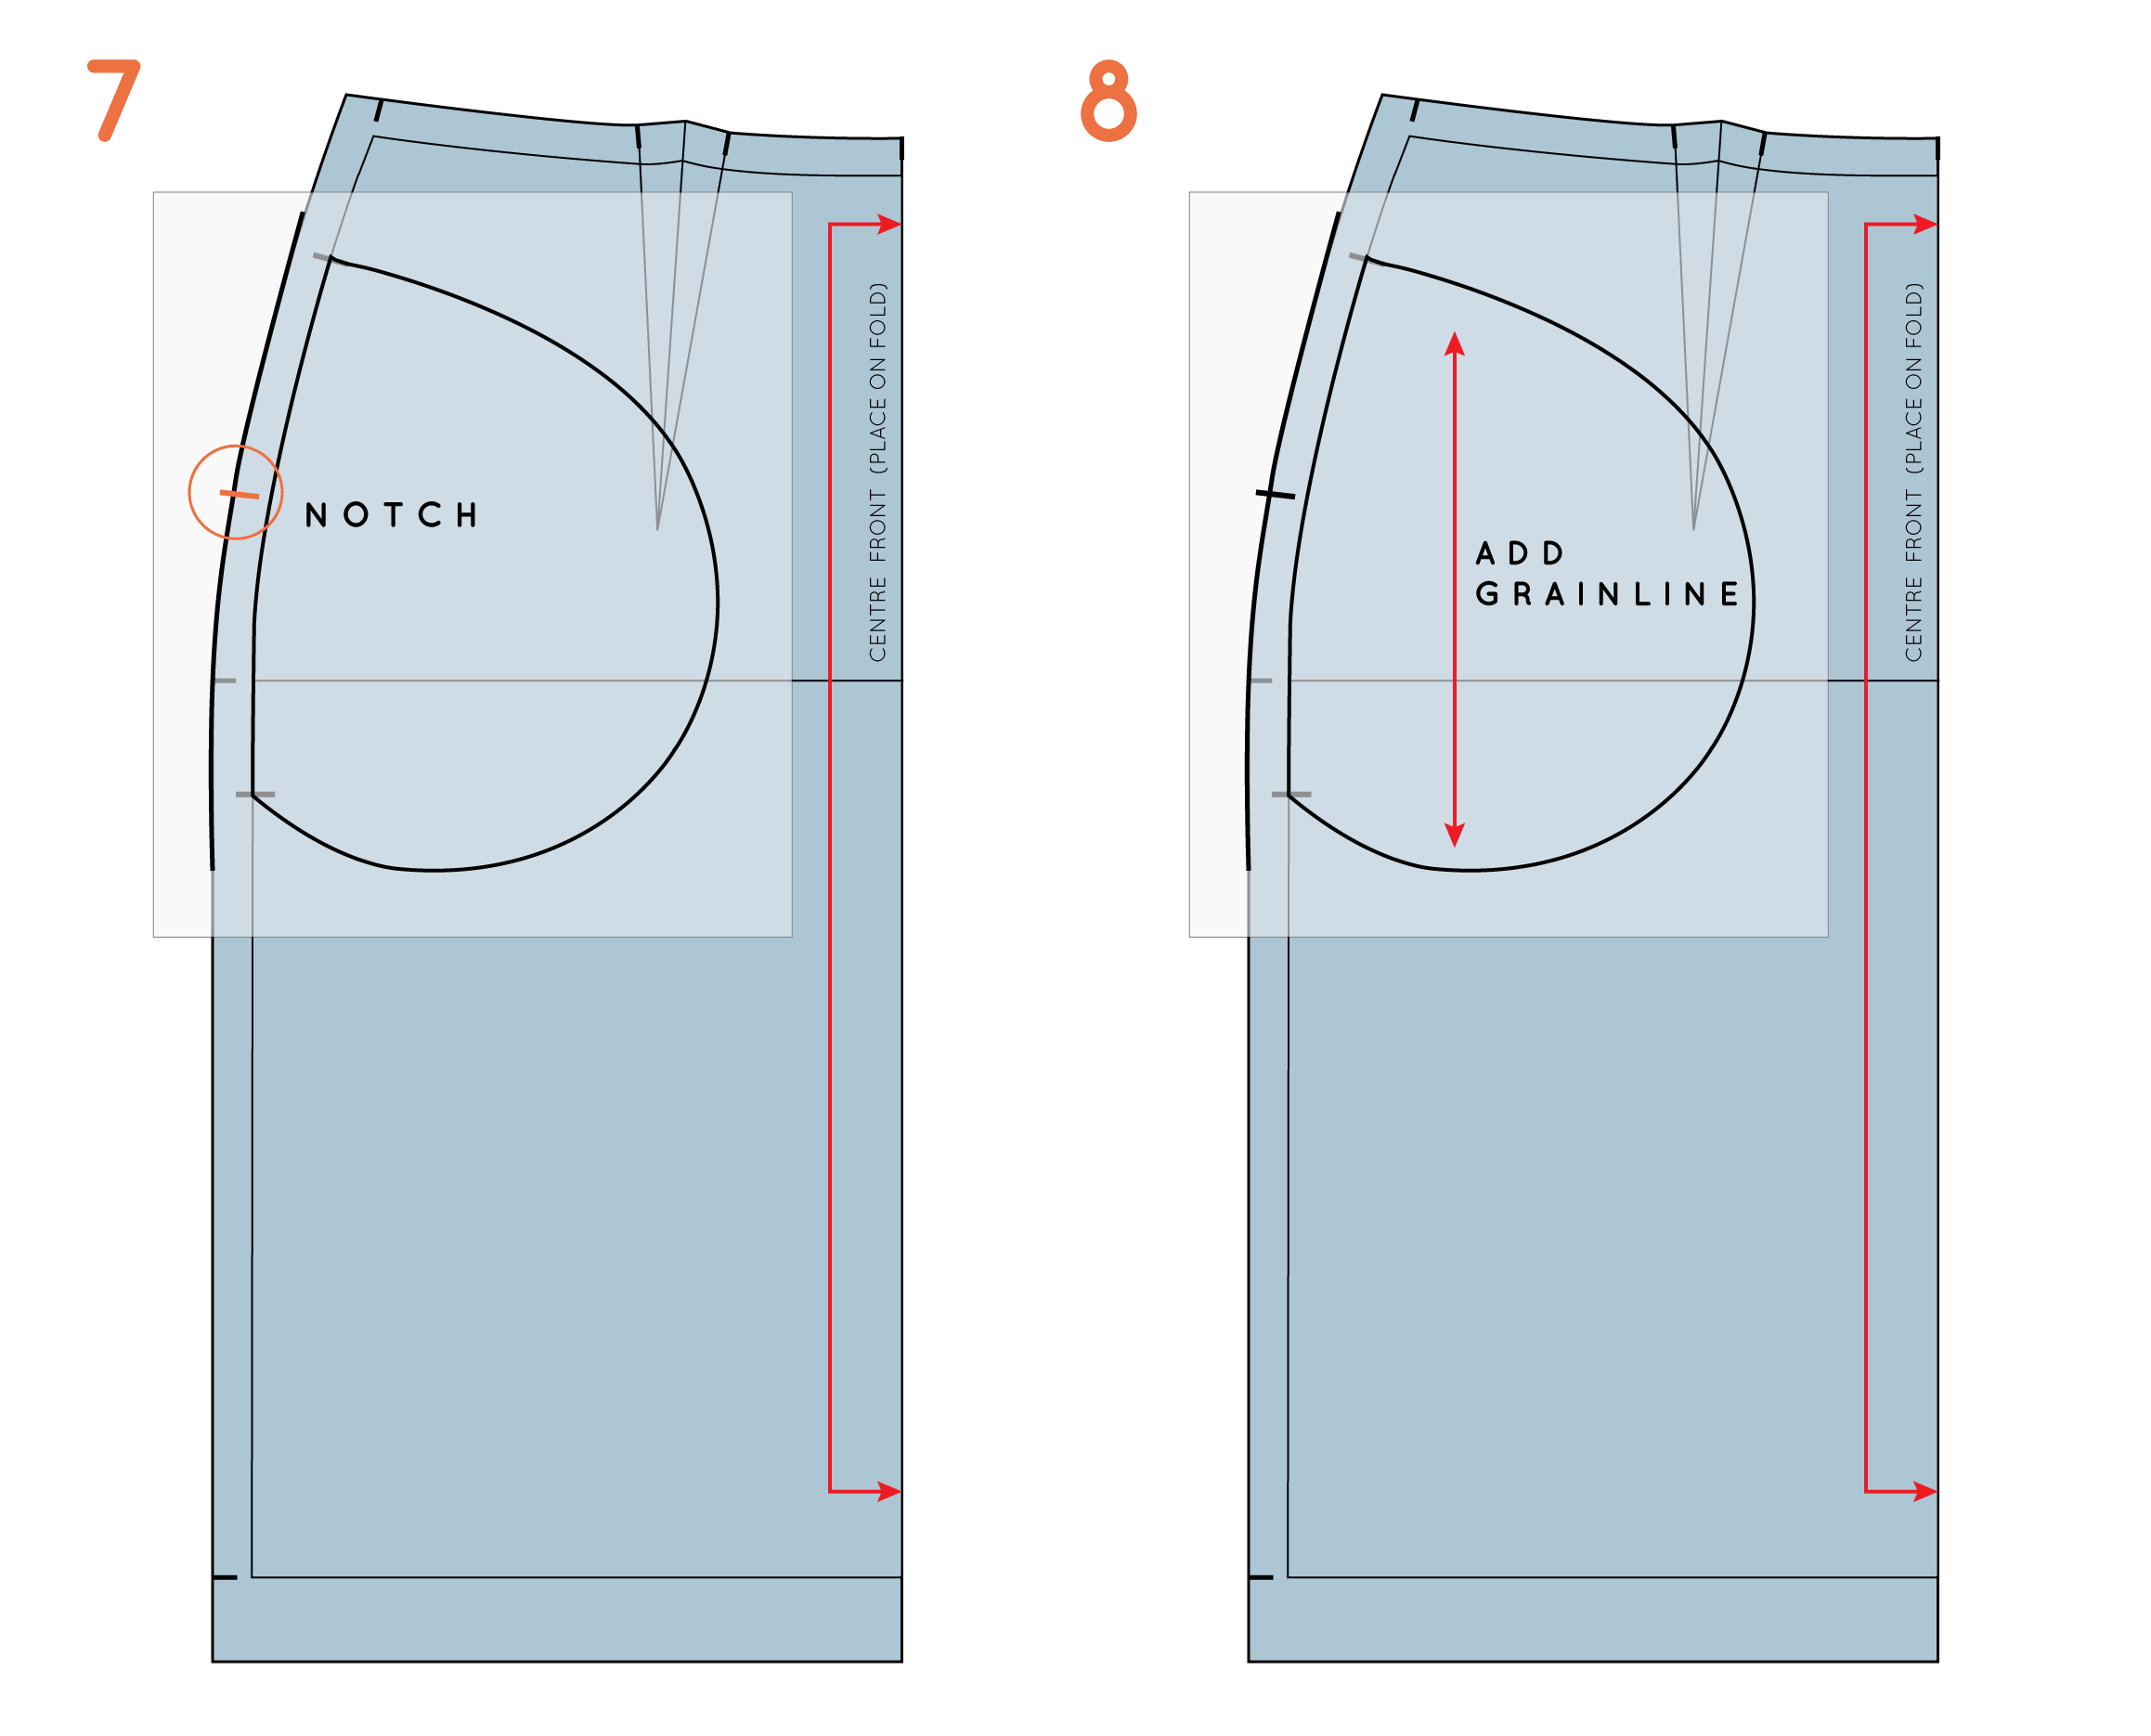
7. Add a notch, roughly in the centre of the pocket opening, and then using a tracing wheel, transfer that notch onto the front pattern piece. This notch will help when you are positioning your pocket, when it comes to sewing.
8. Add a grainline to your pocket piece, making sure it is parallel to grainline on the pattern you are adding the pocket to (this will ensure that the pocket sits nice and flat, when it is sewn in).
Add seam allowance and pattern details
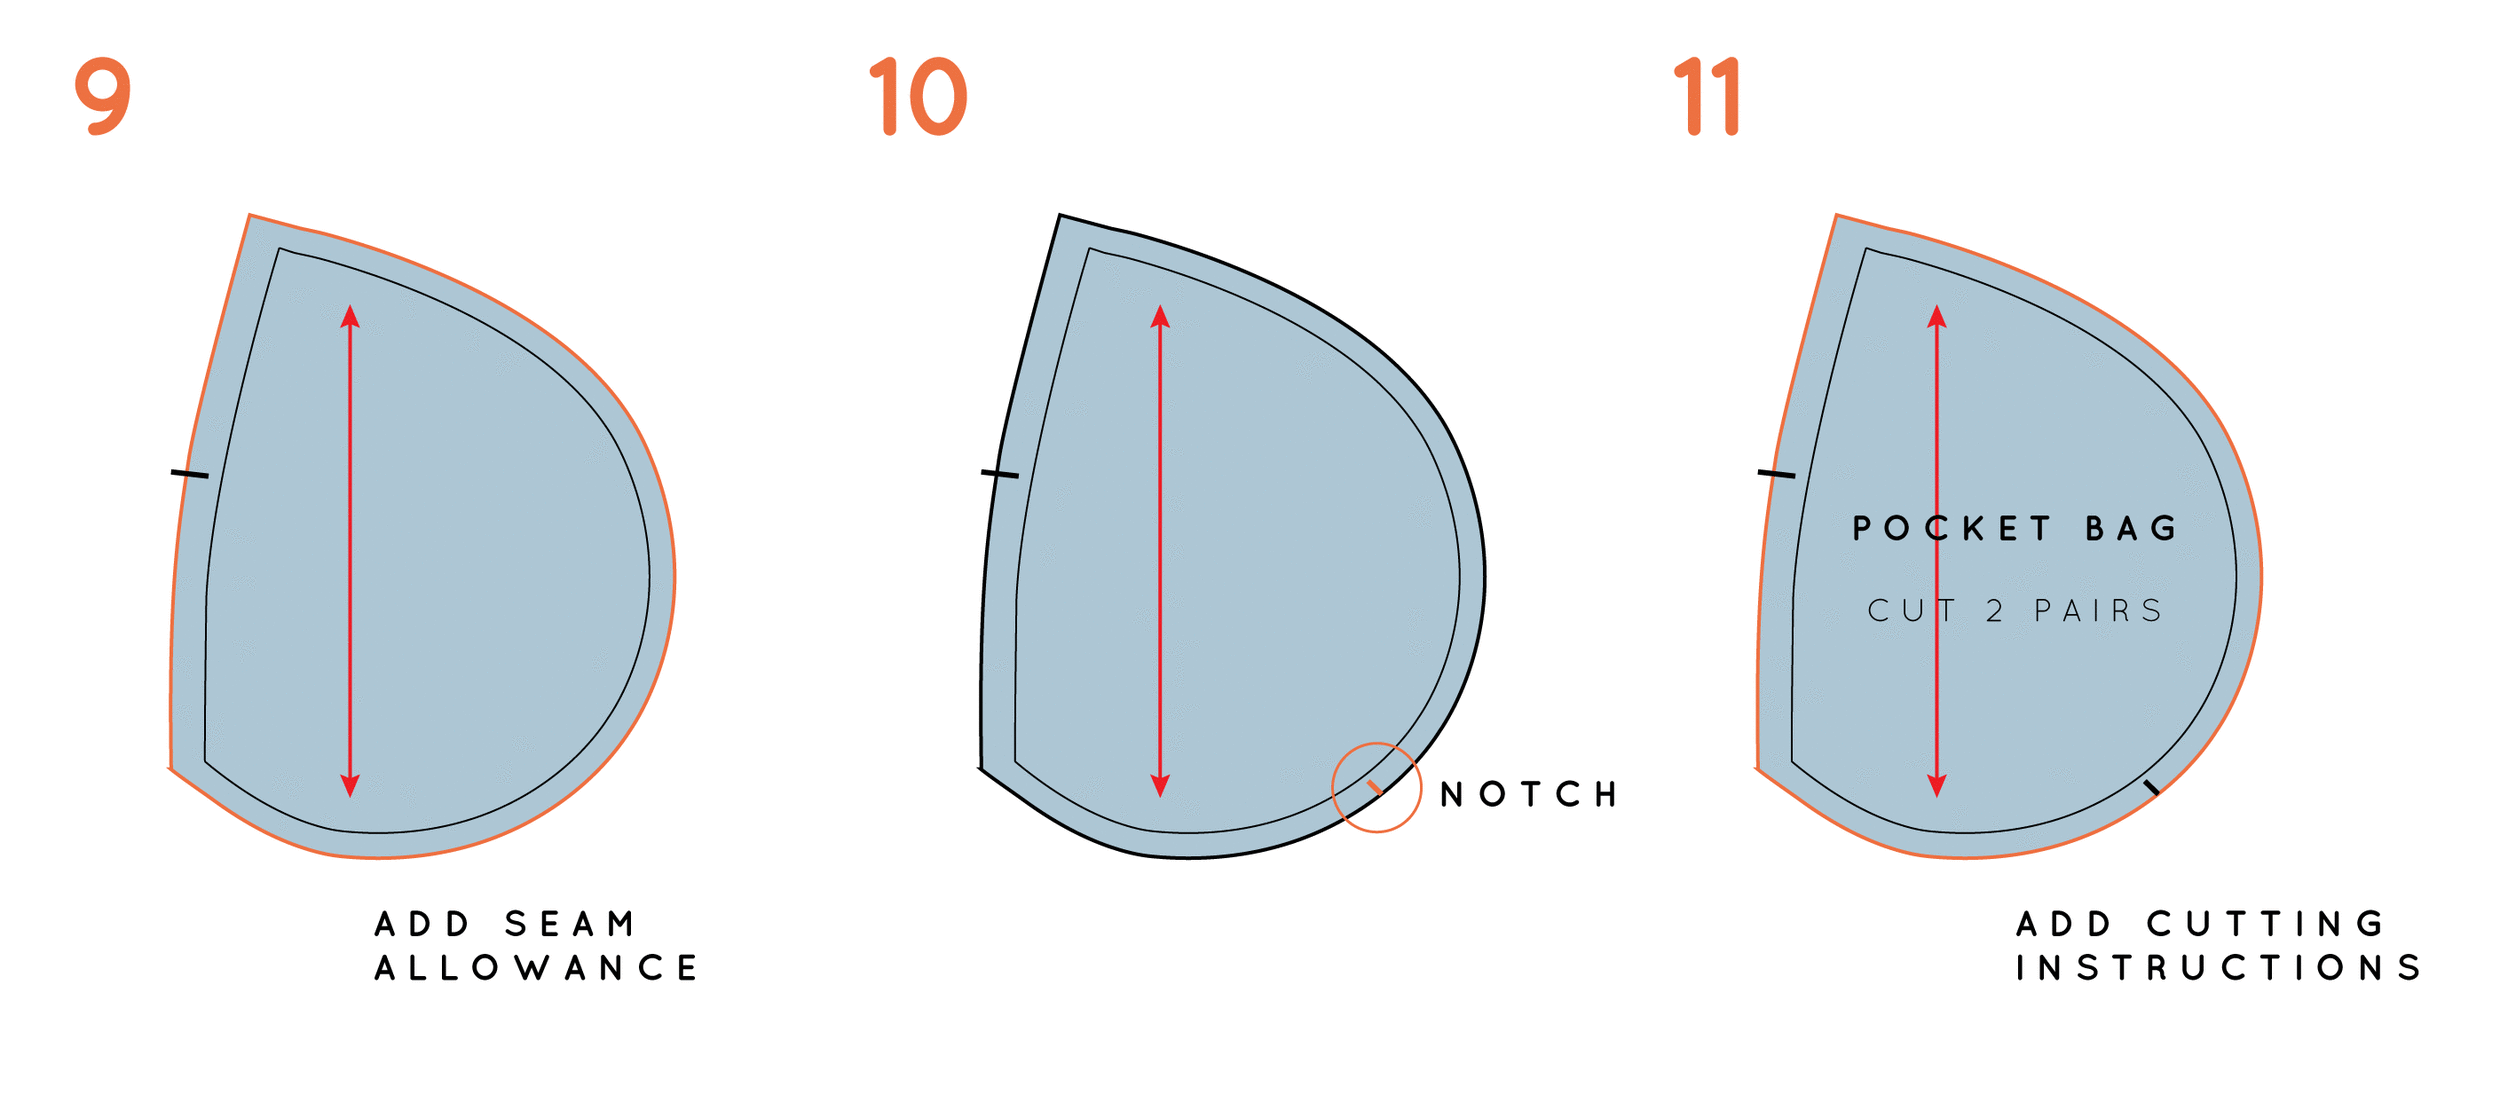
9. Add seam allowance to the curve. I suggest 6mm - 1.2cm (1/4 - 1/2in) to make the curve as easy as possible to sew.
10. Add a notch to be used as a balance point on the curved seam - this helps when sewing the front and back pocket bags together.
11. Add cutting instructions (cut 2 pairs).
When it comes to cutting, you may choose to cut from your main fabric, or something lighter, to minimise bulk.
Transfer notches
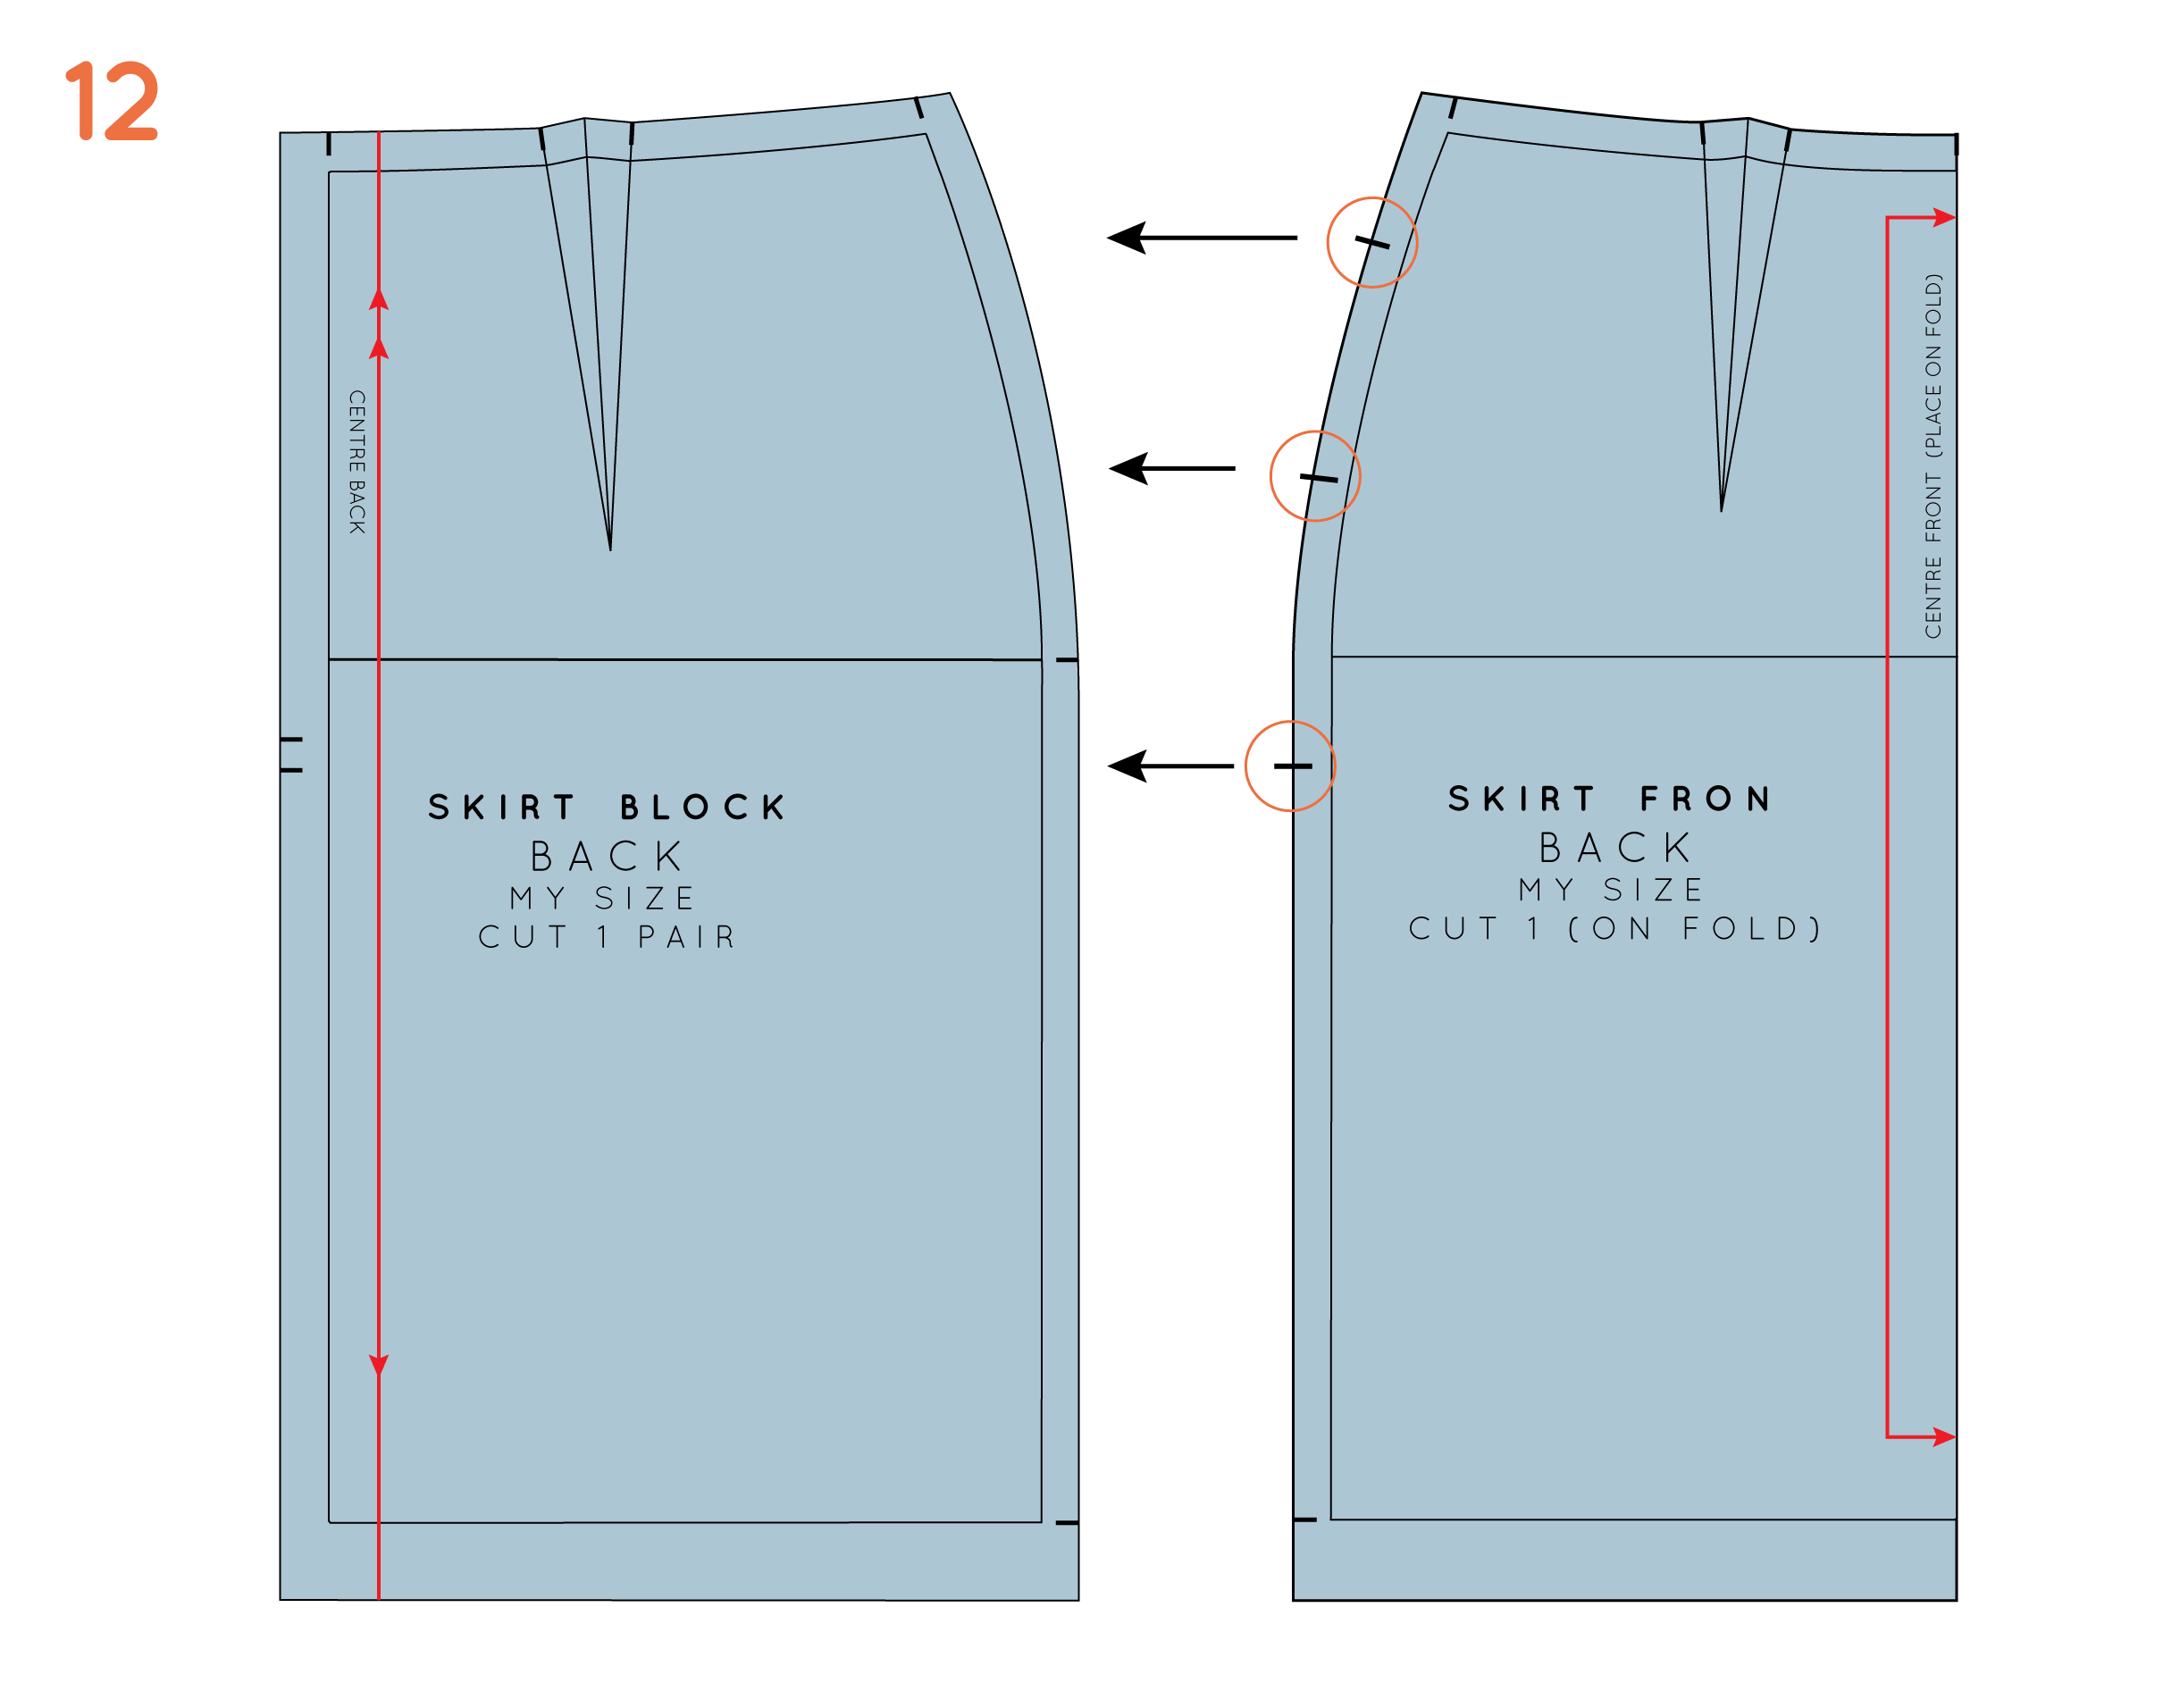
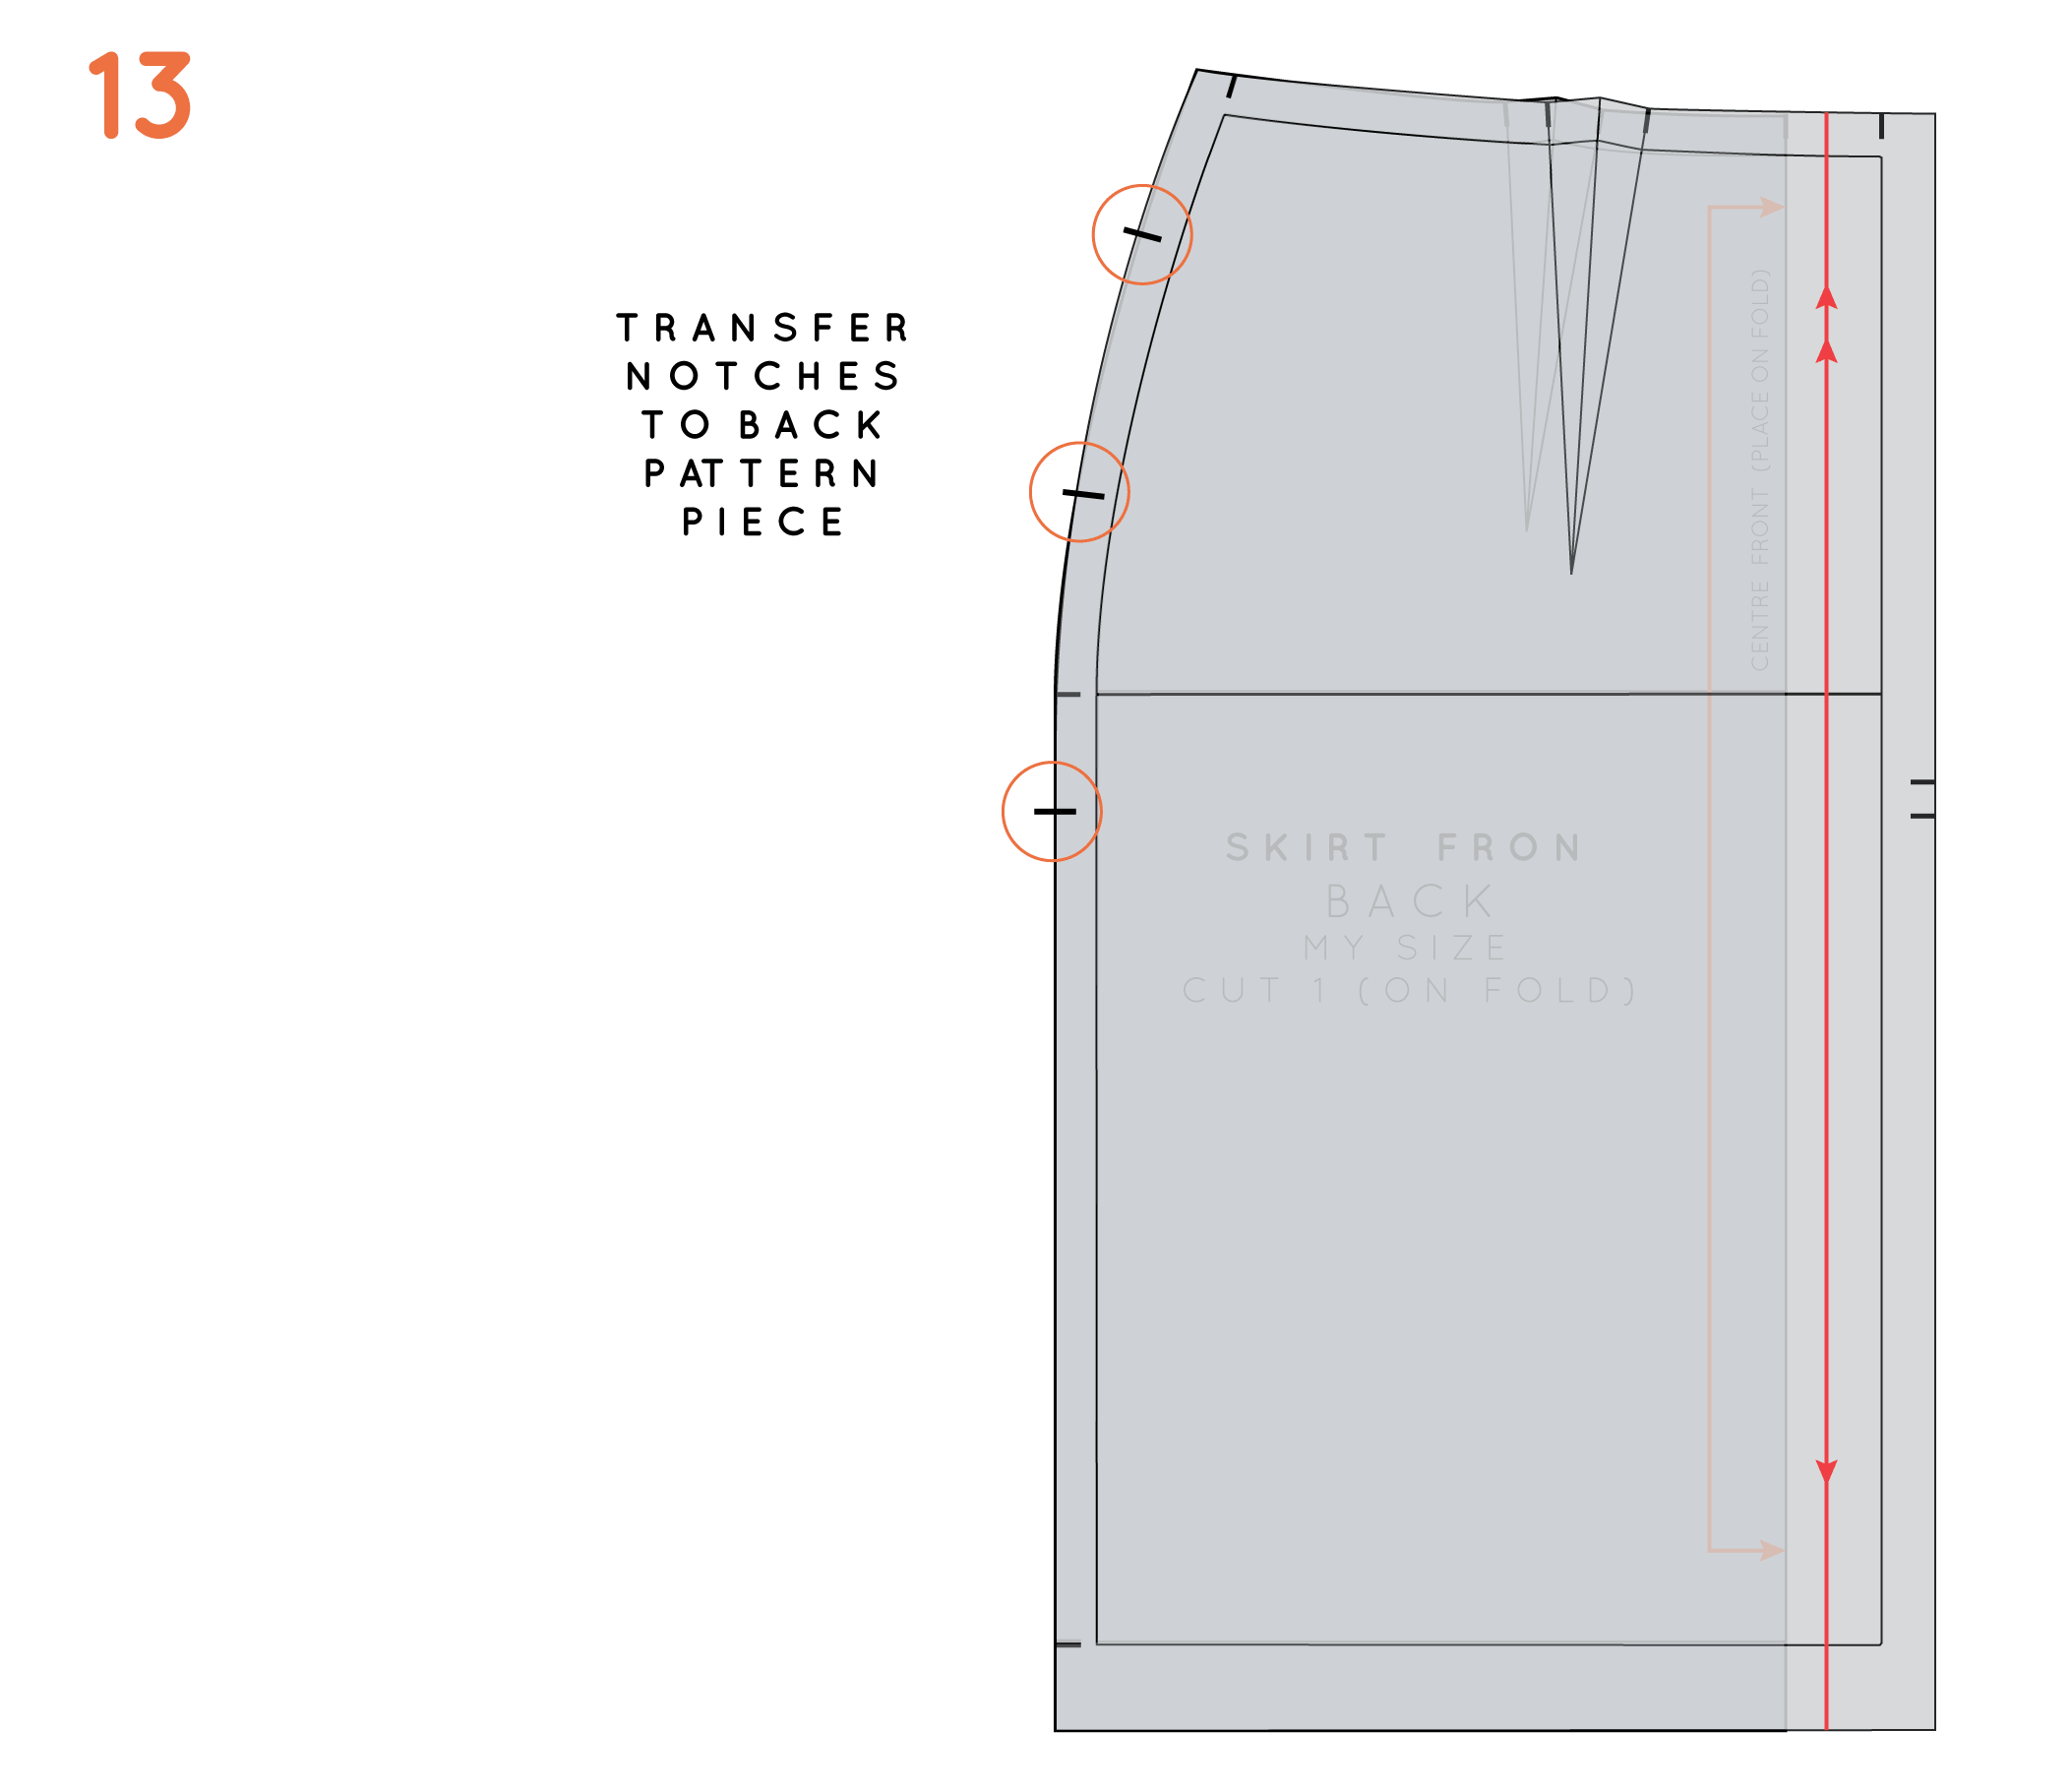
12. The last thing you need to do is transfer the notches from the front pattern piece, to the back, so that you can place the pattern correctly on the back piece when it comes to sewing.
13. Lay the back pattern piece onto the front, matching the side seams at the stitch line. Transfer the three notches onto the back pattern. If your pattern paper is not transparent, you can use a tracing wheel to transfer the notches. And there you have it... You now have in-seam pockets!
ONE LAST THING
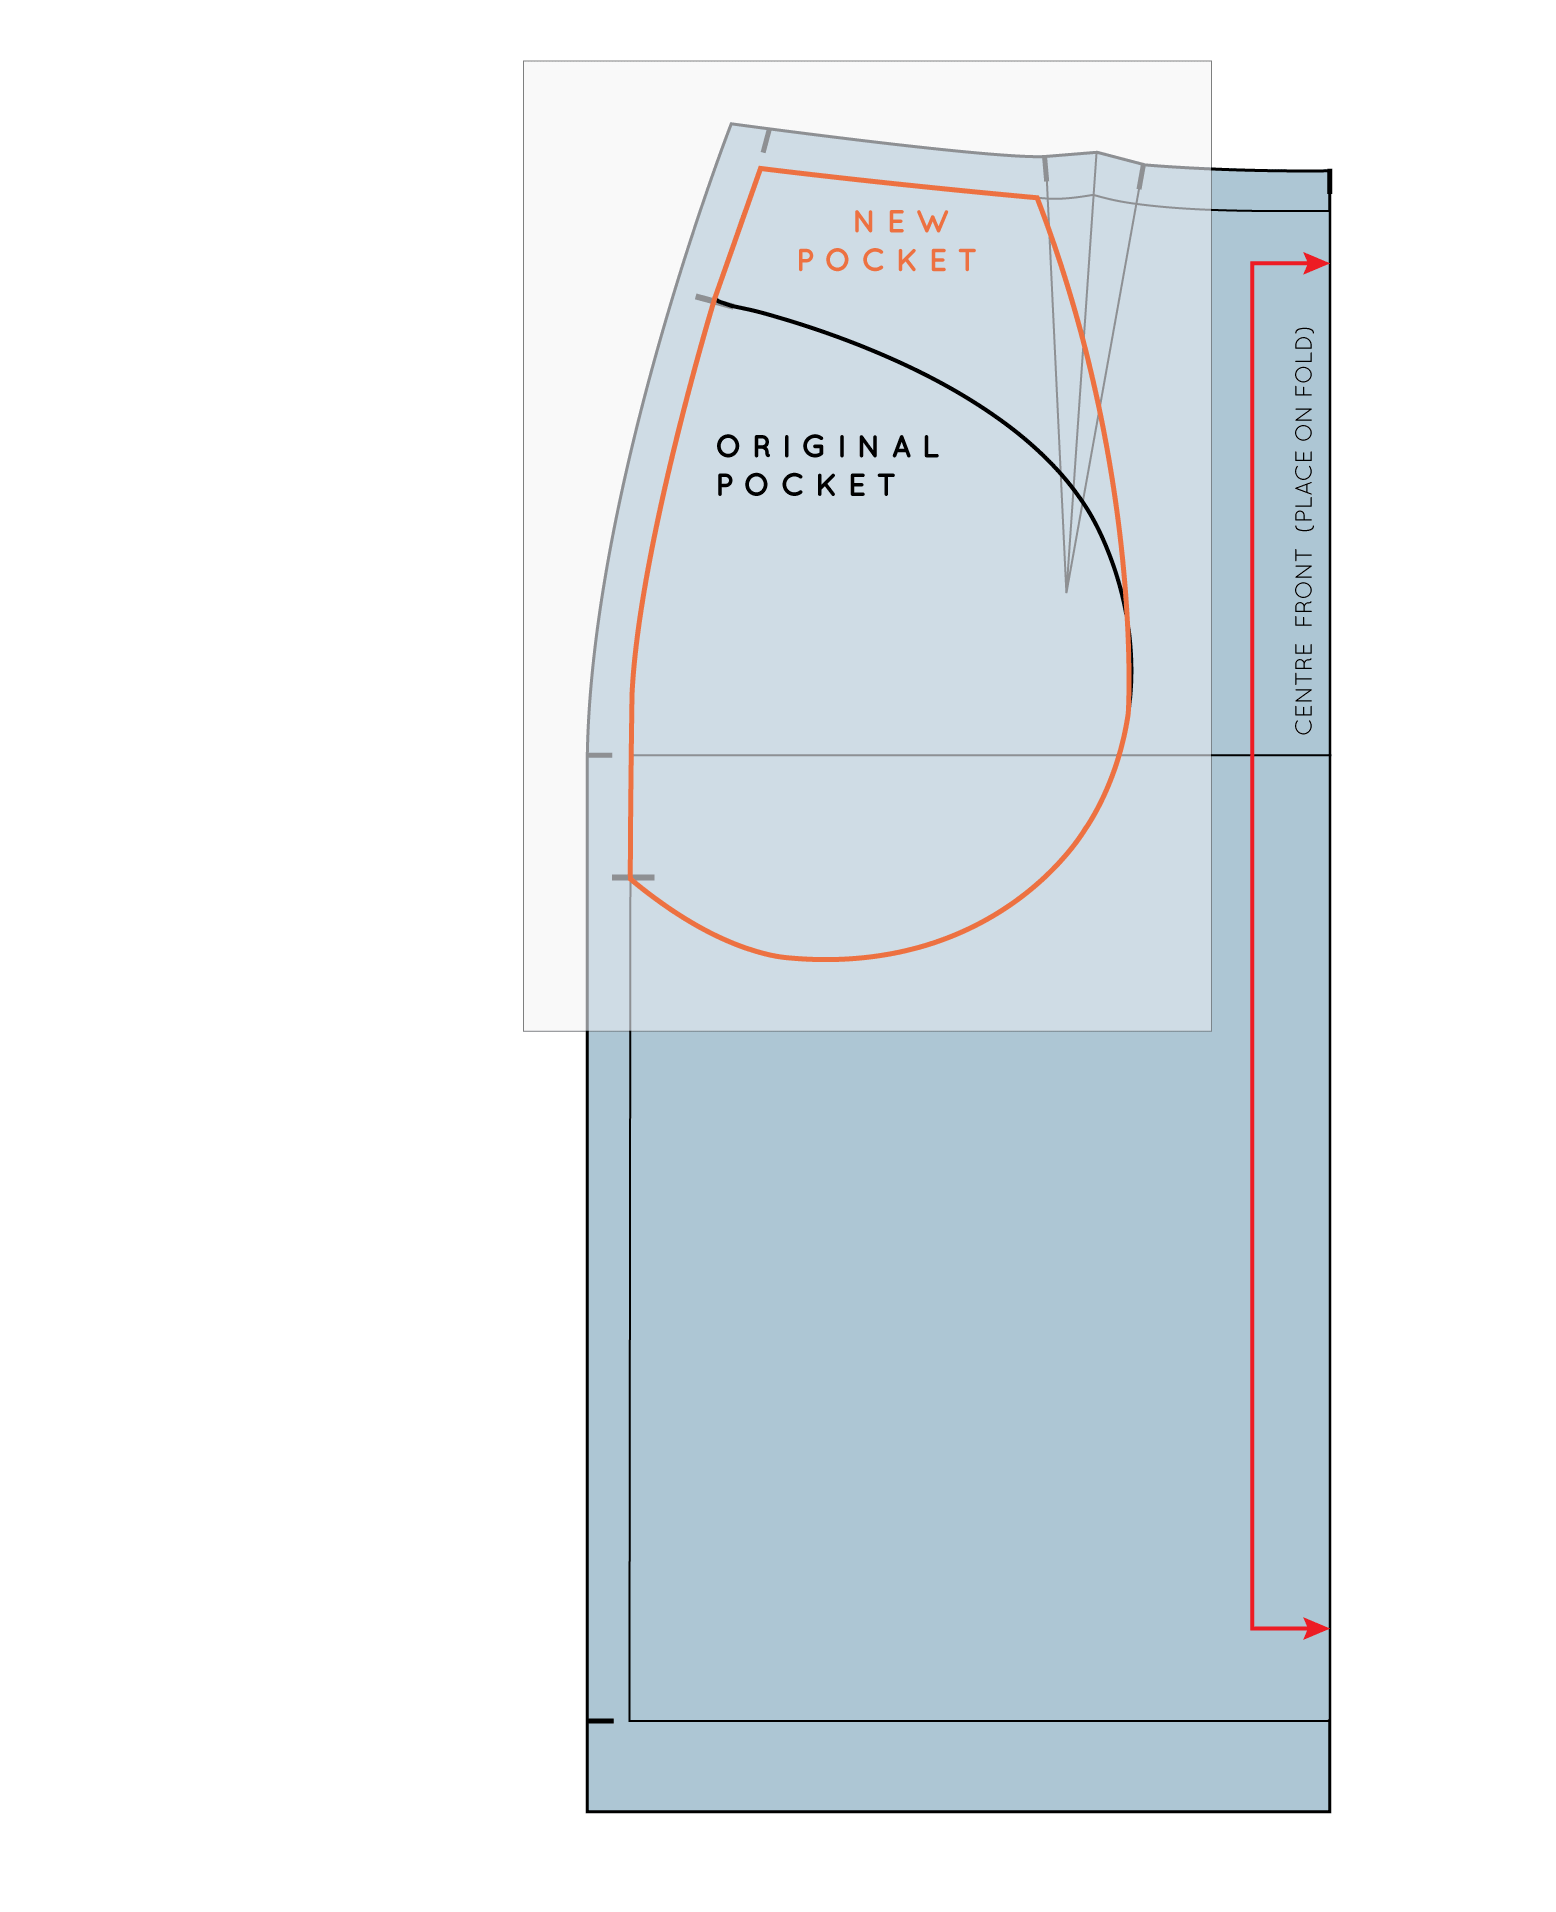
If you are creating a pocket pattern for a garment with a waistband (like the skirt in the example), you may want to consider making your pocket piece so that it sits flush with the waistline. This can give you a lovely finish, and can prevent the pocket bags moving.
To do this, simply draft the pattern piece the same way as the standard pocket bag, but continue to curve up to the waistline. To complete, add seam allowance, notches and pattern markings.
Download a pocket pattern
Just in-case you'd prefer a printable pattern, instead of drafting your own, I have included one for you to download (just click on the diagram above, to start the download). It is a 2 page PDF, so nice and easy to put together. If you would like some help printing it, check out my tutorial on printing PDF patterns.
Happy sewing!


