sewing patterns

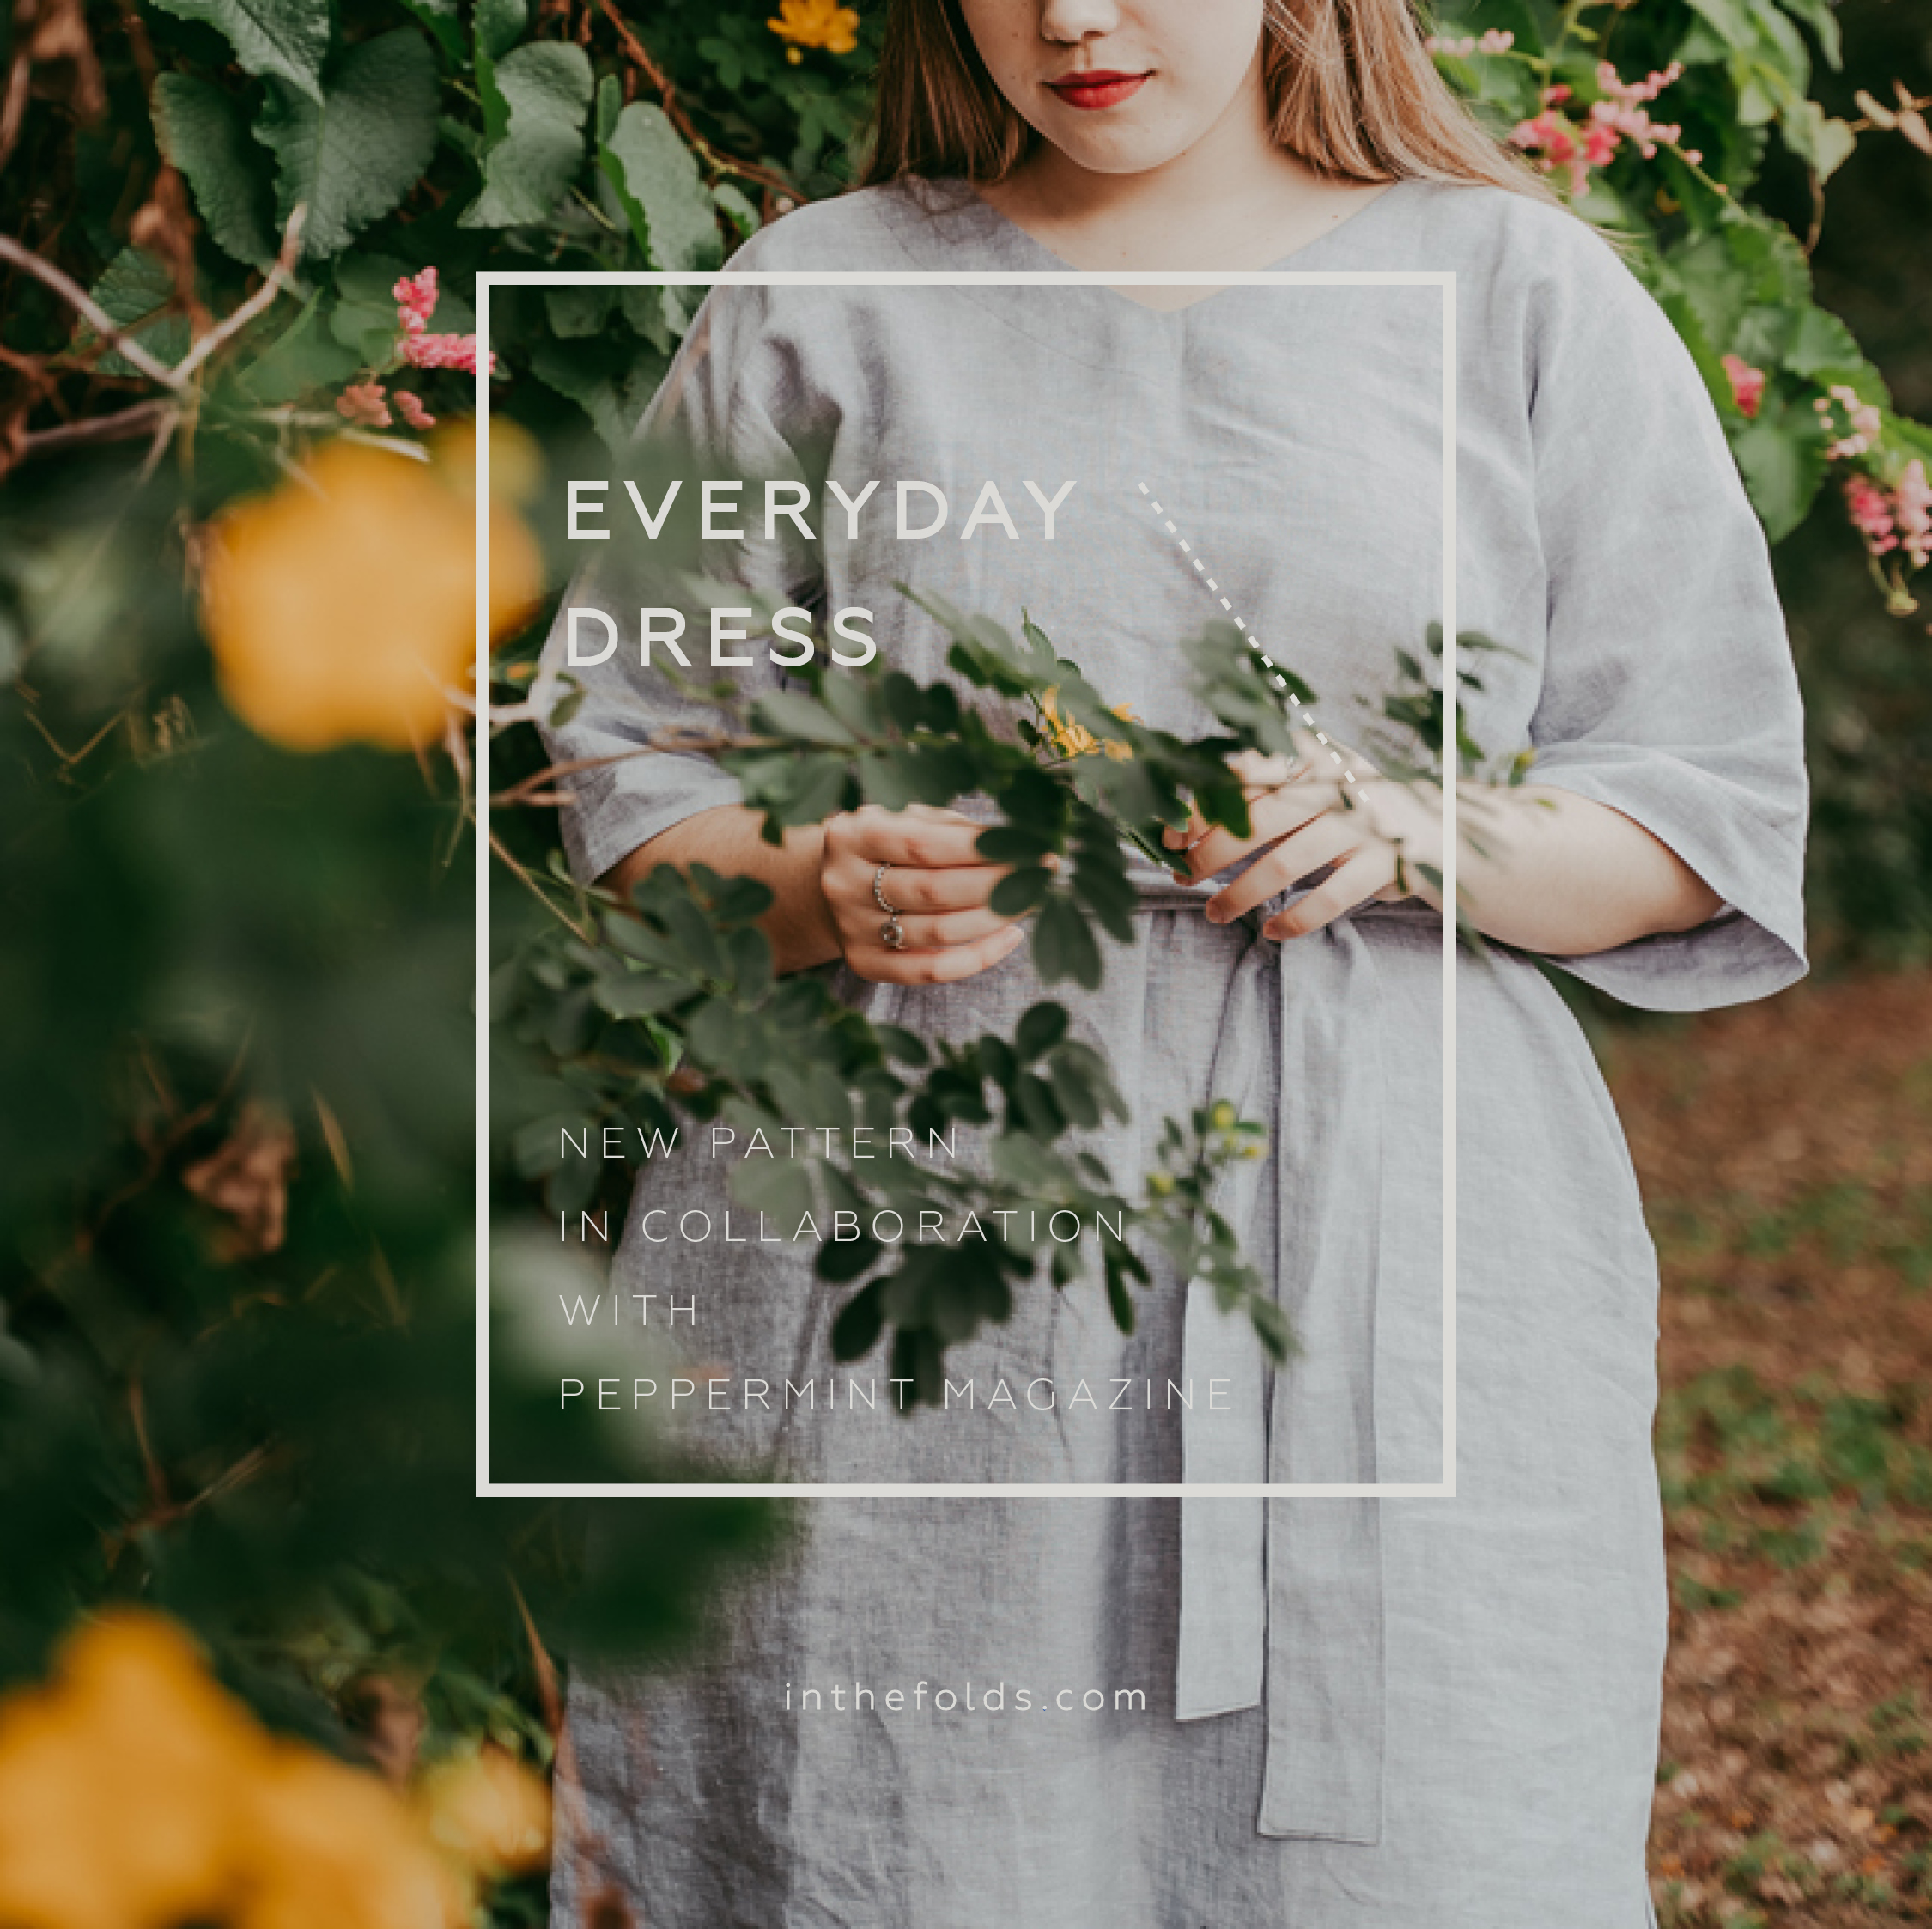
New pattern in collaboration with Peppermint Magazine : the Everyday Dress

BLOG HEADER EVERYDAY DRESS.jpg

I am very excited to be popping onto the blog today to let you know that we have just added a new pattern to the In the Folds in collaboration with Peppermint Magazine pattern family!

While we’re all going crazy for easy-wearing sack dresses, we thought it was about time we created one for you!

Peppermint-everyday-dress-1.jpg

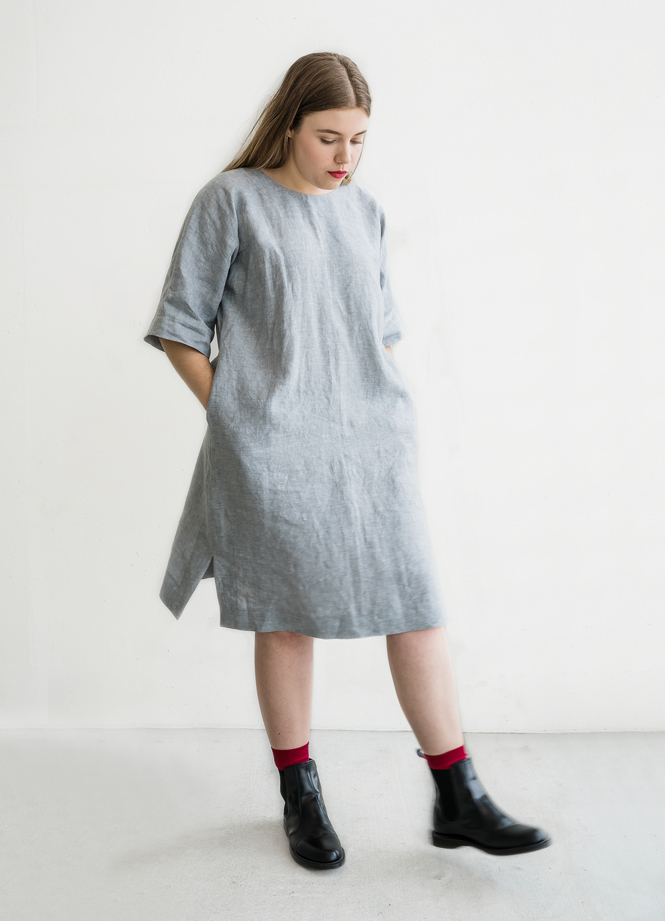
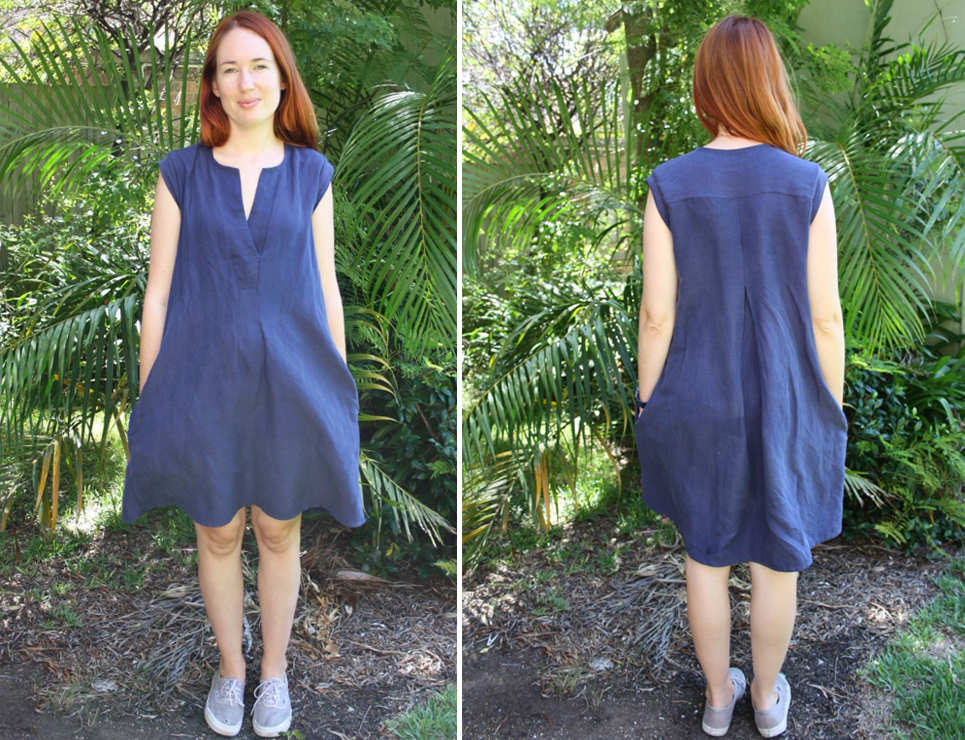
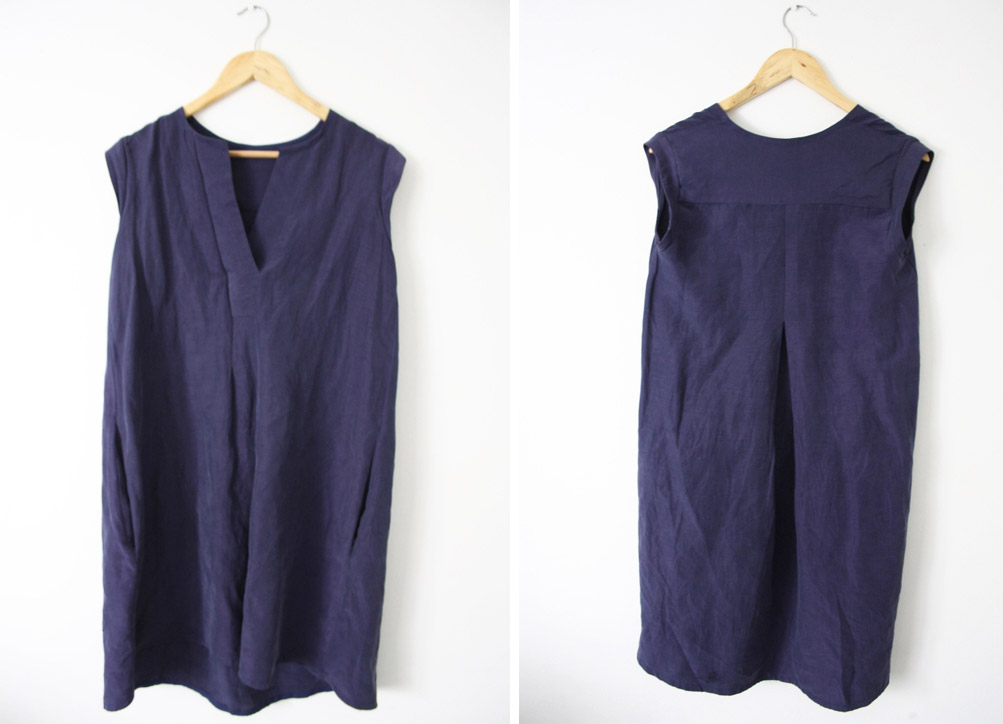
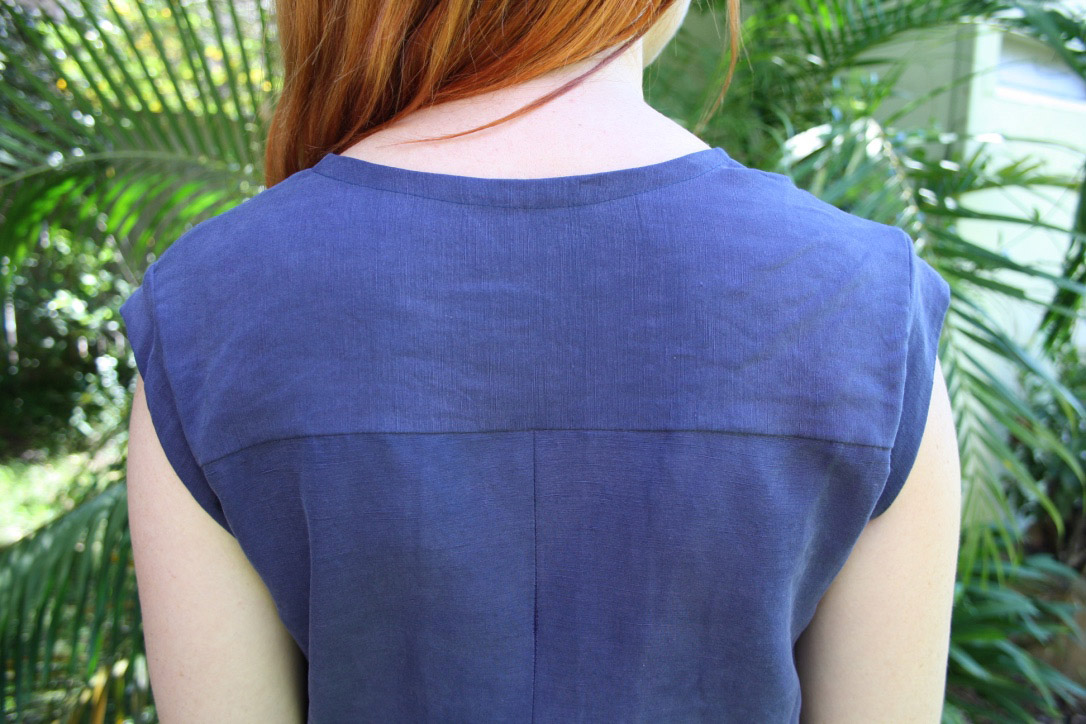
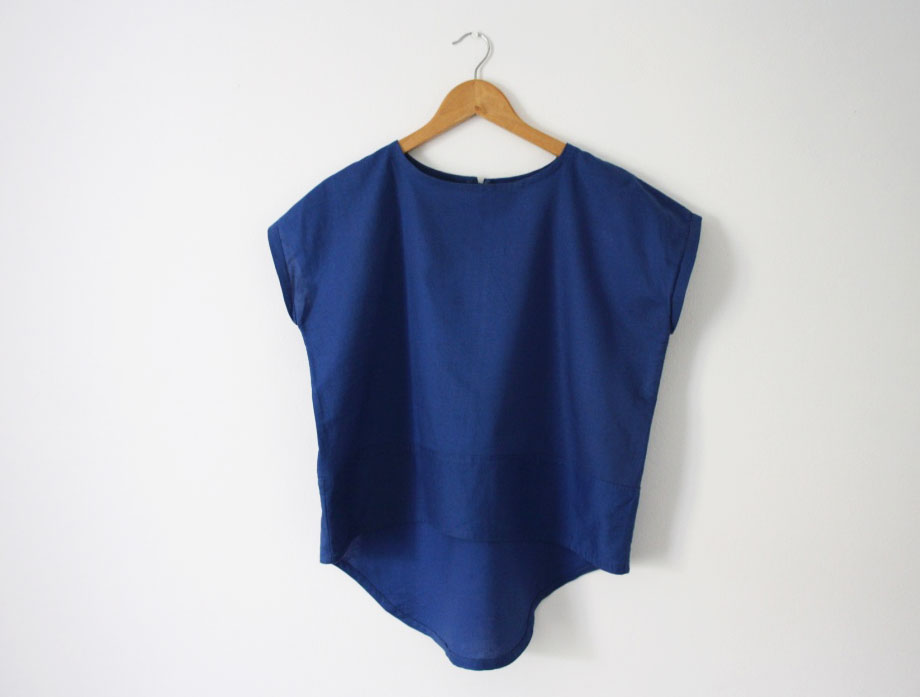
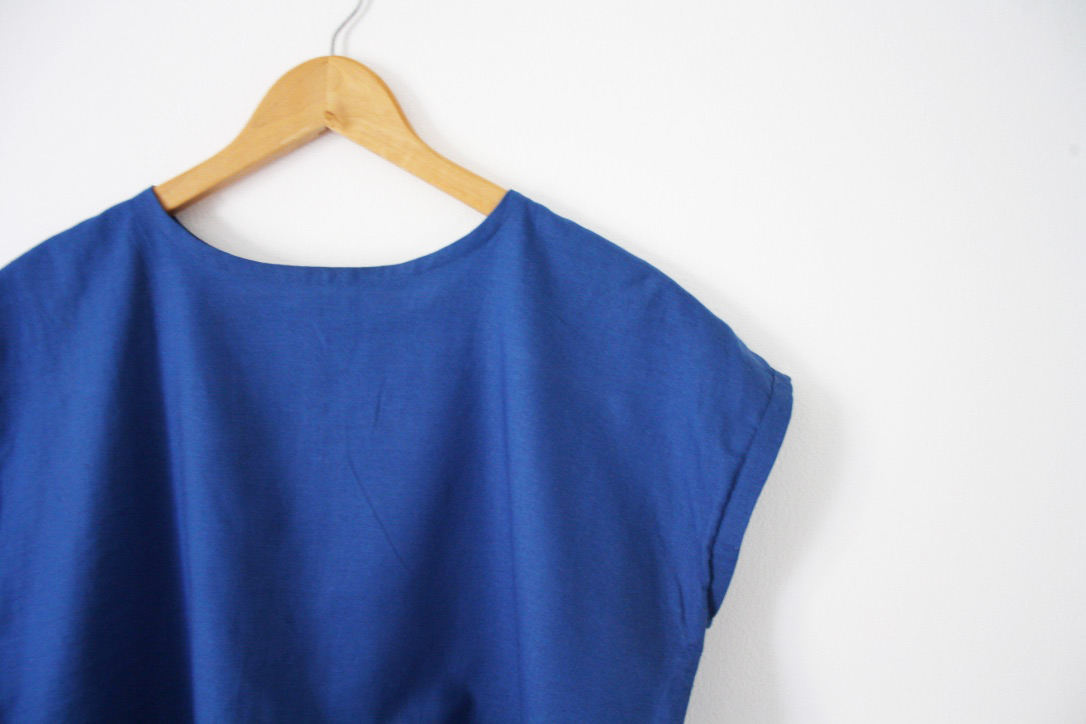
What is really fun about this design, is that you can wear it two different ways - depending on how you’re feeling / your style! The Everyday dress is a knee-length oversized reversible dress. One side of the dress has a soft v-neck, while the other has a round neck. The dress features relaxed boxy sleeves, inseam pockets, hem splits and an optional waist tie. A neck facing is used to finish the neckline, which gives a beautiful and clean finish, as well as a lovely detail on the neckline.

The pattern is available in 10 sizes (approximately AU size 6 - 24) and comes as a layered PDF so you can just download the size that you need. More information about In the Folds sizing can be found here.

PeppermintSewingSchool42-outside2.jpg

Through the creation of this garment you will gain confidence in:

  • sewing with woven fabrics

  • sewing in-seam pockets

  • sewing facings

  • sewing a hem split

As always, the instructions are very detailed, so I’ll be there to hold your hand every step of the way!

Peppermint-everyday-dress-6.jpg

The Everyday dress is compatible with light to mid-weight fabrics. Consider using: cotton, linen, viscose / rayon, chambray or silk. We used smoke chambray linen from The Fabric Store for ours.

Please note: due to the width of the pattern pieces, you will need to use 150cm (60in) wide fabric (or wider).

Peppermint-everyday-dress-4.jpg

The pattern can be downloaded in both A4 and A0 format. This is a great pattern for advanced beginners and beyond. 

I’d love to hear what you think!

Happy sewing lovely people.

New pattern in collaboration with Peppermint Magazine : Wrap skirt

Free Wrap skirt pattern - Peppermint mag collab

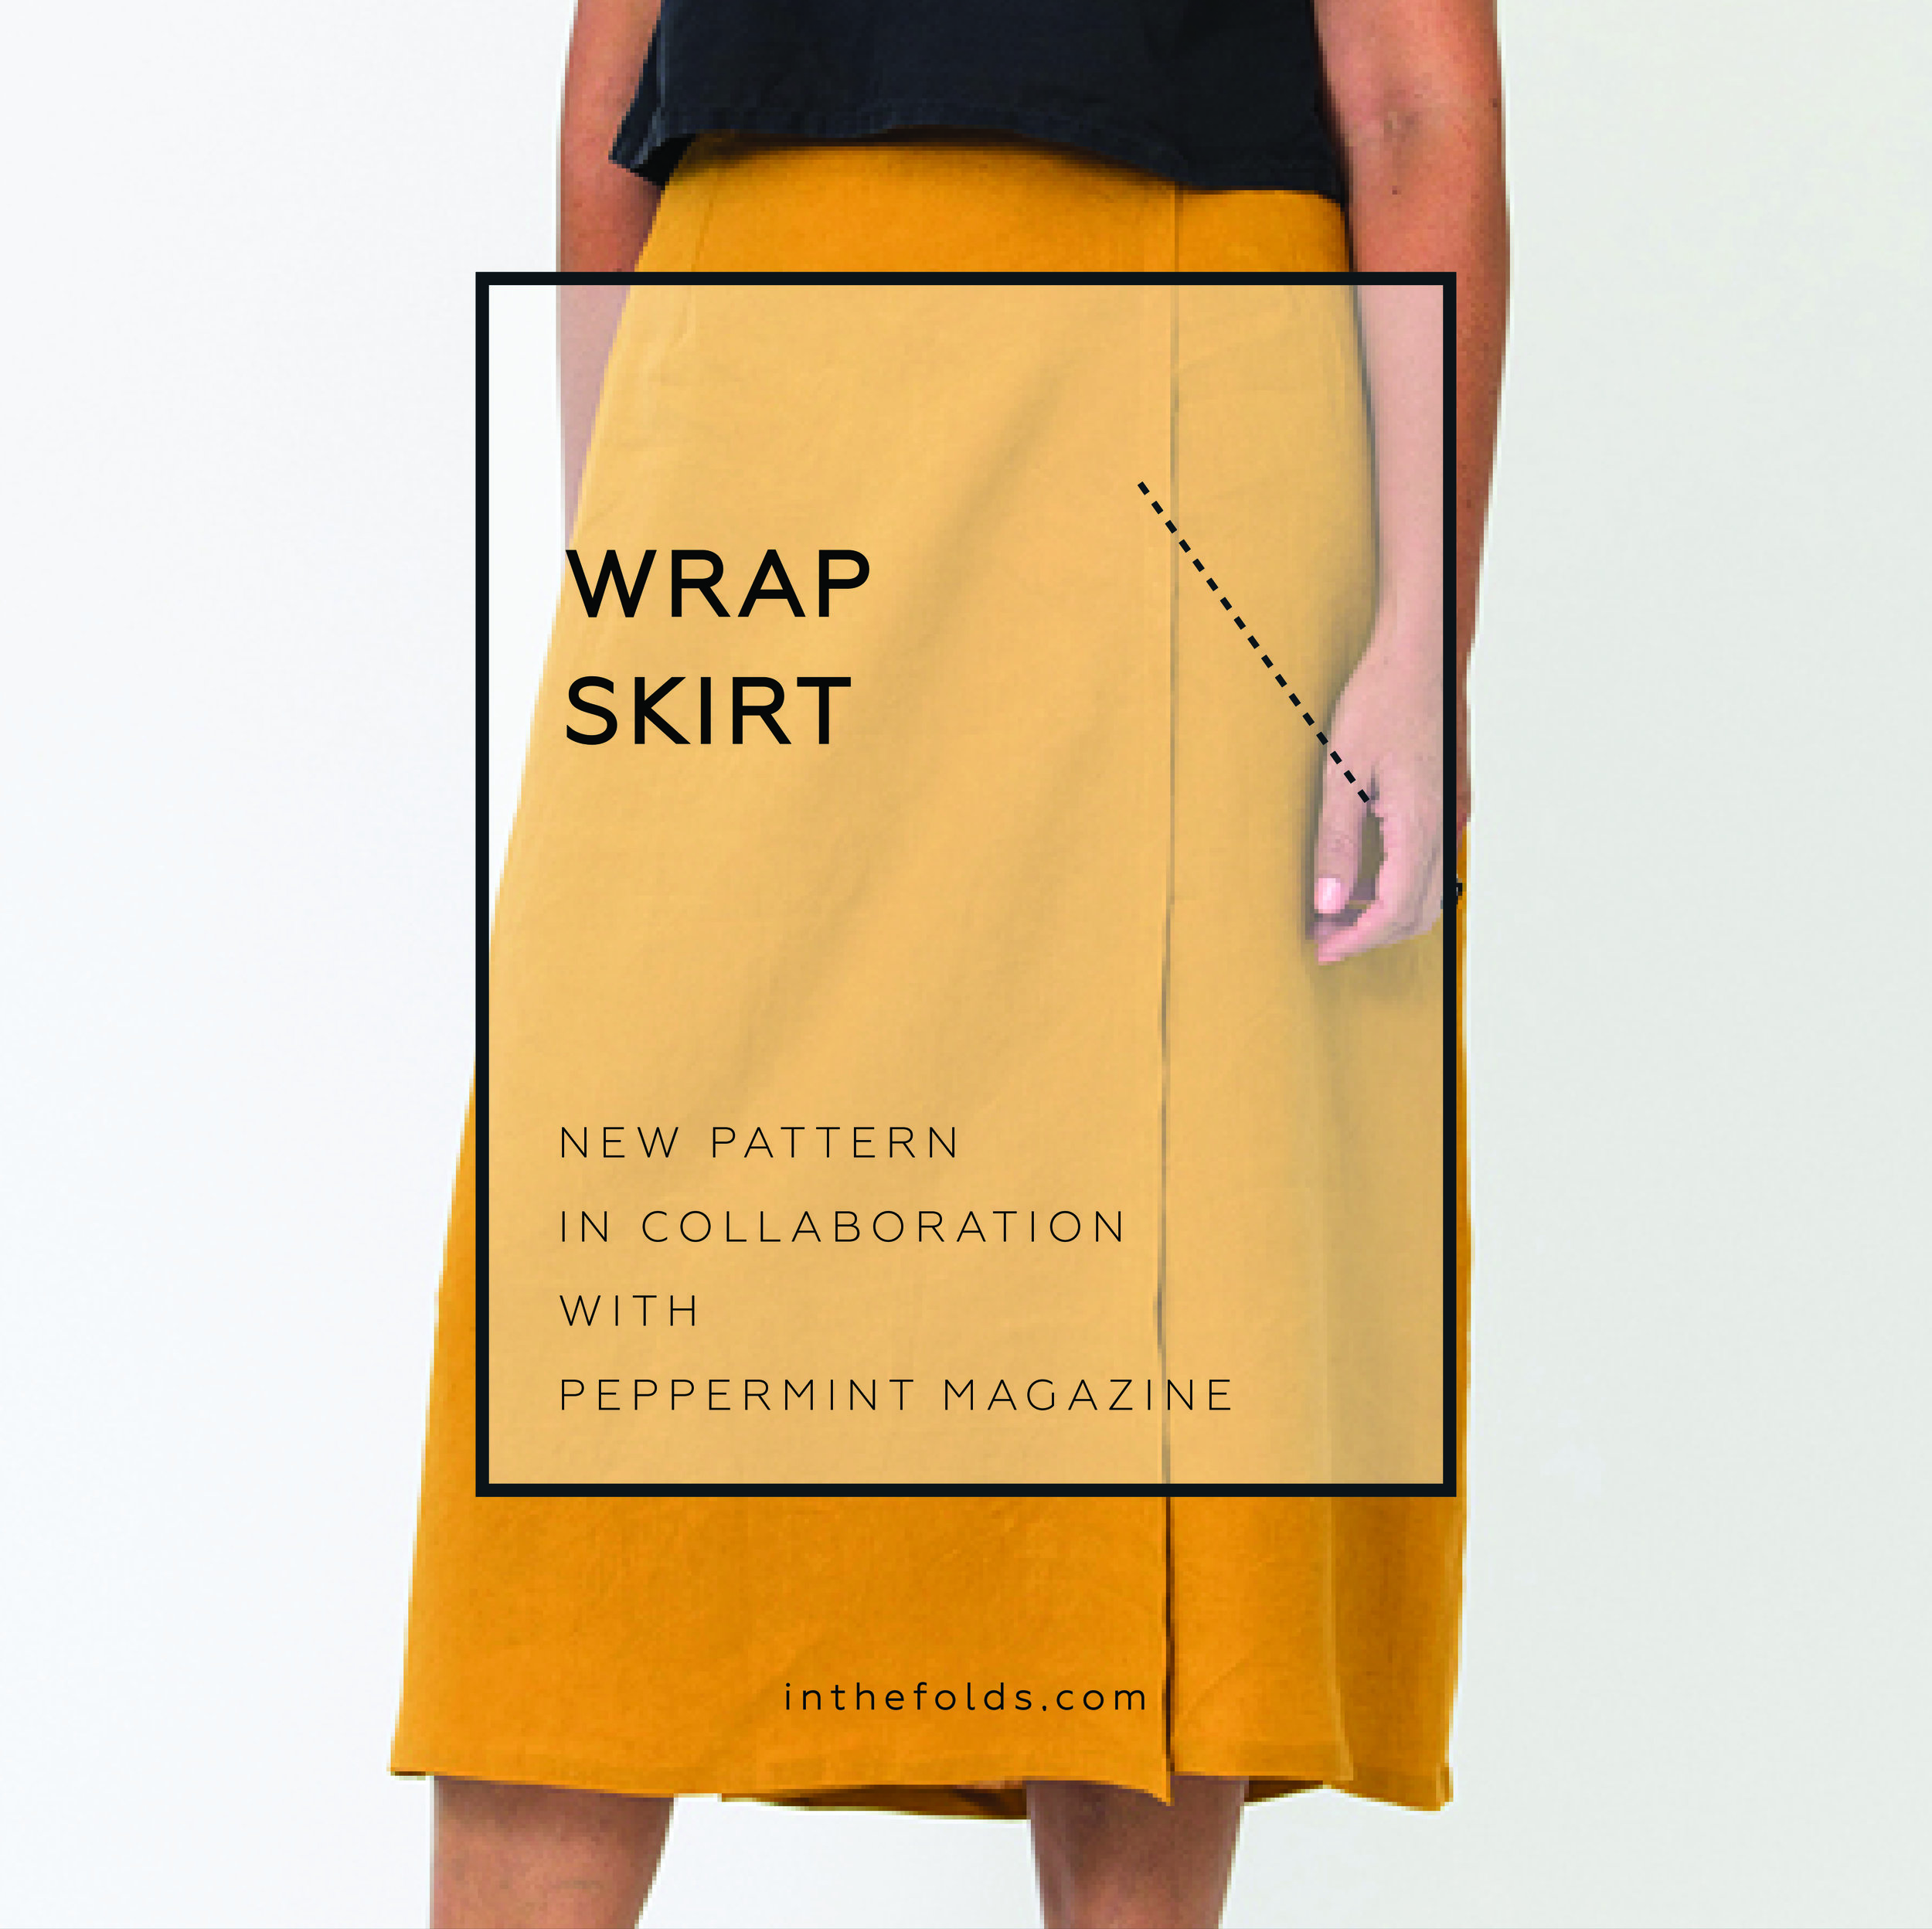
In all the excitement of releasing the Darlow pants, I forgot to let you know that I just released a new pattern in collaboration with Peppermint Magazine. So I am popping in today to introduce you to the Wrap skirt! I have a feeling that this one is going to be really popular, as it’s a quick and easy sew for makers of all levels. And, as always, it’s available for free downloaded.

The pattern is available in 10 sizes (approximately AU size 6 - 24) and comes as a layered PDF so you can just download the size that you need.

PeppermintSewingSchool41c.jpg

The Wrap skirt is a three-quarter length skirt with a waist tie, that sits on the natural waist. The skirt features front and back waist darts, french seams and a buttonhole to feed the waist tie through.

Free Wrap skirt pattern - Peppermint mag collab 2

Through the creation of this garment you will gain confidence in:

  • sewing with woven fabrics

  • sewing darts

  • sewing french seams

As always, the instructions are very detailed, so I’ll be there to hold your hand every step of the way!

Peppermint wrap skirt - free pattern

The Wrap skirt is compatible with a wide range of fabrics. For a soft silhouette, consider using: lightweight cotton, linen, viscose / rayon or silk. For a more structured silhouette, consider using mid to heavy-weight fabrics such as: cotton drill, linen, denim or wool. For the sample, I used a beautiful mid-weight linen from The Fabric Store.

The pattern can be downloaded in both A4 and A0 format. This is a great pattern for beginners and beyond. 

New pattern in collaboration with Peppermint Magazine : The Playsuit

Free Romper pattern - Peppermint mag collab

Yay! A new pattern is here and I am really excited to share it with you! This pattern is another one to add to the collection that I have released in collaboration with Peppermint Magazine. As always, the pattern can be downloaded for free! I really loved designing this pattern. It’s cute, fun and quite a simple sew (and getting the fit right isn’t too tricky due to the loose nature of the design and the tie-up straps).

The pattern is available in 10 sizes (approximately AU size 6 - 24) and comes as a layered PDF so you can just download the size that you need.

Free Romper pattern - Peppermint mag collab 2

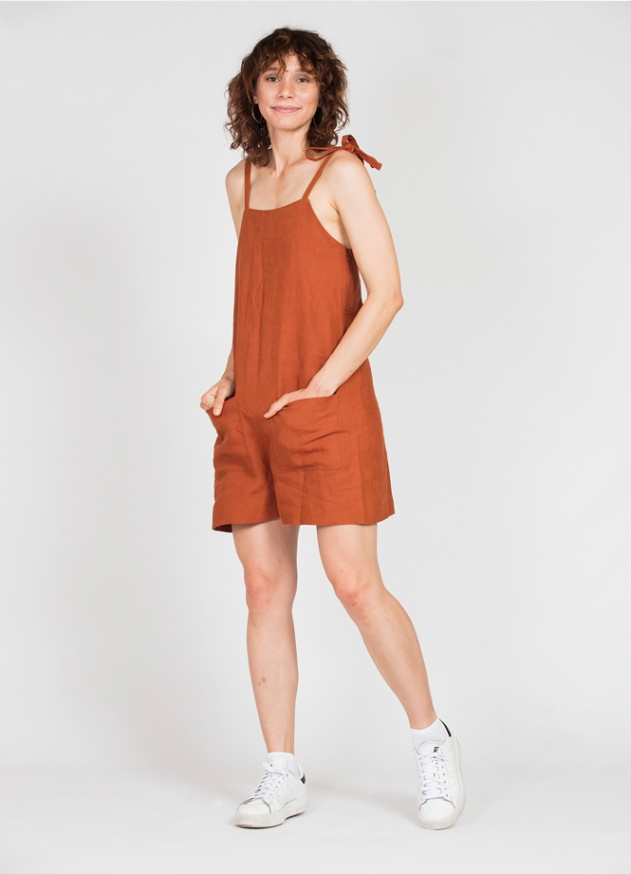
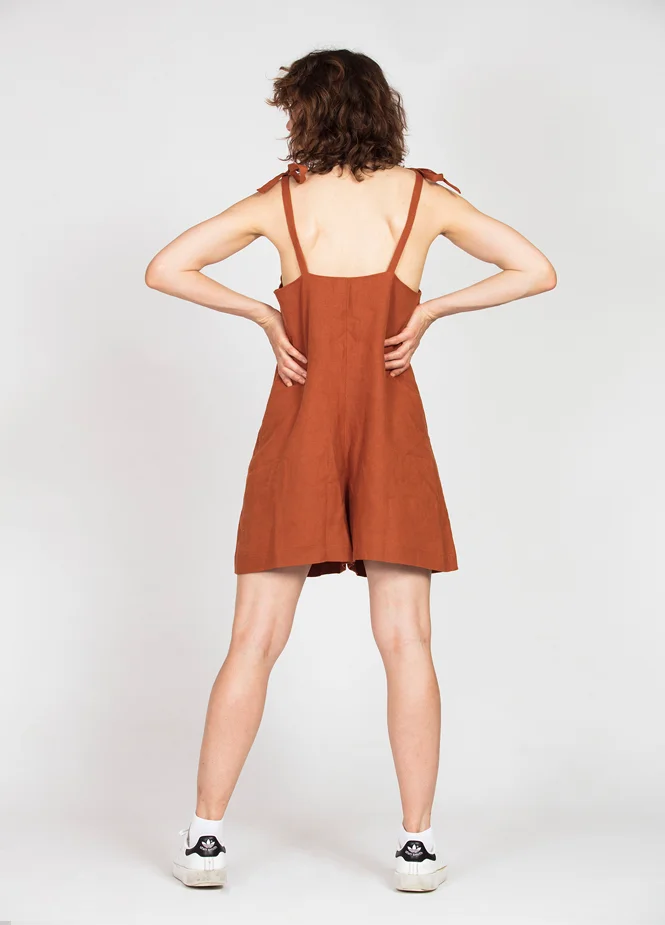
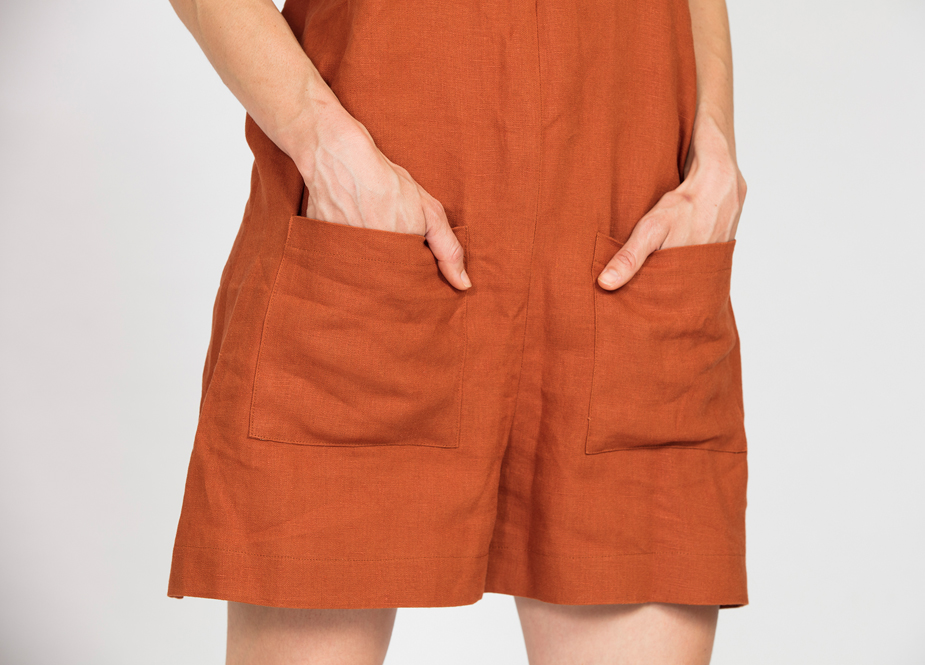
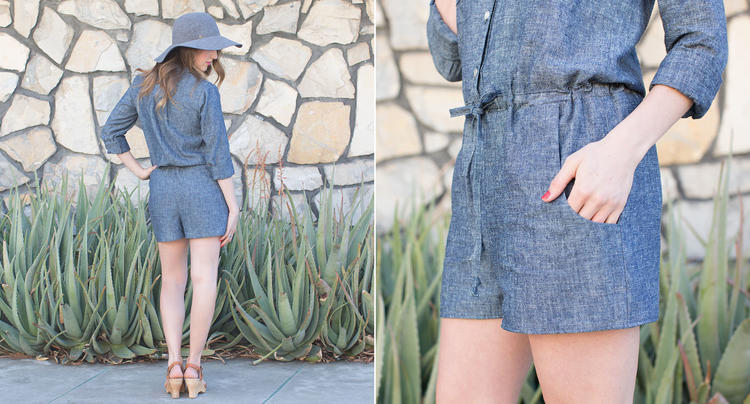
The Playsuit is a comfortable and easy to wear summer staple with bib front and tie straps. The bust area has a close fit and then relaxes into the waist and hip area, for ease and comfort on warm summer days. The Playsuit features patch pockets, invisible zip (in the side for easy access) and an all-in-one facing for a clean and high end finish.

Peppermint playsuit 3

As you can see, the Playsuit looks super cute on its own, but also works really well with a t-shirt underneath. As mentioned, the pattern isn’t too tricky and I’d say it’s a good confidence builder for beginner makers who would like to up their skills a little bit.

Peppermint playsuit free pattern

Through the creation of this garment you will gain confidence in:

  • sewing with woven fabrics

  • sewing an invisible zip

  • making straps

  • sewing a facing

  • sewing pockets

As always, the instructions are very detailed, so I’ll be there to hold your hand every step of the way!

Peppermint playsuit detail

The Playsuit is compatible with a range of different fabrics. Consider using light to mid-weight fabrics such as: linen, linen blends, cotton, gauze or chambray. You could also consider sateen, silk (crepe de chine or habotai), tencel or viscose (rayon) for a dressier look. For a boxier silhouette, consider light-weight denims or heavy-weight cottons. For the sample, I used a beautiful heavy-weight linen from The Fabric Store. The pattern can be downloaded in both A4 and A0 format. This is a great pattern for brave beginners and beyond. 

New pattern in collaboration with Peppermint Magazine : The Ruffle Sleeve Top

RUFFLE-SLEEVE-TOP-BLOG-HEADER_SQUARE2.jpg

It's that time again! Time to release another pattern in collaboration with Peppermint Magazine! As you probably know by now, each quarter I release a pattern with Peppermint that you can download from their website for free.

SewingSchool37.jpg

What I love about this collaboration is that it gives me an opportunity to design something that is a little simpler than my usual patterns, and it also allows you to try out my patterns for free. Win, win! To see the past patterns from the collaboration, look here (issues  30 - 37). 

SewingSchool37-DETAIL1.jpg

For this issue, we decided to make a simple top with a ruffle sleeve. I wanted it to be a piece that was both comfortable, yet still looks put together and chic. To do this, I went for a loose boxy shape, no closure (it just slips over the head) and a facing, to give the neckline a really clean finish. 

I thought it would be nice to encourage a few new techniques in this pattern, so the instructions guide you through making the top with french seams for a clean and professional finish. Although french seams do take a bit of time, they really will make your heart sing each time you look at the insides of your new top! If you would like to see a tutorial on sewing french seams, you can have a look here.

Through the creation of this garment you will gain confidence in:

  • sewing with woven fabrics
  • sewing darts
  • sewing french seams
  • sewing a facing
  • sewing gathers
SewingSchool37-DETAIL2.jpg

The Ruffle Sleeve Top is compatible with a range of different fabrics. Consider using light to
mid-weight fabrics such as: linen, linen blends, cotton, gauze or chambray. For a softer silhouette,
consider sateen, silk or viscose (rayon). Be careful if you are a beginner though, as these fabrics are a little trickier to sew. Softer fabrics will drape over the bust, while stiffer fabrics will create a more voluminous and structured silhouette. If using a sheer fabric, consider binding the neckline rather than using the facing. For the sample I used a beautiful cotton voile from our lovely sponsor for this partnership, The Fabric Store.

The pattern can be downloaded in both A4 and A0 format and comes with detailed instructions, so you will feel supported the whole way through. This is a great pattern for brave beginners and beyond. 

The Collins Top Sew-along : Tester Round-up

Yay! It's time to start the Sew-along for the Collins Top! This has been a long time coming. I had high hopes for this sew-along being ready as soon as the pattern was released, but unfortunately it didn't work out that way. I decided to release the Collins Top the week before #makersforfashrev and two weeks before an overseas trip and so that is what caused the delay (sometimes my planning skills leave a bit to be desired!). 

If you have been following my blog for a little while, you'll proabbly know that a sew-along for me is a pretty big deal. I really like to jam pack in as many posts as possible, to ensure that if you are following along, all your questions get answered and I can help you make a garment that you really love and fits you well. You may remember that the Acton sew-along had a whopping 24 posts in it! It is a lot of work to do, but as a lot of the content can be applied to many other different patterns, I feel it is a worthy mission. I want to help makers be the best makers they can be and I feel this is a great way to help!

I'll be starting with the tester round-up, as I think it's always the best place to start. It gives you a chance to see how the pattern looks on a variety of body shapes, as well as in a range of different fabrics.

I'm not going to lie, testing this pattern was tough. I made a bit of a drafting blunder in the original pattern, which I somehow overlooked before sending it out for testing. I corrected the problem and overall am much happier with the final product, but this did mean that I had to test the pattern twice - which meant a huge testing group!! Thankfully I had so many amazing people put their hands up to get the job done (some of them even tested in both rounds of testing) and we made it in the end!

So without further adieu, here is a round-up of the tester versions of the Collins Top. I have included everyone who wanted their photos shared and have put them in alphabetical order for no reason except that it will help me know that I haven't forgotten anyone!


Adrienne

Alice

"This was a wonderful pattern and produced a lovely garment. This top has already become my favourite item of clothing, not just that I have made but in my whole wardrobe." 

Asheley

"I actually love the inside of my garment. I am a stay at home mom who runs around with my 2 year old and 5 year old, mostly wearing jeans and t-shirts. This top is one of the nicest finished garments in my wardrobe and I made it. Also, I love modern but timeless silhouette. I don't own anything else like this, but would like to make more garments like this."

Becky

"I can sense the work and love in this pattern, everything is so detailed and helpful."

Caz

"Oh my! I love how your patterns fit together! All those angles at the edges and seam allowances, so neat and tidy!"

Emma

"I have always enjoyed making In the Folds patterns. Comfort , thoughtful , generous ; sizing,instructions,sharing of knowledge, design ....artistic .... I learn new techniques every time and there is a simplicity to the design element I adore."

Erin

"I feel very fortunate to be a regular pattern tester for In the Folds. Her unique design style and thoughtful perspective always produce the most interesting and fun garments to maker and wear."

Genevieve

"I really like the amount of ease around the waist and hips to allow for flowy fabric and comfort. I also really like the fit around the bust and the shoulder so that I have a bit of shape without being tight. I like the way it hangs off the shoulder to the back. I think that's panelling. It's lovely and gives subtle help to bring the eye in at the wide points."

Jackie

"I liked that the diagrams in the instructions had the pieces numbered - I mostly just follow diagrams and skim the words so this made it super easy to follow."

Jennifer

"I love that it feels like I am not wearing anything. It is so light and breezy and doesn't hug anything!! I also like the hem design. It adds interest to my wardrobe. I also like the button detail. It adds a nicely tailored aspect to the shirt."

Jessica

"I'm so thankful for have been chosen to test this pattern! I didn't think garment sewing could be so fun! I'm so used to sewing straight seams on quilts that I thought this was going to be really hard to do, but it wasn't. It was really enjoyable. I looked forward to sewing on it each time I did and telling my husband about what I had learned while I was working on the pattern that day."
 

Jurgie

"It feels so comfortable! Easy to wear, easy to style with pants or a skirt. I love the construction of it and how smarty-pants I feel when looking at the panels that make up the top. The dropped hem flatters."

Kate

"A great pattern for woven fabric with loads of panels to mix and match fabric. This top looks great in a fabric that has structure but I decided to use a silk/poly mix which gives it a lovely drape."

Kate

"I love the panelling in this pattern. For me, as a slim flat chested girl, I find fitting a challenge and also that the majority of clothes and commercial patterns are aimed at women with fuller figures or have necklines that only flatter a bigger bust. The panels on the front of the Collins are great because they imitate the effect of princess seams but are much less daunting (for me!). Also the sleeve attachment was so easy - it's all about the raglan sleeves for me these days! I don't know why I didn't start off with patterns which featured raglan sleeves, they're so much easier!" 

Renee

"I especially love the top part (neckline and sleeves) of the Collins top in my chosen fabric. It fits perfectly and is flattering."

Vesna

"I thought that the look is really unique and interesting - I love panel lines of the pattern as well as both versions - with and without the sleeves. While loose and boxy this design is still very flattering, which is not an easy thing to achieve in my opinion. I loved that about Collins. Also, I'm certain that this design would work in pretty much all lengths - which is awesome! I see Collins as a starting point for lots of different looks: depending on the choice of fabric, sleeves or no sleeves and crop/blouse/tunic or dress length - you can end up with a number of cool looking silhouettes, each significantly different than the next one!"


That's it! What do you think? Has this inspired you to make a Collins Top for yourself?

See all the posts in the Collins Top Sew-along.


You may also like:

New pattern : Introducing the Collins Top

I am so excited to be here telling you all that my new pattern is here! Meet the Collins Top -  a loose-fitting trapeze-shaped top designed for woven fabrics. 

The Collins top is It is A-line in shape, perfect for hot summer days. It features a round neck, panel lines, a high-low hem and a centre-back opening, with a button and loop closure.

Due to its length, the Collins Top is the perfect top to pair with skirts or trousers that sit on or above the natural waist.

As always, this pattern is available in 10 sizes, from bust 76cm (30in) - 131cm (51.5in).

What I am most excited about when it comes to the Collins Top is that I designed this pattern specifically for beginners. Okay, I know, I know, there are a lot of pattern pieces and panel lines (I really can't help myself, can I?), but I believe that if you have mastered sewing a straight seam and a curved seam, you can make the Collins. Also, due to the loose nature of the top, there are not too many fitting issues to worry about (possibly just a full bust adjustment), which makes it even more beginner friendly! And, although I designed it specifically for beginners, it does not mean that you more seasoned stitchers won't enjoy it too. It is a really fun pattern to sew up, and lots of room to play! 

View A

The Collins top (view A) has a three-piece raglan sleeve with some extra volume, which creates a fun and interesting shape. Due to the nature of a raglan sleeve, there is no sleeve setting in required (it is all done flat), so it comes together really quickly and easily. 

The neckline is finished with bias binding.

As you can see in this sample, this pattern leaves a lot of room for playing with stripes (or colour blocking), which really highlights the panel lines in the design. As I knew this was something a lot of you would get excited about, I created a little template that you can download for free and experiment with your ideas of colour blocking and stripe direction, before cutting into your fabric. Download it now. 

View B

The Collins top (view B) is sleeveless and the neckline and armholes are finished with an all-in-one facing for a really clean and professional finish. 

The Collins top is compatible with a range of different fabrics. Your choice of fabric will dictate the silhouette you achieve. Consider using light to mid-weight fabrics such as: linen, linen blends, cotton, gauze or chambray. For a softer silhouette, consider sateen, silk (crepe de chine or habotai) or viscose (rayon). These two versions were made from cotton, so I can't wait to share all the tester versions next week, so you can see the range of silhouettes you can achieve with this pattern!

Learn more about the pattern and grab your copy here. 

What do you think? I'd love to hear your thoughts about the new member of the In the Folds pattern family


You may also like:

New pattern in collaboration with Peppermint Magazine : The pleated skirt

I am excited to let you all know that I have just released another pattern in collaboration with Peppermint Magazine! It's a pleated skirt, which features stitched down knife pleats, slanted pockets (that are deep enough to keep your hands nice and snug and your belongings nice and safe), shaped waistband, invisible zip and a hem facing.

I must say, this is my favourite of all the patterns so far. I didn't think I was one to wear this kind of style / silhouette, but once the sample was made up, I really didn't want to give it away! The fabric I used was a beautiful linen / cotton blend from The Drapery (a lovely little fabric retailer based in South Australia, with a great online store), which made it even harder to part with.

It's a little hard to see all the details with the busy print, so here is the technical drawing, to give you a better idea of what's involved. I have rated it as an advanced beginner pattern, as it's quite a straight-forward sew, with only your waist to fit!

You can download the pattern for free from the Peppermint Magazine website. As a bonus, for the first time I have also made the pattern available in A0 format for copy shop printing, as I know how much you all like that feature!

While you're on the Peppermint Magazine website, you may also want to check out the other patterns I have made for the magazine over the past 12 months. I made the Beach Cover-up pattern for summer, the Peplum Top pattern in spring (which has been a favourite for many) and the Sweater Dress pattern last winter. All patterns are available for free!

Get the Pleated Skirt pattern now


You may also like:

The Acton sew-along : 6 tips for sewing with silk (or other delicate fabrics)

When the Acton pattern was in testing, a few of the testers ran into some problems working with silk (or similar shifty fabrics), which got me thinking that it would be a good idea to do a post in the Acton sew-along with some tips, as there are a number of things you can do to make life a lot easier for yourself when working with silk. 


1. PRE-WASH YOUR SILK

Just like with any other fabric, you will need to pre-wash your fabric before you get started. Use the method suggested on the fabric label. Some silks will require hand washing, while others will be fine with a cold machine wash. Wash your fabric and then hang it on the line to dry, before giving it a good press (this is a good time to see how your fabric handles being ironed, and whether a pressing cloth will be required when you're sewing). 


2. Sandwich fabric between thin layers of paper when cutting

This one has probably got a lot of you freaking out already. Yes, I said it... Cut your fabric between layers of paper! I know cutting paper with your fabric scissors is generally a big no-no in the sewing world, but I have been doing this for years (and was taught to do this when studying fashion at university) and my scissors have lived to tell the tale. When working with silk, I think the most important thing is cutting it correctly. If you have ever tried to cut silk without it being sandwiched between papers, you may have realised that it's REALLY difficult. It doesn't want to stay straight, and it is really easy to lose the grain. This leaves you with cut pieces that are not fun to work with. With paper, you can be sure the fabric is on grain, and that you have cut it out correctly (without any of those ragged edges). Convinced you yet?

How to do it...

tips_for_sewing_with_Silk_1.gif

The way I do it is I take a large sheet of paper (I use "dot and cross" drafting paper) and draw a straight line along one of the long sides and one of the short sides. 

I then take the amount of fabric I need, and tear (if possible) along each cut edge (not the selvedge), if they are not already torn. This helps ensure you have got the fabric on grain. If your fabric does not tear nicely (always good to check on a small scrap of fabric first), instead you can find your cross grain by snipping into the edge of the fabric and then pulling a thread or two down from the cross-wise grain. This will create a straight line that you can cut along. Check out this tutorial from Colette if you need more details on how to do it this way. 

tips_for_sewing_with_Silk_3.gif

Now, take the fabric and place it on top of the pattern paper, with right side up - lining up one edge (selvedge side) with the horizontal line on the paper (we'll deal with the vertical line soon). Pin in place, being careful to check the edge remains straight between each pin. 

tips_for_sewing_with_Silk_4.gif

If you are working on the fold (you will cut a pair of each piece), carefully fold the fabric in half, by bringing the opposite selvedge towards you. Line up the selvedge with the pinned edge, and then pin in place (using the original pins, so that the pins are now holding two layers of fabric and a layer of paper). 

tips_for_sewing_with_Silk_5.gif

Make sure both layers of fabric are also straight on the cross-wise grain (marked with the vertical line on the paper), and pin in place. I generally just pin the two sides, but if you feel it will make things easier for you, you can also pin the other two sides of fabric to the paper.

Gently smooth out any wrinkles or bubbles in the fabric. I use a long plastic ruler to do this. 

Put another layer of paper on top, sandwiching the fabric in between the two layers, before putting pins through all four layers.

Now, place the pattern pieces on top of the paper, and line up the grainline on each pattern piece with the selvedges pinned to the paper. 

I normally just pin the pieces in place and then cut.  If you have your pattern on card, you can simply trace around each piece, and use a few pins to anchor them. You could also use pattern weights instead. Carefully cut into each notch, and mark drill holes / darts (in the case of other patterns) etc. with a tailor's tack, rather than marking the fabric (use this Craftsy tutorial, if you're unsure how to do this). 

Tip

I find it easier to leave the cut pieces between the layers of paper until I'm ready to sew them. This way, they remain protected, but are also much easier to identify. 


3. Use the right tools

It's really important that, when you are working with silk, you use the right tools. Make sure your scissors are sharp, use sharp pins (or even better, use silk pins), and use the right machine needle. Using a standard machine needle can cause silk to pull - or may not even be able to get through the tightly woven fibers. Use a fine, sharp needle (such as a 60/8 or 70/10) to prevent this from happening. 


4. If in doubt, hand baste

When sewing with silk, hand basting is your friend. I know many people don't like having to pick up a hand needle and thread, but for me, I'd rather hand sew first, to prevent unpicking later. If your fabric is likely to stretch, and pins aren't going to cut it, then baste the seam before machine-stitching. If you have already made the Acton (or the Rushcutter), you will know that the instructions guide you to hand baste the zip in, before sewing it. You could also hand baste the princess seams, if you are worried that the seam will stretch, 

5. Use a pressing cloth

Before taking to your fabric with the iron, use a small scrap of fabric to check how it takes being pressed. Put your iron on the silk setting and see how it goes. If it looks like it may damage the fabric, use a pressing cloth, 

6. Use tear-away / vilene

When I was at university, as well as in studios doing casual production work, tear-away is used in almost all garments. I am always surprised to hear how few sewers use it. When sewing with flimsy fabric, that is likely to stretch, tear-away helps prevent that from happening. It is particularly useful to use on necklines and armholes.

If you'd like to use tear-away for the neckline / armholes of the Acton, put the SIDE FRONT BODICE and CENTRE FRONT BODICE together as if you have sewn them (stitch line on stitch line).

You will need a pattern piece that looks something like this. Draw a smooth curve 4-5cm (2") down from the neckline and armhole.

tips_for_sewing_with_Silk_10.gif

Trace the piece onto a blank piece of pattern paper, before adding cutting instructions. Repeat for the back pieces. Cut these pieces from tear-away / vilene. 

Stay stitch the tear-away to the neckline (once the bodice is assembled) and then sew as normal. Remove tear-away after you have sewn the neckline / armhole seam. For more details on this process, check out this tutorial from Tessuti.


Now, with those tips under your belt, you should find sewing silk a breeze!

Did I miss anything? Is there a tip you would like to add? I'd love to hear in the comments!


You may also like:

The Acton sew-along : Small Bust Adjustment

small_bust_adjustment_acton_1

Today, for the Acton sew-along, I'll be showing you how to do a small bust adjustment. Although the pattern I have used for the example is the Acton dress, you can adapt this tutorial to any pattern that includes princess seams. 

WHEN YOU'LL NEED TO DO A Small BUST ADJUSTMENT 

Most indie pattern companies (including In the Folds) draft for a B cup bust. There are of course exceptions to this rule (such as Cashmerette and Colette), so make sure you check on your pattern before assuming the bust cup size.

This means that if your bust cup size is smaller than a B you will need to do a Small Bust Adjustment, otherwise known as a SBA, and if your bust cup size is larger than a B you will need to do a Full Bust Adjustment or FBA

WORK OUT YOUR CUP SIZE

Your cup size in sewing patterns may not always correspond to the bra size you wear. To be safe, check your measurements before deciding if you need to make any adjustments to the pattern. 

small_bust_adjustment_acton_2

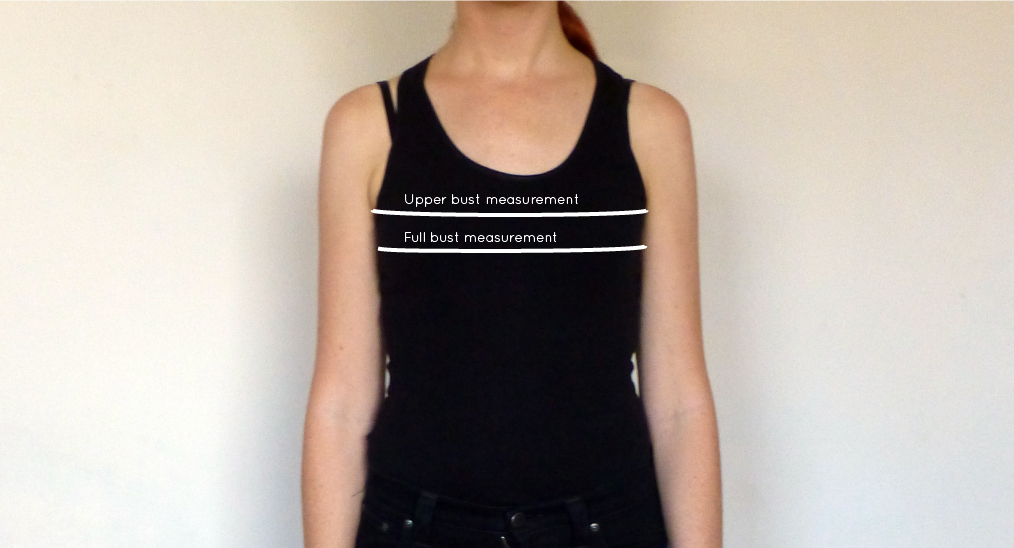
Measure your high bust measurement (the area above your breasts, under your arms) as well as your full bust (the fullest part of your chest / horizontal measurement across your nipples) and then take note of each measurement, as well as the difference.

If the difference is 2.5cm (1") your bust is an A cup, 5cm (2") it's a B cup, 7.5cm (3") is a C cup and so on. 

CHOOSE YOUR SIZE

Now, go back to your high bust measurement and add 5cm (2"). This is what your bust measurement would be if you were a B cup and therefore the size you should be choosing from the pattern.

For example, let's say your upper bust measures 81cm (32"). Add 5cm (2") to this measurement to find out what size your bust measurement falls into on the In the Folds sizing chart (and what size you would be if you had B cup breasts). 81cm + 5cm = 86cm which corresponds to a size C. Your actual bust measurement is 83cm though - 3cm (just over 1") smaller than the bust measurement of the pattern. This means you will need to do a SBA and remove this 3cm (1") from your pattern. 

small_bust_adjustment_acton_3

Just like when we did the FBA, we will also need to remove some length from the bust panel, not only width.

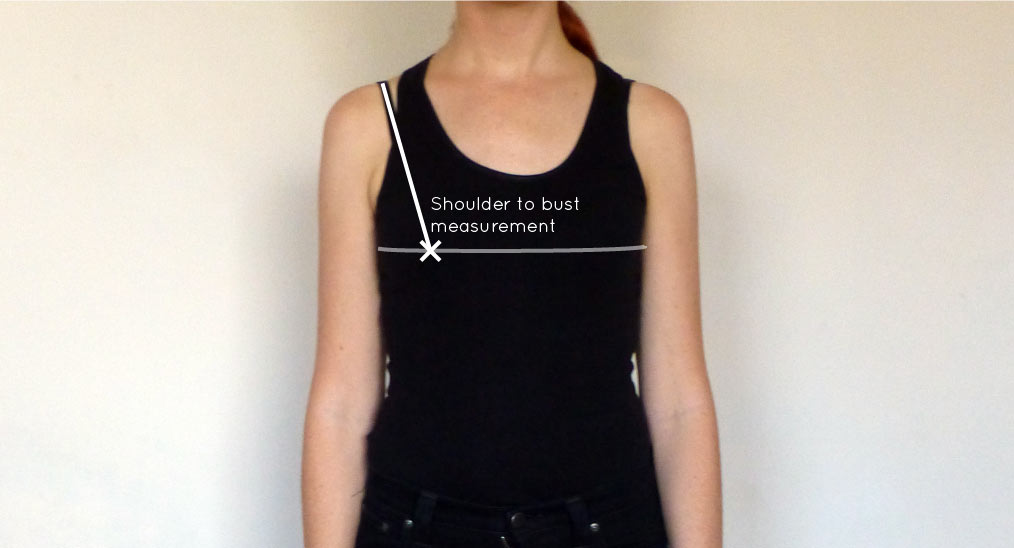
To work out how much length you need to remove, measure from your shoulder down to your bust point. Take note of the measurement. The pattern has been drafted to accommodate the following shoulder to bust length:

Size A - 25cm / Size B - 25.5cm / Size C - 26cm / Size D - 26.5cm / Size E - 27.5cm / Size F - 28.5cm / Size G - 29cm / Size H - 29.5cm / Size J - 30cm / Size K - 31cm

Select the pattern size you will be using and deduct your shoulder to bust measurement from the relevant measurement. For example, my shoulder to bust measurement is 24cm, my measurements put me into a size C bust (although my bust measurements tells me I need an SBA) which is designed for a 26cm shoulder to bust length. This means I will need to reduce the bust seam by 2cm. 

GETTING STARTED

small_bust_adjustment_acton_4

Trace a copy of the SIDE FRONT BODICE and CENTRE FRONT BODICE. I always suggest to trace a copy of the pattern, so if you make a mistake you always have the original to go back to (although with digital patterns you can just print another copy if necessary). Be sure to include all pattern markings (in this case: grainline, notches and drill hole) and make sure you trace off the stitching line (the grey line on the pattern) - this is really important. When making pattern alterations, I normally suggest removing the seam allowance, but because the stitch line is marked on the pattern, you can leave it on if you like. 

Mark the bust line

small_bust_adjustment_acton_5

A : Draw a horizontal line across the fullest part of the bust on the SIDE FRONT BODICE. Mark the point where the horizontal line intersects the stitching line at the side seam as point 1

B : Mark this horizontal line (in the same position) on the CENTRE FRONT BODICE. Mark the point where the  the horizontal line intersects the stitching line at the centre front seam as point 2. 

Remove length from the bust

small_bust_adjustment_acton_6

A : From the bust seam, cut into the line you just marked. Cut towards point 1 and stop right on the side seam stitch line. (This will help us remove length from the bust, but not the side seam).

B : Cut in from the other side of the line now (from the side seam), towards point 1, leaving a 1-2mm "hinge" to keep the two parts of the pattern attached (this techniques is called 'Cut and Spread' - for more info on this technique, check out this tutorial).  

small_bust_adjustment_acton_7

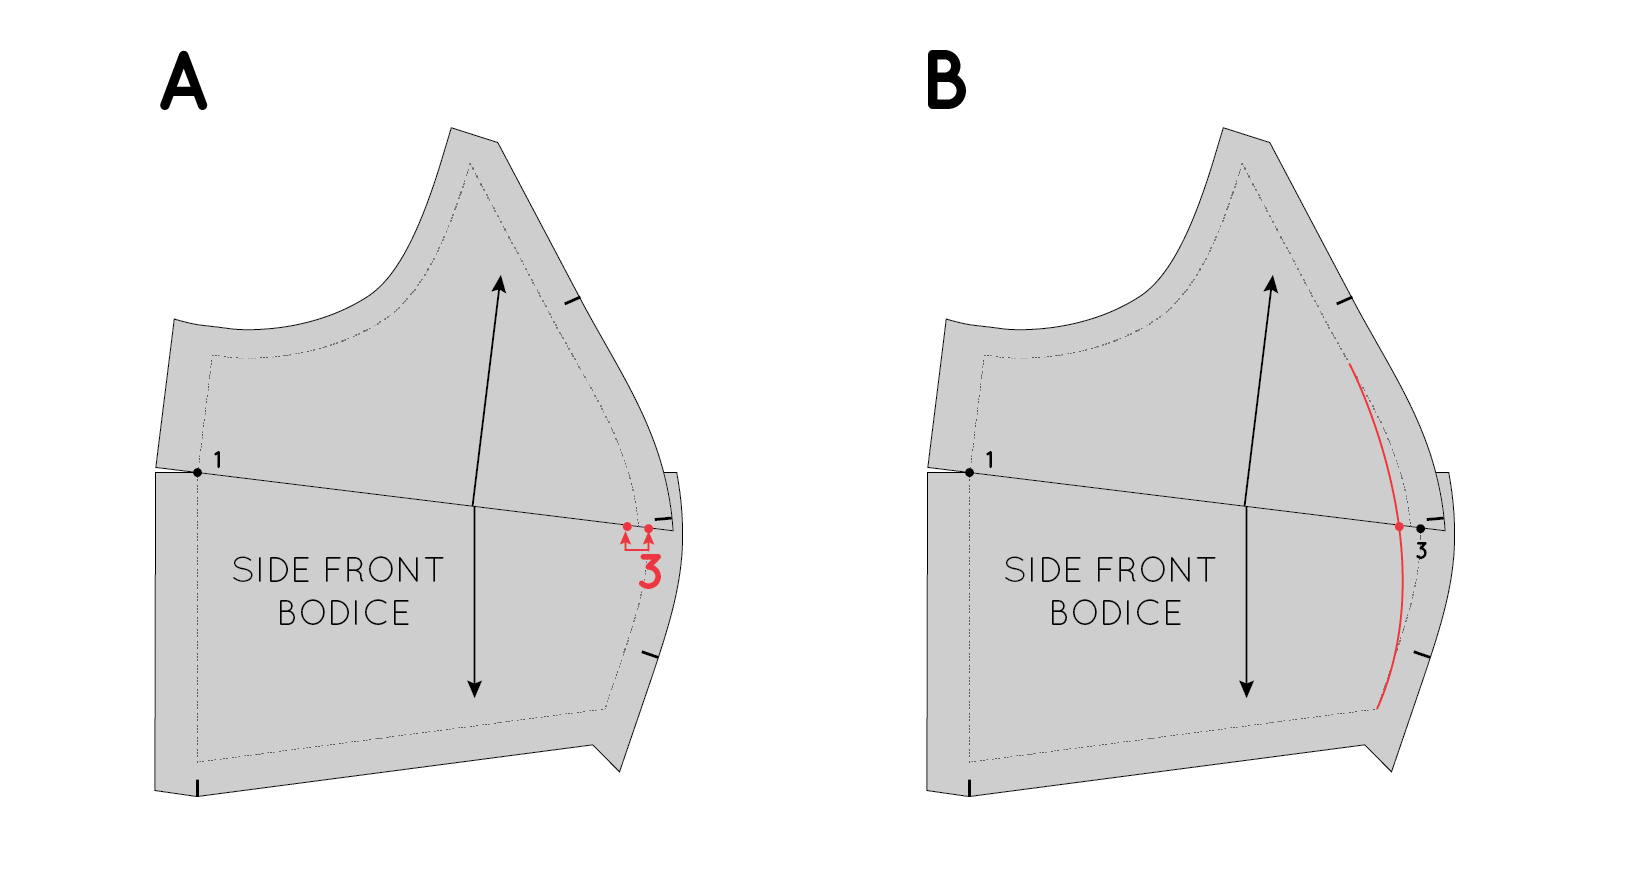
A : On the stitching line of the bust seam, measure down from the cut line the the amount you need to remove from the bust length. Mark with a dot or small line and label as point 3. For example, I am removing 2cm from the bust length, so I marked a point 2cm below the cut line.

B : Gently pull the top section of the pattern down, so that it overlaps the lower section, until the cut line intersects point 3. Tape or glue in place.

Repeat process for the centre front bodice panel

It is now to make the same changes on the CENTRE FRONT BODICE piece, so that the CENTRE FRONT and the SIDE FRONT bodice pieces still fit together. 

small_bust_adjustment_acton_8

A : From the bust seam, cut into the horizontal line on the CENTRE FRONT BODICE. Cut towards point 2 and stop right on the centre front stitch line. 

B : Cut in from the other side of the line now (from the centre front seam), towards point 2, leaving a 1-2mm "hinge" to keep the two parts of the pattern attached.

small_bust_adjustment_acton_9

A : On the stitching line of the bust seam, measure down from the cut line the the amount you need to remove from the bust length. Mark with a dot or small line and label as point 4. For example, I am removing 2cm from the bust length, so I marked a point 2cm below the cut line.

B : Gently pull the top section of the pattern down, so that it overlaps the lower section, until the cut line intersects point 4. Tape or glue in place.

small_bust_adjustment_acton_10

A : Re-draw the centre front seam with a straight line (by joining the top of the original centre front stitch line with the bottom).

B : Re-draw the bust seam line with a straight line (by joining the top of the original seam stitch line with the bottom).

C : You will notice that you removed width from the pattern piece when you re-drew the centre front seam and added width when you re-drew the panel seam - which now cancels each other out. 

Remove width from the side front bodice

Now that we've removed some length from the bust, it's time to remove some width. Take your bust measurement and remove it from the pattern's original bust measurement (found on the sizing chart). For example, as I mentioned at the beginning of the tutorial, I am using a size C bodice - which has a 86cm bust. I have a 83cm bust measurement, so I need to remove 3cm overall. 

Remember, we are doing things on the half (as each piece is cut as a pair), so that means we need to remove half of this overall difference from the SIDE FRONT BODICE and CENTRE FRONT BODICE. I will be removing half of 3cm (i.e 1.5cm) from each side of my bodice, which means I need to remove half of that (8mm) from each of the front bodice pieces.

small_bust_adjustment_acton_11

A : Measuring inward from point 3, mark a point the distance you are removing from the SIDE FRONT BODICE. As mentioned in the example, I will be removing 8mm from the width of each pattern piece, so I will mark a point 8mm in from point 3

B : Now re-draw the bust curve, by drawing a line from the original stitch line, through the point marked in part A, and then down to the stitch line at the waistline. As you can see, the bust line is getting a lot flatter, which is what us small busted ladies like to see! 

Re-draw the side seam

small_bust_adjustment_acton_12

A : You will notice that the side seam is no longer a straight line, since we removed some width from the bust. Re-draw as a straight line by joining the top of the original side seam stitch line with the bottom.

B : This will remove a little more width from your bust width. Take a ruler and check how much this new side seam will skim off. 

Trace the new pattern piece

small_bust_adjustment_acton_13

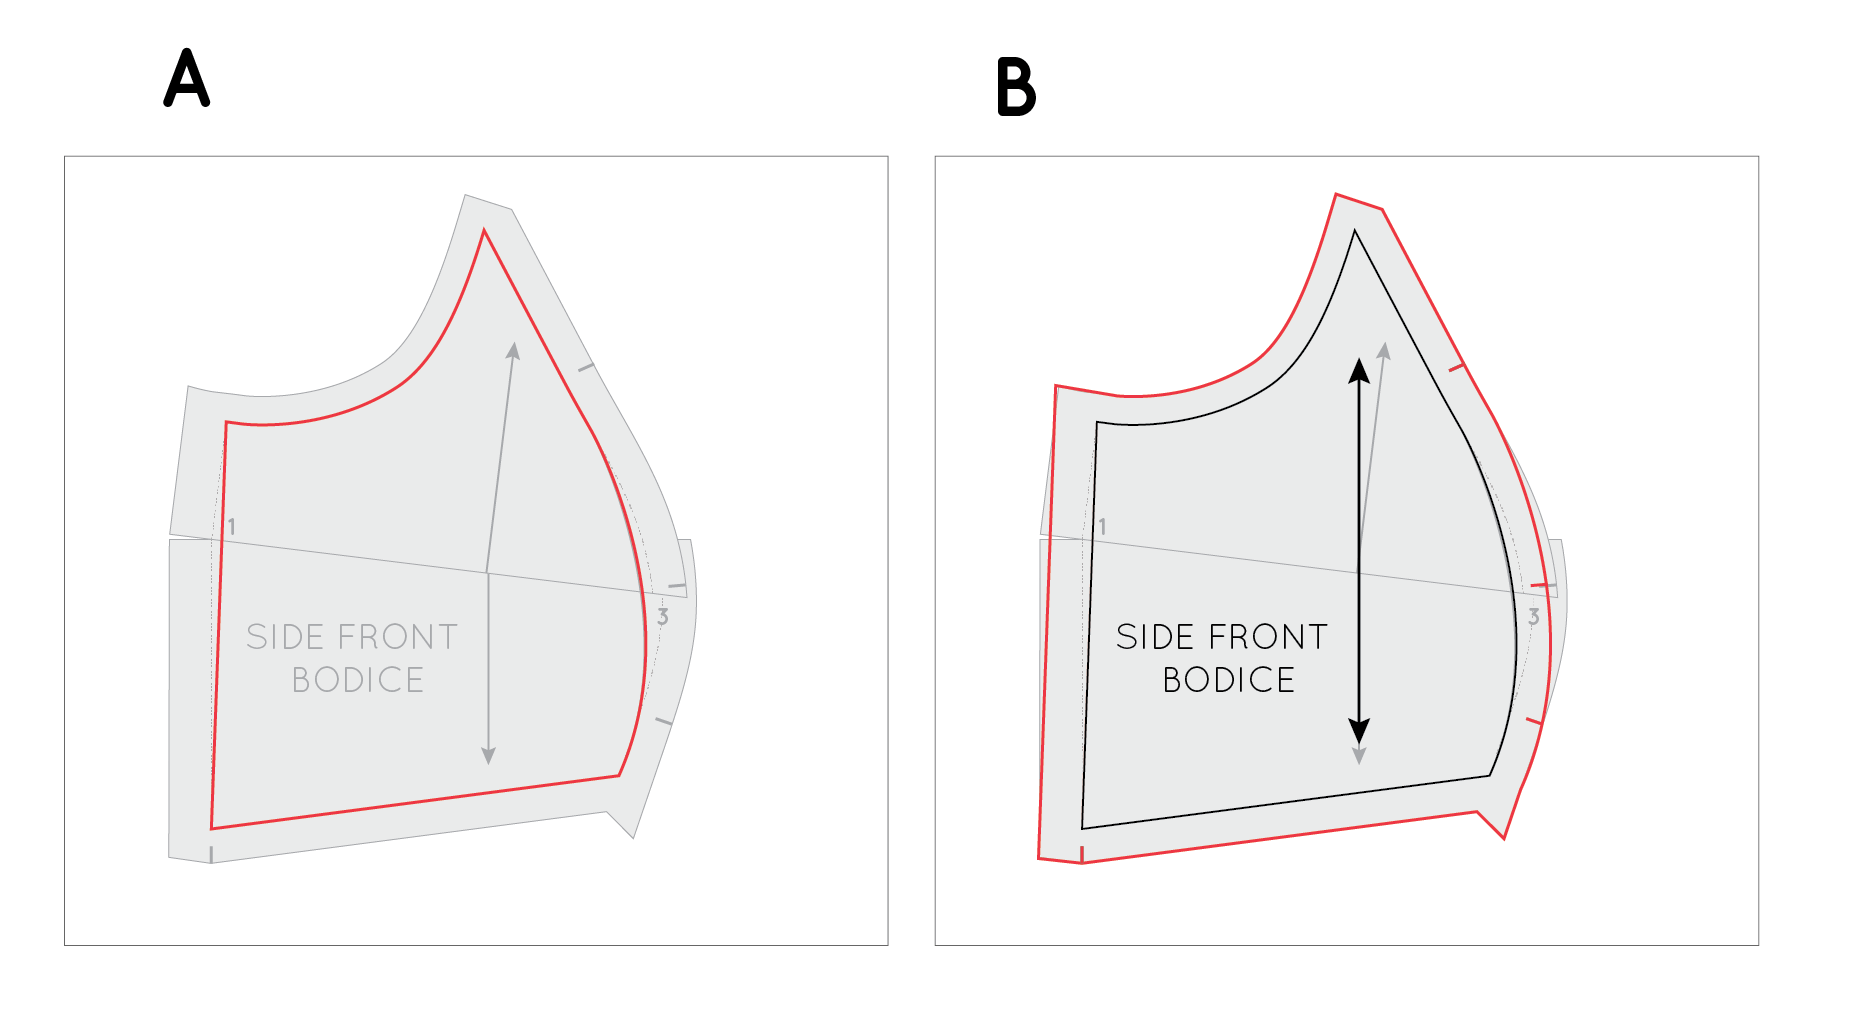
A : Take a fresh piece of pattern paper and trace the SIDE FRONT BODICE. Start by tracing the stitch line. Be careful to check that you are tracing the new side seam line and new bust curve.

B : Add seam allowance to the pattern. You can do this by transferring the original seam allowance lines, or just add yourself - 1.5cm at the side seam, 1.2cm at the waist and bust seam and 1cm around the armhole. Transfer the notches and grainline. 

By this point we have removed width from both sides of the SIDE FRONT BODICE. For example, I removed 8mm from the width at the bust line, and then a further 3mm when I straightened out the side seam. This means that when I cut a pair of this piece, I would have reduced the bust measurement by a total of 22mm {(8mm + 3mm) x 2}. Overall I need to remove 3cm, which means I just have to remove 8mm from the CENTRE FRONT BODICE (half for each piece - i.e. in the case of the example, 4mm either side).

Remove width from the centre front bodice

small_bust_adjustment_acton_14

A : Take the CENTRE FRONT bodice, and measuring from the new bust seam line, on the cut line, mark a point the distance inwards that you still need to remove. For example, I need to remove 4mm from the piece, so I marked a point 4mm in from the new bust stitch line.

B : Re-draw the seam line intersecting this point. You will need to make it slightly curved to intersect. 

Trace the new pattern piece

small_bust_adjustment_acton_15

A : Take a fresh piece of pattern paper and trace the CENTRE FRONT BODICE. Start by tracing the stitch line. Be careful to check that you are tracing the new bust seam line and new centre front.

B : Add seam allowance to the pattern. You can do this by transferring the original seam allowance lines, or just add it yourself -  1.2cm at the waist and bust seam and 1cm around the armhole. Transfer the notches and grainline. You will notice that that we have almost lost the notches on this piece. Transfer the notches from the SIDE FRONT BODICE piece to ensure the notches are in the right place (if you're not quite sure how to do this, don't worry, I've got a tutorial on it coming tomorrow!)

All done! Can you believe it?! It was quite a long post...

Now, before cutting into your real fabric, I suggest making one more toile. Better to be safe than sorry, right?  


You may also like:

The Acton sew-along : Selecting your size

To kick off the Acton sew-along series, we'll be talking about selecting your size.

The Acton sewing pattern is available in sizes A - K (approximately equivalent to AU size 6-24).

TAKE YOUR MEASUREMENTS

To select the appropriate size, first take your measurements.

It is best to take your measurements while wearing only underwear, or otherwise very tight clothing, so that you can get true measurements. Get someone to help you, if you can. Otherwise take your measurements in front of the mirror, so that you can check that your tape measure remains parallel to the floor, and is not twisted, as it is wrapped around your body.

First, measure your bust and take note of the measurement. 

As the Acton has quite a fitted bodice, you should also take your high bust measurement. This will help you determine whether or not you will need to do a Full or Small Bust Adjustment. The 'high bust' is the area above your breasts and under your arms.

waist.jpg

Measure your waist... and (if you want to be able to eat in your Acton) don't suck in your tummy like me!

And then measure your hips. Make sure you are measuring your low hip (i.e. the fullest part of your hips - that includes your butt!)

BODY MEASUREMENTS

Now look at the size chart and circle where your measurements lie. Your measurements may lie across several sizes or between sizes - that's no problem at all!

Before going ahead, we need to check that you are choosing the right size for your bust measurement (you may need to select a different size to your measurements and then to a full or small bust adjustment to get a good fit).

WILL YOU NEED TO DO A FULL / SMALL BUST ADJUSTMENT?

Most indie pattern companies (including In the Folds) draft for a B cup bust. There are of course exceptions to this rule (such as Cashmerette and Colette), so make sure you check on your pattern before assuming the bust cup size.

This means that if your bust cub size is smaller than a B you will need to do a Small Bust Adjustment, otherwise known as a SBA (tutorial coming soon), and if your bust cup size is larger than a B you will need to do a Full Bust Adjustment or FBA (tutorial coming soon). 

WORK OUT YOUR CUP SIZE

Your cup size in sewing patterns may not always correspond to the bra cup size you wear. To be safe, check your measurements before deciding if you need to make any adjustments to the pattern. 

Find the difference between your bust measurement and your high bust measurement.

If the difference is 2.5cm (1") your bust is an A cup, 5cm (2") it's a B cup, 7.5cm (3") is a C cup and so on. 

CHOOSE YOUR SIZE

Now, go back to your high bust measurement and add 5cm (2"). This is what your bust measurement would be if you were a B cup and therefore the size you should be choosing from the pattern.

Change your size selection on the chart if necessary.

For example, let's say your upper bust measures 81cm (32"). Add 5cm (2") to this measurement to find out what size your bust measurement falls into on the In the Folds sizing chart (and what size you would be if you had B cup breasts). 81cm + 5cm = 86cm which corresponds to a size C. Your actual bust measurement is 89cm though - 3cm (1") larger than the cup size of the pattern. This means you will need to do a Full Bust Adjustment and add this 3cm (1") to your pattern. 

An example - looking at my measurements

I thought I'd show you my measurements and how I go about selecting my size, to give you a concrete example of this process. As my patterns do not fit me straight out of the packet! Some designers use themselves as a fit model, but I choose to use a "standard" size 10 model as a base, which means I have to make alterations to my patterns before I can get sewing too.

Bust : My high bust measurement is 82cm. I will add 5cm to this measurement to check whether or not I need to do a FBA or SBA. The result is 87cm - which puts me in a size C. My actual bust measurement is only 84cm though (not the 86cm of the size C bust measurement), which means I will need to do a Small Bust Adjustment to remove the excess 2cm from this area.

Waist : My waist measures 72cm. This is slightly bigger than the size C waist measurement (which is 71cm), so before choosing to use a size C, I will check the pattern's finished garment measurements to see if that will work. 

Looking at the "Finished Measurements" table, you can see the finished waist measurement of the size C is 81.5cm (there is about 10cm ease in the waist), which means that the fact that my waist measurement is 1cm bigger than the size C measurement, is absolutely fine.

Hips : My hip measurement is 100cm, which moves me from the size C, up to the size D. Again, my measurement is 1cm over the size D measurement, but by looking at the Finished Measurement table, I can see that again this won't be  problem due to the amount of ease in the hip, so I can stick to a D.

NOTE : The wrap on view B is deigned in such a way that there is A LOT of extra room at the hips (to allow for the wrap). If your hip measurement is only slightly outside your waist size range, I would not bother grading up at the hips (there will be ample room). If your hip size is more than a size bigger than your waist I suggest grading up. For my measurements, C at the waist and D at the hips, for the wrap version (view B), I just made a straight C (with only alterations made to the bust). 

What size to print?

The pattern has been made with embedded layers so that you can just print the size/s you need! Layers make it much less confusing to cut the right size, and also saves on ink (and paper, in some sizes). Take note of the size or sizes you need to print and then check out this post how to print and assemble your PDF pattern


You may also like : 

New Pattern : The Beach Coverup - in collaboration with Peppermint Magazine

BEACH_COVERUP_cover.jpg

It just ticked over into Summer here in the Southern Hemisphere and I'm celebrating the turn of season with the release of a new pattern in collaboration with Peppermint Magazine!

If you have been following my blog this year, you would have seen the Sweater Dress we released together in Winter and then the Peplum Top that followed in Spring. And the best bit is, you can download them all for free! 

The Beach Cover-up is a simple summer kaftan with a comfortable and relaxed fit, perfect for hot summer days on the beach.

It features a scooped neck, high-low hem and an optional waist tie (that can give you a range of different silhouettes).

Through the creation of this garment you will gain confidence in:
- sewing with light-weight woven fabrics
- sewing straight seams
- sewing curved seams
- attaching bias binding
- attaching trims

Download the pattern now for free from the Peppermint Magazine website (along with heaps more free sewing patterns). 


You may also like:

New images : The Rushcutter

COVER.jpg

When I decided to do a shoot for the release of the Acton dress, I thought it would be a good time to get some images of the Rushcutter too! So today I'd show some of them too, as you may have missed the updates to the product listing.

For View A I chose to use a beautiful mid-weight denim. Really, since I made my own denim Rushcutter, it's just hard to think about using anything else!

It really holds the shape beautifully - especially the pockets - and it shows all the details really well. And I knew it would work beautifully with my model's (Caz from Useful Box) lovely red hair. So that was just a no brainer!

For View B it was a little trickier. I wanted something summery, but also something that wouldn't overtake the details. Enter cotton stripe! I am really pleased with how this one turned out. I had lots of fun playing with the stripe direction and I think overall it works really well.

The only problem was that I din't realise how sheer it was until I got it home, which meant I had to omit the in-seam pockets and my model (my sis') had to wear a nude slip underneath. Lesson learned for next time!


You may also like:

Notes on adding seam allowance

One of the first tutorials I created for this site was about how to add seam allowance to a pattern. If you are going to draft your own patterns, this is really something you are going to need to know how to do (and it's also a greta place to start if you want to learn some basic pattern making principles). In today's tutorial, I'd like to expand on the basics a little. I'd suggest checking out the previous tutorial first if you are unsure how to add seam allowance, and then come back to this tutorial. 

I did work experience with a local fashion designer while I was at university. One day a week I would go to her studio and help out with whatever tasks she needed help with. I learned a lot about things like how to cut fabric, how to trace patterns etc. (which have all really come in handy), but I'd say the best lesson I learned was about marking seam allowances. I remember being asked to add seam allowance to a particularly strange shaped pattern and realising I didn't know what to do when the pattern came to a point at one side. The designer I was working for told me to think about how the piece needs to sit once the seam is sewn and pressed and that should help me work it out. This now seems very obvious, but at the time it was a real 'wow' moment. From that moment on I never struggled, and it is a way of doing seam allowances that I have brought into my patterns. Over time, I have learned this is not always the way it is done and users of my pattern always get really excited about it and see it as a nice little detail in the process, that helps you achieve a really beautiful and professional finish in your hand-made wares. So I thought I'd share it with you today!

An example

Here is an example of what I am talking about from the Rushcutter sewing pattern (as the old saying goes, a picture really is worth a thousand words). This is the pattern piece for the raglan sleeve, and you will notice that at the seam where the sleeve joins to the centre front panel the seam allowance comes to a strange looking point. 

The reason for this is that, after this seam is stitched and then pressed open, with the seam allowance cut like this, it will be able to sit flush with the edge of the sleeve. This will help you get a lovely clean finish when you attach the sleeve to the armhole of the dress. 

How to do it

Take the pattern you are adding seam allowance to. For the sake of the example, I have just used the front pattern piece from a sleeveless top pattern. (which I showed you how to make last week).

Start by adding seam allowance to the straight seams. I'd suggest between 1.2cm (1/2in) and 1.5cm (5/8in).

Add seam allowance to the curves. Curved seams require a slightly smaller than standard seam allowance (as this helps when you are sewing them) so I'd suggest 6mm - 1cm (1/8in - 3/8in). If you're not sure how to add seam allowance to curves, there is information about it in my previous tutorial on adding seam allowances

4.gif

What I didn't go into in the last tutorial was what to do at intersection points. It's not a problem if your pattern piece is made up of straight seams on all sides, but if, like in the example, your pattern has a mixture of straight and curved seams, you will have to add one extra step to the process.

Focus on one particular area to start. I will start with the shoulder seam. Fold along the shoulder line. This is the original shoulder line, not the seam allowance line. By folding along the shoulder line you are able to see what will happen when the seam is stitched and pressed open (which is normally the case with shoulder seams).

Take a tracing wheel (or awl) and trace over the lines that indicate the seam allowance on either side of the shoulder seam (the armhole and the neckline) for approximately 2-3cm (1in).

Unfold the pattern and you will see that you have transferred the shaping to the shoulder seam. 

Use a ruler and pencil to join the dots created by the tracing wheel. 

You will see that when you fold back the seam allowance on the shoulder seam, it now sits flush with the armhole and neckline.

Next, we'll move onto the side seam.

Again, fold along the stitch line. 

Use a tracing wheel to trace along the armhole and hem line (the seam allowance line, not the stitch line) for approximately 2-3cm (1in). 

Unfold to see the lines that have been transferred to the side seam and mark with a ruler and pencil.

Repeat process form all pattern pieces, and that's it, you're done! 


You may also like:

How to : Draft a simple summer top

Summer is here for all of you lucky people in the northern hemisphere, and I thought it would be a great time to show you how to draft a quick and easy sleeveless summer top! You may wonder what I'm thinking, as most of you know I am based in Sydney, where it is currently quite chilly (well at least as chilly as it gets here), but I really wanted to start showing you how to turn your bodice block into a functional garment (as who really wants to wear a bodice block?) and I haven't shown you how to draft a sleeve yet, so sleeveless top it is!

This is a really simple tutorial and a great place to start if you are trying your hand at pattern drafting.

Where to start

1.gif

Trace a copy of your front and back bodice blocks without seam allowance. Be sure to also mark both darts on each piece.

Relocate shoulder darts to the waist

Relocate the shoulder darts on the front and back bodices to the waist, using this method or this method

You won't actually be needing the darts in the waist, so you can redraw the hem with a smooth curve, removing the darts altogether. 

Trace the pattern

Trace the pattern pieces onto a separate piece of pattern paper, leaving enough space in between the pieces for alterations. 

LOWER THE ARMHOLE

It is likely that you will want to lower the armhole of your top for a more comfortable fit. The bodice block is designed to sit right under your arms, and I'd say for a summer top you will want a bit more breathing room. 

Decide how much you would like to lower the armhole by. Mark this distance on the side seam, measuring down from the armhole. Mark this point on both front and back patterns (this is your new underarm point). This is when it's great to have a toile (muslin) to refer to, so you can see exactly how low you want your armhole to be.

It is a good idea to reduce the length of the shoulder seam too. As it stands, it is a decent sized shoulder seam and for a summer top it is likely that you will want something a little slimmer. Remove some of the length from each side (the end close to the armhole and the end close to the neckline) to keep it balanced.

Work out how much you would like to remove from the shoulder and mark this distance on the shoulder seam, measuring in from the armhole. 

Create the new armholes by joining the points marked on the side seam and shoulder seam with a smooth curve. 

Cut along the new armhole line to remove excess from both front and back armholes (or trace off separate to create a new pattern).

LOWER THE NECKLINE

For the same reason I suggested lowering the armholes, I suggest also lowering the neckline. Use the same method used for the armholes. On the front shoulder seam, measure in from the neckline and mark the point where you want your new neckline to be. Mark the same distance on the back pattern piece. Also work out how much you would like to lower the neckline by and mark this point on the centre front and centre back. This doesn't need to be the same distance - you may want a low front (or even a low back).

Re-draw the front and back necklines by joining the points marked on the shoulder line and centre front/back with a smooth curve.

Cut along the new necklines to remove the excess from both front and back pattern pieces (or trace off separate pattern, with lower armhole).

Lengthen the pattern

At this stage, the pattern is still only waist length. If you'd like a cropped tank then you're done, but if you'd prefer some extra length then keep working your way through the tutorial.

The best way to lengthen a pattern is normally to slash the pattern horizontally and then add length through the middle of the pattern, so that the hemline stays intact and the silhouette of the garment doesn't change too drastically. In this case though, I'd suggest just adding length to the bottom of the pattern, as it is likely that you will need a bit of extra width around the hips. 

10.gif

Work out how much you would like to add to the pattern, and extend the centre front, centre back and both side seams by this length. 

Join the lines with smooth curves to create the new front and back hemlines.

Remember to meet each side with right angles so that you get smooth lines when you sew the pattern together. For more on this, check out this tutorial on checking patterns

To complete the pattern, add seam allowance and pattern markings and you're done! 

You may also like:

New pattern : The Jersey Dress - in collaboration with Peppermint Magazine

I made a pattern for Peppermint Magazine! I am very excited about this as it is such a great magazine. I was planning to tell you what it's all about, but then I realised they probably do it much better themselves!

"Peppermint is an Australian eco fashion and lifestyle quarterly focused on style, sustainability and substance. Covering food, fashion, natural living, health and beauty, DIY, diversity, social entrepreneurs and more, it was created for the rapidly growing number of consumers who appreciate good design and creativity, but also care about social and environmental issues, positive media and things that matter."

They have a section on their website called 'Sewing School' where you can access a whole lot of great patterns, and now I have a pattern amongst them!

The pattern is a lovely snugly raglan sleeve jumper dress, with in-seam pockets, which is a really quick sew. It can be sewn with an overlocker or standard sewing machine (and the instructions include both methods) and could be tackled by a confident beginner. Best of all, it's free! You can download it directly from the Peppermint Magazine website. While you're there, you should also check out all the other great patterns that are available. 

Download the pattern now

How to : Draft a bodice block

After weeks and weeks (or was it months?) it is time to move on from the Skirt Series, and up to our upper halves! And also for me to get back to blogging. It has been at the top of my To-do list for weeks and weeks, but somehow I've managed to ignore it and find other things to occupy my time (for further reading on why to-do lists don't work, check out this post).

So, without any more rambling from me, it is time to draft a bodice block! 

The bodice block

A basic bodice block is a great starting point for most patterns involving your top half – it can be used to make tops and dresses, and paired with a sleeve block can be used to make shirts, blazers, jackets and coats. Many patterns evolve from this block. So if you are ready to start making your own patterns, then a bodice block to your specific measurements is a great place to start (although, if you want something a little easier, I would suggest starting with the skirt block).

This tutorial has been adapted from this great "how to" on BurdaStyle.com, which was taken from Winifred Aldrich's Metric Pattern Cutting for Women's Wear (5th ed. Blackwell Publishing: Oxford, 2008, pp 215). I changed the order in places and added more measurements, to hopefully create a better fitting bodice and an easier to follow tutorial.

So, even if you are an absolute beginner, with the right measurements, the right tools and a little patience, you will have a great fitting bodice block in no time!

A little note

I originally posted this tutorial a couple of years ago, on my previous blog, Em Makes Patterns. If you saw it there, do not fret. This tutorial is the same. I've just updated the aesthetics of the tutorial. So there is no need to do it all over again!

One thing I did realise though, after posting this, is that this tutorial will only work for you if you have a smallish bust cup size. It hadn't occurred to me that this would be an issue (as I am very small busted), until a woman contacted me to say that her bodice toile had turned out much too short, and we worked out that it was due to her large bust size. So, if you have a bust size any bigger than a C or D cup, I would suggest using this tutorial to draft the basic shape of your block and then doing a full bust adjustment to get the right cup size.


Update September 2021

Thank you so much for all the enthusiasm for this blog post. It has been my most popular blog post of all time! After 5 years of answering questions, I no longer have capacity to answer individual questions regarding bodice drafting. The comments have now been switched off and I will no longer be able to get back to emails regarding this blog post. I’d suggest reading through the comments if you have a question, as it is likely I have answered a question similar to yours over the years. You can also See the post : Drafting the bodice block - Questions + Answers.

Update 2020

When I created this blog post in 2016, I had no idea that was going to become the most popular blog post on my website!

I have received a number of questions lately about the tutorial and I thought it could be a good idea to publish some of these questions and answers as an opportunity to help you on your own learning journey.

I will update the post as I receive more questions, so that hopefully, if you have a question, you will find a relevant answer here and can keep on going with your draft!

See the post : Drafting the bodice block - Questions + Answers


Measurements

The measurements you will need for this project are:

Waist measurement

Your waist is the bit in between your rib cage and your hips. It is often the most narrow point of your torso.

This measurement is one you will need all the time. To find it, simply wrap the tape measure around your waist, ensuring that the tape measure remains level all the way around (horizontal to the floor at both front and back).

Do not suck in your tummy like I accidentally did in this photo! You want to be as natural as possible, so that your clothes fit well. Make sure the tape isn't too loose, or isn't pulling you in either!

You could also tie a piece of elastic around your waist to get the right position and then measure.

Bust measurement

For your bust measurement, find the fullest point of your breasts and take a horizontal measurement from there.

Ensure the tape measure remains horizontal as it wraps around your back, for an accurate measurement (this is when measuring yourself in front of a mirror helps). 

Please note: if your bust cup size is more than a C or D cup (for more info on working out your bust cup size look here), you will likely be better of making the draft as if you have a B cup bust and then doing a Full bust Adjustment.

Armscye depth

The armscye depth is the measurement I initially found the most tricky to get my head around. For one, I am quite certain I had never heard this term until I started reading sewing blogs (I don't think it was mentioned once in the four years I studied fashion design), but since then, it seems to pop up all the time (always the way, right?) It also seems that there are many different ways people suggest to find it. 

When I first drafted my bodice block, I placed three fingers under my arm and then measured down from my last finger to my waist. I don't really know what the direct correlation is between this measurement and the armscye depth, but apparently, due to the ratio of the body, these two measurements are the same.

The more obvious way of finding this distance is to measure down from the nape of the neck to the (imaginary) horizontal line that runs across your back, between the bottom of your armholes.

Nape of the neck to waist

This measurement is a little tricky to take on your own. Start at the nape of your neck and measure vertically down to your waist. 

The easiest way to do this is to toe a piece of elastic around your waist and have someone measure down from the nape of your neck to the elastic on your waist.

Nape of the neck to Bust line

neck-to-bust.jpg

Again, the easiest way to take this measurement will be to tie a piece of elastic around your bust and have someone measure down from the nape of your neck to the elastic.

Neck circumference

To take your neck measurement, wrap the tape measure around the base of your neck, making sure it is not too tight.

Shoulder length

To measure the length of your shoulder, first find the peak of your shoulder (this is the bony bit before your shoulder becomes your upper arm). Now measure between the base of your neck and the peak of your shoulder.

Back width

Your back width is the horizontal measurement of your back, from the bottom of a standard armhole, across to the other armhole.

Shoulder to bust measurement

For the shoulder to bust measurement, hold the tape measure in the middle of your shoulder (approximately where your bra strap sits) and measure down to bust point, following the curve of your breast.

Bust point to point

Knowing the distance between bust points (I like to call this measurement "the nip to nip") can help when adding bust darts or drawing panels that you would like to cut through the bust (princess panels, for example).

Simply take the horizontal distance between your breasts.

Tools

You will need a large sheet of paper (approximately 1m x 0.5m), a sharp pencil or pacer, a long ruler, and french curve or Patternmaster (or a plate if you don't have a french curve). An eraser will also come in handy!

Okay... Let's go!

Drafting the block


CONSTRUCT THE CENTRE BACK

draft_bodice_block_2

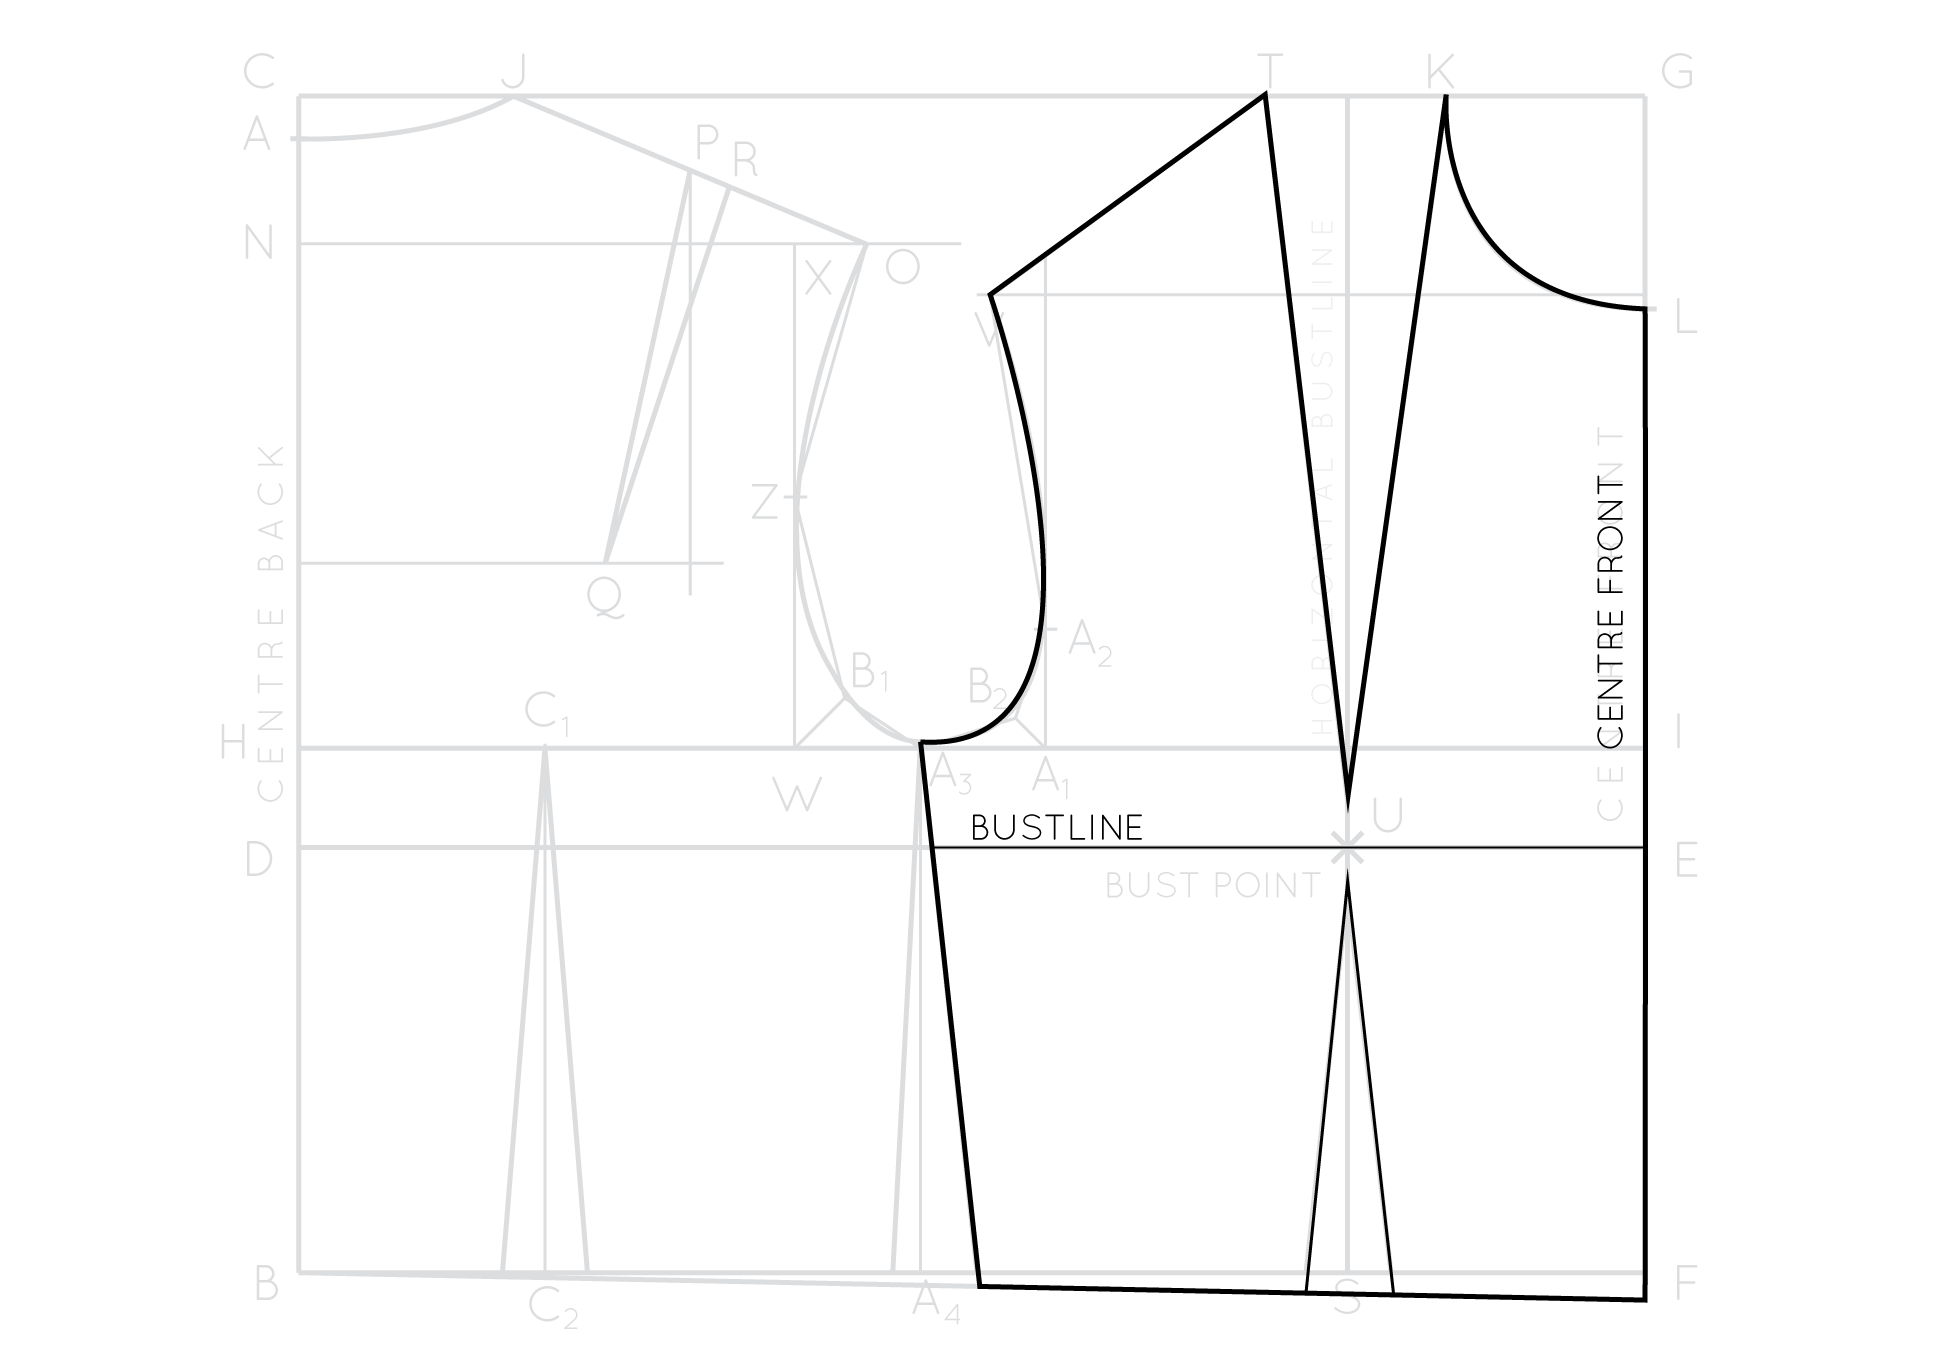
With a large piece of pattern paper mark a point A close to the top left corner (always leave some space around the starting point when drafting patterns). From this point, draw a vertical line down the left hand side of the paper that is the length of the nape of neck to waist measurement. Mark the end point as B. This line will become the CENTRE BACK seam of the block and the grainline of your back pattern piece.

draft_bodice_block_2

Extend line AB by 1.5cm (1/2") from A, and label new endpoint as C. This extra 1.5cm (1/2") allows for back neck shaping. Label AB as CENTRE BACK (CB).

CONSTRUCT the bustline

Next, we will indicate our BUST LINE (the horizontal line that runs through both the front and back of the pattern at bust level). Take the nape of neck to bustline measurement. Then, measuring from point A, mark this length as point D on line AB. 

draft_bodice_block_4

Square out from point D with a line that is half of your bust measurement (only half bust is required as we are making the pattern on the half – i.e. the front will be cut on the fold, and a pair of the back will be cut) plus ease. For the example I decided to add 5cm (2") ease to the bust. Remember to halve the amount of ease, before adding it to your half bust measurement,

draft_bodice_block_6

Label end point of this line as E. Mark this line as BUST LINE.

CONSTRUCT THE WASITLINE

draft_bodice_block_7

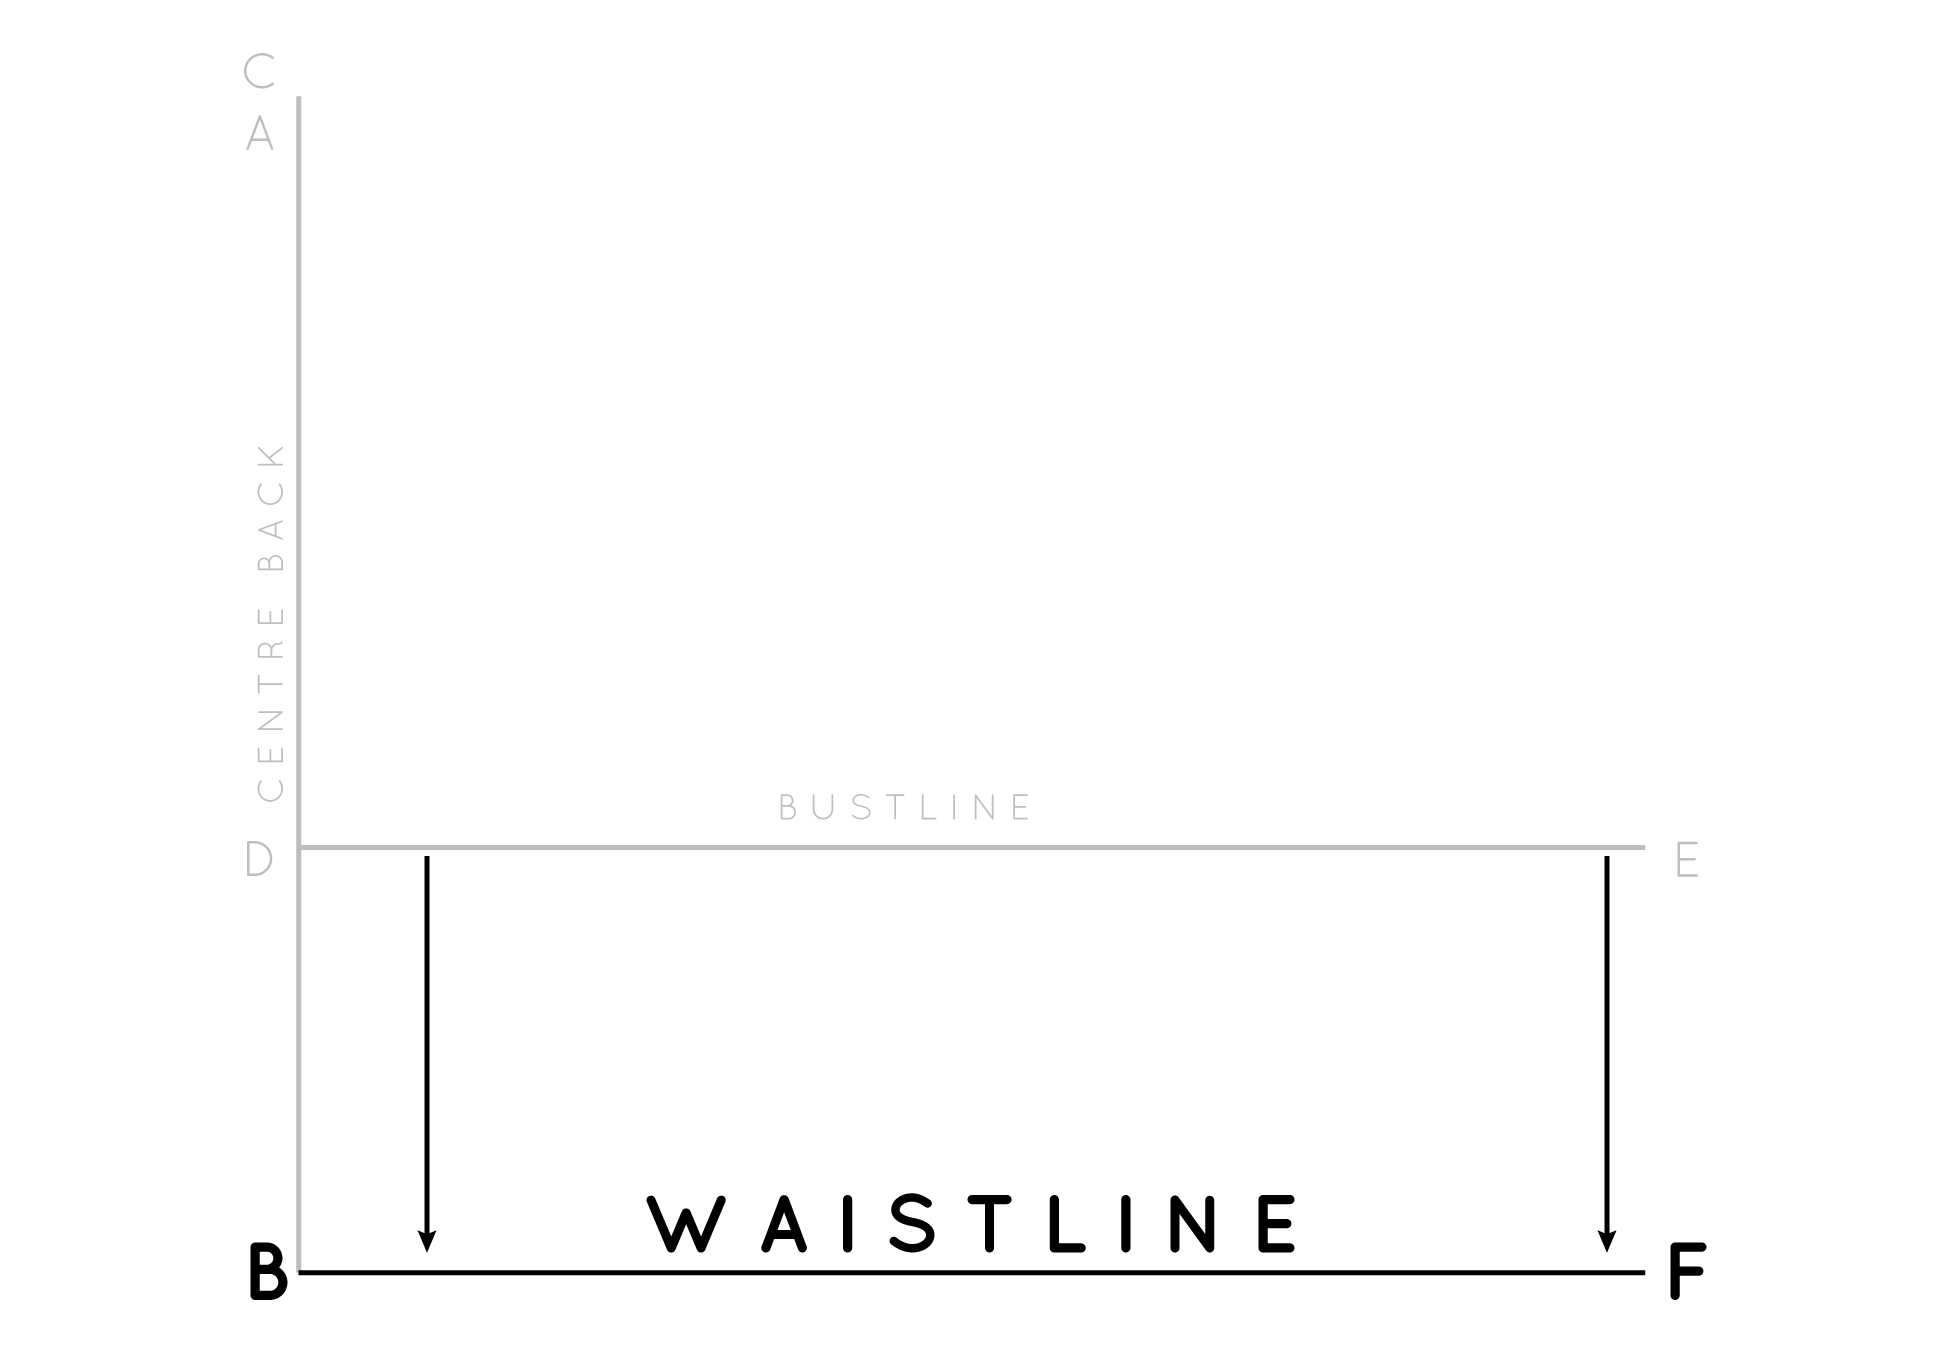
Square out from point B,  drawing a line the same length as your bust line. Mark endpoint as F. Label this line WAIST LINE.

CONSTRUCT THE CENTRE FRONT

draft_bodice_block_8

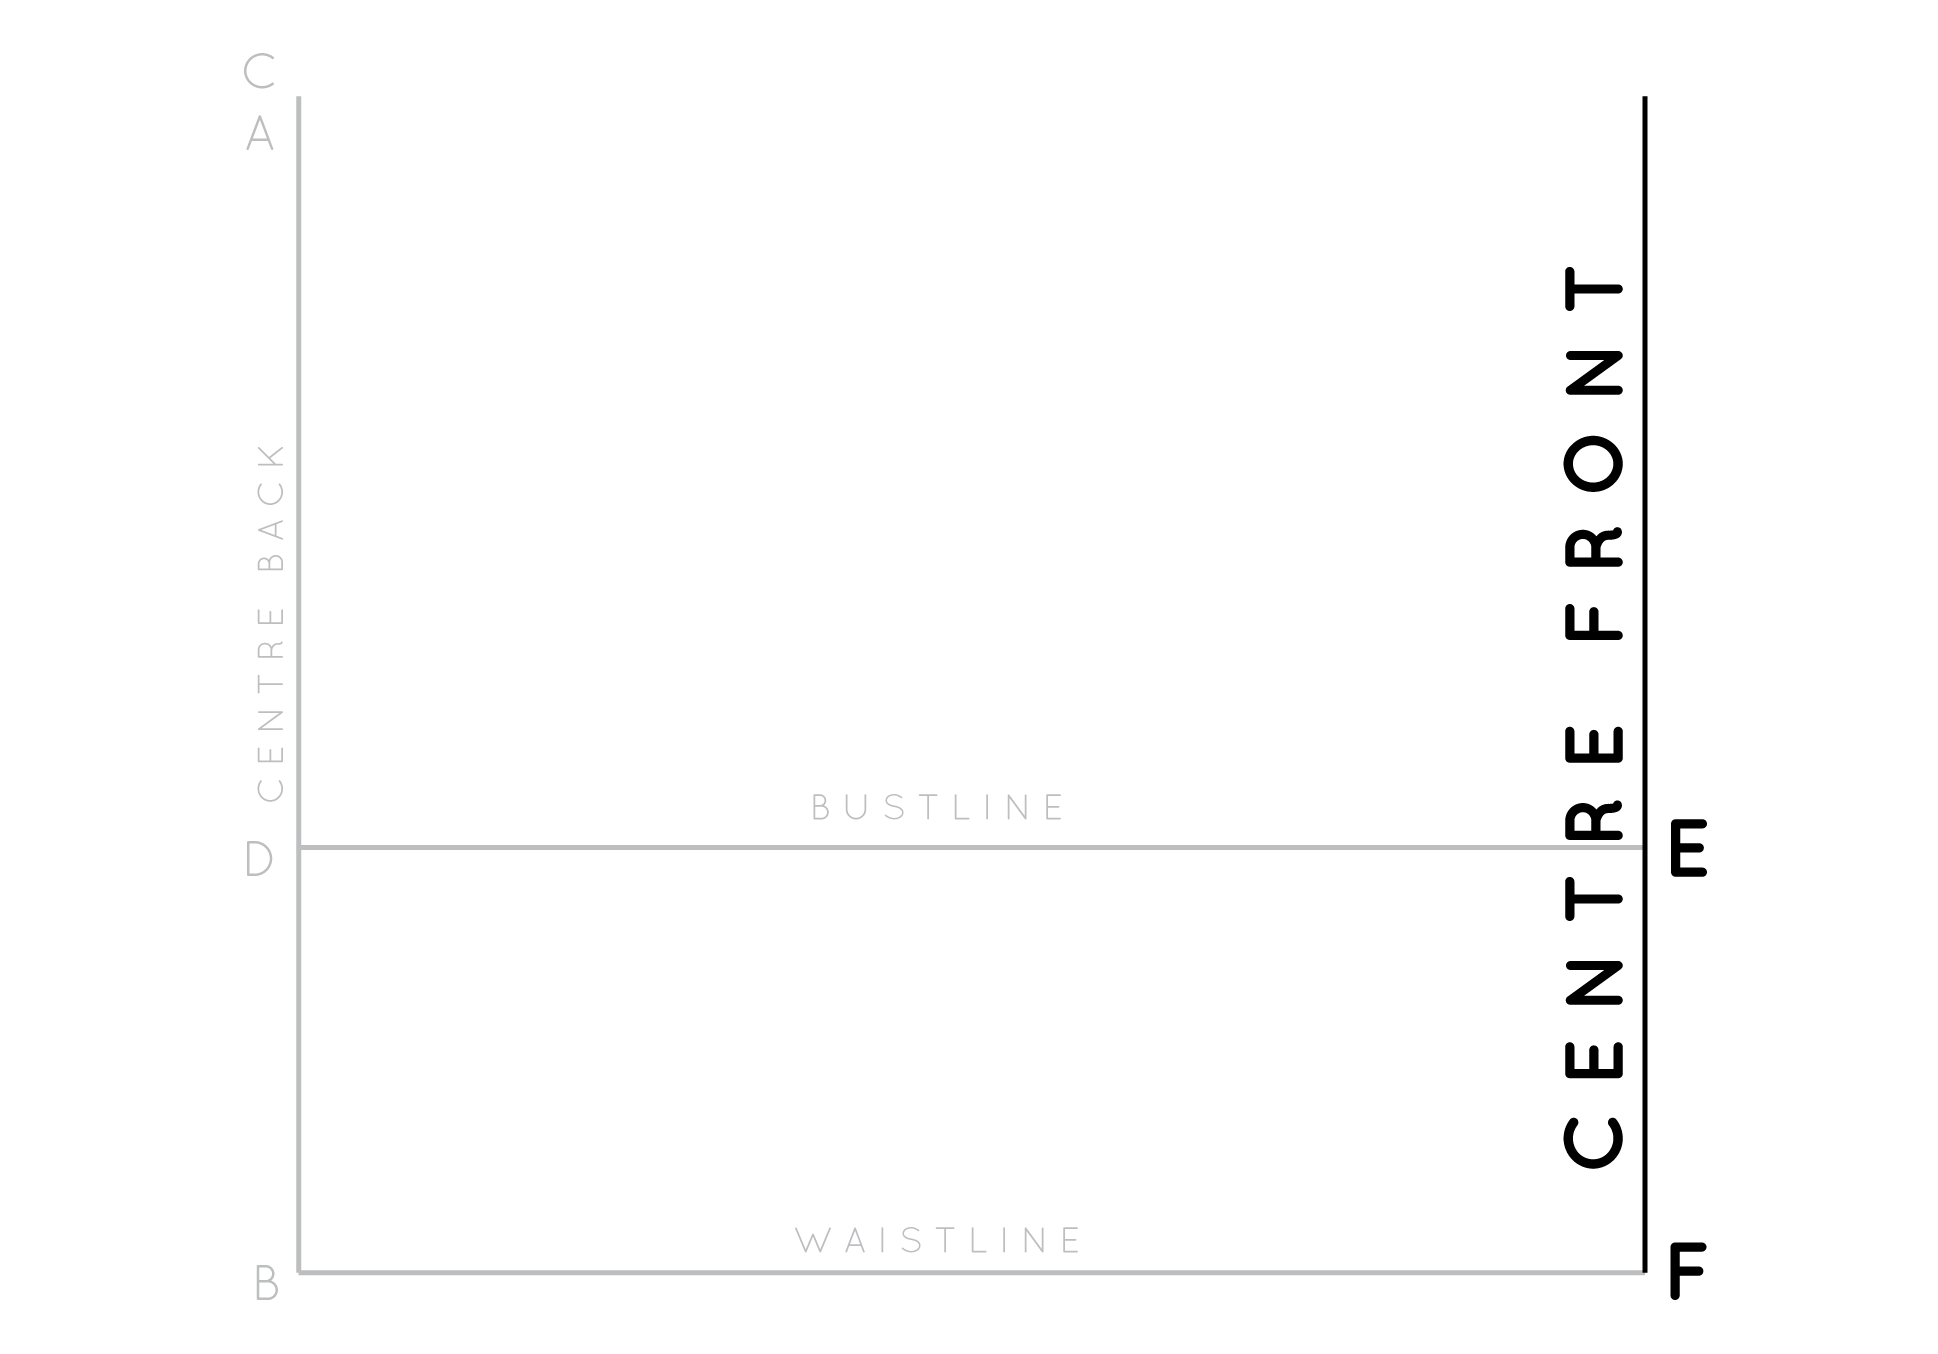
Square up from F (passing through E), the length of the CENTRE BACK (including the extension), and mark the end end point as G. Label FG as the CENTRE FRONT (CF). This will also be the grainline of your front pattern piece.

draft_bodice_block_9

Join G to C with a straight line. 

Mark the armscye

draft_bodice_block_10

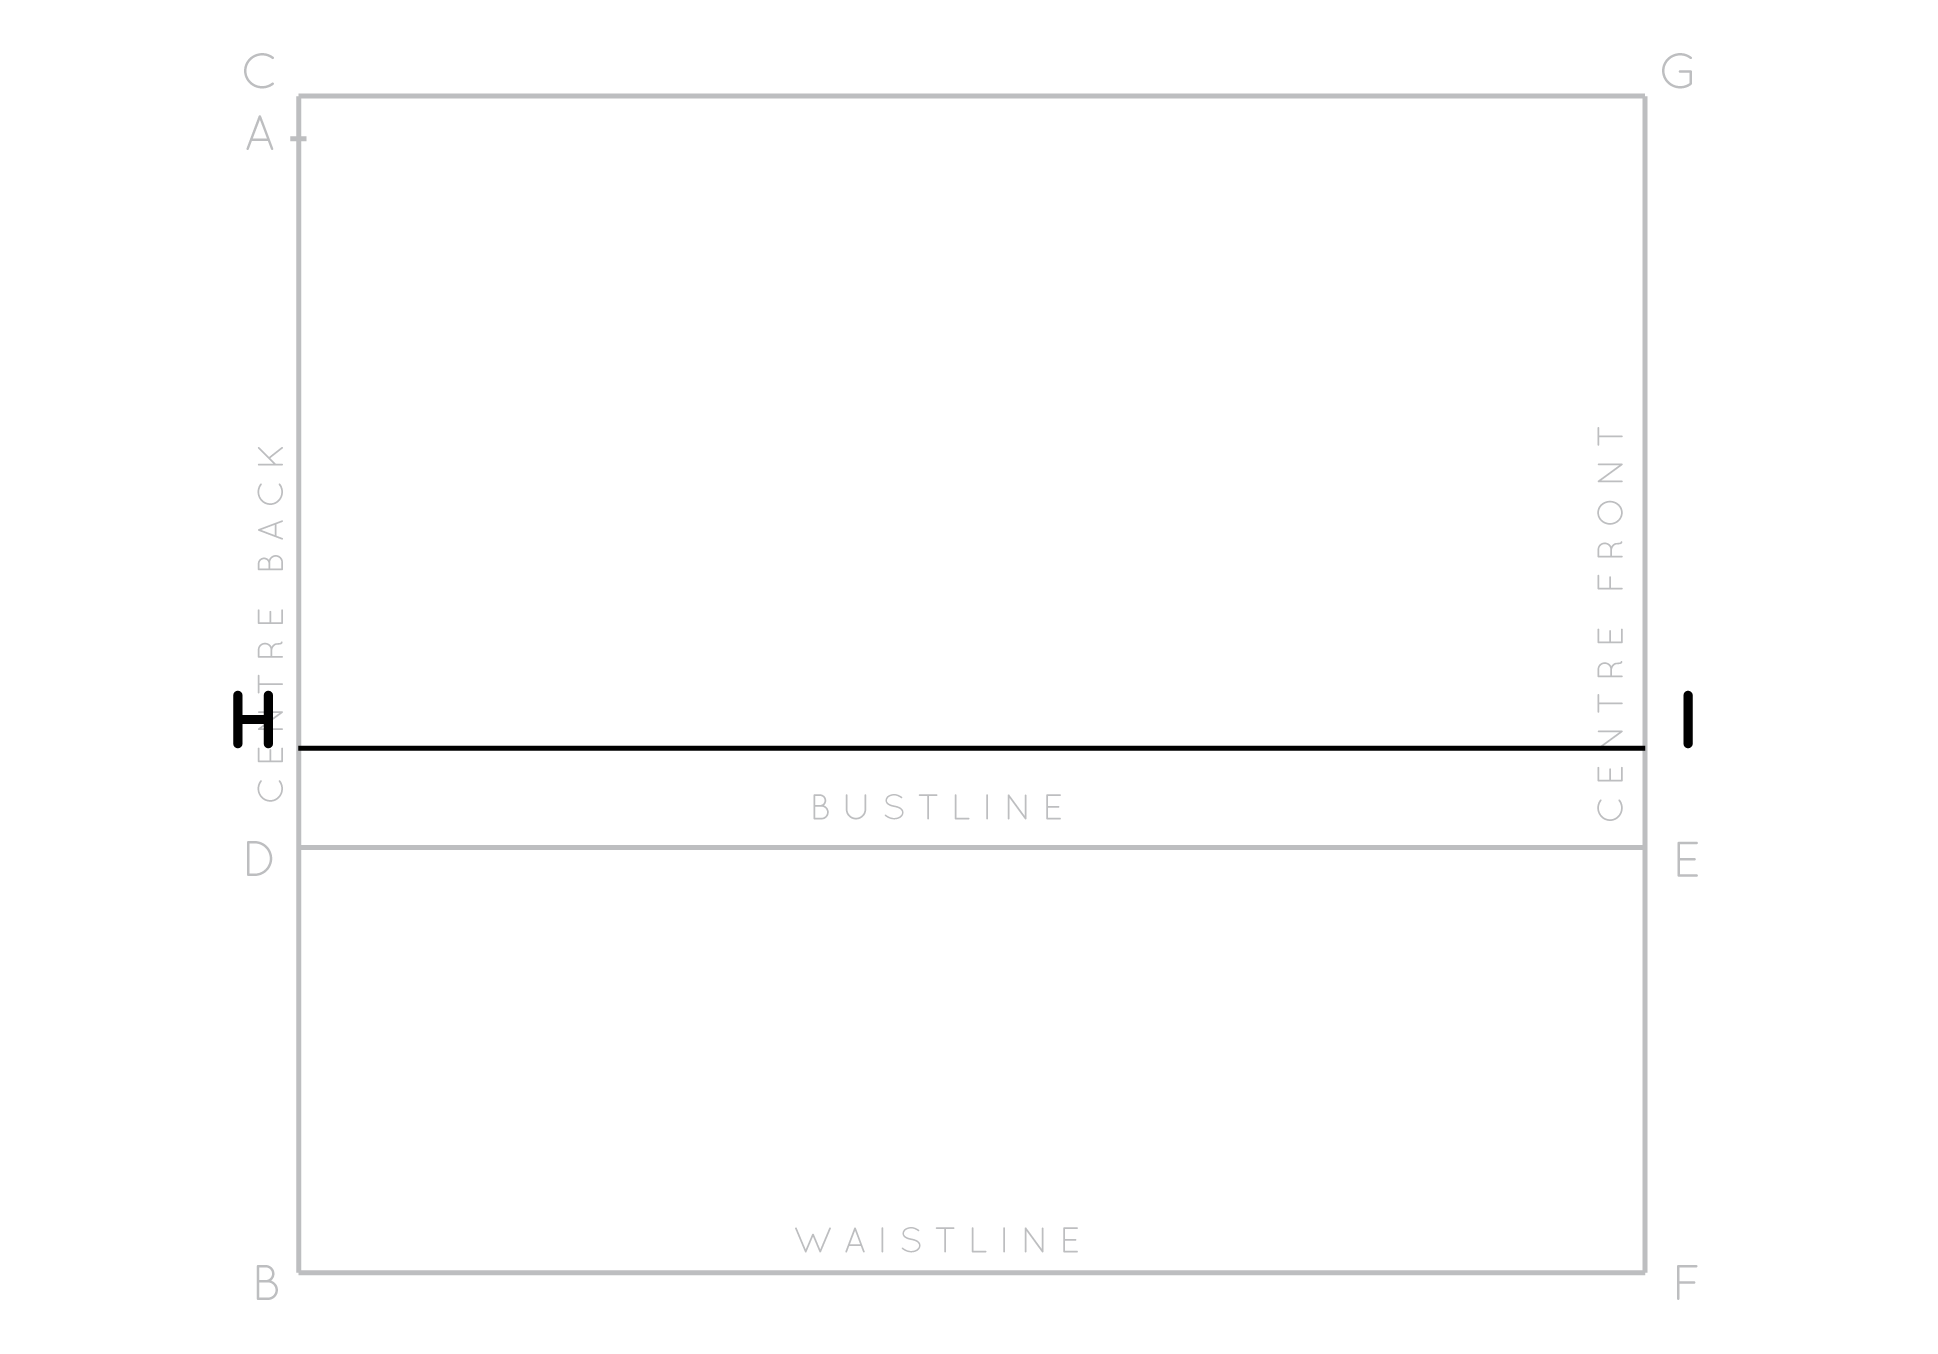
Take the armscye depth measurement and add 0.5cm (1/4"). Measuring from point A down towards point B, mark this distance on CENTRE BACK. Label this point as H

draft_bodice_block_11

Square out from H and extend the line until it intersects the CENTRE FRONT line. Mark the intersection point as I.

Construct the back neckline

draft_bodice_block_12

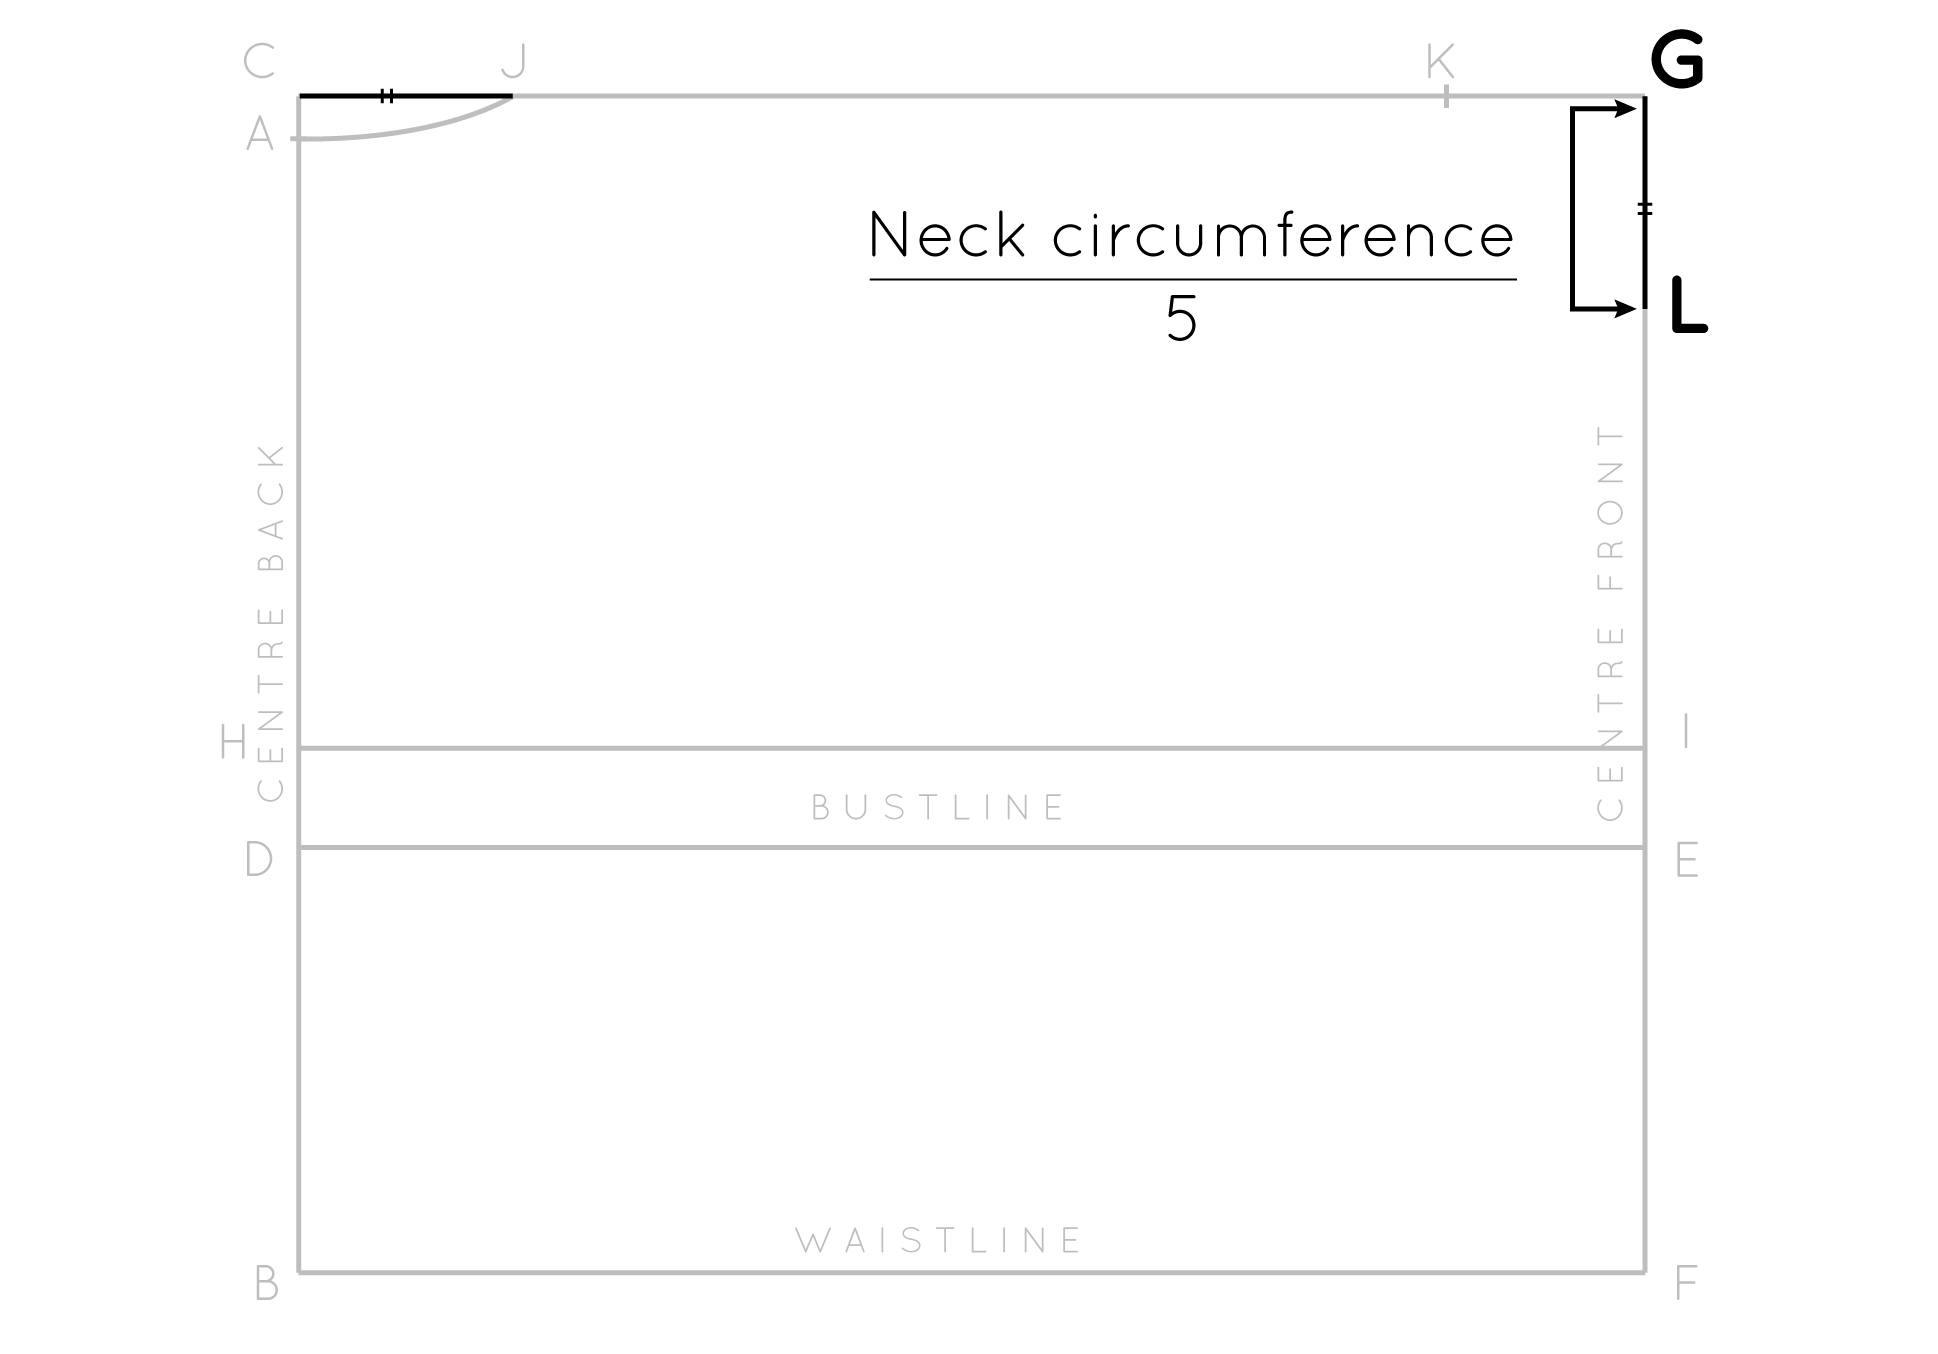
Take your neck measurement and divide it by 5. Measuring from point C, mark this measurement on line CJ. Label this point as point J

Join points A and J with a shallow curve  – this curve is the back neckline.


*Tip

draft_bodice_block_13

When working with curved lines, always check that they come to a right angle when they meet a straight seam (for example, the centre front, centre back or side seam). By doing this, you ensure that you will get a nice smooth curve when you cut a pair of a particular piece, or cut it on the fold. 


Construct the front neckline

draft_bodice_block_14

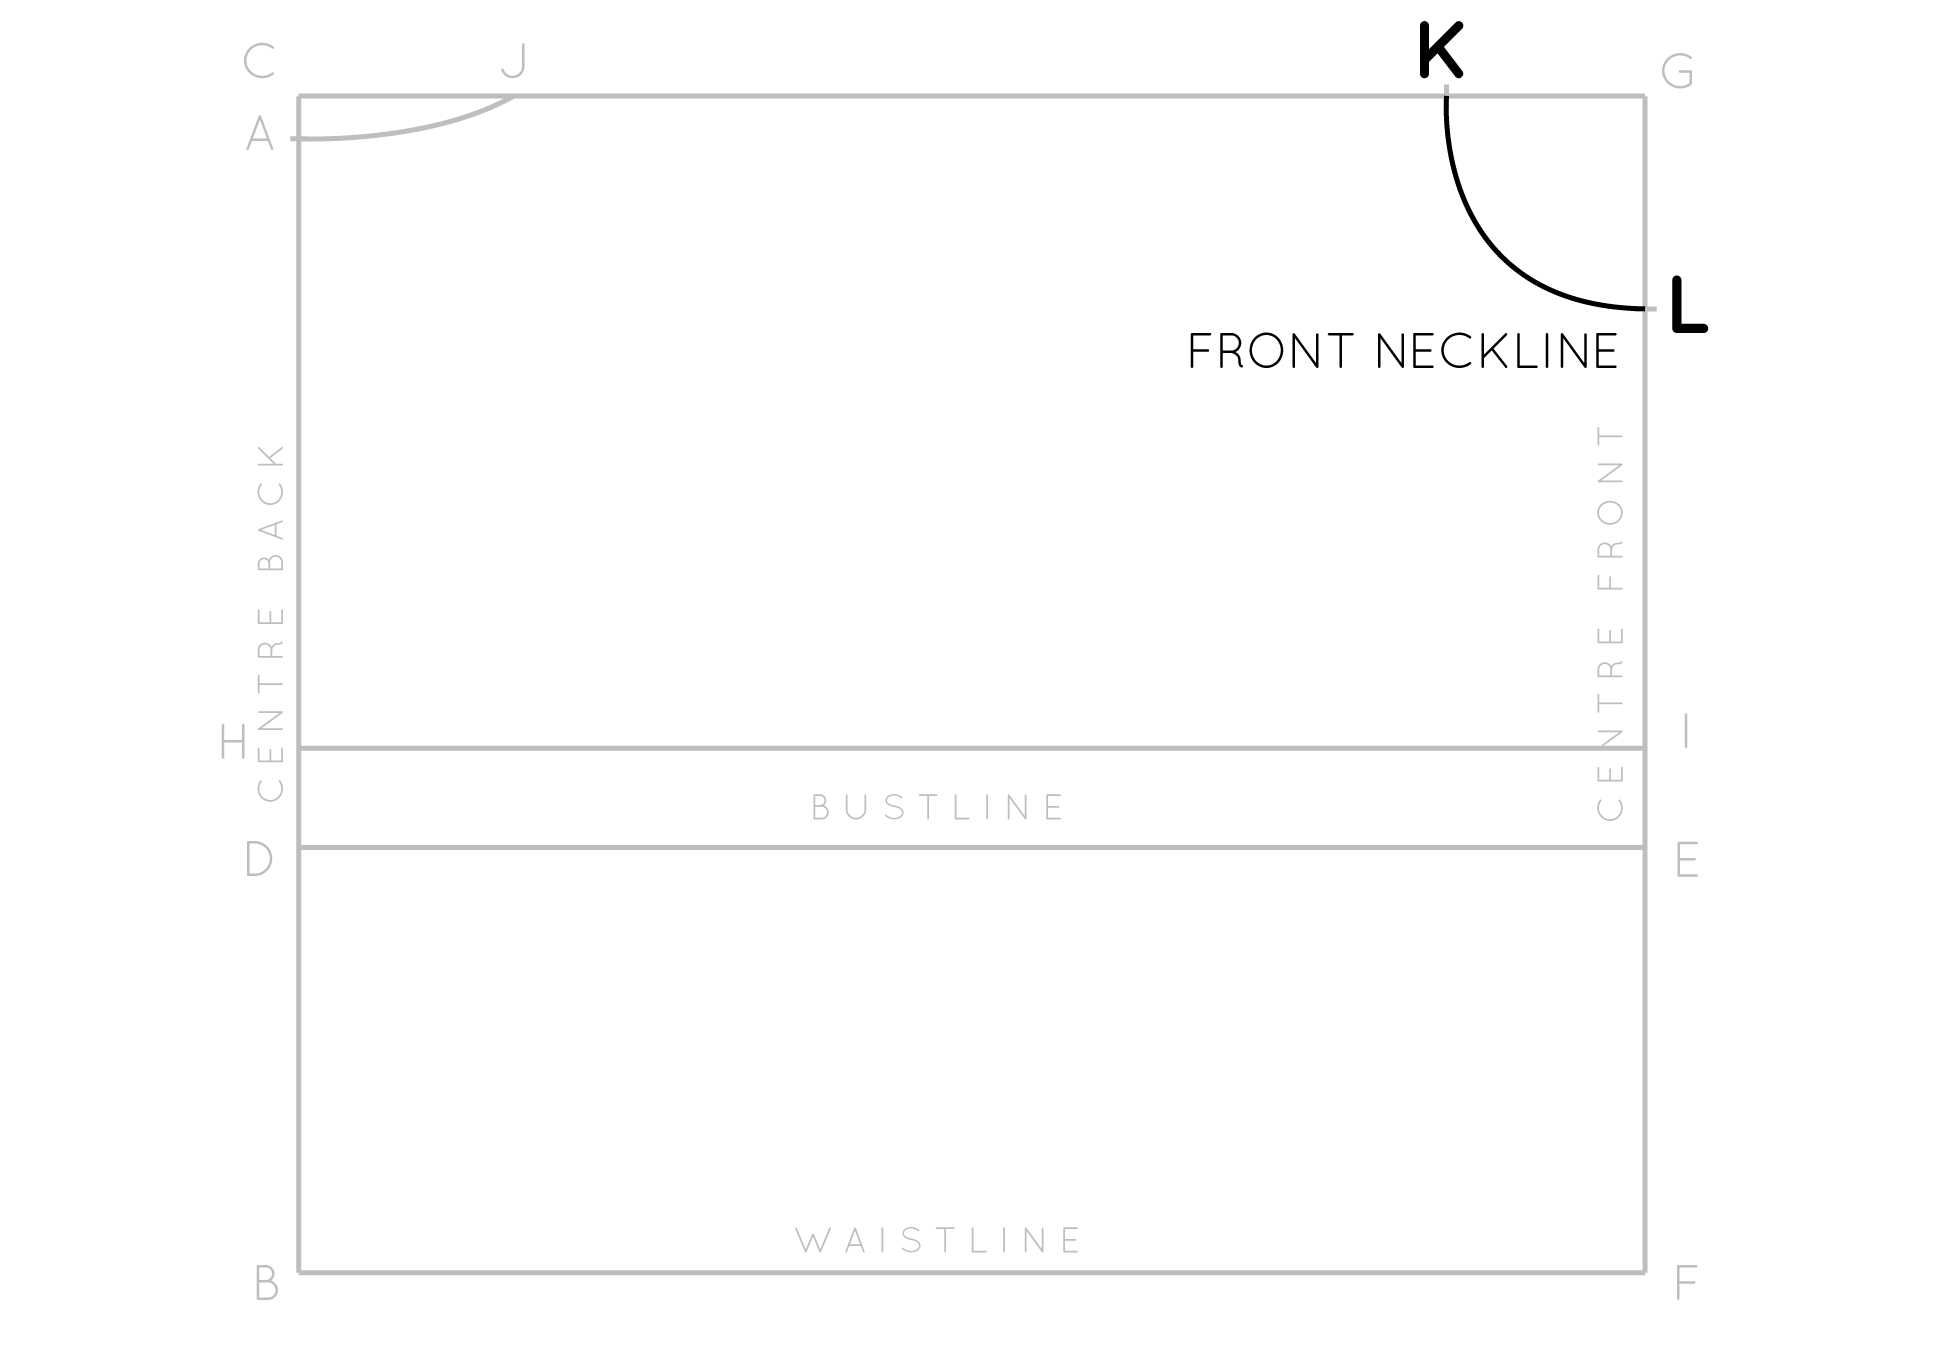
Take your neck measurement, divide it by 5 and then subtract 0.5cm (1/4"). Mark this measurement on line GC (measuring from point G) as point K.

draft_bodice_block_15

On the CENTRE FRONT (GF) mark a point the same length as CJ down from point G (neck circumference divided by 5). Mark the point as L.
 

draft_bodice_block_16

Join K to L with a deep curve – this is the front neckline. As we did with the back neckline, check that the curve of the neckline meets the centre front at a right angle (so that you will get a nice smooth neckline when you cut the piece on the fold).

Drafting the BACK SHOULDER SEAM

draft_bodice_block_17

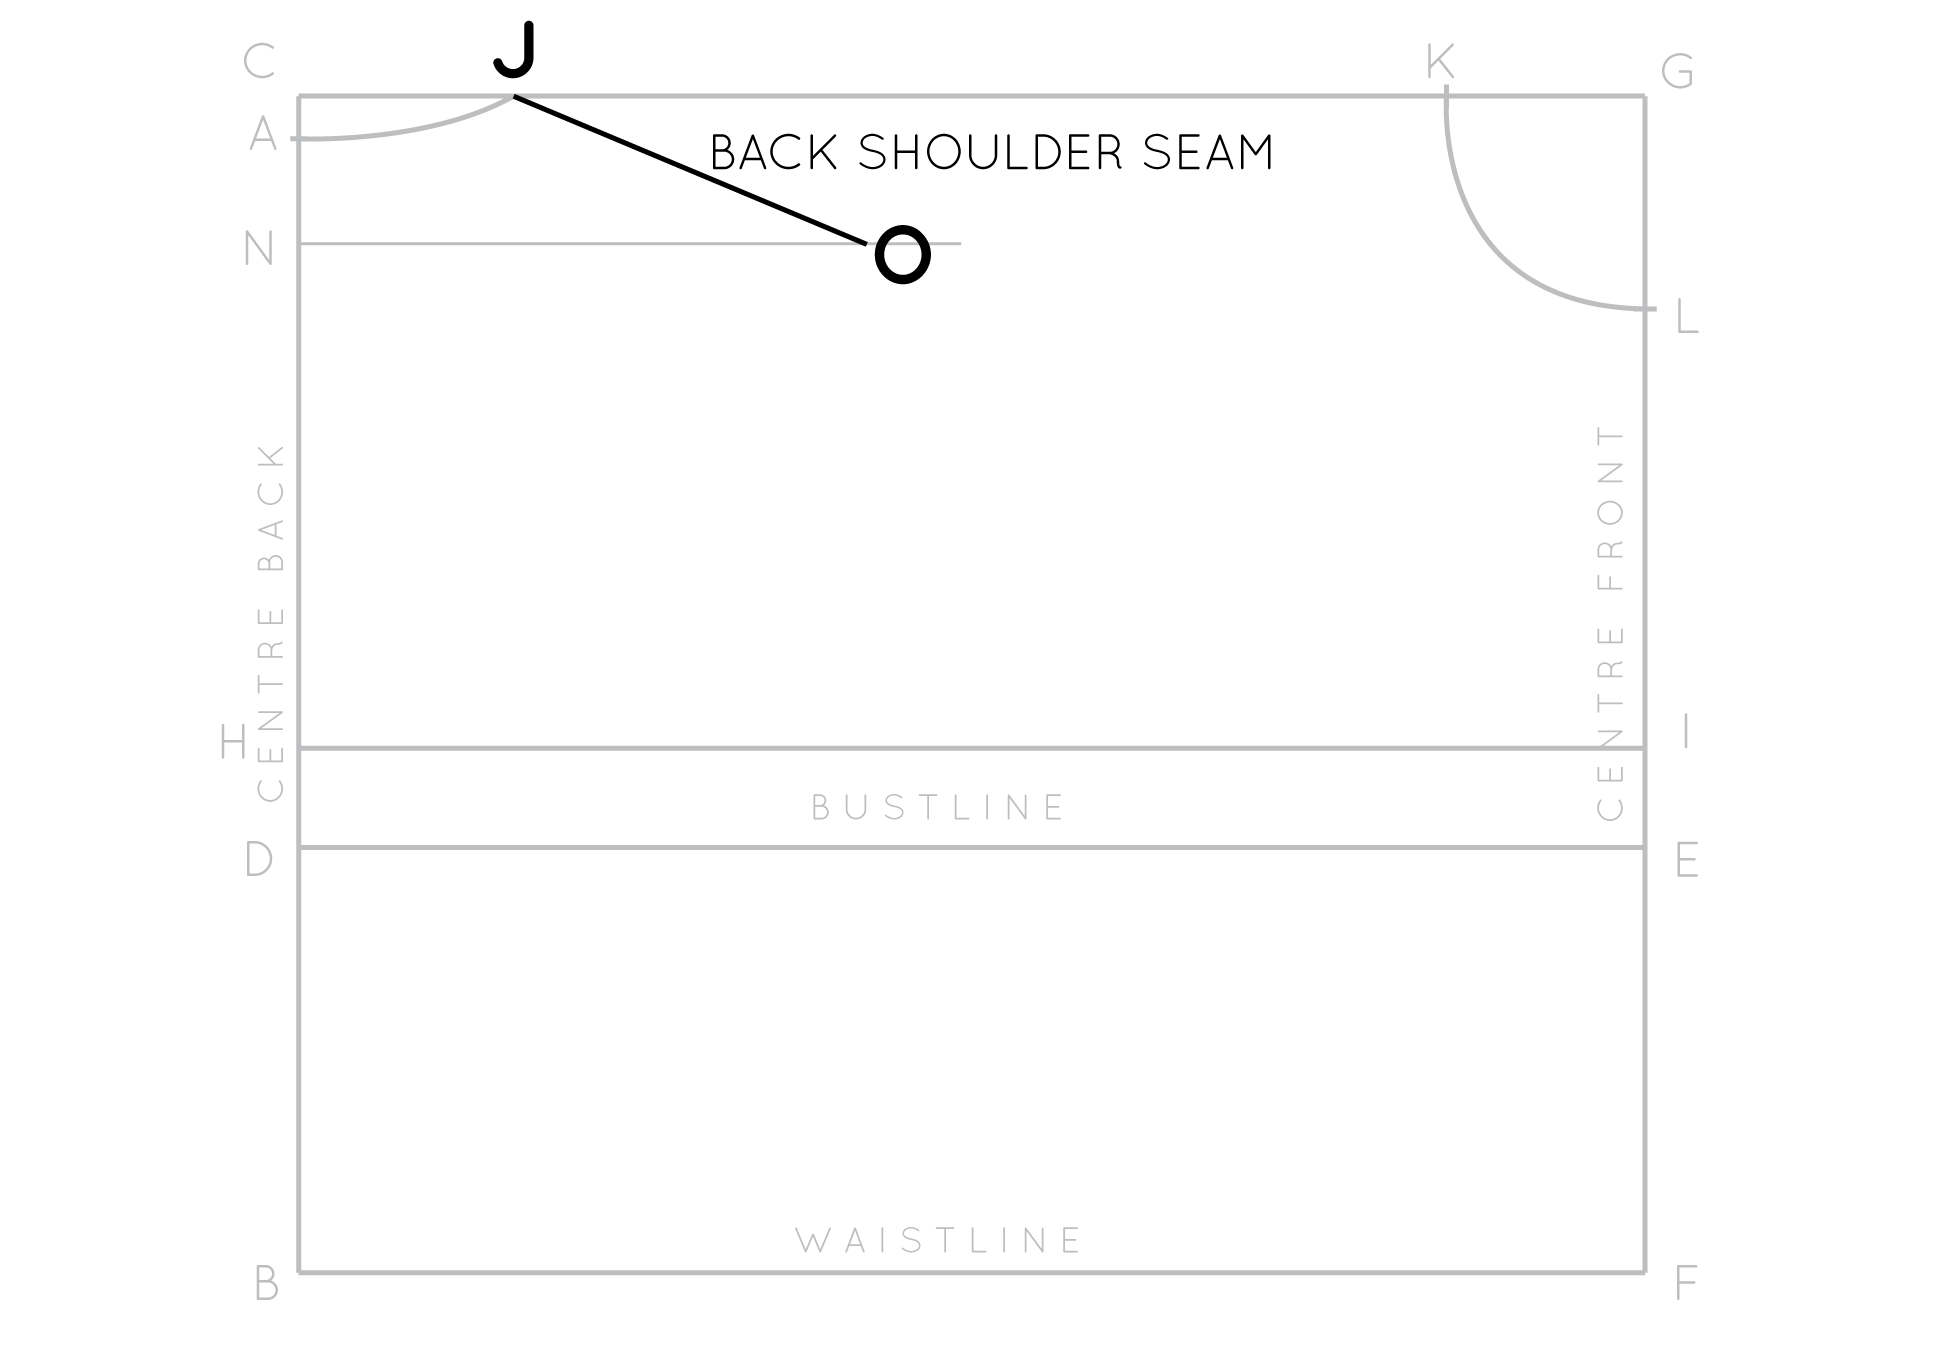
Take your armscye depth measurement and divide it by 5 and then subtract 0.5cm (1/4"). Mark this distance, measuring down from A on the CENTRE BACK as point N.

Square out from point N. This is just a guideline, so does not have to be a specific length.

draft_bodice_block_18

Take your shoulder length measurement and add 1.5cm (1/2") (this is the allowance for the shoulder dart). With this length in mind (or written down if you have a bad memory like me), use a ruler to pivot from point J until your measurement passes through the perpendicular line drawn from N. Draw a straight line to create your shoulder line. Label the endpoint as O.

Drafting the back shoulder dart

draft_bodice_block_19

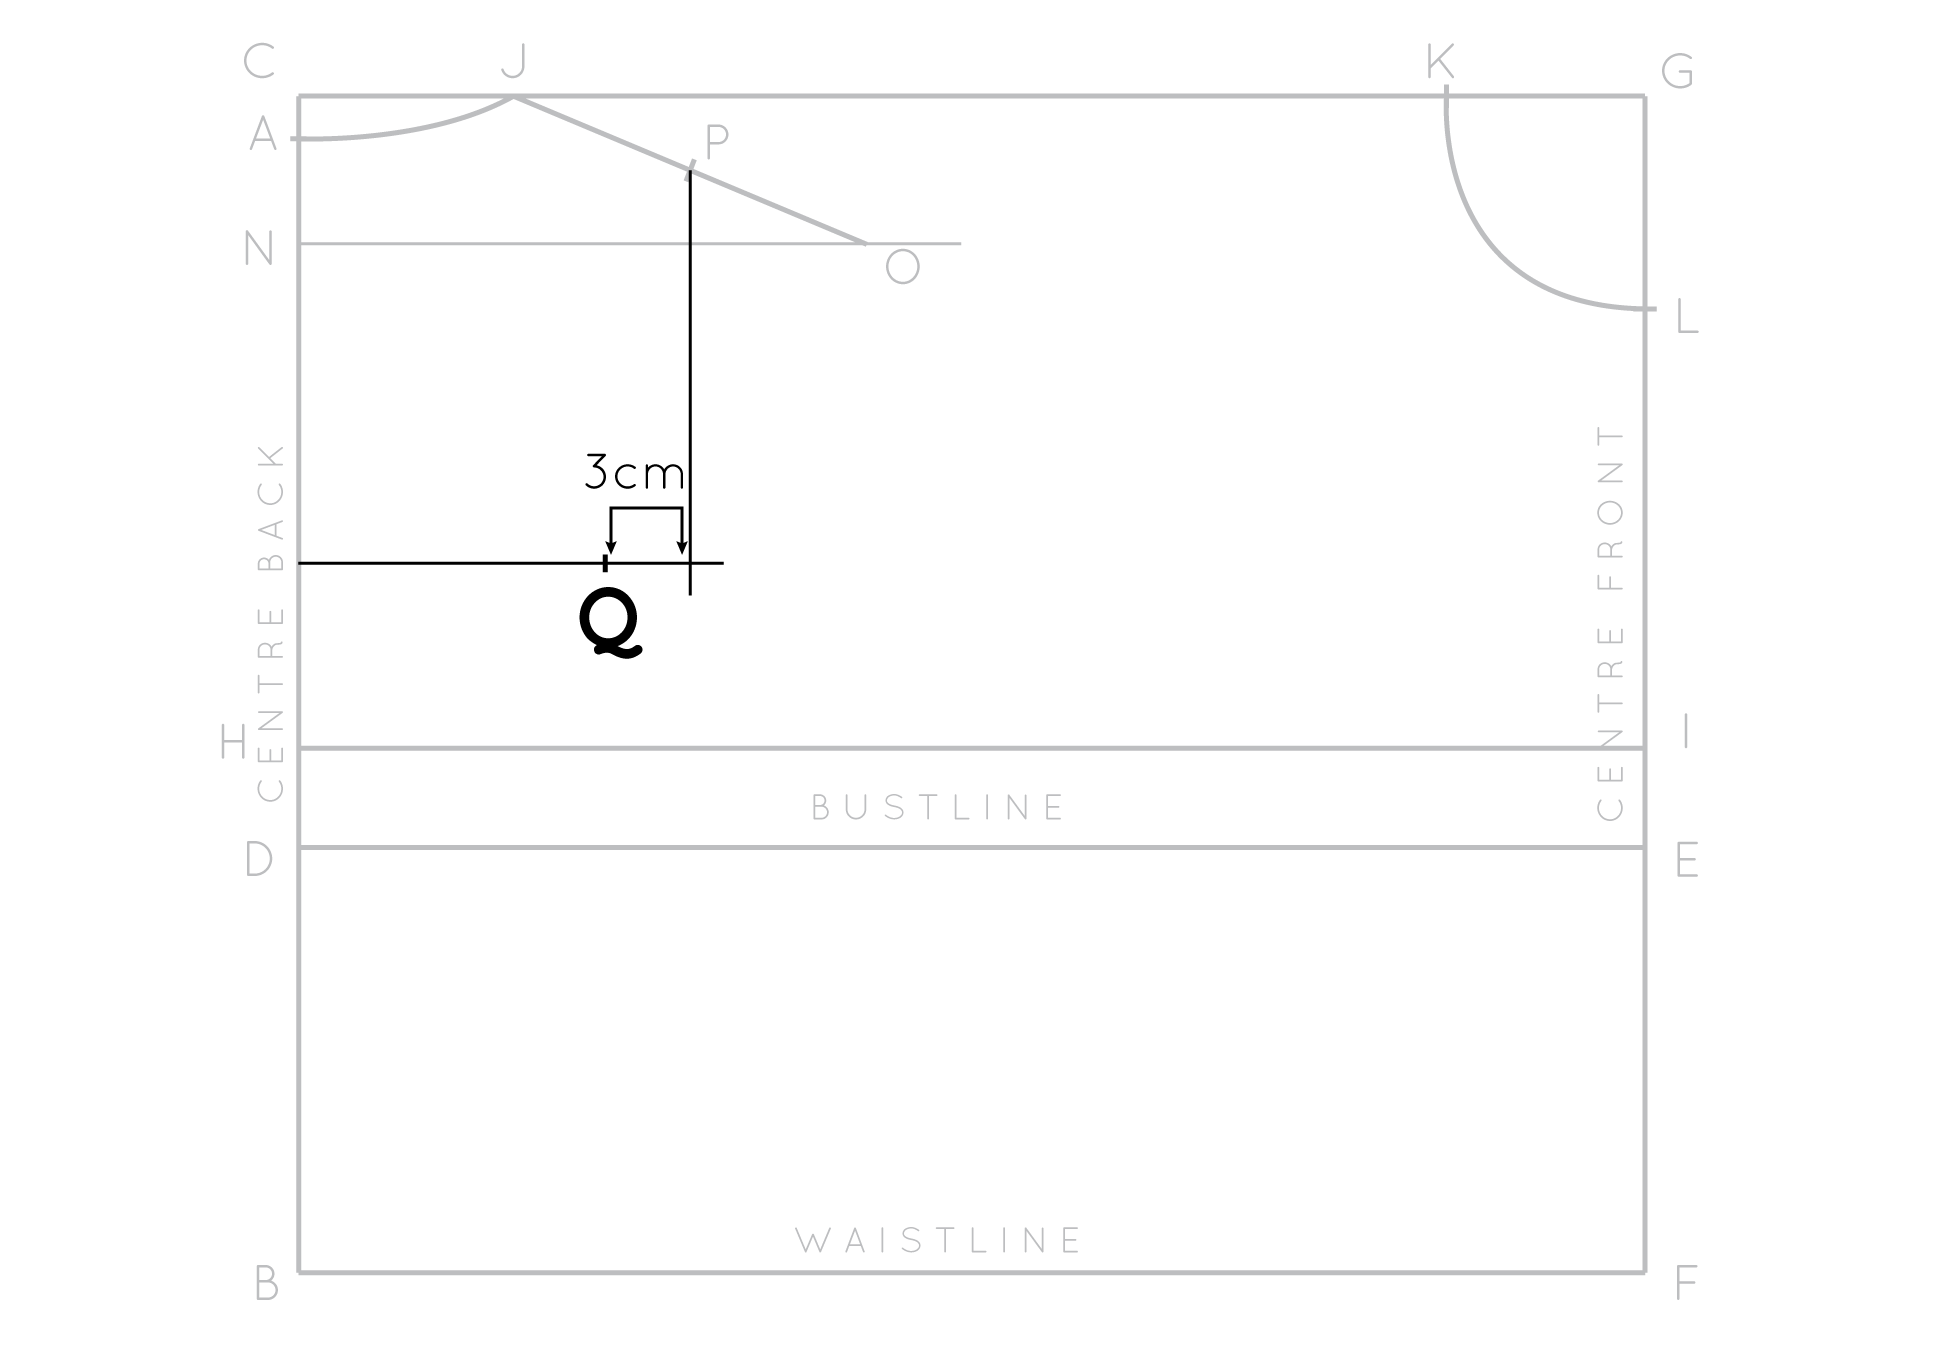
Mark the  midpoint of the back shoulder seam (line JO) (i.e. the distance halfway between J and O) as point P.

draft_bodice_block_20

Mark a point 15cm (6") down from point A, on the CENTRE BACK line, and square out from this point. Once again, this is only a guideline, so does not need to be a specific length.

draft_bodice_block_21

From point P, draw a guideline parallel to CENTRE BACK, extending down until it passes through the perpendicular line that you marked in the previous step.

draft_bodice_block_22

From where these lines intersect, mark a point 3cm (1 1/4") towards the CENTRE BACK and label as point Q. Q will become the point of the back shoulder dart.

draft_bodice_block_23

Mark a point 1.5cm (1/2") from P on the back shoulder seam (line JO), towards O. Label this point as point R

draft_bodice_block_24

Join P to Q to create the first dart arm, and point R to Q to create the second dart arm. 


Download The Little Book of Seam Finishes

Would you like to make clothes that are as beautiful on the inside as they are on the outside?

Sign-up to the newsletter to stay in the loop to receive inspiring content that will help you become a more confident maker. And get started with a free e-book!


Mark the bust point

draft_bodice_block_25

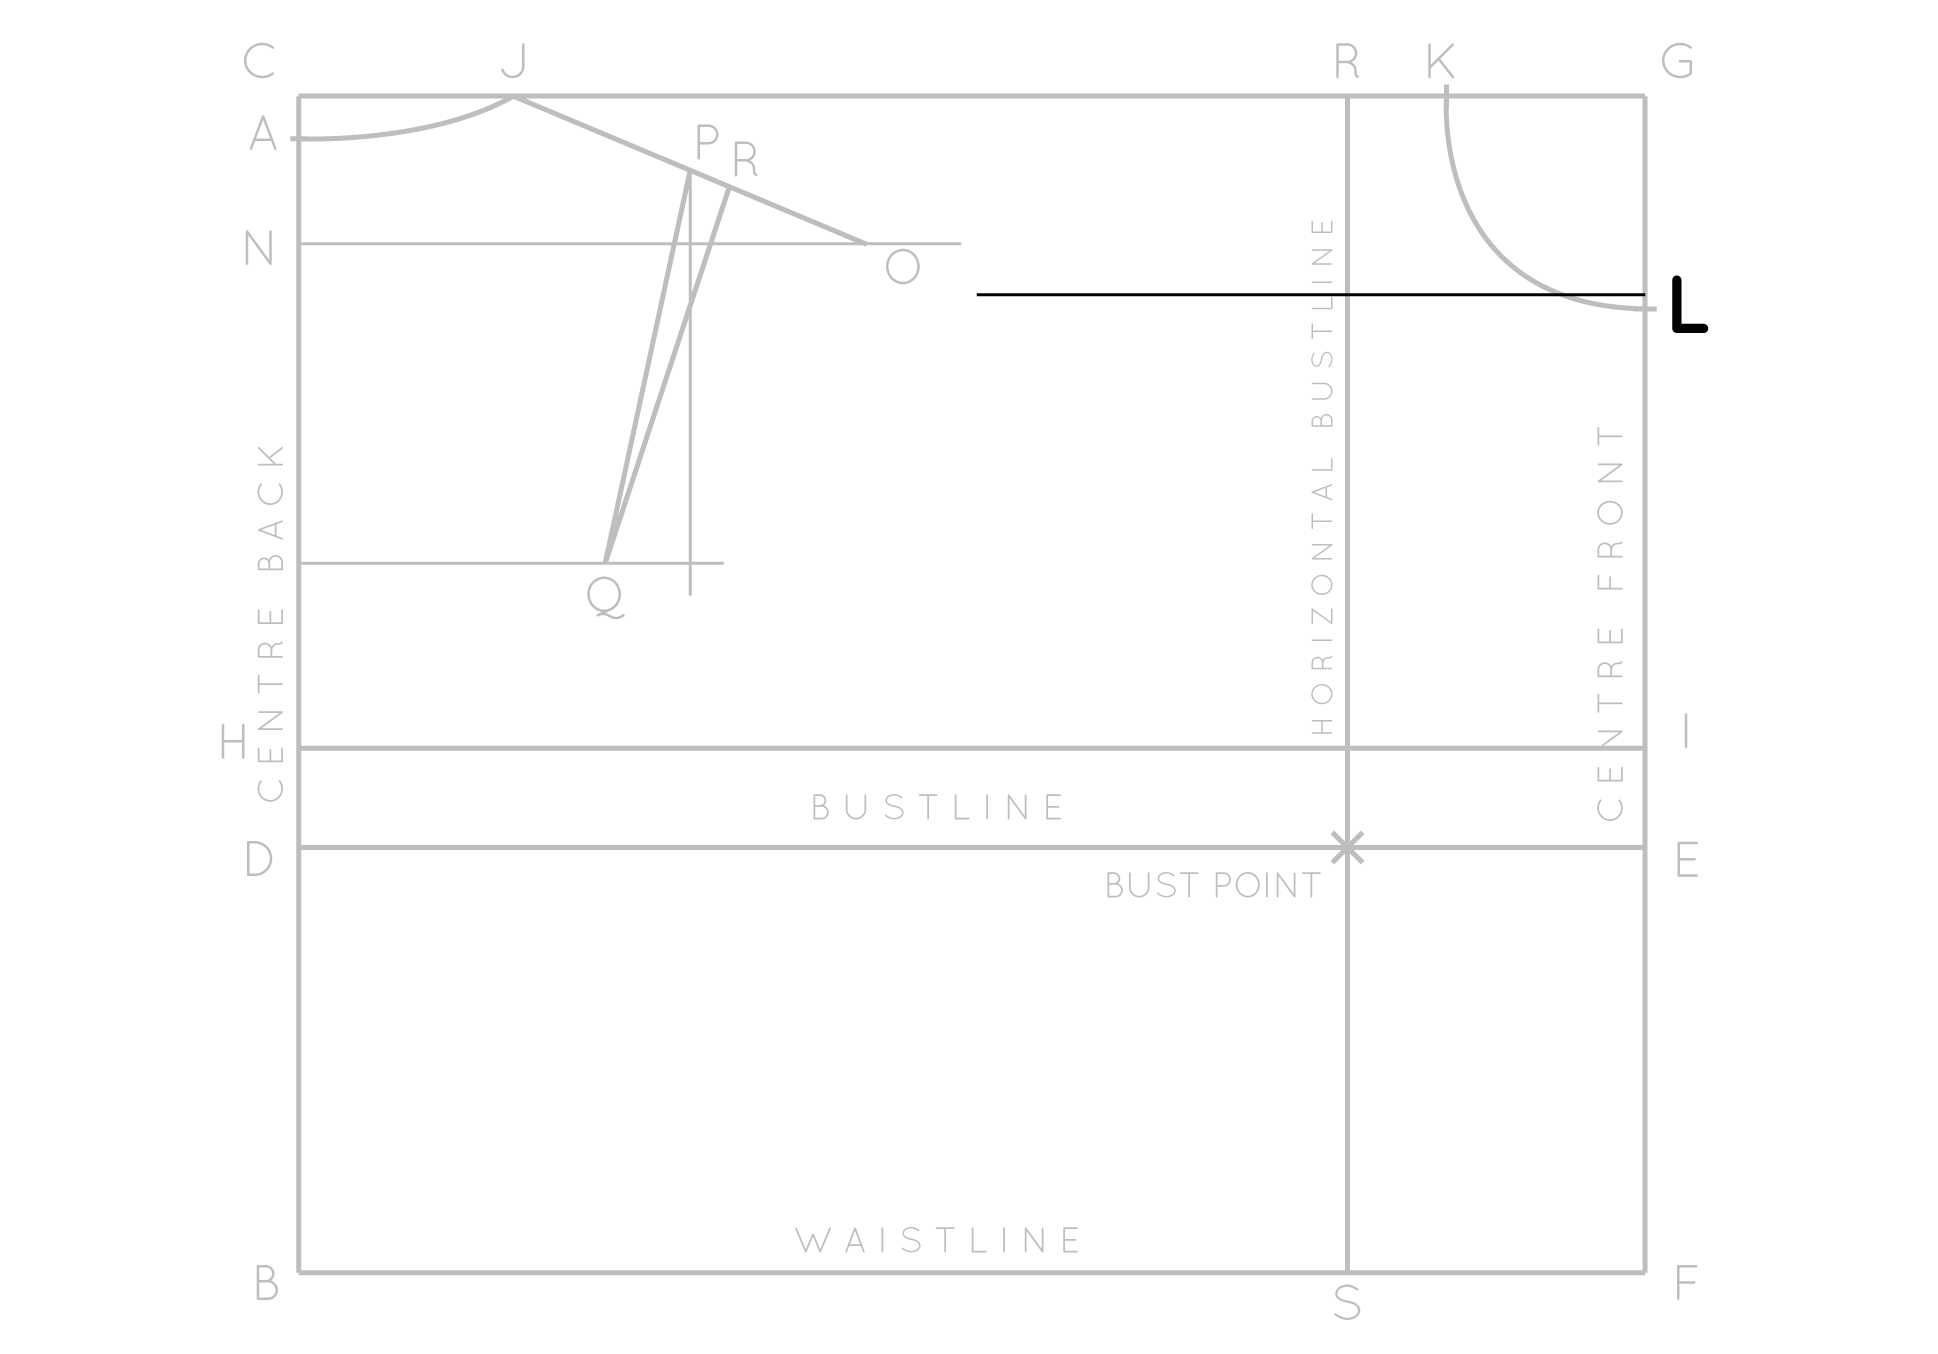
Move your attention to you BUST LINE (line ED). Take your bust point to point measurement and divide it by 2 (as we are working on the half) and add 0.5cm (1/4") (allocated ease). Take note of this measurement. From point E, on the bustline, mark a point, the distance you just found from point E. Mark this point as your BUST POINT.

draft_bodice_block_27

Draw a vertical line, parallel to the centre front and centre back, passing through the bust point, intersecting all your horizontal guidelines. This line is the VERTICAL BUST LINE. Where it intersects CG label as point R and point S where it intersects the WAISTLINE (BF). 

Draft the front shoulder dart

draft_bodice_block_28

Mark a point 0.5cm (1/4") up from L on the CENTRE FRONT (line GF) and square out from this point. Again, this is just a guideline, so it doesn't have to be a specific length. 

draft_bodice_block_29

This is one of the equations taken from the BurdaStyle tutorial that is very handy (I am not sure if I would have been able to work this out without this guidance!)

Add or subtract 0.6 cm (1/4") to 7cm (2 3/4") for each 4cm (1 1/2") bust increment above or below 88cm (34 1/2"). For bigger busts you will need a larger dart (add to 7cm), and for a smaller bust you will need a small dart (therefore subtract from 7cm). 

For example, my bust measurement is 84cm (33"), which is 4cm (1 1/2") below 88cm (34 1/2"), therefore I need to subtract 0.6cm (1/4") from 7cm (2 3/4"), leaving a dart width of 6.4cm (2 1/2"). 

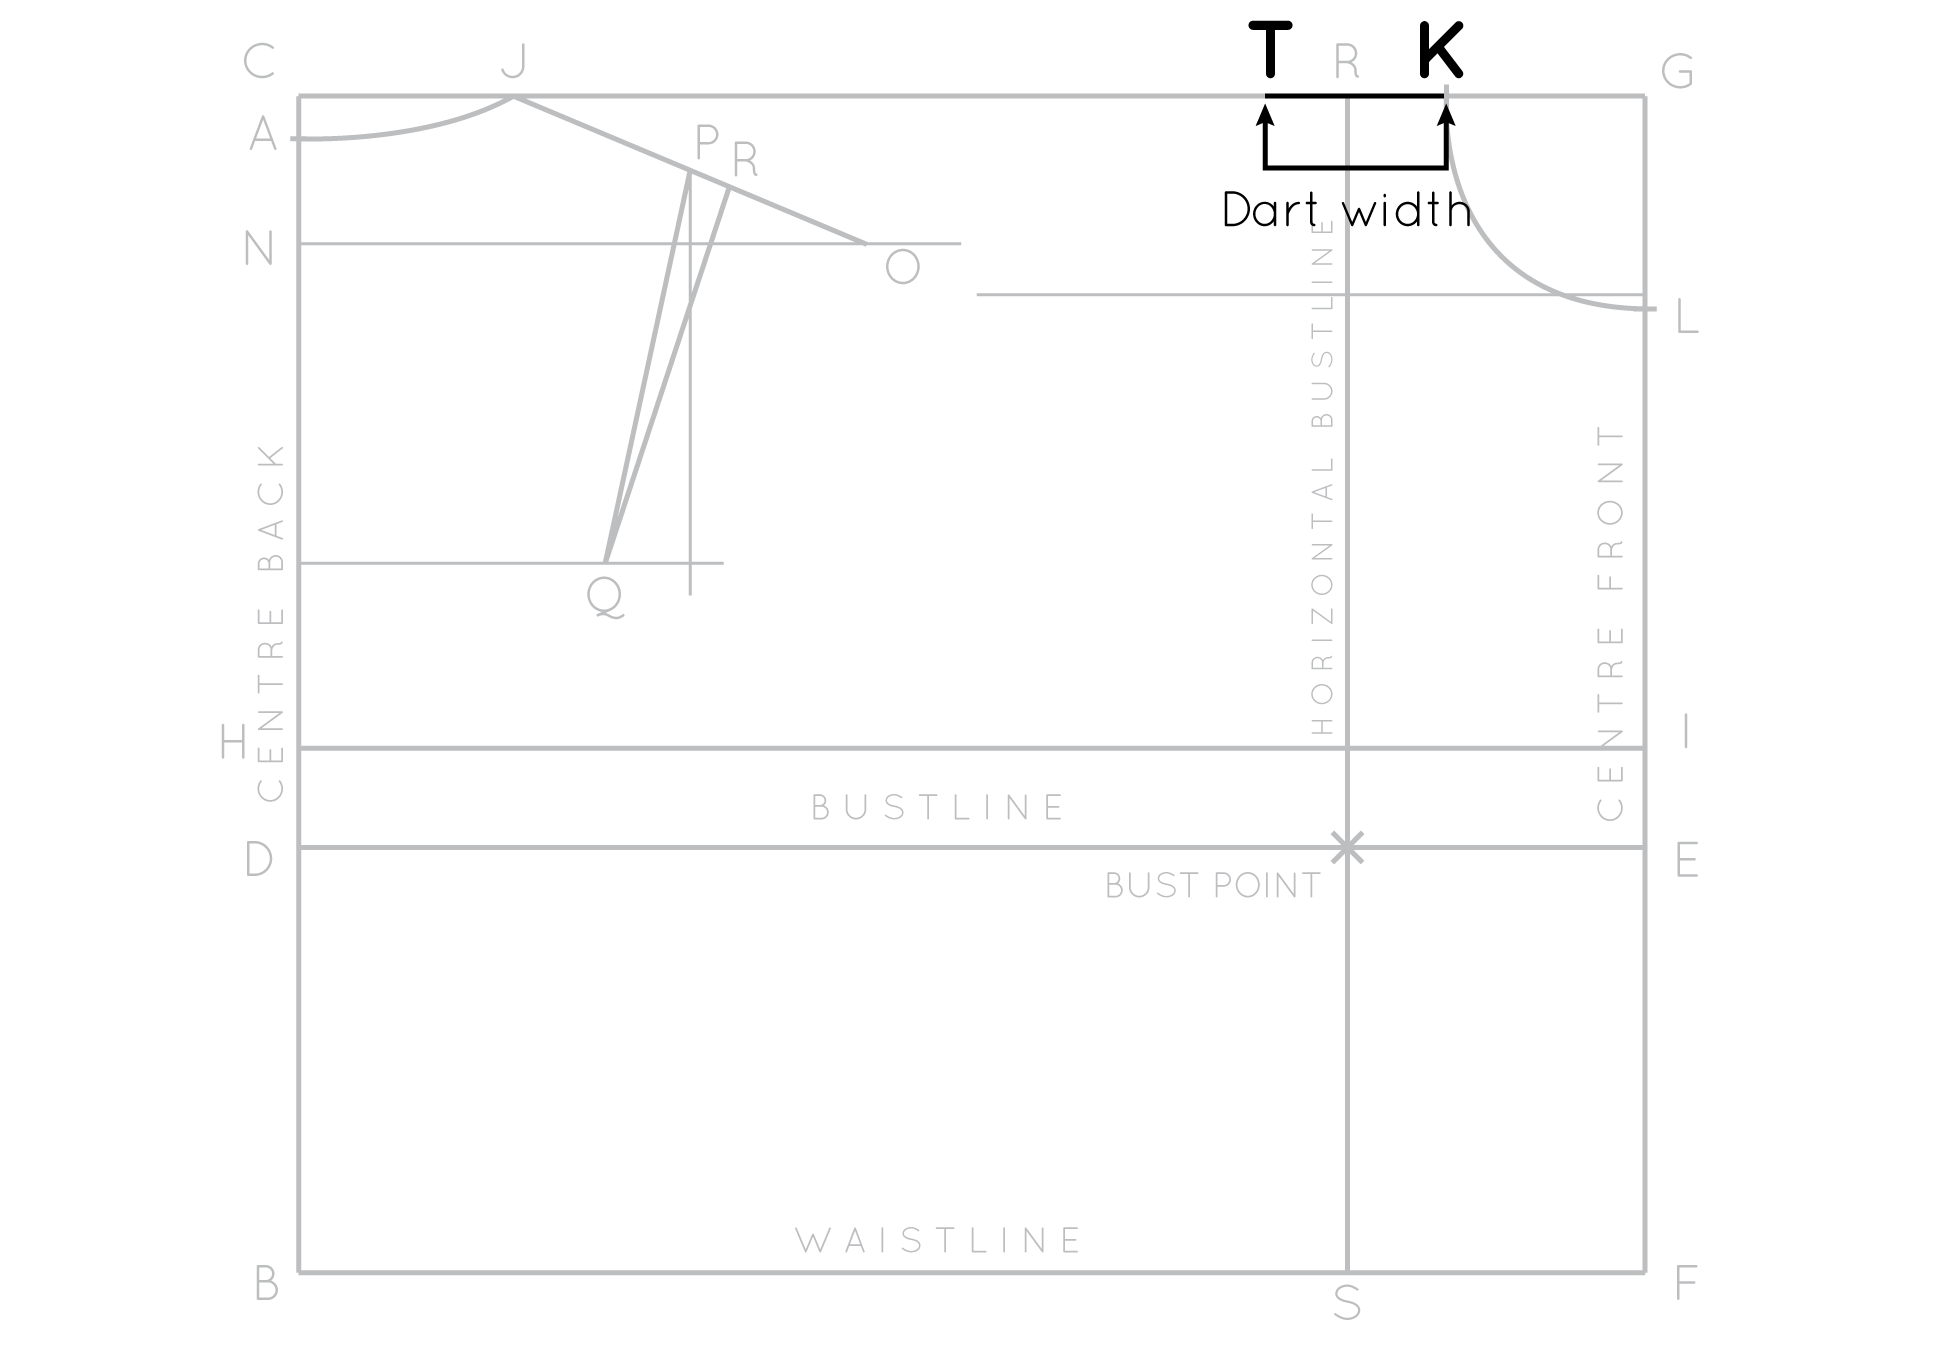
Take dart width measurement and mark this distance from K as point T.

draft_bodice_block_30

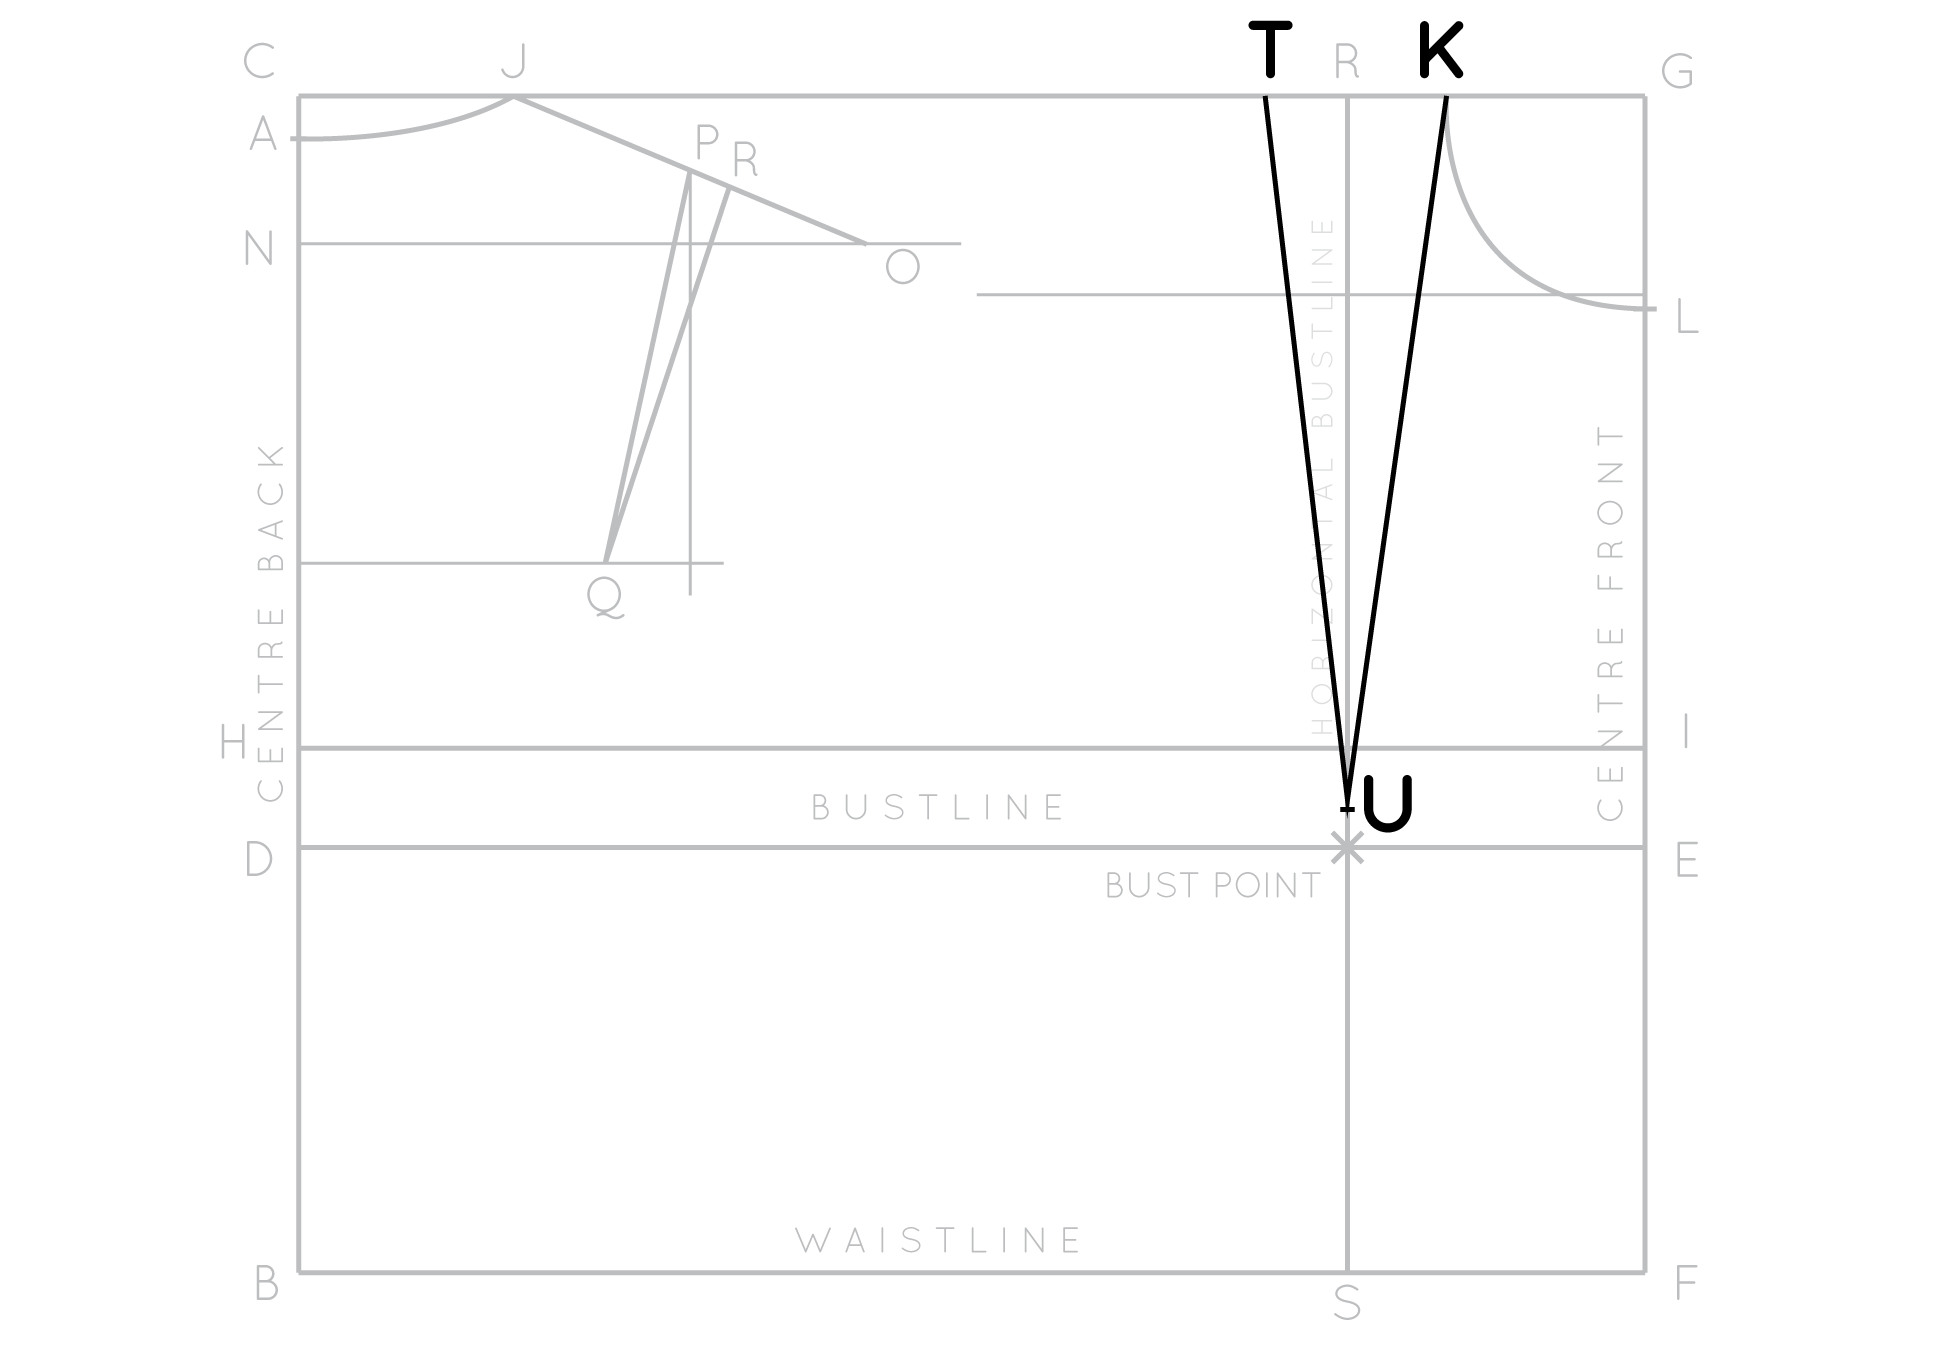
Move down to the BUST POINT and mark a point 1cm (3/8") above it on line RS (vertical bust line) as point U. This will be the point of your dart. The reason why we lift the dart point a little above the bust point is that if the dart point was right at bust point you would be left with Madonna style pointed breasts! 

Join K and T to U with straight lines to create the front shoulder dart.

Drafting front shoulder seam

draft_bodice_block_31

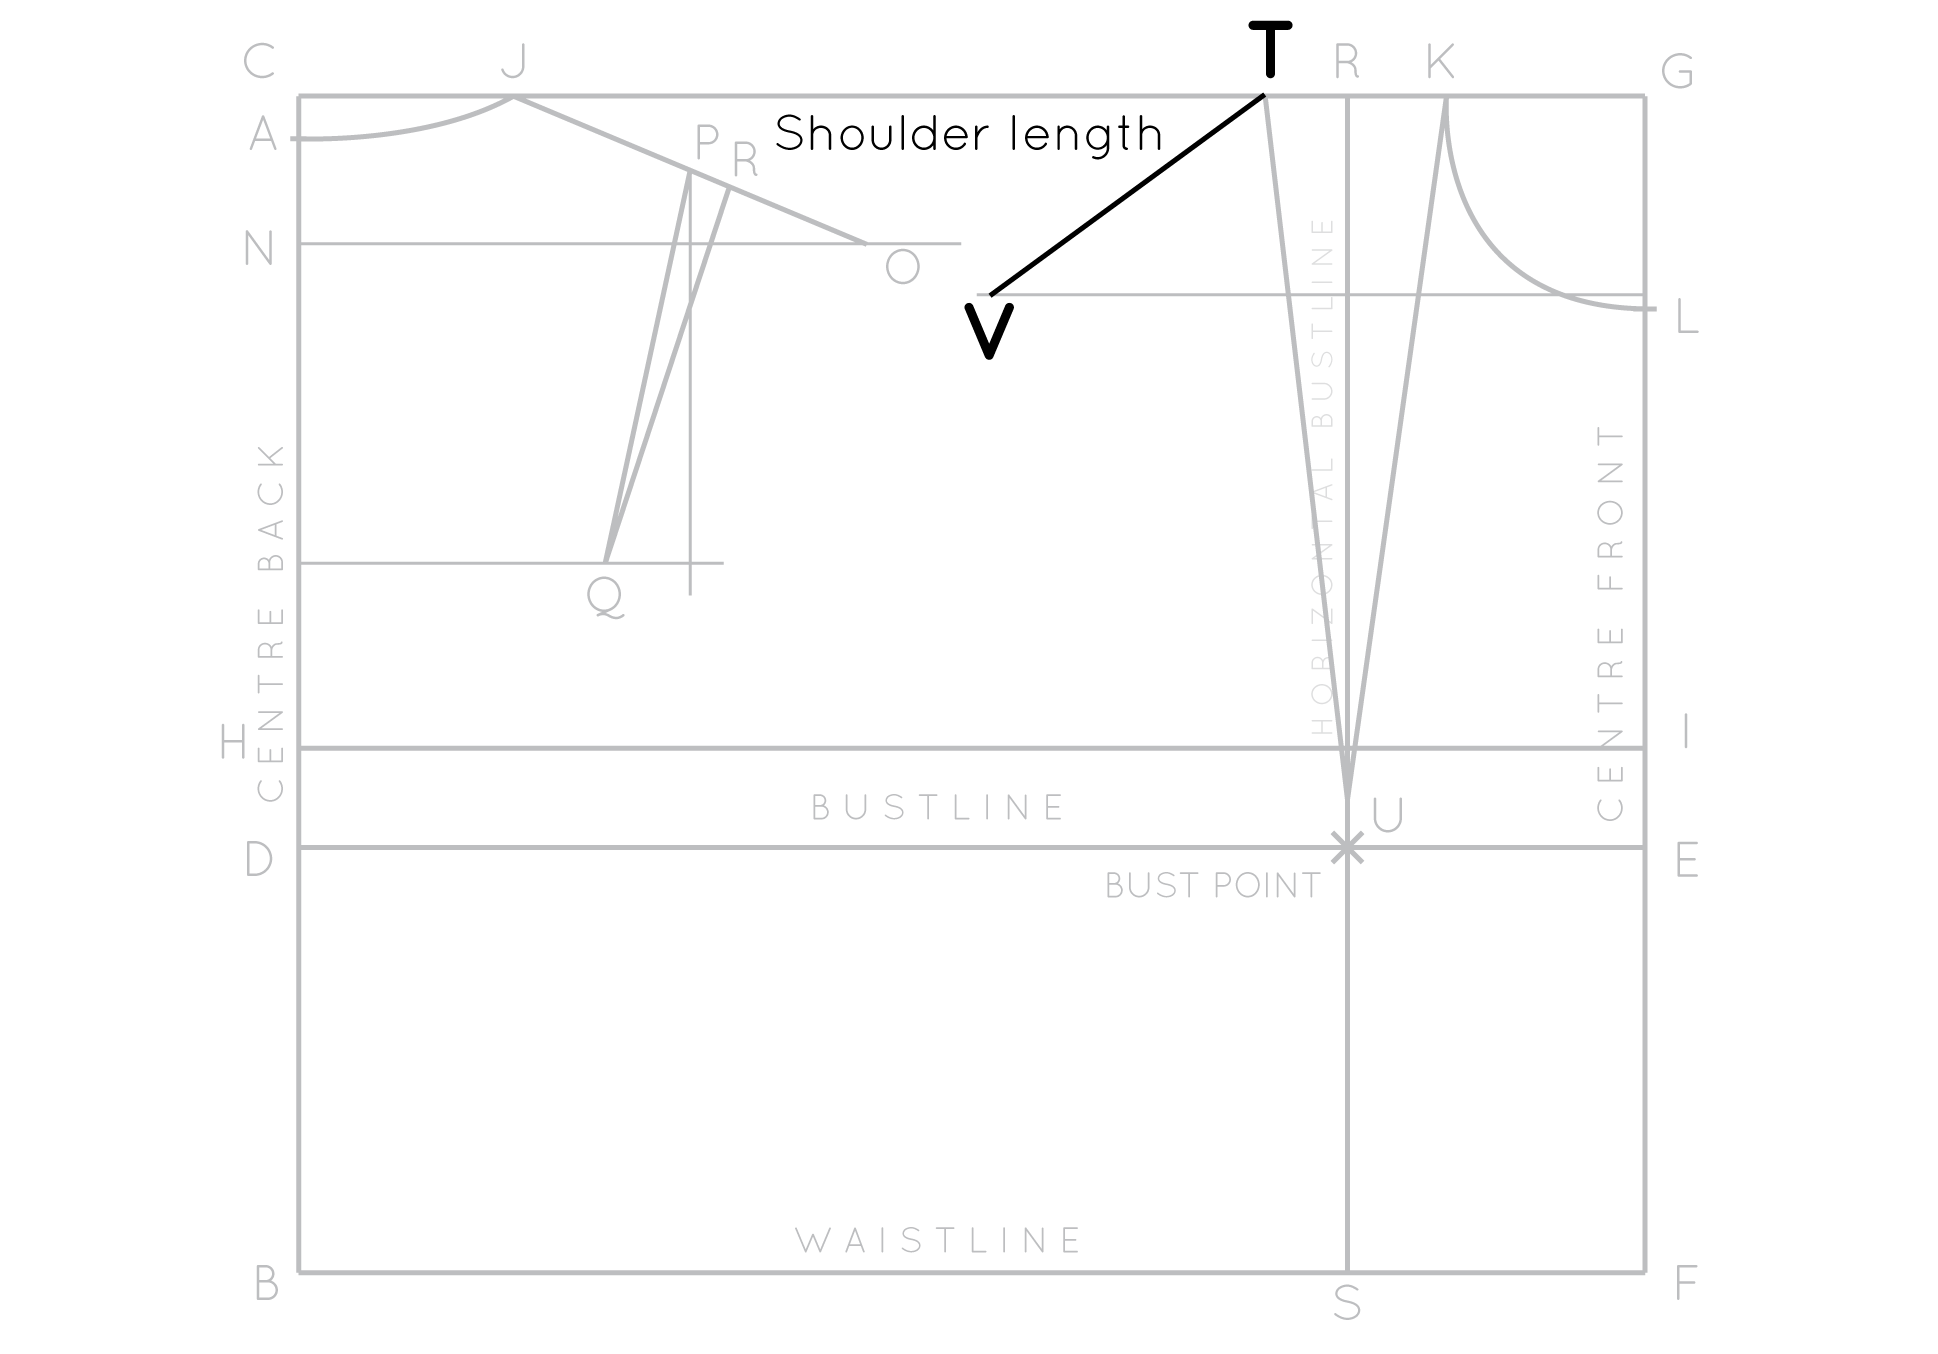
Take your shoulder length measurement and, with this length in mind, and using your ruler, pivot from point T until your measurement passes through the perpendicular line drawn from above point L. Draw a straight line - creating your front shoulder line. Mark the endpoint as point V.

Please note: it's not a problem if your shoulder lines overlap - just keep working through the tutorial. When you get to the end you will be tracing a copy so that you have separate front and back bodice pieces and can add seam allowance.

Drafting the armhole

draft_bodice_block_32

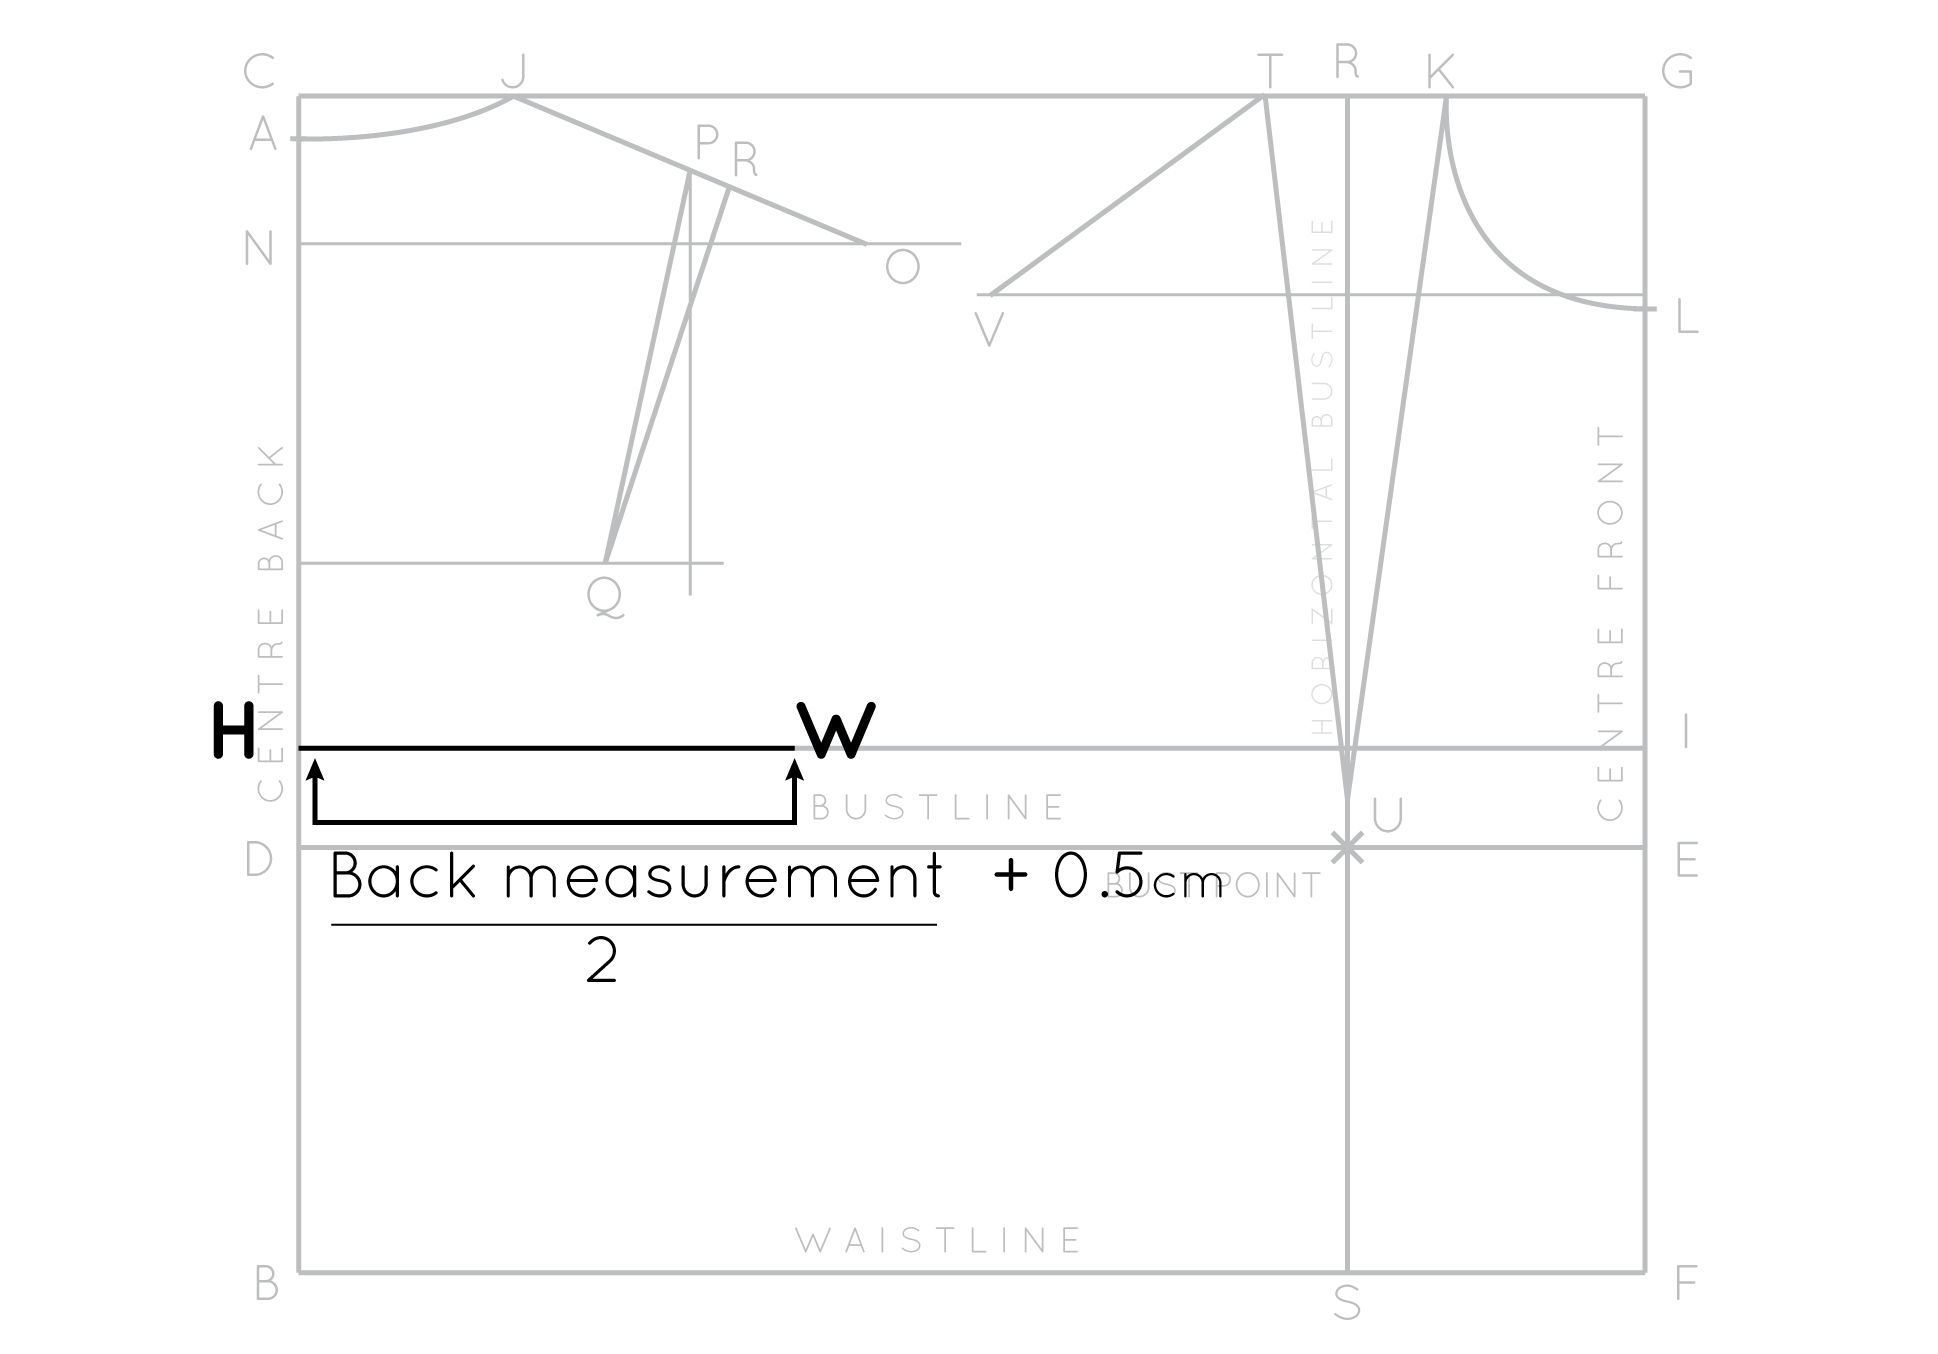
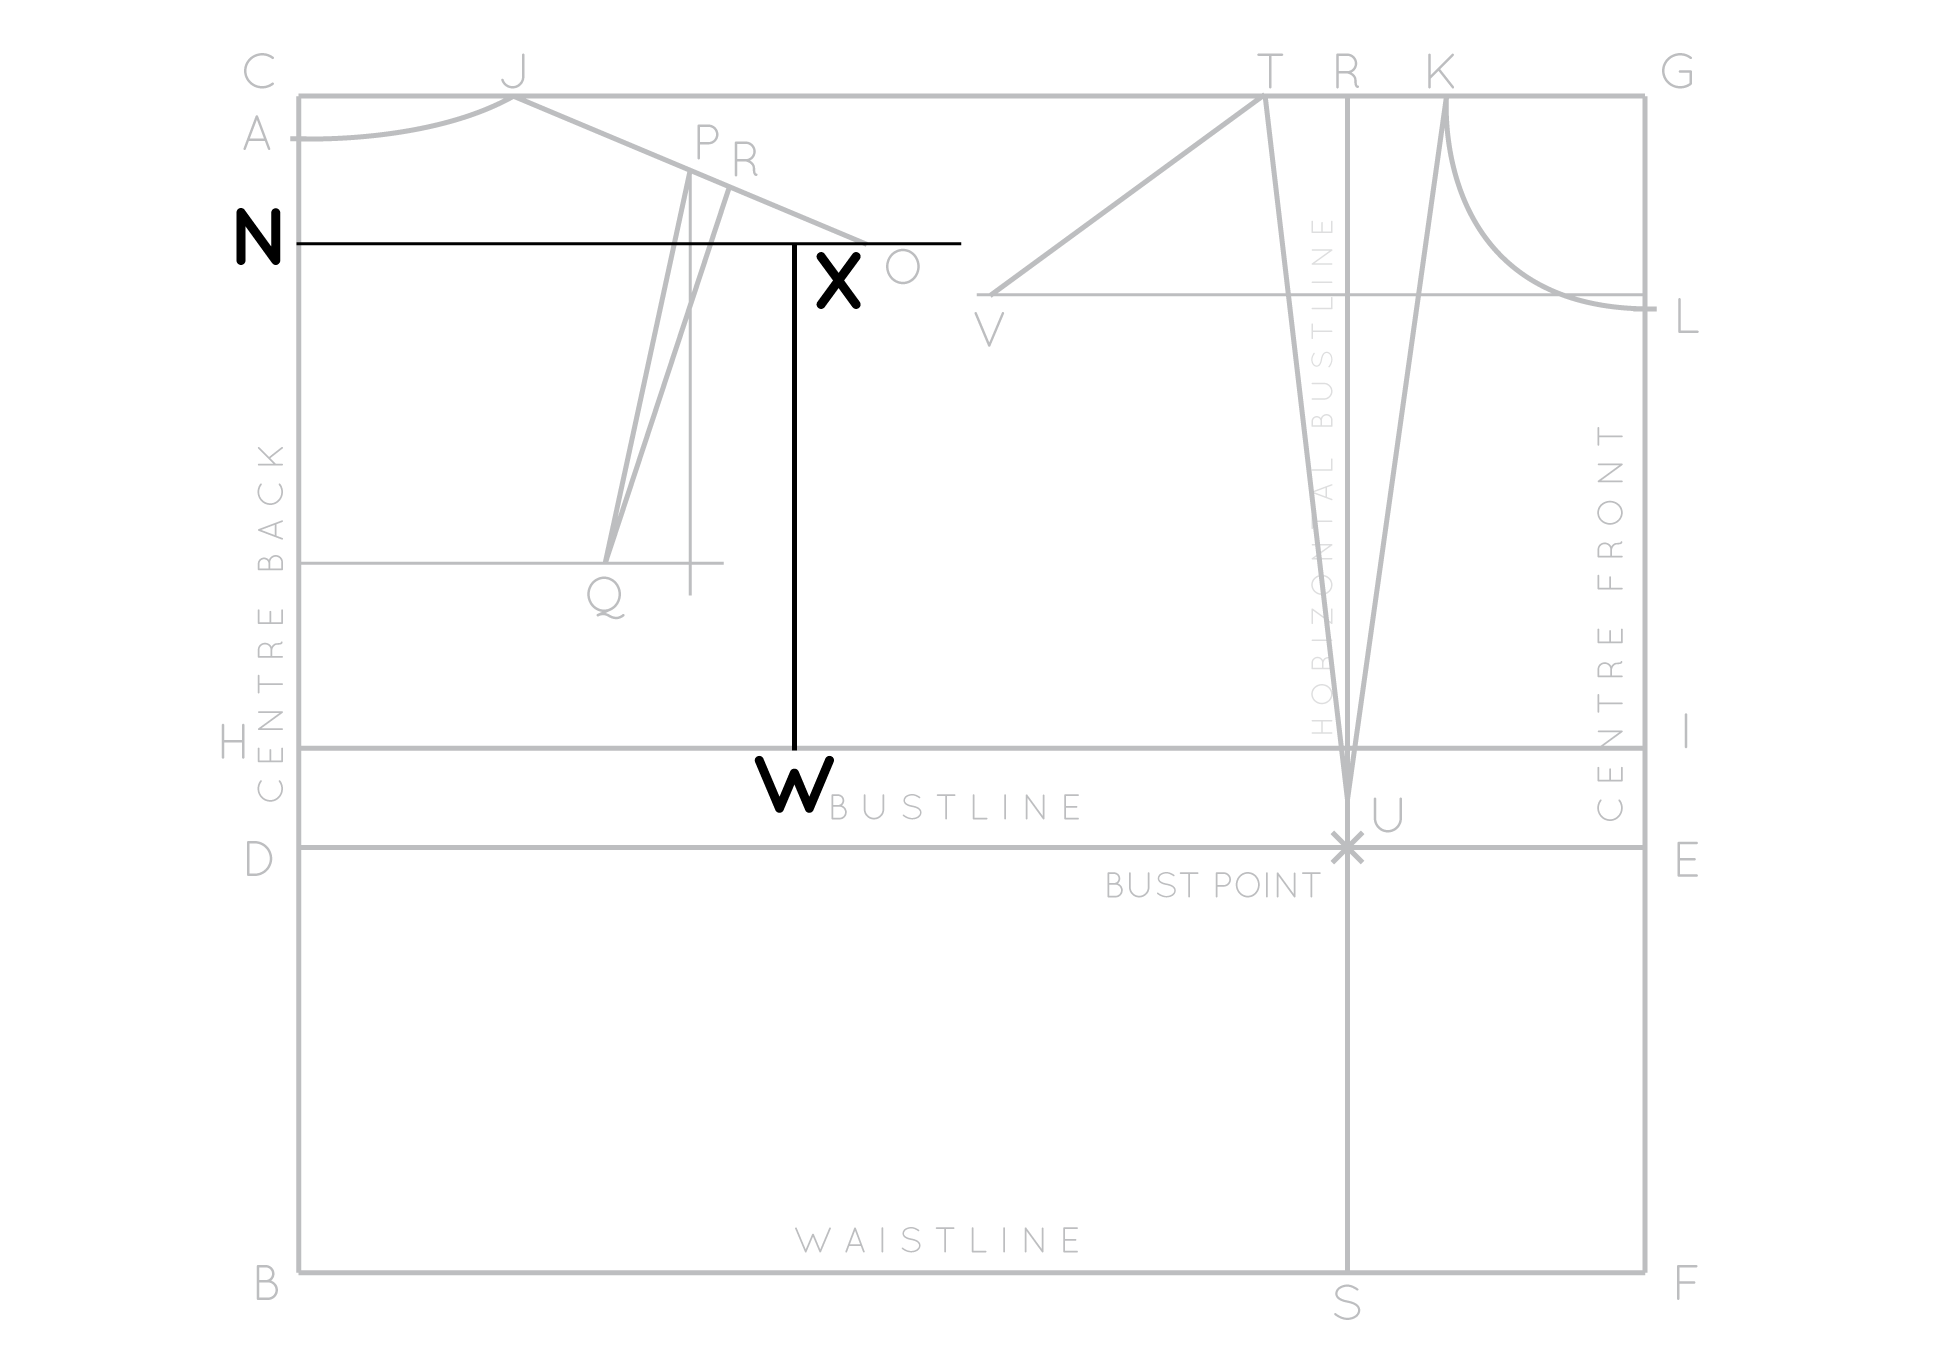
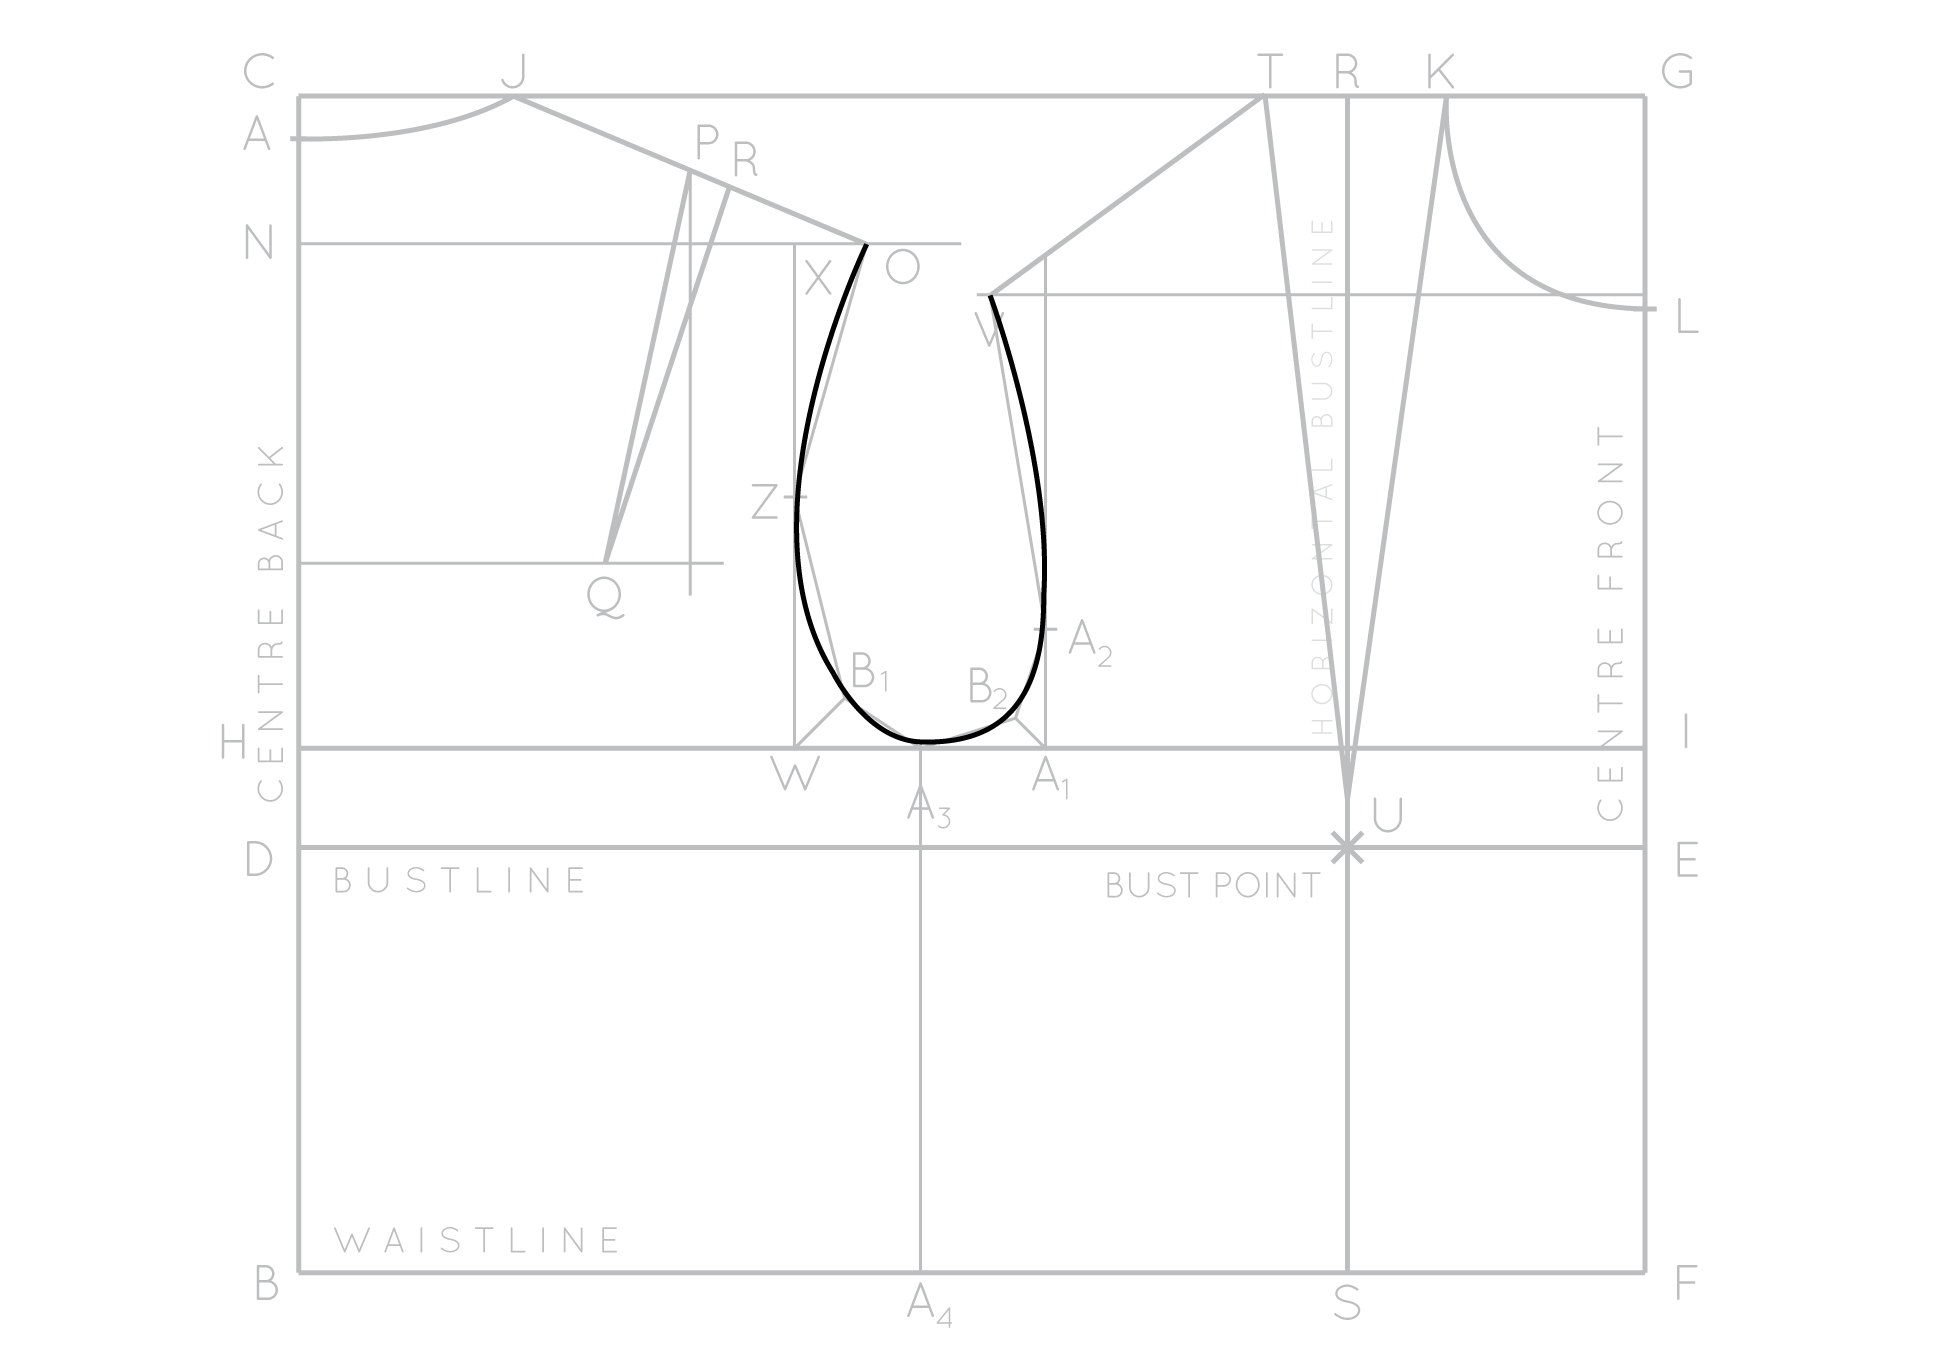
On line HI mark a point that is the length of half of your back measurement plus 0.5cm (1/4”) (allocated ease), from H. Label point as W.

draft_bodice_block_33

Square up from point W until the line intersects the perpendicular line drawn from N. Mark the intersection point as X.

draft_bodice_block_34

Find the midpoint of line XW. Mark as point Z.

draft_bodice_block_35

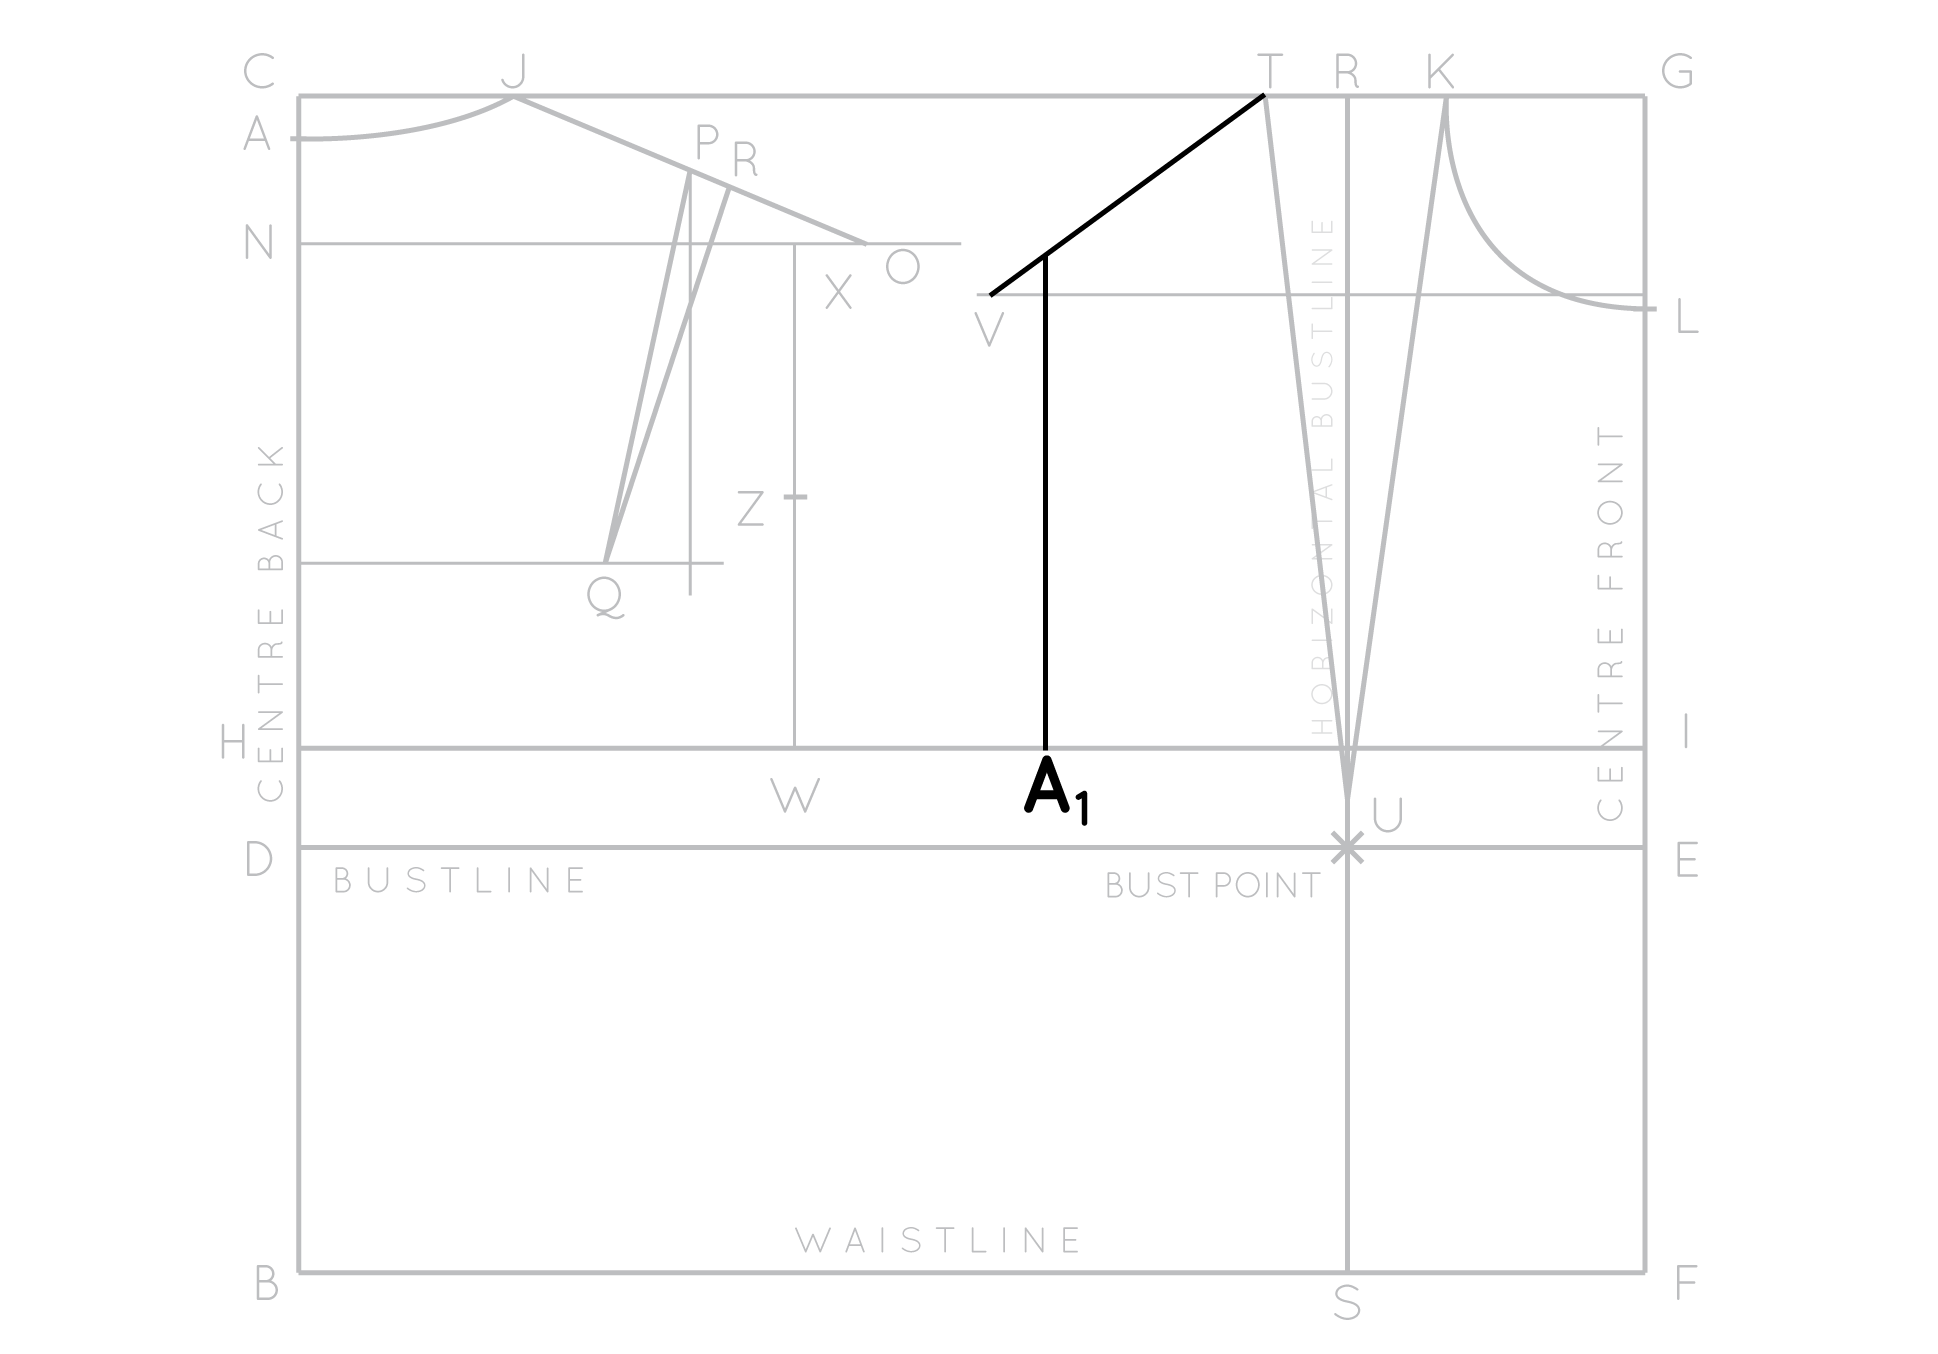
Take the distance from the CENTRE FRONT to BUST POINT (i.e length from E to BP or half bust apex to apex measurement plus 0.5cm) and mark this distance on line HI, measuring from the dart arm closest to CENTRE back. Mark point as A1.

draft_bodice_block_36

Square up from point A1 so that the line intersects the front shoulder seam (line VT).

draft_bodice_block_37

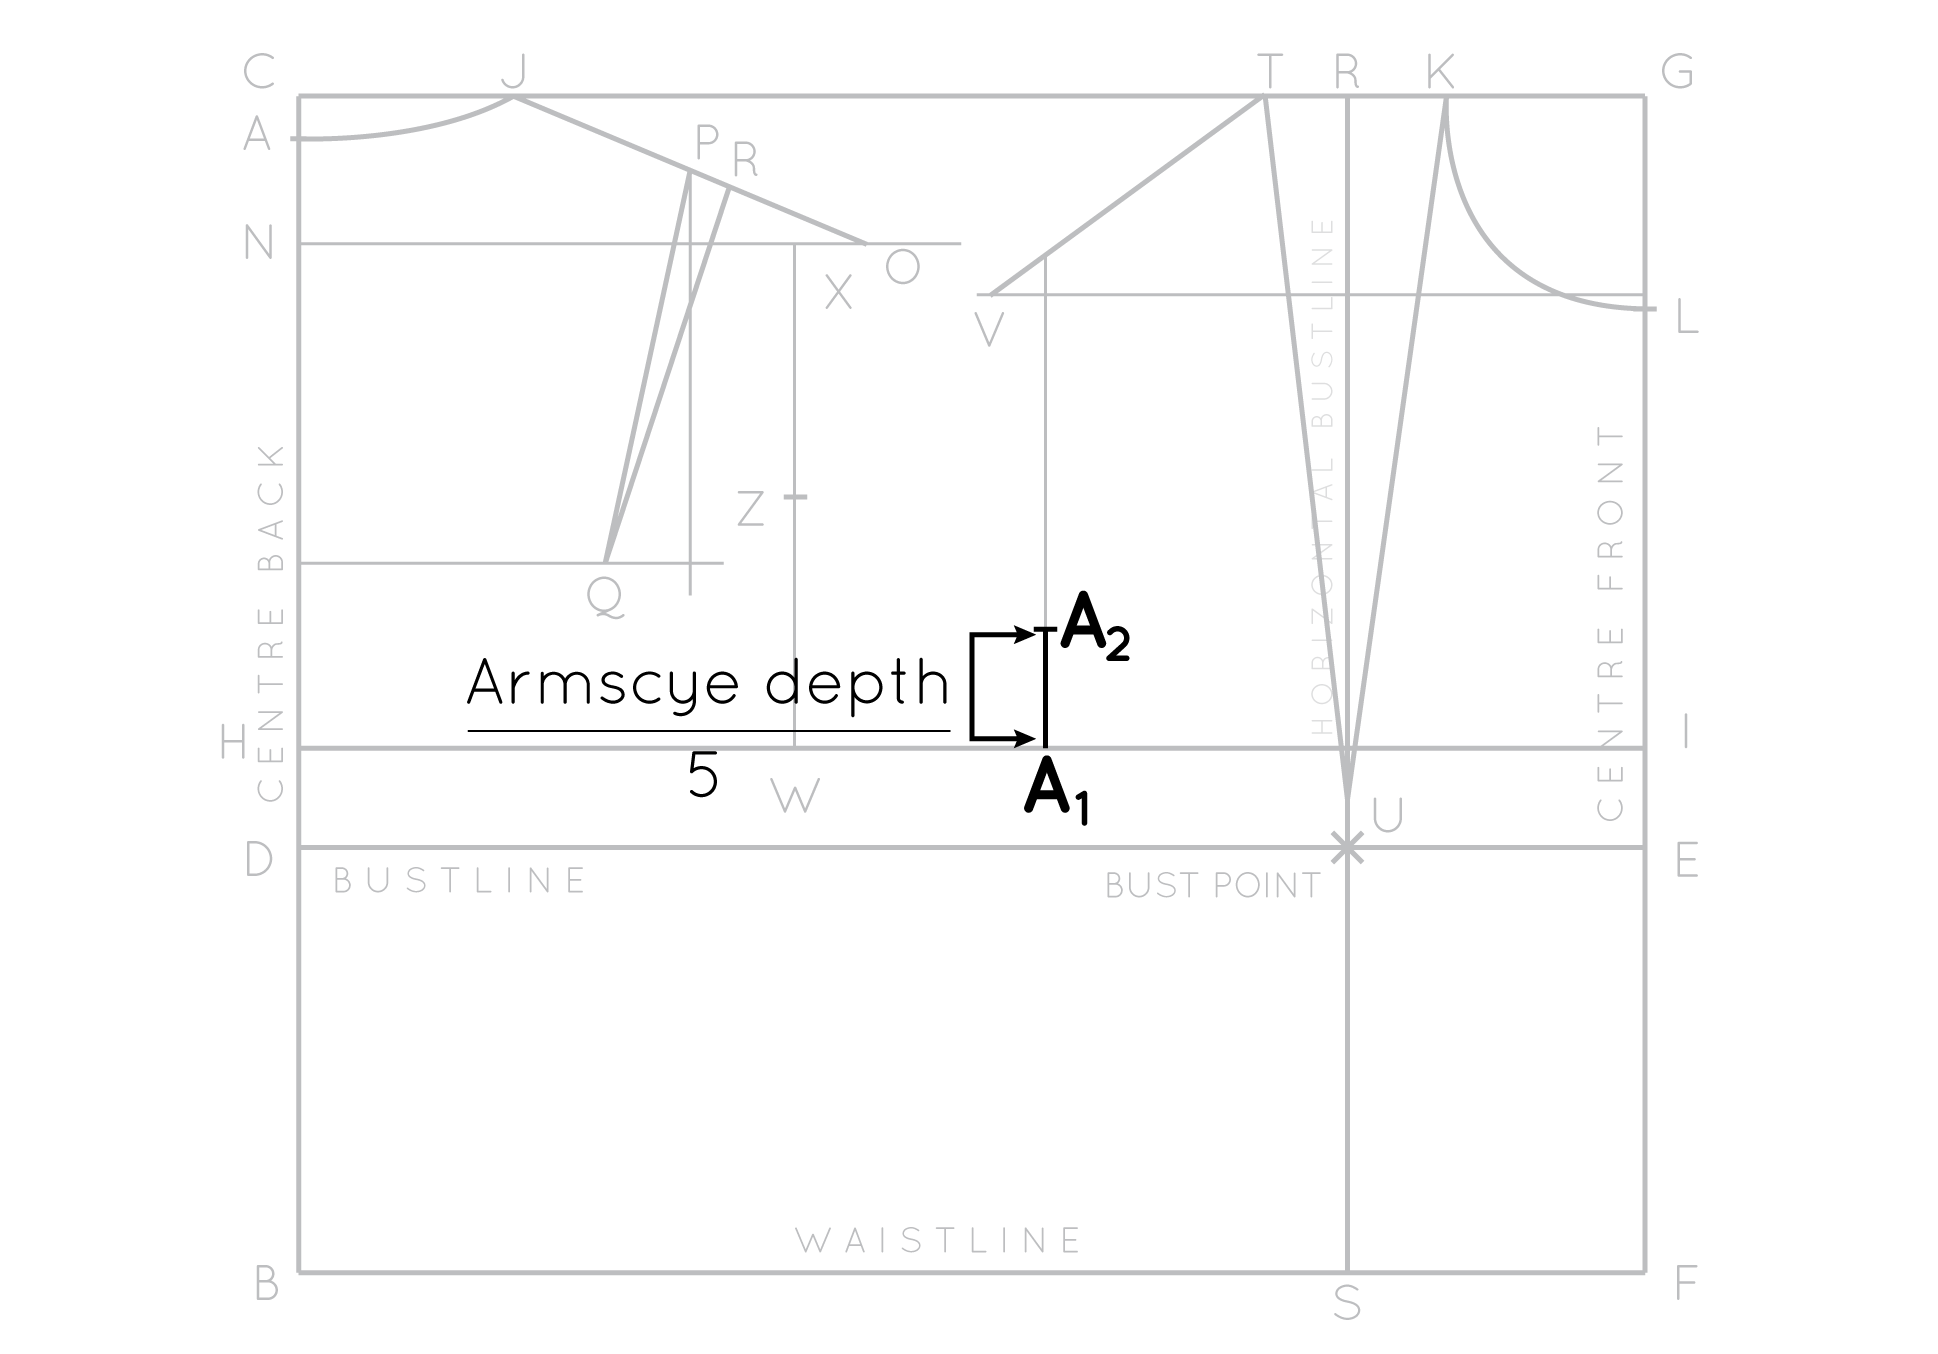
Take the armscye depth measurement and divide it by five. Mark this length on the line just drawn from A1, as point A2.

draft_bodice_block_38

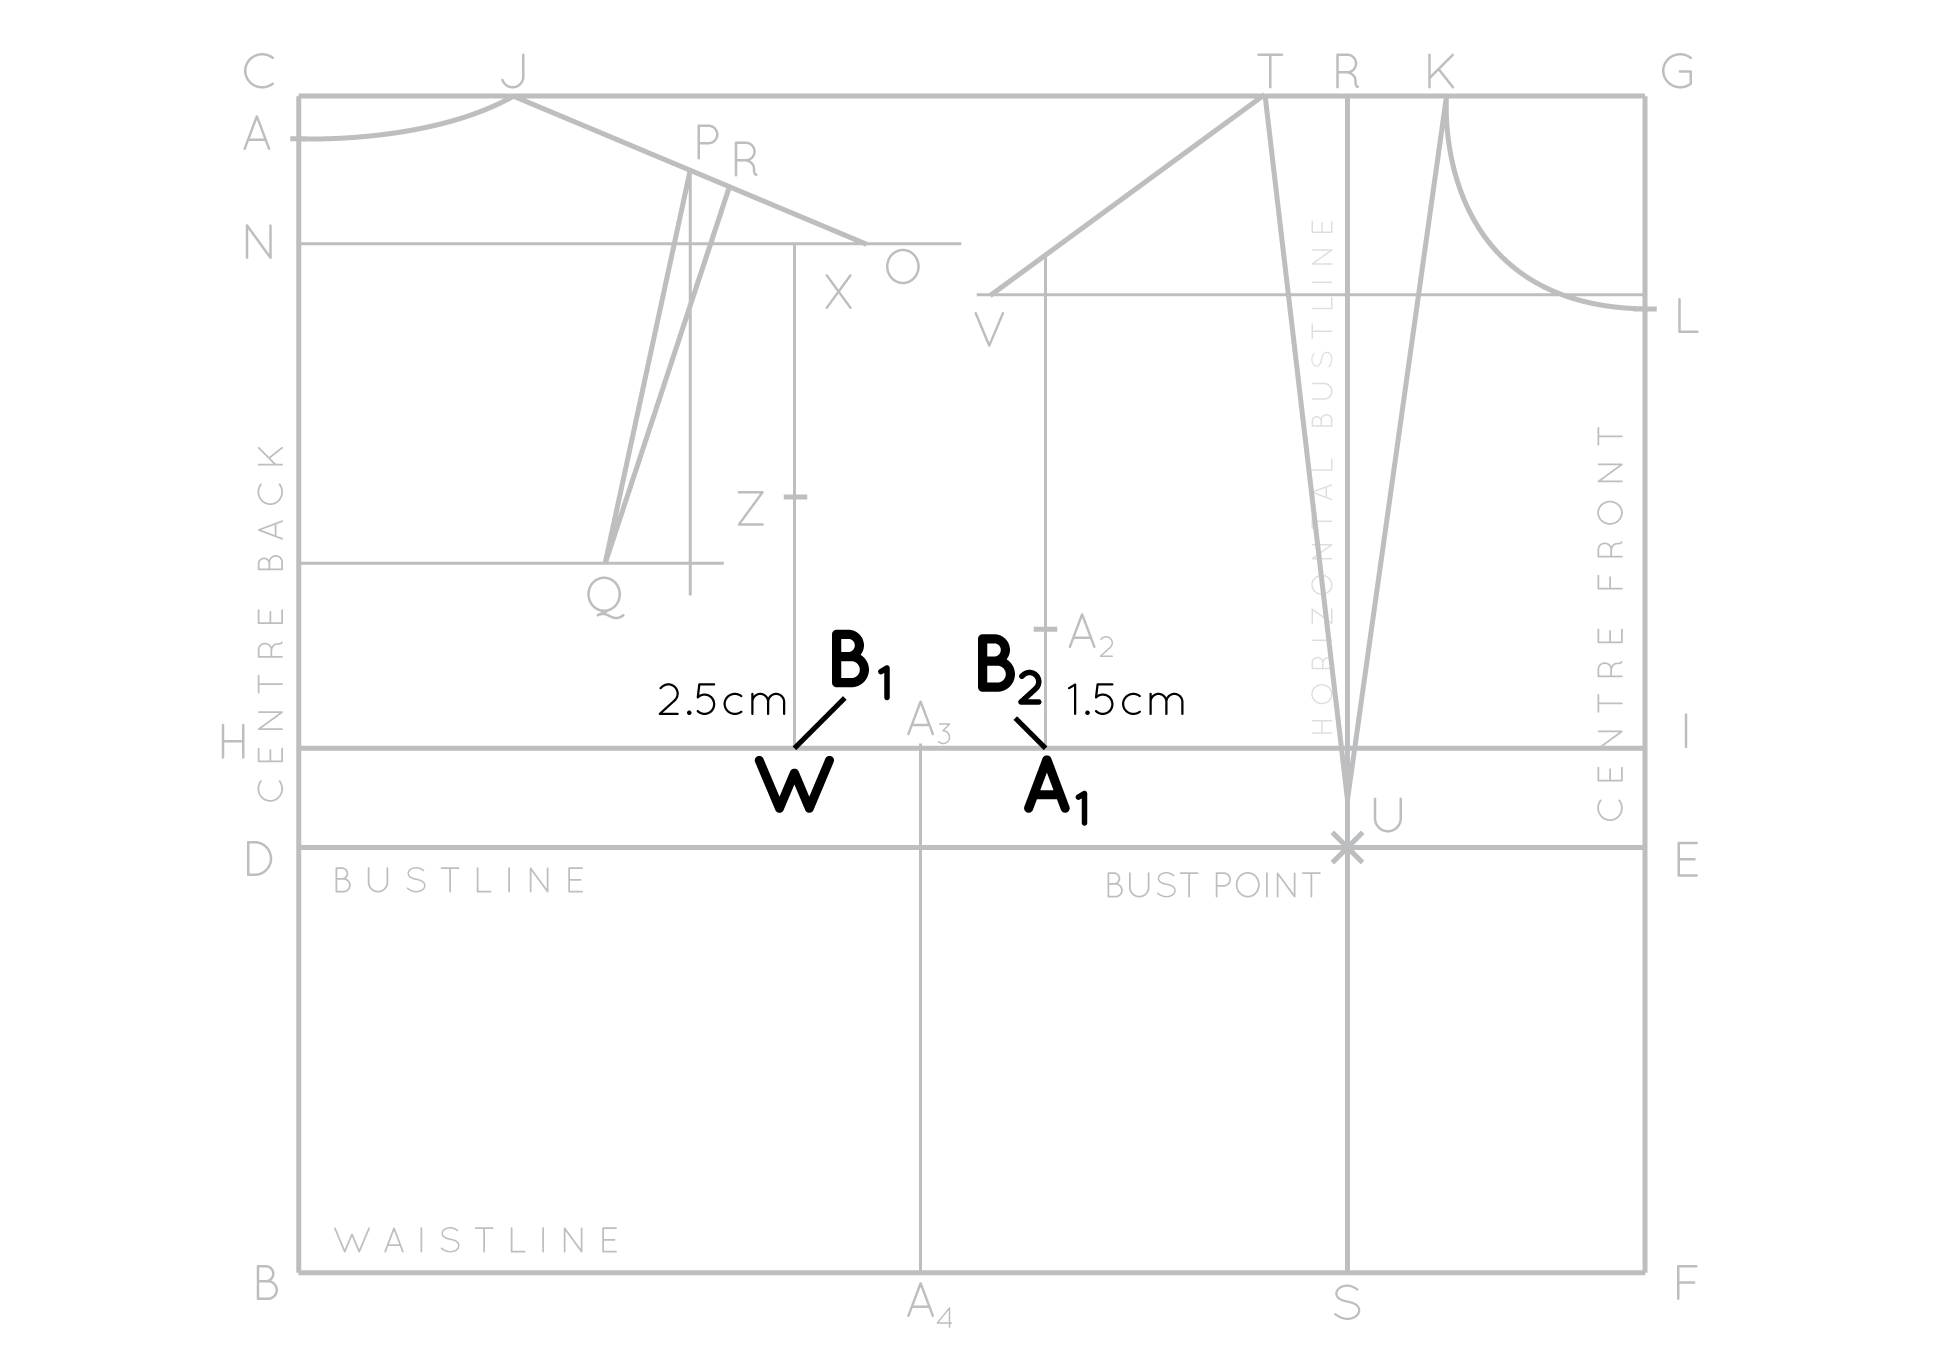
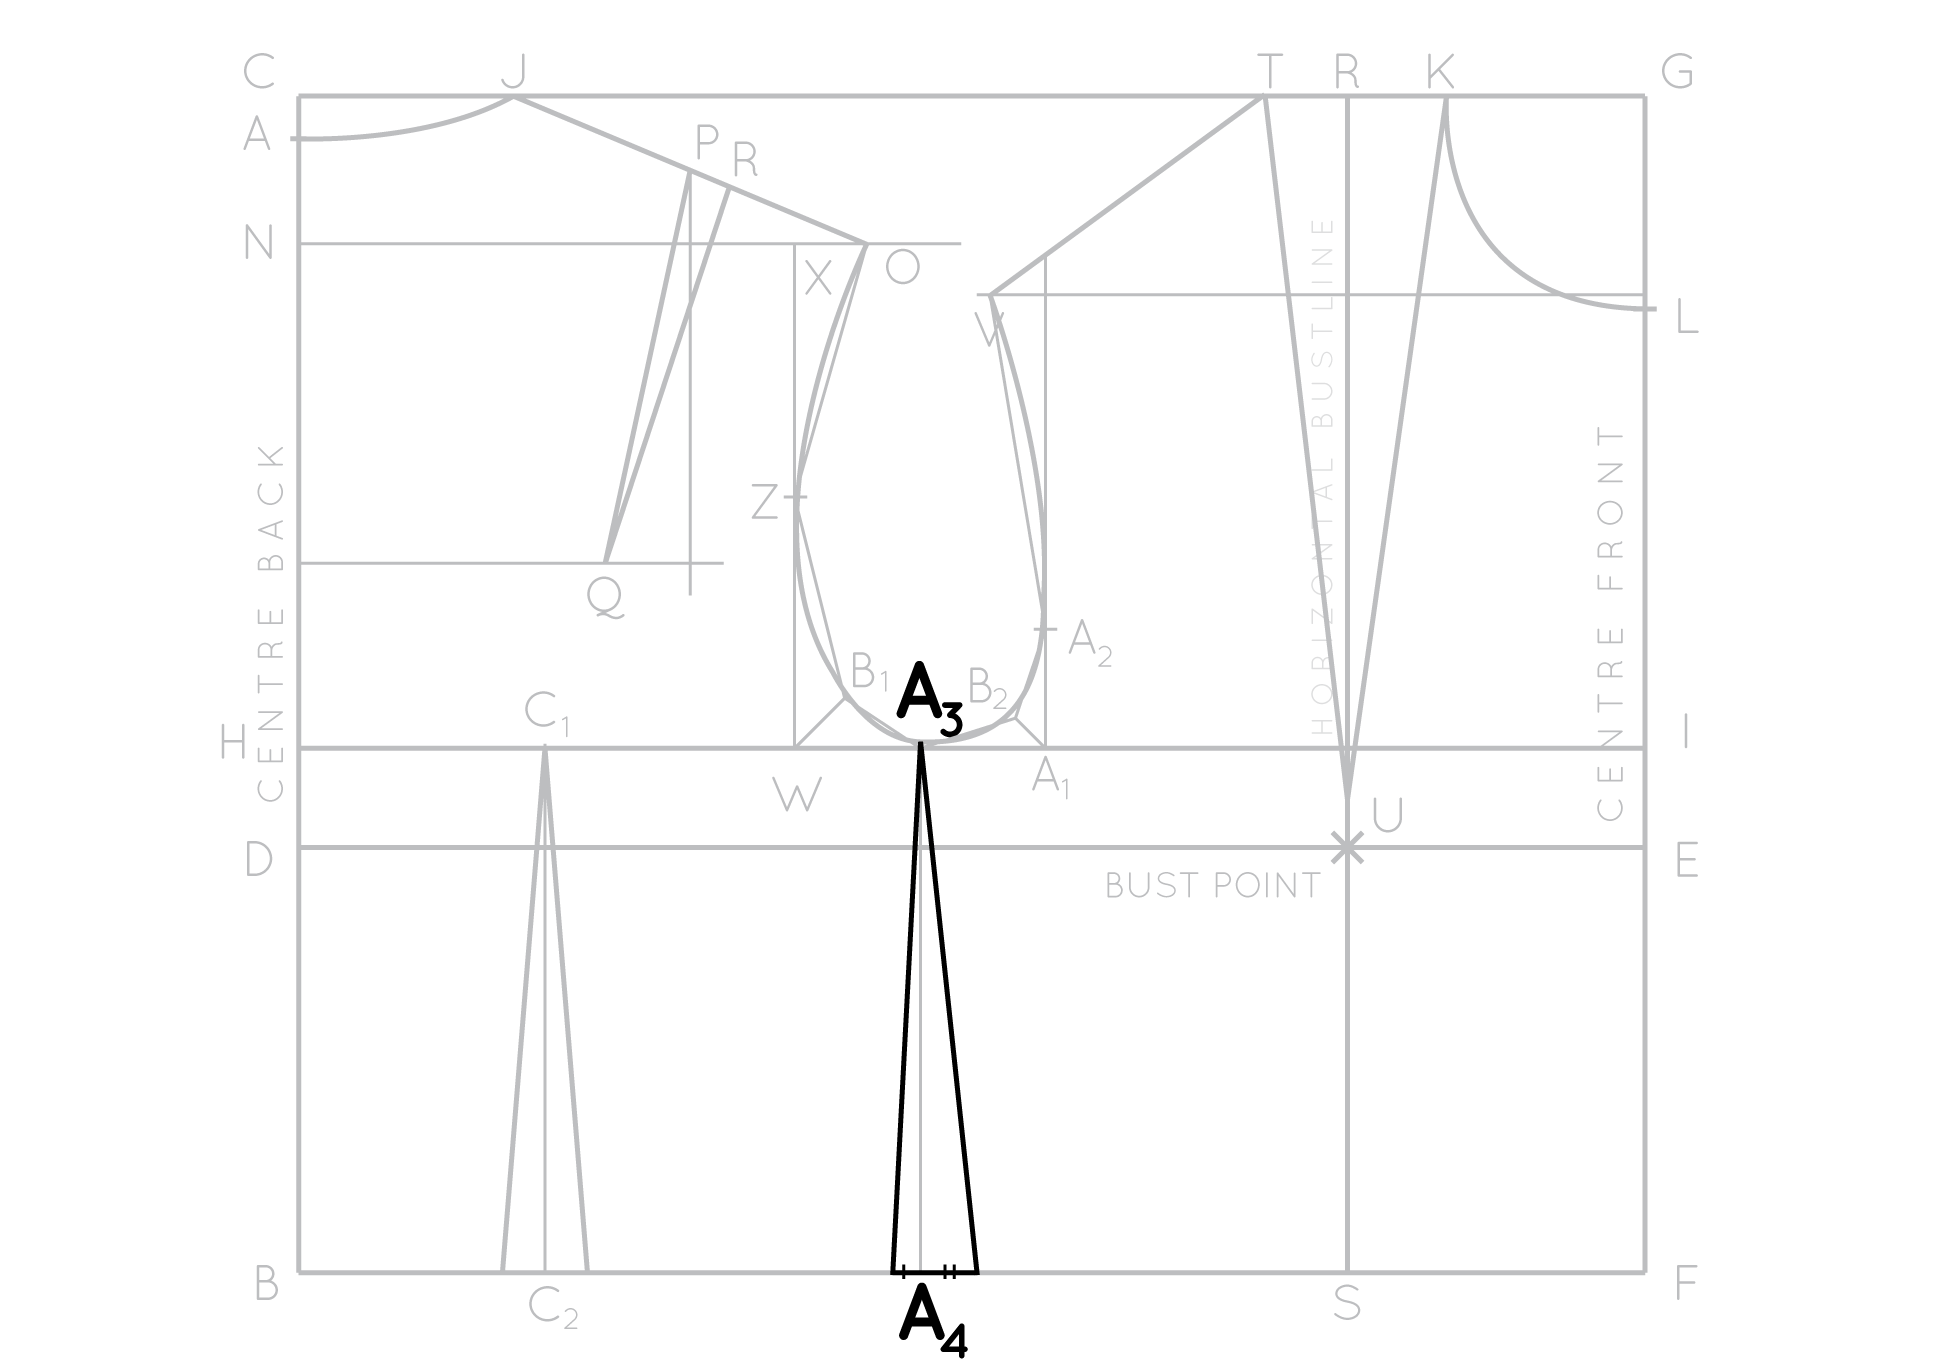
Find the midpoint of the line between W and A1 and mark as A3. Square down from this point so that the line intersects waistline (line BF). Mark intersection point as A4

draft_bodice_block_39

Draw diagonal lines (lines drawn at a 45 degree angle) inwards from points W and A1. From W the line needs to be 2.5cm long (1") (mark endpoint as B1), and from A1 1.5cm long (1/2") (mark endpoint as B2). These diagonal lines will help in the next step, when we are at the stage of drawing in the curve of the armhole.

Join O to Z to B1 to A3 to B2 to A2 to T with straight lines.

draft_bodice_block_40

creating darts

At this point, the waist measurement is the same as the bust measurement. For a lot of us, our bust measurement is larger than our waist measurement. To remove this excess width from the waist and to create a well fitting block you will add waist darts (one in the back waist and one in the front waist – remember this is on the half so when you make your block there will be two in the back, and two in the front. We will also slightly taper the side seam, which we will also treat as a dart at this stage).

To work out how much width you will need to remove with your darts, take your waist measurement and add 2cm (7/8”) ease. Subtract this measurement from your bust measurement and divide your answer by 2.

Divide this number by three, so that it can be distributed evenly throughout back dart, front dart and side seam.

DRAFT THE BACK WAIST DART

draft_bodice_block_41

To mark the placement of the back waist dart, find the midpoint of line HV and label as C1. Square down from this point so that line intersects the WAIST LINE (BF). Mark the point of intersection as point C2. This will become the centre of your back dart.

draft_bodice_block_42

Distribute the dart width evenly either side of C2 and join endpoints to C1 to create dart arms. 

Draft the side seam

draft_bodice_block_43

For simplicity, at this stage, treat the side seam (line A3-A4) as a dart at this point. Distribute one third of the dart width to the back of the bodice and two-thirds to front of the bodice, either side of A2. Join the endpoints to A3 to create the front and back side seams. 

Draft the front waist dart

draft_bodice_block_44

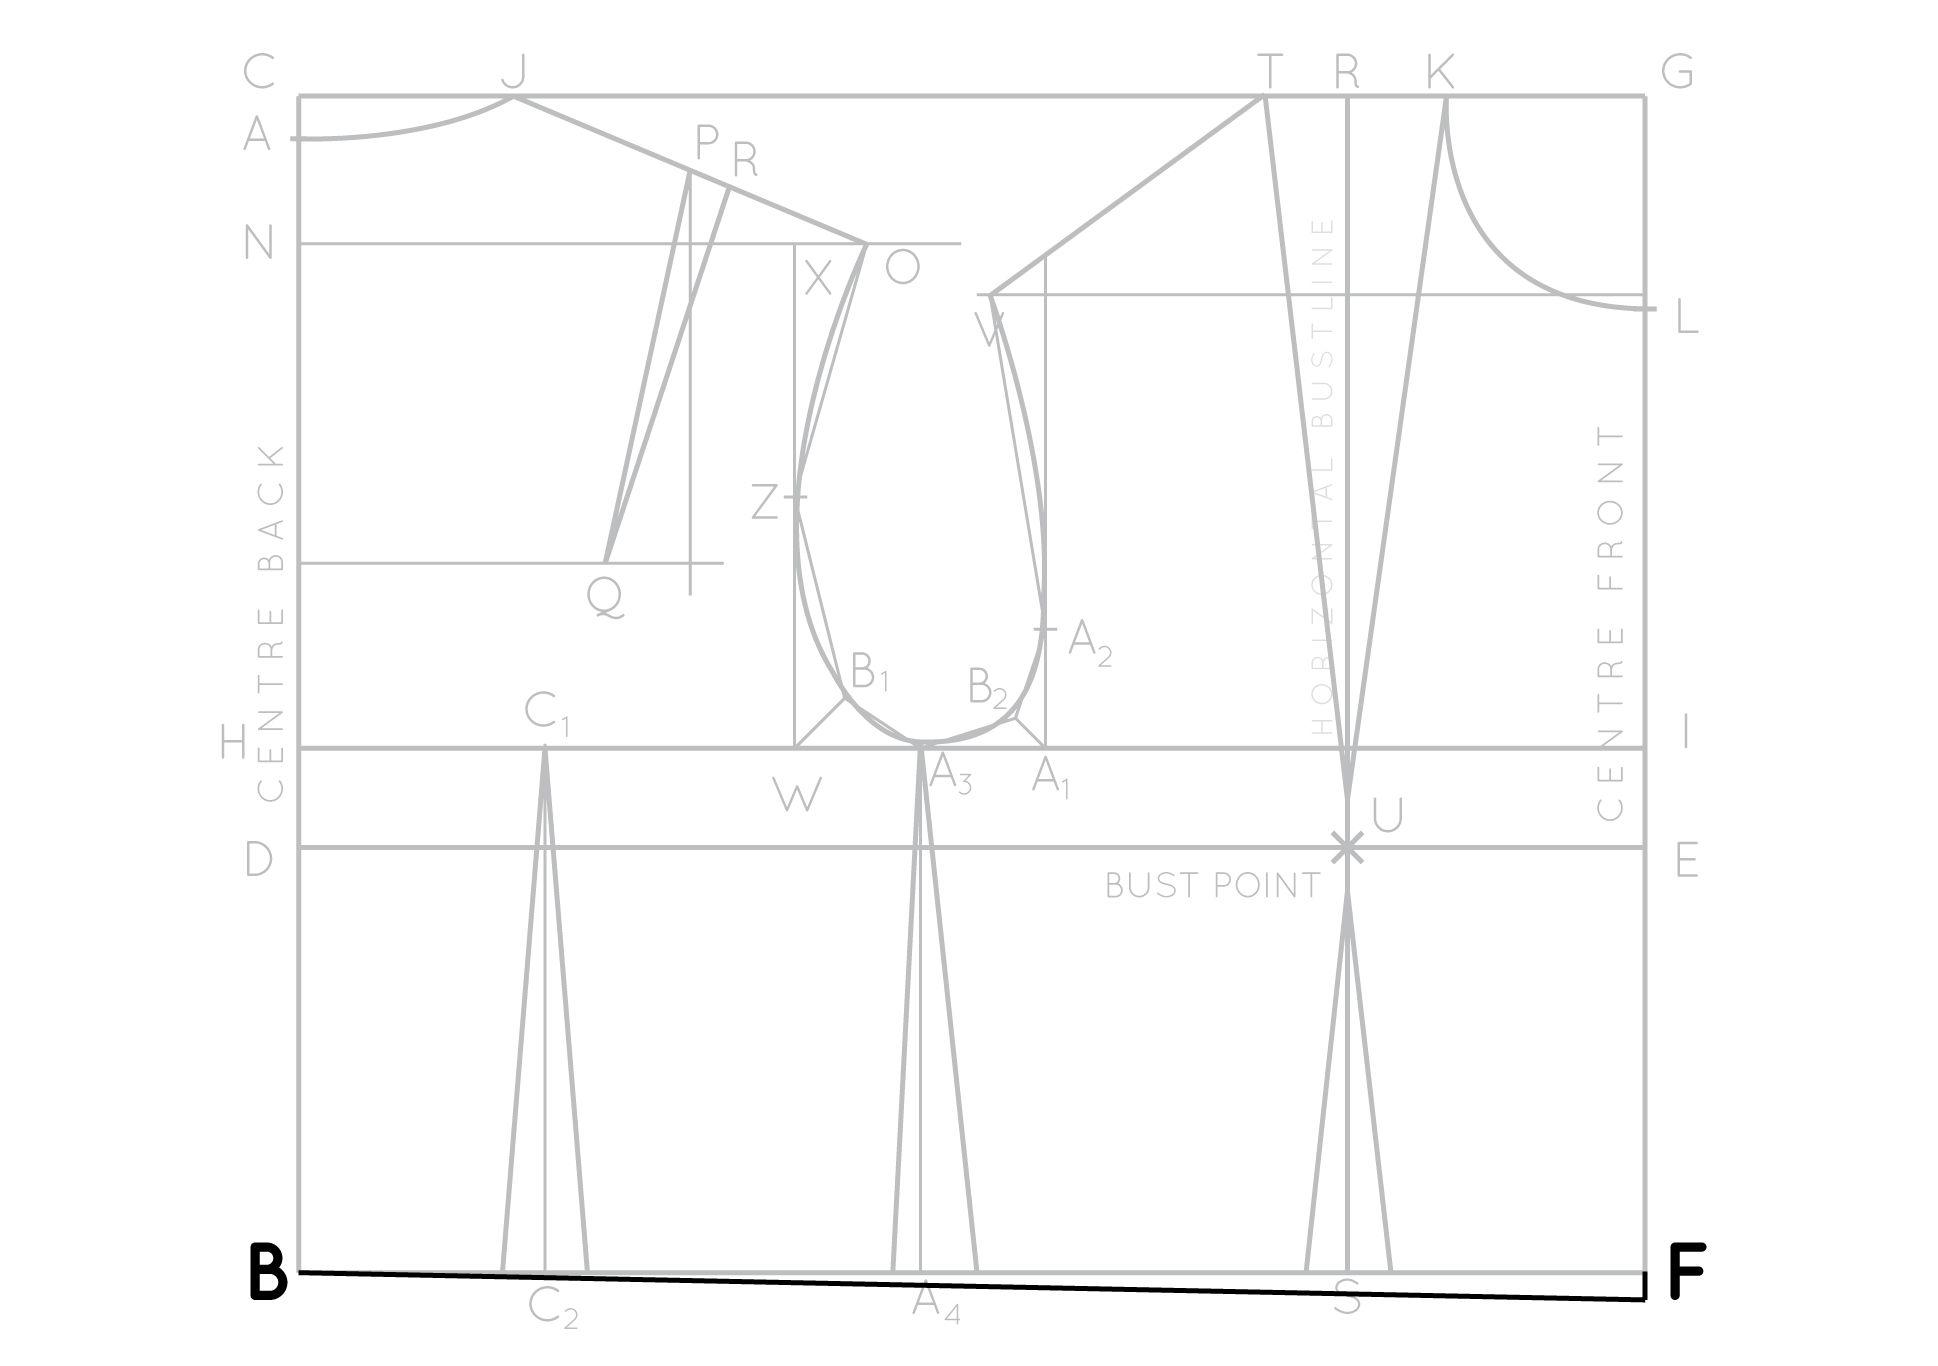
Distribute dart width evenly either side of S and join the endpoints to a point 1cm (3/8") down from BP to create dart arms. 

Balance the waistline

draft_bodice_block_46

At this point the waistline of the pattern is straight. But as the front of our bodice must pass over the fullest part of our chest (our bust), we need to add a little extra length to our CENTRE FRONT, to prevent this part of the waistline from riding up when the bodice is made.  

Mark a point 0.5cm (1/4") to 1.5cm (1/2") down from point F as point C1.

(0.5cm (1/4") for small bust / 1cm (3/8") for medium bust / 1.5cm (1/2") for large bust)

 Join point B to point C1.

Trace the pattern

draft_bodice_block_47

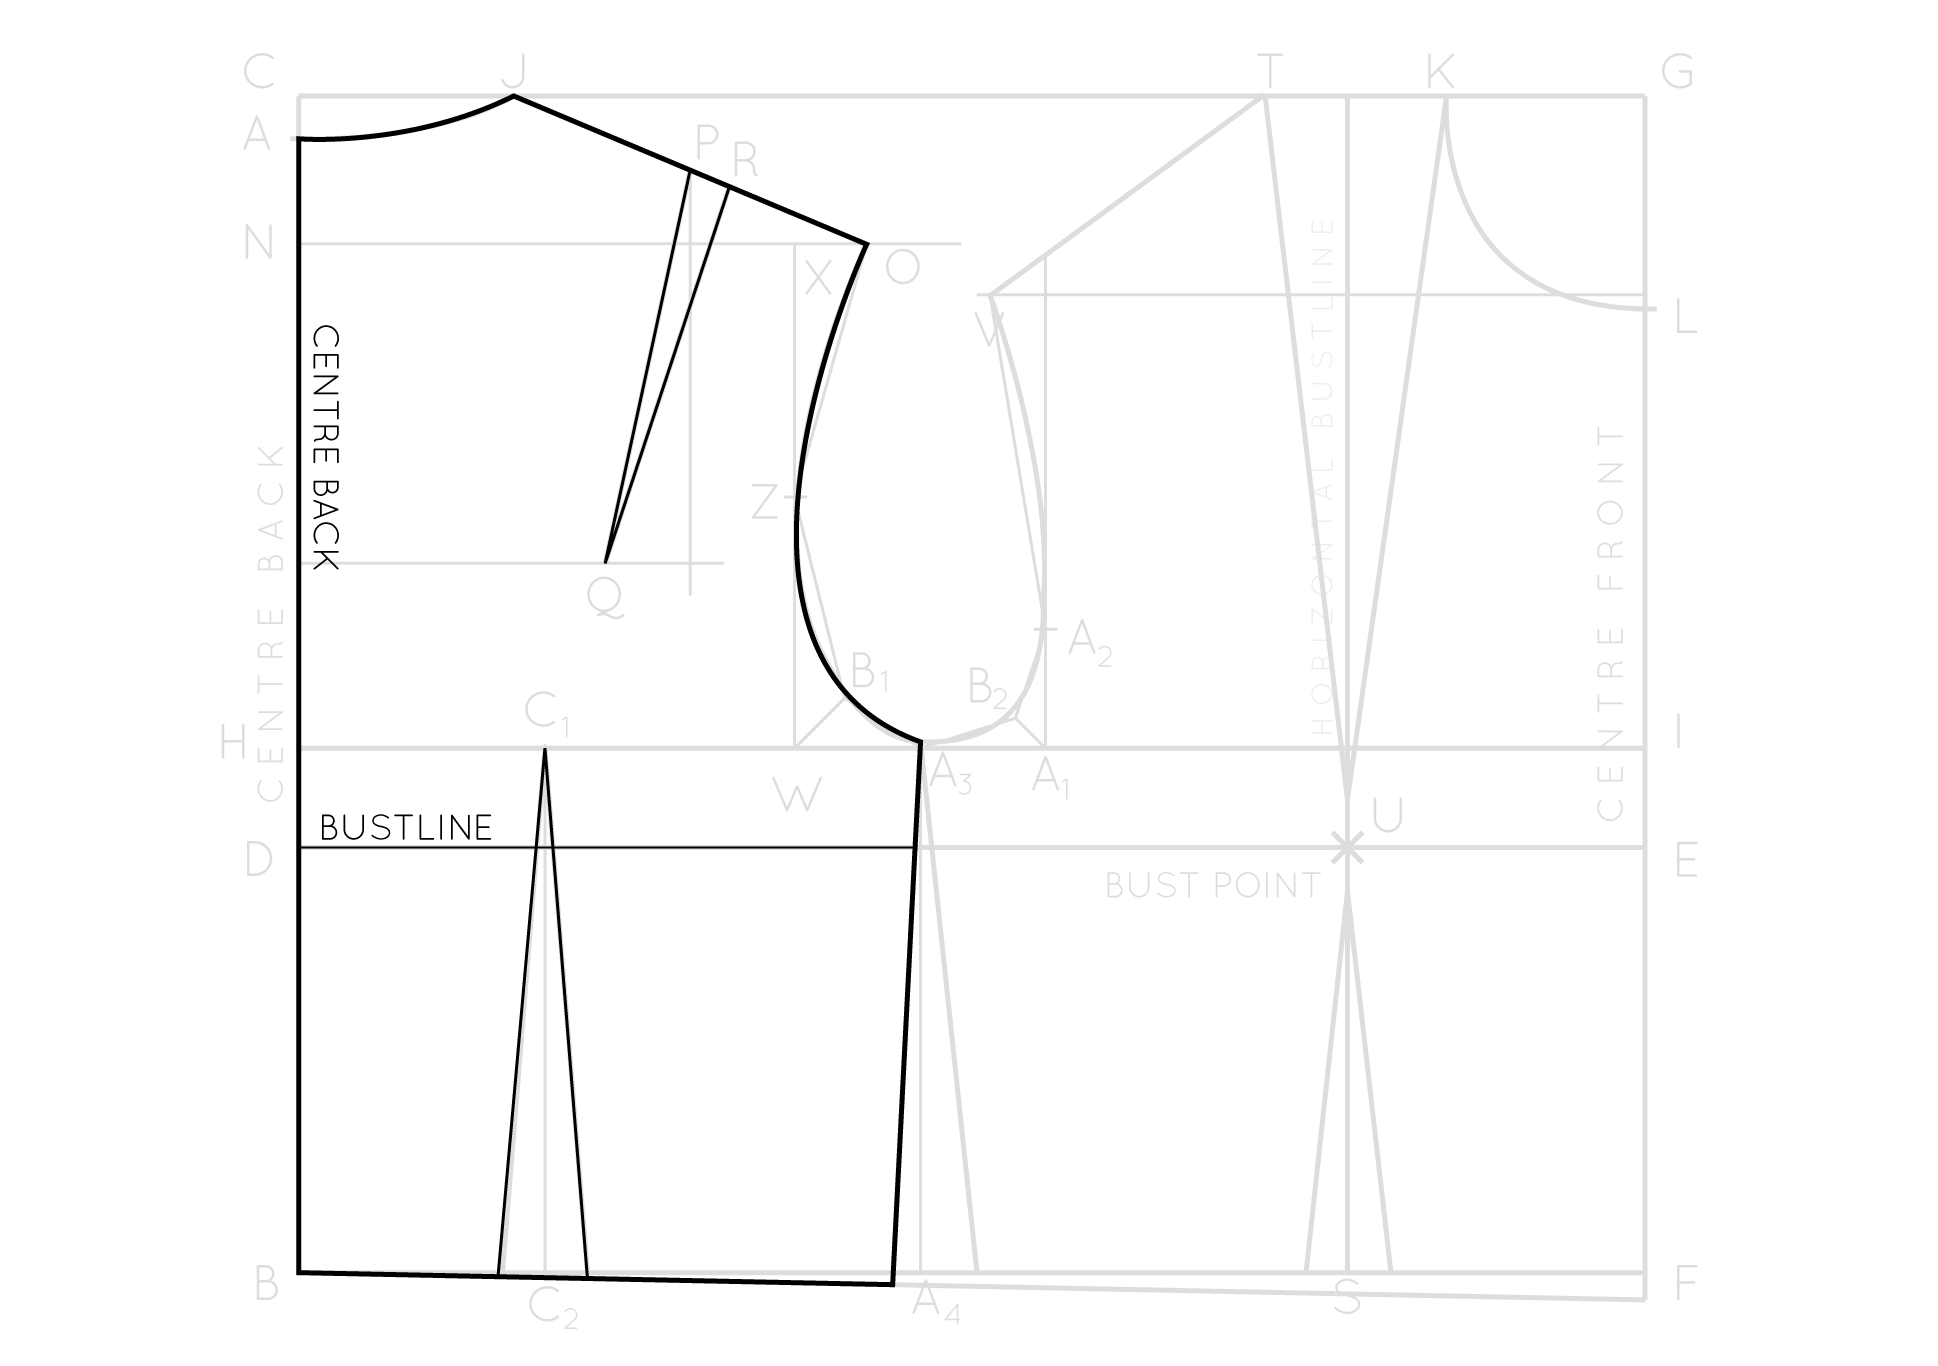
With a second piece of pattern paper, trace off the back pattern piece – being sure to include all important details (i.e. bust line and darts). 

draft_bodice_block_48

Leaving a space between the pieces, trace the front pattern piece.

Add seam allowance to the pattern

draft_bodice_block_49

To finish, add shaping to the darts (following this tutorial) and then add seam allowance to the pattern. As it is a bodice block, I find that it is handy to have it available without seam allowance (as when you are making alterations or adjusting a pattern it is far easier to do so without seam allowance), but as you will need to make a toile to see how it fits, add seam allowance to the seams that will be sewn - the side seams, centre back and shoulder seams. The other seams - the neckline, armholes and waistline - can be left without seam allowance so that you can get a true indication of what it will look like without having to finish these seams or add a facing etc. I went for 1.5cm (1/2") seam allowance on the shoulders and side seams, and 2cm (7/8") on the centre back. For more details on adding seam allowance, you can take a look at this tutorial

Add pattern markings and cutting instructions

draft_bodice_block_50

Add pattern markings to the pattern – being sure to mark drill holes (I always mark my drill holes 1 - 1.5cm (3/8" - 1/2") above the dart point and notches.

And voila! There you have a basic bodice block to your very own measurements!

Sew it up (in calico or something similar you may have hiding in your sewing box), see how it fits and then you are ready to start getting creative making your own patterns!


Have a question about this tutorial?

Please check out these Frequently Asked Questions about the tutorial before getting in touch. I do love hearing from you, but you are likely to find your answer faster than we are able to get back to you.


profile pic.jpg

Did you enjoy this tutorial?

It is our vision to empower you to make a wardrobe that you will wear, love and cherish - long into the future.

If this tutorial has helped you, it would be greatly appreciated if you could give thanks with a small donation. This will help us to continue to create content like this tutorial and continue offering it for free - so it can be accessed by all.

We greatly appreciate your support!


You may also like:

The Indiesew Blog Tour

indiesew_spring_inthefolds_1

If you read my last post or are following me on Instagram, you will know that The Rushcutter is part of the Indiesew Spring Collection (yay!).  

As part of the fun and festivities, there's a blog tour going on, which is really exciting. When Allie first mentioned this, I was a little apprehensive. Free time for sewing has been scarce lately, and I wasn't sure if I would be biting off more than I could chew, if I put my hand up to be involved. But then I remembered that I work wonders with a deadline (hello very late nights, lots of stress, and not washing my hair for three days), and although it could end up being a little stressful, it would be a good excuse to make a couple of things that could fill some holes in my wardrobe. And the collection is beautiful right? So it would be crazy not to get involved!

Which brings me to the fact that today is the day that I get to share what I made from the collection. 

The Sanibel Dress and Romper from Hey June

sanibel_heyjune

Sanibel by Hey June

Description form Indiesew: When you're looking for a comfortable, yet flattering garment the Sanibel sewing pattern by Hey June fits the bill. This dress or romper features a cinched elastic waist with drawstring closure. The full button placket and two collar options make this a great project for the intermediate sewist. Sew your Sanibel in a lightweight denim and pair it with clogs and a floppy hat for a great spring look.

If you have been following along with me for a while (particularly in my early days of blogging, when I was still over at Em Makes Patterns), you may know that I find it very difficult to make a pattern straight out of the envelope. It is basically impossible. I have the best of intentions when I get the pattern, and then suddenly, like a tidal wave hitting me, I get the urge to hack the pattern into something I can call my own. So before going on, I want to apologise  to Adrianna from Hey June Handmade. Your pattern is absolutely beautiful and so very versatile, but my crazy urge to cut and spread and add and take away took over and now my Sanibel looks nothing like a Sanibel, (although I just love it all the same, and I hope you do too!). 

the pattern

Before I did hack up this pattern, I did take the time to have a proper look over it, in its original form, and also go through the instruction booklet pretty thoroughly, and I can definitely say this is a great pattern. It is well drafted, the instructions are clear and thorough, and it has loads of options to play with. I am even starting to think about making a shirt, by taking just the upper section of the romper and lengthening it.

Another thing that I loved about both patterns that I made from the Spring Collection collection, is that they came with copyshop versions, that I could take to a print shop and get printed on A0 sized sheets. Although it is adds a little extra cost, to me it's definitely worth the time saved. 

THE HACK

indiesew_spring_inthefolds_2

So here it is. Although, as you can see, my dress looks nothing like the original, it didn't actually that much effort to alter the original pattern to create the pattern I ended up using. 

What I did:

  • joined the skirt pattern to the shirt pattern leaving out the waist tie and casing
  • increased the width of the dress slightly, at the side seam
  • added a pleat to the centre back, using this method
  • removed some of the width from the capped sleeve at the shoulder
  • created my own placket, and added pleats to the centre front
  • left off the collar and instead bound the neckline with bias binding
  • and added in-seam pockets (of course)

Fabric

indiesew_spring_inthefolds_3

This fabric is a bit of a mystery, as I bought it from The Fabric Cave (a brilliant shop in Sydney where you can find the most incredible range of pre-loved fabric) but after a lot of fondling and a little bit of a burn test, I have come to the conclusion that I think it is a silk linen blend (not bad for an op shop, I must say). I really do get a lot of joy out of using second hand fabric, and the fact that sometimes, when ironed, I get a waft of that charity shop scent, is just part of it's charm (or at least that's what I keep telling myself).

Construction

indiesew_spring_inthefolds_4

As I altered the pattern so much, there was not much use for the instructions (although I did use them for sewing in the capped sleeves). I decided to go with french seams, because I just love them, and they really make me feel like my clothing is in another league of quality. I needed to overlock around the placket though.

indiesew_spring_inthefolds_5

I used the in-seam pocket pattern from The Rushcutter, that you can learn how to draft (or even just download) right here, and then I used this method to finish the pockets with french seams. 

I used a lightweight iron on interfacing on the placket to add some structure, before finishing the neckline and hem with bias binding, using this method and this method

Final thoughts

indiesew_spring_inthefolds_6

I just love this dress. It is exactly the kind of thing I love wearing at the moment - cool, breezy and very easy to wear. It can be dressed up or down, and goes just as well with my sneakers (which I spend 90% of my time in) as it does with dressier shoes. It is just the kind of thing my wardrobe has been begging for since I started working for myself (things I can just throw on and then run, yet still look somewhat put together) and I am very tempted to make myself another one quicksmart. 

Florence Kimono by Sew Caroline

florence-kimono-sew-caroline.jpg

Florence Kimono by Sew Caroline

The second pattern I decided to make was the Florence Kimono, by Sew Caroline.

Description from Indiesew: The perfect spring kimono has arrived! The Florence Kimono sewing pattern by Sew Caroline is a relaxed-fit kimono with 3/4 sleeves and three different hem lengths. Add lace trim to the sleeves and hem for a pop of visual interest. Sew your Florence Kimono in a flowing rayon challis and pair it with a knit tank top, skinny jeans, and heels for a night on the town.

The Pattern

indiesew_spring_inthefolds_7

The pattern is a nice easy one that you can smash out in a couple of hours. It consists of three pieces - the front, the back and the sleeve, so cutting was nice and speedy - so I was sat at my machine in now time. As I said earlier, the pattern includes an A0 version, which is much appreciated as the pattern pieces are quite big, due to the over-sized nature of this silhouette. 

Fabric

Like my 'Sanibel,' I used a pre-loved fabric I found at The Fabric Cave. Once again, I wasn't sure of the fibre content, but due to its handle and the way it presses, I would say it's a viscose rayon. I am in two minds about the print (which may or may not be because my boyfriend described it as a "grandma print") but I guess time can only tell.

The hack

indiesew_spring_inthefolds_8

I was much tamer with Florence than I was with poor Sanibel. The only change I made was to add a pleat in the centre back seam, which I made using this method (I am clearly going through a pleat stage).

Construction

The instructions ask for french seams, which was definitely the right choice for my fabric. For the opening, the pattern suggests using bias binding to finish the edge, and I decided not to bother, and just sewed a thin double folded hem, using this method (the same finish I used for the actual hem).

Final thoughts

This was a really quick project, which was a very satisfying sew!


The collection

As you can see, I didn't quite get through the whole Spring /collection (although I did make a Lou Box earlier this year), but I can definitely say it's a great little collection, and definitely a great place to start if you are thinking about sewing yourself a capsule wardrobe this spring. For more details or to purchase the collection, head over to Indiesew.

The blog tour

I really hope you are enjoying the Indiesew Spring Collection Blog Tour as much as I am. IF you've missed it, here are the previous posts in the series:

Feb 24: Sew Mariefleur

Feb 25: Dandelion Drift

Feb 26: Right Sides Together

Feb 29: Sewbon

March 1: Sew DIY

And here is what's still to come:

March 3: Sew Caroline

March 4: Baste + Gather

March 5: Ada Spragg


You may also like:

Finished project : The Lou Box top by Sew Diy

inthefolds_louboxtop_1

Late last year, Beth from Sew DIY and I had the great idea of doing a little pattern swap. We had been swooning over each others patterns on Instagram, so thought it was about time we did something about it. 

Beth has a couple of patterns to choose from in her shop, but after a little deliberation, I decided to go with the Lou Box Top as I noticed there was a bit of a gap in my wardrobe for nice easy basics that I can wear to work, and thought that I could use the Lou Box to fill the gap. 

I love to use stash fabric, whenever possible, so decided to use some left over cotton linen that I had bought from The Fabric Store for a dress I had made for a friend at the beginning of the summer. 

What I liked straight away about the Lou Box, when I opened the pattern file, was all the options. There are two neckline options (a crew neck and a scoop neck) and three hem options (straight, dip or curved) and can be made in woven or knit (or a combination of the two).

I couldn't make up my mind between the straight hem and the dipped hem, but thought I could go ahead and make the dipped hem, and if I didn't like it, I could just cut the hem straight once the top was assembled. I ended up printing and cutting all the options available in the pattern, so that I have them ready to go  for next time (and there will definitely be a next time).

inthefolds_louboxtop_2

When I got to laying the pattern on the fabric, ready for cutting, I realised there wasn't going to be enough meterage. I already had my heart set on the fabric, so decided to add a horizontal panel line on both the front and back.

This was a super easy alteration to make as the pattern is actually made up of seperate panels, for each hemline option (the pattern pieces are just stuck together before the fabric is cut). So I just added seam allowance to the bottom of the body of the top and then seam allowance on the top of the hem panel.

inthefolds_louboxtop_3

I actually really like this detail, and am considering doing the same thing next time, but using contrasting fabrics. 

inthefolds_louboxtop_4

I also detoured from the instructions a little by turning the sleeve up to create a small cuff (rather than turning under, as the instructions suggested), to add another little detail. 

inthefolds_louboxtop_5
inthefolds_louboxtop_6

In terms of fabric, Beth suggests using 'Light-weight knit or woven fabric with lots of drape, such as crepe de chine, chiffon, georgette and jersey,' and I know my cotton linen choice is a little more on the structured side that these suggestions, so it's definitely a little boxier than some of the other versions I've seen. I was a little worried about my decision just to go with it, but now that its' finished, it's one of the things I like most about this top!

inthefolds_louboxtop_7

I feel really comfortable in it, and cannot believe how many times I've reached for it since I made it. It really has filled a gap in my wardrobe!

inthefolds_louboxtop_8

It was a super speedy make, which was a really nice change for me, because I have been working on samples for my next pattern, which generally take a while as I am really pedantic when I am sampling, so that nothing gets past without being resolved. Sewing someone else's pattern, gave me a chance to disconnect from work, and gave me a chance to really enjoy the process, without the stress that sits alongside working on one of my own patterns before it's released. It's also a good opportunity to see how other designers do things!

Well that's about all I can say about the Lou Box Top from Sew DIY. It's a perfect beginner pattern, but also a lovely speedy sew for the more experienced - providing lots of opportunity for variation. Thank you so much Beth for offering to trade patterns with me. I had a lot of fun!

Beth made a really beautiful Ruschutter, so you should definitely go check out her post.


You may also like:

How to draft box pleats

drafting_box_pleats_1

My transition back into work mode, after a much needed break, has been a little slower than anticipated. I have been concentrating on many things already this year - filling in my calendar and working out a plan of attack for 2016, catching up on emails that came through over the holiday period, and madly sampling a couple of new patterns. But.. when it comes to my blog, I have been procrastinating! Today though, I had it in my diary that I would focus on getting back onto blog content, and although it is a little painful (as I seem to have forgotten a few things over the break... What's that font called again? What line weight do I normally do my illustrations in? So it is taking me afr longer than usual to even get started) here I am, getting the blog back on track, as I have a HUGE amount of content planned for you this year, so I better get on with it, before it suddenly becomes February! 

drafting_box_pleats_2

So, without further ado, I am going to get into the first pattern making tutorial of 2016! As you may know, if you have been following along, towards the end of year I was working on a blog series about drafting skirt patterns. I still have a few more tutorials related to skirts that I think you might like, so that's what I'll be focussing on for the moment. As I've said before, if you are new to pattern making and just wanting to dip your toe in, skirts are the place to start! They can be as simple as you choose to make them, and the fitting of a skirt is much easier than the bodice or trouser block, giving you a chance to learn some pattern making fundamentals before dealing with the ups and downs of fitting.  

Pleats

Adding pleats is a really simple adjustment that can be made to a pattern that can totally transform the look of a garment. There are many different types of pleats:- box pleats, knife pleats, accordion pleats (the fabric needs to be pleated with heat), top stitched pleats and kick pleats. Pleats can be inserted in tops, dresses, trousers and sleeve heads, but today I will be showing you how to add a box pleat to a skirt. 

Box pleats

drafting_box_pleats_3

In this tutorial, I will show you how to create a box pleat and an inverted box pleat. The drafting process is the same, the only difference is the direction the pleat is folded when you are sewing.

Getting started

drafting_box_pleats_4

1. To start, take the skirt pattern you would like to add a pleat to. I chose to use the basic A-line skirt block (that I have made a tutorial for here). You could choose a self drafted pattern, or even consider adding pleats to a pattern you have in your stash.

2. Take a seperate piece of pattern paper, and trace a copy of the skirt without seam allowance. Give yourself some extra space alongside the centre front as this is where you will be adding the pleat. 

drafting_box_pleats_5

Now, you will need to have a think about the size of your pleat. This is totally up to you. If you are struggling to work out the width of your pleat, have a play around with some fabric (or even a piece of paper), folding different sized pleats to get an idea of how it will look. 

Creating the pleat

drafting_box_pleats_6

3. When you have worked out the width you would like the pleat to be, divide that figure by two (as we are working only on half of the pattern - the piece will be cut on the fold, to create a full front piece). Now draw a rectangle half the width of the pleat (the figure you just found), and the length of the centre front. For example, if I would like to create a 12cm pleat, I will add a rectangle to the centre front that is 6cm wide.

4. Now draw a second rectangle the same length and width as the first. 

drafting_box_pleats_7

The centre front (fold 2) and the line between the two rectangles (fold 1) will become the fold lines for the pleat.

Fold the pleat

drafting_box_pleats_8

5. Fold along Fold 1, folding the first rectangle towards the body of the skirt.

6. Now fold along the centre front (Fold 2), folding the pleat so that it sits flat behind the body of the skirt. 

Transfer waistline shaping

drafting_box_pleats_9

Just like with a dart, when you fold a pleat on a curved edge, you will need to adjust the edge of the pleat, so that when it is folded it will sit flush with the waistline.

To do this:

7. With the pleat still folded, take a tracing wheel and trace along the waistline, transferring the shape of the waistline onto the folded paper underneath. Repeat for the hemline.

8. Unfold the pleat, take a ruler and pencil, and join the dots created by the tracing wheel into a smooth curve. 

Mark the pleat

drafting_box_pleats_10

9. You now need to use an arrow to indicate which direction the pleat needs to be folded. For an inverted box pleat, the centre front needs to be folded towards the centre of the pattern. Indicate the direction of the fold with an arrow. At this point you can also add the grainline and note to 'Place on fold.'

drafting_box_pleats_11

10. For a standard box pleat, the centre of the pattern needs to be folded towards the centre front. Indicate the direction of the fold with an arrow. At this point you can also add the grainline and note to 'Place on fold.'

Stitching the pleat

drafting_box_pleats_12

Now have a think about whether you would like to stitch the pleats in place. This will depend on your fabric choice and the style of your skirt (or garment). You could consider leaving the pleats free, stitching down a few centimetres to give the pleat a little more structure, or stitch down 15cm (6 inches) or so, to really give some structure to your pleat. 

Mark a drill hole

If you would like to add some structure with some stitching, it is a good idea to mark a drill hole on your pattern, marking the end point of your line of stitching.

drafting_box_pleats_13

11. Measuring down from the waistline on the centre front, mark a drill hole the distance down you would like to stitch your pleat. 

ADD PATTERN MARKINGS

8.gif

12. To complete the pattern, add seam allowance and pattern markings


You may also like:

How to make a waist sash

how_to-make_a_waist_sash_1

Last week, we pretty much finished sewing our Rushcutters! All we've got to do now is create a the waist sash (if you want a waist sash for your Rushcutter. It's totally optional!) 

Creating a waist sash is a really simple way to totally transform a silhouette. I decided to include a waist sash in the Rushcutter pattern to give sewers more options for their pattern.

If you haven't got the pattern, don't worry, keep reading, I'll tell you what measurements I used so you can make a waist sash for any pattern you like!

Drafting the pattern

First, you will need to consider how wide you would like your sash to be.  As a guide, the waist sash on the Rushcutter is 3.5cm wide.

Then you need to think about how long you would like your sash to be. Remember, you will need quite a bit of extra length for the bow. Consider tying some string or ribbon around your waist to work out how much extra you will need. For the Rushcutter, I took the waist measurement and added 1.15m for the tie. Sounds like a lot, but you really do need it!

Once you have your measurements, you can draft the pattern (or draw straight onto the fabric with tailor's chalk). Draw a rectangle DOUBLE the width of your finished waist sash and HALF the length of your finished sash. 

Add seam allowance (I went for 1cm, but this is up to you) to all sides. If you would prefer not to have a seam in the centre back, just add seam allowance to three sides (2 long sides and 1 short) and then write 'place on fold' on the side that doesn't have seam allowance.

Draw a line that cuts the pattern piece in half horizontally that will be your grainline and fold line.

Sew the sash

Take the two WAIST SASH pieces (from The Rushcutter pattern or the pieces you drafted) that you have cut and, with right sides together, join them together at the centre back with a 1cm (3/8in) seam allowance. Once stitched, press the seam open. 

how_to-make_a_waist_sash_3

With right sides together, fold the sash in half length ways and press. Pin along the long edge and stitch with a 1cm (3/8in) seam allowance. 

how_to-make_a_waist_sash_4

Use your fingers to roll the seam so that it is in the centre of the tube. Press the seam allowance open.

how_to-make_a_waist_sash_5

Turn back both short ends of the tube by 1cm (3/8in) and press.

TURN THE SASH

how_to-make_a_waist_sash_6

Take a safety pin or bodkin and attach it to one side of one of the short ends of the tube.

how_to-make_a_waist_sash_7

Feed the safety pin through the tube to turn the right side out. Press flat. 

how_to-make_a_waist_sash_8

Enclose the short ends of the sash, by stitching nice and close to the edge. Alternative, you could consider sewing by hand (with a slip stitch) to finish the ends invisibly.

Give the dress one final press and you are done!