
Today, for the Acton sew-along, I'll be showing you how to do a small bust adjustment. Although the pattern I have used for the example is the Acton dress, you can adapt this tutorial to any pattern that includes princess seams.
WHEN YOU'LL NEED TO DO A Small BUST ADJUSTMENT
Most indie pattern companies (including In the Folds) draft for a B cup bust. There are of course exceptions to this rule (such as Cashmerette and Colette), so make sure you check on your pattern before assuming the bust cup size.
This means that if your bust cup size is smaller than a B you will need to do a Small Bust Adjustment, otherwise known as a SBA, and if your bust cup size is larger than a B you will need to do a Full Bust Adjustment or FBA.
WORK OUT YOUR CUP SIZE
Your cup size in sewing patterns may not always correspond to the bra size you wear. To be safe, check your measurements before deciding if you need to make any adjustments to the pattern.
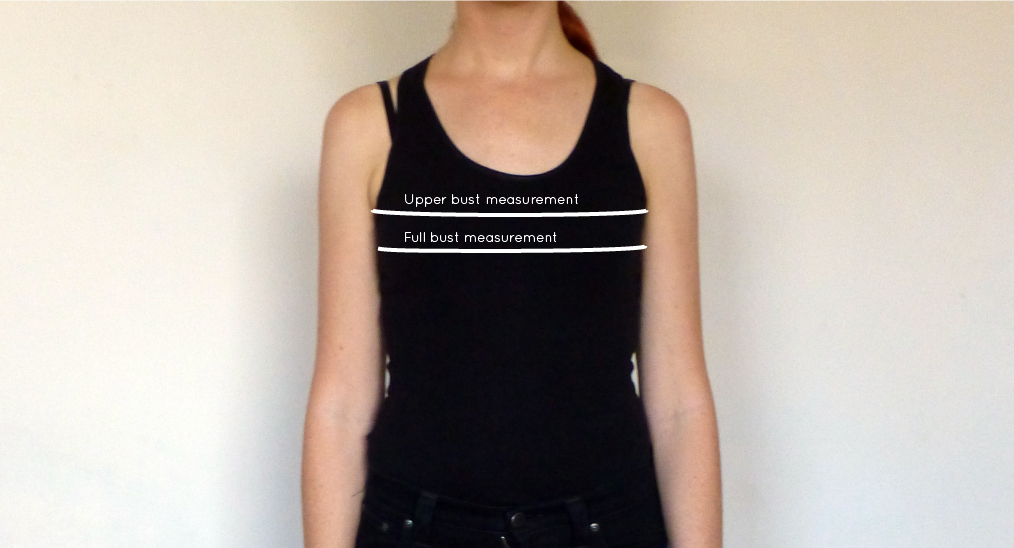
Measure your high bust measurement (the area above your breasts, under your arms) as well as your full bust (the fullest part of your chest / horizontal measurement across your nipples) and then take note of each measurement, as well as the difference.
If the difference is 2.5cm (1") your bust is an A cup, 5cm (2") it's a B cup, 7.5cm (3") is a C cup and so on.
CHOOSE YOUR SIZE
Now, go back to your high bust measurement and add 5cm (2"). This is what your bust measurement would be if you were a B cup and therefore the size you should be choosing from the pattern.
For example, let's say your upper bust measures 81cm (32"). Add 5cm (2") to this measurement to find out what size your bust measurement falls into on the In the Folds sizing chart (and what size you would be if you had B cup breasts). 81cm + 5cm = 86cm which corresponds to a size C. Your actual bust measurement is 83cm though - 3cm (just over 1") smaller than the bust measurement of the pattern. This means you will need to do a SBA and remove this 3cm (1") from your pattern.
Just like when we did the FBA, we will also need to remove some length from the bust panel, not only width.
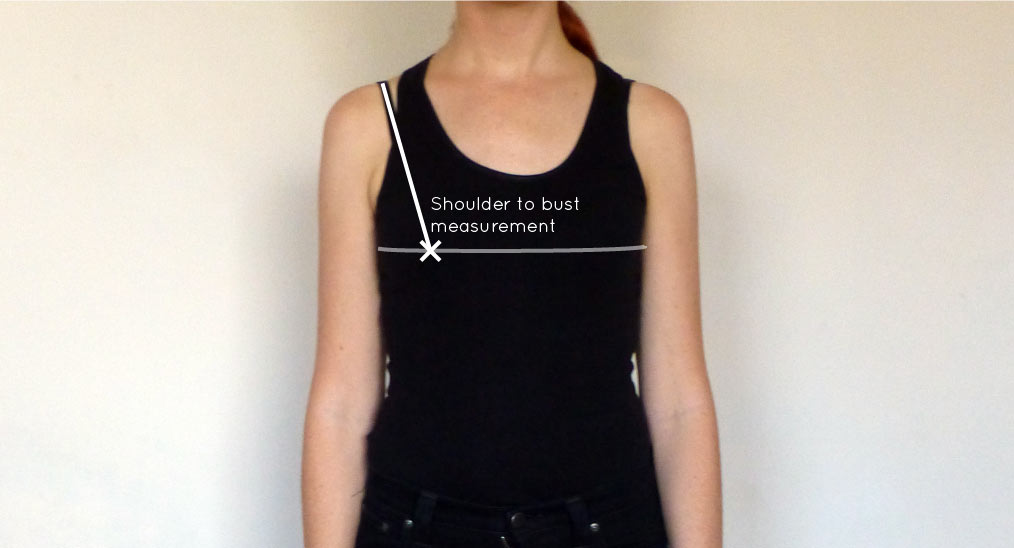
To work out how much length you need to remove, measure from your shoulder down to your bust point. Take note of the measurement. The pattern has been drafted to accommodate the following shoulder to bust length:
Size A - 25cm / Size B - 25.5cm / Size C - 26cm / Size D - 26.5cm / Size E - 27.5cm / Size F - 28.5cm / Size G - 29cm / Size H - 29.5cm / Size J - 30cm / Size K - 31cm
Select the pattern size you will be using and deduct your shoulder to bust measurement from the relevant measurement. For example, my shoulder to bust measurement is 24cm, my measurements put me into a size C bust (although my bust measurements tells me I need an SBA) which is designed for a 26cm shoulder to bust length. This means I will need to reduce the bust seam by 2cm.
GETTING STARTED

Trace a copy of the SIDE FRONT BODICE and CENTRE FRONT BODICE. I always suggest to trace a copy of the pattern, so if you make a mistake you always have the original to go back to (although with digital patterns you can just print another copy if necessary). Be sure to include all pattern markings (in this case: grainline, notches and drill hole) and make sure you trace off the stitching line (the grey line on the pattern) - this is really important. When making pattern alterations, I normally suggest removing the seam allowance, but because the stitch line is marked on the pattern, you can leave it on if you like.
Mark the bust line

A : Draw a horizontal line across the fullest part of the bust on the SIDE FRONT BODICE. Mark the point where the horizontal line intersects the stitching line at the side seam as point 1.
B : Mark this horizontal line (in the same position) on the CENTRE FRONT BODICE. Mark the point where the the horizontal line intersects the stitching line at the centre front seam as point 2.
Remove length from the bust

A : From the bust seam, cut into the line you just marked. Cut towards point 1 and stop right on the side seam stitch line. (This will help us remove length from the bust, but not the side seam).
B : Cut in from the other side of the line now (from the side seam), towards point 1, leaving a 1-2mm "hinge" to keep the two parts of the pattern attached (this techniques is called 'Cut and Spread' - for more info on this technique, check out this tutorial).

A : On the stitching line of the bust seam, measure down from the cut line the the amount you need to remove from the bust length. Mark with a dot or small line and label as point 3. For example, I am removing 2cm from the bust length, so I marked a point 2cm below the cut line.
B : Gently pull the top section of the pattern down, so that it overlaps the lower section, until the cut line intersects point 3. Tape or glue in place.
Repeat process for the centre front bodice panel
It is now to make the same changes on the CENTRE FRONT BODICE piece, so that the CENTRE FRONT and the SIDE FRONT bodice pieces still fit together.

A : From the bust seam, cut into the horizontal line on the CENTRE FRONT BODICE. Cut towards point 2 and stop right on the centre front stitch line.
B : Cut in from the other side of the line now (from the centre front seam), towards point 2, leaving a 1-2mm "hinge" to keep the two parts of the pattern attached.

A : On the stitching line of the bust seam, measure down from the cut line the the amount you need to remove from the bust length. Mark with a dot or small line and label as point 4. For example, I am removing 2cm from the bust length, so I marked a point 2cm below the cut line.
B : Gently pull the top section of the pattern down, so that it overlaps the lower section, until the cut line intersects point 4. Tape or glue in place.

A : Re-draw the centre front seam with a straight line (by joining the top of the original centre front stitch line with the bottom).
B : Re-draw the bust seam line with a straight line (by joining the top of the original seam stitch line with the bottom).
C : You will notice that you removed width from the pattern piece when you re-drew the centre front seam and added width when you re-drew the panel seam - which now cancels each other out.
Remove width from the side front bodice
Now that we've removed some length from the bust, it's time to remove some width. Take your bust measurement and remove it from the pattern's original bust measurement (found on the sizing chart). For example, as I mentioned at the beginning of the tutorial, I am using a size C bodice - which has a 86cm bust. I have a 83cm bust measurement, so I need to remove 3cm overall.
Remember, we are doing things on the half (as each piece is cut as a pair), so that means we need to remove half of this overall difference from the SIDE FRONT BODICE and CENTRE FRONT BODICE. I will be removing half of 3cm (i.e 1.5cm) from each side of my bodice, which means I need to remove half of that (8mm) from each of the front bodice pieces.
A : Measuring inward from point 3, mark a point the distance you are removing from the SIDE FRONT BODICE. As mentioned in the example, I will be removing 8mm from the width of each pattern piece, so I will mark a point 8mm in from point 3.
B : Now re-draw the bust curve, by drawing a line from the original stitch line, through the point marked in part A, and then down to the stitch line at the waistline. As you can see, the bust line is getting a lot flatter, which is what us small busted ladies like to see!
Re-draw the side seam

A : You will notice that the side seam is no longer a straight line, since we removed some width from the bust. Re-draw as a straight line by joining the top of the original side seam stitch line with the bottom.
B : This will remove a little more width from your bust width. Take a ruler and check how much this new side seam will skim off.
Trace the new pattern piece
A : Take a fresh piece of pattern paper and trace the SIDE FRONT BODICE. Start by tracing the stitch line. Be careful to check that you are tracing the new side seam line and new bust curve.
B : Add seam allowance to the pattern. You can do this by transferring the original seam allowance lines, or just add yourself - 1.5cm at the side seam, 1.2cm at the waist and bust seam and 1cm around the armhole. Transfer the notches and grainline.
By this point we have removed width from both sides of the SIDE FRONT BODICE. For example, I removed 8mm from the width at the bust line, and then a further 3mm when I straightened out the side seam. This means that when I cut a pair of this piece, I would have reduced the bust measurement by a total of 22mm {(8mm + 3mm) x 2}. Overall I need to remove 3cm, which means I just have to remove 8mm from the CENTRE FRONT BODICE (half for each piece - i.e. in the case of the example, 4mm either side).
Remove width from the centre front bodice

A : Take the CENTRE FRONT bodice, and measuring from the new bust seam line, on the cut line, mark a point the distance inwards that you still need to remove. For example, I need to remove 4mm from the piece, so I marked a point 4mm in from the new bust stitch line.
B : Re-draw the seam line intersecting this point. You will need to make it slightly curved to intersect.
Trace the new pattern piece

A : Take a fresh piece of pattern paper and trace the CENTRE FRONT BODICE. Start by tracing the stitch line. Be careful to check that you are tracing the new bust seam line and new centre front.
B : Add seam allowance to the pattern. You can do this by transferring the original seam allowance lines, or just add it yourself - 1.2cm at the waist and bust seam and 1cm around the armhole. Transfer the notches and grainline. You will notice that that we have almost lost the notches on this piece. Transfer the notches from the SIDE FRONT BODICE piece to ensure the notches are in the right place (if you're not quite sure how to do this, don't worry, I've got a tutorial on it coming tomorrow!)
All done! Can you believe it?! It was quite a long post...
Now, before cutting into your real fabric, I suggest making one more toile. Better to be safe than sorry, right?


