Welcome to the first tutorial in the Collins Top Sew-along! In today's post, we're talking Full Bust Adjustments (FBA), which is one of the most frequently used adjustments. A few of you have already contacted me about how to do a FBA on the Collins Top, so I know this tutorial will be helpful to a lot of you!
During the Acton Sew-along I showed you how to do a FBA on a princess seam, but for the Collins Top you'll need a slightly different technique as it doesn't have a princess seam (or a dart).
You will be able to use this tutorial on any pattern that has a flat front (doesn't have a princess seam or dart).
We'll be making the FBA by adding a dart to the CENTRE FRONT PANEL only. We will do this by adding a dart to the front (with the side panel and centre front panel as a whole piece) and then removing it from the side panel - leaving you with just a small dart in the centre front panel. If you like, you can then close out the dart altogether and redistribute the fullness to the hem. You can find out how to do that by looking at the next post in the Collins Top sew-along.
WHEN YOU'LL NEED TO DO A FULL BUST ADJUSTMENT
Most indie pattern companies (including In the Folds) draft for a B cup bust. There are of course exceptions to this rule (such as Cashmerette and Colette Patterns), so make sure you check on your pattern before assuming the bust cup size.
In terms of the Collins Top, it is a loose style which means it is a little more forgiving than more fitted patterns (such as the Acton, for example) so in some cases you can probably get away with not making a bust adjustment. For example, if your bust is smaller than a B cup, it is unlikely you need to bother doing a Small Bust Adjustment. I have an A cup bust, but have not made adjustments to any of my Collins tops. Also if your bust is just slightly bigger than a B cup, it is also likely you will be okay without the adjustment. By checking the finished measurmentes, you will see that there is a lot of ease in this pattern.
Check the finished garment measurements and go from there.
WORK OUT YOUR CUP SIZE
Your cup size in sewing patterns may not always correspond to the bra size you wear. To be safe, check your measurements before deciding if you need to make any adjustments to the pattern.
To do this, measure your high bust measurement (the area above your breasts, under your arms) as well as your full bust (the fullest part of your chest) and then take note of each measurement, as well as the difference.
If the difference is 2.5cm (1") your bust is an A cup, 5cm (2") it's a B cup, 7.5cm (3") is a C cup and so on.
CHOOSE YOUR SIZE
Now, go back to your high bust measurement and add 5cm (2"). This is what your bust measurement would be if you were a B cup and therefore the size you should be choosing from the pattern.
For example, let's say your upper bust measures 81cm (32"). Add 5cm (2") to this measurement to find out what size your bust measurement falls into on the In the Folds sizing chart (and what size you would be if you had B cup breasts). 81cm + 5cm = 86cm which corresponds to a size C. Your actual bust measurement is 89cm though - 3cm (1") larger than the cup size of the pattern. This means you need to do a FBA and add this 3cm (1") to your pattern.
As the bodice is cut on the fold, you need to take the measurement you will be adding and divide it by two. For example, this 3cm (just over 1") mentioned in the example, will be split between either side of the front bodice - 1.5cm (1/2") on each side.
GETTING STARTED
Step 1:
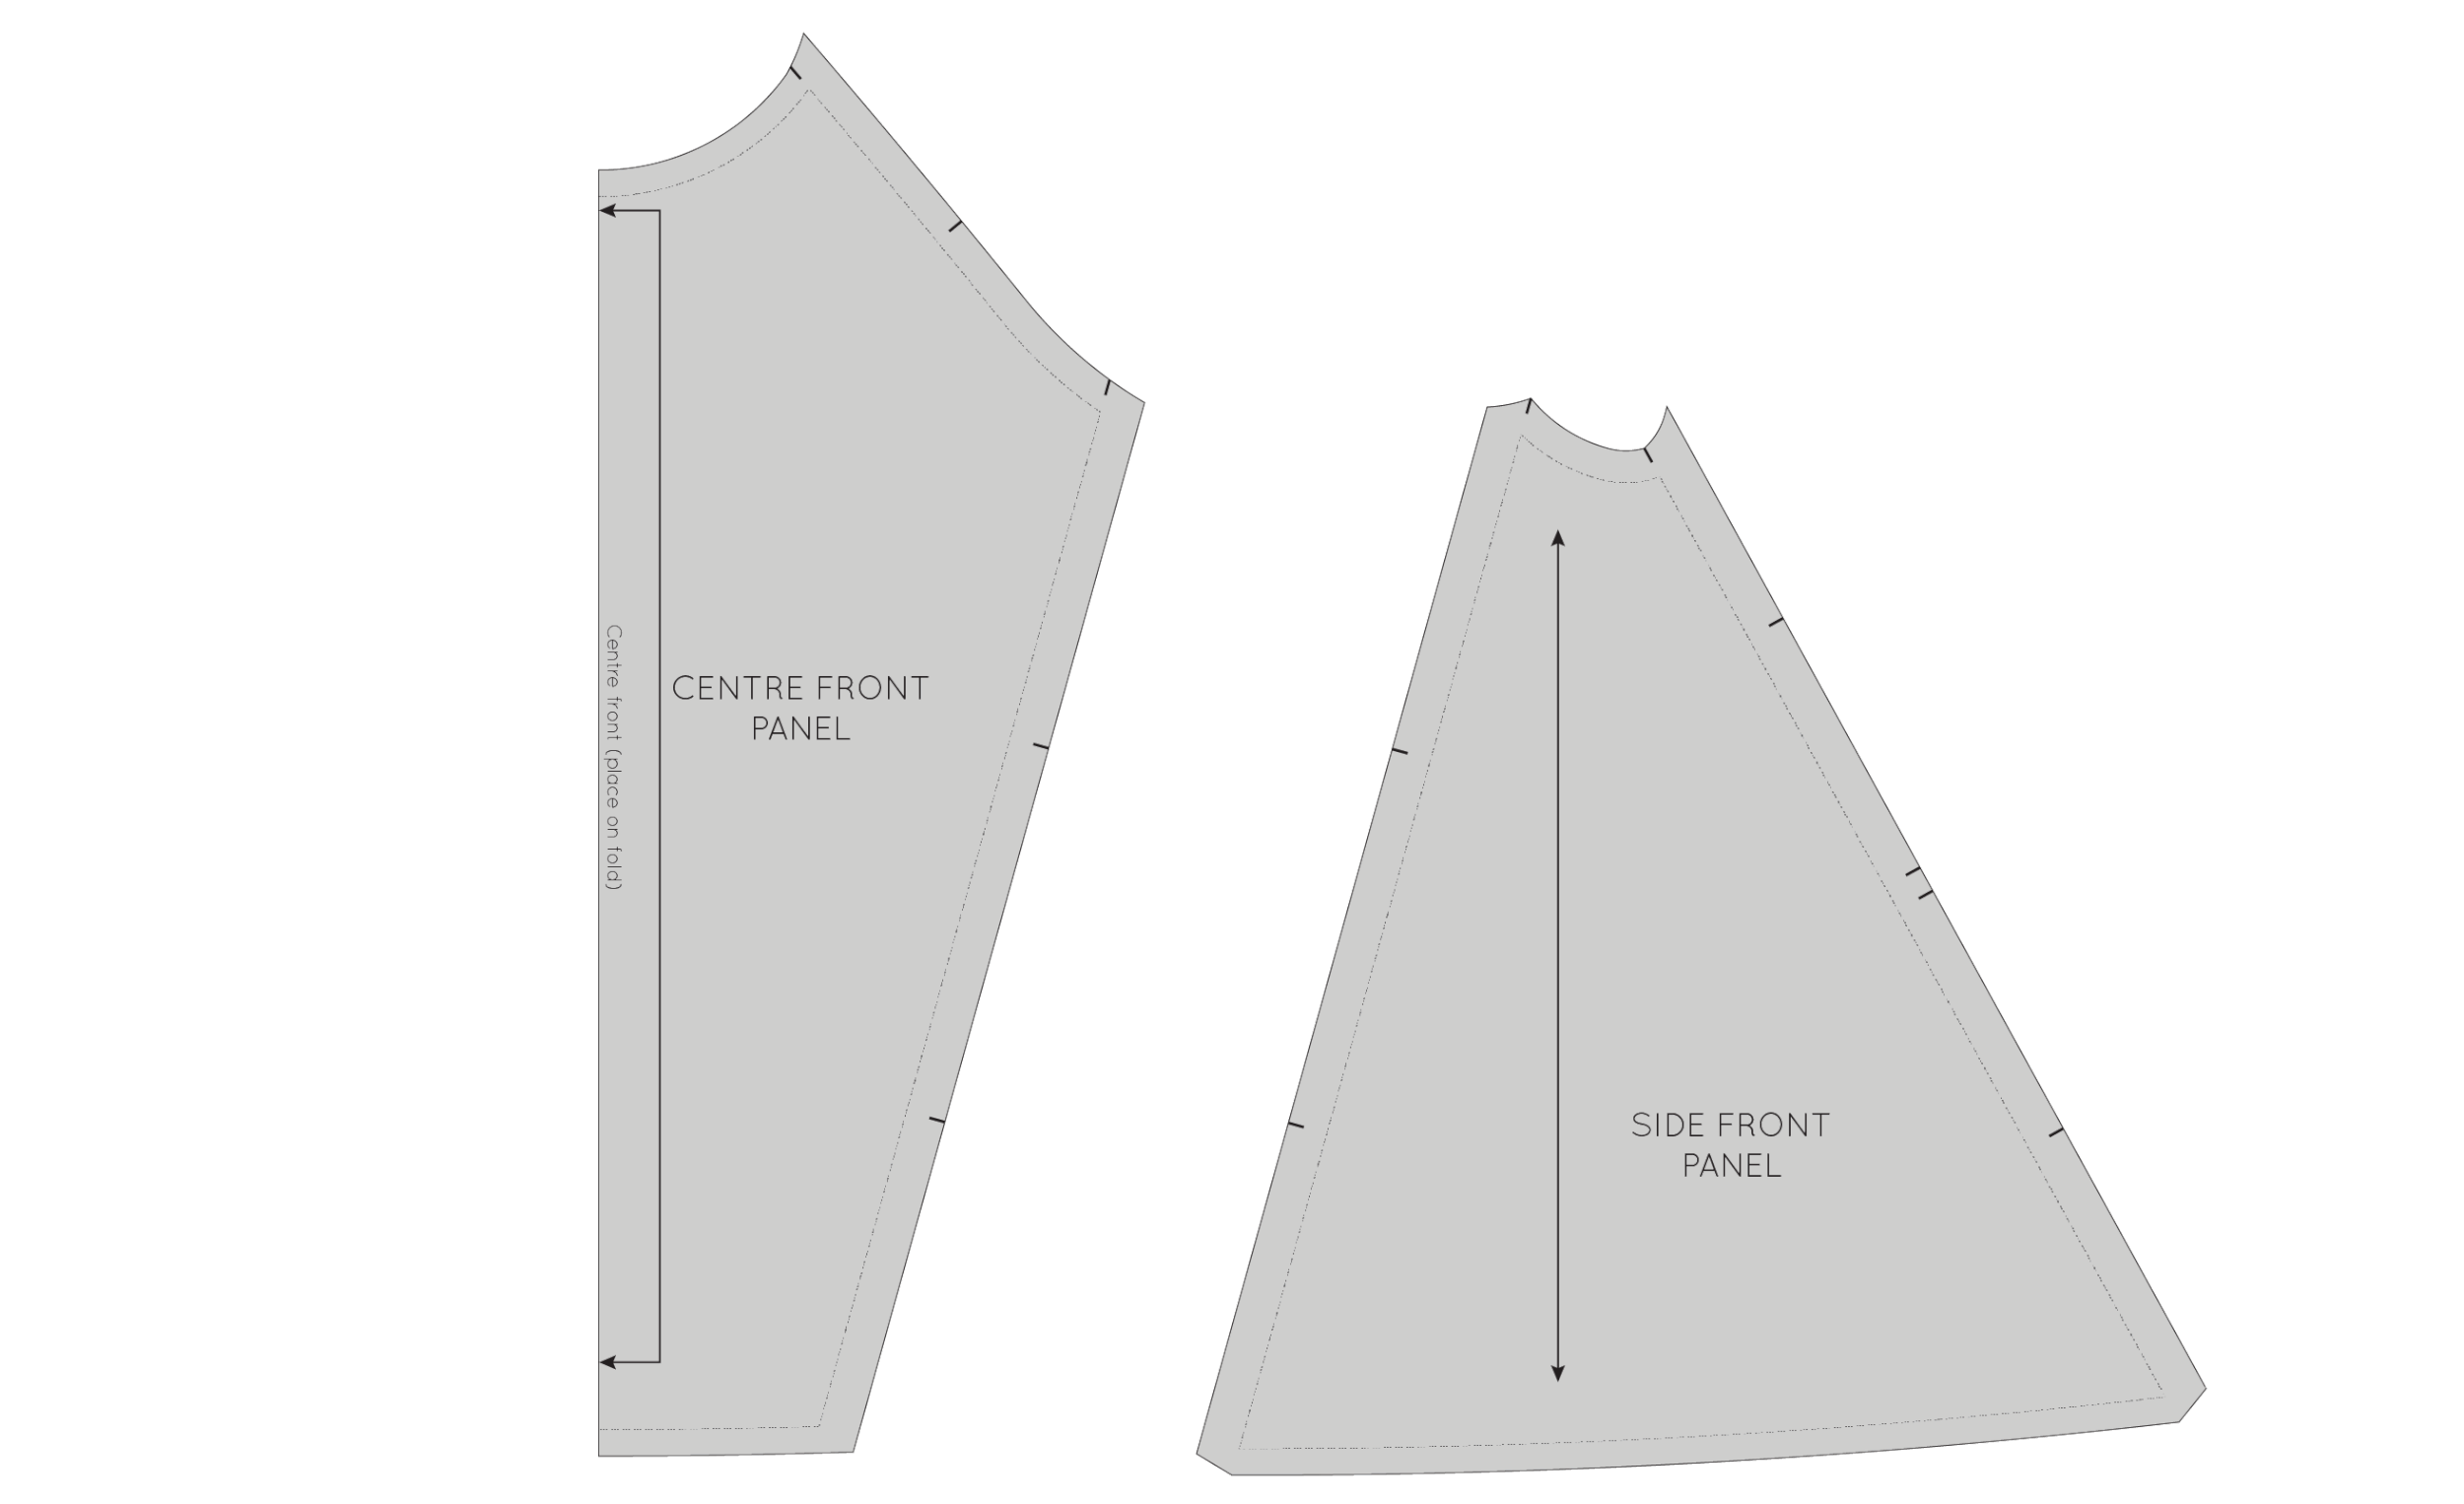
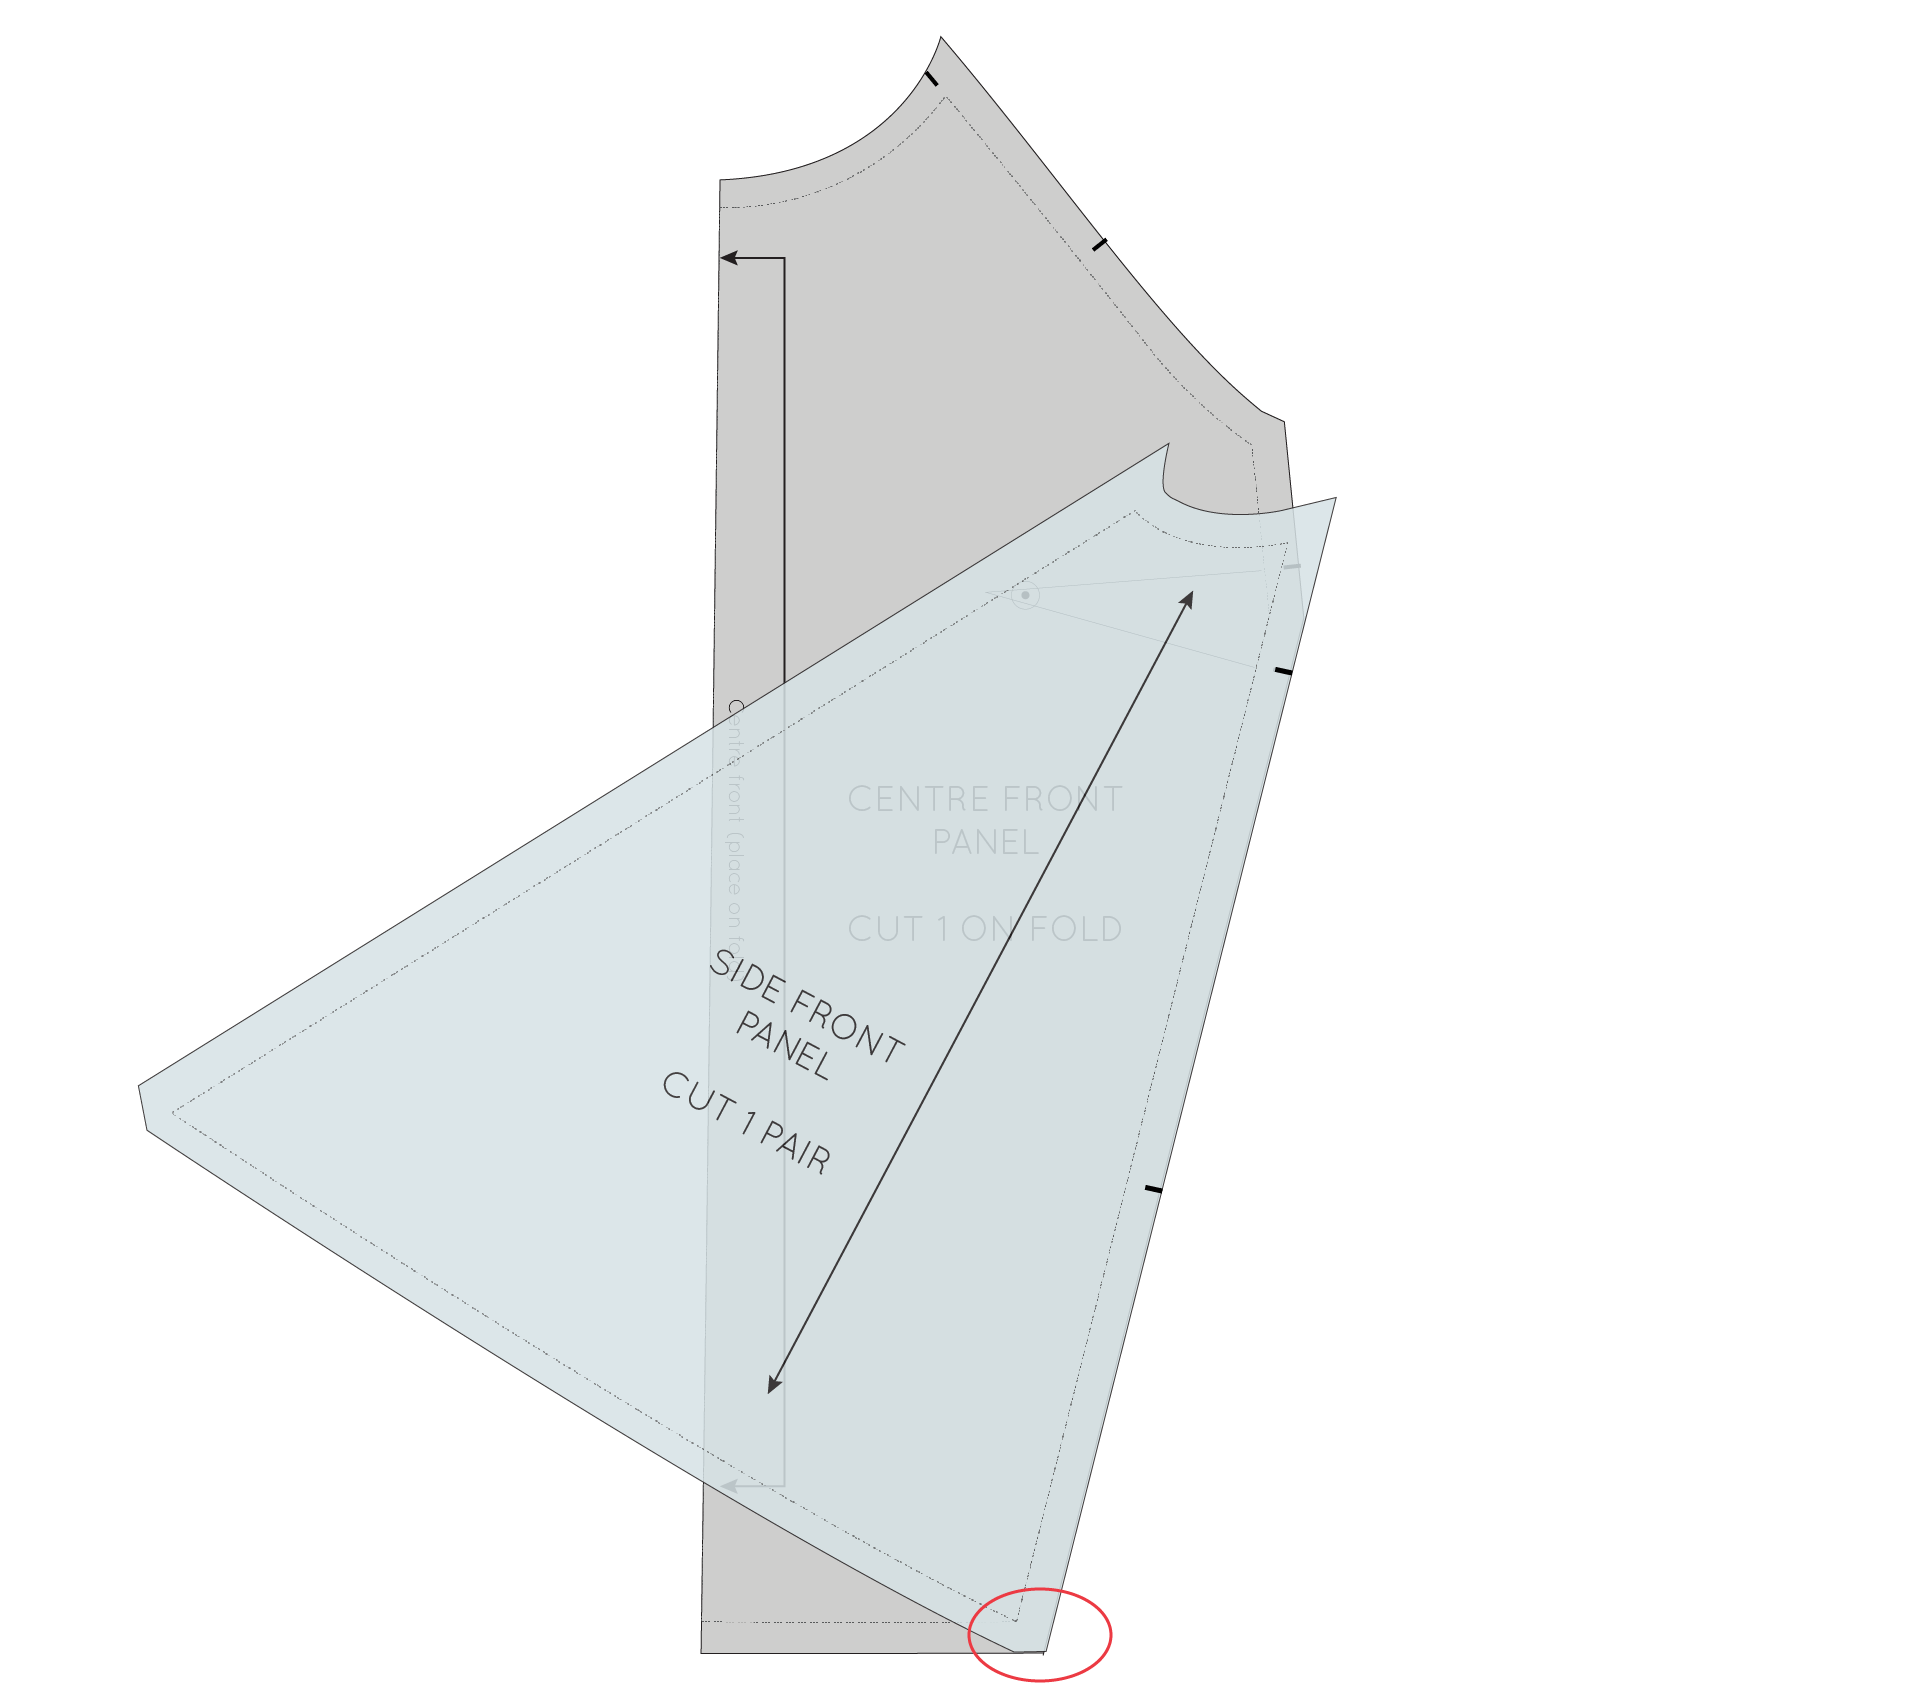
Take the two pieces that make the front of the Collins Top - the CENTRE FRONT PANEL and the SIDE FRONT PANEL. The first step will be to turn these pieces into one pattern piece (removing the panel line) as this will make the adjustment much easier to manage. At the end, we'll put the panel line back in place, so there won't be any change to the design of the top (except for the addition of the dart - which can be removed later on, if you prefer).
TRACE PIECES
Step 2:
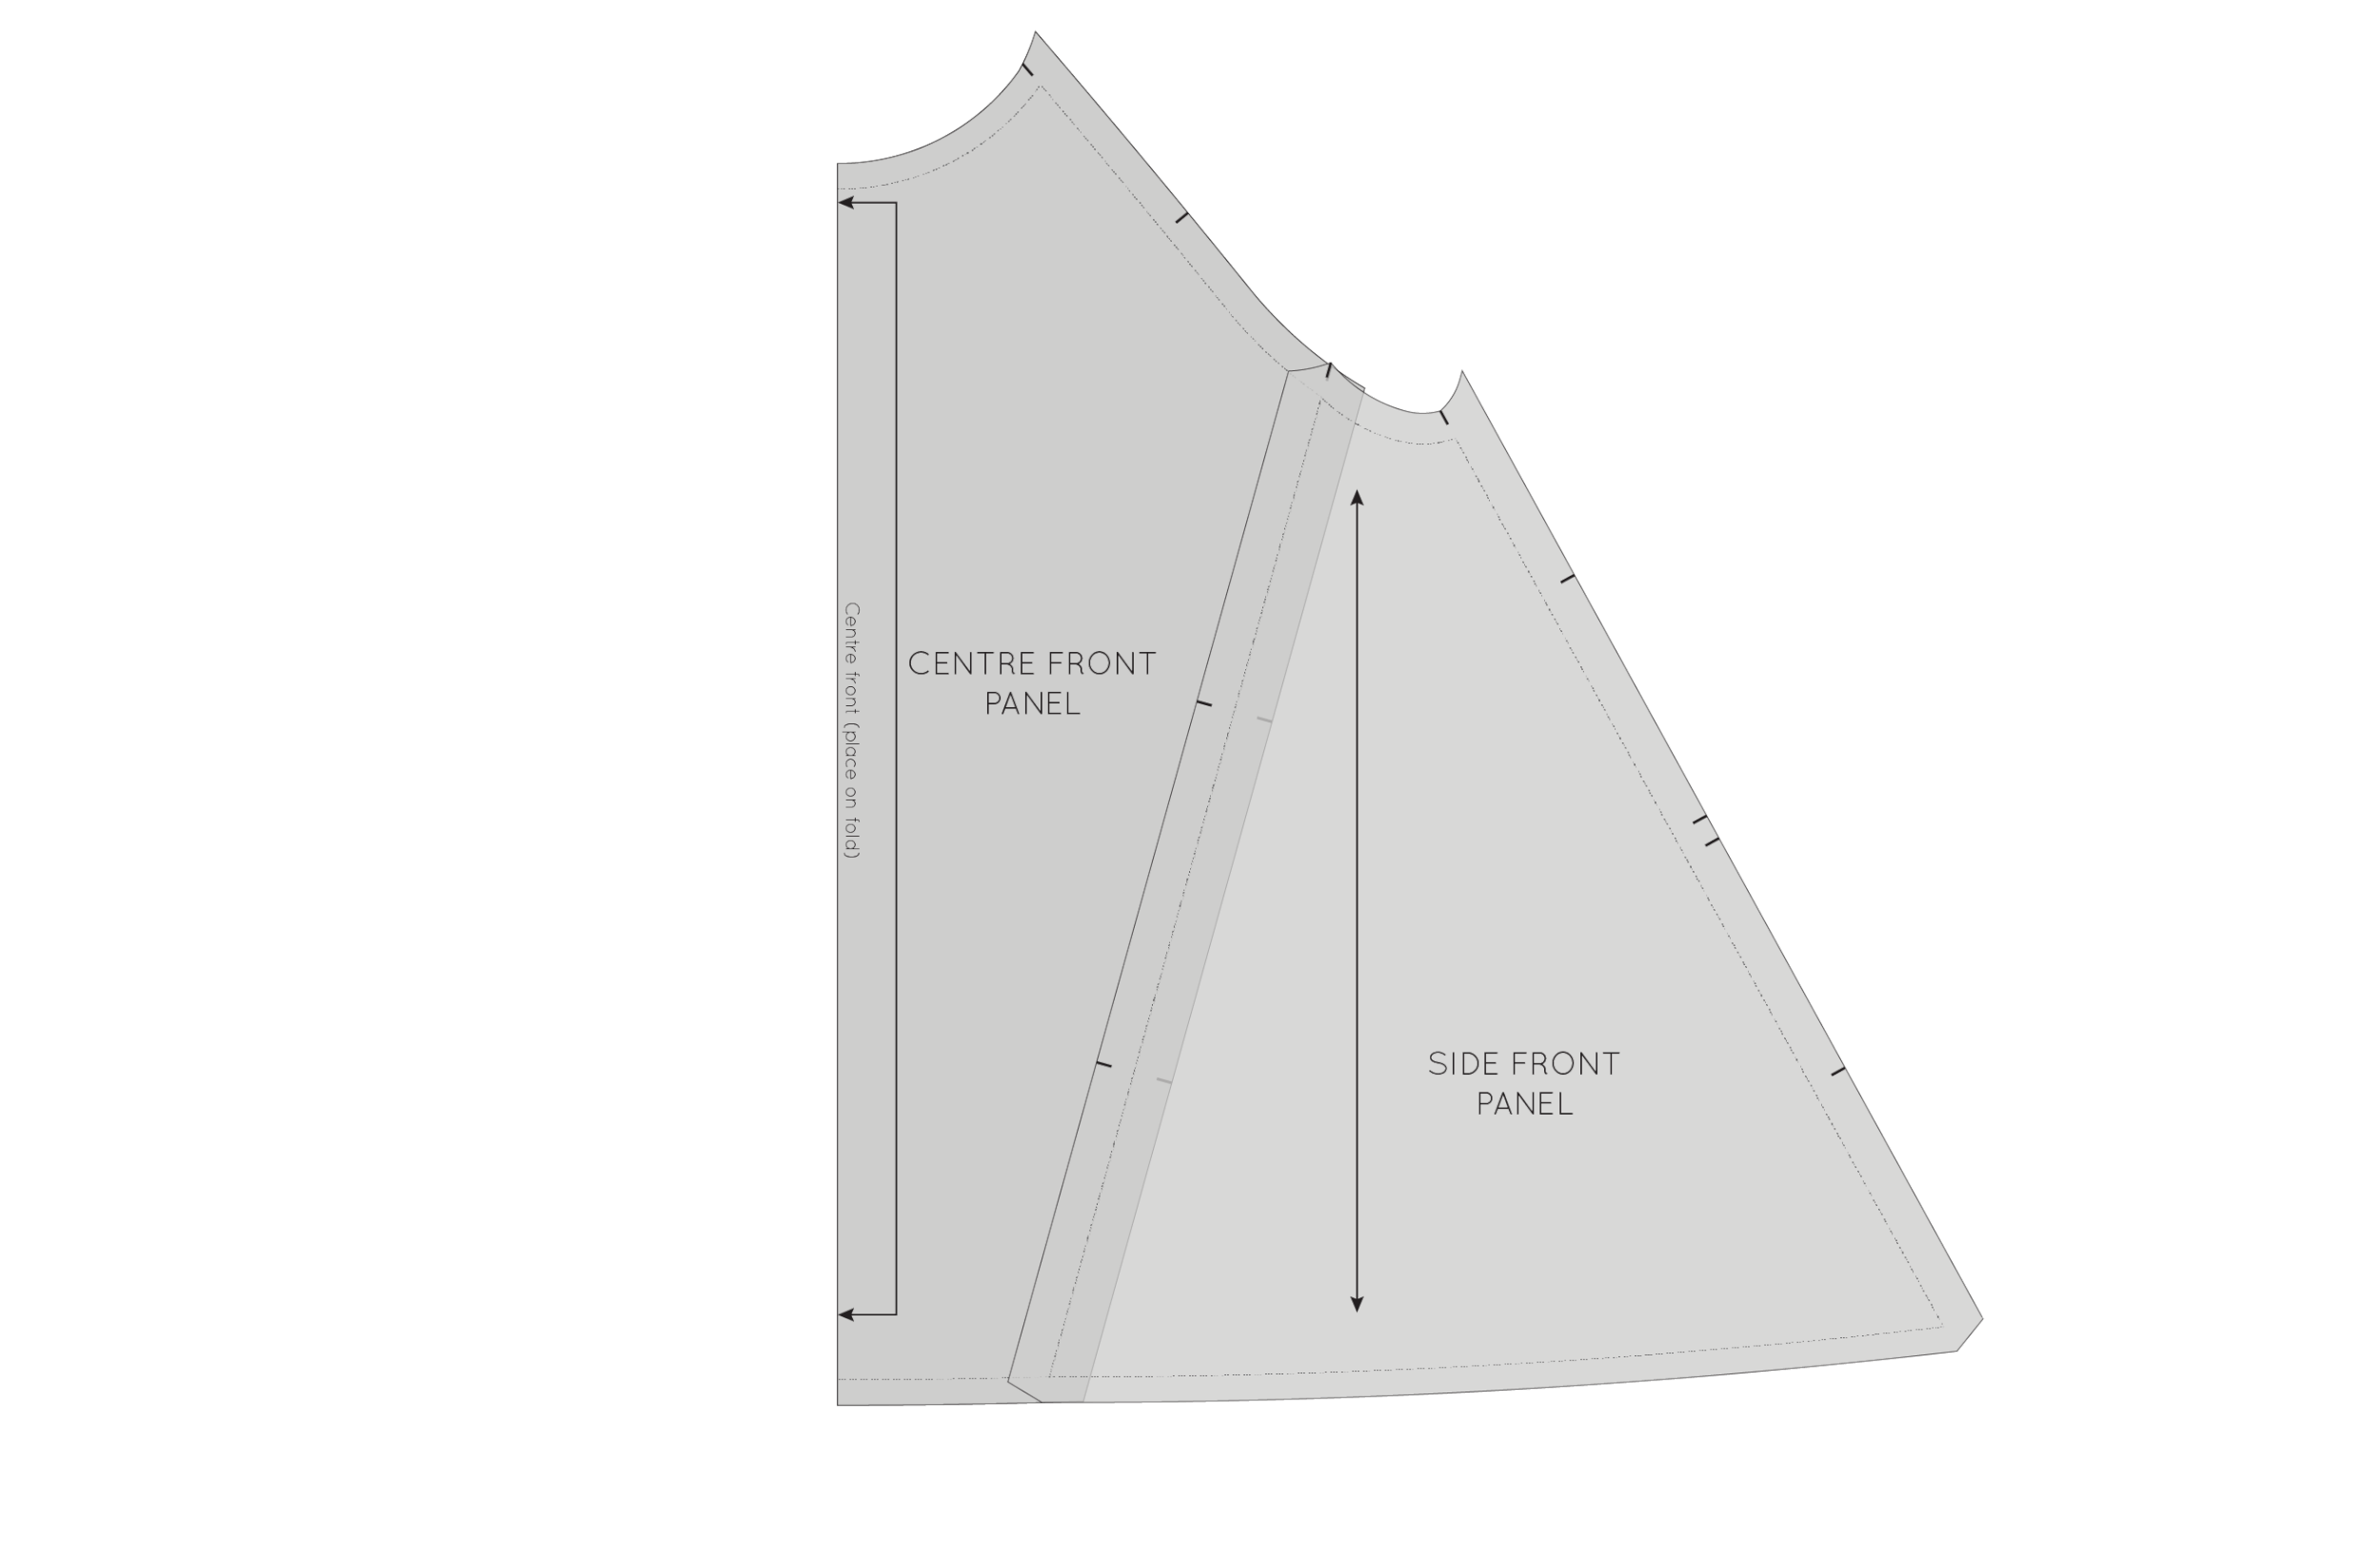
Take the SIDE FRONT PANEL piece and place it on top of the CENTRE FRONT PANEL, lining up the stitch lines (the grey line on the pattern), as if the pieces have been sewn together. If you are struggling to see the lines, it can help to put the pieces up to a window and see through the paper that way (or a lightbox, if you have one). Once the pieces are correctly lined up, use masking tape (or similar) to hold the pieces in place.
Step 2:
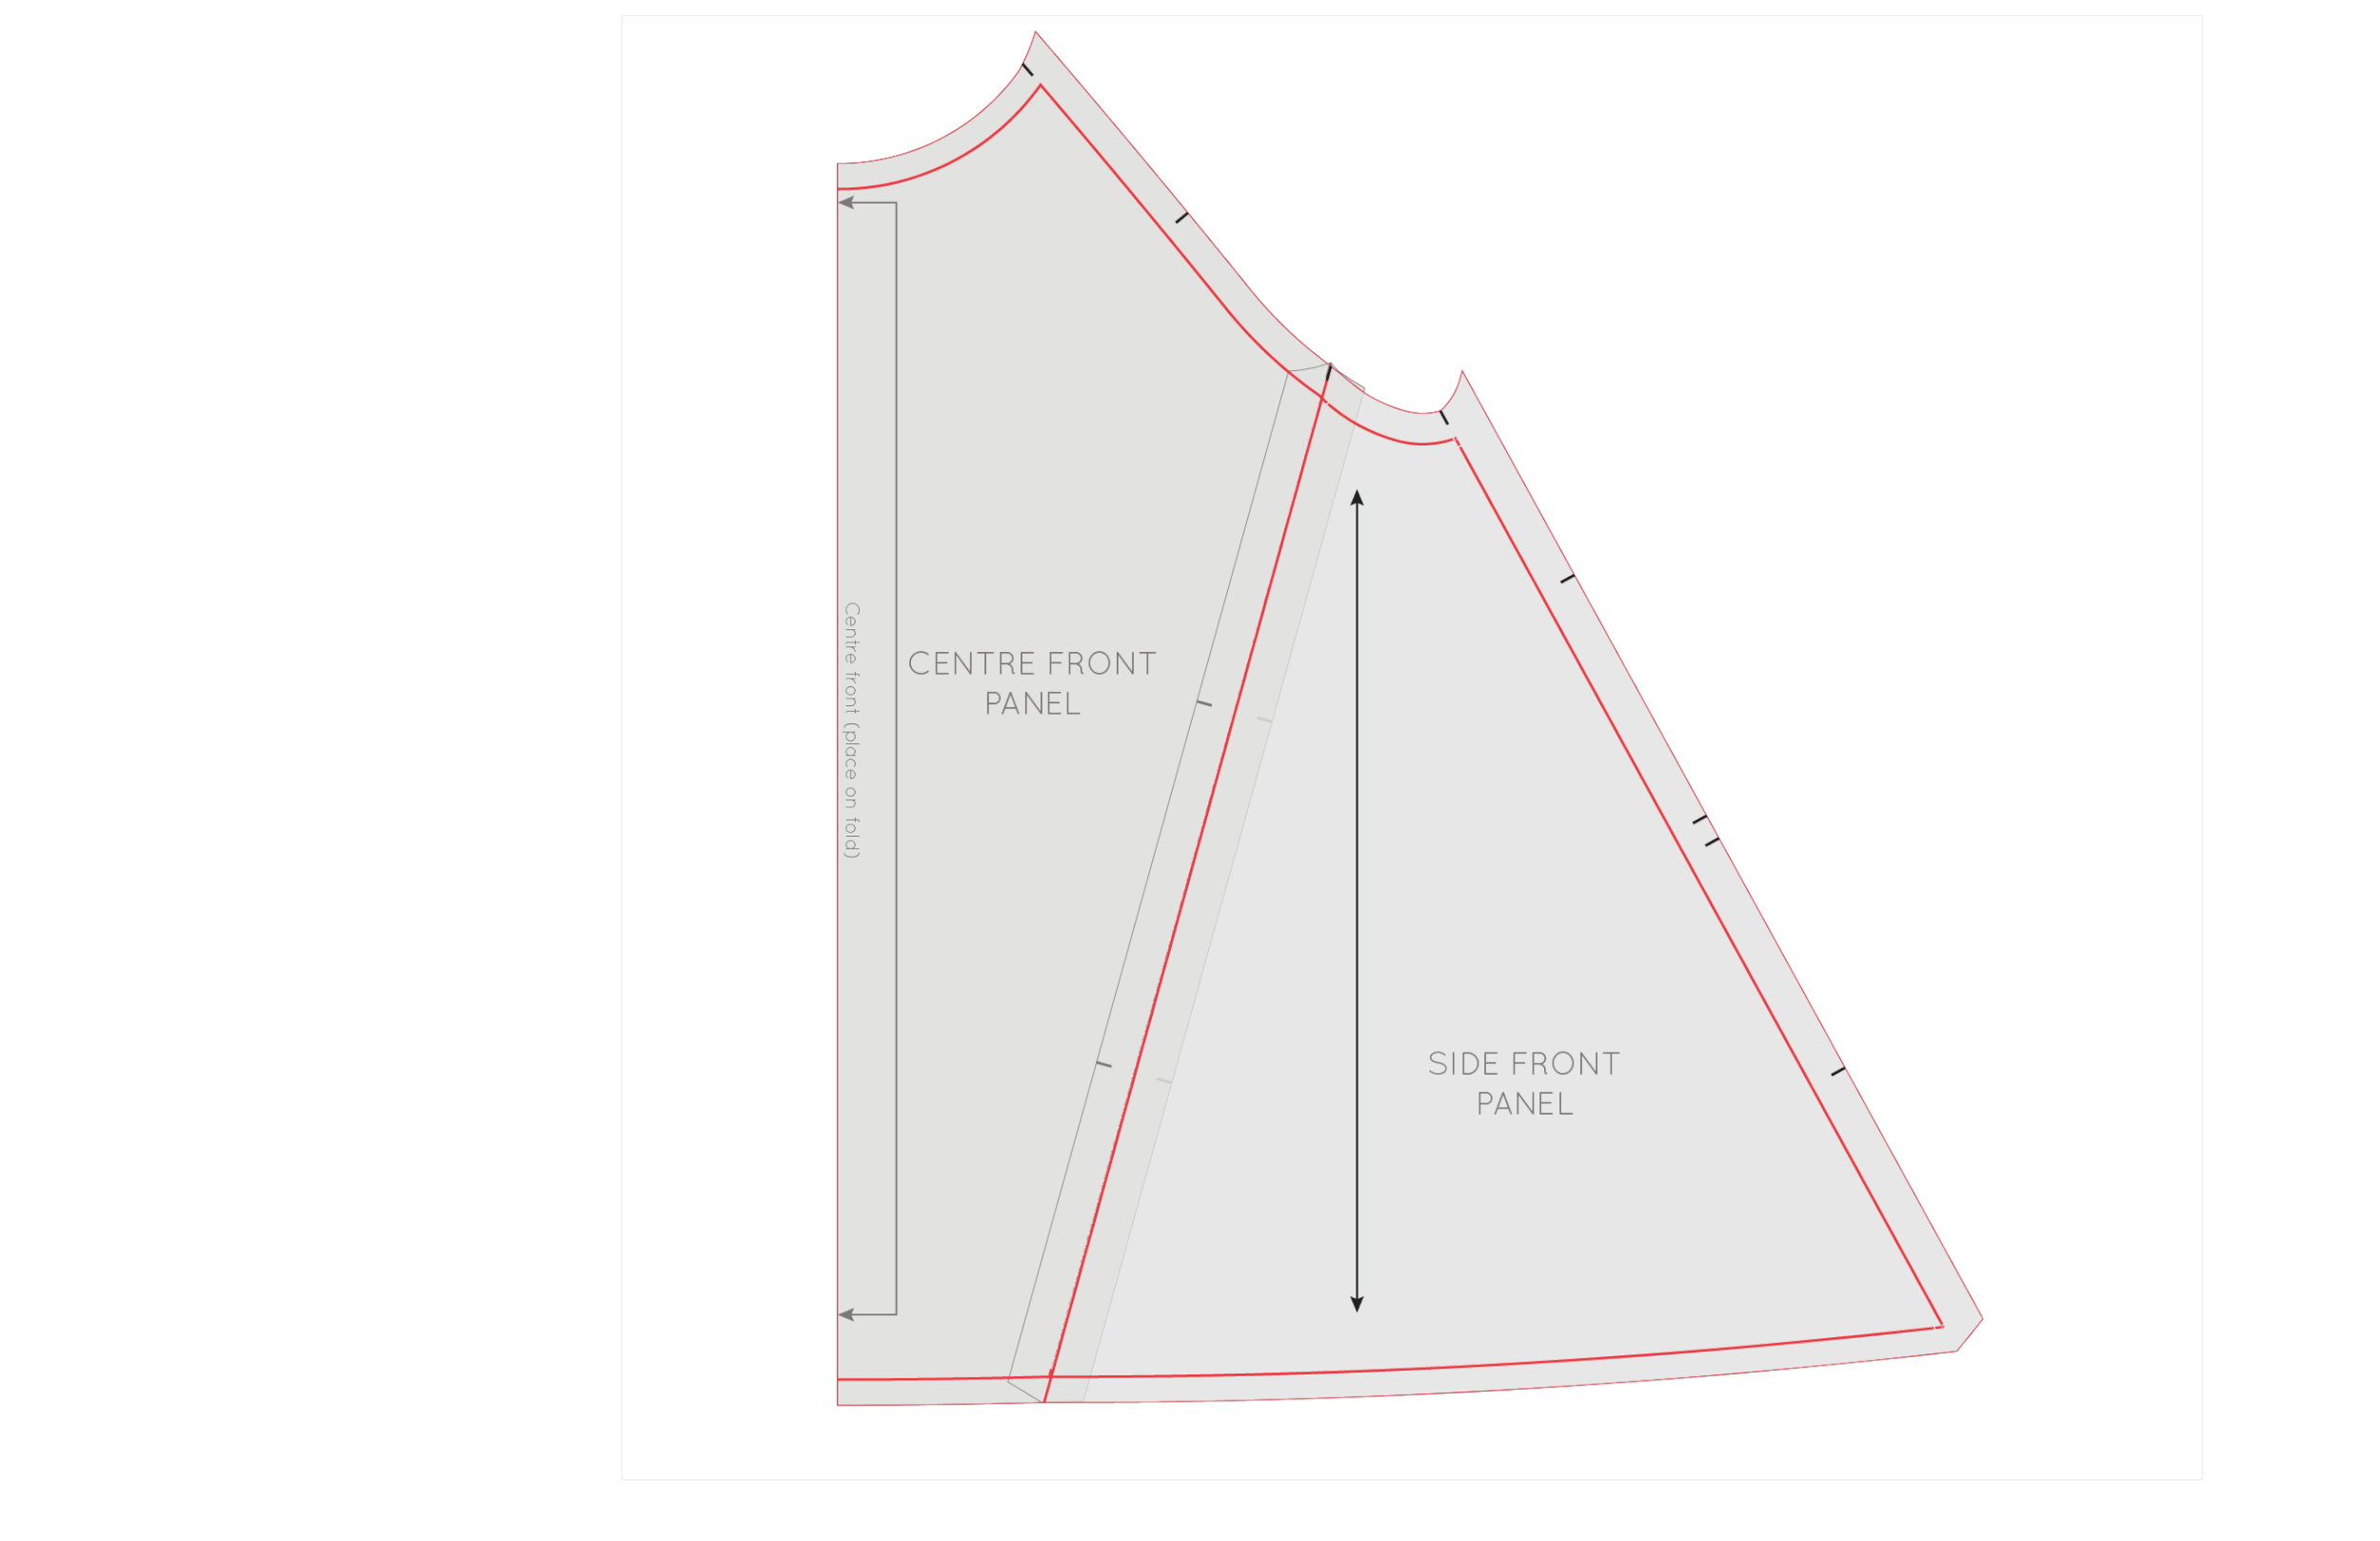
Take a piece of pattern paper and trace the piece - being sure to include all pattern markings (in this case: the grainline and notches). Also trace the panel line.
Make sure you trace both the cutting line and the stitching line - this is really important. In the Folds patterns include the stitching line on each pattern piece so that it is easier for you to make alterations to your pattern. I know we would all love to be able to cut a pattern in a straight size and for it to fit perfectly, but unfortunately that's not the way it is (I even have to make adjustments to In the Folds patterns so they fit my figure properly), so having the stitch lines can help you make adjustments more quickly and easily. When making pattern alterations, I normally suggest removing the seam allowance, but because the stitch line is marked on the pattern, you can leave it on.
MARK APEX POINT ON THE PATTERN
Step 3:
The next step is to mark your apex point on the pattern. Your apex point is the peak of the fullest part of your breast... which basically means your nipple! This point varies from person to person, so you can work it out by holding the pattern piece up to your body and working it out, or by referring to a toile (if you have toiled your Collins Top before working on any adjustments).
PREPARE PATTERN PIECE FOR THE ADJUSTMENT
Step 5:
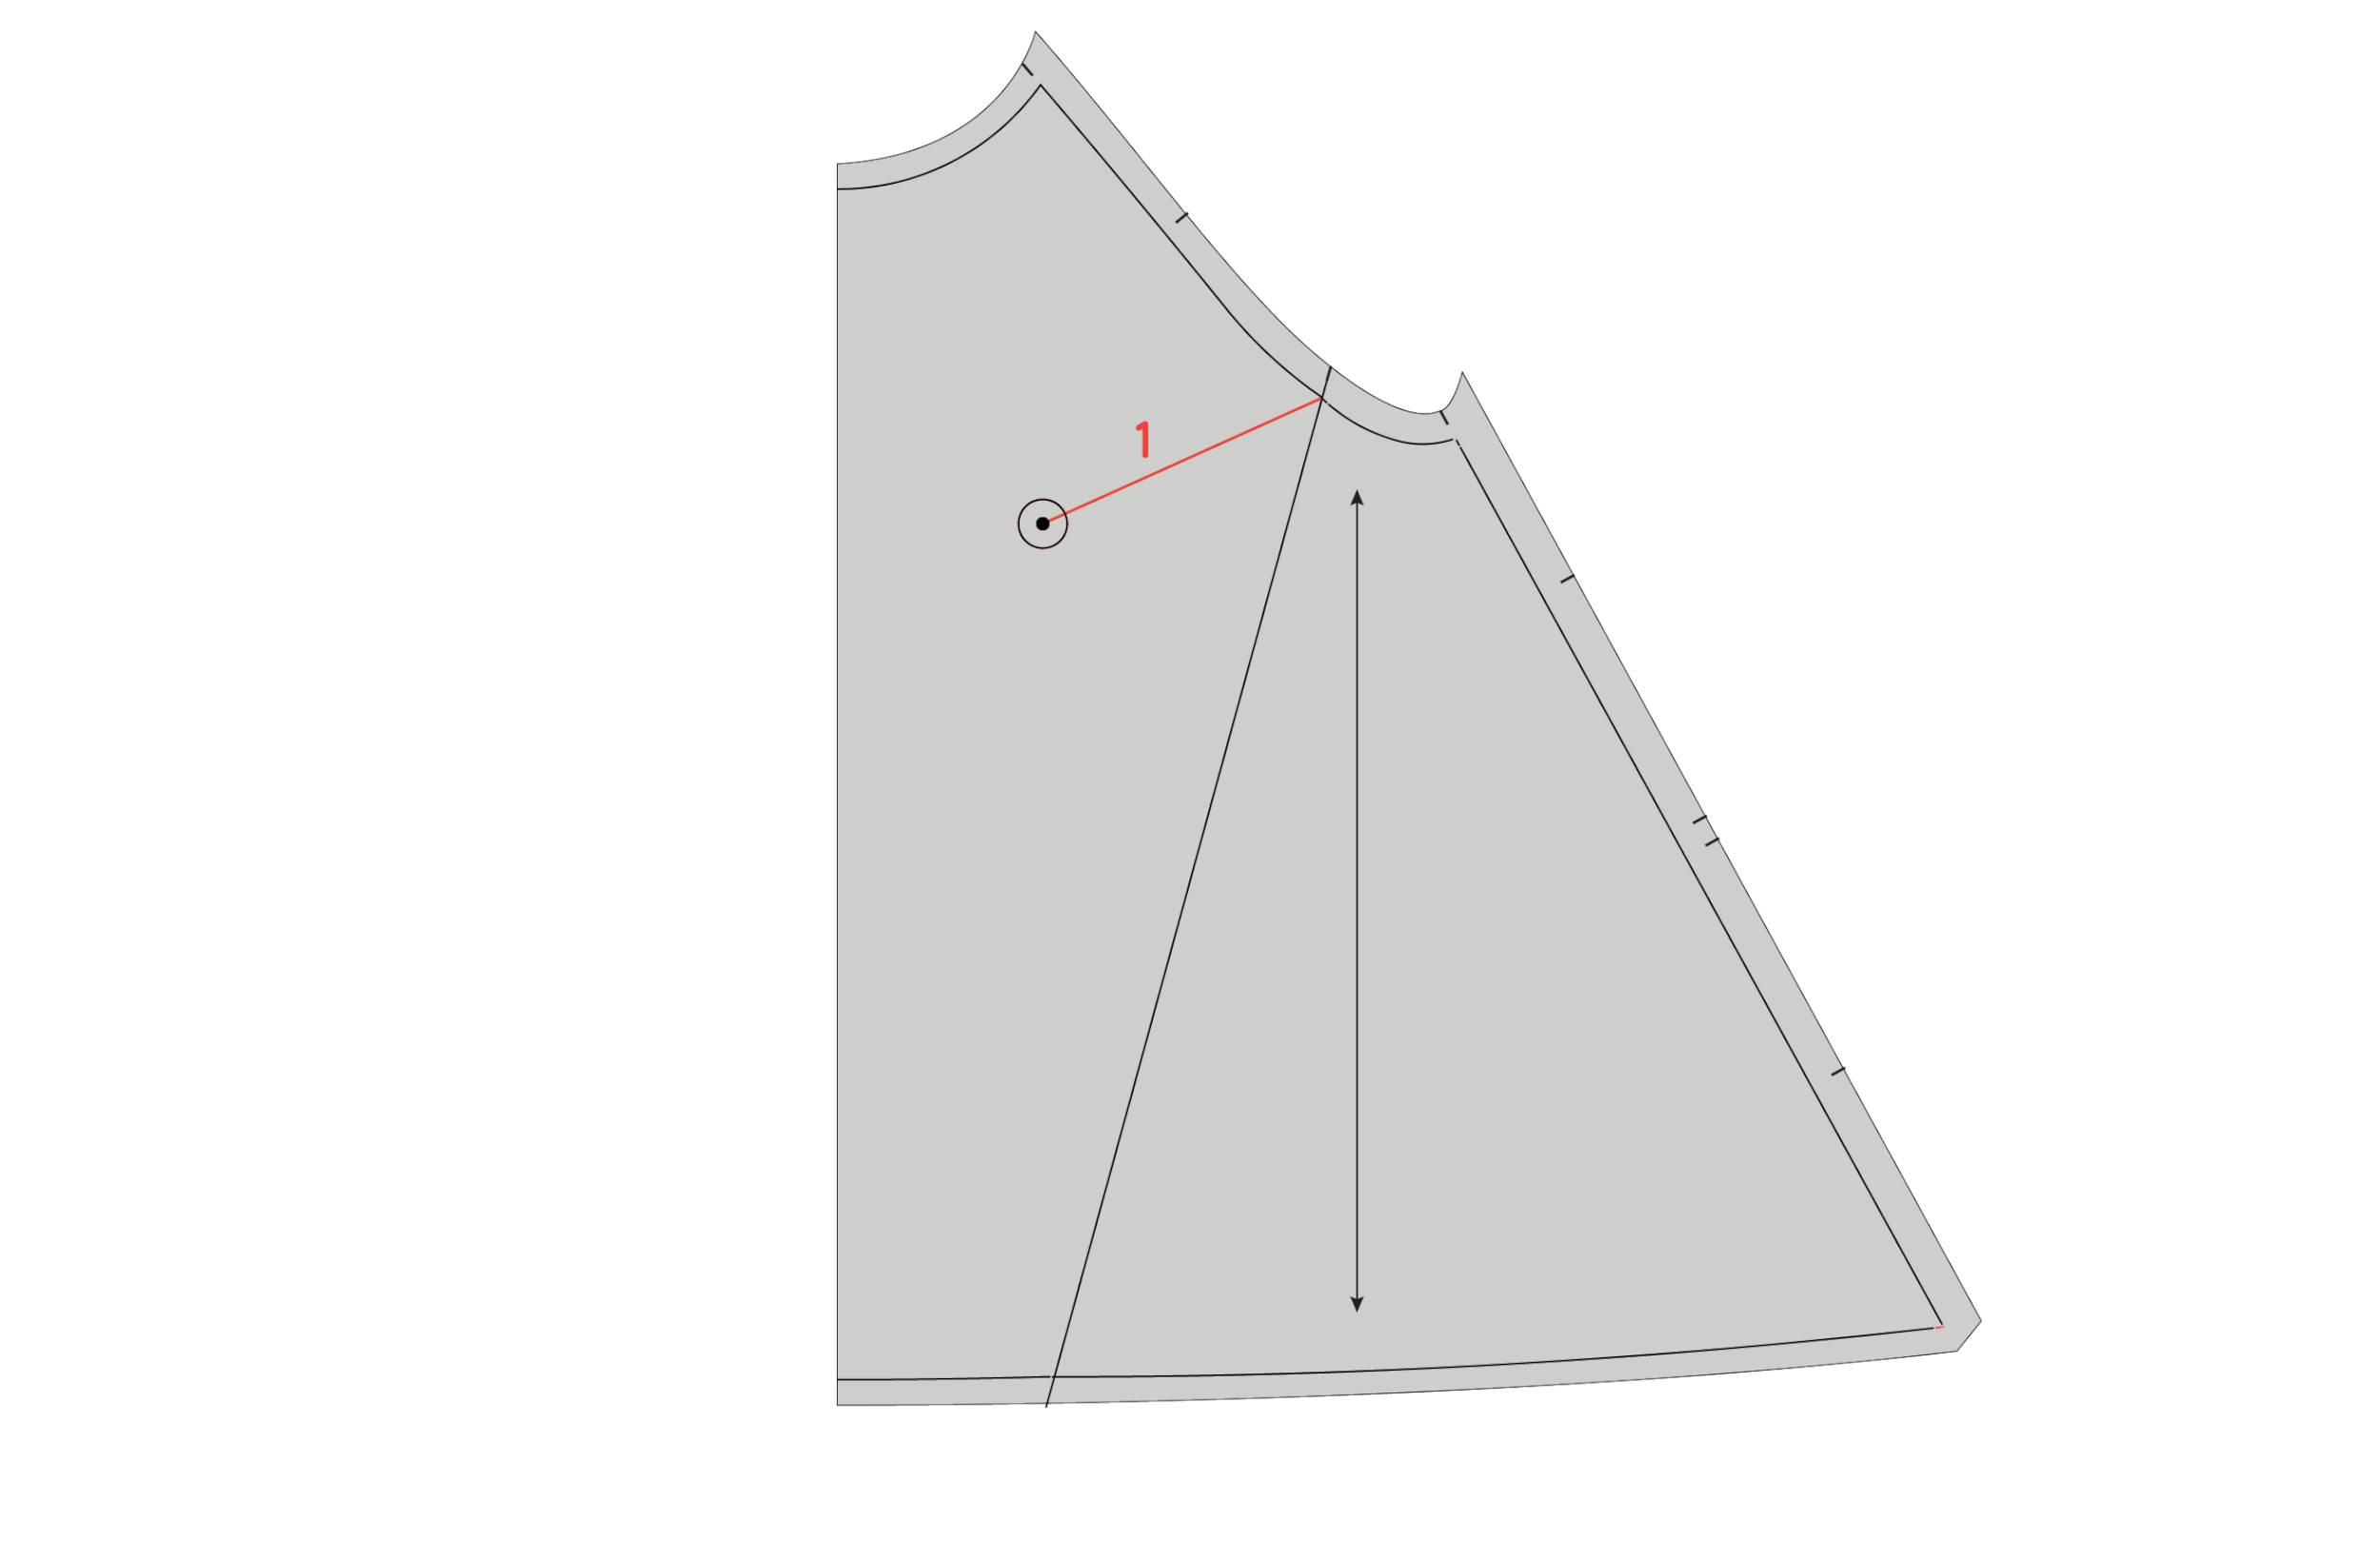
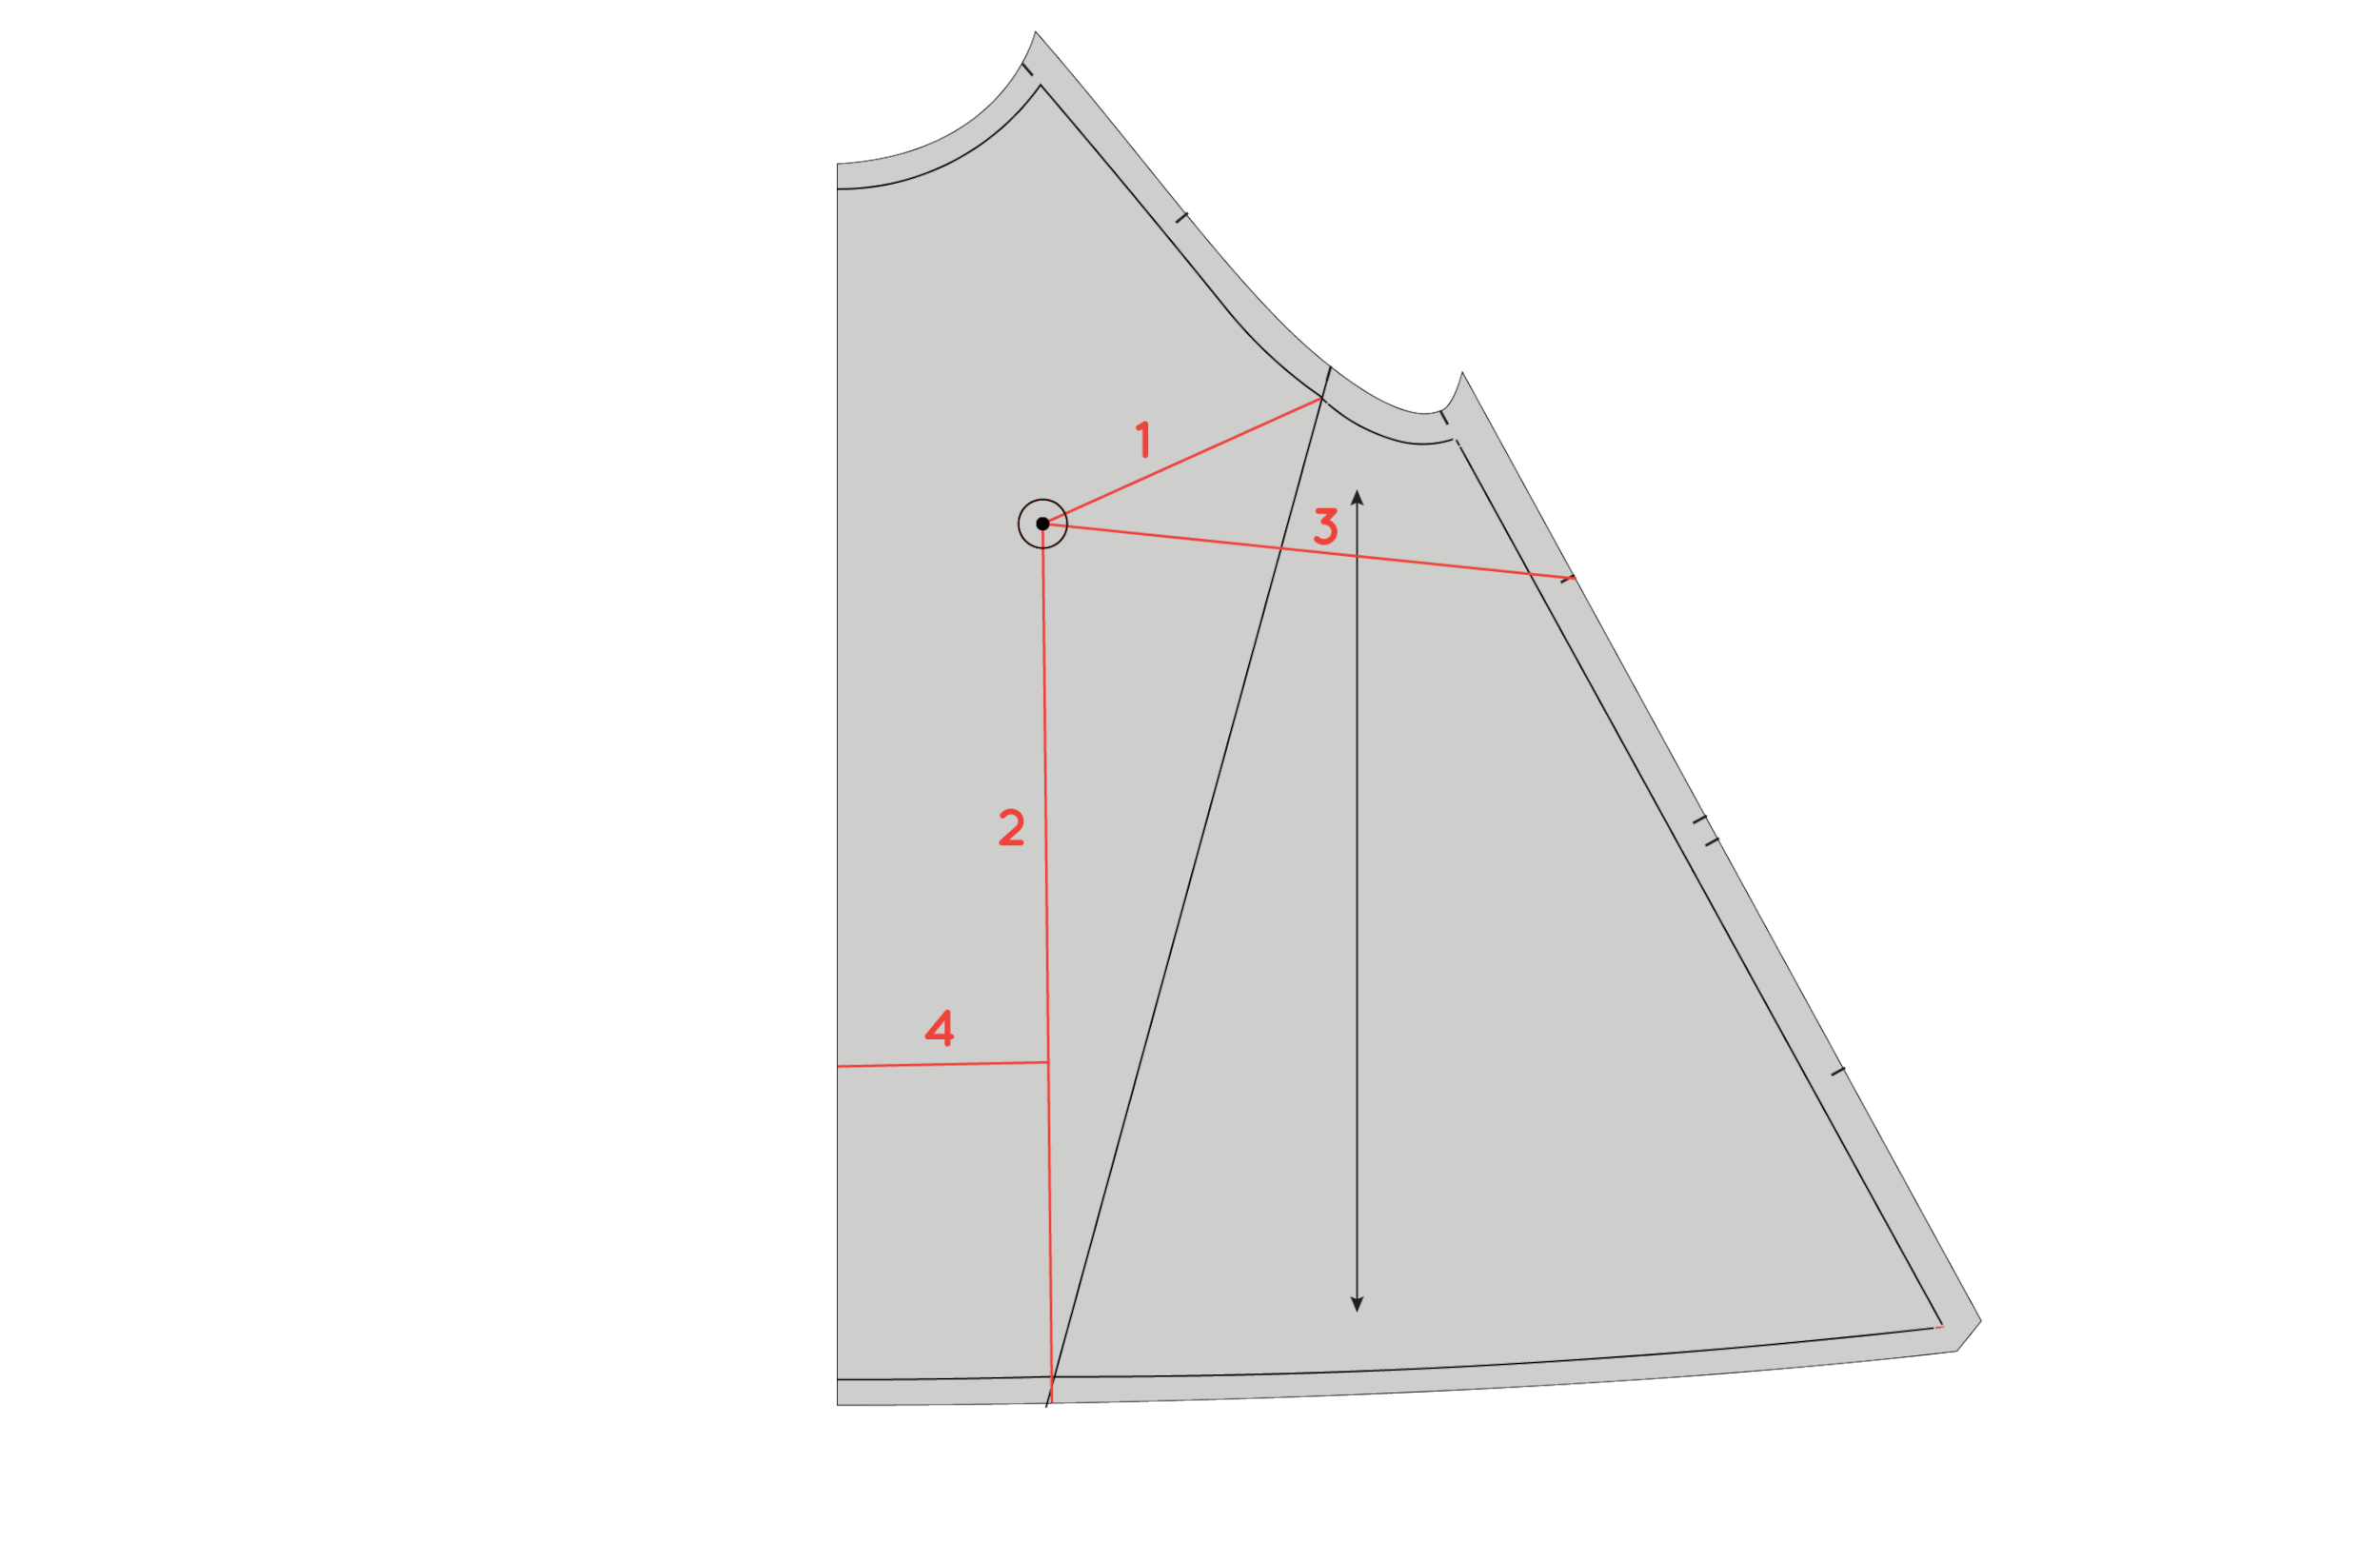
Take a ruler and draw a line from where the panel line intersects the armhole to your apex point. You can label this line as line 1.
Step 6:
Now draw a line from the apex point straight down to the hemline - parallel to the centre front. This is line 2.
Step 7:
Draw a line from the apex point to the side seam. You'll want it to meet the side seam about 5cm (2in) down from the armhole. I chose to rule the line to the first notch on the side seam. This is line 3.
Step 8:
Draw the last guideline (4) perpendicular to line 2 about 12cm (3in) up from the hemline.
Cut
Step 9:
Now it's time to start making that adjustment!
A: From the hem of the top, cut up line 2, towards the apex point. From the apex point turn and continue cutting, this time along line 1. Stop when you are about 1-2mm away from the armhole line (stitch line).
B: Cut in towards the armhole stitch line from the seam allowance, stopping about 1-2mm from where you stopped cutting in step A - creating a small "hinge."
Step 10:
Cut along line 3 from the side seam towards the apex point. Stop 1-2mm from the apex point, again creating a small "hinge."
Add width to the pattern
Step 11:
Take a piece of pattern paper (about the size of your front piece) and draw a vertical line in roughly the centre of the paper.
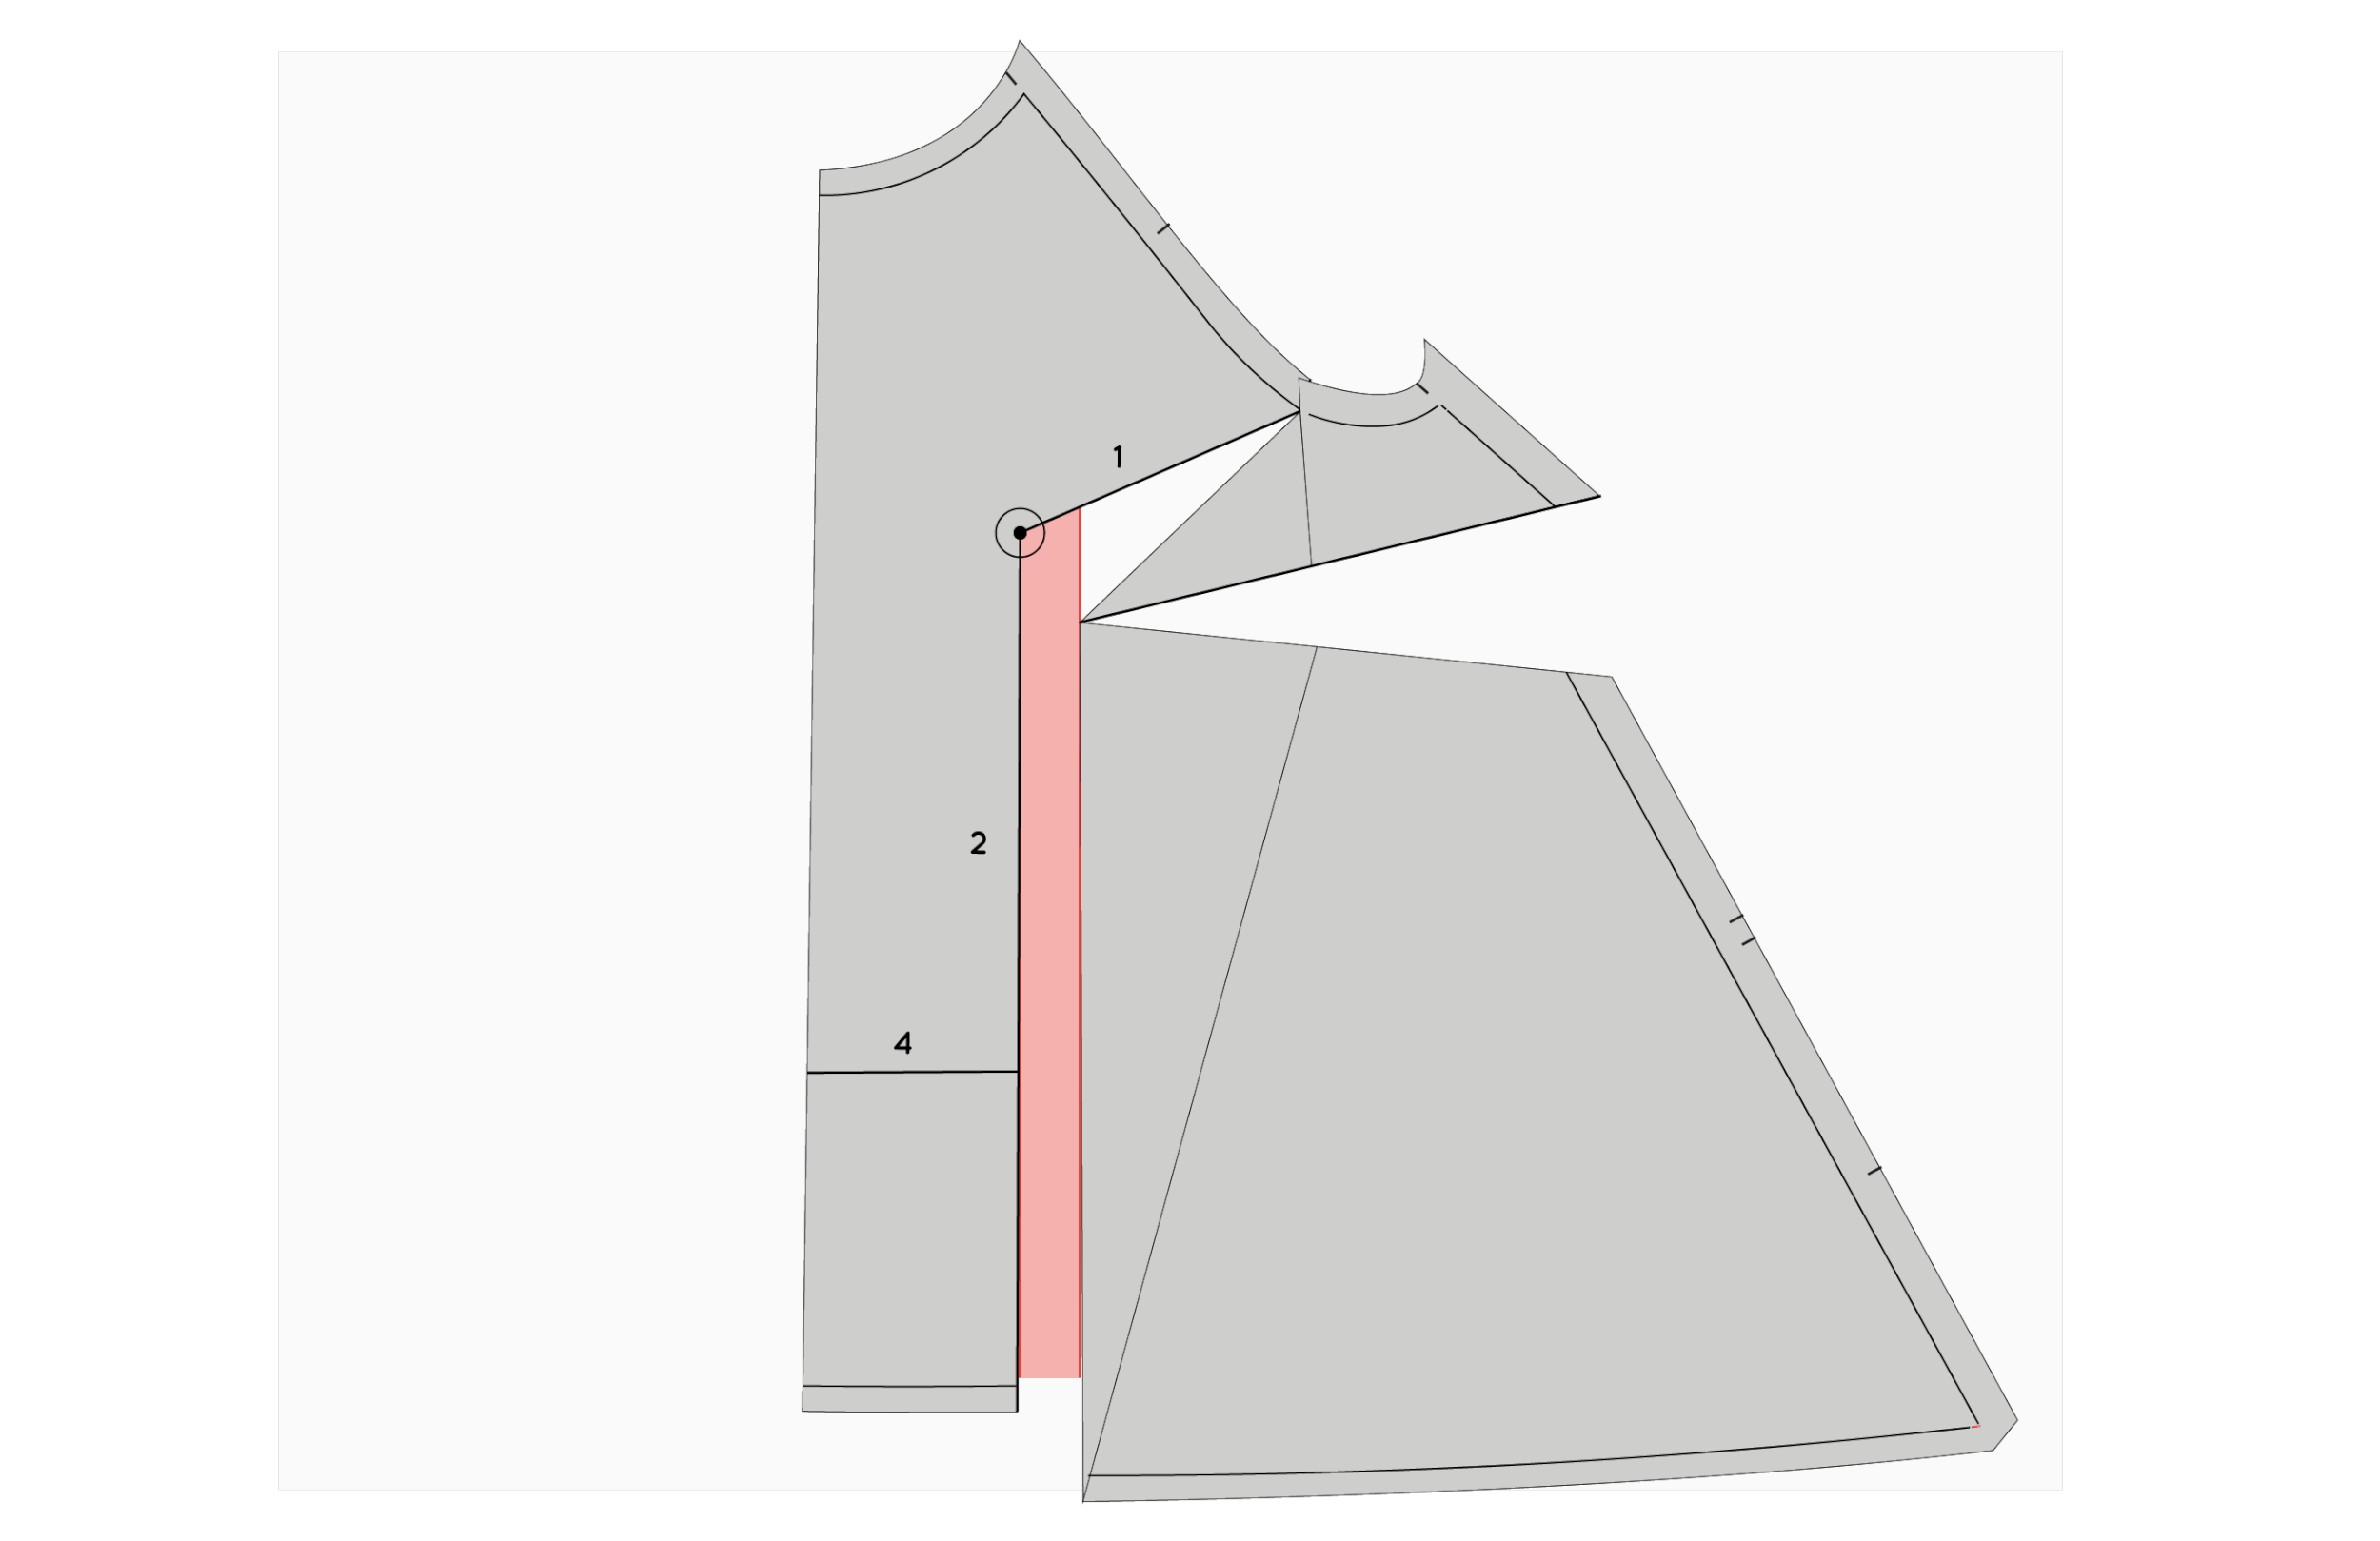
By this stage you should know how much width you need to add to the bust. Take this measurement and divide it by two (you will add half the extra width to either side of the front piece, so in total it equals the whole amount you need). Draw a second line - parallel to the first - this distance away from the first line. For example, if you need to add a total of 5cm (2in) to the bust, you will be drawing the line 2.5cm (1in) away from the first.
Step 12:
Carefully place your pattern piece on top of the paper underneath.
Now that you have cut through the lines, you will be able to manoeuvre the pieces so that you can the extra width you need to add around the bust. Carefully place the pattern onto the guidelines you drew in the previous step. Line up the the left-hand side of your pattern with the first line (line on left side), and carefully tape in place. Only tape above line 4, as in a moment we will be cutting along that line.
Now, carefully spread open the cut (line 2), spreading the side of your bodice until the apex point intersects with the second line (right hand side). As you do this, you will see a dart open up at the side seam (line 3).
Add length to the pattern
Step 13:
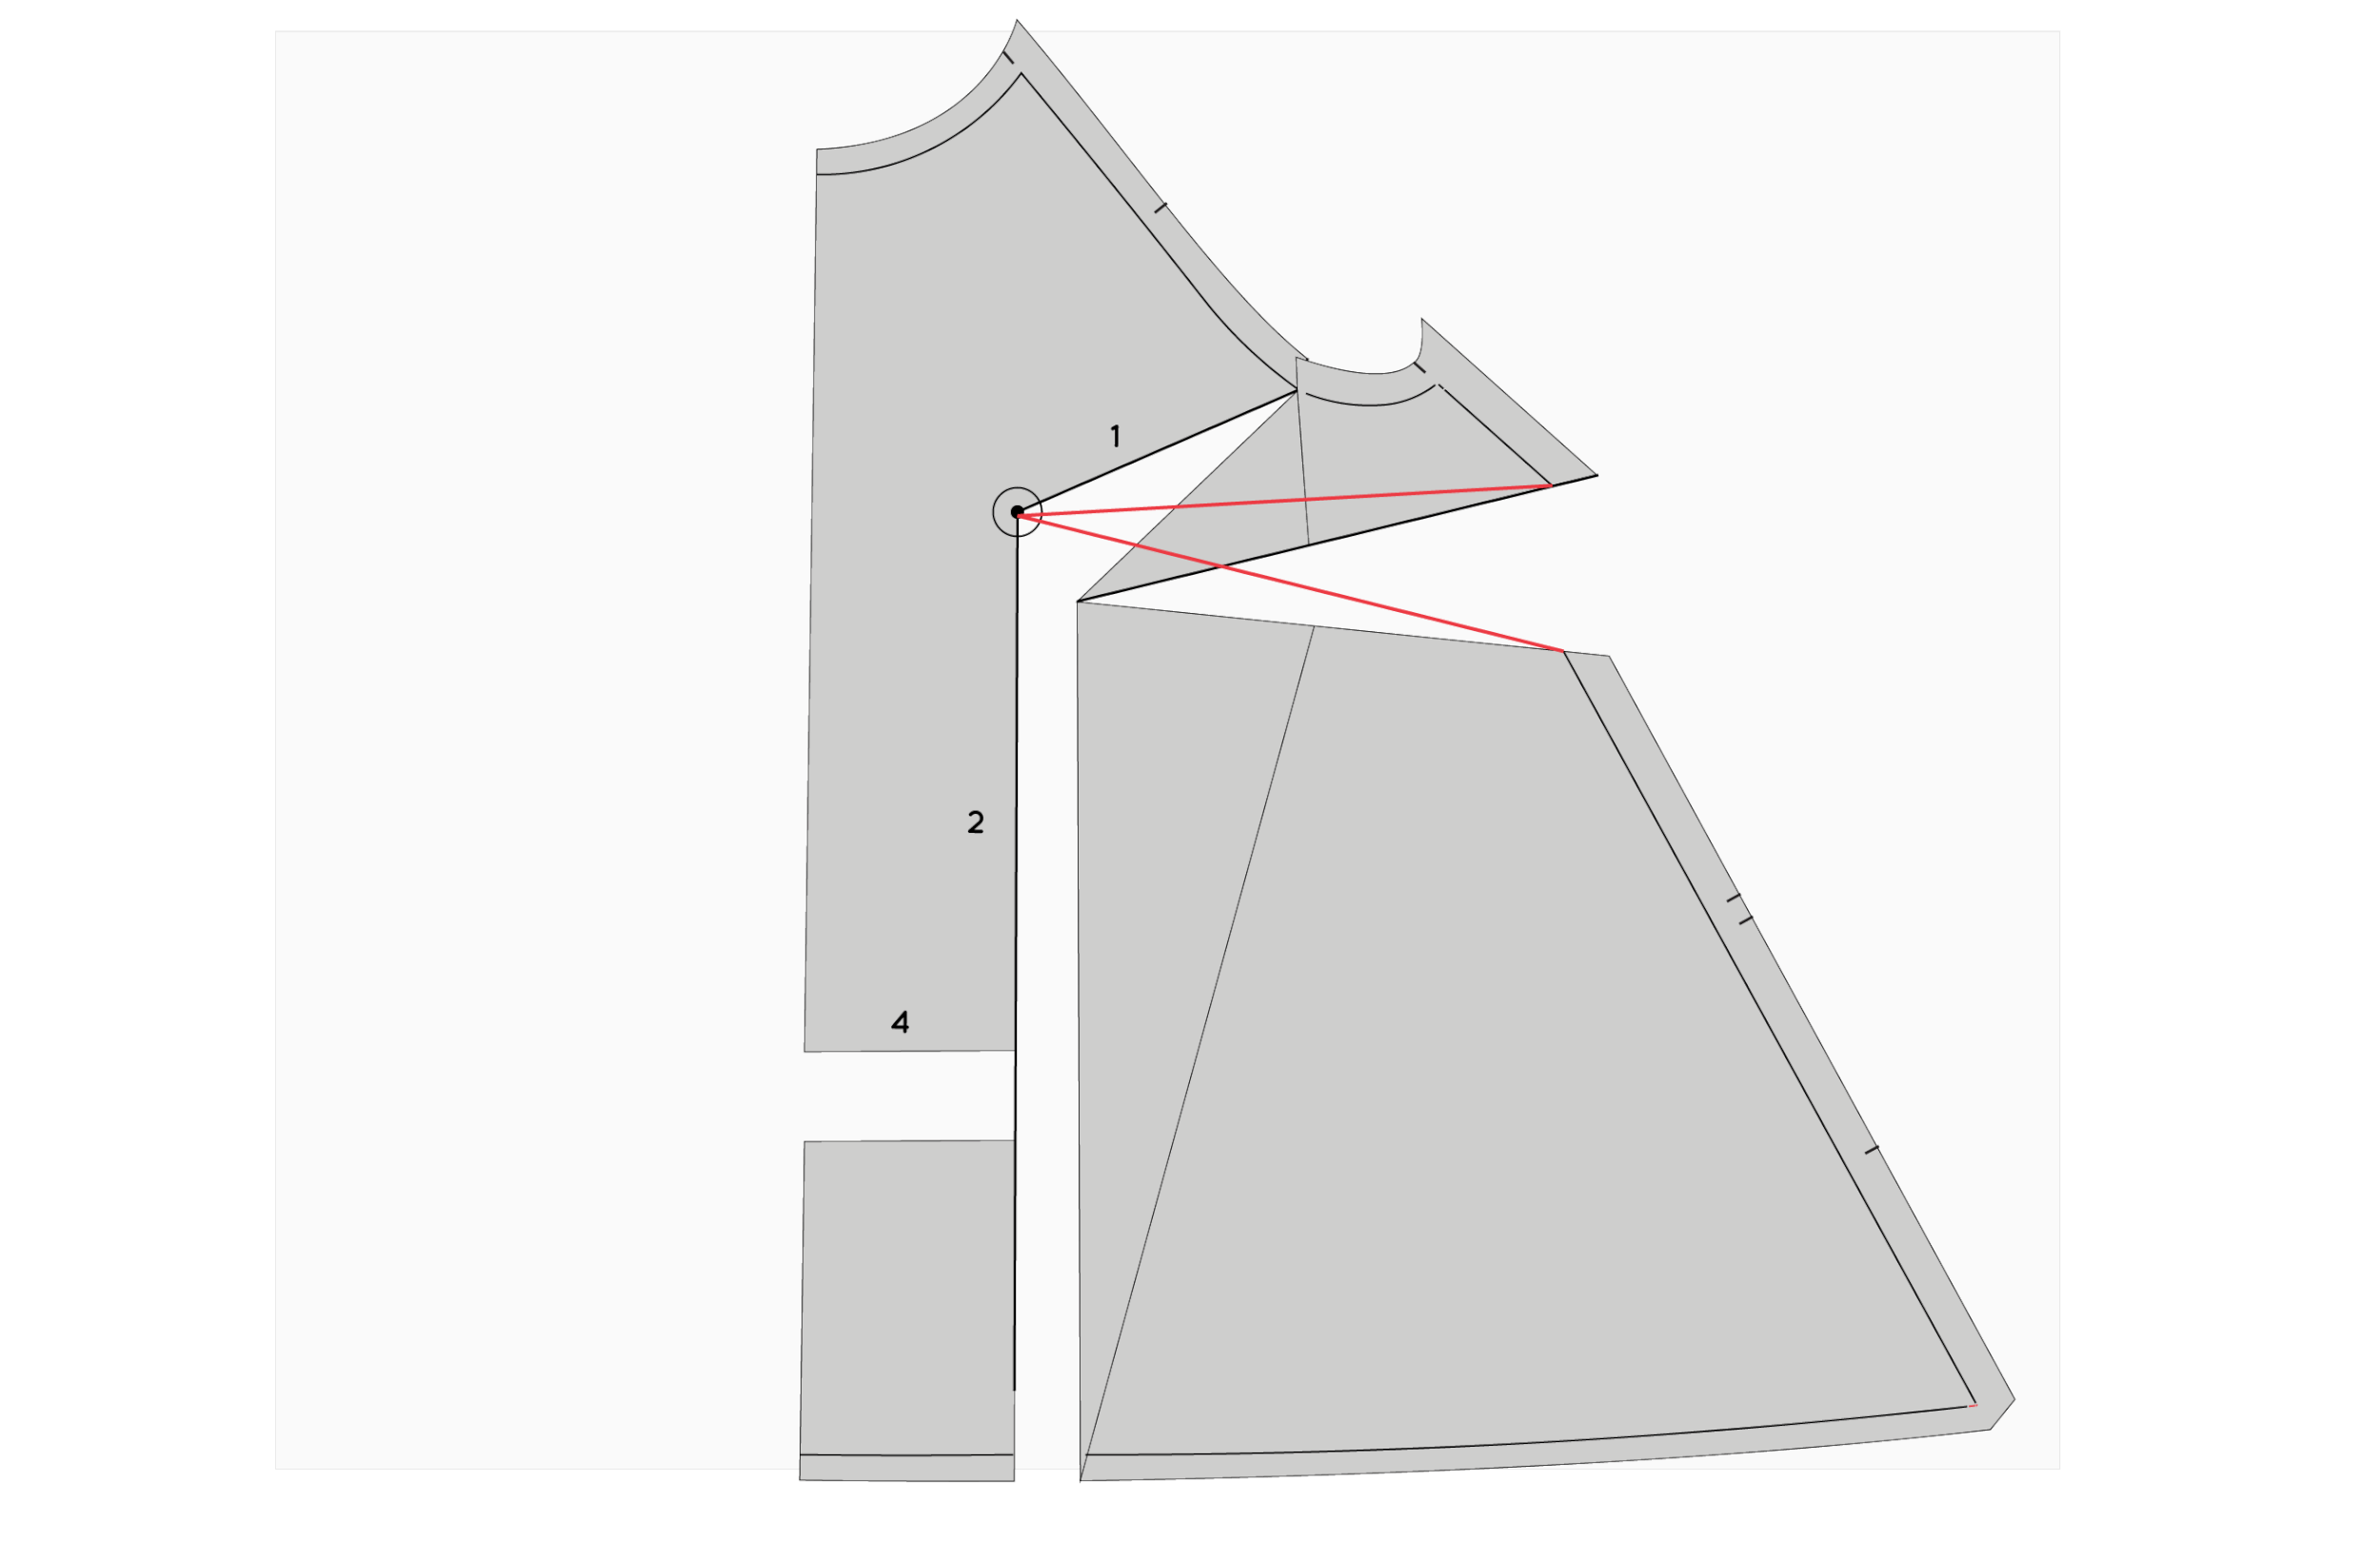
Cut along line 4, detaching that piece of the pattern. Move this section down until it is in line with the rest of the pattern (horizontally). Tape or glue in place. You can see that this adjustment has not only added width to the pattern, but length as well. When making a full bust adjustment you need to add extra length so that there is enough fabric to comfortably go over the breasts, without making the garment too short.
Create a dart
Step 14:
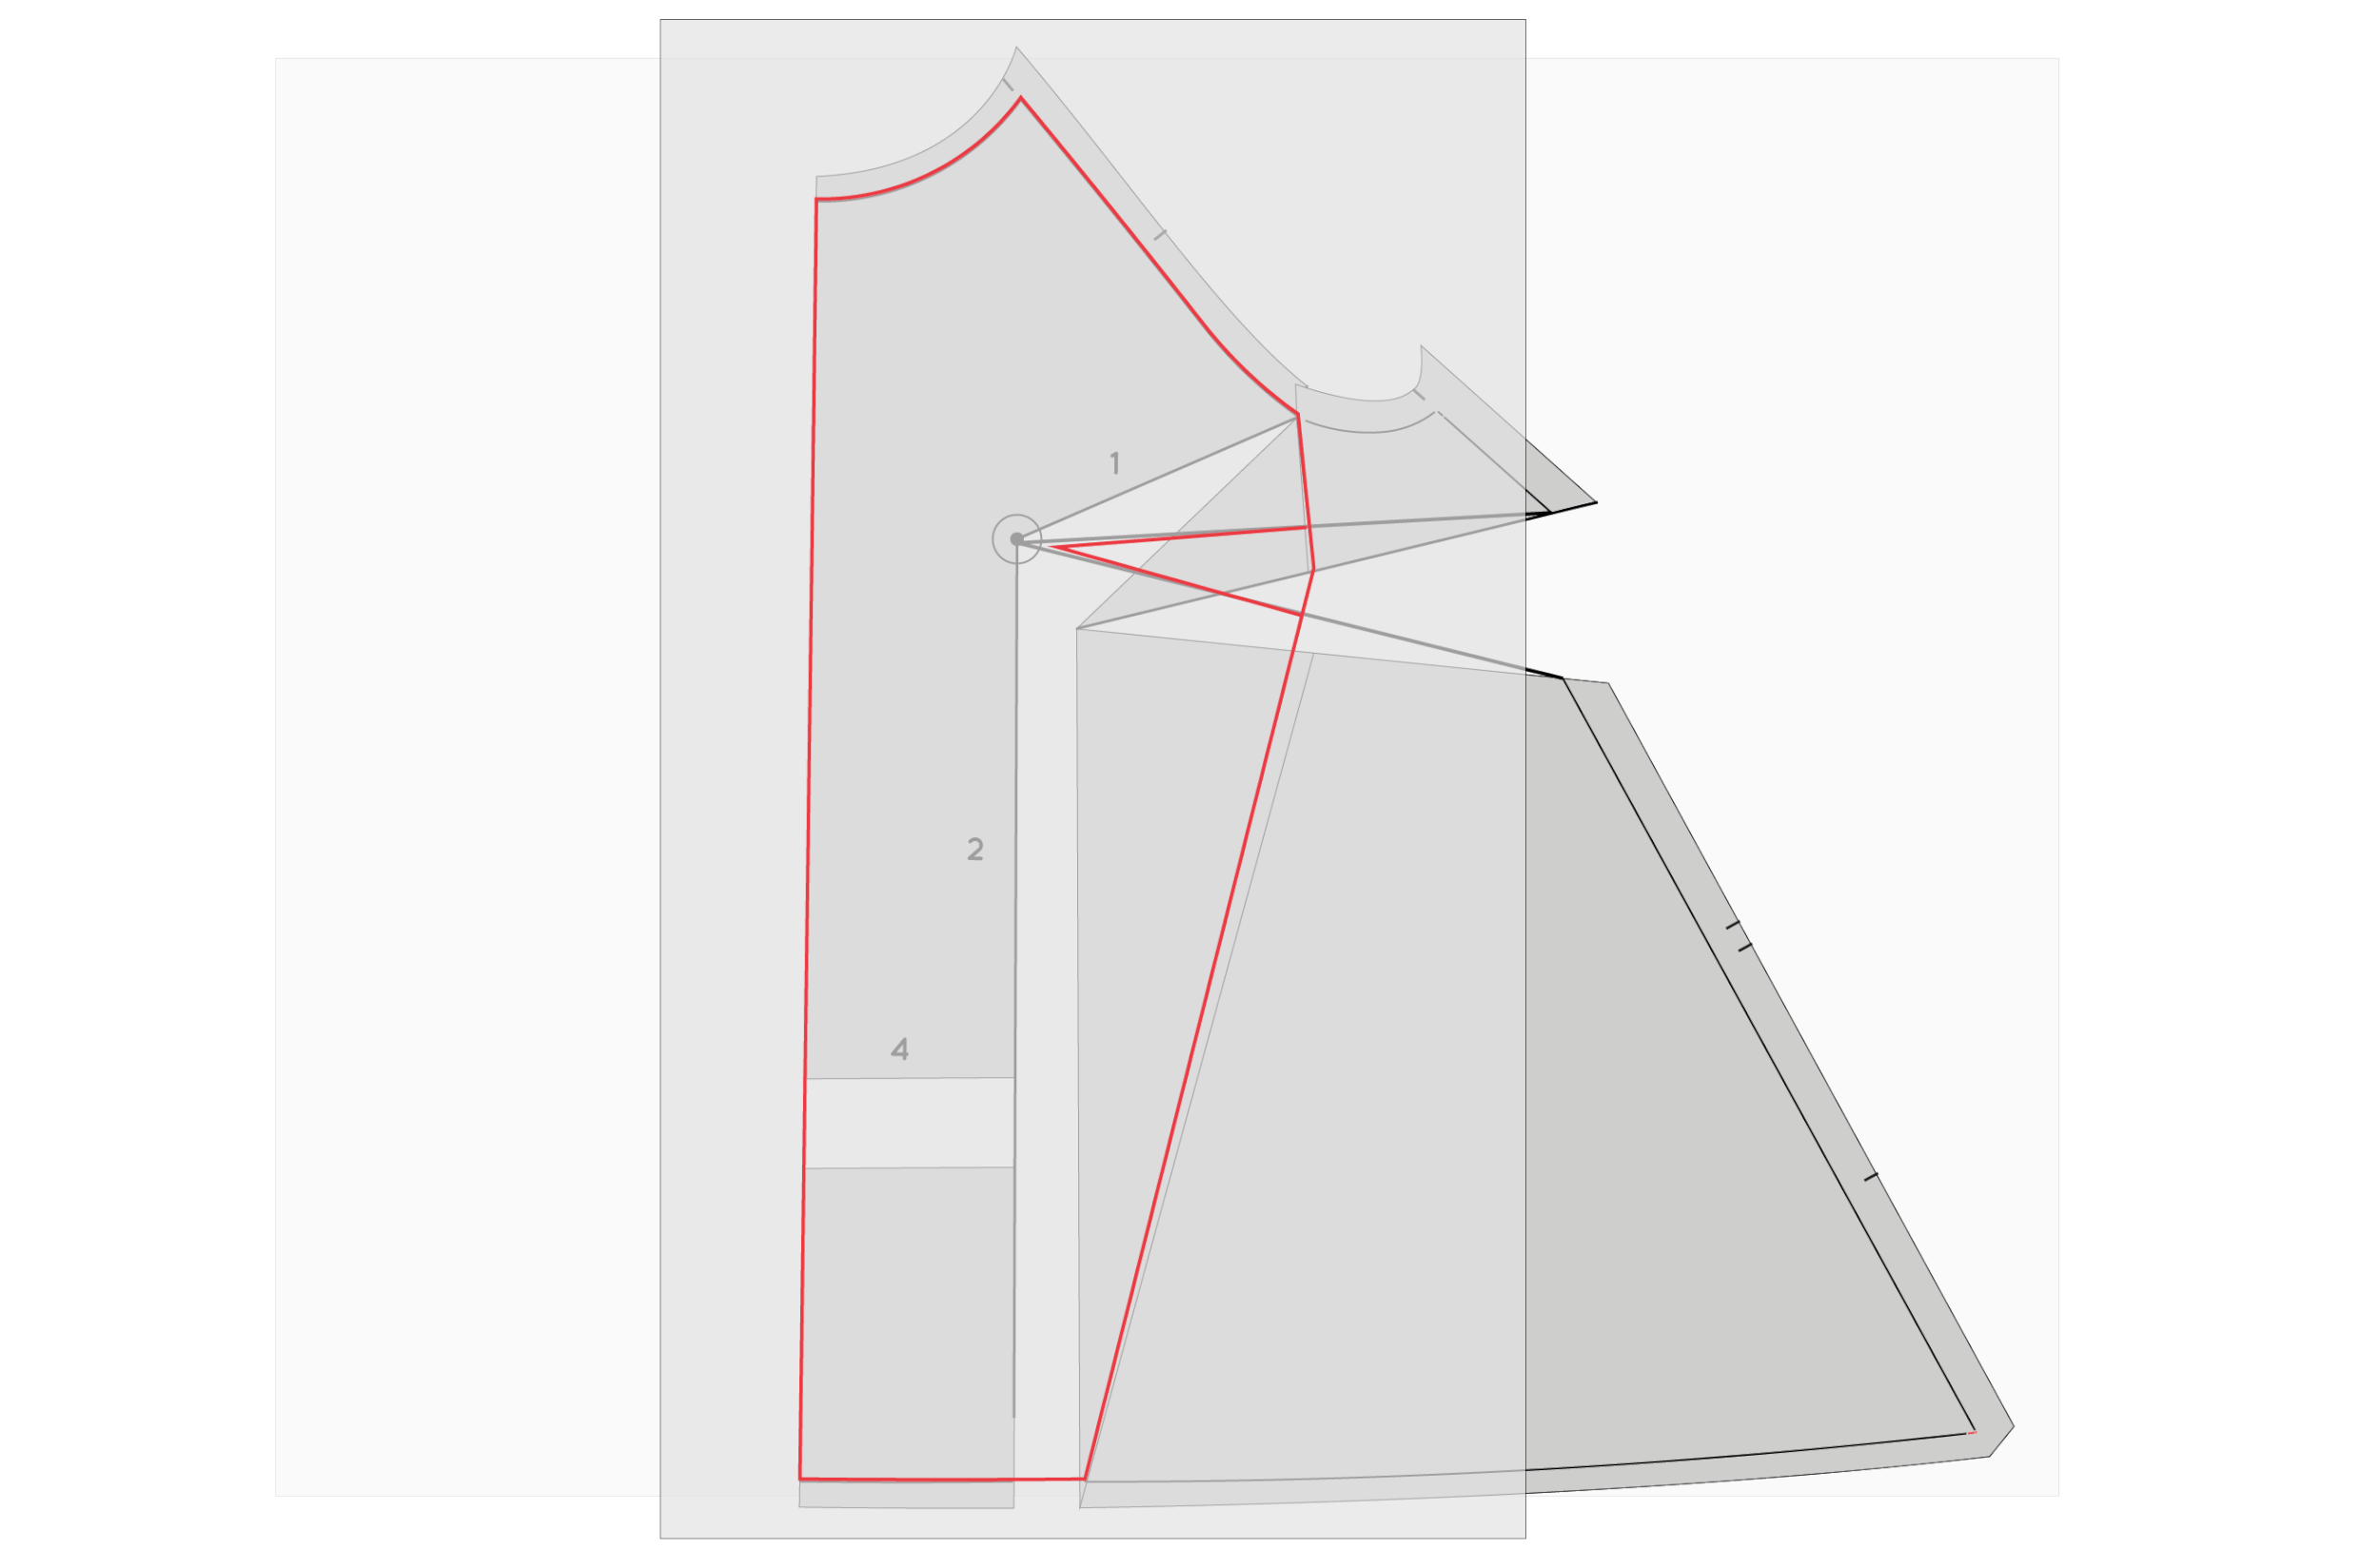
You will see that through making the adjustment, you have made a dart at the side seam. Draw in two dart arms, one from each side of the opening on the side seam to the apex point.
Step 15:
We will call the dart arms the 'upper dart arm' and the 'lower dart arm.'
Re-draw Panel line
Step 16:
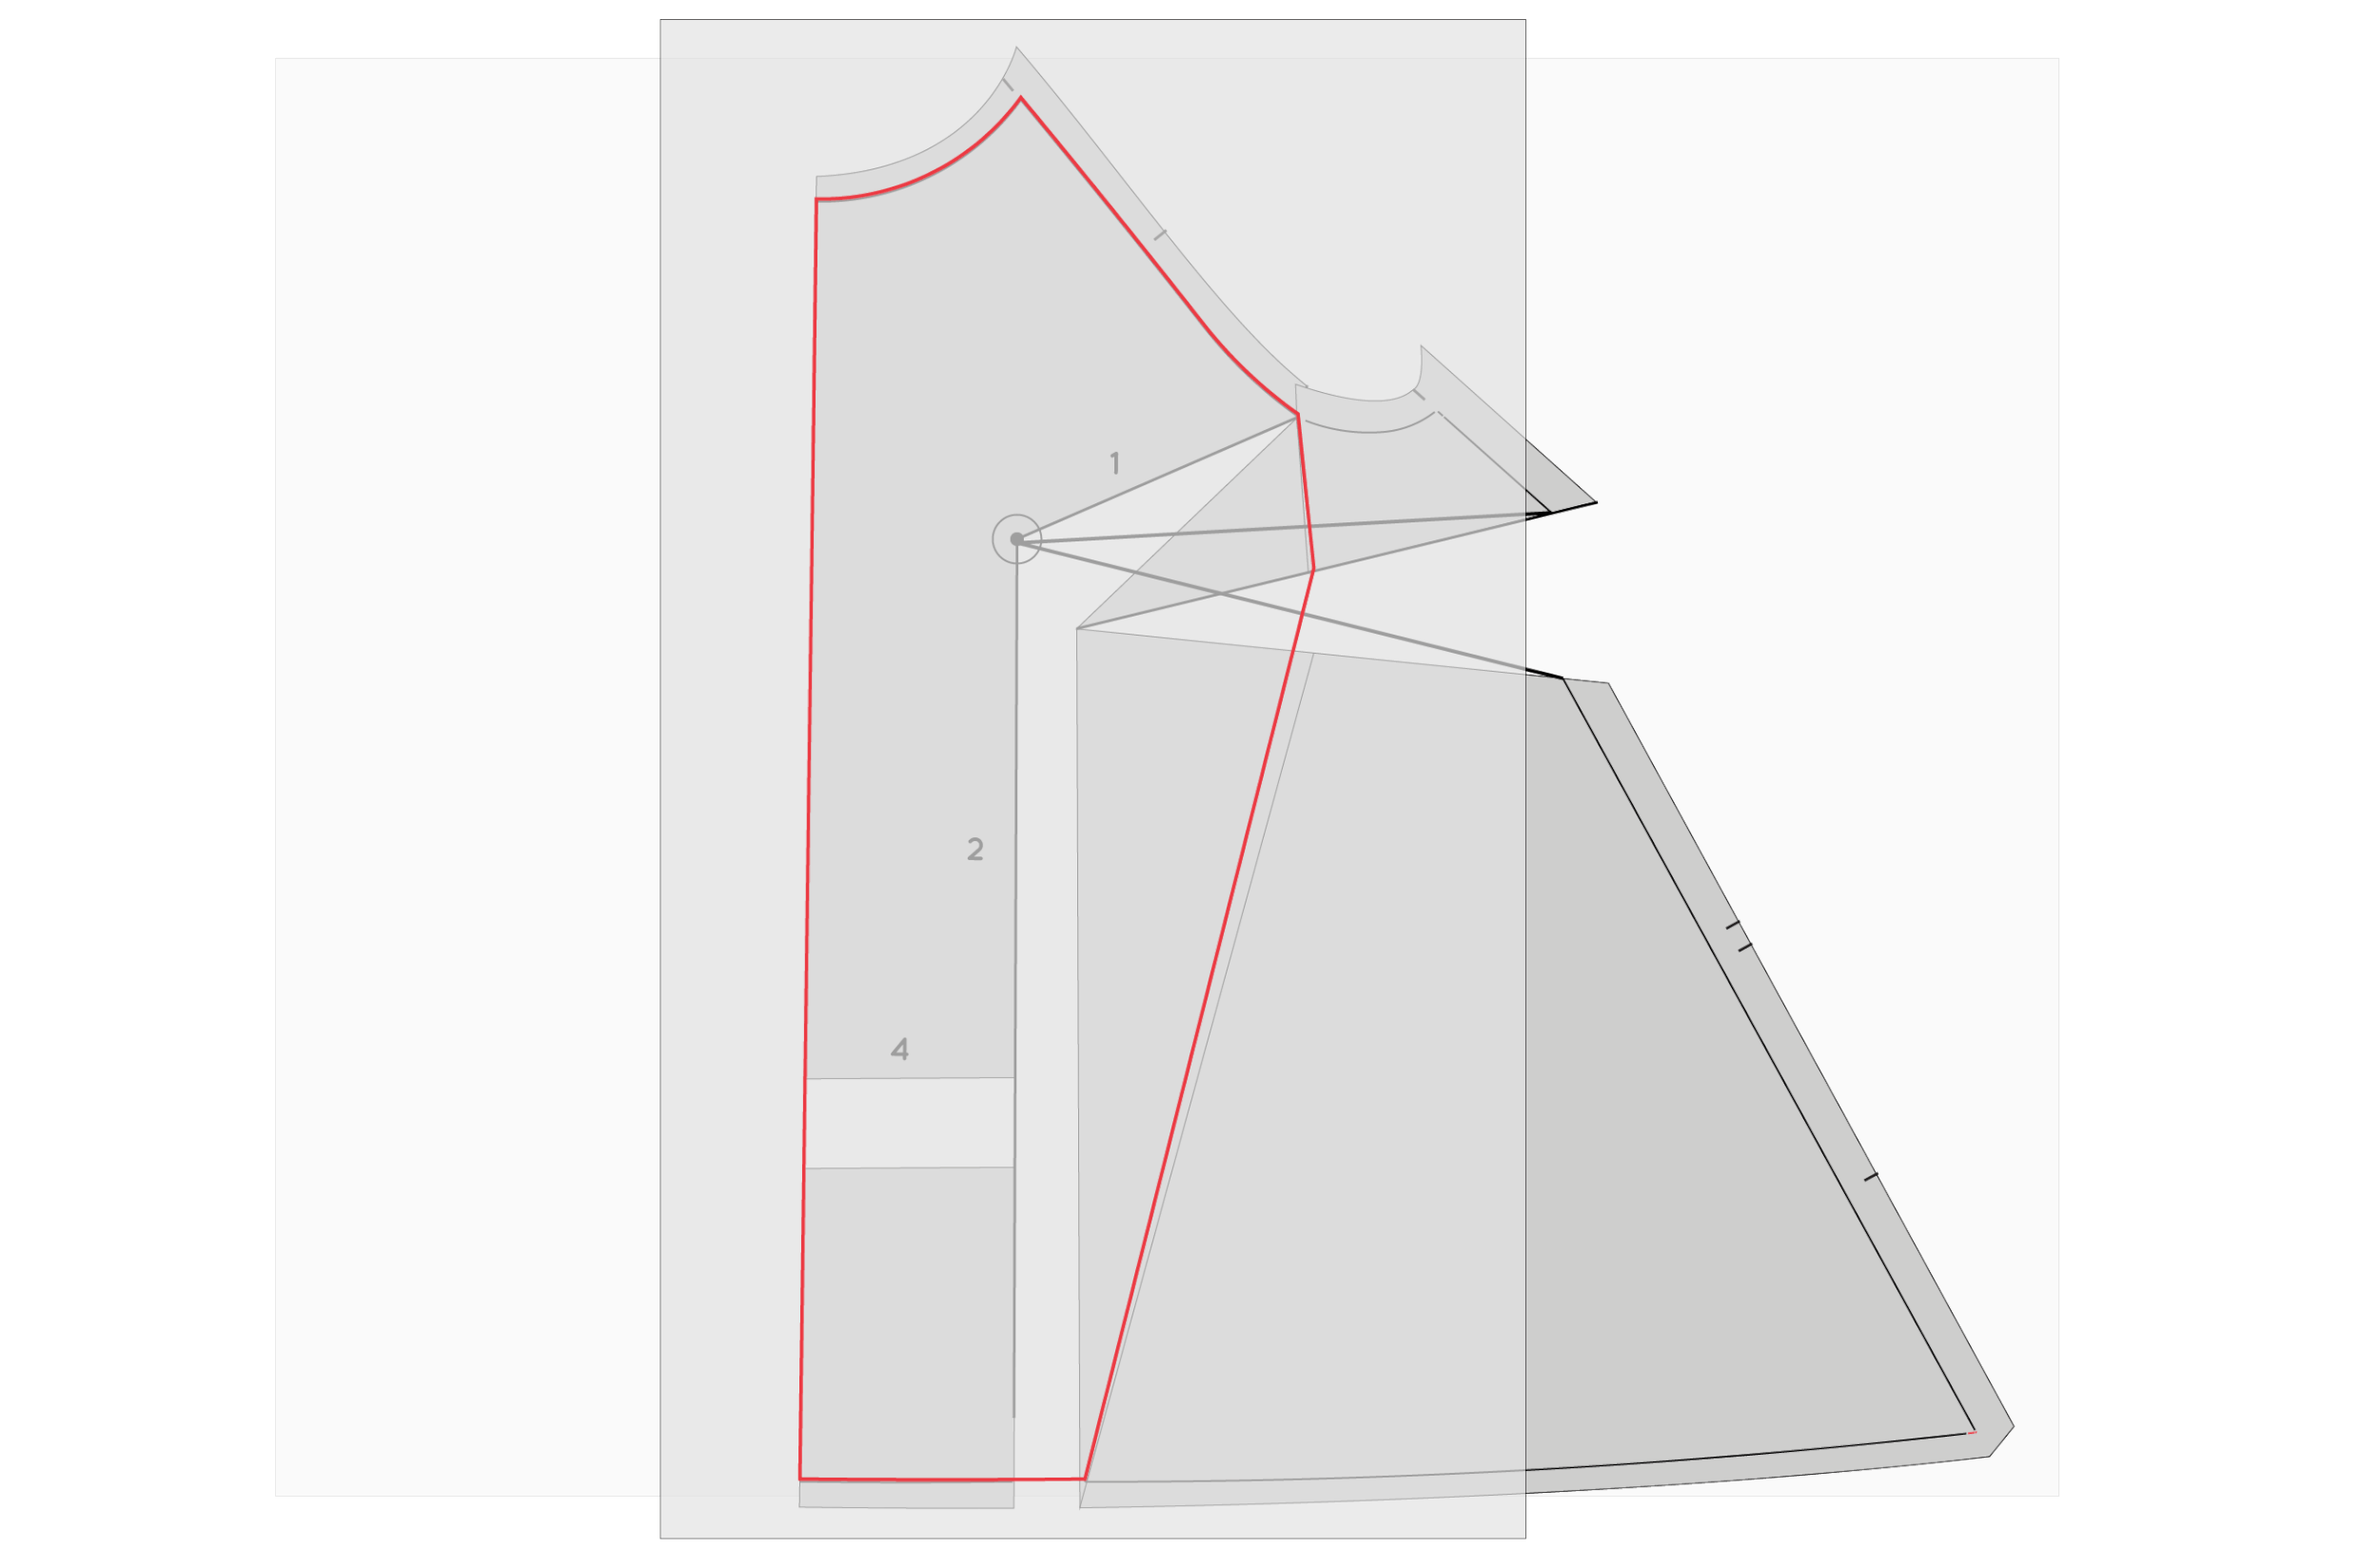
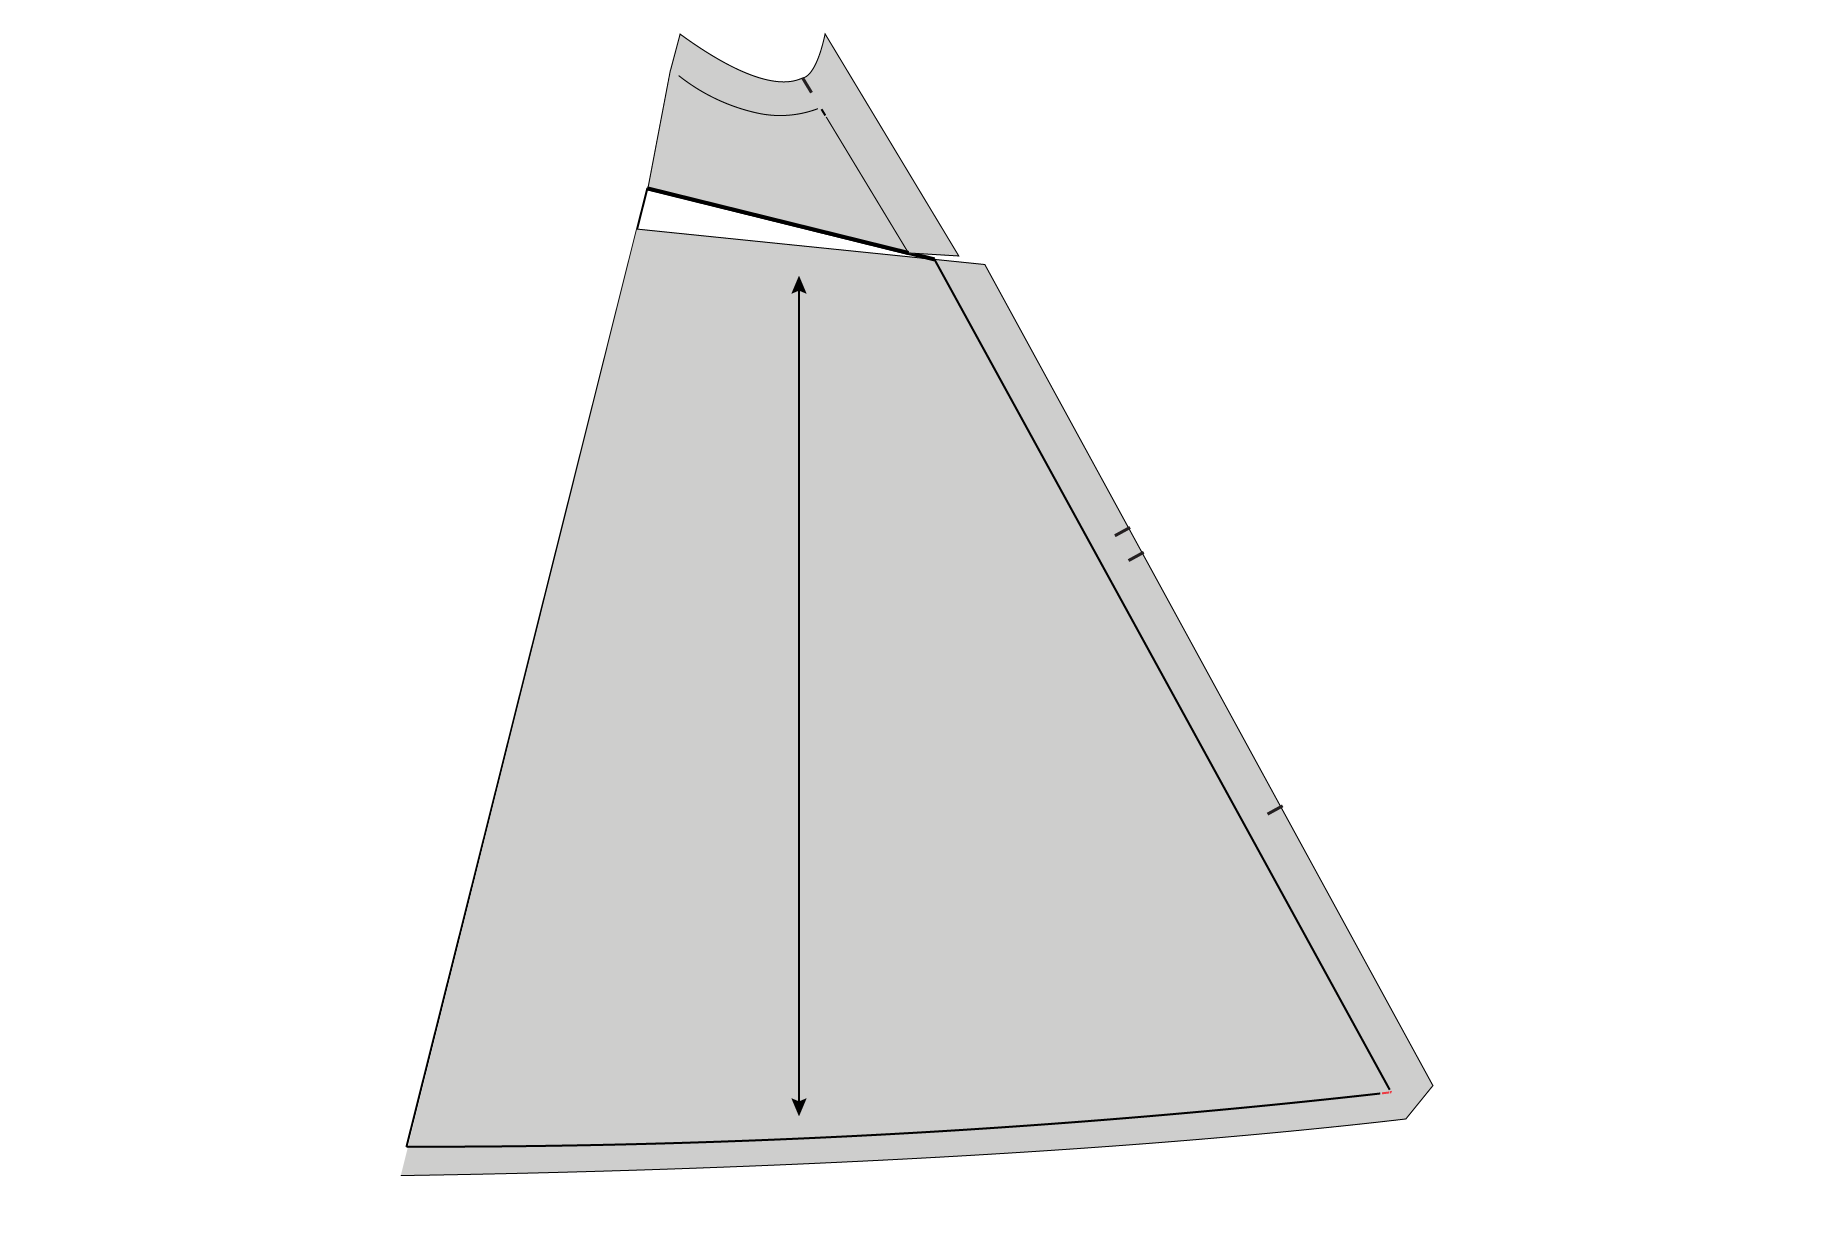
The next thing we need to do is work out what this adjustment has done to the panel line and if any adjustment to the line needs to be made. To do this, we will need to fold out the dart as if it has been sewn. To do this, fold along the lower dart arm.
You will notice this tutorial has shifted from illustrations to photographs. Unfortunately my illustration skills leave me hanging a bit when it comes to illustrating three dimensional techniques, so I thought the clearest way to illustrate this technique would be through photographs. I used a print out of one of the illustrations to keep things consistent, and hopefully not confuse you too much!
Step 17:
Take your working piece to a corner of your table. By using a corner, you will be able to fold out your dart as if the piece has been sewn. Align the apex point (the dart point) with the corner of the table, and move the folded line (lower dart arm) towards the upper dart arm.
Step 18:
When the lower dart arm is in line with the upper dart arm, finger press (making sure the dart is sitting flat) and then tape or pin in place.
Step 19:
You will notice that the panel line is no longer a continuous line, and it is also no longer straight.
Step 20:
To rectify this, take a ruler and draw a straight line from the top of the panel line (the point that intersects the armhole) to the bottom of the panel line (where the line intersects the hem). This can be a little awkward to do, having the pattern still on the corner of the table, so just be careful and take your time to get it right.
Before removing the pin, take a tracing wheel and run it over the line at the point where the dart is folded (this will transfer the date shaping to the bulk of the dart). If you don't have a tracing wheel, simply take a pin and make pin points every 2-3mm along the panel line over the folded dart.
Step 21:
Unfold the dart.
You will now have the correct dart shaping marked on your piece (so that when your dart is folded and then sewn, the dart will sit flush with the panel line).
Step 22:
Take a ruler and join the dots to finalise the dart shaping.
For more detail on the process, check out this tutorial on How to Add Dart Shaping.
Finalise the centre front panel piece
Step 23:
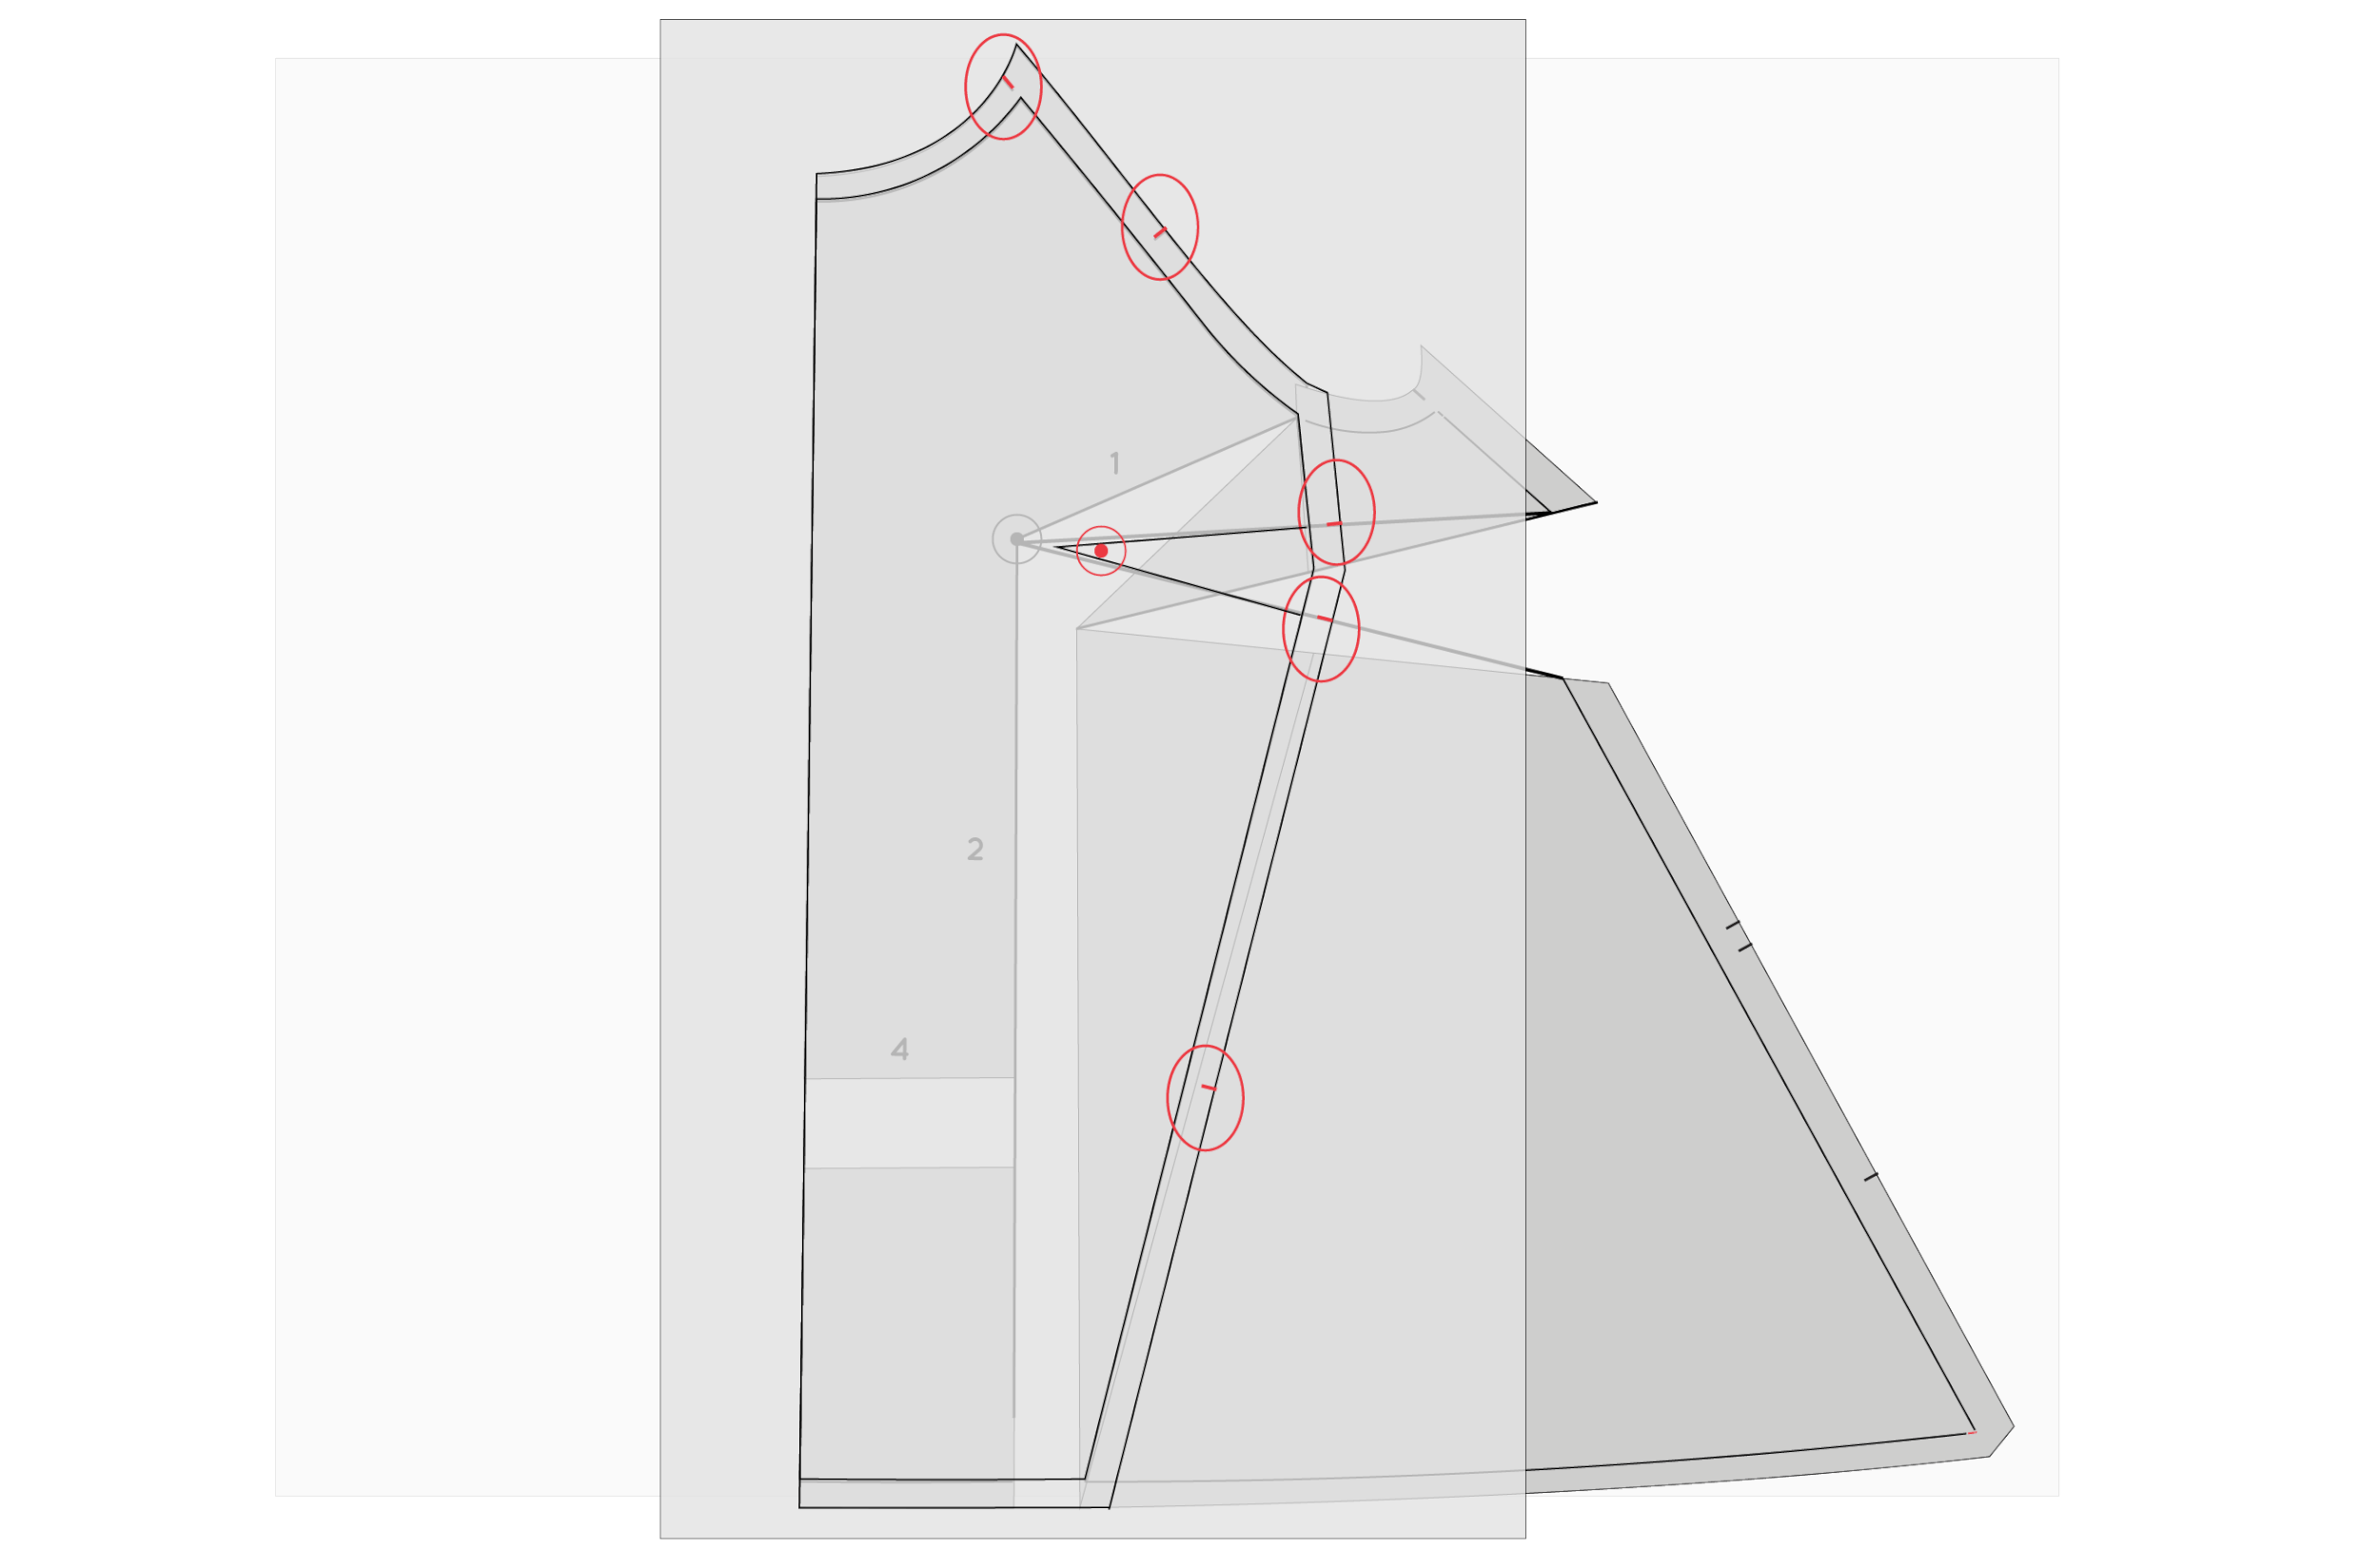
Take a spare piece of pattern paper and trace off the centre front panel, being sure to trace the new panel line and not the original line.
Step 24:
Now, mark the dart. You will want to make the point of the dart about 1.5cm (5/8in) from the apex point (inside the dart), to avoid the dart point sitting right on top of your nipple (not a great look).
Add seam allowance
Step 25:
Add seam allowance by tracing the original seam allowance on the neckline, armhole and hem and then adding 1.2cm (1/2in) to the panel line.
For further explanation about adding seam allowance to a pattern, check out this tutorial.
Mark notches
Step 26:
Mark in your notches by tracing the original notches and then adding one at either dart arm. Add another notch on the panel line (this will act as a balance point for when you are joining the FRONT SIDE PANEL). You can place it wherever you like as we will mark it on the FRONT SIDE PANEL piece a little later in the tutorial.
You will also need to mark the dart point. I like to mark dart point 1.5cm (5/8in) inside the dart so that when I am sewing it, I sew 1.5cm (5/8in) beyond the marking and the marking gets hidden inside the dart.
Step 27:
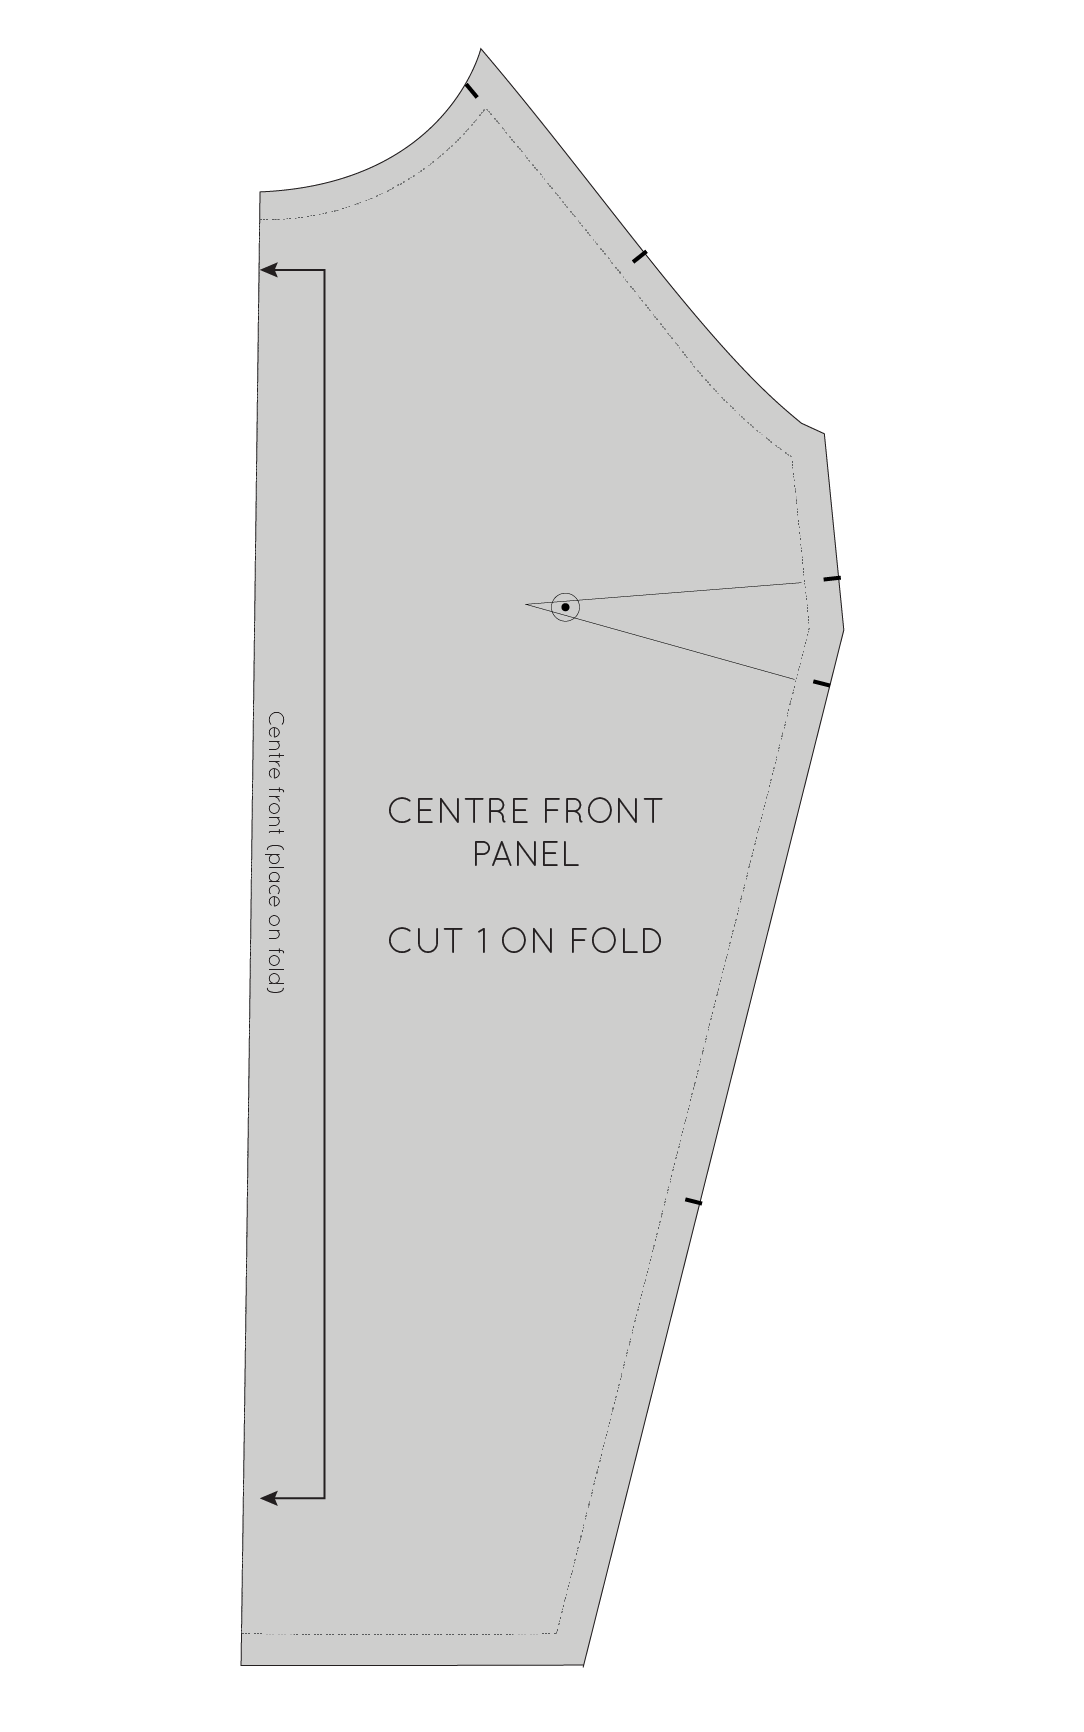
Finalise the pattern piece by adding cutting instructions, marking the grainline and the centre front. You can then cut out your pattern piece, ready for fabric cutting!
For more information on adding pattern markings, take a look at this tutorial, which covers all you need to know about notches, grainlines and cutting instructions.
Finalise the SIDE FRONT panel
Step 28:
Move back to your working piece.
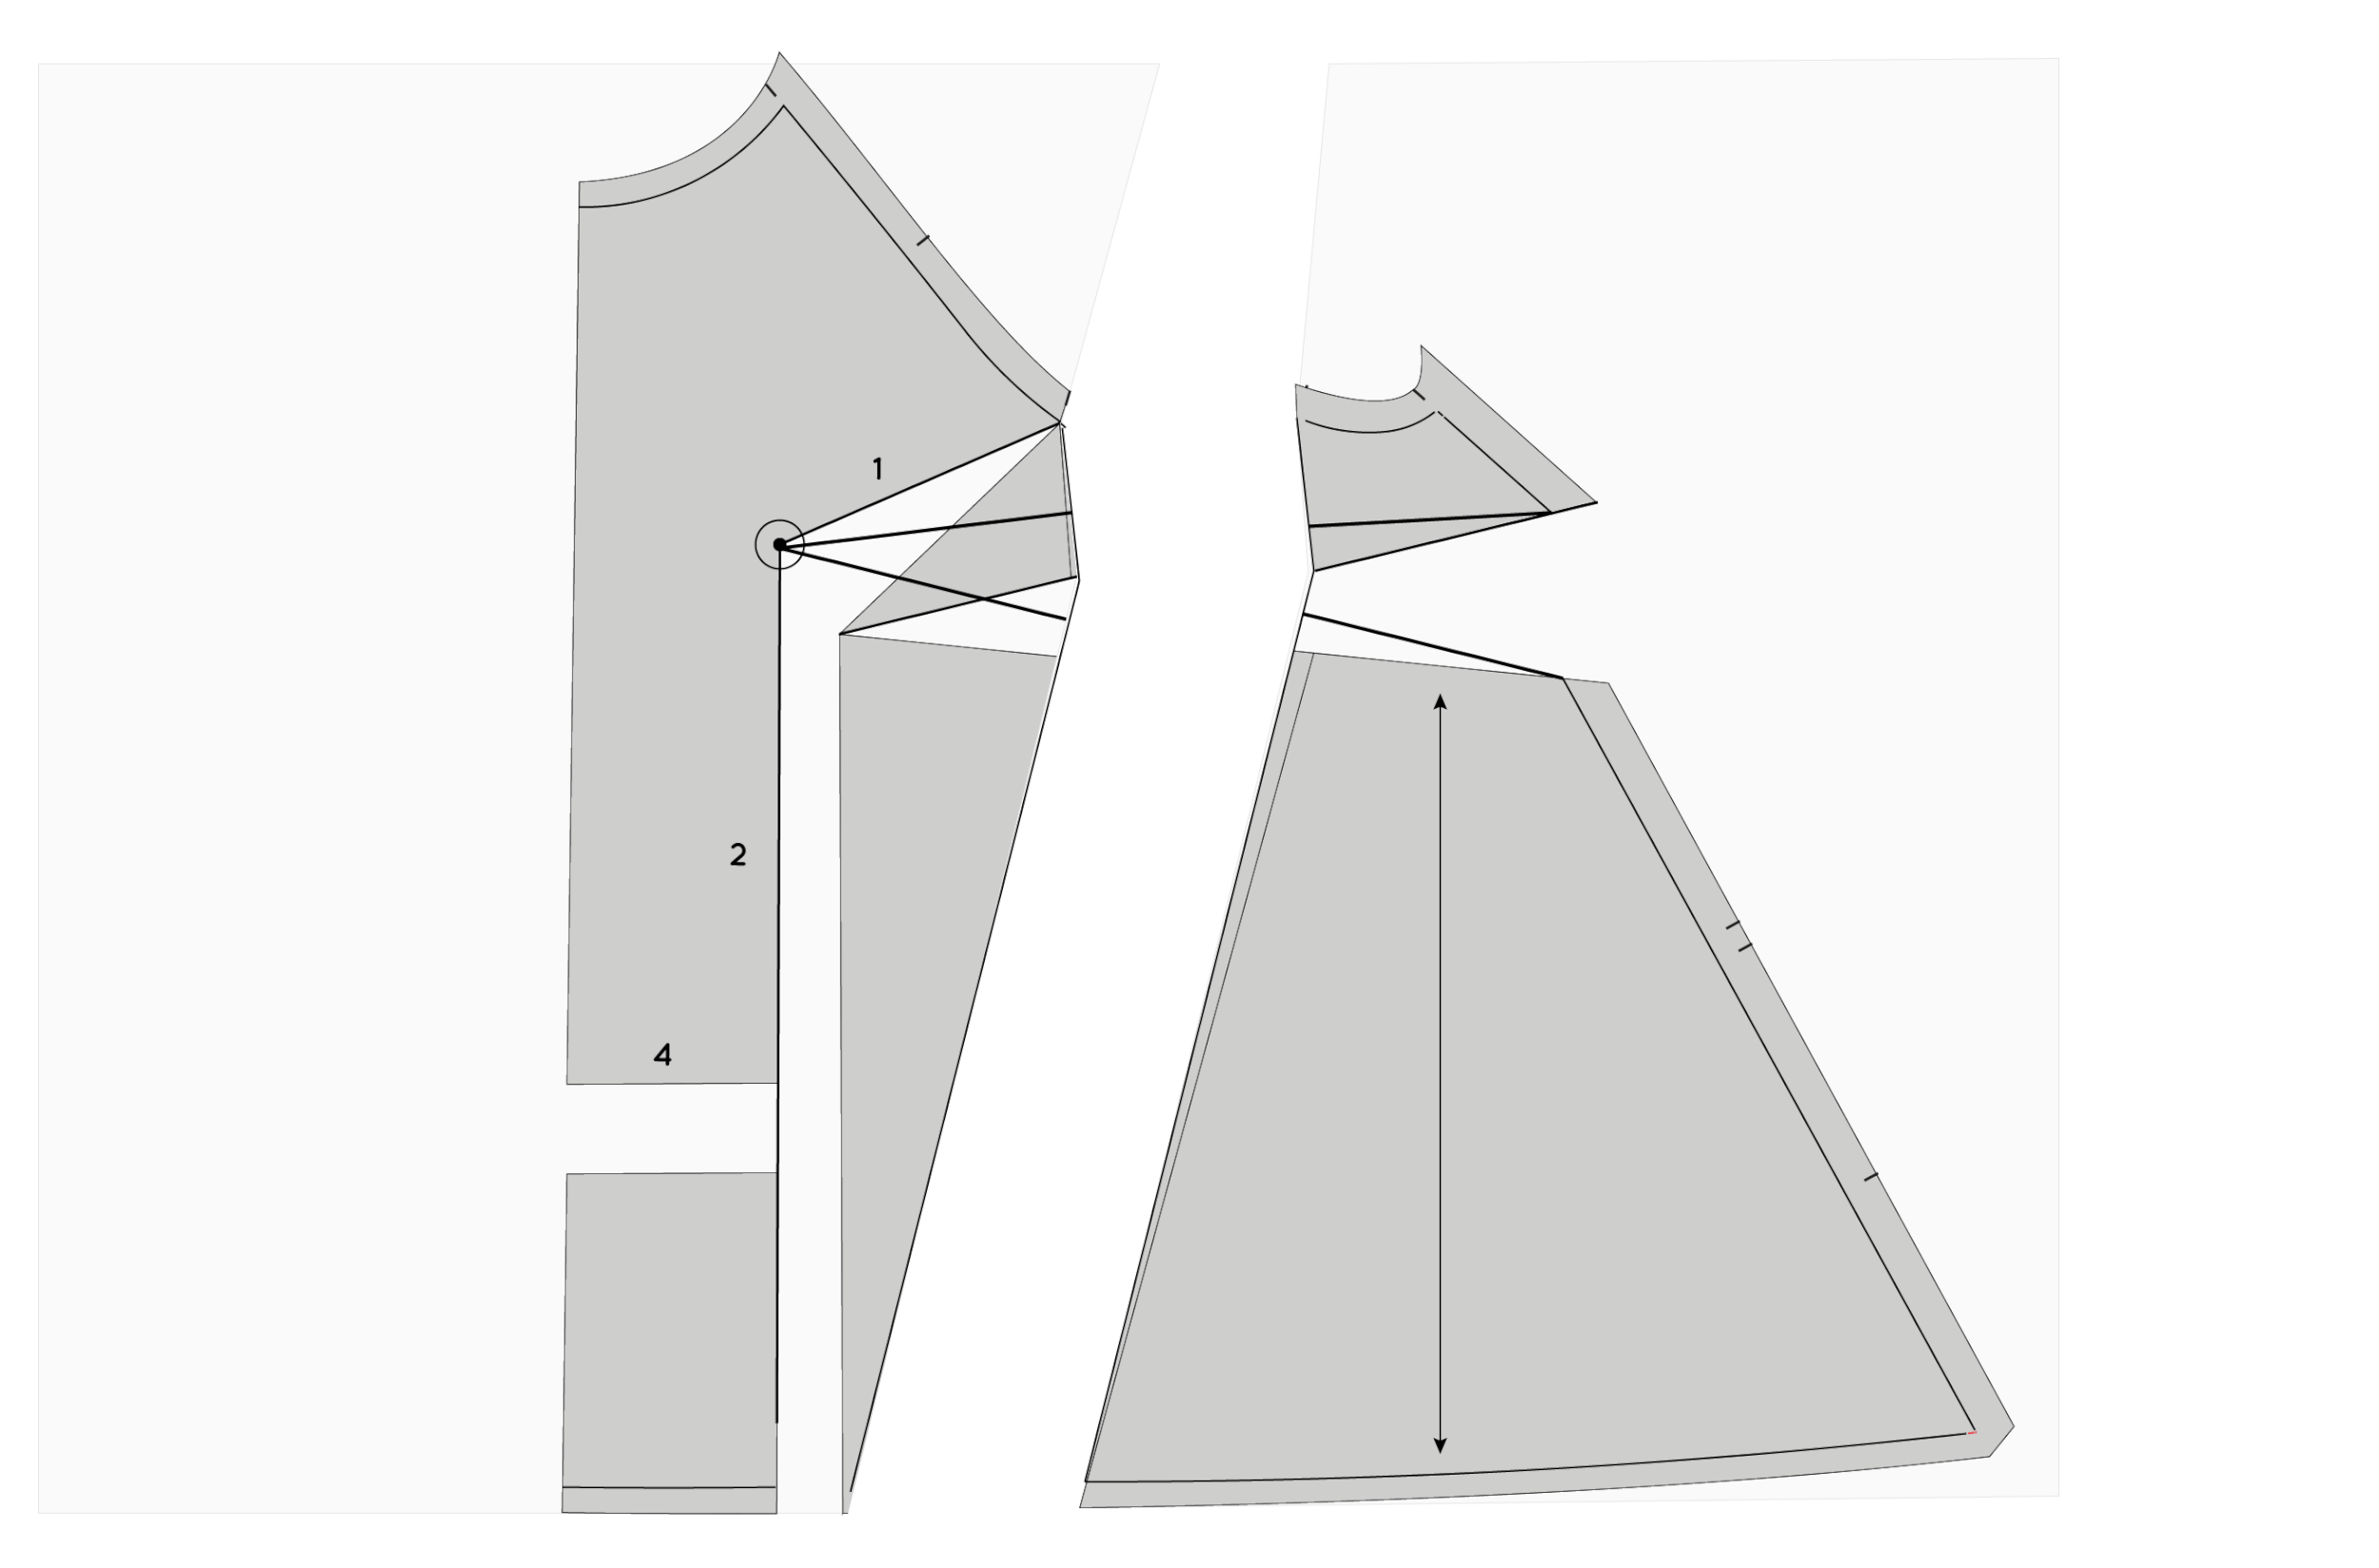
Cut along the panel line (being sure it's the new panel line and not the original panel line) - separating the piece into two, so that we can focus on the SIDE FRONT PANEL.
Step 29:
Cut along the dart arms that intersect the FRONT SIDE PANEL (we will be removing the dart from the FRONT SIDE PANEL, as we only need the dart in CENTRE FRONT PANEL) to create two separate pieces.
Step 30:
Tape the two pieces together by lining up the cut edges. You have now closed out the section of the dart that was on this panel.
Create a new pattern piece
Step 31:
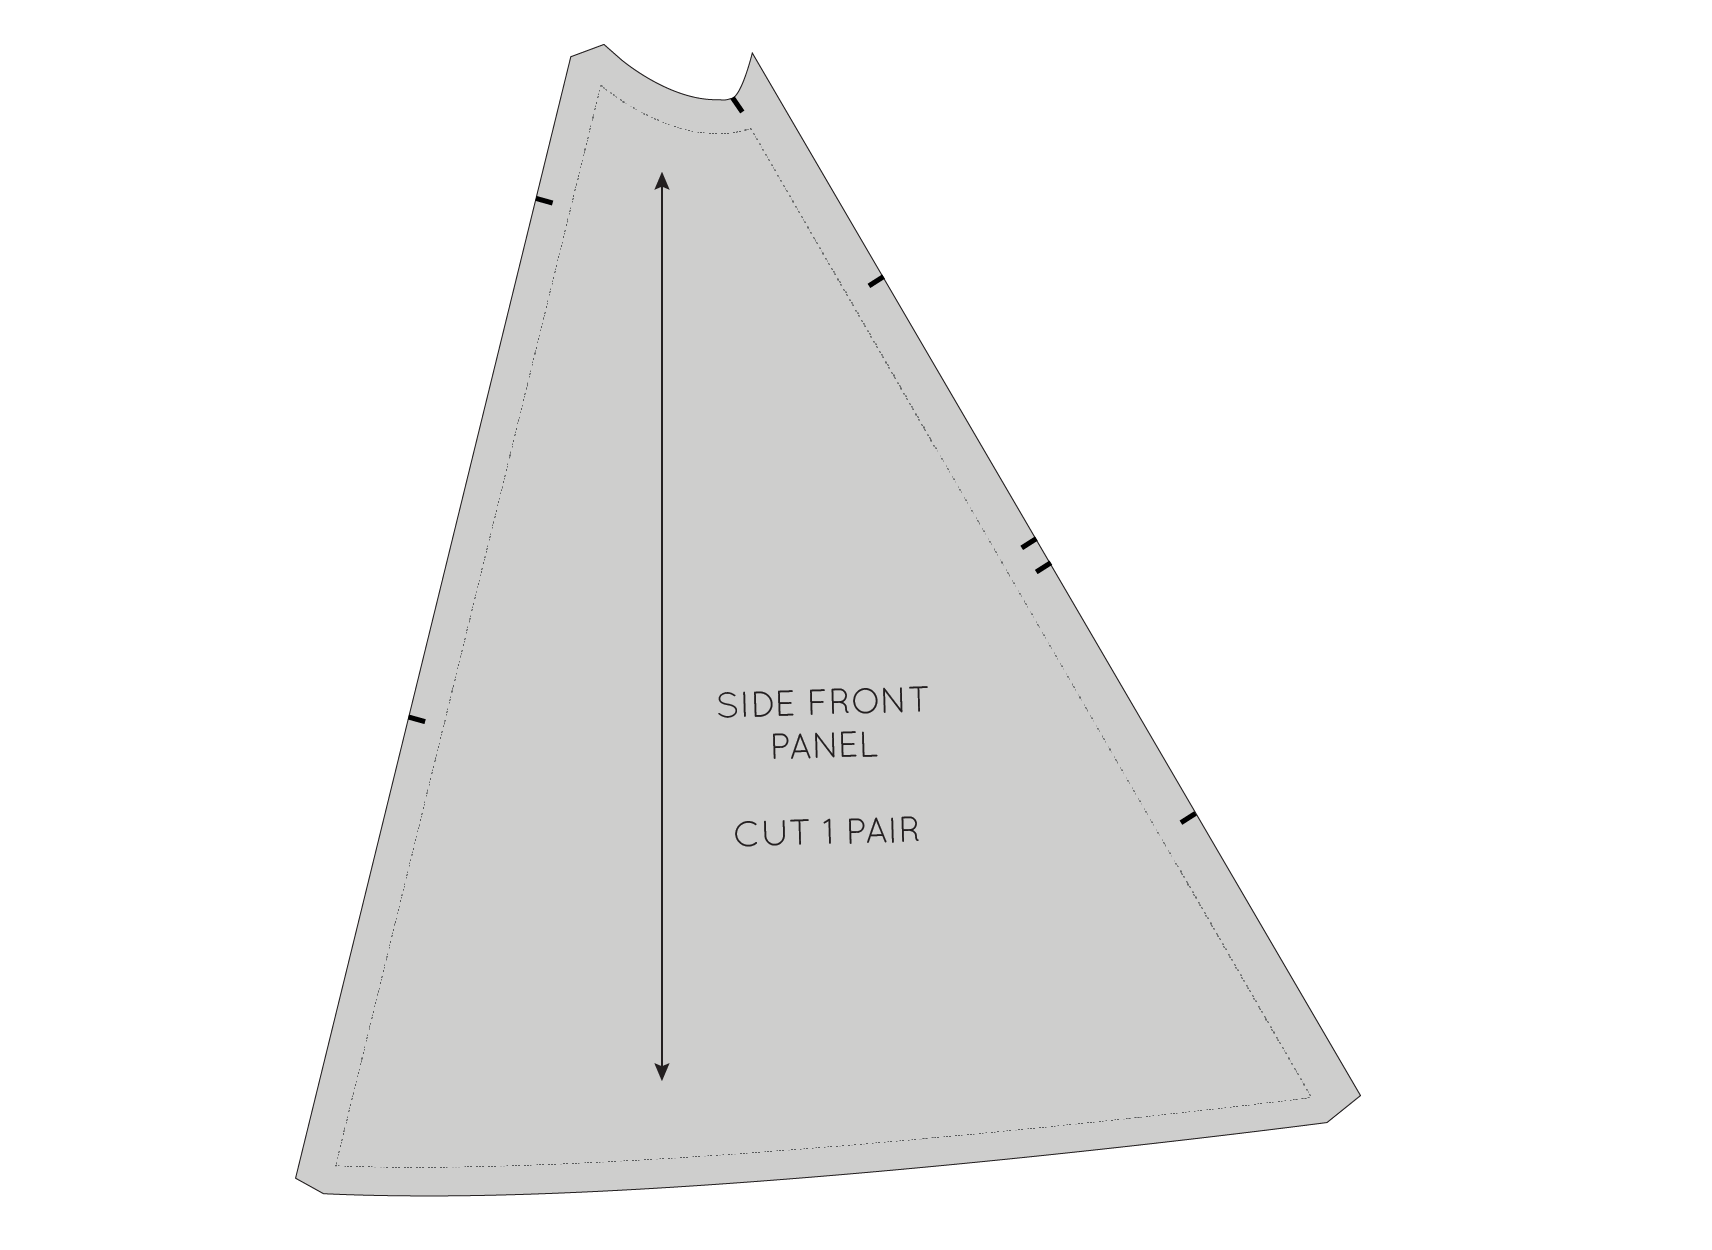
Take a piece of pattern paper and trace the new pattern piece. Your side seam is likely to be a little disjointed since making the adjustment (like mine is in the example). Re-draw the seam by drawing a straight line from the top to the bottom of the seam - on the stitch line. This is called "truing" a pattern.
Add seam allowance
Step 32:
Add seam allowance in the same way that you did on the front panel. The side seam has 1.5cm (5/8in) seam allowance and the panel line has 1.2cm (1/2in).
Step 33:
Transfer the grainline and add cutting instructions.
You will notice that we have lost almost all the notches in the process of making the adjustment. I'll show you how to get those back now.
Marking notches
Step 34:
Place the SIDE FRONT PANEL on top of the CENTRE FRONT PANEL, lining up the stitch line - as if the two pieces were being sewn (this is when transparent pattern paper is really helpful). The CENTRE FRONT PANEL will be right side up and the SIDE FRONT PANEL will be right side down.
Step 35:
Transfer the notches from the CENTRE FRONT PANEL onto the SIDE FRONT PANEL. Only transfer the notch from the lower dart arm, not the upper dart arm (as when the dart is sewn, the dart will be what lines up with the notch on the SIDE FRONT PANEL).
True the seam allowance
Step 36:
While you have the pattern there, true the seam allowance at the hem (so that when the seam is pressed it will sit flush with the hem).
For more detail on why we do this and how to do it, check out this tutorial on truing patterns.
Step 37:
Now we can true the top of the seam allowance by aligning the top of the panel seam (above the top notch) with the CENTRE FRONT PANEL. You will notice that the rest of the seam no longer matches up. This is because of the dart. When the dart is sewn, the angle of the seam will change and match perfectly with the SIDE FRONT PANEL.
Step 38:
True the seam allowance in the same way that you did for the other end of the seam.
Add notches to the side seam
Step 39:
Now it's time to add notches to the side seam. Take the SIDE BACK PANEL so that we can transfer the notches from this piece onto the SIDE FRONT PANEL (as these pieces will be sewn together and therefore need to match).
Step 40:
Again, line up the stitching lines, as if you were sewing the pieces together. Transfer the notches from the SIDE BACK PANEL to the SIDE FRONT PANEL.
Please note : If there is a discrepancy between the lengths of the side seams (which there could be due to the alteration we made to the SIDE FRONT PANEL), use this tutorial to true the seams so that they are the same length.
And there you have it, the finished SIDE FRONT PANEL!
Now you can go ahead and make your Collins Top! The process will be the same as the instructions that come with the pattern, except you will need to start by sewing your darts in the CENTRE FRONT PANEL.


