
THE Q & A SERIES - How to remove pleats from a pattern
Hi there!
I was hoping that you might be able to send me the details on how to remove the pleats from the back of the Hove Jacket?
Thank you kindly!
Amy
Hi Amy,
I’m excited you’re going to be adapting the Hove jacket to better suit your preferences!
For those of you who aren't looking to remove the pleats from the Hove jacket, you can also use this technique on most patterns with pleats.
PREPARE THE PATTERN

Step 1
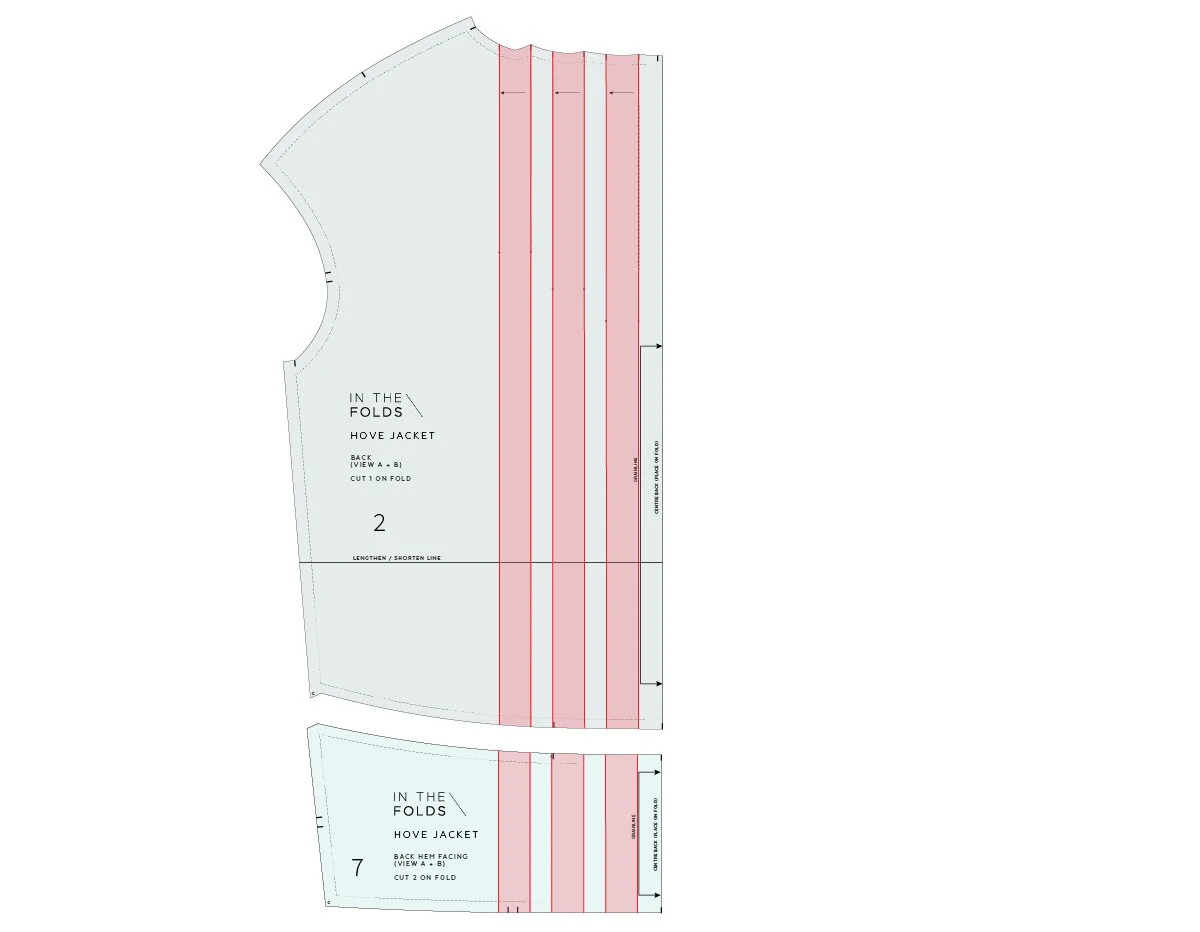
Take BACK [2] and BACK HEM FACING [7] pieces from the pattern. If you think you’d like to go back to the original design in the future, I’d suggest tracing a copy to make the alterations on (although you can always re-print from the PDF later down the track - so that’s an option too).

Step 2
Place the BACK HEM FACING [7] piece on top of the BACK [2] piece, lining up the centre back lines (the fold line).
Place stitch line on stitch line (the grey line marked on the pattern), as if the pattern pieces have been sewn together. You will notice that you can’t match the seam line all the way along the piece - this is because there is some shaping in the seam - don’t worry about the end section (towards the side seam) where it doesn’t match - as long as the centre back lines match (as this is where the alteration will be made).
Tape pieces in place (with something that can be removed as you will want to separate pieces again in a moment).
EXTEND THE PLEATS

Step 3
Take a ruler and draw in the pleat lines by extending the pleat lines on the pattern all the way down to the bottom of the BACK [2] and through to the bottom of the BACK HEM FACING [7] - ensure these lines remain parallel to the centre back (a long clear pattern drafting ruler will really help with this, if you’ve got one).
REMOVE THE PLEATS
Step 4
Remove the tape so that you have the two seperate pattern pieces again.
I have shaded the pleats so you can see the parts of the pattern that make up the pleats and what we will be removing.

Step 5
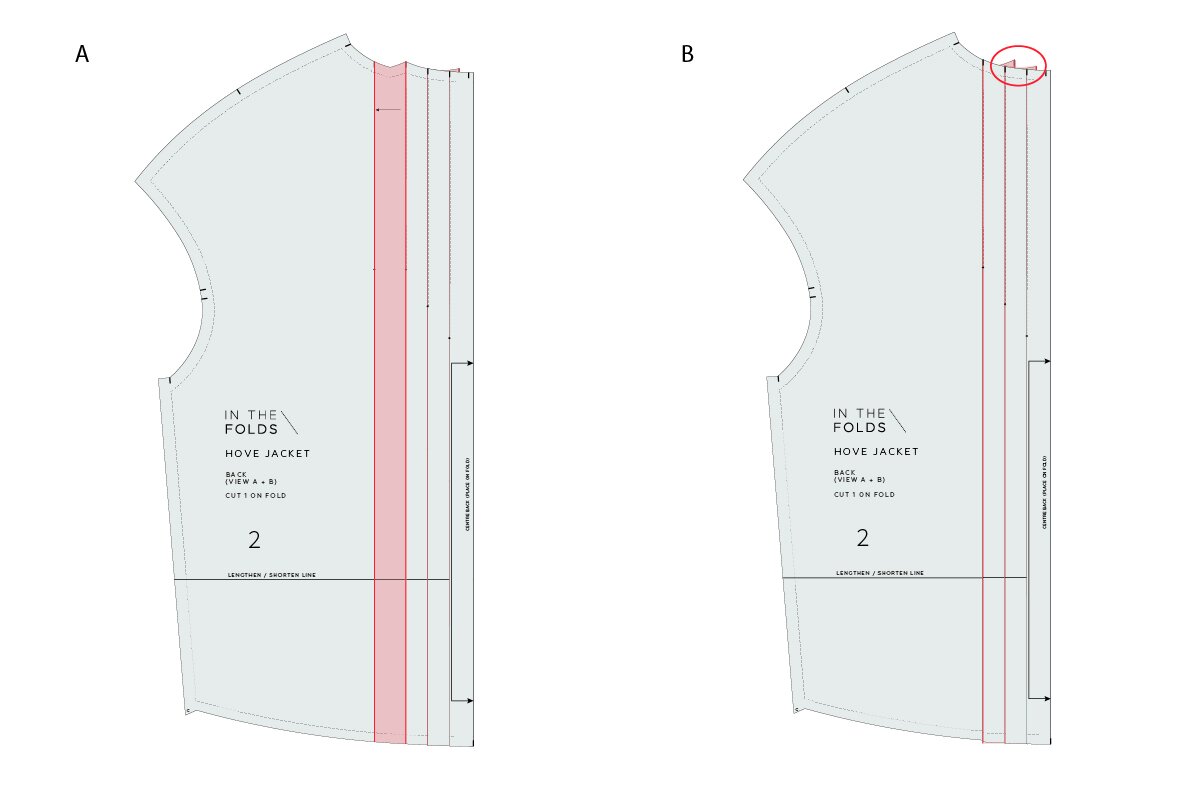
a. On the BACK [2] piece, carefully cut along the pleat line closest to the centre back, detaching this section from the rest of the pattern piece.
b. Slide the section you removed across so that it lines up with the other side of the pleat and removes the pleat value. Line up the top and bottom of the piece and then glue / tape in place.
c. You will notice that there is some excess on the right side of the centre back seam (this is because the pleat value is greater than the section of the pattern to the right of it. Trim off the excess pleat value.
Step 6
a. Repeat Step 5 for the centre pleat (the next pleat along).
b. Repeat Step 5 for the final pleat.
Trim excess paper from the neckline.

Step 7
a. On the BACK HEM FACING [7] piece, carefully cut along the pleat line closest to the centre back, detaching this section from the rest of the pattern piece.
b. Slide the section you removed across so that it lines up with the other side of the pleat and removes the pleat value. Line up the top and bottom of the piece and then glue / tape in place.
c. You will notice that there is some excess on the right side of the centre back seam (this is because the pleat value is greater than the section of the pattern to the right of it. Trim off the excess pleat value.
d. Repeat process for the centre pleat (the next pleat along).
e. Repeat process for the final pleat.
FINALISE THE PATTERN

Step 8
Smooth out curves on the cutting line with a curved ruler before trimming off any excess. You can use the pieces as they are, or trace if you would like a fresh copy.
TIP: It’s always a good idea to keep note of the alterations you have made to a pattern, so that you can refer to this information later down the track. You can write this directly on the pattern itself, or download this pattern specification template.
Happy sewing,
Emily
P.S. Would you like to know what the Q & A series is all about? This page tells you a little bit more about the motive behind the series. Past issues from the Q & A series can be found here.
Don't have a question, but found this newsletter helpful? I'd love to hear from you! Get in touch and say hi.
What you’ve been making

Collins top made by @dreaminspiredbk

The Rushcutter dress made by @icecjan


Peppermint wrap top made by @madebytayla_


