THE Q & A SERIES - Adding and removing fullness from a sleeve hem
Hi Emily!
I’d like to know how to reduce the fullness in a puffed/gathered sleeve - as opposed to slashing a straight sleeve design to add in fullness. I often come across patterns that I love everything about - except for a gathered sleeve cap, or or gathering into a cuff, that makes it difficult to layer under a cardigan or jacket (here in Canada it’s all about layering to stay warm!).
Do I slash & straighten and redraw the sleeve cap?
Thank you!
- Vivian
Fredericton, Canada
Hi Vivian,
What you suggested is exactly right! You need to slash and close to remove the fullness from a sleeve cuff or cap - rather than the usual technique of cutting / slashing and spreading.

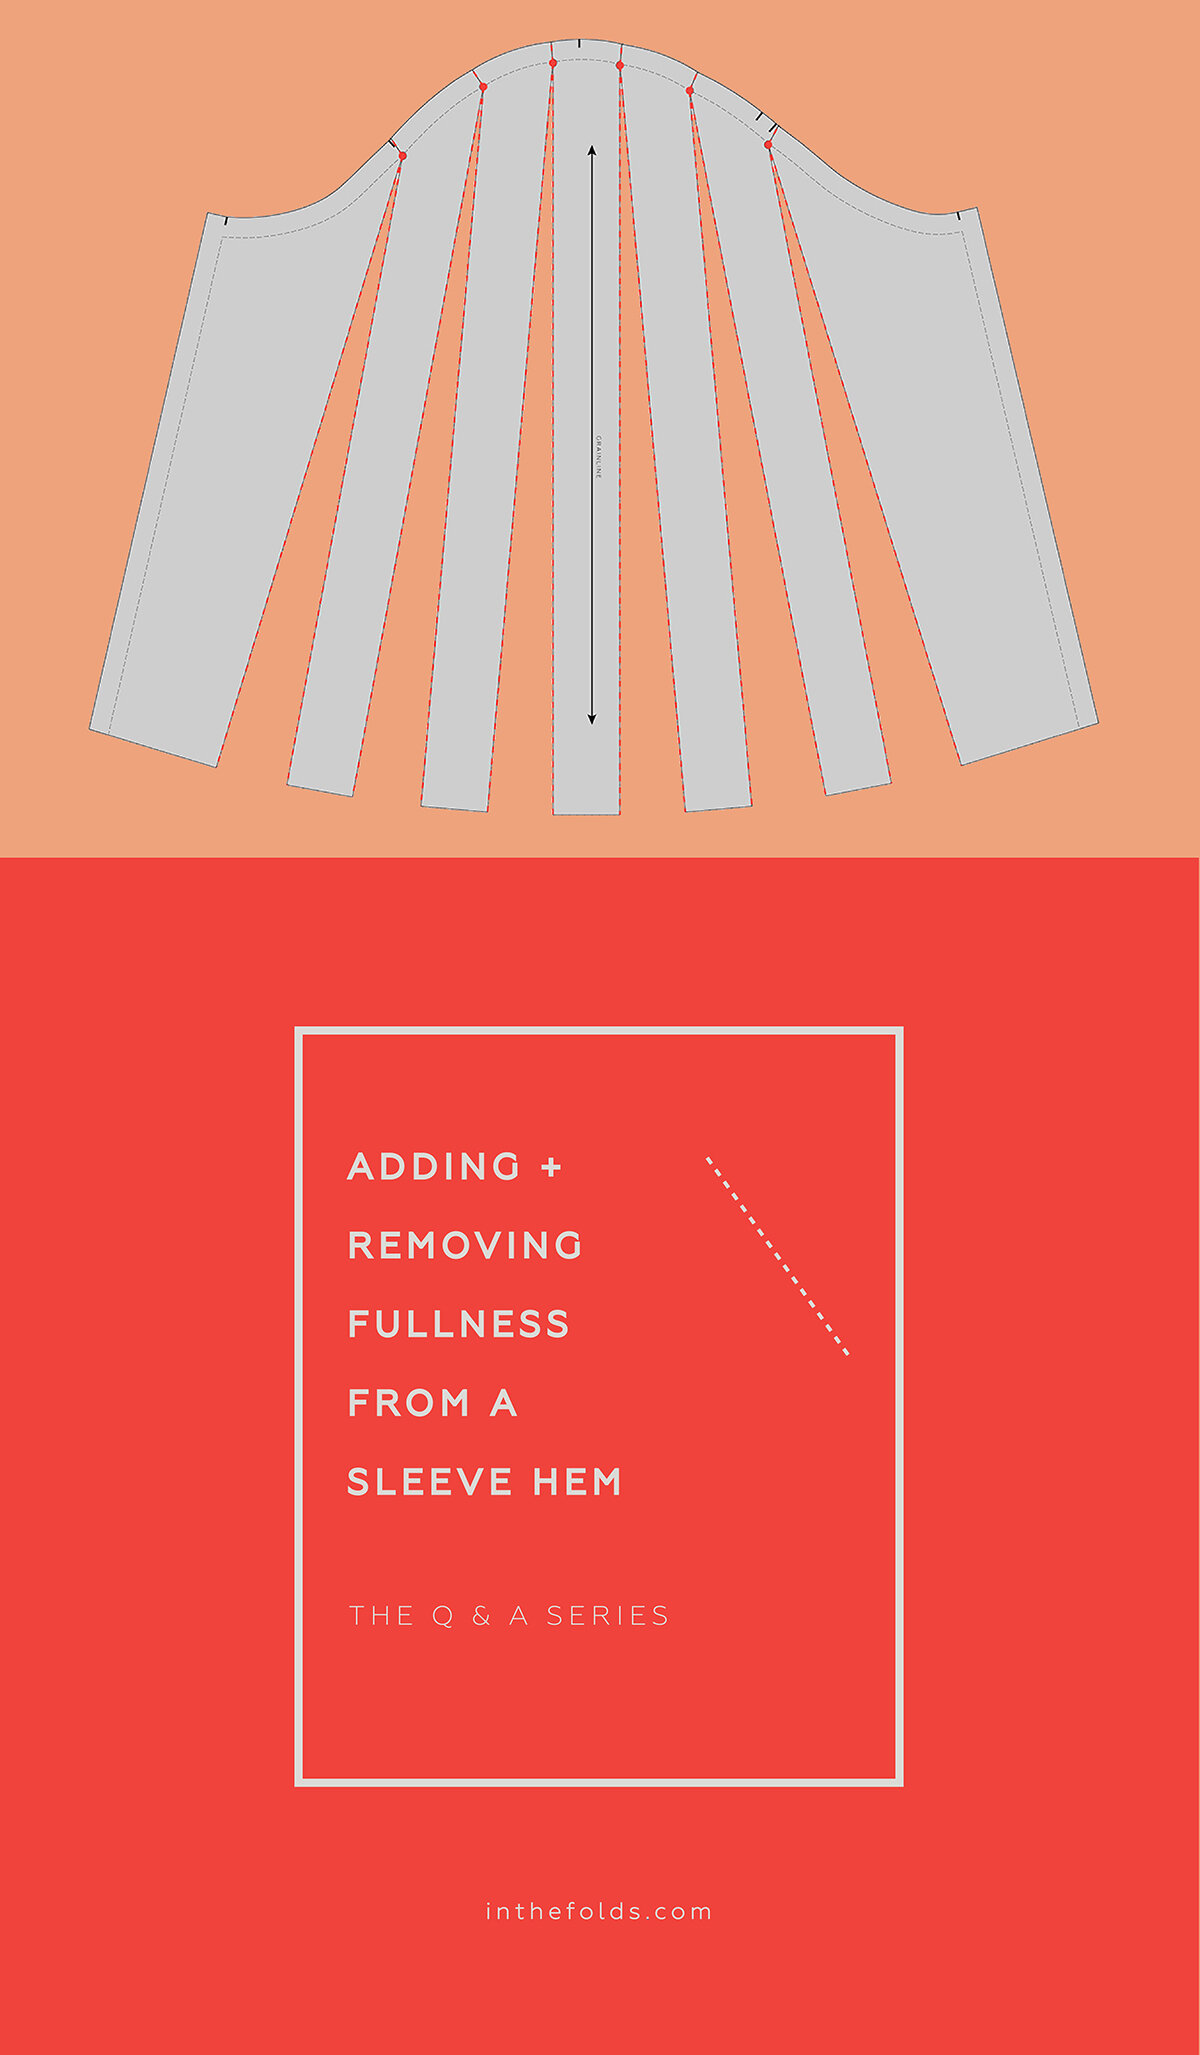
I thought that for today's post I would show you how to add fullness to a sleeve at the hem (like you would need to do to create a bishop sleeve, gathered sleeve or a flared sleeve - as pictured above) and then show you how to remove this fullness - if you're working the other way - as in the case of the question. The technique is basically the same, so I thought it would be a good opportunity to teach this technique for both uses (adding fullness and removing fullness).
I had been planning on also including removing fullness from a sleeve cap but realised this was going to become a very long tutorial - so I will split it over two issues and show you how to do that next week!
PREPARE PATTERN

For the example, I will be using the sleeve from the Peppermint Wrap top pattern, although you could use any sleeve pattern that you like.
Take the pattern piece and trace a copy - if you would like to keep the original. The stitch line (the grey line on my patterns) will come in handy for this tutorial. If your pattern does not have the stitch line marked on it, you can mark it with a clear ruler.
ADD FULLNESS
MARK CUT + SPREAD LINES

Mark in your slash lines on the pattern. It is up to you how many you mark - but be generous with the number of lines you mark, as this will help the change to the pattern be nice and gradual so that your lines remain as smooth as possible when you make the adjustment. Be sure to keep the slash lines parallel to the grainline and evenly spread.
In the case of the example I will be adding fullness to the centre section of the sleeve, but you can add slash lines across the whole sleeve - it will just depend where you want the fullness and how much fullness you would like to add. You will be cutting these lines, to add volume to the pattern - wherever there is a slash more fabric will be added.
CUT + SPREAD

It is a good idea to put the pattern on top of a larger piece of pattern paper at this stage, as after you cut the pattern it becomes very delicate and difficult to move.
Take your scissors and cut along the first slash line, from the hemline up towards the sleeve cap. Go nice and slow as you approach the stitch line (marked with circles in the illustration) as you will be wanting to leave a small "hinge" intact to help with the alteration. Then cut in from the seam allowance, leaving 1-2mm uncut.
Repeat for each line marked, being careful to keep the pattern intact (although it's not a disaster if you accidentally cut through the hinge - just use a small piece of masking tape to put the sections back together).

With your grainline in the centre (and keeping this section of the pattern straight), gradually start spreading each section of the cut pattern - opening each cut line by a consistent amount.
HOW MUCH VOLUME TO ADD?
Think about how much volume you would like to add to the pattern piece overall. You may want to do this by eye (just cut along the line and then spread until it looks as though enough volume has been added), or by an exact amount. If you are just opening up a hemline, I would say that doing it by eye is fine. But if, for example, you are using this technique on a skirt pattern to increase the hip measurement, then I would suggest finding an exact amount so that you don't get any surprises.
If you have found an exact amount that you would like to add to the pattern, you will need to divide this figure by the number of cuts you have made. For example, in the sleeve pictured, I added 21cm to the hemline. I divided this 21cm by the number of slash lines (6) and therefore opened up each slash line by 3.5cm.
Tape / glue pattern in place to the piece of pattern paper underneath.
TRACE PATTERN

You can either smooth out the lines of the pattern on the original pattern that you have glued / taped, or re-trace on a fresh piece of pattern paper. Sometimes it is good to use the original, as then you can keep track of the changes you made to the pattern - but this is up to you.
When tracing the new pattern piece, you need to make sure all lines are nice and smooth. Use a French curve ruler, or even a straight ruler (that is my preference for drawing curves) to work your way around the pattern. Draw the new hemline by drawing a smooth curve that follows the hem sections of the original sleeve. Be sure to also transfer the notches and grainline if you are tracing the pattern.
FINALISE PATTERN + ADD PATTERN MARKINGS
Add seam allowance to the hem of the pattern. The amount will depend on your hem treatment - for example, if you are adding a cuff, rolling the hem, or creating a hem facing.
Add pattern details to the new pattern piece. This includes:
Pattern name (e.g. Peppermint Wrap Top)
Piece name (e.g. Flared sleeve)
Size (e.g. Size E)
Cutting instructions (e.g. Cut 1 pair)
Number of pieces (e.g. piece 4 / 5)
I also like to add notes of the changes I made (e.g. 21cm added to the hemline using cut & spread technique on 12 April 2020)
And you're ready to use your new sleeve pattern! I'd suggest making a toile to check you are happy, before cutting your garment.
REMOVE FULLNESS
MARK CUT + SPREAD LINES

To remove fullness, we will use the sleeve piece created in the previous example.
Mark in your slash lines on the pattern. It is up to you how many you mark - like in the first example, be generous with the number of lines you mark, as this will help the change to the pattern be nice and gradual so that your lines remain as smooth as possible when you make the adjustment.
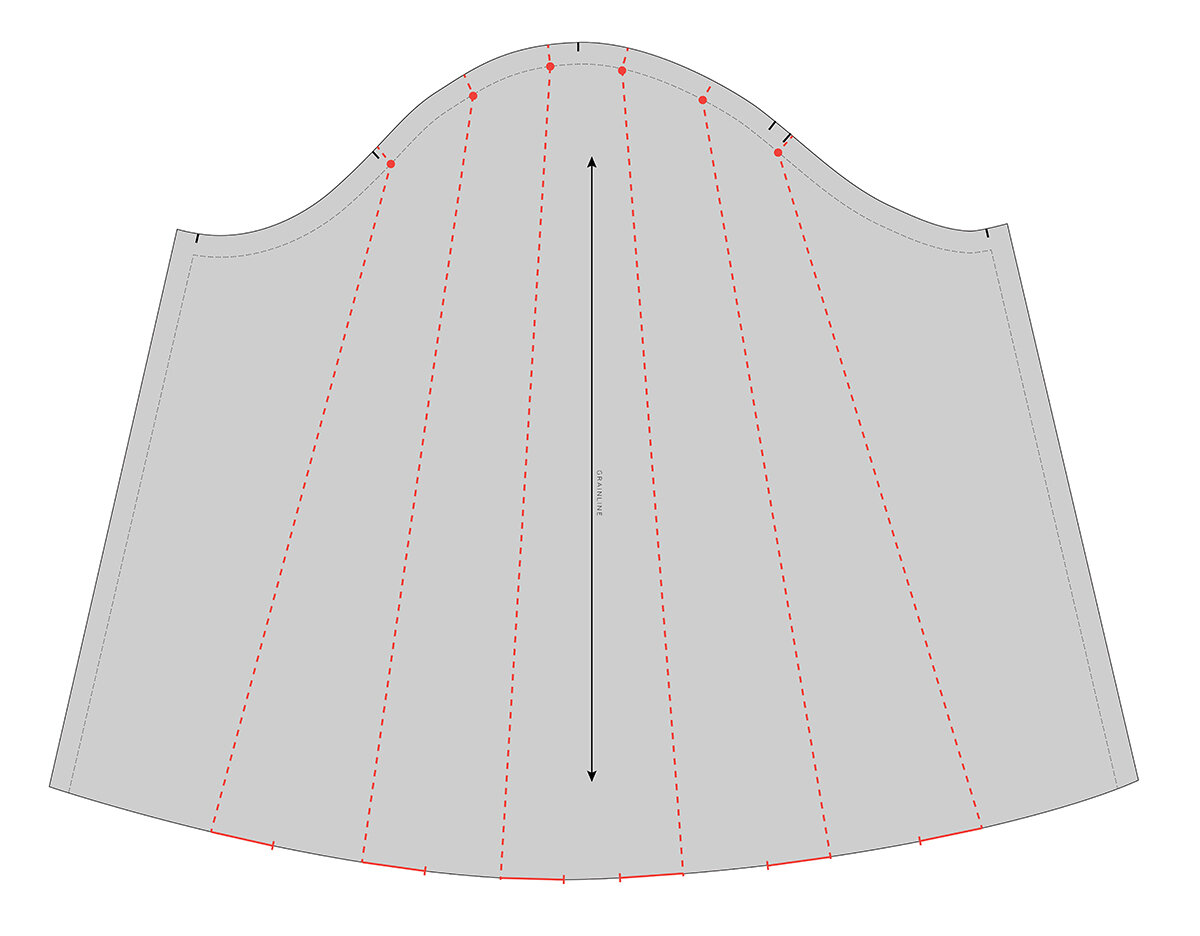
As you will see, due to the shape of the sleeve pattern piece, the slash lines will need to gradually fan out, so that they can remain evenly spaced out (rather then parallel to the grainline like they were in the earlier example).
HOW MUCH VOLUME TO REMOVE?
Work out how much volume you will be removing from the hem of the sleeve, and then divide this by the number of slash lines. For example, I will be removing 21cm from the hem of the sleeve, so will be removing 3.5cm from each slash line. Mark this amount on each section of the pattern - along the hemline. Alternatively you can do this by eye - although this will depend on the hem treatment. For example, if you are going to be attaching a cuff, you will need to carefully check the hem length so that it will fit the cuff. If joining to a sleeve cuff, you will still need a little bit of fullness in the bottom the sleeve, so that you can make a pleat or gathers before joining it to the cuff.
Take your scissors and cut along the first slash line, from the hemline up towards the sleeve cap. Go nice and slow as you approach the stitch line (marked with circles in the illustration) as you will be wanting to leave a small "hinge" intact to help with the alteration. Then cut in from the seam allowance, leaving 1-2mm uncut.
Repeat for each line marked, being careful to keep the pattern intact (although it's not a disaster if you accidentally cut through the hinge - just use a small piece of masking tape to put the sections back together).
CUT + CLOSE

With your grainline in the centre (and keeping this section of the pattern straight), gradually start overlapping each section of the pattern with the section beside it - lining up the cut edge with the point marked previously - to remove the desired amount. Tape or glue in place.

Repeat for each slash line.
TRACE PATTERN

You can either smooth out the lines of the pattern on the pattern that you have glued / taped, or re-trace on a fresh piece of pattern paper. Sometimes it is good to use the original, as then you can keep track of the changes you made to the pattern - but this is up to you.
When tracing the new pattern piece, you need to make sure all lines are nice and smooth. Use a French curve ruler, or even a straight ruler (that is my preference for drawing curves) to work your way around the pattern. Draw the new hemline by drawing a straight line from one side of the pattern to the other (being sure to check the hemline is perpendicular to the grainline). Be sure to also transfer the notches and grainline if you are tracing the pattern.
FINALISE PATTERN + ADD PATTERN MARKINGS
Add seam allowance to the hem of the pattern. The amount will depend on your hem treatment.
Add pattern details to the new pattern piece. This includes:
Pattern name (e.g. Peppermint Wrap Top)
Piece name (e.g. Sleeve)
Size (e.g. Size E)
Cutting instructions (e.g. Cut 1 pair)
Number of pieces (e.g. piece 4 / 5)
I also like to add notes of the changes I made (e.g. 21cm removed from the hemline using cut & spread technique on 12 April 2020)
And you're ready to use your new sleeve pattern! I'd suggest making a toile to check you are happy, before cutting your garment.
I hope that helps you and I will be back next week to show you how to use this technique on a sleeve cap.
Happy sewing,
Emily
resources mentioned in this issue
Peppermint Wrap top sewing pattern. Pattern can be downloaded for free here.
Adding volume to a pattern. Tutorial can be found here.
How to add seam allowance to a sewing pattern. Tutorial can be found here.
How to draft a hem facing. Tutorial can be found here.
Making a toile. Tutorial can be found here.
P.S. Would you like to know what the Q & A series is all about? This page tells you a little bit more about the motive behind the series. Past issues from the Q & A series can be found here.
Don't have a question, but found this newsletter helpful? I'd love to hear from you! Get in touch and say hi.


