
THE Q & A SERIES
balances lines:
what they are and how to use them
Hi Emily & Team,
I would love it if you could talk about balance lines on a garment. This is something I've learned about recently and seems critical for having a garment hang nicely, but I've struggled to find good resources explaining the concept and how to use it when assessing fit.
I specifically have a common fitting issue where the bust is snug, the neckline pulls up and chokes me, the shoulder sleeve is sitting back, the side seams swing forward, the sleeve twists, and the back armhole looks a bit like hungry bum but into the armpit. Its like the whole garment is tilted diagonally on me from the side.
If you have any advice on this fitting mystery, I'd appreciate it!
Best,
Claire
Seattle, USA
Hi Claire,
For sewists who haven’t yet delved into making fitting adjustments to the garments they sew, balance lines will be a new concept, so thanks for asking such a great question!
WHAT ARE BALANCE LINES
Balance lines in pattern making refer to the horizontal and vertical lines that can be marked on a pattern or toile to ensure that the garment hangs properly when worn. They help maintain the balance of the garment, ensuring that it sits correctly on the body without twisting or pulling in any direction.
Balance lines can also give you a good indication if a garment is fitting correctly and can be used as reference points when making pattern adjustments to a pattern.
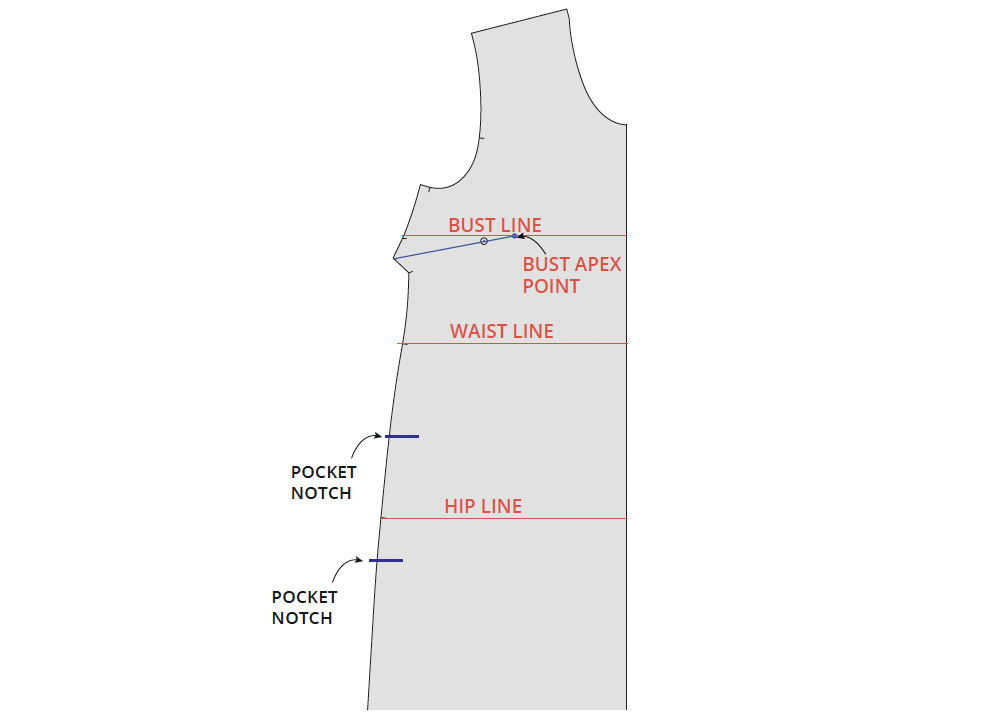
Horizontal balance lines are often drawn across the pattern pieces at key points: the bust, waist, and hip levels.
Vertical balance lines are usually the centre front and centre back of the garment. The side seam can also be used as a balance line.
HOW TO USE BALANCE LINES WHEN SEWING

Step 1 - Select your size or sizes
Before getting started, you’ll need to work out what size pattern to print. Take your measurements using a tape measure. We suggest doing this in front of a full length mirror. It can be helpful to take note of each measurement in a table like the one below where you can also take note of the size your measurement in each area corresponds to.
If your measurements are between sizes, look to the finished garment measurements to decide if you should select the smaller or larger size. This allows you to check the amount of ease in the pattern. For more information on how to use finished garment measurements to select your size see this post.
We suggest printing patterns in the size/s you need in relation to your HIGH BUST, WAIST and HIP measurements only. This disregards your bust measurement as it’s better to do a Full Bust Adjustment or Small Bust Adjustment (SBA) if required, rather than selecting a size based on your bust measurement.

Step 2 - Compare the lines on the pattern to your body measurements
Measure the vertical differences between the balance lines on the pattern so you can compare it to your body measurements.You may find it helpful to use a table like the one below to keep track.
Take some thin elastic and wrap a piece around your BUST horizontally. Hold it in place by tying a knot or pinning in place. Make it tight enough that it will stay put, but not so tight that it flattens your bust or stretches the elastic in any way. It is good to do this in front of the mirror so that you can check that the elastic remains parallel to the floor the whole way around. Repeat for your WAIST and HIP.

Take a tape measure and measure the vertical distance between your BUST LINE and your WAIST LINE. Record in the table above (4). Take the vertical measurement between your WAIST LINE and HIP LINE and record in the table (5). Measure down from your SHOULDER to your BUST APEX POINT (6).
Compare your measurements with the pattern measurements to assess whether or not you need to add or remove length in any of these places. Record any differences in the third column.
It is a good idea to add or remove length from the pattern in relation to your findings before making a toile.
Important! Some adjustments need to be made before making a toile
Certain adjustments need to be made to the pattern before making a toile as they will allow for a fitting.
For example, it’s a good idea to make a Full Bust Adjustment or Small Bust Adjustment before making a toile as this will allow the bust area to fit. If you need an FBA and don’t make this adjustment, you may not be able to get the garment on and you won’t be able to conduct your fitting.
Step 3 - Mark balance lines on the toile
At this point you can make a toile to check the fit of the pattern so far.
The alterations made to the pattern in the previous steps should give you a great starting point. The toile will help you check that you're on the right track and home in on some details.
HOW TO USE BALANCE LINES TO CHECK THE FIT
Once you’ve made a toile, set yourself up in front of the mirror to do a fitting. With regards to balance lines specifically, you need to check that the side seams appear straight and are perpendicular to the floor. If the side seam is pulling towards the front or the back, this normally means that you need more width in the area where it's pulling.
Also check that the bust line is sitting on your bust, the waist line is on your waist and the hip line is on your hip. If they are not sitting in the correct position it may indicate you need to add or remove length in that particular area.
I hope this gives you a good starting off point on your journey to learning how to fit clothes to your own unique measurements. And, if you feel like this post has peaked your interest in learning this fantastic skill you should definitely sign up to Curated by ITF because this is exactly the kind of fun stuff we teach!
Happy fitting,
Emily
RESOURCES MENTIONED IN THIS ISSUE
Using finished garment measurements to select your size - tutorial here.
More information about our monthly sewing subscription, Curated by ITF, can be found here.
For more issues of the Q & A series, you can check out the archive here.
WHAT YOU’VE BEEN MAKING

Peppermint Everyday dress made by @andramakes

Attwood pants made by @hollyhorseradish


