Q&A - fitting

ISSUE 176 - HOW TO DO A BROAD BACK ADJUSTMENT

How to do a broad back adjustment.

THE Q & A SERIES

HOW TO DO A BROAD BACK ADJUSTMENT

Hi Emily,

I really love your patterns and have made several! I have a question about the ruffle top - I have broad shoulders and find that the pattern restricts my arm movement. I’m not sure if it’s a result of my broad shoulders, but I then often find the arm holes also make me feel super restricted. How do I adjust fit for my broad shoulders and get more depth through the armhole without everything getting really baggy? I have broad shoulders but am also tall and lean!

Thanks,

Anna

Dulacca, Australia


Hi Anne,

Thanks so much for the lovely compliment. It’s always great to hear feedback from our customers, especially good feedback! 

From your description, it sounds like you need to do a broad back adjustment. (And, you’d probably be surprised at how many of our Curated by ITF members have added this to their standard pattern adjustments list!)

Here’s what you need to know…

WHEN TO MAKE THIS ADJUSTMENT

When fitting your toile / muslin, you should check you are happy with the fit of the back. Put your arms out in front of you (parallel to the floor) and check that the range of movement in the back is comfortable, and fabric is not digging in anywhere. Be sure to sew the sleeves into your toile so you can check there is enough room across the back. If you feel like the garment is pulling, digging in or restricting your movement across your back, you may need to do a broad back adjustment.

We included this tutorial in our Cartwright Fit Kit (along with a host of other fitting tutorials), so the illustrations show you how to do the alteration on a dress, but the process is the same for a top, like the Peppermint Ruffle Sleeve top.

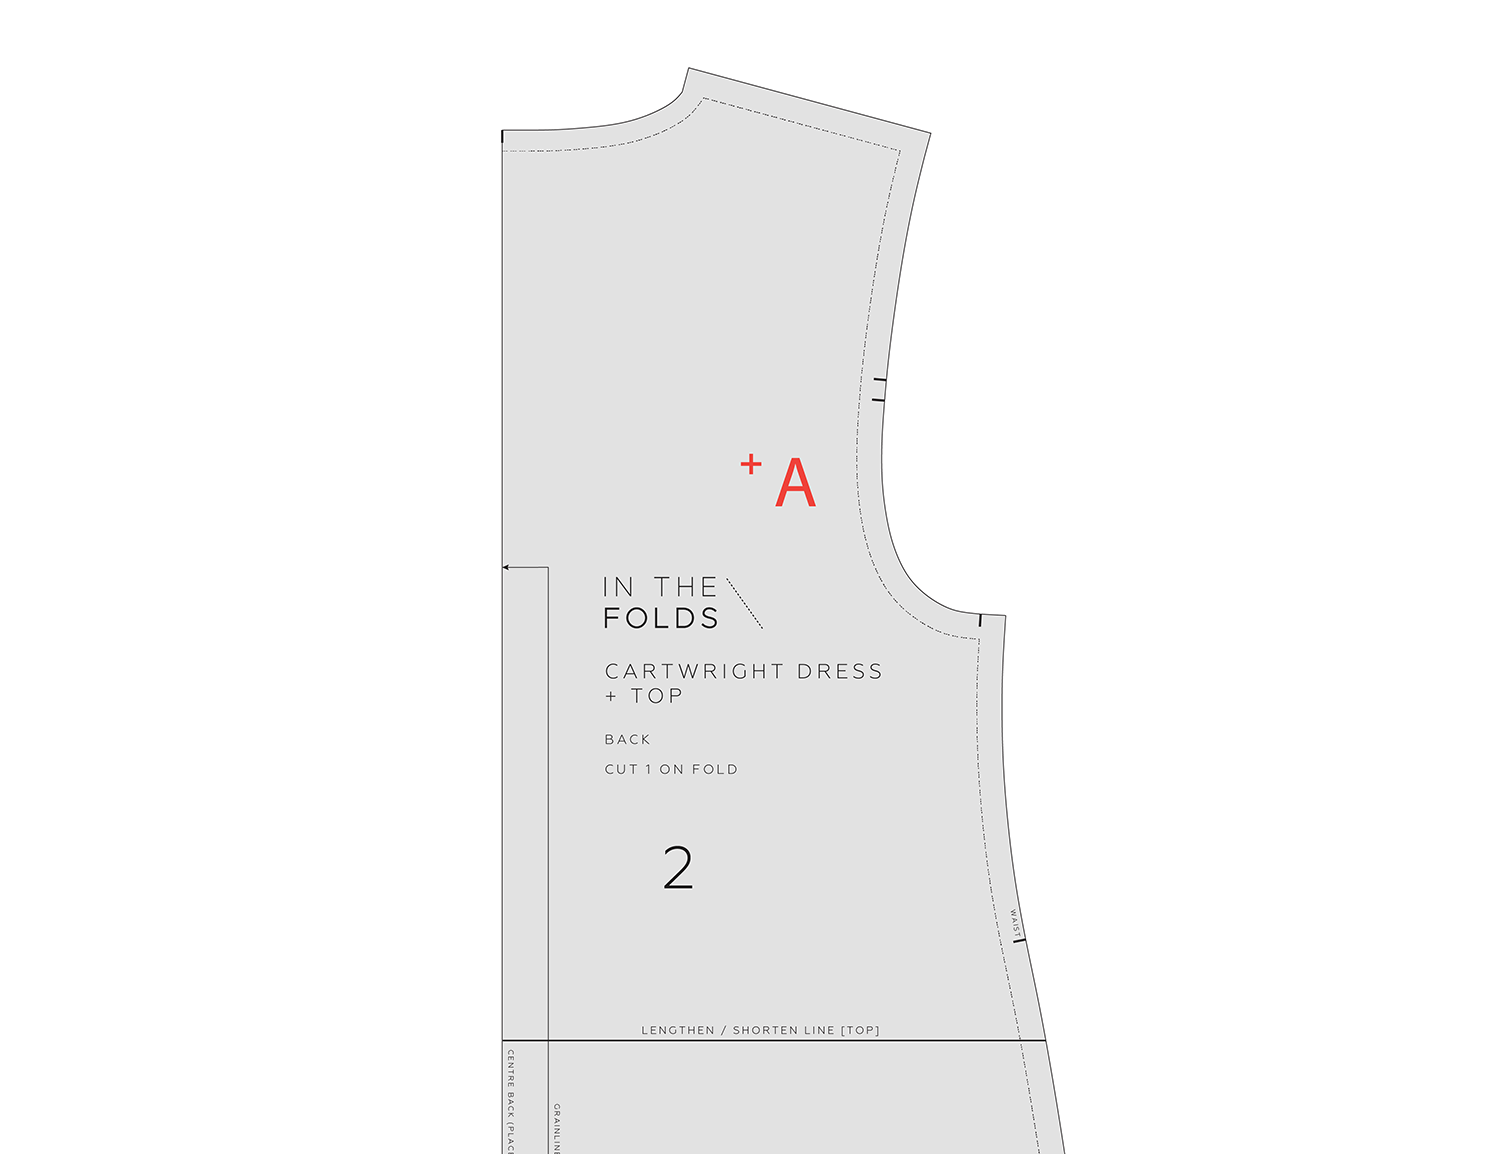
Broad back adjustment illustration 1

Step 1

Referring to your toile, find your shoulder blade or where the garment is pulling the most. Mark this point on the pattern. We will call this point A.

Broad back adjustment illustration 2.

Step 2

Draw a line perpendicular to the CENTRE BACK line running through point A, from the middle edge of the piece through the armscye. We will call this line B.

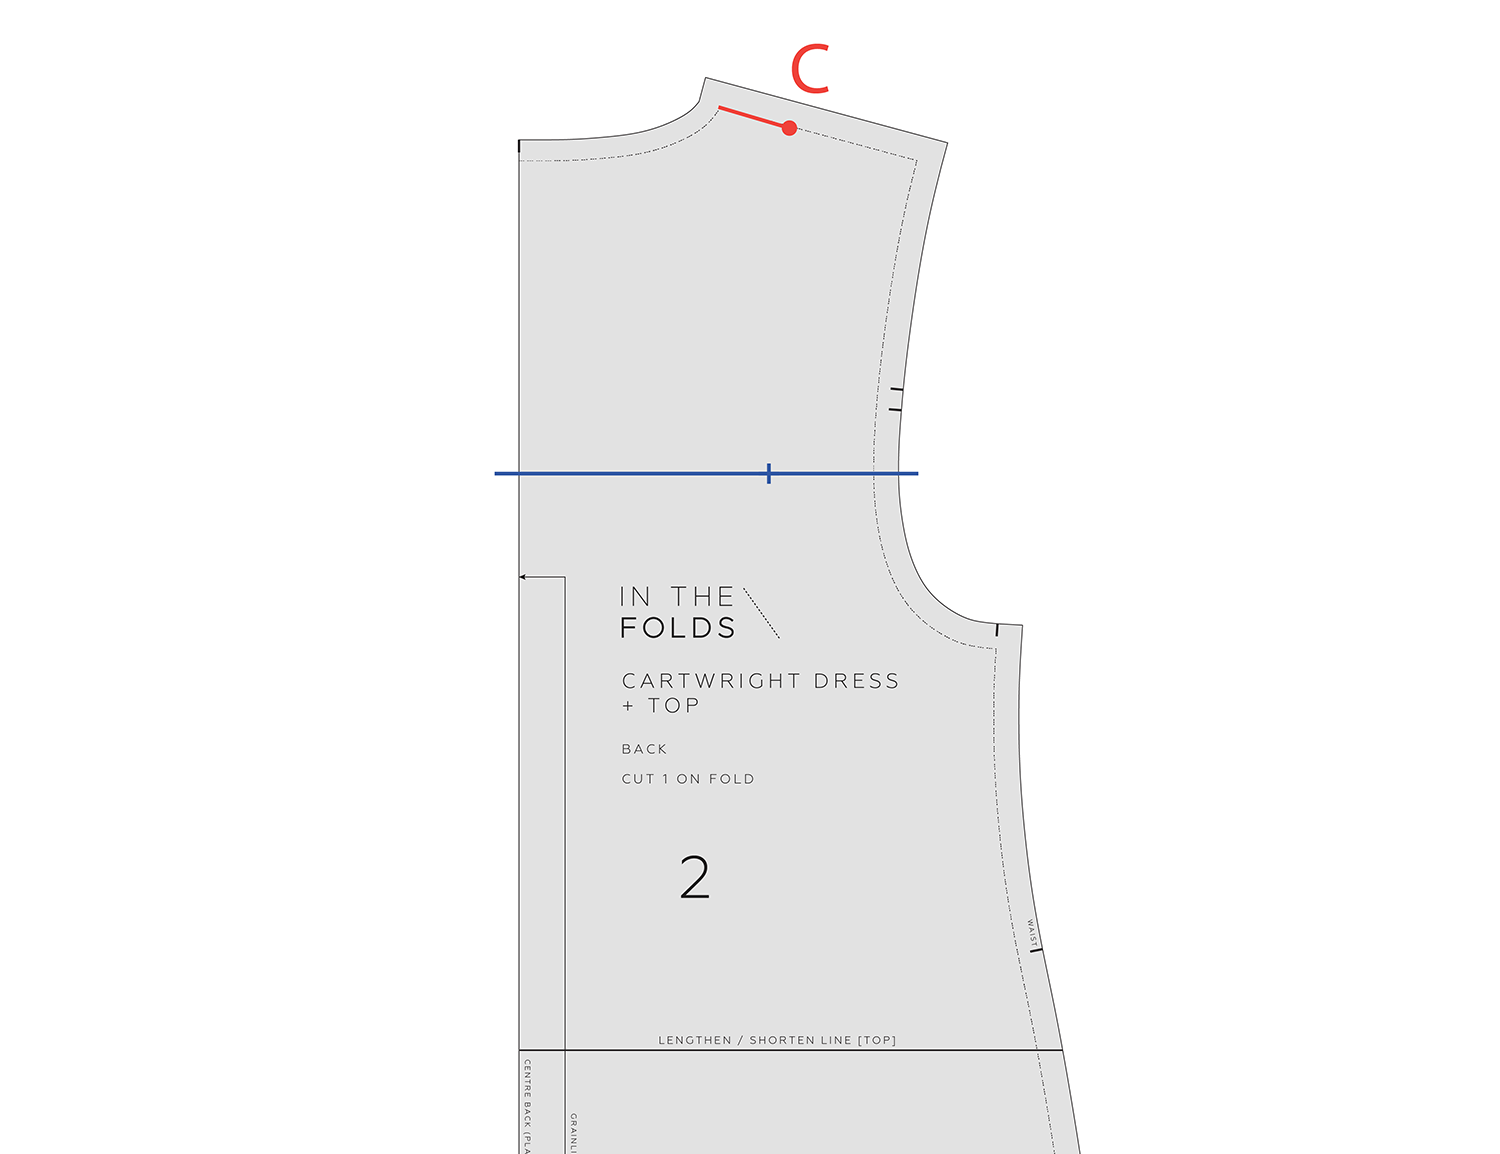
Broad back adjustment illustration 3

Step 3

Measure the length of the shoulder STITCH LINE and divide the result by 3. Mark this distance from the neck point on the STITCH LINE. We will call this point C.

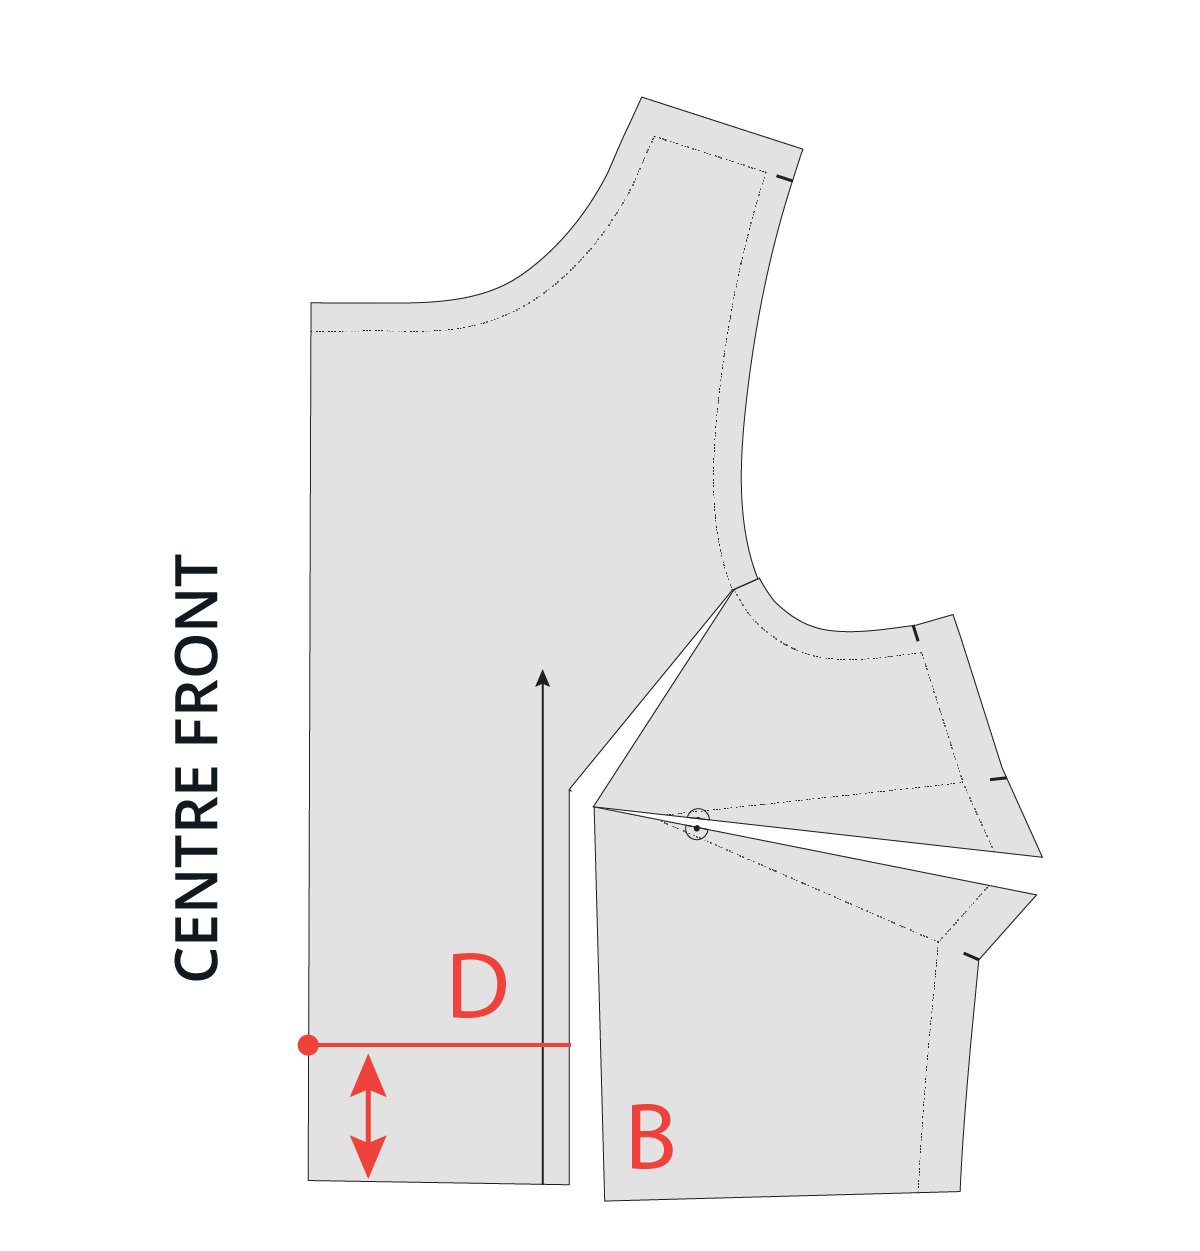
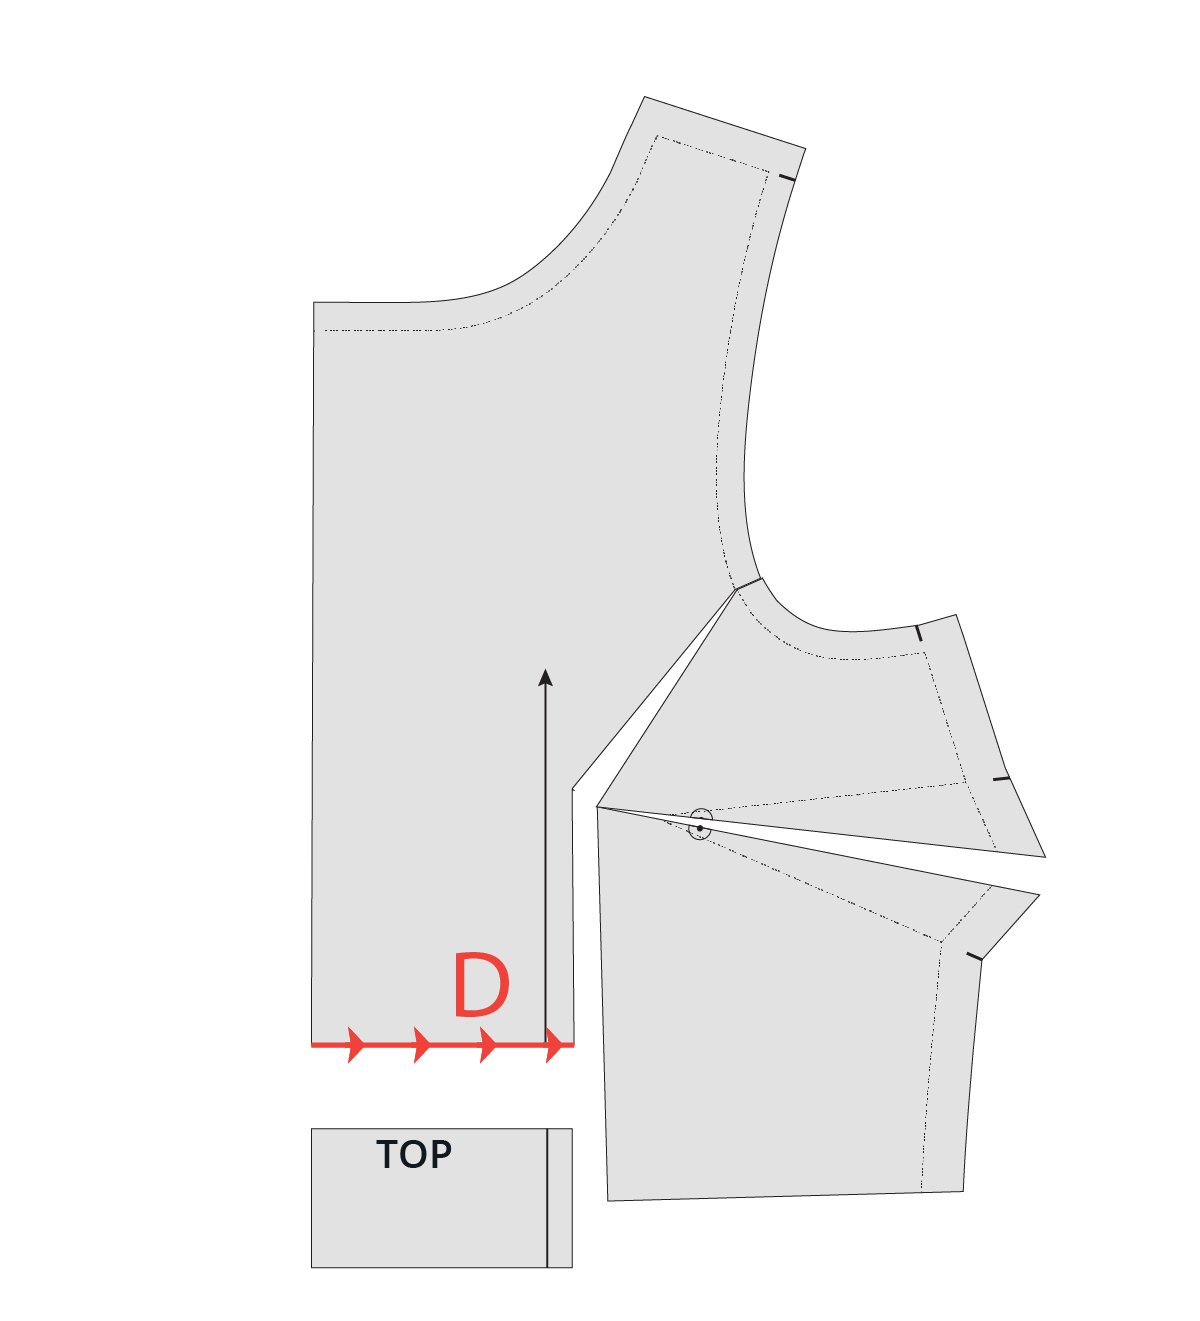
Broad back adjustment illustration 4 & 5

Step 4

Draw a line from C down to the hemline, parallel to the CENTRE BACK line. We will call this line D.

Step 5

Cut up line D, starting at the hemline. Stop 1-2mm from point C. Cut in from the outer edge of the shoulder seam allowance. Stop 1-2mm from point C, creating a hinge.

Broad back adjustment illustration 6 & 7

STEP 6

Slide paper underneath the pattern. Using line D to access line B, cut along line B towards the armscye STITCH LINE. Stop cutting 1-2mm from the STITCH LINE.

Cut in from the outer edge of the armscye seam allowance. Stop 1-2mm from the STITCH LINE to create a hinge.

Step 7

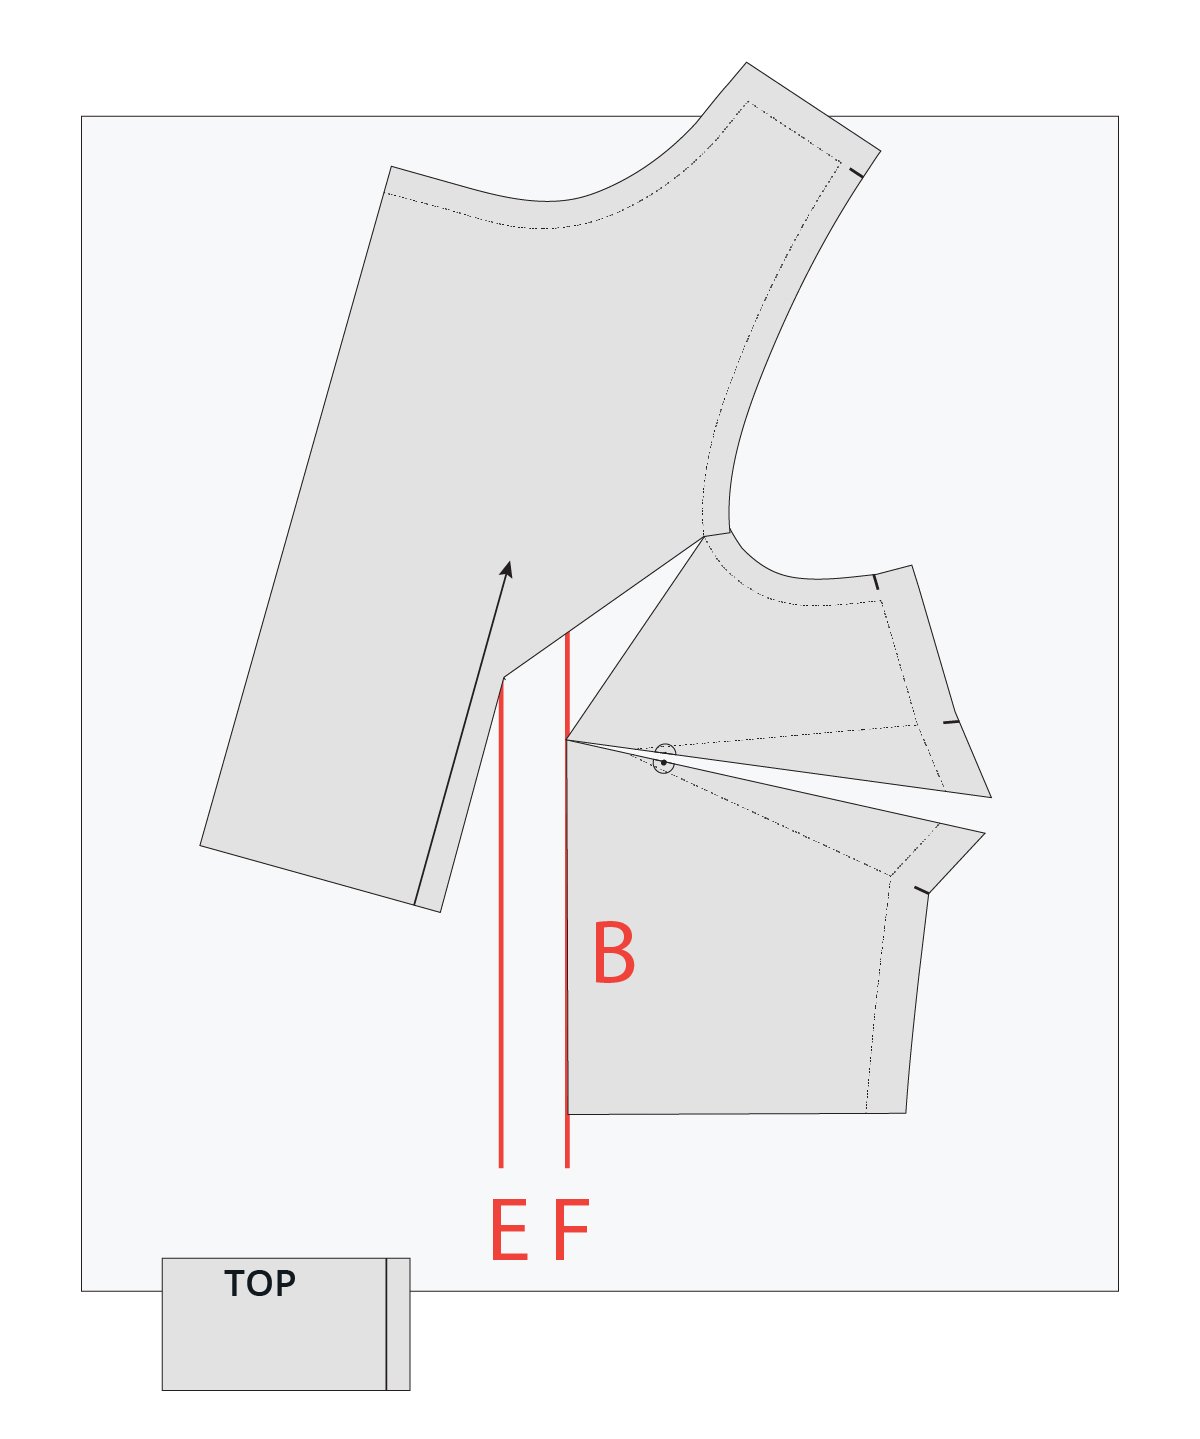
Keep the CENTRE BACK line straight and swing open line D. Tape CENTRE BACK section to paper underneath to keep it in place.

Mark the amount you need to add to the back width by extending line B by the amount required. We will call this point E.

Broad back adjustment illustration 8

STEP 8

Slide the armscye section of the pattern over until the cut edge meets point E. Tape the shoulder section.

Broad back adjustment illustration 9 & 10

STEP 9

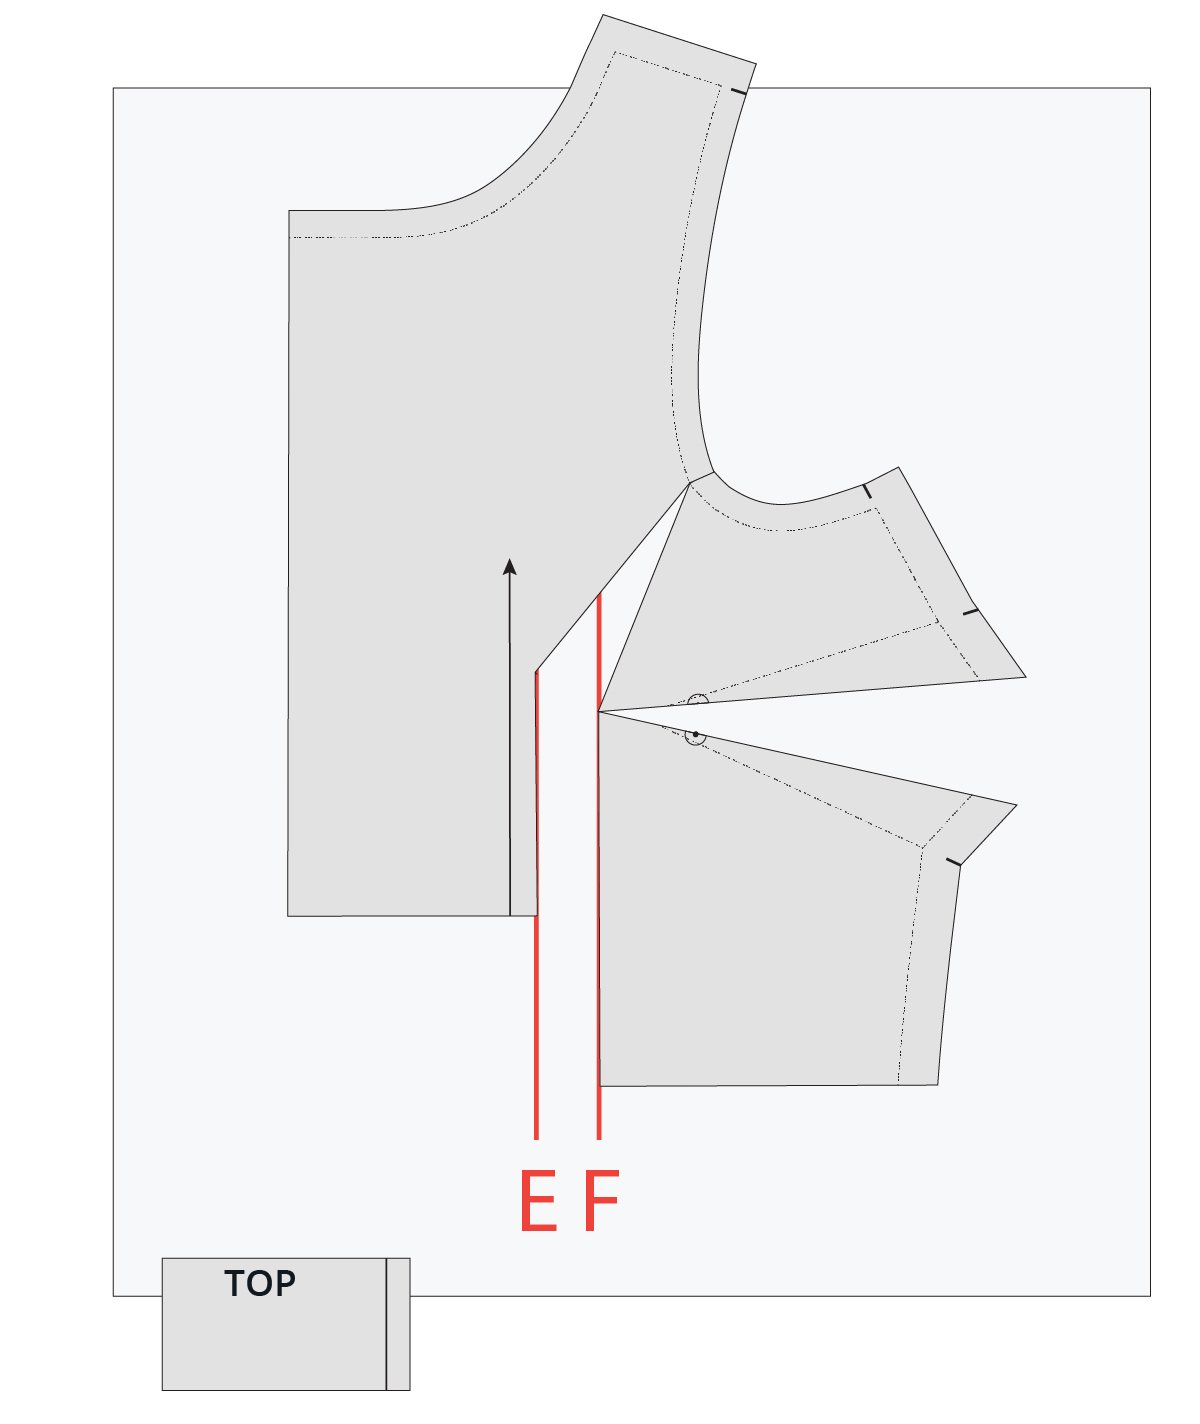
Swing the bottom section around so that the hem line is touching on each side of line D. The hem will be slightly shorter on the outer edge.

STEP 10

Take a ruler and mark in the new shoulder CUT LINE with a straight line. Re-draw the armscye with a smooth curve.

Re-draw the hem line with a smooth curve over the alteration.

Cut out the pattern piece to remove excess paper.

COMMUNITY TIP

As a designer and patternmaker, I am constantly learning. I learn within my own practice from trying to figure things out as I draft new patterns, and I learn constantly from our amazing Curated by ITF community.

This week I saw this great tip from Rachael (read more about Rachael here!) related to broad back adjustments and thought I’d include it here.

Broad back adjustment illustration community tip

What's worked for me with the broad back adjustment, since I was just trying to add width in a very specific area, is to make a lot of smaller cuts to adjust in that specific area with more nuance. It works best if you can get someone to draw on the toile exactly where the fabric is pulling so you know precisely where you need to add it in.

- Rachael, Curated by ITF member

I hope this helps you with your broad back fitting, Anne! It’s always a pleasure to help makers sew a wardrobe they love, that fits perfectly!

Happy sewing,

Emily


RESOURCES MENTIONED IN THIS ISSUE

  • The Peppermint Ruffle Sleeve top is a pattern we designed in collaboration with Peppermint magazine. You can download it for free here.

  • More information about our Curated by ITF membership can be found here. Sign up during the month of August to get the Malvern culottes pattern delivered straight to your inbox.

  • The Cartwright dress & top pattern can be found here.


For more issues of the Q & A series, you can check out the archive here.


WHAT YOU’VE BEEN MAKING

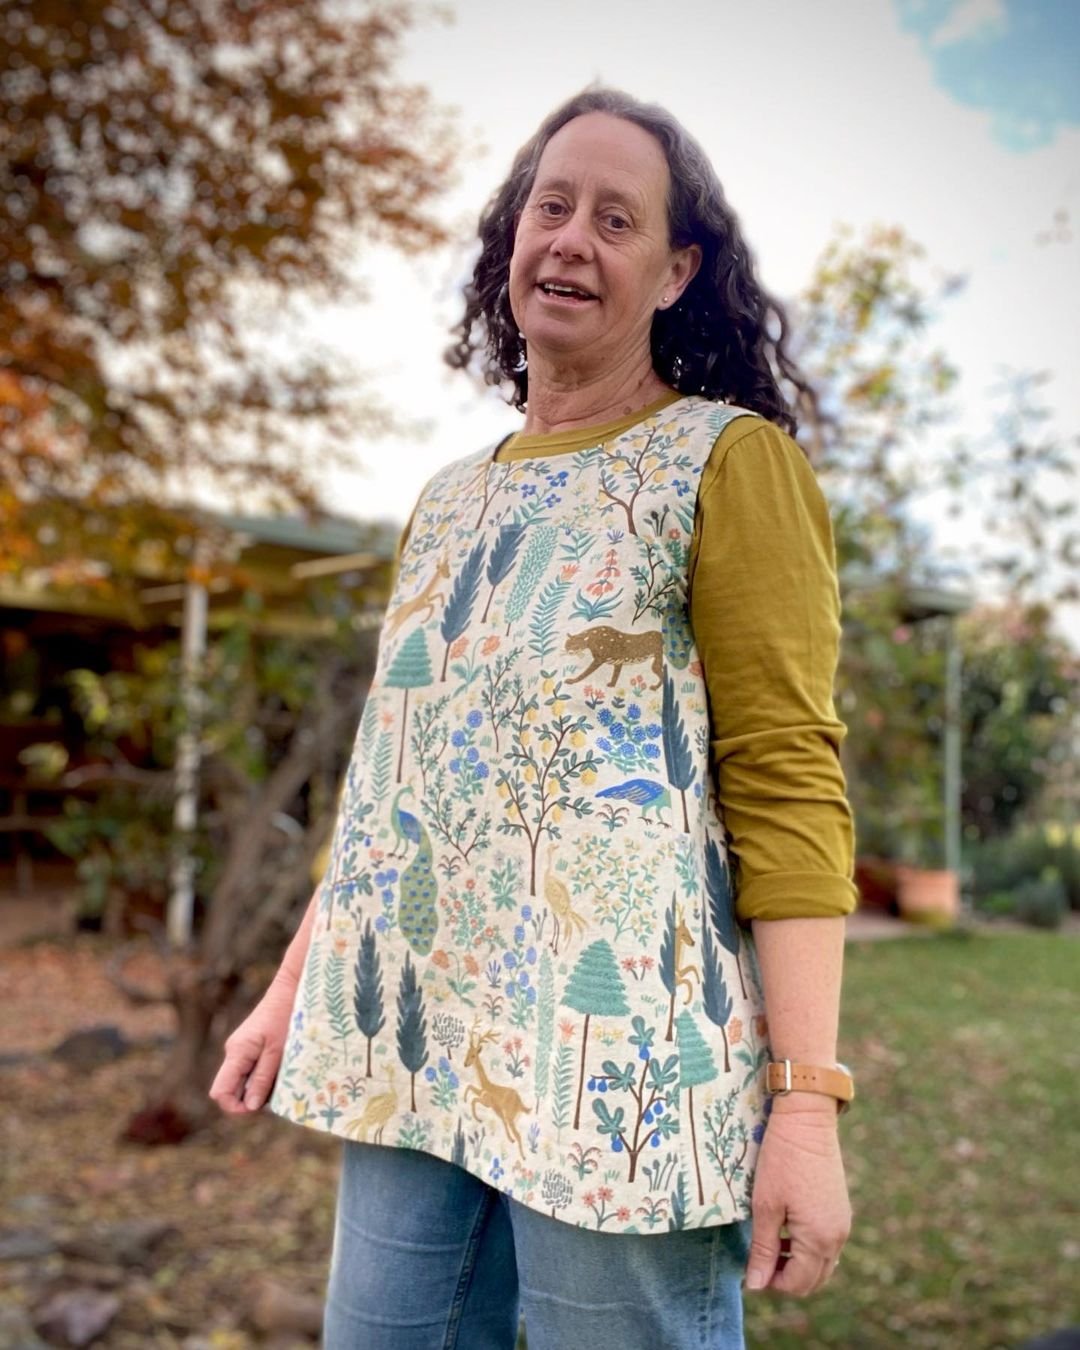
Hacked Marden shirt made by Curated by ITF member, Lise.


MORE POSTS IN THE SERIES

ISSUE 169 - BALANCE LINES: WHAT THEY ARE AND HOW TO USE THEM

THE Q & A SERIES

balances lines:
what they are and how to use them

Hi Emily & Team,

I would love it if you could talk about balance lines on a garment. This is something I've learned about recently and seems critical for having a garment hang nicely, but I've struggled to find good resources explaining the concept and how to use it when assessing fit.

I specifically have a common fitting issue where the bust is snug, the neckline pulls up and chokes me, the shoulder sleeve is sitting back, the side seams swing forward, the sleeve twists, and the back armhole looks a bit like hungry bum but into the armpit. Its like the whole garment is tilted diagonally on me from the side.

If you have any advice on this fitting mystery, I'd appreciate it!

Best,
Claire
Seattle, USA


Hi Claire,

For sewists who haven’t yet delved into making fitting adjustments to the garments they sew, balance lines will be a new concept, so thanks for asking such a great question!

WHAT ARE BALANCE LINES

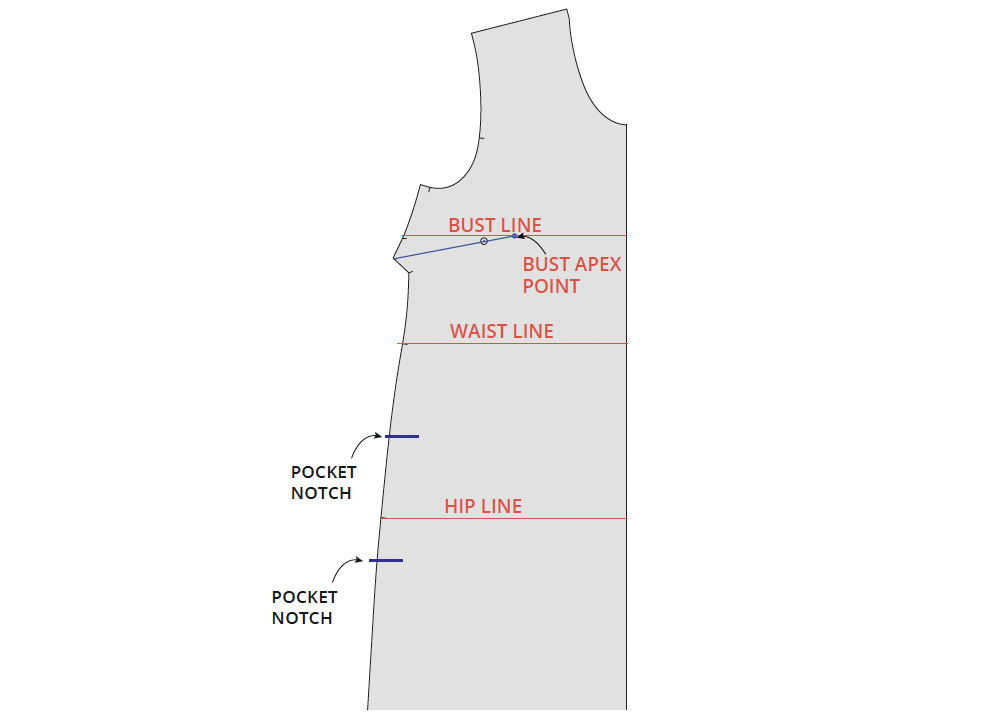
Balance lines in pattern making refer to the horizontal and vertical lines that can be marked on a pattern or toile to ensure that the garment hangs properly when worn. They help maintain the balance of the garment, ensuring that it sits correctly on the body without twisting or pulling in any direction.

Balance lines can also give you a good indication if a garment is fitting correctly and can be used as reference points when making pattern adjustments to a pattern.

  • Horizontal balance lines are often drawn across the pattern pieces at key points: the bust, waist, and hip levels. 

  • Vertical balance lines are usually the centre front and centre back of the garment. The side seam can also be used as a balance line.

HOW TO USE BALANCE LINES WHEN SEWING

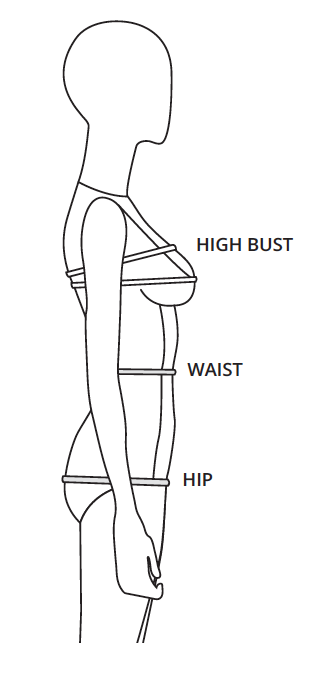
Sewing measurement chart for use when taking your body measurements.

Step 1 - Select your size or sizes

Before getting started, you’ll need to work out what size pattern to print. Take your measurements using a tape measure. We suggest doing this in front of a full length mirror. It can be helpful to take note of each measurement in a table like the one below where you can also take note of the size your measurement in each area corresponds to.

If your measurements are between sizes, look to the finished garment measurements to decide if you should select the smaller or larger size. This allows you to check the amount of ease in the pattern. For more information on how to use finished garment measurements to select your size see this post.

We suggest printing patterns in the size/s you need in relation to your HIGH BUST, WAIST and HIP measurements only. This disregards your bust measurement as it’s better to do a Full Bust Adjustment or Small Bust Adjustment (SBA) if required, rather than selecting a size based on your bust measurement.

Chart for comparing body measurements to pattern measurements.

Step 2 - Compare the lines on the pattern to your body measurements

Measure the vertical differences between the balance lines on the pattern so you can compare it to your body measurements.You may find it helpful to use a table like the one below to keep track.

Take some thin elastic and wrap a piece around your BUST horizontally. Hold it in place by tying a knot or pinning in place. Make it tight enough that it will stay put, but not so tight that it flattens your bust or stretches the elastic in any way. It is good to do this in front of the mirror so that you can check that the elastic remains parallel to the floor the whole way around. Repeat for your WAIST and HIP.

Measure body at balance line points shown on pattern.

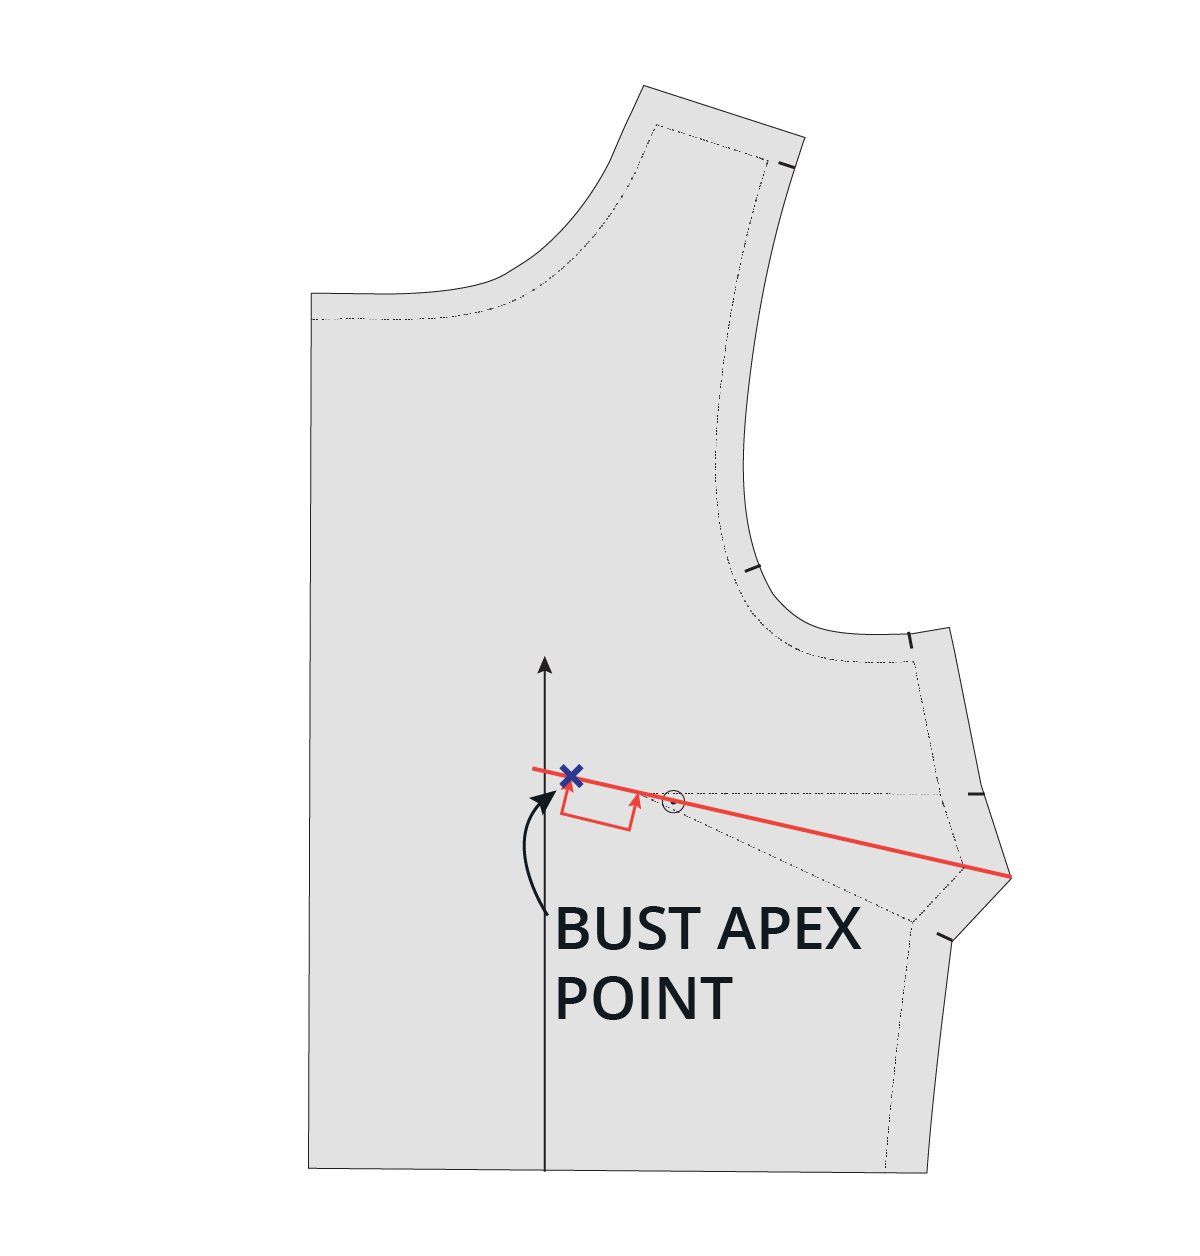
Take a tape measure and measure the vertical distance between your BUST LINE and your WAIST LINE. Record in the table above (4). Take the vertical measurement between your WAIST LINE and HIP LINE and record in the table (5). Measure down from your SHOULDER to your BUST APEX POINT (6).

Compare your measurements with the pattern measurements to assess whether or not you need to add or remove length in any of these places. Record any differences in the third column. 

It is a good idea to add or remove length from the pattern in relation to your findings before making a toile.

Important! Some adjustments need to be made before making a toile

Certain adjustments need to be made to the pattern before making a toile as they will allow for a fitting.

For example, it’s a good idea to make a Full Bust Adjustment or Small Bust Adjustment before making a toile as this will allow the bust area to fit. If you need an FBA and don’t make this adjustment, you may not be able to get the garment on and you won’t be able to conduct your fitting.

Mark balance lines on toile.

Step 3 - Mark balance lines on the toile

At this point you can make a toile to check the fit of the pattern so far.

The alterations made to the pattern in the previous steps should give you a great starting point. The toile will help you check that you're on the right track and home in on some details.

HOW TO USE BALANCE LINES TO CHECK THE FIT

Once you’ve made a toile, set yourself up in front of the mirror to do a fitting. With regards to balance lines specifically, you need to check that the side seams appear straight and are perpendicular to the floor. If the side seam is pulling towards the front or the back, this normally means that you need more width in the area where it's pulling.

Also check that the bust line is sitting on your bust, the waist line is on your waist and the hip line is on your hip. If they are not sitting in the correct position it may indicate you need to add or remove length in that particular area.

I hope this gives you a good starting off point on your journey to learning how to fit clothes to your own unique measurements. And, if you feel like this post has peaked your interest in learning this fantastic skill you should definitely sign up to Curated by ITF because this is exactly the kind of fun stuff we teach!

Happy fitting,

Emily


RESOURCES MENTIONED IN THIS ISSUE

  • Using finished garment measurements to select your size - tutorial here.

  • More information about our monthly sewing subscription, Curated by ITF, can be found here.


For more issues of the Q & A series, you can check out the archive here.


WHAT YOU’VE BEEN MAKING


MORE POSTS IN THE SERIES

ISSUE 163 - Full bicep adjustment for a grown-on sleeve

How to do a full bicep adjustment on dolman sleeves.

THE Q & A SERIES

Full bicep adjustment on dolman sleeves

Hi Emily

I recently read your Q&A on full bicep adjustments which was fantastic, but I now have the problem of how to do a full bicep adjustment on grown-on sleeves or even dolman sleeves. Any tips?

Thanks!

Chloe
Sheffield, UK


Hi Chloe,

Thanks for reaching out and I’m happy to help.

DO I NEED A FULL BICEP ADJUSTMENT?

This adjustment is needed if a sleeve is too tight around the bicep, or if the fabric bunches up around the bicep. As you can imagine, it’s not too hard to figure out if you need to make this adjustment on a finished garment. You’ll know, either as soon as you put it on, or within a very short period of time while wearing it.

But what if you haven’t actually made the garment yet? 

HOW TO CHECK IF YOU HAVE FULL BICEPS AND NEED TO ADJUST YOUR PATTERN

Firstly, think about your current wardrobe. Is this a problem you’ve experienced with ready-to-wear or other garments you’ve made before? If so, you’ll probably need to do a full bicep adjustment.

However, it’s important to consider the design of a pattern and amount of ease allowed for.

For fitted designs it’s likely that you’ll need to do an adjustment if this is a problem you’ve had before, whereas more generous ease allowances found in relaxed garment styles may mean that you can avoid doing the adjustment entirely. To double check, keep reading!

Measure your bicep and compare it to the bicep measurement of the pattern. Some patterns may specify this measurement, which makes it easy to compare, but if not, measure the sleeve pattern piece, minus the seam allowance and multiply by two.

Hold a measuring tape around your bicep at the length allowed for in the pattern. How does it feel? Is there plenty of room when your bicep is flexed and at rest? If so, you probably don’t need a bicep adjustment.

Still not sure? Keep reading!

Make a toile/muslin to be absolutely certain before sewing the pattern in your ‘good’ fabric. Put the toile on and consider how it feels around your bicep. If you aren’t happy with the fit and think it needs more ease, proceed on to making the actual adjustment, as outlined below. 

HOW TO MAKE A FULL BICEP ADJUSTMENT ON A GROWN-ON SLEEVE

Want to know how to do a full bicep adjustment on a regular sleeve? Check this tutorial out.

When making a pattern adjustment of any kind the first thing you need to think about is what area you need to alter. In this case, the goal is to add width to the bicep area of a pattern. 

Step 1

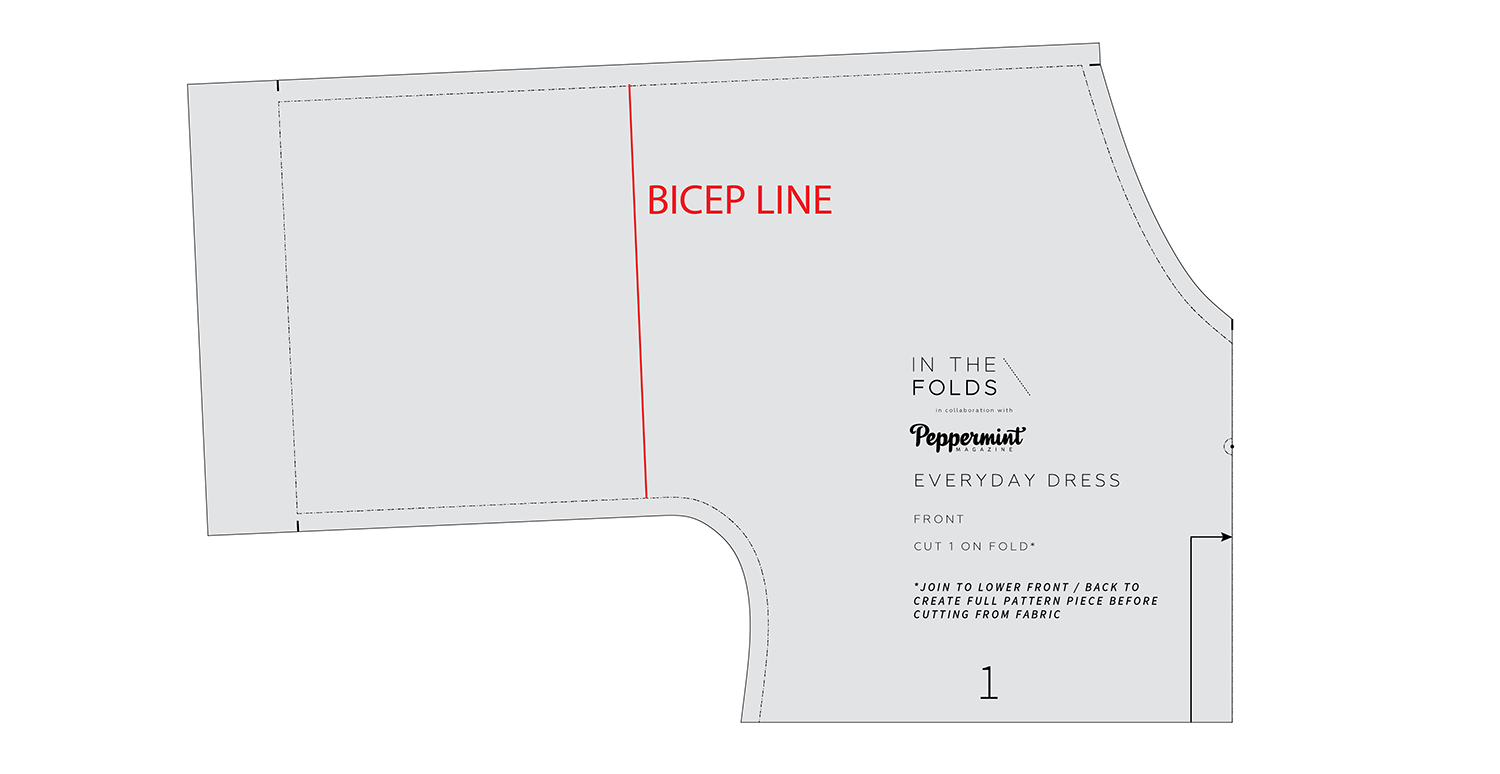
Mark the bicep line on the pattern. (Your bicep is usually the fullest part of your upper arm.) On a grown-on sleeve you can estimate where this is by holding the pattern up to your body. If you have a toile, refer to that. 

Technical illustration of step 1 in full bicep adjustment on grown-on sleeve.

Draw the line from stitch line to stitch line.

Step 2

Technical illustration of step 2 in full bicep adjustment on grown-on sleeve.

Measure the bicep width on the pattern and take note of your measurement.

You will need to do the same on the BACK pattern piece and add the two numbers together. Compare this to your actual bicep measurement. 

To find this, wrap a tape measure around your bicep - usually the widest part of your arm. Flex the muscle if you know there is a large difference between your bicep while flexed and at rest. 

Compare the measurements and consider how much ease you would like in the pattern. 

For a relaxed style like the Everyday dress, you will want at least 10cm (4in) ease or more. Alternatively, if you have made a full bicep adjustment on a standard sleeve, you can add the same amount to this sleeve.

Step 3

Now that the bicep is marked, think about what other lines you need on the pattern to make the alteration. It can be helpful to look at the alteration on a regular sleeve to see what’s required and then apply it to the pattern you’re working on. 

Technical illustration of step 3 in full bicep adjustment on grown-on sleeve.

For example, if you look at the same alteration on a regular sleeve (above) you can see we also need a vertical line from the bicep to the hem to help us add our width. 

Technical illustration of step 3 in full bicep adjustment on grown-on sleeve.

Step 4

Draw a line perpendicular to the sleeve hem that intersects with the bicep line.

Technical illustration of step 4 in full bicep adjustment on grown-on sleeve.

Step 5

You’ll also need another line that runs from the intersection point on the bicep line, up to the neckline.

Technical illustration of step 5 in full bicep adjustment on grown-on sleeve.

Step 6

From the shoulder, cut down through the bicep line to the stitch line at the underseam. Stop 1-2mm from the stitch line and then cut into the seam allowance towards the end of the cut line to create a small hinge.

Technical illustration of step 6 in full bicep adjustment on grown-on sleeve.

Step 7

From the bicep line, cut down the line to the hem. Stop 1-2mm from the hem stitch line and then cut into the hem allowance towards the end of the cut line to create a small hinge.

Technical illustration of step 7 in full bicep adjustment on grown-on sleeve.

Step 8

Slide some pattern paper under the pattern piece.

Use the small hinges in the pattern piece to open the bicep line by the desired amount. 

Remember that you will be doing the same alteration to the back so if you are adding 4cm (for example), you need to split this amount through the front and back.

Technical illustration of step 8a in full bicep adjustment on grown-on sleeve.

Use the hinge at the neckline to manoeuvre the upper shoulder section to line up with the lower sleeve. Tape the piece in place on the pattern paper.

Technical illustration of step 8b in full bicep adjustment on grown-on sleeve.

Step 9

To finalise the pattern piece, you have a few options.

You can mark a line over the alteration as a smooth curve. Join the new sleeve seam to the hem line with a straight line that is perpendicular to the shoulder seam.

As you can see in the illustration, to have a hemline that is perpendicular to the shoulder seam, I needed to cut a little bit of length off the seam. This isn’t an issue as you can see a similar amount of length was added to the shoulder seam when I made the alteration.

Technical illustration of step 9 in full bicep adjustment on grown-on sleeve.

Or, an alternative is to draw a straight line through the alteration. As you can see, this will add some width to the hem, so you need to consider if you are happy with this.

Technical illustration of step 9b in full bicep adjustment on grown-on sleeve.

If you would like the straight shoulder seam like the original pattern but don’t want any extra hem width, consider taking some width off the underseam as illustrated.

Step 10

Once you’ve made the alteration to the FRONT, you will need to repeat for the BACK. Always be sure to check and true your seams by walking the seams together.

And, don’t forget to add seam allowance back on to the altered sections of the pattern!

To sum up the process of making an alteration to an unconventional pattern piece:

  1. Work out what area needs to change and mark a guideline. If you are changing the bust this would mean finding the bust line. In this case, it’s marking the bicep line.

  2. Look at how to make the alteration on conventional/traditional shaped patterns and then translate this to your pattern.

  3. Mark in additional guidelines to help you slash and alter the pattern. Remember, only cut to the stitch line. It can be helpful to print the pattern piece on a small piece of paper (i.e. print the A0 version as A4) and have a play around to see if the cuts will give you the desired effect. I often do this multiple times until I am happy.

  4. Once you’ve made the alteration, do the same to any pieces that are also impacted.

  5. Check and true your pattern pieces to ensure everything still matches together.

  6. Add seam allowance back on to altered seams.

  7. Make a toile to check that you’re happy with the alteration.

Happy fitting!

Emily


RESOURCES MENTIONED IN THIS ISSUE

  • The Everyday dress pattern can be found here.

  • How to do a full bicep adjustment on a conventional sleeve - tutorial here.

  • Checking and truing seams - tutorial here.

  • Walking seams together - tutorial here.


For more issues of the Q & A series, you can check out the archive here.


WHAT YOU’VE BEEN MAKING


MORE POSTS IN THE SERIES

ISSUE 162 - HOW TO ALTER A PATTERN WITH PANELS

THE Q & A SERIES

HOW TO ALTER A PATTERN WITH PANELS

Hi Emily,

I love this idea. It is so very helpful and generous of you to share all that you’ve learnt and your experience. Very cool.

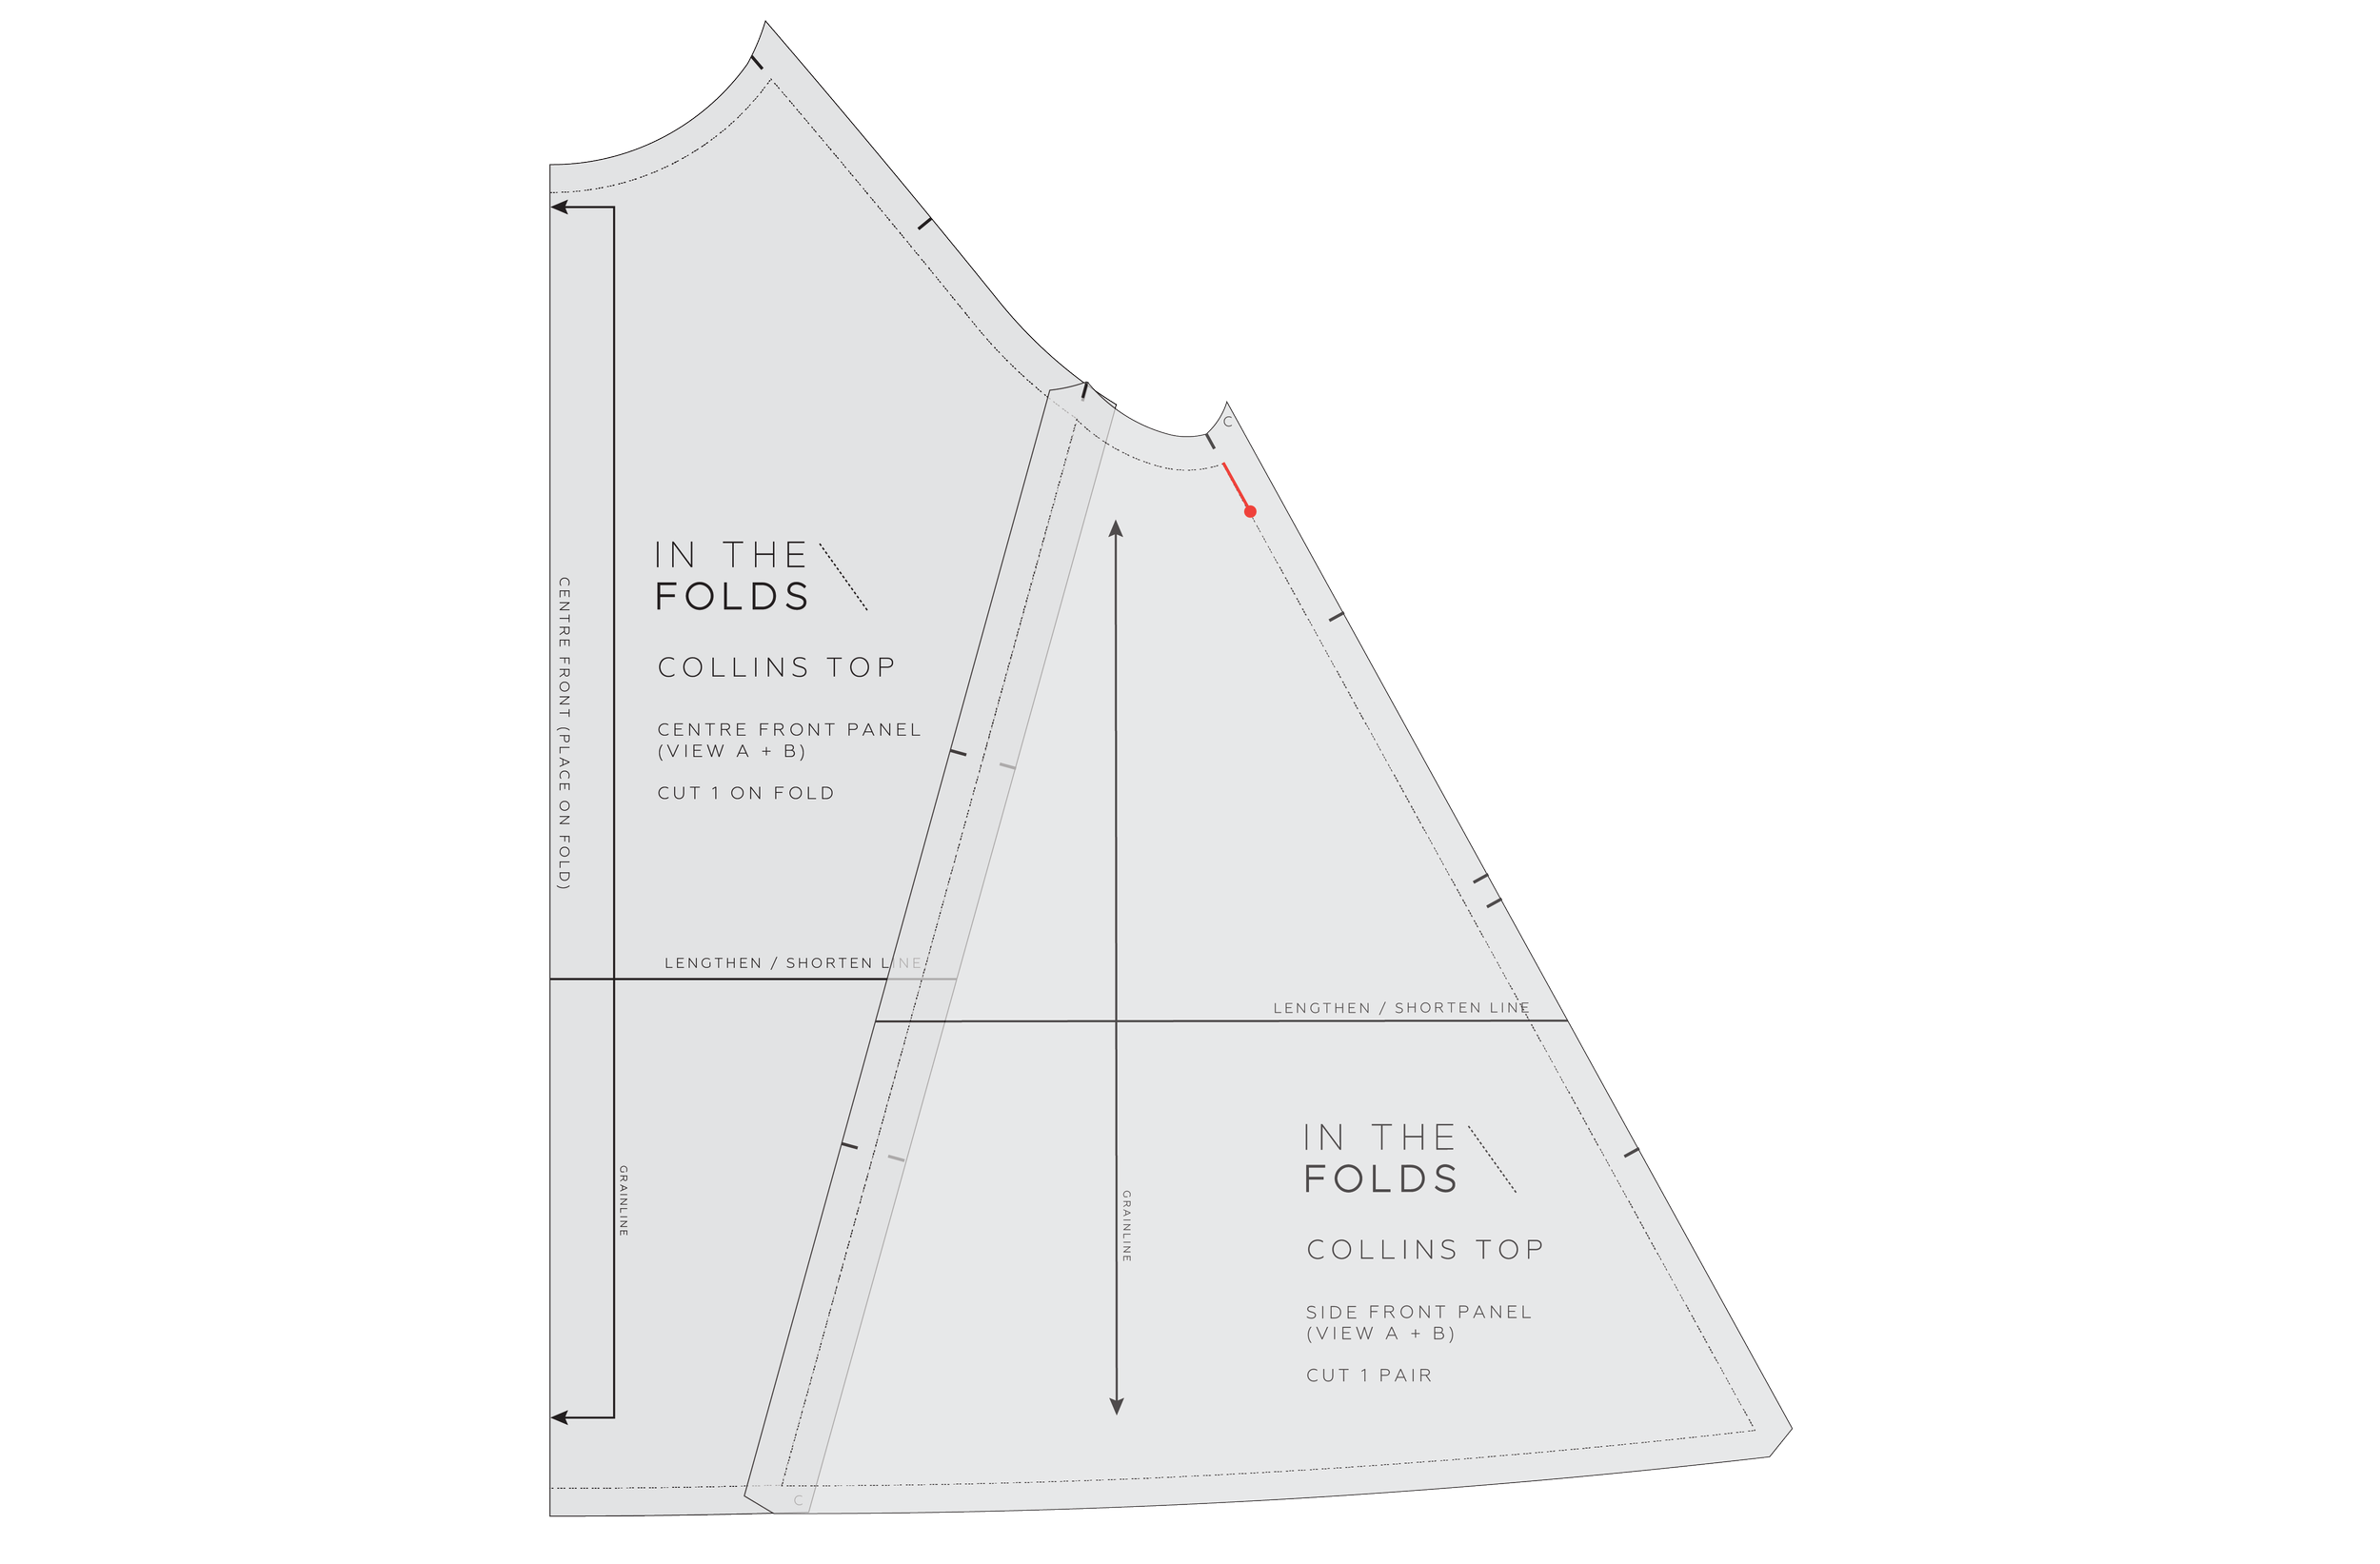
I have a question about raising the back neckline of the Collins Top. Would you extend the back piece and the back sleeve and sleeve shoulder panel pieces and blend to the front neckline? I’m never sure how to deal with the curve of the neckline. I have discovered I need to do a High Round Back Adjustment on most tops, so I use the Centre Back seam to add length and a curve, but maybe I need to add this to the next seam along too (where the back meets the back sleeve?). Thanks for your help!

Cheers,

Genevieve

Brisbane, Australia


Hi Genevieve,

We thought this would be a great question to answer this week as we have just released the Elwood dress pattern

You’ll notice some similarities between Elwood and our Collins top, because Elwood was drafted from the Collins top. I always had this niggling feeling that I wasn’t quite done with the Collins top pattern, and had revisited it a number of times when experimenting with 3D pattern drafting. 

When our community asked for a signature In the Folds pattern for 2024, I knew it was time to revisit what I’d been working on in Clo3D and bring one of these ideas to fruition. (Check out this blog post if you’re interested in reading more about my Clo3D adventures!)

What this means for you (and any of our other customers thinking about sewing Elwood) is that our fitting tutorials created for the Collins top, will also apply to the Elwood dress. If you’d like to check out some of these tutorials, you can find some links to them below.

Here’s how to:

How to make fit alterations to a panelled pattern

When making fitting alterations to a pattern that has panel lines, there are a few things you need to do. This process will allow you to make any alterations you like to a pattern.

Step 1: Mark the stitch line on the pattern

Mark stitch lines on pattern.

When making pattern alterations the stitch line should be marked on the pattern. All In the Folds patterns have the stitch line marked, and we thought this was just standard in the sewing industry, but turns out it’s not! So what this means is you may need to mark in the seam allowance on the pattern yourself. 

Step 2: Remove panel lines

Remove panel lines for upper back adjustment.

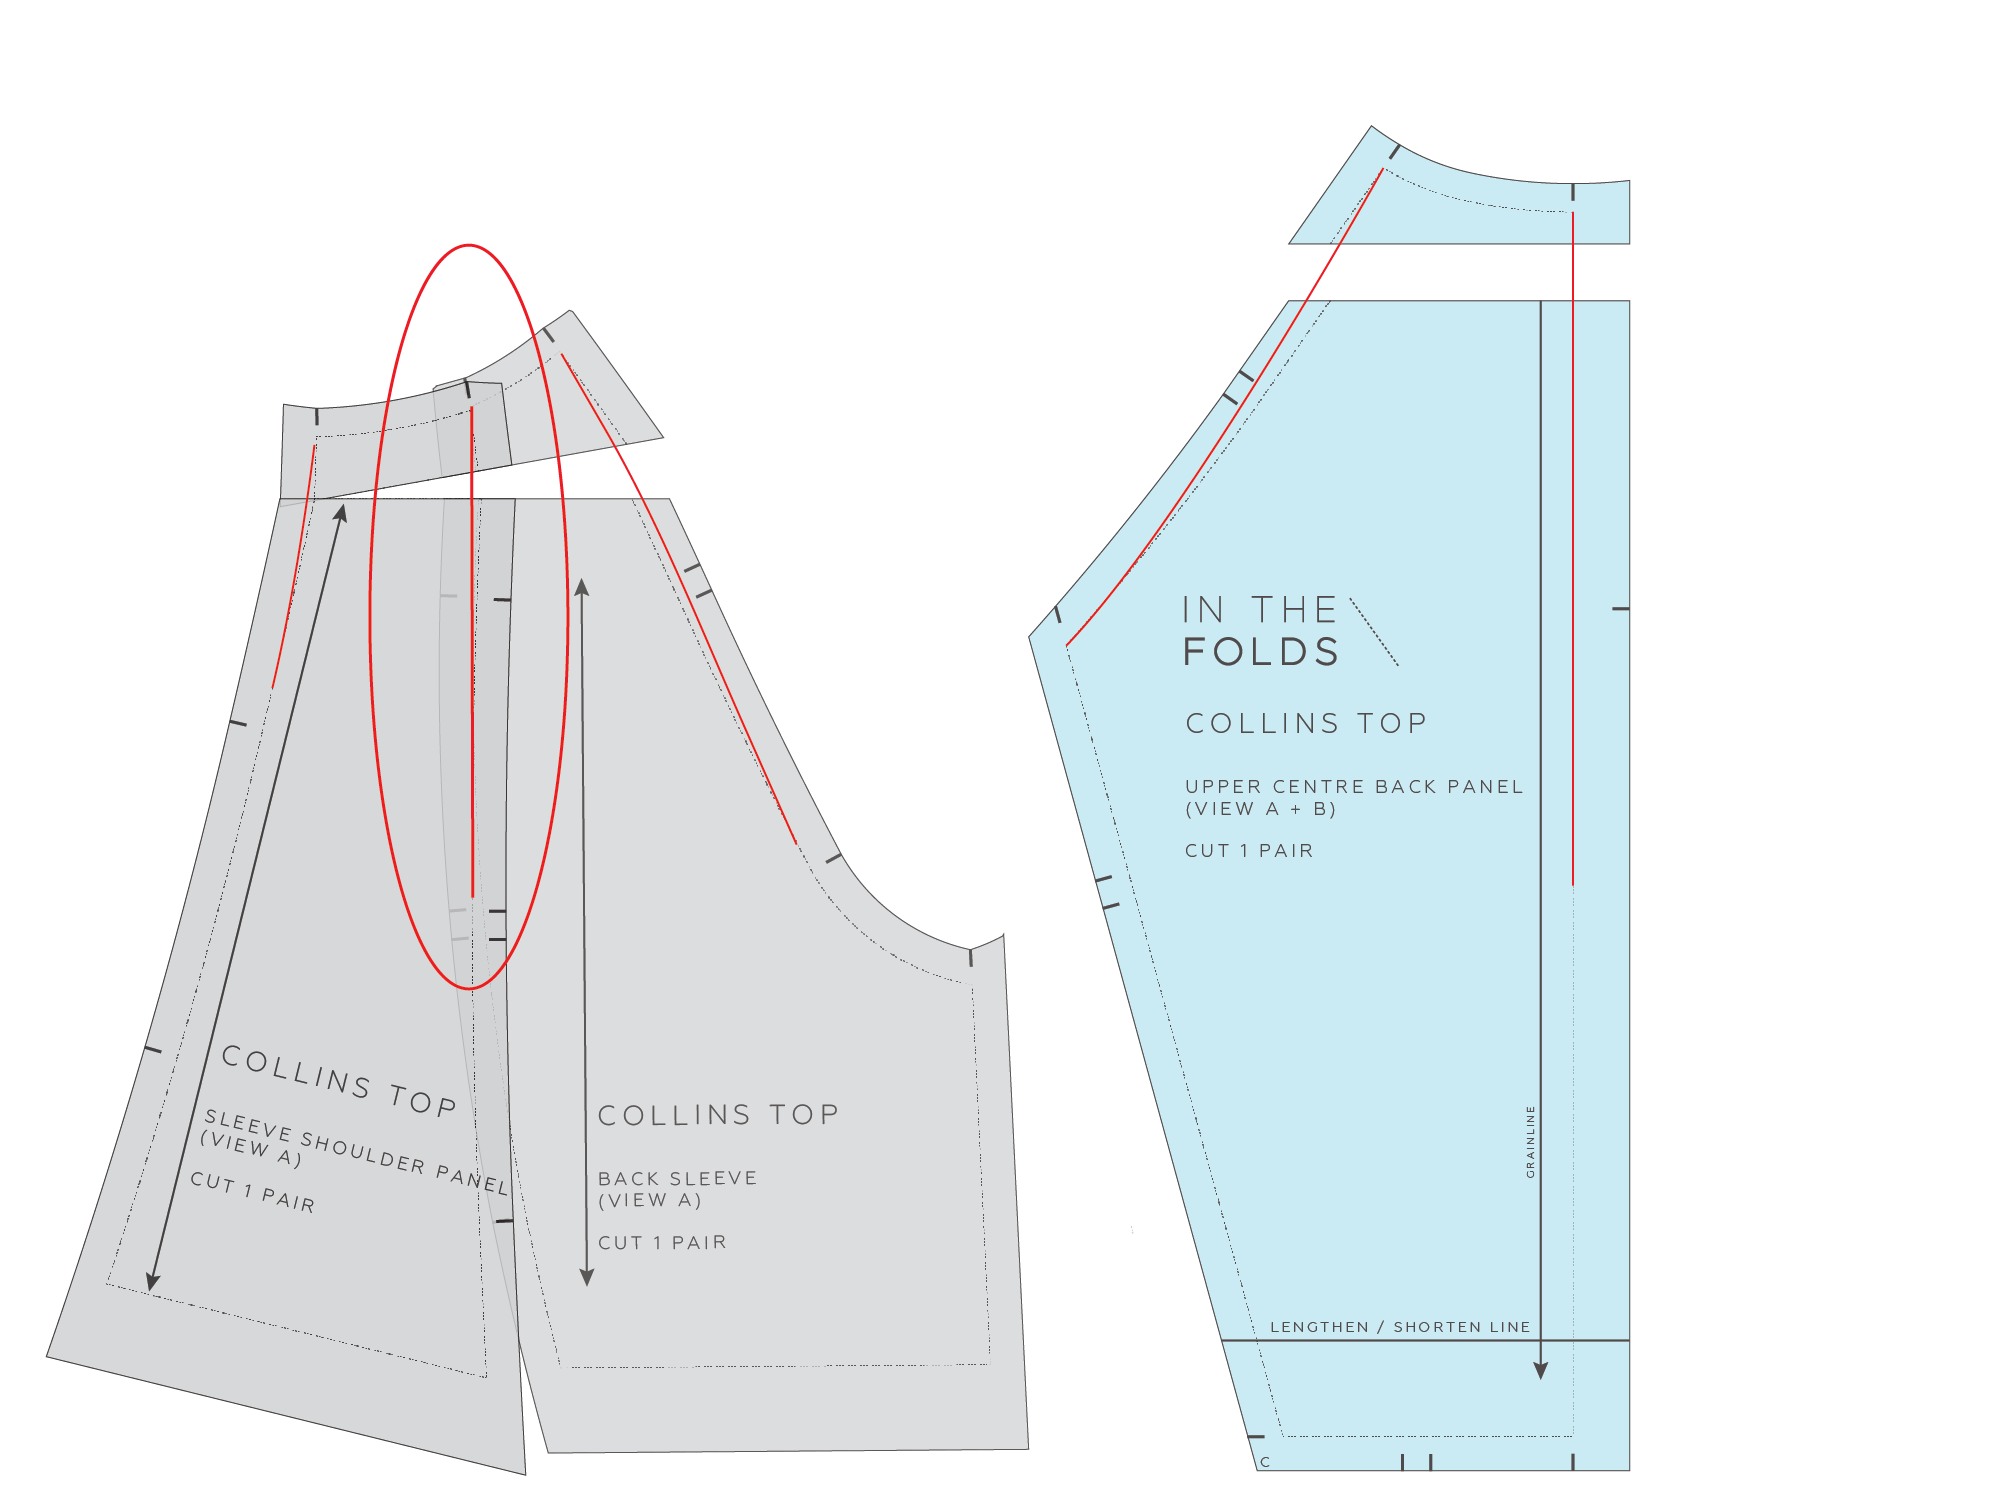
Place pieces together to temporarily remove the panel lines. In the case of the Collins top, this means joining the SHOULDER PANEL piece to the BACK SLEEVE. This is when your stitch lines come in handy because you need to position your pieces stitch line on stitch line as if the pieces have been sewn together. This doesn’t mean we’ll be losing our panel lines, just that we’re removing them to make the alteration easier to manage and then we’ll bring it back. Hold the pattern pieces together with tape or pins… something that won't rip your pattern piece or be too hard to remove.

Step 3: Make the alteration

Make the upper back alteration.

In this case we’ll be drawing a horizontal line through our back piece, towards the neck, and through the similar area on the sleeve pieces. On the sleeve I have marked the alteration line perpendicular to the back sleeve grainline.

Add the alteration amount required.

Add the amount required. This is when having a toile to refer to is very helpful. Or, if this is an alteration you regularly have to make, then you might have a good idea how much is required.

Step 4: True the lines

True the lines of your pattern alteration.

“Truing” your lines means that you need to draw a smooth line over the alteration. This takes some practice, so be sure to use a pencil. I like to use a transparent ruler and pivot it to create a nice smooth curve (similar to the way I add seam allowance on a pattern), but you may prefer to use a French curve.

Step 5: Add your panel lines back in

Add panel lines back in.

If you have joined any pattern pieces together to make the alteration, mark the panel lines back in. Do this the same way as how you trued your lines. You want the lines to be as smooth as possible.


Step 6: Finalise the pattern piece

Finalise the pattern piece.

To finalise the pattern pieces you will need to add seam allowance onto the areas that have been altered.

Trace altered pattern pieces onto pattern paper.

For pieces that have been joined, trace the altered pieces onto pattern paper, then add seam allowance on. When tracing a pattern, be sure to always transfer the notches and the grainline.

Step 7: Check the pattern pieces

Check the pattern pieces.

Walk the seams to check that everything fits together nicely and that none of the notches have moved. By doing this you are checking that seams that you will be joining together are the right length, so you don’t get any nasty surprises at the sewing stage. You also need to check that you have smooth lines. For example, in the diagram I am checking that the neckline is still a nice smooth curve. If you realise that the line is no longer smooth, smooth it out and use a tracing wheel to transfer the new line onto the overlapped paper.

Step 8: Make a toile

It’s always a good idea to make a toile to check a pattern alteration you’ve made. In the case of this alteration, you may also want to check if you need more shaping through the back. To do this you can get someone to help you and pinch our excess fabric through the back seams.

As with any pattern alteration, the important thing is to take it one step at a time. It’s usually when we’re rushing that we make mistakes, so I recommend working through the process bit by bit and having a practise before you start chopping into your good fabric!

Happy Elwood and Collins sewing!

Emily


RESOURCES MENTIONED IN THIS ISSUE

  • The Elwood dress pattern is currently available with a Curated by ITF subscription for the month of February 2024. More information can be found here.

  • The Collins top pattern can be found here.

  • Fitting tutorials that relate to the Collins top can also be applied to the Elwood dress. They can be found here.

  • How to make a toile - post can be found here.

  • Checking and truing seams - post can be found here.


For more issues of the Q & A series, you can check out the archive here.


WHAT YOU’VE BEEN MAKING


MORE POSTS IN THE SERIES

ISSUE 159 - FORWARD SHOULDER ADJUSTMENT ON A CURVED SHOULDER SEAM

THE Q & A SERIES

HOW TO DO A FORWARD SHOULDER ADJUSTMENT ON a CURVED SHOULDER SEAM

Hey Emily,

How do I do a forward shoulder adjustment with the sloped shoulder on the Marden shirt???

Suthi, Curated by ITF member


One of the features we love about the Marden shirt is that smooth, shaped shoulder.

And even though some members of our Curated by ITF community weren’t sure about it at first, we were quietly confident that once they made the shirt and put it on, they’d fall in love with it.

And we were right! (See Exhibit A below, a conversation thread from our private Curated by ITF online community.)

Sue wears a printed Liberty poplin Marden shirt in View B.

Sue’s Liberty Marden shirt in View B.

Lynn wears a white striped linen Marden shirt in View A.

Lynn’s linen Marden shirt in View A.

But if, like some of our Curated community members, one of your go-to fitting alterations is a forward shoulder adjustment (FSA), the curved shoulder line may leave you scratching your head. So we’ve come to your rescue with the answer you’re seeking!

Not sure what a forward shoulder adjustment is? Read this tutorial.

how to do a forward shoulder adjustment on a curved shoulder seam

As a quick overview, what we’re going to do is remove the shoulder shaping, make the FSA as we normally would and then add the shoulder shaping back on.

Let’s go!

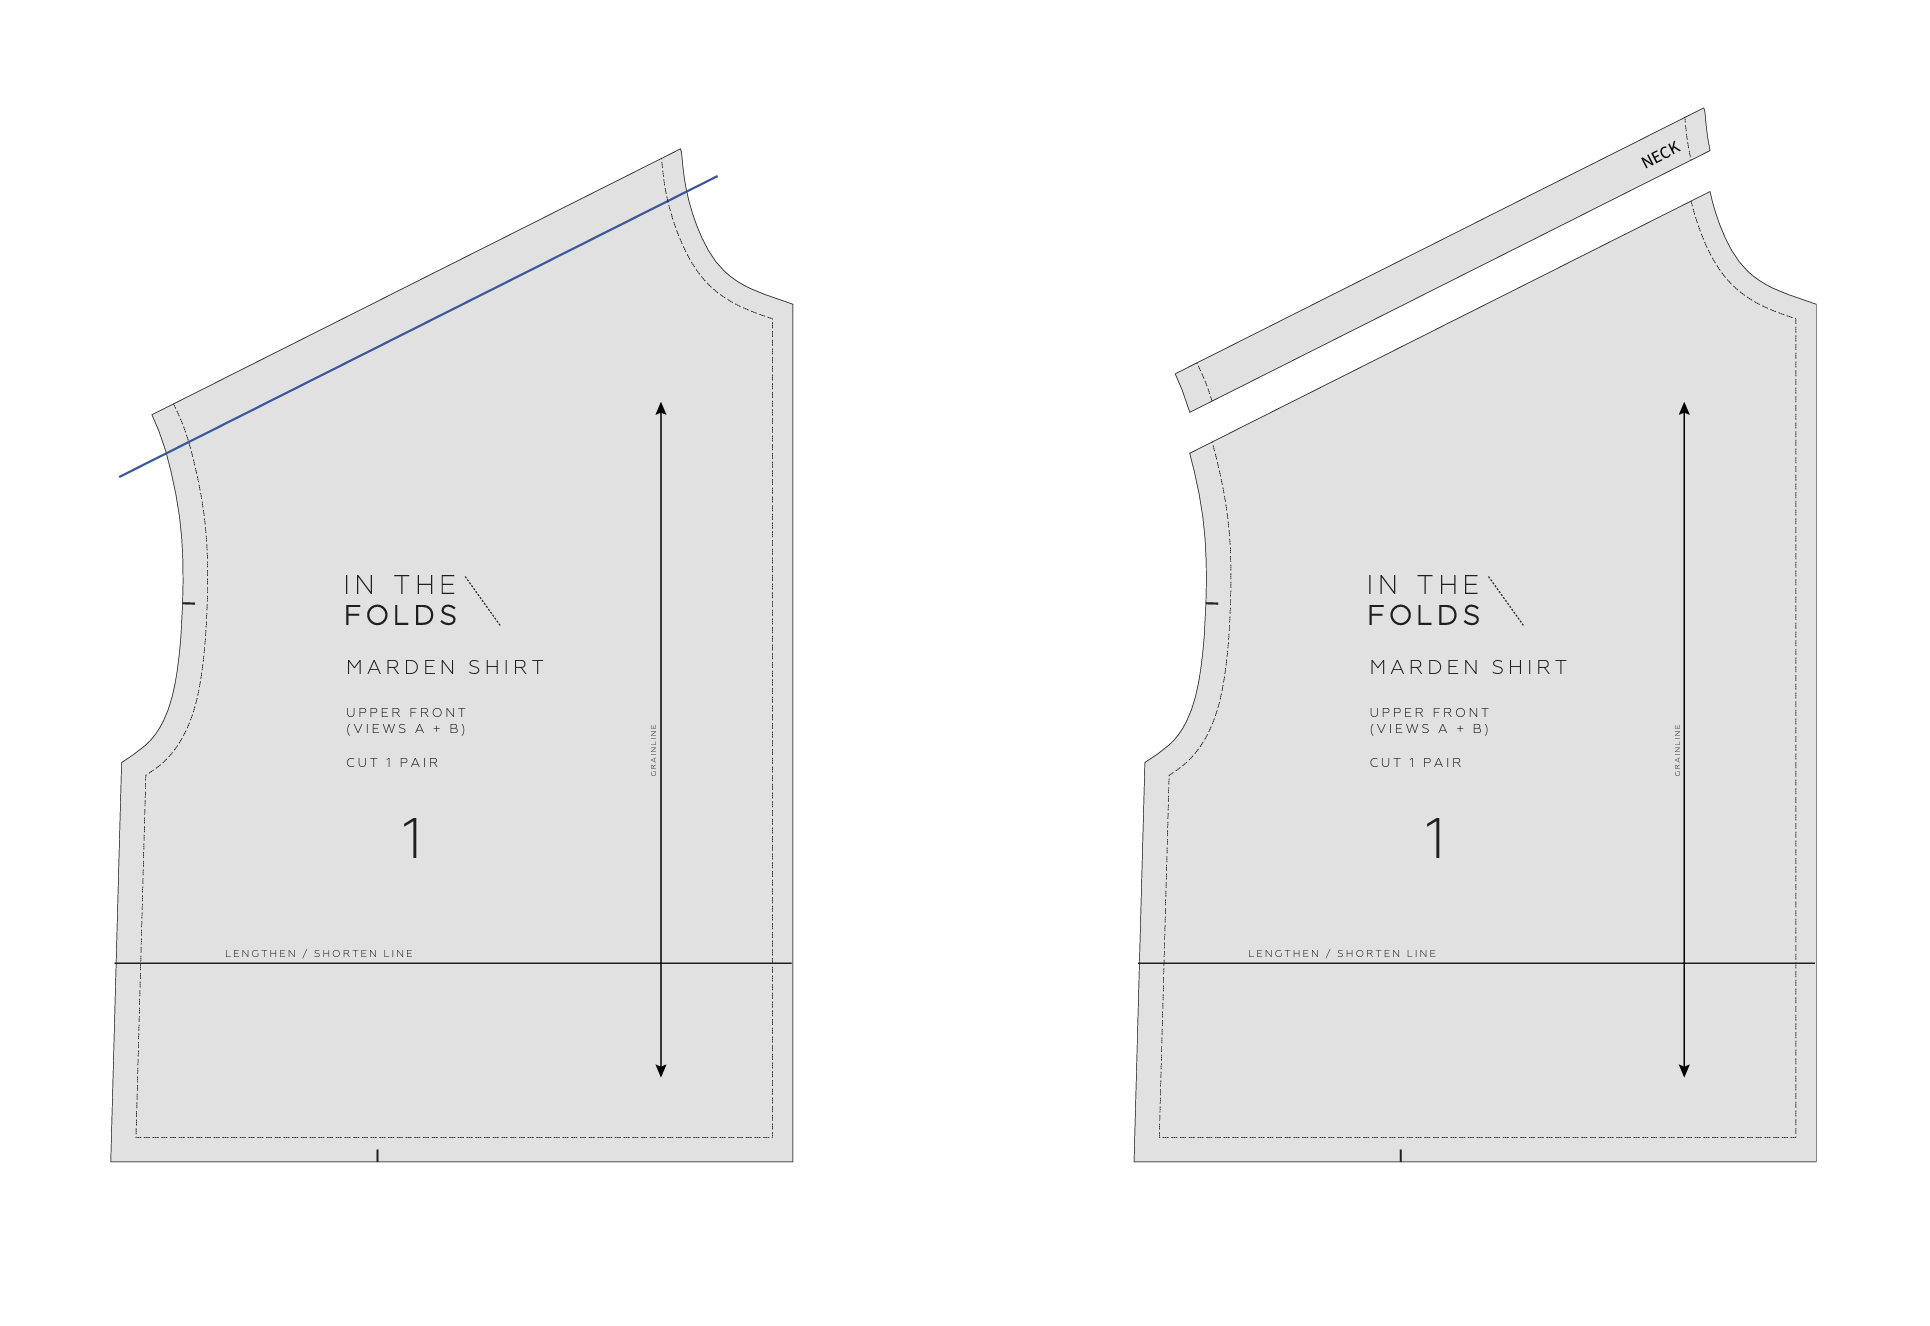
STEP 1

Draw a straight line through the shoulder STITCH LINE, intersecting with the armhole and neckline at each side on the FRONT and BACK.

STEP 2

Cut along the lines marked in STEP 1 and label as ‘FRONT SHOULDER’ and ‘BACK SHOULDER.’

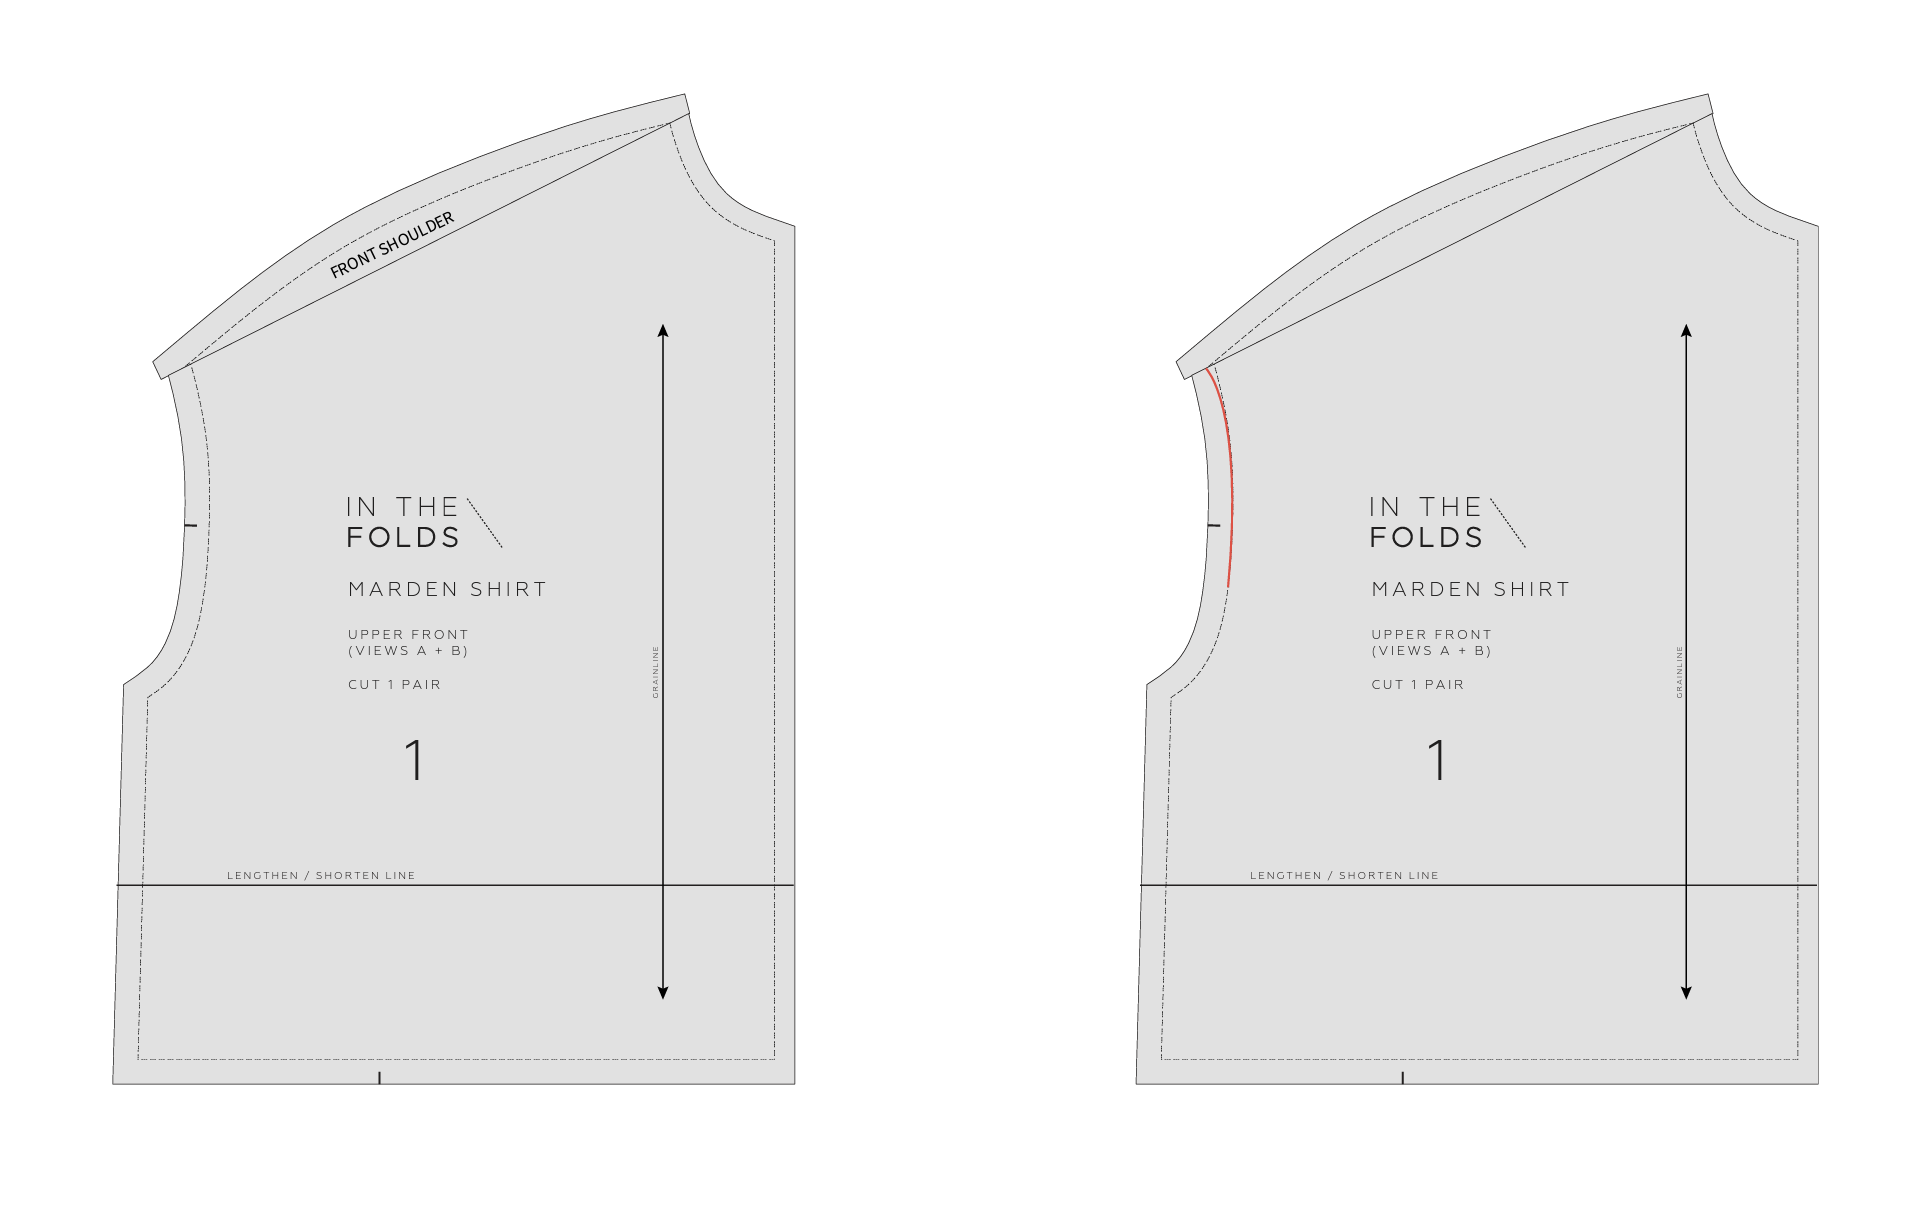
STEP 3

On the FRONT, mark the amount you would like to move the shoulder seam forward by. For example, if you need to move the seam 2cm (¾in) forward, draw a line 2cm from the cut line. (Not sure how much you need to move the shoulder seam by? Read this post.)

Cut along the line and label the side that’s close to the NECK so you get the piece around the right way when you join it to the BACK.

STEP 4

Stick the piece cut from the FRONT onto the BACK. You may need to add some paper behind the piece to make it easier to attach it accurately. Attach the BACK shoulder shaping back on.

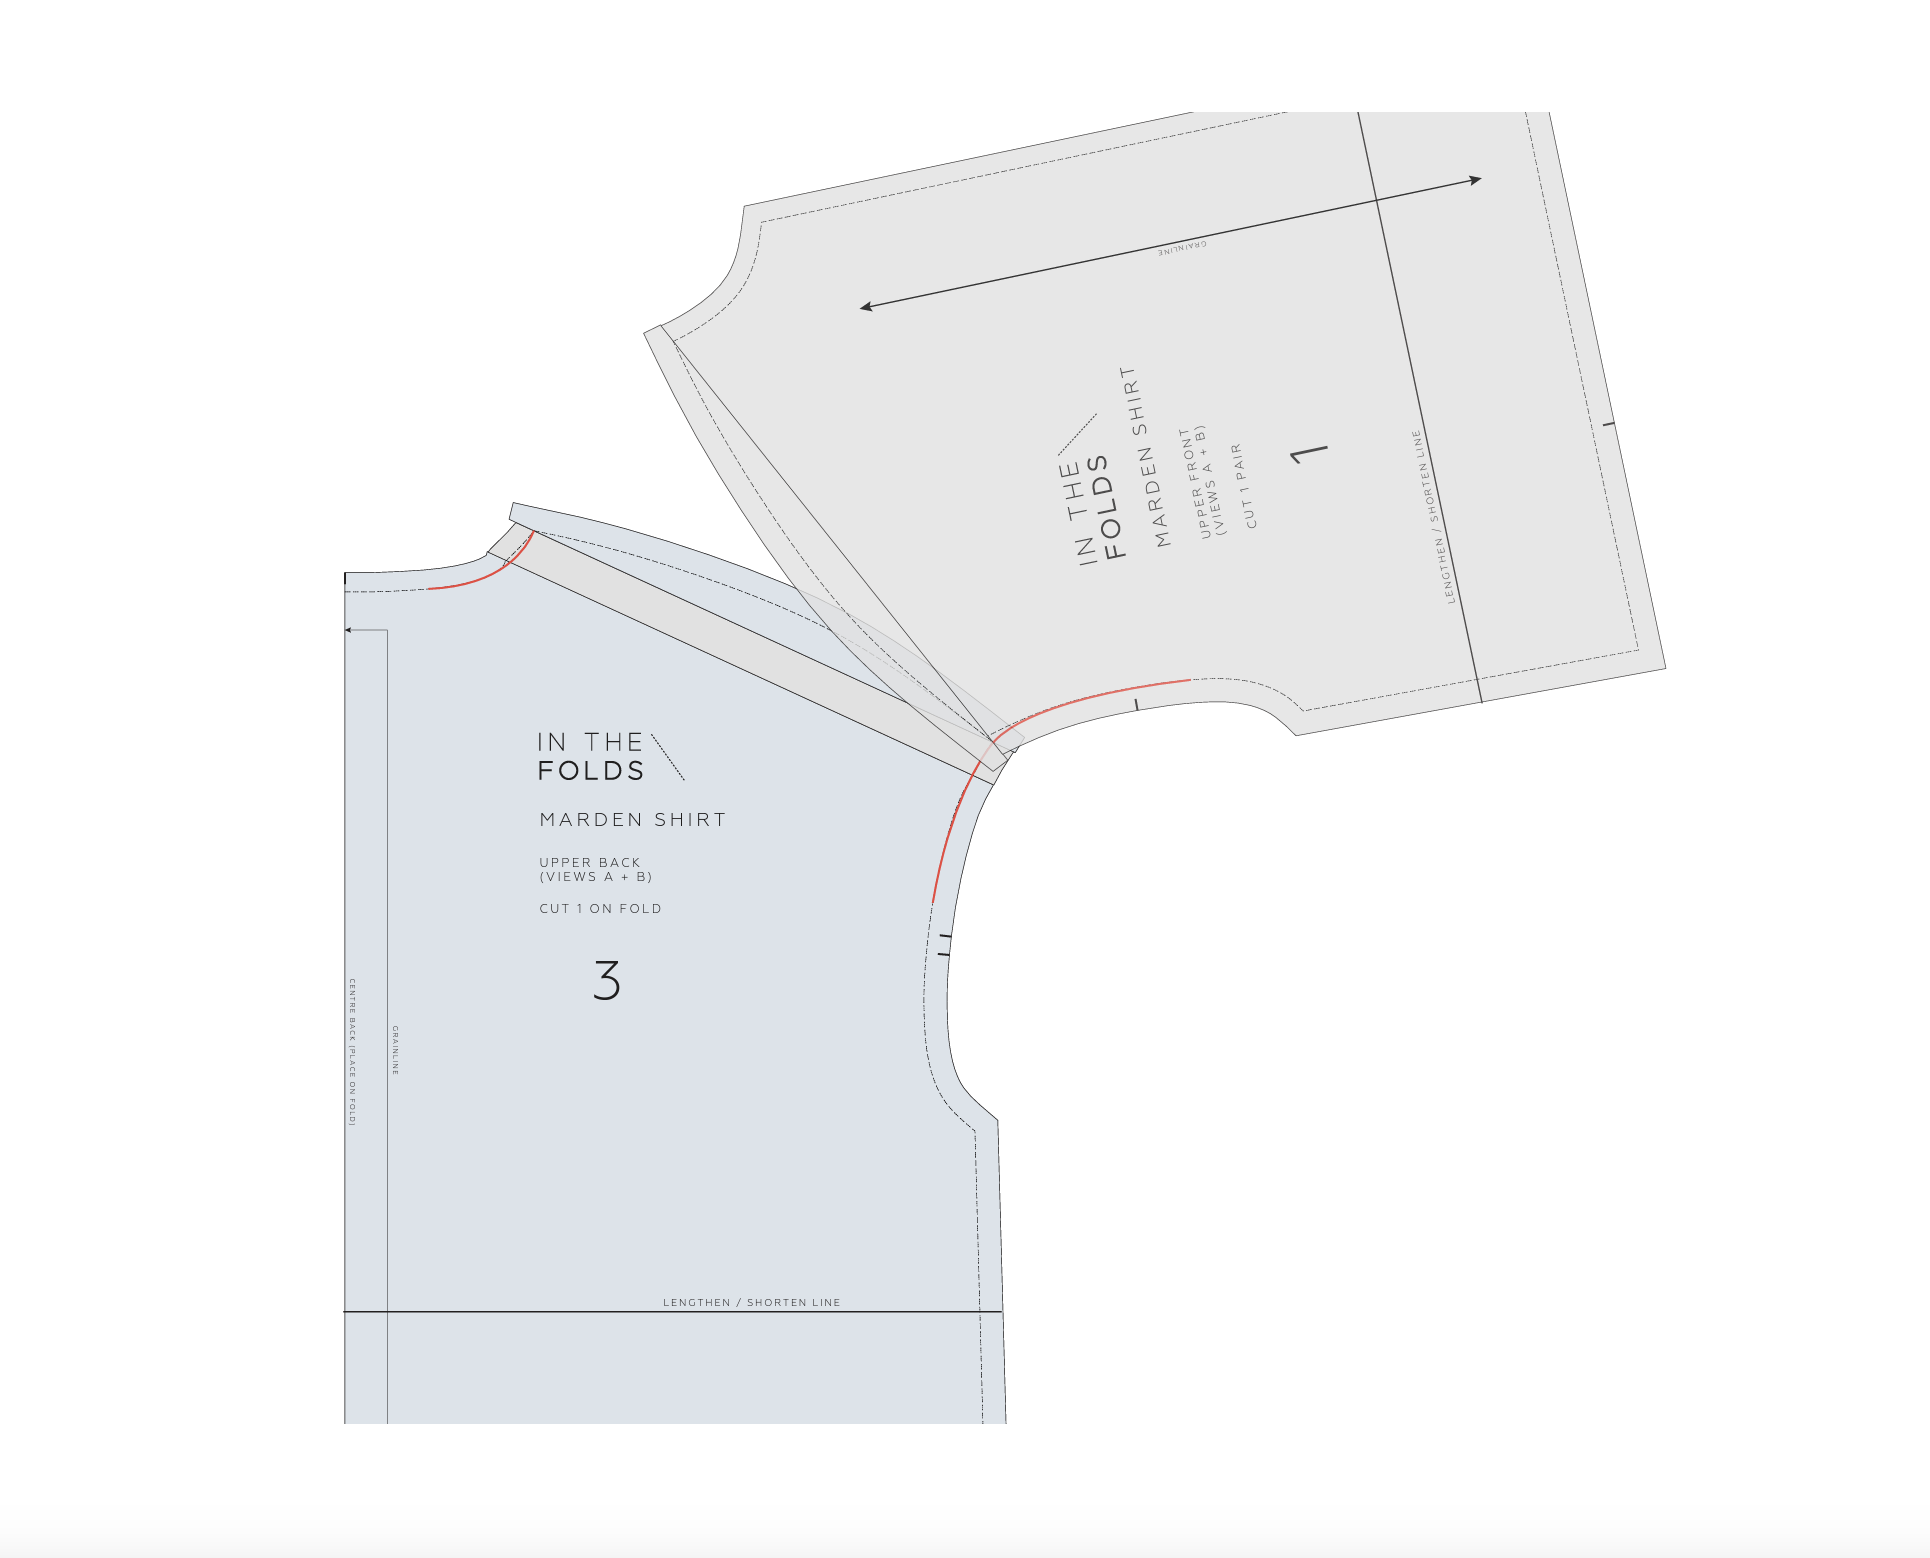
STEP 5

Smooth out the stitchlines around the armhole and neckline where the adjustments have been made.

STEP 6

Attach the FRONT shoulder shaping back onto the FRONT. Smooth out the armhole and neckline (if required).

STEP 7

Line up the FRONT and BACK neckline at the shoulder to check the flow through, and adjust if necessary. Read this post about checking and truing adjustments when patternmaking.

STEP 8

Line up the FRONT and BACK neckline at the armhole to check the flow through, and adjust if necessary.

And that’s it! It’s not as scary as it seems. I hope this helps you get your Marden shirts to fit perfectly.

Happy sewing,

Emily


RESOURCES MENTIONED IN THIS ISSUE


For more issues of the Q & A series, you can check out the archive here.


WHAT YOU’VE BEEN MAKING


MORE POSTS IN THE SERIES

ISSUE 158 - HOW TO LOWER THE COLLINS TOP ARMHOLE (VIEW A)

THE Q & A SERIES

HOW TO LOWER THE COLLINS TOP ARMHOLE

Hi Emily,

I would like to lower the armhole on the Collins top with sleeves. I found a tutorial on the sleeveless version but could not find one for the version with sleeves.

Could you help me please?

Thank you so much in advance!

M


Hi there!

We love it when our customers ask us how to customise their makes to fit their own unique bodies and measurements. We also know how uncomfortable it is when a garment cuts in under the arm, so we’re very happy to be able to answer this question!

HOW TO CHECK IF YOU NEED TO LOWER THE ARMHOLE

Before we get started, I think it’s worth checking that you are sure this is the alteration you need. I raise this, because this same fit issue could be caused by the need to add length between the shoulder and the bust line. This adjustment also lowers the position of the armhole and could correct the problem.

The best way to work out if you need this adjustment in a garment is to check where the dart is sitting. If it's sitting too high then that's a pretty good indication that length is required. If not, then you're right and just lowering the armhole should do the trick.

In the case of the Collins top (which doesn’t have a dart) I would say to consider your wardrobe in general. Do you often have problems with armholes cutting in? If so, then it’s likely that you need to add length between the shoulder and bust line, rather than lower the armhole specifically.

Some of our Curated by ITF members have realised, through the process of learning to fit clothes specifically to their unique body measurements, that this is a consistently needed adjustment, and it has become one of their standard adjustments when making clothes for themselves.

If the problem of armholes cutting in is not a common issue for you, then read on!

HOW TO LOWER THE ARMHOLE ON THE COLLINS TOP (VIEW A)

Because of the puzzle element of the Collins top (which happens to be one of most loved parts of this pattern!) we know it might feel a little daunting to attempt fit alterations, but as with anything, if you just take it step by step, you’ll have no trouble at all.

Here you go!

STEP 1

Pin or tape (with something that is easily removed) the SIDE FRONT PANEL to the CENTRE FRONT PANEL as if they have been joined.

On the side seam STITCH LINE, mark the amount you would like to lower the armhole by.

STEP 2

Redraw the armhole with a nice smooth curve, joining the point marked in the previous step. Keep the line as similar to the original as you can and meet the side seam at a right angle.

STEP 3

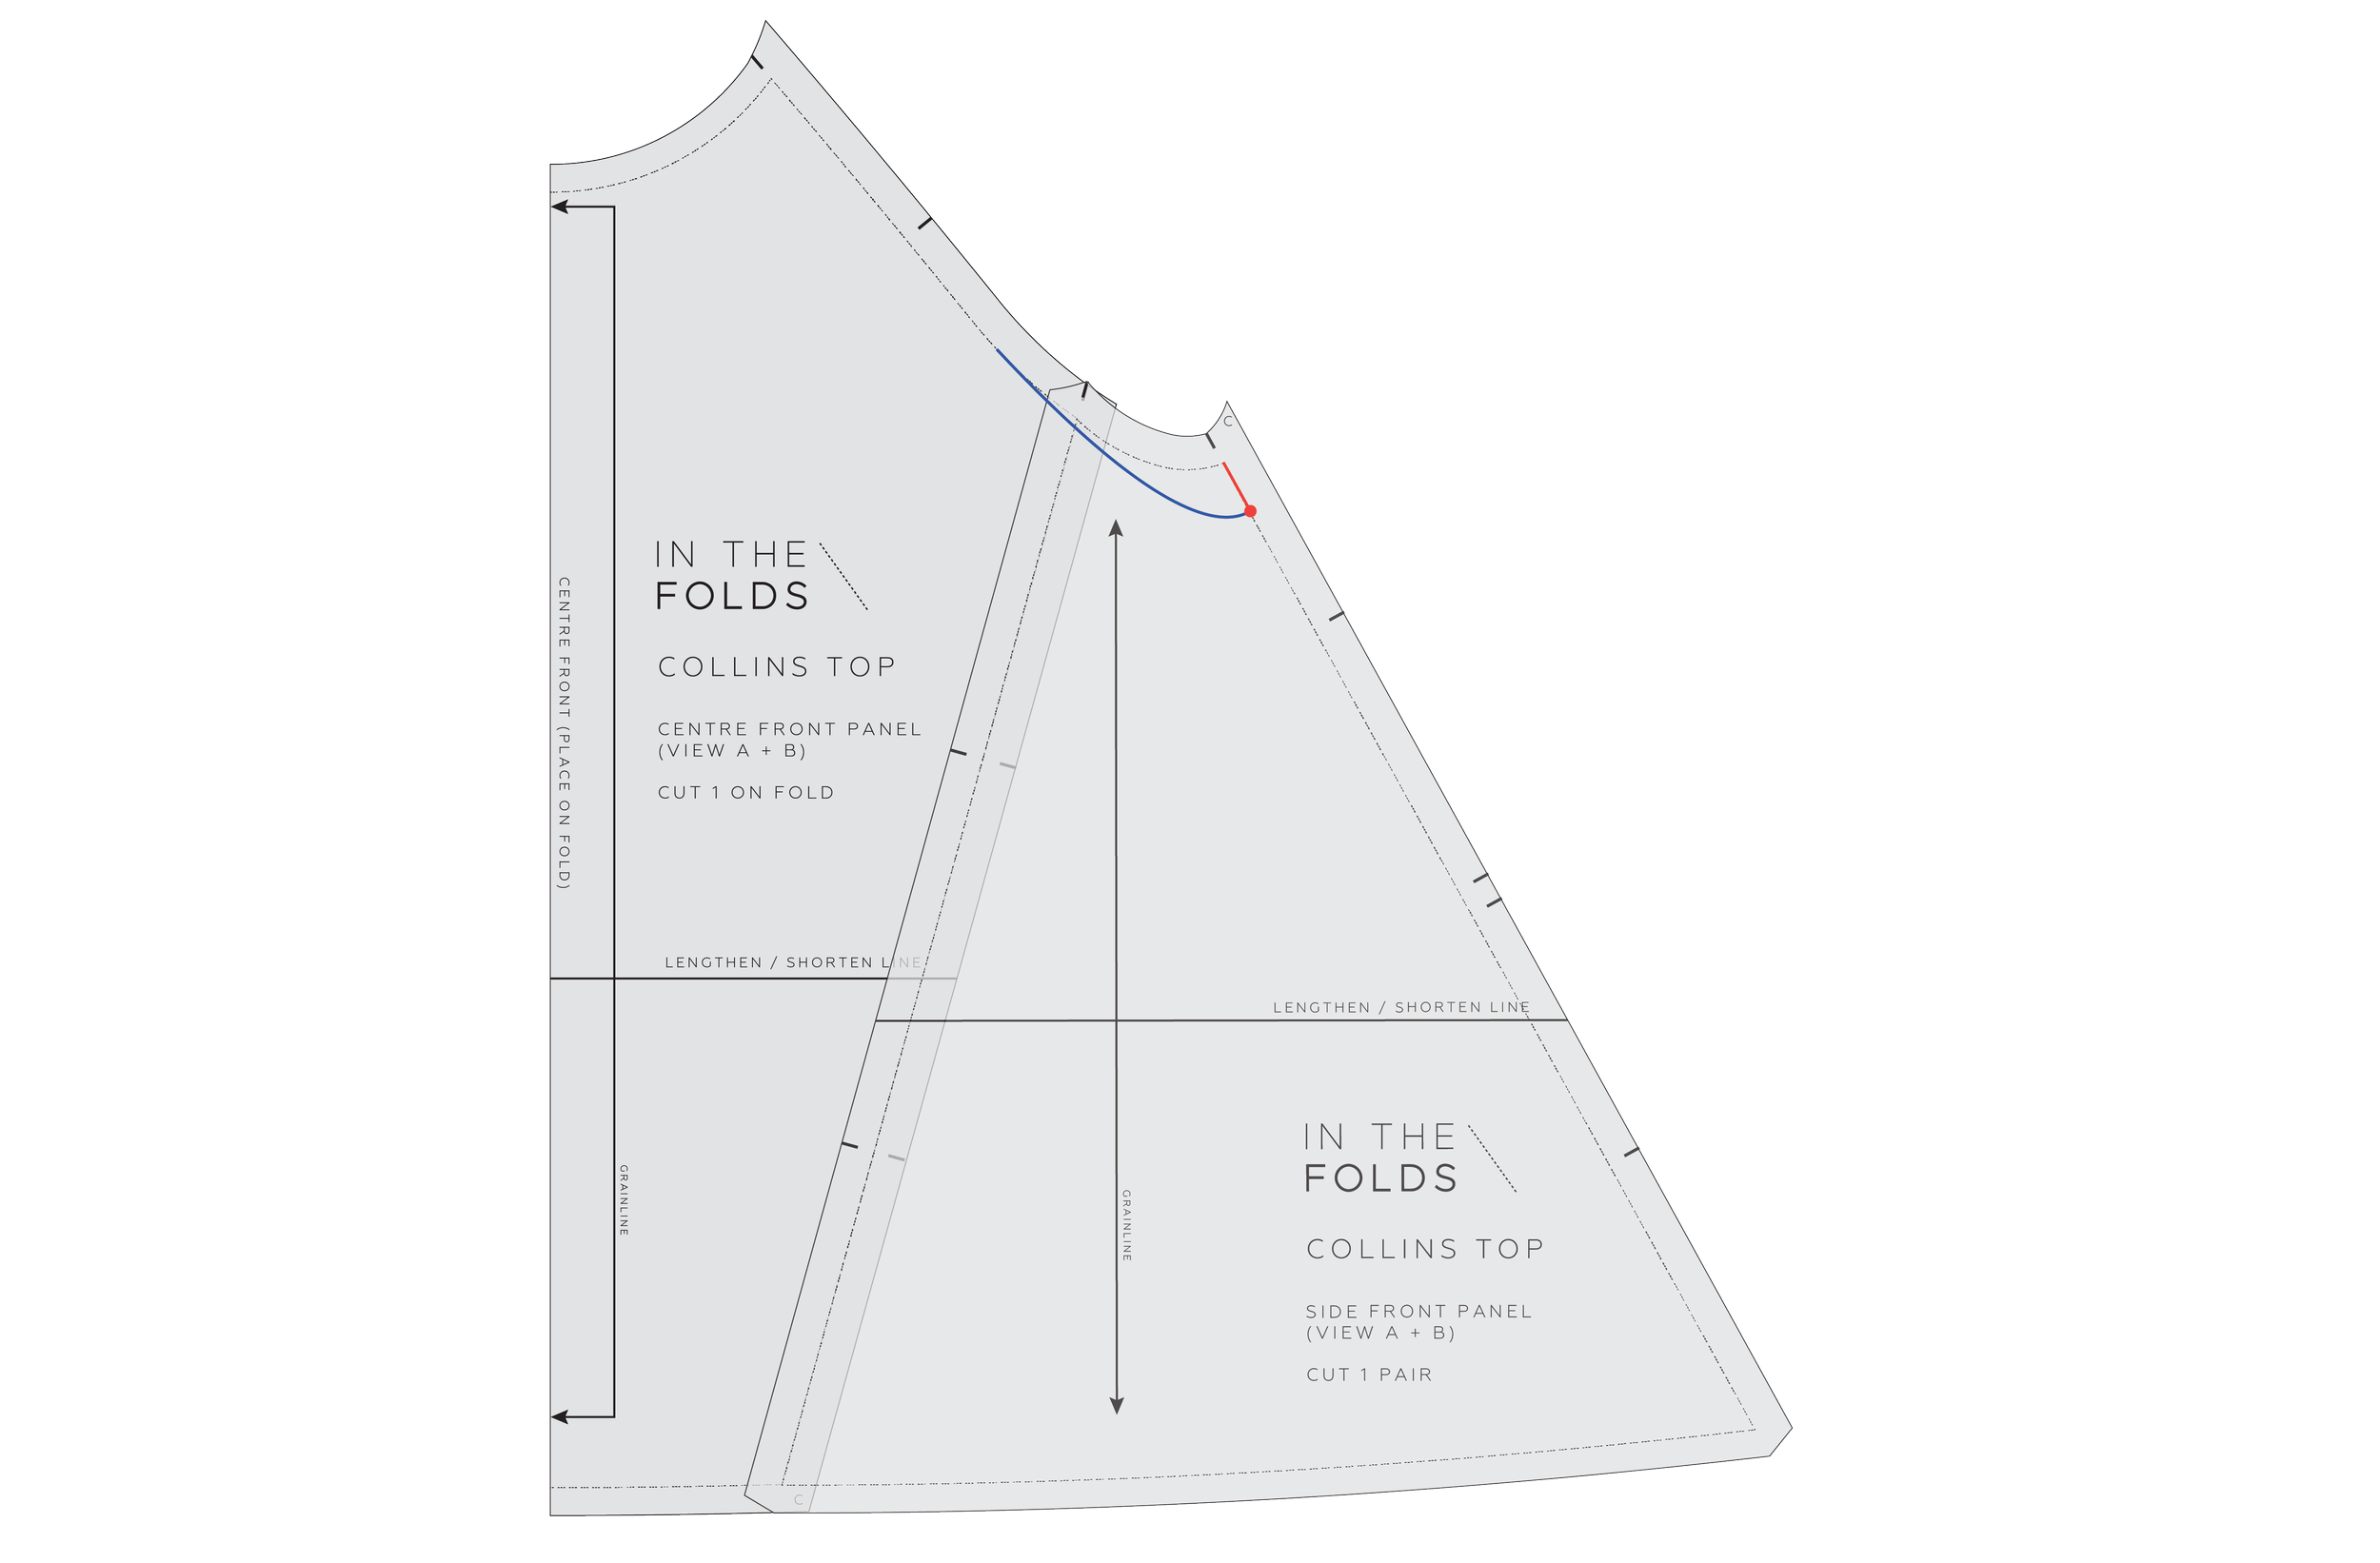
Line up the sleeve panels, STITCH LINE on STITCH LINE as if they have been joined and pin / tape in place. Mark in the bicep line (red line), which runs from the top of the underseam on the front through to the underseam on the back. Take half the measurement you used in STEP 1 and lower the bicep line by this amount (blue line).


OUR CUSTOMERS LOVE THE COLLINS TOP FOR ITS SATISFYING PUZZLE-LIKE CONSTRUCTION


STEP 4

Re-draw the armhole lines with a smooth curve.

STEP 5

Walk the front sleeve into the front armhole, STITCH LINE on STITCH LINE, starting at the neck side of the line.

It is likely that the STITCH LINE on the FRONT SLEEVE is not long enough to reach the end of the armhole curve due to the alteration.

Measure the distance between the sleeve STITCH LINE and the side seam on the SIDE FRONT PANEL. This is the amount that needs to be added to the FRONT SLEEVE.

STEP 6

Add this amount to the sleeve curve and then join to the hem STITCH LINE.

If it is a large alteration and the shape of the sleeve underseam is going to change drastically, we suggest also adding some width at the hem to keep the shape of the piece intact.

STEP 7

Now, repeat the same alteration for the back pieces, then check the front and back side seams line up nicely at the top and bottom of the seam.

Add seam allowance to the new lines (red) and cut away any excess.

Happy fitting!

Emily


RESOURCES MENTIONED IN THIS ISSUE

  • The Collins top pattern can be found here.

  • Adjusting length above the bust - blog post here.

  • Checking patterns: Curved seams - blog post here.

  • How to add seam allowance to a sewing pattern - blog post here.


For more issues of the Q & A series, you can check out the archive here.

WHAT YOU’VE BEEN MAKING


MORE POSTS IN THE SERIES

ISSUE 154 - HOW TO MAKE A FLAT BUTT ADJUSTMENT

THE Q & A SERIES

HOW TO DO A FLAT BUTT ADJUSTMENT

Hi Emily, 

I absolutely LOVE the Q&A series!  Finding you and In The Folds has been a game-changer in my sewing journey! 

One question which I'm struggling with finding much information about is how to do a 'flat seat' adjustment. I understand that a wedge needs to be taken out from the back crotch seam, but how is that actually done? 

Appreciate any guidance you can give!

Thanks, Kimi
New Zealand


Hi Kimi!

Thanks for your question! Firstly, because I know this is a question that many people out there will love to get an answer to as well, but also because making clothes that fit is one of the foundations of In the Folds. Nobody wants to spend hours of their time (not to mention the money!) sewing clothes that don’t fit the way you want them to. And the thing is, with a little practice, these skills can quickly become second nature and just another normal part of your sewing process.

With the release of our Attwood pants pattern, it’s also a timely tutorial to cover in case someone decides their Attwood pants need a bit of adjusting. 

However, it’s not quite as simple as removing a wedge from the back crotch seam. In last week’s Behind the Scenes post we discussed why we like to use industrial sewing techniques in our patterns, and I think this is another great example of the difference between professional fitting alterations and those you will find in the home sewing world. 

While you might find that taking a wedge out of the back crotch seam gets the job done, it may cause fit issues in other areas and it will probably affect the finished look of the garment. 

So, here’s a step-by-step tutorial for correcting this issue using professional fitting techniques so you know exactly how to do it! And, if you’re interested in learning more pants fitting techniques, check out our Pants Fitting pattern & Fit Kit.

HOW TO TELL IF YOU NEED A FLAT BUTT ADJUSTMENT

Also known as a baggy butt adjustment, you’ll know you need to make a fit adjustment to your pants because you’ll notice excess fabric in the back of the pants. You could even say that the back may look a little deflated and saggy.

You can check this easily by standing in front of a full length mirror, using another mirror to look at the back of your garment while being worn. Try to avoid using only one mirror to do this because turning your torso to look in the mirror will cause the garment to twist and will not give an accurate representation of the fit.

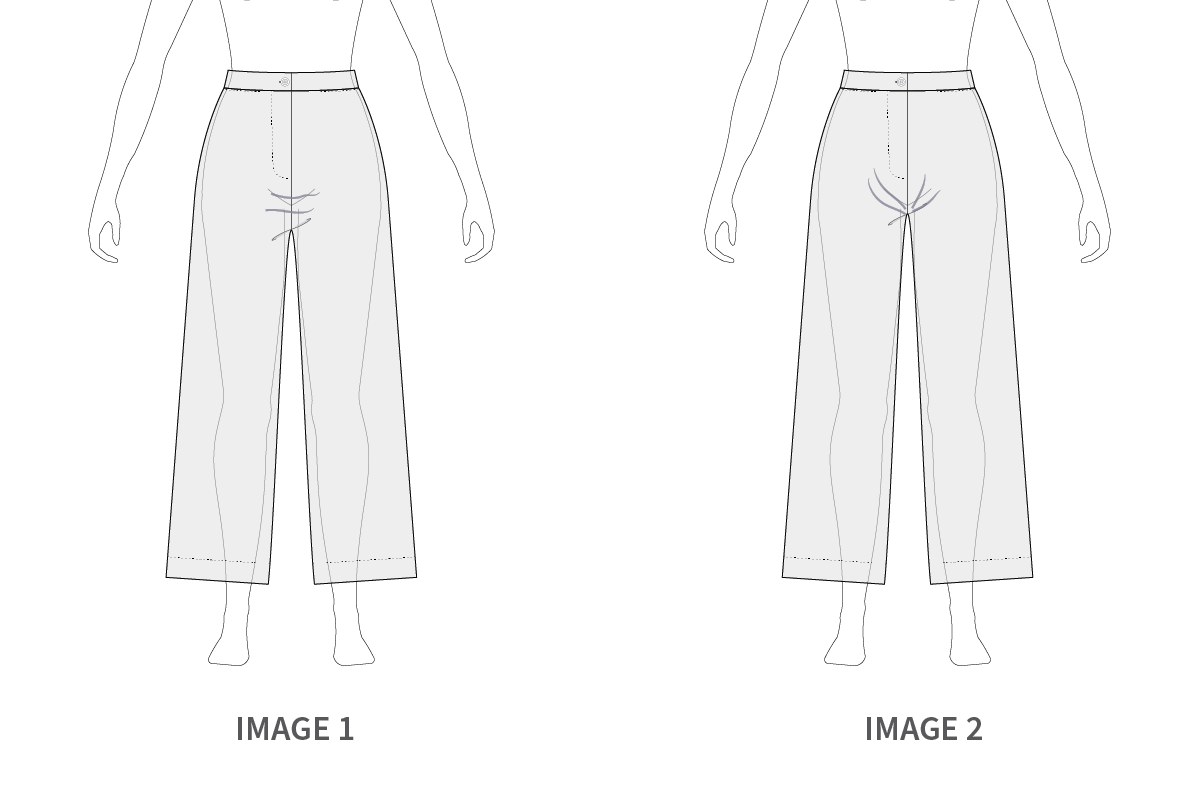
If the back is baggy and has too much fabric (Image 1), we will pinch out fabric vertically and evenly throughout the back leg and then add in any extra fabric that is needed at the waist.

PREPARE TO MAKE THE ADJUSTMENT

While wearing the garment, roughly pinch out the excess that needs to be removed in the butt area. (Image 2, below). You may need someone to help you do this if you’re trying to fit them on yourself! We’ll remove fabric throughout the whole leg evenly to stop the pattern from skewing. 

Take the toile off and pin out vertically through the whole leg (Image 3), making sure to take an even amount. Unpick side seam at the waist and add in fabric if necessary (Image 4).


IN THE FOLDS PANTS PATTERNS & RESOURCES


HOW TO DO A FLAT BUTT ADJUSTMENT

Step 1

a Draw a line from the top to the bottom of the pattern parallel to the grainline roughly in the middle of the pattern. Make sure to avoid the dart. Let's call this line A.

b Draw another line parallel to line A. The distance between the two should be the amount you'd like to remove from the pattern. Let's call this line B.

Step 2 

Add an 'anchor line' perpendicular to lines A and B. This will help you line up the pattern.

Step 3

Cut through line B completely and overlap, aligning line B with line A. Use the anchor line to help realign the pieces. Tape in place.

Step 4

Taking from the pattern evenly means we've also made the waist and leg measurements smaller, so it's likely you'll need to adjust the pattern to add the amount that you took out through the whole leg back to the waist area only to return the waist measurement to the original. We will spread the amount we are adding to the pattern between the CENTRE BACK and the side seam.

i Record the amount you took from the pattern overall, (see STEP 1 b).

ii Divide the amount from (i) by 2 so we can add it evenly on each side.

a Mark in the distance found in ii, out from the STITCHLINE at both the CB and side seam.

Step 5

Re-draw the side seam and CB seam with smooth lines, joining them back to the waist STITCH LINE (a) and CUT LINE (b). Cut off excess paper. Check all seams are the correct length by 'walking' the pattern pieces, as if you were sewing them together.

I hope this helps you get the fit you’re after, and don’t forget to check out our Pants Fitting pattern and Fit Kit for even more in-depth tutorials just like this one!

Happy sewing,

Emily


RESOURCES MENTIONED IN THIS ISSUE

  • The Attwood pants pattern is the August 2023 project for our Curated by ITF membership, and can be purchased here, or after August by current members in our Past Issues section. More information about the subscription can be found here.

  • The Pants Fitting pattern + Fit Kit was released in 2023 as part of our Pants Sewing series. It is currently only available to members of our Curated by ITF subscription, but will be released soon as a standalone resource in our online shop.

  • Checking patterns: Curved seams - blog post here.


For more issues of the Q & A series, you can check out the archive here.

WHAT YOU’VE BEEN MAKING


MORE POSTS IN THE SERIES

ISSUE 149 - RESOURCES FOR PLUS SIZE SEWING

THE Q & A SERIES

Resources for plus size sewists

Hi again,

Could you talk more about your process of expanding your size range? It's really exciting to see your sizing expand!

A common challenge for plus size sewing is a huge lack of resources around how to draft patterns for larger sizes. It seems this is a problem on an industry level in fashion, schools, etc, as well as for home sewists and indie pattern companies.

Clearly knowledge exists, as clothing and patterns have been made in larger sizes. And more and more RTW and home sewing companies are putting out more sizes.

As far as I am aware, there is no book or central resource explaining how to draft larger sizes. As far as I can tell, it seems like indie sewing companies either have people who have figured out their own plus size block / drafting system and/or have access to industry biometric data. But this assumes they either have specialised knowledge already or access to professional resources that are not available to the average home sewist. Ie. it seems like there's a bit of an information desert.

Did you run into this challenge finding useful information in your size expansion process? Did you come across any useful resources? I am so curious about the process.

Thanks kindly,

Claire


Note: This is the second part of my answer to Claire’s questions. You can read part one here.

Hi Claire, 

Unfortunately, you’re right - there isn’t a lot of information about drafting patterns for larger sizes that’s easily accessible for the home sewist. As I mentioned in the part one of my answer, there’s not even much that’s easily accessible for pattern designers! 

The indie pattern design industry has significantly contributed to expanding the available resources, so hopefully in time there will be more. In the meantime, here’s what I recommend.

CREATE A PATTERN CAPSULE

The concept of a pattern capsule is one that really excites us at In the Folds, and is part of the foundation of our monthly project subscription, Curated by ITF

Similar to a capsule wardrobe, a pattern capsule is where you have a small number of base patterns that you fit to your specific body shape and measurements and then adapt to your taste and style to create new designs.

If you select a pattern from a company that has drafted their patterns specifically for plus sizes, there will be less work for you to do in creating your pattern block. The main thing to remember when looking for a pattern to use as a base is that the pattern must fit you. It may not fit you perfectly straight out of the packet or off the printer (which is the case for most humans), but you don’t want to be grading up or amending issues with the pattern that are unrelated to fit. 

If you’re interested in finding base patterns to start with, this list will be helpful:

  • We recently extended our pattern sizes to a hip measurement of 184cm (72.5”) and are releasing all our new patterns in this extended size range. We are also working to update our whole portfolio to include the new size range, but you can view what’s available now here.

  • The Curvy Sewing Collective have collated a list of plus size pattern makers and also have a fantastic list of resources for pattern adjustments, fitting tips and pattern reviews. 

  • Jess, from Broad in the Seams has a list of plus size patterns

  • The Fat Friendly Pattern Club has a list of beginner friendly patterns

  • Muna and Broad patterns are specifically drafted for plus size sewists.

LEARN HOW TO FIT GARMENTS

Learning to fit our own clothes might be daunting at first, but the great thing is that we often need the same adjustments with each garment we sew. So, once you’ve identified the alterations you need to make it gets easier! 

For example, you may find for your body measurements and shape that you need to add length and do a full tummy adjustment, so each time you start on a new pattern you know to specifically check these areas first.

Learning how to fit the clothes you’re making doesn’t have to be an ordeal - there’s lots of resources that can help you do this.

To start with, our Fit Kits help identify the adjustments you need to make to a garment, and then show you how to do each one through illustrated tutorials. For example, our Barkly skirt pattern is available in our full size range and has the Barkly skirt Fit Kit that runs through the most common fitting alterations required for skirts.  (I should also mention that although it was created alongside the Barkly skirt pattern, the tutorials can be applied to most skirt patterns.) 

Ahead of the Curve from Cashmerette is a fantastic book that is described as ‘the first sewing book to empower curvy and plus size sewists to feel body confident by sewing a wardrobe that fits.’ It includes lots of photos that help plus-size sewists identify which adjustments they might need to make to a pattern.

Now that you’ve made the fit alterations on the pattern blocks and you don’t have to worry about doing them over and over again each time you sew a new garment I recommend transferring your base patterns onto card for safekeeping, and then you can move on to the fun part - pattern hacking!

LEARN HOW TO PATTERN HACK

Learning how to sew is simply a matter of skill-building. You learn and practise one skill, and then once you’ve figured it out, you move onto the next skill. Pattern hacking is no different. Once you’ve learned how to fit clothes, learning how to hack patterns into something new is just the next step! It’s just a matter of finding the resources to support you as you learn the skill (which I realise is the problem we’re addressing, but hear me out!).

The methods for hacking patterns into new designs are basically the same, regardless of the size of the intended wearer. Because of this, plus size sewists can make use of the many free online tutorials related to pattern hacking, including those on the In the Folds website.

Because we want our customers and members to become confident sewists we have also created Hack Kits specifically for some of our patterns. In our Curated by ITF membership, we’ve seen how these pattern hacking resources empower sewists to experiment with a range of styles that they may not have considered before, because they’re supported by a resource they can refer to when they have questions.

For example, our Barkly skit Hack Kit includes a range of different skirt styles with lots of techniques relevant to drafting skirts. The added benefit for our Curated by ITF members is that if/when they hit a snag during this process or need clarification about something, they can ask as many questions as they need in our online community and we (or our very clever and supportive community!) will provide the answers.

Thanks for your questions, Claire. I know you’re not the only person who has been frustrated by the lack of size inclusivity in the sewing industries, so I hope this post helps you find some plus size pattern drafting and fitting resources to support you in your sewing journey. Of course, this support can most definitely be found in our Curated by ITF community.

And if you have any further questions, please leave them in the comments section and we’ll help as much as we can.

Happy sewing,

Emily 


RESOURCES MENTIONED IN THIS ISSUE

  • More information about our monthly sewing subscription, Curated by ITF, can be found here.

  • Read Part One of this question here - Q&A 148: Our experience in extending our pattern size range.

  • The Barkly skirt pattern, Fit Kit and Hack Kit can be purchased as a bundle here.

  • How to transfer patterns onto card - read the tutorial here.

  • The Curvy Sewing Collective resources can be found here.

  • Broad in the Seams list of plus size patterns can be found here.

  • The Fat Friendly Pattern Club list of beginner friendly sewing patterns can be found here.

  • Muna & Broad plus size patterns can be found here.

  • Ahead of the Curve by Cashmerette can be found here.

  • View all In the Folds patterns currently in available in our extended size range in our new Skills Library here and view our sizing chart here.


For more issues of the Q & A series, you can check out the archive here.

WHAT YOU’VE BEEN MAKING


MORE POSTS IN THE SERIES

ISSUE 142 - THE DIFFERENCE BETWEEN PATTERN SIZING AND READY TO WEAR

THE Q & A SERIES

THE DIFFERENCE BETWEEN PATTERN SIZING AND READY TO WEAR

Hi, 

I purchased the Flynn Jacket pattern. I need your sizes in international sizing (XS, S, M, L, XL). Your sizing does not help in cutting these sizes.

Thanks,

A


Hi there,

I am thrilled to hear you will be giving the Flynn jacket a go!

If you have never used one of our patterns, you may have been surprised to see the size charts and realise there is no sign of numbers (apart from the measurements themselves) or international sizing, as you noted. This was a very intentional choice that I made when starting In the Folds.

WHY HAND-MADE IS DIFFERENT TO READY TO WEAR

Sewing your own clothes is very different to buying ready-to-wear clothing.

When it comes to ready-to-wear you have to pick the closest size to your body measurements and hope for the best.

This might mean the garment fits you well through the bust, but pulls a little at the hips. Or that the hips fit well, but the neckline gapes. 

When it comes to sewing your own clothes you don’t have to settle for a garment that only fits certain parts of your body. Just one of the perks of making your own clothes! You can make a garment fit your unique body measurements by grading between pattern sizes. You can then alter the length to suit you, and make other alterations too, such as a full bust adjustment or a narrow shoulder adjustment).

WHY IN THE FOLDS SIZING DOESN’T USE NUMBERS

Here’s two reasons why we don’t use numbers in our garment sizing:

1. The focus should be on YOUR body, not a standard someone else has set.

By steering clear of international sizing and standard numbered sizing, we are encouraging sewists to do the most important thing you can do before starting a project… take accurate measurements of your body!

When it comes to sewing, using your measurements (rather than the numbers next to the measurements) is really important because it will help you make a garment that fits YOU.

It also means that you can acquaint yourself with the size chart for the particular pattern brand you are using, because they are all different.

2. We will not support systems that encourage body shaming.

By using letters instead of numbers in our size chart, we aim to remove the hesitance or shame some makers may feel when looking at traditional sizing numbers on tags in stores.

This is a side to ready-to-wear fashion that we want to leave behind! We believe making garments is about making clothes that fit your unique body, not about the size you wear. And this is one way we can help you (and the fashion world at large!) achieve this.

HOW TO FIGURE OUT YOUR IN THE FOLDS SIZE

We suggest you grab a tape measure, put on some tight clothing (leggings and a tight t-shirt or singlet work well), step in front of a mirror and take your measurements.

If you’ve printed a copy of the pattern, circle the size (or sizes) your measurements align with for each point of your body. In the case of the Flynn jacket, this is your bust, waist and hips.

ALWAYS CHECK THE FINISHED GARMENT MEASUREMENTS

Before selecting a size it’s always a good idea to understand how closely the garment is supposed to fit and how much ease is in each area of the pattern.

With In the Folds patterns, we always include two measurement charts in our instruction booklets. One for body measurements (which are the same across all In the Folds patterns), and the other for finished measurements chart (which changes between patterns depending on the intended fit of the design).

The finished measurements chart includes the measurements of the finished garment in specific locations, and information about the amount of ease that has been included in the pattern.

UNDERSTANDING PATTERN EASE

How much ease there is in a pattern will determine if you need to make alterations to a pattern.

For example, if your hip measurement is in a larger size than your waist measurement, you might usually need to grade between sizes. But, if you look at the amount of ease in the hips of the Flynn pattern you may choose not to grade because there is a lot of ease provided in the design.

Selecting the correct size before you begin is an important part of the sewing process and we want to support you to feel confident when doing this. We have another post about selecting the correct pattern size that you might be interested to read here.

Happy sewing,

Emily


RESOURCES MENTIONED IN THIS ISSUE

  • The Flynn jacket pattern can be found here.

  • Selecting the correct size - tutorial here.


For more issues of the Q & A series, you can check out the archive here.

WHAT YOU’VE BEEN MAKING


MORE POSTS IN THE SERIES

ISSUE 135 - HOW TO AVOID HUNGRY BUM IN PANTS

THE Q & A SERIES

HOW TO AVOID HUNGRY BUM IN PANTS

Hi Emily,

How can I avoid the “hungry bum” on trousers ?

Sandie


Hi Sandie,

Thanks for asking this question. It’s something that nobody likes to think happens to them, but I’m sure we’ve all fallen foul of it at some point in our lives!

WHAT IS HUNGRY BUM WHEN REFERRING TO PANTS?

For those who’ve never heard the term ‘hungry bum’ you might be more familiar with the term ‘wedgie’. Basically, both terms refer to when your pants creep up in between the thighs and buttocks, and stay there.

SIGNS OF HUNGRY BUM

When we think of ‘hungry bum’ we immediately conjure up worst case scenario images in our head. In reality, the affect of a ‘hungry bum’ can be measured on a scale. For a bit of laugh, let’s say the scale goes from the lower end of ‘feeling peckish’ to ‘absolutely famished’ at the higher end ;)

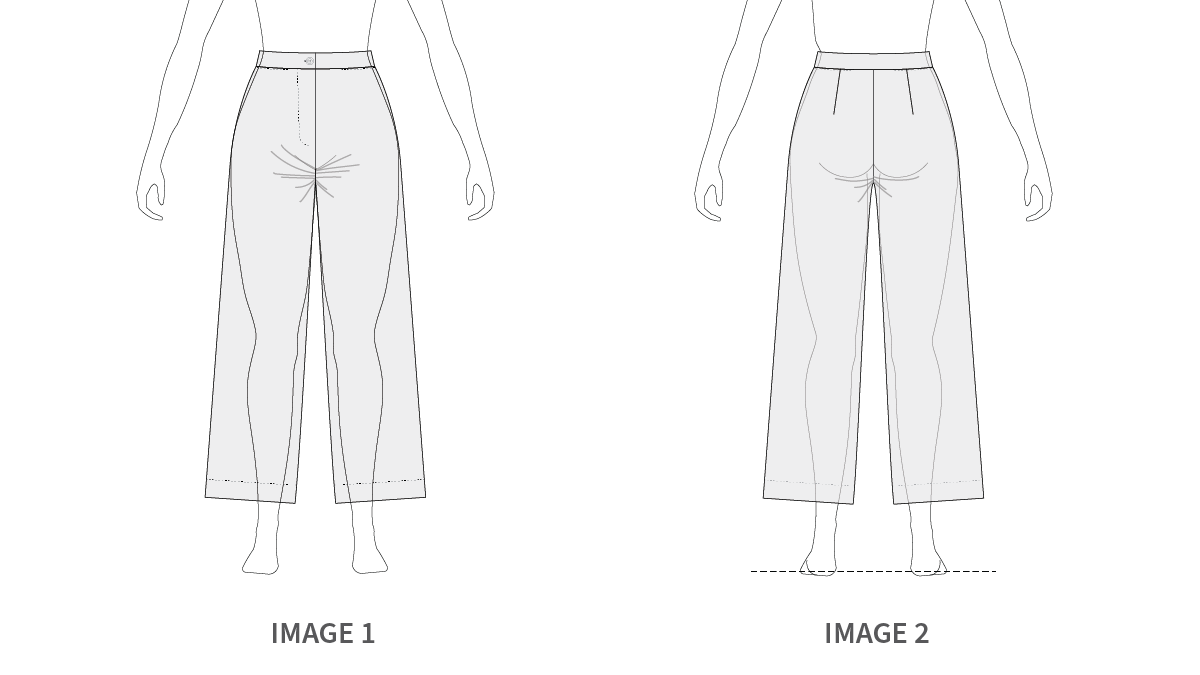
In all seriousness, if you’ve noticed that you’ve got fabric pulling towards the front or back crotch of your pants, or the fabric is bunching up between your legs, then you’ve probably got a ‘hungry bum’. The fabric around the thighs may also feel tight.

But what causes it, specifically?

the causes of hungry bum

Although it is difficult to say what is causing the ‘hungry bum’ without seeing photos of a toile being worn, it’s commonly a result of a garment not fitting the wearer’s thighs properly. If this is the case, the alteration that needs to be made is a Full Thigh Adjustment. This is just one of the pants fitting adjustments we cover in our Pants Fitting issue of Curated by ITF.

when to do a full thigh adjustment

You’ll know you need to make this adjustment if your toile is too tight in the thigh area or you struggle to pull your toile up beyond your thighs. You may also notice that your range of movement is limited in the thigh area. If you cannot pull your toile up over your thighs you definitely need to include a Full Thigh Adjustment in your pants fitting process.

If a Full Thigh Adjustment is common for you, we suggest measuring the thigh on the FRONT [1] and BACK [2] pieces and comparing that to your body measurements before making a toile.

Keep in mind that you require ease in the thigh of the pattern so that you can comfortably sit and stand.

PREPARATIONS FOR A FULL THIGH ADJUSTMENT

Unpick the inner leg seams of your toile from the crotch to a point approximately 25-30cm (10-12in) down the seam. Open up the seam and pin a strip of fabric in the opening at the width you think you need to add.

Try on the toile. Add or remove width in the opening depending on the result.

Continue the process until you are happy with the amount of width added to the toile.

HOW TO DO A FULL THIGH ADJUSTMENT ON PANTS

Step 1

On the FRONT [1], extend the inner leg seam from a point midway between the notches up through the crotch seam. The line needs to be parallel to the grainline. We will call this line A.

At the bottom of line A, draw a perpendicular line through the seam allowance to the CUT LINE.

Step 2

Cut down line A from the crotch seam. Stop 1-2mm from the end of the line at the STITCH LINE. Cut into the seam allowance towards the end of the line, creating a small hinge of paper at the end of line A.

Step 3

Refer to your toile to work out how much width needs to be added to the thigh of the pattern. We will add half the amount to the FRONT [1] and the other half to the BACK [1].

Slide a piece of pattern paper under the cut section. Swing out the inner leg seam. Mark a point out from the STITCH LINE of the crotch at the width you would like to add. We will call this point B.

Step 4

Swing the inner leg section so that the STITCH LINE meets point B. Tape in place. Redraw crotch seam STITCH LINE and CUT LINE, joining the two sections with a smooth curve that merges into the original crotch seam.

Step 5

Straighten out the top section of the inner leg seam. This will help you retain the nice smooth scoop of the crotch seam when this seam is sewn. Smooth out the inner leg seam where the alteration was made, if required.

Step 6

Repeat STEPS 1 - 5 for the BACK [2]. Add the same amount to the BACK [2] as you did to the FRONT [1].

If you notice on your toile that the fabric is only pulling at the front or back then you can choose to make this adjustment to only one section.

Step 7

Check that the crotch seam is a nice smooth curve by lining up the STITCH LINES of the inner leg seams. For more details on checking curved seams, see this tutorial.

There’s a lot to consider when you’re sewing pants and if you’re just starting out on your pants sewing journey we highly recommend our Pants Sewing series, which is part of our Curated by ITF subscription.

Across three Issues we cover everything you need to know to be able to sew, fit and design yourself a pair of pants you love to wear! As well as the resources we provide in each Issue, you also have access to our online sewing community, where you can ask all your sewing questions and get the support you need to help you on your way!

Happy sewing,

Emily


RESOURCES MENTIONED IN THIS ISSUE

  • The Pants Sewing Skills Kit, Pants Fitting pattern & Fit Kit and the Pants Design Kit are the first, second and third parts of our Pants Sewing project series, which is available through our Curated by ITF subscription. Past issues are also now available for purchase by subscribers. More information can be found here.

  • Checking patterns: curved seams - read the tutorial here.


For more issues of the Q & A series, you can check out the archive here.

WHAT YOU’VE BEEN MAKING


MORE POSTS IN THE SERIES

ISSUE 134 - HOW TO ALTER THE CROTCH LENGTH ON PANTS

THE Q & A SERIES

HOW TO ALTER THE CROTCH LENGTH ON PANTS

My biggest challenge is how to alter to crotch/rise in pants.  I need to lengthen the crotch in back without adding width and shorten rise in front.  I'm a size 6 US / 10 British so the issue for me is not adding more room.  It's all about the fit!

Thank you and so grateful for this series. 

Best regards,

Mary

Bend, USA


Hi Mary,

What’s great about your question is that you already know what changes you need to make to a pants pattern to achieve a great fit. Often diagnosing the issue is the trickiest part of the pants fitting process. Once you know what you need to do, it’s just a matter of working through the alterations methodically. 

You can definitely alter the crotch length in different ways on the front and the back of pants.

As the alteration is made only to the crotch curve (and not the side seam), it’s fine to remove crotch length from the front and then add crotch length to the back.

WHEN TO ADJUST CROTCH LENGTH

The best way to work out if you need to add or remove length from the front or back crotch seam is to make a toile and assess the fit in front of a full length mirror while it’s being worn.

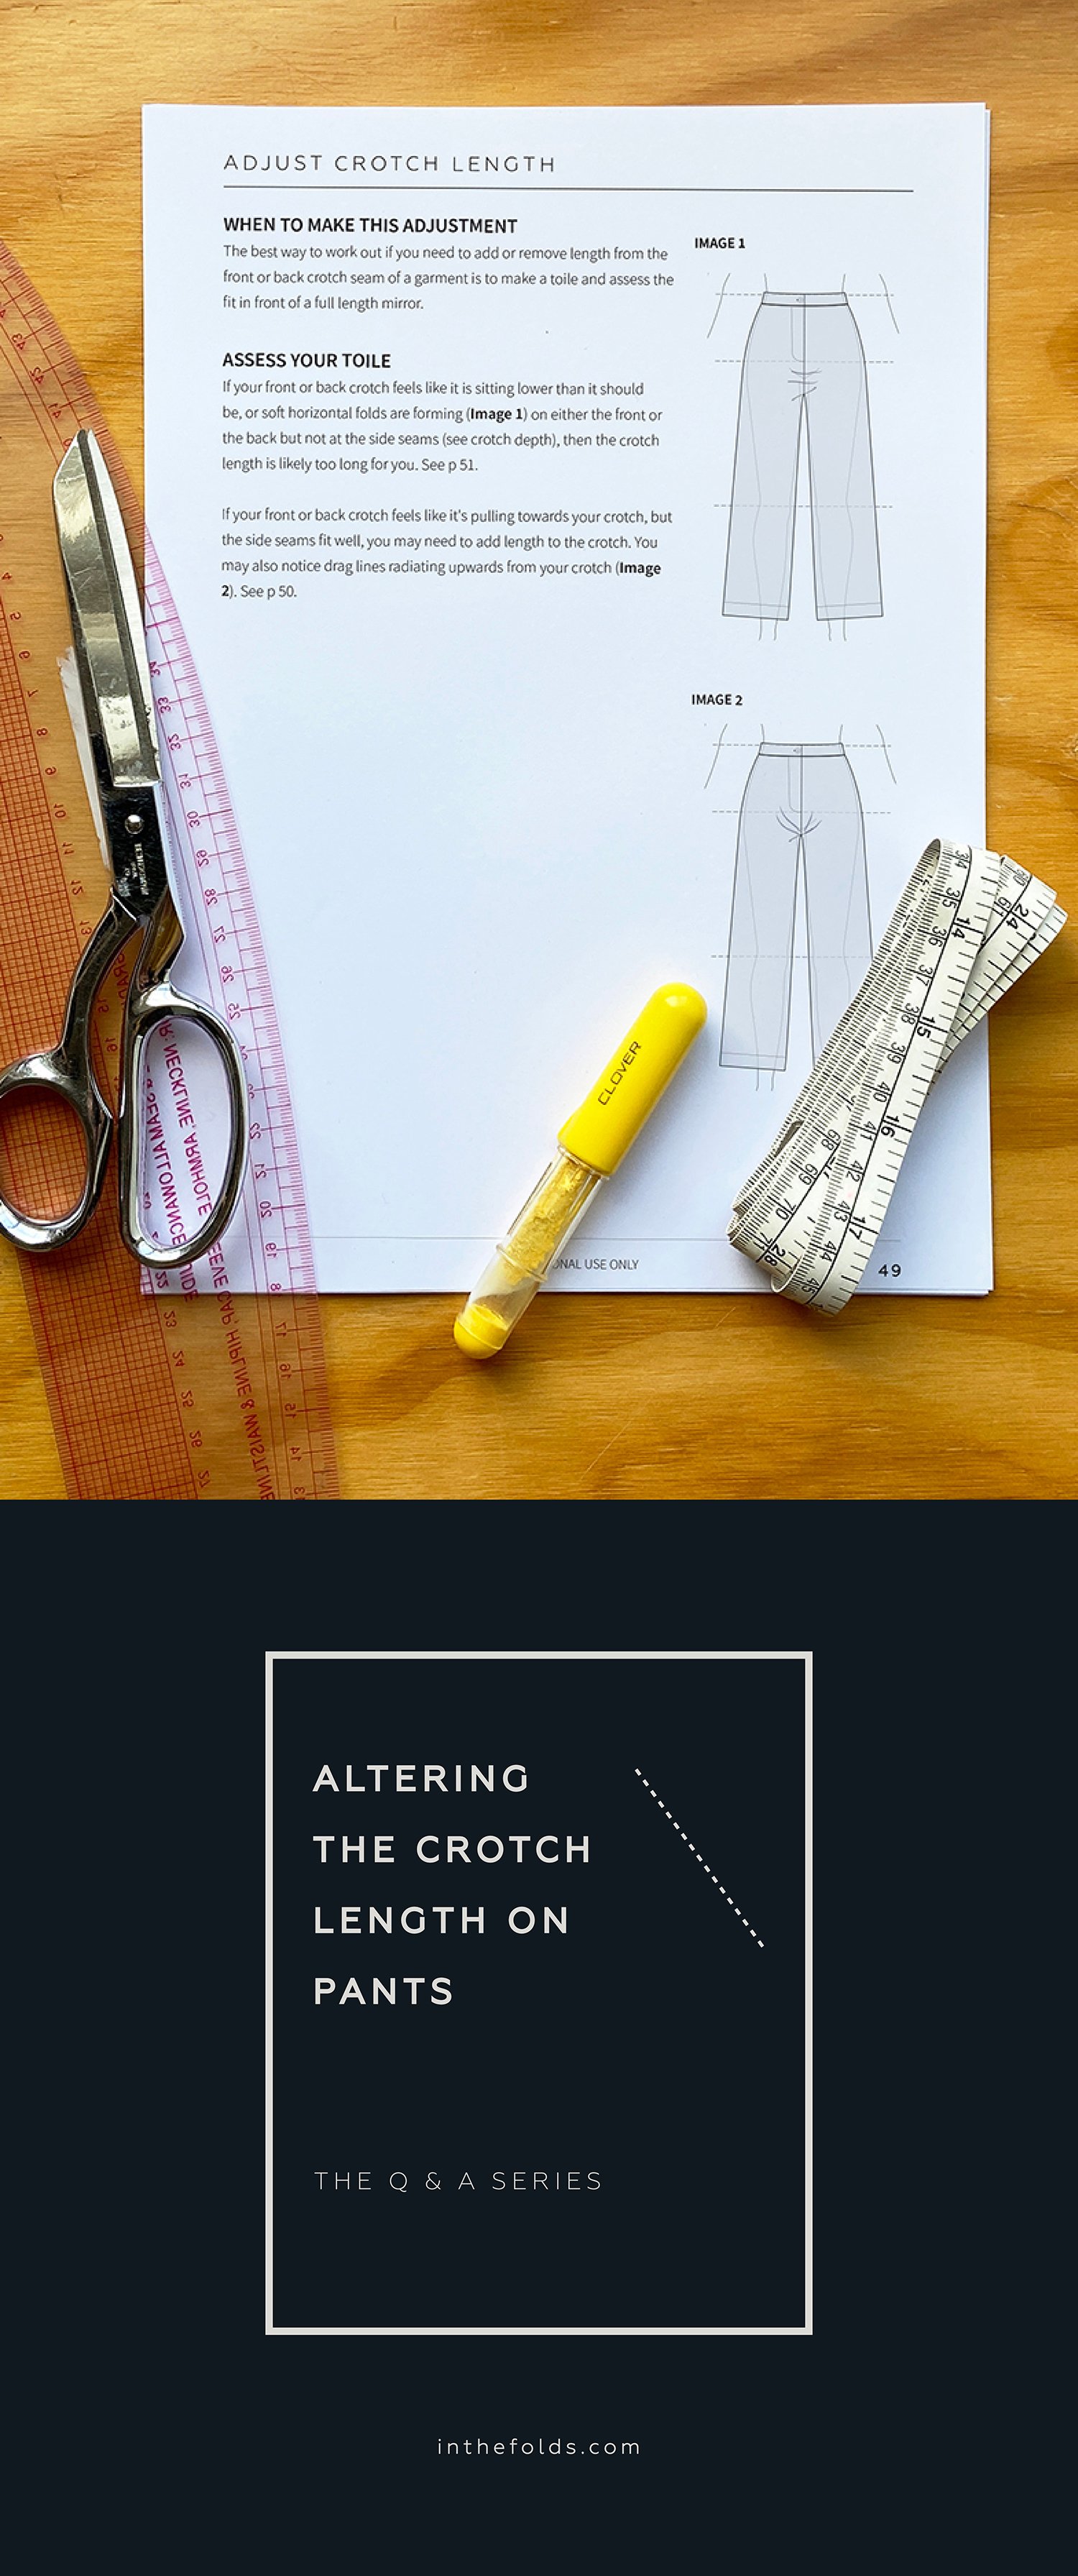
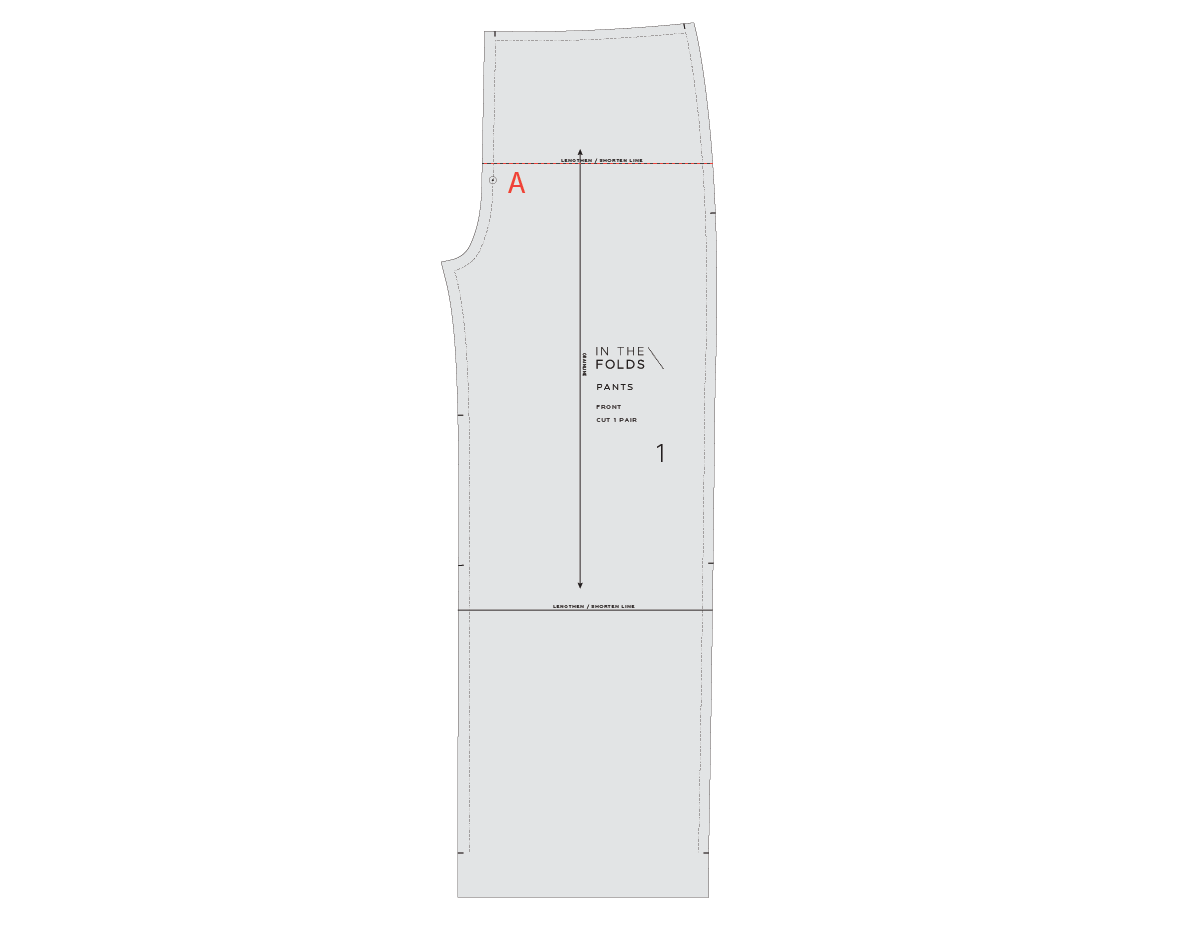
If the front or back crotch feels like it is sitting lower than it should be, or soft horizontal folds are forming (Image 1) on either the front or the back but not at the side seams, then the crotch length is likely too long for you. 

If the front or back crotch feels like it's pulling towards you, but the side seams fit well, you may need to add length to the crotch. You may also notice drag lines radiating upwards from your crotch (Image 2).

HOW TO LENGTHEN CROTCH LENGTH

The steps are the same for the FRONT [1] and BACK [2] pattern pieces. You may need to alter one or both.

Step 1

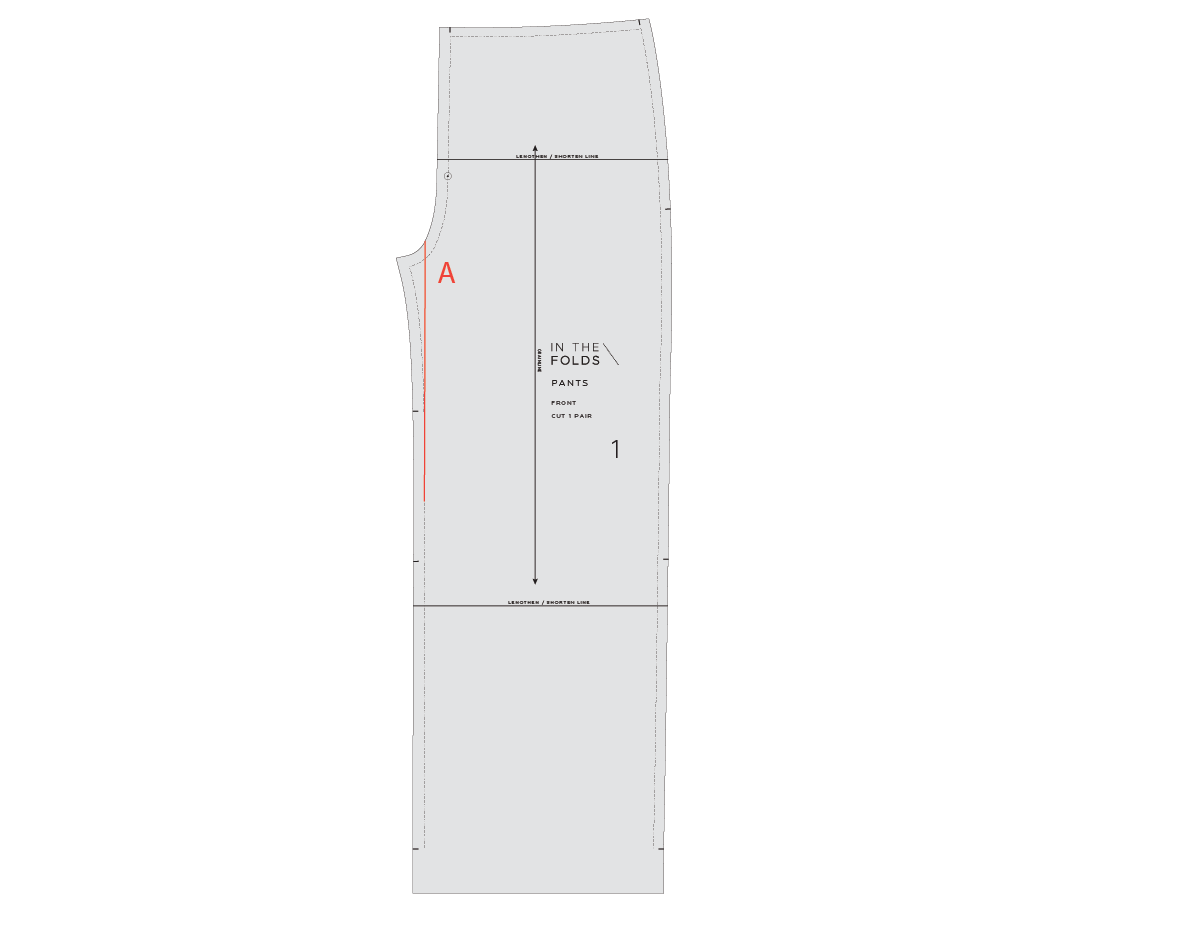
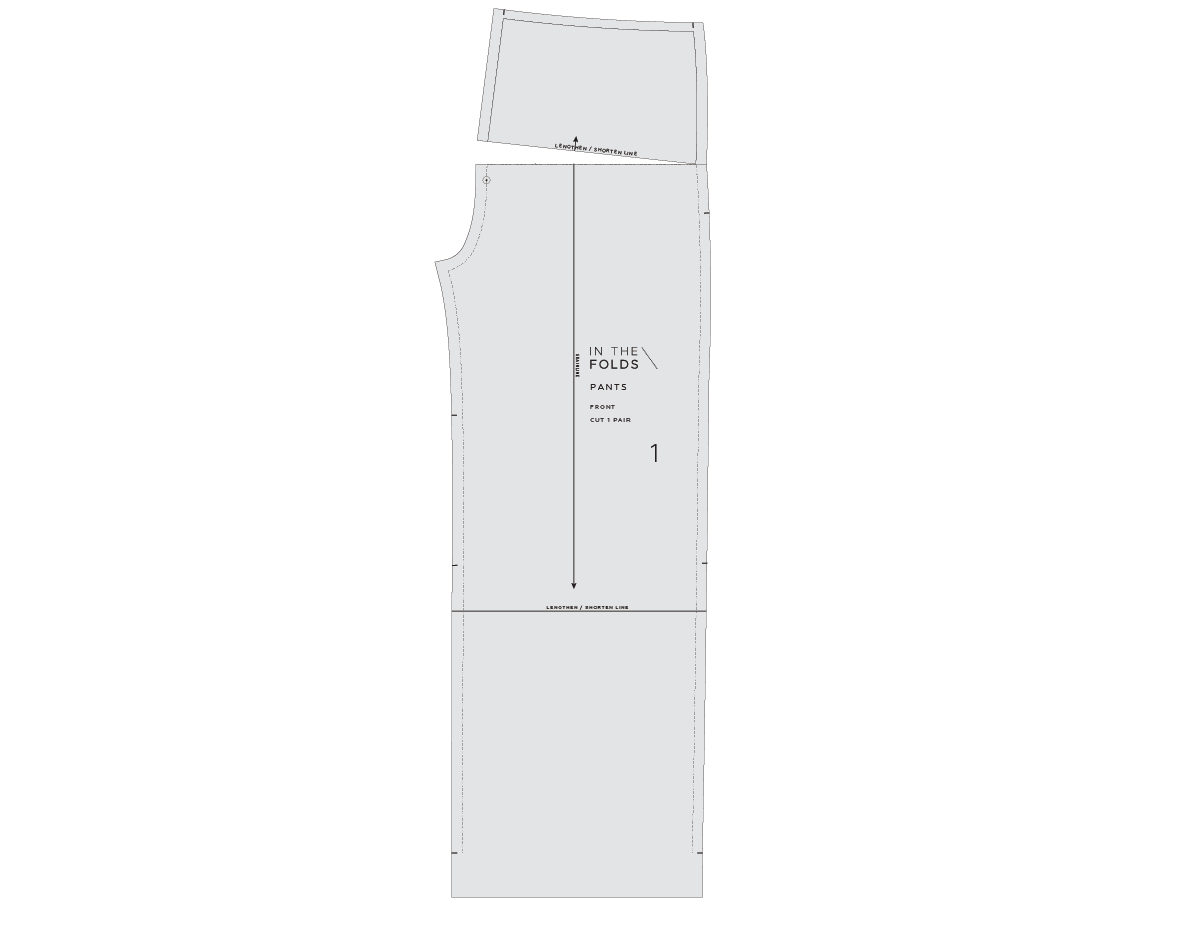
Mark a line through the pattern piece perpendicular to the grainline in the section above the crotch curve. We don't want to change the curve, just the length of the CENTRE FRONT / CENTRE BACK seam. 

We will refer to this as line A. If your cut line goes through notches (such as for fly placement), keep a note of their original locations so you can redraw them later.

Step 2

Cut along line A from the CENTRE FRONT.

Slow down as you approach the STITCH LINE on the side seam and stop when you are 1-2mm from the STITCH LINE. Cut in from the side seam on line A towards the point where you stopped cutting. Stop cutting when you are 1-2mm from the STITCH LINE to create a hinge.

Step 3

Determine how much you would like to add to the crotch length.

The best way to find this is by making a toile and cutting into the fabric across the crotch. You can pin some fabric into the opening and reassess the fit.

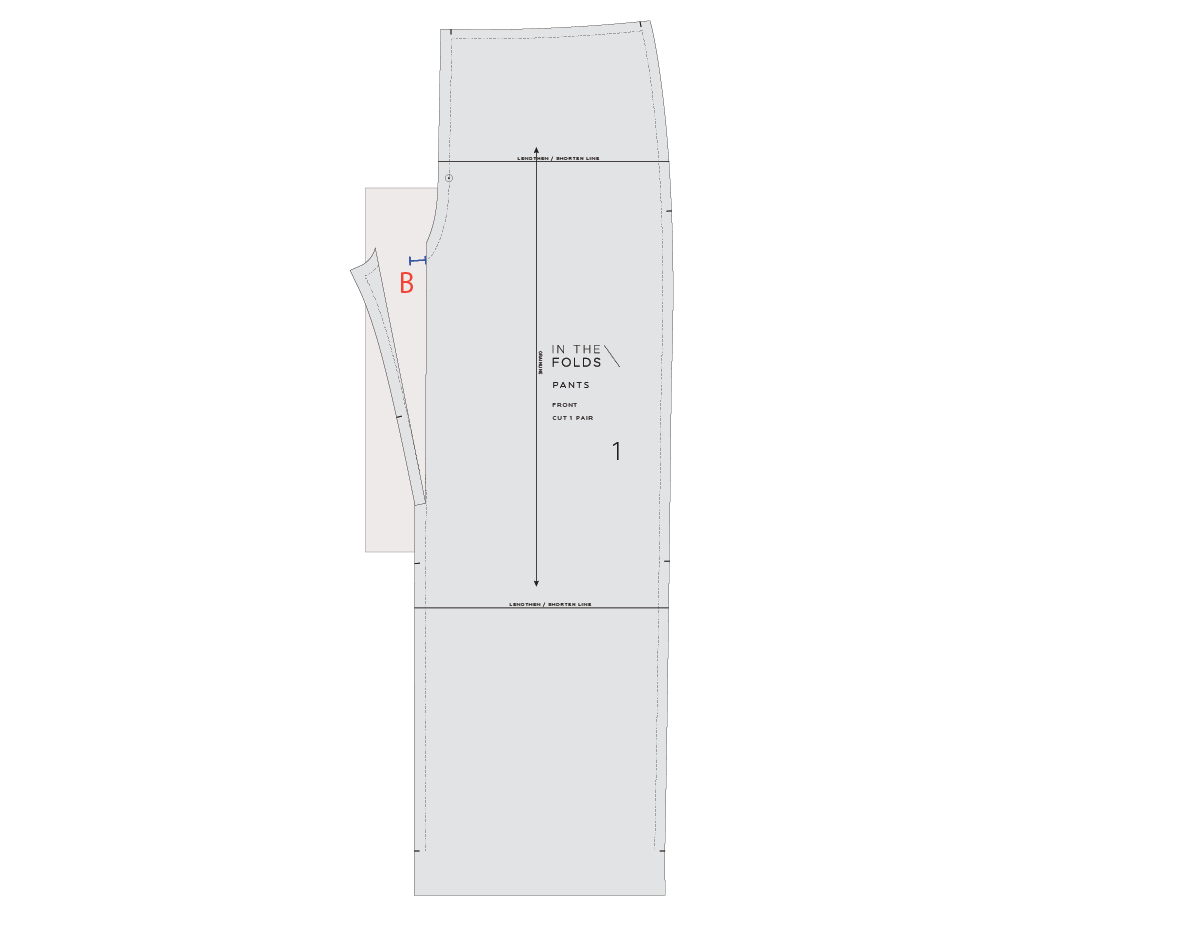
Take a piece of pattern paper slightly larger than the amount you would like to add and mark a horizontal line. We will refer to this as line B. Mark a line below line B, parallel to line B and equal to the distance you will be adding. We will refer to this as line C.

Step 4

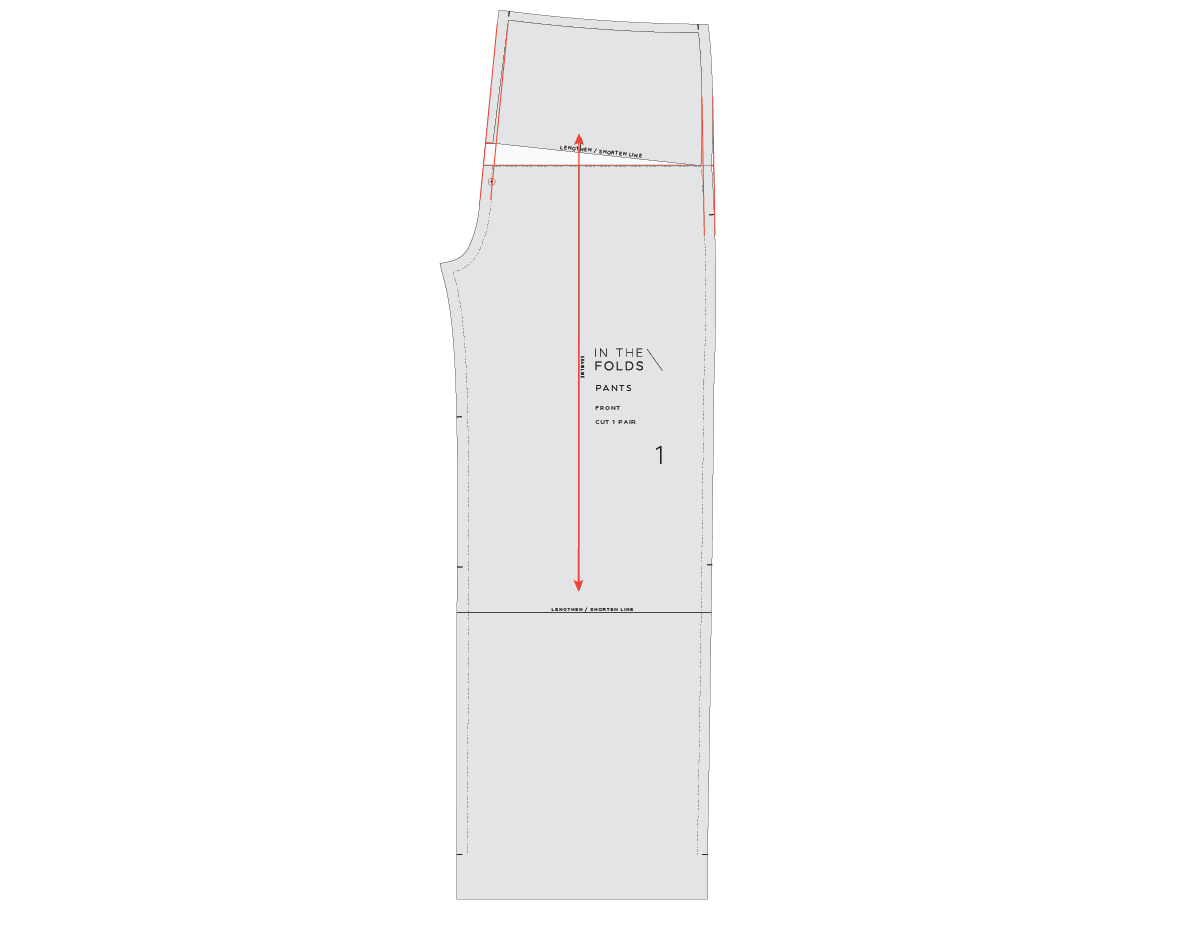
Slide the paper under the pattern. Line up line A (pants section) with line C and tape in place. 

Carefully rotate the top section of the pattern until the CENTRE FRONT STITCH LINE hits line B. Tape or glue in place.

Step 5

Re-draw the side seam and CENTRE FRONT seam with nice smooth curves.

Redraw the grainline following the grainline on the leg of the pants. Cut off excess paper.

HOW TO SHORTEN CROTCH LENGTH

To shorten the crotch length, the steps are the same for the FRONT [1] and BACK [2] pattern pieces. You may need to alter one or both.

Repeat STEPS 1 and 2 above.

Step 3

Consider how much you would like to remove from the crotch. The best way to find this is by making a toile and assessing the amount by pinning out a wedge from the crotch and checking the fit.

Once you know the amount, measure up from line A on the CENTRE FRONT STITCH LINE and mark a point equal to the amount you would like to remove. We will refer to this as point B.

Step 4

Carefully rotate the top section of the pattern so that point B meets with line A.

Tape or glue in place.

Step 5

Re-draw the side seam and CENTRE FRONT seam (CUT and STITCH LINES) with nice smooth curves. Redraw the grainline following the grainline on the leg of the pants.

This month for our Curated by ITF project we are working with our community to make toiles, conduct fittings and determine what alterations to make.

Our latest issue, the Pants Fitting pattern and Fit Kit, guides you through the whole process and then we’re right there in our online sewing community to answer all your questions, assess your toile photos and guide you through the process. If you’re interested to learn more about the pants sewing, fitting and design process, sign up to Curated by ITF now!

Happy fitting,

Emily


RESOURCES MENTIONED IN THIS ISSUE

  • The Pants Fitting pattern & Fit Kit is the second part in our Pants Sewing project series, which is available through our Curated by ITF subscription. Past issues are also now available for purchase by subscribers. More information can be found here.


For more issues of the Q & A series, you can check out the archive here.

WHAT YOU’VE BEEN MAKING


MORE POSTS IN THE SERIES

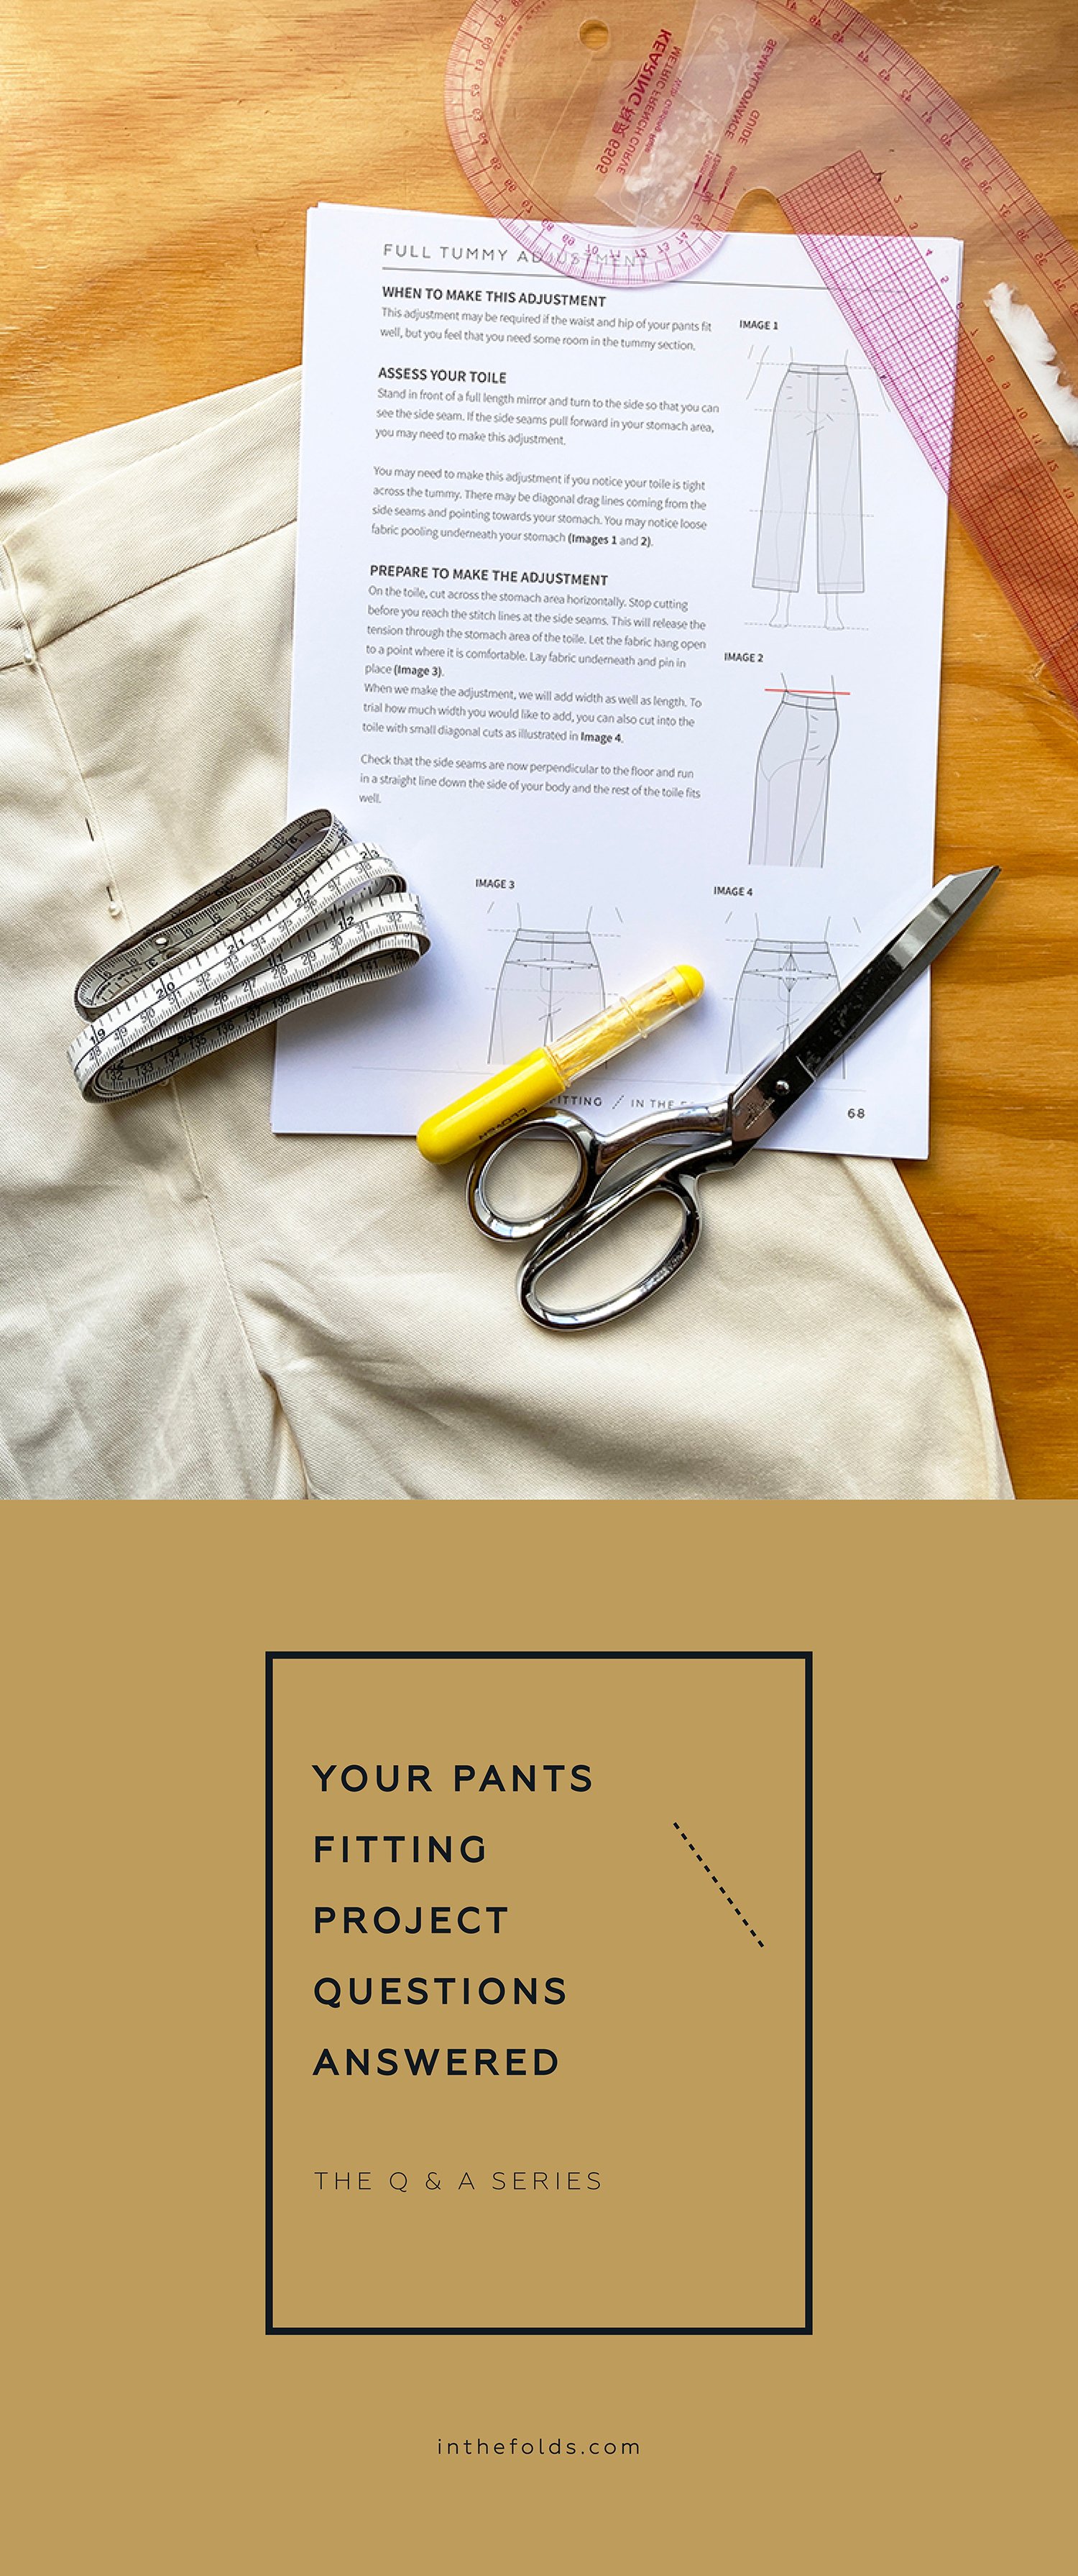
ISSUE 133 - YOUR PANTS FITTING PROJECT QUESTIONS ANSWERED

THE Q & A SERIES

YOUR PANTS FITTING PROJECT QUESTIONS ANSWERED

We’ve had lots of new members join our Curated by ITF community this month who are looking to build their skills in the area of sewing, drafting and fitting pants, and we’re excited to be able to help them learn this valuable garment sewing skill.

We know that, for many people, sewing pants is a no-go zone. Many makers learn the hard way that you’re unlikely to get a pair of well-fitted pants by ‘winging it’. Because pants incorporate the waist, hips, crotch curve and thighs, pants require you to have a good grasp of the fundamentals of the fitting process (or be willing to give it a red hot go!).

Understanding the why, what, where, and when of fitting pants means that when you hit a roadblock you know what adjustment to use to rectify it. It also means you have a process to follow that allows you to troubleshoot the issue, trying different approaches separately, or knowing when to use a combination of adjustments.

We’ve had a few questions come in lately relating to this month’s Pants Fitting Pattern, so this week is a little different to our usual Q&A post. We’re sharing our answers to these questions all at once in the hope that it might also answer any questions you have also had, and get you on the journey to designing, fitting and sewing pants that you love!


Just wondering if this pant pattern is the same as the Wide leg pants, but without the front pocket. I have the Wide leg pants printed out and removed the front pocket to make fitting easier for the first pair. I thought I would save some paper if they are the same draft.

Tracy


Hi Tracy,

The pattern for Issue 14 of Curated is different to the Wide Leg pants pattern, but it is quite similar. The legs are narrower on the new pattern and the back dart is shorter. We also chose not to include pockets in the Pants Fitting pattern, which makes it quicker and easier to toile and make alterations. This also makes it easier to be used as a base pattern that can be used in the future to draft other patterns from (that’s what’s coming for Issue 15 of Curated!)

In saying that though, I think you'd be fine to use the Wide Leg pants pattern you have already printed and started on, as it is very similar and all the resources in the Fit Kit will apply to that pattern. We’re also happy to show you how to remove the pocket, if you’d like to make it more like a block pattern.

You can always make the leg narrower, as we have included a tutorial in the Fit Kit for how to do that.

Happy sewing (and fitting),

Emily

Hello,

I have an existing pant block, but it is from before kids and so my body has changed - mainly bigger and maybe more tummy.

I wonder if I can use this block for my toile and do the fit alterations to it rather than use the pant pattern supplied?

Thanks,
Denise


Hi Denise,

Good question!

We have made the resources so that the techniques apply to other pants patterns and blocks, so you could definitely give it a go.

One thing to note is that when fitting a garment it is much easier to remove fabric, rather than add it in, so I'd be checking that you can make a toile that fits you well enough from the block to conduct a fitting.

If you mainly need more room across the tummy, then you could definitely do a full tummy adjustment to add more room in the tummy area. You could also add a larger seam allowance to the pattern (particularly in the side seams) so that you have more room to play with during the fitting.

It might be worth a go as an experiment. You can see after a fitting how much work is involved in adjusting the block and then decide if you're better off sticking with the block or using our pants fitting pattern.

Happy sewing,

Emily

Hello,

I am interested in
joining your community, mainly to learn about pants fitting.

Via Peppermint I got access to you Wide Leg Pants pattern. I really love the style and made already two Wide Leg pants. However, I have the feeling that the fit has room for improvement.

Recently, I bought 3 fabrics for making autumn/winter pants based on this pattern. Would the Pants fitting project of this month work along with the Wide Leg pants pattern or is it compulsory to use the pants pattern that comes with the fitting project?

Thanks in advance for your help.

Kind regards,
Monika


Hi Monika,

You can definitely work along with the fitting content we released this month using the Wide Leg Pants pattern.

The fitting pattern is quite similar to the Wide Leg pants pattern. The main differences are how much width is in the leg and that the fitting pattern doesn't have any pockets (which makes the fitting process easier).

All the resources in the Fit Kit and community group will definitely be helpful to you on your pants fitting journey. Some of our makers (who we like to call ‘Foldies’) are also working on the Wide Leg pants pattern, so you won’t be alone! We created the content to be relevant to a range of different pants patterns so that the resources can be used for different projects.

You will be fine to jump on board and follow the process with this pattern.

Happy sewing,

Emily


RESOURCES MENTIONED IN THIS ISSUE

  • The Pants Fitting pattern & Fit Kit is the second part in our Pants Sewing project series, which is available through our Curated by ITF subscription. Past issues are also now available for purchase by subscribers. More information can be found here.

  • The Wide Leg pants pattern can be found here.

  • How to add seam allowance to a pattern - read the tutorial here.


For more issues of the Q & A series, you can check out the archive here.

WHAT YOU’VE BEEN MAKING


MORE POSTS IN THE SERIES

ISSUE 132 - WHAT YOU NEED TO KNOW TO SEW PANTS THAT FIT

THE Q & A SERIES

WHAT YOU NEED TO KNOW TO
SEW PANTS THAT FIT


How do you make a pants pattern fit?  

Thanks,

Nancy
Hampton Georgia, United States


Hi Nancy,

That’s a great question. How to sew pants that fit is a question we have answered in great detail in this month’s Curated by ITF project, the Pants Fitting pattern & Fit Kit!

We all know that fitting pants can be a little overwhelming. Just like our mantra here at In the Folds,  what we suggest you do is slow down, take the pressure off and take it one step at a time. Keep reading to see what we believe you need to know to sew pants that fit, plus we share a Pants Fitting Checklist that you can use whenever you’re working through the fitting process.

BE WARY OF OVER-FITTING

Before getting started with fitting a pair of pants we suggest you get a clear goal in mind.

It is important to remember that the goal is not to make pants that have no creases. This is called “over-fitting” and indicates that the pants have no ease in them. As you can imagine, this would make them very uncomfortable to wear and to move around in! The goal is to make pants that are comfortable to wear and that you like the look of.

It can be easy to get caught up in fitting a garment perfectly - especially as you're standing in a static pose, in front of a mirror, wearing calico.

Try to remember that as you move and use the real fabrics, the creases that seem to stand out while standing still most likely won't show up as much as they do in calico. 

TAKE ACCURATE MEASUREMENTS

It’s a very good idea to take accurate body measurements with a tape measure before getting started. To do this, we recommend putting on some tight clothes, like leggings or just your underwear.

Take your waist and hip measurements first. Be sure to measure at the fullest part of your hips. Do this in front of a full length mirror and check from the side that the tape measure is not dipping up or down. It’s also a good idea to take your waist and hip measurements while sitting down, to ensure you will have enough ease while sitting.

If your measurements are between sizes, use the finished garment measurements from the pattern to help you decide if you should select the smaller or larger size. This measurement shows the amount of ease in the pattern. If a pattern is somewhat fitted, we recommend selecting the larger size for your toile, as it is easier to remove fabric from the toile than add fabric in.

ALWAYS MAKE A TOILE

We all know what it’s like... You purchase (or draft) a new pattern and you just want to get into it and make it so you can wear it!

While this approach may work for some garments, when it comes to sewing pants, we strongly recommend you make a toile first. A toile is a test version of a garment, made from a similar, but often cheaper, fabric. You can read more about making a toile here. By making a toile you can check the fit of the garment, and make any adjustments before cutting into your 'real' fabric.

Consider increasing the stitch length on your machine. This makes sewing your toile faster, but also means it's a lot easier to open up seams if you want to make an adjustment during the fitting process. We suggest that you trace a copy of the pattern before making any adjustments. This way you always have a copy of the original pattern to refer to.

FITTING YOUR TOILE

Once you have selected your size and made your toile, you can do a fitting to check if you need to make any alterations.

This is a good time to mention that most of us will require some alterations. This is not to deter you, but to let you know that it’s completely normal to need to make alterations!

Patterns are designed to a standard shape, but most of us are not the standard. By reminding yourself of this you can see pattern alterations as another skill to add to your repertoire and see it as just another part of the sewing process instead of a chore.

When fitting your toile, try to be methodical. It can be easy to be overwhelmed by the process, but just remind yourself that one effective alteration can make a world of difference and will often resolve multiple issues.

Because of this, it’s also good to remember not to make too many changes once. Just make one alteration to your toile and then re-fit before doing anything else you think you need.

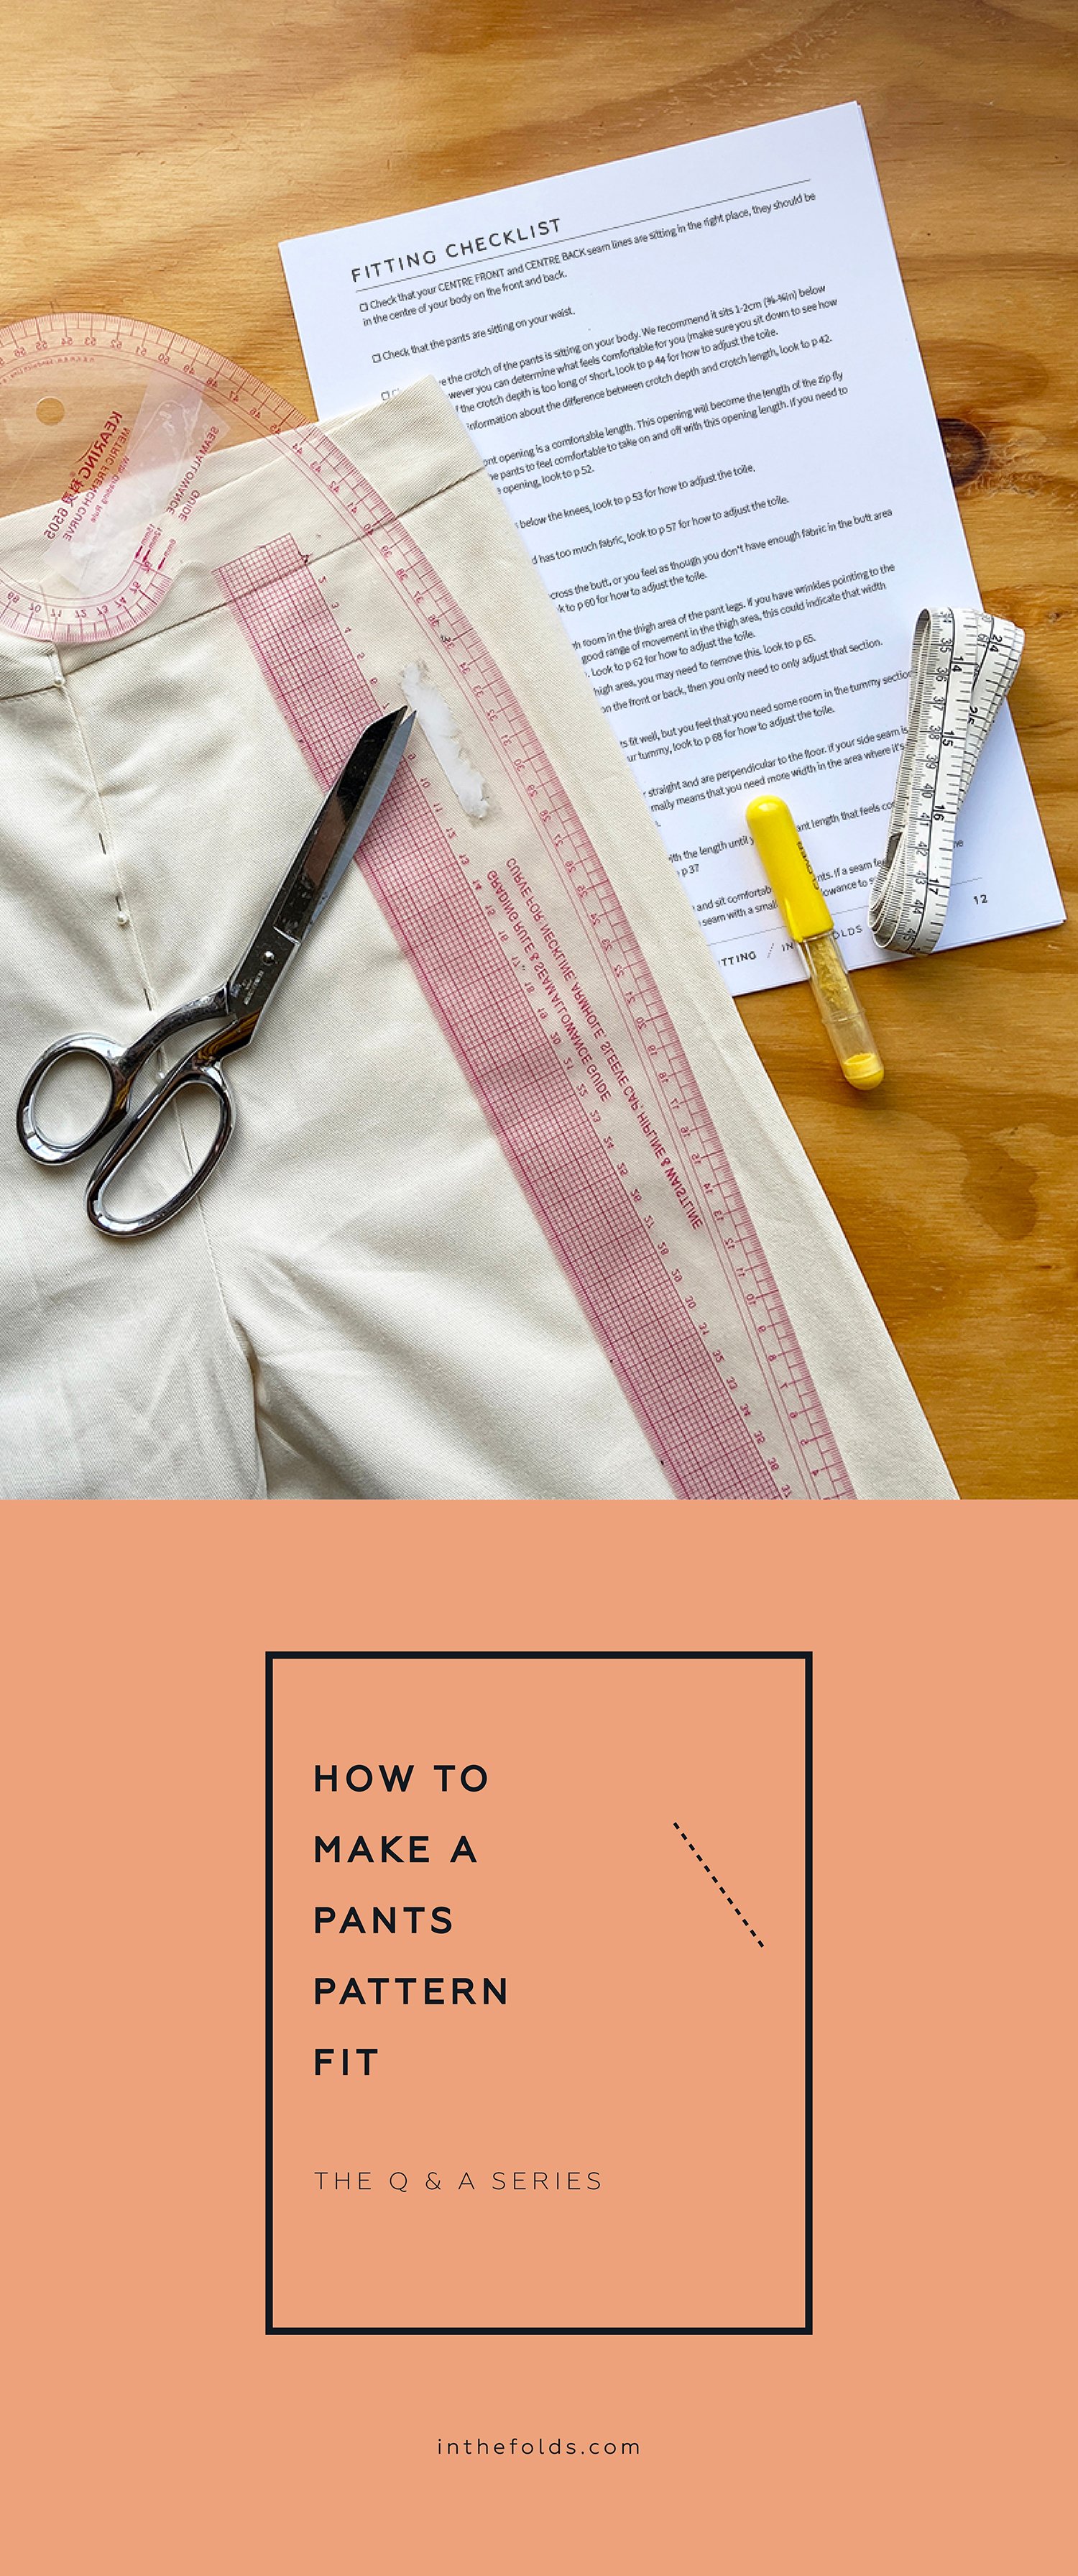
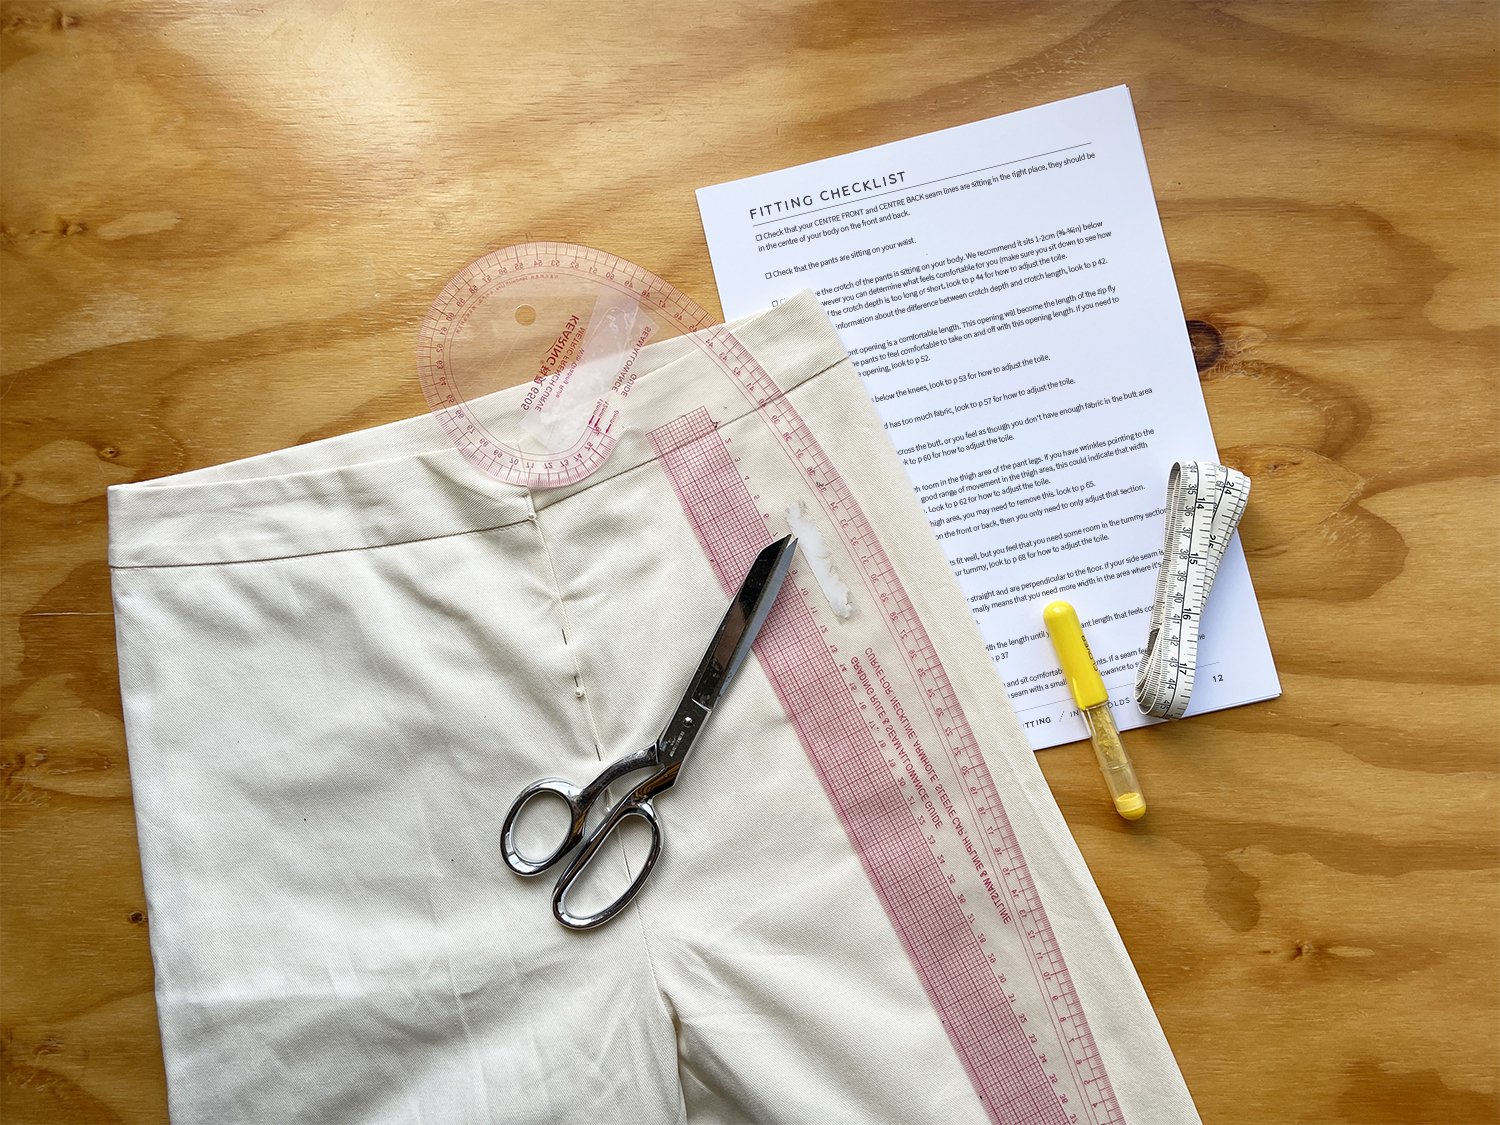
PANTS FITTING CHECKLIST

Our current issue of Curated by ITF includes an extensive Pants Fitting Checklist. We thought we’d share a few of the main things with you so you know where to get started:

  1. Check that your CENTRE FRONT and CENTRE BACK seam lines are sitting in the right place. They should be in the centre of your body on the front and back.

  2. Check that the pants are sitting on your waist (or where they are supposed to be sitting).

  3. Check where the crotch of the pants is sitting on your body. Where this sits will depend on the pattern and how it has been designed.

  4. Check that the opening is a comfortable length and you can get in and out of the pants easily. For example, with our pants fitting pattern it has a front opening for a zip fly front.

  5. Check for drag lines on your toile. Drag lines are lines in the fabric that form when fabric is being pulled across a part of the body. It may indicate that there is not enough length or width in a certain part of the garment. Sometimes it can be easier to spot drag lines by taking a photo of your toile. Ask a friend or family member to take the photos or use a tripod or balance your phone on something and use a self-timer to take photos of yourself. Be sure to take photos from all angles. 

  6. Check that you have enough room in the thigh area of the pant legs. It’s a good idea to check while sitting too.

  7. Check that you have enough room in the tummy area. If the waist and hips fit well, but you’re experiencing pulling across the front, you may need some extra room in that area. 

  8. Check that your side seams appear straight and are perpendicular to the floor. If your side seam is pulling towards the front or the back, this normally means that you need more width in the area where it's pulling.

  9. Check the hem length. Have a play with the length until you get a pant length that feels comfortable for you.

  10. Check that you can move and sit comfortably in the pants. Move around. If a seam feels tight, let out the seam with your seam ripper and re-pin the seam with a smaller seam allowance to see if this helps.

We hope this helps you get started on your pants fitting journey. If you feel like you still need a bit of extra support and encouragement, be sure to sign-up to Curated by ITF this month and work alongside our community!

Happy fitting,

Emily


RESOURCES MENTIONED IN THIS ISSUE

  • The Pants Fitting pattern & Fit Kit is the second part in our Pants Sewing project series, which is available through our Curated by ITF subscription. Past issues are also now available for purchase by subscribers. More information can be found here.

  • How to (and why) make a toile - read the tutorial here.


For more issues of the Q & A series, you can check out the archive here.

WHAT YOU’VE BEEN MAKING


MORE POSTS IN THE SERIES

ISSUE 130 - How to shorten the Hove jacket

THE Q & A SERIES

How to shorten the Hove jacket

Hi Emily 

I am really enjoying improving my skills each month with Curated and I’m about to start the Hove Jacket (View A).

I am short and I would like to shorten the overall jacket length . This pattern has a couple of beautiful curves in its feature panels that are intersected by the shorten/lengthen lines - could you please provide some tips on grading a curve when shortening 80-100mm.

Jen
Adelaide


Hi Jen,

Great to hear you are enjoying Curated by ITF and would like to give the Hove jacket a go!

Here at In the Folds we love a curved seam. They make fun and interesting shapes to wear and sew. Some of our favourite curved seams can be found in the Hove jacket, Flynn jacket and the Darlow pants.

You’re right though, when it comes to shortening or lengthening a pattern with curves, it does change the process a little bit, in comparison to altering straight seams. 

The Hove jacket and the Flynn jacket are actually sibling patterns and share the same curves. We have a tutorial here that shows you how to shorten the Flynn, which you can use on the Hove jacket as well.

CHECK AND TRUING A PATTERN

Once you have made the adjustment to the length, the most important part of the process is to check that your seams fit together. This is called “checking and truing” a pattern.

This means that you walk the seams together as if they have been sewn and check that all the seams are the correct length and that the notches line up. We have a tutorial on that process here.

I’d suggest you get into the habit of checking and truing your patterns after making any pattern alterations. It only takes a few minutes once you get the hang of it. Believe me, it will save you a lot of frustration in the long run because you’ll be able to catch a rogue notch or a seam that you didn’t quite adjust properly before it affects the garment’s construction.

I hope these tutorials give you the confidence to shorten the pattern!

Happy sewing,
Emily

Happy sewing,

Emily


RESOURCES MENTIONED IN THIS ISSUE

  • The Flynn jacket pattern can be found here.

  • The Hove jacket pattern can be found here.

  • The Darlow pants pattern can be found here.

  • More information about our Curated by ITF sewing subscription can be found here.

  • Shortening the Flynn jacket - tutorial can be found here.

  • Checking and truing - tutorial can be found here.


For more issues of the Q & A series, you can check out the archive here.


WHAT YOU’VE BEEN MAKING


MORE POSTS IN THE SERIES

ISSUE 125 - HOW TO DO A FULL BUST ADJUSTMENT

THE Q & A SERIES

HOW TO DO A FULL BUST ADJUSTMENT

Hi there,

I really love the new Rennie dress pattern and I'm considering signing up for your Curated by ITF sewing subscription, but I have a full bust and I don't know if the pattern will fit me. Can you please help me figure this out?

Thanks for your time,

Deb


Hi Deb,

I'm so glad to hear that you love our latest Curated by ITF project, the Rennie dress! We're in love with it ourselves. In fact, I just finished making another one for myself, and can confirm that the beautiful finishes make it such an empowering sew! There's really nothing like the feeling you get after finishing a garment that looks as beautiful on the inside as on the outside. 

When it comes to sewing your own clothes it's really important to understand that a pattern is really just a starting point. As I'm sure you can appreciate, it is impossible to make one pattern fit the myriad of wonderful body shapes and sizes in the world. So we're really proud at In the Folds to be able to provide extra resources to our customers to help you fit our patterns to YOUR particular body. And we can definitely help you figure out what you need to do if you have a full bust.

What is a full bust adjustment?

In sewing terms, an adjustment made to a pattern to accomodate a full or larger bust is called a Full Bust Adjustment (FBA).

HOW DO I KNOW IF I NEED A FULL BUST ADJUSTMENT?

You should always use the pattern fit measurements as your starting point when determining what pattern adjustments need to be made, and the same goes for a Full Bust Adustment. This will give you an understanding of how your body aligns with the sizes the pattern provides. 

In The Folds patterns are drafted for a B cup bust for sizes A-J, and a D-cup bust for sizes G-P. If your bust cup size is larger than the pattern’s intended cup size you may need to do a Full Bust Adjustment or FBA.

You also need to consider the style of the pattern you're making, and how you would like the finished garment to fit. If a pattern has a lot of ease (ie. a loose or generous fit), you may choose not to adjust the pattern. If a pattern is designed to be fitted in the bust, it is more likely that you will need to make an FBA.

If you have already made a toile and everything fits nicely, but feels or looks tight across the bust you may need to make a FBA. This will also apply if there are diagonal lines radiating from the centre front or side seams towards your bust apex point.

Keep in mind that there are cases when your measurements may indicate that you need to do a FBA, but you actually need to alter another part of the pattern, such as the back width.

WORK OUT YOUR SEWING CUP SIZE

Cup sizes in sewing patterns are different to bra sizes and often don't correspond. Figuring out your sewing cup size should be your first step in determining if you need to make a pattern adjustment.

To figure out your sewing cup size, take your HIGH BUST MEASUREMENT (1) and BUST MEASUREMENT (2) and record them in the table above.

Work out the difference between your HIGH BUST MEASUREMENT (1) and BUST MEASUREMENT (2) and add it to the table (3).

If the difference between your HIGH BUST MEASUREMENT and your FULL BUST MEASUREMENT is 2.5cm (1") your bust is an A cup, 5cm (2") it's a B cup, 7.5cm (3") is a C cup, 10cm (4in) is a D cup and so on.

You can remove the dart all together by removing the full difference between the high bust and bust measurement of the pattern. 

Record your bust cup size in the chart (4).

If your cup size is smaller than the pattern’s cup size you may need to do a Small Bust Adjustment (SBA) - you can find a tutorial here.

If your cup size is the same or similar to the pattern’s cup size, it’s likely you can leave it as it is.

If your cup size is bigger than the pattern’s cup size, you may need to do an FBA.

Many In The Folds patterns include a lot of design ease, so you may choose not to make the alteration for some styles (for example, I have an A cup size bust and don't bother with an SBA for the Collins top or the Rushcutter dress, but I do for the Acton dress, as it is more fitted).

FIGURE OUT HOW MUCH TO ADD

To make a correct adjustment you now need to work out how much you to add to the pattern to fit your bust cup size.

If you have a C cup bust cup size and your pattern is a B cup, then you will need to add 1 cup size (i.e. 2.5cm / 1in). If you have a D cup bust cup size, you will need to add 2 cup sizes (i.e. 5cm / 2in) and so on. Record the amount you need to add in the table above (5).

This number is the total amount you need to add to the pattern.

The FRONT [1] piece of a pattern is usually cut on the fold or as a pair so you will need to add half of your measurement at (5) to each side of the pattern. Divide (5) from the table by 2 and record it in the table above (6). This is the amount you will be adding to the pattern.

HOW TO DO A FULL BUST ADJUSTMENT

We will use the example of changing a pattern from a B cup to a D cup.

This means we will be adding 5cm (2in) or 2 cup sizes in total. Therefore, half of this - 2.5cm (1in) should be added to the FRONT [1] pattern piece, so that when the piece is cut as a pair or on the fold, the full amount required will be added.

To begin, trace a copy of the FRONT [1] pattern piece. (We suggest you use a copy so that if you make a mistake you always have the original to go back to.) Be sure to include all pattern markings, including grainline, notches and drill hole. It is also important trace off the stitching line (the grey line on the pattern).

Note: If your pattern is a jumpsuit or has design panels/features below the waistline then you may have to cut through the waist section of the pattern.

In the example of a jumpsuit, you will have the bodice and pant sections as two independent pieces. In this case, we would alter the bodice section and then join the other pieces back together.

Step 1

Take a ruler and draw a line through the centre of the dart. Extend the line beyond the tip of the dart. 

This line will be referred to as line A.

Step 2

Mark the apex point on the line. (The BUST APEX POINT is the peak of your bust). On In The Folds B-cup patterns this is normally 2.5cm (1in) beyond the tip of the dart point. On In The Folds D-cup patterns this is normally 5cm (2in) beyond the tip of the dart point.

If you have already found your actual BUST APEX POINT in relation to the pattern, mark this point, rather than the point indicated.

Step 3

Draw a line straight down from the BUST APEX POINT, parallel to the grainline. Extend to the WAIST LINE.

This line will be referred to as line B.

Step 4

Draw a line from the BUST APEX POINT through to the notch on the armhole. 

This line will be referred to as line C.

Step 5

From the LENGTHEN/SHORTEN LINE, cut up line B. When you get to the BUST APEX POINT, turn and cut along line C

Slow down as you approach the STITCH LINE. Stop about 1mm from the STITCH LINE. 

Cut in from the seam allowance on the armhole towards the point you stopped cutting on line C. Don’t cut through to the point - leave a small 1-2mm ‘hinge’ of paper that keeps the two parts of the pattern piece intact.

Step 6

Cut along line A from the side seam. Leave a small paper hinge at the BUST APEX POINT.

Step 7

The alteration so far is preparing the pattern to add width to the bust line. You will also need to add some length to the bust. This is because we need more fabric across the bust horizontally, as well as vertically. 

Mark a line 5cm (2in) from the bottom (parallel to the LENGTHEN/SHORTEN LINE) from line B to the CENTRE FRONT. 

We will refer to this as line D.

Step 8

Cut along line D. Mark the top of the piece that you remove so that you don't get confused when you put the pieces back together.

Step 9

Take a piece of pattern paper that is larger than the bodice section. Draw a vertical line in roughly the centre of the paper. We will refer to this as line E

By this stage you should know how much width you need to add to the bust (if you don't, refer to the measurements you recorded in the table above). Draw a second line, parallel to the first, the distance you need to add away from the first line. For example, if you need to add a total of 5cm (2in) to the bust, you will draw the line 2.5cm (1in) away from the first line.

This will be line F.

Step 10

Now that you have cut through the lines on the pattern, you will be able to manoeuvre the pattern to add the extra width you need at the bust. 

Carefully place the pattern onto the guidelines you drew in the previous step. To start, align line B on the pattern (the side of line B that is on the dart side) with line F

Tape or glue in place (this section of the pattern only).

Step 11

Carefully move the other side of the pattern piece until the other side of line B (closest to the CENTRE FRONT) lines up with line E. When everything is lined up, tape this section of the pattern in place.

Step 12

Take a ruler and extend the CENTRE FRONT line (along the CUT LINE) onto the paper underneath. Do the same for the LENGTHEN/SHORTEN line at the waist. The two lines will intersect.

Step 13

Take the section of the pattern you cut off in Step 8 and line up the corner with the lines marked in Step 12. When it’s in place, tape or glue in place.

Step 14

Draw in the dart arms by joining the dart notches to the original dart point and extending the lines until they intersect. 

Check that this is the correct dart point positioning for your body. Do this by measuring your body and checking the pattern, or by creating a toile. Here’s a video resource from Made to sew on how to measure your bust apex.

Due to the FBA, you may end up with a very large dart and as a result it can be difficult to achieve the shaping you need for the bust. Consider rotating part of the dart to become a second dart. We would suggest a French dart. See this article for more info on rotating darts

Reattach the lower section of the pattern if applicable. You will notice the waist measurement has increased. Adjust the bodice to match the lower section.

Making clothes to fit your own body is another very empowering aspect of learning to sew. I hope this tutorial helps you on your sewing adventures, Deb!

Happy sewing!

Emily


RESOURCES MENTIONED IN THIS ISSUE

  • Rennie dress pattern is currently only available as part of our Curated by ITF sewing subscription. It will be released as a standalone pattern in 2023. More information about Curated by ITF can be found here.

  • Small Bust Adjustment - tutorial here.

  • Collins top - pattern here.

  • Rushcutter dress - pattern here.

  • Acton dress - pattern here.

  • How to measure your bust apex - tutorial here.

  • How to rotate darts - tutorial here.


For more issues of the Q & A series, you can check out the archive here.


WHAT YOU’VE BEEN MAKING

Want your photo featured in our weekly email?
Make sure to tag us on instagram! @inthefolds


MORE POSTS IN THE SERIES

ISSUE 119 - How to raise an armscye on a pattern

THE Q & A SERIES

How to raise an armscye on a pattern

Hi there!

I enjoyed seeing your answer to last week's question and I have a follow-up question. Rather than how to lower the armscye on a pattern, how do I go about raising the armscye?

Thanks,

Jenna


WHAT IS AN ARMSCYE ADJUSTMENT?

We’re happy to hear you found last week’s tutorial interesting!

As we explained in last week's email, an armscye (or armhole) adjustment is where you redraw a sewing pattern to make it fit your body. In this case, we need to raise the armscye to accommodate the unique shape of the body.

How do I know if I need to raise an armscye?

You'll know you need to raise the armscye of a garment if:

  • The armhole sits lower than you would like. In this case you might see the garment sitting lower than the top of your bra.

  • The armhole feels too long - it feels as though there is too much fabric in the armscye.

How to raise the armscye on a pattern

The first question to ask yourself is - how much would you like to raise the armscye by?

The easiest way to work this out is by trying on the garment. Stand side-on in front of a mirror and lift your arm. Take a ruler and hold the top of it where you would like the bottom of the armscye to sit. Record the distance between the top of the ruler and the original armscye position. You could use a tape measure to do this, but we find it easier to use a ruler as it remains straight - if you have a friend to help you then a tape measure is fine.

It’s also a good idea to visualise how this will change the shape of the armhole, as when you raise the armscye it will also make it smaller. In the illustration above we have marked the new armscye on the garment so you can visualise the alteration before making it.

Make the adjustment on the pattern

Step 1

Take some pattern paper and tape / glue to the front armhole. This is the area we will be raising up and filling in with more paper (which means more fabric when we cut the pattern).

Step 2

Take a ruler and pencil. Extend the side seam stitch line up onto the attached paper. Be sure to follow the angle of the original side seam.

On In the Folds patterns the stitch line is marked on the pattern (the stitch line is the pattern without seam allowance), but if your pattern doesn’t have the stitch line marked, you will need to mark it first.

Step 3

On the line marked in the previous step, measure up from the point where the side seam stitch line meets the armhole stitch line, mark the amount you would like to raise the armhole by (this is the measurement you found when you took the measurement from your toile).

Step 4

Redraw the armscye curve - joining the point marked in STEP 3 to the original armscye stitch line. We suggest joining the armscye about one-third of the way around the curve when measuring from the bottom, although this will depend on how much you are raising the armscye by. If you are only raising the armhole by more than 1.5cm (5/8in), you may need to join the new line higher up the armscye to ensure the transition remains nice and smooth.

This will take a bit of trial and error to get a line you are happy with. Take it easy and use a pencil. A French curve or Patternmaster will come in handy for this.

The line that meets the side seam should be fairly flat by the time it meets the side seam stitch line. This will ensure the armscye doesn’t come to a point under the arm. Get it as smooth as you can, but we will check this again in a moment, so the line does not have to be finalised yet.

Step 5

Repeat STEPS 1-2 on the BACK pattern piece. You need to raise the armscye on the FRONT and BACK by the same amount.

Step 6

Place the FRONT and BACK pieces together at the side seam, stitch line on stitch line, as if the pieces have been joined.

Check that the curve from the front armscye runs smoothly through the side seam to the back and there are no dips or bumps.

Smooth out the armscye if it needs it and use a tracing wheel to transfer the markings to the overlapped section of the pieces.

Step 7

Add seam allowance onto the new armscye stitch lines on the FRONT and BACK. The seam allowance needs to be the same amount that was on the original armscye line. More information on how to add seam allowance to a pattern can be found here.

Cut along the new armscye seam allowance line to remove the excess paper.

Step 8

Move any notches to the new pattern edge. In this case, it’s the seam allowance notches on the side seam and the FRONT armscye notch.

Step 9

To finalise the pattern, make the same adjustment to the armhole facing pieces (if the pattern has facings).

Happy sewing,

Emily


RESOURCES MENTIONED IN THIS ISSUE

  • How to lower an armscye on a pattern. Tutorial can be found here.

  • How to add seam allowance to a pattern. Tutorial can be found here.


For more issues of the Q & A series, you can check out the archive here.


WHAT YOU’VE BEEN MAKING


MORE POSTS IN THE SERIES

ISSUE 118 - How to lower the armscye on a pattern

How to lower the armscye on a pattern

THE Q & A SERIES

How to lower the armscye on a pattern

Hi, I have a question about armscyes. I have a couple of sleeveless dresses and tops which feel uncomfortable in the underarm area - they feel too tight. Is there an easy way to lower the armscye for a more comfortable fit? Or do you have any other suggestions on how to improve the fit?

Thank you! 

Jennifer
Thirlmere, Australia


If you've ever worn a garment that doesn't fit correctly under the arms you'll know how uncomfortable (we'd even go as far as to say painful!) it can be. Aside from comfort, wearing ill-fitting garments can actually lead to them wearing out earlier than they should. Unnecessary stress on the armhole can cause seams to break, and in some situations, the fabric may even tear and cause irreparable damage to the item. Sustainability is something we care a lot about so we definitely want our clothes to last as long as they can, especially when we've dedicated many hours to making them by hand.

Thankfully, lowering an armscye is a relatively simple pattern adjustment to make that will have a significant impact on the fit and wearability of your clothes. So let's get to it!

What is an armscye adjustment?

An armscye (or armhole) adjustment is where you redraw a sewing pattern to make it fit your body. In this case, we need to lower the armscye to accommodate the unique shape of the body.

How do I know if I need to make an armscye adjustment?

You'll know you need to lower the armscye of a garment if:

  • A garment restricts the movement of your arms and shoulders. In this case, the garment will feel tight and you may even find that the armhole seams cut into the front of your armpits.

  • You notice pulling across the front of a garment.

A bust showing a marked up toile.

Sometimes a tight armscye is caused by not having enough length in the area between the shoulder and the bust (rather than indicating the need to lower the armscye). The easiest way to check this is to determine whether the bust darts are in the correct position. If they are sitting too high, this could be an indication that you need more length added to the pattern between the shoulder and bust. In which case you can lengthen the pattern above the bust line using this tutorial. By lengthening the pattern in this way, you will be lowering the armsyce as well as adding more length through the whole chest. If the bust darts are in the correct position then it is likely you just need to lower the armscye.

How to lower the armscye on a pattern

A dressmaker's dummy is wearing a blue dress. A pin sits under the armhole.

The first question to ask yourself is - how much would you like to lower the armscye by?

The easiest way to work this out is by trying on the garment that feels too tight at the armscye. Place a horizontal pin in the side seam under the arm in the position where you would like the bottom of the armscye to sit.

A dressmaker's dummy  is wearing a blue dress. The image is marked to show how to lower an armscye.

It’s also a good idea to visualise how this will change the shape of the armhole, as when you lower the armscye it will also make it wider. In the illustration above we have marked the new armscye on the garment so you can visualise what this change will do.

Also, think about the underwear you might wear with the garment, and consider if lowering the armscye will impact this. Will the underwear be visible by making this change?

When you are happy with the amount you will be lowering the armscye by, measure this on the garment from the top of the side seam down to the pin. Record the measurement.

Make the adjustment on the pattern

A marked up pattern image showing how to lower an armscye.

Step 1

Take the FRONT piece of your pattern and mark the new armscye point on the side seam. Measuring from the point where the side seam stitch line meets the armscye stitch line. On In the Folds patterns the stitch line is marked on the pattern (the stitch line is the pattern without seam allowance), but if your pattern doesn’t have the stitch line marked, you will need to mark it first.

Step 2

Redraw the armscye curve - joining the point marked in STEP 1 to the original armscye stitch line. We suggest joining the armscye about one-third of the way around the curve when measuring from the bottom. If the armscye feels tight in other parts of the curve (not just under the arm), you might choose to join the armscye higher up so that the curve becomes larger.

The line that meets the side seam should be fairly flat by the time it meets the side seam stitch line. This will ensure the armscye doesn’t come to a point under the arm. Get it as smooth as you can, but we will check this again in a moment, so the line does not have to be finalised yet.

Drawing curves takes a bit of practice. If you're planning on making adjustments to patterns regularly, a French curve is a useful sewing tool to add to your collection, and will help greatly in this example.

Step 3

Repeat STEPS 1 and 2 on the BACK pattern piece. You need to lower the armscye on the FRONT and BACK by the same amount.

Step 4

Place the FRONT and BACK pieces together at the side seam, stitch line on stitch line, as if the pieces have been joined.

Check that the curve from the front armscye runs smoothly through the side seam to the back and there are no dips or bumps.

Smooth out the armscye if it needs it and use a tracing wheel to transfer the markings to the overlapped section of the pieces.

Step 5

Add seam allowance onto the new armscye stitch lines on the FRONT and BACK. The seam allowance needs to be the same amount that was on the original armscye line. More information on how to add seam allowance to a pattern can be found here.

Cut along the new armscye seam allowance line to remove the excess paper.

A marked up pattern image showing how to lower an armscye.

Step 6

Move any notches to the new pattern edge. In this case, it’s the seam allowance notches on the side seam and the FRONT armscye notch.

Step 7

To finalise the pattern, make the same adjustment to the armhole facing pieces (if the pattern has facings).

Learning how to alter patterns is the thing that allows you to really step your 'me-mades' up a notch, whether it’s for achieving a better fit or tailoring a garment to suit your tastes and preferences. This is a key element of our sewing subscription Curated by ITF. Each month we learn loads of different techniques to adjust a pattern to create a myriad of new options. So if you’ve been wanting to learn some pattern making skills but don’t know where to start, check out Curated by ITF today!

Happy sewing,

Emily


RESOURCES MENTIONED IN THIS ISSUE

  • How to lengthen a pattern above the bust - tutorial here.

  • How to add seam allowance to a sewing pattern - tutorial here.

  • More information about Curated by In the Folds can be found here, and details of our latest issue can be found here.


For more issues of the Q & A series, you can check out the archive here.


WHAT YOU’VE BEEN MAKING


MORE POSTS IN THE SERIES

ISSUE 116 - High bust measurement on In the Folds patterns

THE Q & A SERIES

High bust measurement on In the Folds patterns

Hello there!

I am a member of Curated by ITF which I enjoy. I do, however, tend to look at the patterns that you produce for Peppermint Magazine. I have just downloaded the Pleated Summer Dress and I have a couple of questions:

What cup size has been used for the dress block, please? You quote height but not upper bust size. This helps me understand if I need to do an FBA even before making up a toile.

One of the last instructions is around buttonholes and placing them in the placket. Surely it would be easier to do the buttonholes before actually attaching the skirt so that you have less fabric to wrestle???? (fabric wrestling is popular sport for me!)

I look forward to hearing from you.

Thanks

Zoe


At this stage, all In the Folds patterns are drafted for a B cup bust (except for the Whitlow robe which we recently released in our extended size range). The Pleated summer dress pattern was produced a number of years ago, before we started including high bust measurements in our instruction booklets. The same block was used that we currently use and you can find the high bust measurements here.

Feel free to place your buttons and buttonholes at any point you like. You could even do them as soon as the placket is complete as the neckline is all finished at this point. I just generally do them at the end as it was the way I was taught, but there is no particular reason to do that and it's always a good idea to construct garments in the ways that are comfortable to you (and avoid fabric wrestling if possible).

I think we often can second guess ourselves and assume the instructions know better - but there are often times when you are better off choosing a method or order of construction that suits your preferences. Even I fall into this trap sometimes when I use another company's patterns and then kick myself later for not just doing it the way that I enjoy / that makes me feel comfortable.

Happy sewing,

Emily


RESOURCES MENTIONED IN THIS ISSUE

  • The free Pleated Summer dress pattern can be found here.

  • The Sizing Chart that all In the Folds patterns are based on is available here.


For more issues of the Q & A series, you can check out the archive here.


WHAT YOU’VE BEEN MAKING


MORE POSTS IN THE SERIES

ISSUE 114 - Grading between sizes on a panelled skirt pattern

Grading between sizes on a panelled skirt pattern.

THE Q & A SERIES

Grading between sizes on a panelled skirt pattern

Hello Emily

I am participating in a denim sew-along this month and plan to make your Barkly skirt again.

I am getting the pattern for view A (the shorter length) printed out again so that I can adjust the pattern more accurately and give a better review.

Could you help me with this, please? I didn't understand grading the sizes on your site. I am size E for the waist and C for the hips, I am 32" waist and 37" hips. What is the best way of adjusting this on a panelled skirt, please?

Do I simply put the ruler straight from the waist size E to the bottom hem size C and not alter the curved of the hip where the pockets lie on the side front and back panels.

I plan to use stretch denim and make a lapped zip and so will alter seam allowances for a centre back 1" seam allowance.

Christine


Hi Christine,

I’m thrilled to hear you’re using the Barkly skirt pattern for a sew-along! It's always so motivating when you're sewing with others, which is one of the reasons why we created our Curated by ITF subscription

In fact, this month in Curated by ITF we are learning all things skirt fitting and the Barkly skirt pattern is our focus. We cover this question exactly (and so much more!) so I can definitely help you out with this!

When to grade between sizes

For many of us, our measurements will range across several pattern sizes, which means we will need to grade between sizes. For example, if our waist measurement is in a smaller size bracket than our hip measurement, we will need to grade up from the waist to the hip on the pattern. 

Getting started

Start by printing the pattern in the sizes that you need.

Once printed, you can draw straight on the pattern or take a large piece of pattern paper and lay it over or under the pieces to trace the pattern (depending on whether your paper is transparent or not).

On the Barkly skirt, the WAIST LINE is the top edge of the pattern (this is what attaches to the waist band / waist facing) and the HIP LINE is at the STYLE VARIATION LINE.

Use these instructions if your waist is in a smaller size bracket than your hip.

a  On the CENTRE FRONT PANEL [1/12] pattern piece, start at the pattern edge of the size you require for the waist. Take a ruler or French curve and draw a smooth line to the hip of the required size at the hip line. This line needs to become a gentle curve as it approaches the HIP LINE. Follow the edge of the pattern from the HIP LINE down. Repeat for the SIDE FRONT PANEL [2/13] , SIDE BACK PANEL [7/16] and CENTRE BACK PANEL [6/15].

b   It is likely that some notches will no longer be in the correct position. Work your way along the new pattern edge and move notches to the new CUT LINE. Adjust the pocket pieces by moving to STEP 2.

Use these instructions if your waist is in a larger size bracket than your hip.

On the CENTRE FRONT PANEL [1/12] pattern piece, start at the pattern edge of the size you require for the waist. Take a ruler and draw a smooth line to the hip of the required size at the HIP LINE. Depending on how many sizes you are grading between, to hit the HIP LINE on the CENTRE FRONT PANEL [1/12], the line may need to become a concave curve. This is not ideal as a seam shape, so we suggest instead drawing the line so it is straight and meets the hem of the smaller size. Follow the CUT LINE of the smaller size from the HIP LINE down to the hem. Move notches to the correct position (see STEP b above).

Repeat for the SIDE FRONT PANEL [2/13], SIDE BACK PANEL [7/16] and CENTRE BACK PANEL [6/15].

Adjust the pocket pieces by moving to STEP 2.

Adjust pocket pieces

Take the SIDE FRONT PANEL [2/13] and trace along the pocket edge of your waist size. We recommend using a coloured pen or highlighter to prevent confusion between sizes.

Trace a copy of the POCKET FACING [4] and POCKET BAG [5] pieces in the larger of the sizes you graded to. Don't cut them out just yet.

Place the POCKET FACING [4] on top of the SIDE FRONT PANEL [2/13] and line up the original notches so it is sitting correctly. Use pins or pattern weights to hold in place. Transfer the new seam lines onto the POCKET FACING [4] and trace the pocket edge. Transfer the correct notches.

With the POCKET FACING [4] still in place, place the POCKET BAG [5] on top, lining up the original notches. Hold in place with pins or pattern weights. Transfer the new seam line onto the piece. Transfer the correct notches.

Cut out your new pocket pattern pieces.

Before cutting your pattern pieces from fabric, check that all the pattern pieces fit together correctly.

Happy sewing,

Emily


RESOURCES MENTIONED IN THIS ISSUE

  • Barkly skirt pattern can be found here.

  • The Barkly skirt Fit Kit is available exclusively in this month's Curated by ITF subscription. You can learn more about our Curated By ITF subscription here.

  • Checking patterns: Curved seams tutorial can be found here.


For more issues of the Q & A series, you can check out the archive here.


WHAT YOU’VE BEEN MAKING


MORE POSTS IN THE SERIES