draft a waistband

How to : Draft a waistband for a wrap skirt

waistband_wrap_skirt_1

As you may have seen, last week I showed you how to draft a wrap skirt. The post started to get a little long, so I decided that I would leave the waistband for a seperate tutorial - that I am writing today!

waistband_wrap_skirt_2

The waistband required for a wrap skirt, is one of the most basic to make of all. It is rectangular in shape (with no shaping or darts) and is secured by a waist tie. Depending how long the ties are, you can either secure it with a bow at the front or back of the skirt.

Measure the waistline

waistband_wrap_skirt_3

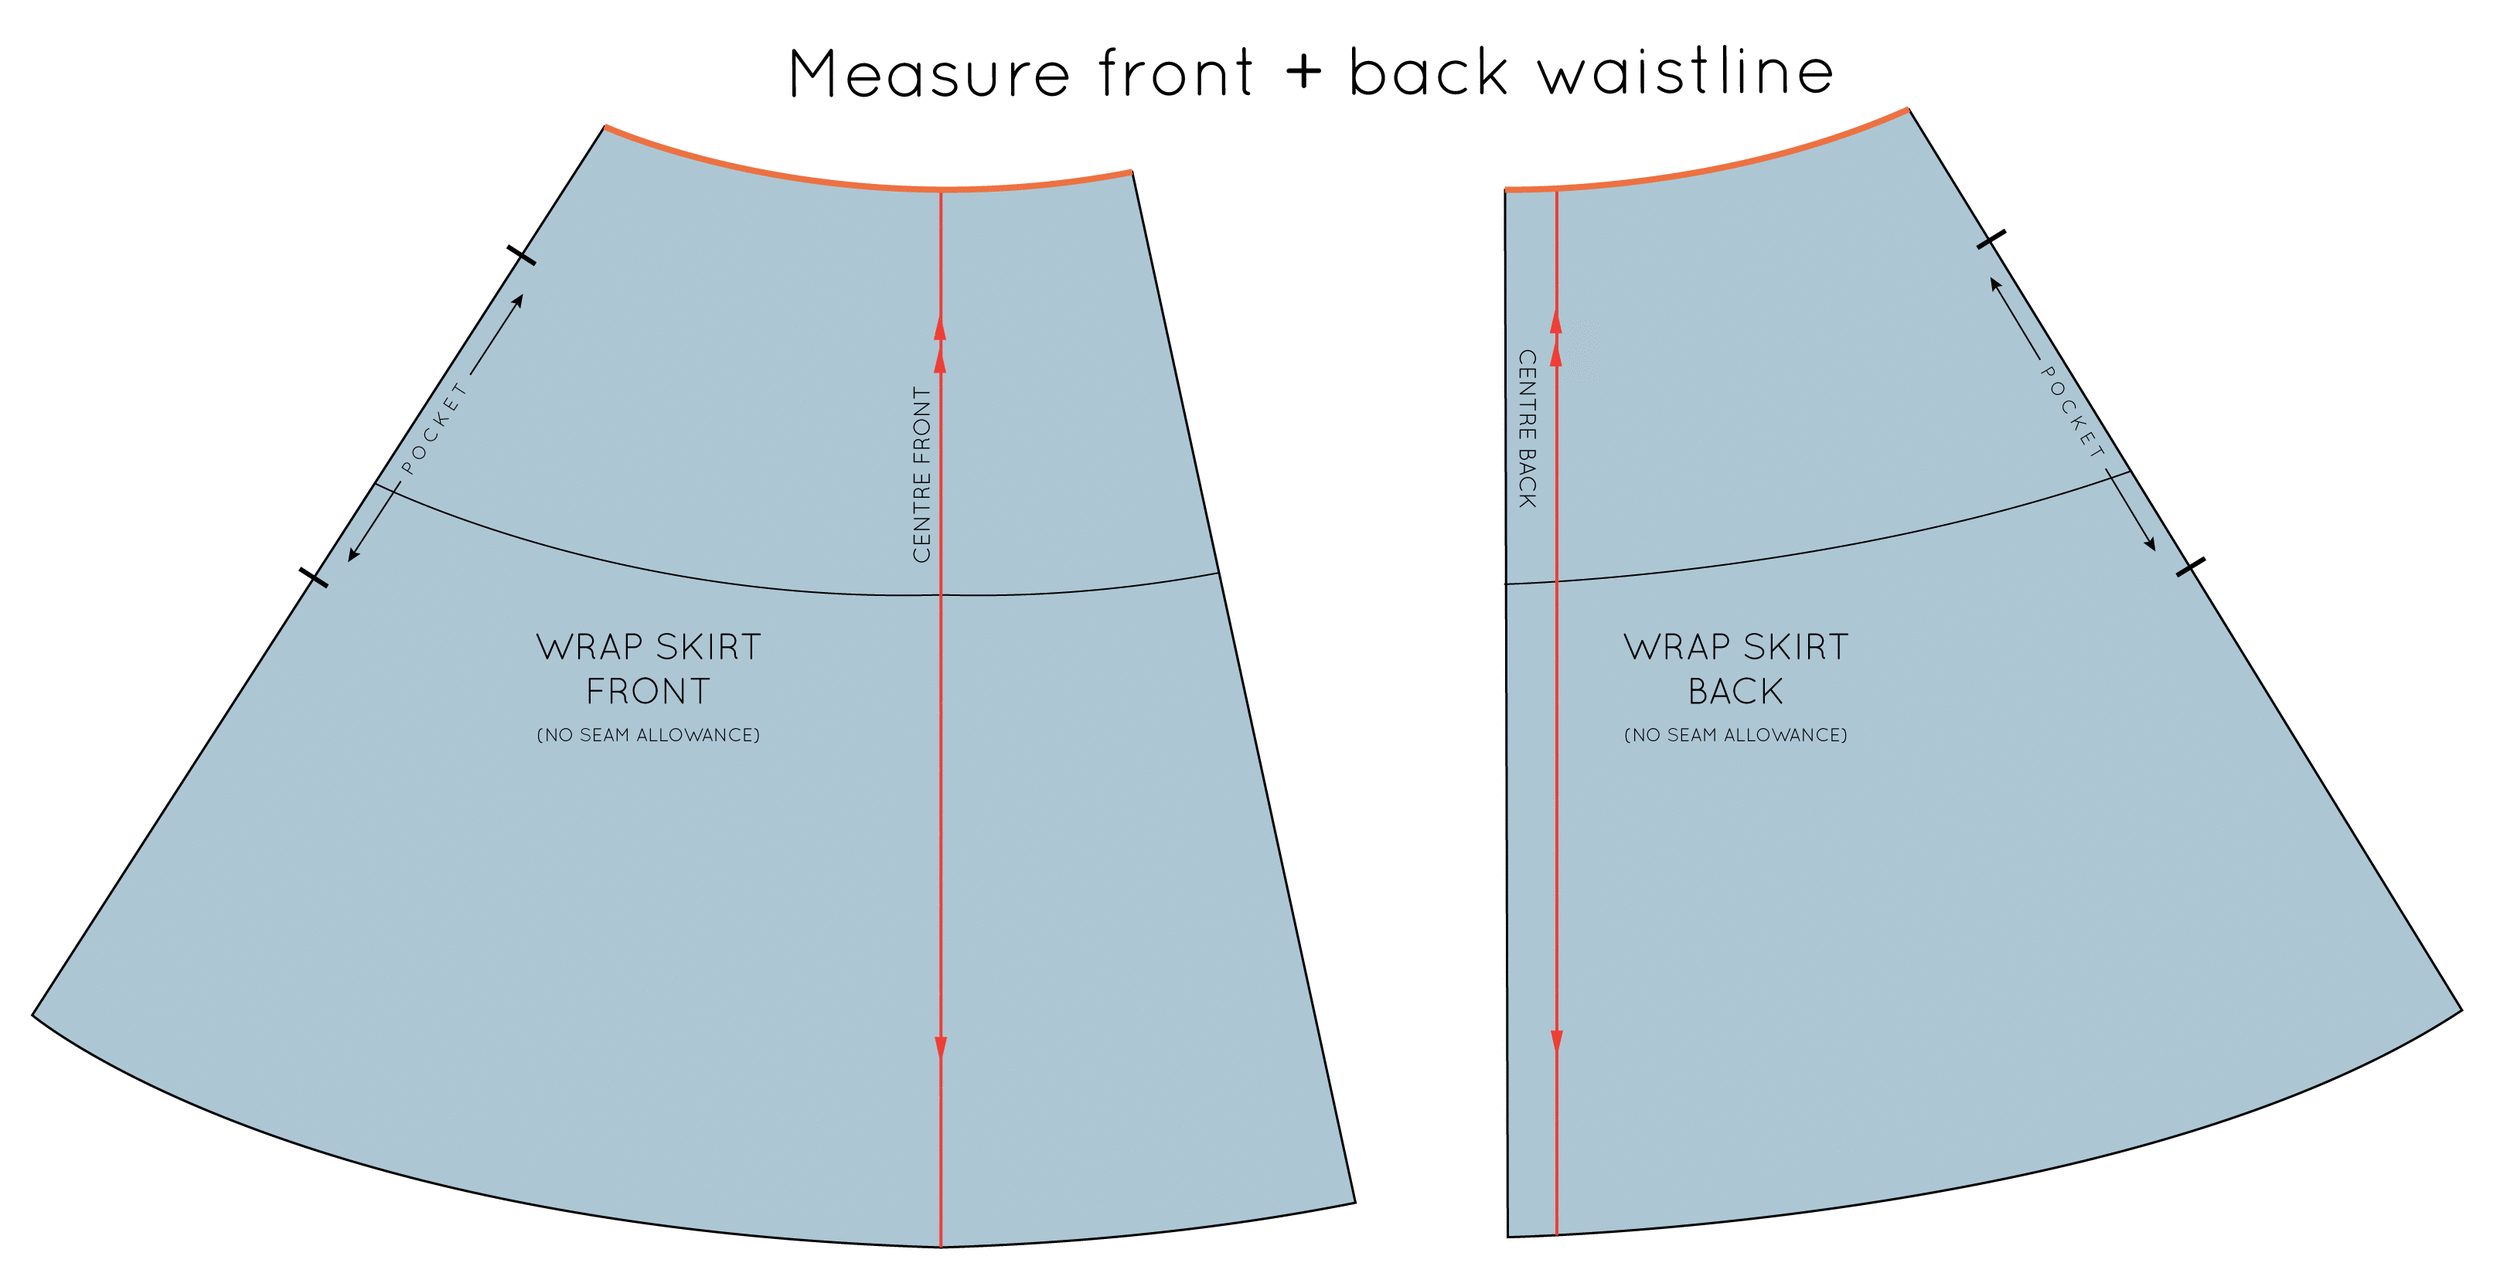
To work out the measurements for your waistband, first, measure the front and back waistline seams of your skirt.

If your pattern has seam allowance, be sure to measure the stitch line and not the edge of the pattern, for an accurate measurement.

You may notice that my pattern pieces have notches for an in-seam pocket. If you would like to know how to add a pocket to your pattern, head over to this tutorial (it's super easy and there is even a printable pocket pattern piece included at the end of the tutorial, if you don't feel like drafting your own!)

Construct the waistband

waistband_wrap_skirt_4

Take the total waist measurement and divide by two (we will be making half a pattern and marking it "Place on fold" - to create a full pattern piece).

waistband_wrap_skirt_5

Decide on the width of your waistband.

This is up to you, although be careful, do not make it too small, as it needs to be wide enough to place a button hole that the waist tie can loop through.

As a guide, my waistband was 4.5cm wide.

waistband_wrap_skirt_6

Complete the shape of the waistband by forming a rectangle, and label the centre back on your pattern piece.

Mark notches

waistband_wrap_skirt_7

Before you can complete the pattern, you need to add notches, to make it easier to sew the two pieces together. 

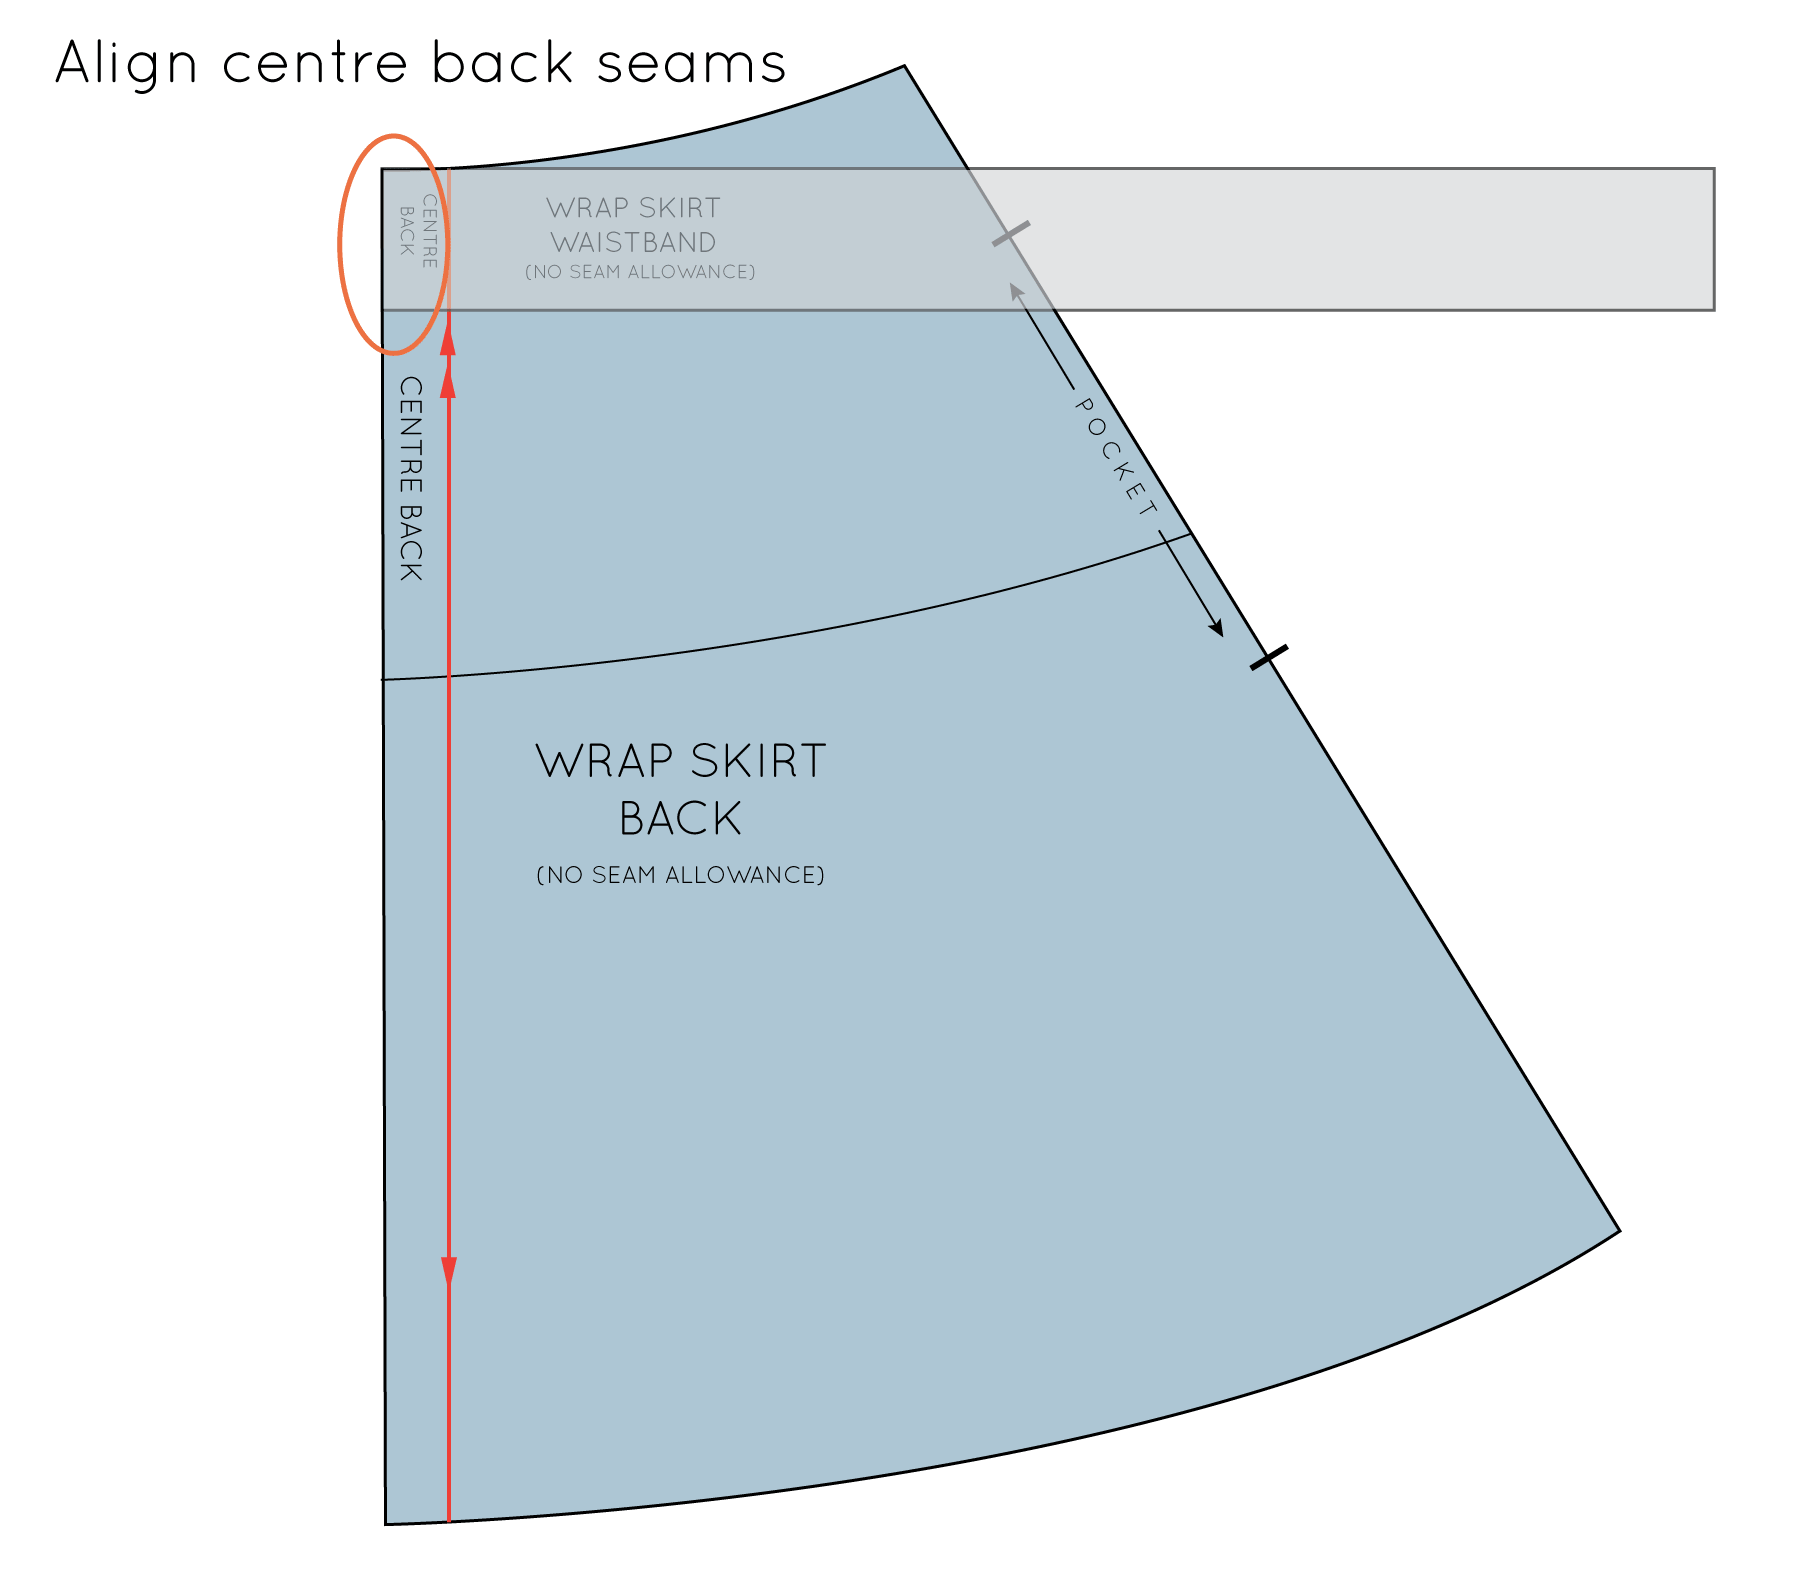
To do this, line up the centre back of the waistband with the centre back of the skirt, as if you were sewing the two pieces together.

Pivot

waistband_wrap_skirt_8

With a stiletto or pin, pivot the waistband pattern along the waist of the skirt - as if you were sewing the pieces together - until you reach the side seam. If you need more guidance with this technique, check out the tutorial on pivoting, that I posted earlier this week. 

Mark side seam

waistband_wrap_skirt_9

When at the side seam, transfer the seam location onto the waistband with a notch.

Move to the front pattern piece

waistband_wrap_skirt_10

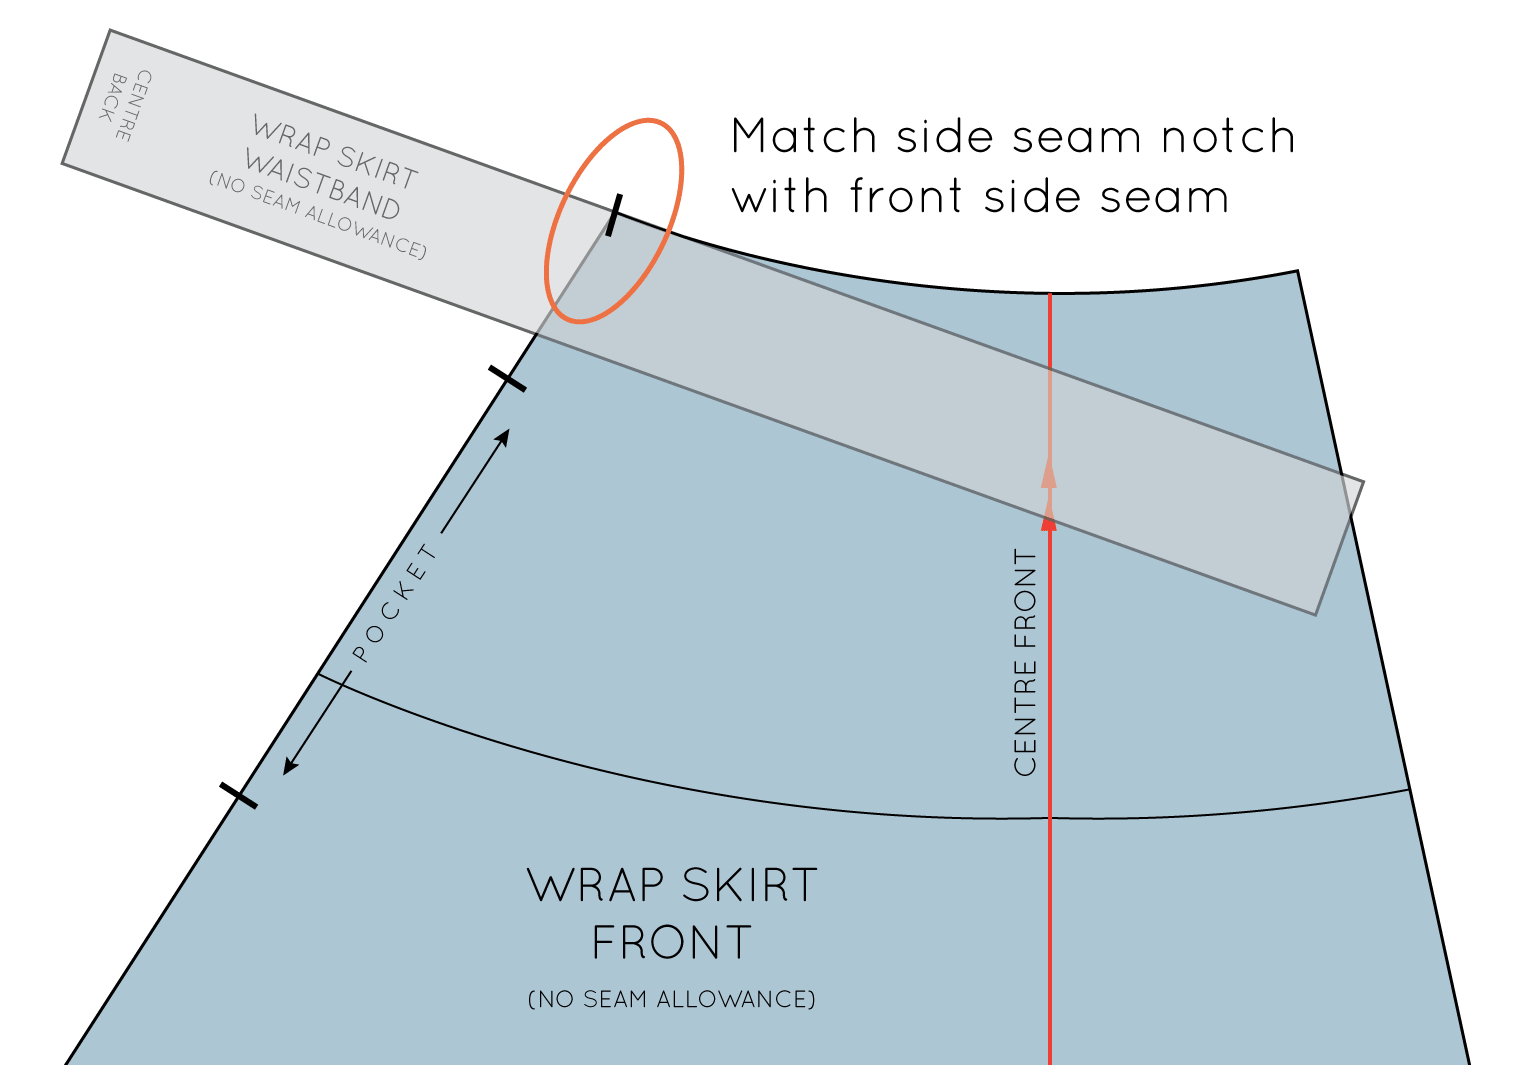
Remove the waistband from the back pattern piece and move it onto the front.

Line up the side seam notch on the waistband with the side seam of the skirt, so that you can continue pivoting the waistband on the front waistband. 

Mark the centre front

waistband_wrap_skirt_11

Pivot the waistband along the skirt until you reach the centre front.

Transfer the centre front point onto the waistband with a notch.

waistband_wrap_skirt_12

Continue pivoting until the end, to confirm that the waistband and the skirt are the same length.

waistband_wrap_skirt_13

Extend the notches, cutting through the waistband pattern piece. You now have the centre back, centre front and side seam marked on your waistband pattern.

Add pattern markings

15.gifwaistband_wrap_skirt_14

You now need to add pattern markings / cutting instructions to the pattern. The centre back will need to be placed on fold, and a pair of these will need to be cut. Add notches at the centre front and side seam (and the centre back seam, when cutting).

Make the waist tie

Work out how long you would like your wait tie to be. 

A good place to start, I think, is your waist measurement plus 30cm.

waistband_wrap_skirt_16

Work out the width you would like your tie to be. Remember, it will need to be slightly thinner than your waistband, so that it can fit through the buttonhole when the skirt is "wrapped."

16.gifwaistband_wrap_skirt_16

Take the figure you have worked out for the length of your tie, and divide this measurement by two (as we will only need to make half the pattern piece). Draw a rectangle this long, and the width you have decided on. To complete the pattern, draw a horizontal line, through the centre of the pattern, and mark as a "fold line."

Add cutting instructions (cut 1 pair - on fold) and seam allowance.


Mark the buttonhole

15_2.gifwaistband_wrap_skirt_17

You will also need to mark the location of the button hole. The buttonhole is how the waist tie wraps around the skirt and only needs to be marked on the left hand side of the pattern.

And you're done! I really hope you have enjoyed this tutorial.


What do you think? Pretty easy, right? Would love to know if you are drafting yourself a wrap skirt!

You may also like:

How to draft a shaped waistband

draft_a_shaped_waistband_1

Last week, I showed you how to draft a straight waistband for your skirt block (it will also work for other garments, such as trousers) as part of The Skirt Series I have been running for the last couple of weeks. Today, I will be showing you how to draft a shaped waistband. 

Before starting, though, I'd like to a little re-cap of a couple of things (which you may remember, if you read the previous waistband post).

two types of waistbands

Most waistbands on skirts or trousers are based on these two basic waistband shapes:

draft_a_shaped_waistband_2

A straight waistband - which is a long rectangle that generally does not have side seams. 

draft_a_shaped_waistband_3

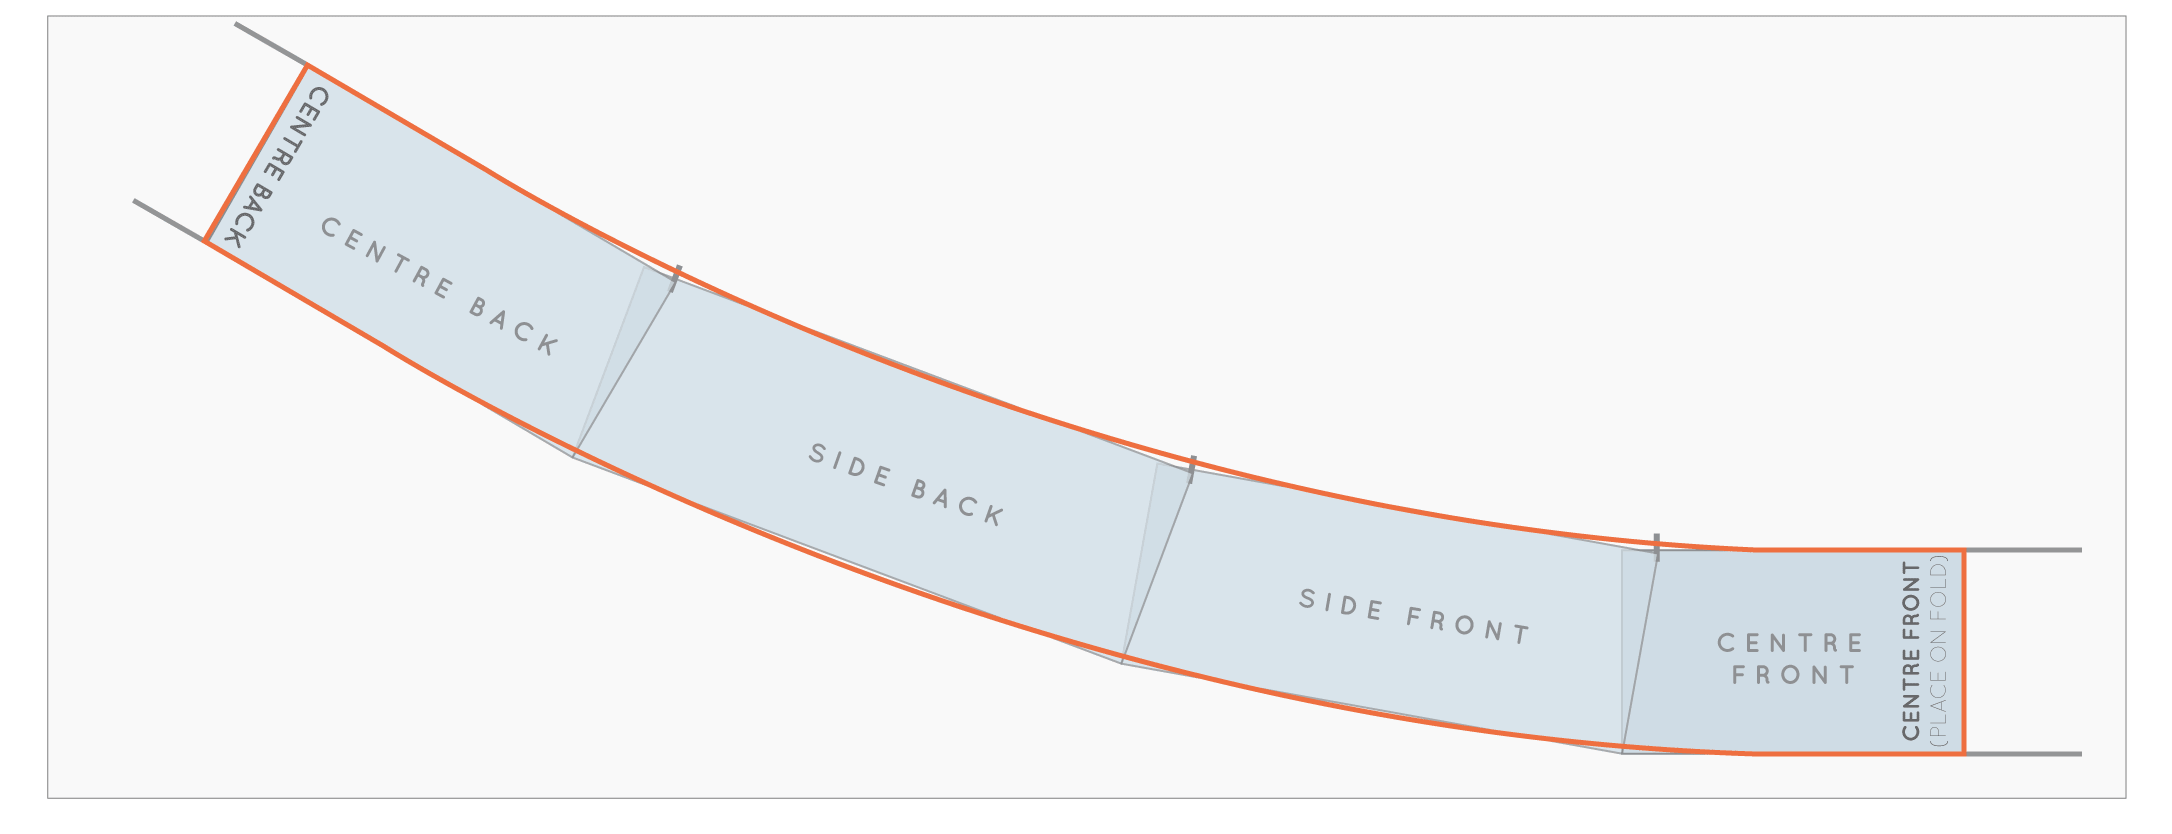
A shaped waistband - which may, or may not, have side seams. 

SHOULD I DRAFT A STRAIGHT WAISTBAND OR A SHAPED WAISTBAND?

Either option can be drafted for the skirt block, and which is better for you comes down to individual preference and body shape. For me, I am a little too curvaceous in the lower half to feel comfortable in a straight waistband (as the top of a straight waistband tends to gape on me).

If you followed the tutorial to draft a straight waistband, you will see the first few steps are the same, so if you'd like to go back to the construction of your straight waistband, then you can! If you haven't already drafted the straight waistband, not to worry, just skip over the next two steps and start with 'Take measurements.'

Trace your pattern

draft_a_shaped_waistband_4

On a seperate piece of pattern paper, trace a copy of the straight waistband, without seam allowance.

Indicate the centre front and centre back.

draft_a_shaped_waistband_5

Using the notches to guide you, mark the points of interest (front dart, back dart, side seam) with vertical lines on the pattern.

TAKE MEASUREMENTS

If you haven't already drafted the straight waistband, you will need to start by taking some measurements from your skirt block. 

draft_a_shaped_waistband_6

Remember to measure along the stitch line, not the edge of the pattern.

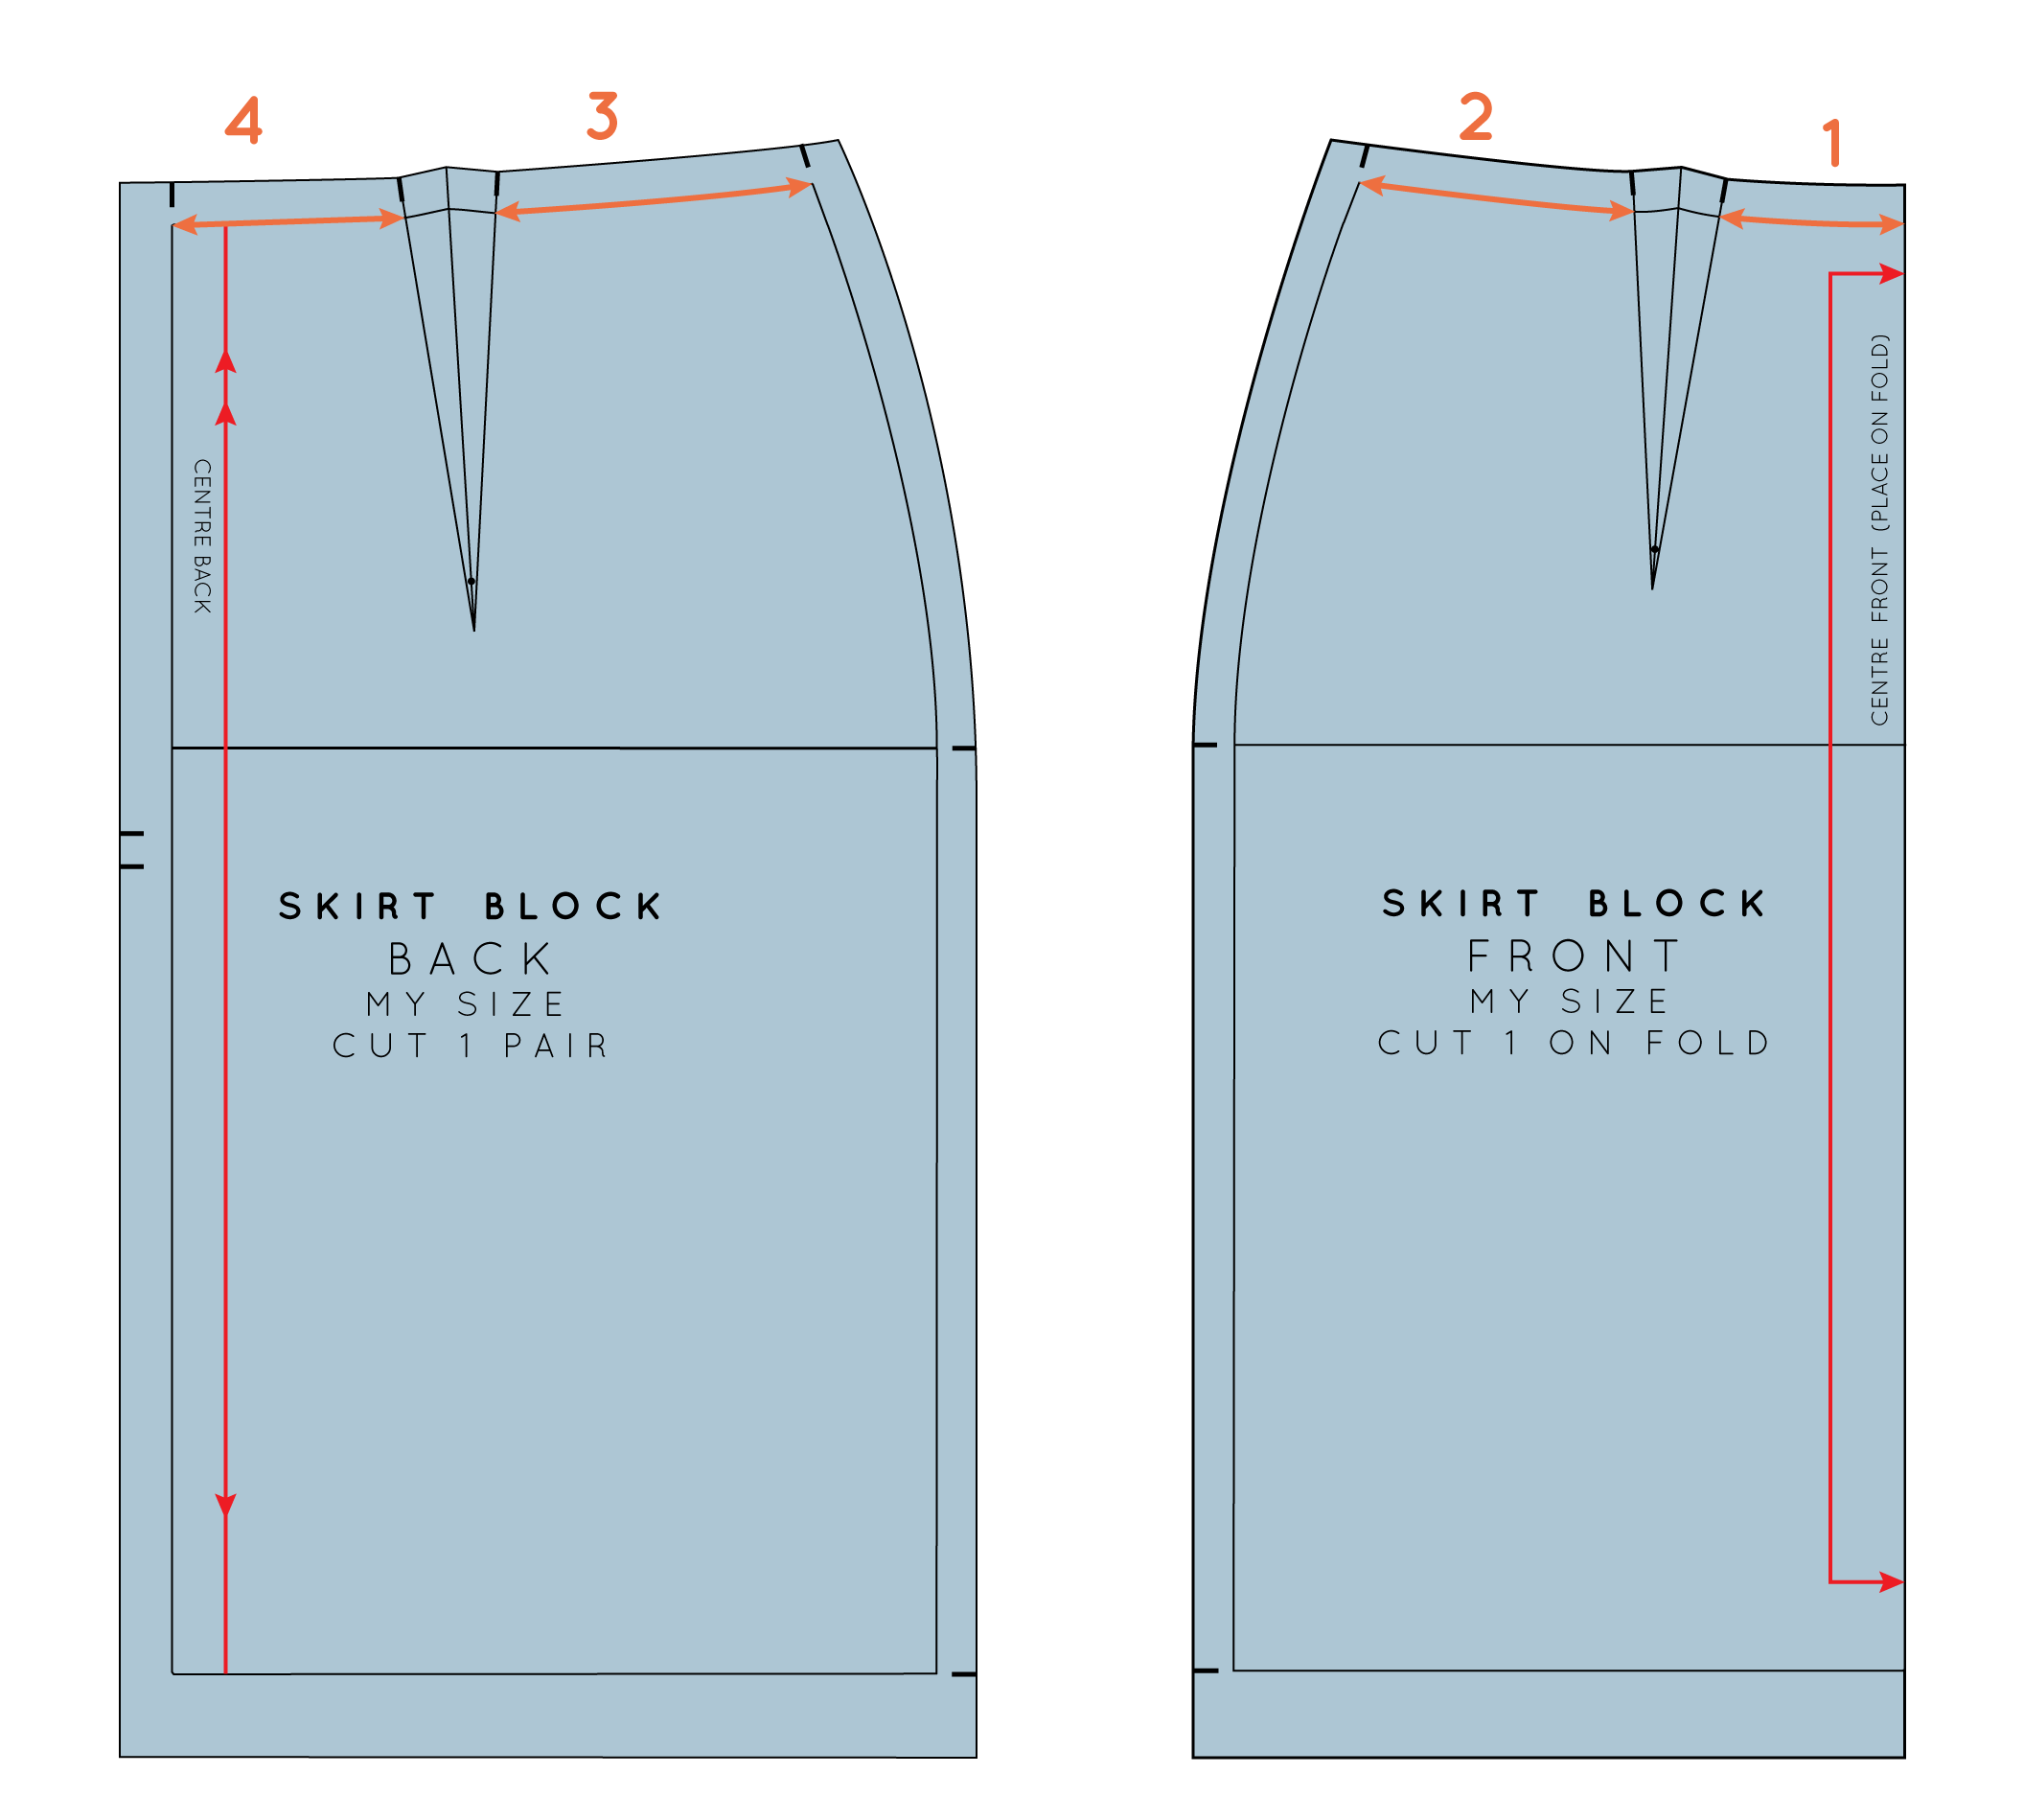
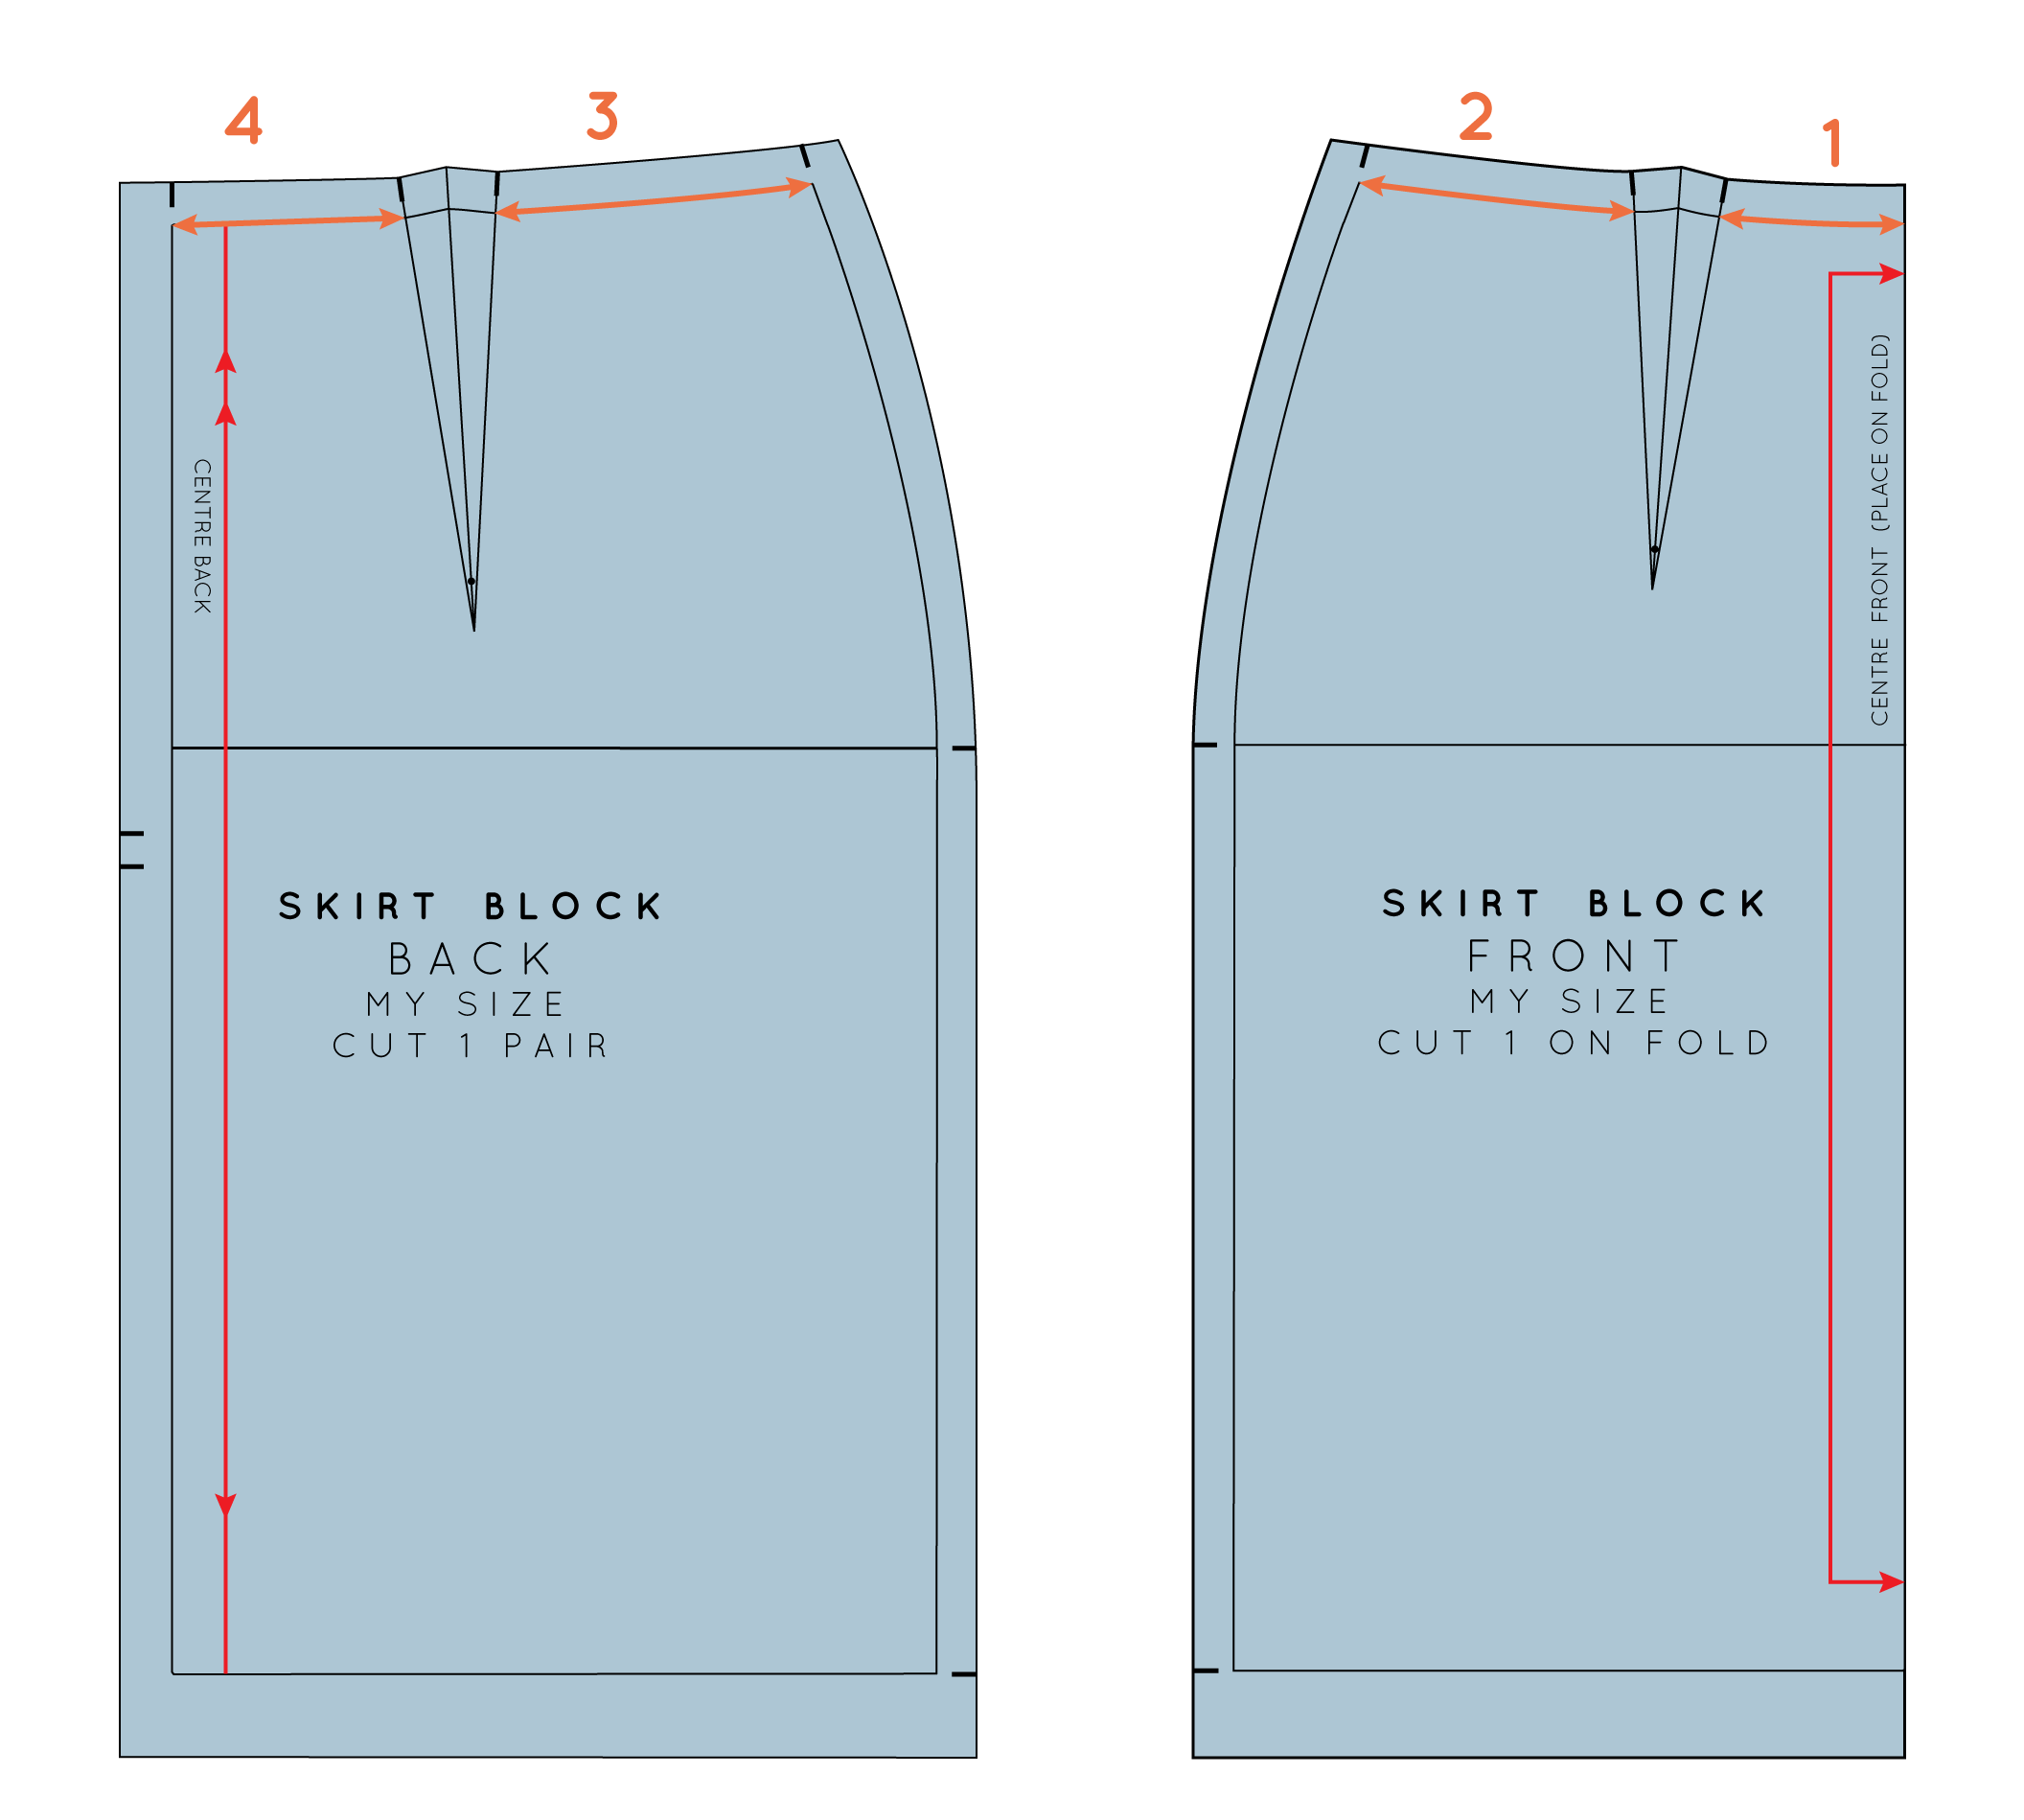
Measuring along the waistline, on the front pattern piece:

1 - Centre front to first dart arm

2 - Second dart arm to side seam

On the back pattern piece:

3 - Side seam to first dart arm

4 - Second dart arm to centre back

WAISTBAND CONSTRUCTION

There are several ways to draft a shaped waistband, including using the waist section of the bodice block to construct, but as I have not yet shown you how to draft a bodice block (but definitely plan to in the future), I'll show you how to draft the waistband using the skirt block.

draft_a_shaped_waistband_7

Add the four measurements taken in the previous step together to find the length of the waistband. Remember this measurement gives you half the waistband, as the pattern piece can be cut on the fold. Draw a line as long as this measurement. 

draft_a_shaped_waistband_8

Decide how wide you would like your waistband to be - consider a measurement around 3 - 6cm (1 1/4 - 2 1/4in). Draw a perpendicular line from either end of your original line, the height of your waistband.

draft_a_shaped_waistband_9

Complete the rectangle by connecting the end points of the lines drawn in the previous step.

So now that you have the basic shape, it's time to get some markings onto your pattern piece.

draft_a_shaped_waistband_10

Going back to your original measurements (from your skirt block), measuring from the right hand side of your waistband, mark in each point of interest with a perpendicular line. You need to mark the location of your front dart, the side seam and back dart. You can also label each end as the centre front (right hand side) and centre back (left hand side).

And this is where the tutorial takes a turn away from the straight waistband tutorial...

Label your pattern

draft_a_shaped_waistband_11

Label each section of the waistband, with the following:

1 - Centre front

2 - Side front

3 - Side back

4 - Centre back

Measurements required

You will now need to find the difference between your waist measurement (where your skirt sits) and the top of your waistband.

draft_a_shaped_waistband_12

A good way of doing this, is by putting on your skirt toile (as you can see, my skirt is a digital one!) and working out where the top of your waistband will sit (this will depend on how wide you are making your waistband). Take a tape measure and measure around your waist at the point where your waistband will end. Take note of the measurement.

Compare measurements

Work out the difference between the measurement you just took and your actual waist measurement. Take note of this number.

You now need to divide this measurement by 2 (as you will be cutting your pattern on the fold) and then divide it by 3 (as you will be distributing the measurement evenly throughout the pattern piece).

For example, if the difference between your measurements is 6cm, you need to divide that by 2, which gives you a result of 3cm. You then divide the 3cm into 3, giving you 1cm. That number (in this case, 1cm) is the one you need in the next step.

Waistband construction

draft_a_shaped_waistband_13

Take that number and, on your waistband, mark a point to the right side of each vertical line (excluding the centre front and centre back), that distance away from the line. If you were to use the same numbers I used in the example above, for this step, you would need to mark a point 1cm from each vertical line. 

draft_a_shaped_waistband_14

Label these points as A, B and C.

Cut

draft_a_shaped_waistband_15

Cut down each vertical line, from the top of the waistband. Do not cut all the way through the pattern, leave a small "hinge" to keep the pattern pieces attached.

Close

draft_a_shaped_waistband_16

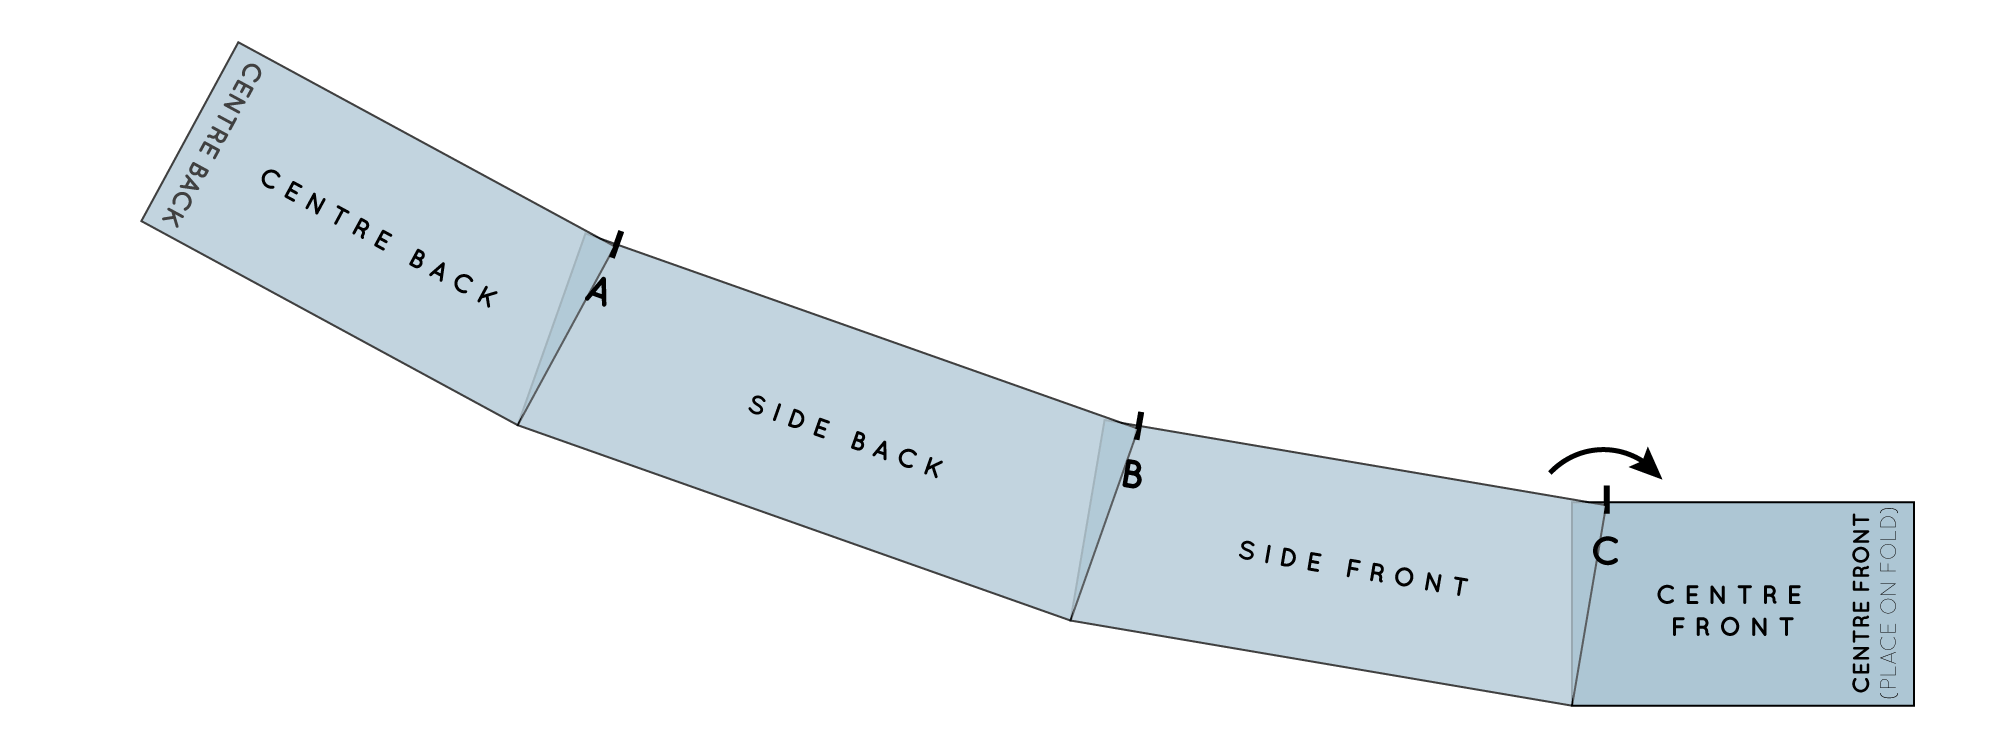
Being careful not to break the "hinge," rotate the centre back piece, until the slashed line overlaps point A. Tape or glue in place. 

draft_a_shaped_waistband_17

Repeat for the 'side back' piece (which is now attached to the centre back piece). Rotate until the slashed line overlaps point B and then stick in place. 

draft_a_shaped_waistband_18

Rotate the final slash line, aligning the cut line with point C.

As you can see, your waistband is no longer a rectangle! The top edge of your waistband is now narrower than the bottom edge. 

Trace the pattern

draft_a_shaped_waistband_19

Take a piece of pattern paper and place it on top of your waistband construction so that you can trace it. 

Start by tracing the centre front (and labelling it as the 'centre front'). From the centre front draw a perpendicular line at either end of the line.

draft_a_shaped_waistband_20

By doing this, you will ensure that you get a nice smooth waistband across the centre front and back (as you can see in the example above) - when the piece is cut on the fold.

Repeat for the centre back.

draft_a_shaped_waistband_21

Now, using a ruler, or a hip curve, join the perpendicular lines (drawn in the previous step) with smooth curves, creating the waistband shape.

Add notches

draft_a_shaped_waistband_21

Before removing the pattern from the construction underneath, mark each point of interest with a notch. These notches will make it much easy for you to sew the waistband to the skirt, without the worry of stretching the waistband. 

draft_a_shaped_waistband_22

It is also a good idea to add notches along the top edge of the waistband. I like to put them in a different spot to the notches on the bottom edge, to save any confusion. 

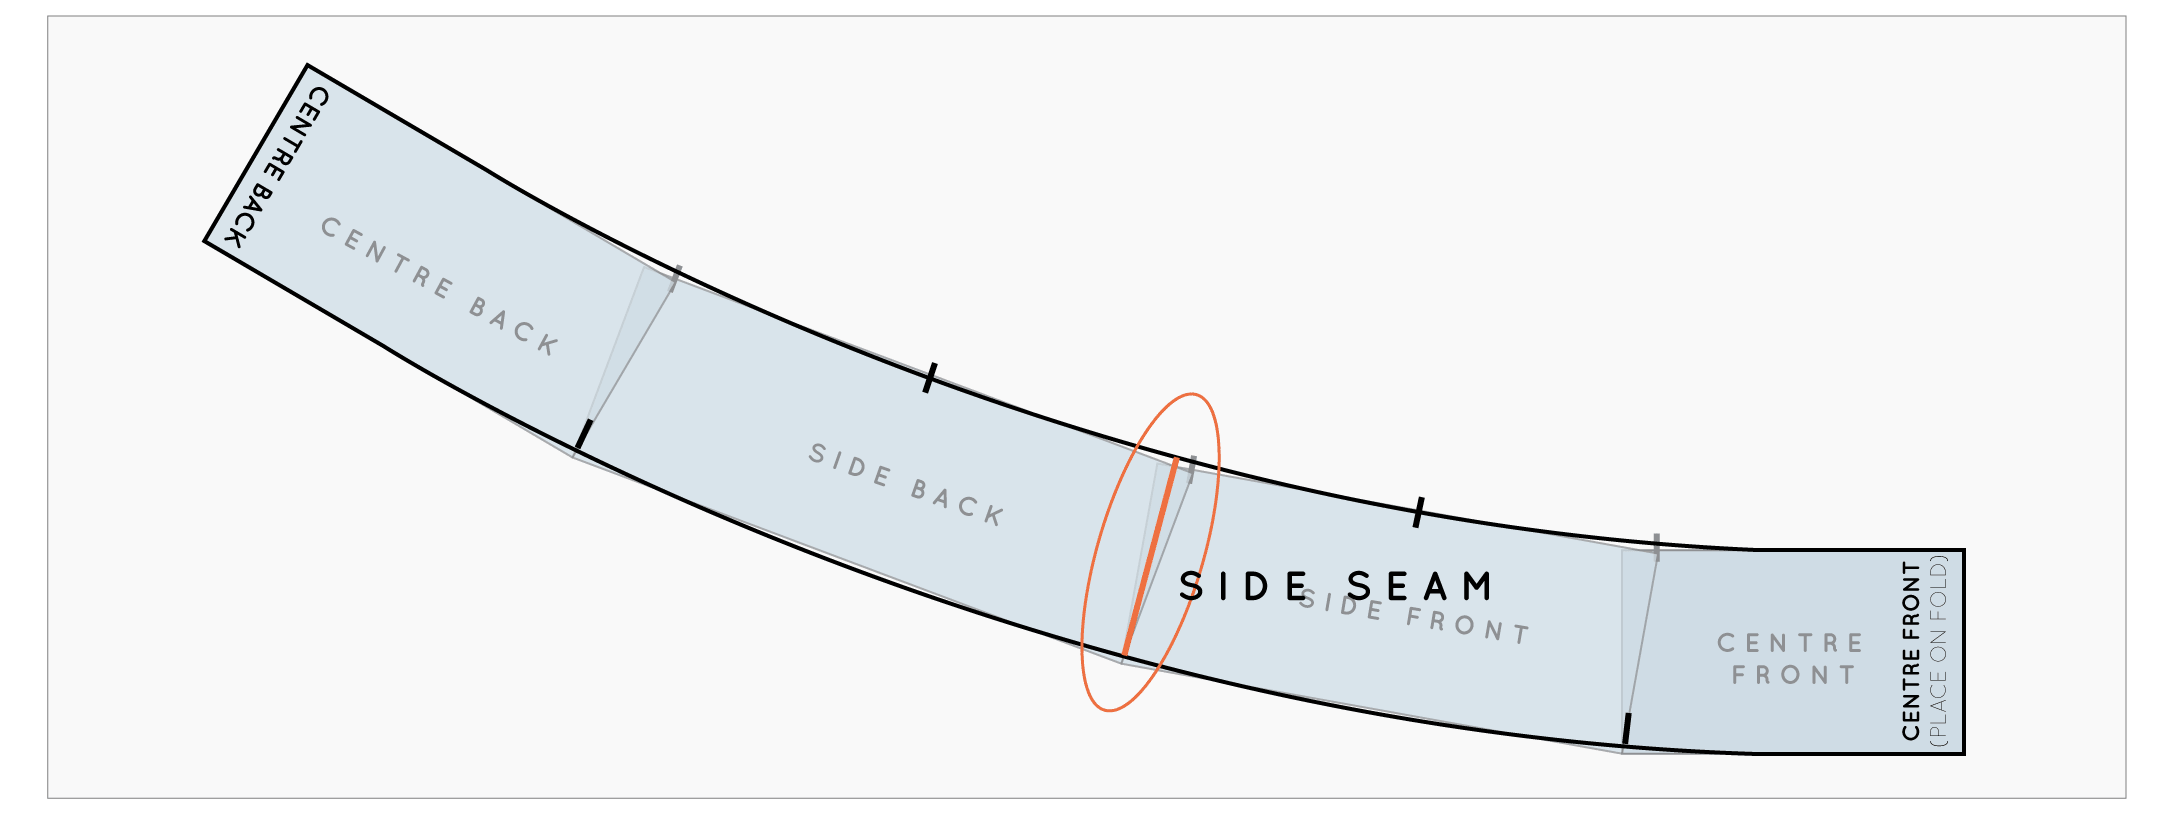
Add a side seam

draft_a_shaped_waistband_23

If you would prefer to have a side seam in your waistband (rather than all-in-one), at this point you should draw in your side seam.  Draw a straight line from the middle notch on the lower edge of the waistband up through the centre of the respective slash line (through the centre of the overlap).

Add seam allowance

draft_a_shaped_waistband_24

You should have now transferred all the necessary details from your pattern construction onto your pattern. You can now add seam allowance to the top and bottom edges, as well as the centre back. I would suggest 1-1.5cm (3/8 - 5/8in) on the curved edges and 1.5-2.5cm (5/8in - 1in) on the centre back. 

If you have added a side seam, I would suggest adding seam allowance of 1.2 - 1.5cm (1/2 - 5/8in) to this seam.

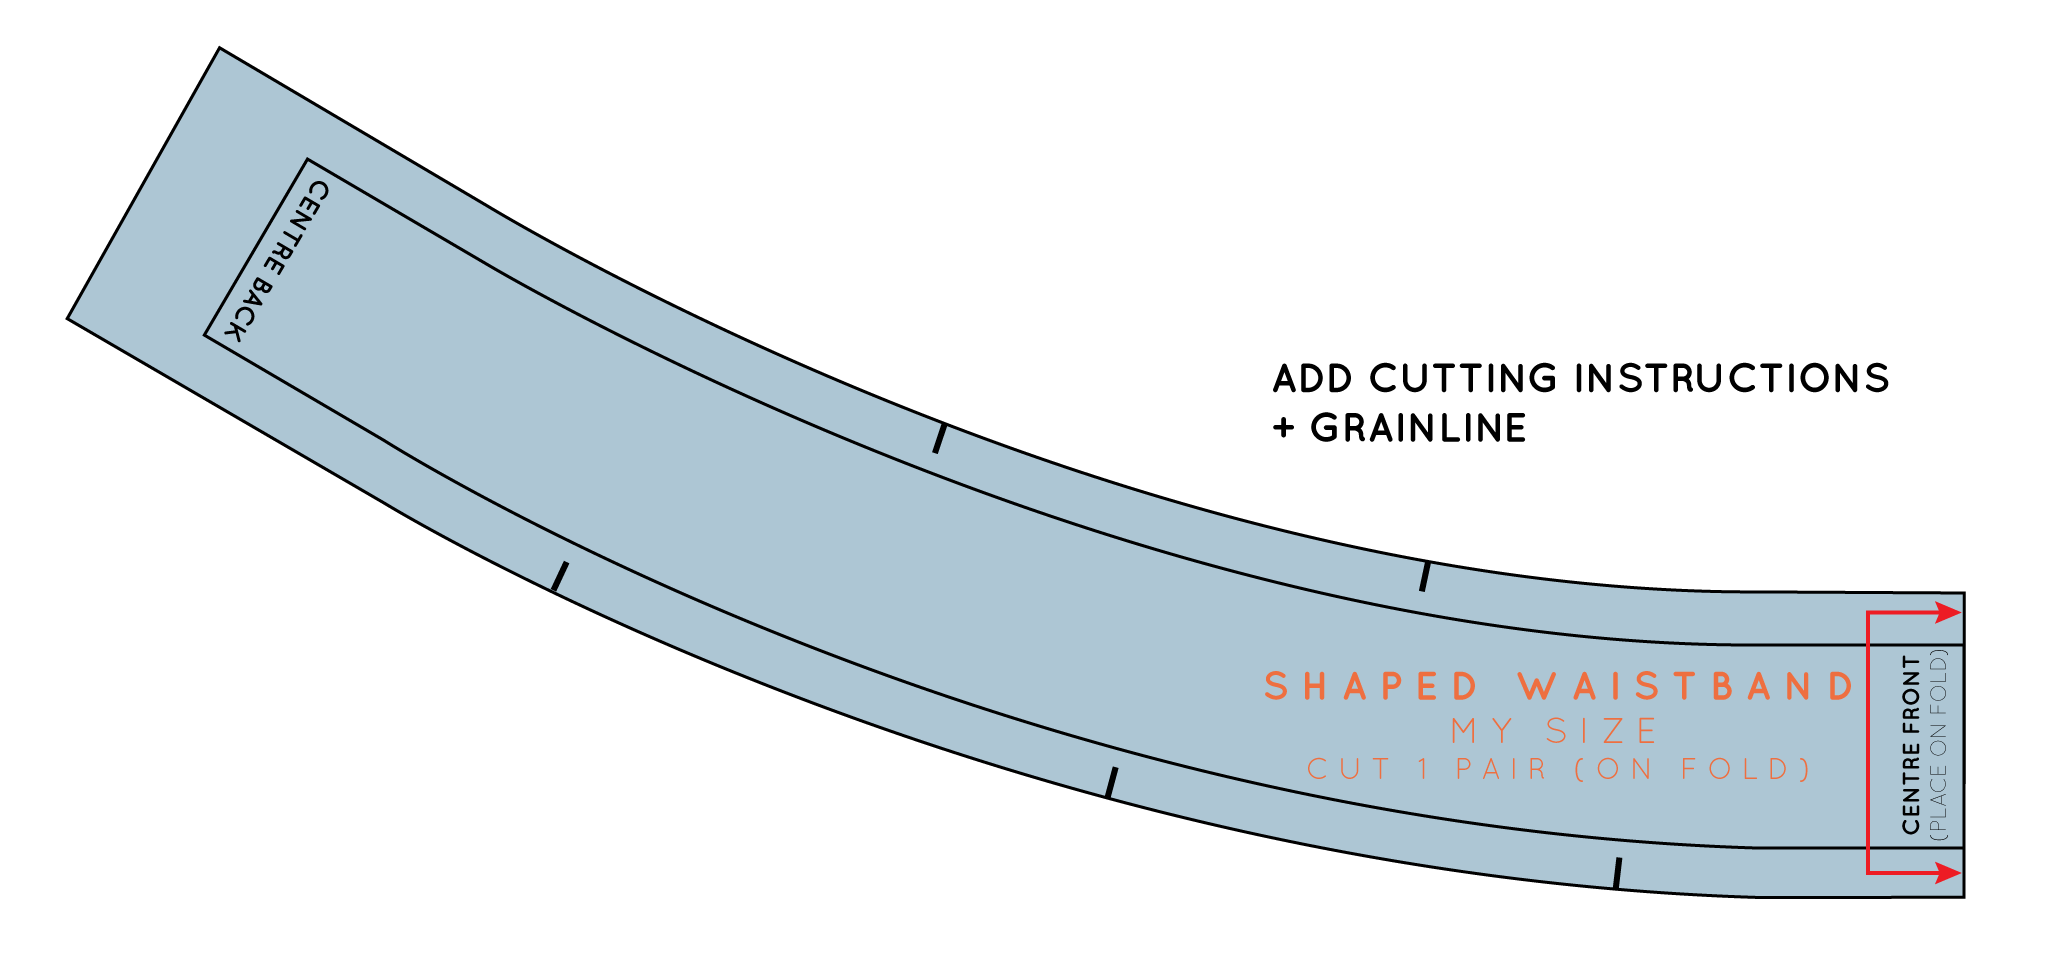
Add grainline and cutting instructions

draft_a_shaped_waistband_25


Mark the grainline (parallel to the centre front) and add cutting instructions (cut 1 on fold).

If you have added a side seam, the grainline on the back piece will run parallel to the centre back, and the cutting instructions will be 'cut 2 pairs'. 

You may consider fusing you waistband, but that will come down to your fabric choice and design. 


You may also like:

Drafting a waistband

draft_a_waistband_1

In the last couple of weeks I've been showing you how to draft a skirt block to your own measurements, as part of The Skirt Series. In today's post I am going to show you how to draft a waistband for the skirt. If you have just made the skirt block and need to make a toile to see how it fits, I wouldn't bother making a waistband. You are better off whizzing up a quick toile, checking how it fits, and then once you are happy with it, making the waistband.

Two types of waistbands

Most waistbands on skirts or trousers are based on these two basic waistband shapes:

draft_a_waistband_2

A straight waistband - which is a long rectangle that generally does not have side seams. 

draft_a_waistband_3

A shaped waistband - which may, or may not, have side seams. 

Should I draft a straight waistband or a shaped waistband?

Either option can be drafted for the skirt block, and which is better for you comes down to individual preference and body shape. For me, I am a little too curvaceous in the lower half to feel comfortable in a straight waistband.

In today's post I will show you how to draft a straight waistband, and then next week I will get to shaped waistbands. And then you can work out which one is for you! The good thing about drafting your own waistband, is that you will be able to use it whenever a waistband is called for, and you know that you will get a great fit every time. 

Take measurements

draft_a_waistband__4

To start, take your skirt block and take note of some measurements. Remember to measure along the stitch line, not the edge of the pattern.

Measuring along the waistline, on front pattern:

1 - Centre front to first dart arm

2 - Second dart arm to side seam

On back pattern:

3 - Side seam to first dart arm

4 - Second dart arm to centre back

Waistband construction

draft_a_waistband_5

Add the four measurements taken in the previous step together to find the length of the waistband. Remember this measurement gives you half the waistband, as the pattern piece can be cut on the fold. Draw a line as long as this measurement. 

draft_a_waistband_6

Decide how wide you would like your waistband to be - consider a measurement between 2 and 6 centimetres. Draw a perpendicular line from either end of your original line, the height of your waistband.

draft_a_waistband_7

Complete the rectangle by connecting the end points of the lines drawn in the previous step.

So now you have the basic shape, it's time to get some markings onto your pattern piece.

draft_a_waistband_8

Going back to your original measurements (from your skirt block), measuring from the right hand side of your waistband, mark in each point of interest with a perpendicular line. You want to mark the location of your front dart, the side seam and back dart. You can also label each end as the centre front (right hand side) and centre back (left hand side).

Add seam allowance

draft_a_waistband_9

Add seam allowance to the top and bottom edges (I suggest 1 - 1.5cm). You can also add seam allowance to the centre back. I usually add 2cm to the centre back, to allow for the zip. Remember that the seam allowance you use on the waistband pattern, but be the same as the seam allowances you added to the skirt block, as you will be sewing these pieces together. 

Add notches

draft_a_waistband_10

Add notches to the pattern. You will want notches at all points of interest on the bottom edge (side seam, both darts and centre back), while on the top edge I would suggest only notching the centre back and then one other point that is not in line with the darts on the bottom edge. This will help you know which way up the pattern should go when you are sewing. This may not seem necessary as the piece is symmetrical, but if you are using a directional print, it will help make sure you don't end up with an upside down print! When cutting I would also suggest notching the centre front on both edges. 

Add pattern details

draft_a_waistband_11

Add pattern details and the grainline (runs vertically through the pattern), indicating that the centre front needs to be cut on the fold.

Button extension

draft_a_waistband_12

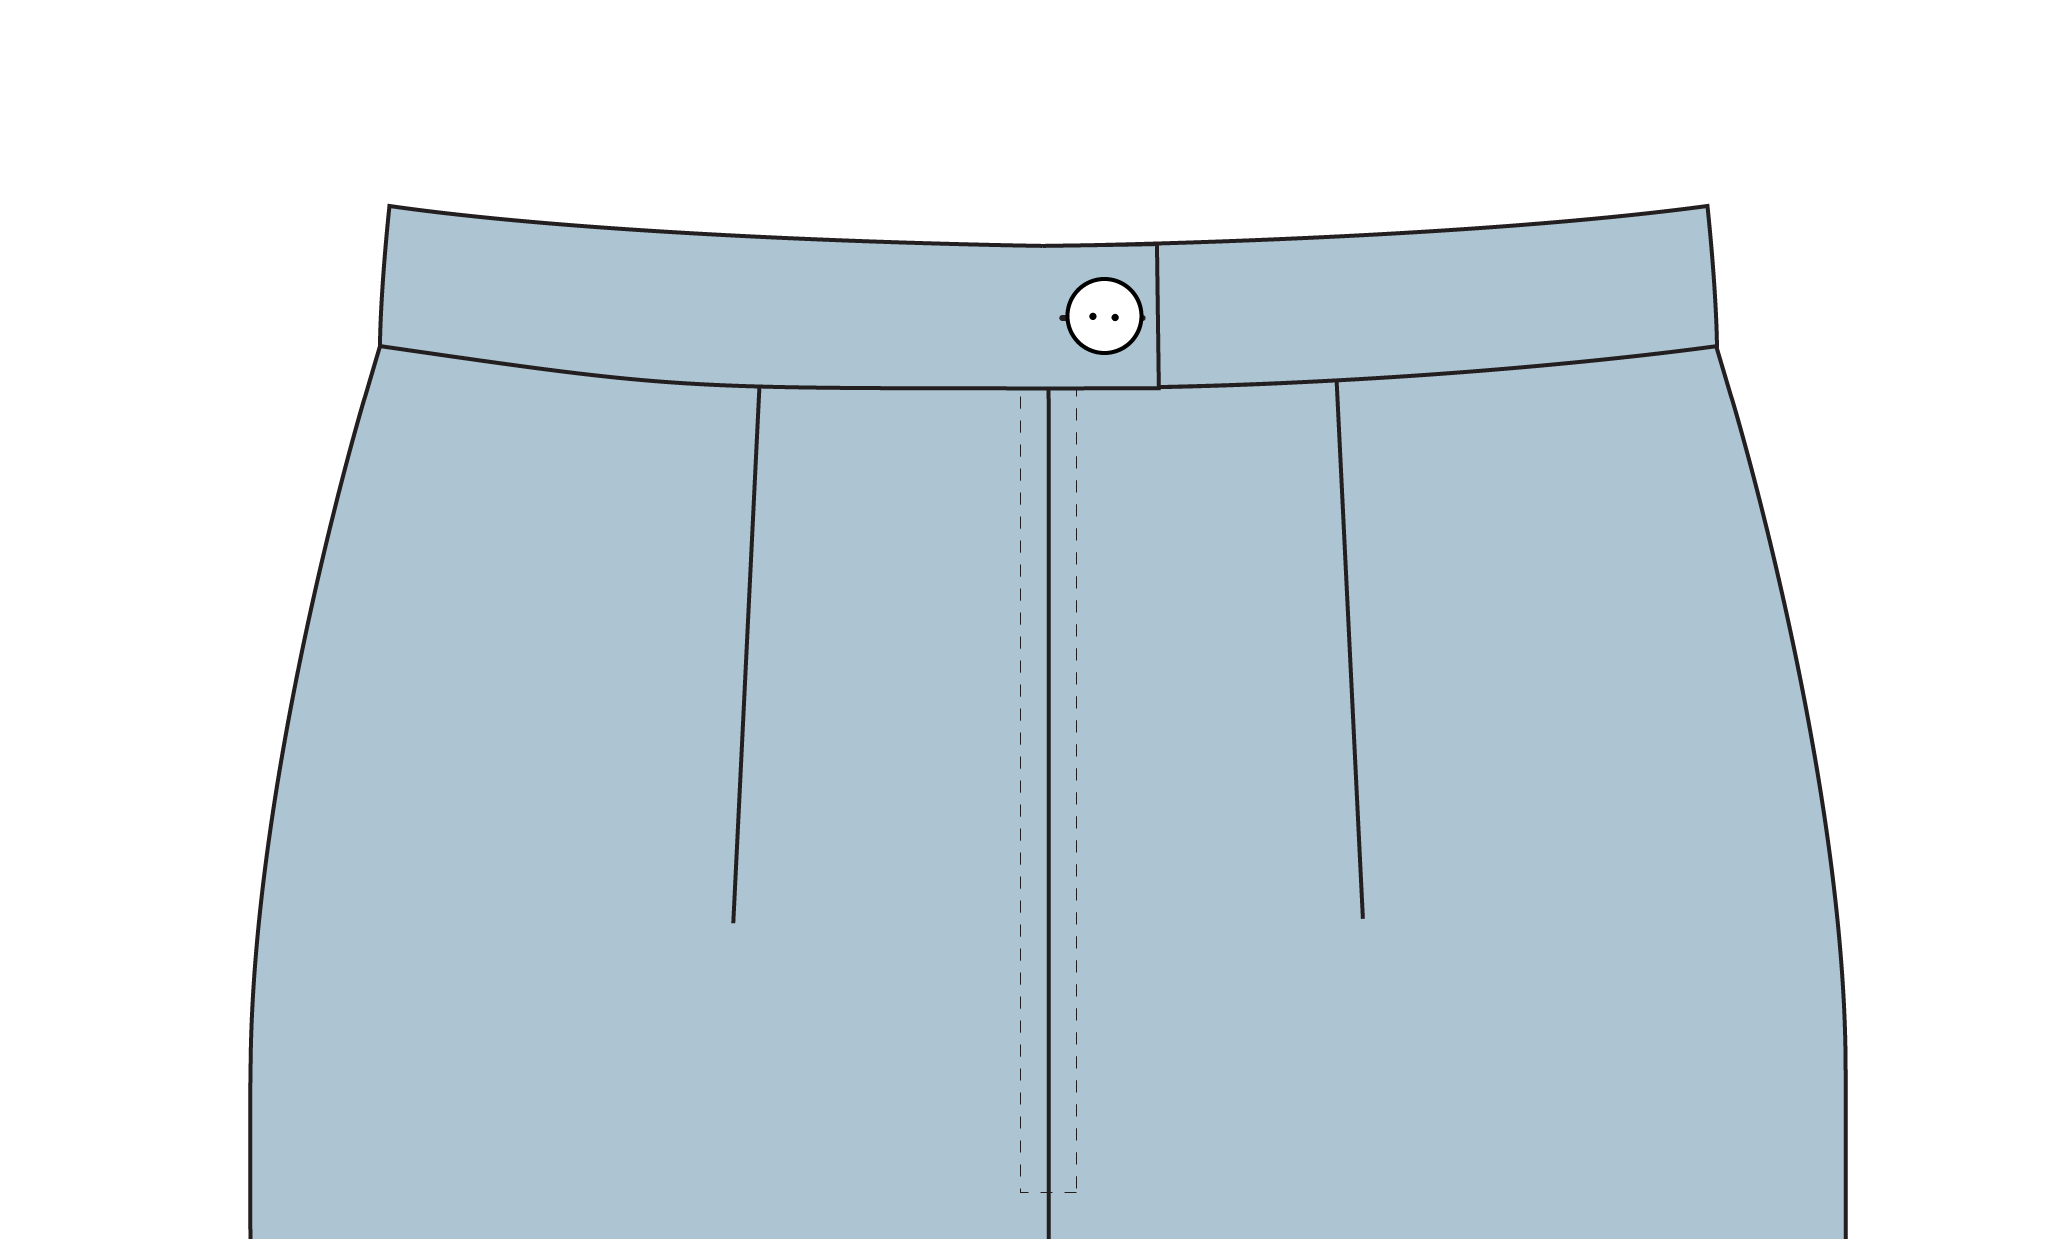
If you would like your zip to run straight through the waistband like this, then your waistband pattern is ready to go and you can get sewing!
draft_a_waistband_13

But if you would prefer the zip to stop at the waistline and then have a button to close the waistband, you will need to add a button extension to your pattern piece (which will only take a second).

Adding a button extension

draft_a_waistband_14

The extension will only be added to one end of the waistband, so you will need to fold the pattern in half (down the centre front) and trace the pattern to create a full pattern piece. Do not add seam allowance to the centre back on the second side. At the centre back you will be wanting to add the button extension. The length of this will depend on the size of your button, though I would say 3-4cm should be fine. Add seam allowance to the extension and now it's done!


What are your thoughts on waistbands? Do you prefer a shaped waistband, or does a straight waistband do the trick?


You may also like: