pattern blocks

Drafting a bodice block - a few questions and answers

BODICE-BLOCK-ANSWERS.jpg

Drafting a bodice block - a few questions and answers

A few years ago, I created a blog post about how to draft a bodice block from your own measurements. Little did I know that this was going to become the most popular blog post on my website!

I have received a number of questions lately about the tutorial and I thought it could be a good idea to publish some of these questions and answers as an opportunity to help you on your own learning journey. I love the Q&A format - over the last year or so I have been sending a newsletter that includes a question from the community and my answer to it and I have loved all your responses to the series. I think it’s a great way to see what people actually need help with, rather than just producing the content that I assume people need. It’s also a fun challenge for me and I feel that I am constantly learning from these questions.

I will update this post as I receive more questions, so that hopefully, if you have a question, you will find a relevant answer here and can keep on going with your draft!

Update September 2021

Thank you so much for all the enthusiasm for my blog posts about bodice drafting. It has been my most popular blog post of all time! After 5 years of answering questions, I no longer have capacity to answer individual questions regarding bodice drafting. The comments have now been switched off and I will no longer be able to get back to emails regarding these blog posts.

The aim of pattern drafting

The first thing I’d like to talk about when it comes to making any pattern, is that we are not aiming for perfection right out of the gate. The idea is to get as close as you can to a good fit and then make a toile / muslin and check the fit on your body. It’s almost impossible to know if something is going to fit you properly by just looking at a flat pattern. You can get a good idea of how something will fit, but you just won’t know until you give it a go.

The aim when drafting or adapting patterns is to create a pattern that fits you. For example, in regard to the bodice block, you are aiming to get a bodice block that fits you closely so that you can use it to draft other patterns from it (for example, this simple summer top). If when you try on your toile, you realise that the shoulders are too wide, you can make a narrow shoulder adjustment. If you notice that the dart point is in the incorrect position, you can move it. Although following a tutorial down to the letter is a great first step, that is not the end goal. There will be a point where you need to assess your toile and make some changes to achieve a good fit. A tutorial like the bodice block tutorial I created, helps you get to a really good starting point, but then it’s about looking at your toile (and your pattern) and making some changes to get nice smooth lines, or get your lines in the right position. I hope that by sharing some of my questions and answers with you, you will know what I mean and can take something away from this post!


Question : Armhole curve

Hi Emily,

 Thank you so much for the well-written and detailed blog post on how to draft a bodice block! I am just starting to sew and really appreciate amazing resources like yours.

I have the same problem as Denise Palmones about the armhole: “On that note I am having some concerns on my shoulder area on draft. I notice that my TV line is too long that it is almost on the same column of my P on the darts. Having so makes a weird armhole that has a cross leading to look like an asymmetric infinity symbol and not an oblong (V, A2 crosses the O,Z line) and I can't make it sense out of it.”

Could you please let me know how to proceed?

Thank you!

- Crystal

bodice-block-armhole.jpg

Answer:

Hi Crystal,

It's looking great. I'd suggest just drawing your armhole as a nice smooth curve, don't worry too much that it's not hitting all the points (it’s much more important that you get a nice armhole shape). See example below:

bodice-block-armhole-2.jpg

I hope that helps!

Happy sewing,

Emily


Question : Armhole curve 2

Hi there,

Hope you are well.  I have been using your tutorial for how to draft a bodice block and everything seems correct apart from my armhole, which is looking very wonky!  Please could you offer me any advice on how to solve this problem?

I have attached pictures of my bodice block as it is.  

Thank you for the great tutorial, even as a beginner, I found it really straightforward to follow!

I look forward to hearing from you.

- Julia

bodice block-armhole 2.jpg

Answer:

Hi Julia,

Thanks for getting in touch.

I am pleased to see you're using my tutorial! Thanks for sending through photos, that really helps.

What I suggest you do is smooth out the armhole to get a nice curved shape on the front and back. See the photo below.

re-draft-bodice-block-armhole.jpg

You are then able to make a toile and see how it fits!

Happy sewing,

Emily


Question: Fitting the armhole

Hi there,

I continued to work on the block and finally got the fabric to make a blockout and see what edits needed to be made. Unfortunately there is some gaping in the armpit and despite looking online I can’t find how to fix it, a lot of what I see to fix it in the back of the arm would be a shoulder dart but nothing about the front. Would you have any advice on how to fix this?

Thank you so much,

 - Shayleen

Answer:

Hi Shayleen,

Nice to get an update and see your toile. It's looking good!

What I suggest you do is pin out some darts from the armhole (in both the back and the front if both are required) to get the armhole fitting more snugly. You will need to do this while it's on the body, so if you have someone who can help, it will be a little bit easier. Once you have pinned the darts, mark them with a marker and remove the pins. You can then transfer these new darts to your pattern. Once your darts are there, you can rotate the armhole dart value, so that it can be added to the waist or shoulder dart (or a little bit to each). This will help you get the correct shaping, without actually adding a third dart. I have a tutorial about rotating dart values that you can find here.

I hope that helps!

Happy sewing,

Emily


Question: Drafting the armhole

Hi Emily! 

I followed your bodice block tutorial to draft a block based on my measurements, and it was soooo much fun!  Thank you for the thorough and easy to follow tutorial ❤️  Unfortunately, I came across an issue when placing point V and drawing my line from T to V.  Based on your example in the tutorial, it looks as though point V should extend from point T, past the A1, A2 line.  Mine however falls short. 

When drawling the armsye, it looked strange to go from A2 to V, so I also drew a line from A2 to ? (You will see this ? point on my attached draft photos).  I have also included my measurements.  Do you know what I did incorrectly and how to fix it?

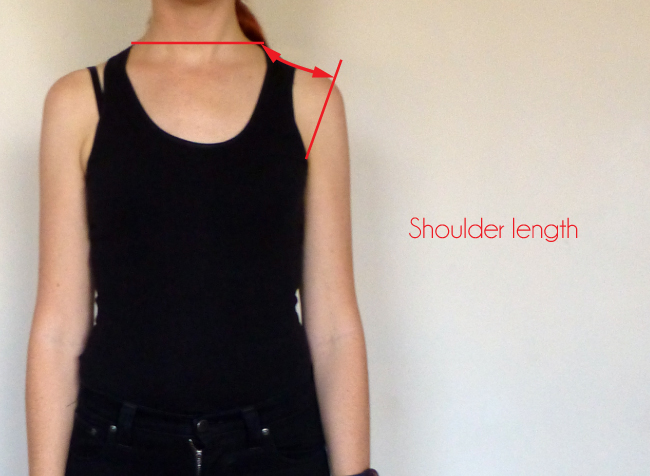
When measuring my shoulder length I stopped at the bony peak, however my shoulder socket extends well past that (approximately 5cm to the end of my shoulder to where my arm goes down to my elbow)... not sure if that could be the issue... 

Hopefully this makes sense to you! 

Warmly, 

- Kelly

armhole 3.jpg

Answer:

Hi Kelly,

I am so pleased to hear you had a good time following the tutorial!

I had a play in Illustrator and without having all your measurements and going through the whole process, it's a little bit tricky to see what's going to happen, but from what I can tell, what I suggest you do is:

  • I'd move point K slightly further away from the centre front

  • Rotate the angle of the dart slightly

  • Move point V so it's a bit further up / out. This just reduces the severity of the front shoulder angle

  • Check your front shoulder length. My suggested alteration might make your shoulder seam slightly longer - if so, you will need to add this onto the back too.

  • Draw armhole as illustrated below.

Artboard 12.jpg

This should be enough to get you to the point where you can make a toile, which is when you will really see what's working and not working.

Let me know how you go!

Happy sewing,

Emily


Question: Star Trek shoulders

Hi Emily, 

Thank you so much for your help, I’ve been scratching my head over this for the past 2 days! 

I’ve included photos, I traced the offending 80’s/Star Trek shoulder line in red to make it easier to see. 

I really appreciate the insight, I’m sure you get tons of cries for help. 

FYI I found your blog via WithWendy’s latest video and am *really* enjoying it, thank you for the quality content. 

High bust: 84cm 

Full bust: 87 cm (I’m obviously not very full chested! ^^) 

Best regards, 

- Silvia

bodice-block-shoulder.jpg

Answer:

Hi Silvia,

You're right! It was fantastic to get a shout-out on WithWendy's youtube channel, but it has made for quite a busy week! I don't follow anyone on youtube so it was nice to discover her and see how great her videos are!

I had a play in Illustrator and without having all your measurements and going through the whole process, it's a little bit tricky to see what's going to happen, but from what I can tell, what I suggest you do is:

answer.jpg
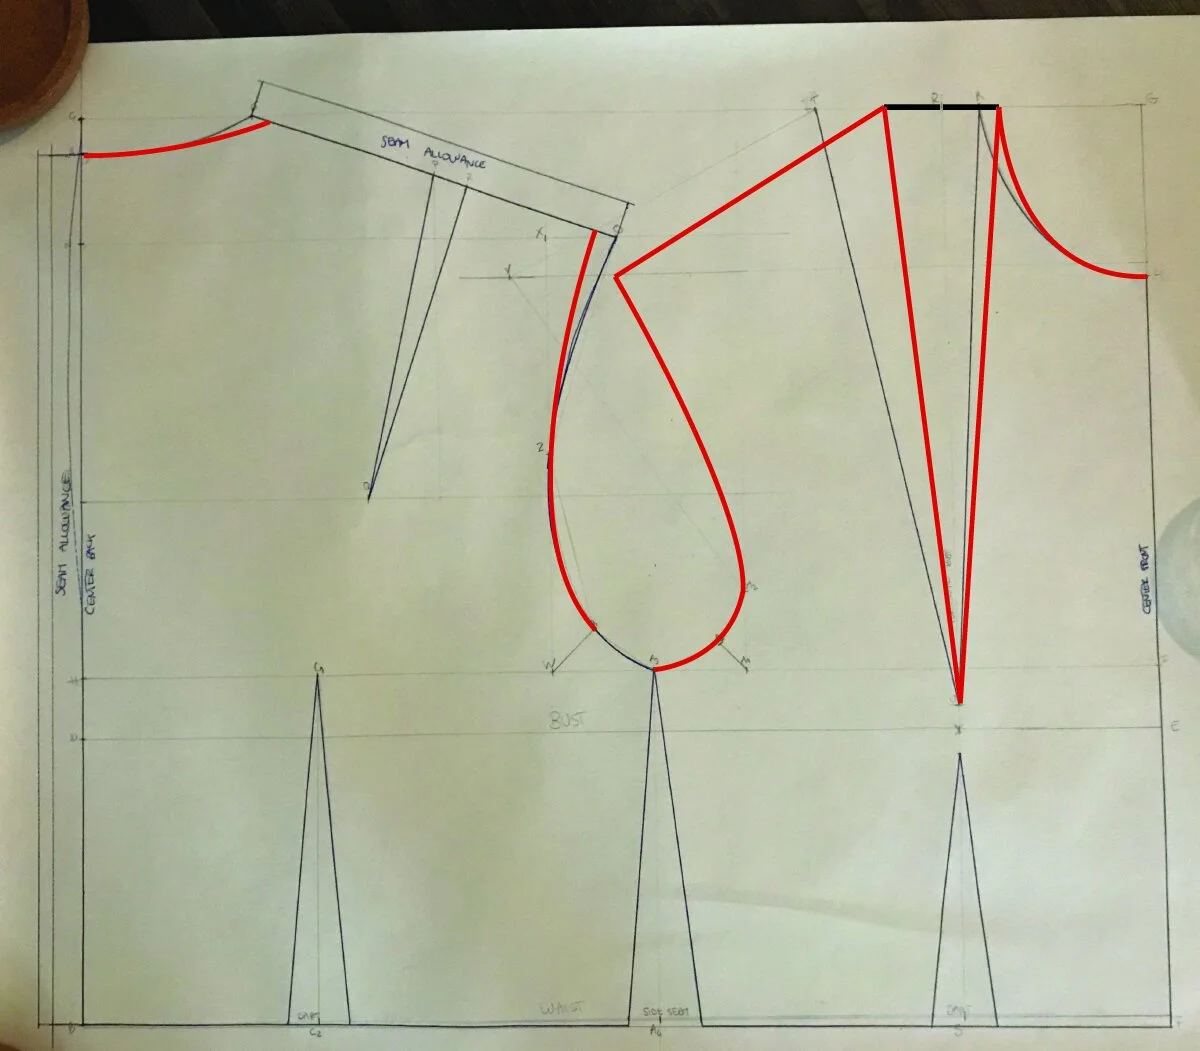
  • Move your point K slightly closer towards the centre front

  • reduce your shoulder dart size. I know the tutorial doesn't say to do this - but with your bust size, you can probably afford to make the dart smaller (and I can relate, you have similar full and high bust measurements to me! That's why it's so great to make your own clothes as you can avoid the baggy bit in the bust of fitted ready made clothes)

  • Reduce your shoulder length by about 1.5cm - you will need to remove this from the back shoulder too - as illustrated.

I think that should get you to the point when you can make a toile / muslin. You should be able to quickly see how things are looking and if you need to make an alteration. If you realise that you need that extra 1.5cm back on the shoulder, rather than extending the shoulder line I'd suggest you do a broad shoulder adjustment. I have a tutorial you can check out here.

I hope that helps Silvia. Let me know how you go!

Happy drafting,

Emily


Question: Shoulder lines overlapping

Hello Emily, 

I found your blog post via withwendy and try to make the bodice. 

Another person had the same problem as me regard to make a armhole. Because the lines JO and TV are crossing. 

Sorry for my poor english. I still hope you can understand my problem. 

Thank you very much. 

Best regards

Anhthu

bodice-block-shoulders.jpg

Answer:

Hi Anhthu,

 Thank you for getting in touch. I am pleased you're giving my tutorial a go!

 It's not a problem that your shoulder lines are crossing. Just keep working through the tutorial. When you get to the end you will trace the front and back bodice onto new pieces of paper, so the overlapping shoulders will no longer be a problem. Does that make sense?

Happy drafting,

Emily


How to : Move a dart (using the 'Pivot' technique)

inthefolds_move_a_dart_1

Last week I showed you how to relocate a dart using the 'Cut and Spread Technique.' As the title suggests, this technique involves cutting your pattern piece to move the dart (and can also be used to add fullness to a pattern).

If you would prefer not to cut into your pattern (because it is a master copy, or you want to just experiment before finalising anything) it is a good idea to use the 'pivot' technique to move a dart. The outcome is exactly the same, it's just a different way of achieving it. I use both techniques in practice and it totally depends on what I am doing as to which one I choose to use. 

Tools

To perform this techniques you will need your original pattern (the basic bodice, for example), a seperate piece of pattern paper, a stiletto (also known as an awl) and a pencil.

Choose the new dart position

inthefolds_move_a_dart_2

Have a think about where you would like to move your dart/s to. In the image above you can see some suggestions about where you could move the darts to on the front basic bodice. 

For the point of the exercise I have chosen to move the shoulder dart to the armhole but you can use this process to move either dart anywhere. 

Mark the new dart position

inthefolds_move_a_dart_3

1. Draw a line where you would like your new dart to be placed. The dart point will need to be at the same point as the original dart.

2. Place the pattern onto a piece of pattern paper and hold in place with a pattern weight. Focus on the dart you are moving (which in this case is the shoulder dart) and the dart arm closest to the centre front - this is the point where you will start tracing around the pattern. I have labeled the dart arms 'Dart Arm #1' and 'Dart Arm #2' to help with the explanation. 

Trace the original pattern

inthefolds_move_a_dart_4

3. Start tracing around the pattern piece from 'Dart Arm # 2' - going down the neckline, centre front, along the waistline, up the side seam and then around the armhole until you reach the new dart location. Stop tracing here. 

As the waist dart is staying where it is, remember to mark the dart point and notches so that when you remove the pattern you are tracing, you can redraw the waist dart in its original position.

4. Now it is time to pivot the pattern to remove the shoulder dart and create a dart at the armhole. Take your stiletto (or a pin or sharp pencil if you don't have one) and insert the point into the point of the shoulder dart. Remember this is not the drill hole (as the drill hole is marked 1-1.5cm from the dart point), but the point itself. In the next step you will be closing out the shoulder dart by rotating 'Dart Arm #1' towards 'Dart Arm #2.' 

Pivot the pattern

inthefolds_move_a_dart_5

5. Remove the weight from the pattern. With the point of the stiletto securely in the drill hole, rotate (or pivot) the pattern so that 'Dart Arm #1' now lines up with the point where you started tracing the pattern in Step 3 (where 'Dart Arm #2' was originally), being careful to hold the piece of pattern paper that you are tracing onto securely in place. 

6. Place the weight back on the pattern and trace the remainder of the pattern, starting at the point where your new dart is marked and continuing to 'Dart Arm #1.'

Complete your new dart

inthefolds_move_a_dart_6

7. Remove the pattern piece you were tracing and re-draw the waist dart (or any design features that you have transferred from the original pattern).

8. Complete the new dart by joining the opening in the armhole to the dart point with a straight line. 

Add markings + cutting instructions

inthefolds_move_a_dart_7

9. Complete the pattern by adding shaping to the new dart, adding pattern markings (in this case notches and the grainline) and cutting instructions as well as seam allowance.

And that's it. Now you have two techniques for moving darts in your repertoire!


You may also like:

How to : Draft a bodice block

After weeks and weeks (or was it months?) it is time to move on from the Skirt Series, and up to our upper halves! And also for me to get back to blogging. It has been at the top of my To-do list for weeks and weeks, but somehow I've managed to ignore it and find other things to occupy my time (for further reading on why to-do lists don't work, check out this post).

So, without any more rambling from me, it is time to draft a bodice block! 

The bodice block

A basic bodice block is a great starting point for most patterns involving your top half – it can be used to make tops and dresses, and paired with a sleeve block can be used to make shirts, blazers, jackets and coats. Many patterns evolve from this block. So if you are ready to start making your own patterns, then a bodice block to your specific measurements is a great place to start (although, if you want something a little easier, I would suggest starting with the skirt block).

This tutorial has been adapted from this great "how to" on BurdaStyle.com, which was taken from Winifred Aldrich's Metric Pattern Cutting for Women's Wear (5th ed. Blackwell Publishing: Oxford, 2008, pp 215). I changed the order in places and added more measurements, to hopefully create a better fitting bodice and an easier to follow tutorial.

So, even if you are an absolute beginner, with the right measurements, the right tools and a little patience, you will have a great fitting bodice block in no time!

A little note

I originally posted this tutorial a couple of years ago, on my previous blog, Em Makes Patterns. If you saw it there, do not fret. This tutorial is the same. I've just updated the aesthetics of the tutorial. So there is no need to do it all over again!

One thing I did realise though, after posting this, is that this tutorial will only work for you if you have a smallish bust cup size. It hadn't occurred to me that this would be an issue (as I am very small busted), until a woman contacted me to say that her bodice toile had turned out much too short, and we worked out that it was due to her large bust size. So, if you have a bust size any bigger than a C or D cup, I would suggest using this tutorial to draft the basic shape of your block and then doing a full bust adjustment to get the right cup size.


Update September 2021

Thank you so much for all the enthusiasm for this blog post. It has been my most popular blog post of all time! After 5 years of answering questions, I no longer have capacity to answer individual questions regarding bodice drafting. The comments have now been switched off and I will no longer be able to get back to emails regarding this blog post. I’d suggest reading through the comments if you have a question, as it is likely I have answered a question similar to yours over the years. You can also See the post : Drafting the bodice block - Questions + Answers.

Update 2020

When I created this blog post in 2016, I had no idea that was going to become the most popular blog post on my website!

I have received a number of questions lately about the tutorial and I thought it could be a good idea to publish some of these questions and answers as an opportunity to help you on your own learning journey.

I will update the post as I receive more questions, so that hopefully, if you have a question, you will find a relevant answer here and can keep on going with your draft!

See the post : Drafting the bodice block - Questions + Answers


Measurements

The measurements you will need for this project are:

Waist measurement

Your waist is the bit in between your rib cage and your hips. It is often the most narrow point of your torso.

This measurement is one you will need all the time. To find it, simply wrap the tape measure around your waist, ensuring that the tape measure remains level all the way around (horizontal to the floor at both front and back).

Do not suck in your tummy like I accidentally did in this photo! You want to be as natural as possible, so that your clothes fit well. Make sure the tape isn't too loose, or isn't pulling you in either!

You could also tie a piece of elastic around your waist to get the right position and then measure.

Bust measurement

For your bust measurement, find the fullest point of your breasts and take a horizontal measurement from there.

Ensure the tape measure remains horizontal as it wraps around your back, for an accurate measurement (this is when measuring yourself in front of a mirror helps). 

Please note: if your bust cup size is more than a C or D cup (for more info on working out your bust cup size look here), you will likely be better of making the draft as if you have a B cup bust and then doing a Full bust Adjustment.

Armscye depth

The armscye depth is the measurement I initially found the most tricky to get my head around. For one, I am quite certain I had never heard this term until I started reading sewing blogs (I don't think it was mentioned once in the four years I studied fashion design), but since then, it seems to pop up all the time (always the way, right?) It also seems that there are many different ways people suggest to find it. 

When I first drafted my bodice block, I placed three fingers under my arm and then measured down from my last finger to my waist. I don't really know what the direct correlation is between this measurement and the armscye depth, but apparently, due to the ratio of the body, these two measurements are the same.

The more obvious way of finding this distance is to measure down from the nape of the neck to the (imaginary) horizontal line that runs across your back, between the bottom of your armholes.

Nape of the neck to waist

This measurement is a little tricky to take on your own. Start at the nape of your neck and measure vertically down to your waist. 

The easiest way to do this is to toe a piece of elastic around your waist and have someone measure down from the nape of your neck to the elastic on your waist.

Nape of the neck to Bust line

neck-to-bust.jpg

Again, the easiest way to take this measurement will be to tie a piece of elastic around your bust and have someone measure down from the nape of your neck to the elastic.

Neck circumference

To take your neck measurement, wrap the tape measure around the base of your neck, making sure it is not too tight.

Shoulder length

To measure the length of your shoulder, first find the peak of your shoulder (this is the bony bit before your shoulder becomes your upper arm). Now measure between the base of your neck and the peak of your shoulder.

Back width

Your back width is the horizontal measurement of your back, from the bottom of a standard armhole, across to the other armhole.

Shoulder to bust measurement

For the shoulder to bust measurement, hold the tape measure in the middle of your shoulder (approximately where your bra strap sits) and measure down to bust point, following the curve of your breast.

Bust point to point

Knowing the distance between bust points (I like to call this measurement "the nip to nip") can help when adding bust darts or drawing panels that you would like to cut through the bust (princess panels, for example).

Simply take the horizontal distance between your breasts.

Tools

You will need a large sheet of paper (approximately 1m x 0.5m), a sharp pencil or pacer, a long ruler, and french curve or Patternmaster (or a plate if you don't have a french curve). An eraser will also come in handy!

Okay... Let's go!

Drafting the block


CONSTRUCT THE CENTRE BACK

draft_bodice_block_2

With a large piece of pattern paper mark a point A close to the top left corner (always leave some space around the starting point when drafting patterns). From this point, draw a vertical line down the left hand side of the paper that is the length of the nape of neck to waist measurement. Mark the end point as B. This line will become the CENTRE BACK seam of the block and the grainline of your back pattern piece.

draft_bodice_block_2

Extend line AB by 1.5cm (1/2") from A, and label new endpoint as C. This extra 1.5cm (1/2") allows for back neck shaping. Label AB as CENTRE BACK (CB).

CONSTRUCT the bustline

Next, we will indicate our BUST LINE (the horizontal line that runs through both the front and back of the pattern at bust level). Take the nape of neck to bustline measurement. Then, measuring from point A, mark this length as point D on line AB. 

draft_bodice_block_4

Square out from point D with a line that is half of your bust measurement (only half bust is required as we are making the pattern on the half – i.e. the front will be cut on the fold, and a pair of the back will be cut) plus ease. For the example I decided to add 5cm (2") ease to the bust. Remember to halve the amount of ease, before adding it to your half bust measurement,

draft_bodice_block_6

Label end point of this line as E. Mark this line as BUST LINE.

CONSTRUCT THE WASITLINE

draft_bodice_block_7

Square out from point B,  drawing a line the same length as your bust line. Mark endpoint as F. Label this line WAIST LINE.

CONSTRUCT THE CENTRE FRONT

draft_bodice_block_8

Square up from F (passing through E), the length of the CENTRE BACK (including the extension), and mark the end end point as G. Label FG as the CENTRE FRONT (CF). This will also be the grainline of your front pattern piece.

draft_bodice_block_9

Join G to C with a straight line. 

Mark the armscye

draft_bodice_block_10

Take the armscye depth measurement and add 0.5cm (1/4"). Measuring from point A down towards point B, mark this distance on CENTRE BACK. Label this point as H

draft_bodice_block_11

Square out from H and extend the line until it intersects the CENTRE FRONT line. Mark the intersection point as I.

Construct the back neckline

draft_bodice_block_12

Take your neck measurement and divide it by 5. Measuring from point C, mark this measurement on line CJ. Label this point as point J

Join points A and J with a shallow curve  – this curve is the back neckline.


*Tip

draft_bodice_block_13

When working with curved lines, always check that they come to a right angle when they meet a straight seam (for example, the centre front, centre back or side seam). By doing this, you ensure that you will get a nice smooth curve when you cut a pair of a particular piece, or cut it on the fold. 


Construct the front neckline

draft_bodice_block_14

Take your neck measurement, divide it by 5 and then subtract 0.5cm (1/4"). Mark this measurement on line GC (measuring from point G) as point K.

draft_bodice_block_15

On the CENTRE FRONT (GF) mark a point the same length as CJ down from point G (neck circumference divided by 5). Mark the point as L.
 

draft_bodice_block_16

Join K to L with a deep curve – this is the front neckline. As we did with the back neckline, check that the curve of the neckline meets the centre front at a right angle (so that you will get a nice smooth neckline when you cut the piece on the fold).

Drafting the BACK SHOULDER SEAM

draft_bodice_block_17

Take your armscye depth measurement and divide it by 5 and then subtract 0.5cm (1/4"). Mark this distance, measuring down from A on the CENTRE BACK as point N.

Square out from point N. This is just a guideline, so does not have to be a specific length.

draft_bodice_block_18

Take your shoulder length measurement and add 1.5cm (1/2") (this is the allowance for the shoulder dart). With this length in mind (or written down if you have a bad memory like me), use a ruler to pivot from point J until your measurement passes through the perpendicular line drawn from N. Draw a straight line to create your shoulder line. Label the endpoint as O.

Drafting the back shoulder dart

draft_bodice_block_19

Mark the  midpoint of the back shoulder seam (line JO) (i.e. the distance halfway between J and O) as point P.

draft_bodice_block_20

Mark a point 15cm (6") down from point A, on the CENTRE BACK line, and square out from this point. Once again, this is only a guideline, so does not need to be a specific length.

draft_bodice_block_21

From point P, draw a guideline parallel to CENTRE BACK, extending down until it passes through the perpendicular line that you marked in the previous step.

draft_bodice_block_22

From where these lines intersect, mark a point 3cm (1 1/4") towards the CENTRE BACK and label as point Q. Q will become the point of the back shoulder dart.

draft_bodice_block_23

Mark a point 1.5cm (1/2") from P on the back shoulder seam (line JO), towards O. Label this point as point R

draft_bodice_block_24

Join P to Q to create the first dart arm, and point R to Q to create the second dart arm. 


Download The Little Book of Seam Finishes

Would you like to make clothes that are as beautiful on the inside as they are on the outside?

Sign-up to the newsletter to stay in the loop to receive inspiring content that will help you become a more confident maker. And get started with a free e-book!


Mark the bust point

draft_bodice_block_25

Move your attention to you BUST LINE (line ED). Take your bust point to point measurement and divide it by 2 (as we are working on the half) and add 0.5cm (1/4") (allocated ease). Take note of this measurement. From point E, on the bustline, mark a point, the distance you just found from point E. Mark this point as your BUST POINT.

draft_bodice_block_27

Draw a vertical line, parallel to the centre front and centre back, passing through the bust point, intersecting all your horizontal guidelines. This line is the VERTICAL BUST LINE. Where it intersects CG label as point R and point S where it intersects the WAISTLINE (BF). 

Draft the front shoulder dart

draft_bodice_block_28

Mark a point 0.5cm (1/4") up from L on the CENTRE FRONT (line GF) and square out from this point. Again, this is just a guideline, so it doesn't have to be a specific length. 

draft_bodice_block_29

This is one of the equations taken from the BurdaStyle tutorial that is very handy (I am not sure if I would have been able to work this out without this guidance!)

Add or subtract 0.6 cm (1/4") to 7cm (2 3/4") for each 4cm (1 1/2") bust increment above or below 88cm (34 1/2"). For bigger busts you will need a larger dart (add to 7cm), and for a smaller bust you will need a small dart (therefore subtract from 7cm). 

For example, my bust measurement is 84cm (33"), which is 4cm (1 1/2") below 88cm (34 1/2"), therefore I need to subtract 0.6cm (1/4") from 7cm (2 3/4"), leaving a dart width of 6.4cm (2 1/2"). 

Take dart width measurement and mark this distance from K as point T.

draft_bodice_block_30

Move down to the BUST POINT and mark a point 1cm (3/8") above it on line RS (vertical bust line) as point U. This will be the point of your dart. The reason why we lift the dart point a little above the bust point is that if the dart point was right at bust point you would be left with Madonna style pointed breasts! 

Join K and T to U with straight lines to create the front shoulder dart.

Drafting front shoulder seam

draft_bodice_block_31

Take your shoulder length measurement and, with this length in mind, and using your ruler, pivot from point T until your measurement passes through the perpendicular line drawn from above point L. Draw a straight line - creating your front shoulder line. Mark the endpoint as point V.

Please note: it's not a problem if your shoulder lines overlap - just keep working through the tutorial. When you get to the end you will be tracing a copy so that you have separate front and back bodice pieces and can add seam allowance.

Drafting the armhole

draft_bodice_block_32

On line HI mark a point that is the length of half of your back measurement plus 0.5cm (1/4”) (allocated ease), from H. Label point as W.

draft_bodice_block_33

Square up from point W until the line intersects the perpendicular line drawn from N. Mark the intersection point as X.

draft_bodice_block_34

Find the midpoint of line XW. Mark as point Z.

draft_bodice_block_35

Take the distance from the CENTRE FRONT to BUST POINT (i.e length from E to BP or half bust apex to apex measurement plus 0.5cm) and mark this distance on line HI, measuring from the dart arm closest to CENTRE back. Mark point as A1.

draft_bodice_block_36

Square up from point A1 so that the line intersects the front shoulder seam (line VT).

draft_bodice_block_37

Take the armscye depth measurement and divide it by five. Mark this length on the line just drawn from A1, as point A2.

draft_bodice_block_38

Find the midpoint of the line between W and A1 and mark as A3. Square down from this point so that the line intersects waistline (line BF). Mark intersection point as A4

draft_bodice_block_39

Draw diagonal lines (lines drawn at a 45 degree angle) inwards from points W and A1. From W the line needs to be 2.5cm long (1") (mark endpoint as B1), and from A1 1.5cm long (1/2") (mark endpoint as B2). These diagonal lines will help in the next step, when we are at the stage of drawing in the curve of the armhole.

Join O to Z to B1 to A3 to B2 to A2 to T with straight lines.

draft_bodice_block_40

creating darts

At this point, the waist measurement is the same as the bust measurement. For a lot of us, our bust measurement is larger than our waist measurement. To remove this excess width from the waist and to create a well fitting block you will add waist darts (one in the back waist and one in the front waist – remember this is on the half so when you make your block there will be two in the back, and two in the front. We will also slightly taper the side seam, which we will also treat as a dart at this stage).

To work out how much width you will need to remove with your darts, take your waist measurement and add 2cm (7/8”) ease. Subtract this measurement from your bust measurement and divide your answer by 2.

Divide this number by three, so that it can be distributed evenly throughout back dart, front dart and side seam.

DRAFT THE BACK WAIST DART

draft_bodice_block_41

To mark the placement of the back waist dart, find the midpoint of line HV and label as C1. Square down from this point so that line intersects the WAIST LINE (BF). Mark the point of intersection as point C2. This will become the centre of your back dart.

draft_bodice_block_42

Distribute the dart width evenly either side of C2 and join endpoints to C1 to create dart arms. 

Draft the side seam

draft_bodice_block_43

For simplicity, at this stage, treat the side seam (line A3-A4) as a dart at this point. Distribute one third of the dart width to the back of the bodice and two-thirds to front of the bodice, either side of A2. Join the endpoints to A3 to create the front and back side seams. 

Draft the front waist dart

draft_bodice_block_44

Distribute dart width evenly either side of S and join the endpoints to a point 1cm (3/8") down from BP to create dart arms. 

Balance the waistline

draft_bodice_block_46

At this point the waistline of the pattern is straight. But as the front of our bodice must pass over the fullest part of our chest (our bust), we need to add a little extra length to our CENTRE FRONT, to prevent this part of the waistline from riding up when the bodice is made.  

Mark a point 0.5cm (1/4") to 1.5cm (1/2") down from point F as point C1.

(0.5cm (1/4") for small bust / 1cm (3/8") for medium bust / 1.5cm (1/2") for large bust)

 Join point B to point C1.

Trace the pattern

draft_bodice_block_47

With a second piece of pattern paper, trace off the back pattern piece – being sure to include all important details (i.e. bust line and darts). 

draft_bodice_block_48

Leaving a space between the pieces, trace the front pattern piece.

Add seam allowance to the pattern

draft_bodice_block_49

To finish, add shaping to the darts (following this tutorial) and then add seam allowance to the pattern. As it is a bodice block, I find that it is handy to have it available without seam allowance (as when you are making alterations or adjusting a pattern it is far easier to do so without seam allowance), but as you will need to make a toile to see how it fits, add seam allowance to the seams that will be sewn - the side seams, centre back and shoulder seams. The other seams - the neckline, armholes and waistline - can be left without seam allowance so that you can get a true indication of what it will look like without having to finish these seams or add a facing etc. I went for 1.5cm (1/2") seam allowance on the shoulders and side seams, and 2cm (7/8") on the centre back. For more details on adding seam allowance, you can take a look at this tutorial

Add pattern markings and cutting instructions

draft_bodice_block_50

Add pattern markings to the pattern – being sure to mark drill holes (I always mark my drill holes 1 - 1.5cm (3/8" - 1/2") above the dart point and notches.

And voila! There you have a basic bodice block to your very own measurements!

Sew it up (in calico or something similar you may have hiding in your sewing box), see how it fits and then you are ready to start getting creative making your own patterns!


Have a question about this tutorial?

Please check out these Frequently Asked Questions about the tutorial before getting in touch. I do love hearing from you, but you are likely to find your answer faster than we are able to get back to you.


profile pic.jpg

Did you enjoy this tutorial?

It is our vision to empower you to make a wardrobe that you will wear, love and cherish - long into the future.

If this tutorial has helped you, it would be greatly appreciated if you could give thanks with a small donation. This will help us to continue to create content like this tutorial and continue offering it for free - so it can be accessed by all.

We greatly appreciate your support!


You may also like:

How to : Add panel lines to a skirt pattern

how_to_add_panel_lines_skirt_1

Panel lines are a great way to add interest to a design. There are countless variations and it is a way to include more than one fabric in your design if you would like. I really struggle to keep a design limited to one fabric, so often add a contrast fabric with panel lines. Panel lines are also a good way to eliminate darts, without losing the fitted shape of the garment.

Now that our skirt blocks are done, it's time to have a play! In today's post I will show you the basics of creating panel lines on a pattern. This same principle can be used on all different patterns, so keep reading, even if it's a bodice or dress you're planning to add panels to. 

how_to_add_panel_lines_skirt_2

I will show you how to add panel lines where the darts are on the original skirt block. With these panels, you will no longer need darts, as the shaping required will be provided by the panel lines.

Mark panel lines

how_to_add_panel_lines_skirt_3

1. Take your skirt pattern and draw a line from the tip of the dart to the hemline, ensuring it is parallel to the centre front (or entre back if you are working on the back pattern piece).

2. Add notches to the line. This will help when you are matching the two pieces together later. I suggest putting one in line with the dart point and another on the straight part of the line.

Now that you have the line marked, you can cut the pattern into two pieces, or you can trace the pieces onto seperate pieces of paper (my preferred method).

Create side front panel piece

how_to_add_panel_lines_skirt_

3. Take a separate piece of pattern paper, and place it on top of your skirt block. To start, you will be tracing the left side panel. Trace down the side seam, along the hemline, up the line you drew (Step 1), along the left dart arm (being sure that the transition between line and dart is a smooth curve) and then along the waistline. Transfer the notches from the panel line, and notch the hip line on the side seam.

4. Before removing the tracing, transfer the grainline, which should be parallel to the original grainline. Add pattern information and cutting directions (Front side panel / cut 1 pair).

Create centre front panel piece

how_to_add_panel_lines_skirt_4

5. Next, you will need to trace the centre front panel. Take another piece of pattern paper and trace down the centre front, along the hemline, up the panel line, up the right-hand dart arm and along the waistline. Once again, make sure your transistion from panel line to dart line is nice and smooth. Transfer the notches on the panel line.

6. Before removing the tracing, transfer the grainline, which should be parallel to the original grainline. Add pattern information and cutting directions (Centre front panel / cut 1 on fold).

Add seam allowance

how_to_add_panel_lines_skirt_5

7. Add seam allowance to both pattern pieces. I suggest 1.2cm - 1.5cm (1/2in - 9/16in). You may want to add more to the hemline, but for the sake of the example I have left the seam allowance consistent. Repeat process for the back pattern, and now you have a skirt with panels, instead of darts!


You may also like:

How to draft a shaped waistband

draft_a_shaped_waistband_1

Last week, I showed you how to draft a straight waistband for your skirt block (it will also work for other garments, such as trousers) as part of The Skirt Series I have been running for the last couple of weeks. Today, I will be showing you how to draft a shaped waistband. 

Before starting, though, I'd like to a little re-cap of a couple of things (which you may remember, if you read the previous waistband post).

two types of waistbands

Most waistbands on skirts or trousers are based on these two basic waistband shapes:

draft_a_shaped_waistband_2

A straight waistband - which is a long rectangle that generally does not have side seams. 

draft_a_shaped_waistband_3

A shaped waistband - which may, or may not, have side seams. 

SHOULD I DRAFT A STRAIGHT WAISTBAND OR A SHAPED WAISTBAND?

Either option can be drafted for the skirt block, and which is better for you comes down to individual preference and body shape. For me, I am a little too curvaceous in the lower half to feel comfortable in a straight waistband (as the top of a straight waistband tends to gape on me).

If you followed the tutorial to draft a straight waistband, you will see the first few steps are the same, so if you'd like to go back to the construction of your straight waistband, then you can! If you haven't already drafted the straight waistband, not to worry, just skip over the next two steps and start with 'Take measurements.'

Trace your pattern

draft_a_shaped_waistband_4

On a seperate piece of pattern paper, trace a copy of the straight waistband, without seam allowance.

Indicate the centre front and centre back.

draft_a_shaped_waistband_5

Using the notches to guide you, mark the points of interest (front dart, back dart, side seam) with vertical lines on the pattern.

TAKE MEASUREMENTS

If you haven't already drafted the straight waistband, you will need to start by taking some measurements from your skirt block. 

draft_a_shaped_waistband_6

Remember to measure along the stitch line, not the edge of the pattern.

Measuring along the waistline, on the front pattern piece:

1 - Centre front to first dart arm

2 - Second dart arm to side seam

On the back pattern piece:

3 - Side seam to first dart arm

4 - Second dart arm to centre back

WAISTBAND CONSTRUCTION

There are several ways to draft a shaped waistband, including using the waist section of the bodice block to construct, but as I have not yet shown you how to draft a bodice block (but definitely plan to in the future), I'll show you how to draft the waistband using the skirt block.

draft_a_shaped_waistband_7

Add the four measurements taken in the previous step together to find the length of the waistband. Remember this measurement gives you half the waistband, as the pattern piece can be cut on the fold. Draw a line as long as this measurement. 

draft_a_shaped_waistband_8

Decide how wide you would like your waistband to be - consider a measurement around 3 - 6cm (1 1/4 - 2 1/4in). Draw a perpendicular line from either end of your original line, the height of your waistband.

draft_a_shaped_waistband_9

Complete the rectangle by connecting the end points of the lines drawn in the previous step.

So now that you have the basic shape, it's time to get some markings onto your pattern piece.

draft_a_shaped_waistband_10

Going back to your original measurements (from your skirt block), measuring from the right hand side of your waistband, mark in each point of interest with a perpendicular line. You need to mark the location of your front dart, the side seam and back dart. You can also label each end as the centre front (right hand side) and centre back (left hand side).

And this is where the tutorial takes a turn away from the straight waistband tutorial...

Label your pattern

draft_a_shaped_waistband_11

Label each section of the waistband, with the following:

1 - Centre front

2 - Side front

3 - Side back

4 - Centre back

Measurements required

You will now need to find the difference between your waist measurement (where your skirt sits) and the top of your waistband.

draft_a_shaped_waistband_12

A good way of doing this, is by putting on your skirt toile (as you can see, my skirt is a digital one!) and working out where the top of your waistband will sit (this will depend on how wide you are making your waistband). Take a tape measure and measure around your waist at the point where your waistband will end. Take note of the measurement.

Compare measurements

Work out the difference between the measurement you just took and your actual waist measurement. Take note of this number.

You now need to divide this measurement by 2 (as you will be cutting your pattern on the fold) and then divide it by 3 (as you will be distributing the measurement evenly throughout the pattern piece).

For example, if the difference between your measurements is 6cm, you need to divide that by 2, which gives you a result of 3cm. You then divide the 3cm into 3, giving you 1cm. That number (in this case, 1cm) is the one you need in the next step.

Waistband construction

draft_a_shaped_waistband_13

Take that number and, on your waistband, mark a point to the right side of each vertical line (excluding the centre front and centre back), that distance away from the line. If you were to use the same numbers I used in the example above, for this step, you would need to mark a point 1cm from each vertical line. 

draft_a_shaped_waistband_14

Label these points as A, B and C.

Cut

draft_a_shaped_waistband_15

Cut down each vertical line, from the top of the waistband. Do not cut all the way through the pattern, leave a small "hinge" to keep the pattern pieces attached.

Close

draft_a_shaped_waistband_16

Being careful not to break the "hinge," rotate the centre back piece, until the slashed line overlaps point A. Tape or glue in place. 

draft_a_shaped_waistband_17

Repeat for the 'side back' piece (which is now attached to the centre back piece). Rotate until the slashed line overlaps point B and then stick in place. 

draft_a_shaped_waistband_18

Rotate the final slash line, aligning the cut line with point C.

As you can see, your waistband is no longer a rectangle! The top edge of your waistband is now narrower than the bottom edge. 

Trace the pattern

draft_a_shaped_waistband_19

Take a piece of pattern paper and place it on top of your waistband construction so that you can trace it. 

Start by tracing the centre front (and labelling it as the 'centre front'). From the centre front draw a perpendicular line at either end of the line.

draft_a_shaped_waistband_20

By doing this, you will ensure that you get a nice smooth waistband across the centre front and back (as you can see in the example above) - when the piece is cut on the fold.

Repeat for the centre back.

draft_a_shaped_waistband_21

Now, using a ruler, or a hip curve, join the perpendicular lines (drawn in the previous step) with smooth curves, creating the waistband shape.

Add notches

draft_a_shaped_waistband_21

Before removing the pattern from the construction underneath, mark each point of interest with a notch. These notches will make it much easy for you to sew the waistband to the skirt, without the worry of stretching the waistband. 

draft_a_shaped_waistband_22

It is also a good idea to add notches along the top edge of the waistband. I like to put them in a different spot to the notches on the bottom edge, to save any confusion. 

Add a side seam

draft_a_shaped_waistband_23

If you would prefer to have a side seam in your waistband (rather than all-in-one), at this point you should draw in your side seam.  Draw a straight line from the middle notch on the lower edge of the waistband up through the centre of the respective slash line (through the centre of the overlap).

Add seam allowance

draft_a_shaped_waistband_24

You should have now transferred all the necessary details from your pattern construction onto your pattern. You can now add seam allowance to the top and bottom edges, as well as the centre back. I would suggest 1-1.5cm (3/8 - 5/8in) on the curved edges and 1.5-2.5cm (5/8in - 1in) on the centre back. 

If you have added a side seam, I would suggest adding seam allowance of 1.2 - 1.5cm (1/2 - 5/8in) to this seam.

Add grainline and cutting instructions

draft_a_shaped_waistband_25


Mark the grainline (parallel to the centre front) and add cutting instructions (cut 1 on fold).

If you have added a side seam, the grainline on the back piece will run parallel to the centre back, and the cutting instructions will be 'cut 2 pairs'. 

You may consider fusing you waistband, but that will come down to your fabric choice and design. 


You may also like:

Throwback Thursday: Adding volume to a pattern

ADD-VOLUME_cut_and_spread_1.gif

Over the past weeks I have been showing you how to draft a skirt block, as part of The Skirt Series.

Now that it is complete, it is time to start making the pattern your own. 

ADD-VOLUME_cut_and_spread_2

Last week I showed you how to draft an A-line skirt, by relocating the fullness of the dart to the hemline, using the cut and spread technique.

Today I will show you how to add more volume to the skirt block, using this same technique. You can use this same method to add fullness to just about any pattern piece: sleeves, trousers, blouses and jackets, and many more. 

Mark the cut and spread lines

ADD-VOLUME_cut_and_spread_3

1. I am using my skirt block to demonstrate this tutorial. The darts have already been moved, as shown in this tutorial. As always, it is best to have a copy of your pattern, without seam allowance. It is much easier to make adjustments with seam allowance removed.

2. Draw three lines (this is only a suggestion, you could use more or less) down the length of your pattern, roughly parallel to the centre front. Space them out, with roughly even gaps between them.

ADD-VOLUME_cut_and_spread_4

3. You will be cutting these lines, to add volume to the pattern. Wherever there is a line, this is where more fabric will be added - that's why it is best that they are evenly spaced.

4. Take your scissors and cut along the first guideline, from the hemline up towards the waistline.

ADD-VOLUME_cut_and_spread_5

5. Do not cut all the way through the pattern. Stop a few millimeters (1/16 in) from the waistline, leaving a 1-2mm "hinge" to keep the two pieces together.


How much volume to add?

Think about how much volume you are wanting to add to the pattern overall. You may want to do this by eye (just cut along the line and then spread until it looks as though enough volume has been added), or by an exact amount. If you are just opening up a hemline, I would say that doing it by eye is fine. But if, for example, the hip-line of a pattern is too tight and you are spreading the pattern to accommodate this, then I would suggest finding an exact amount so that you don't get any surprises.

If you have found an exact amount, you will need to divide this figure by four, as the volume will need to be distributed between the four pieces that make up the skirt pattern (front right, front left, back left and back right). Then divide the number again, by the number of guidelines you have on your pattern piece.

For example, if you would like to add an overall 30cm to the hemline, you will be adding 7.5cm to each pattern piece. If I was to add this to my pattern used as an example, I would divide this 7.5cm by my three guidelines, meaning I would open up each guideline by 2.5cm.

Cut and spread 

ADD-VOLUME_cut_and_spread_6

6. Slide a separate piece of pattern paper under your pattern, so that you will have something to stick the pattern to once you make the adjustments. Spread the hemline by the amount worked out in the previous step. Use tape or glue to secure in place.

7. Repeat process for the other lines, spreading each opening by the same amount as the first.

Check pattern

ADD-VOLUME_cut_and_spread_7

8. Redraw the waistline with a smooth curve.

9. Redraw the hemline with a smooth curve.

ADD-VOLUME_cut_and_spread_8

10. Check the the hemline meets the side seam and the centre front with a right angle. This will help you get a nice smooth hemline between front and back pattern pieces.

Complete the pattern

The pattern is done and you can now add seam allowance. If the pattern is a bit of a mess, with all that tape and extra paper, then simply trace a copy onto a seperate piece of paper.


You may also like:

Drafting a waistband

draft_a_waistband_1

In the last couple of weeks I've been showing you how to draft a skirt block to your own measurements, as part of The Skirt Series. In today's post I am going to show you how to draft a waistband for the skirt. If you have just made the skirt block and need to make a toile to see how it fits, I wouldn't bother making a waistband. You are better off whizzing up a quick toile, checking how it fits, and then once you are happy with it, making the waistband.

Two types of waistbands

Most waistbands on skirts or trousers are based on these two basic waistband shapes:

draft_a_waistband_2

A straight waistband - which is a long rectangle that generally does not have side seams. 

draft_a_waistband_3

A shaped waistband - which may, or may not, have side seams. 

Should I draft a straight waistband or a shaped waistband?

Either option can be drafted for the skirt block, and which is better for you comes down to individual preference and body shape. For me, I am a little too curvaceous in the lower half to feel comfortable in a straight waistband.

In today's post I will show you how to draft a straight waistband, and then next week I will get to shaped waistbands. And then you can work out which one is for you! The good thing about drafting your own waistband, is that you will be able to use it whenever a waistband is called for, and you know that you will get a great fit every time. 

Take measurements

draft_a_waistband__4

To start, take your skirt block and take note of some measurements. Remember to measure along the stitch line, not the edge of the pattern.

Measuring along the waistline, on front pattern:

1 - Centre front to first dart arm

2 - Second dart arm to side seam

On back pattern:

3 - Side seam to first dart arm

4 - Second dart arm to centre back

Waistband construction

draft_a_waistband_5

Add the four measurements taken in the previous step together to find the length of the waistband. Remember this measurement gives you half the waistband, as the pattern piece can be cut on the fold. Draw a line as long as this measurement. 

draft_a_waistband_6

Decide how wide you would like your waistband to be - consider a measurement between 2 and 6 centimetres. Draw a perpendicular line from either end of your original line, the height of your waistband.

draft_a_waistband_7

Complete the rectangle by connecting the end points of the lines drawn in the previous step.

So now you have the basic shape, it's time to get some markings onto your pattern piece.

draft_a_waistband_8

Going back to your original measurements (from your skirt block), measuring from the right hand side of your waistband, mark in each point of interest with a perpendicular line. You want to mark the location of your front dart, the side seam and back dart. You can also label each end as the centre front (right hand side) and centre back (left hand side).

Add seam allowance

draft_a_waistband_9

Add seam allowance to the top and bottom edges (I suggest 1 - 1.5cm). You can also add seam allowance to the centre back. I usually add 2cm to the centre back, to allow for the zip. Remember that the seam allowance you use on the waistband pattern, but be the same as the seam allowances you added to the skirt block, as you will be sewing these pieces together. 

Add notches

draft_a_waistband_10

Add notches to the pattern. You will want notches at all points of interest on the bottom edge (side seam, both darts and centre back), while on the top edge I would suggest only notching the centre back and then one other point that is not in line with the darts on the bottom edge. This will help you know which way up the pattern should go when you are sewing. This may not seem necessary as the piece is symmetrical, but if you are using a directional print, it will help make sure you don't end up with an upside down print! When cutting I would also suggest notching the centre front on both edges. 

Add pattern details

draft_a_waistband_11

Add pattern details and the grainline (runs vertically through the pattern), indicating that the centre front needs to be cut on the fold.

Button extension

draft_a_waistband_12

If you would like your zip to run straight through the waistband like this, then your waistband pattern is ready to go and you can get sewing!

draft_a_waistband_13

But if you would prefer the zip to stop at the waistline and then have a button to close the waistband, you will need to add a button extension to your pattern piece (which will only take a second).

Adding a button extension

draft_a_waistband_14

The extension will only be added to one end of the waistband, so you will need to fold the pattern in half (down the centre front) and trace the pattern to create a full pattern piece. Do not add seam allowance to the centre back on the second side. At the centre back you will be wanting to add the button extension. The length of this will depend on the size of your button, though I would say 3-4cm should be fine. Add seam allowance to the extension and now it's done!


What are your thoughts on waistbands? Do you prefer a shaped waistband, or does a straight waistband do the trick?


You may also like:

Throwback Thursday: How to use the cut + spread technique to draft an A-line skirt

cut_and_spread_inthefolds

After a few days of Rushcutter pattern alterations, it is time to get back to our skirt blocks, as it is, after all, Throwback Thursday! So Welcome back to The Skirt Series! Now that the pattern is pretty much complete (we just need to create a waistband pattern - which I will cover in tomorrow's post) I think we should have a play around with our new pattern blocks.

Once you have a skirt block that fits you well, there is just so much that can be done with it, and over the next few weeks I plan to show you some of the techniques you will need to know to transform your block into a skirt. 

One of the techniques I use the most when I am flat pattern-making, is relocating darts. So I think that is a good place for us to start! Once you know how to do it, you will be able to use this technique on any pattern that has darts.

Cut and spread

cut_and_spread_inthefolds_1

So today, I will show you how to relocate the waist darts in the skirt block, to create an A-line skirt. 

1. To start, you will need your skirt block. I will demonstrate by showing the front pattern piece, but the principle is exactly the same for the back pattern piece.

2. Trace a copy of your skirt block, without seam allowance. 

3. Draw a line, parallel to the centre front, from the tip of the dart, down to the hemline. 

cut_and_spread_inthefolds_2

4. Starting at the hemline, cut along this line, until you are 1-2mm from the dart point.

5. Now focusing on the outside dart arm (the dart closest to the side seam), cut down from the waistline towards the dart point, once again stopping 1-2mm from the dart point. This will create a small 'hinge,' so that the two parts of your pattern remain attached. But you will be able to open and close your dart with ease.

cut_and_spread_inthefolds_3

6. Close the waist dart by rotating the pattern, until the cut dart arm sits on top of the inner dart arm.

7. When in position, tape (or glue) in place. You will see that, by closing the dart, you have opened up the hemline, giving the skirt an A-line shape.

Trace the pattern

cut_and_spread_inthefolds_4

8. Take a separate piece of pattern paper and use a weight to hold it in place on top of the pattern. Trace around the pattern. You will see that the waistline has become quite angular since removing the dart, so you will need to redraw it with a soft curve. You will also need to redraw the hem with a smooth curve.

9. Add pattern details, notches and repeat for the back pattern piece.

cut_and_spread_inthefolds_5

10. If you would like a more drastic A-line you can redraw the side seam as a straight line (this will remove any shaping around the waist). To complete the pattern, add seam allowance.

Want to give it a go yourself?

I have created a small scale version of my skirt block that you can download (just click the image above) so that you can have a play around, if you are short of time, paper or space. It is also great to have a small scale version of techniques for your reference, so that you can easily store them for reference. And there will be many more new techniques to come, so print a few copies!


You may also like:

Adding pattern markings to your patterns

adding_pattern_markings_to_you_patterns_inthefolds

For those of you have been following along with The Skirt Series, we have almost finished our blocks! We have drafted the pattern, added shaping to the darts, added seam allowance, and today we are going to finish it all off by adding pattern markings.

Pattern markings

There are a number of markings you should always add to your pattern pieces. They help you with laying patterns on the fabric correctly when cutting your fabric, and also help when sewing your garment together. 

The grainline

The grainline ensures that the pattern is placed on the fabric the right way. If the grain is not straight (and it is intended to be), you may end up with a badly fitted garment.

The grainline usually runs vertically through a pattern, although in some cases it will run horizontally or even diagonally (bias cut patterns). I like to use arrows to indicate the top and bottom of the pattern - this can help when you have a directional print or a pattern piece that is an unconventional shape. The double arrow points towards the top, and the single arrow points towards the bottom. I also like to draw grainlines so they run from one edge of the pattern to the other, this is really hand when using a striped fabric, to ensure your placement is exactly right. 

Notches

Notches are small cuts in the fabric that guide you while you are sewing (they are also commonly indicated with small triangles). If you have sewn The Rushcutter, you will know how much I love a good notch! 

Notches are used to indicate:

  • seam allowance
  • dart arms
  •  the location of design details such as: pleats, gathers or pockets
  • the centre front
  • the centre back
  • balance points

Balance points are pointers on your pattern that help you put pieces together correctly, as well as help you when you are sewing a very long, or curved seam.

For example, I tend to add a balance point (or even two or three - depending on the length of the seam) part way down a side seam to ensure that the pieces are sewn together correctly and I am not left with excess fabric on one side of the seam at the end. Balance points also help to prevent stretching the seam when sewing. In the skirt block, for example, the notch at the hip line acts as a balance point.

A notching no-no

Try to avoid notching both sides of a corner as this can weaken the fabric (as well as the pattern itself). 

Double notches

Double notches are normally used to indicate the direction a piece should be sewn in (and generally indicate the back of the pattern piece). For example, a double notch is used on a sleeve cap to indicate where the sleeve cap meets the back armhole. In a side panel, a double notch is also often used to show where the piece meets with the back pattern piece.

I also like to use a double notch to indicate the end of a zip (if I am using a zip in the centre back).

Drill holes

Drill holes are used to indicate a dart point. I prefer to place drill holes 1cm - 1.5cm up from the actual dart point, so that when the dart is sewn, the marking is hidden inside the dart.

Drill holes can be used to indicate other design features, such as:

  • placement of patch pockets
  • placement of belt loops
  • or any other design feature that is in an area where you are unable to mark a notch on a seam

Pattern instructions

Pattern instructions are your way of keeping track of, and identifying, pattern pieces.

On each pattern piece, you should include:

  • the name of the pattern
  • the name of the pattern piece
  • size
  • cutting instructions
  • number of pieces
  • date

Some of these things may seem quite obvious, but the clearer your markings are, the easier your pattern will be to use. Particularly if you decide to use the pattern in a month, or even a year! If the instructions are clear, you won't waste any time trying to remember the details of your pattern. 

And that's it! You can go ahead and make a toile of your skirt block and see how it fits!


In the coming weeks I am planning on showing you some different ways to hack the skirt block into a different design. Do you have anything you would like to see in particular?


You may also like:

Throwback Thursday: How to add seam allowance to a sewing pattern

Last week, I showed you how to draft a skirt block from your own measurements, and then how to add shaping to the darts at the waistline, as part of The Skirt Series.

add_seam_allowance_to_a_pattern_inthefolds_2

Before going ahead and making a toile to see how it fits, you will need to add seam allowance and pattern markings (which will be in tomorrow's post). 

What is seam allowance?

add_seam_allowance_to_a_pattern_inthefolds_3

Seam allowance is the extra space you add around the edge of a pattern piece so that it can be sewn together.

If you do not plan to make up a toile of your pattern (in the case of pattern blocks), then there is no need to add seam allowance. When you are using a block to create a pattern it is much easier to use it without seam allowance and then add seam allowance once the pattern is complete. 

How do I add seam allowance?

I find that the easiest way to add seam allowance is with a long transparent ruler. Not to worry if you don’t have one though, you can just use and ordinary ruler and mark the seam allowance width at intervals along the seam and then draw the line through all the points.

I have two different rulers, which I find super helpful. One only shows centimetres, but also has lines to indicate the millimetres in between. This one is very handy for when I'm adding 6mm seam allowance to a neckline or 12mm to a seam.

add_seam_allowance_to_a_pattern_inthefolds-4

The other, which I have used for this tutorial, only show has a line for every 5mm. If I am using a 1cm / 1.5cm / 2cm seam allowance, then this is definitely the one I reach for, as there are a lot fewer lines to get confused by!

Before getting started

Before getting started, have a think about the seam allowances you plan to use. I know some commercial patterns use the same seam allowance on every seam, but I think you are much better off changing the allowance depending on the seam. This will help you get a much cleaner and more professional finish.

The seam allowance required will have a lot to do with the fabric you are using, and how you will be finishing the seams too. For example, if you are making a silk chiffon top, it is best to use a narrow seam allowance, so you are not left with bulky seams that show through. A silk chiffon top is a delicate piece of clothing, that is not worn everyday and is normally hand washed, so it can afford to have smaller seam allowances. But, if you are making a pair of trousers or a coat, you need seams that a stronger (particularly in places where tension is put on the seams - e.g. the crotch of trousers) and therefore need a seam allowance that is wider than what you would use for your chiffon top. 

Standard seam allowances

I have put together a table to help guide you with how much seam allowance to add, but as I said, it is up to you! If you click on it, you can download a printable version of the table. It may be handy to put up on the wall in your sewing room!

Adding seam allowance to your skirt block

This tutorial will show you the method I use for adding seam allowance to a pattern, using a skirt block as an example. This method can be used to add seam allowance to any pattern.

add_seam_allowance_to_a_pattern_inthefolds-6

Decide on how much seam allowance you will be adding (using the table above if needed) and find where the line is that indicates that width on your ruler. 

add_seam_allowance_to_a_pattern_inthefolds-7

Lay that particular line (the width of your seam allowance) along the side seam of your pattern.

add_seam_allowance_to_a_pattern_inthefolds-8

With a sharp pencil, or pacer, draw in your seam allowance, being careful to keep your ruler in place. Be sure to extend the line past the original line by a couple of centimetres (this helps when we add seam allowance to the other seams).

add_seam_allowance_to_a_pattern_inthefolds-9

After marking the side seam, it's now time to move on to the hip curve.

If the seam you are adding seam allowance to is curved (which it is in this case) you will need to mark the seam allowance with a broken line. Line up your seam with the ruler and draw a small line (in this case, two lines).

add_seam_allowance_to_a_pattern_inthefolds-10

Then pivot your ruler to you next point (I tend to do this every 1 – 1.5cm) and continue marking the seam allowance with a broken line.

For tight curves (such as the bodice neckline) mark your seam allowance guidelines closer together to ensure a smooth and accurate curve.

add_seam_allowance_to_a_pattern_inthefolds-11

Continue pivoting until you have gone around the whole curve.

add_seam_allowance_to_a_pattern_inthefolds-12

Next, on to the waistline. Before starting to add seam allowance, extend both dart arms, as well as the centre line, by a few centimetres. This will help when you are adding seam allowance to the top of the dart.

add_seam_allowance_to_a_pattern_inthefolds-13

Mark the seam allowance on the waistband, and then follow the angle of the dart, when you get to the first dart arm. Repeat for the other side.

add_seam_allowance_to_a_pattern_inthefolds-14

Continue along the waistline, towards the centre front, pivoting the ruler when necessary. 

add_seam_allowance_to_a_pattern_inthefolds-15

The centre front does not need seam allowance, as you will be cutting this piece on the fold. Just extend the centre front line a little beyond each edge, so that it can intersect with the seams on the other sides. 

add_seam_allowance_to_a_pattern_inthefolds-16

Mark the hem allowance by measuring down the centre front and side seam from the stitching line. 

add_seam_allowance_to_a_pattern_inthefolds-17

Join the points to create the hemline. 

add_seam_allowance_to_a_pattern_inthefolds-18

By this stage, you should have worked your way around the whole pattern.

add_seam_allowance_to_a_pattern_inthefolds-18

Now to do something about those broken lines. 

Draw in your curve by joining the broken lines to form a smooth curve. You can do this by carefully pivoting your ruler, using a French curve or something else round (like a large mug or plate depending on the shape of the curve). A good way to check if your curve is smooth is, with the pattern flat on a table, to crouch down and look at the curve at eye level. You will quickly see if there are any sharp points!

add_seam_allowance_to_a_pattern_inthefolds-19

Repeat for the back pattern piece. And you are done, your pattern now has seam allowance!


I would love to know if I have convinced any of you to try doing some pattern making yet?


You may also like:

A tutorial: How to add dart shaping

inthefolds_dartshaping_1

Welcome back to my latest addition to the blog: The Skirt Series. In yesterday's tutorial, I showed you how to draft a skirt block.

inthefolds_dartshaping_2

At this stage the pattern is drafted, but it is not yet complete. There are still two things to do before we can go ahead and make a toile - we need to add dart shaping and then add seam allowance. I will cover dart shaping in today's post and then next week I'll get to adding seam allowance.

What is a dart?

Essentially, pattern drafting is the act of making something two dimensional (the fabric) fit around something three dimensional (the body). Darts are a way of doing this and are most commonly used to create shape around areas of the body that are curved - the bust, shoulders, elbows and waist, but can be used pretty much anywhere - whether purely for fit, or also as a design detail.

What is dart shaping and why do I need to think about it?

inthefolds_dartshaping_3

You may have put a dart in something before and noticed that the dart has changed the shape of the seam that it lies on and is no longer the smooth line it once was. In the example, I have folded the dart, and it has caused the waistline to become very sharp and angular. This is because we have lost 3cm to the dart, which is what gave us our nice smooth curve.

inthefolds_dartshaping_4

To prevent this from happening, you need to add dart shaping. This will ensure that once your dart is sewn in your waistline (or which ever seam your dart is located) it will remain a smooth line.

Let's get drafting!

Take one piece of your skirt (I will be starting with the front), or any other pattern piece that you are working on, that has a dart. Your pattern should still be on a larger piece of paper (not yet cut out).

inthefolds_dartshaping_5

You will need to fold the dart, so you can predict what will happen when you sew the dart when you get to making it up in fabric. Think about which direction the fullness of your dart will be pressed once it is sewn, this will decide which dart arm you need to fold.

Generally vertical darts are pressed towards the centre front (in the case of front darts) and the centre back (in the case of back darts). It seems reviews can be mixed when it comes to more horizontal darts, but I tend to push mine up up.

Fold along Dart arm # 2, down to the dart point, being careful to fold right on the line, to make a crease.

inthefolds_dartshaping_6

Working with darts on a flat surface can be difficult so move over to the corner of your table (hopefully you have a square or rectangular table like me, otherwise a big book will do the trick), placing the point of your dart on top of the corner of the table.

inthefolds_dartshaping_7

Fold the dart, by placing Dart arm # 2 on top of Dart arm # 1 (this is when that crease comes in handy). You will quickly see that it is much easier to get the dart to sit flat when it is sitting on a corner.

You will see that your seam would look like if you were to sew it without adding dart shaping. Not great, right?

inthefolds_dartshaping_8

Use a weight to keep your pattern in place on the corner and then take a ruler and pencil and redraw the waistline with a nice smooth curve.

inthefolds_dartshaping_9

Take your tracing wheel and trace along your new seam line - particularly focusing on where the dart is folded (go over this area a couple of times to ensure the markings transfer through the fold).

inthefolds_dartshaping_10

Unfold the dart and you will see the markings transferred from the tracing wheel.

inthefolds_dartshaping_11

Take a ruler and join the dots to form a nice smooth line.

And there you have it, a dart with shaping!


I must say that this little tip is one of my favourites. Do you have a favourite pattern cutting technique?


You may also like:

Throwback Thursday : Drafting a skirt block

inthefolds_draftaskirtblock_tutorial

As I mentioned last week, I will be diving into the Em Makes Patterns archives every Thursday to bring you some juicy pattern making goodness. 

For this weeks Throwback Thursday post, I thought it was worth starting right at the very beginning. If you are thinking about learning to your own patterns, then the best place to start is by drafting a skirt block. 

The skirt series

This is the first post of the skirt series, and each week I will be adding more posts, so that by the end of it, you will have a skirt block made to your measurements, and also have some pattern making techniques under your belt, so that you can make the skirt of your dreams!

What is a pattern block?

A pattern block is a basic pattern drafted to specific (or custom) measurements.

It is the starting point for most patterns (when flat pattern cutting), and can be manipulated and adjusted to meet individual design preferences.

It is a good idea to transfer your blocks onto cardboard, to keep them strong, as once you have a set of these, you will be using them a lot!

The skirt block

A skirt block is a fitted skirt that sits on the waist. Generally skirt blocks have two darts in the front and two in the back, although it is common to see a variation on this (for example, four darts in the back). By drafting a skirt block, you will get to know some basic techniques, and also get a sense of flat pattern making.

Tools + supplies

To draft a skirt block, you will need:

  • a piece of pattern paper

  • a ruler

  • a pencil

  • a tape measure

  • You may also want a french curve (or plate) for drawing the hip curve. To be honest, I don't use a curved ruler very often, and would rather use a standard ruler to draw my curves. But I will leave that tutorial for another day!

Measurements required

For this tutorial, you will need the following measurements: 

This distance will depend on how long/short you would like to make your skirt block - I made mine to finish just above my knee. 

Let's get drafting!

Mark the centre back

inthefolds_draftaskirtblock_1

To start, draw a straight line down the left hand side of your pattern paper, the length of your WAIST TO HEM measurement.

Label the ends as A and B. 

This will become the CENTRE BACK seam in your skirt.

Mark the waistline

inthefolds_draftaskirtblock_2

You will need to add a small amount of ease to the pattern (which will allow you to walk/sit/dance in your skirt). It is up to you how much ease you add - but as it is a block it should be quite close fitting, I suggest adding about 5cm to the HIP measurement and 3cm to the WAIST measurement.

Take your HIP measurement and add ease to this measurement, then divide result by two. As for all symmetrical patterns, you will be making half the skirt pattern (as the front pattern will be cut on the fold, and a pair of backs will be cut, to create a full skirt).

Draw a line from A (perpendicular to the CENTRE BACK seam ie. AB) the length of the measurement you found above. Label the end point as C.

This line (AC) will become the waistline of the skirt.

Mark the hemline

inthefolds_draftaskirtblock_3

Move down to point B and draw a line, perpendicular to the CENTRE BACK, the same length as the waistline. Label the endpoint as D.

This line (BD) will become the HEMLINE of the skirt.

Mark the centre front

inthefolds_draftaskirtblock_4

Join points C and D. This will be the Centre Front of the skirt.

Mark the hip line

inthefolds_draftaskirtblock_5

Take your WAIST TO HIP measurement and mark a point this distance from A, down the CENTRE BACK line. Mark point as E.

inthefolds_draftaskirtblock_6

Draw a perpendicular line from E that intersects with the CENTRE FRONT (CD).

You can mark this line as the HIP LINE.

Mark the side seam

inthefolds_draftaskirtblock_7

It is now time to mark the side seam. 

Take your full HIP MEASUREMENT and divide by four (once agin because we will be cutting on the fold). Add 1.5cm to the result. This extra 1.5cm will move the side seam slightly beyond the halfway point - to allow room for your derriere in the back of the skirt.  

Mark this measurement on your HIP LINE, measuring from point E. 

Mark point as F.

inthefolds_draftaskirtblock_8

Draw a perpendicular line from F, that extends up to the WAISTLINE (mark intersection point as G) and down to the HEMLINE. 

inthefolds_draftaskirtblock_9

At this stage, your waistline is the same length as your hip line. This is not the case in most women's bodies, so you will need to remove some width from the waistline. This will be done by creating four darts (two in the front and two in the back) and curving the hip line at the side seam.

To do this, take you WAIST measurement and subtract it from your HIP measurement. 

With your result, subtract the width of your four darts (4 darts measuring 3cm each = 12cm). The result is how much you need to remove from the side seams. 

Take the result and divide by two (as we are making half the pattern) and distribute either side of point G, on the waistline (half the measurement on the front pattern and half on the back). Mark points as H and I.

inthefolds_draftaskirtblock_10

Join H to F with a smooth curve. 

If you have quite a big difference between your waist and hip measurements and are worried that the hip curve is too extreme, you may choose to increase the width of your darts to compensate. 

inthefolds_draftaskirtblock_11

Repeat for the front by joining I to F with a smooth curve. 

inthefolds_draftaskirtblock_12

You will need to extend your side seams slightly beyond the WAISTLINE to accommodate the curve of your hips. Extend lines from H and I by 1.5cm, at the same angle as the curved hip line so that each becomes one continuous line.

Waistline

inthefolds_draftaskirtblock_13

Join the new point (extension from H) to A with a smooth curved line. You have now created the back waistline of the skirt.

inthefolds_draftaskirtblock_14

Repeat for front pattern. Join the new point (extension from I) to C with a smooth curved line. This is now the front waistline.


DOWNLOAD THE LITTLE BOOK OF SEAM FINISHES

Would you like to make clothes that are as beautiful on the inside as they are on the outside?

Sign-up to the newsletter to stay in the loop to receive inspiring content that will help you become a more confident maker. And get started with a free e-book!


Darts

inthefolds_draftaskirtblock_15

Now it is time to draw in the darts.

Mark the midpoints of both front and back waistlines. Label the midpoint of the back waistline as J and front waistline as K.

inthefolds_draftaskirtblock_16

From point J, mark a point 1.5cm towards the CENTRE BACK. From this new point, mark another point 1.5cm towards the CENTRE BACK.

If you have decided to increase your dart width, then make sure you remember to add in this width now. For example, if you plan to make the darts 3.5cm wide, then mark your points 1.75cm apart. If your dart value goes beyond 4cm, I would suggest creating two smaller darts instead - you will get a more flattering shape that way.

inthefolds_draftaskirtblock_17

These points mark the centre of the back dart, and the dart arms 1.5cm either side (to create a dart that is 3cm wide).

Draw a line that is 14cm long (this will be the length of your back dart) from the middle point. The line should be perpendicular to the waistline.

inthefolds_draftaskirtblock_18

Join the points either side to the endpoint of the line you just drew. You have now created the two dart arms.

inthefolds_draftaskirtblock_20

Move to your front waistline.

From point K, mark a point 1.5cm towards the CENTRE FRONT. From this new point, mark another point 1.5cm towards the CENTRE FRONT. These points mark the centre of your front dart, and the dart arms 1.5cm either side (to create a dart that is 3cm wide).

inthefolds_draftaskirtblock_21

Draw a line that is 13cm long (this will be the length of your front dart) from the middle point. This line should be perpendicular to the waistline. This will be the centre line of your front dart.

inthefolds_draftaskirtblock_22

Join the points either side to the endpoint of the dart centre line. This will complete your front dart.

inthefolds_draftaskirtblock_23

By this point, it should really be starting to look like a skirt pattern!

Finishing up

inthefolds_draftaskirtblock_24

Take a seperate piece of pattern paper and trace a copy of the front pattern. Remember to include all markings (hip line, dart, centre front). 

inthefolds_draftaskirtblock_25

Leaving some space between the pattern pieces (you still haven't added seam allowance), trace around the back pattern piece - once again, marking all important points. 

inthefolds_draftaskirtblock_26

And now you have a front and back skirt pattern! Add grainlines (parallel to the centre front and centre back) and label each piece.

For labelling I always use the format:

  • pattern name

  • name of pattern piece

  • sizing information (if required)

  • cutting instructions

  • You can also add the date and whether or not there is seam allowance added

Some of these things may seem very obvious, but I'm telling you, it makes it much easier if you pick the pattern up in a few months time!

Before cutting out the pattern, you will need to add shaping to the dart at the waistline, and seam allowance. You can go right ahead and do this, or you can wait for me to show you on the blog (very soon)!


profile pic.jpg

DID YOU ENJOY THIS TUTORIAL?

It is our vision to empower you to make a wardrobe that you will wear, love and cherish - long into the future.

If this tutorial has helped you, it would be greatly appreciated if you could give thanks with a small donation. This will help us to continue to create content like this tutorial and continue offering it for free - so it can be accessed by all.

We greatly appreciate your support!


How did you go? Would love to know if you have any questions related to drafting a skirt block?


You may also like: