THE Q & A SERIES - GRADING BETWEEN PANT SIZES (THE PEPPERMINT WIDE LEG PANTS)
Hi Emily,
Could you please explain how I can grade between pattern sizes. In the instructions you say that I should use a diagonal line between the 2 sizes, but I don't understand what to do. Is it possible to show that in pictures or a video? That would be so helpful!
I feel a bit insecure whether I have to grade between sizes or not for the wide leg pants. My waist is 74 cm, hip 100/101 cm. Do you think I should grade between C and D or just make D? I’m afraid the pants might become too wide at the waist…. Could you advise me? The fabric I want to use is a cotton twill.
Thank you very much in advance!
P.S. About your question regarding plans for 2020: I am going to try to reuse 'old' clothes to make something new. For instance, make a blouse out of an old shirt of my husband that has a little hole in the sleeve. And I want to make a bag out of an old leather jacket from my mother in law.
I started sewing 3 months ago and so far I made a pleated skirt, an a-line skirt, the peppermint every day dress and I just finished the wrap top. I love your patterns because of the very clear is instructions. I learn a lot from them. Thank you so much!
- Marjon
Almere, The Netherlands
Hi Marjon,
Thank you for your email. I am thrilled to hear you are enjoying using my patterns!
Wow, it sounds like you are really sewing up a storm in your first few month of sewing - well done!

In regard to your question about sizing, I have a tutorial about grading between sizes on my website here.
In terms of your question in regard to the Peppermint Wide Leg pants, rather than grading between sizes at the side seam, I would suggest altering the darts. Grading between sizes at the side seam is a good method for a lot of patterns and it will work with this pattern, but I think you would be better off keeping the side seam intact as it will give you a nicer shape, and the adjustment you're needing to make isn't a large one.
INCREASE DART WIDTH
What I would suggest doing is cutting the pattern in a size D. This is the right fit for your hip measurement, but will be about 2cm (3/4in) too big for you at the waist. It is much easier to make a pattern smaller, than make a pattern larger, so the size D is definitely the best starting point for your measurements.
As you are wanting to reduce the waist by 2cm (3/4in), you will be wanting to increase the width of each dart by 1cm (3/8in) (i.e. 2 darts at a 1cm increase = 2cm removed in total), to make the finished waist measurement 2cm (3/4in) smaller.

To do this, take the BACK LEG pattern piece and measuring from the dart arms (where the dart arms intersect with the stitch line), mark a point 5mm away on each side of the dart. You need to mark this point on the stitch line (faint grey line on the pattern), rather than the cut line (black line) on the pattern because the waist measurement is taken from the stitch line. My patterns all have the stitch line marked - but if you were using a pattern that does not have the seam allowance marked, simply mark it in before making an adjustment.
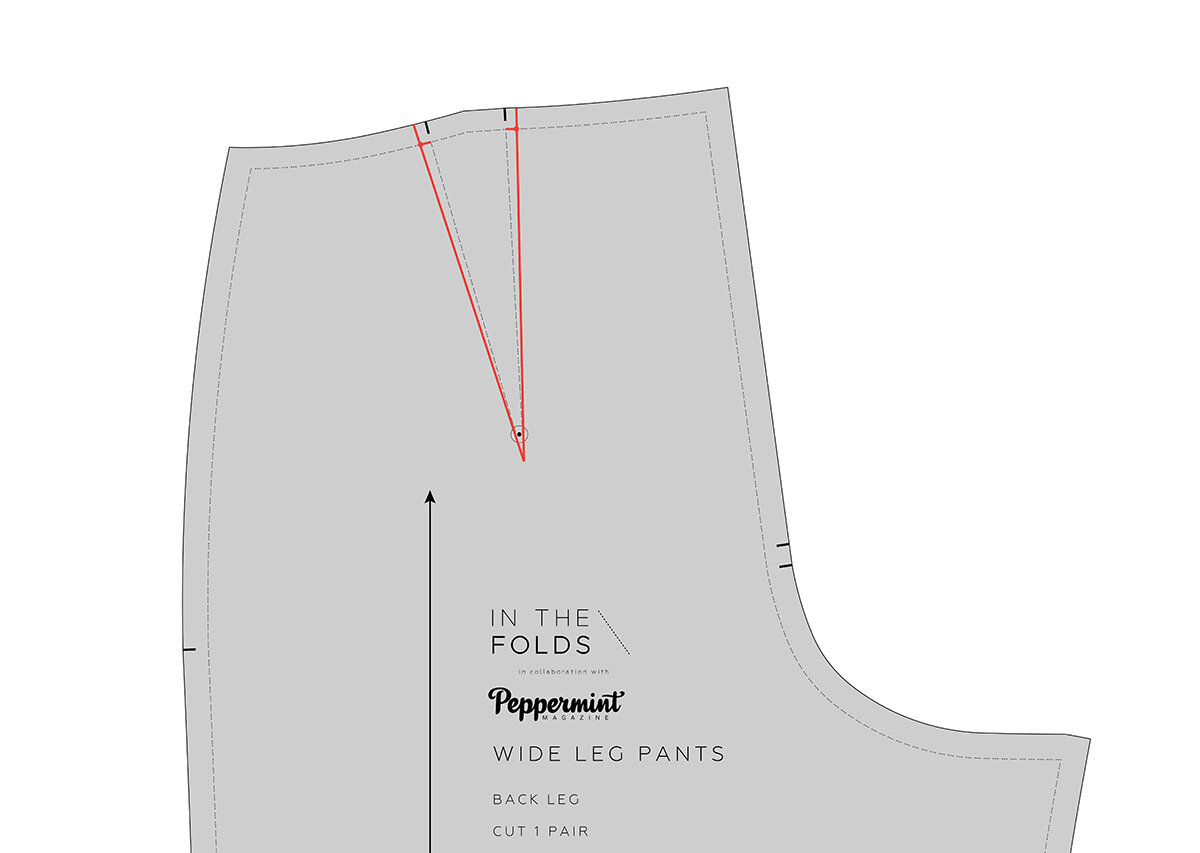
Re-draw the dart arms by drawing straight lines from the points marked on the stitch line in the previous step, down to the tip of the dart. Continue the lines so that they run to the cut line (edge of the pattern), as illustrated above.
RE-SHAPE WAISTLINE
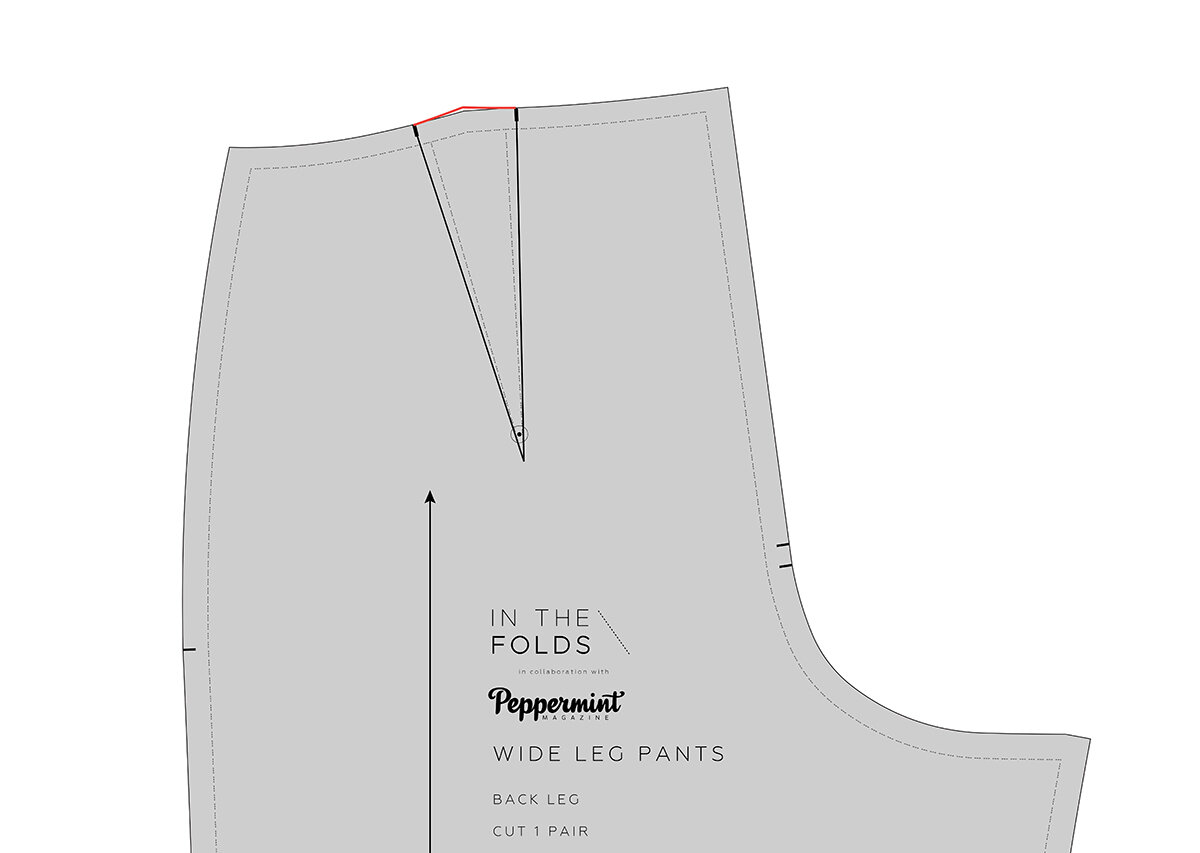
To complete the change to the dart, you will need to move the notches to be in line with the new dart arms. You will also need to re-shape the top of the dart, so that you get a nice smooth waistline when the dart is sewn. I have a tutorial on my website about dart shaping here.
REMOVING MORE FROM THE WAIST
If you were needing to remove more from the waist, you could also take a little bit of width from the side seam. I thought I would add notes about this, just in case you are reading and would like to make a similar adjustment to the pattern, but would like to remove more than a few centimetres from the waist.

For example, if you needed to remove 4cm (1 1/2in) from the waist in total, you could remove 2cm (3/4in) from the darts as illustrated already and then remove the other 2cm (3/4in) from the front and back side seams - 1cm (3/8in) from the front waist and 1cm (3/8in) from the back waist. As each piece is cut as a pair, you need to remove half of this amount from each pattern piece. In the case of the example, this would mean taking 5mm from the front side seam (1cm in total when cut as a pair) and the other 5mm from the back side seam (1cm in total when cut as a pair).
You can see this illustrated above - I marked a point 5mm in from the side seam, on the stitch line, and then re-drew the the top section of the side seam, by drawing a nice smooth curve that started at the point marked and re-joined the original stitch line at the hip point. Once I was happy with the new stitch line, I added the 1.2cm (1/2in) seam allowance. You then need to cut along the new cut line to remove the excess from the side seam that is no longer needed.
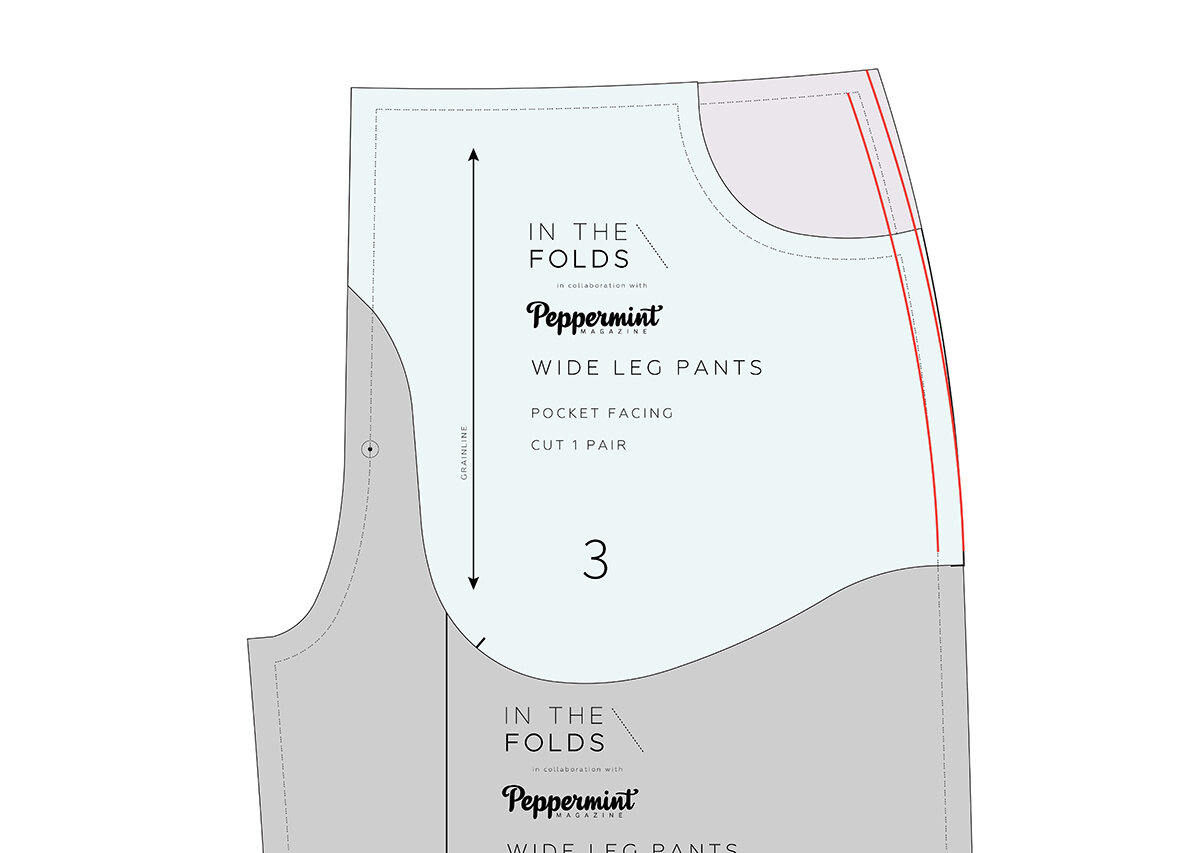
For the front pant leg, remember that you will also need to make the change to the pocket pieces. Do this by placing the pattern pieces one on top of the other (lining up the edges as if they have been sewn together) and then holding in place with pattern weights. You can then mark the new cut line as you did for the back piece, before cutting through all the layers to copy the adjustment across the three pattern pieces.
TO KEEP IN MIND
The other thing to keep in mind when making adjustments like this, is that there are small changes you can make during the making process itself. For example, you might make this 2cm (3/4in) waist adjustment and then make the pants and realise that you could do with removing another 2cm (3/4in). That is okay! You can simply take a few more millimetres from the darts and also take some from the side seam. This is why it's a really good idea to make sure you have staystitched your waist seam so that you can try your pants on before attaching the waistband. You can even wait to cut your waistband until you have fitted the pants (as any changes to the waist of the pants will also impact the waistband), so you know you are cutting the right size waistband.
To make changes while I am making a garment, I like to use a ruler and tailor's chalk to mark the amendment on the fabric itself, making sure the alteration is the same on each side of the garment, so that things remain symmetrical. I then make a note on a post-it about what I did and staple it to the pattern pieces, so that next time I use the pattern I know to make the adjustment/s to the pattern before cutting.
ALTER WAISTBAND PIECES
If you have made changes to the waist edge of any pants, you will need to adjust the waistband pieces to reflect the changes.
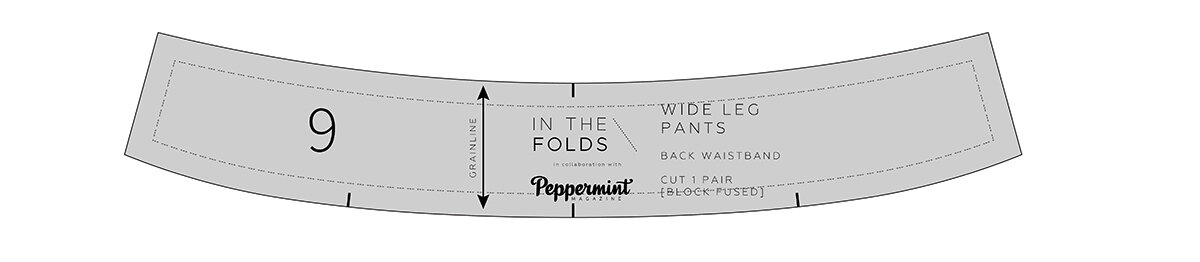
For the case of this example, I will go back to Marjon's measurements - we have removed 2cm (3/4in) from the back waistline of the pants and we now need to remove the same amount from the back waistband too.
Take the pattern piece and cut it in half vertically. This saves you from making the amendment on each side of the pattern, as you can cut the waistband on the fold once you have made the change, or re-cut your pattern piece in full after making the change (this ensures your pattern piece remains symmetrical).


Take a ruler and mark a line through the pattern piece at the notch (this notch indicates where the waistband lines up with the dart, so reflects the point on the waist where we made the adjustment on the pant piece).

Cut along the line marked in the previous step.
On the section of the waistband with the grainline, mark a point 1cm (3/8in) from the cut line, on both the top and bottom of the waistband (on the stitch line). We are marking 1cm (3/8in) as this is the amount that was removed from the waistline on the pant back, so we need to remove the same amount from the waistband.

Join these two marks with a straight line (if you have a clear ruler with horizontally markings you could miss the previous step and mark this line in straight away, using the cut line as a reference).

Stick the pieces back together by aligning the cut edge of the left side with the line marked on the right side. Tape or glue in place.
Move the notch over by half the amount removed from the piece. For example, 1cm (3/8in) was removed from the piece, so the notch will need to move 5mm to the left (this is because on the back pant, 5mm was taken from each side of the dart - rather than 1cm from one place).

The alteration hasn't made any difference to the cut line on the top and bottom edge of the pattern piece as we only removed 1cm (3/8in), but if the change was more drastic, you might need to smooth out the edges after making the alteration. To do this, take a line of best fit and draw a smooth curve.
Cut the back waistband piece on the fold, or trace a copy onto a piece of paper before cutting it on the fold from paper to create a full pattern piece (pinning the paper in place before cutting can prevent it from wiggling around).
The final thing you should always do after making alterations to a pattern, is to walk in your seams to check that everything still lines up correctly (such as notches) and the seams that will be sewn together are the correct length. You can find a tutorial on my website about checking patterns here.
I hope this was helpful!
Happy sewing,
Emily
resources mentioned in this issue
The Acton Sew-along: How to Grade between sizes. Tutorial can be found here.
Peppermint Wide Leg pants pattern can be downloaded for free here.
In the Folds sizing chart can be found here.
How to add dart shaping. Tutorial can be found here.
Checking patterns: Curved seams. Tutorial can be found here.
P.S. Would you like to know what the Q & A series is all about? This page tells you a little bit more about the motive behind the series. Past issues from the Q & A series can be found here.
Don't have a question, but found this newsletter helpful? I'd love to hear from you! Get in touch and say hi.


