
THE Q & A SERIES - HOW TO DO A SMALL BUST ADJUSTMENT (SBA) ON THE RUFFLE SLEEVE TOP
Hello,
I have a question about the Ruffle Sleeve Top and darts. In my teen years I would ignore them and just draw a straight line down the sides and deal with it after. Knowing that's not correct I tried the slash and spread and adding paper in.
The gap is so wide and if I add to the back too it becomes a tent. I'm only 5 foot and an A cup. Is there a simpler way that doesn't involve a dress makers class?
Thanks so much!
Lorie
Kapaa, United States
Hi Lorie,
This is definitely an alteration you can make without needing to do a dress makers class! The alteration you are wanting to do is a Small Bust Adjustment (SBA) and I'm happy to show you how to make this adjustment on the Ruffle Sleeve Top pattern.
WHEN YOU’LL NEED TO MAKE A SMALL BUST ADJUSTMENT
Most indie pattern companies (including In the Folds) draft for a B cup bust. There are of course exceptions to this rule (such as Cashmerette and Colette), so make sure you check on your pattern before assuming the bust cup size. Lately a lot of designers have been adding to their size ranges (which is fantastic to see), as well as adding to their cup size offerings - so definitely check before deciding to make any adjustment. In saying that though, if you have a small bust cup size, it is likely you will need to make a SBA, as all the indie pattern companies that come to mind draft for a B cup bust or larger.
For In the Folds patterns, if your bust cup size is smaller than a B cup you will need to do a Small Bust Adjustment, otherwise known as a SBA, and if your bust cup size is larger than a B you will need to do a Full Bust Adjustment or FBA. In saying that though, many In the Folds patterns include a lot of design ease, so you may choose not to make the alteration for some styles (for example, I have an A cup size bust and don't bother with an SBA for the Collins top or the Rushcutter dress, but I do for the Acton dress).

WORK OUT YOUR CUP SIZE
Your cup size in sewing patterns may not always correspond to the bra size you wear (and normally won't). To be safe, check your measurements before deciding if you need to make any adjustments to the pattern.
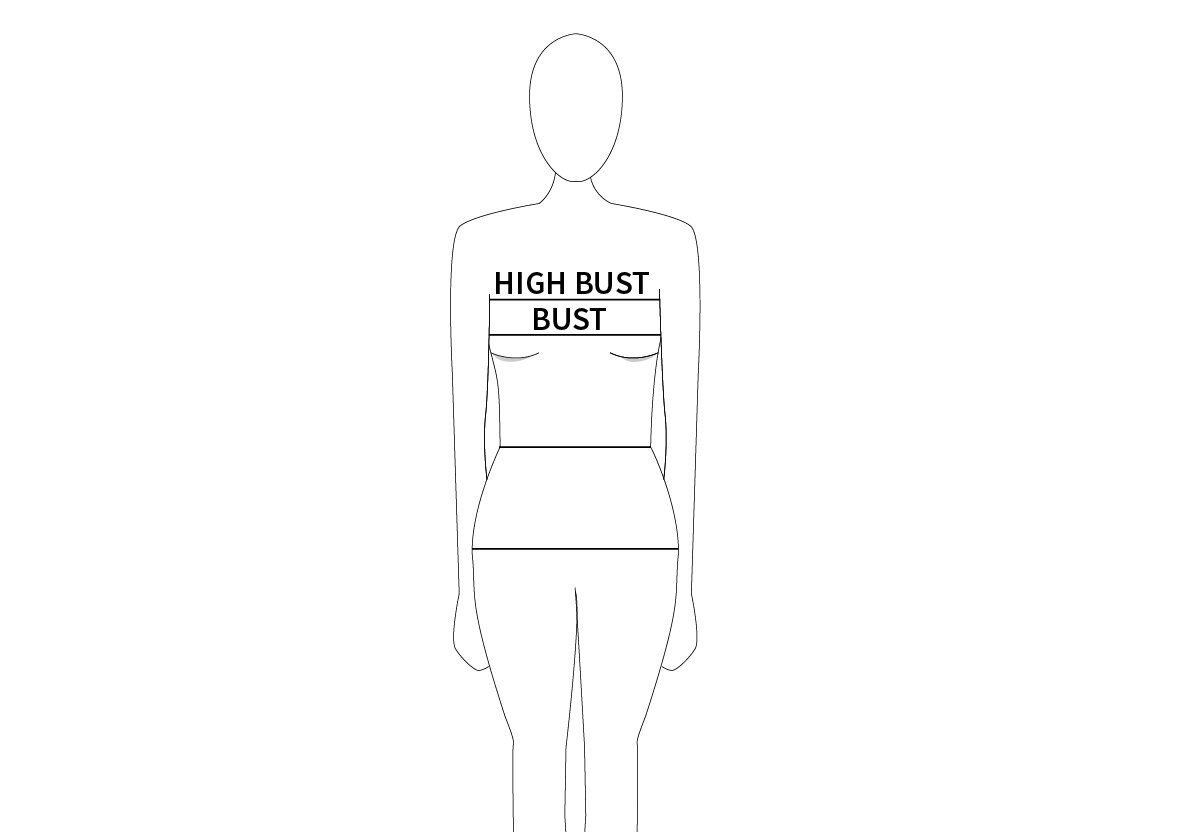
Measure your high bust (the area above your breasts, under your arms) as well as your full bust (the fullest part of your chest / horizontal measurement across your bust apex) and then take note of each measurement, as well as the difference.
If the difference is 2.5cm (1") your bust is an A cup, 5cm (2") it's a B cup, 7.5cm (3") is a C cup and so on.
CHOOSE YOUR SIZE
Now, go back to your high bust measurement and add 5cm (2"). This is what your bust measurement would be if you were a B cup and therefore the size you should be choosing from the pattern.
For example, let's say your upper bust measures 81cm (32"). Add 5cm (2") to this measurement to find out what size your bust measurement falls into on the In the Folds sizing chart (and what size you would be if you had a B cup size). 81cm + 5cm = 86cm which corresponds to a size C. Your actual bust measurement is 83cm though - 3cm (just over 1") smaller than the bust measurement of the pattern. This means you will need to do a SBA and remove this 3cm (1") from your pattern.
For the sake of the example, I am going to remove 5cm, which will remove the bust shaping (and the dart) all together - as this is what Lorie would like to do - you can use this same method to alter the pattern to fit an A cup or to remove all bust shaping.
HOW TO MAKE THE ADJUSTMENT
Step 1
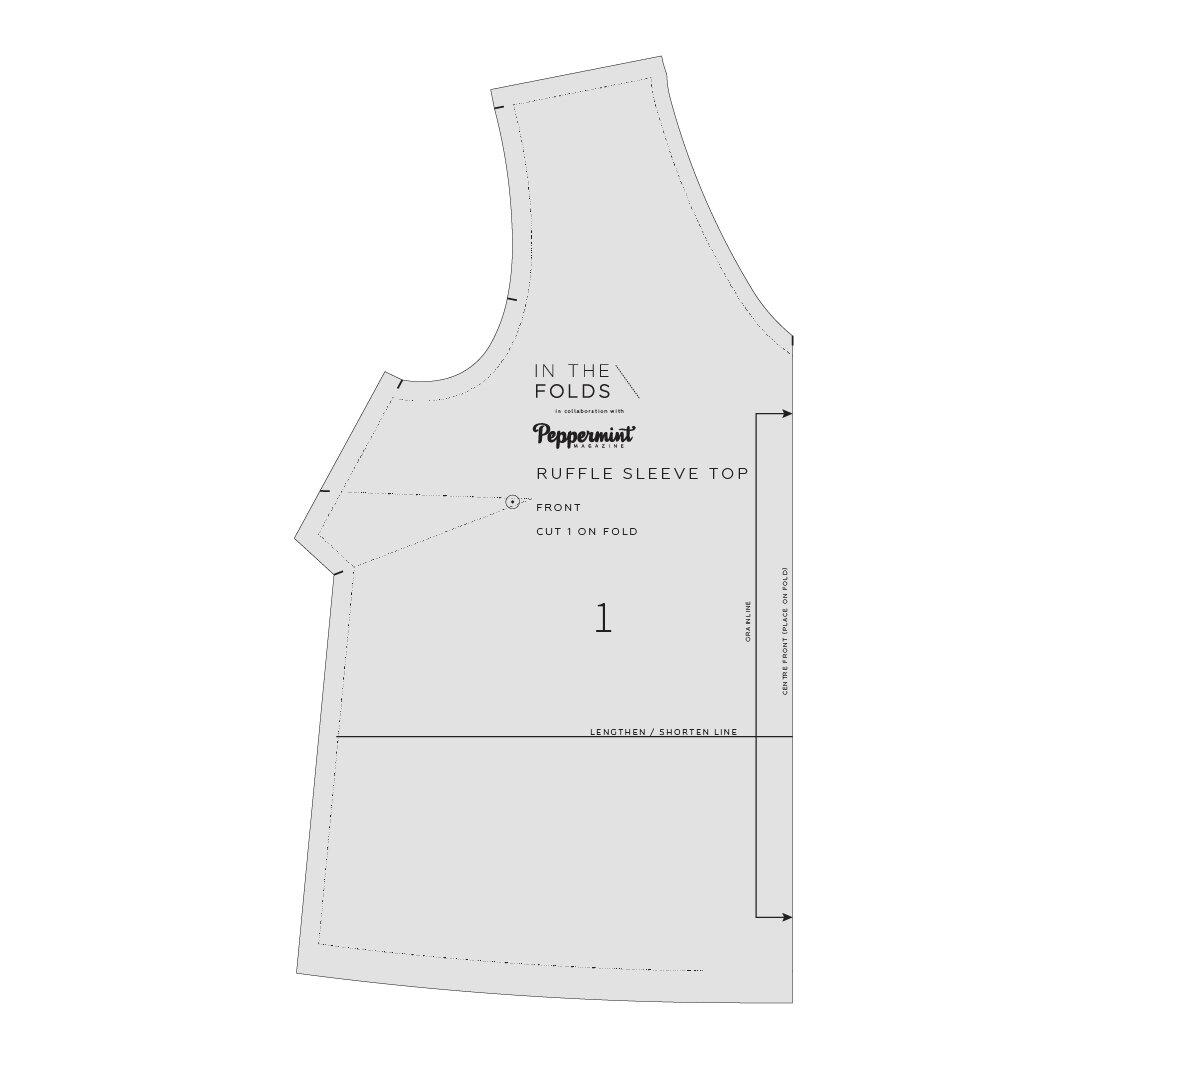
Take the FRONT [1] piece from the Ruffle Sleeve top pattern. If you think you’d like to go back to the original design in the future, I’d suggest tracing a copy to make the alteration on (although you can always re-print from the PDF later down the track if you need to).
If you are tracing a copy of the pattern, be sure to transfer the stitch line (grey line on the pattern) as well as the cutting line, as it will help you with this tutorial.

Step 2
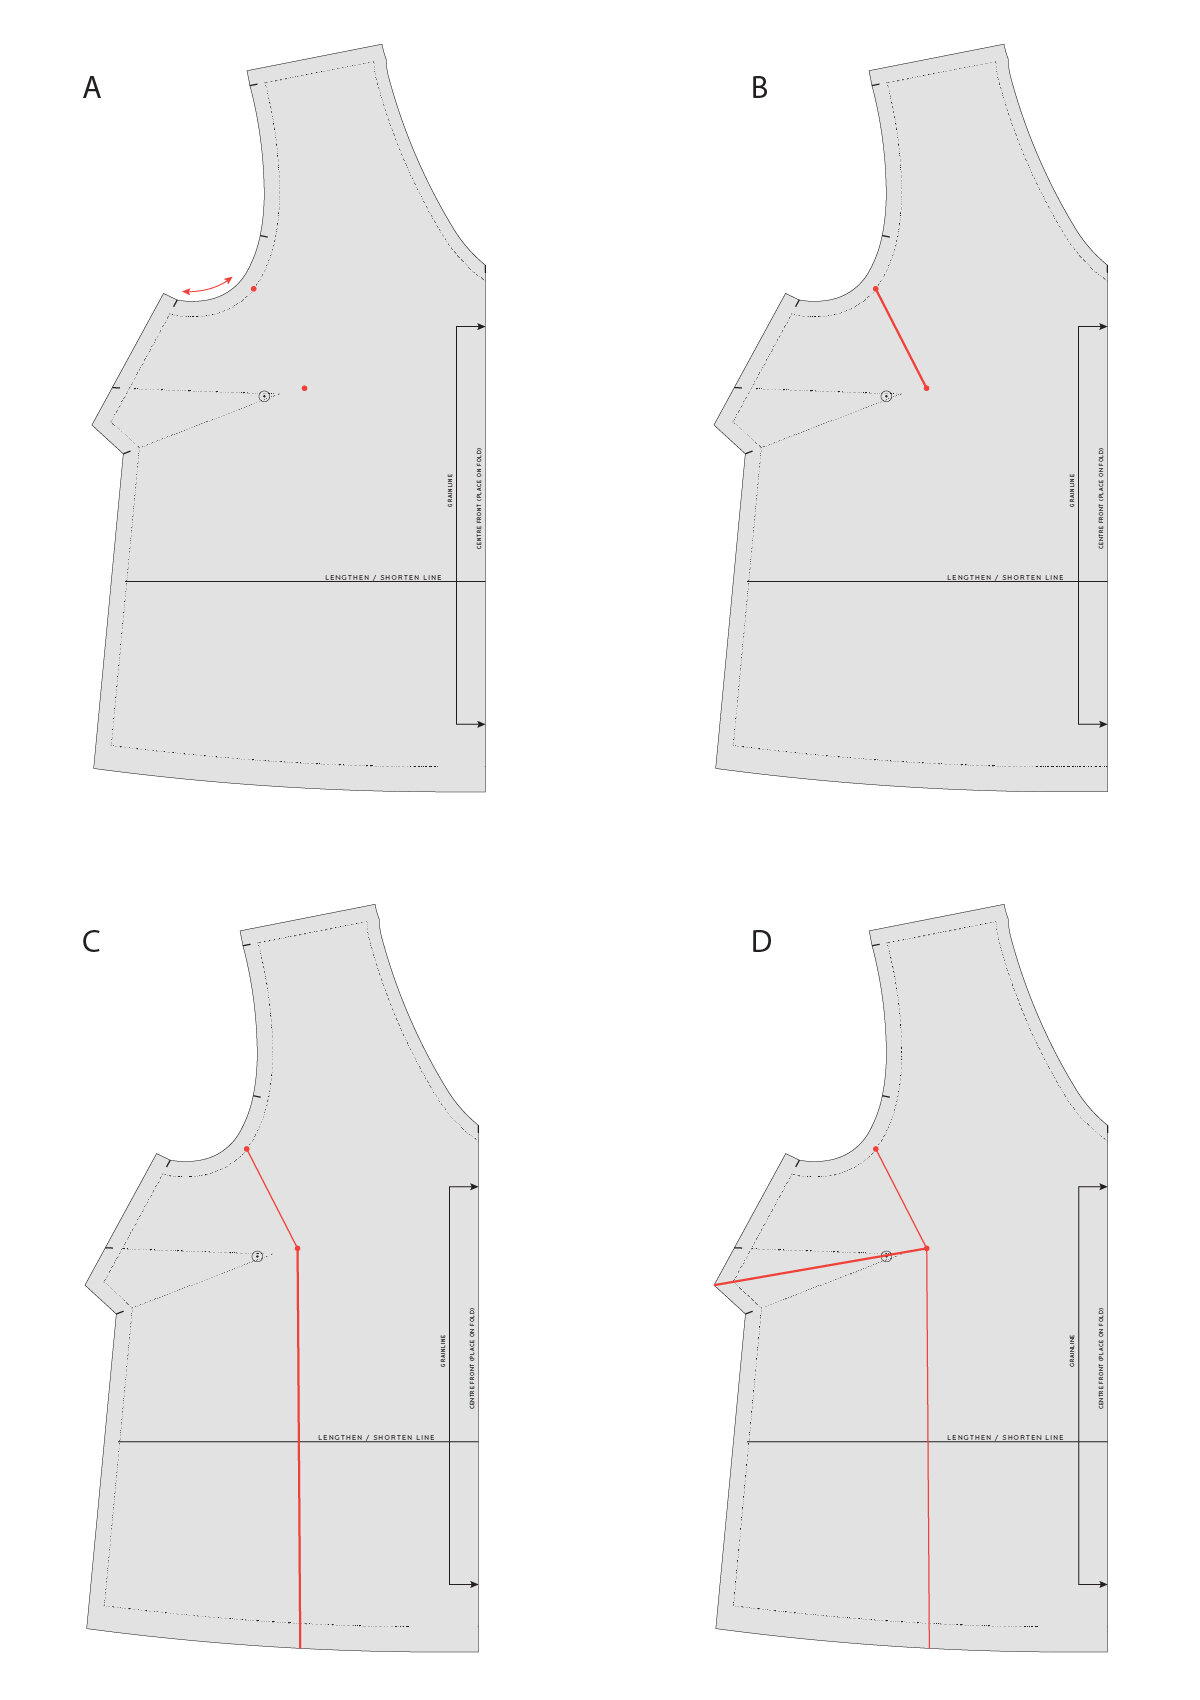
Mark your bust point (the apex of your bust - which basically means your nipple) on the pattern piece. You can find this by holding the pattern piece up to your body (with the dart folded as if it has been sewn), or by marking your bust point on your toile (if you've made one) and then transferring this onto the pattern.
For the sake of the example I have marked the bust point 2cm (3/4in) from the tip of the dart.
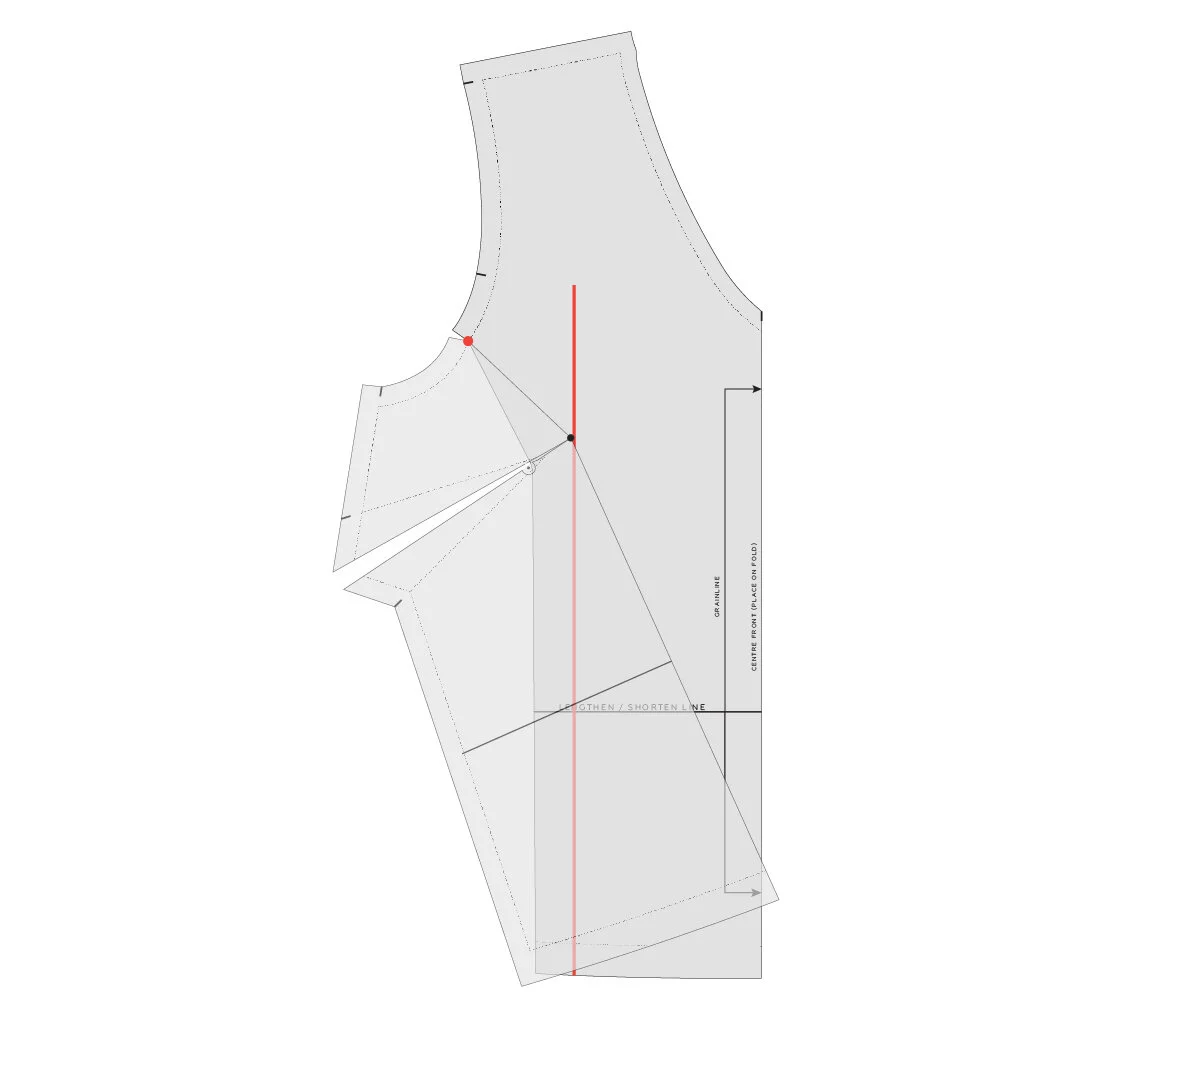
Step 3
A. Mark a point on the armhole (on the grey stitch line), approximately 1/3 the length of the front armhole - measuring from the point where the armhole meets the side seam.
B. With a ruler, join the point marked on the armhole with the bust point marking.
C. Rule a straight line down from the bust point to the hemline - ensuring that it runs parallel to the grainline / centre front of the pattern.
D. Rule another line - this one from the centre of the dart, over to the bust point. In the case of the example, it is easy to see where the centre of the dart is due to the shape of it, but if you are using a different pattern that has different dart shaping, you may need to fold out the dart to find the centre.
Step 4
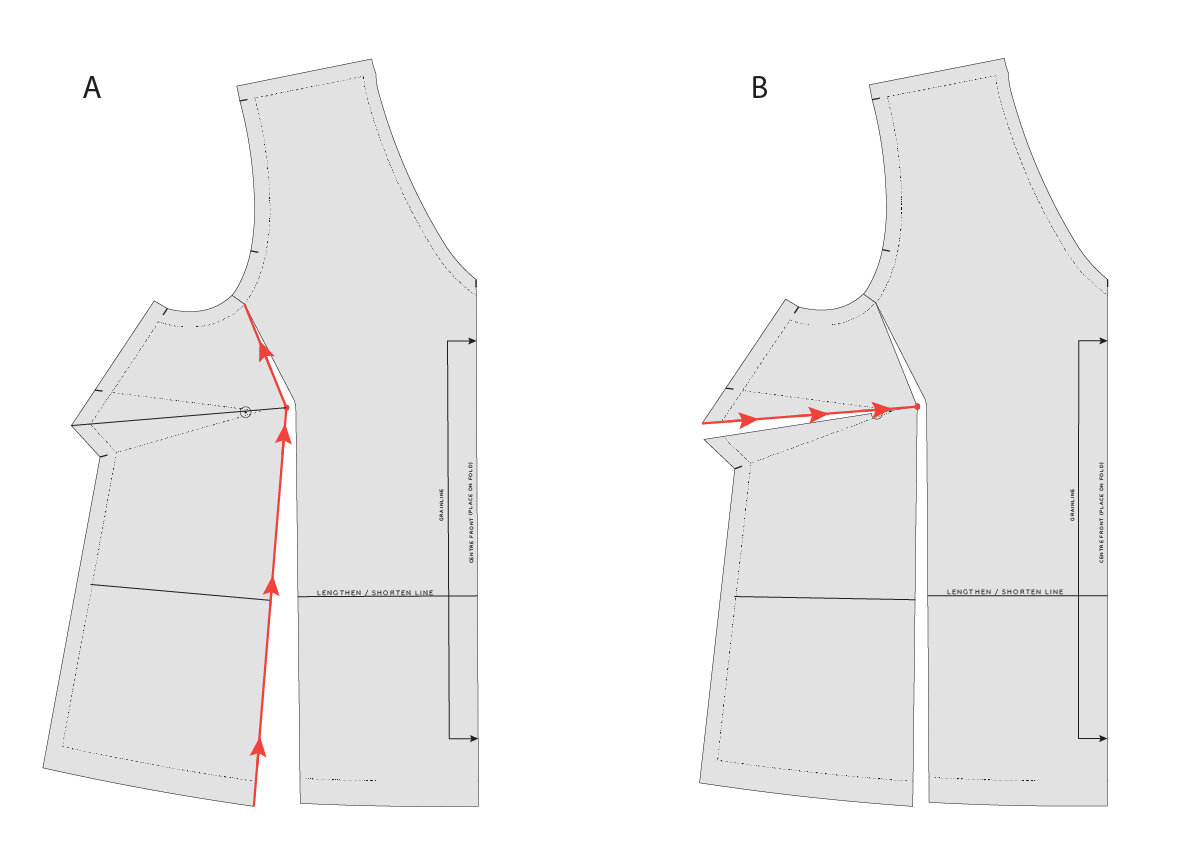
A. Take a pair of scissors and cut up from the hemline to the bust point along the line marked in the previous step. When you get to the bust point, turn the corner and continue cutting along the line that joins to the armhole. Stop cutting just before you reach the stitch line on the armhole. Turn the pattern around and cut into the seam allowance on the armhole towards the point marked on the armhole, leaving a small 1-2mm “hinge” of paper (a hinge in this sense is a small bit of paper that allows you to adjust patterns, whilst still keeping the piece intact).
B. Cut a second line - from the centre of the dart, over to the bust point. Again, leave a small hinge of paper intact as you approach the bust point.

Step 5
Mark a line to indicate how much width you will be removing from the pattern. You should have found how much you need to remove right at the beginning (if you didn't, go back and check your measurements now).
If you need to remove 5cm (2in), like in the case of this example, you need to halve this measurement (i.e. 2.5cm/1in). This is because the front pattern piece is cut on the fold. By removing half the width from one half, when you cut the pattern on the fold, this will equate to the total that needs to be removed. In the example, we are removing 5cm (2in), so we need to remove 2.5cm (1in) from the front pattern piece, which will equal 5cm (2in) when the pattern piece is cut on the fold.
Mark a line - the distance found (eg 2.5cm / 1in) from the cut line (from the hem to the bust point) - ensuring that it runs parallel to the grainline / centre front.

Step 6
As well as removing width from the bust section of the pattern, you will also need to remove some length (as the pattern has length built in to go over the bust, and with a smaller bust, you will require less width as well as less length in this area).
Cut along the LENGTHEN / SHORTEN line, only on the centre section of the pattern.
Loosely put the pieces back together for now (you will need this horizontal cut line a little bit later on in the tutorial).
Step 7
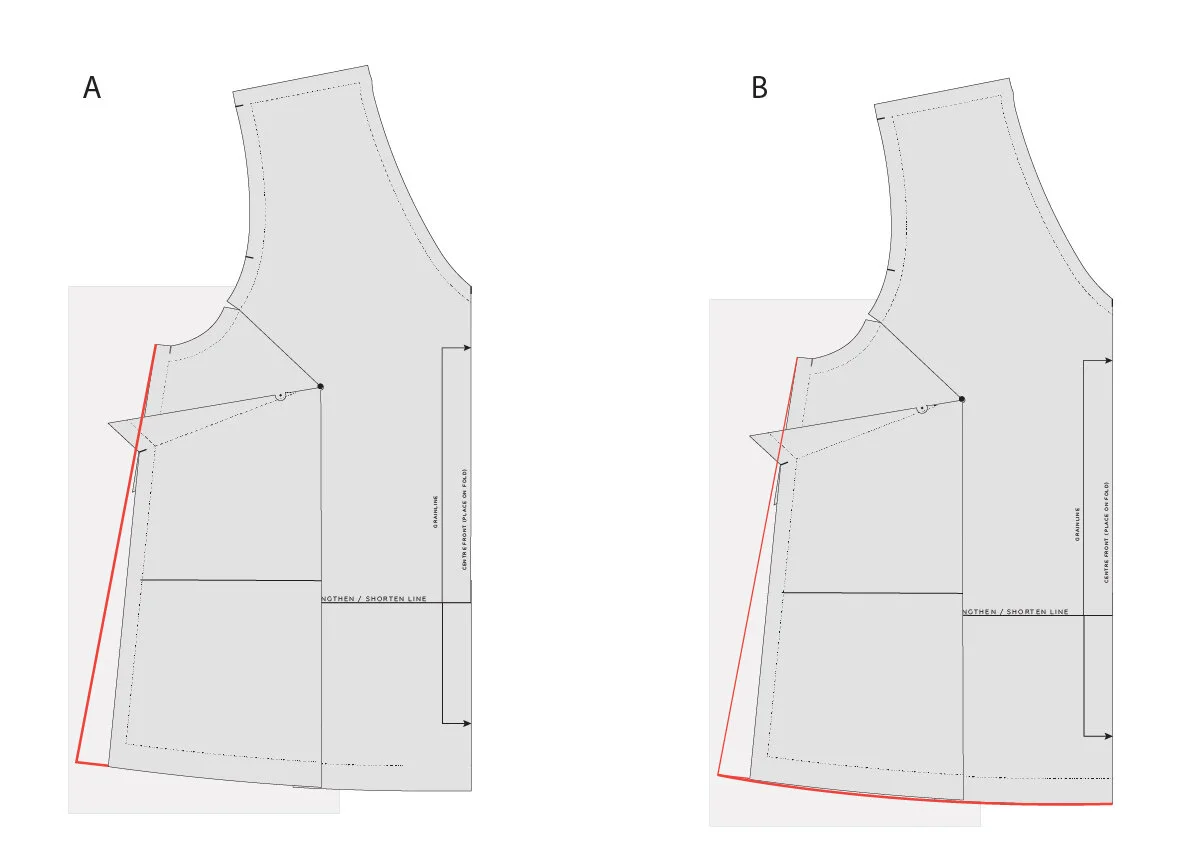
Now the fun bit! Carefully swing the left hand side of the pattern so that the bust point marking meets with the line marked in STEP 5.

Step 8
Holding the top section of the pattern in place (the bottom of the armhole and top of the side seam), rotate the lower section (the bottom half of the dart and the lower side seam), so that the cut line lines up to the line marked in STEP 5.
Once it's all lined up, tape in place.

Step 9
You can now see why we made that horizontal cut line in STEP 6. If you look at the hemline, you can see that it now longer lines up. This is because the length required to go over the B cup bust has been removed from the side section of the pattern piece, but not from the centre section (just yet).
Carefully slide the lower centre front section so that the hemline reconnects, be sure to keep the centre front straight (you can also use the LENGTHEN / SHORTEN line to check that you have got everything lined up nice and straight).

Step 10
It's time to check and true your seams!
What does this mean? This means you need to check that the seams you have altered still fit together with the seams they will be joined to. In the case of the example, we will want to check that the front side seam is still the same length as the back side seam.
If you have drafted your own pattern or made an alteration to a pattern, it is really important that you always check that your patterns fit together correctly before going on ahead and cutting your fabric. It may seem a bit tedious checking each seam, but taking a few minutes to check your patterns at this stage can save you cutting out incorrect patterns and wasting precious time and fabric later on.
A. Start by re-drawing the side seam with a straight line (along the stitch line and the cutting line), then measure the stitch line on the front side seam and check that it's the same as the side seam of the back side seam. Adjust if required.
B. Re-draw the hemline with a nice smooth curve that becomes a right angle at the centre front.
ONE THING TO NOTE
Step 11
One thing that you must note when doing a Small Bust Adjustment is that you are removing width from the waist area as well as the bust area. It's unlikely that this will be a problem for you with the Ruffle Sleeve Pattern as the pattern has a lot of design ease in it (it is designed to have a loose fit), but with other patterns, you should definitely check that the waist will still fit you comfortably. If you would like to add what was removed from the hemline in this particular pattern (so that the hem circumference remains the same as the original pattern, you can simply add it to the side seam).
A. Measuring from the side seam, extend the hem line by the amount that was removed (in the case of the example this was 2.5cm / 1in) and then draw a straight line from this point back to the top of the seam line.
B. Re-draw the hemline with a nice smooth curve that becomes a right angle at the centre front.
Now that you have made a change to the front pattern piece, you will also need to change the front facing piece. I would suggest re-drafting it, as it is a lot quicker than doing another SBA.
And that's it! Now you can reduce the bust cup size (or remove it all together) on the Ruffle Sleeve Top (or similar patterns).
Happy sewing,
Emily
resources mentioned in this issue
The Peppermint Ruffle Sleeve top pattern can be downloaded for free here.
The Collins top pattern can be found here.
The Rushcutter dress pattern can be found here.
The Acton dress pattern can be found here.
Full Bust Adjustment (FBA) on princess panels (from the Acton dress sew-along). Tutorial can be found here.
The In the Folds sizing chart can be found here.
How to : Check and true sewing patterns. Tutorial can be found here.
How to: Draft an all-in-one facing. Tutorial can be found here.
P.S. Would you like to know what the Q & A series is all about? This page tells you a little bit more about the motive behind the series. Past issues from the Q & A series can be found here.
Don't have a question, but found this newsletter helpful? I'd love to hear from you! Get in touch and say hi.
What you’ve been making

Acton dress made by @sewbee73

Hacked Peppermint Everyday Dress made by @sewsweetprints
Collins top made by @thimblewinder

Hacked Peppermint Ruffle Sleeve Top made by @go.your.sewn.way


