
THE Q & A SERIES - HOW TO LOWER AN ARMSCYE DART
Kia ora Emily!
I hope you're well.
I'm just wondering if you have any resources to hand (or able to point me in the direction of some) on how to lower the bust dart in the armscye in the Peppermint jumpsuit. I'm used to moving bust darts in the side seam but the armscye seems to be a different kettle of fish!
I'm attempting to "tissue" fit the pattern and I think I need to lower the apex by about 4-5cm. It seems a lot, but I am fairly low busted so perhaps it's not. Or is it a matter of just pivoting the dart to point at a slightly different place? I don't think I need to make a small or full bust adjustment, I only need to alter the position.
Thanks in advance for any help or insight you can provide! I appreciate it.
Rebecca
Hi Rebecca,
I'm excited you are giving the Peppermint jumpsuit pattern a go! This question actually stumped me for a moment too! I printed the bodice section and gave the adjustment a go and after a few attempts I figured it out. It's actually pretty much the same method you would use for moving a dart up or down on the side seam (you can check out this tutorial from Curvy Sewing Collective to see the regular method) - but it's the angle of the dart and the armscye curve that makes it slightly different.
MOVE THE DART POINT ONLY
To start, there are times that you can simply move the dart point and re-draw your dart arms to meet the new dart point (as you suggested). I tried this first, and moved the apex point down 4-5cm.

As you can see in the example, the dart angle changes fairly significantly and I realised that the line of the dart when it was sewn just wouldn’t make a nice line visually.
If you are following along this tutorial at home, and you only need to move the dart point by a couple of centimetres - it might be worth trying this option first (as it shouldn't impact the angle of the dart as much as it did in the example). If it does look like you can afford to do it, just remember that you will need to re-shape the dart at the armscye - this tutorial shows you how to do that.
PREPARE THE PATTERN
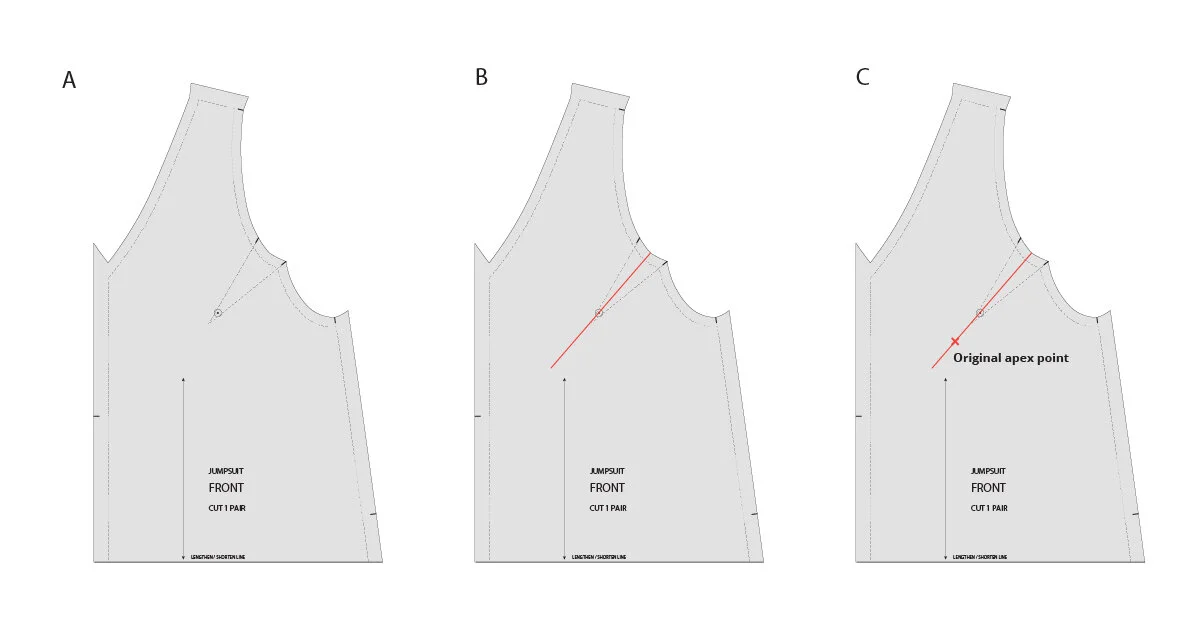
Step 1
A Take the FRONT piece from the Peppermint Jumpsuit pattern (or the pattern you’d like to make the adjustment to). If you think you’d like to go back to the original in the future, I’d suggest tracing a copy to make the alteration on (although you can always re-print from the PDF later down the track if you need to). As the alteration is only being made to the dart, you can just take the top section of the pattern (you can stick it back to the rest of the pattern after you have made the alteration) - this will make the pattern piece much easier to manoeuvre.
If you are tracing a copy of the pattern, be sure to transfer the stitch line (grey line on the pattern) as well as the cutting line, as it will help you with this tutorial. As usual, be sure to transfer pattern markings and notches.
B Draw a line through the centre of the dart, from the armscye through to the dart point (and extend a few centimetres past the dart point).
C Mark the apex point on the line (the apex point is the peak of your bust). On In the Folds patterns this is normally about 2.5cm (1in) beyond the tip of the dart point.
MARK NEW APEX POINT

Step 2
A Mark your new apex point on the pattern piece. You can find this by checking your toile / muslin and transferring the measurement to the pattern.
B Draw a line to represent the centre of what will become your new dart. This should go from the new apex point through to the armscye and be parallel to the centre line of the original dart.
C Draw a box around the original dart - using the guideline in the centre of the dart as a reference. Each side of the box should be parallel to the centre dart line and far enough away to not cut through the dart. In the example I marked the lines 2.5cm (1in) from the centre line.
Complete the box at the end closest to the dart point by joining the two lines at the end with a perpendicular line - again, you need the line to not cut through the dart / apex point marking. In the example I drew the short line 1cm (3/8in) beyond the apex point.
D Using the centre line of your new dart as a starting point, draw another box - the same distance away from the centre dart line as you marked on the original dart. For example, if you marked the line 2.5cm from the original dart line, mark the line 2.5cm down from the new centre dart line - ensuring it is also parallel to the new dart centre line.
Do the same for the short side of the box (again, making sure it's perpendicular to the line) - the one that is below the apex point (you won’t need the top line of the box - so there is no need to mark that one in).
MOVE THE DART

Step 3
A Mark a line crossways through the original dart - perpendicular to the centre dart line. It doesn’t really matter where you position this line, as long as it’s within the dart.
B Take some scissors and cut out the box that surrounds the original dart.
C Cut along the line marked through the dart (in part A of this step) so that now your dart is in 2 parts.

Step 4
A Take the piece of paper that has the tip of the dart on it and line up the corner of this rectangle with the corner of the box that was drawn around the new centre dart line (the blue dotted line in the illustration).
Tape / glue in place.
B Move the other part of the dart to line up with the same guideline. Align the bottom edge of this piece of paper with the guideline and the stitch line on the armscye at the dart legs with the stitch line of the armscye on the main pattern piece. As you can see, this will create a gap in the centre of the dart. This is why the dart had to be cut in half - if we didn’t cut it, the end of the dart would no longer meet the armscye and we would have a distorted armscye. This way we have the correct armscye as well as the correct position for our new apex point.
C Take some scrap paper and fill in the gap in the pattern - using tape / glue to secure in place.
FINALISE THE NEW DART

Step 5
A Re-draw the dart arms - joining the notches on the armscye to the dart point. As you can see, you now have a dart that is lower (and longer) than the original, but has the same angle as the original.
B Fold out the dart - as if it has been sewn - with the bulk of the dart pressed down. Doing this over the corner of a table helps (placing the dart point on the corner). More about how to do this can be found here.
C Redraw the armhole with a nice smooth curve (a French curve will be handy here, if you have one). Use a tracing wheel to transfer the armhole shaping onto the dart.
FINALISE THE PATTERN

Step 6
A Open the dart and redraw the armscye over the dart - following the markings created by the tracing wheel.
B Add the seam allowance back on (by following the new armscye line). More details about adding seam allowance can be found here.
You will also need to redraft your front facing piece to accommodate the change. But I will save that for next week!
Happy sewing,
Emily
resources mentioned in this issue
The Peppermint jumpsuit can be downloaded for free here.
P.S. Would you like to know what the Q & A series is all about? This page tells you a little bit more about the motive behind the series. Past issues from the Q & A series can be found here.
Don't have a question, but found this newsletter helpful? I'd love to hear from you! Get in touch and say hi.
What you’ve been making

Flynn jacket made by @ jenndumon

Peppermint jumpsuit made by @sway.mo

Peppermint playsuit made by @jac_sewandtell


