
THE Q & A SERIES
How to do a Full Bust Adjustment (FBA) on a jumpsuit pattern
Hi Emily,
How would you do an FBA on the Peppermint Jumpsuit?
Kindest Regards
- Kacy
Hello!
Thanks so much for the lovely Playsuit pattern. It’s super comfy and is all things happiness. It took forever to make with small people around, but a lovely therapeutic process. One question though, how do you do a FBA for a playsuit or the jumpsuit? They’re all in one and I can’t quite figure that. Probably simple and mama brain is getting stuck sorry!
Thanks again! (Hitting up the wrap top and the pleated dress for mum next)
Kind regards,
- Kate
Dear Emily,
I love the Peppermint jumpsuit and decided to try out my first In the Folds pattern. I purchased some beautiful black linen and a small amount of cotton to add in-seam pockets (thank you for Issue 18 of the Q&A series!) I am quite small but I have a curvy figure with a small waist. My problem with dresses and jumpsuits is my generous bust measurement (F cup).
In preparation I modified the pattern by shortening size C (I’m 160cm) and tested it out by just making the bodice section in calico. I’m so glad I did as the darts were totally wrong (much too high) and my breasts were squashed! If I make the bigger size it gapes under the arms and the neckline is baggy and too revealing.
I’ve done some online research about armhole darts but it looks tricky - I’d love some assistance.
Many thanks,
- Karen
Hi Kacy, Kate and Karen,
As you can see, this is a question that I have been asked quite a few time and I thought it was about time I answer it in the Q&A series!
As we have a jumpsuit pattern due to launch next weekend (as the first project in our new offering Curated by In the Folds), we thought it would be fun to give you a first look at one of the tutorials that will be coming with the jumpsuit Fit Kit, How to do a Full Bust Adjustment (FBA) on a jumpsuit pattern.
In the tutorial, we will use the example of changing the pattern from a B cup to an D cup. This means we will be adding 5cm (2in) - or 2 cup sizes in total and therefore half of this - 2.5cm (1in) to the FRONT [1] pattern piece. When the piece is cut as a pair, the full amount required will be added. You will need to adjust this measurement in relation to your particular body measurements. In the Fit Kit, we've got a step-by-step PDF that guides you through this process.

GET STARTED
Trace a copy of the FRONT [1] pattern piece. We suggest that you trace a copy of the pattern, so if you make a mistake you always have the original to go back to. Be sure to include all pattern markings. This includes: grainline, notches and drill hole. It is important to make sure you trace off the stitching line (the grey line on the pattern).
STEP 1
Cut through the LENGTHEN / SHORTEN line in the waist section of the pattern - so that you have the bodice and pant sections as two independent pieces. We will be altering the bodice section and then joining the pieces back together. For the moment you can set the pant section of the pattern piece aside.

STEP 2
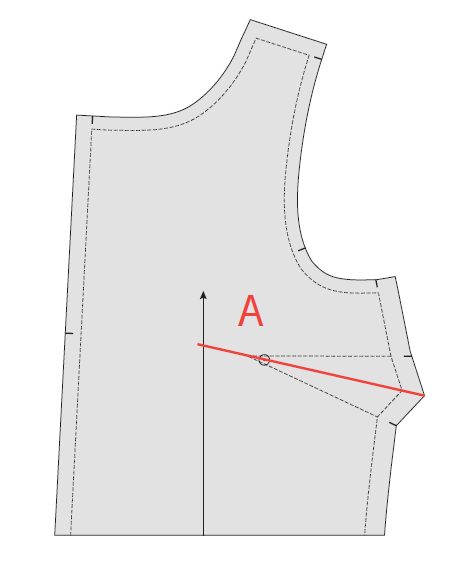
Take a ruler and draw a line through the centre of the dart. Extend the line beyond the tip of the dart. This line will be referred to as line A.
STEP 3
Mark the bust apex point on the line. The BUST APEX POINT is the peak of your bust (otherwise known as your nipple). On In the Folds patterns this is normally 2.5cm (1in) beyond the tip of the dart point.
Please note: If you are making this alteration on the Peppermint jumpsuit, you will need to rotate the dart from the armscye to the side seam before making this adjustment (we will move it back once the alteration is done). We will show you how to rotate bust darts in a future issue of the Q&A series, or you can find it in the Neale jumpsuit Fit Kit that will be released to email subscribers on August 15th.


STEP 4
Draw a line straight down from the BUST APEX POINT, parallel to the grainline. Extend to the CUT LINE. This line will be referred to as line B.
STEP 5
Draw a line from the BUST APEX POINT through to the notch on the armhole. This line will be referred to as line C.


STEP 6
From the bottom of the piece, cut along line B. When you get to the BUST APEX POINT, turn and cut along line C. Slow down as you approach the STITCH LINE (grey line on the pattern). Stop about 1mm from the STITCH LINE. Cut in from the seam allowance on the armhole towards the point you stopped cutting on line C. Don’t cut through to the point - leave a small 1-2mm ‘hinge’ of paper that keeps the two parts of the pattern piece intact.
STEP 7
Cut along line A from the side seam. Leave a small paper hinge at the BUST APEX POINT.


STEP 8
The alteration so far is preparing the pattern to add width to the bust line. You will also need to add length to the bodice over the bust. This is because the projection of the bust requires more fabric in terms of both length and width.This ensures the waistline remains straight and in the correct location. Mark a line 5cm (2in) from the bottom (parallel to the CUT LINE). Start at line B and mark through to the CENTRE FRONT. We will refer to this as line D.
STEP 9
Cut along line D. Label the top of the piece that you remove so that you don't get confused when you put the pieces back together.


STEP 10
Take a piece of pattern paper that is larger than the bodice section of the jumpsuit. Draw a vertical line in roughly the centre of the paper. We will refer to this as line E. By this stage you should know how much width you need to add to the bust. Draw a second line - parallel to the first - the distance you plan to add away from the first line. For example, if you need to add a total of 5cm (2in) to the bust, you will be drawing the line 2.5cm (1in) away from the first line. We will call the second line F.
STEP 11
Now that you have cut through the lines on the front pattern piece, you will be able to manoeuvre the piece so that you can add the extra width you need at the bust. Carefully place the pattern piece onto the guidelines you drew in the previous step. To start, align line B on the pattern (the side of line B that is closest to the dart) with line F on the paper. Tape or glue this section of the pattern piece in place.


STEP 12
Carefully move the other side of the pattern piece until the side closest to CENTRE FRONT of line B lines up with line E on the pattern paper. When everything is lined up, tape in place, ensuring all parts of the pattern remain flat.
STEP 13
Take a ruler and extend the CENTRE FRONT line (the outer edge) onto the paper underneath. Do the same for the CUT LINE at the waist. The two lines will intersect.


STEP 14
Take the section of the pattern you cut off in STEP 9 and line up the corner with the lines marked in STEP 13. When it’s in place, tape or glue in place.
STEP 15
Draw in your dart arms by joining the dart notches to the original dart point and extending the lines until they intersect.
Check that this is the correct dart point positioning for your body.
Please note: Due to the FBA, you may end up with a very large dart. It can be difficult to achieve the shaping you need for the bust with a very large dart. Consider rotating part of the dart to become a second dart using some of the volume of the side seam dart. We would suggest a French dart. We will show you how to rotate bust darts in a future issue of the Q&A series, or you can find it in the Neale jumpsuit Fit Kit that will be released to email subscribers on August 15th.
STEP 16
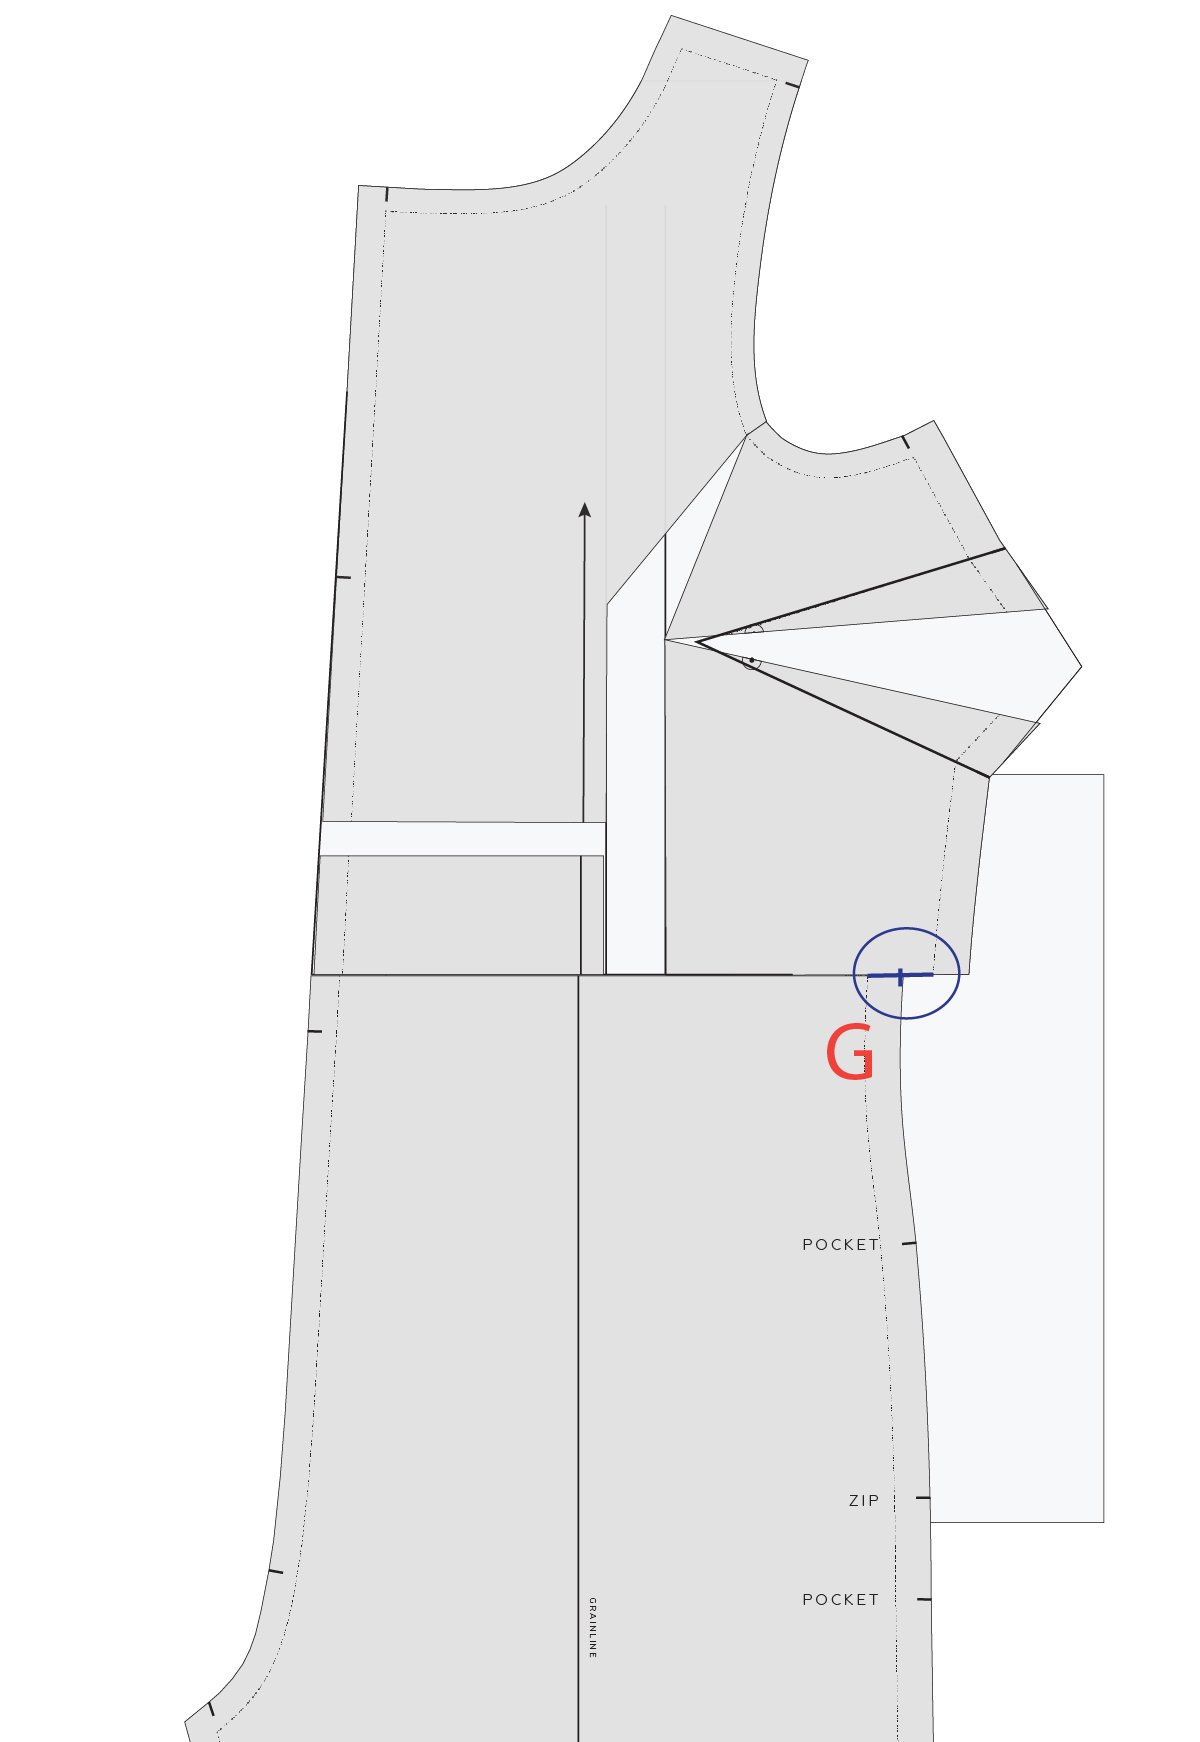
Join the pant section of the pattern back to the bodice section by lining up the CUT LINES. Check that the grainline is straight and aligned on either side of the CUT LINE. Tape in place.
We have cropped the image so you can see what it looks like at the join point. You will notice that the side seam no longer lines up. This is because we have added width to the bodice section to accommodate a larger bust cup size.
Measure the distance between the STITCH LINES on the side seam between the two parts of the pattern where they meet on the CUT LINE. Mark a point in the centre of the two lines. We will refer to this as point G.
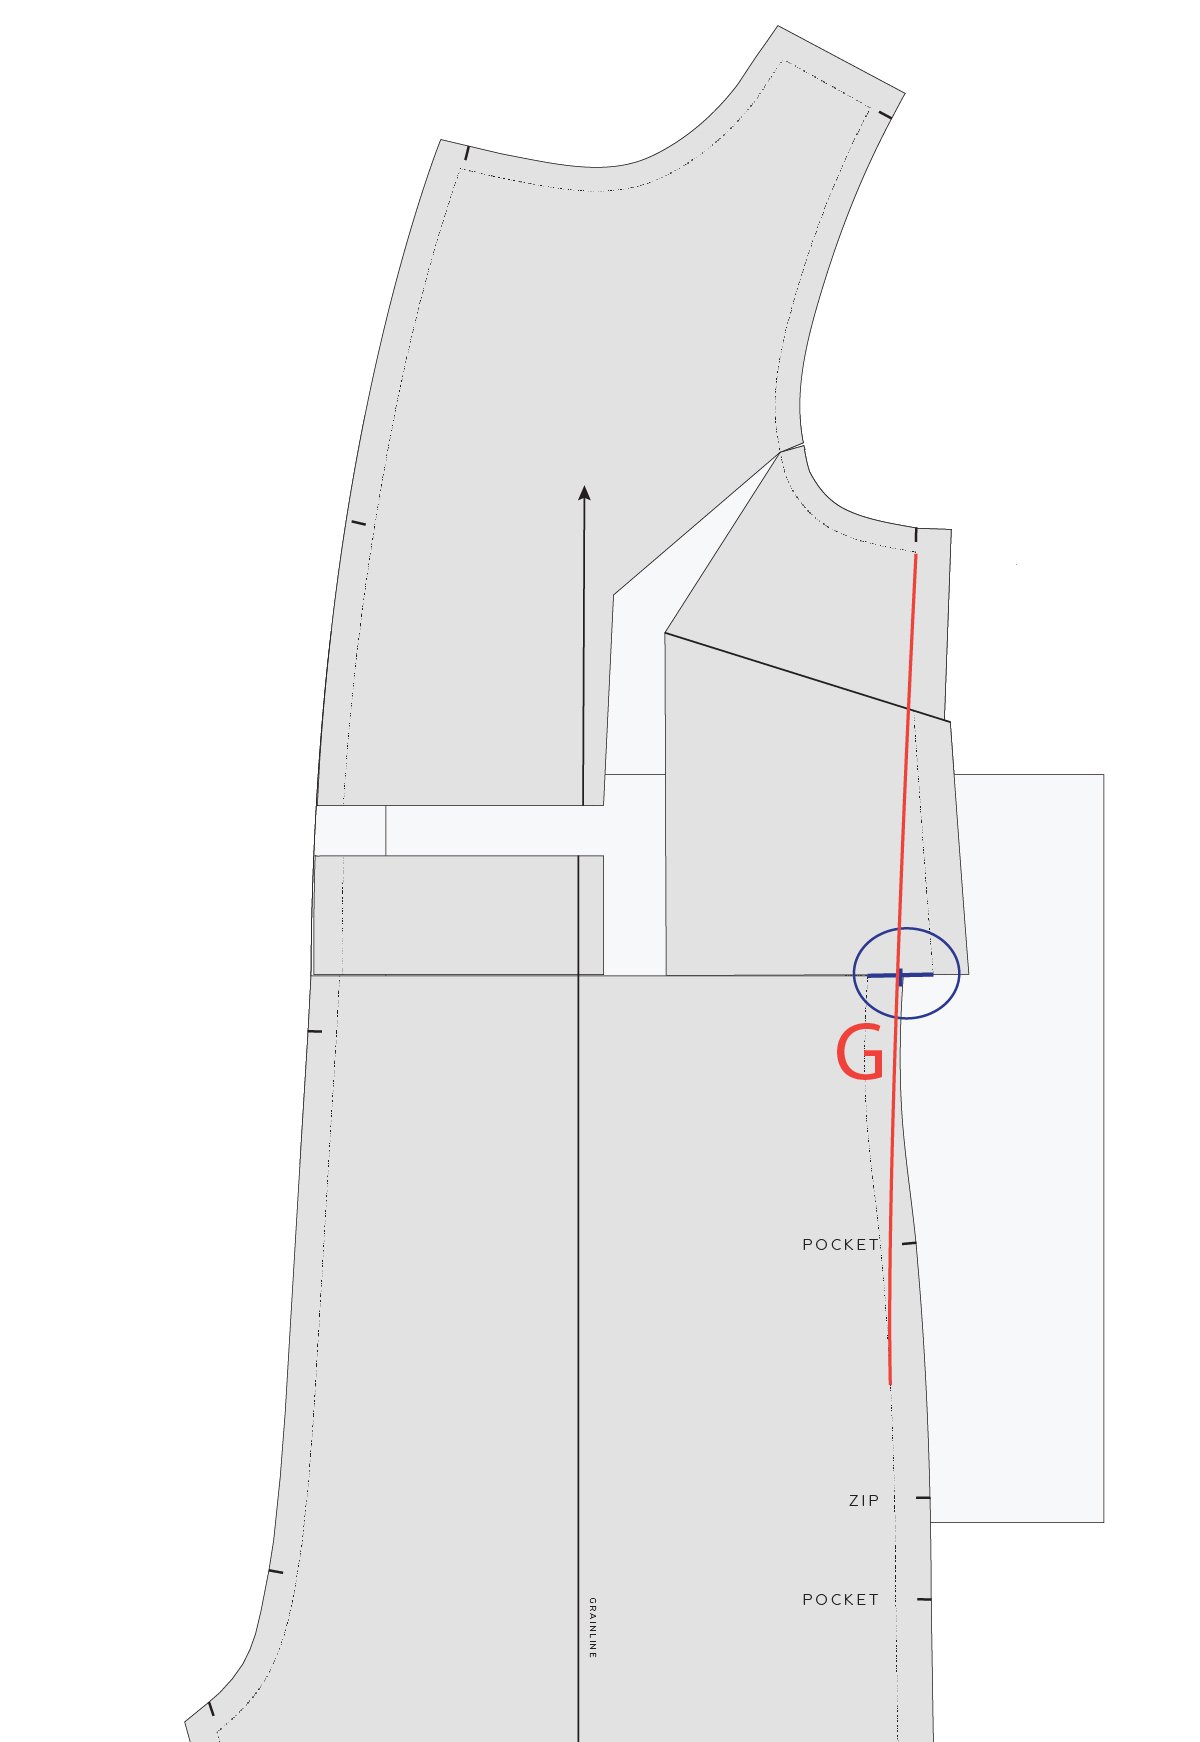
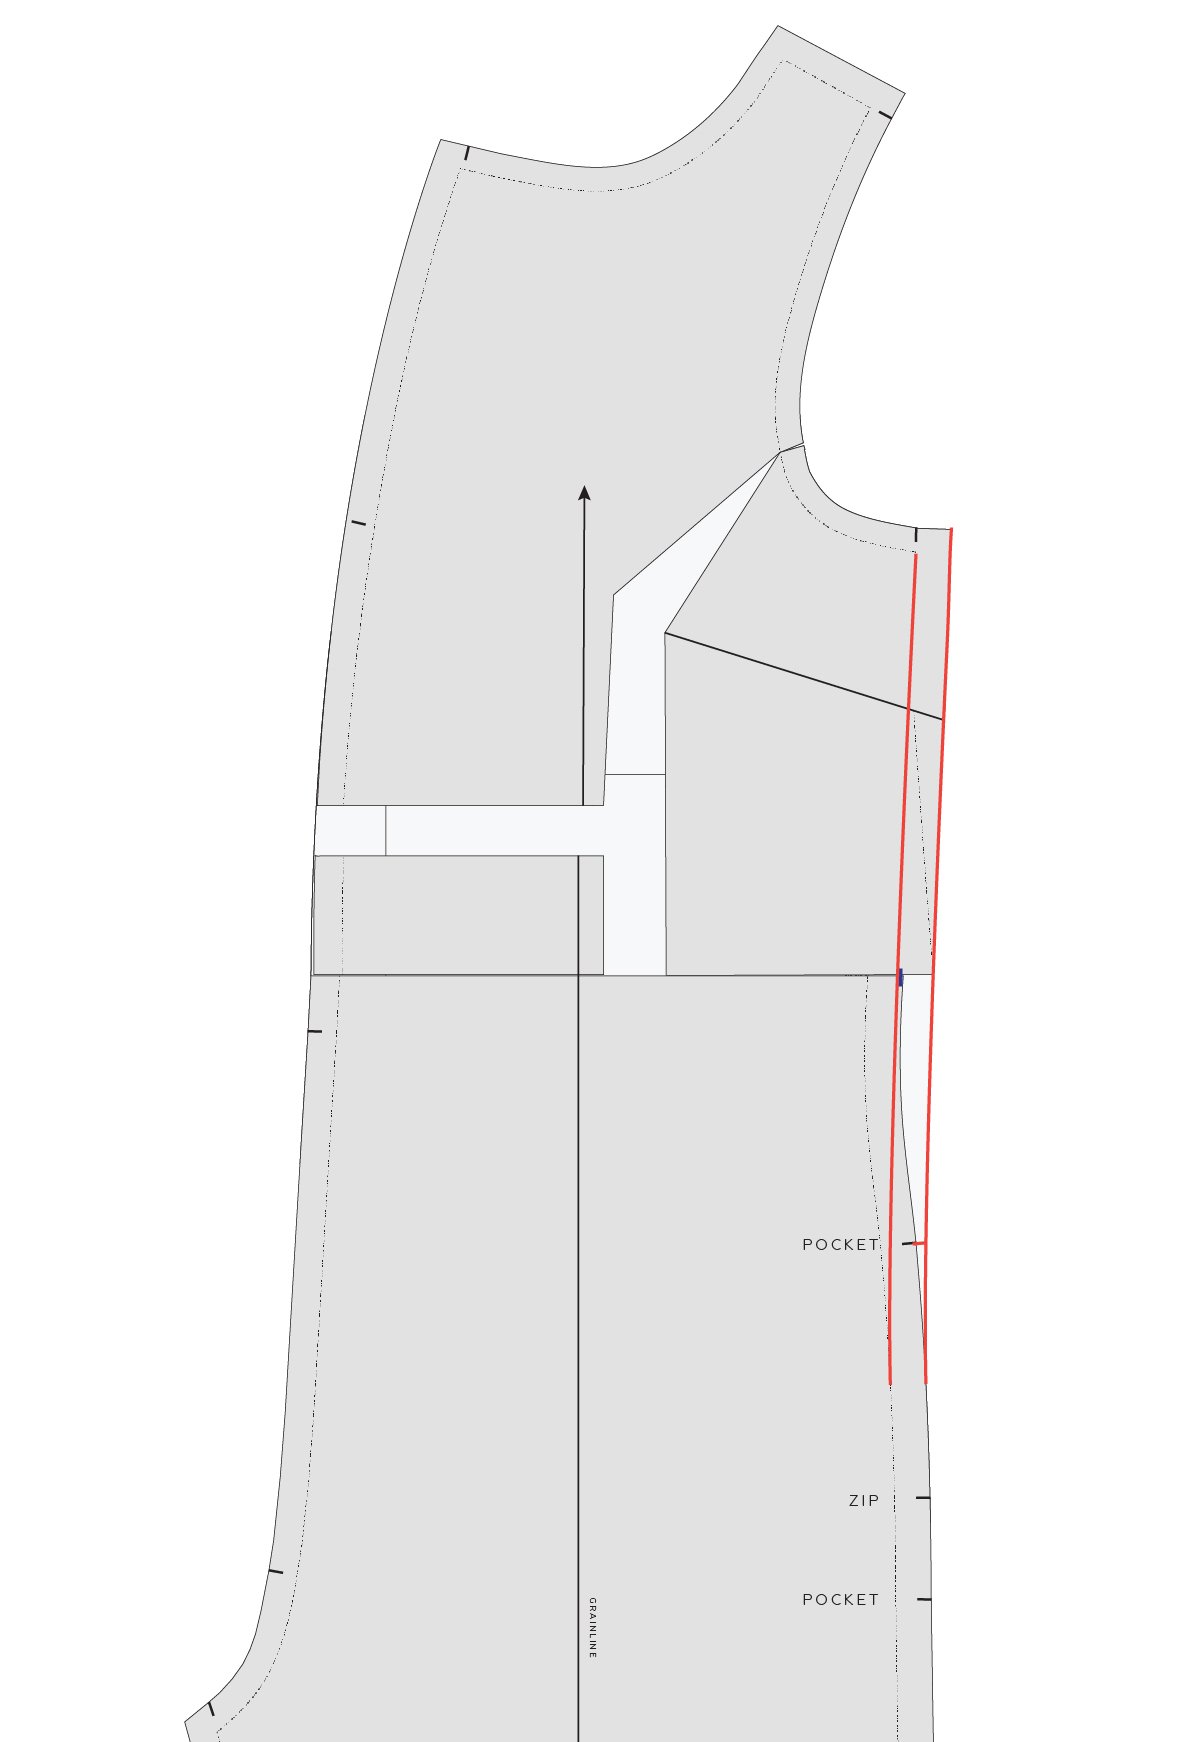
STEP 17
We now need to fold the dart (as if it has been sewn) to true the side seam. Look at this tutorial for guidance on this technique. Create a new side seam by marking a line of best fit from the upper section of the FRONT [1] to the lower, going through point G. Be sure to draw a nice smooth line, with the transition between points as gradual as possible.
As you can see, our line has straightened out the shaping at the waist. You may be able to add some of this shaping back in, but we'd suggest making a toile to check the fit first.
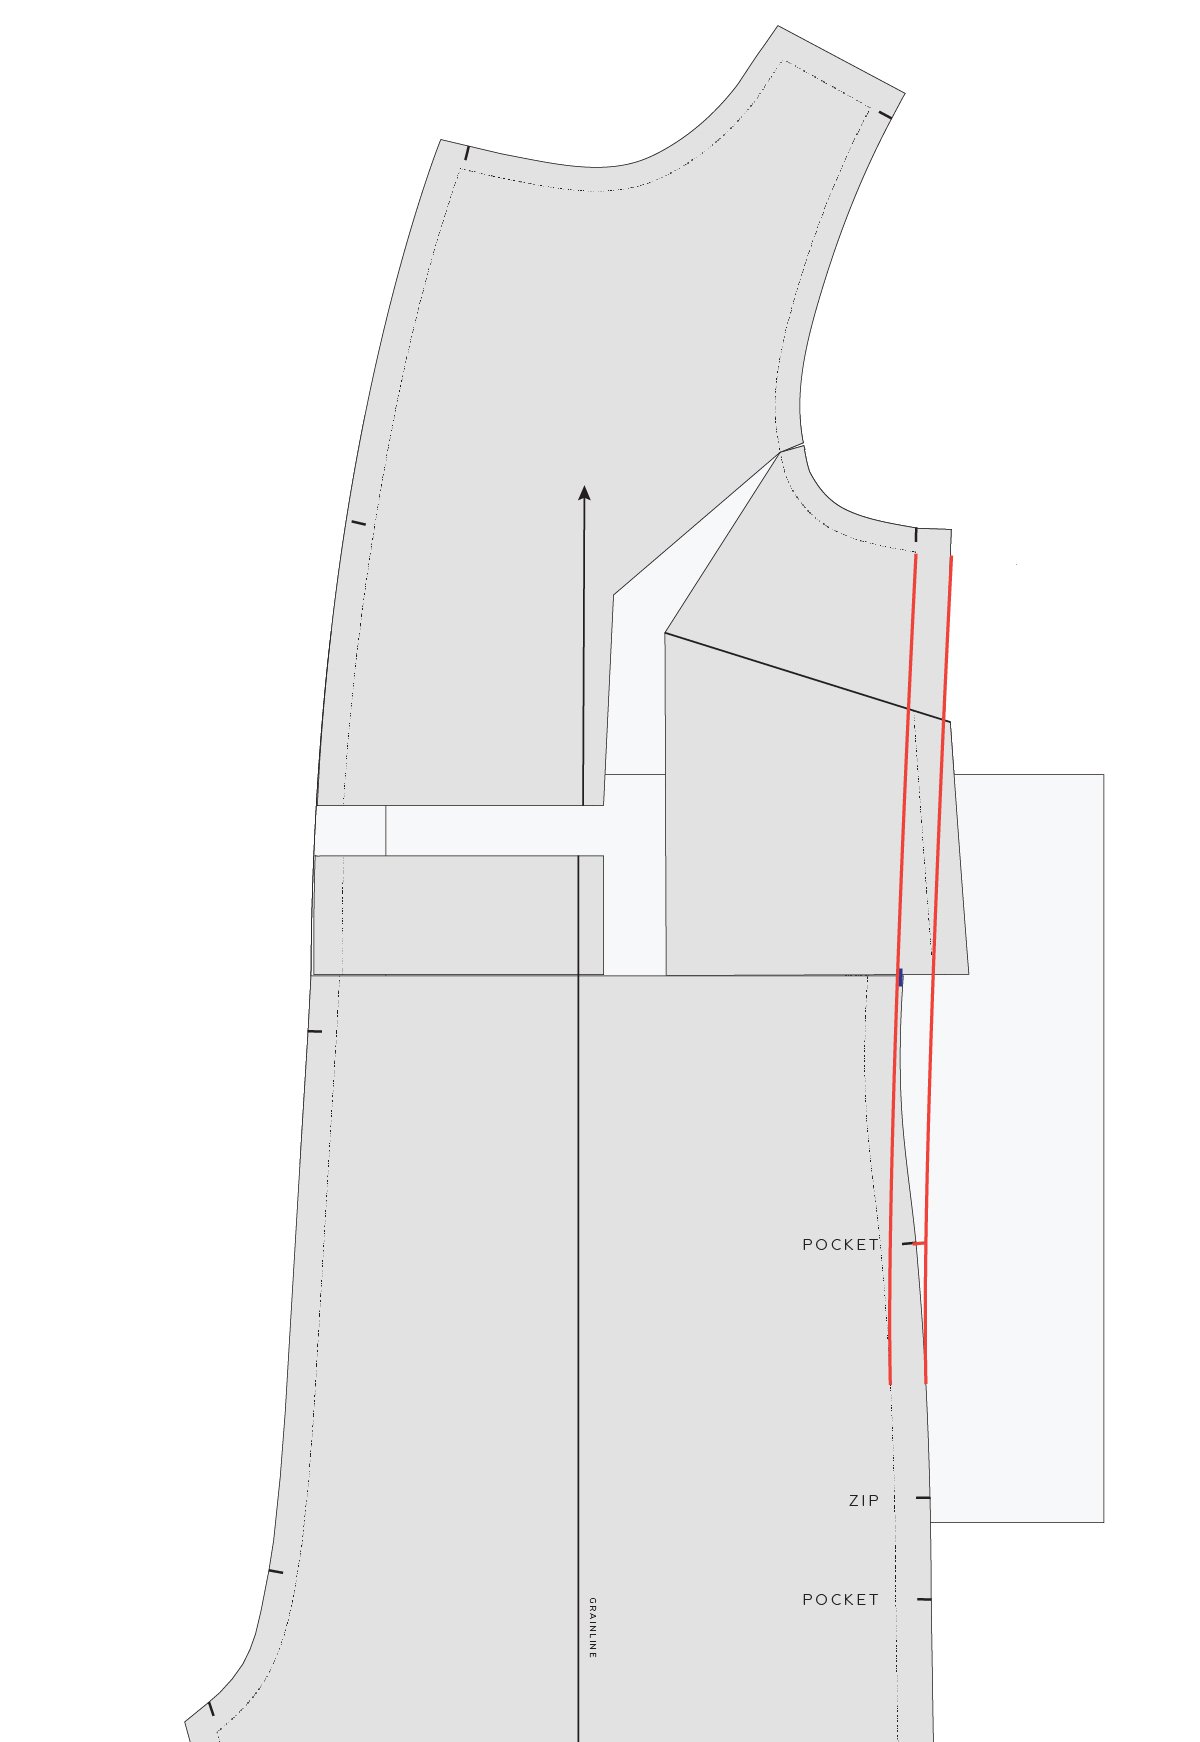
STEP 18
Re-draw the seam allowance lines (cutting line), by adding seam allowance back on to the STITCH LINE. Smooth back into the original CUT LINES. Move any displaced notches to the new edge of the pattern.
STEP 19
Cut off the excess paper from both side with the dart still folded. When you cut along the folded paper that creates the dart, this will create the dart shaping that you require so that when you sew and press the dart it will line up with the side seam edge for a clean finish.
We hope you enjoyed this tutorial! If you would like to learn more about fitting adjustments for a jumpsuit pattern, keep your eye out for the Neale jumpsuit pattern and Fit Kit that we will be releasing very soon!
Happy sewing,
Emily
resources mentioned in this issue
The Peppermint jumpsuit pattern can be found here.
The Peppermint playsuit pattern can be found here.
How to add in-seam pockets to the Peppermint jumpsuit - tutorial can be found here.
How to add dart shaping - tutorial can be found here.
The Neale jumpsuit pattern that is featured in this tutorial will be available on August 15th.
For more issues of the Q & A series, you can check out the archive here.
What you’ve been making

Peppermint jumpsuit made by @the.sewcialite

Peppermint jumpsuit made by @far_and_close

Peppermint jumpsuit made by @sowsewmegs


