Hi there,
I’m making your Ruffle Sleeve top and have chosen a more transparent fabric. Instead of sewing it with the facing, is there a better method?
Thank you!
Juliet
Hi Juliet,
Thanks for your question! I think this is a problem a lot of people come across. It's great to start thinking about finishing options before you start cutting and sewing your fabric!
There are a few options you could use for the Ruffle sleeve top instead of a facing:
BINDING THE NECKLINE
You may like to finish it with blind binding - a binding that is stitched on the inside. Have a look at our how to sew binding tutorial on the blog. It is likely the fabric will appear darker in this area if you're using a transparent fabric, but it should look like a neat small line along the neckline, rather than being able to see the facing line through the top.
LINING THE TOP
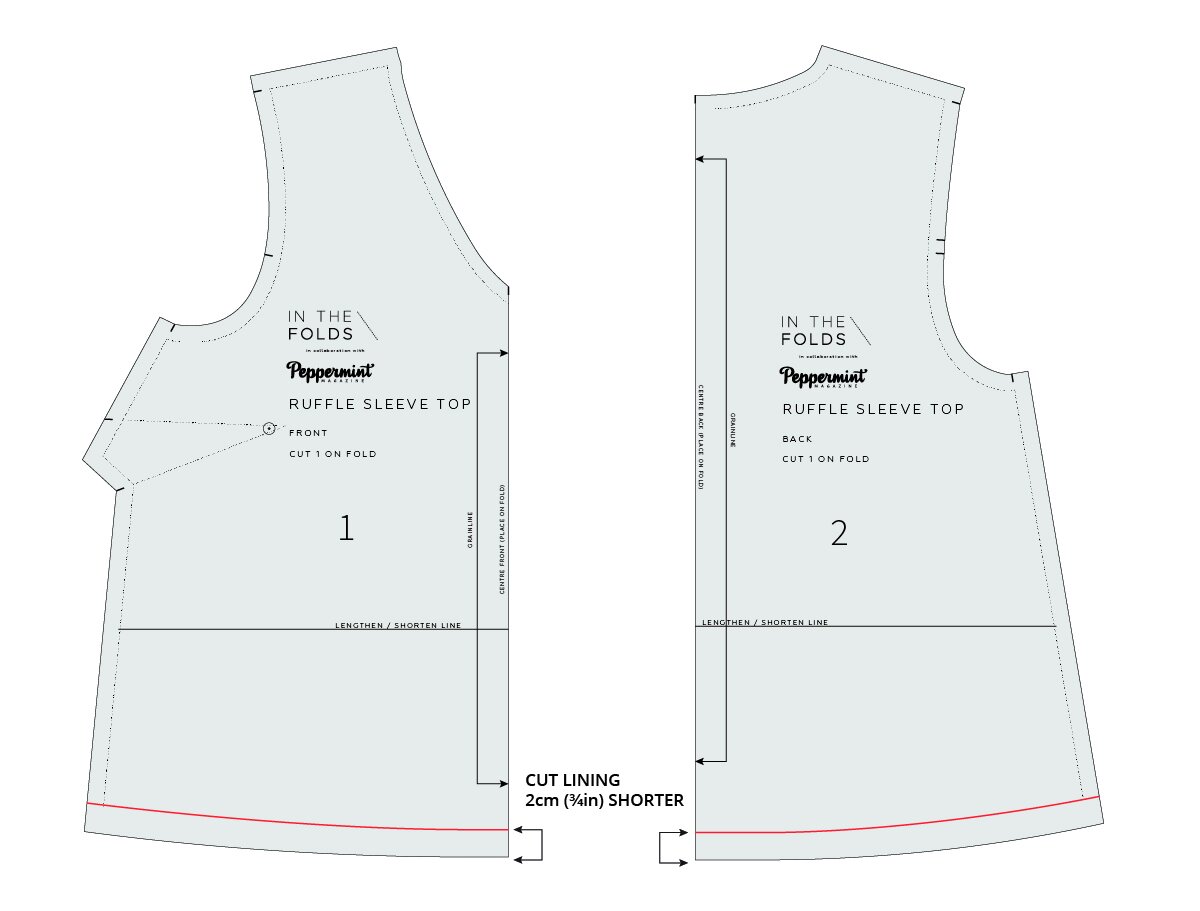
Another option is to cut two of the front and back pieces so that you can line the body pieces of the top. This would make it less transparent and give an even finish of transparency on the front and back. For the lining pieces - cut 2cm from the hem so that it is shorter than the outer layer of fabric. Remember with this option, the sleeve would still be transparent.
For sewing:
STEP 1
Sew the shoulders and side seams on both the outer and the lining pieces.
STEP 2
At the neckline, place the right sides together of the lining and the outer layer and pin - using the shoulder seams as a guide. Stitch with the neckline 1cm (⅜in) seam allowance.
STEP 3
Grade the seam allowance - particularly focusing on the point at the centre front. Clip into the seam allowance around the curve of the back neck.
STEP 4
Use your fingers to press the seam allowance towards the lining and understitch around the neckline (this will help the lining remain on the inside of the top).
Turn the lining to the inside of the top and give it a good press.
STEP 5
At the armholes, baste (sew using a long stitch) the two layers together so you can treat them as one when attaching to the sleeve. Attach the sleeve following the instructions from the pattern, remember to treat the outer (long pieces) as the right side when attaching the sleeve.
STEP 6
Finish the hem of the outer top and lining separately. The lining will sit 2cm (¾in) shorter than the outer layer.
I hope this has given you some food for thought and you are now ready to get started on your Ruffle sleeve top.
Happy sewing!
Alys
P.S. Would you like to know what the Q & A series is all about? This page tells you a little bit more about the motive behind the series. Past issues from the Q & A series can be found here.
Don't have a question, but found this newsletter helpful? I'd love to hear from you! Get in touch and say hi.
What you’ve been making
Collins top made by @simplyjocreations
Hacked Peppermint wrap top made by @carnivalandcrown
Peppermint jumpsuit made by @_handmaking_a


