
Has anyone successfully shortened Darlow pants? I'm 5'2" and I'm not sure it would be doable to whack out 3" or so and maintain the pattern lines ....
Jasmin
New Zealand
Making fit adjustments to any pattern can seem a little daunting, especially if you’ve never done it before.
But making fit adjustments to a panelled design like the Darlow pants? We can totally understand if some makers might put it in the ‘too hard basket’.
In fact, that’s exactly why we create all the supporting resources for our patterns. This blog, for example, and pattern Fit Kits and Hack Kits! Because we want our patterns to be used by as many people as possible. Not just the handful of people whose body measurements just happen to (by pure luck!) exactly match the pattern block we use to design our patterns. (And it’s also why we extended our size range, for that matter.)
So, the short answer to this question is, YES! Lots of people have successfully shortened the Darlow pants.
The long answer?
HOW MUCH CAN YOU SHORTEN DARLOW PANTS BY?
As you might have assumed, shortening a pattern like Darlow, which has lots of shaped panels, isn’t as straightforward as shortening a design like our Peppermint Wide Leg pants.
Regardless of the design, it’s really important to shorten pants in the right place, which is why our patterns include shorten/lengthen lines. But for a detailed design like Darlow, shortening or lengthening will have a significant impact on the shape of the panels.
SHORTENING THE DARLOW PANTS - VIEW A

Step 1
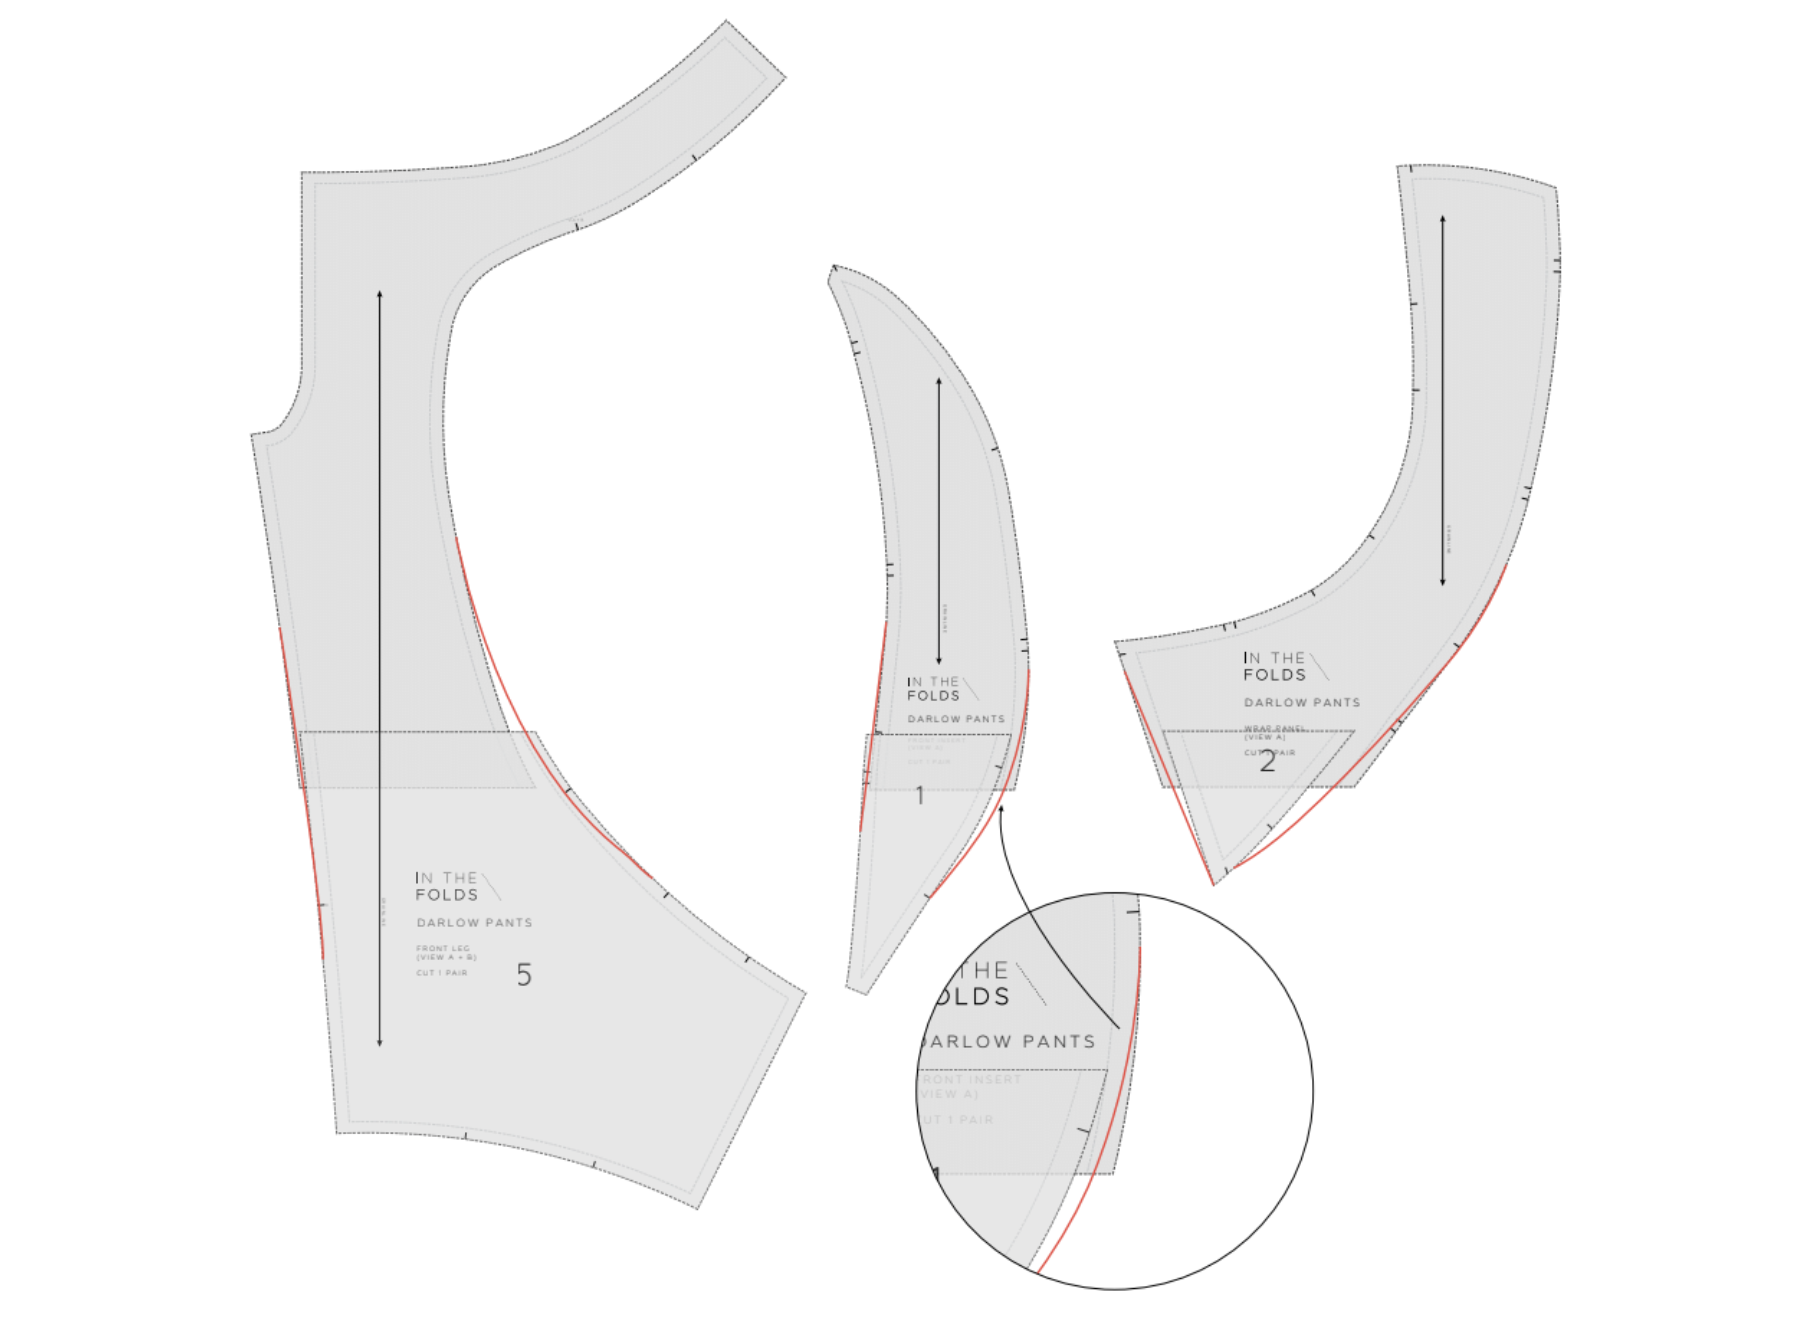
Draw a vertical line perpendicular to the LENGTHEN / SHORTEN lines on the FRONT INSERT [1], and WRAP PANEL[2] - these lines will act as a guide as the grainline is not marked on the lower section of the pattern and you will need it when making the alteration.
Cut through the LENGTHEN / SHORTEN line on the FRONT LEG [5], FRONT INSERT [1], and WRAP PANEL [2].Measuring up from the cut line, mark a horizontal line on each pattern piece, the distance of the amount of lengthyou would like to remove. In the example above, you can see the red line is 5cm (2in) above the cut line and theshaded section shows the amount of length that will be removed from each pattern piece.

Step 2
Move the lower part of each pattern piece up to the line marked in the previous step. Use the grainline to ensurethat you line the pieces up correctly (this is when the vertical lines you marked in STEP 1 will come in handy).
Glue or tape in place.
Step 3
Re-draw the seam lines with smooth lines over the adjustment. You will notice that in some cases you will be adding a little bit on to create the line of best fit, while in other cases you will need to shave a bit off. This will even out as you go around the pattern.
When marking a line over the area that has been altered, there might be a large gap between the two sides of the line. In this case - split the difference by marking a point in the centre of the area and drawing the line across thispoint (highlighted in the close-up in the illustration above). You can choose to trace the pattern on to fresh patternpaper or tape on small pieces of paper / masking tape where you need to fill a small gap to complete the seam line.
Cut off any excess paper that is outside of the new lines.
Check all seams are the correct length by "walking" the pattern pieces, as if you were sewing them together. Transfer / re-draw any notches that have been misplaced. Due to the shape of the pieces, some notches may notline up due to the different points the alteration was made. After checking that the seam is the correct length,transfer one notch to the other piece (and cross out the notch that is no longer in the correct position).
SHORTENING THE PATTERN - VIEW B

Step 1
Draw a vertical line perpendicular to the LENGTHEN / SHORTEN line on SIDE BACK PANEL [14] - this line will act as a guide as the grainline is not marked on the lower section of the pattern piece and you will need it when making the alteration.
Cut through the LENGTHEN / SHORTEN line on the FRONT LEG [5], SIDE FRONT PANEL [21], CENTRE BACK PANEL [13] and SIDE BACK PANEL [14].
Measuring up from the cut line, mark a horizontal line on each pattern piece, the distance equal to the amount oflength you would like to remove. In the example above, you can see the red line is 5cm (2in) above the cut line andthe shaded section shows the amount of length that will be removed from the pattern piece.

Step 2
Move the lower part of each pattern piece up to the line marked in the previous step. Use the grainline to ensurethat you line the pieces up correctly (this is when the line you marked in STEP 1 will come in handy).
Glue or tape in place.

Step 3
Re-draw the seam lines with smooth lines over the adjustment. You will notice that in some cases you will be adding a little bit on to create the line of best fit, while in other cases you will need to shave a bit off. This will even out as you go around the pattern.
When marking a line over the area that has been altered, there might be a large gap between the two sides of the line. In this case - split the difference by marking a point in the centre of the area and drawing the line across thispoint (highlighted in the close-up in the illustration above). You can choose to trace the pattern on to fresh pattern paper or tape on small pieces of paper / masking tape where you need to fill a small gap to complete the seam line.
Cut off any excess paper that is outside of the new lines.
Check all seams are the correct length by "walking" the pattern pieces, as if you were sewing them together. Transfer / re-draw any notches that have been misplaced. Due to the shape of the pieces, some notches may not line up due to the different points where the alteration was made. After checking that the seam is the correct length, transfer one notch to the other piece (and cross out the notch that is no longer in the correct position).
For more issues of the Q & A series, you can check out the archive here.
WHAT YOU’VE BEEN MAKING


Lengthened Peppermint playsuit by @sew.it.like.gracie


