
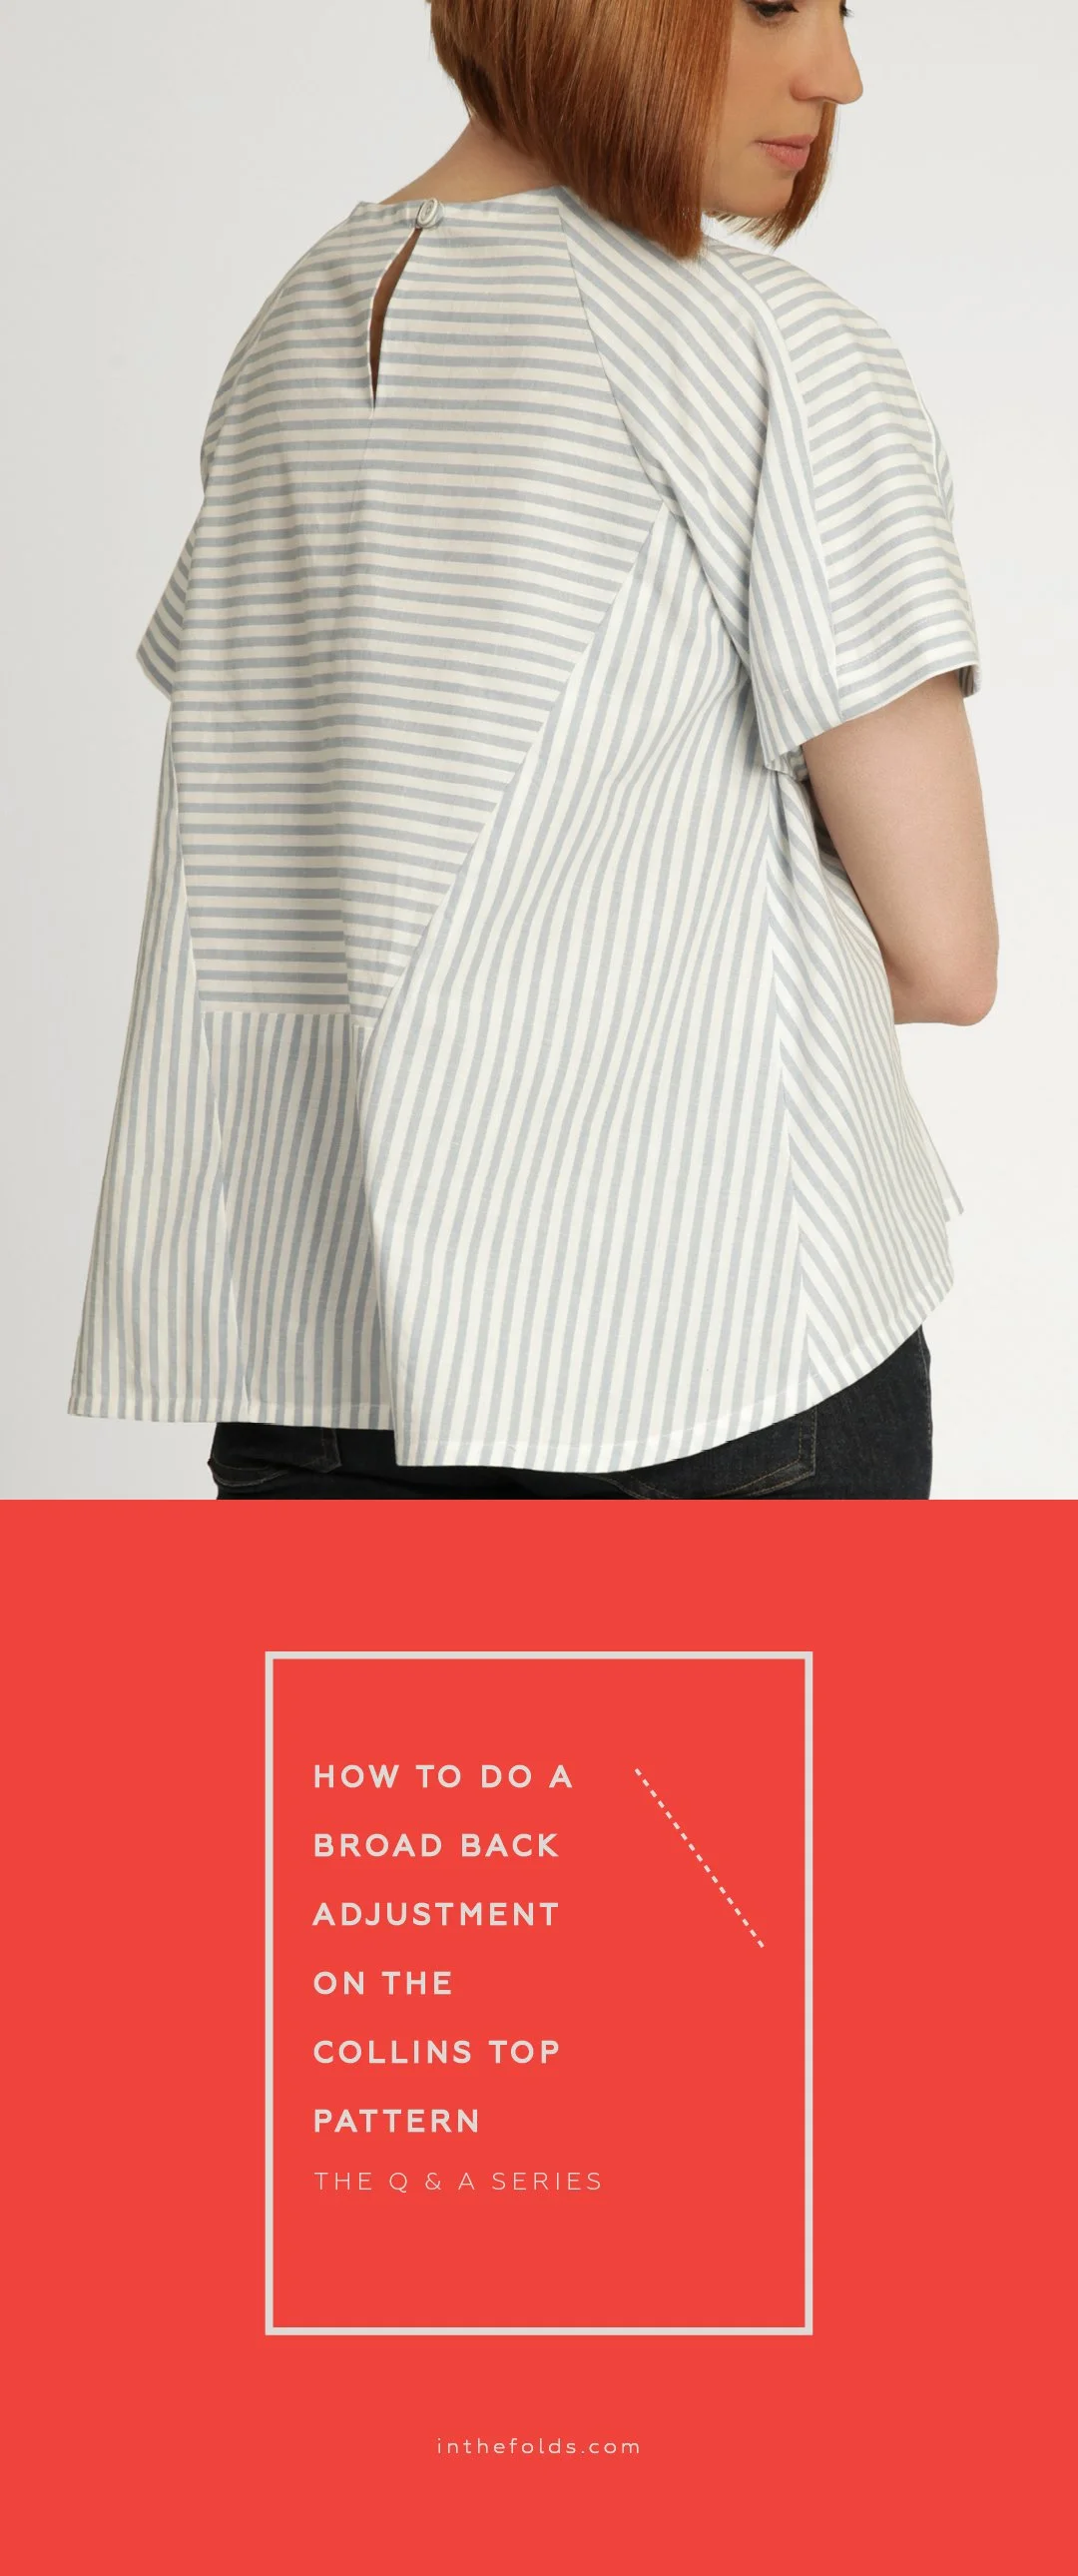
THE Q & A SERIES
Recently, I received this lovely email from a reader, Alyssa:
Hello!
As I get more experienced with sewing, I find I really enjoy the different approach ITF patterns take. I've just made the Darlow bag and plan to take it travelling.I do have a question: how do I do a broad back adjustment on the Collins top, as it has so many pieces? Is spreading the centre back enough? Not urgent as the sleeveless view works fine for me, but when I get around to making one with sleeves I'll want the extra space for my shoulders.
When I read this question, I knew it wasn't something I could answer off the top of my head. I was going to need to get the pattern out and have a look. And a play. I also knew I'd need to revisit this broad back adjustment tutorial I made a couple of years ago.
For two reasons:
I don't know every pattern alteration off by heart. It's a bit like cooking. I know the general principles and have the skills required, but sometimes I still need to look up a recipe to remind myself of the steps.
I like to keep my tutorials as consistent as possible. That way, if you like the way I approach pattern alterations, you can come back to In the Folds and find a familiar process for most of the adjustments you might need to make.
Once I'd refreshed my memory, I opened up the Collins Top pattern in Illustrator and started playing around with it.
I tend to do this kind of work digitally, particularly when I'm creating tutorials, as it makes it easier to turn the process into illustrations. It's also handy at the moment because I'm in Spain and don't have access to a printer or my usual patternmaking supplies!
I started with how I thought I'd make the alteration, tried a few things, changed my mind and eventually figured out an approach I was happy with. Initially, I thought I'd just show you the finished tutorial. The "right" way to do it. But then I realised that what might be the most interesting part probably wasn't the final answer. It was how I got there.
Although I have a fashion design degree and have been making patterns for home sewists for over ten years, I still need to look things up. I still need to experiment. And I still need to use trial and error to work out the best way forward. It's something all patternmakers do, but probably not something we talk about very much. Which means you might assume that we just know all the answers. But I certainly don't!
What I am good at is knowing where to look, how to get started and how to work through a problem when the answer isn't immediately obvious.
So, even if you don't need a broad back adjustment on your Collins top, I hope you'll find this tutorial interesting as a little glimpse into how I approach patternmaking and problem-solving.
Why do we need a different approach for the Collins Top?
As I mentioned, we already have a tutorial showing you how to do a broad back adjustment. So why do we need another one?
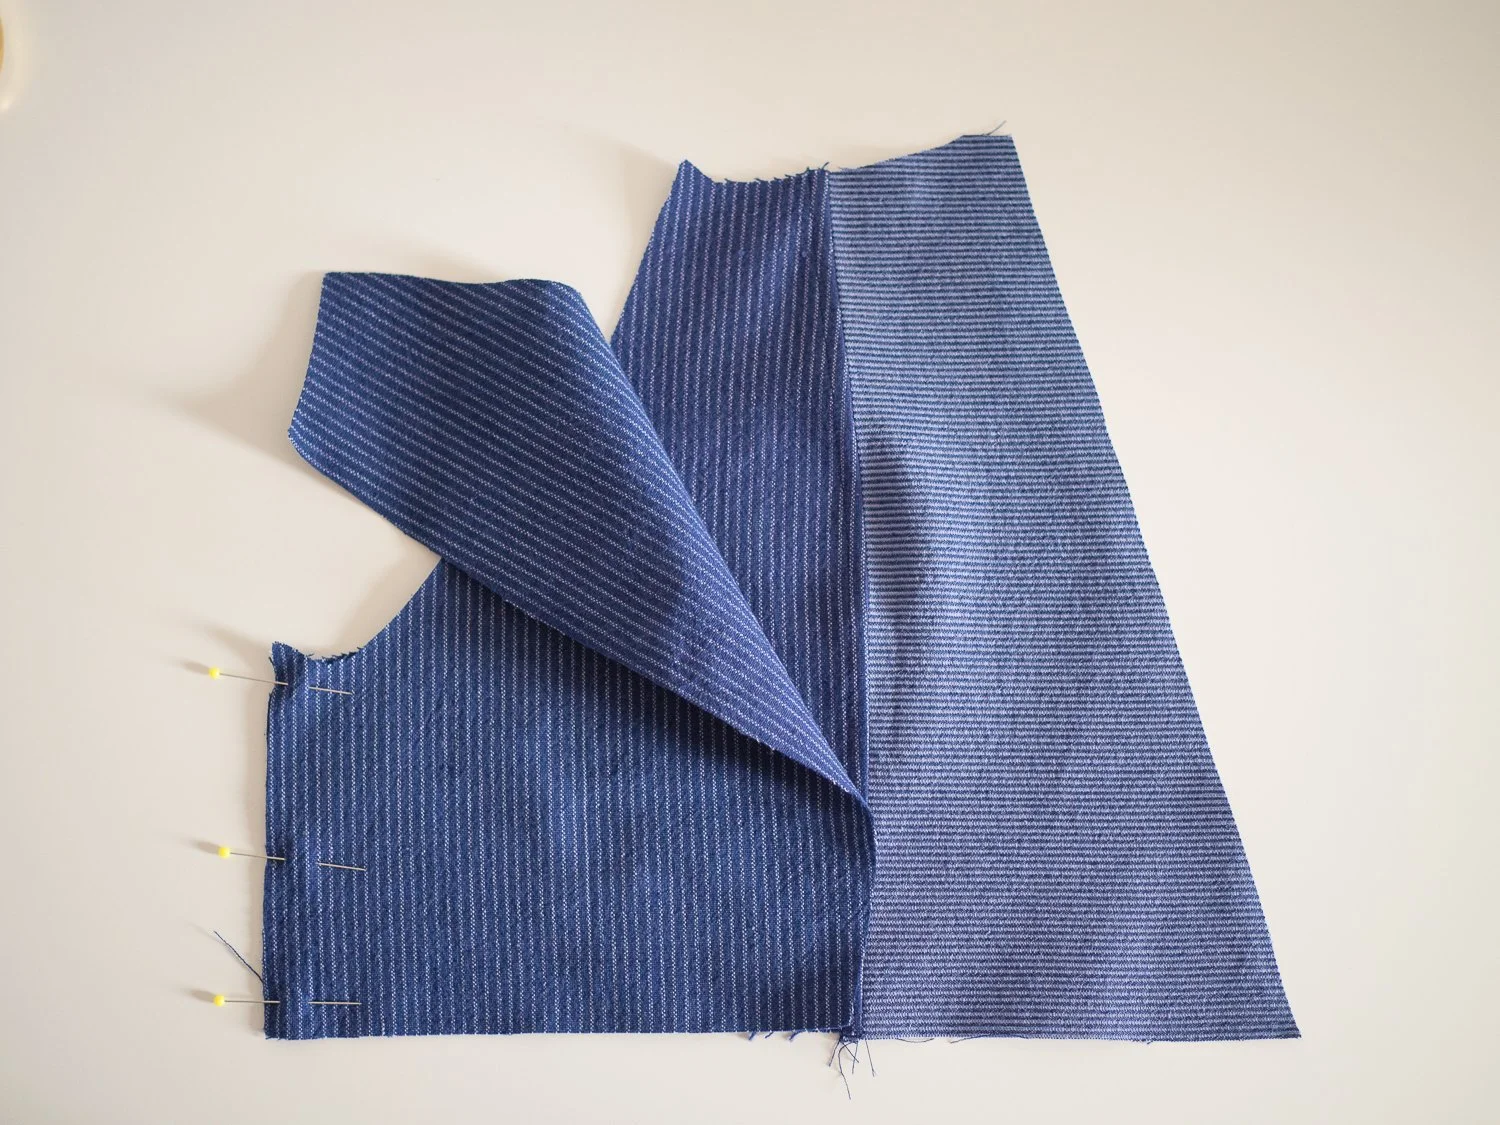
Well, the Collins top isn't your average bodice. It has a raglan sleeve made up of three panels, which might just be my favourite thing about this pattern! The panel lines create an interesting shape, and they make the top really fun to sew.
But they way the pattern comes together also means that we can't simply follow the usual method for making a broad back adjustment on a bodice with a standard set-in sleeve. We need to think a little differently about how the pieces fit together and where the additional width needs to go.
And that's where the fun begins…
Preparing the pattern
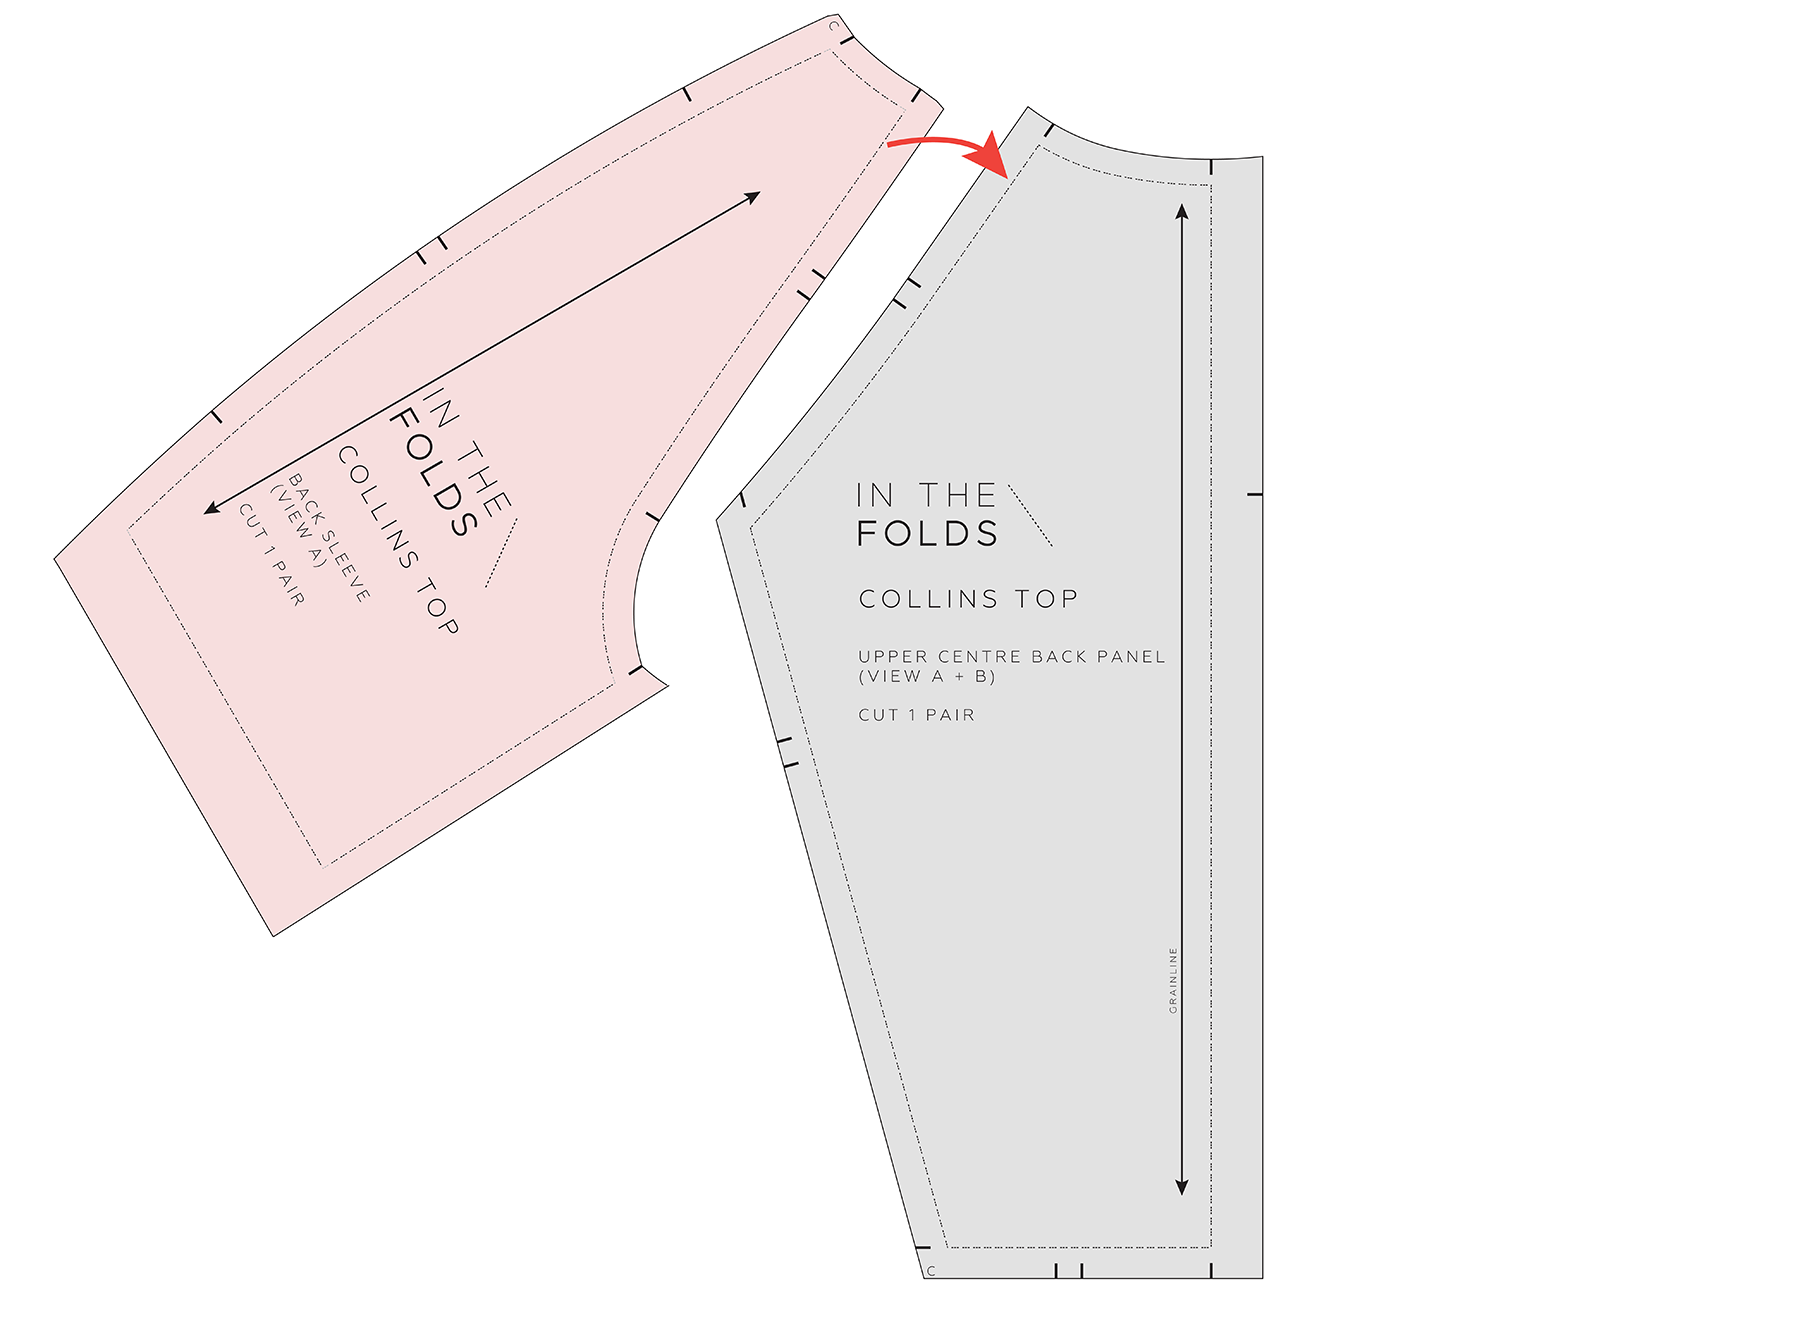
Step 1
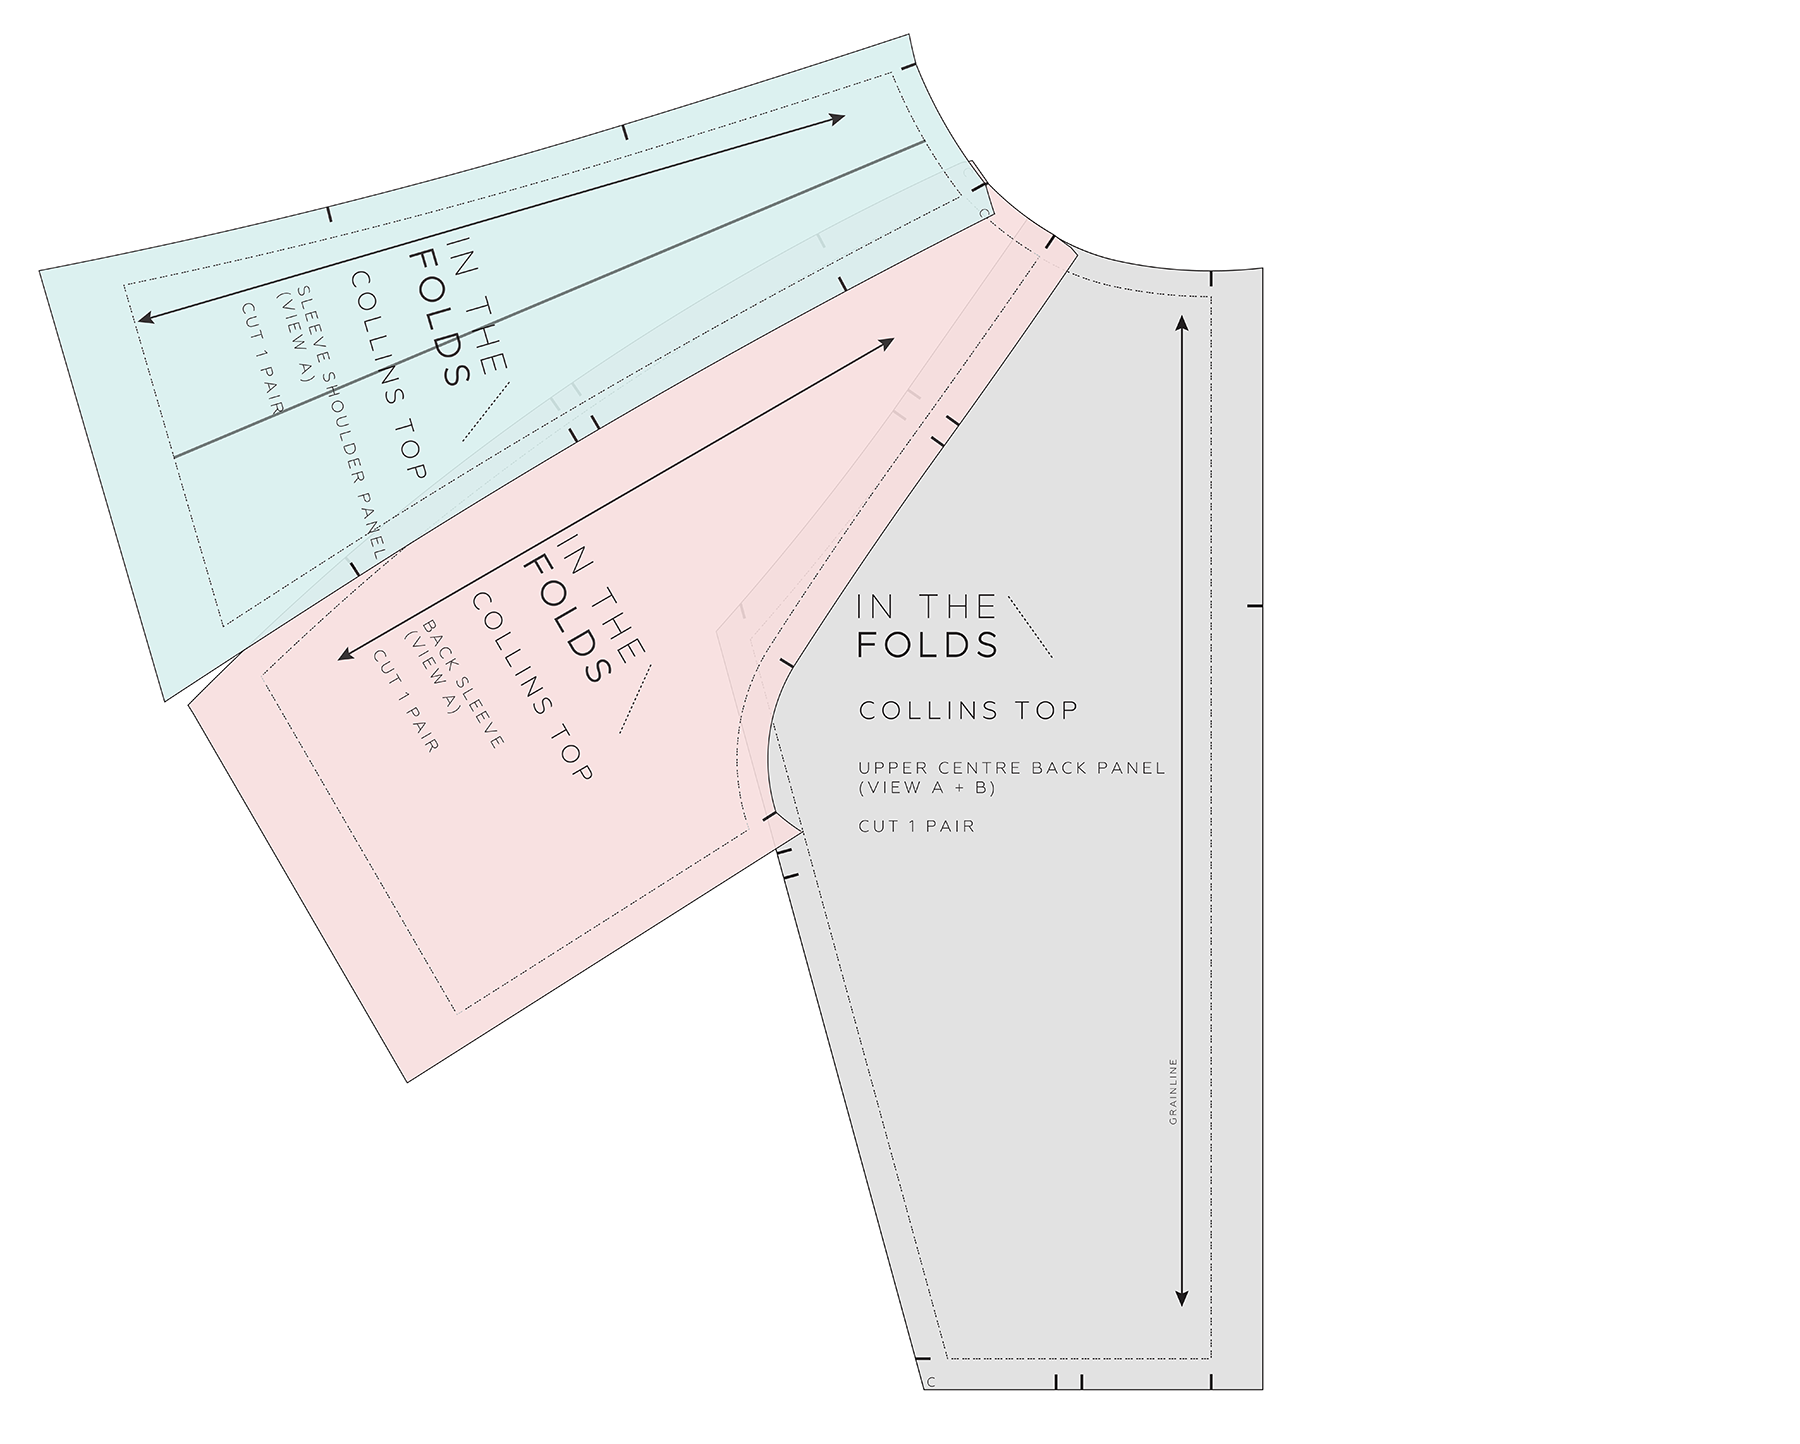
Take the UPPER CENTRE BACK PANEL and BACK SLEEVE pattern pieces.
We're going to put these pieces together as though they've already been sewn.
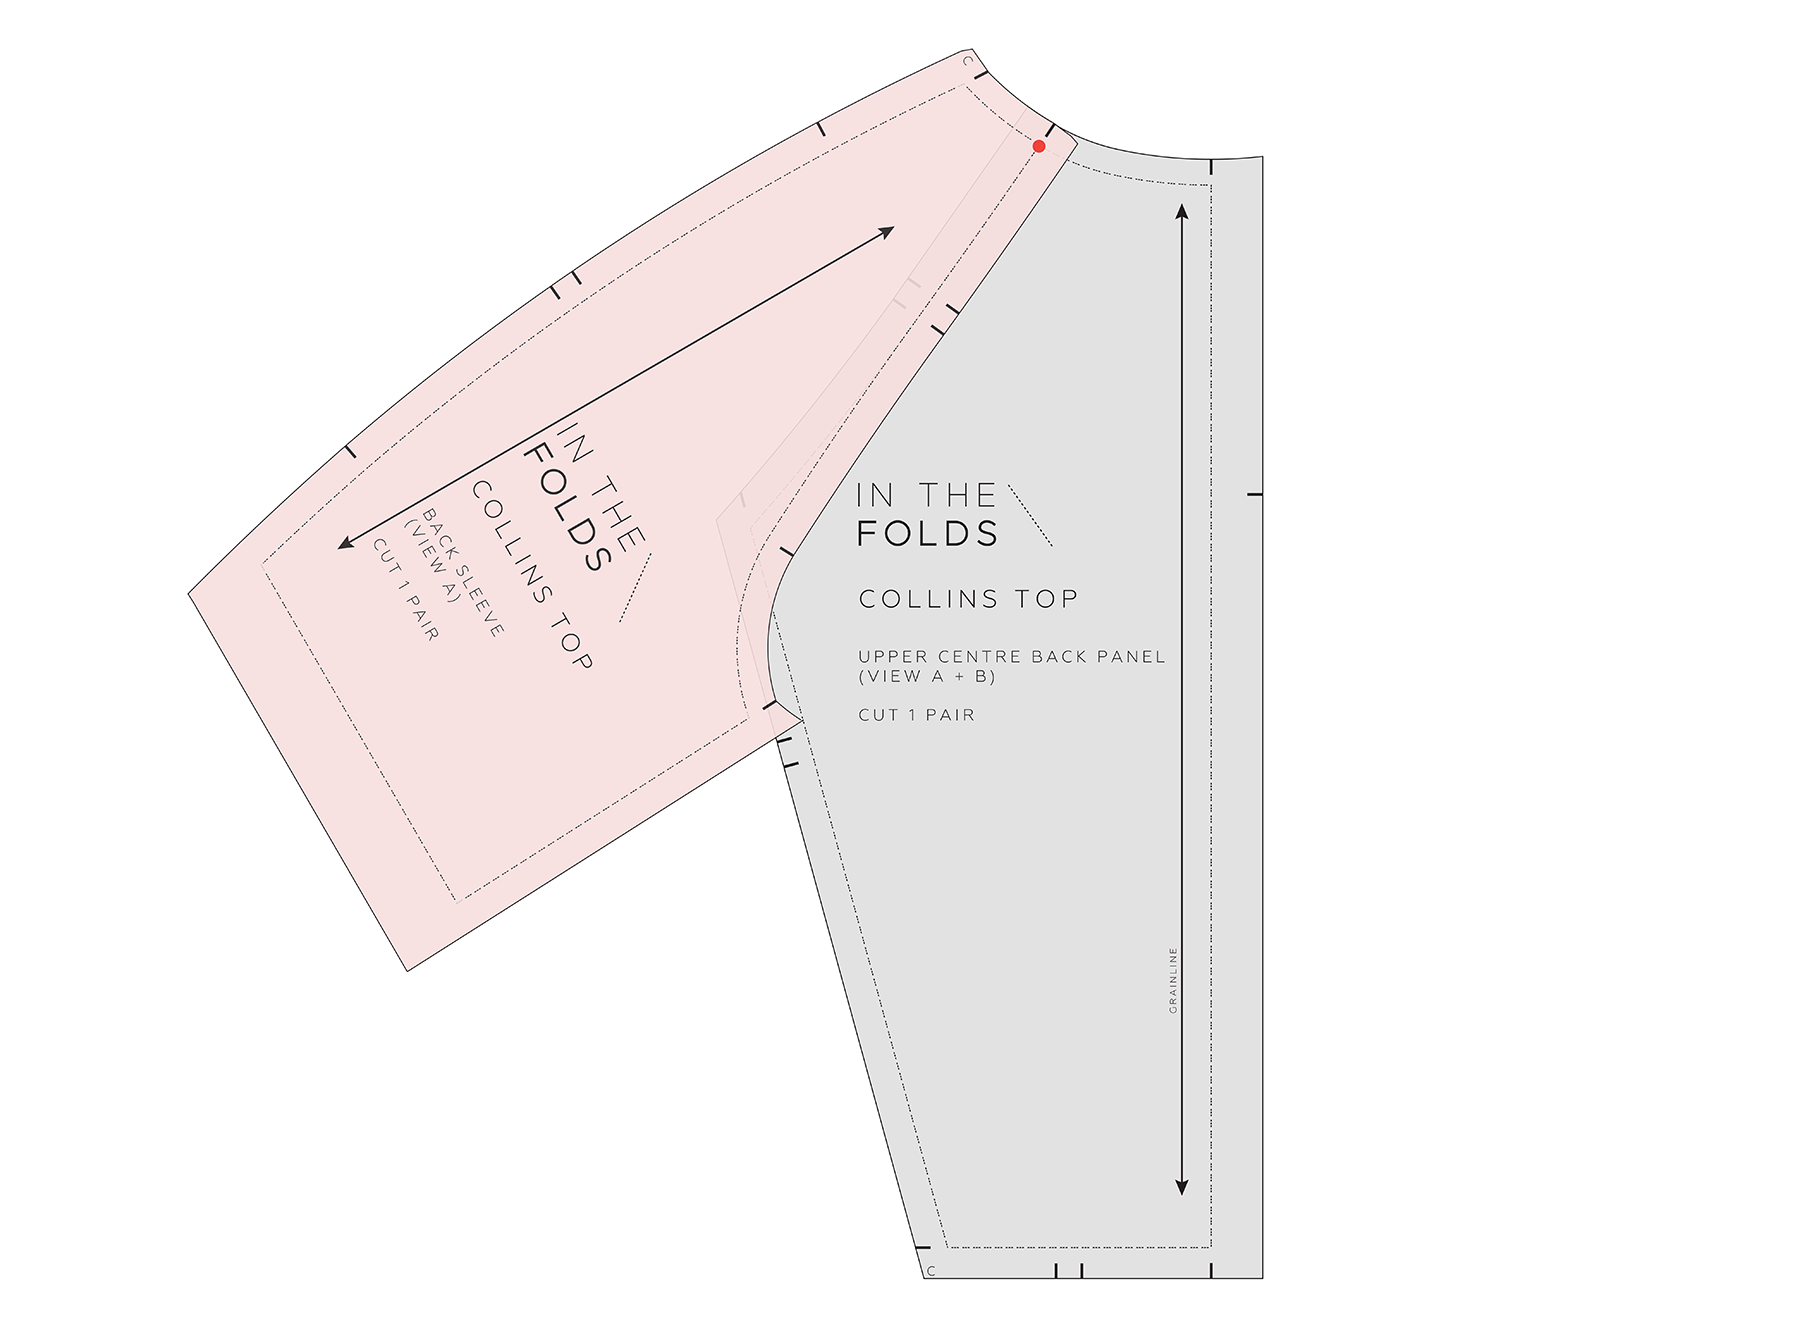
Line up the pieces, STITCH LINE on STITCH LINE, starting at the neckline. You'll notice that you can't line up the entire seam. That's okay! The reason for this is that our bodies aren't flat. The curve in the sleeve piece allows the fabric to wrap around the body and under the arm.
Use masking tape or a pin to hold the pieces together where they meet.
Step 2
Take the SLEEVE SHOULDER PANEL and line it up with the BACK SLEEVE, again matching the STITCH LINES.
My first unnecessary step
As I worked through the adjustment, I realised that attaching the SLEEVE SHOULDER PANEL wasn't actually necessary. But I'm leaving this step here because I want to show you how I figured that out.
At this point, I was thinking about how I could adapt the standard broad back adjustment to work with these unusual pattern pieces.
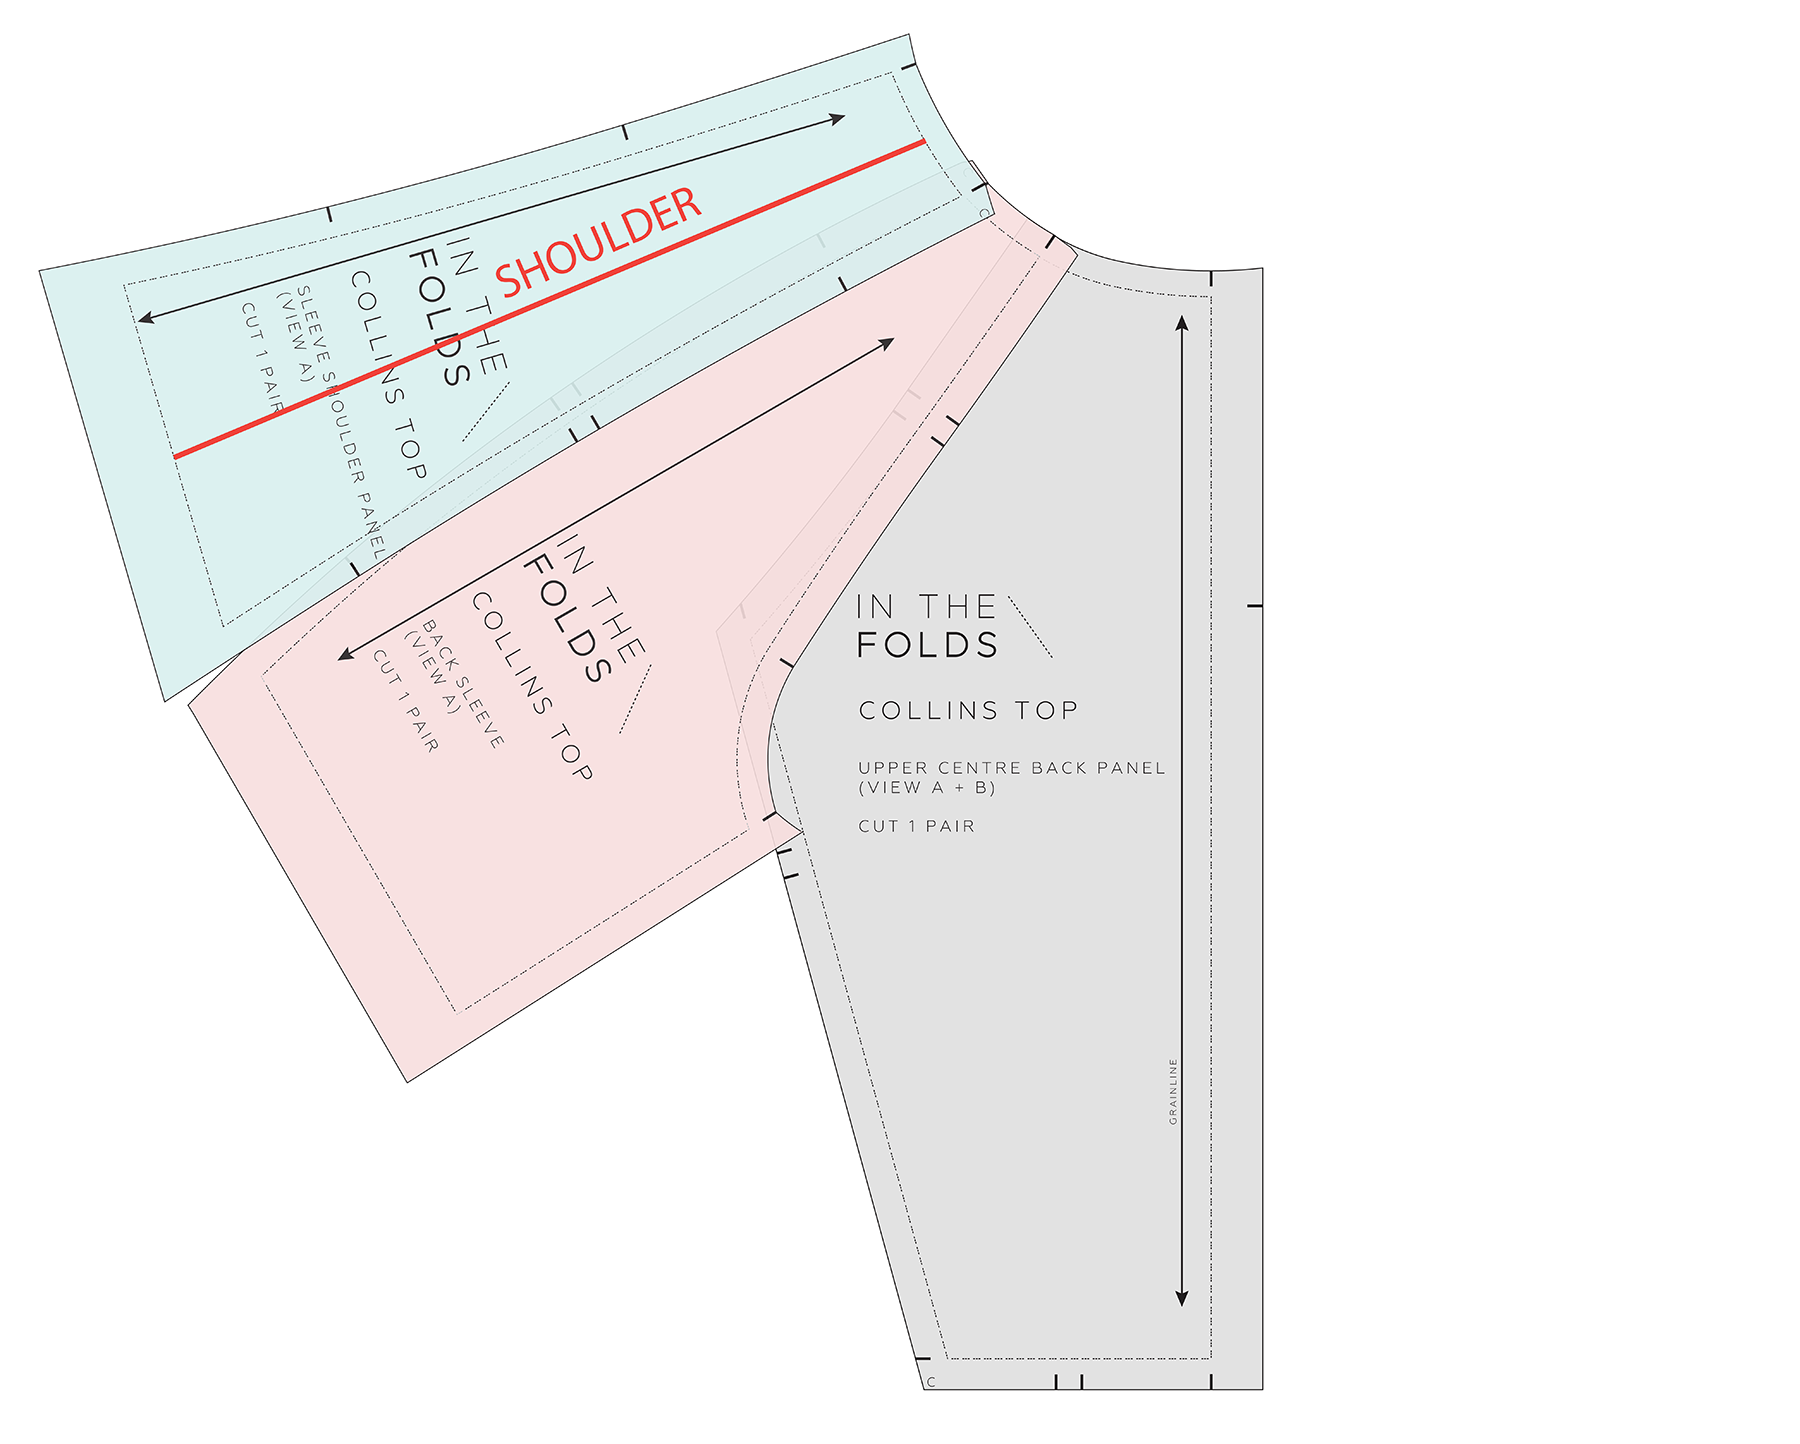
In the original tutorial, the adjustment involves a line running through the shoulder. So I marked the approximate shoulder position on the SLEEVE SHOULDER PANEL with a straight line.
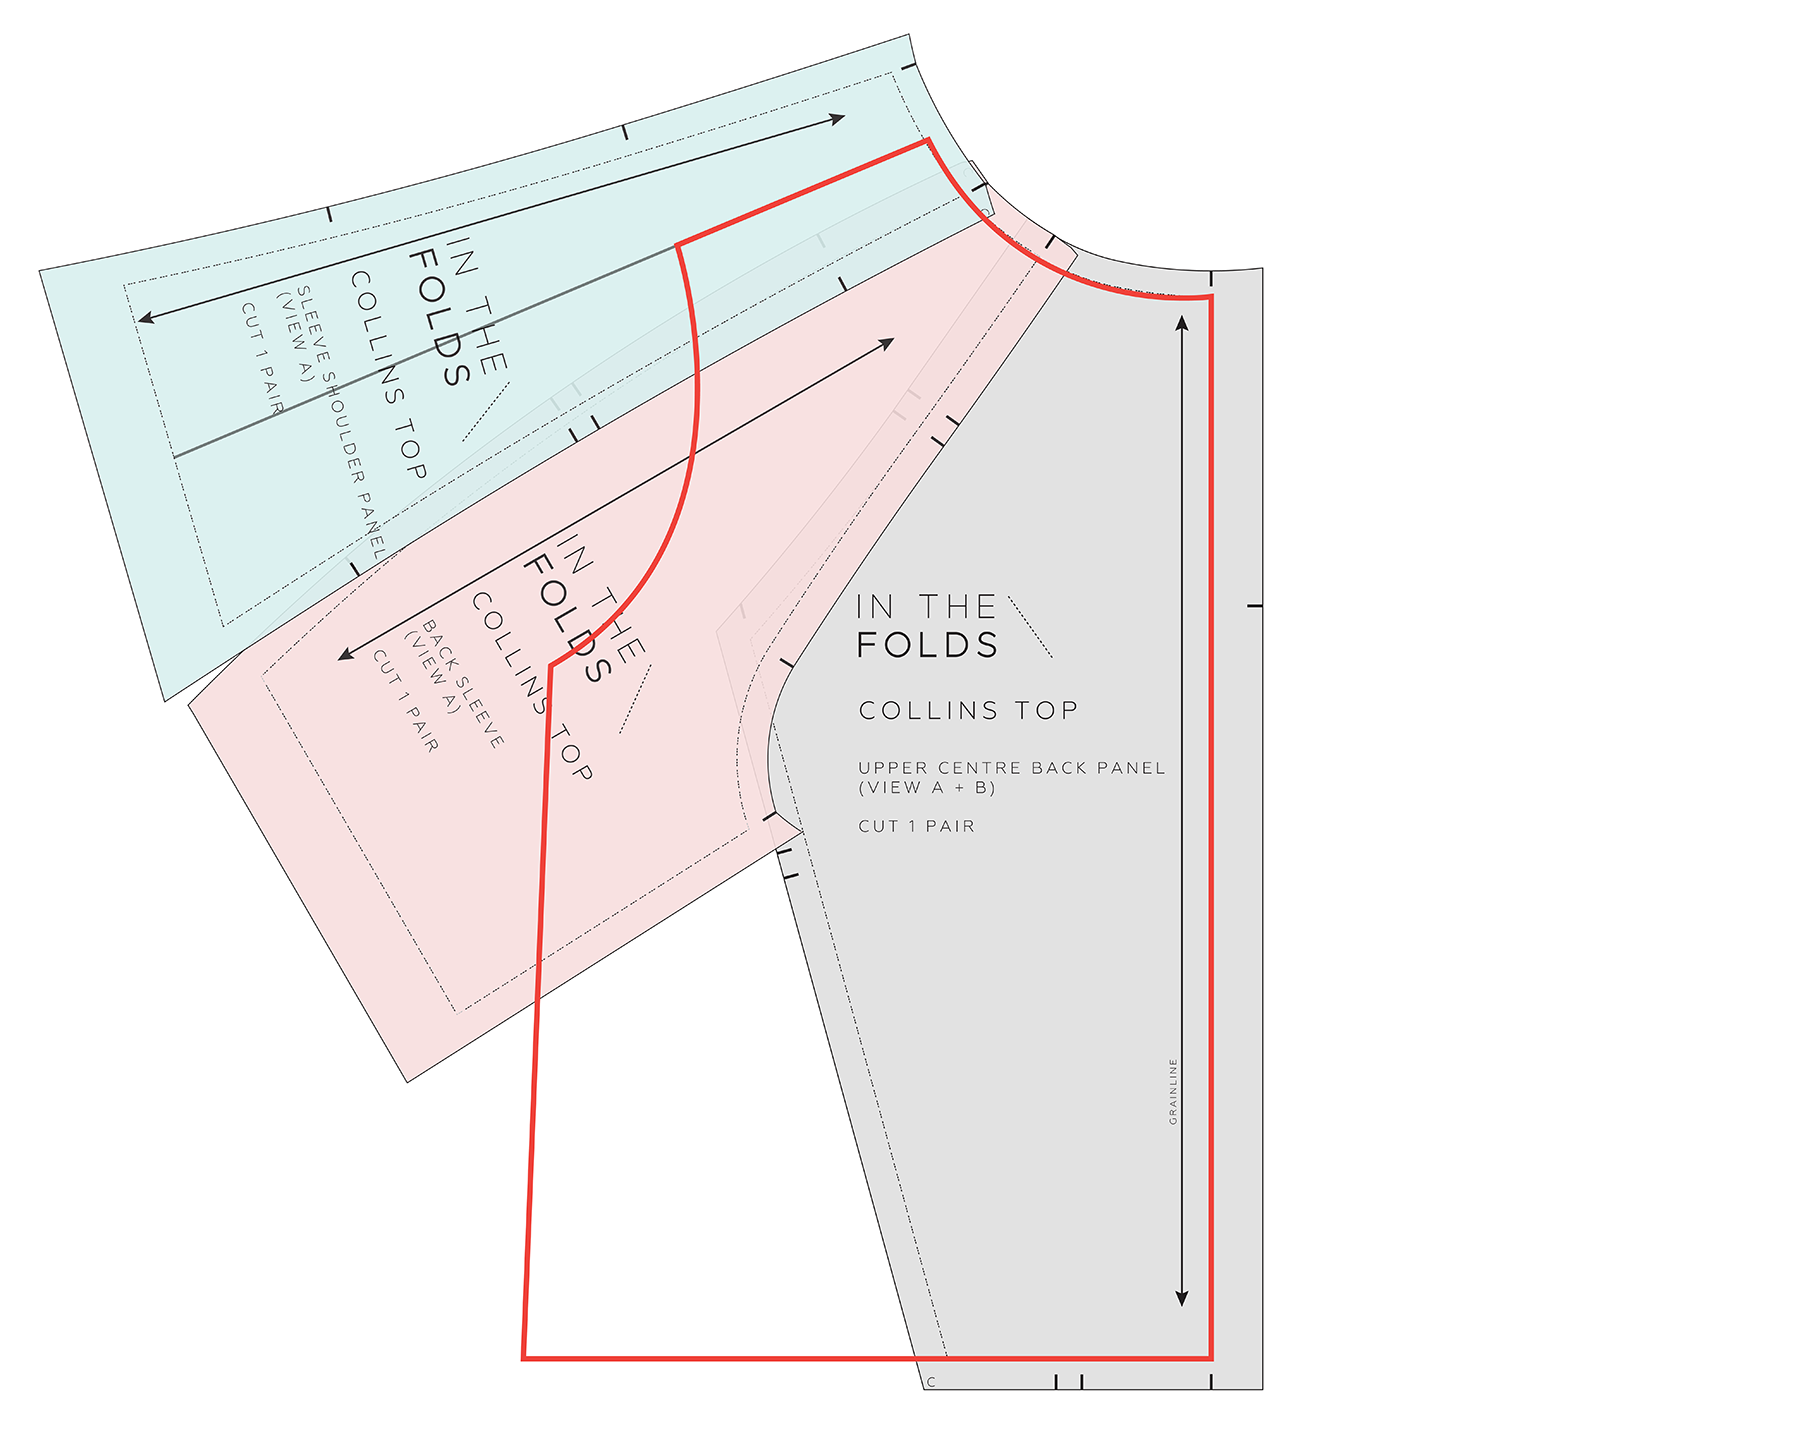
I then imagined the outline of a more conventional bodice over the Collins pattern pieces. This helped me visualise where the alteration lines would normally go and how they might relate to the Collins top.
You'll notice that I've left this bodice outline in the following illustrations. It's just there to help you keep your bearings as we work through the adjustment. You don't need to draw this outline on your own pattern.
Working out where the extra width needs to go
With that imaginary bodice shape in mind, I went back to my original broad back adjustment tutorial. The first thing we need to establish is where the additional width is required.
Step 3
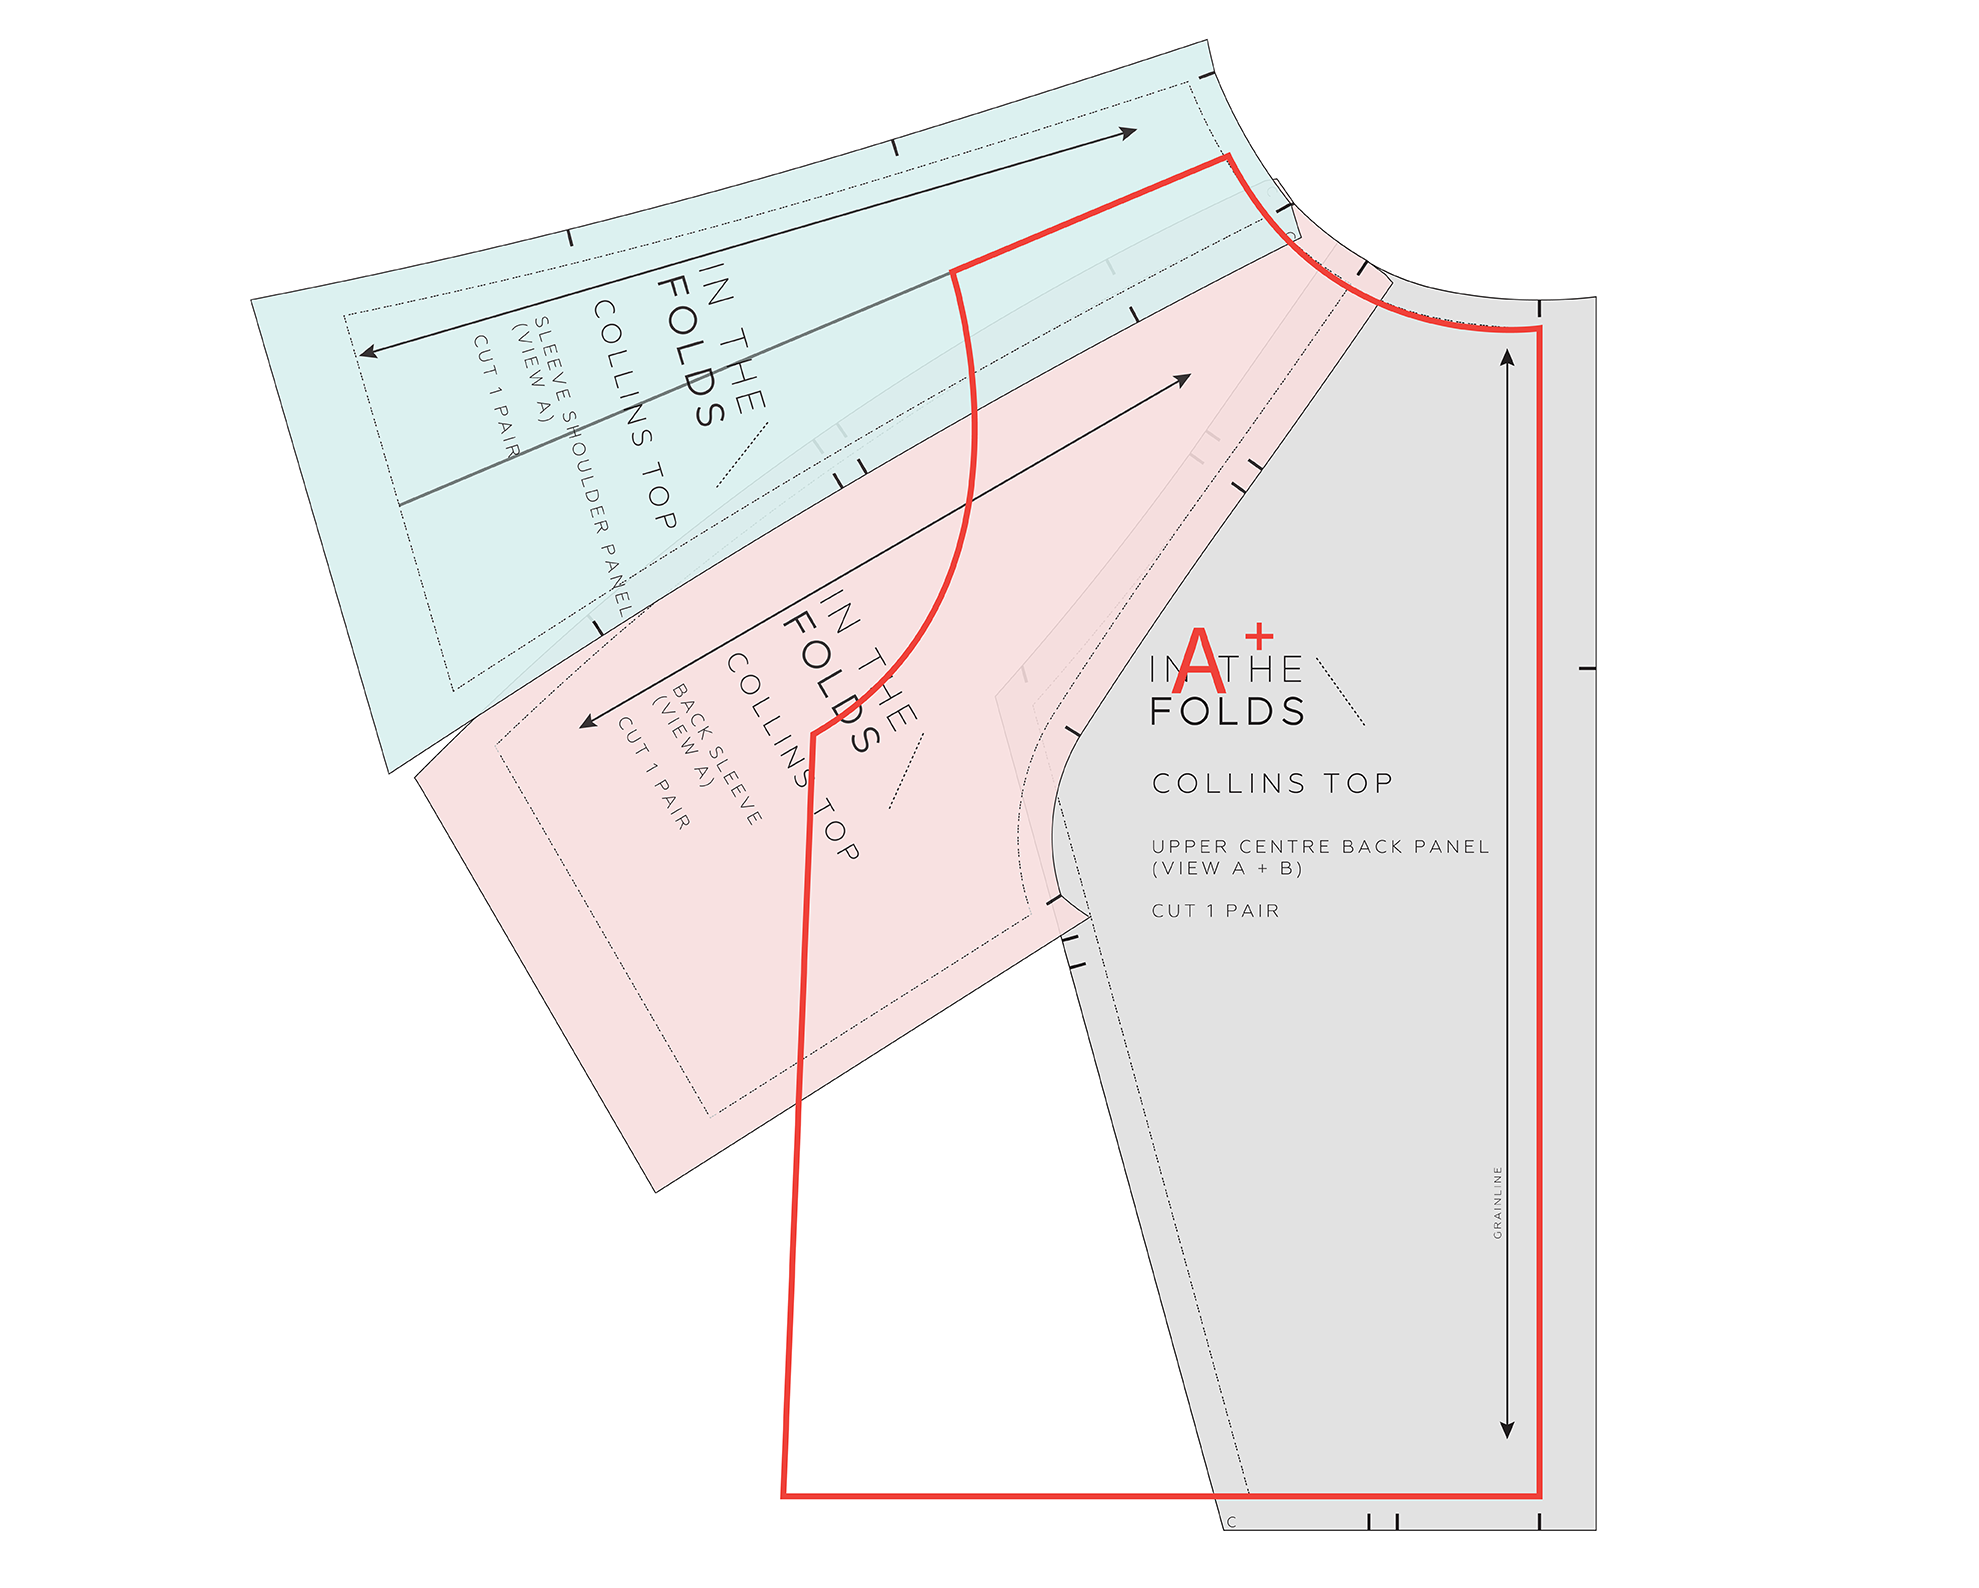
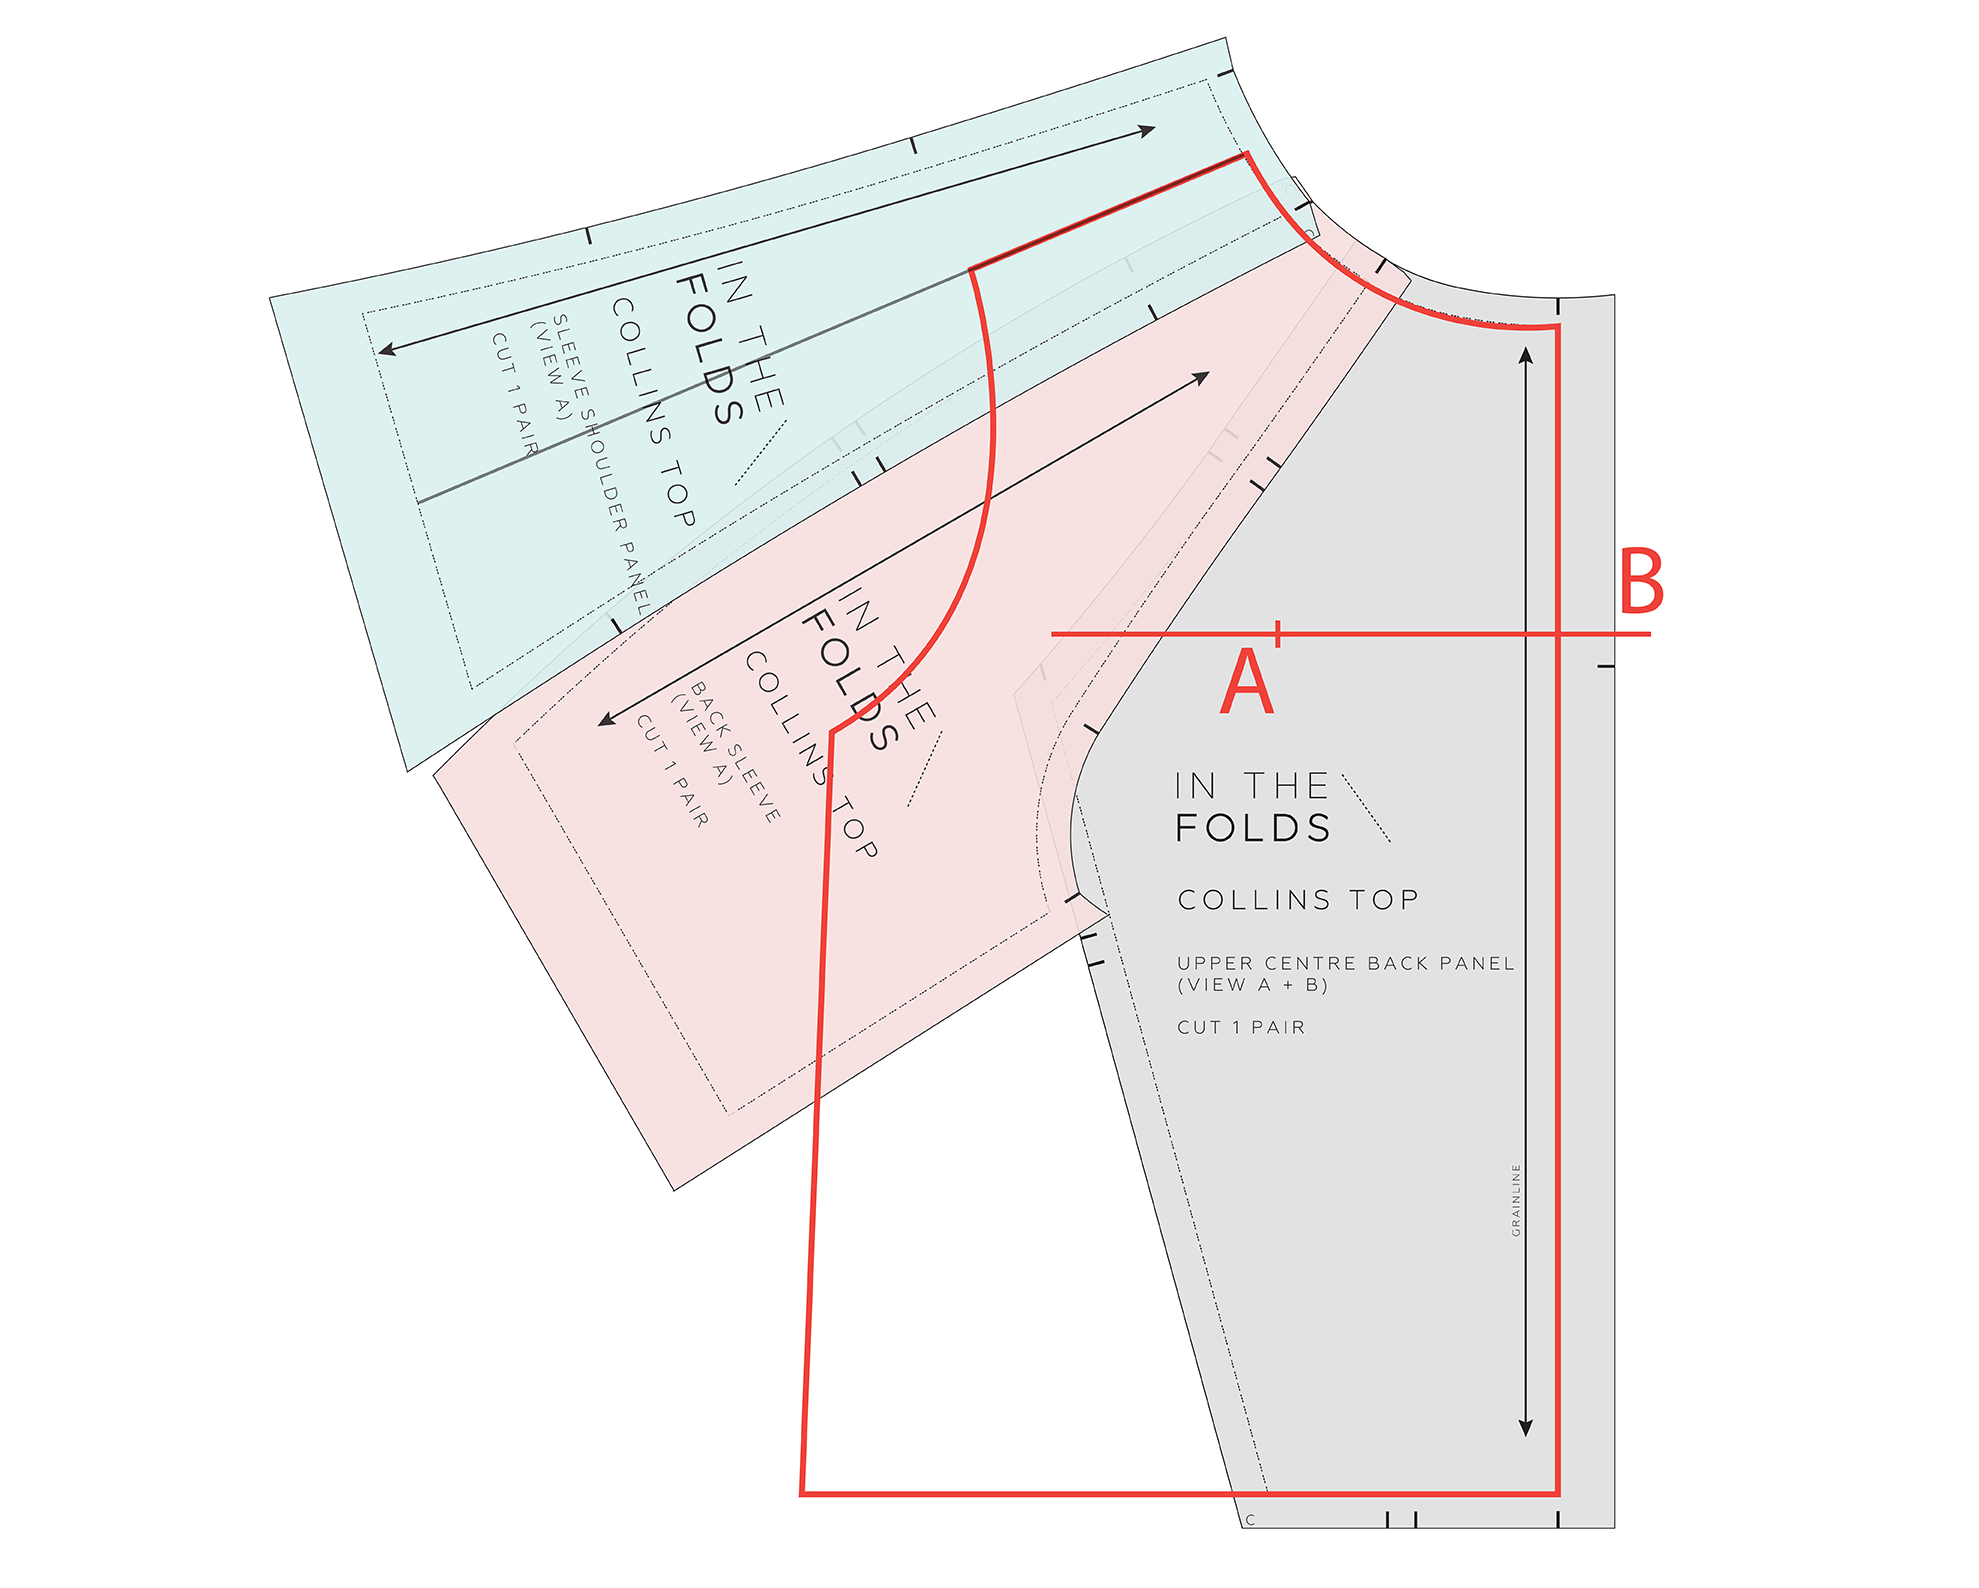
Referring to your toile, locate your shoulder blade or the area where the garment is pulling the most. Mark this position on your pattern. We will call this point A.
Step 4
Draw a line perpendicular to the CENTRE BACK line, passing through point A. The line should start at the CENTRE BACK and run across the BACK PANEL. It doesn't need to extend onto the sleeve.
We will call this line B.
Finding a better way
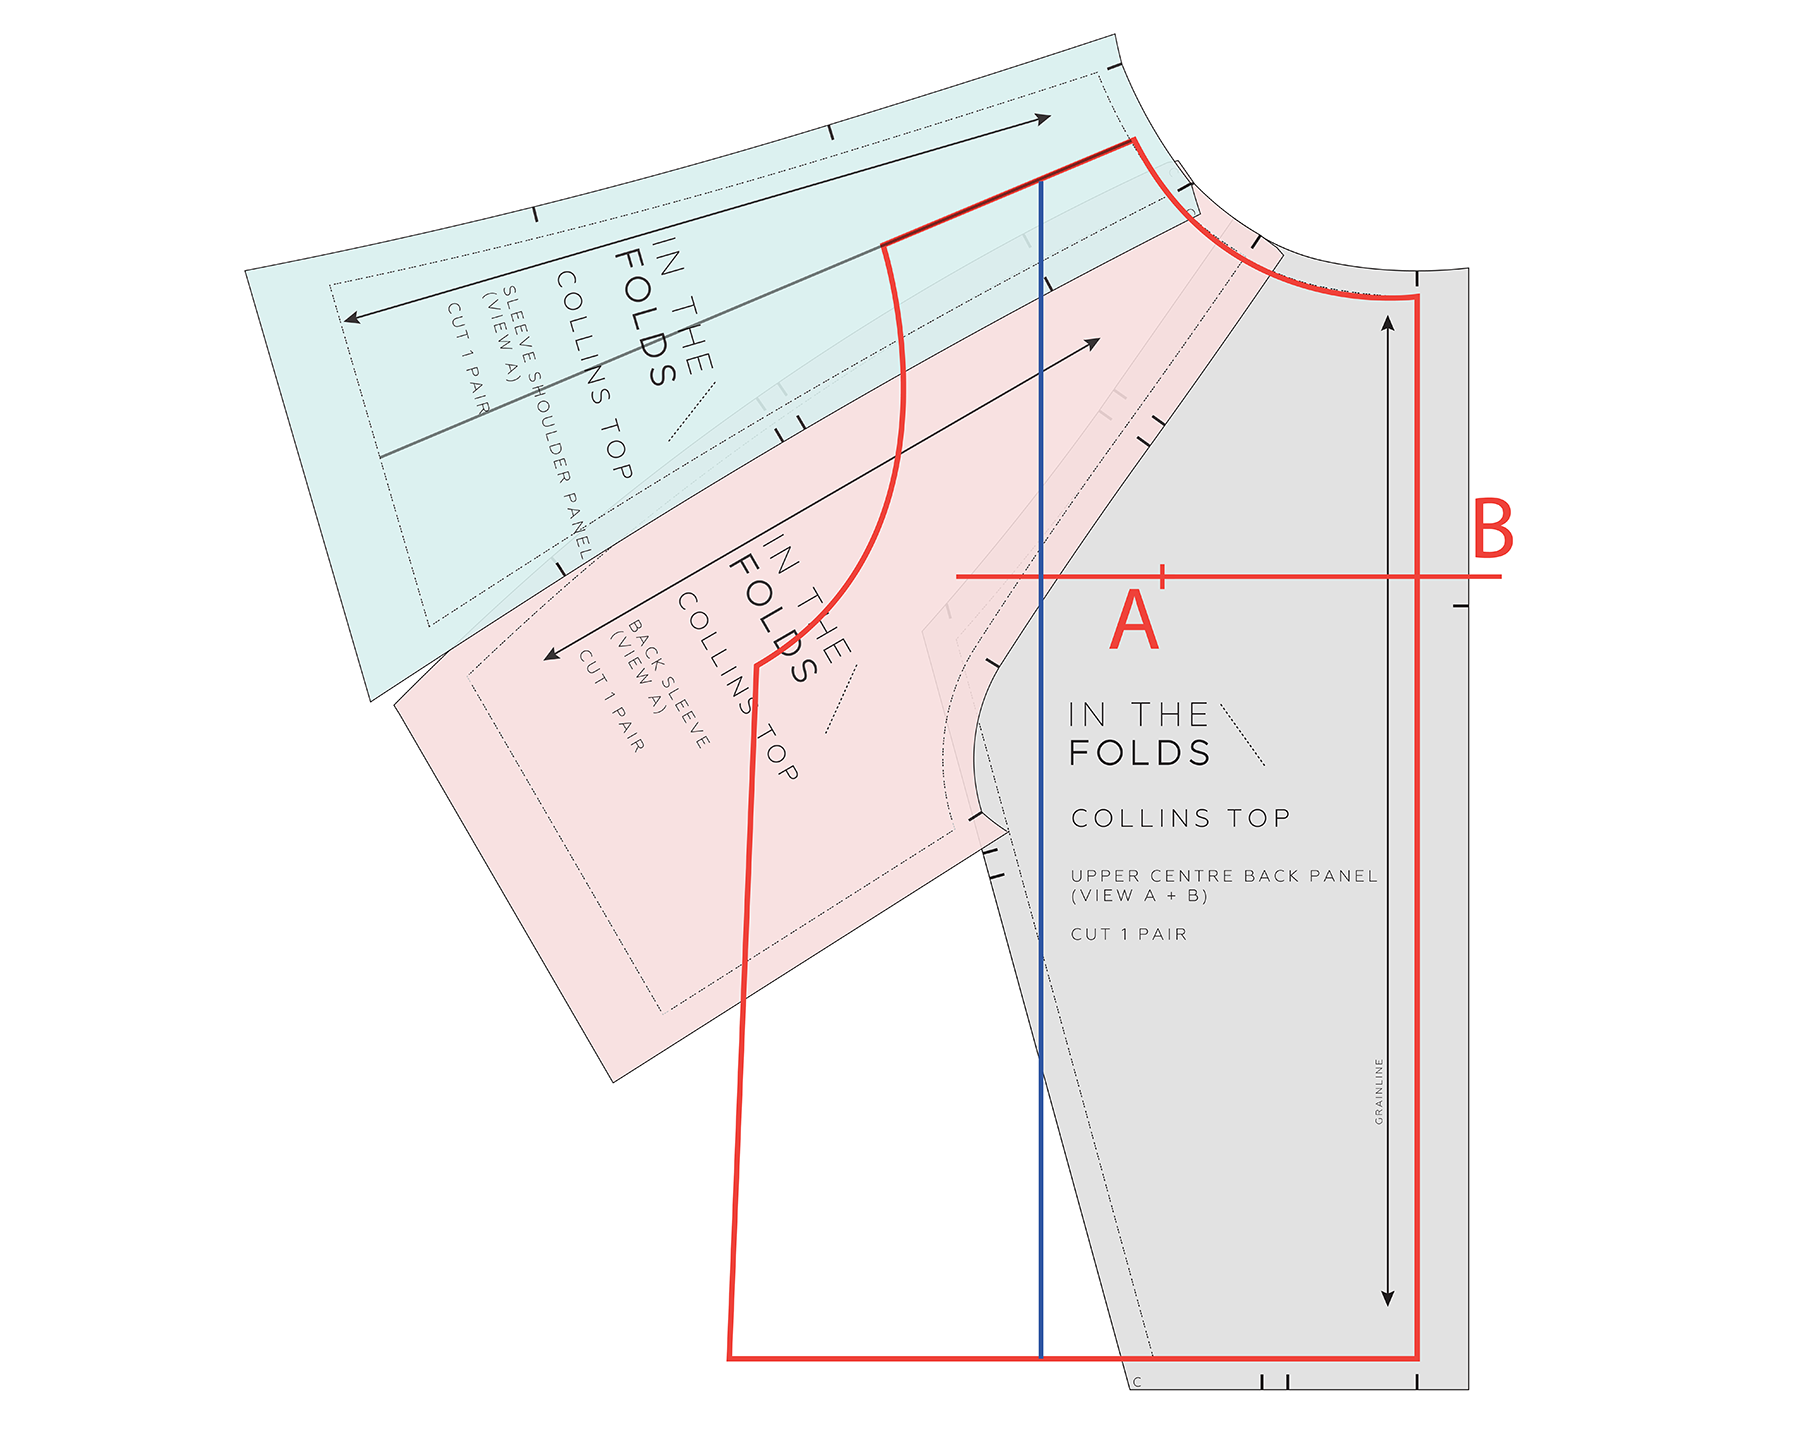
At this point, I was planning to follow the method from my original tutorial and create an adjustment line through the shoulder as illustrated above.
I marked a point on the approximate shoulder line I'd drawn earlier and drew a line parallel to the CENTRE BACK, down through the pattern. But when I looked at where that line landed, it wasn't quite where I wanted to add the width. Which got me thinking…
What would happen if, instead of drawing a line through an imaginary point on the shoulder, I drew a line straight up from point A? So I tried it.
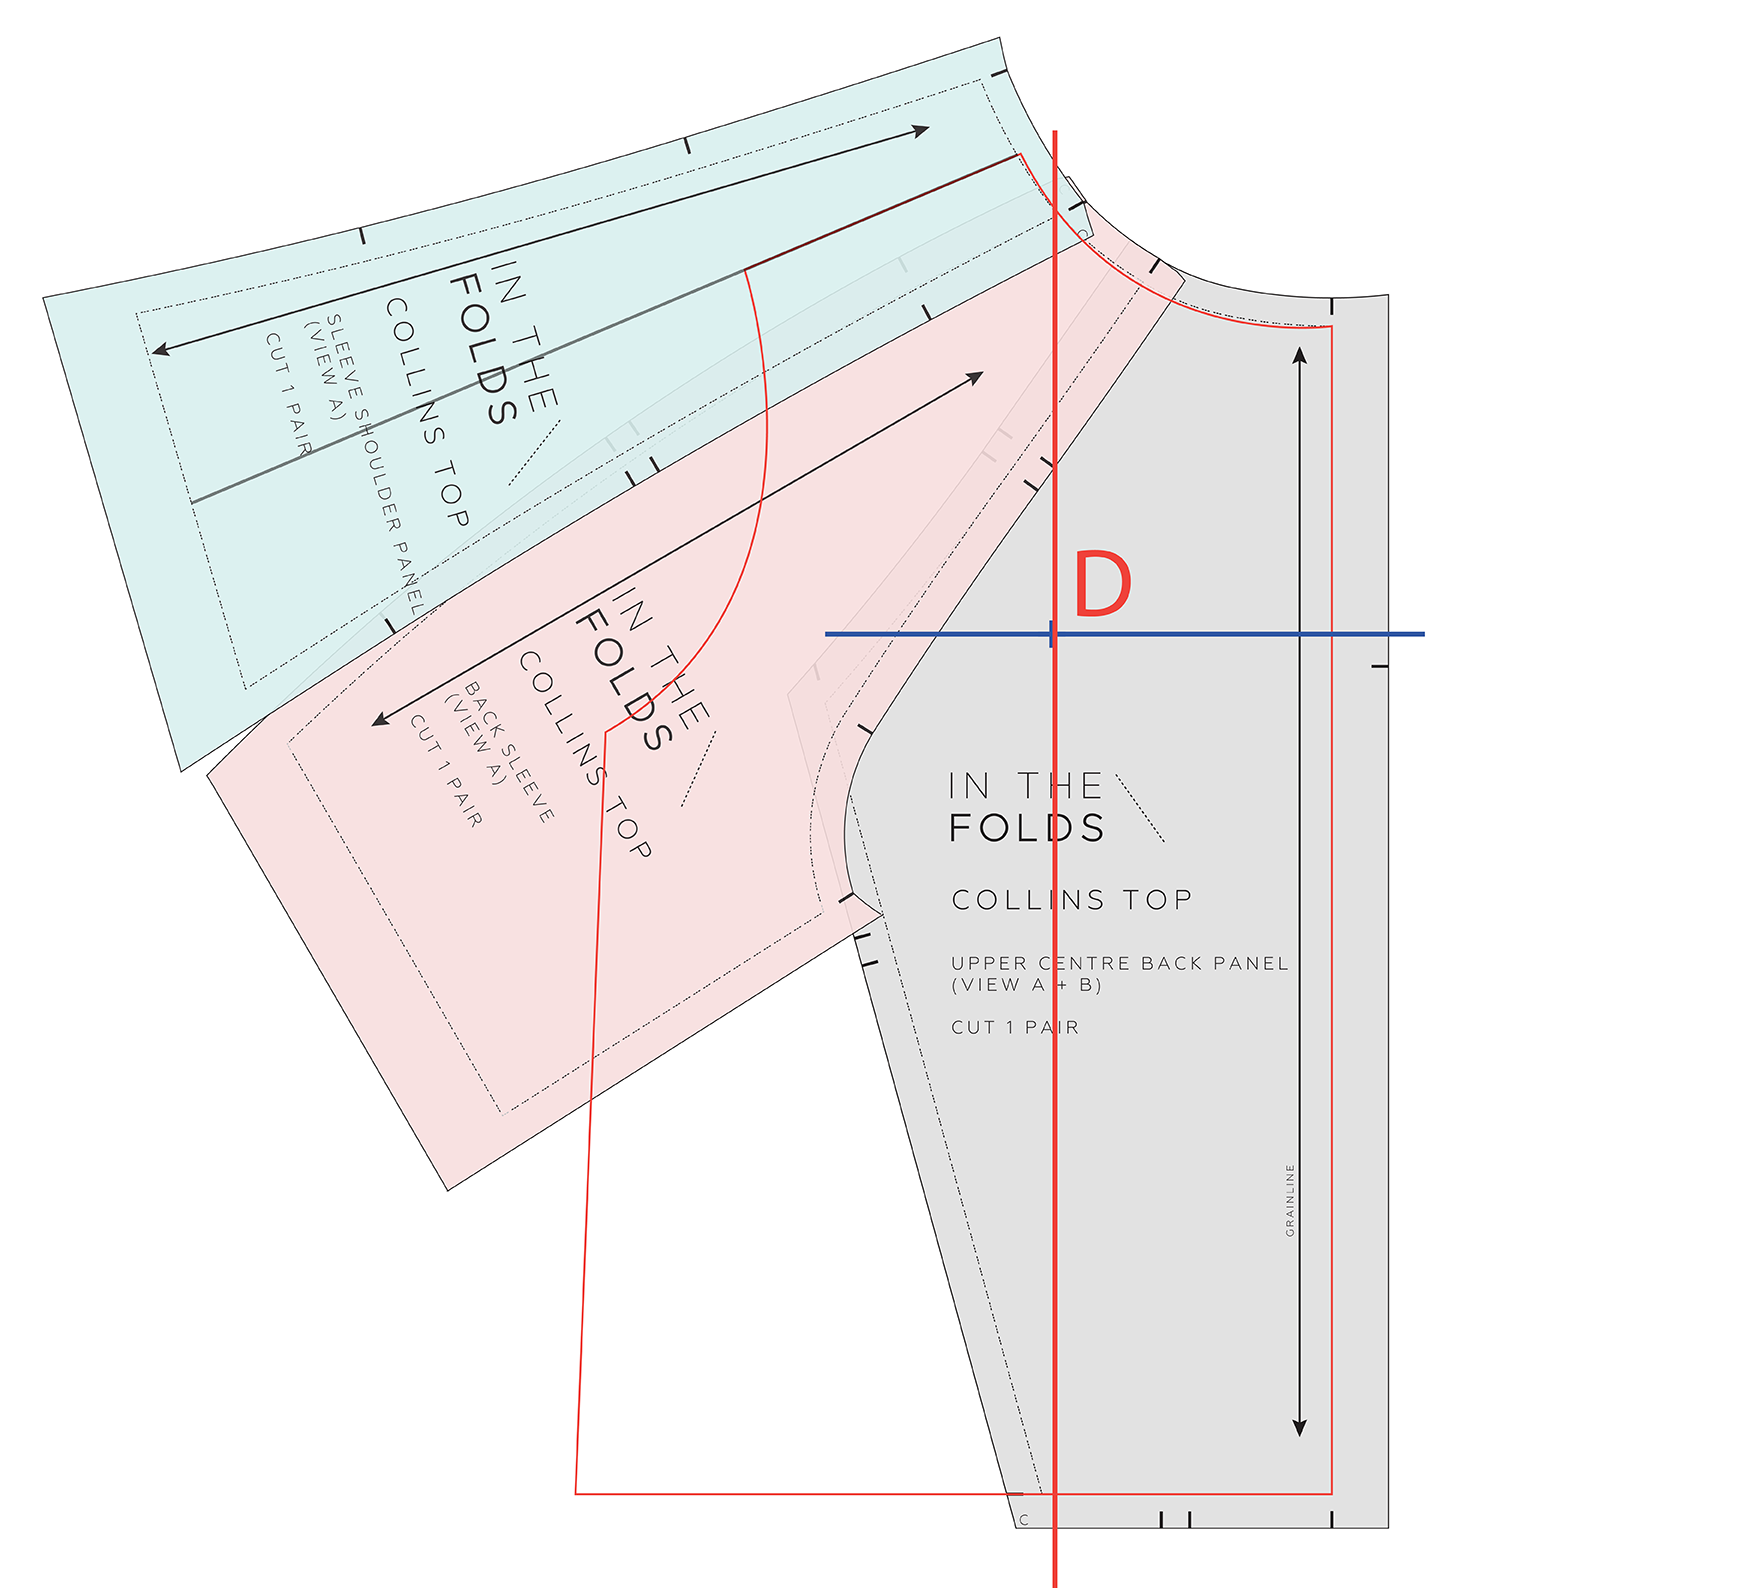
The new line didn't touch the SLEEVE SHOULDER PANEL at all! That meant I could make the alteration without needing to adjust that extra pattern piece. One less piece to work with. One less thing to potentially complicate the adjustment. Much better!
We'll call this new adjustment line D.
Making the adjustment
Step 5
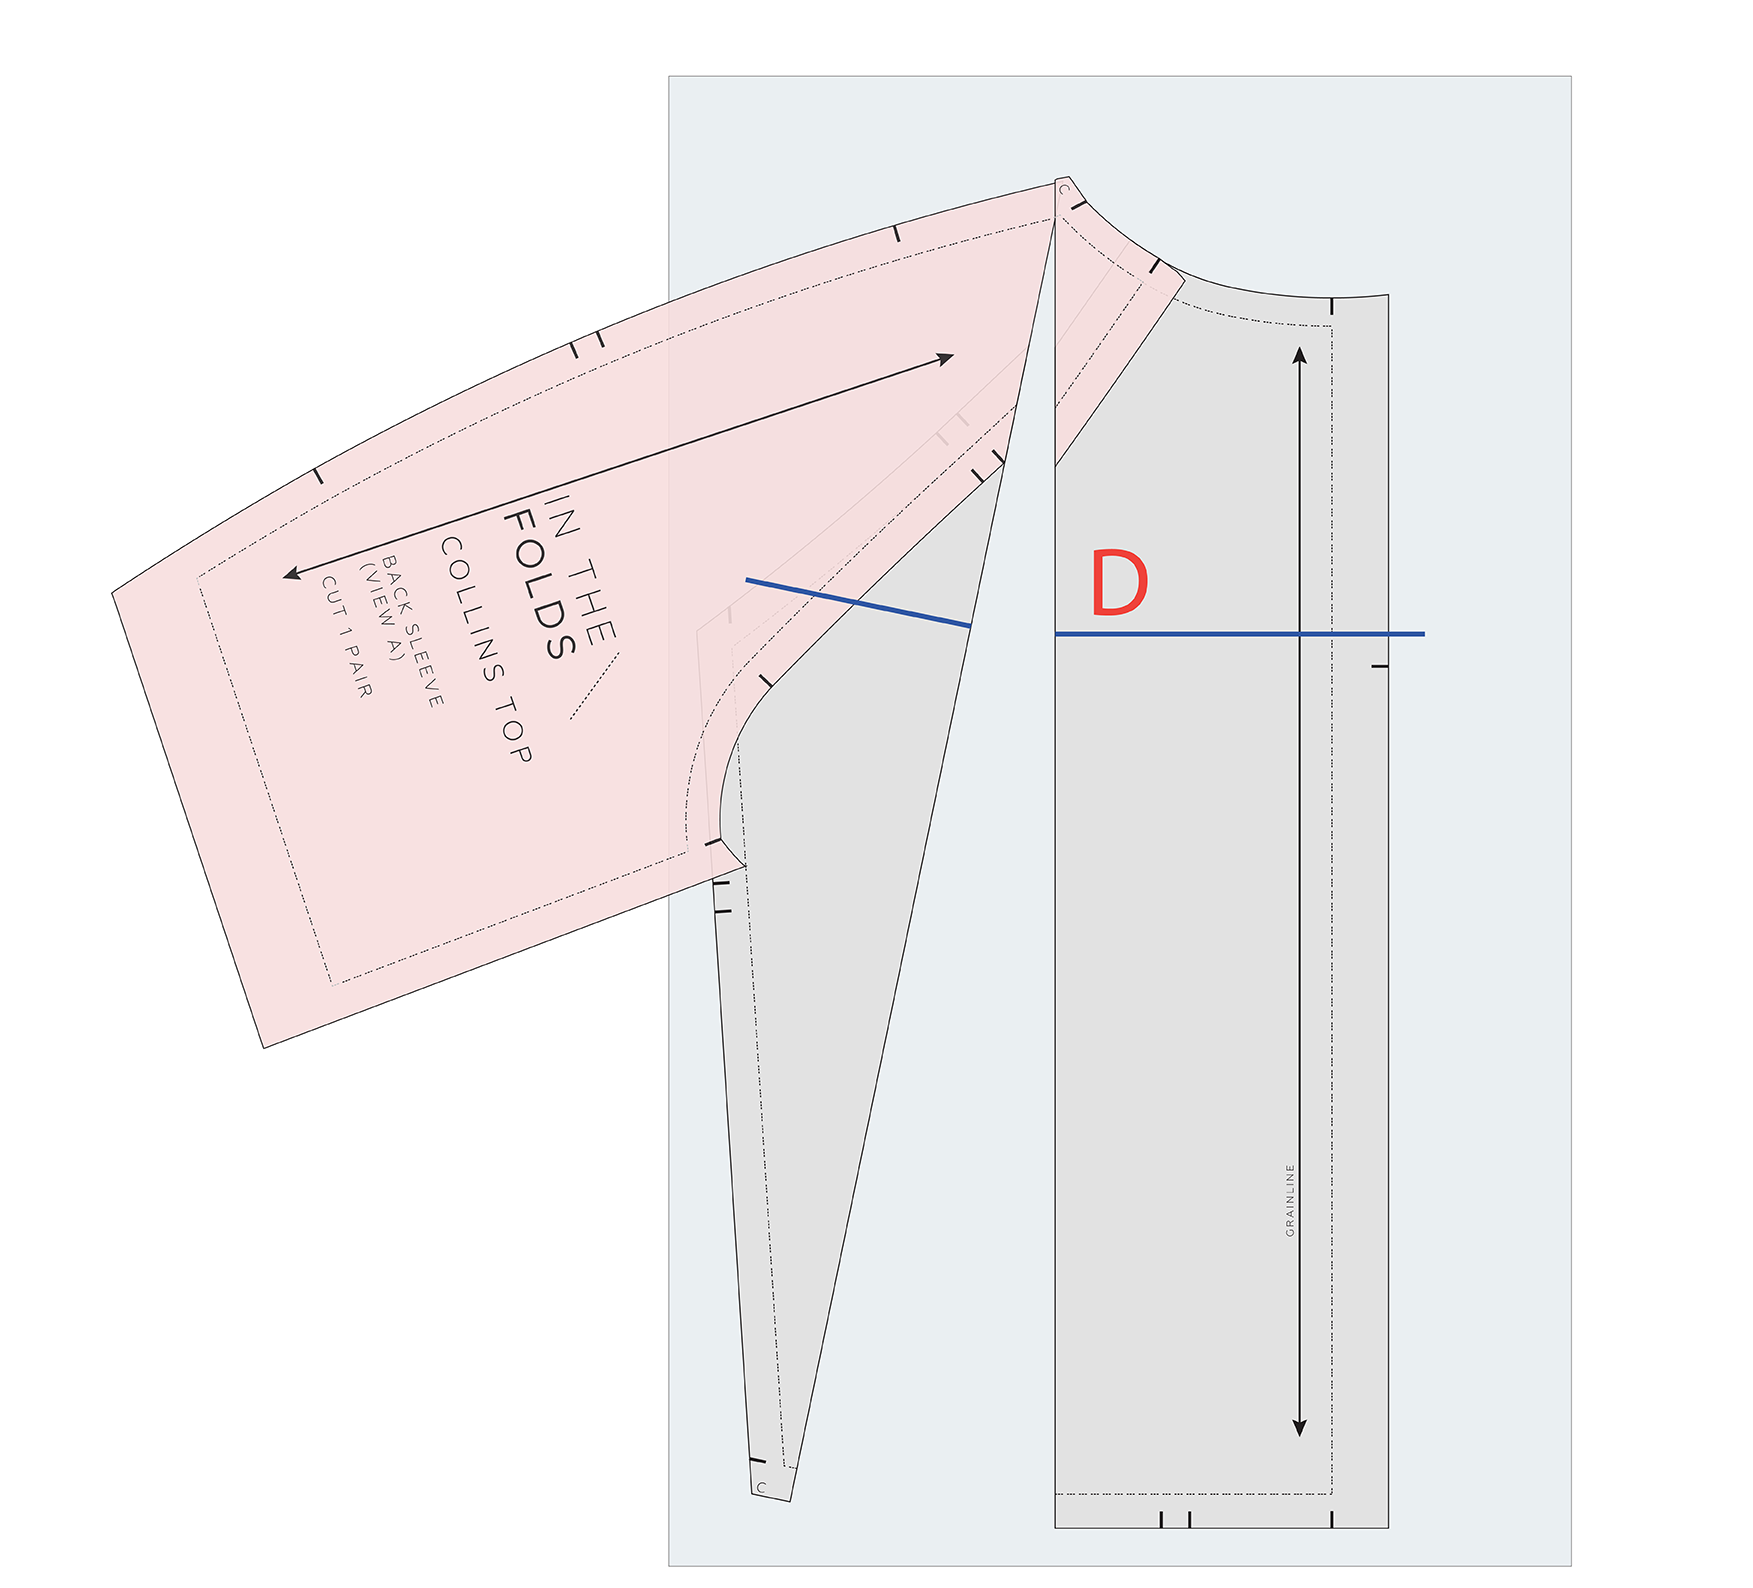
Slide a piece of pattern paper underneath the pattern.
Cut up line D, starting at the hemline. Stop 1–2 mm from the STITCH LINE at the neck line, leaving a small paper hinge.
Next, cut in from the outer edge of the shoulder seam allowance, stopping 1–2 mm before the STITCH LINE to create the hinge.
Another little change of plan
In my original broad back adjustment tutorial, I included another instruction at this point:
"Cut in from the outer edge of the armscye seam allowance. Stop 1–2 mm from the STITCH LINE to create a hinge." But as I worked through this version, I found myself wondering why I'd suggested doing that so early. I realised it could wait until later in the process. So that's what we're going to do here.
It's a nice reminder that even when you've been doing something for years, there are always opportunities to rethink your process and make things a little smoother.
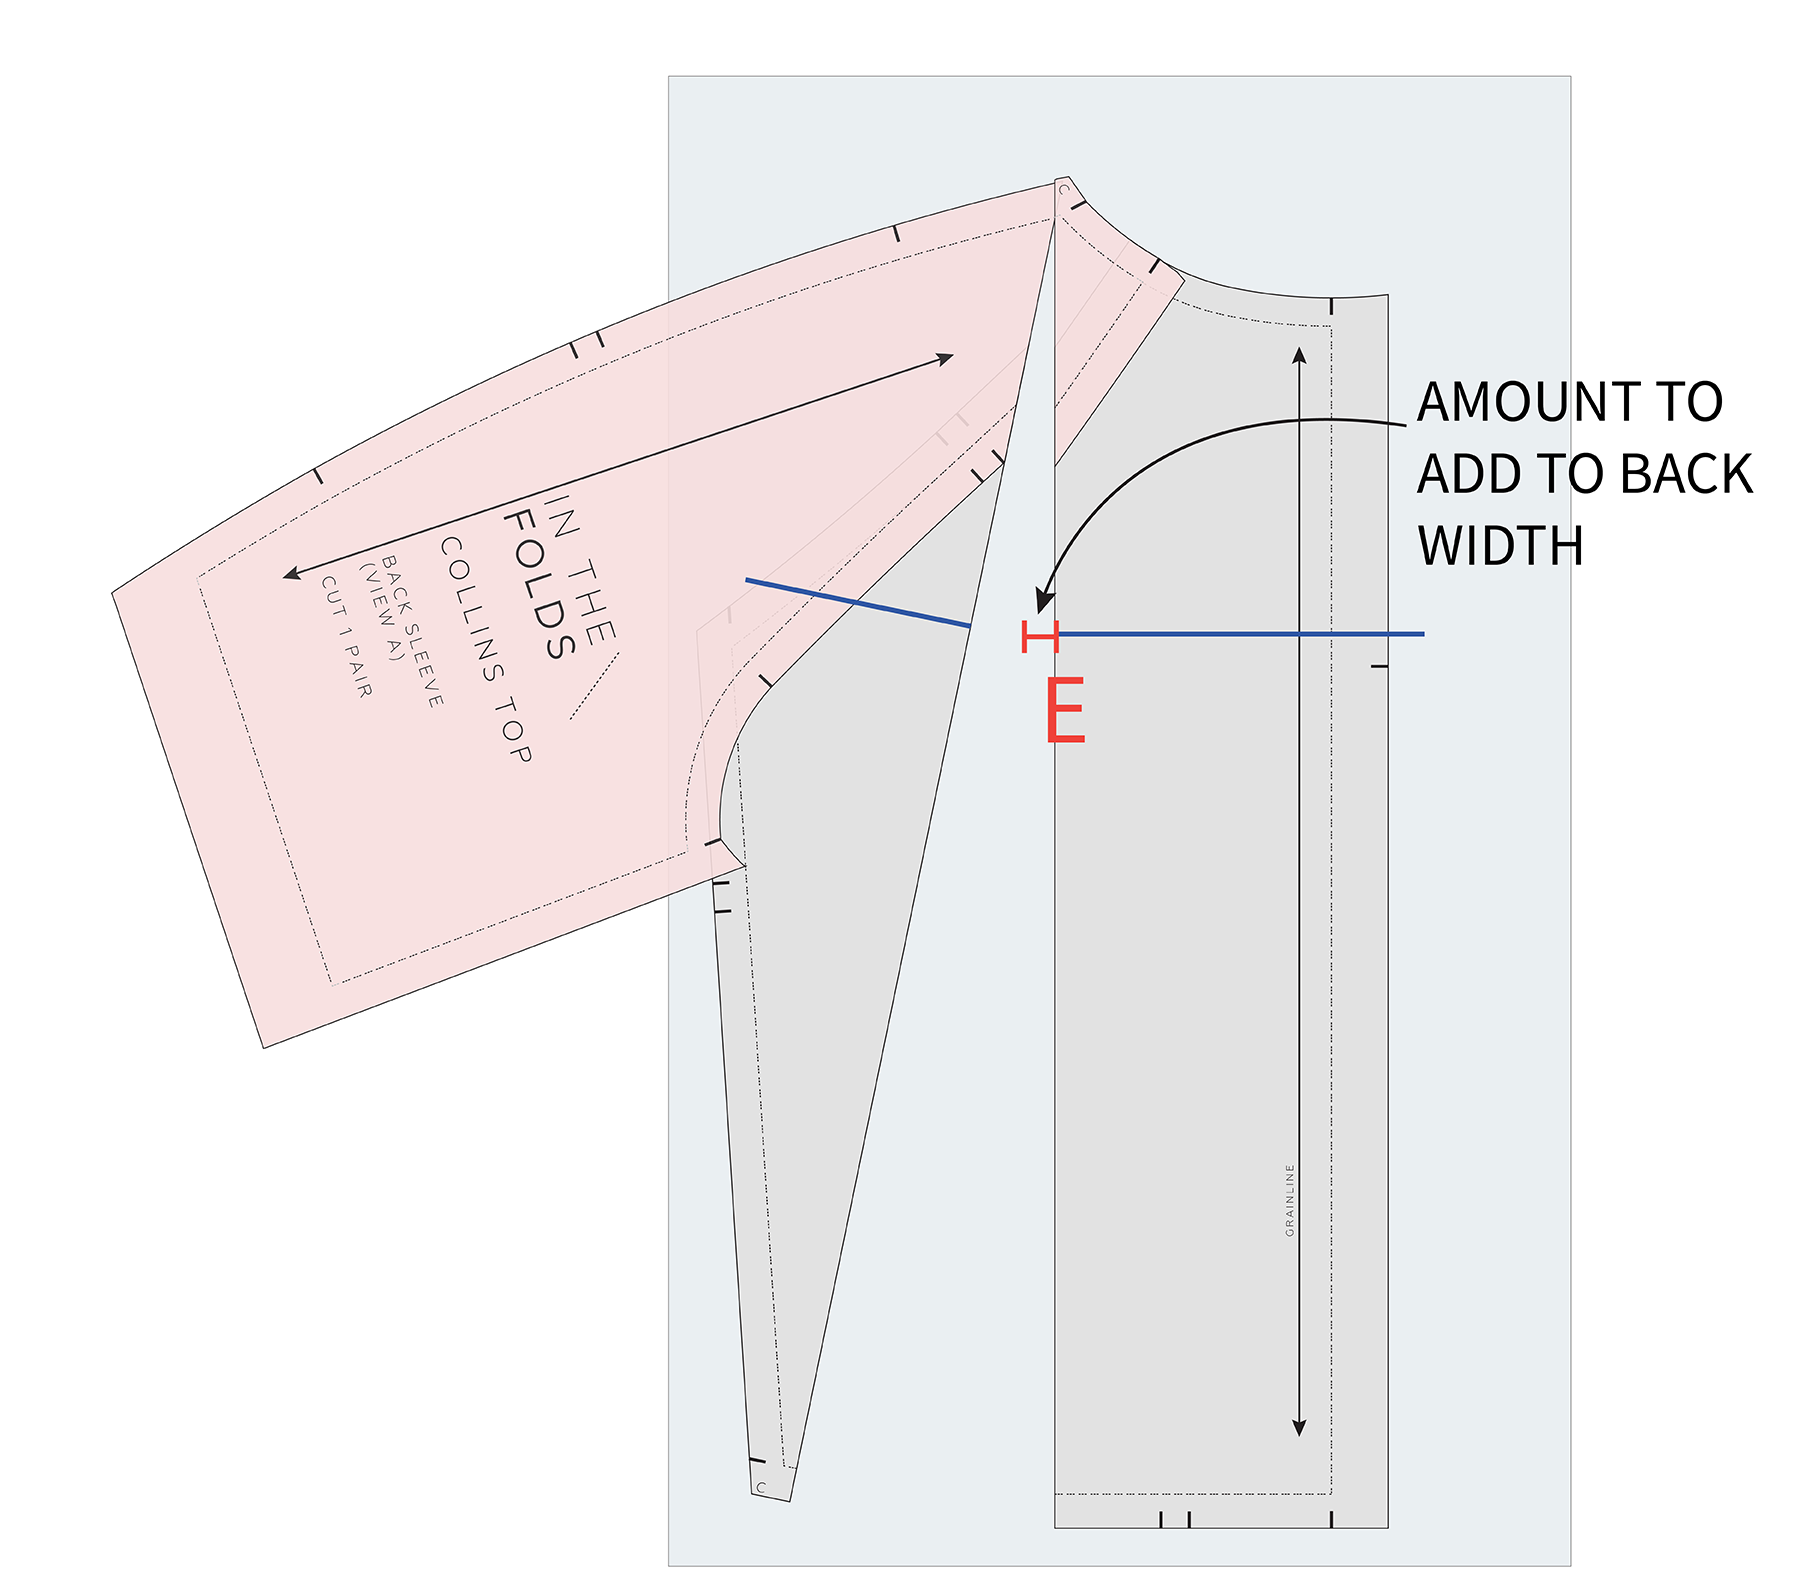
Step 7
Keeping the CENTRE BACK line straight, swing open line D. Tape the CENTRE BACK section to the paper underneath to hold it in place.
Extend line B by the amount of additional width you need. Mark the end of this extension as point E.
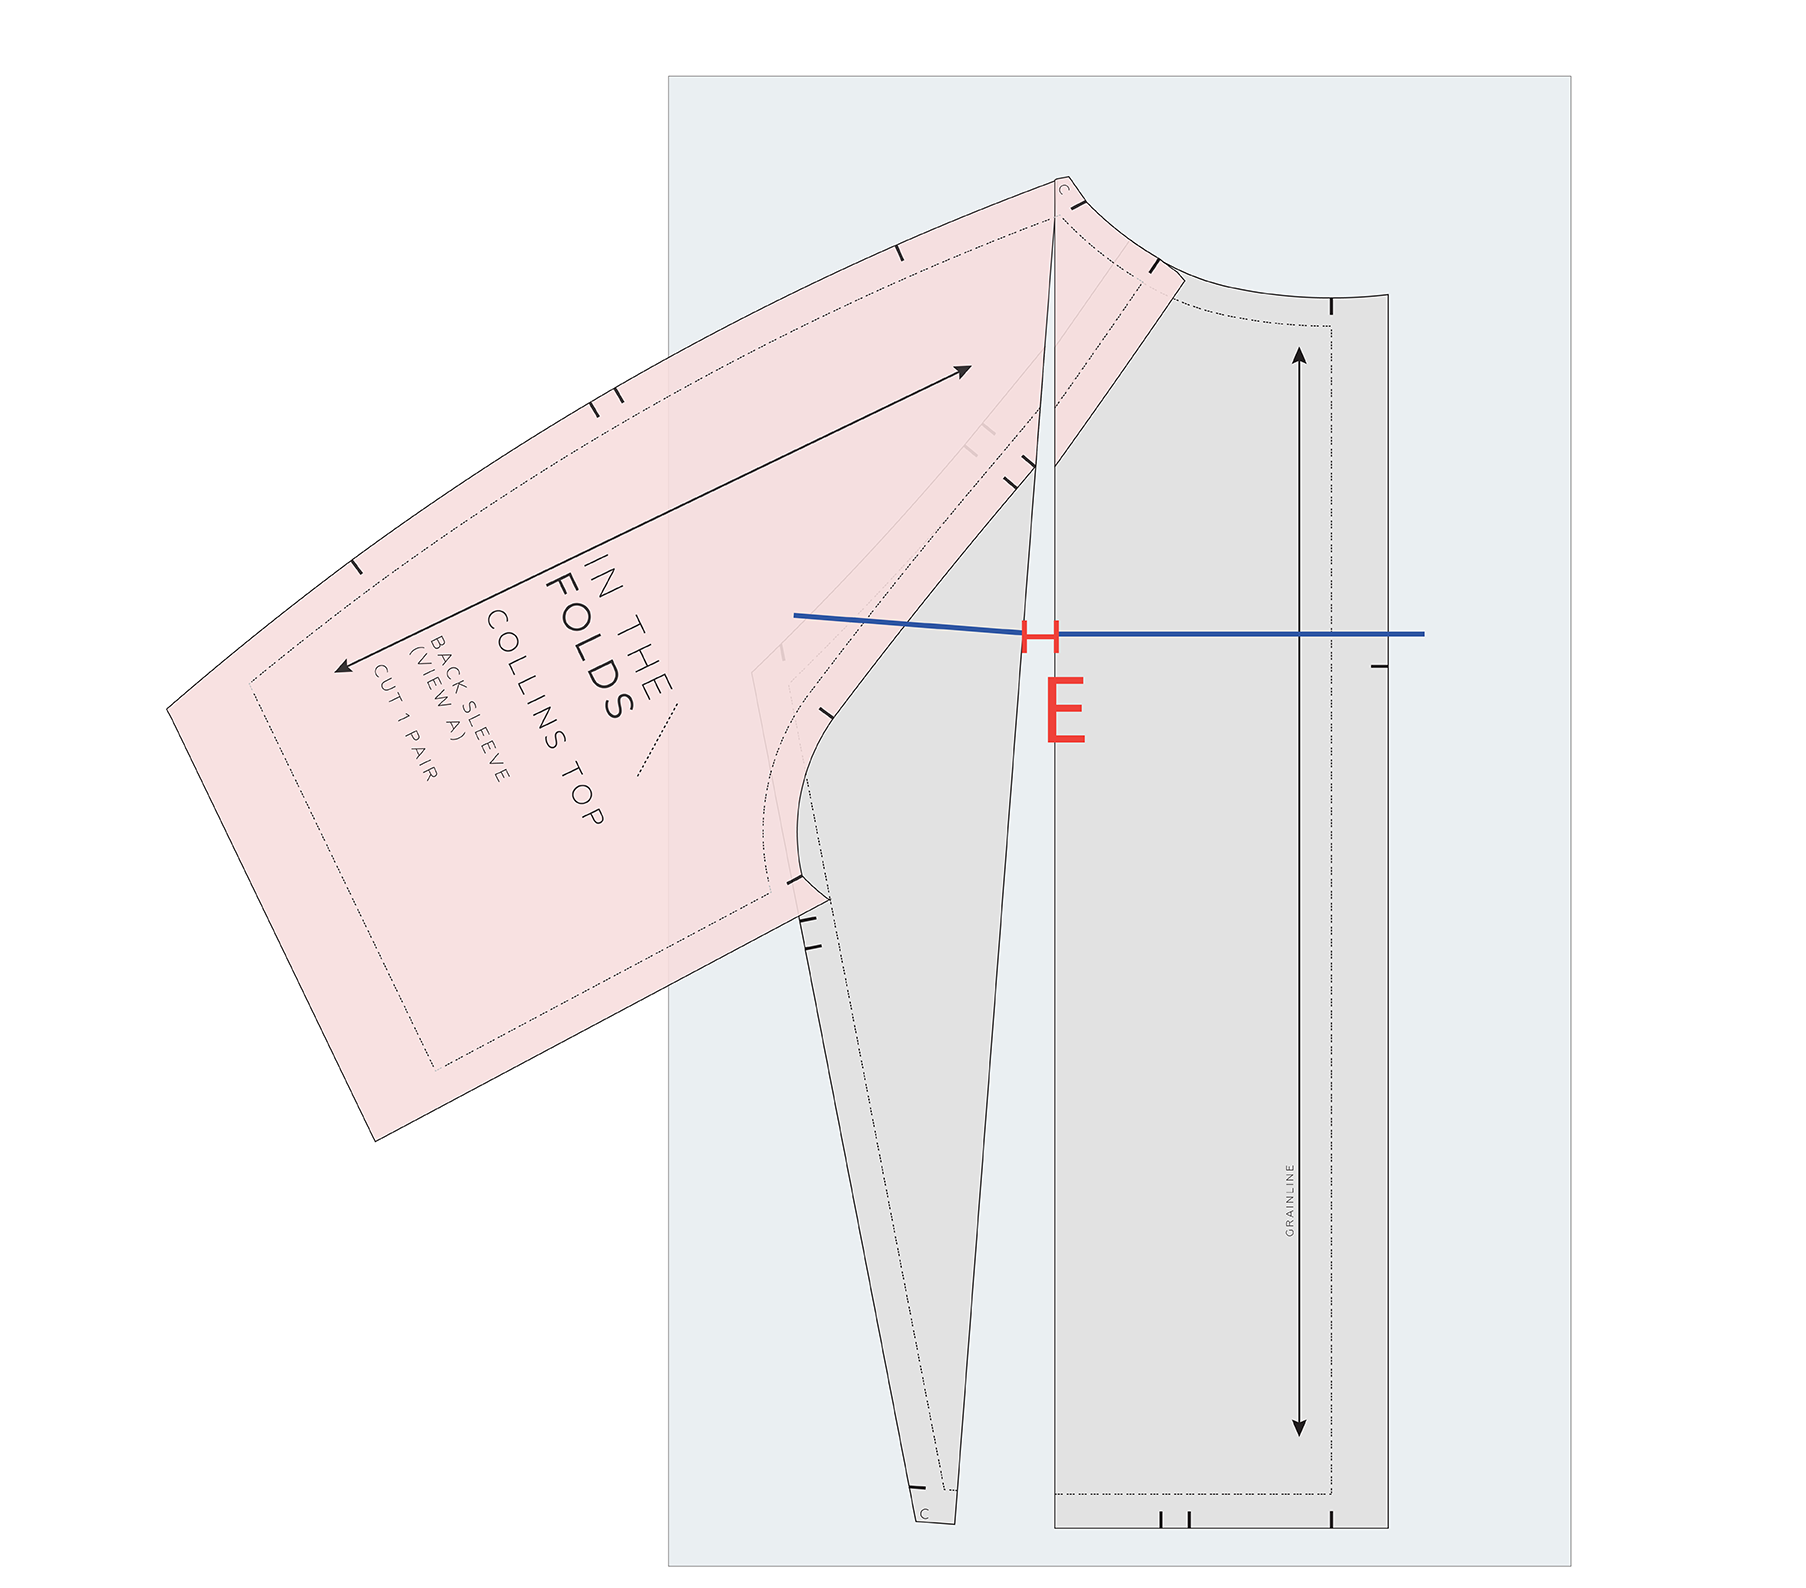
Step 8
Slide the panel seam section of the pattern across until the cut edge meets point E. Be sure you're moving the panel seam section, rather than the CENTRE BACK section. Hold the pieces in place with tape or pins.
Tracing the adjusted pattern pieces
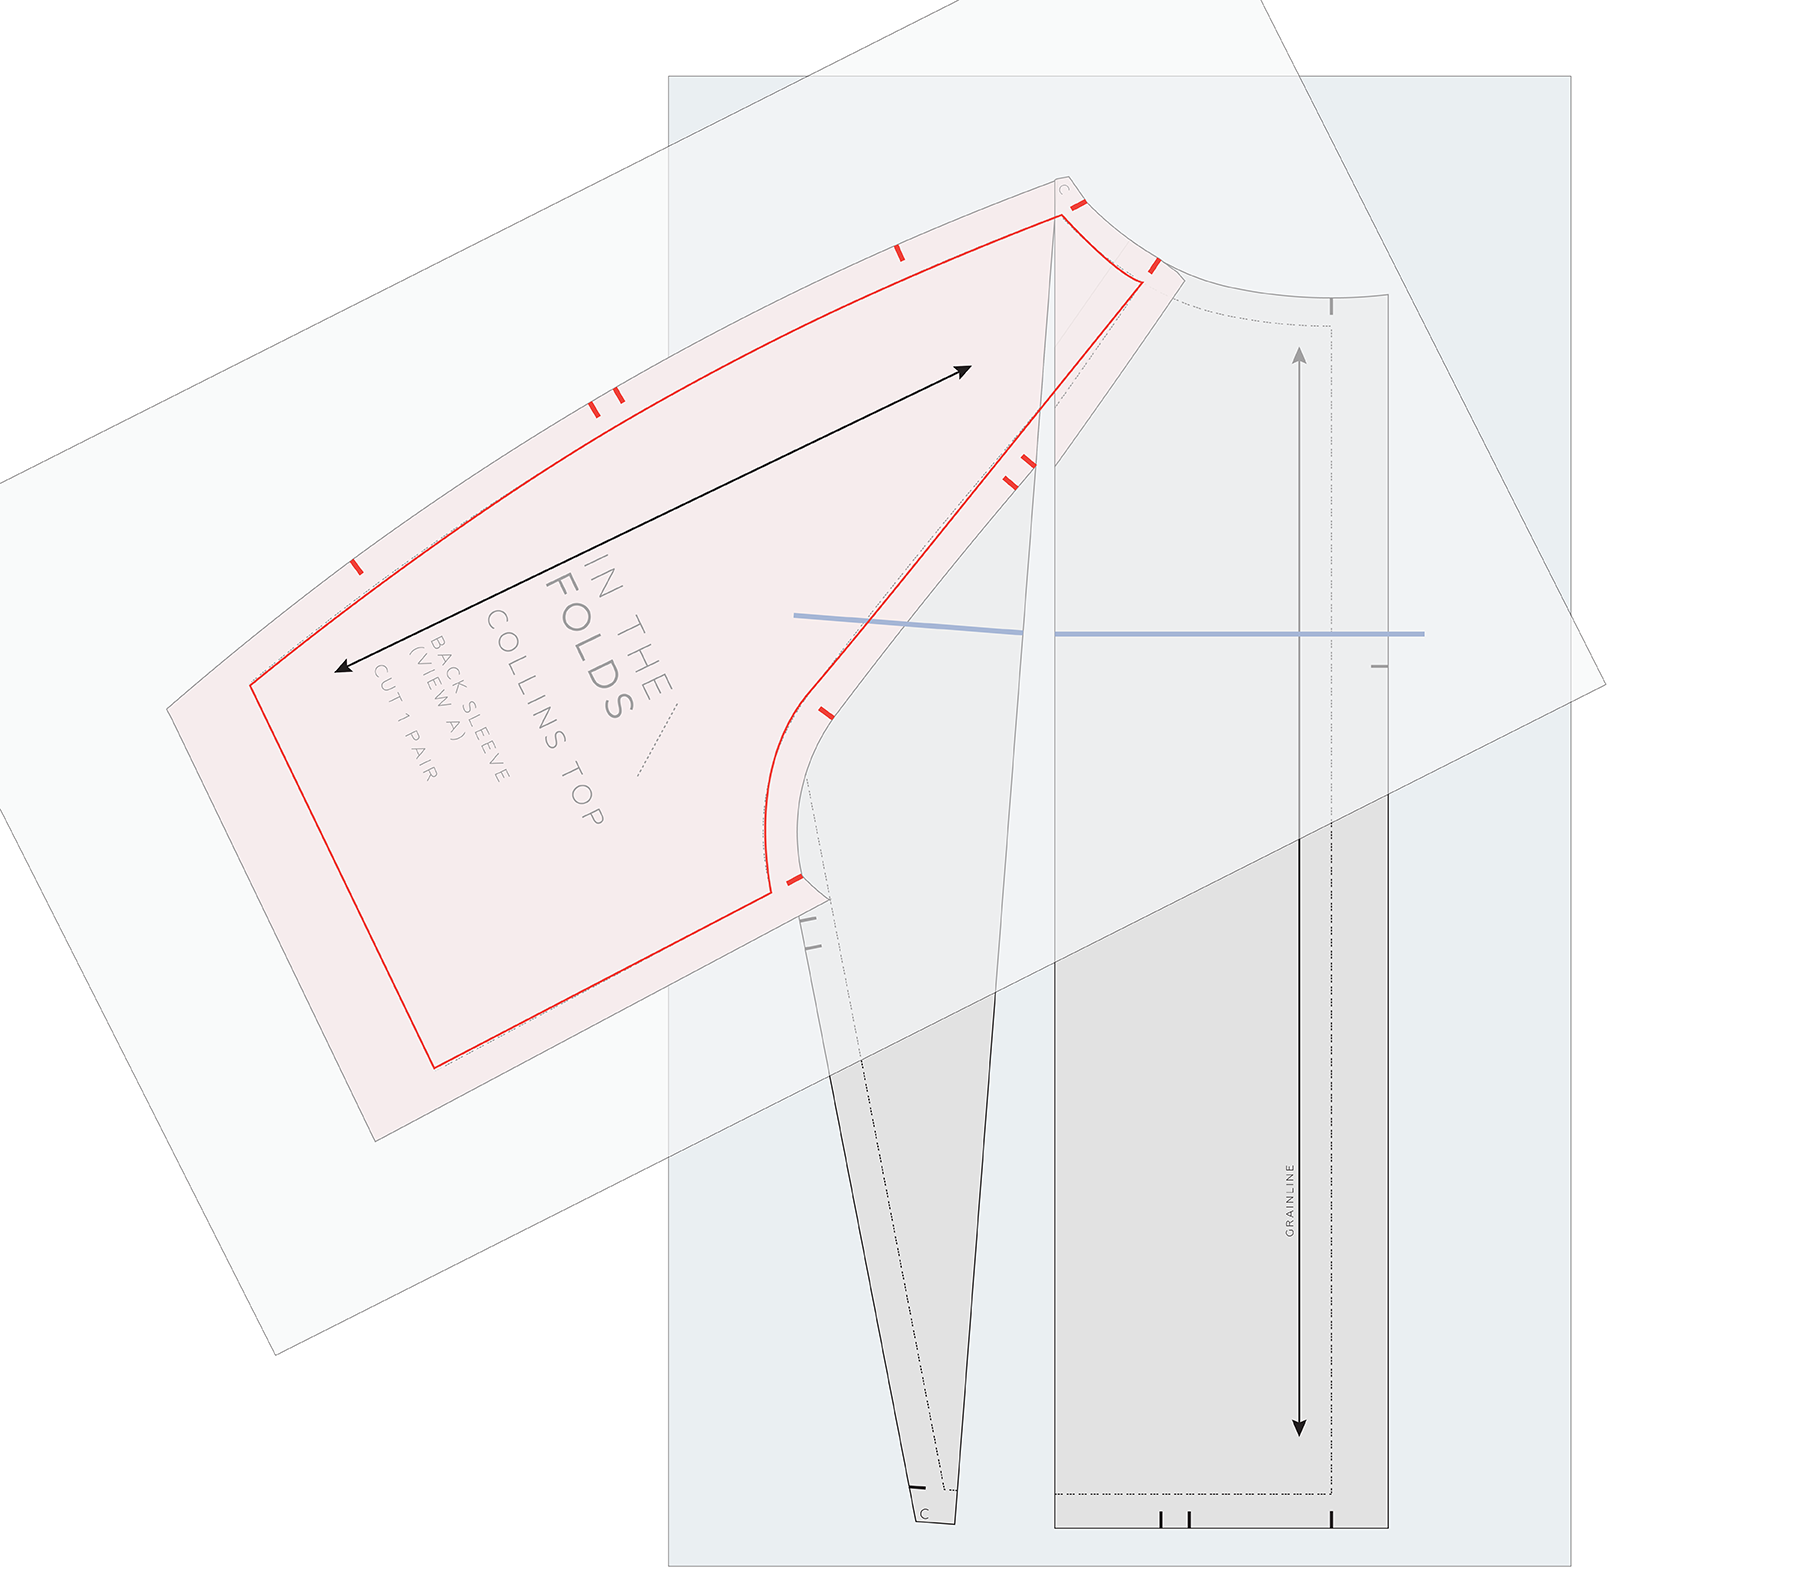
Step 9
A. Take another piece of pattern paper and trace off the altered BACK SLEEVE piece, starting with the STITCH LINE. Transfer the notches and grainline.
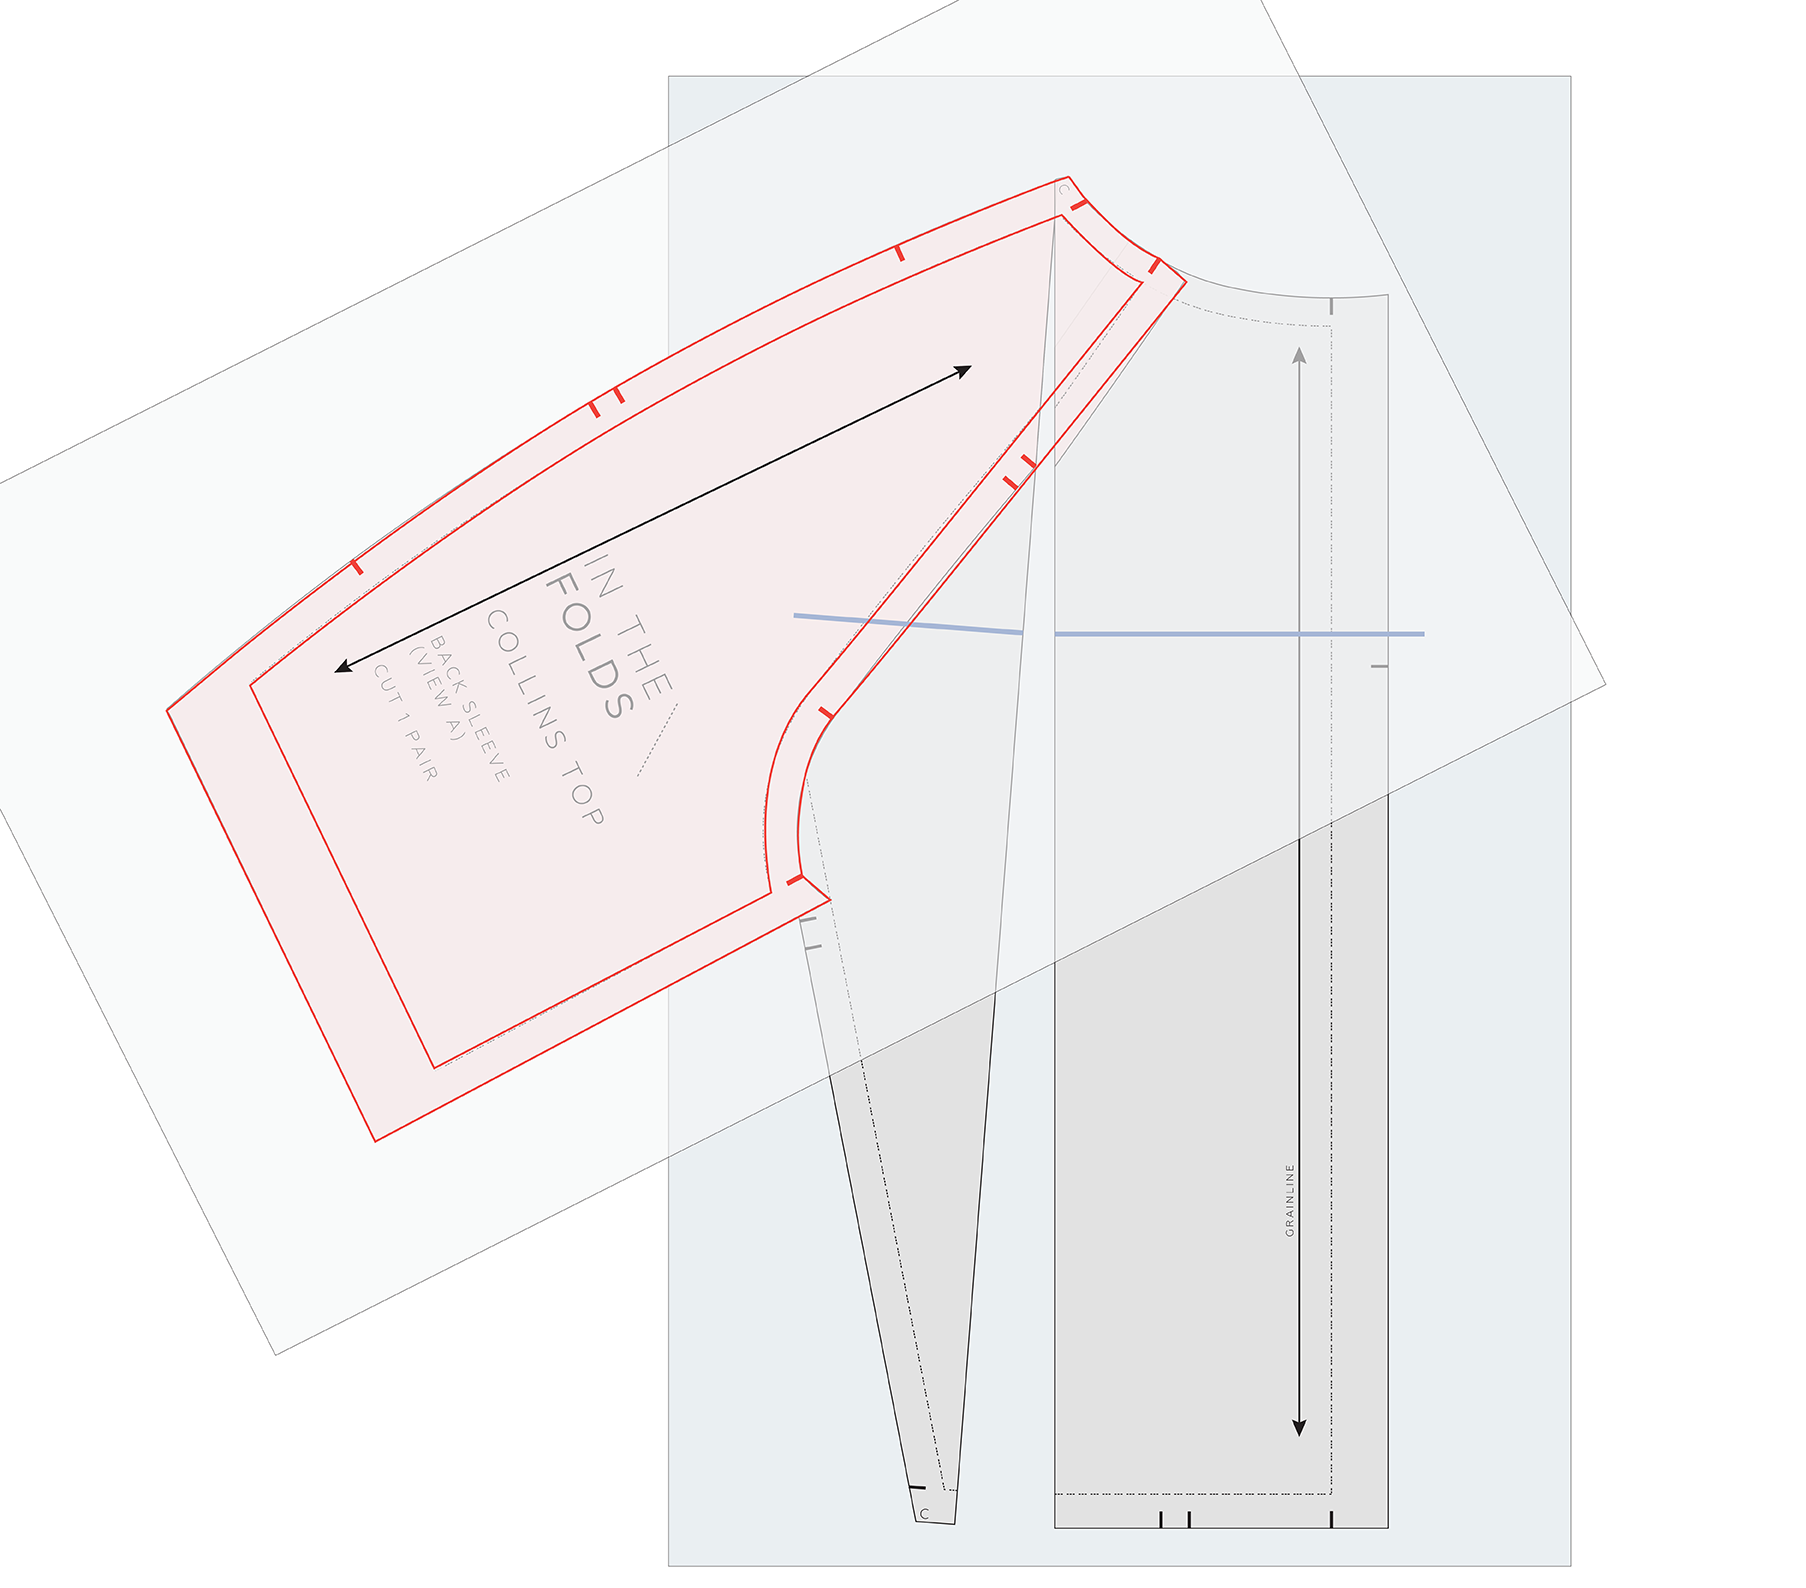
B. Add the seam allowance back onto the pattern piece.
Remove the BACK SLEEVE from your working pattern as the adjustment to that piece has now been made.
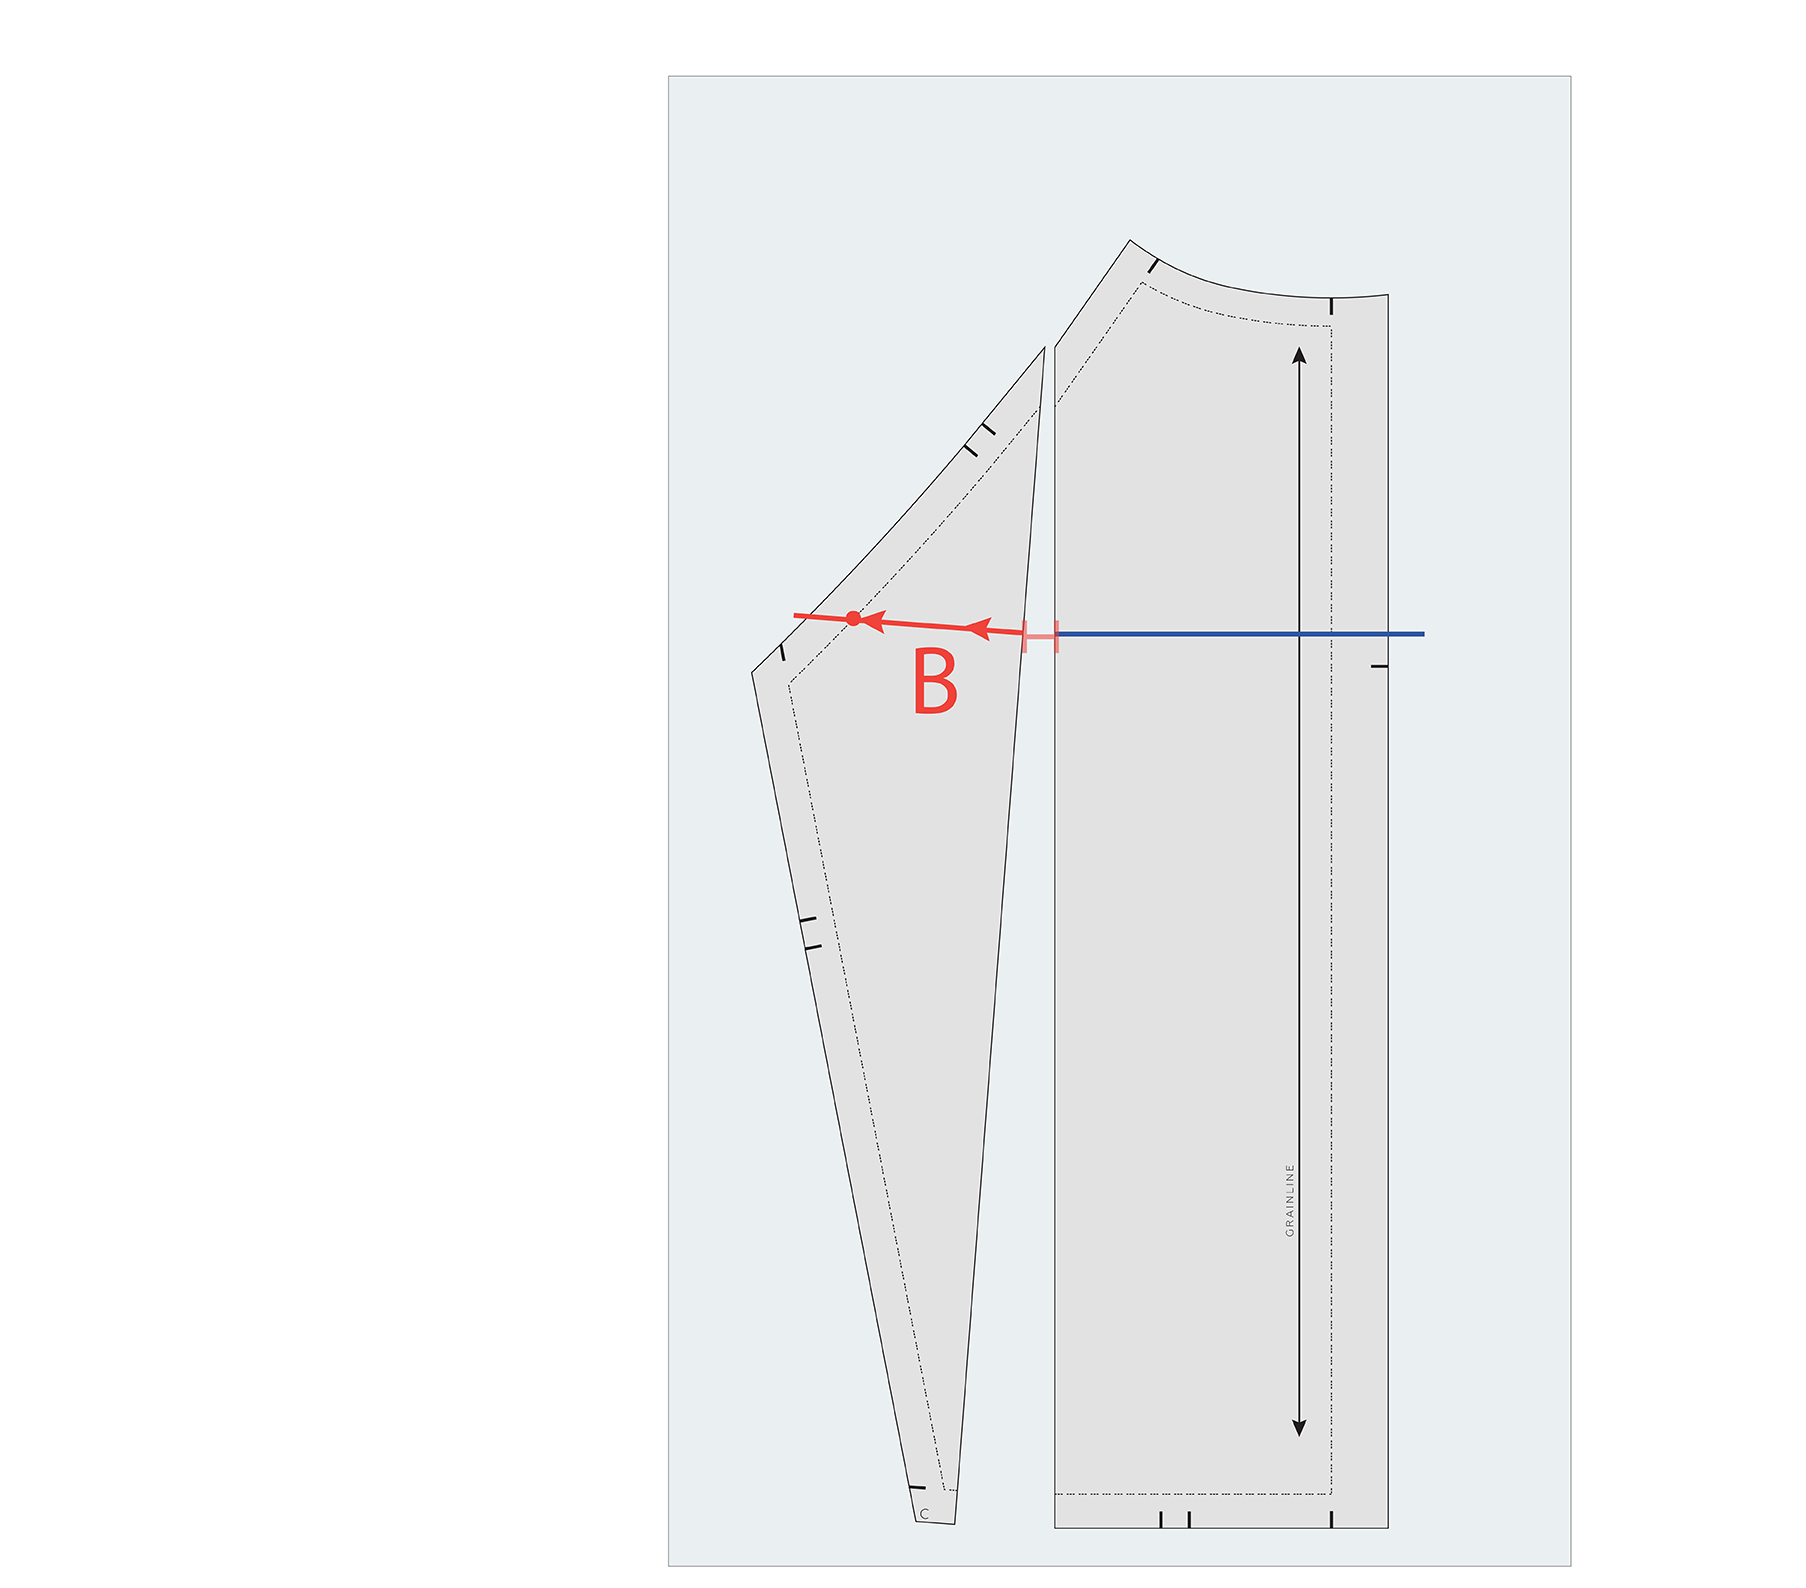
Step 10
Cut along the uncut part of Line B. Cut until you are 1-2mm from the STITCH LINE.
Cut in from the seam allowance on the other side of this point, creating a hinge like we did earlier.
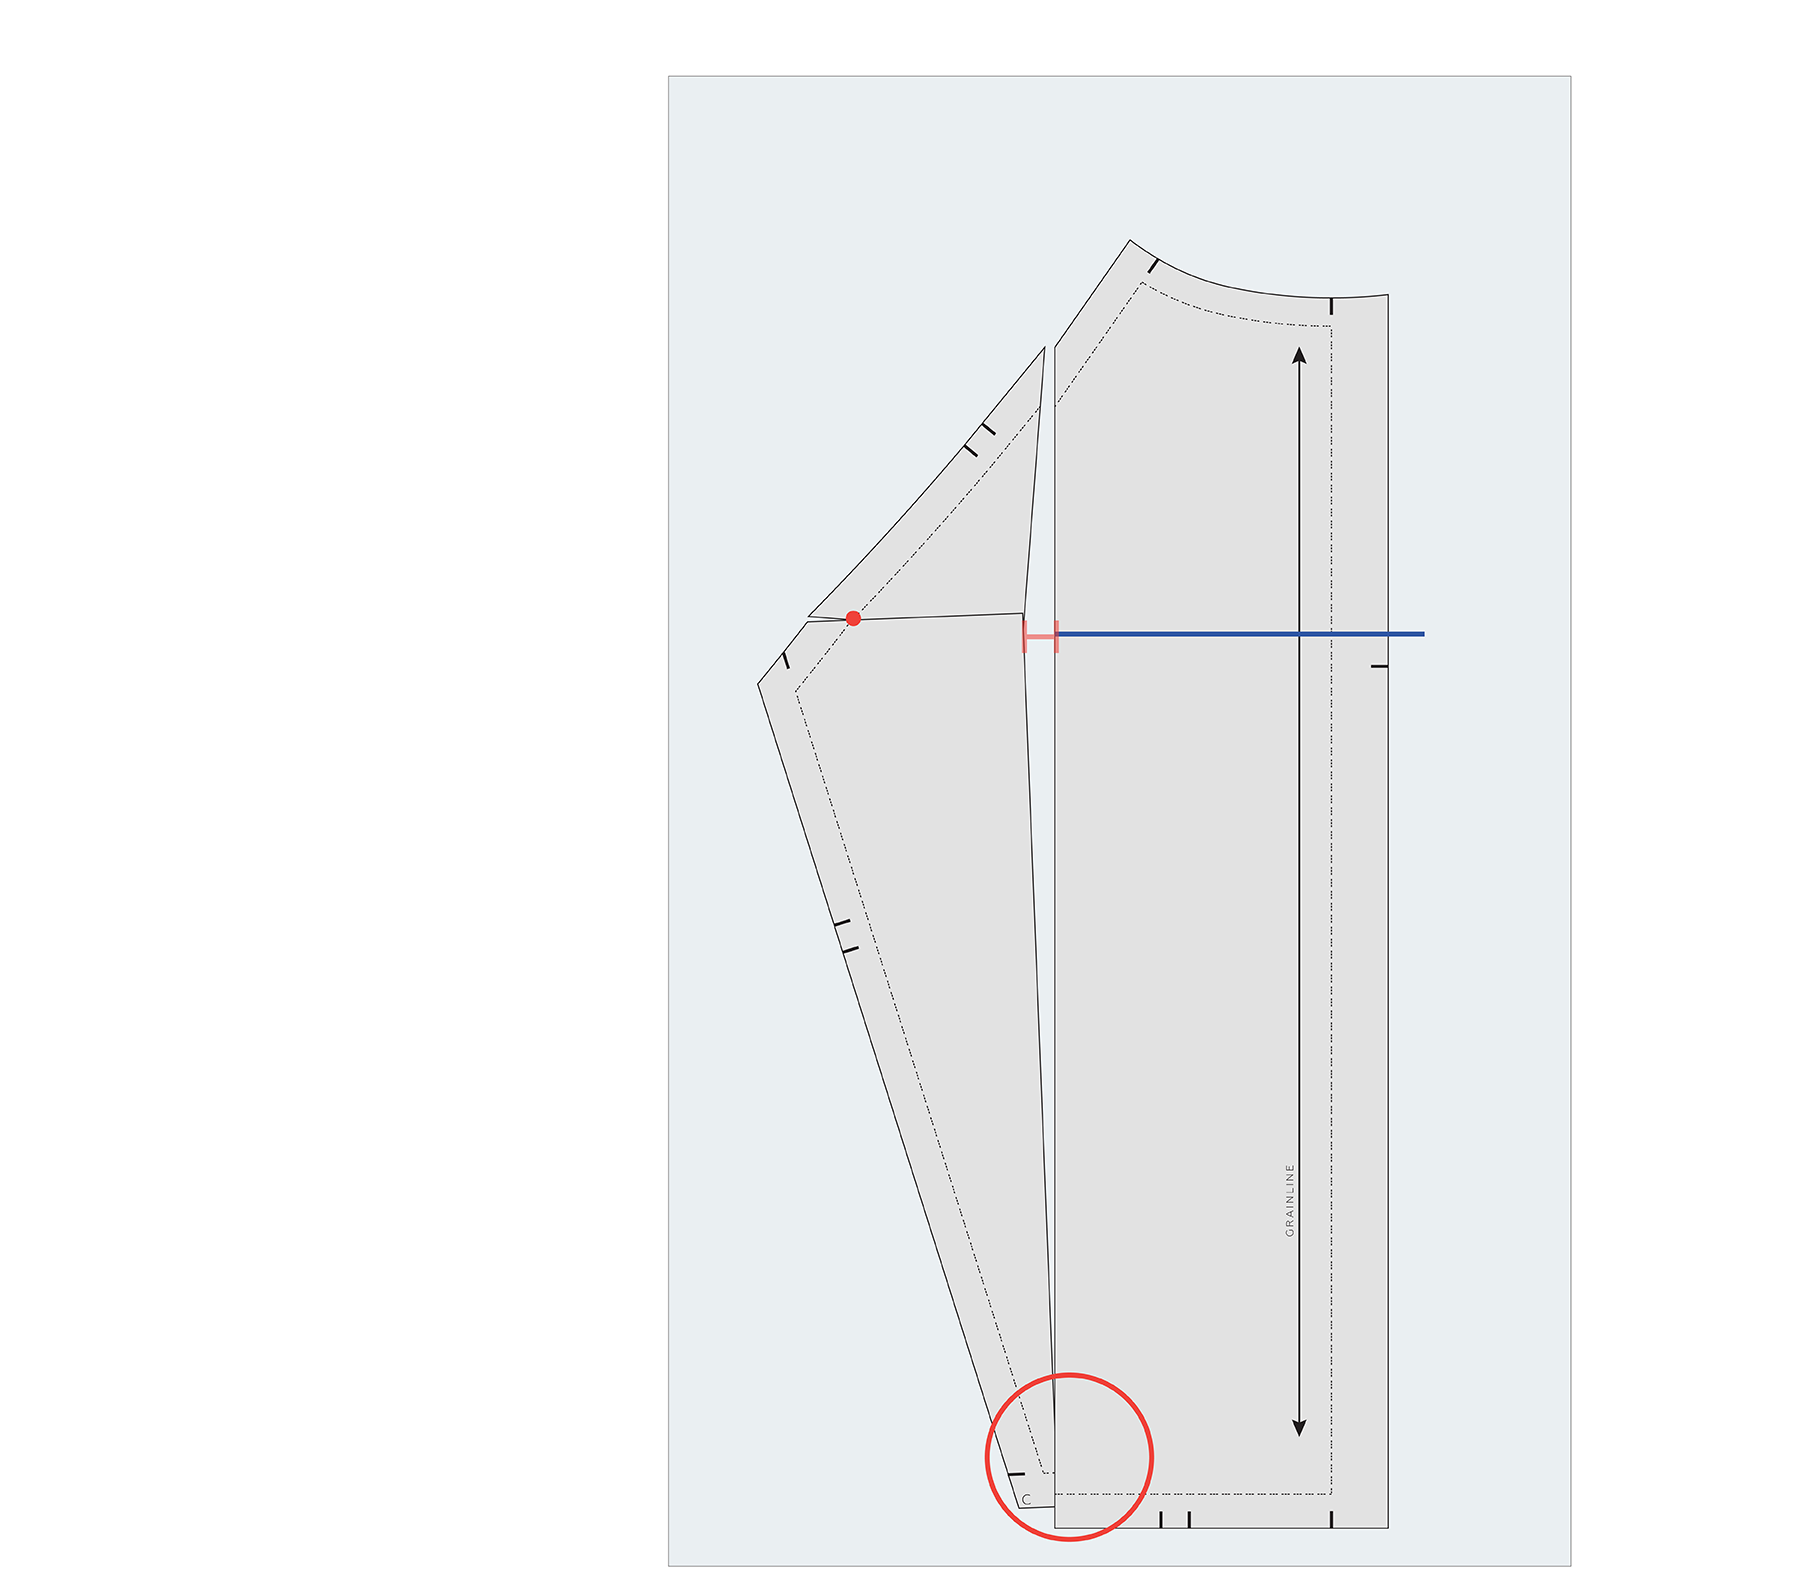
Step 11
Swing the lower section around so that the bottom of the piece is touching on each side of line D. You will notice that the adjusted section is now sitting slightly higher than the centre back section of the piece. We will fix this in the next step so that the pattern goes back together.
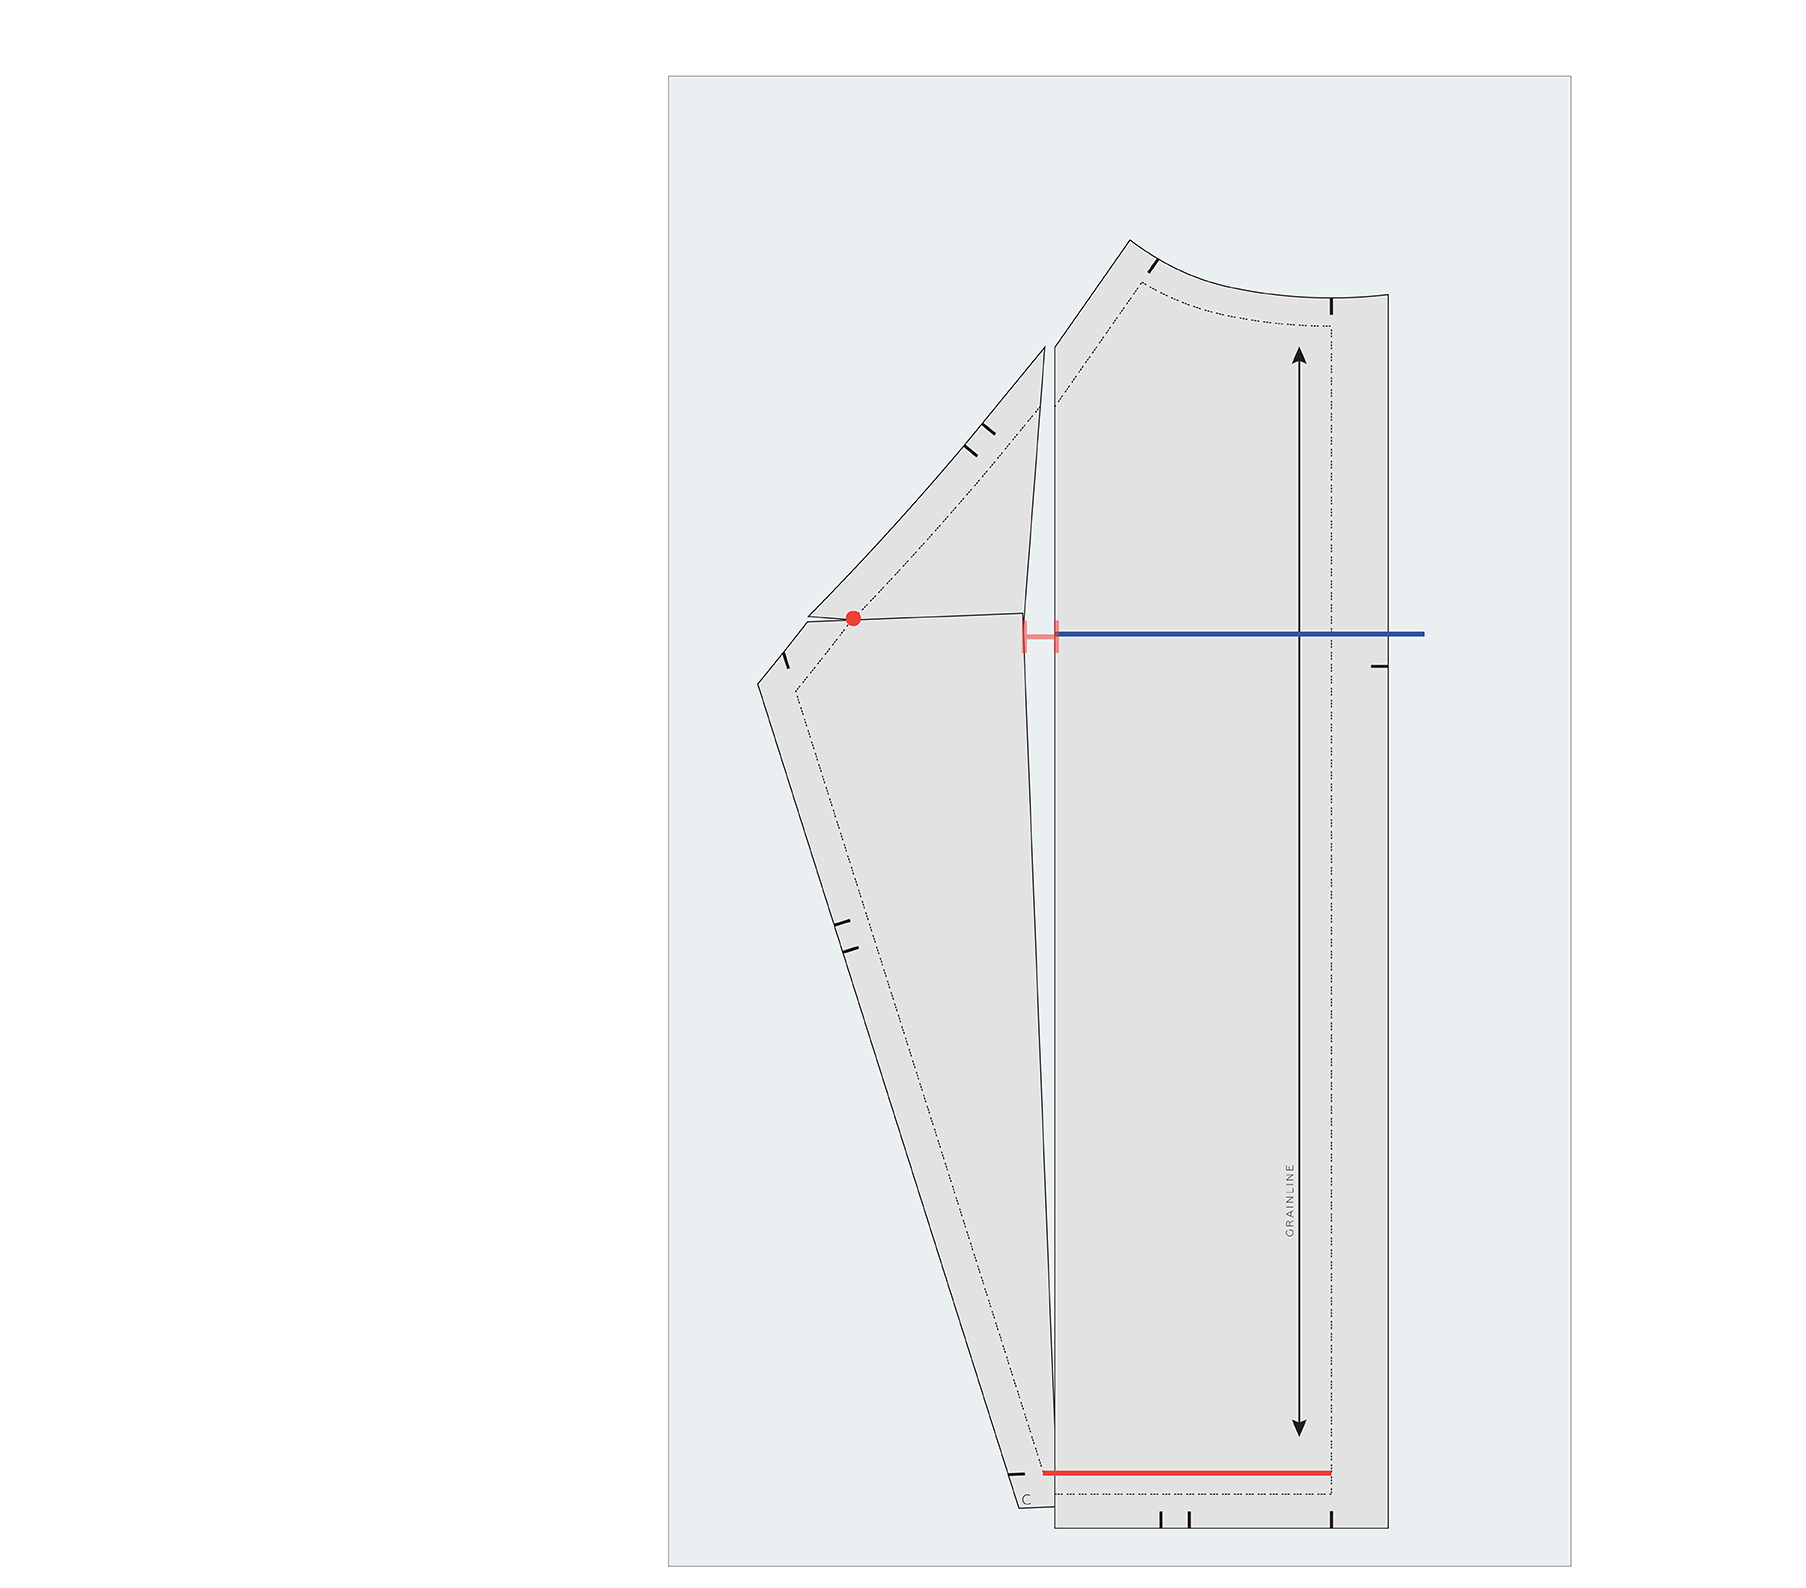
Step 12
Draw a straight line from the bottom of the panel STITCH LINE across to the CENTRE BACK. This line should be perpendicular to the CENTRE BACK line to maintain the integrity of the original design.
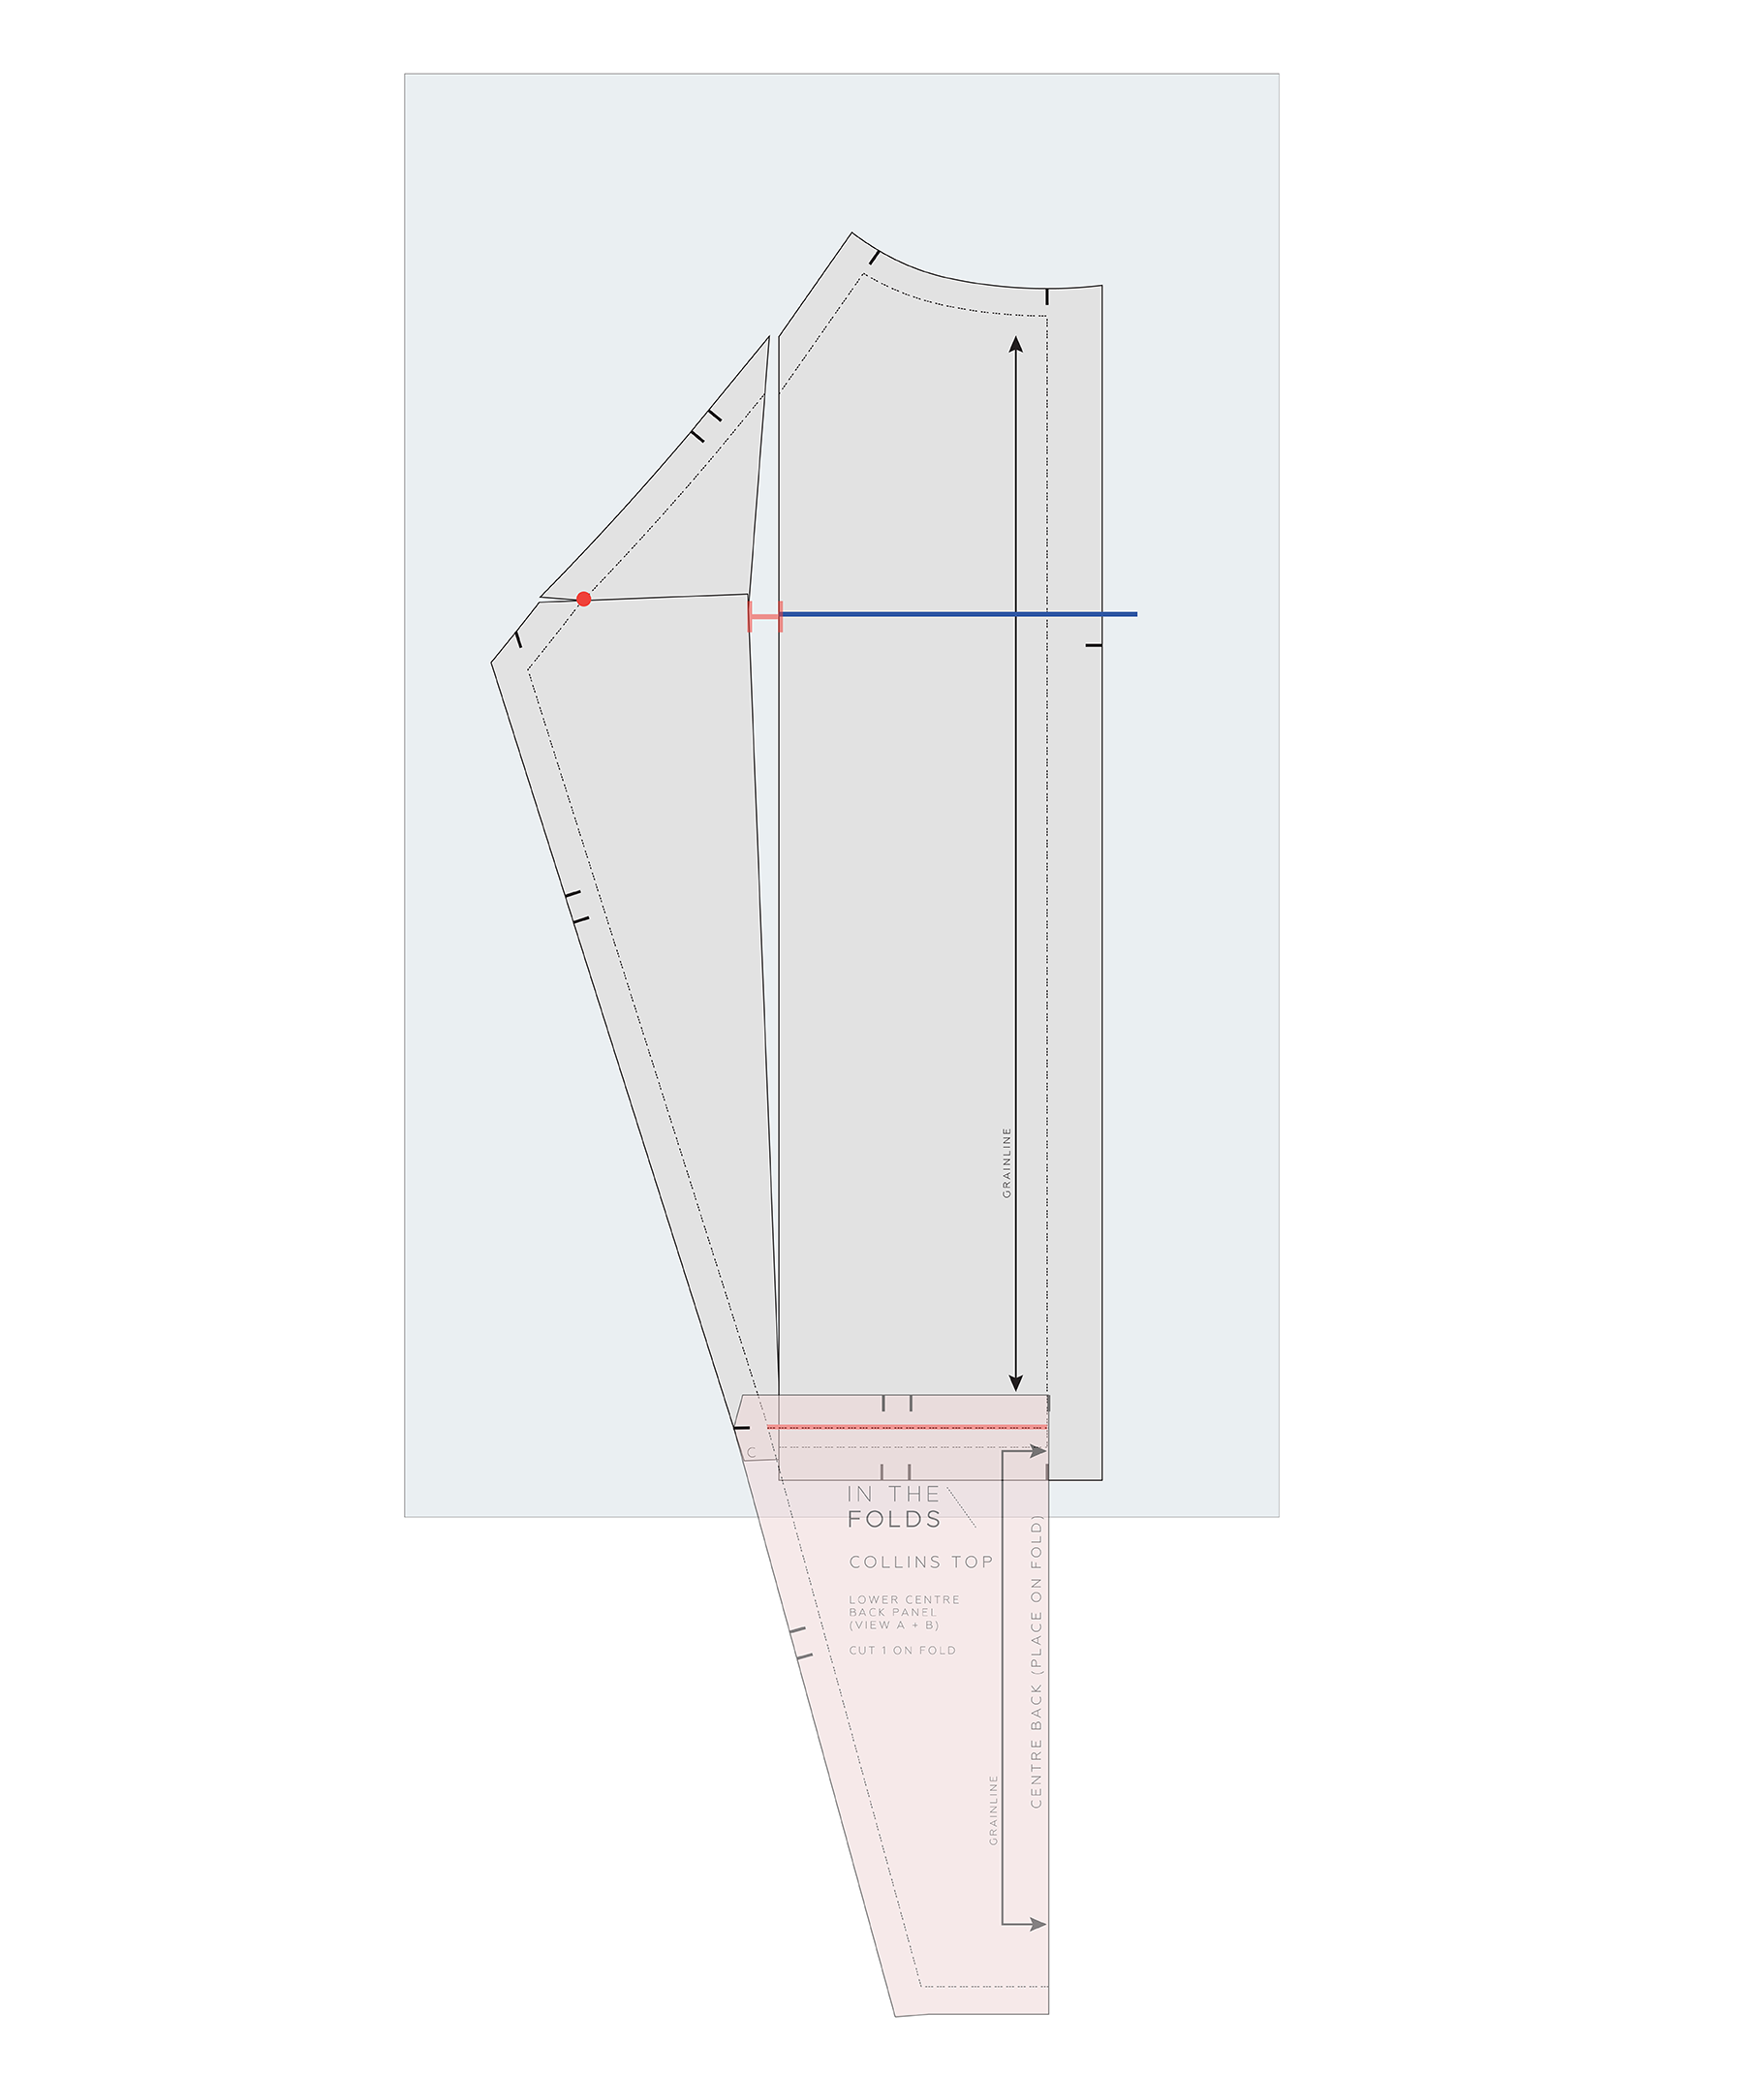
Step 13
Check the LOWER CENTRE BACK PANEL still matches the lower seam on the CENTRE BACK PANEL. For more details about checking patterns, check out this tutorial.
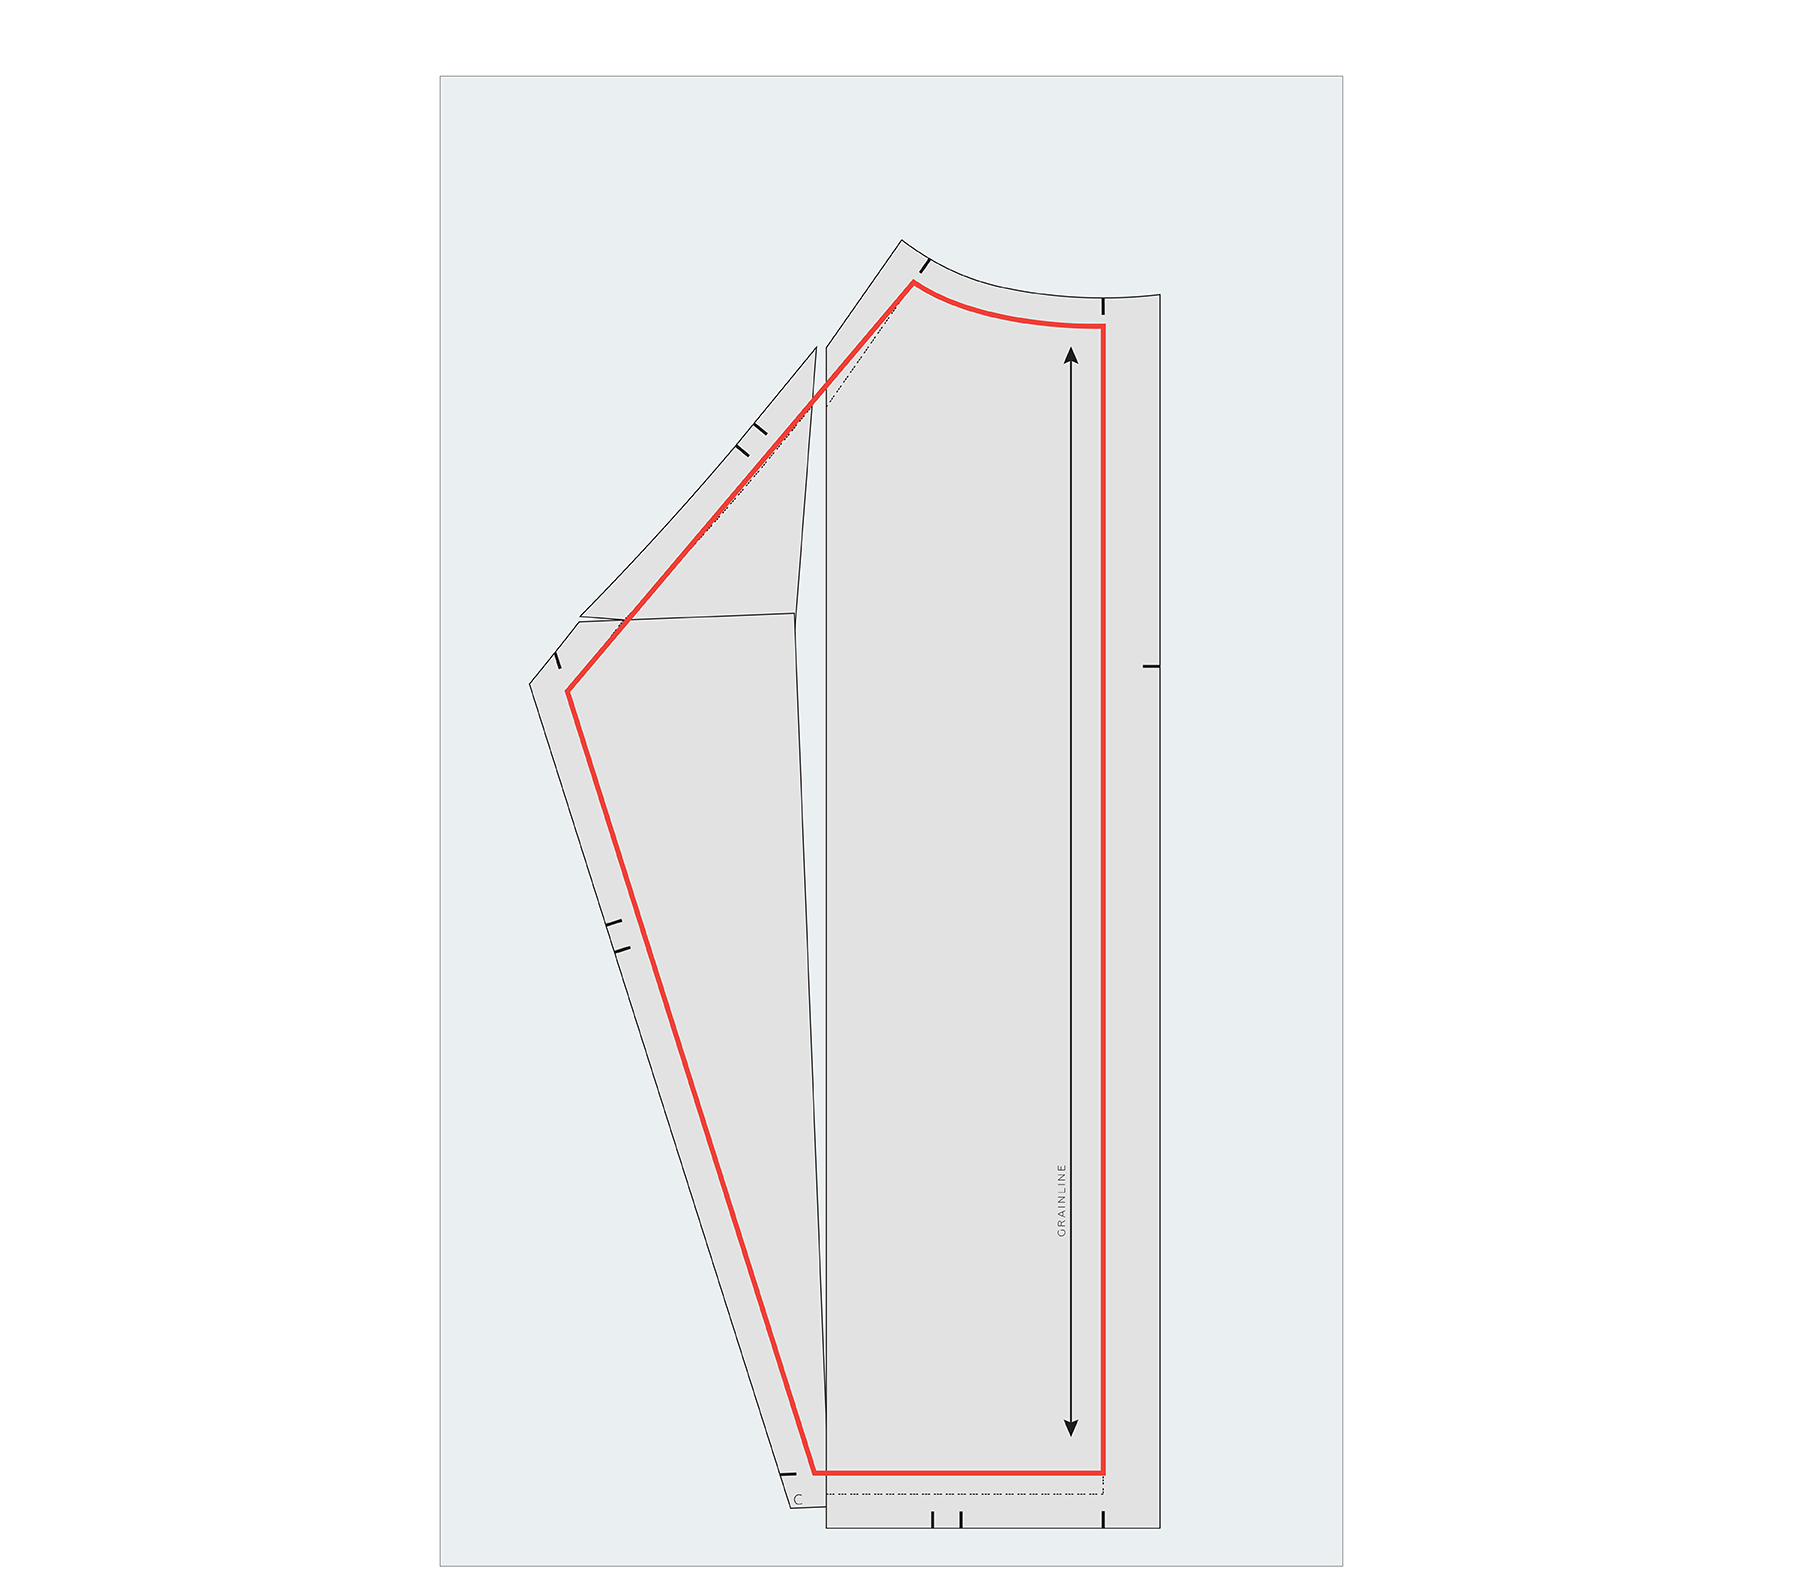
Step 14
Mark in your new STITCH LINES. You can trace a fresh copy, or if you like (my preference), just use a highlighter or coloured pen on the altered pattern so that it’s very obvious which lines are the correct ones.
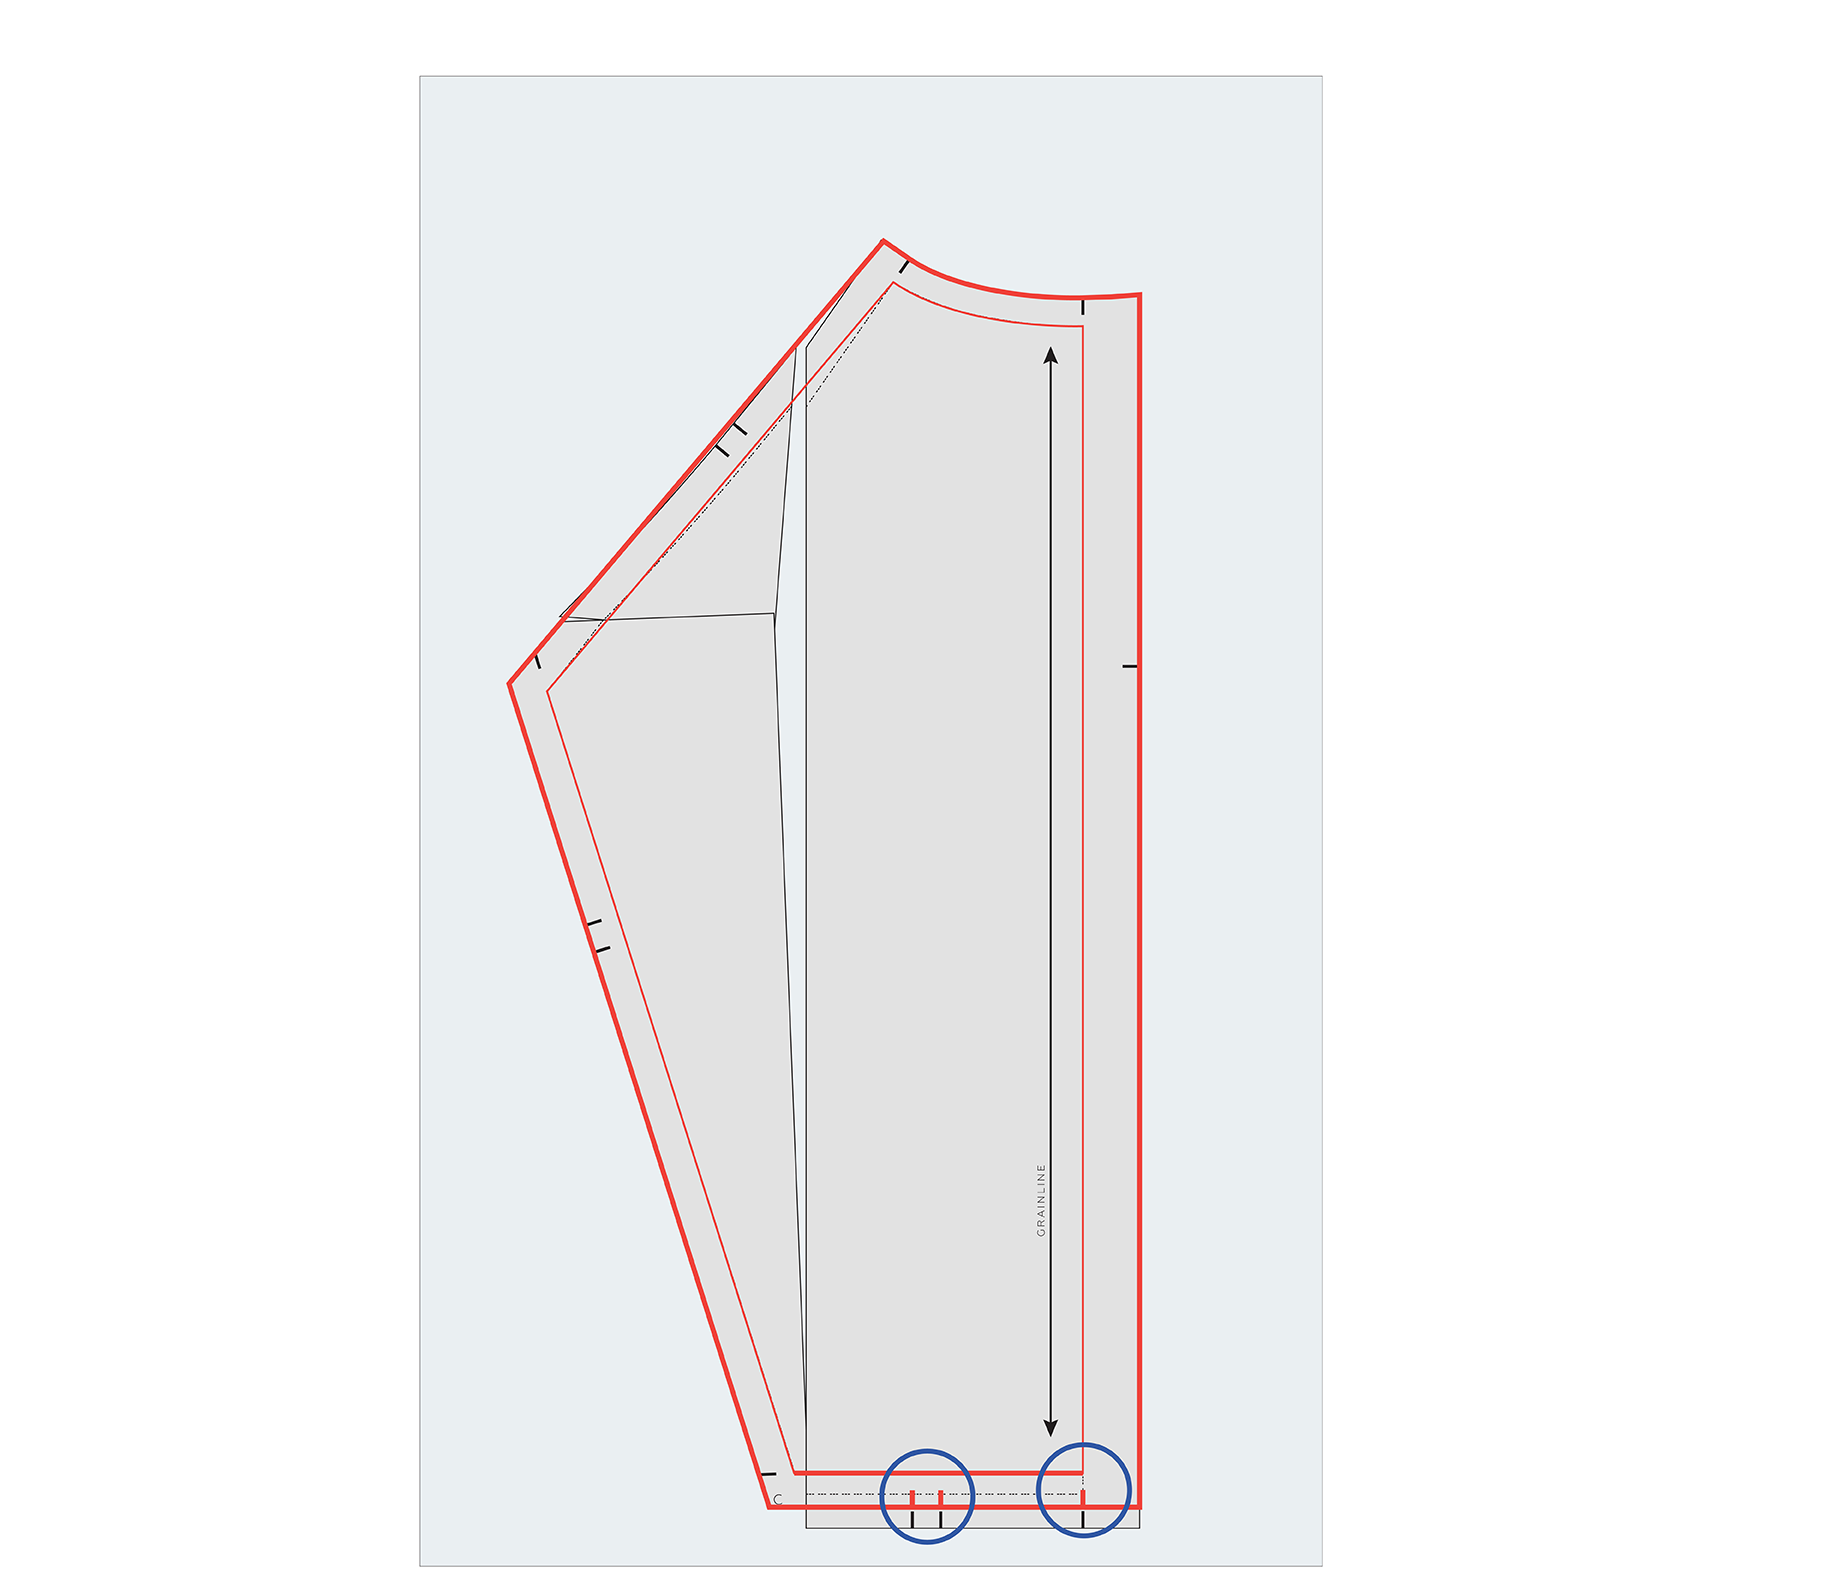
Step 15
Add seam allowance onto the new lines. Move the notches at the bottom up to the new CUT LINE.
Before you cut into your fabric
Check and true your pattern and consider making a toile to check the alteration.
A little reminder about patternmaking
I hope this has been useful, whether you're making a broad back adjustment to your Collins top or you're simply curious about how patternmakers work through an unfamiliar problem.
One of the things I love most about patternmaking is that there's almost always more than one way to approach something. Sometimes the first idea works. Sometimes you need to try a few things, move pieces around, revisit an old tutorial or start again. The important thing is knowing that you don't have to see the whole solution before you begin. You just need somewhere to start.
For more issues of the Q & A series, you can check out the archive here.