
THE Q & A SERIES
HOW TO ALTER A DROPPED SHOULDER TO A SET-IN SLEEVE
I prefer fitted button down shirts, but the trend for women's shirts right now tends to be ‘oversized’ with the shoulder hitting in the middle of the bicep instead of the top of the shoulder. Is it possible to buy one of those patterns and change where the shoulder hits? And if it is, how does that affect the rest of the pattern, especially the sleeves?
Thanks for your help.
Sage
Toronto, Canada
Hi Sage,
We had a few community members with this exact question when we released the Marden shirt, so I thought it was a good one to answer.
Your question touches on two things:
The difference between a dropped shoulder sleeve and a set-in sleeve
What these two sleeve types have to do with the overall fit of a shirt.
So let’s dive in!
the difference between a set-in sleeve and a dropped shoulder sleeve

Our Cartwright dress and top pattern has a set-in sleeve, while our Marden shirt pattern has a dropped shoulder.
Set-in Sleeve
Construction - The sleeve is sewn into the armhole, aligning with the natural shoulder line.
Fit - More fitted and structured, following the natural contours of the shoulder and arm.
Appearance - Provides a tailored, polished look, as the sleeve cap fits snugly around the shoulder.
Use - Common in more formal and tailored garments, such as blazers, dress shirts, and fitted tops.
Dropped shoulder
Construction - The shoulder seam extends beyond the natural shoulder line, often ending halfway down the upper arm.
Fit - Looser and more relaxed, giving a casual and oversized look.
Appearance - The sleeve is attached lower on the arm, creating a slouchy, laid-back silhouette.
Use - Frequently seen in casual and oversized clothing, such as sweatshirts and t-shirts.
Due to how far the shoulder seam extends beyond the shoulder, the dropped shoulder has a boxier fit.

Above is a comparison of the front pattern pieces.
As you can see, the dropped shoulder pattern on the right is much boxier. The shoulder seam in our Marden pattern is longer and curved, although this isn’t always the case for dropped shoulder patterns. It can be straight, depending on the fabric it will be made of and the design. The side seam is straight and the armhole is much smaller.
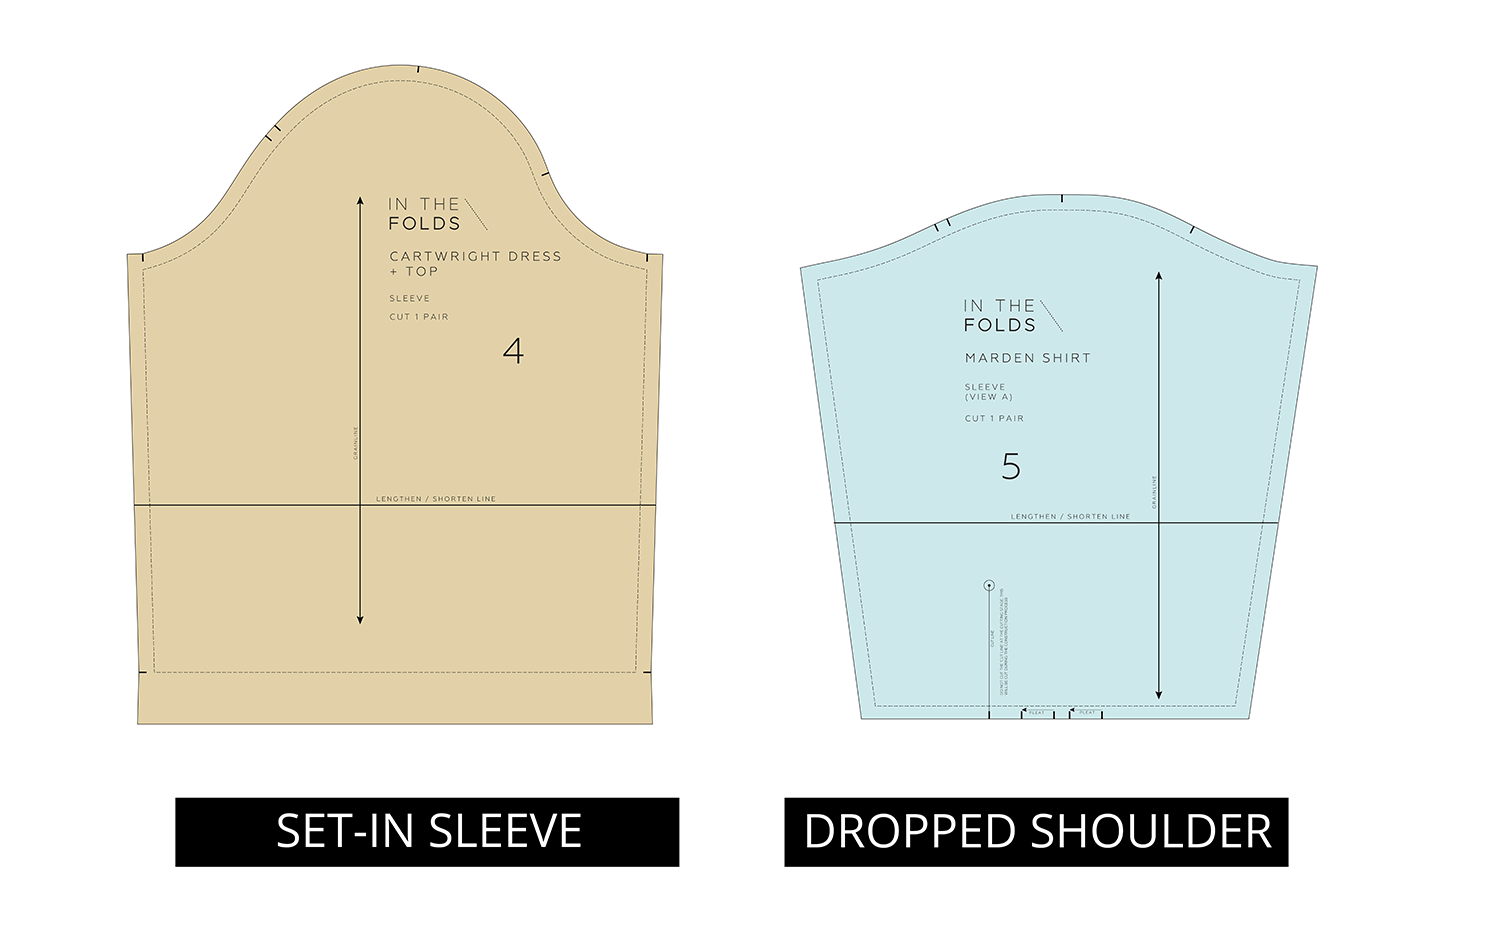
The sleeve required for a dropped shoulder (on the right) has a much lower sleeve cap as it doesn’t need to reach the shoulder. From the bicep line down there is not a huge difference.
In the case of these specific patterns, the Marden shirt sleeve is more tapered to accommodate the cuff.
Is it possible to buy a dropped shoulder pattern and change where the shoulder seam hits?
The answer is yes, you can definitely purchase one of these patterns with a dropped shoulder and alter the pattern. And we love that you’re considering pattern hacking! Adding these types of skills to your repertoire opens up a whole new world of opportunities when you’re sewing, and it’s what we’re all about at In the Folds.
However, drafting a set-in sleeve from a dropped shoulder sleeve pattern is quite complicated and I wouldn’t suggest you try this.
Instead, if you like elements of a dropped shoulder pattern, but you don’t like the dropped shoulder part, here’s what I recommend. Rather than remove the dropped shoulder sleeve, mash the two patterns together so you can take the elements from each pattern that you want.
This will be MUCH simpler than trying to draft a set-in sleeve from a dropped shoulder sleeve. The other way around is manageable, but going back is much more difficult.
Below is a step-by-step tutorial of how to do this with the Marden and Cartwright patterns.
How to remove a dropped shoulder from a pattern
For this tutorial I will be transferring the set-in sleeve from the Cartwright dress over to the Marden shirt.

Step 1
To begin, we need to check we have the CENTRE FRONT marked on both patterns. This will give us a point to match across both patterns.
Due to the button placket on the Marden shirt, to mark the CENTRE FRONT we need to add to the FRONT pattern piece half the width of the button placket, as the CENTRE FRONT on a button-up shirt is in the middle of the placket where the buttons are placed.

Step 2
Transfer the neckline from the Marden shirt to the Cartwright dress. This will allow us to attach the Marden collar pieces to this altered pattern.
Place one pattern piece on top of the other, lining up the CENTRE FRONTS. Slide the pattern that’s on top up or down until the STITCH LINES at the shoulder (where it intersects with the neckline) line up. Hold in place with a pattern weight.

Step 3
Slide some pattern paper under the neckline of the pattern you are altering and stick in place. Trace the neckline onto the paper.
In this case you will see that we have to trace part of the shoulder seam as well. This is because the Cartwright dress has a lower neckline than the Marden.

Step 4
Trace the seam line down the CENTRE FRONT. This means you will be able to attach the placket (sometimes called a button band) from the dropped shoulder pattern to the more fitted pattern.

Step 5
Transfer any other details from the dropped shoulder pattern onto the more fitted pattern. In this case we need to trace the horizontal seam from the Marden shirt onto the Cartwright dress.

Step 6
The lower panel on the Marden shirt would also need to have the width reduced so it matches the new more fitted version of the pattern.
Line up the STITCH LINE on the LOWER PANEL with the horizontal seam line marked on the altered pattern. By lining up the side seam STITCH LINE we can just remove the width from the CENTRE FRONT area.
Step 7
Complete the pattern by repeating the process on the back and reflecting the changes onto any other pattern pieces that are impacted.
In the case of this example, we would also need to alter the LOWER BACK PANEL and the hem facing pieces. Once those pieces are altered we can then use the collar pieces, sleeve, placket, cuff and button placket from the Marden shirt pattern.
Step 8
When the pattern is complete, be sure to make a toile to check you are happy with the fit.
If altering patterns to better suit your preferences is something you have been hoping to learn, this month’s issue of Curated by ITF might be the one for you!
Happy drafting,
Emily
RESOURCES MENTIONED IN THIS ISSUE
More information about our Curated by ITF subscription can be found here. Sign up during the month of July to get part two of our Copy Your Clothes Series, the Make it your own Skills Kit, delivered straight to your inbox.
The Cartwright dress and top pattern can be found here.
The Marden shirt pattern can be found here.
For more issues of the Q & A series, you can check out the archive here.
WHAT YOU’VE BEEN MAKING

Acton dress made by @annamadeitmn

Hacked Peppermint peplum top made by @_rubysthreads_


