ISSUE 169 - BALANCE LINES: WHAT THEY ARE AND HOW TO USE THEM

THE Q & A SERIES

balances lines:
what they are and how to use them

Hi Emily & Team,

I would love it if you could talk about balance lines on a garment. This is something I've learned about recently and seems critical for having a garment hang nicely, but I've struggled to find good resources explaining the concept and how to use it when assessing fit.

I specifically have a common fitting issue where the bust is snug, the neckline pulls up and chokes me, the shoulder sleeve is sitting back, the side seams swing forward, the sleeve twists, and the back armhole looks a bit like hungry bum but into the armpit. Its like the whole garment is tilted diagonally on me from the side.

If you have any advice on this fitting mystery, I'd appreciate it!

Best,
Claire
Seattle, USA


Hi Claire,

For sewists who haven’t yet delved into making fitting adjustments to the garments they sew, balance lines will be a new concept, so thanks for asking such a great question!

WHAT ARE BALANCE LINES

Balance lines in pattern making refer to the horizontal and vertical lines that can be marked on a pattern or toile to ensure that the garment hangs properly when worn. They help maintain the balance of the garment, ensuring that it sits correctly on the body without twisting or pulling in any direction.

Balance lines can also give you a good indication if a garment is fitting correctly and can be used as reference points when making pattern adjustments to a pattern.

  • Horizontal balance lines are often drawn across the pattern pieces at key points: the bust, waist, and hip levels. 

  • Vertical balance lines are usually the centre front and centre back of the garment. The side seam can also be used as a balance line.

HOW TO USE BALANCE LINES WHEN SEWING

Sewing measurement chart for use when taking your body measurements.

Step 1 - Select your size or sizes

Before getting started, you’ll need to work out what size pattern to print. Take your measurements using a tape measure. We suggest doing this in front of a full length mirror. It can be helpful to take note of each measurement in a table like the one below where you can also take note of the size your measurement in each area corresponds to.

If your measurements are between sizes, look to the finished garment measurements to decide if you should select the smaller or larger size. This allows you to check the amount of ease in the pattern. For more information on how to use finished garment measurements to select your size see this post.

We suggest printing patterns in the size/s you need in relation to your HIGH BUST, WAIST and HIP measurements only. This disregards your bust measurement as it’s better to do a Full Bust Adjustment or Small Bust Adjustment (SBA) if required, rather than selecting a size based on your bust measurement.

Chart for comparing body measurements to pattern measurements.

Step 2 - Compare the lines on the pattern to your body measurements

Measure the vertical differences between the balance lines on the pattern so you can compare it to your body measurements.You may find it helpful to use a table like the one below to keep track.

Take some thin elastic and wrap a piece around your BUST horizontally. Hold it in place by tying a knot or pinning in place. Make it tight enough that it will stay put, but not so tight that it flattens your bust or stretches the elastic in any way. It is good to do this in front of the mirror so that you can check that the elastic remains parallel to the floor the whole way around. Repeat for your WAIST and HIP.

Measure body at balance line points shown on pattern.

Take a tape measure and measure the vertical distance between your BUST LINE and your WAIST LINE. Record in the table above (4). Take the vertical measurement between your WAIST LINE and HIP LINE and record in the table (5). Measure down from your SHOULDER to your BUST APEX POINT (6).

Compare your measurements with the pattern measurements to assess whether or not you need to add or remove length in any of these places. Record any differences in the third column. 

It is a good idea to add or remove length from the pattern in relation to your findings before making a toile.

Important! Some adjustments need to be made before making a toile

Certain adjustments need to be made to the pattern before making a toile as they will allow for a fitting.

For example, it’s a good idea to make a Full Bust Adjustment or Small Bust Adjustment before making a toile as this will allow the bust area to fit. If you need an FBA and don’t make this adjustment, you may not be able to get the garment on and you won’t be able to conduct your fitting.

Mark balance lines on toile.

Step 3 - Mark balance lines on the toile

At this point you can make a toile to check the fit of the pattern so far.

The alterations made to the pattern in the previous steps should give you a great starting point. The toile will help you check that you're on the right track and home in on some details.

HOW TO USE BALANCE LINES TO CHECK THE FIT

Once you’ve made a toile, set yourself up in front of the mirror to do a fitting. With regards to balance lines specifically, you need to check that the side seams appear straight and are perpendicular to the floor. If the side seam is pulling towards the front or the back, this normally means that you need more width in the area where it's pulling.

Also check that the bust line is sitting on your bust, the waist line is on your waist and the hip line is on your hip. If they are not sitting in the correct position it may indicate you need to add or remove length in that particular area.

I hope this gives you a good starting off point on your journey to learning how to fit clothes to your own unique measurements. And, if you feel like this post has peaked your interest in learning this fantastic skill you should definitely sign up to Curated by ITF because this is exactly the kind of fun stuff we teach!

Happy fitting,

Emily


RESOURCES MENTIONED IN THIS ISSUE

  • Using finished garment measurements to select your size - tutorial here.

  • More information about our monthly sewing subscription, Curated by ITF, can be found here.


For more issues of the Q & A series, you can check out the archive here.


WHAT YOU’VE BEEN MAKING


MORE POSTS IN THE SERIES

ISSUE 168 - REMOVING PANEL LINES FROM A PATTERN

THE Q & A SERIES

HOW TO REMOVE PANEL LINES FROM A PATTERN

On the Acton dress the centre front bodice is not cut on the fold, although the seam is straight and so it could be. I'm wondering if there is any structural purpose to having a seam down the centre front, or whether I could cut on the fold so I don't have to pattern match my tricky fabric.

A

Sydney, Australia


Hi there!

I’ll answer your question specifically, as well as give you some pointers about removing seams in general for anyone else reading along that may have this question in relation to another pattern.

In general, if a seam line is straight, it’s normally fine to remove it.

For example, in our Attwood pants we used a lot of panel lines to create a design feature. The design intention of the different panels allows makers to play with the pattern and use fabric in different ways (like colour blocking or directional prints) to create different looks. When made in a solid colour, the panel lines add a point of difference so that the pants are more than ‘just’ a plain pair of pants. But, the panel lines aren’t a necessary part of the Attwood pants’ ‘constructability’ and can be removed if you want a basic pair of pants with the same fit as the Attwoods.

If you look at the centre seam lines on the Atwood pants you can see they are straight.

HOW TO REMOVE PANEL LINES FROM THE ATTWOOD PANTS PATTERN

Removing the panel lines from the Attwood pants pattern is very straightforward.

Line up the corresponding panel pieces with STITCH LINE (grey line on our patterns) on STITCH LINE. Tape or glue in place. 

Done!

In the case of the Attwood pants, you could even do this to remove the side seams!

In most cases there will be shaping in the side seam, but due to the wide leg and elastic waist of the Attwoods pants pattern, the side seam is almost straight. 

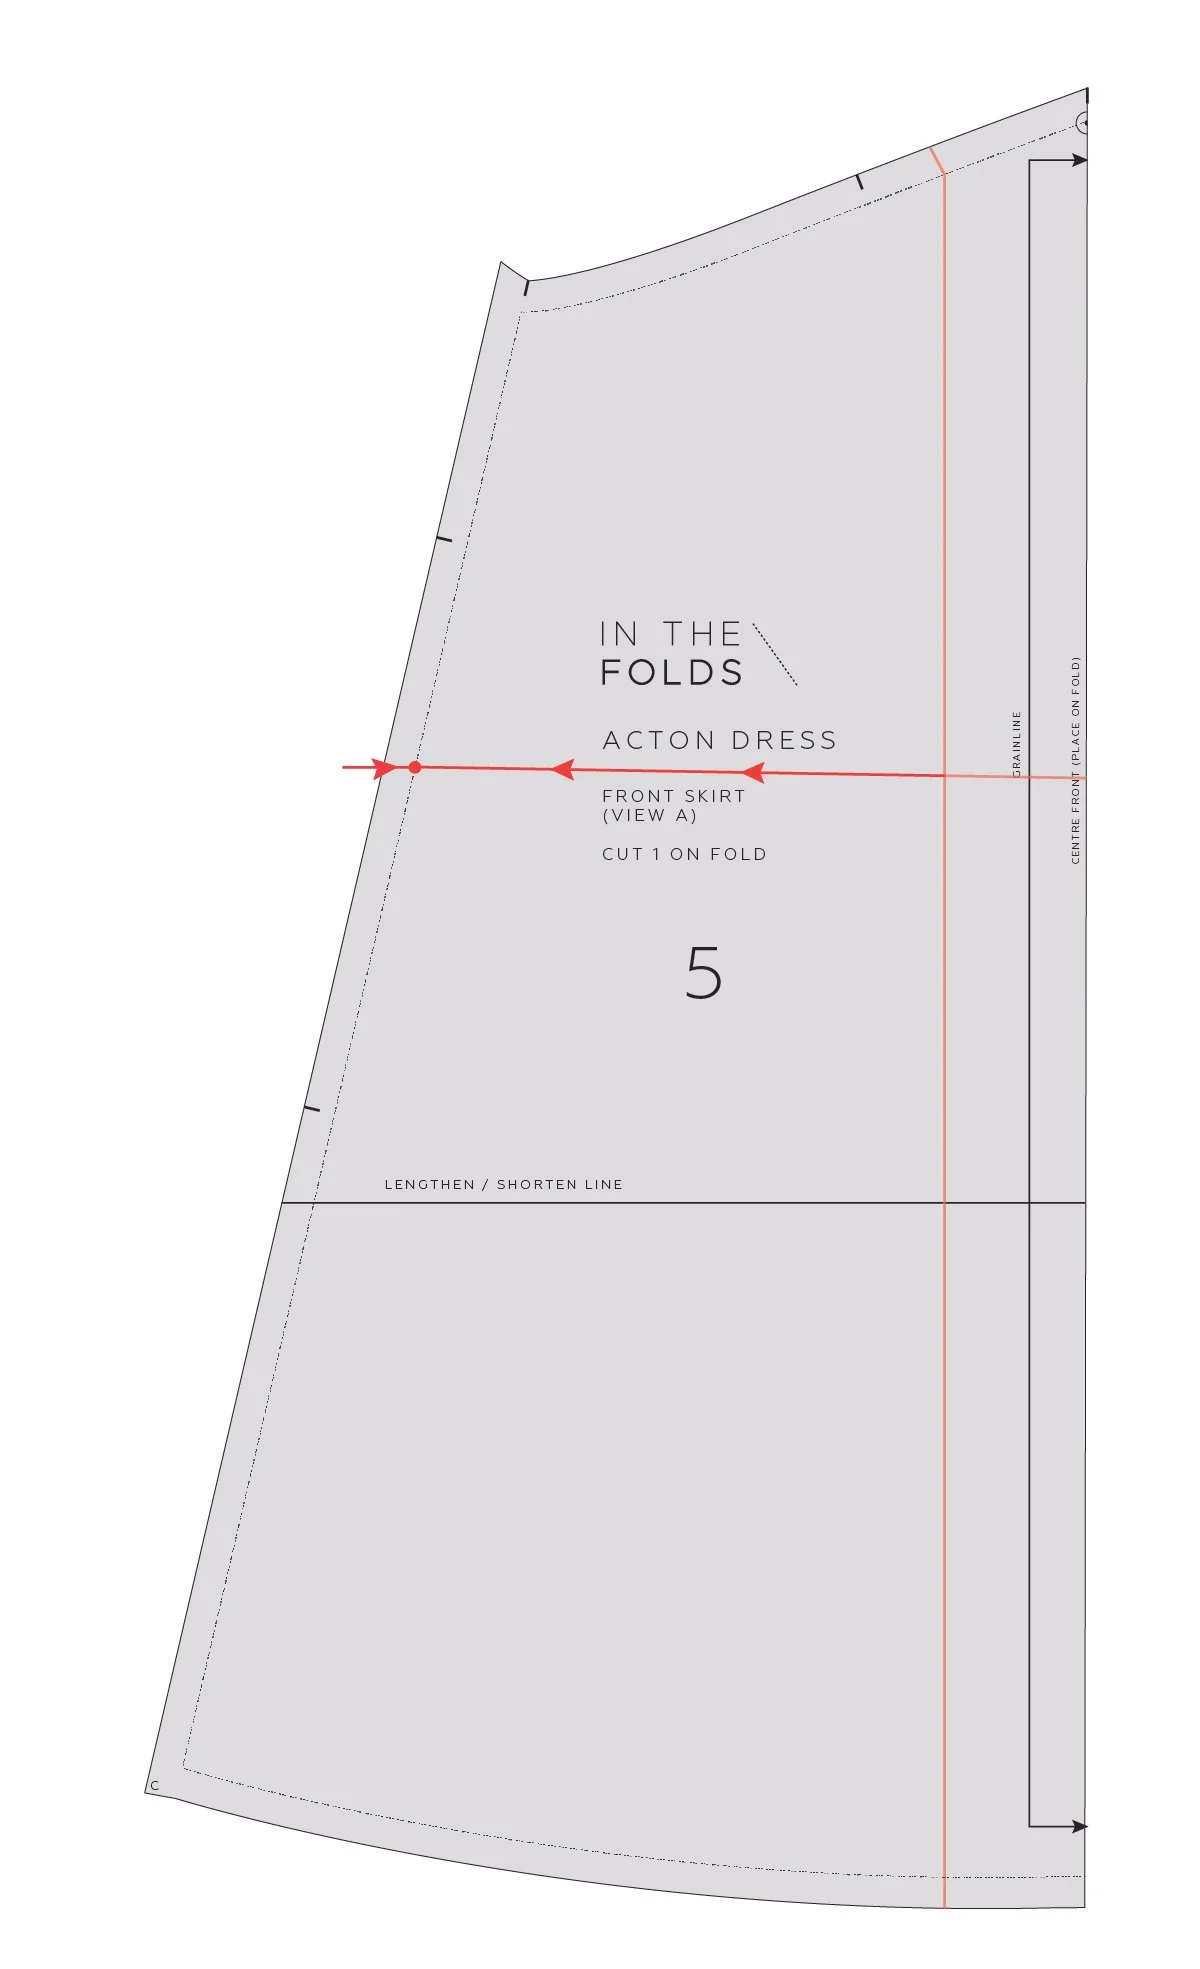
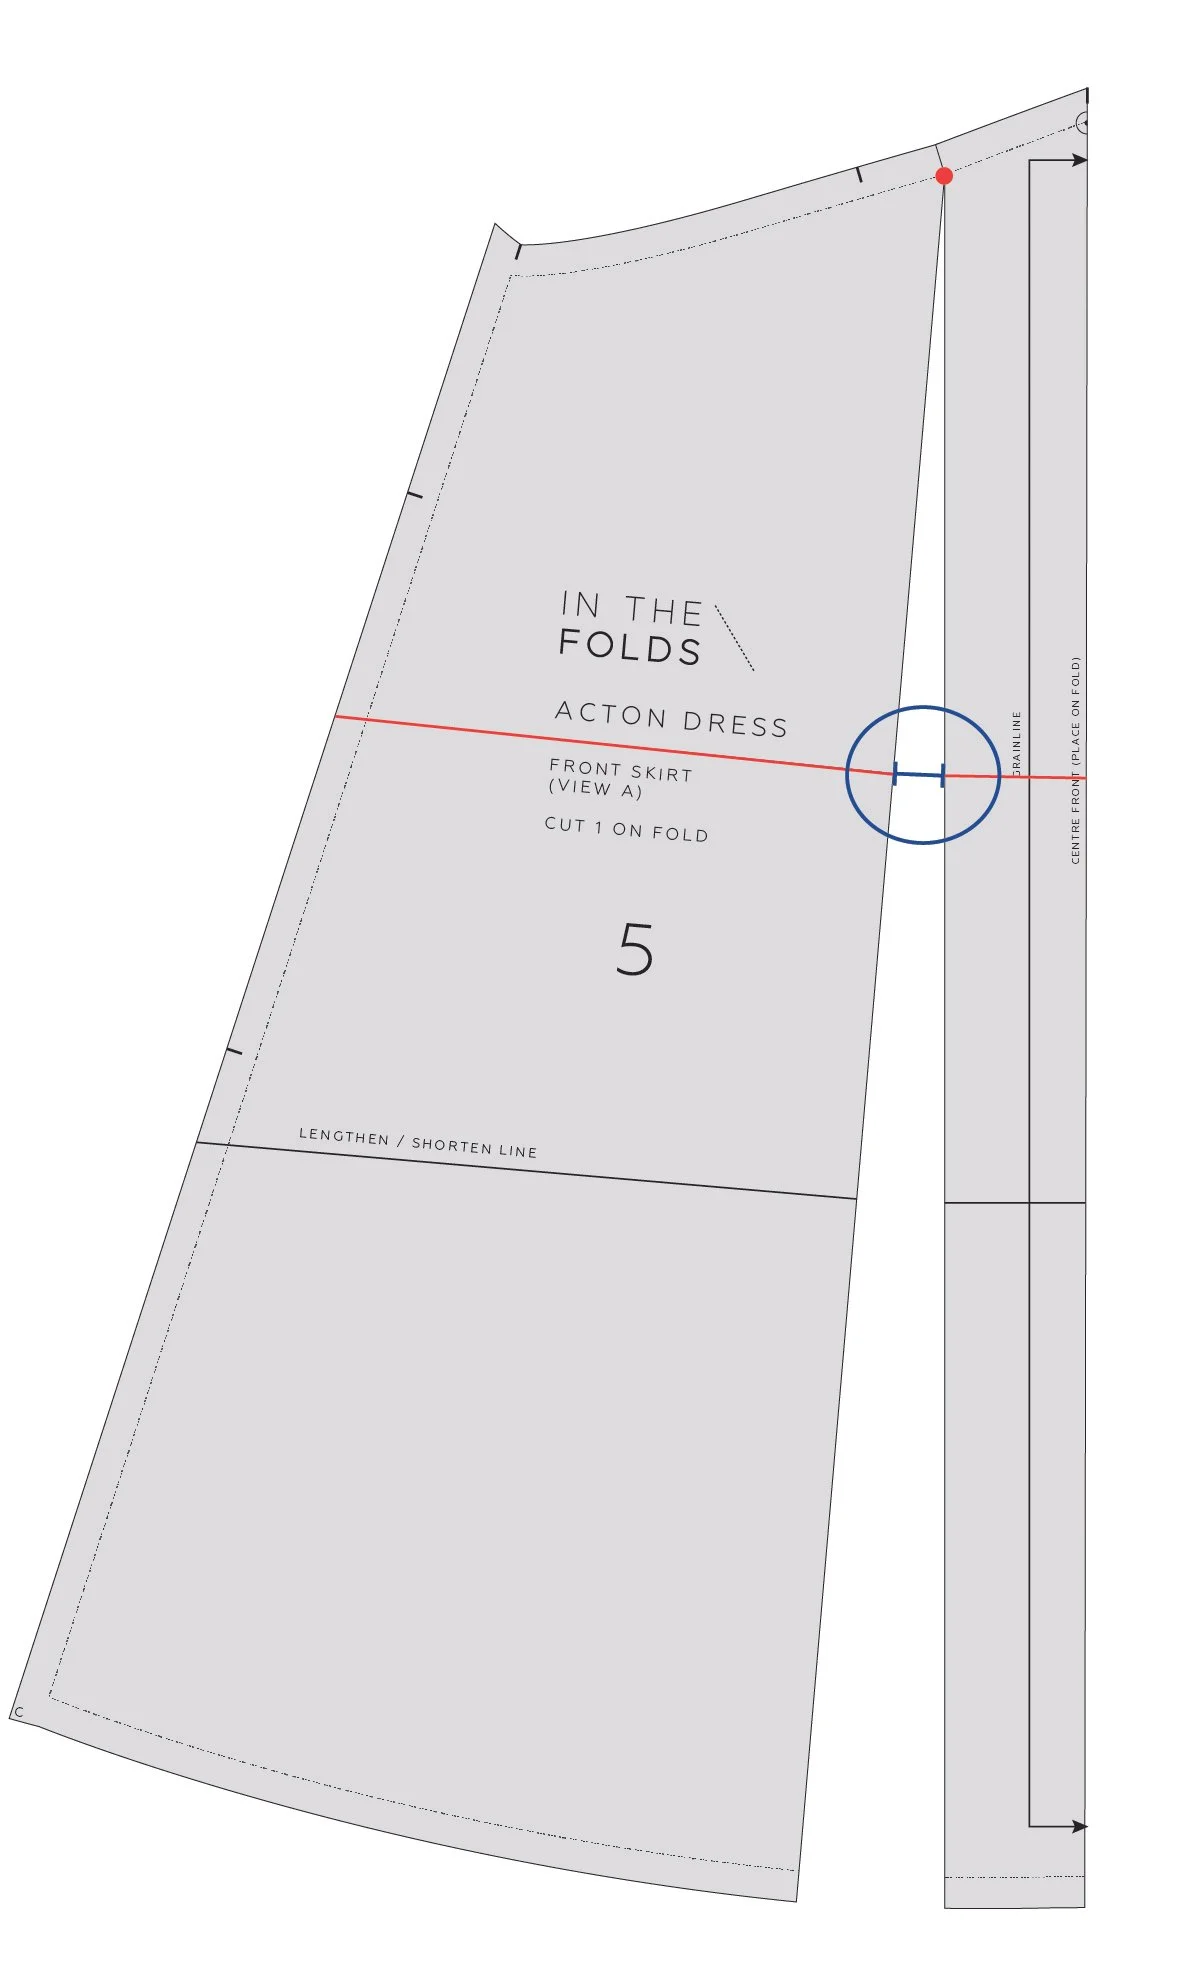
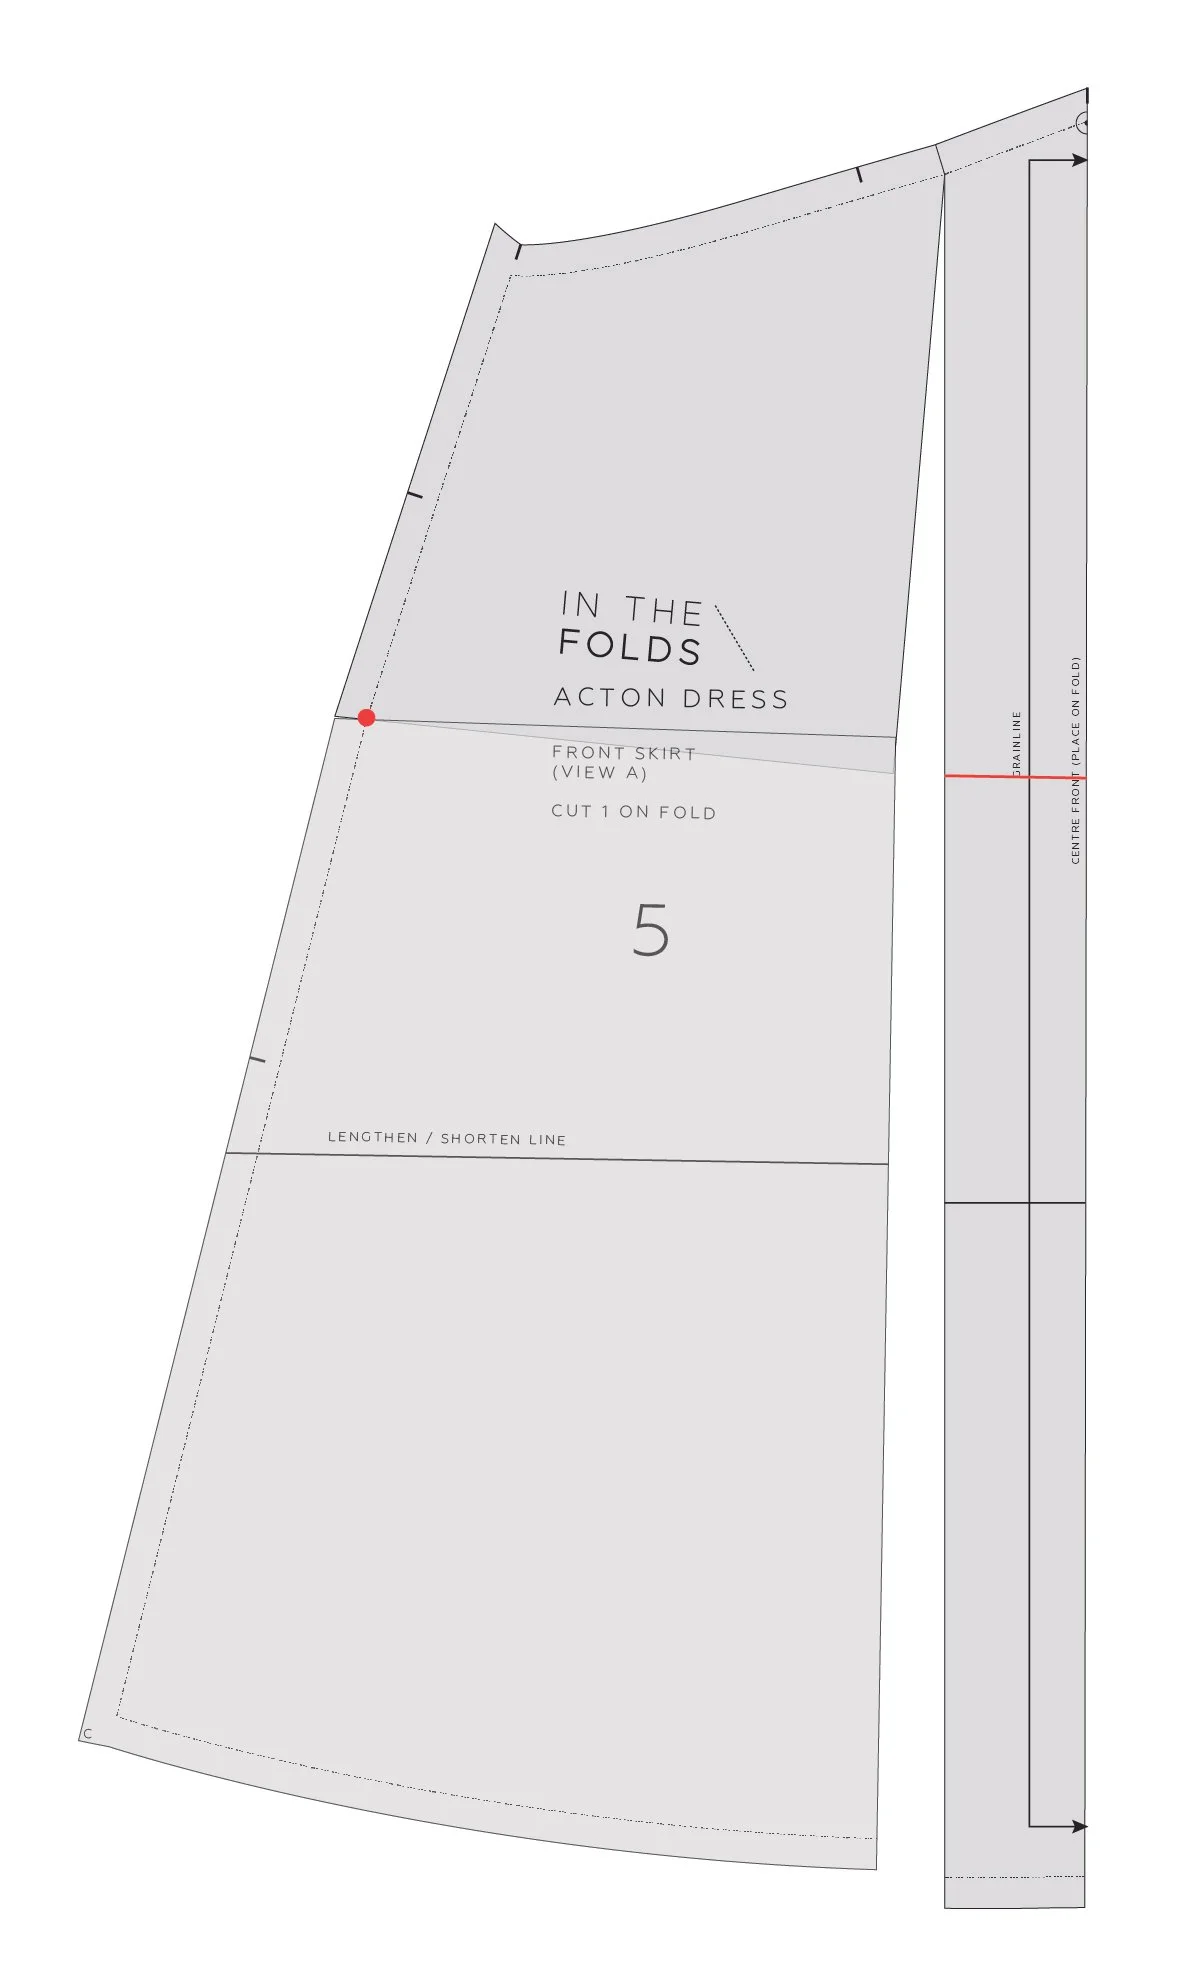
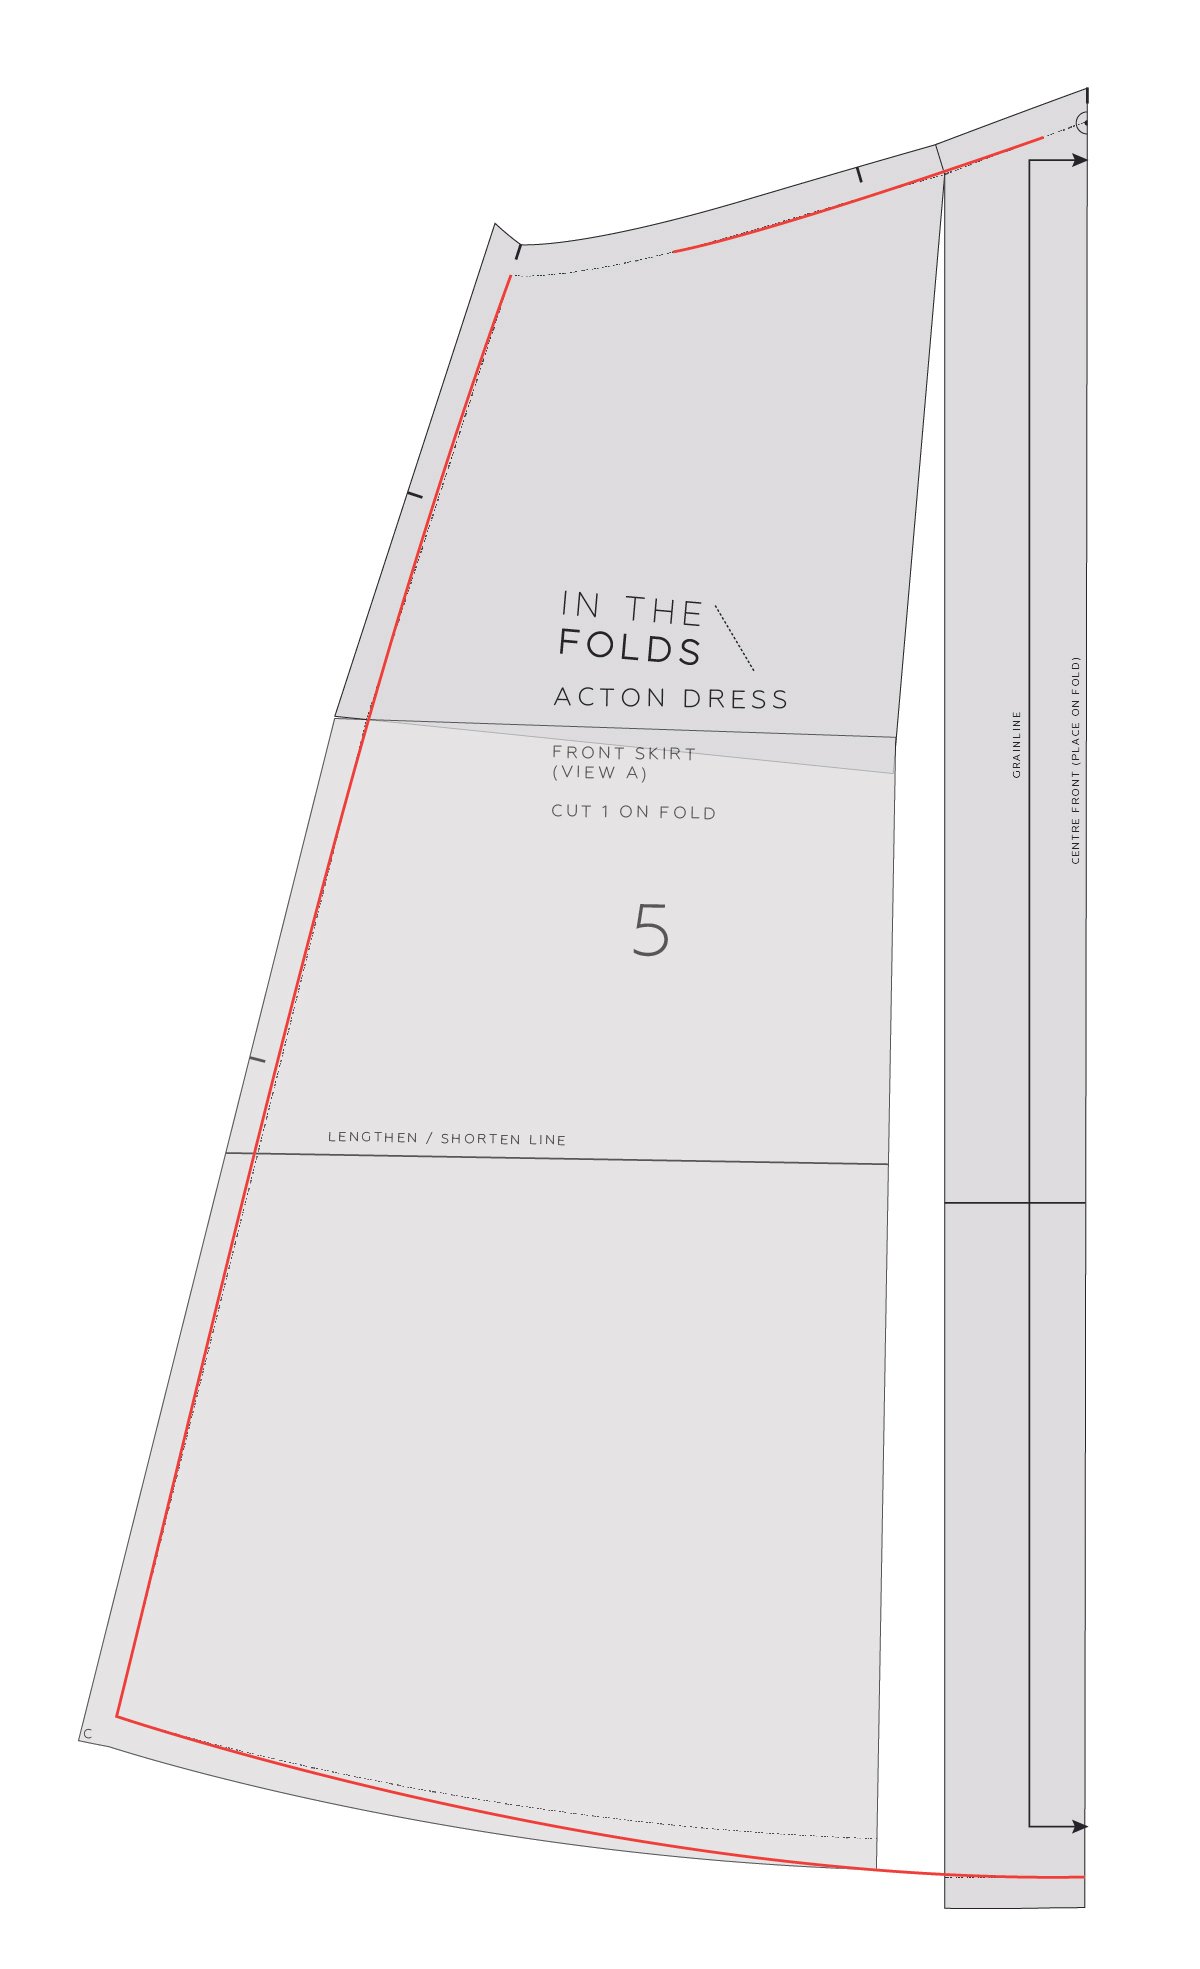
Shown above is the CENTRE FRONT BODICE panel and the SIDE FRONT BODICE panel of the Acton dress pattern.

Shaping is created for the bust through a princess panel. (If you’d like to learn more about princess panels, read this blog post.)

As you can see, although the seam lines on the CENTRE FRONT BODICE (piece 1) are straight, the curve on the SIDE FRONT BODICE (piece 2) is what creates the shaping. We can’t remove this panel line as a result.

However, the CENTRE FRONT SEAM LINE on piece 1 is straight, so it can be removed.

When determining if a seam can be removed, the other things to check for are design details or markings. In this case you can see there is a drill hole on the CENTRE FRONT STITCH LINE.

What is a drill hole?

Drill holes are small holes marked on a pattern. They are used to indicate a dart point or other design feature, such as the location of patch pockets, belt loops or pivot point - any feature that is located in an area where you are unable to notch a seam. They are marked on fabric with chalk or a tailor's tack. You can read more about drill holes here.

In this case the drill hole indicates where you need to stop stitching when joining the CENTRE FRONT BODICE pieces together.

An opening is required to join the bodice to the skirt due to the V shape of this seam line.

The opening in the seam allows flexibility so that both sides of the bodice can be pinned accurately to the skirt. So you can see that this drill hole marking is important to the pattern and needs to be included in any design changes made.

HOW TO REMOVE PANEL LINES FROM THE ACTON DRESS PATTERN

Step 1

To remove the panel line from the CENTRE FRONT BODICE, remove the seam allowance from the centre front seam by cutting along the STITCH LINE. Remember that you still need the drill hole marking.

Alter the cutting instructions so this piece is cut on the fold rather than as a pair.

Step 2

When you cut the piece, mark the drill hole and cut along the fold from the bottom of the piece to the drill hole to create the required opening in the centre front.

And that’s it!

Happy Acton and Attwood sewing!

Emily


RESOURCES MENTIONED IN THIS ISSUE

  • The Attwood pants pattern can be found here.

  • The Acton dress pattern can be found here.

  • How to create princess panels - blog post here.

  • Adding pattern markings to your patterns - blog post here.


For more issues of the Q & A series, you can check out the archive here.


WHAT YOU’VE BEEN MAKING


MORE POSTS IN THE SERIES

ISSUE 167 - MEMBER QUESTIONS WE'VE ANSWERED ABOUT ORMOND

THE Q & A SERIES

Ormond coat questions answered!

With each new Curated by ITF project we release we get lots of fantastic questions from our members in our private online community. From new sewists to the more advanced, there’s ALWAYS something to learn. 

And of course, we love to answer them! Our daily to-do list includes checking in with our community to get to know them, see what they’ve been chatting about and answering their questions in ways that make their sewing experience easier and more enjoyable.

Here’s a few we’ve answered recently which you might find helpful too.


INTERFACING ON ORMOND VIEW A BUT NOT VIEW B?

Question from Curated member, Kim:

I was flipping through the instructions and note that on View A the coat hem and sleeve hems are interfaced but the View B ones are not. I’m assuming it has something to do with the length, but curious as to why the hems (especially the sleeves) are interfaced?

Emily’s answer:

Good question Kim! I went back and forth about this decision and opted for only interfacing on View A because of the length and the more traditional style of View A. 

Interfacing adds a bit of extra weight to the hems, so this helps it sit nicely and helps with the folds. For View B, because it's a more casual style I decided to leave off the interfacing. You could add interfacing to View B if you wanted to.


BIAS BINDING WIDTH FOR THICK FABRICS?

Question from Curated member, Michaela: 

Emily, you mentioned about not buying bias binding yet if using a thick fabric, to ensure it’s wide enough. I’m using a vintage pure wool blanket for View A. What would be the best way to work out what width bias binding I need?

Emily’s answer:

What I'd do is stack three layers of your fabric together and sew them together with a 1.2 or 1.5cm seam allowance. 

Start with the binding width you think would work best and test it out by sewing it to one edge. If it's not wide enough, trim it off and sew the seam again and then try with a wider binding. Sara (our pattern tester who made the wool version) said that the bulk through the vent is the main place she needed the extra width in the binding. She made her binding 4cm so that's the width I would try at first.


ORMOND COATS FOR MEN?

Question from Curated member, Lucy: 

How would it be best to adjust the Ormond coat pattern for men? Just from chest down straighten it?

Emily’s answer: 

This is a good question! To be honest, I'm not sure. I'm a womenswear patternmaker so only have very limited experience with mens patterns. For the G-P range you would need to alter the pattern due to the bust dart, but for the A-J range I think it would be worth giving it a go. 

My approach would be:

  • Choose size based on chest measurement (in relation to bust)

  • Definitely make a toile to check the fit. The areas I'd be wanting to have a good look at would be across the back and shoulders and through the arms / bicep

  • Due to it being a raglan sleeve it is easier to make adjustments through the shoulder than a set-in sleeve, so I'd be sewing the shoulder seam with a basting stitch so it's easy to unpick if you need to add in some of the seam allowance.

  • I think the pattern would be easy enough to alter for menswear after you've looked at the toile to check everything.

  • Check the length of sleeves, length of body of jacket and pocket position.

Comment from Curated member, Jo:

I just noticed that Friday Pattern Company have a blog post up about adjusting a cis male jacket pattern for cis female body shape - the principles in reverse might help you. Here it is.


TOPSTITCHING ADVICE?

Question from Curated member, Sarah:

I'm interested to try contrast topstitching. I have a dark sea green cotton twill and am considering a cyclamen pink thread. Do I use the one thread for everything or swap it in when there is an obvious top stitch?

Leanne’s answer:

That sounds like such an awesome combo! I would only switch in the topstitching thread in areas where you want topstitching to be visible. 

For other purposes like stay stitching or anywhere you don't want visible top stitching (in my case that meant the facing stitch line and hems) then just use your regular matching thread. 

FYI - I used 2 spools of top stitching thread for my Ormond Coat but I played thread chicken at the end, it was really down to the wire. Having three spools on hand would have helped ease the stress levels! (But I also did have to unpick and redo a couple of topstitched areas, so you might find you can get away with two spools, depending on which size you are making. (I made an E) Hope all this helps!  


And finally—a tip from Curated member, Lynda!

Today I finished a lined wool jacket and thought I'd share a tip I wish I'd known. The fabric is mid blue and I used the white interfacing I had, not knowing it would show when I cut open the large thick buttonholes which have two layers of wool + interfacing (boo!).  A fusspot sewist thing for sure that only I will see, but next time I'll definitely consider the colour!


As well as giving you a little insight into the kind of place our private online community is (read: fun, happy, super inclusive and ALL about sewing!), I hope these questions have helped you on your sewing journey. And if you’d like to have help just like this at your fingertips, sign up to our Curated by ITF sewing subscription and get the Ormond coat pattern as well!

Happy sewing,

Emily


RESOURCES MENTIONED IN THIS ISSUE

  • Our private online community is an In the Folds sewing resource available exclusively to members of our Curated by ITF subscription. Each month we share additional resources that relate to the current project, as well as answer questions our members might have about anything sewing related. Past issues are now available for purchase by current subscribers.


For more issues of the Q & A series, you can check out the archive here.


WHAT YOU’VE BEEN MAKING


MORE POSTS IN THE SERIES

ISSUE 166 - THE BASICS OF GRADING PATTERNS: PART TWO

THE Q & A SERIES

THE BASICS OF GRADING PATTERNS: SHIFT METHOD

Hi there! 

I recently got some vintage pattern but unfortunately they’re not all my size:(. I think that means it’s time for me to learn how to resize patterns, if you could please help me, even if it’s just some tricks or things to look out for, I’d be so very appreciative!

Sadiya Coovadia

Toronto, Canada


Following on from part one of our answer (which you can read here), this week I’m going to show you how to grade patterns using the Shift method.

If you’re new to pattern grading, I’d suggest giving the Slash and Spread method a go first, as it will familiarise you with the concepts involved. This is an important part of learning how to make pattern alterations.

WHY USE THE SHIFT METHOD OF PATTERN GRADING?

The Shift method of pattern grading is a good option if you don’t want to cut up your pattern pieces, and is the method professional patternmakers use when grading manually.

how to grade patterns using the shift method

For this method, you will need the stitch line marked on the pattern. (Note: All In the Folds patterns come with the stitch line marked, however not all patterns do. Read more about this here.) 

You can either have the seam allowance on the pattern or not. If you do have seam allowance on the pattern you will need a tracing wheel to transfer the pattern lines onto the pattern paper.

Step 1

To get started, prepare your pattern in the same way you did in steps 1 to 3 of the Slash and Spread method. You need the lines marked on the pattern piece.

Vertical and horizontal lines marked on pattern paper for grading.

Step 2

On a piece of pattern paper mark a vertical line and label it CENTRE FRONT. Mark a horizontal line, perpendicular to the first, towards the top of the line. These lines will help you keep things accurate as you move the pattern piece.

Centre front of pattern lined up with vertical line on pattern paper.

Step 3

Line up the CENTRE FRONT of the pattern piece with the CENTRE FRONT line on the paper. Line up the upper grading line on the pattern with the horizontal line on the pattern paper. Hold in place with pattern weights.

Step 4 of grading patterns using the Shift method.

Step 4

Starting at the CENTRE FRONT neckline, trace the neckline up to the vertical grading line onto the paper using a tracing wheel. If your pattern doesn’t have seam allowance, just trace the edge of the pattern.

Using a ruler, extend the grading line onto the paper.

Step 5

Using a ruler, extend the grading line onto the paper at the top and bottom of the pattern piece.

Mark a second line, ¼ of the grade amount from the first.

Step 6

Mark a second line, ¼ of the grade amount from the first (See Part One for how to work this out).

Slide the pattern piece over so that the grading line on the pattern piece lines up with the second line.

Step 7

Carefully slide the pattern piece over so that the grading line on the pattern piece lines up with the second line. Use the horizontal line to ensure the piece stays level. Hold in place with a pattern weight.

Continue tracing the pattern stitch line until you reach the next grading line.

Step 8

Continue tracing the pattern stitch line until you reach the next grading line.

Extend the grading line onto the paper and draw a second line to the left of the first, ¼ of the grade amount.

Step 9

Again, extend the grading line onto the paper and draw a second line to the left of the first, ¼ of the grade amount.

Slide the pattern piece over and continue tracing the piece up to the next grading line.

Step 10

Slide the pattern piece over and continue tracing the piece up to the next grading line.

Repeat Step 10 but for the vertical lines.

Step 11

For the vertical lines, do the same thing. Mark a second line below the first and slide the pattern piece down to line up with the new line.

Markings on pattern paper when pattern removed.

Step 12

Continue the process until you get back to the CENTRE FRONT. Remove the pattern piece.

Smooth lines marked to create new pattern piece.

Step 13

Finalise the pattern piece by drawing nice smooth lines over the traced lines. Add seam allowance and pattern markings. Repeat for the remainder of the pattern.

Finally, check and true the pattern.

Happy sewing,

Emily


RESOURCES MENTIONED IN THIS ISSUE

  • The Basics of grading patterns: Part One - read the tutorial here.

  • Checking & truing patterns - read the tutorial here.


For more issues of the Q & A series, you can check out the archive here.


WHAT YOU’VE BEEN MAKING


MORE POSTS IN THE SERIES

ISSUE 165 - THE BASICS OF GRADING PATTERNS: PART ONE

Grading patterns: slash and spread method.

THE Q & A SERIES

THE BASICS OF GRADING PATTERNS

Hi there! 

I recently got some vintage pattern but unfortunately they’re not all my size:(. I think that means it’s time for me to learn how to resize patterns, if you could please help me, even if it’s just some tricks or things to look out for, I’d be so very appreciative!

Sadiya Coovadia

Toronto, Canada


Hi Sadiya,

What a great opportunity to begin building on your sewing skills! The thing about learning skills and techniques like these is that it opens up a whole new world of sewing, and we’re happy to help a fellow maker on their sewing journey.

So, congratulations, and here’s what you need to know!

To start with, you’re going to need to either increase or decrease the vintage patterns to make them fit your size. To do this you need to understand grading.

WHAT IS GRADING?

The term ‘grading’ is used in two ways in the sewing world. 

Firstly, grading can refer to when you alter the lines of the pattern to go between sizes. For example, you may have a size D bust, a size E waist and a size F hip. Obviously, you can’t make a straight size E because the bust will be too large and the hip will be too small. So you will grade between sizes to get a fit that suits your specific measurements. This is a very common pattern alteration when making your own clothes and a good one to learn how to do.

The other use of the word grading is how it’s used in the fashion industry.  Pattern grading is the process of increasing or decreasing the size of a clothing pattern to create various sizes, while maintaining the proportions and overall design of the original garment. 

Grading involves using a set of rules and measurements to scale the pattern up or down, typically based on standard size charts or specific customer measurements. This ensures that each size of the garment fits correctly and maintains the intended style and design details.

two methods of grading manually

There are two main ways to grade a pattern manually: the slash and spread method and the shift method. In this week’s tutorial I will show you how to grade a pattern using slash and spread, and next week I will show you the shift method.

Which grading method is better?

Both methods will give you the same result, but if you’re just getting started, the method I’ll show you in this tutorial - slash and spread - is easier. It’s also a great starting point for getting your head around the concept of grading, which will in turn be helpful if you decide you prefer to use the shift method. 

The disadvantage of the slash and spread method is that you need to cut through your pattern, so I suggest tracing a copy of the original pattern before you get started.

Tools for grading

You need a transparent grading ruler for this tutorial. You can make it work with a regular ruler, but a grading ruler will speed up the process and make it more accurate.

You also need some pattern paper, glue or tape and a pacer pencil.


HOW TO RESIZE PATTERNS USING THE SLASH AND SPREAD METHOD

The first thing you need to do when grading a pattern is work out how much width needs to be added or removed. 

Start by looking at the size chart for the pattern, and comparing it to your actual measurements. Remember, patterns for woven garments have a certain amount of ease built into them (the space between your body and the garment) so when grading a pattern you want to have the same amount of ease in the pattern as when it was designed. The finished garment measurements can help with that. 

Ease = finished garment measurements - body measurements

Parts of a bodice pattern.

For our example, we will say that you need to add 10cm (4in) to your pattern in the bust, waist and hip.

If you think about a bodice pattern, normally you have a front and back piece that are cut on the fold to create the full garment. So you have a left front, left right, left back and right back. This means that when grading a pattern, you need to distribute the alteration between the four parts of the pattern.

To increase the pattern by 10cm, we divide this by 4 (the four parts of the pattern), which means each part of the pattern will increase by 2.5cm.

You then need to know what ¼ of this amount is and what ½ of this amount is. I find it helpful to jot these numbers down at the beginning of the process so they’re right in front of me.

In this case, ¼= 6.25mm (I’ll round to 6.2mm)
½= 1.25cm (I’ll round to 1.3cm)

Distribute the grade through the pattern

It’s helpful to have a diagram of where the alteration will be made in front of you as specific parts of a pattern need to be altered, and this will be the same across most patterns. This diagram from Threads is a helpful reference.

Mark the lines on the pattern

In the Folds Cartwright top pattern marked with red horizontal lines at the sleeve and waist.

Step 1
Mark in the horizontal slash lines on the pattern. We’re working on a top pattern, so the horizontal lines go through the armhole and the waist. These lines need to be perpendicular to CENTRE FRONT.

Vertical slash lines at shoulder, armhole and neckline.

Step 2

Mark in the vertical slash lines. They go through the neckline (close to the centre front), through the shoulder, and through the armhole near the side seam. These lines should be parallel to the CENTRE FRONT.

Example of grade distribution when resizing patterns.

Step 3

Take note of how the grade will be distributed through the piece. 

For the vertical lines, ¼ goes through the line closest to CENTRE FRONT, another ¼ through the shoulder area, and ½ through the armhole area. If you add these fractions together you get 1, which means the whole grade will be distributed through the piece.

For the horizontal lines, we will distribute ¼ through each line.

Cut through slash lines.

Step 4

Cut through the slash lines. Being careful to not mix up the pieces.

Mark centre front on large piece of pattern paper.

Step 5

Take a piece of pattern paper that is larger than your pattern piece (if grading the pattern up) and mark in the CENTRE FRONT down one side.

Line up centre front edge with same edge on paper.

Step 6

Start with the CENTRE FRONT next section of the pattern. Line up the CENTRE FRONT edge with the CENTRE FRONT marked on the page and glue or tape in place.

In the illustrations I have changed the section of the pattern to orange when it is in position.

Draw lines onto paper.

Step 7

Draw a line down the side of the piece that is taped in place, parallel to the CENTRE FRONT. Draw a line across the bottom of the piece, perpendicular to CENTRE FRONT.

Add 1/4 of the grade.

Step 8

Referring to your diagram in Step 3, you will see that ¼ of the grade (i.e. 6.2mm) needs to be added to this section.

Draw a line 6.2mm from the vertical line, making sure it’s parallel to the first line.

Line up your next pattern piece.

Step 9

Slide the next piece of the pattern over and line up the corner of the piece with the corner created by the lines. Tape or glue in place.

Add 1/4 of the grade, slide pattern piece over.

Step 10

Repeat the process on the other side of the piece, again adding ¼ of the grade. Slide the pattern piece over and tape or glue in place.

Add 1/4 of the grade to the pattern vertically.

Step 11

At this stage you have the top section of the pattern in position, so you now need to move to the next row of pieces.

Before we get started, we need to add ¼ of the grade to the piece vertically. Use your ruler to mark this in below the pieces that are stuck in place.

Slide next three pattern pieces into position using guidelines.

Step 12

Place the next three pieces in position using the guidelines. Stop when you get to the armhole, as we need to add another guideline there.

Step 13

Draw a line down the side of the last piece that is taped in place, parallel to the CENTRE FRONT.

Mark in another guideline, parallel to the CENTRE FRONT, this time ½ of the grade (i.e. 1.3cm). Slide the next part of the pattern over and tape or glue in place.

Step 14

Rule a line across the bottom of the pieces and another ¼ of the grade down from that. Position the remaining pattern pieces and tape or glue in place.

FINALISE THE PATTERN

Redraw smooth stitch lines and add seam allowance.

Redraw smooth stitch lines over the alteration. Add seam allowance back onto the pattern.

Grading a sleeve.

Repeat the process for the back pattern (with the guidelines in the same positions as on front) and sleeve (if it has one).

Making the pattern smaller

Grading to a smaller size.

The same process can be used for making a pattern smaller. Rather than slashing and spreading to add width, you need to overlap the sections of the pattern to make it smaller.

Finally, check and true the pattern.

Happy sewing,

Emily


RESOURCES MENTIONED IN THIS ISSUE

  • Checking & truing patterns - read the tutorial here.


For more issues of the Q & A series, you can check out the archive here.


WHAT YOU’VE BEEN MAKING


MORE POSTS IN THE SERIES

ISSUE 164 - HOW TO CUT FABRIC STRAIGHT

THE Q & A SERIES

HOW TO CUT FABRIC STRAIGHT WHEN SEWING

Dear Emily,

You write beautiful tutorials and I save them all in the hopes that one day they will be useful.  Today I'm going to try the bias binding neckline one.  

The reason I'm writing is because I can't cut a straight line on fabric.  It looks straight, but ends up on an angle. I'd love a tutorial.  I have lovely, lovely scissors and a wheel thing.  

I remember as a kid making a jumpsuit and a long dress and now I can't even make a decent rectangular bag!  I made one using shark material for my grandson's bday gift.  I figure that if he sees it doesn't have to be perfect it will set him free from sewing worry.  

Today I'm going to sew a cushion with my granddaughter.   So we're still sewing, I just really would love some help with cutting fabric!  Pretty basic stuff!

Be well and thank you for your wonderful site. 

April in Snowy Ottawa, Canada


Hi April,

Thanks so much for this question, and I can confirm that you are most definitely not the only person to experience this problem! It is quite a skill to cut fabric straight (at the best of times - I’ll explain what I mean by this!) so here are my thoughts on how to cut fabric straight.

POSSIBLE CAUSES FOR NOT CUTTING FABRIC STRAIGHT

My first question to you is, are you sure it’s a ‘you’ problem? You might be relieved to hear that sometimes it’s not you causing the wonkiness. Rather, the problem could be that the fabric is off grain. 

What this means is that the fabric is warped or stretched during the manufacturing process. With printed fabrics (like your shark print) this can mean that even though the print looks straight, it’s not actually aligned with the grainline. This makes it impossible for you to cut your fabric straight - that is, in line with a pattern’s grainline. 

Similarly, the grainline might be straight on the fabric, but it wasn’t printed straight, again meaning that when you cut a pattern according to the grainline it will look wonky.

Finally, it may not have been cut off the bolt straight, so if you’re using the cut line as a reference point, you may again end of up with a wonky piece.

TIPS FOR CUTTING FABRIC IN A STRAIGHT LINE

Square up your fabric

My first tip is to make sure the whole piece of fabric you have purchased is square before you begin cutting into it. Here’s how to do this. As close as possible to one end of your who piece of fabric (ie. no more than 2cm), snip into the edge of the fabric at a 90 degree angle to the selvedge. It’s ok to eyeball this as it should only be a very small cut (around 1cm). Take the edges of the fabric in your hands on each side of the snip and tear it from one selvedge to the other. This should cause the fabric to tear along a threadline and the result should be a straight line. You can read more in this post on how to find the straight grain on fabric.

Once you’ve checked that the grainline is straight on the fabric, give the fabric a good press. Below are some points to keep in mind when doing this.

The difference between ironing and pressing

Ironing involves moving the iron back and forth over the fabric to remove wrinkles. Pressing, on the other hand, is a technique where the iron is placed onto the fabric in a stationary position for a short period of time. Pressing is more about applying heat , pressure and moisture (through steam) to specific areas, rather than gliding the iron over the entire fabric. 

In the case of preparing the fabric to be cut, be careful to gently glide the iron over fabric, rather than putting pressure on the fabric as this may stretch the fabric and cause it to go off grain. It’s a good idea to give the selvedges a good press, so you can line them up easily with the edge of your cutting table.

Lay the fabric out flat

Consider if you will be cutting flat, or cutting on the fold. Normally the pattern you are using will specify this. It will also depend on your fabric. For thick fabrics or when lining up prints, cutting flat will make for more accurate cutting. Cutting on the fold is normally the most efficient way to cut as it will speed up the process. Having the fabric on the fold and cutting two layers at once can also add stability.

When laying the fabric on your cutting surface, use a long straight line as your reference point. If you cut on a table, this could be the edge of the table, or if you cut on the floor you might like to stick a line of masking tape down which you can easily remove afterwards.

Line up the selvedge with the straight line (eg. the edge of the table) and, if you can, align the cut edge of the fabric with the corner of the table. This will confirm that the two edges are straight. 

Gently move the piece of fabric into place so that it is laying flat. Don’t stretch the fabric at all. Once the selvedge is in position, use your finger tips to remove any bubbles. A long plastic ruler can also help to flatten it out, especially if it’s a large piece of fabric and you can’t reach all of it.

Don’t let the fabric drape over the table as this can distort the grain. If the fabric is too large to lay flat on the table, roll or fold the length up onto the end of the table to ensure it doesn’t pull on the fabric.

Pin fabric between two layers of paper to prevent shifting and make it easier to cut.

If your fabric is prone to shifting, I strongly recommend cutting it between layers of paper. Ideally you will cut between two, but even just one (either on the top or under the fabric) will make a difference. This is a great technique to use, particularly when cutting lightweight or shifty fabrics like silk.

Once your fabric is in position, you can use pattern weights (or whatever you have to hand, like tins of food!) to hold it in place.

Align pattern grain line with straight selvedge.

Position the pattern pieces using the grainline to ensure they are straight. To do this, measure from both ends of the grainline to the selvedge with a tape measure. Once it’s straight, use pattern weights to hold in place and then pin. 

Cutting the fabric

Make sure your scissors (or rotary cutter, if that is your preference) are nice and sharp. It can help to cut loosely around the piece before actually cutting the piece to release the tension on the fabric and ensure there is no fabric weight pulling on the fabric you’re trying to cut. However, this only works if you’ve got a bit of wiggle room with your fabric yardage!

If you're right-handed cut to the right of the pattern piece.
If you're left-handed cut to the left of the pattern piece.

If you’re right handed, cut with the pattern piece to the left of the scissors.If you’re left handed, do the opposite. Use your hand, or pattern weights, to hold the piece in place as you cut. Cut with long cuts, rather than small snips. Cutting like this means you can clearly see the edge of the pattern and can use your other hand to support the fabric and pattern piece. If you are finding it difficult to get to certain parts of the pattern piece to cut in this way, loosely cut around the piece so you can rotate the piece to get into a comfortable position.

HOW TO PREVENT STRETCHING ONCE FABRIC IS CUT

To ensure the fabric doesn’t stretch after cutting, it’s best to leave the pattern pieces pinned to the fabric if possible. This also means you won’t run the risk of mixing up pattern pieces.

When it comes to assembling the garment, make sure you staystitch any areas that are prone to stretching. This is normally necklines, armholes (on sleeveless garments only) and pieces cut on the bias. To staystitch, stitch 6mm (1/4in) from the raw edge. If staystitching a neckline, stitch from the shoulder down to the centre front / centre back on each side. 

I hope this helps with your sewing endeavours!

Happy sewing,

Emily


RESOURCES MENTIONED IN THIS ISSUE

  • How to find the straight grain on fabric - tutorial here.

  • How to cut tricky fabrics - tutorial here.


For more issues of the Q & A series, you can check out the archive here.


WHAT YOU’VE BEEN MAKING


MORE POSTS IN THE SERIES

ISSUE 163 - Full bicep adjustment for a grown-on sleeve

How to do a full bicep adjustment on dolman sleeves.

THE Q & A SERIES

Full bicep adjustment on dolman sleeves

Hi Emily

I recently read your Q&A on full bicep adjustments which was fantastic, but I now have the problem of how to do a full bicep adjustment on grown-on sleeves or even dolman sleeves. Any tips?

Thanks!

Chloe
Sheffield, UK


Hi Chloe,

Thanks for reaching out and I’m happy to help.

DO I NEED A FULL BICEP ADJUSTMENT?

This adjustment is needed if a sleeve is too tight around the bicep, or if the fabric bunches up around the bicep. As you can imagine, it’s not too hard to figure out if you need to make this adjustment on a finished garment. You’ll know, either as soon as you put it on, or within a very short period of time while wearing it.

But what if you haven’t actually made the garment yet? 

HOW TO CHECK IF YOU HAVE FULL BICEPS AND NEED TO ADJUST YOUR PATTERN

Firstly, think about your current wardrobe. Is this a problem you’ve experienced with ready-to-wear or other garments you’ve made before? If so, you’ll probably need to do a full bicep adjustment.

However, it’s important to consider the design of a pattern and amount of ease allowed for.

For fitted designs it’s likely that you’ll need to do an adjustment if this is a problem you’ve had before, whereas more generous ease allowances found in relaxed garment styles may mean that you can avoid doing the adjustment entirely. To double check, keep reading!

Measure your bicep and compare it to the bicep measurement of the pattern. Some patterns may specify this measurement, which makes it easy to compare, but if not, measure the sleeve pattern piece, minus the seam allowance and multiply by two.

Hold a measuring tape around your bicep at the length allowed for in the pattern. How does it feel? Is there plenty of room when your bicep is flexed and at rest? If so, you probably don’t need a bicep adjustment.

Still not sure? Keep reading!

Make a toile/muslin to be absolutely certain before sewing the pattern in your ‘good’ fabric. Put the toile on and consider how it feels around your bicep. If you aren’t happy with the fit and think it needs more ease, proceed on to making the actual adjustment, as outlined below. 

HOW TO MAKE A FULL BICEP ADJUSTMENT ON A GROWN-ON SLEEVE

Want to know how to do a full bicep adjustment on a regular sleeve? Check this tutorial out.

When making a pattern adjustment of any kind the first thing you need to think about is what area you need to alter. In this case, the goal is to add width to the bicep area of a pattern. 

Step 1

Mark the bicep line on the pattern. (Your bicep is usually the fullest part of your upper arm.) On a grown-on sleeve you can estimate where this is by holding the pattern up to your body. If you have a toile, refer to that. 

Technical illustration of step 1 in full bicep adjustment on grown-on sleeve.

Draw the line from stitch line to stitch line.

Step 2

Technical illustration of step 2 in full bicep adjustment on grown-on sleeve.

Measure the bicep width on the pattern and take note of your measurement.

You will need to do the same on the BACK pattern piece and add the two numbers together. Compare this to your actual bicep measurement. 

To find this, wrap a tape measure around your bicep - usually the widest part of your arm. Flex the muscle if you know there is a large difference between your bicep while flexed and at rest. 

Compare the measurements and consider how much ease you would like in the pattern. 

For a relaxed style like the Everyday dress, you will want at least 10cm (4in) ease or more. Alternatively, if you have made a full bicep adjustment on a standard sleeve, you can add the same amount to this sleeve.

Step 3

Now that the bicep is marked, think about what other lines you need on the pattern to make the alteration. It can be helpful to look at the alteration on a regular sleeve to see what’s required and then apply it to the pattern you’re working on. 

Technical illustration of step 3 in full bicep adjustment on grown-on sleeve.

For example, if you look at the same alteration on a regular sleeve (above) you can see we also need a vertical line from the bicep to the hem to help us add our width. 

Technical illustration of step 3 in full bicep adjustment on grown-on sleeve.

Step 4

Draw a line perpendicular to the sleeve hem that intersects with the bicep line.

Technical illustration of step 4 in full bicep adjustment on grown-on sleeve.

Step 5

You’ll also need another line that runs from the intersection point on the bicep line, up to the neckline.

Technical illustration of step 5 in full bicep adjustment on grown-on sleeve.

Step 6

From the shoulder, cut down through the bicep line to the stitch line at the underseam. Stop 1-2mm from the stitch line and then cut into the seam allowance towards the end of the cut line to create a small hinge.

Technical illustration of step 6 in full bicep adjustment on grown-on sleeve.

Step 7

From the bicep line, cut down the line to the hem. Stop 1-2mm from the hem stitch line and then cut into the hem allowance towards the end of the cut line to create a small hinge.

Technical illustration of step 7 in full bicep adjustment on grown-on sleeve.

Step 8

Slide some pattern paper under the pattern piece.

Use the small hinges in the pattern piece to open the bicep line by the desired amount. 

Remember that you will be doing the same alteration to the back so if you are adding 4cm (for example), you need to split this amount through the front and back.

Technical illustration of step 8a in full bicep adjustment on grown-on sleeve.

Use the hinge at the neckline to manoeuvre the upper shoulder section to line up with the lower sleeve. Tape the piece in place on the pattern paper.

Technical illustration of step 8b in full bicep adjustment on grown-on sleeve.

Step 9

To finalise the pattern piece, you have a few options.

You can mark a line over the alteration as a smooth curve. Join the new sleeve seam to the hem line with a straight line that is perpendicular to the shoulder seam.

As you can see in the illustration, to have a hemline that is perpendicular to the shoulder seam, I needed to cut a little bit of length off the seam. This isn’t an issue as you can see a similar amount of length was added to the shoulder seam when I made the alteration.

Technical illustration of step 9 in full bicep adjustment on grown-on sleeve.

Or, an alternative is to draw a straight line through the alteration. As you can see, this will add some width to the hem, so you need to consider if you are happy with this.

Technical illustration of step 9b in full bicep adjustment on grown-on sleeve.

If you would like the straight shoulder seam like the original pattern but don’t want any extra hem width, consider taking some width off the underseam as illustrated.

Step 10

Once you’ve made the alteration to the FRONT, you will need to repeat for the BACK. Always be sure to check and true your seams by walking the seams together.

And, don’t forget to add seam allowance back on to the altered sections of the pattern!

To sum up the process of making an alteration to an unconventional pattern piece:

  1. Work out what area needs to change and mark a guideline. If you are changing the bust this would mean finding the bust line. In this case, it’s marking the bicep line.

  2. Look at how to make the alteration on conventional/traditional shaped patterns and then translate this to your pattern.

  3. Mark in additional guidelines to help you slash and alter the pattern. Remember, only cut to the stitch line. It can be helpful to print the pattern piece on a small piece of paper (i.e. print the A0 version as A4) and have a play around to see if the cuts will give you the desired effect. I often do this multiple times until I am happy.

  4. Once you’ve made the alteration, do the same to any pieces that are also impacted.

  5. Check and true your pattern pieces to ensure everything still matches together.

  6. Add seam allowance back on to altered seams.

  7. Make a toile to check that you’re happy with the alteration.

Happy fitting!

Emily


RESOURCES MENTIONED IN THIS ISSUE

  • The Everyday dress pattern can be found here.

  • How to do a full bicep adjustment on a conventional sleeve - tutorial here.

  • Checking and truing seams - tutorial here.

  • Walking seams together - tutorial here.


For more issues of the Q & A series, you can check out the archive here.


WHAT YOU’VE BEEN MAKING


MORE POSTS IN THE SERIES

ISSUE 162 - HOW TO ALTER A PATTERN WITH PANELS

THE Q & A SERIES

HOW TO ALTER A PATTERN WITH PANELS

Hi Emily,

I love this idea. It is so very helpful and generous of you to share all that you’ve learnt and your experience. Very cool.

I have a question about raising the back neckline of the Collins Top. Would you extend the back piece and the back sleeve and sleeve shoulder panel pieces and blend to the front neckline? I’m never sure how to deal with the curve of the neckline. I have discovered I need to do a High Round Back Adjustment on most tops, so I use the Centre Back seam to add length and a curve, but maybe I need to add this to the next seam along too (where the back meets the back sleeve?). Thanks for your help!

Cheers,

Genevieve

Brisbane, Australia


Hi Genevieve,

We thought this would be a great question to answer this week as we have just released the Elwood dress pattern

You’ll notice some similarities between Elwood and our Collins top, because Elwood was drafted from the Collins top. I always had this niggling feeling that I wasn’t quite done with the Collins top pattern, and had revisited it a number of times when experimenting with 3D pattern drafting. 

When our community asked for a signature In the Folds pattern for 2024, I knew it was time to revisit what I’d been working on in Clo3D and bring one of these ideas to fruition. (Check out this blog post if you’re interested in reading more about my Clo3D adventures!)

What this means for you (and any of our other customers thinking about sewing Elwood) is that our fitting tutorials created for the Collins top, will also apply to the Elwood dress. If you’d like to check out some of these tutorials, you can find some links to them below.

Here’s how to:

How to make fit alterations to a panelled pattern

When making fitting alterations to a pattern that has panel lines, there are a few things you need to do. This process will allow you to make any alterations you like to a pattern.

Step 1: Mark the stitch line on the pattern

Mark stitch lines on pattern.

When making pattern alterations the stitch line should be marked on the pattern. All In the Folds patterns have the stitch line marked, and we thought this was just standard in the sewing industry, but turns out it’s not! So what this means is you may need to mark in the seam allowance on the pattern yourself. 

Step 2: Remove panel lines

Remove panel lines for upper back adjustment.

Place pieces together to temporarily remove the panel lines. In the case of the Collins top, this means joining the SHOULDER PANEL piece to the BACK SLEEVE. This is when your stitch lines come in handy because you need to position your pieces stitch line on stitch line as if the pieces have been sewn together. This doesn’t mean we’ll be losing our panel lines, just that we’re removing them to make the alteration easier to manage and then we’ll bring it back. Hold the pattern pieces together with tape or pins… something that won't rip your pattern piece or be too hard to remove.

Step 3: Make the alteration

Make the upper back alteration.

In this case we’ll be drawing a horizontal line through our back piece, towards the neck, and through the similar area on the sleeve pieces. On the sleeve I have marked the alteration line perpendicular to the back sleeve grainline.

Add the alteration amount required.

Add the amount required. This is when having a toile to refer to is very helpful. Or, if this is an alteration you regularly have to make, then you might have a good idea how much is required.

Step 4: True the lines

True the lines of your pattern alteration.

“Truing” your lines means that you need to draw a smooth line over the alteration. This takes some practice, so be sure to use a pencil. I like to use a transparent ruler and pivot it to create a nice smooth curve (similar to the way I add seam allowance on a pattern), but you may prefer to use a French curve.

Step 5: Add your panel lines back in

Add panel lines back in.

If you have joined any pattern pieces together to make the alteration, mark the panel lines back in. Do this the same way as how you trued your lines. You want the lines to be as smooth as possible.


Step 6: Finalise the pattern piece

Finalise the pattern piece.

To finalise the pattern pieces you will need to add seam allowance onto the areas that have been altered.

Trace altered pattern pieces onto pattern paper.

For pieces that have been joined, trace the altered pieces onto pattern paper, then add seam allowance on. When tracing a pattern, be sure to always transfer the notches and the grainline.

Step 7: Check the pattern pieces

Check the pattern pieces.

Walk the seams to check that everything fits together nicely and that none of the notches have moved. By doing this you are checking that seams that you will be joining together are the right length, so you don’t get any nasty surprises at the sewing stage. You also need to check that you have smooth lines. For example, in the diagram I am checking that the neckline is still a nice smooth curve. If you realise that the line is no longer smooth, smooth it out and use a tracing wheel to transfer the new line onto the overlapped paper.

Step 8: Make a toile

It’s always a good idea to make a toile to check a pattern alteration you’ve made. In the case of this alteration, you may also want to check if you need more shaping through the back. To do this you can get someone to help you and pinch our excess fabric through the back seams.

As with any pattern alteration, the important thing is to take it one step at a time. It’s usually when we’re rushing that we make mistakes, so I recommend working through the process bit by bit and having a practise before you start chopping into your good fabric!

Happy Elwood and Collins sewing!

Emily


RESOURCES MENTIONED IN THIS ISSUE

  • The Elwood dress pattern is currently available with a Curated by ITF subscription for the month of February 2024. More information can be found here.

  • The Collins top pattern can be found here.

  • Fitting tutorials that relate to the Collins top can also be applied to the Elwood dress. They can be found here.

  • How to make a toile - post can be found here.

  • Checking and truing seams - post can be found here.


For more issues of the Q & A series, you can check out the archive here.


WHAT YOU’VE BEEN MAKING


MORE POSTS IN THE SERIES

ISSUE 161 - HOW TO MANAGE A GROWING WARDROBE OF HANDMADE CLOTHES

THE Q & A SERIES

HOW TO MANAGE A GROWING WARDROBE OF HANDMADE CLOTHES

From all your makes do you ever feel like you have too many clothes? What do you do about storage and do you wear all your makes regularly? Do you ever get rid of your older makes that no longer work for you?


This question came up in our private, online Curated by ITF community this week and it got such great interaction that we thought we’d share everyone’s comments with you today!

For most makers, having a full wardrobe is definitely not an unusual ‘problem’. And we use the word ‘problem’ very carefully because the concept of sewing as a form of self-care is known and very much appreciated in the creative community.

Emily sits at a sewing machine and is working on a toile.

the benefits of sewing : more than just clothing

The benefits we get out of making are so much more than just having clothes to put on. Making gives us the opportunity to take a break from day-to-day life. When the rest of our life happens at break-neck speed, sewing allows us to focus on the task at hand and to be mindful and meditative.

Sewing motivates and challenges us. It gives us the opportunity to continue to learn and solve problems once we’ve finished studying for our profession. It teaches us resilience, because it doesn’t matter how long we’ve been sewing for, there will always be moments when our makes just don’t go to plan.

And one thing we know for sure, because we see it everyday with our Foldies in our Curated by ITF community, sewing provides an opportunity to connect with others who share our love for the craft. And we think this is probably the best part of all!

So with all that in mind, here are some ways our Foldies manage a growing wardrobe of clothes!

Charity shop donations

If you’re getting stressed about your expanding wardrobe, consider gifting any unworn makes to your local charity shop. One of our clever Foldies likes to help the volunteers out by including a little tag that includes the size of the garment and the fabric content. 

Gift to family and friends

If you’ve been sewing for a while then it’s likely that you’ve had a friend or family member comment positively on a garment you’ve made. Try to remember if anyone has admired the garment you’re wanting to move on and wrap it up as a little pressie for them. 

If you’ve decided you definitely need to slow down or stop making clothes for yourself for a while, but you’re also thinking about your growing fabric collection, consider loved ones you can make gifts for. By making clothes for others, you’re filling your sewing cup, practicing fitting on other people and emptying your fabric stash at the same time! Win, win, win!

Only make garments you need and really, really love

If you have trouble handing over garments you’ve poured your heart and soul into, you’re not alone! In this case, being more selective in the garments you choose to make can help. Try not to be influenced by trends or the latest patterns. Instead, take a look at your wardrobe and think about the garments you always go back to over and over again. Why is this the case? Is it the fabric? The colour? The cut? The style? Where are the gaps in your wardrobe? Our Slow Sewing Planner is a helpful tool to have when working through this process. 

@sewingwithkate wearing her original Rennie dress

@sewingwithkate wearing her refashioned Rennie dress

Refashion garments to make them more wearable

Sometimes it’s not until after we’ve made something and tried it on or worn it a few times that we realise it just doesn’t suit us. In these situations it can be helpful to consider whether there’s any little changes you can make to a garment to improve it. 

Take it in if it’s too baggy. Turn a dress into a skirt and top. Take up the hem or let the hem out.

The pattern instructions may say you’re finished, but your imagination doesn’t have to! Take the opportunity to try something you may not have thought of before.

Reuse the fabric in another garment

Depending on the garment size, take the time to cut off all the seams so that you have as much usable fabric as possible. Return what fabric you have left to your fabric stash to be used in another make in its entirety or for pocket bags, facings, or making bias bind. 

One-in-one-out

If you’re making a new garment, commit to donating the least favourite alternative already in your wardrobe. If you decide you love everything in your wardrobe, adopting this approach may help curb the impulse to make something new!

It’s important to find balance with everything we do, including the garments we sew and the hobbies we have, so we hope this post helps you if you’ve been struggling with an expanding wardrobe full of beautiful me-mades!

Happy sewing,

Emily


RESOURCES MENTIONED IN THIS ISSUE

  • Curated by ITF is our sewing subscription and private, online community. Join now to get a new project each month to stop pattern-stashing and start skill-building!

  • Our Slow Sewing Planner helps you gain clarity on what’s missing from your wardrobe, as well as sustainable tips for organising what you already have.

  • Our Rennie dress pattern is a boxy, relaxed fitting calf-length dress made for easy dressing that incorporates a range of finishing techniques for a beautifully finished garment. This pattern will elevate your wardrobe and sewing skills!


For more issues of the Q & A series, you can check out the archive here.


WHAT YOU’VE BEEN MAKING


MORE POSTS IN THE SERIES

ISSUE 160 - HOW TO TRUE A DART

THE Q & A SERIES

HOW TO TRUE A DART

Hi there,

Just wondering if you can help me with what I need to do to a pattern after I’ve added in a dart. I can’t quite wrap my head around how to make the points on the seam edge that you see on patterns…

Thanks,
Janice


With the release of our Marden shirt Hack Kit this month (part three of our Sewing Shirts Series - check out part one and part two), we thought this was a timely topic to address.

Sometimes when you’re learning a new skill there’ll be strange words and techniques to learn that won’t mean anything to you at first and this may be one of those times!

If you’ve got no idea what it means to true a dart, but you’re keen to learn, you’ve come to the right place!

But let’s start at the beginning…

When you first start learning the skill of pattern making, it’s helpful to remember that your aim is to turn a flat object into something with shape and curves.

To do this, we have to manipulate fabric by folding or gathering it, essentially tucking excess fabric into seams in one area (which are then stitched in place) in order to create shape or volume in another area.

what is a dart?

Darts are one approach garment designers use to make something two dimensional (like fabric) fit around something three dimensional (your body).

Although they are most commonly used to create shape around areas of the body that are curved, such as the bust, shoulders, elbows and waist, they can be used pretty much anywhere, whether purely for fit or as a design detail.

WHAT IS DART SHAPING AND WHY DO WE NEED TO THINK ABOUT IT?

You may have put a dart in a garment before and noticed that it changed the shape of the seam that it lies on and it’s no longer the smooth line it once was. We don’t want to just leave it like this as the additional fabric in that area may affect the fit and finish of the garment.

So, we add something called dart shaping. Dart shaping is a technique used to manage the extra fabric that’s been added into a garment and ensure that once the dart is sewn, the seam it's on will remain a nice smooth line, which ultimately means we’ll get a nice clean garment finish (something we love at In the Folds!).

how to add dart shaping

Note that in the example above, we have added seam allowance to all seams except for the side seam. We cannot add seam allowance to the side seam until we have trued the dart and added dart shaping.

Be sure to leave excess paper on the seam with the dart, as we will need this for the dart shaping.

STEP 1

Take the pattern piece that requires dart shaping.

Fold the dart so you can predict what will happen to the shape of the seam when you sew the dart from the fabric.

Think about which direction the fullness of your dart will be pressed once it is sewn. This will decide which dart arm you need to fold. Generally, vertical darts are pressed towards the centre front (in the case of front darts) and the centre back (in the case of back darts). For horizontal darts (like the one pictured), the bulk of the dart is pressed down.

Tip - You will be using a tracing wheel in the following steps, so it’s a good idea to slide a cutting mat under the pattern so you don't damage your table.

STEP 2

Folding a dart on a flat surface is not possible, as we are making a two dimensional pattern three dimensional.

Place the tip of the dart on the corner of a table (or a large book also works) and fold the lower dart arm so that it meets the upper dart arm.

As you can see in the example, the side seam line doesn't match up on either side of the folded dart. We will correct this before marking the dart shaping. 

Hold the folded dart in place with a pin or pattern weight.

STEP 3

Take a ruler and draw a straight line from the top of the side seam, down to the hemline. This is the new side seam STITCH LINE. If the seam had previously been a curve, you would draw in a smooth curve.

STEP 4

Use a tracing wheel to transfer the new side seam STITCH LINE onto the folded section of the dart. This will give you the shaping you need for the dart.  If you don't have a tracing wheel, poke small holes along the stitch line using a stiletto, pin or similar.

STEP 5

Add seam allowance to the side seam. Use a tracing wheel to transfer the seam allowance line onto the folded section of the dart.

STEP 6

Unfold the dart. You will see the dots made by the tracing wheel. Take a ruler and join the dots to form a nice smooth line.

STEP 7

Add notches at the side seam by extending the dart arms through the seam allowance. Mark notches.

video - truing a dart 

If you’re someone who learns by watching, take a look at this video where I walk you through the process of creating dart shaping.

Happy patternmaking,

Emily


RESOURCES MENTIONED IN THIS ISSUE


For more issues of the Q & A series, you can check out the archive here.


WHAT YOU’VE BEEN MAKING

Annabel wears a colour blocked Neale jumpsuit hack.

Neale jumpsuit hack made by @thatsewannabel


MORE POSTS IN THE SERIES

ISSUE 159 - FORWARD SHOULDER ADJUSTMENT ON A CURVED SHOULDER SEAM

THE Q & A SERIES

HOW TO DO A FORWARD SHOULDER ADJUSTMENT ON a CURVED SHOULDER SEAM

Hey Emily,

How do I do a forward shoulder adjustment with the sloped shoulder on the Marden shirt???

Suthi, Curated by ITF member


One of the features we love about the Marden shirt is that smooth, shaped shoulder.

And even though some members of our Curated by ITF community weren’t sure about it at first, we were quietly confident that once they made the shirt and put it on, they’d fall in love with it.

And we were right! (See Exhibit A below, a conversation thread from our private Curated by ITF online community.)

Sue wears a printed Liberty poplin Marden shirt in View B.

Sue’s Liberty Marden shirt in View B.

Lynn wears a white striped linen Marden shirt in View A.

Lynn’s linen Marden shirt in View A.

But if, like some of our Curated community members, one of your go-to fitting alterations is a forward shoulder adjustment (FSA), the curved shoulder line may leave you scratching your head. So we’ve come to your rescue with the answer you’re seeking!

Not sure what a forward shoulder adjustment is? Read this tutorial.

how to do a forward shoulder adjustment on a curved shoulder seam

As a quick overview, what we’re going to do is remove the shoulder shaping, make the FSA as we normally would and then add the shoulder shaping back on.

Let’s go!

STEP 1

Draw a straight line through the shoulder STITCH LINE, intersecting with the armhole and neckline at each side on the FRONT and BACK.

STEP 2

Cut along the lines marked in STEP 1 and label as ‘FRONT SHOULDER’ and ‘BACK SHOULDER.’

STEP 3

On the FRONT, mark the amount you would like to move the shoulder seam forward by. For example, if you need to move the seam 2cm (¾in) forward, draw a line 2cm from the cut line. (Not sure how much you need to move the shoulder seam by? Read this post.)

Cut along the line and label the side that’s close to the NECK so you get the piece around the right way when you join it to the BACK.

STEP 4

Stick the piece cut from the FRONT onto the BACK. You may need to add some paper behind the piece to make it easier to attach it accurately. Attach the BACK shoulder shaping back on.

STEP 5

Smooth out the stitchlines around the armhole and neckline where the adjustments have been made.

STEP 6

Attach the FRONT shoulder shaping back onto the FRONT. Smooth out the armhole and neckline (if required).

STEP 7

Line up the FRONT and BACK neckline at the shoulder to check the flow through, and adjust if necessary. Read this post about checking and truing adjustments when patternmaking.

STEP 8

Line up the FRONT and BACK neckline at the armhole to check the flow through, and adjust if necessary.

And that’s it! It’s not as scary as it seems. I hope this helps you get your Marden shirts to fit perfectly.

Happy sewing,

Emily


RESOURCES MENTIONED IN THIS ISSUE


For more issues of the Q & A series, you can check out the archive here.

WHAT YOU’VE BEEN MAKING


MORE POSTS IN THE SERIES

ISSUE 158 - HOW TO LOWER THE COLLINS TOP ARMHOLE (VIEW A)

THE Q & A SERIES

HOW TO LOWER THE COLLINS TOP ARMHOLE

Hi Emily,

I would like to lower the armhole on the Collins top with sleeves. I found a tutorial on the sleeveless version but could not find one for the version with sleeves.

Could you help me please?

Thank you so much in advance!

M


Hi there!

We love it when our customers ask us how to customise their makes to fit their own unique bodies and measurements. We also know how uncomfortable it is when a garment cuts in under the arm, so we’re very happy to be able to answer this question!

HOW TO CHECK IF YOU NEED TO LOWER THE ARMHOLE

Before we get started, I think it’s worth checking that you are sure this is the alteration you need. I raise this, because this same fit issue could be caused by the need to add length between the shoulder and the bust line. This adjustment also lowers the position of the armhole and could correct the problem.

The best way to work out if you need this adjustment in a garment is to check where the dart is sitting. If it's sitting too high then that's a pretty good indication that length is required. If not, then you're right and just lowering the armhole should do the trick.

In the case of the Collins top (which doesn’t have a dart) I would say to consider your wardrobe in general. Do you often have problems with armholes cutting in? If so, then it’s likely that you need to add length between the shoulder and bust line, rather than lower the armhole specifically.

Some of our Curated by ITF members have realised, through the process of learning to fit clothes specifically to their unique body measurements, that this is a consistently needed adjustment, and it has become one of their standard adjustments when making clothes for themselves.

If the problem of armholes cutting in is not a common issue for you, then read on!

HOW TO LOWER THE ARMHOLE ON THE COLLINS TOP (VIEW A)

Because of the puzzle element of the Collins top (which happens to be one of most loved parts of this pattern!) we know it might feel a little daunting to attempt fit alterations, but as with anything, if you just take it step by step, you’ll have no trouble at all.

Here you go!

STEP 1

Pin or tape (with something that is easily removed) the SIDE FRONT PANEL to the CENTRE FRONT PANEL as if they have been joined.

On the side seam STITCH LINE, mark the amount you would like to lower the armhole by.

STEP 2

Redraw the armhole with a nice smooth curve, joining the point marked in the previous step. Keep the line as similar to the original as you can and meet the side seam at a right angle.

STEP 3

Line up the sleeve panels, STITCH LINE on STITCH LINE as if they have been joined and pin / tape in place. Mark in the bicep line (red line), which runs from the top of the underseam on the front through to the underseam on the back. Take half the measurement you used in STEP 1 and lower the bicep line by this amount (blue line).


OUR CUSTOMERS LOVE THE COLLINS TOP FOR ITS SATISFYING PUZZLE-LIKE CONSTRUCTION


STEP 4

Re-draw the armhole lines with a smooth curve.

STEP 5

Walk the front sleeve into the front armhole, STITCH LINE on STITCH LINE, starting at the neck side of the line.

It is likely that the STITCH LINE on the FRONT SLEEVE is not long enough to reach the end of the armhole curve due to the alteration.

Measure the distance between the sleeve STITCH LINE and the side seam on the SIDE FRONT PANEL. This is the amount that needs to be added to the FRONT SLEEVE.

STEP 6

Add this amount to the sleeve curve and then join to the hem STITCH LINE.

If it is a large alteration and the shape of the sleeve underseam is going to change drastically, we suggest also adding some width at the hem to keep the shape of the piece intact.

STEP 7

Now, repeat the same alteration for the back pieces, then check the front and back side seams line up nicely at the top and bottom of the seam.

Add seam allowance to the new lines (red) and cut away any excess.

Happy fitting!

Emily


RESOURCES MENTIONED IN THIS ISSUE

  • The Collins top pattern can be found here.

  • Adjusting length above the bust - blog post here.

  • Checking patterns: Curved seams - blog post here.

  • How to add seam allowance to a sewing pattern - blog post here.


For more issues of the Q & A series, you can check out the archive here.


WHAT YOU’VE BEEN MAKING


MORE POSTS IN THE SERIES

ISSUE 157 - EXPERIMENTING WITH INTERFACING

Why you should experiment with interfacing.

THE Q & A SERIES

experimenting with interfacing

Hello, I’m new to your site & love the idea of asking a question and getting a helpful answer.

My question is, when using iron on interfacing in a collar or cuff should the interfaced side be outermost or on the underside? And if on the underside, how do you get over the seam allowance (that’s been graded) showing through light weight fabric? I look forward to finding out the right way, thank you.

Alison, UK


Hi Alison!

We’re very glad you’ve found us, and we’re happy to help.

Interfacing is a scary topic for many sewists. When things go well, it is a wonderful thing and can help us create beautiful finishes and looks in our garments. But when things don’t go so well… well, it’s likely that you’ve had a run in with interfacing at some point in your sewing journey (as have the majority of us!) and you’ll know first hand how frustrating it can be to work with.

We wrote a post about what you need to know about interfacing just recently, as it’s an important part of shirt-making, the topic we’re currently focusing on in our sewing subscription, Curated by ITF. This month we’re moving onto the second part of the series, the Marden shirt pattern!

NEW SEWING PROJECT? TIME TO TEST YOUR INTERFACING AND FABRIC!

When it comes to advising about which side of a collar or cuff to interface, it really depends on the fabric and interfacing you’re planning on using for the garment. Which makes it almost impossible for me to provide a definitive ‘do this in all scenarios’ answer (sorry!).

But, I’d start by encouraging you to experiment with the interfacing and fabric you have in mind for your project, particularly when sewing with lightweight fabric. (More on how to do this here.)

Consider the look of the fabric once the interfacing has been fused to it. Is it very obvious and visible through the fabric? Does it negatively impact the look of the fabric, or does it just provide the structure that is needed?

In general, I block fuse both sides of the collar and cuffs. So that's normally what I'd test out first.

As you have mentioned, you may decide that you would prefer to fuse only one of the pieces, rather than the pair. If you're wanting a more relaxed look, you'll generally only fuse the undercollar. This allows the fabric on the top collar to look like the rest of the shirt.

However, if you are using a fabric that is so lightweight it is transparent, then I'd likely be fusing the one that will be on the outside when worn (i.e. the top collar). As you may guess, this is to prevent the seam allowances showing through the collar. If, however, you’re not happy with the finish of the fabric once the interfacing is applied, you may also consider experimenting with using a lightweight cotton as a sew-in interfacing instead.

Hope this helps, and good luck in your interfacing experimentation!

Emily


RESOURCES MENTIONED IN THIS ISSUE


For more issues of the Q & A series, you can check out the archive here.

WHAT YOU’VE BEEN MAKING


MORE POSTS IN THE SERIES

ISSUE 156 - HOW TO GET BUTTONHOLES RIGHT

THE Q & A SERIES

HOW TO GET BUTTONHOLES RIGHT

Hey Emily,

Do you have any tips please for buttonhole spacing & getting the buttons to sit flat on the fabric?

Thanks,
Sheila, Hobart


Hi Sheila,

Buttonholes can be tricky, hey.

There’s so many elements involved in getting them right… the spacing, the stitching, the cutting, the button sewing… And so much that can go badly wrong. (We’ve all experienced the fear of accidentally cutting right through the buttonhole stitching!)

With our Sewing Shirts Skills Kit for this month’s Curated by ITF project we cover everything you need to know, such as how to create a button template, how to mark button placement and how to sew buttons on correctly, but here’s a few tips that may help.

HOW TO MARK BUTTON PLACEMENT

There are a number of different methods you can use to transfer the button and buttonhole placement markings to your shirt. The most common are: 

  • Mark the positions directly onto the finished button placket. 

  • Mark the buttonhole positions on the placket pattern piece and use this to transfer the markings to the pattern.

  • Make a button template.

The most common method is marking the positions directly onto the finished button placket. This gives you flexibility when deciding on button position and allows you to see what the buttons will look like before sewing the buttonholes.

BUTTONHOLE SPACING

When marking button placement, start by marking the top button position. It will be placed closer to the top of the placket than the regular button spacing as it supports the collar stand. We recommend anywhere from 1.5cm (⅝in) - 5cm (2in) down from the top edge. 

Mark the remaining button positions 9cm (3½in) from the top button. For the bottom button, keep in mind that you don’t want it to sit too close to the hem and normally there is a larger space between the bottom button and the hem than between the other buttons..  

Tip! We like to take inspiration from our favourite garments that are already in our wardrobe and we recommend you do the same! Take some time to have a look at the shirts you love to wear and use a measuring tape to replicate the placement on the garment you’re making.

TAILOR BUTTON POSITION TO YOUR BODY

Because you’re making the garment, remember that you can put the buttons wherever you want, according to the needs of your body. To do this, try on the shirt and close the button placket. Place a horizontal pin at the bust line through the top placket only. This is the position where the shirt is most likely to gape. Take the shirt off and space the buttons evenly along the placket starting from the pin. Remember to leave a space at the bottom and ensure the top button is about 1.5cm (⅝in) - 5cm (2in) down from the top edge.

TIPS FOR SEWING BUTTONS

We’ve included a step-by-step tutorial for how to sew buttons onto a garment (specifically a shirt) in our Sewing Shirts Skills Kit, which you can access by joining Curated by ITF, our sewing subscription. 

Otherwise, the main things to keep in mind are:

  • Before sewing a button in position, place a pin, needle or matchstick across the button and make your stitches over it. This will create some extra give in the thread for when you’re creating the shank under the button.

  • Be sure to use interfacing on your button placket as this will help give the area structure. If for some reason you choose not to use interfacing on the whole placket, cut a small circle of interfacing and fuse where the button will be stitched to create stability.

  • Select a button that isn’t too heavy for the fabric you are using. This may take some experimenting on samplers.

  • Use the same number of stitches on each button to keep things consistent. 

Happy sewing,

Emily


RESOURCES MENTIONED IN THIS ISSUE

  • The Sewing Shirts Skills Kit is the first part of our Sewing Shirts project series, which is available through our Curated by ITF subscription. Past issues are now available for purchase by current subscribers. More information can be found here.


For more issues of the Q & A series, you can check out the archive here.


WHAT YOU’VE BEEN MAKING


MORE POSTS IN THE SERIES

ISSUE 155 - WHAT YOU NEED TO KNOW ABOUT INTERFACING

THE Q & A SERIES

WHAT YOU NEED TO KNOW ABOUT INTERFACING

Fusible interfacing seems to ruin everything I make with it. After washing it looks rumpled and horrible. Everyone seems to love it so I must be doing it wrong. HELP!

Jamie, Costa Mesa


Hi Jamie,

You’re definitely not the only maker out there who feels this way about fusible interfacing, because it’s one of those areas where things can go wrong very quickly. 

We’re looking at interfacing this month as part of our Sewing Shirts Skills Kit project for Curated by ITF. Interfacing is an important component of shirt making (and garment sewing in general) and so it’s definitely timely that we answer this question for everyone.

WHAT IS INTERFACING?

Interfacing is an additional layer that is applied to fabric to create structure in a garment. It is also used to ensure certain areas of a garment hold their shape or can support a particular part of a garment. Finally, it can be used to reinforce high stress areas of a garment (for example, buttons and buttonholes). 

Interfacing is applied to the wrong side of the garment so is not visible once the garment is assembled. The most common parts of a garment to use interfacing are: collars, cuffs, button plackets and waistbands. But, it may also be used on facings or around pocket openings for extra support or reinforcement.

TYPES OF INTERFACING

There is a wide range of interfacing available, but generally there are two main types of interfacing that you would be aware of.

Iron-on (or fusible) interfacing

This has a thin layer of glue on one side and needs to be bonded with the fabric using an iron or fusing press.

Most garment makers would predominantly use fusible interfacing, however there are some applications where it isn’t appropriate, such as:

  • Fabric that can’t be ironed, such as sequins, anything with a nap (velvet or fur), vinyls or metallic fibres.

  • Very sheer fabrics

  • Anything with a loose or open weave (eg. mesh, lace)

  • Fabrics that are heavily textured as it may not bond well.

Sew-in (or non-fusible) interfacing 

This type of interfacing is not bonded to the fabric, rather it is attached by sewing it to the fabric. It is most commonly used when you are using a fabric that cannot be pressed or has a texture that you would like to avoid pressing. Fabrics, such as stable cotton, can be used as sew-in interfacing and is something you can also experiment with!

Within these two main types, interfacing can be further categorised by the way it’s made:

Non-woven interfacing

Made by bonding the fibres together, non-woven interfacing has no grain and can be cut in any direction without fraying which makes it very easy to use. However, it can be quite delicate and tear easily, yet at the same time it can be quite stiff with a paper-like quality. For this reason, we believe it is better suited to craft projects and bag making.

If you’ve purchased interfacing before, it’s likely that you’ve purchased non-woven as it’s readily available and tends to be one of the cheaper options. 

Woven interfacing 

Constructed in the same way as woven fabric, woven interfacing behaves and moves like woven fabric, so it’s the best choice when working with woven fabric as it is less likely to affect its drape. 

Like woven fabric, woven interfacing has a grainline so pieces need to be cut on grain (in relation to the grainline on the pattern). The benefit of woven interfacing is that it is able to move with the fabric, and is less likely to affect the drape and fall of a fabric.

Knit interfacing

Knit interfacing has some crosswise stretch and minimal lengthwise stretch so that it can add stability and support to knit fabric. Knit interfacing can be used on woven fabrics and can be a good option on lightweight fabrics that naturally stretch and have drape.

INTERFACING WEIGHTS

Interfacing also comes in multiple weights - light, medium and heavy. When choosing the weight of the interfacing, it is a good idea to select an interfacing that is the same weight or lighter than the fabric you are using. Lightweight woven interfacing will be most commonly used for garment sewing.

EXPERIMENTING WITH INTERFACING

Before selecting interfacing for a project, it is a good idea to experiment with different options on the fabric you plan on using. 

We recommend you cut swatches of fabric (approximately 10cm x 10cm / 4in x 4in) and fuse the interfacing to the wrong side. Label each one with the interfacing you used. To compare, pin them to a noticeboard or onto a mannequin on one corner so you can see how they drape. Fold each piece in half and feel how it feels when it is doubled, as this is how it will feel on a collar or cuff (if you choose to fuse both sides of the collar or cuff).

TIPS FOR WORKING WITH IRON-ON INTERFACING

There is a lot of conflicting information out there about how to apply interfacing. Don’t use steam. Use LOTS of steam! Use a damp cloth. Don’t use a damp cloth…

Thankfully, there are places we can go to benefit from other people’s experience, like this interfacing focused Sewing Pattern Review thread

We recommend that you start out following the manufacturer’s instructions, and then trouble-shoot if you’re still having problems. 

Here’s a few tips!

  1. Use high quality interfacing. The difference is noticeable!

  2. For light coloured fabrics, use white interfacing. For dark coloured fabrics, use black or grey interfacing. It's handy to have some of each colour in your stash.

  3. Prewash your fabric so that it doesn’t shrink when you fuse the interfacing with heat. This may be what is causing your interfacing to bubble as the fabric will shrink but the interfacing won’t.

  4. Cover your ironing board with a large piece of scrap fabric or calico. This will protect it from the interfacing adhesive.

  5. If piece fusing, sandwich the interfacing between two layers of paper and then cut out the pattern piece/s. This will ensure the interfacing does not stretch and the pieces are cut accurately.

  6. Before fusing your interfacing, always check which is the right and wrong side. The right side is smooth and the wrong side (the side with the glue that attaches to your fabric) is bumpy. If you look closely you can see the small glue dots on the wrong side.

  7. Cut the interfacing slightly smaller than the piece of fabric you are interfacing. This will prevent the interfacing going beyond the edges and ending up on your ironing board (or scrap fabric).

  8. Start with your iron on a low setting and work your way up until the interfacing fuses to the fabric without burning.

  9. Place the iron down onto the interfacing without dragging across the interfacing. Press to fuse one section and then lift the iron and put it back down on the next section. This will prevent the interfacing from stretching or moving into the incorrect position.

  10. When the interfacing is fused to the fabric, turn the fabric to the right side and press (you can drag the iron across once the interfacing is attached).

Side note: We know that in the home sewing industry it is often recommended to use a damp press cloth when fusing interfacing to fabric. This approach is not used in the professional garment sewing industry and it isn’t the approach we use ourselves, but we recommend following the manufacturer’s instructions if that is what is advised.

I hope this helps, Jamie!

Happy sewing,

Emily


RESOURCES MENTIONED IN THIS ISSUE

  • The Sewing Shirts Skills Kit is the first part of our Sewing Shirts project series, which is available through our Curated by ITF subscription. Past issues are now available for purchase by current subscribers. More information can be found here.


For more issues of the Q & A series, you can check out the archive here.


WHAT YOU’VE BEEN MAKING


MORE POSTS IN THE SERIES

ISSUE 154 - HOW TO MAKE A FLAT BUTT ADJUSTMENT

THE Q & A SERIES

HOW TO DO A FLAT BUTT ADJUSTMENT

Hi Emily, 

I absolutely LOVE the Q&A series!  Finding you and In The Folds has been a game-changer in my sewing journey! 

One question which I'm struggling with finding much information about is how to do a 'flat seat' adjustment. I understand that a wedge needs to be taken out from the back crotch seam, but how is that actually done? 

Appreciate any guidance you can give!

Thanks, Kimi
New Zealand


Hi Kimi!

Thanks for your question! Firstly, because I know this is a question that many people out there will love to get an answer to as well, but also because making clothes that fit is one of the foundations of In the Folds. Nobody wants to spend hours of their time (not to mention the money!) sewing clothes that don’t fit the way you want them to. And the thing is, with a little practice, these skills can quickly become second nature and just another normal part of your sewing process.

With the release of our Attwood pants pattern, it’s also a timely tutorial to cover in case someone decides their Attwood pants need a bit of adjusting. 

However, it’s not quite as simple as removing a wedge from the back crotch seam. In last week’s Behind the Scenes post we discussed why we like to use industrial sewing techniques in our patterns, and I think this is another great example of the difference between professional fitting alterations and those you will find in the home sewing world. 

While you might find that taking a wedge out of the back crotch seam gets the job done, it may cause fit issues in other areas and it will probably affect the finished look of the garment. 

So, here’s a step-by-step tutorial for correcting this issue using professional fitting techniques so you know exactly how to do it! And, if you’re interested in learning more pants fitting techniques, check out our Pants Fitting pattern & Fit Kit.

HOW TO TELL IF YOU NEED A FLAT BUTT ADJUSTMENT

Also known as a baggy butt adjustment, you’ll know you need to make a fit adjustment to your pants because you’ll notice excess fabric in the back of the pants. You could even say that the back may look a little deflated and saggy.

You can check this easily by standing in front of a full length mirror, using another mirror to look at the back of your garment while being worn. Try to avoid using only one mirror to do this because turning your torso to look in the mirror will cause the garment to twist and will not give an accurate representation of the fit.

If the back is baggy and has too much fabric (Image 1), we will pinch out fabric vertically and evenly throughout the back leg and then add in any extra fabric that is needed at the waist.

PREPARE TO MAKE THE ADJUSTMENT

While wearing the garment, roughly pinch out the excess that needs to be removed in the butt area. (Image 2, below). You may need someone to help you do this if you’re trying to fit them on yourself! We’ll remove fabric throughout the whole leg evenly to stop the pattern from skewing. 

Take the toile off and pin out vertically through the whole leg (Image 3), making sure to take an even amount. Unpick side seam at the waist and add in fabric if necessary (Image 4).


IN THE FOLDS PANTS PATTERNS & RESOURCES


HOW TO DO A FLAT BUTT ADJUSTMENT

Step 1

a Draw a line from the top to the bottom of the pattern parallel to the grainline roughly in the middle of the pattern. Make sure to avoid the dart. Let's call this line A.

b Draw another line parallel to line A. The distance between the two should be the amount you'd like to remove from the pattern. Let's call this line B.

Step 2 

Add an 'anchor line' perpendicular to lines A and B. This will help you line up the pattern.

Step 3

Cut through line B completely and overlap, aligning line B with line A. Use the anchor line to help realign the pieces. Tape in place.

Step 4

Taking from the pattern evenly means we've also made the waist and leg measurements smaller, so it's likely you'll need to adjust the pattern to add the amount that you took out through the whole leg back to the waist area only to return the waist measurement to the original. We will spread the amount we are adding to the pattern between the CENTRE BACK and the side seam.

i Record the amount you took from the pattern overall, (see STEP 1 b).

ii Divide the amount from (i) by 2 so we can add it evenly on each side.

a Mark in the distance found in ii, out from the STITCHLINE at both the CB and side seam.

Step 5

Re-draw the side seam and CB seam with smooth lines, joining them back to the waist STITCH LINE (a) and CUT LINE (b). Cut off excess paper. Check all seams are the correct length by 'walking' the pattern pieces, as if you were sewing them together.

I hope this helps you get the fit you’re after, and don’t forget to check out our Pants Fitting pattern and Fit Kit for even more in-depth tutorials just like this one!

Happy sewing,

Emily


RESOURCES MENTIONED IN THIS ISSUE

  • The Attwood pants pattern is the August 2023 project for our Curated by ITF membership, and can be purchased here, or after August by current members in our Past Issues section. More information about the subscription can be found here.

  • The Pants Fitting pattern + Fit Kit was released in 2023 as part of our Pants Sewing series. It is currently only available to members of our Curated by ITF subscription, but will be released soon as a standalone resource in our online shop.

  • Checking patterns: Curved seams - blog post here.


For more issues of the Q & A series, you can check out the archive here.


WHAT YOU’VE BEEN MAKING


MORE POSTS IN THE SERIES

ISSUE 153 - HOW TO SEW FLAT FELLED SEAMS

How to sew flat felled seams.

THE Q & A SERIES

How to sew flat felled seams

Hi Emily,

I am really loving being a member of Curated. I’m learning a lot and it’s pushed me out of my comfort zone. Something I would like to suggest for an upcoming pattern is flat felled seams. I love the look of them and would love to give them a go. I know I could just try them out myself, but there’s something about getting a push from the monthly project that I know will encourage me to do it. And it’s always fun to do it along with the other ‘Foldies’ too.

Jennifer
Preston, UK


Hi Jennifer,

I am assuming you’ve seen our shiny new pattern, the Attwood pants, by now! 

We are really excited about this one as it’s our first pattern that includes flat felled seams! We’ve covered French seams and bound seams in some of our other patterns, but never flat felled… so we thought it was about time we rectify that!

What is a flat felled seam?

Flat felled seams are one of the strongest seam finishes. The raw edge is enclosed inside the seam (like French seams), and then it's pressed flat and stitched to keep the seam nice and flat.

When should I use a flat felled seam?

Flat felled seams are suitable for hardwearing items such as jeans and jackets. You will also sometimes use this finish for making shirts. They can also be used as a design feature - as we have done with the Attwood pants.

Types of flat felled seams

There are various ways to sew flat felled seams and we have chosen the method we find the most straightforward. Flat felled seams can be sewn so that the seam is enclosed on the right side of the garment (Option 1) or on the wrong side of the garment (Option 2).

For the Attwood pants, we used the method that has the enclosed seam on the right side of the pants to make a feature of the flat felled seams. If you would prefer the alternative (enclosed seam on the wrong side of the garment), you can construct them that way. We suggest sewing samples of both options to work out your preference.

Flat Felled Seam Option 1 

Seams sewn wrong sides together. Seam allowance is enclosed on the right side of the garment when the seam is complete. This is the method used throughout these instructions.

Flat Felled Seam Option 2 

Seams sewn right sides together. Seam allowance is enclosed on the wrong side of the garment when the seam is complete.

How to sew a flat felled seam

How to sew flat felled seams - Step 1.

Step 1
Pin the pieces you are joining together with wrong sides together. Stitch with a 1.2cm (½in) seam allowance (or what your pattern specifies).

How to sew flat felled seams - Step 2.

Step 2
Trim down one side of the seam allowance to 6mm (¼in). The instructions will guide you as to which side to trim down. If sewing a sampler, you can trim down either.

How to sew flat felled seams - Step 3.

Step 3
Press the seam open with the seam allowance pressed to one side.

Step 4
Turn the wider side of the seam allowance over the narrow side. The raw edge of the wider side should sit about 1mm back from the stitch line. Press well when you are happy with where the edge is sitting.

How to sew flat felled seams - Step 5.

Step 5
Flip the seam allowance over to the other side of the seam, so that the raw edge is now enclosed in the seam. Press and pin through all layers.

How to sew flat felled seams - Step 6.

Step 6
Carefully stitch close to the fold to complete the seam.

As you know, Jennifer, we’ll be going through everything with our Curated by ITF online community, so if you have any questions you definitely ask then! (And you’re right… it’s way more fun to do it together!)

Happy sewing,

Emily


RESOURCES MENTIONED IN THIS ISSUE


For more issues of the Q & A series, you can check out the archive here.


WHAT YOU’VE BEEN MAKING


MORE POSTS IN THE SERIES

ISSUE 152 - HOW TO ALTER A RAGLAN NECKLINE

THE Q & A SERIES

How to alter a raglan neckline

Hi Emily,

How do I make a raglan neckline smaller? Is it as simple as lengthening each of the four seam lines or is there more to it to maintain the shape?

Katie
Long Beach, USA


Hi Katie,

Raglan sleeves have been on our mind this month as it’s one of the tutorials included in our Cartwright dress Hack Kit, so we thought this would be a great question to tackle! And the raglan sleeve design has to be one of our favourites. Two of our first patterns ever released included it - the Rushcutter dress and the Collins top!

And I’m pleased to tell you, you are correct! To raise the neckline on a raglan sleeve (which will make it smaller) you need to continue the seam lines to your chosen neckline height.

I wanted to show you this on the raglan sleeve we drafted from the Cartwright dress + top pattern but realised the neckline couldn’t get much higher, so I’ll show you how to lower it first and then add back on… as I realised that someone out there might like to learn how to do the opposite!

How to lower the neckline on a garment with a raglan sleeve

Step 1

First you need to know how much you would like to lower the neckline by. You can work this out by referring to your toile (if you have one).

On the pattern, measuring from the STITCH LINE, mark in your new neckline with a broken line - marking the distance you would like to lower the neckline by.

For my example, we are lowering the neckline by 2.5cm (1in). Mark the new neckline on the FRONT, BACK and SLEEVE.

If you would like to see how we mark a curved line with a broken line you can check out this video.

Step 2

Join the broken line with a ruler or French curve. Make sure your new neckline meets the CENTRE FRONT and CENTRE back at a right angle.

Step 3

Before adding seam allowance, it’s a good idea to line up the pieces, stitch line on stitch line, to check the flow through of the neckline.

Checking the flow through means that you check how a line will look when the garment is assembled. You want lines to transition smoothly across seams with no lumps or bumps.

For more information on checking the flow through, or checking and truing, read this post.

Step 4

When you’re happy with the new neckline, add seam allowance. We suggest using a seam allowance of 1cm (3/8in), although if you prefer sewing a neckline with a seam allowance of 6mm (1/4in) that works too. Cut along the line to remove excess paper.

How to raise the neckline on a garment with a raglan sleeve

To raise the neckline, do the opposite.

Tape or glue some paper onto the top section of each pattern piece, so that you can “grow on” the new neckline.

Extend each STITCH LINE by the desired amount, following the angle of the seam.

Mark the new neckline by marking it at regular increments, measuring up from the original line.

As we did when lowering, it’s a good idea to check the flow through of the lines before adding seam allowance.

How to draft an alternate RAGLAN neckline

While we’re talking about necklines and raglans, I thought it would be fun to show you how to change the design of a raglan neckline - so, rather than just raising or lowering, how to change the shape like in the V-neck raglan neckline above.

Step 1

Place the SLEEVE on the FRONT, stitch line on stitch line, as if it has been sewn. Draw in your new neckline going from the shoulder dart to the CENTRE FRONT.

Step 2

On the dart STITCH LINE, measure down to determine how much you have lowered the neckline at this point. Mark this same amount on the other side of the dart. This will ensure the two sides of the dart meet cleanly when you sew the dart.

Step 3

Place the SLEEVE on the BACK, stitch line on stitch line, as if it has been sewn. Draw in your new neckline going from the point marked in STEP 2 to the CENTRE BACK.

And you’re done! I hope this tutorial gives you the confidence to start altering necklines on raglan sleeve patterns so you can make them exactly how you want them to be!

If you’re interested in learning more about patternmaking and hacking, our sewing membership, Curated by ITF, is the perfect place. With a new project each month, a back catalogue of past issues to keep you busy, support from industry experienced teachers and an inspiring online community you’ll learn everything you need to know to turn patterns into whatever beautifully finished garments you want to wear, and that fit perfectly!

Happy sewing,

Emily


RESOURCES MENTIONED IN THIS ISSUE


For more issues of the Q & A series, you can check out the archive here.


WHAT YOU’VE BEEN MAKING


MORE POSTS IN THE SERIES

Issue 151 - Tips for sewing a dress

Tips for sewing a dress.

THE Q & A SERIES

TIPS FOR SEWING A DRESS

Hi Emily,

I’m making the Rushcutter dress. Have you any tips? It’s my first dress.

Sonya


Hi Sonya,

Great to hear you’re giving the Rushcutter dress pattern a go! This was the very first pattern we released and has become an all-time favourite since then.

We’ve got dresses on our minds this month as we just released the Cartwright dress and top pattern in our Curated by ITF membership, and we think they’re a super fun project to make. 

Dresses make great additions to a wardrobe because they’re a complete outfit - no need to think about what other garments go with them! Which definitely makes getting dressed in the morning much easier. I think a dress is also a great opportunity to be a bit daring with your fabric choice through fun prints and bright and bold colours.

My top tips for what to do before making a dress (or any project really!), would be:

READ THROUGH THE INSTRUCTIONS BEFORE YOU START

This will help you prepare and familiarise yourself with the techniques used in the pattern, so that once you get started you have a rough idea of the construction process of the dress will play out. 

The Rushcutter is a good example of the importance of doing this, because it has a particularly fun way of coming together, so even just seeing the illustrations will be helpful. 

Any journey is a little easier when you know where you’re heading, so don’t skip this step!

CHECK OUT THE RELATED HASHTAG ON INSTAGRAM

It’s really helpful to see a design on a range of different bodies, and also to see what fabrics work well for the pattern. Selecting the right fabric for the project is one of the challenges when making your own clothing, so seeing how the pattern looks made up in a particular fabric is always helpful. You can scroll through the Rushcutter dress hashtag on Instagram here.

Also, have a read through this post where we talk about choosing fabric for the Rushcutter dress pattern.

TAKE YOUR MEASUREMENTS FIRST

You should do this before starting any new project so that you can select the correct size/s. We have a blog post that will help you with that process here. 

If you’re looking to take a deep dive into garment fitting, our Curated by ITF membership has a very supportive community with lots of additional resources to help you do this. This month we’re working on the Cartwright dress + top pattern

In our Curated by ITF membership our new release patterns are accompanied by a supporting Fit Kit resource that covers how to measure yourself, choose a size and the order of operation for alterations for the pattern it relates to. The Fit Kit also covers a range of alterations with step-by-step instructions and illustrations, as well as patternmaking tutorials that show you handy techniques like adding seam allowance and what you need to do to check your patterns after making alterations.

When we release our designs as standalone patterns (usually 6-12 months after releasing them in our Curated by ITF membership), we make the Fit Kits available for purchase for an additional cost. You can see this with our Sawtell dress pattern which was recently released as a standalone pattern in our extended size range.

MAKE THE MOST OF PATTERN LAYERS

If using the PDF version of the pattern, we suggest taking advantage of the layers in the pattern so that you only print the size/s that you need. If using the paper pattern version, we suggest tracing a copy of the size/s you need so that you can come back to the pattern in the future (this isn't as important with the PDF version as you can always re-print it).

MAKE A TOILE

Also known as a muslin, a toile is basically a draft version of a pattern. The name comes from the fabric often used to make them - muslin (the American name) or toile (the French name). You can read more about it here

At In the Folds, we believe making a toile is a really important part of sewing a garment and it’s another step that we don’t recommend skipping. By making a toile you can check the fit and have a practice run of new techniques. It means when you sew the real thing, you can enjoy the process and relax into some mindful slow sewing, instead of worrying about making mistakes and wasting money and fabric.

FOCUS ON WHAT YOU’D LIKE TO LEARN

Making clothes is such a fun hobby and there is so much room for growth and experimentation. It can, however, be frustrating when things don't go to plan, so we suggest focusing on the skills you would like to learn from the project, rather than just the end result of a finished dress. This way you will enjoy the process and have some great new skills under your belt when you're done! 

The skills you’ll learn when making the Rushcutter dress  include sewing: curved seams, pockets (inset or in-seam, depending on the view you choose), buttons or an invisible zip, and bias binding. 

CHECK OUT THE RUSHCUTTER SEWALONG

Our pattern instruction booklets are an exhaustive reference for constructing our patterns, but to help you even more we also have a sewalong for the Rushcutter which includes photos of the construction process rather than illustrations.

We hope you enjoy using the Rushcutter dress pattern and making your first dress!

Happy sewing,

Emily


RESOURCES MENTIONED IN THIS ISSUE

  • The Rushcutter dress pattern can be found here.

  • The Sawtell dress pattern can be found here.

  • Check out our Rushcutter dress sewalong here.

  • More information about our monthly sewing subscription, Curated by ITF, can be found here.

  • Choosing fabric for the Rushcutter dress - read the post here.

  • How to print and assemble your PDF sewing pattern - read the post here.

  • How to (and why) make a toile - read the post here.


For more issues of the Q & A series, you can check out the archive here.

WHAT YOU’VE BEEN MAKING


MORE POSTS IN THE SERIES

ISSUE 150 - CHOOSING FABRIC FOR THE RUSHCUTTER DRESS

THE Q & A SERIES

CHOOSING FABRIC FOR THE RUSHCUTTER DRESS

Hello In the Folds!

Would you say the Rushcutter dress could be made in a fine cotton corduroy? I’m thinking of running the corduroy horizontally for the side panels. And I’d make it sleeveless to wear turtlenecks under it in the autumn and winter.

Being a “confident beginner” in sewing, but not so confident in fabric selection I’d appreciate your thoughts on if this would be a good fabric choice.

By the way, your patterns are beautiful, and I’m equally impressed with your print materials and the design of your website. Such a beautiful, and elegant approach to design, all the way around.

Thank you!

Amy


Hi Amy,

Wow! Firstly, thanks so much for your lovely compliments. It’s very nice to receive feedback like this and know that all our hard work doesn’t go unnoticed. The entire In the Folds team really appreciates it!

You’re not alone in struggling to match fabrics to sewing projects. 

It can be tricky, especially when you’re just starting out, but I’m pleased to say that it definitely gets easier over time. Like most things, it just takes practice, and unfortunately a few mistakes! The good thing is that we can learn just as much from the failures as the successes.

Since we’d all prefer not to have to learn the hard way, I’ll share some tips that can help you gain confidence in selecting the right fabric for the project.

Use your wardrobe as a resource

Look at the garments you already have in your wardrobe and think about how they hang, drape and sit on the body. Check the fibre content of the fabric, and think about how they feel. If there is a piece you really love, take it with you next time you are fabric shopping and use it as inspiration!

Of course the above option doesn't work if you shop for fabric online. If this is the case, many independent online fabric retailers will send out samples for a small fee. Order some samples and compare them to the fabrics in your wardrobe.

Our Slow Sewing Planner is a great resource to help you understand your wardrobe choices so that you can then apply the information to the garments you are making. Check it out here!

Shop for fabric at op shops (thrift stores)

This will give you a chance to work with a variety of fabrics whilst also not breaking the bank. It might also encourage you to step out of your comfort zone with your choices.

Follow makers with a similar style / aesthetic to you 

Lots of makers include fabric details with their photos on social media so you can see how the fabric works for a particular pattern and how it looks on the body. Create a folder on Instagram so you can save fabrics and pattern combinations you like.

Search social media hashtags

If there is a particular pattern you like, use the hashtag function to see what fabrics other makers have made it in. If you see a version you like and the maker hasn’t included the details, ask them! As you probably already know, makers love to talk about anything sewing and fabric related. I’m sure they’ll be flattered to hear that you love their make and would like to make one of your own.

You can follow us on Instagram here, and check out the Rushcutter dress hashtag here.

Be willing to make mistakes 

This is a big (and sometimes painful…) one! But, often our best lessons are learned through making mistakes. 

Let yourself explore different options and ideas so you can learn what fabrics work for different patterns. Accept that you’re still going to get surprises sometimes. I have been sewing for about 25 years and still get a surprise every now and again.

Selecting fabric for the RuShcutter dress

We recommend light to mid-weight fabrics such as: cotton shirting, poplin, sateen, linen, silk, light to mid-weight wool, chambray or light to mid-weight denim. 

Your fabric choice will have a big impact on the silhouette you will achieve. For a more structured, boxy look, consider mid-weight denim, twill or jacquard. Or, for a more relaxed, draped look, consider a viscose blend or silk crepe de chine.

Fine cotton corduroy would be a great choice and would be lovely to wear turtlenecks underneath. 

My only other tip would be to select a size that gives you a bit of extra wiggle room in the top area so the underarms don't feel tight with a shirt underneath. Good luck!

Happy sewing,

Emily


RESOURCES MENTIONED IN THIS ISSUE

  • The Rushcutter dress pattern can be found here.

  • The Slow Sewing Planner can be found here.

  • Check out our Rushcutter dress sewing tutorials here.


For more issues of the Q & A series, you can check out the archive here.

WHAT YOU’VE BEEN MAKING


MORE POSTS IN THE SERIES