Pants Fitting Full Seat Butt Adjustment Malvern culottes
Q & A - PANTS FITTING: SWAY BACK ADJUSTMENT
issue 193 - HOW TO ADD BUTTONS TO THE PEPPERMINT WRAP SKIRT

THE Q & A SERIES
ADD BUTTONS TO THE PEPPERMINT WRAP SKIRT
Hello there!
I am a subscriber to your wonderful monthly Curated by In the Folds and I really love how much you are happy to share your knowledge with us. Your Fit Guides are so good for me to review and learn from every time I begin a project.
I have a question regarding the Peppermint Wrap Skirt which I bought a few years back (a contribution to the community was made) and I have yet to make it!!! However, I am thinking of making it, but I wondered how difficult would it be to use buttons as opposed to the tie to close the skirt? I know that I would need an internal button to hold the underlying front skirt, but any suggestions as to how best to position the outer button would be good?
Thank you very much.
Zoe, Australia
Hi Zoe!
This is such a great question, which I’m sure many makers will also appreciate the answer to. Our Peppermint Wrap skirt pattern, a collaboration with Peppermint Magazine many moons ago, has been one of our MOST popular designs.
Sometimes designs are a classic for a reason, right?
You may also have seen that our Malvern culottes pattern uses a similar closure technique, so I’m excited to be able to add the tutorial to our resources!
And what makes it even better is that this hack won’t take any patternmaking wizardry and is perfect for anyone wanting to give a little pattern hacking a go without being overwhelmed.
how to change a tie to buttons on a wrap skirt

Step 1
Take the WAIST TIE - LEFT SIDE [5] and identify the outer notch. This is the notch that lines up with the edge of the wrap on the left side. The rest of the piece is what makes the tie on that side.

Step 2
Draw a line straight up from that notch. Perpendicular to the edge of the piece.

Step 3
Repeat on the other side - WAIST TIE - RIGHT SIDE [4], again using the outer notch. This time it’s on the other side of the piece.

Step 4
Move the pattern info (piece name and cutting instructions) and grainline over to the section with the notches, otherwise it will be removed when you cut off the tie section of the piece.
Cut through the lines marked in Step 2 and Step 3. You can discard these pieces as you won’t be needing them.

Step 5
Add seam allowance to the cut edge on each side of the waistband. This will now be closed like a regular waistband. 1cm (3/8in) is sufficient.

Step 6
You may be able to remove the centre back seam in the waistband due to the reduced width. Place the CENTRE BACK STITCH LINE on one piece on top of the other. The CENTRE BACK is indicated with double notches on each piece.
Measure the width of the piece. If it is less than the fabric width you plan to use then you can tape it in place. If you do this, add a notch at the CENTRE BACK STITCH LINE to indicate the CENTRE BACK. This will help you when you are pinning the waistband to the skirt. You can also update the pattern label.
If your fabric isn’t wide enough, that’s okay, just keep the CENTRE BACK seam.

Step 7
Now that the tie has been removed, I’d recommend block fusing the whole waistband to help it hold its structure and give it more stability where the buttons and buttonholes are. Add BLOCK FUSE to the pattern pieces so you remember when cutting.
As for working out where the buttons and buttonholes need to go, this also left me scratching my head too! It’s much easier to work out once you have the skirt and waistband in front of you. I got out my lovely linen wrap skirt to have a play and worked out how I’d do it.
What I suggest you do is just make it and then work out the button and buttonhole positions once it’s complete. The beauty of wrap skirts is that they are quite forgiving in terms of fit so there’s room for you to work out the best place for you to have your buttons.

Step 8
If I were to make this hack, I would put concealed buttons on the side of the wrap that ends up on top and then button holes on the “under” wrap. To work this out, wrap the waistband around you and use chalk to mark the ideal position of the buttons. You will definitely want a button and buttonhole close to the edge of the waistband, while the second one will depend on you.
I hope this helps you on your patternhacking journey!
Happy sewing,
Emily
For more issues of the Q & A series, you can check out the archive here.
WHAT YOU’VE BEEN MAKING

Darlow bag made by Curated member, Lise.

Attwood pants made by @tenderfoot.sewing
MORE POSTS IN THE SERIES


ISSUE 188 - HOW TO HACK THE MALVERN CULOTTES INTO A SKIRT
I made two pairs of the Malvern culottes. Second one I shortened. I'm wearing them a lot and love the look but don't like how low the crotch is. I love culottes for the skirt look without the thigh rub.
How can I adjust these to bring the crotch up or make them a skirt??
In our last Q&A we explored why culottes have such a low crotch and how to raise it for a closer fit at the crotch.
But what if we take things a step further? What if we could transform the Malvern Culottes into a skirt?
That question got my patternmaking brain buzzing, and I couldn’t resist giving it a go. In this instalment, I’ll walk you through the process of modifying the Malvern culottes into a skirt, while keeping the same beautiful silhouette.
Let’s dive into some pattern hacking magic!
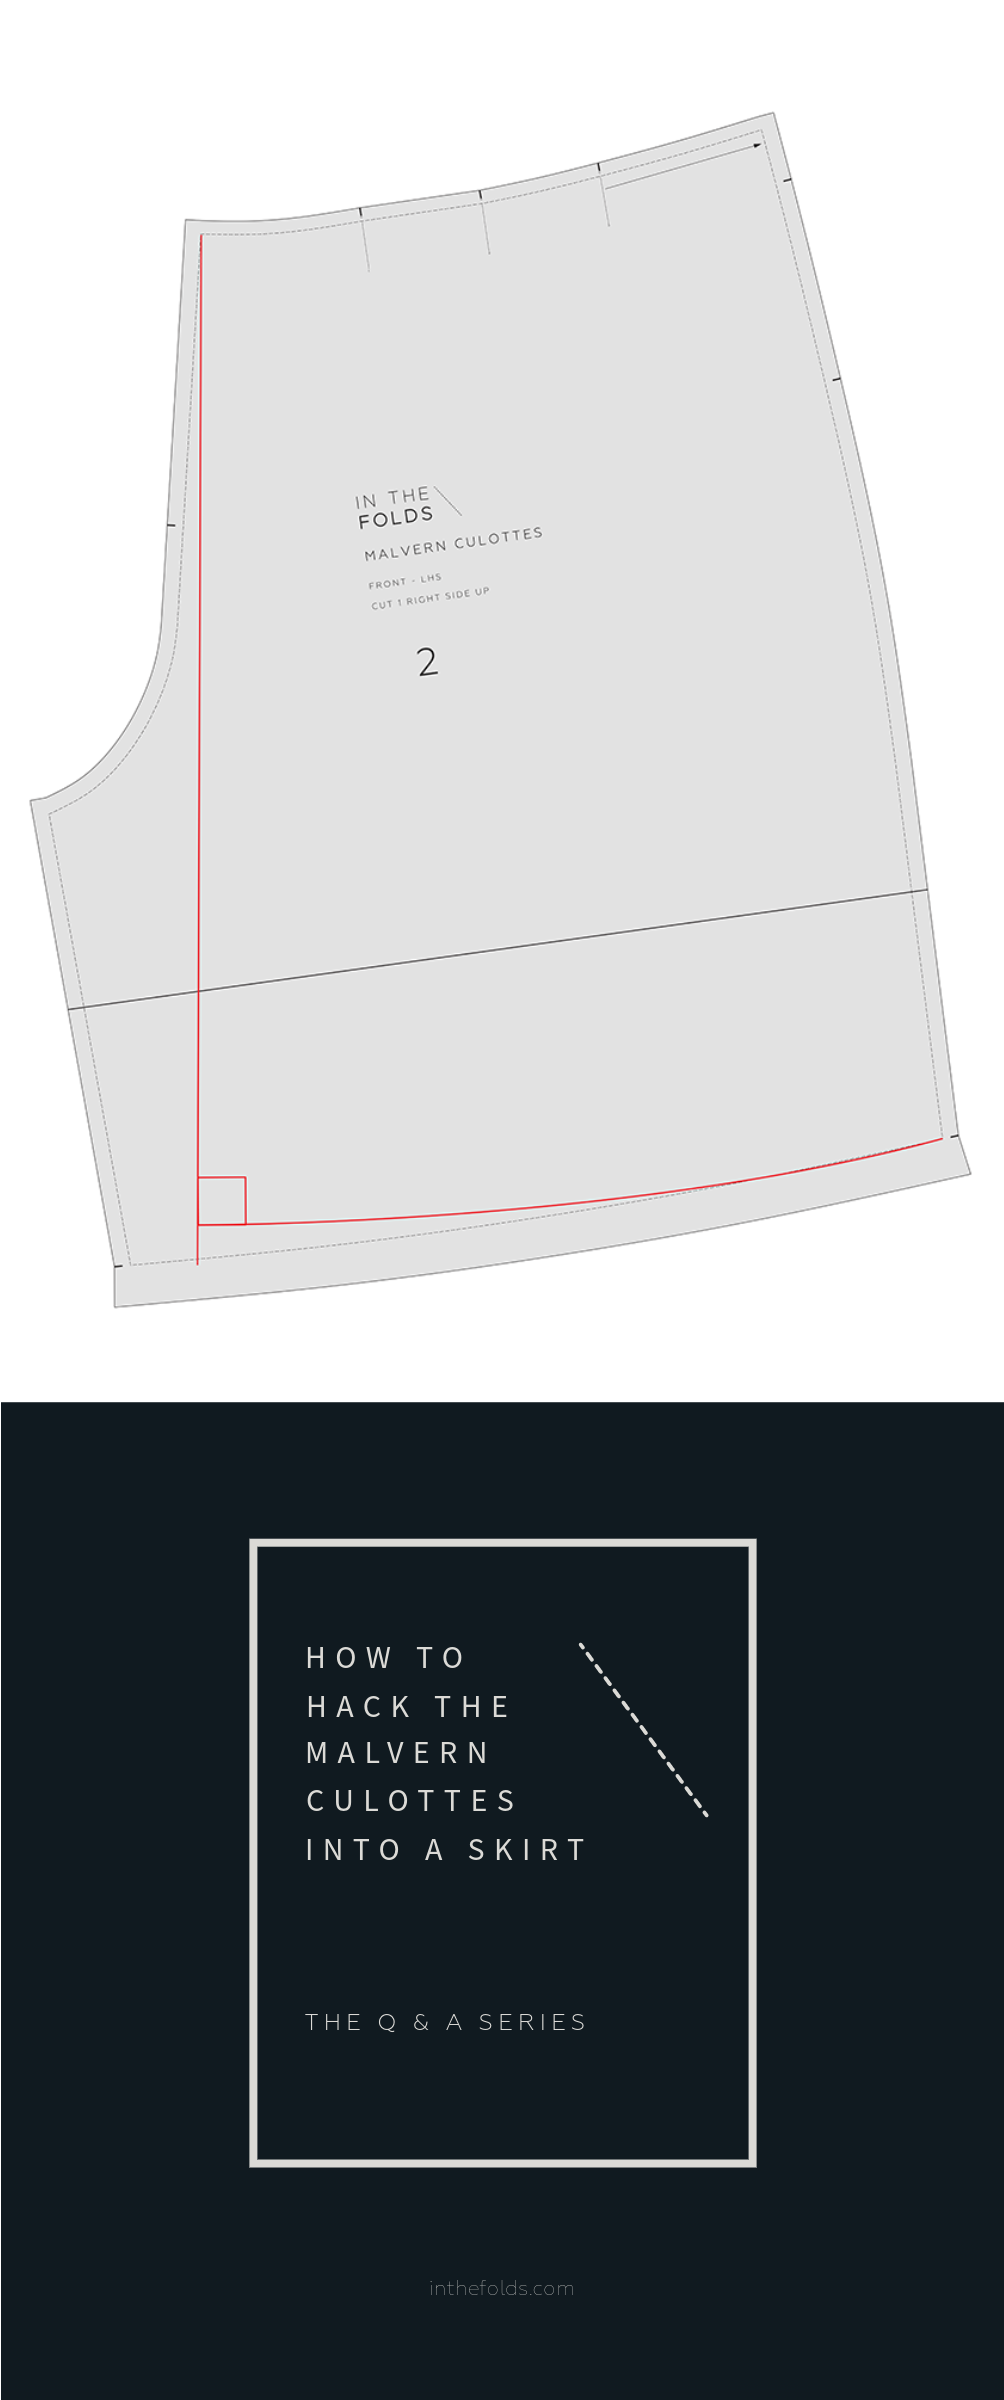
HOW TO HACK THE MALVERN CULOTTES INTO A SKIRT

Step 1
Take the FRONT - LHS [2] and draw a straight line down from the waist STITCH LINE through to the hem STITCH LINE. It needs to meet the CENTRE FRONT waist at a right angle. (See the red box in the image above.)

Step 2
The line marked in Step 1 will become the new CENTRE FRONT of the pattern. Rotate the pattern piece so that the CENTRE FRONT is vertical. Draw a new hem line that meets CENTRE FRONT at a right angle and meets the STITCH LINE at the bottom of the side seam.

Step 3
Take the FRONT - RHS [1] and flip the FRONT - LHS [2] so that the crotch seam and inner leg seam line up. Transfer the new CENTRE FRONT line and part of the new hem line onto the FRONT - RHS [1] with a tracing wheel.

Step 4
Draw a smooth curve from the bottom of the CENTRE FRONT to the STITCH LINE at the bottom of the side seam. It needs to meet CENTRE FRONT at a right angle.
On both FRONT pieces, add seam allowance to the new CENTRE FRONT and hem line. Cut off excess paper.

Step 5
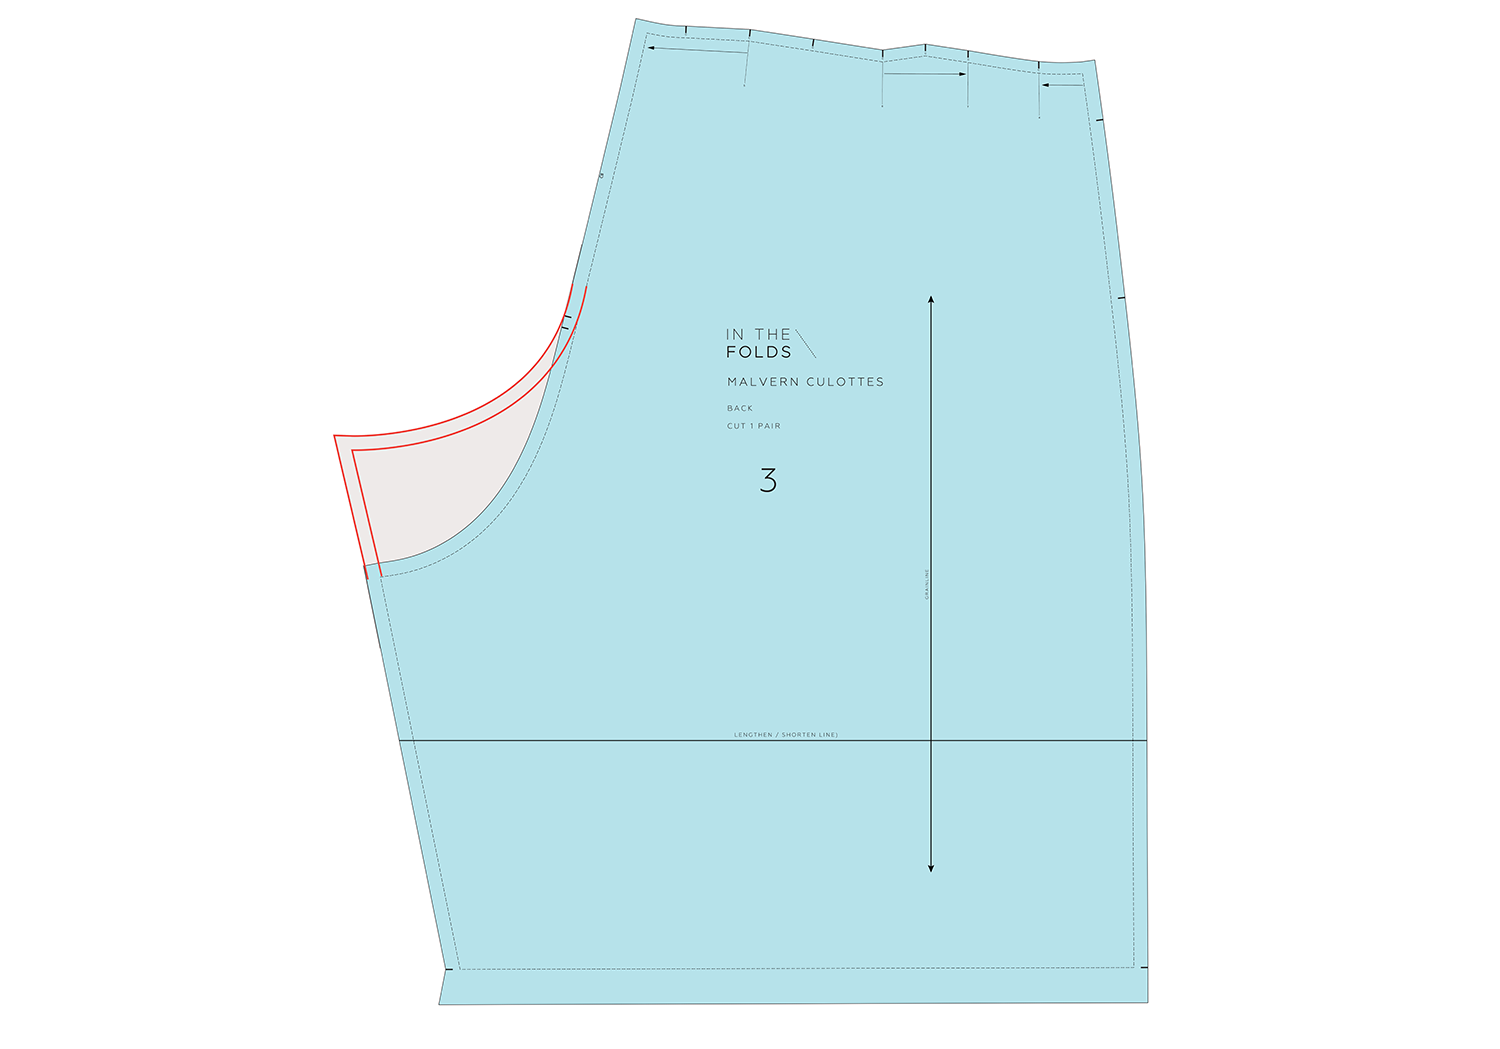
Move to the BACK and draw a straight line down from the waist STITCH LINE through to the hem STITCH LINE. It needs to meet the CENTRE FRONT waist at a right angle.

Step 6
The line marked in Step 5 will become the new CENTRE BACK of the pattern. Rotate the pattern piece so that the CENTRE BACK is vertical. Draw a new hem line that meets CENTRE BACK at a right angle and meets the STITCH LINE at the bottom of the side seam.
Add seam allowance to the new CENTRE BACK and hem line. Cut off excess paper.
You can now follow the instructions for making the Malvern culottes, but instead of sewing up the front and back inner leg seams and then joining the crotch seam, join the FRONT pieces together at the CENTRE FRONT and the BACK pieces together at the CENTRE BACK.
You can see some photos of my Malvern skirt toile here.


We’d love to see your Malvern skirts if you give this hack a go! Remember to tag us if you share them on Instagram!
Happy hacking (and sewing),
Emily
RESOURCES MENTIONED IN THIS ISSUE
The Malvern culottes pattern - digital pattern available here.
For more issues of the Q & A series, you can check out the archive here.
WHAT YOU’VE BEEN MAKING


MORE POSTS IN THE SERIES
ISSUE 187 - HOW TO RAISE THE CROTCH ON CULOTTES

I made two pairs of the Malvern culottes. Second one I shortened. I'm wearing them a lot and love the look but don't like how low the crotch is. I love culottes for the skirt look without the thigh rub.
How can I adjust these to bring the crotch up or make them a skirt??
Oh what a great question! This one really got my brain ticking.
At first, I realised I actually didn’t know why the crotch on culottes is so much lower than regular pants and it’s something I have just taken for granted, assuming it had something to do with wanting them to look like a skirt.
I have this problem when I wear culottes too. (I usually wear thin cotton bike shorts under them to prevent the thigh rub, which is what I wear under dresses and skirts.) So, I felt like this topic needed a deep dive as I’m sure we’re not the only ones!
What are culottes?
Culottes are a type of garment that looks like a skirt but are actually pants. They are usually wide-legged and can be knee-length, mid-calf, or even full-length. Some look more like pants and some look more like skirts (like the Malvern culottes).
What the experts say about culotte design
I went through one of my old patternmaking books - Patternmaking for Fashion Design (4th Edition) by Helen Joseph-Armstrong - to see what it says about culottes. This is what I found:
Culottes were developed when women started riding bikes. It was seen as unfashionable (maybe even improper) for women to wear pants, so a new garment type needed to be developed… which were culottes!
Culottes hang away from the stomach and bum so have a wider crotch extension in comparison to traditional slacks or trousers. I also learned that “slacks” and “trousers” are different things and shouldn’t be used interchangeably.
Culottes have the largest crotch extension (in comparison to other pant styles) because “the pants is the greatest distance from the figure at crotch level.” (p 546)
In Armstrong’s book she suggests that culottes are drafted from a skirt block (normally an A-line) rather than a pants block.
Crotch depth for culottes is suggested as actual crotch depth (I will tell you how to find that below) plus at least 2cm (but often more).
What is crotch depth?

Crotch depth refers to the vertical distance from the waist to the crotch.

On a pattern, you can find this by measuring from the waist seam to the crotch seam.

The easiest way to find this distance on your body is to wrap something around your waist and sit on a chair. Measure the vertical distance from your waist to the chair.
Comparing crotch depth

In the diagram above I have overlapped the CENTRE FRONT waist on the Peppermint wide leg pants and the Malvern culottes to compare the difference in crotch depth. As you can see it’s significant - 15cm.
HOW TO RAISE THE CROTCH ON A CULOTTES PATTERN
I knew I’d need to make a toile so that I could check how a large change like this would feel on the body. I decided to lift the crotch by 11cm.
Here’s what you need to do to alter the crotch depth on a culottes pattern:

Step 1
Attach some paper to the crotch area of one of the FRONT pieces. Due to the asymmetric nature of the pattern there are two FRONT pieces. Extend the inner leg seam STITCH LINE by the desired amount.

Step 2
Draw a smooth curve to create a new crotch curve that transitions into the original crotch curve at the notch. A French curve will be helpful here if you have one.

Step 3
Add seam allowance to the new STITCH LINE. In this case it’s 1.2cm.
Step 4
Transfer the same shape to the other FRONT piece. The Malvern culottes are asymmetrical so there are two different FRONT pieces, if you are working with another pattern and the FRONT is cut as a pair then you don’t need to do this step.
Step 5
Repeat process on the BACK. The BACK curve will not be the same as the FRONT. Cut off excess paper.
the outcome

They feel good!
And they still look like a skirt so the design hasn’t been lost. I actually think I could bring them up another few centimetres to completely erase the thigh rub and they’d still look good.

Here you can see the toile on a dress form. Please note that the waistband overlaps more on the dress form than it should. I wanted to make them in my size so I could feel them on my body, but my dress form is a few sizes smaller than me.

And here is a pattern comparison so you can see how much closer it is to a regular pants pattern - now just a 4cm difference.
The second part to your question also got my brain whirring… a Malvern skirt? That sounds interesting too! In the next Q&A I’m going to give it a go, so stay tuned!
Happy patternhacking!
Emily
For more issues of the Q & A series, you can check out the archive here.
WHAT YOU’VE BEEN MAKING

Peppermint jumpsuit made by @eliza.sew
