
THE Q & A SERIES - LENGTHENING THE PEPPERMINT WRAP TOP
Hello
This is my first ever make of one of your patterns, and I love how it turned out. I have a query though, I would like to lengthen it slightly, so where would I do that on the pattern, if I did it from the base of the bodice and back it would also increase the width of the ties.
Thanks for a wonderful pattern and my first ever french seams without any stress.
Julie

(Please note, the photo above shows Julie's original top. Scroll to the bottom to see the lengthened version).
Hi Julie,
Thank you so much for taking the time to add your submission to the Makers Gallery! I really appreciate it.
I am so pleased you enjoyed using your first In the Folds pattern. It looks fantastic!
I have done a few illustrations to explain how I would go about lengthening the top, as you're right, it's not as straightforward as how you would normally go about lengthening a pattern, due to the wrap sections.
STEP 1 - PREPARE YOUR PATTERN
To start, consider if you would like to make the alteration to the original pattern, or trace a copy. The beautiful thing about PDF patterns is that you can always re-print the original if required, but if you think you will be wanting the original, I'd suggest saving time and tracing a copy now. If tracing, be sure to transfer all important markings, such as dart point and notches.
STEP 2 - MARK LENGTHENING LINE

Mark a horizontal line through the pattern. I suggest marking the line between the two notches. To make sure the line is horizontal - check that it is perpendicular to the grainline.
You will see in the illustration that the line runs directly across the pattern, until it reaches the seam allowance line. At this point I have drawn a line that cuts through the seam allowance at a right angle. This will make it easier when you are using this section as a "hinge" (more details on this technique below).

Take a large piece of paper and mark two horizontal lines, the distance apart you would like to add to the top. For example, if you would like to add 5cm (2in) to the length of the top - draw the lines 5cm (2in) apart.
STEP 3 - CUT PATTERN

Cut through the line on the pattern piece, stopping when you get to the seam allowance line on the wrap side. Cut in to the seam allowance on the wrap side, stopping at the point on the seam allowance - creating a small hinge of paper (2mm or so wide).
STEP 4 - MAKE THE ADJUSTMENT

Place the pattern on top of the piece of paper with the lines marked.
Line up the top section of the pattern with the first line and stick down with glue or tape. Open up a dart in the side seam, using the hinge on the other side and move the lower section of the pattern until it reaches the lower line . Glue / tape in place.
More information about the 'cut and spread' technique can be found here, if this technique is new to you.
STEP 5 - RE-DRAW SIDE SEAM

Re-draw the side seam, by drawing a line of best fit. Move the notch back up to the original location (about 14cm below the first notch).
STEP 6 - ADJUST HEMLINE
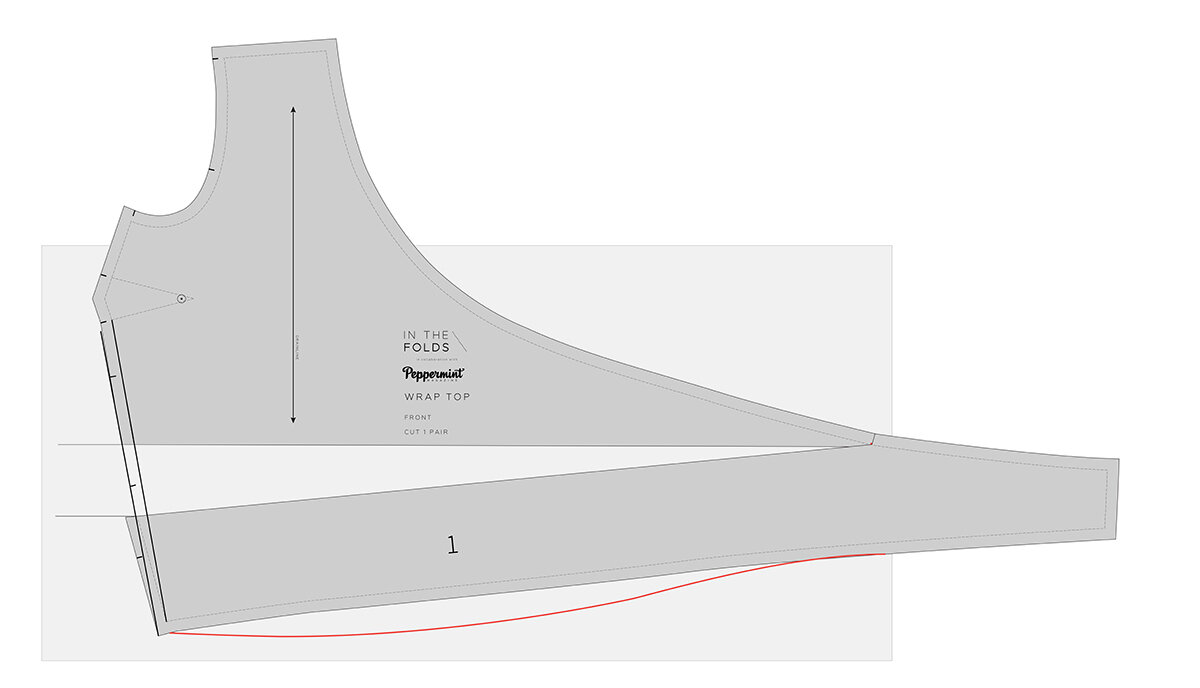
You can also add a little more length to the front of the top at the hemline (if you like), by altering the shape of the hem as illustrated.
You can then lengthen the back of the top as you normally would - adding the same amount of length that you added to the front (measured at the side seam) and also moving the notches.
As this is quite a big alteration, I'd suggest making a toile/muslin before making the top, to check you are happy with the length and how the top is now sitting.

As this Q and A series is based on questions that I have received over time, I can let you know how this alteration worked for Julie. Here is her new lengthened top, made using this tutorial!
Happy sewing,
Emily
Resources mentioned in this newsletter
Free Peppermint Wrap top pattern. Download the pattern here.
Lengthen a pattern (the regular way). Step-by-step tutorial can be found here.
Maker Stories - a place where you can see a range of people wearing In the Folds patterns and find out what alterations they made to the pattern (or submit your own make!) Maker Stories submissions can be found here.
The 'Cut and Spread' technique. Tutorial can be found here.
How to (and why) make a toile / muslin. Tutorial can be found here.
P.S. Would you like to know what the Q & A series is all about? This page tells you a little bit more about the motive behind the series.
Don't have a question, but found this newsletter helpful? I'd love to hear from you! Get in touch and say hi.


