
THE Q & A SERIES
How to remove a bust dart from a pattern
Hi Emily,
I am going to make the ruffle top from Peppermint Magazine and I am wondering if it is possible to remove the side darts. Usually by the time I do an SBA (Small Bust Adjustment) and shorten the darts there isn’t much left. If the top is boxier can I just move the dart to the hemline and not sew the dart there and have a wider hemline?
Thanks!
Shelby
Hi Shelby,
Great to hear you would like to sew the Ruffle Sleeve top!
You can definitely remove the dart from this pattern. When you rotate the dart to the hemline it does look like you are removing the dart, but what you're really doing is relocating it. As you mention in your question, this will make for a fuller hemline which is what will give you the fit required over the bust that was originally created by the bust dart.
I think you're better off removing the dart all together, as it sounds like you don't need that added fullness at the hem. For those of you reading along, I have included details about rotating the dart to the hem, so if you would like to remove the dart, but keep the fullness required for a B cup bust size, keep on reading!

Step 1
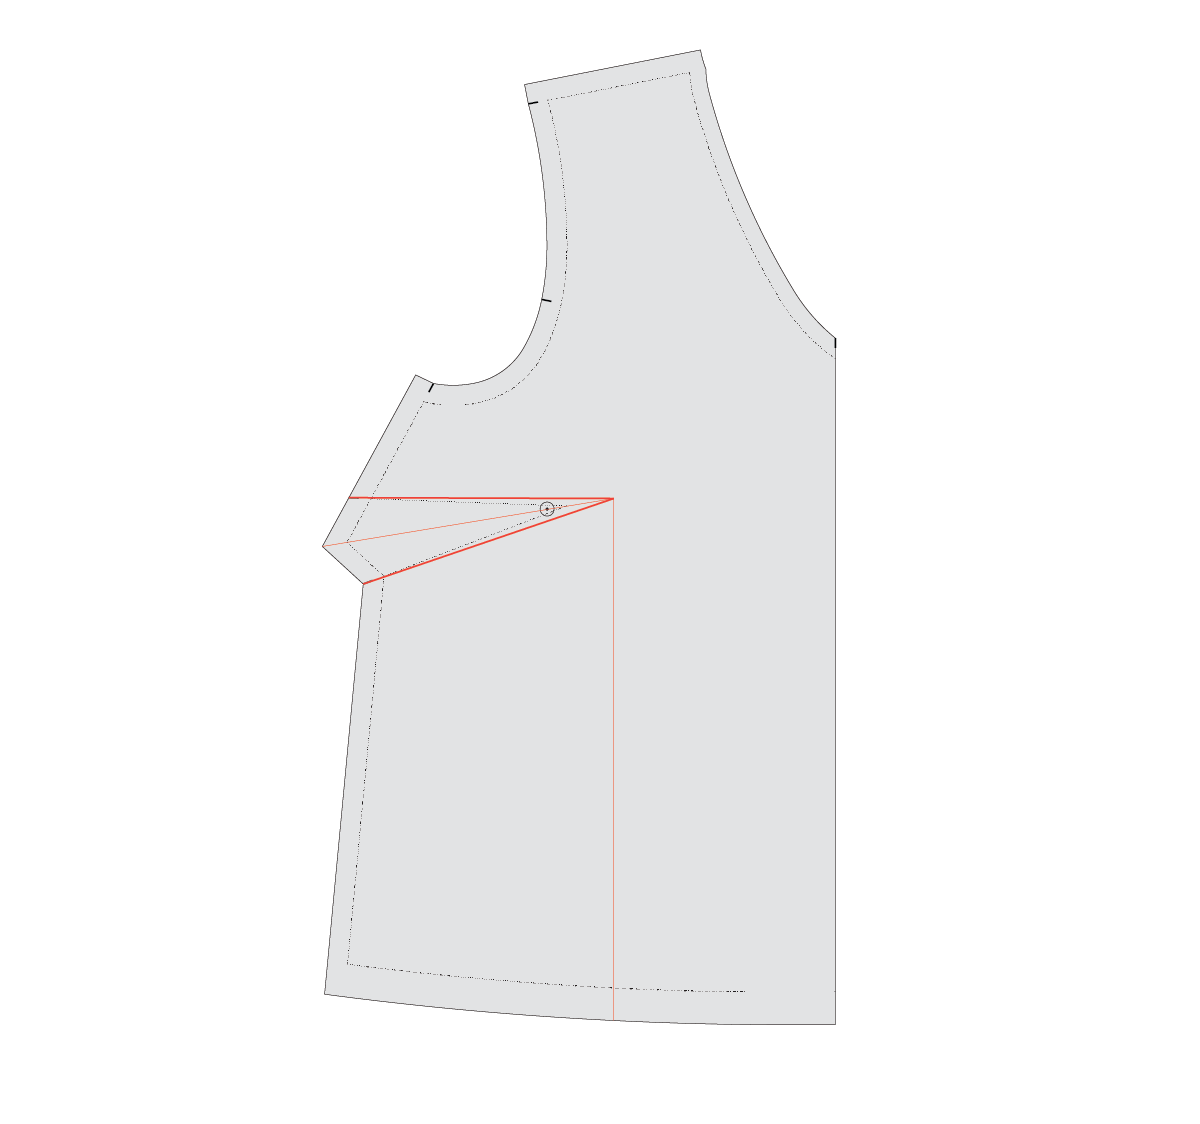
Draw a line through the dart to the bust apex point (normally 2.5cm / 1inch from the tip of the dart). If this does not correspond to your actual bust apex point don't worry, you will be removing the dart so it doesn't really matter. For those of you who plan on keeping the fullness, it is a good idea to mark your actual bust apex point.
Draw a line from the bust apex point to the hemline - parallel to the centre front.
Step 2
Draw in new dart arms - from the notches on the side seam to the bust apex point.

Step 3
Cut up from the hemline along your vertical line. Stop 1-2mm from the bust apex point.
Cut along the top dart arm towards the bust apex point. Stop 1-2mm from the bust apex point to create a hinge.

Step 4
Carefully rotate the cut dart arm so it meets the uncut dart arm. Through this process you are relocating the dart fullness to the hem (this is called the 'slash and spread' technique and you can learn more about it here). Tape dart closed. Fill the gap with some paper and tape in place.

If you are happy with the fullness in the hem, you can finalise the pattern at this stage - smooth out the hem with a soft curve and straighten out the side seam. Cut off any excess paper.
This pattern as it is still drafted for a B cup bust. Although we have removed the dart, the fullness at the hem creates shaping that will fit over the bust.
To remove the hem fullness

Step 5
Measure the opening in the hem - measuring on the stitch line on each side of the opening (this is the grey line on In the Folds patterns). Take note of the measurement.

Step 6
We are now going to remove this excess from the side seam. Mark the amount recorded in the previous step on the hem line - measuring from the side seam (on the stitch line). If you want to keep some of the fullness you can, just mark a shorter amount from the side seam.
Create a new side seam, drawing a straight line from the point marked up to the top of the side seam (again, this line needs to meet the top of the side seam on the stitch line).

Step 7
Add seam allowance to the new hemline and new side seam line. Check the side seam length against the back pattern piece to confirm they are the same length. Tweak front side seam if required.

Step 8
Cut off any excess paper to complete the pattern.
A comparison
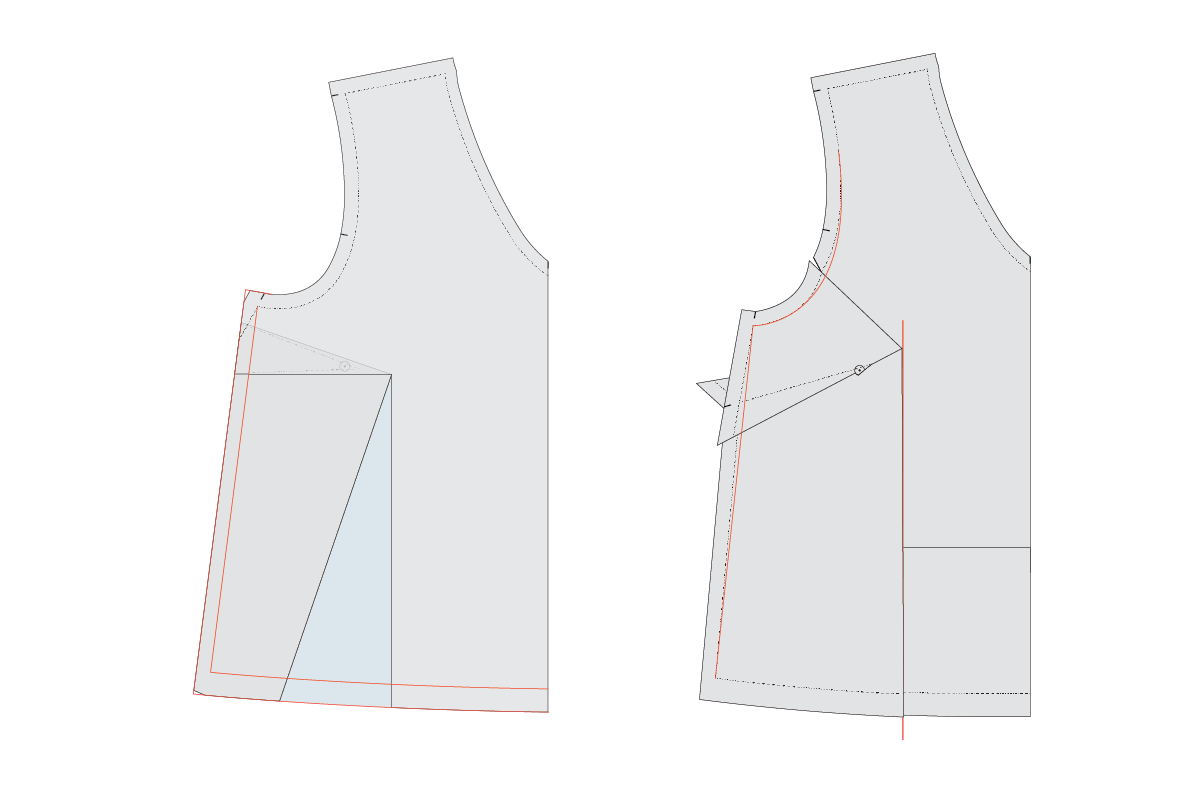
While creating this tutorial, I was interested to see a comparison between the above method to remove bust shaping and using a Small Bust Adjustment (SBA) to remove the dart. On the left you can see the method we used for this tutorial and on the right you can see the SBA. The two look quite similar. Below you can see the SBA placed on top of the other method. The SBA method has slightly less width, but the other method gives a nicer armhole shape, so I would suggest using the method outlined in the tutorial so that you are not disrupting the armhole curve.

We hope you found this helpful!
Happy sewing,
Emily
For more issues of the Q & A series, you can check out the archive here.
WHAT YOU’VE BEEN MAKING

Flynn jacket made by @elbe_textiles

Hacked Peppermint wrap top made by @sal.sews

Peppermint wrap top made by @sal.sews

Peppermint peplum top made by @makesbykatee


