Rennie dress

ISSUE 128 - ALTERING A SLEEVE FOR A FORWARD SHOULDER ADJUSTMENT

ALTERING A SLEEVE FOR A FORWARD SHOULDER ADJUSTMENT

THE Q & A SERIES

ALTERING A SLEEVE FOR A FORWARD SHOULDER ADJUSTMENT

Hi there!

I just made a forward shoulder adjustment to the Rennie dress, but I’m not sure what to do with the sleeve. I know the front and back sleeve is symmetrical, but with the alteration I now need the sleeve head to move forward to line up with the shoulder seam. How do I adjust the sleeve to match with the altered pattern?


Hi Amy,

I’m so glad to hear you’re learning new sewing skills using our Rennie dress pattern!

Sometimes it can be difficult to know what the next step is when making pattern adjustments - which is exactly why we came up with our Curated by ITF subscription - what’s better than having professional garment designers you can go to to ask all your sewing questions, after all!?

But knowing that when you make one change to a pattern it usually means there will be other changes to make is definitely half the battle, and the fact that you knew to ask the question is a big indicator that you have a good understanding of the pattern making process. Well done!

And I’m very happy to be able to help you with a solution to your question.

If you aren’t sure what a Forward Shoulder Adjustment is and whether you need one, check out this tutorial first!

HOW TO ALTER A SLEEVE WHEN DOING A FSA

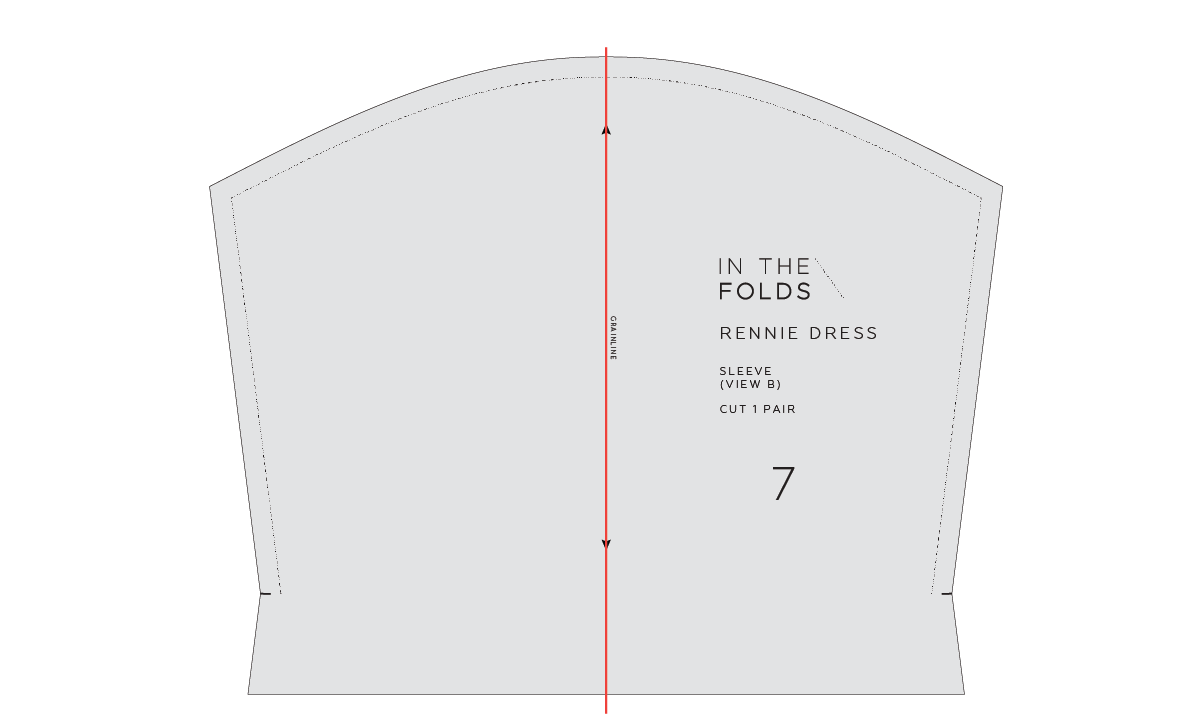
Technical drawing of Rennie sleeve pattern piece.

Step 1

Extend the grainline so it runs through the whole pattern piece.

Technical drawing of Rennie sleeve pattern piece.

Step 2

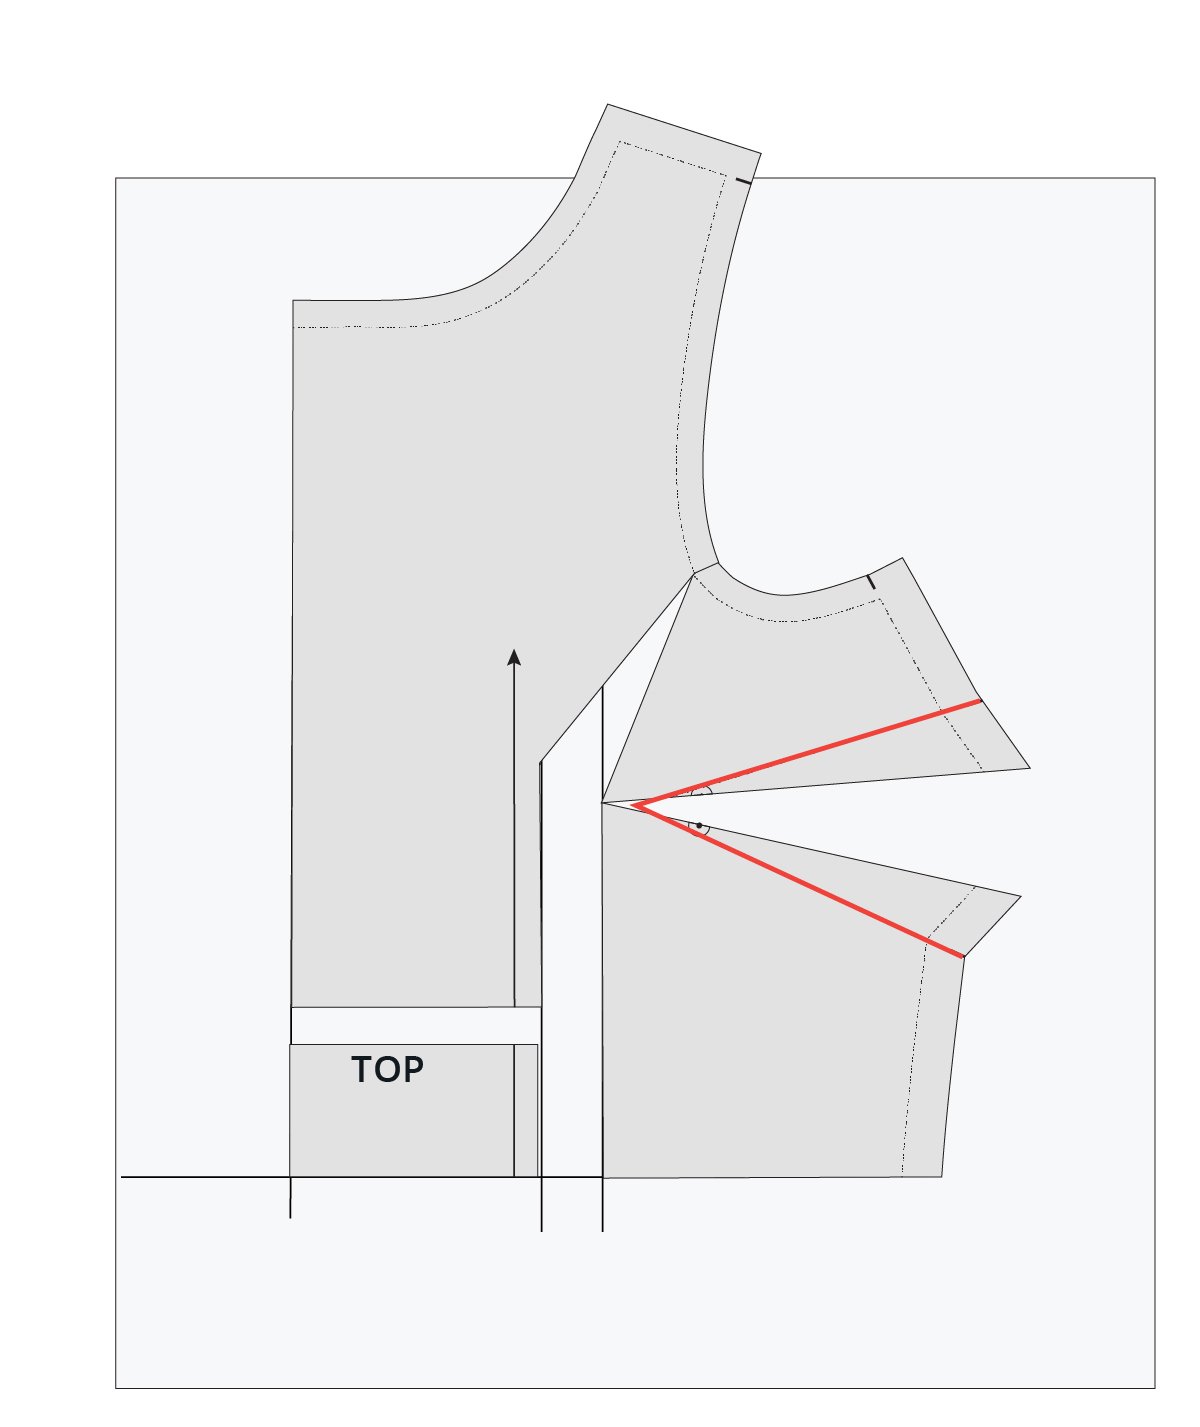
Draw slash lines from about 1/3 of the way down the front and back sleeve cap (measuring from the grainline), down to a point on the grainline about halfway down.

Technical drawing of Rennie sleeve pattern piece.

Step 3

Cut through the slash lines, creating a hinge where the lines intersect at the grainline.

Refer back to your pattern to see how far forward you moved the shoulder. Mark this point on the front of the sleeve cap - measuring from the slash line towards the underseam (the seam that joins the two sides of the sleeve). As the Rennie dress (in the size A - J size range) is the same sleeve cap for front and back, you will need to mark one of them as the front.

Technical drawing of Rennie sleeve pattern piece.

Step 4

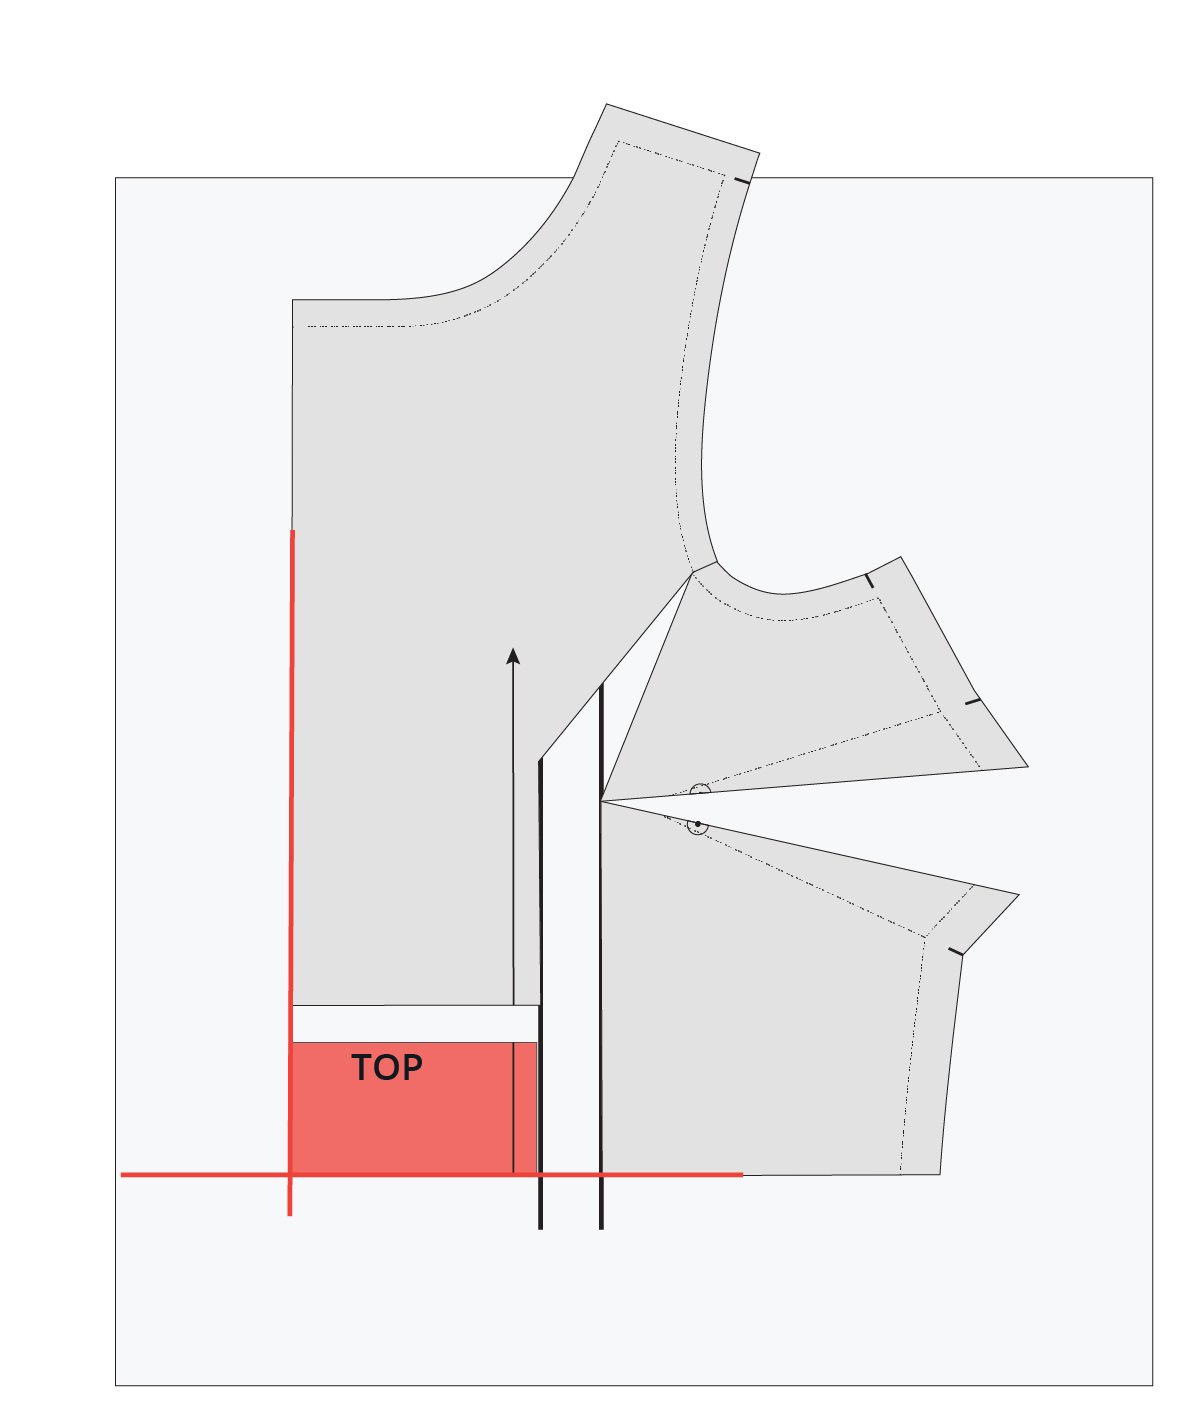
Use the hinge to move the sleeve cap forward until the stitching line meets the line marked in the previous. Tape in place.

Technical drawing of Rennie sleeve pattern piece.

Step 5

Use a scrap of paper to fill the opening at the back sleeve cap.

Technical drawing of Rennie sleeve pattern piece.

Step 6

True the sleeve cap by drawing a smooth curve over the alterations on both the stitch line and the edge of the pattern. You can now see that the centre of the sleeve cap (along with the shoulder notch) is tilted towards the front to match the altered pattern.

Technical drawing of Rennie sleeve pattern piece.

Step 7

Cut off excess paper and re-draw the grainline by extending the original grainline from the lower section of the sleeve up towards the sleeve cap.

Happy sewing,

Emily


RESOURCES MENTIONED IN THIS ISSUE

  • Rennie dress pattern - this pattern was released in Issue 12 of our Curated by ITF subscription. It will be available as a standalone pattern in 2023.

  • How to do a forward shoulder adjustment - tutorial here.


For more issues of the Q & A series, you can check out the archive here.


WHAT YOU’VE BEEN MAKING


MORE POSTS IN THE SERIES

ISSUE 126 - Removing dress volume to make a slimmer fit

THE Q & A SERIES

Removing dress volume for a slimmer fit

Hi Emily,

I just finished sewing the everyday dress as a toile (old doona) hacked into a tunic with a French seam. I’ve made other patterns of yours (Darlow pants, Collins top and Rushcutter dress), which I’ve really enjoyed.

I have some beautiful hand printed linen with a large scale print and am searching for a pattern. I like the look of the Rennie dress but I need a slimmer fit (no belt), can you comment on fit? 

Margaret


Hi Margaret,

I’m so happy to hear you have been enjoying using our patterns.

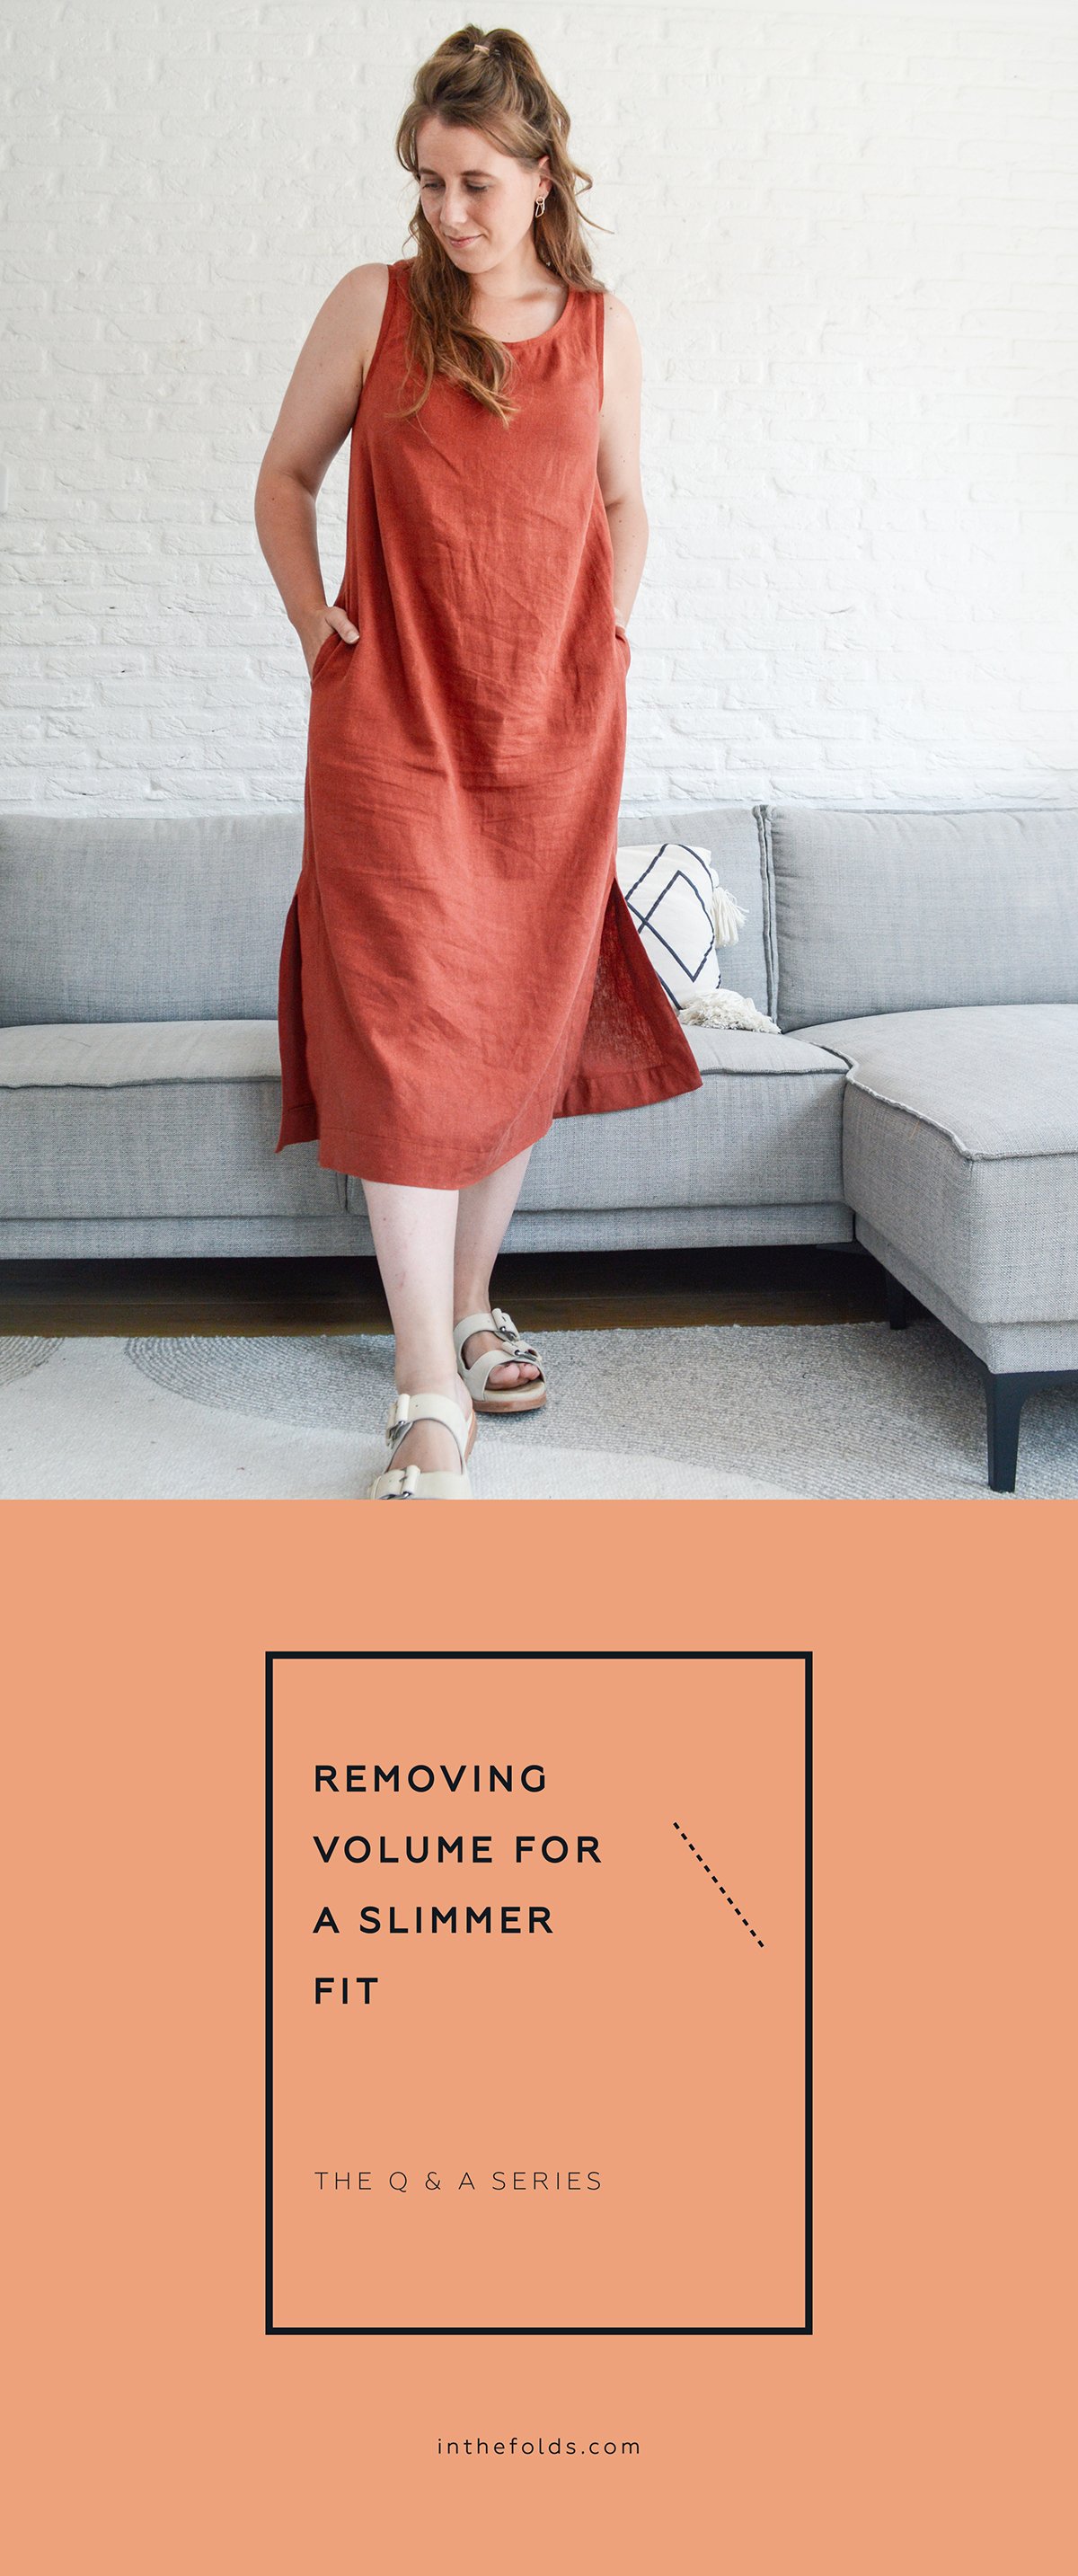
You can definitely slim down the shape of the Rennie dress so that you don’t need to wear a belt. The fit of the dress is slightly A-line, so it sounds like a straighter fit is more what you’re looking for. 

What you can do is use the slash and spread technique to reduce volume in the pattern. This technique is often used to add volume to a pattern, but you can also use the same approach to reduce volume from a pattern!

How to use the slash & spread technique on the rennie dress

Pattern illustration of step 1.

Step 1

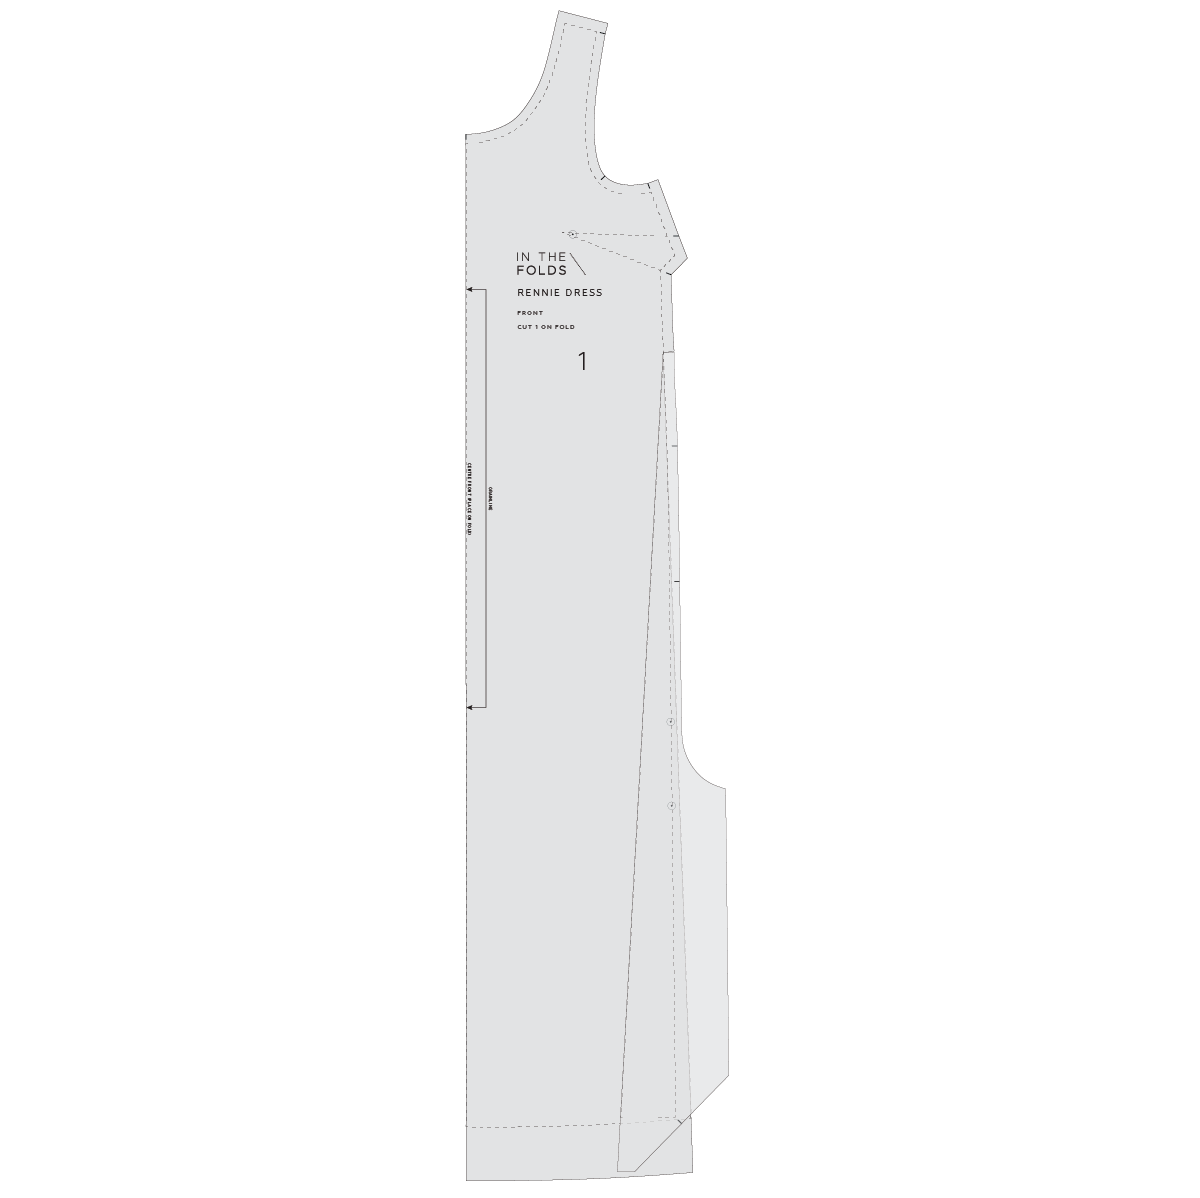
First, you need to think about where you would like to reduce the volume. Looking at the FRONT pattern piece you can see that the pattern becomes A line in shape from around the waist down. We don’t want to change the fit of the bust, so will draw our slash line from the hem up to the waist on the side seam.

Illustration of step 2.

Step 2

Cut along the slash line from the hem up to the stitch line at the waist. Cut into the seam allowance on the side towards the point you stopped cutting, stopping 1-2mm from the slash line. This will create a small hinge of paper.

Illustration of step 3.

Step 3

Gently slide the cut section across the pattern, removing the desired amount of volume. This is up to you. Remember, this alteration will reduce the finished garment measurement at the hip, so it’s a good idea to work out how much volume you can afford to lose.

Remember, you don’t want the pattern being tight at the hips. You also need ease so you can get the dress on and off, move around and sit. Once you are happy with the amount removed, tape or glue in place.

Illustration of step 4.

Step 4

Re-draw the hem with a smooth line over the alteration. Cut off any excess paper. Repeat process on the back, removing the same amount of volume.

I hope this gives you the confidence to try out the Rennie dress!

Happy sewing,

Emily


RESOURCES MENTIONED IN THIS ISSUE

  • The Rennie dress pattern is currently only available as part of our Curated by ITF sewing subscription. It will be released as a standalone pattern in 2023. More information about Curated by ITF can be found here.

  • How to add volume to a pattern tutorial.


For more issues of the Q & A series, you can check out the archive here.


WHAT YOU’VE BEEN MAKING


MORE POSTS IN THE SERIES

ISSUE 125 - HOW TO DO A FULL BUST ADJUSTMENT

THE Q & A SERIES

HOW TO DO A FULL BUST ADJUSTMENT

Hi there,

I really love the new Rennie dress pattern and I'm considering signing up for your Curated by ITF sewing subscription, but I have a full bust and I don't know if the pattern will fit me. Can you please help me figure this out?

Thanks for your time,

Deb


Hi Deb,

I'm so glad to hear that you love our latest Curated by ITF project, the Rennie dress! We're in love with it ourselves. In fact, I just finished making another one for myself, and can confirm that the beautiful finishes make it such an empowering sew! There's really nothing like the feeling you get after finishing a garment that looks as beautiful on the inside as on the outside. 

When it comes to sewing your own clothes it's really important to understand that a pattern is really just a starting point. As I'm sure you can appreciate, it is impossible to make one pattern fit the myriad of wonderful body shapes and sizes in the world. So we're really proud at In the Folds to be able to provide extra resources to our customers to help you fit our patterns to YOUR particular body. And we can definitely help you figure out what you need to do if you have a full bust.

What is a full bust adjustment?

In sewing terms, an adjustment made to a pattern to accomodate a full or larger bust is called a Full Bust Adjustment (FBA).

HOW DO I KNOW IF I NEED A FULL BUST ADJUSTMENT?

You should always use the pattern fit measurements as your starting point when determining what pattern adjustments need to be made, and the same goes for a Full Bust Adustment. This will give you an understanding of how your body aligns with the sizes the pattern provides. 

In The Folds patterns are drafted for a B cup bust for sizes A-J, and a D-cup bust for sizes G-P. If your bust cup size is larger than the pattern’s intended cup size you may need to do a Full Bust Adjustment or FBA.

You also need to consider the style of the pattern you're making, and how you would like the finished garment to fit. If a pattern has a lot of ease (ie. a loose or generous fit), you may choose not to adjust the pattern. If a pattern is designed to be fitted in the bust, it is more likely that you will need to make an FBA.

If you have already made a toile and everything fits nicely, but feels or looks tight across the bust you may need to make a FBA. This will also apply if there are diagonal lines radiating from the centre front or side seams towards your bust apex point.

Keep in mind that there are cases when your measurements may indicate that you need to do a FBA, but you actually need to alter another part of the pattern, such as the back width.

WORK OUT YOUR SEWING CUP SIZE

Cup sizes in sewing patterns are different to bra sizes and often don't correspond. Figuring out your sewing cup size should be your first step in determining if you need to make a pattern adjustment.

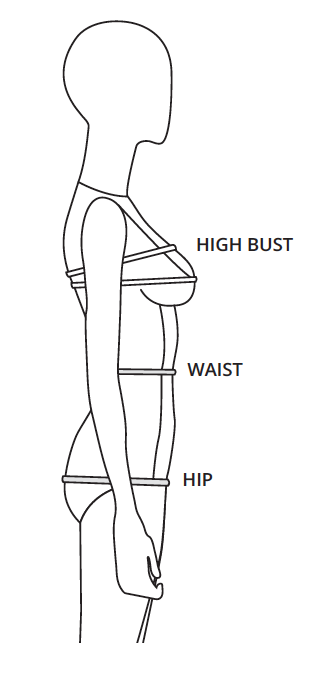
To figure out your sewing cup size, take your HIGH BUST MEASUREMENT (1) and BUST MEASUREMENT (2) and record them in the table above.

Work out the difference between your HIGH BUST MEASUREMENT (1) and BUST MEASUREMENT (2) and add it to the table (3).

If the difference between your HIGH BUST MEASUREMENT and your FULL BUST MEASUREMENT is 2.5cm (1") your bust is an A cup, 5cm (2") it's a B cup, 7.5cm (3") is a C cup, 10cm (4in) is a D cup and so on.

You can remove the dart all together by removing the full difference between the high bust and bust measurement of the pattern. 

Record your bust cup size in the chart (4).

If your cup size is smaller than the pattern’s cup size you may need to do a Small Bust Adjustment (SBA) - you can find a tutorial here.

If your cup size is the same or similar to the pattern’s cup size, it’s likely you can leave it as it is.

If your cup size is bigger than the pattern’s cup size, you may need to do an FBA.

Many In The Folds patterns include a lot of design ease, so you may choose not to make the alteration for some styles (for example, I have an A cup size bust and don't bother with an SBA for the Collins top or the Rushcutter dress, but I do for the Acton dress, as it is more fitted).

FIGURE OUT HOW MUCH TO ADD

To make a correct adjustment you now need to work out how much you to add to the pattern to fit your bust cup size.

If you have a C cup bust cup size and your pattern is a B cup, then you will need to add 1 cup size (i.e. 2.5cm / 1in). If you have a D cup bust cup size, you will need to add 2 cup sizes (i.e. 5cm / 2in) and so on. Record the amount you need to add in the table above (5).

This number is the total amount you need to add to the pattern.

The FRONT [1] piece of a pattern is usually cut on the fold or as a pair so you will need to add half of your measurement at (5) to each side of the pattern. Divide (5) from the table by 2 and record it in the table above (6). This is the amount you will be adding to the pattern.

HOW TO DO A FULL BUST ADJUSTMENT

We will use the example of changing a pattern from a B cup to a D cup.

This means we will be adding 5cm (2in) or 2 cup sizes in total. Therefore, half of this - 2.5cm (1in) should be added to the FRONT [1] pattern piece, so that when the piece is cut as a pair or on the fold, the full amount required will be added.

To begin, trace a copy of the FRONT [1] pattern piece. (We suggest you use a copy so that if you make a mistake you always have the original to go back to.) Be sure to include all pattern markings, including grainline, notches and drill hole. It is also important trace off the stitching line (the grey line on the pattern).

Note: If your pattern is a jumpsuit or has design panels/features below the waistline then you may have to cut through the waist section of the pattern.

In the example of a jumpsuit, you will have the bodice and pant sections as two independent pieces. In this case, we would alter the bodice section and then join the other pieces back together.

Step 1

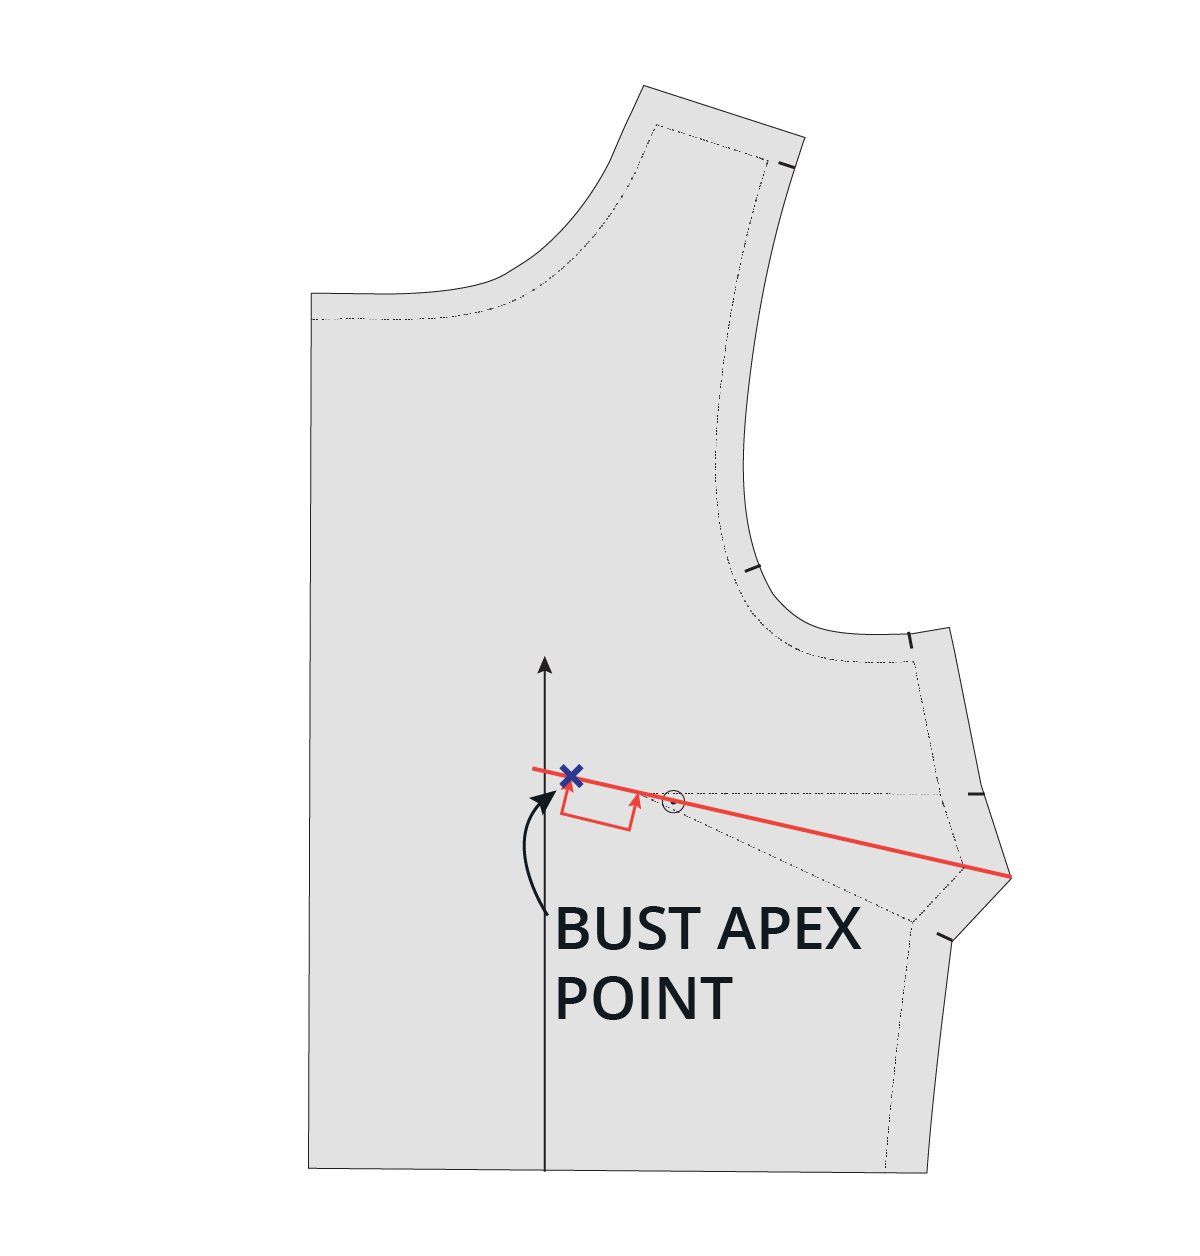
Take a ruler and draw a line through the centre of the dart. Extend the line beyond the tip of the dart. 

This line will be referred to as line A.

Step 2

Mark the apex point on the line. (The BUST APEX POINT is the peak of your bust). On In The Folds B-cup patterns this is normally 2.5cm (1in) beyond the tip of the dart point. On In The Folds D-cup patterns this is normally 5cm (2in) beyond the tip of the dart point.

If you have already found your actual BUST APEX POINT in relation to the pattern, mark this point, rather than the point indicated.

Step 3

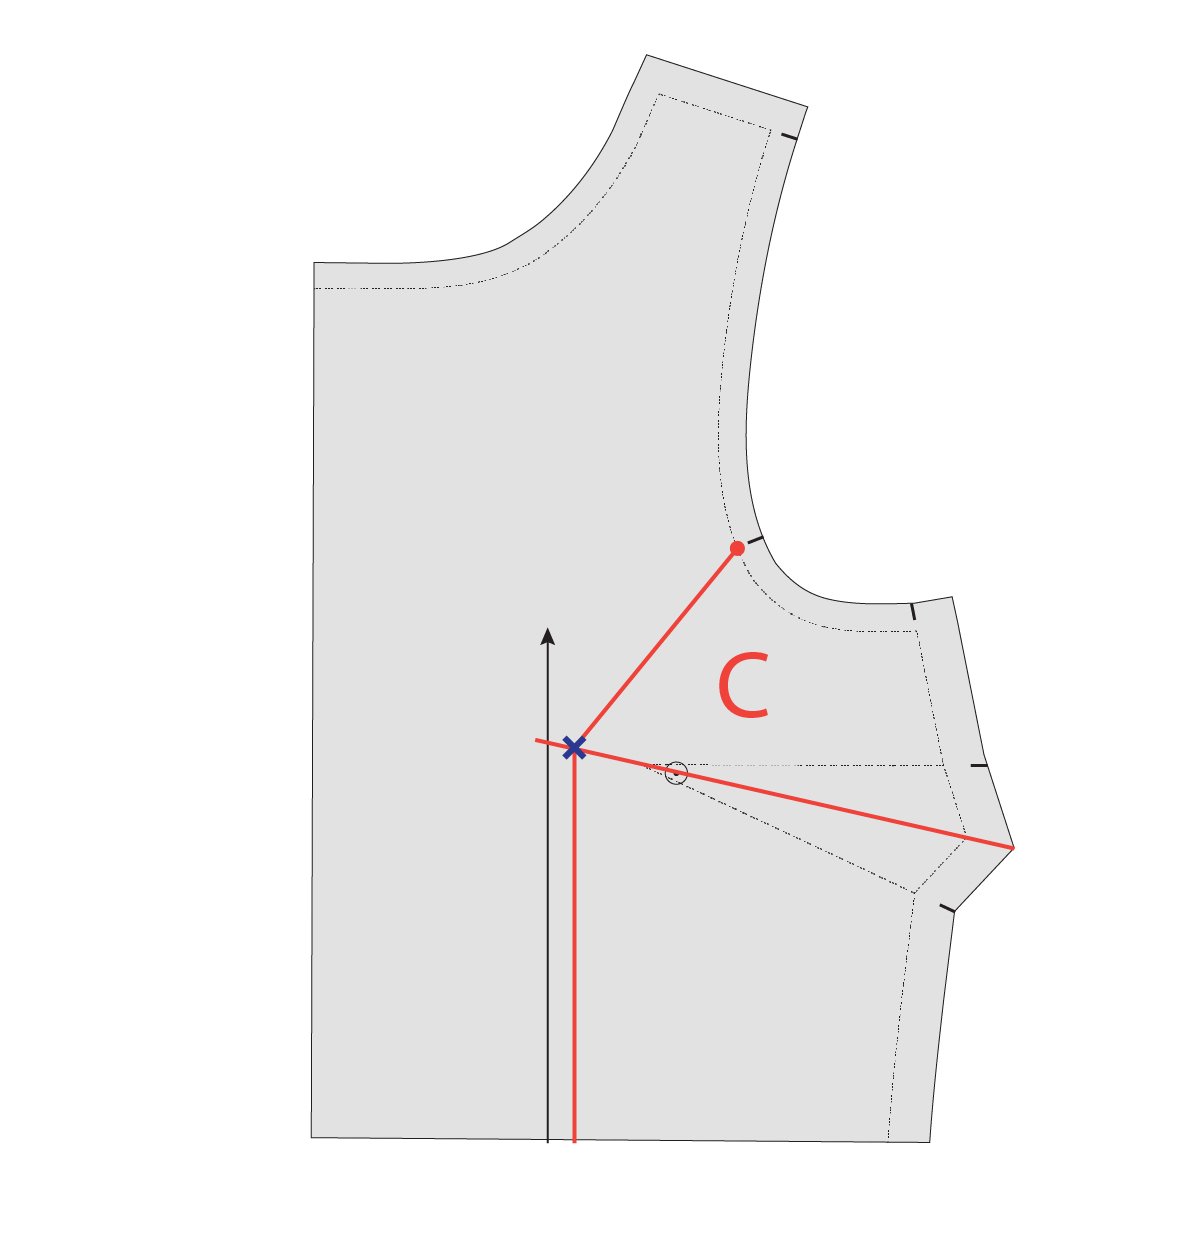
Draw a line straight down from the BUST APEX POINT, parallel to the grainline. Extend to the WAIST LINE.

This line will be referred to as line B.

Step 4

Draw a line from the BUST APEX POINT through to the notch on the armhole. 

This line will be referred to as line C.

Step 5

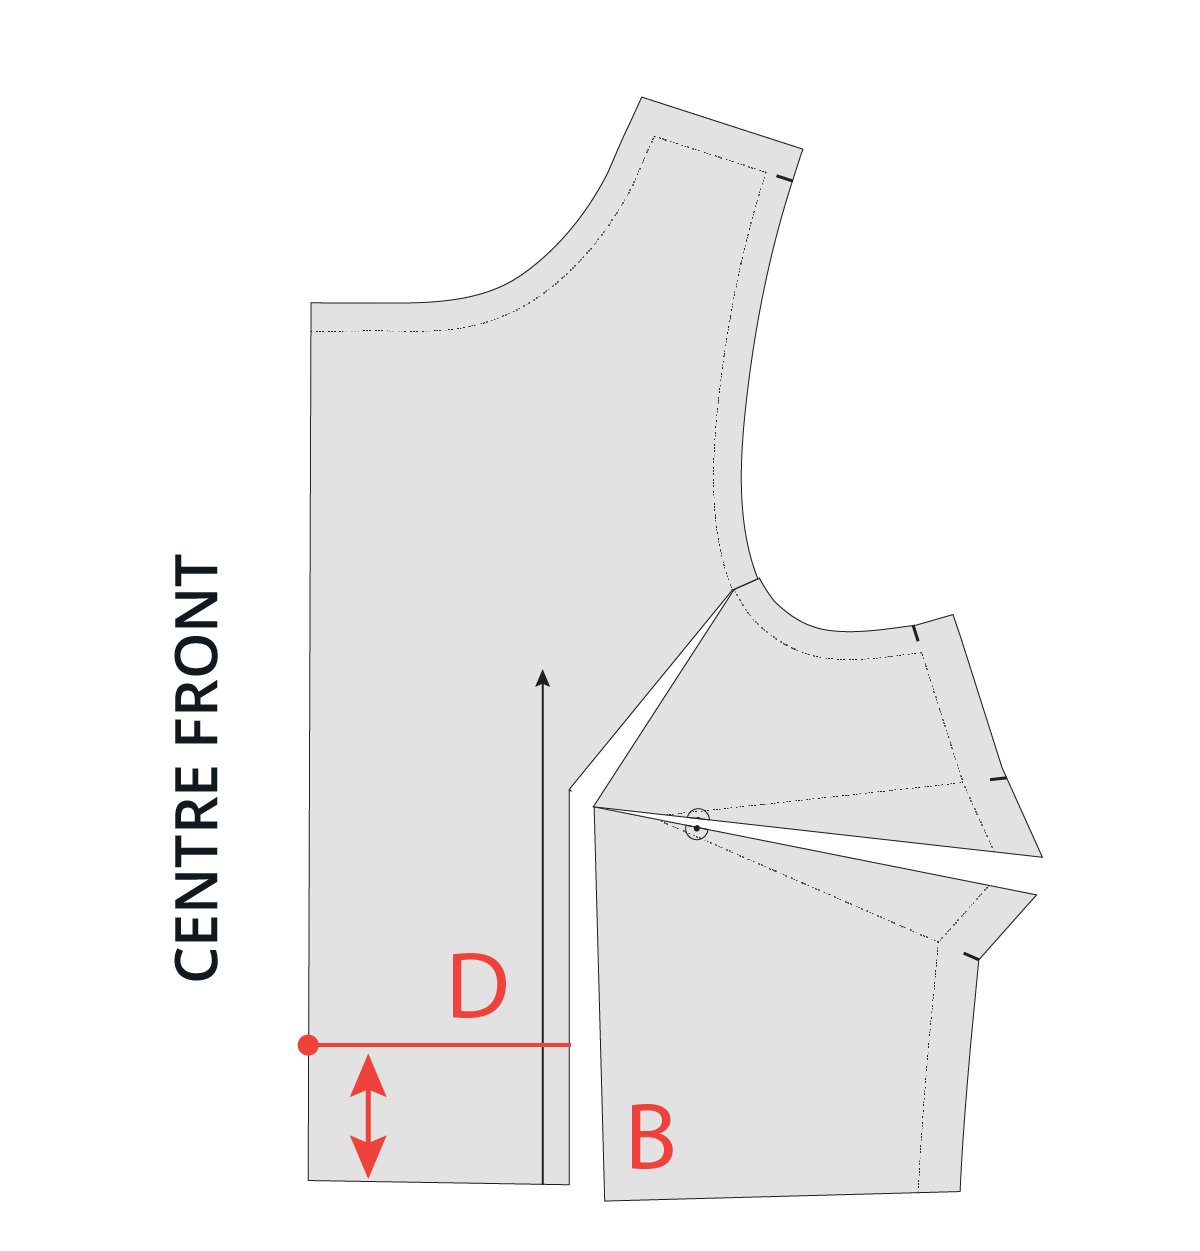
From the LENGTHEN/SHORTEN LINE, cut up line B. When you get to the BUST APEX POINT, turn and cut along line C

Slow down as you approach the STITCH LINE. Stop about 1mm from the STITCH LINE. 

Cut in from the seam allowance on the armhole towards the point you stopped cutting on line C. Don’t cut through to the point - leave a small 1-2mm ‘hinge’ of paper that keeps the two parts of the pattern piece intact.

Step 6

Cut along line A from the side seam. Leave a small paper hinge at the BUST APEX POINT.

Step 7

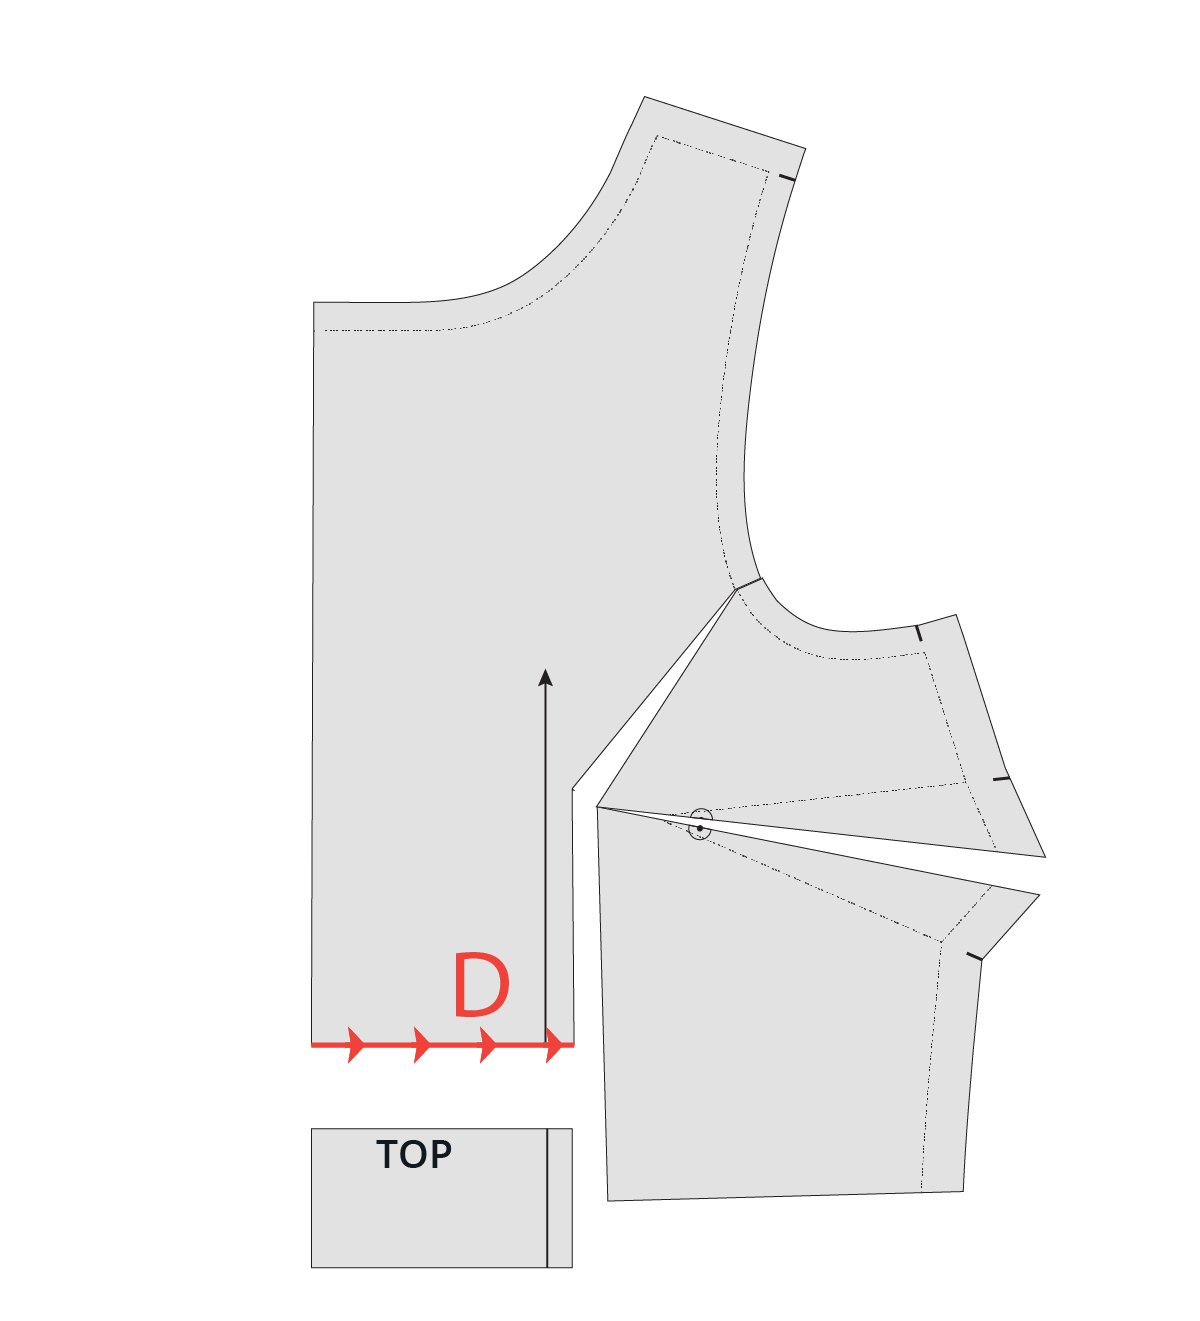
The alteration so far is preparing the pattern to add width to the bust line. You will also need to add some length to the bust. This is because we need more fabric across the bust horizontally, as well as vertically. 

Mark a line 5cm (2in) from the bottom (parallel to the LENGTHEN/SHORTEN LINE) from line B to the CENTRE FRONT. 

We will refer to this as line D.

Step 8

Cut along line D. Mark the top of the piece that you remove so that you don't get confused when you put the pieces back together.

Step 9

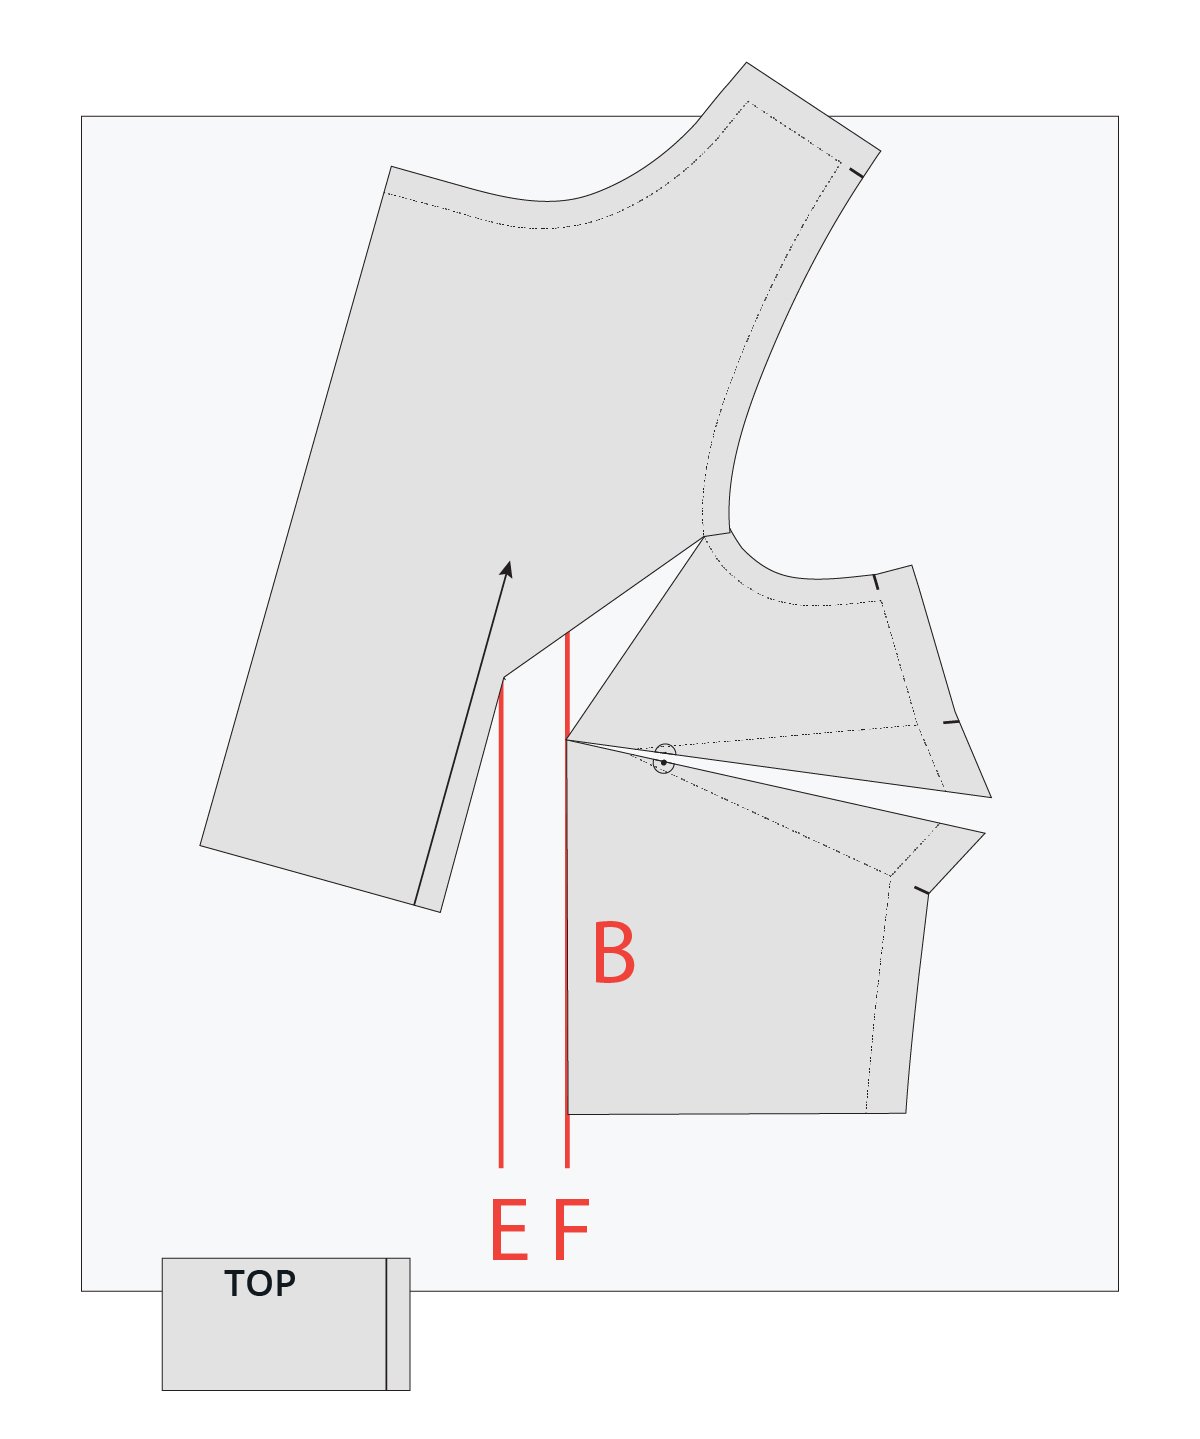
Take a piece of pattern paper that is larger than the bodice section. Draw a vertical line in roughly the centre of the paper. We will refer to this as line E

By this stage you should know how much width you need to add to the bust (if you don't, refer to the measurements you recorded in the table above). Draw a second line, parallel to the first, the distance you need to add away from the first line. For example, if you need to add a total of 5cm (2in) to the bust, you will draw the line 2.5cm (1in) away from the first line.

This will be line F.

Step 10

Now that you have cut through the lines on the pattern, you will be able to manoeuvre the pattern to add the extra width you need at the bust. 

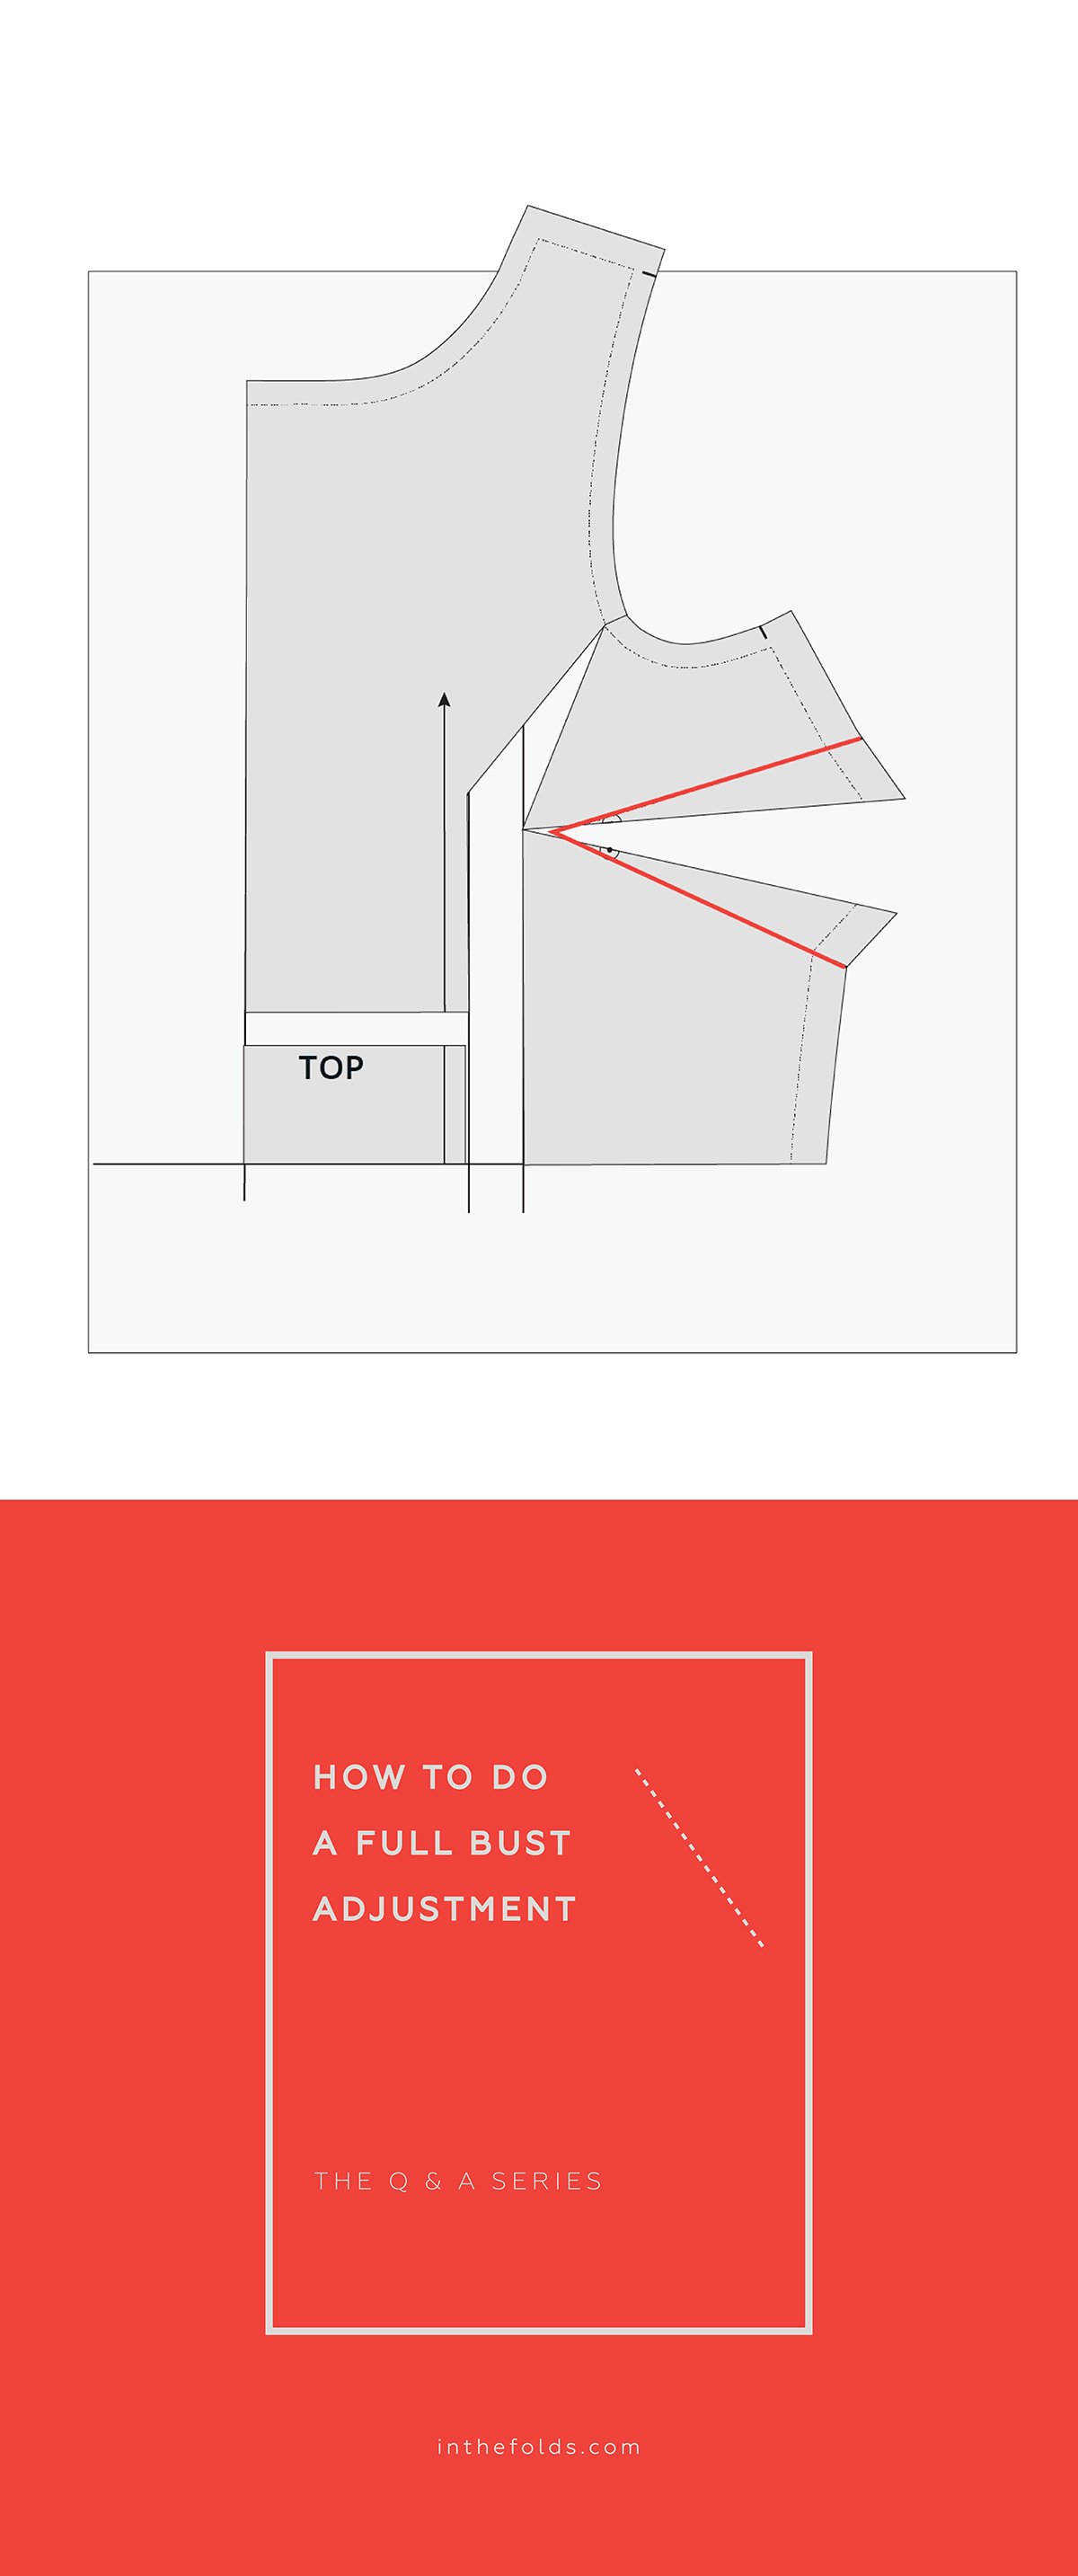
Carefully place the pattern onto the guidelines you drew in the previous step. To start, align line B on the pattern (the side of line B that is on the dart side) with line F

Tape or glue in place (this section of the pattern only).

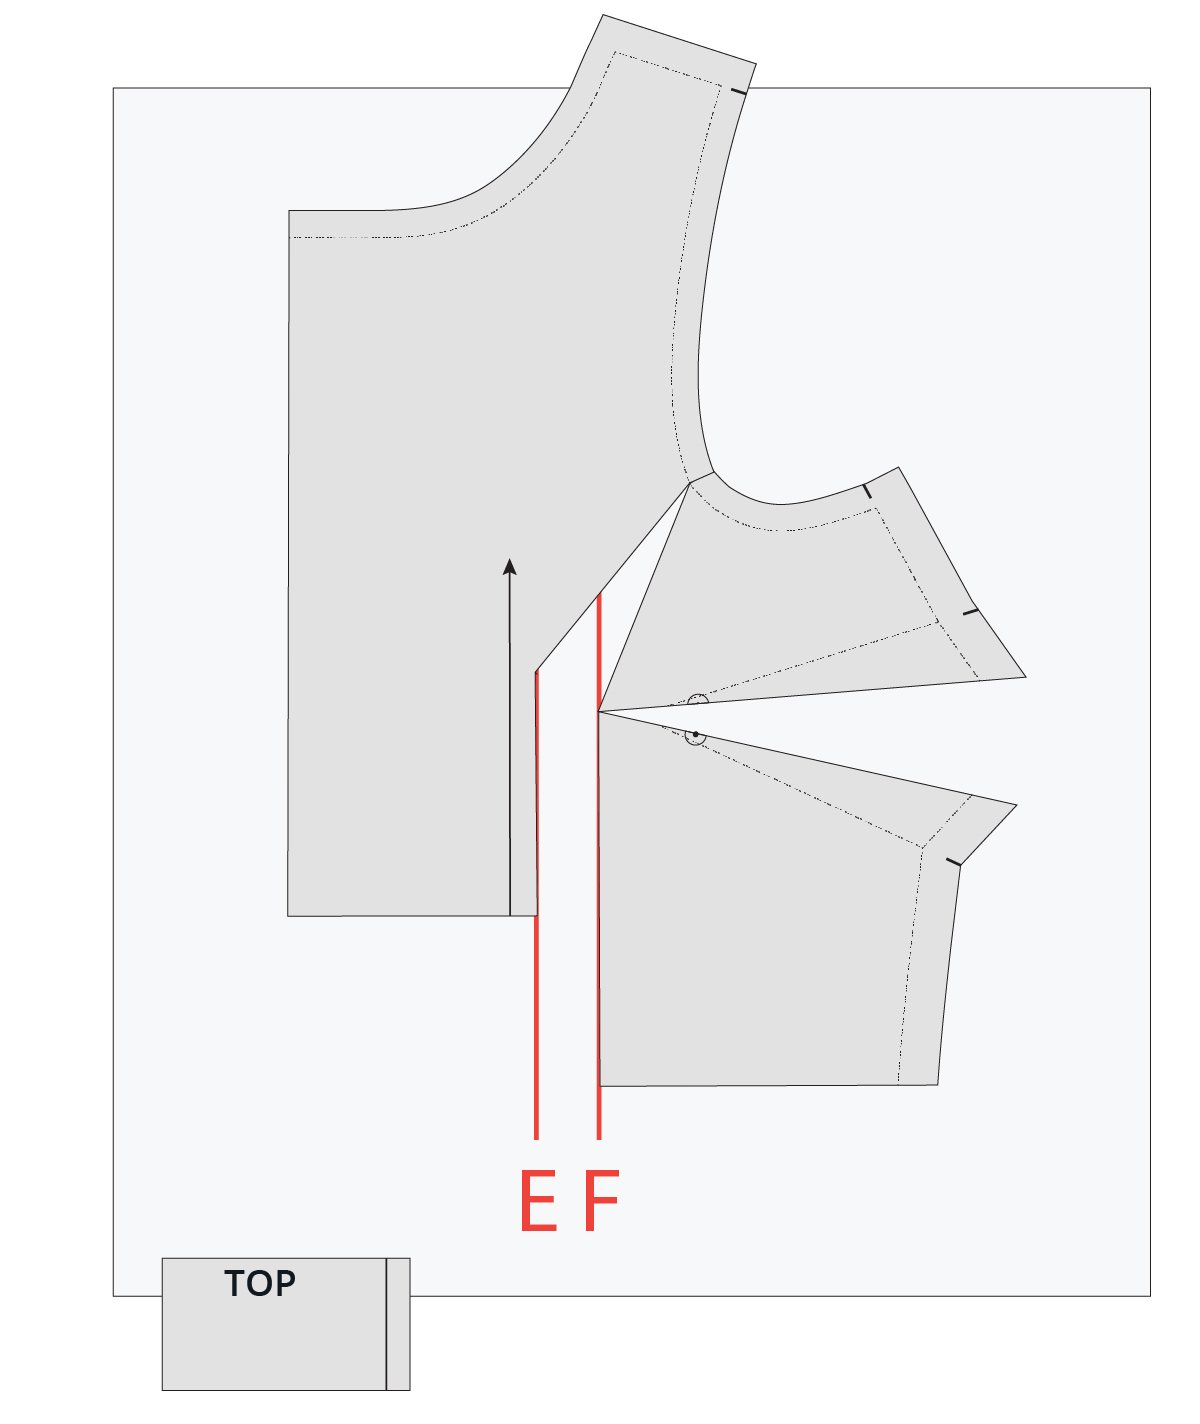
Step 11

Carefully move the other side of the pattern piece until the other side of line B (closest to the CENTRE FRONT) lines up with line E. When everything is lined up, tape this section of the pattern in place.

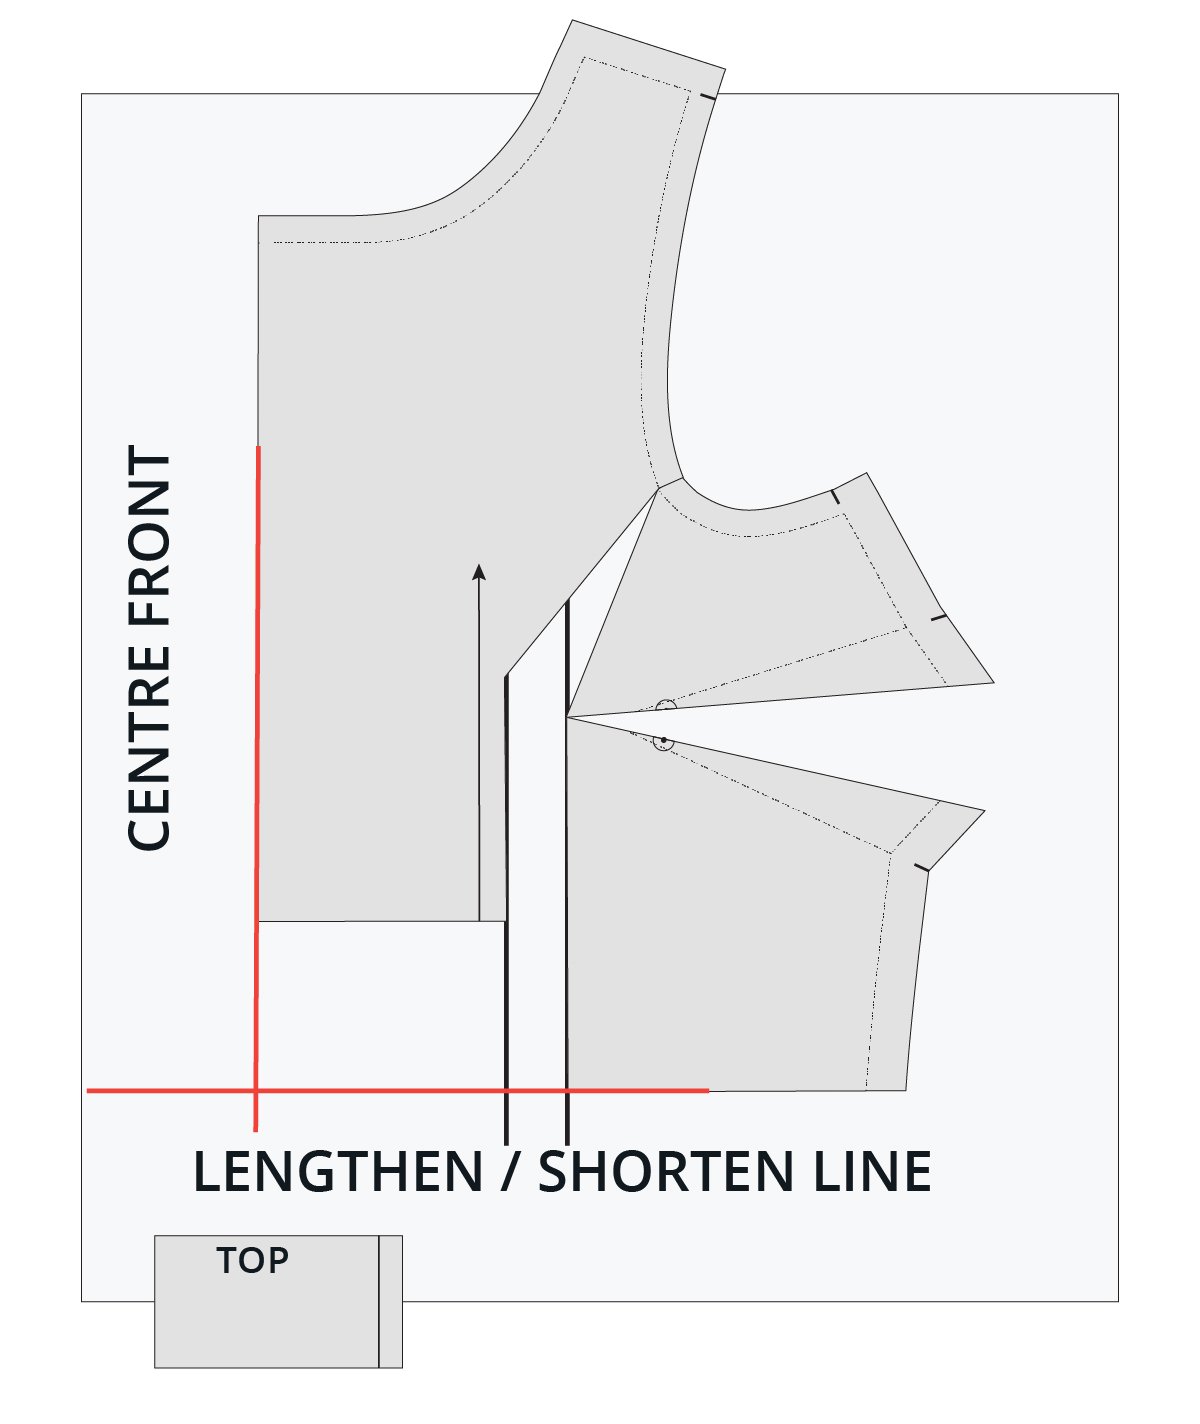
Step 12

Take a ruler and extend the CENTRE FRONT line (along the CUT LINE) onto the paper underneath. Do the same for the LENGTHEN/SHORTEN line at the waist. The two lines will intersect.

Step 13

Take the section of the pattern you cut off in Step 8 and line up the corner with the lines marked in Step 12. When it’s in place, tape or glue in place.

Step 14

Draw in the dart arms by joining the dart notches to the original dart point and extending the lines until they intersect. 

Check that this is the correct dart point positioning for your body. Do this by measuring your body and checking the pattern, or by creating a toile. Here’s a video resource from Made to sew on how to measure your bust apex.

Due to the FBA, you may end up with a very large dart and as a result it can be difficult to achieve the shaping you need for the bust. Consider rotating part of the dart to become a second dart. We would suggest a French dart. See this article for more info on rotating darts

Reattach the lower section of the pattern if applicable. You will notice the waist measurement has increased. Adjust the bodice to match the lower section.

Making clothes to fit your own body is another very empowering aspect of learning to sew. I hope this tutorial helps you on your sewing adventures, Deb!

Happy sewing!

Emily


RESOURCES MENTIONED IN THIS ISSUE

  • Rennie dress pattern is currently only available as part of our Curated by ITF sewing subscription. It will be released as a standalone pattern in 2023. More information about Curated by ITF can be found here.

  • Small Bust Adjustment - tutorial here.

  • Collins top - pattern here.

  • Rushcutter dress - pattern here.

  • Acton dress - pattern here.

  • How to measure your bust apex - tutorial here.

  • How to rotate darts - tutorial here.


For more issues of the Q & A series, you can check out the archive here.


WHAT YOU’VE BEEN MAKING

Want your photo featured in our weekly email?
Make sure to tag us on instagram! @inthefolds


MORE POSTS IN THE SERIES

ISSUE 123 - Sewing a hem split and French seams

THE Q & A SERIES

Sewing a hem split and French seams

Firstly thank you so much for creating such patterns that allow a novice to create their own handmade wardrobe and learn the intricate techniques through your instructions and guidance.

My question regarding the everyday dress is that instead of finishing the edges using zigzag stitch (I do not own a serger) and then just hemming it as usual, can I use the french seam method for the sides like you've shown in the wrap top pattern instruction? This way my dress would not fray in wash and will always be neat from inside. I am not sure if it will take up a lot of seam allowance or if it was at all possible due to the side pockets. Hence I wanted to know from your end regarding this. 

Looking forward to hear from you soon. 

Thanks,

Sharvari


Hi Sharvari,

Great to hear you'll be giving the Everyday dress pattern a go and would like to get those insides looking as beautiful as the outside!

This is the perfect question for us to answer this week as we have just released our latest Curated by ITF pattern - the Rennie dress. This pattern (and all the resources we will be sharing throughout the month in our online sewing community) is all about beautiful finishes to elevate your handmade wardrobe.

The reason the side seams for the Everyday dress pattern are sewn with a regular seam (zig-zag or overlocked to finish) is because of the hem splits.

You could do a french seam along the side seam, it’s just when you get to the split you wouldn't be able to press those seams open. When we were designing the Rennie dress this is something we wanted to find a solution for! We wanted both French seams and a hem split, so we got to work figuring out how we could have both… and we did! So in today’s post we will be showing you how to sew French seams when you also have a hem split.

What is a French seam?

French seams are a technique used to finish seam allowances to prevent fraying. We love them at ITF because they give a beautiful, clean finish without the need for an overlocker (serger).

It's a great option if you do not have one of those machines and want a better finish than you can get with a zig-zag stitch. In fact, I'd even go as far as to say, it's far preferable to a regular overlocked or zig-zagged finish and you should use it wherever you can!

French seams are great for light to mid-weight fabrics, especially those that are prone to fraying. French seams are also the best choice of finish if you are using a sheer fabric because it prevents unsightly overlocking being visible through the fabric.

Although French seams are more time consuming than using an overlocker (serger), they are very satisfying and give one of the most beautiful finishes possible.

How to sew a French seam

I'm not going to go into how to sew French seams right now, but you can find a step-by-step of how to sew a French seam in a past issue of the Q&A series here.

How to sew a French seam and a hem split in the Everyday dress

Step 1

With wrong sides together, pin the FRONT [1] to the BACK [2] on both sides. Pin down from the armhole, around the pocket and down to the upper drill hole. Take a ruler and chalk and mark a point 1.2cm (½in) above the upper drill hole on the side seam edge. From this point, draw a diagonal line to the first upper drill hole.

(For these instructions we already have attached the pocket bags. To see how to attach the pockets with French seams read this past issue of the Q&A series.)

Stitch the side seams with a 6mm (¼in) seam allowance. Stop stitching when you get to the diagonal guideline and put your needle down. Lift your machine foot and turn towards the drill hole. Put the foot down and stitch along the guideline towards the drill hole. Stop stitching on the drill hole (you may need to walk your last few stitches in) and then back stitch.

Step 2

Clip into the corners between the IN-SEAM POCKET [3] and the body of the dress, before trimming back the whole seam by half.

Snip into the seam allowance towards the upper drill hole at a right angle. Then cut in again, parallel to the line of stitching, removing a small triangle from the seam allowance.

Step 3

Turn the dress inside out and press the seams with right sides together. Use a corner turner to get a nice sharp corner at the bottom of the seam.

Mark the stitch line from the bottom of the IN-SEAM POCKETS [3] down to the lower drill hole that marks the top of the hem split on each side. Pin the seam from the armhole, around the pocket and down to the lower drill hole.

Stitch the seam with a 6mm (¼in) seam allowance, sewing down to the lower drill hole. Press the seams and IN-SEAM POCKETS [3] towards the FRONT [1].

You have now finished the side seam with a French seam, but can press the hem split open.

If you’ve been wanting to up your game when it comes to seam finishes, now would be a great time to join Curated by ITF. You can give these techniques a go (along with many more) along with the support of our incredible online community, and our ITF team are available to answer any questions you might have!

Happy sewing,

Emily


RESOURCES MENTIONED IN THIS ISSUE

  • Everyday dress pattern can be found here.

  • More information about Curated by ITF can be found here.

  • Rennie dress pattern can be found here.

  • Tips for sewing French seams - tutorial can be found here.

  • How to sew in-seam pockets with French seams - tutorial can be found here.


For more issues of the Q & A series, you can check out the archive here.


WHAT YOU’VE BEEN MAKING


MORE POSTS IN THE SERIES