sewing patterns

How to : Add panel lines to a skirt pattern

how_to_add_panel_lines_skirt_1

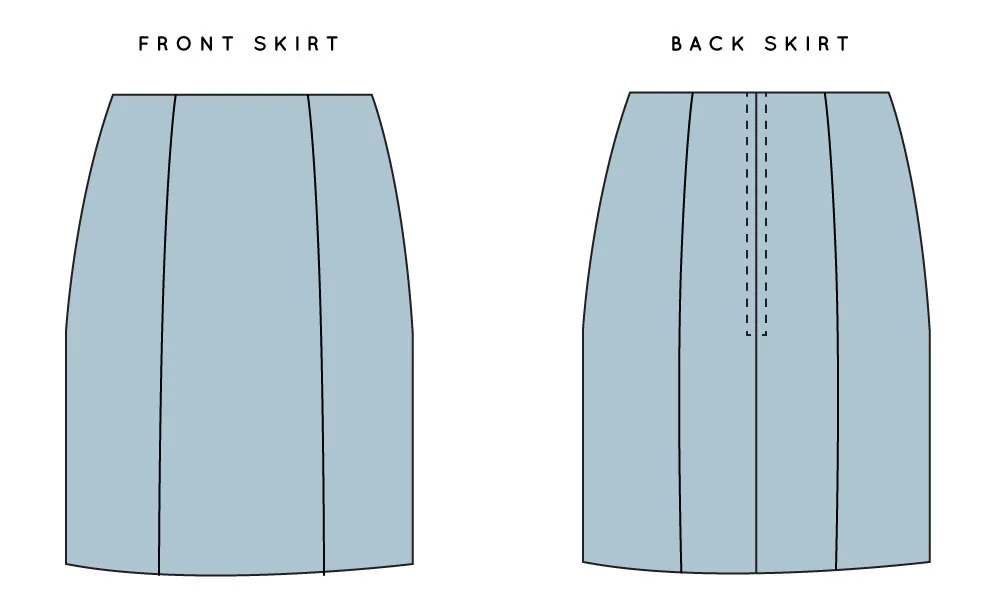
Panel lines are a great way to add interest to a design. There are countless variations and it is a way to include more than one fabric in your design if you would like. I really struggle to keep a design limited to one fabric, so often add a contrast fabric with panel lines. Panel lines are also a good way to eliminate darts, without losing the fitted shape of the garment.

Now that our skirt blocks are done, it's time to have a play! In today's post I will show you the basics of creating panel lines on a pattern. This same principle can be used on all different patterns, so keep reading, even if it's a bodice or dress you're planning to add panels to. 

how_to_add_panel_lines_skirt_2

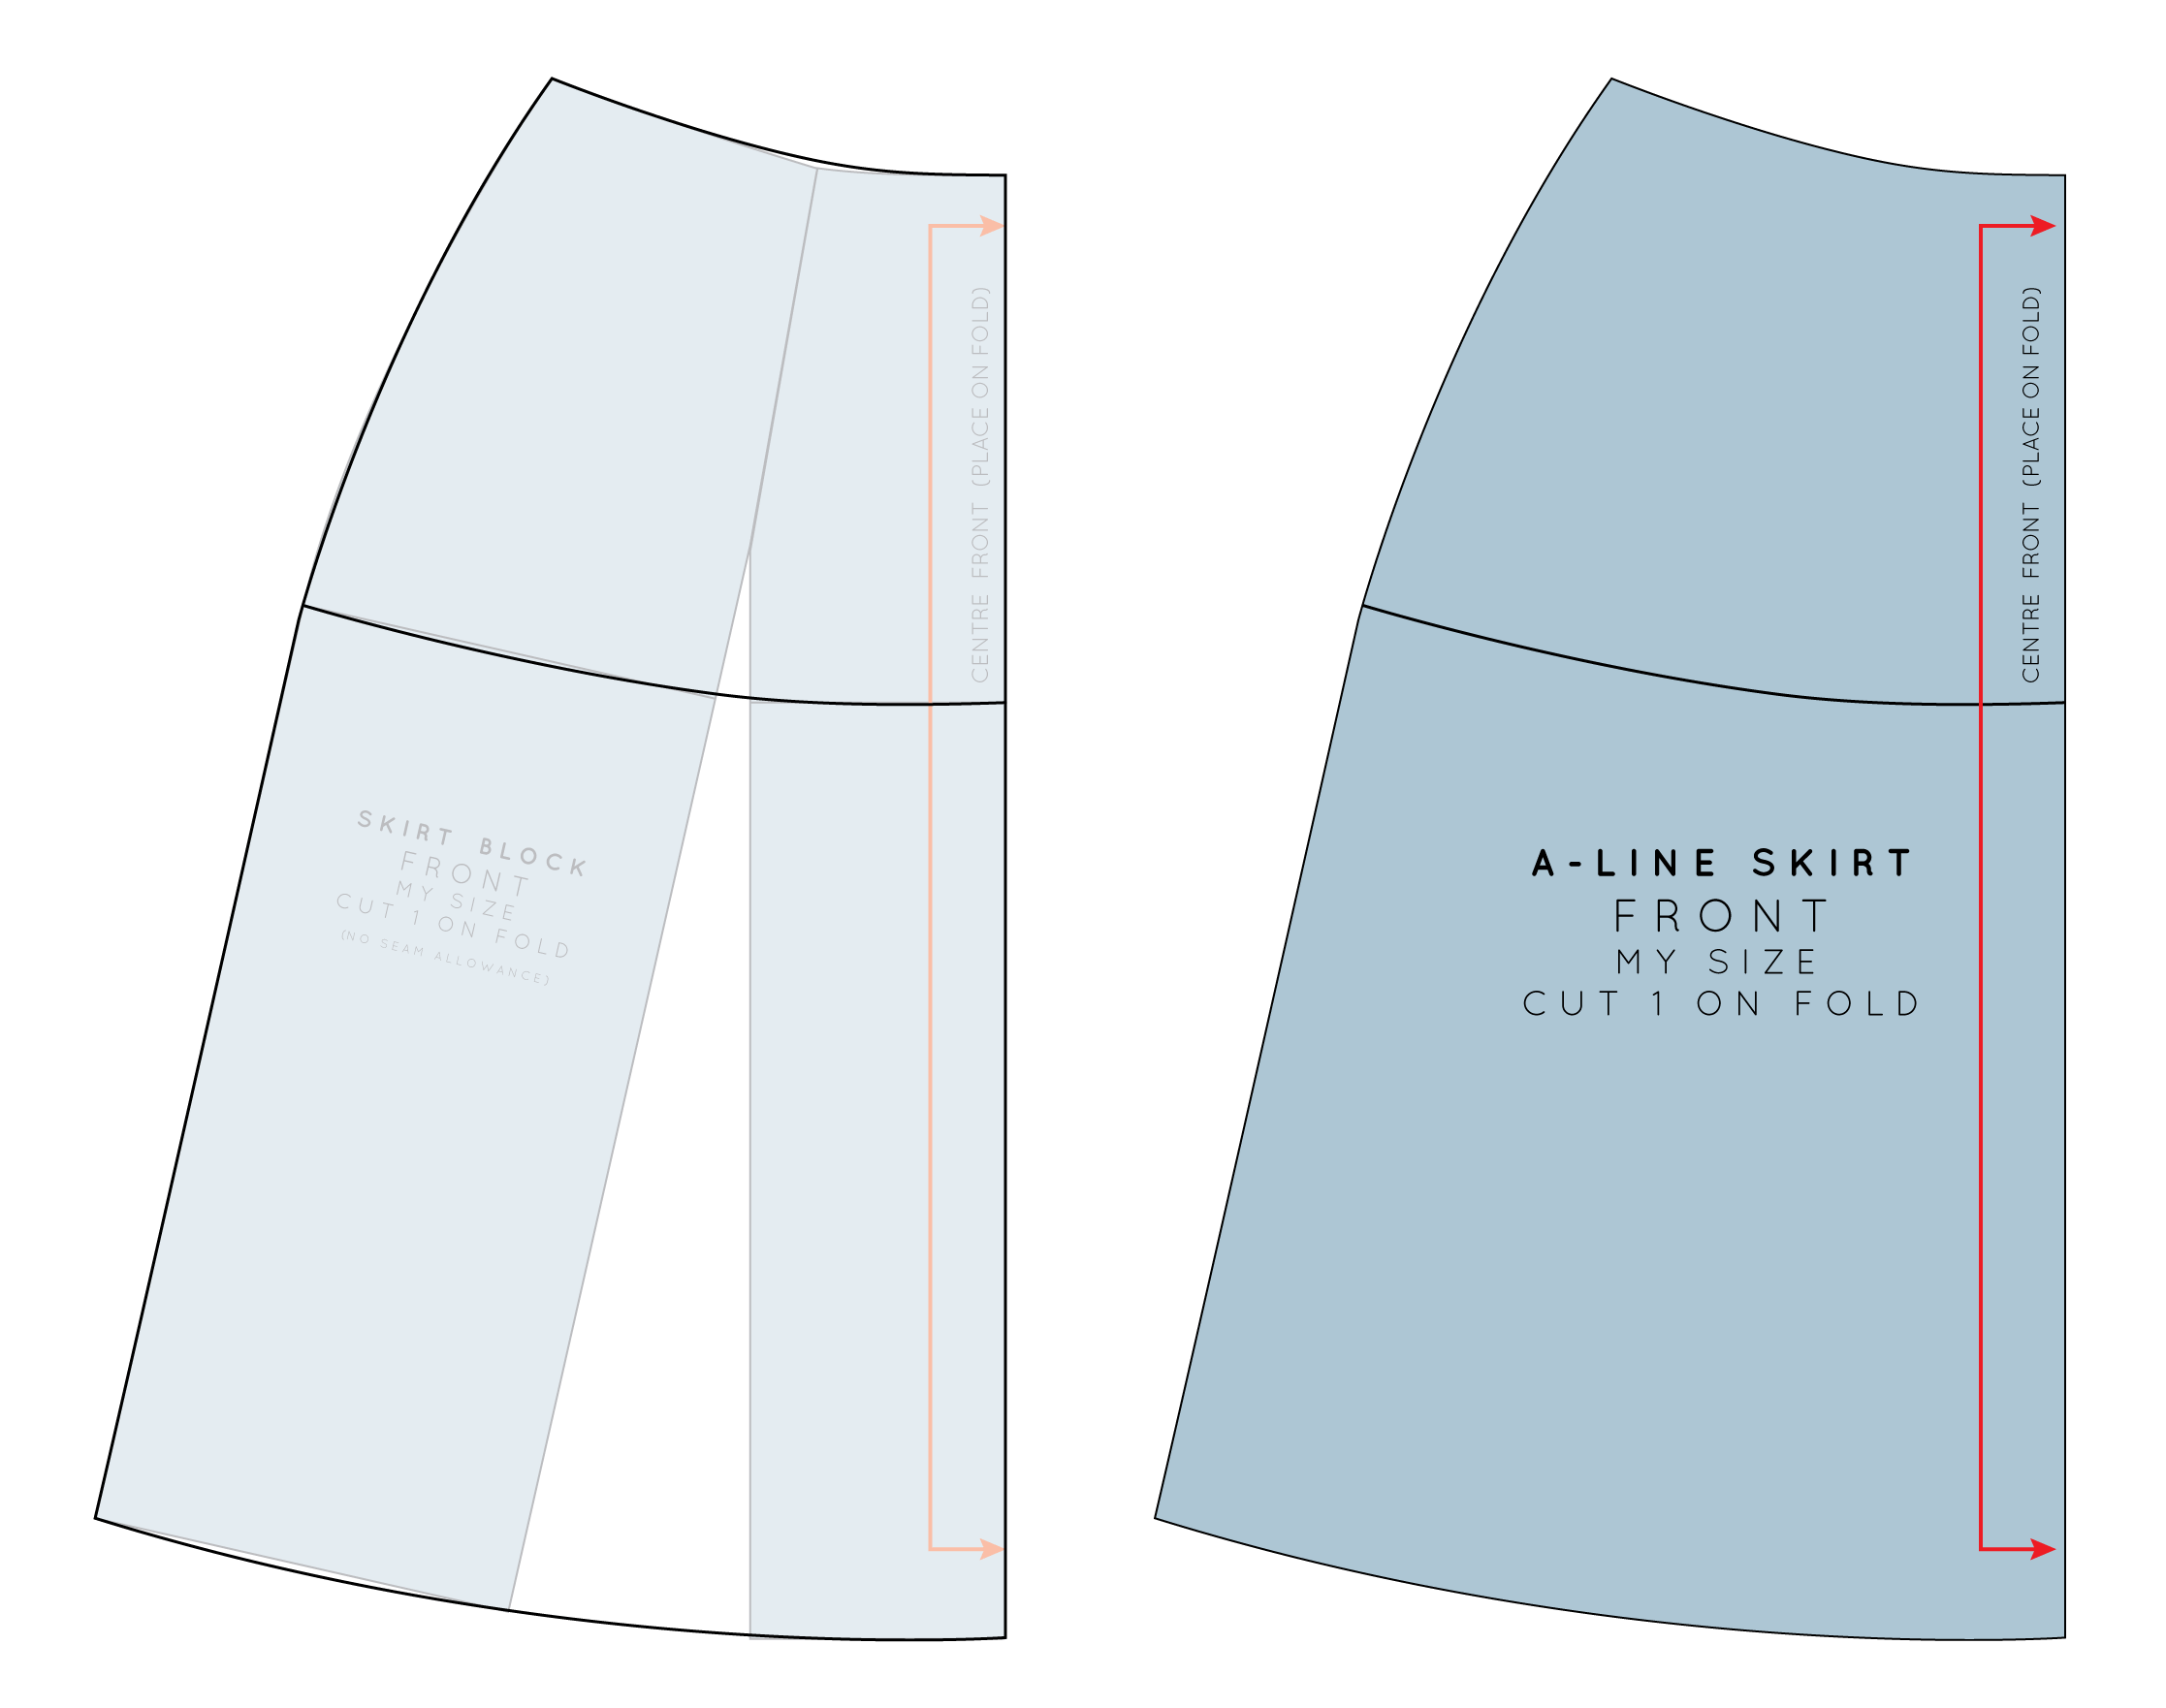
I will show you how to add panel lines where the darts are on the original skirt block. With these panels, you will no longer need darts, as the shaping required will be provided by the panel lines.

Mark panel lines

how_to_add_panel_lines_skirt_3

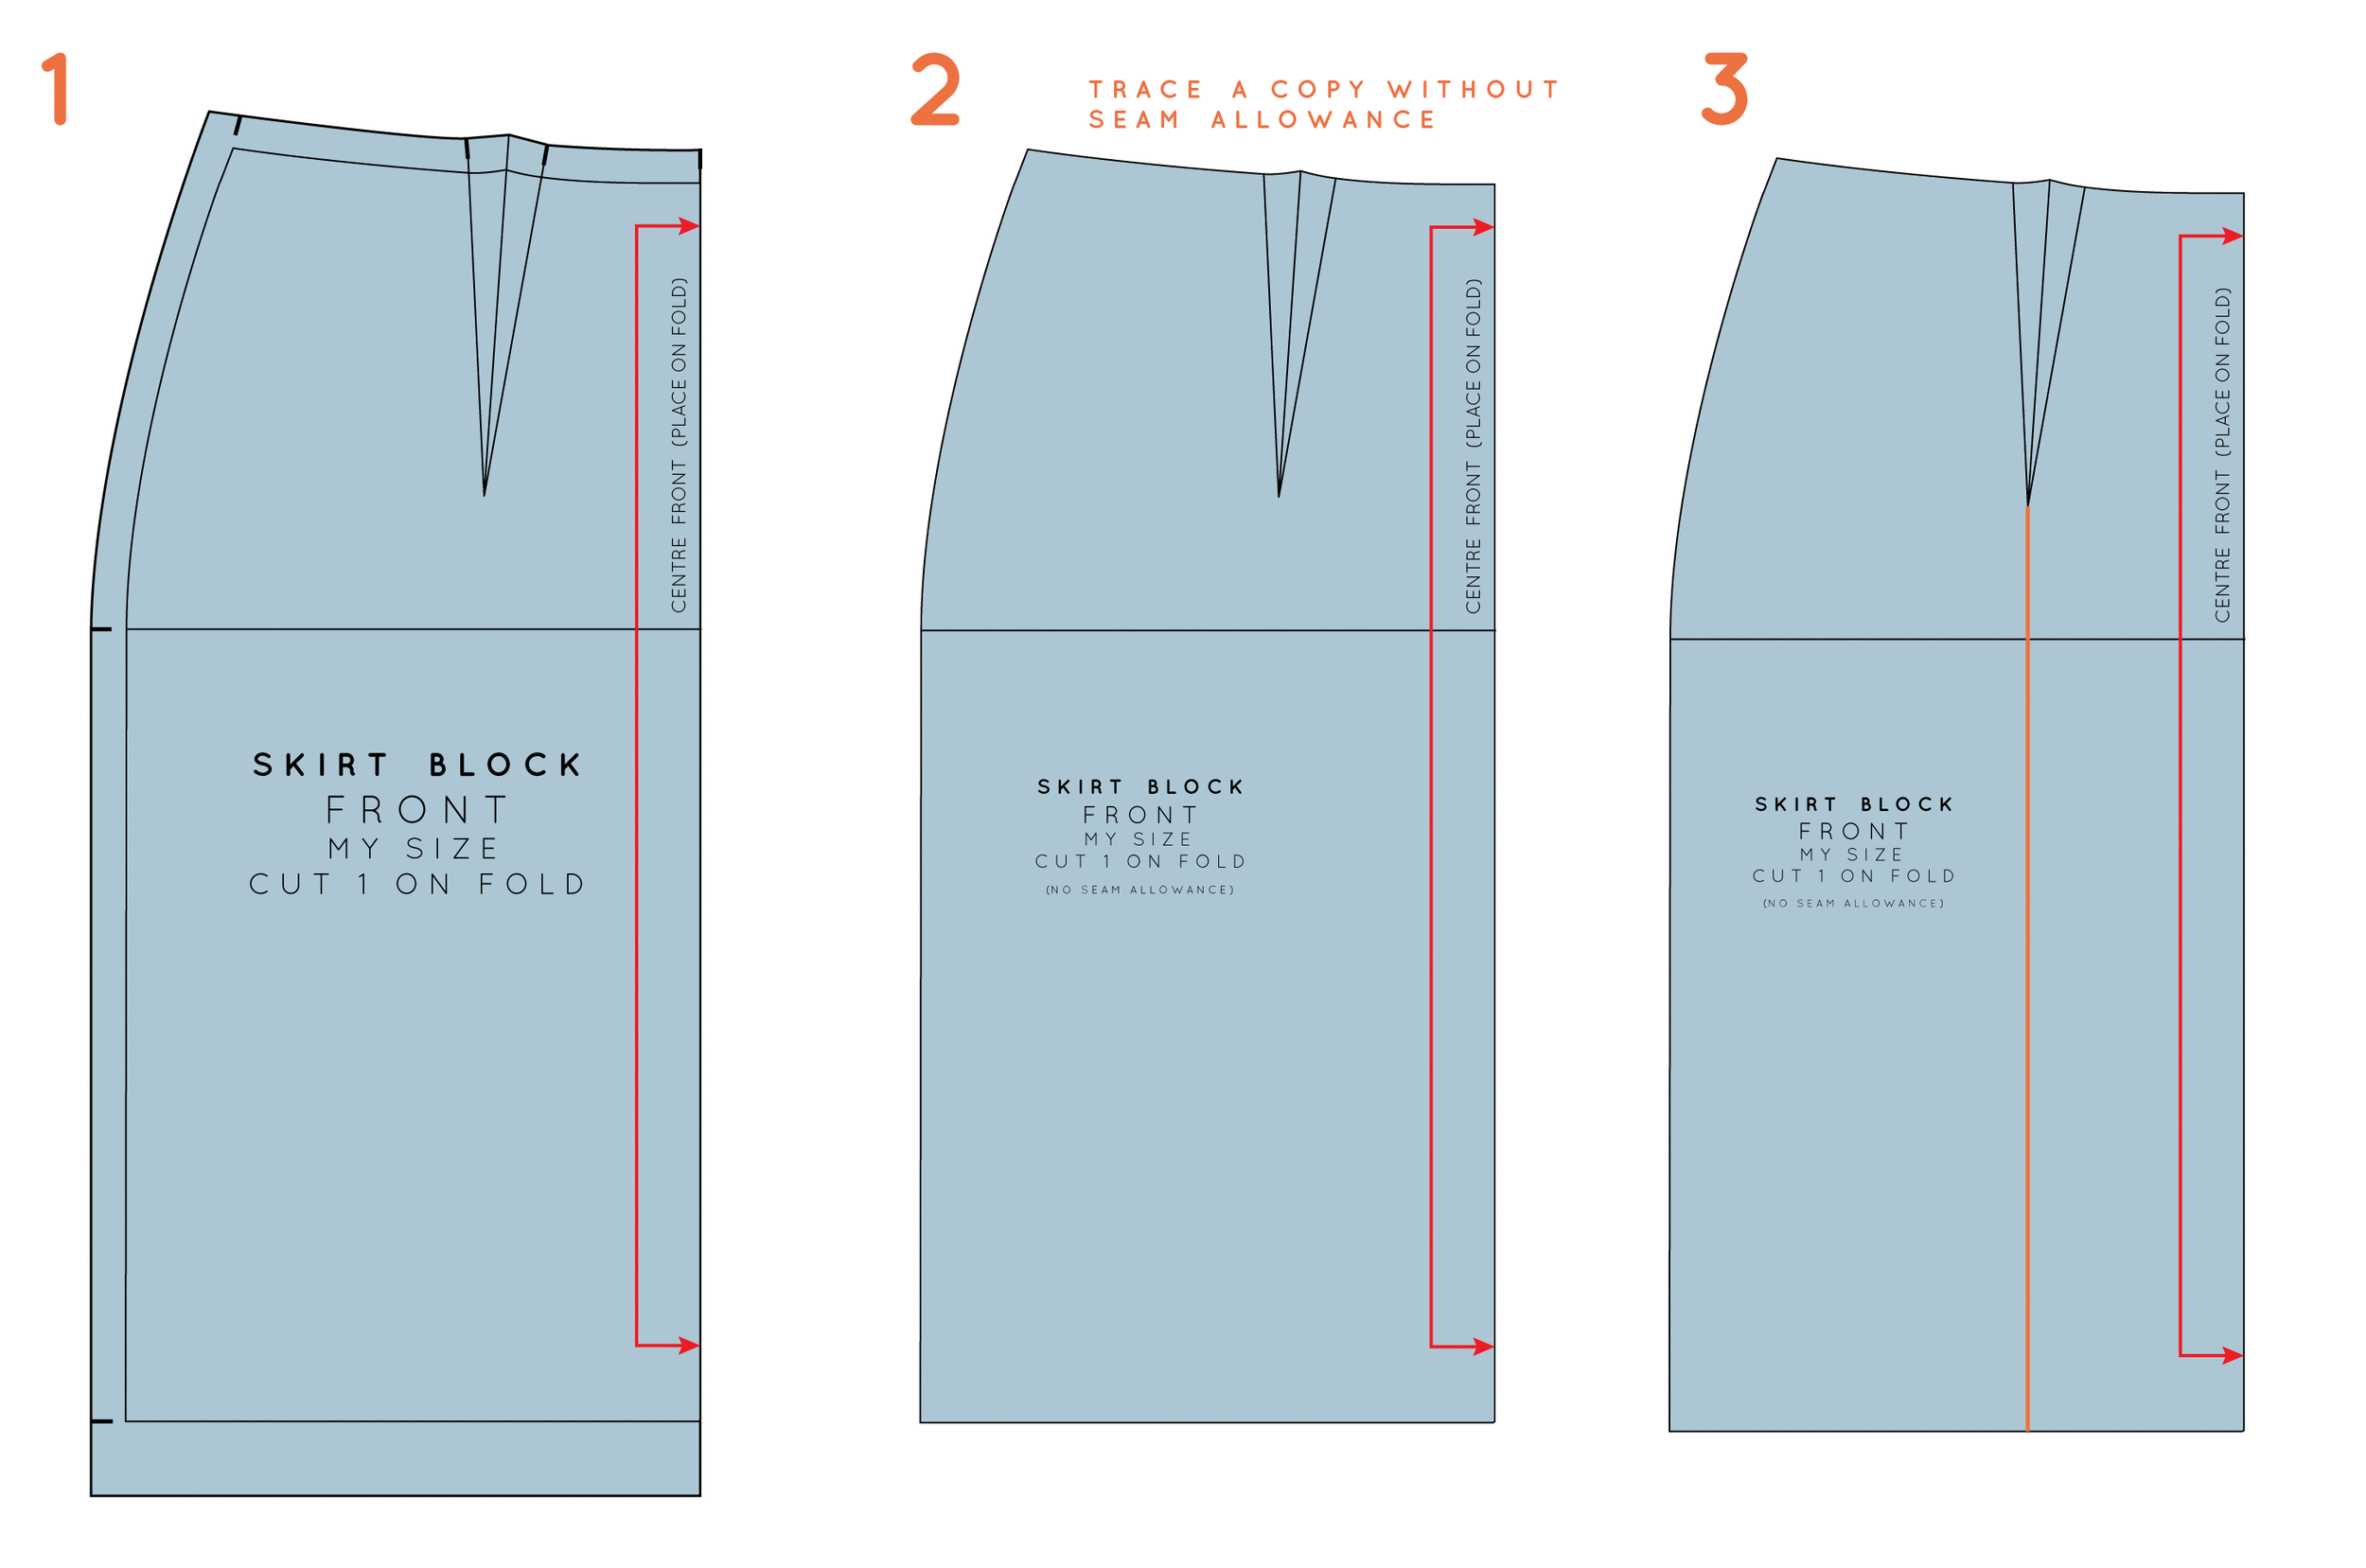
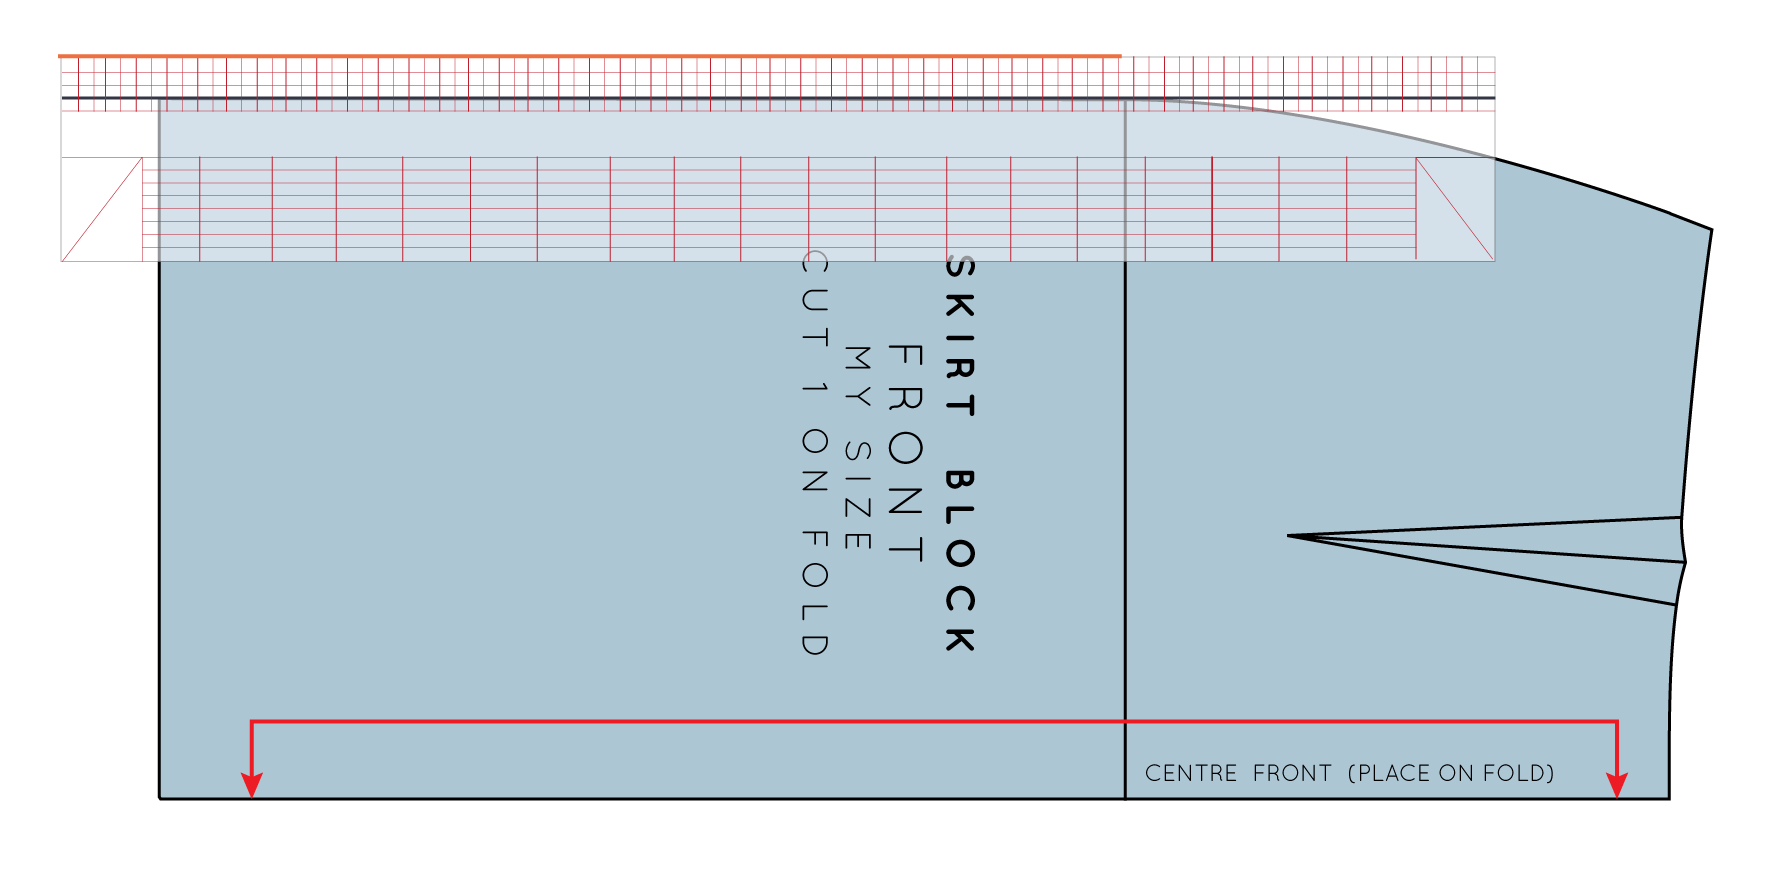
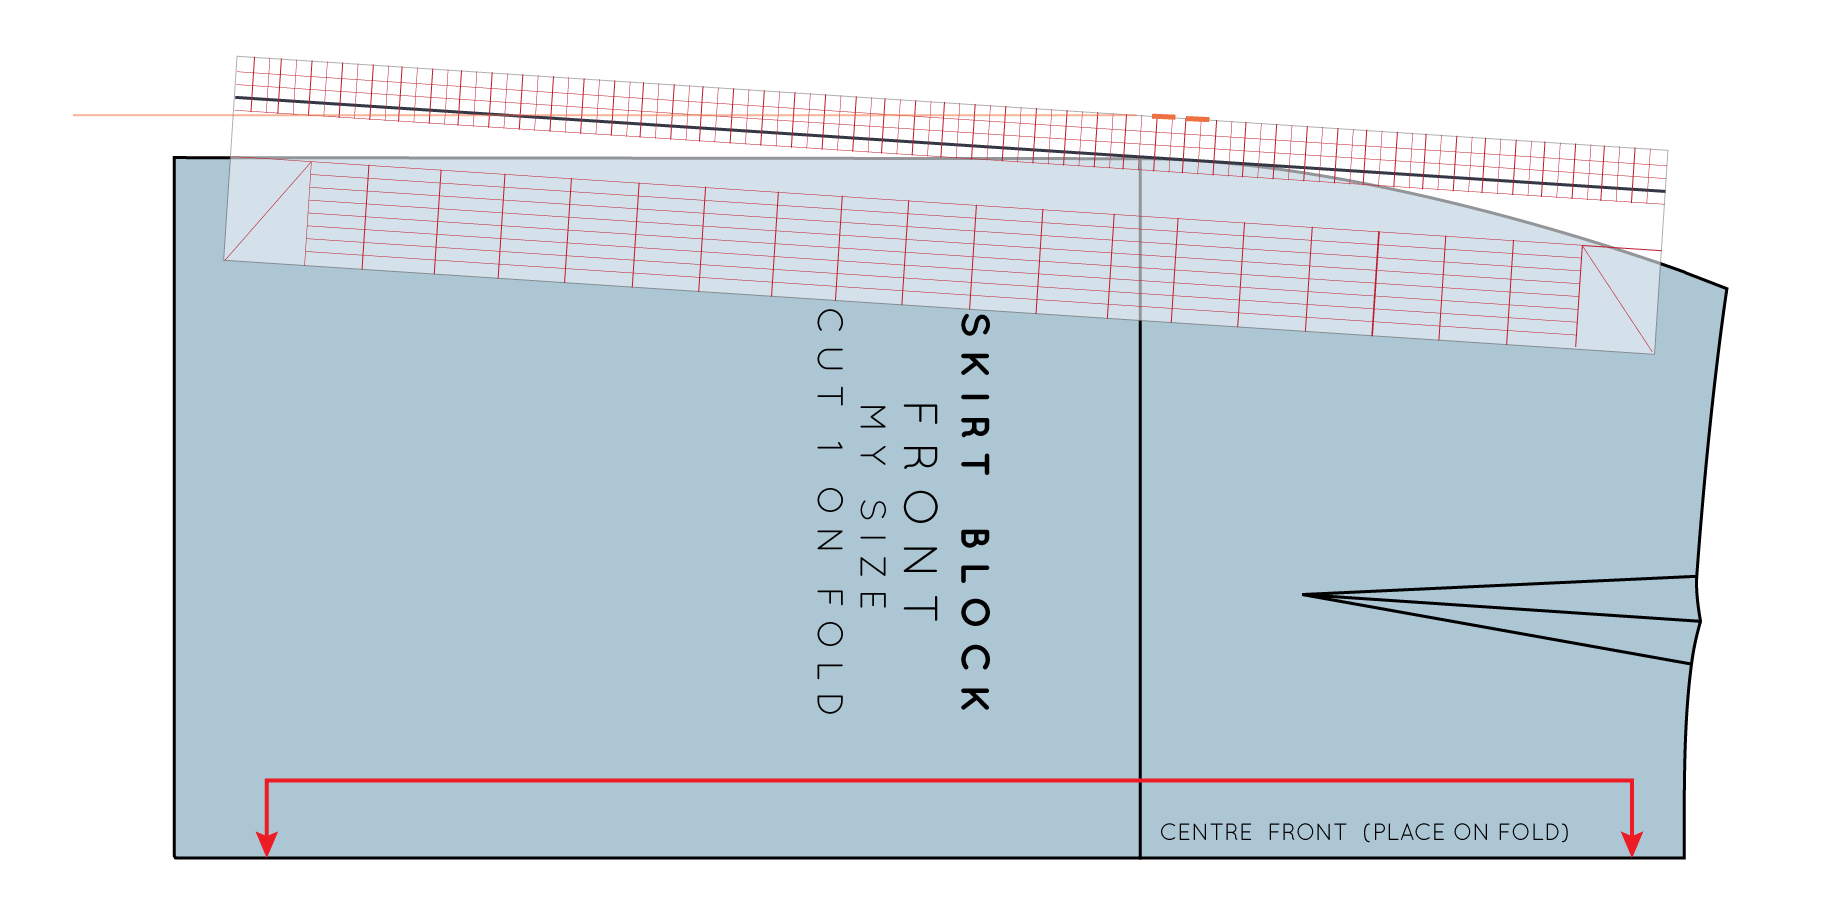
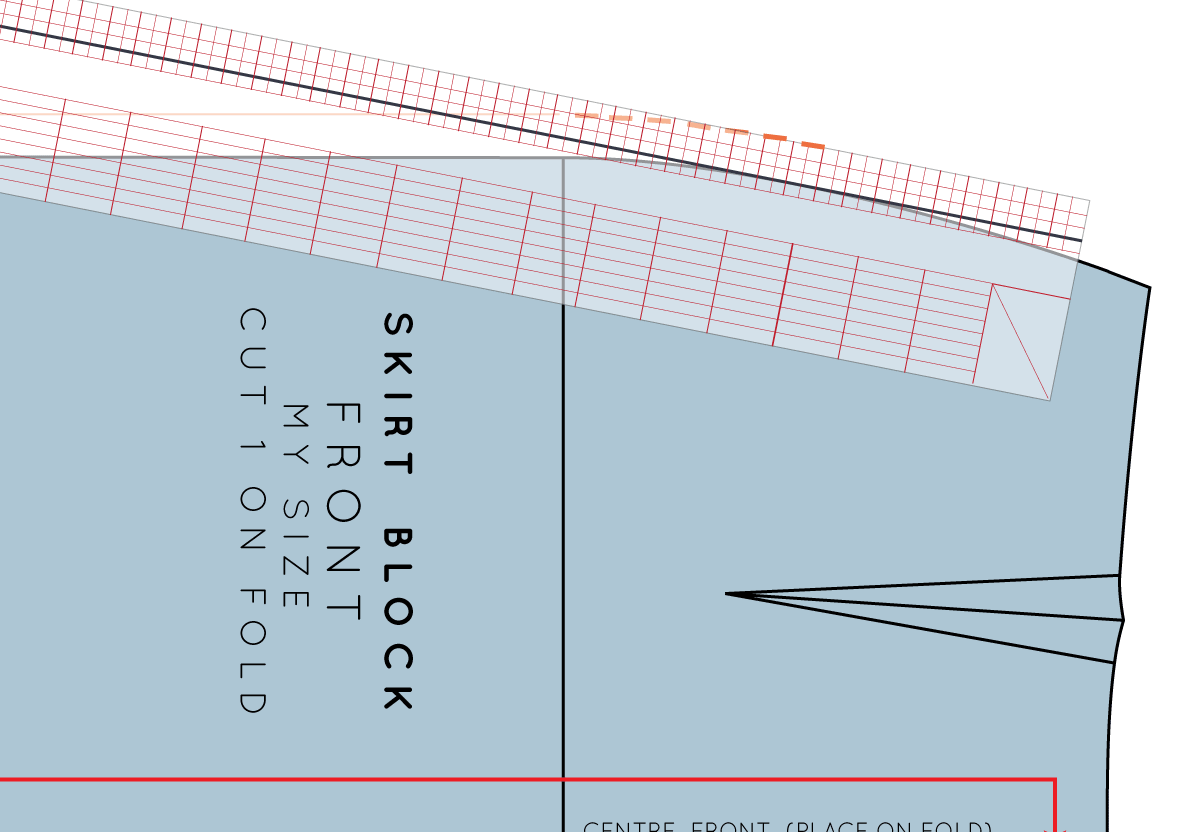
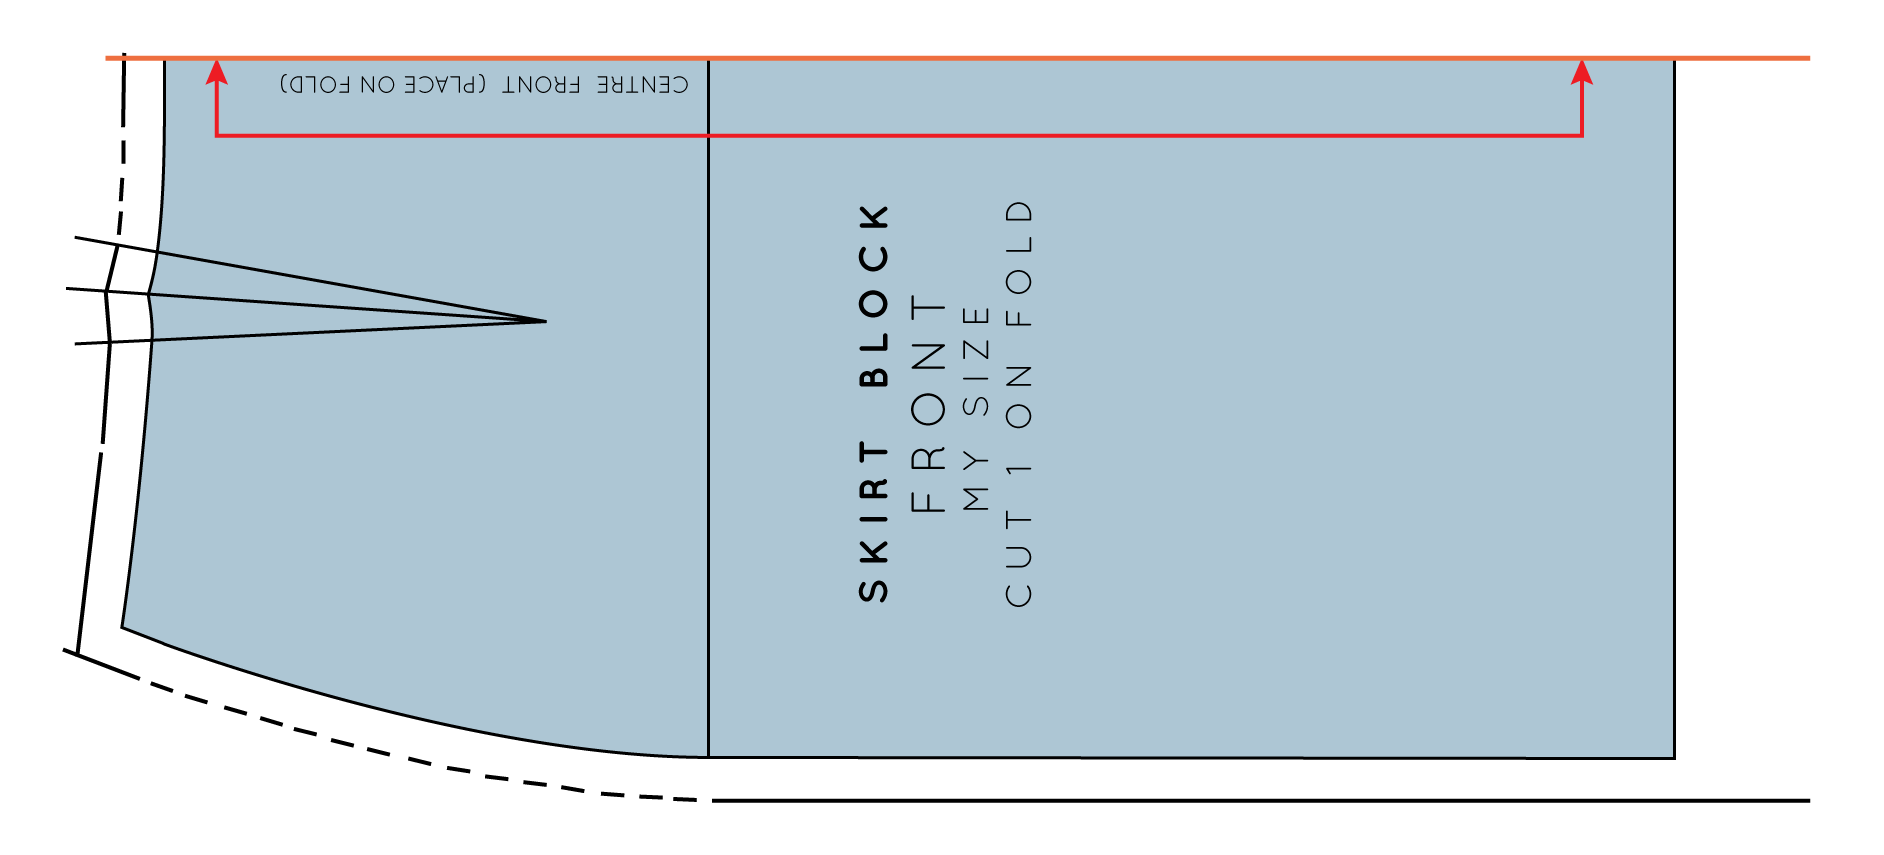
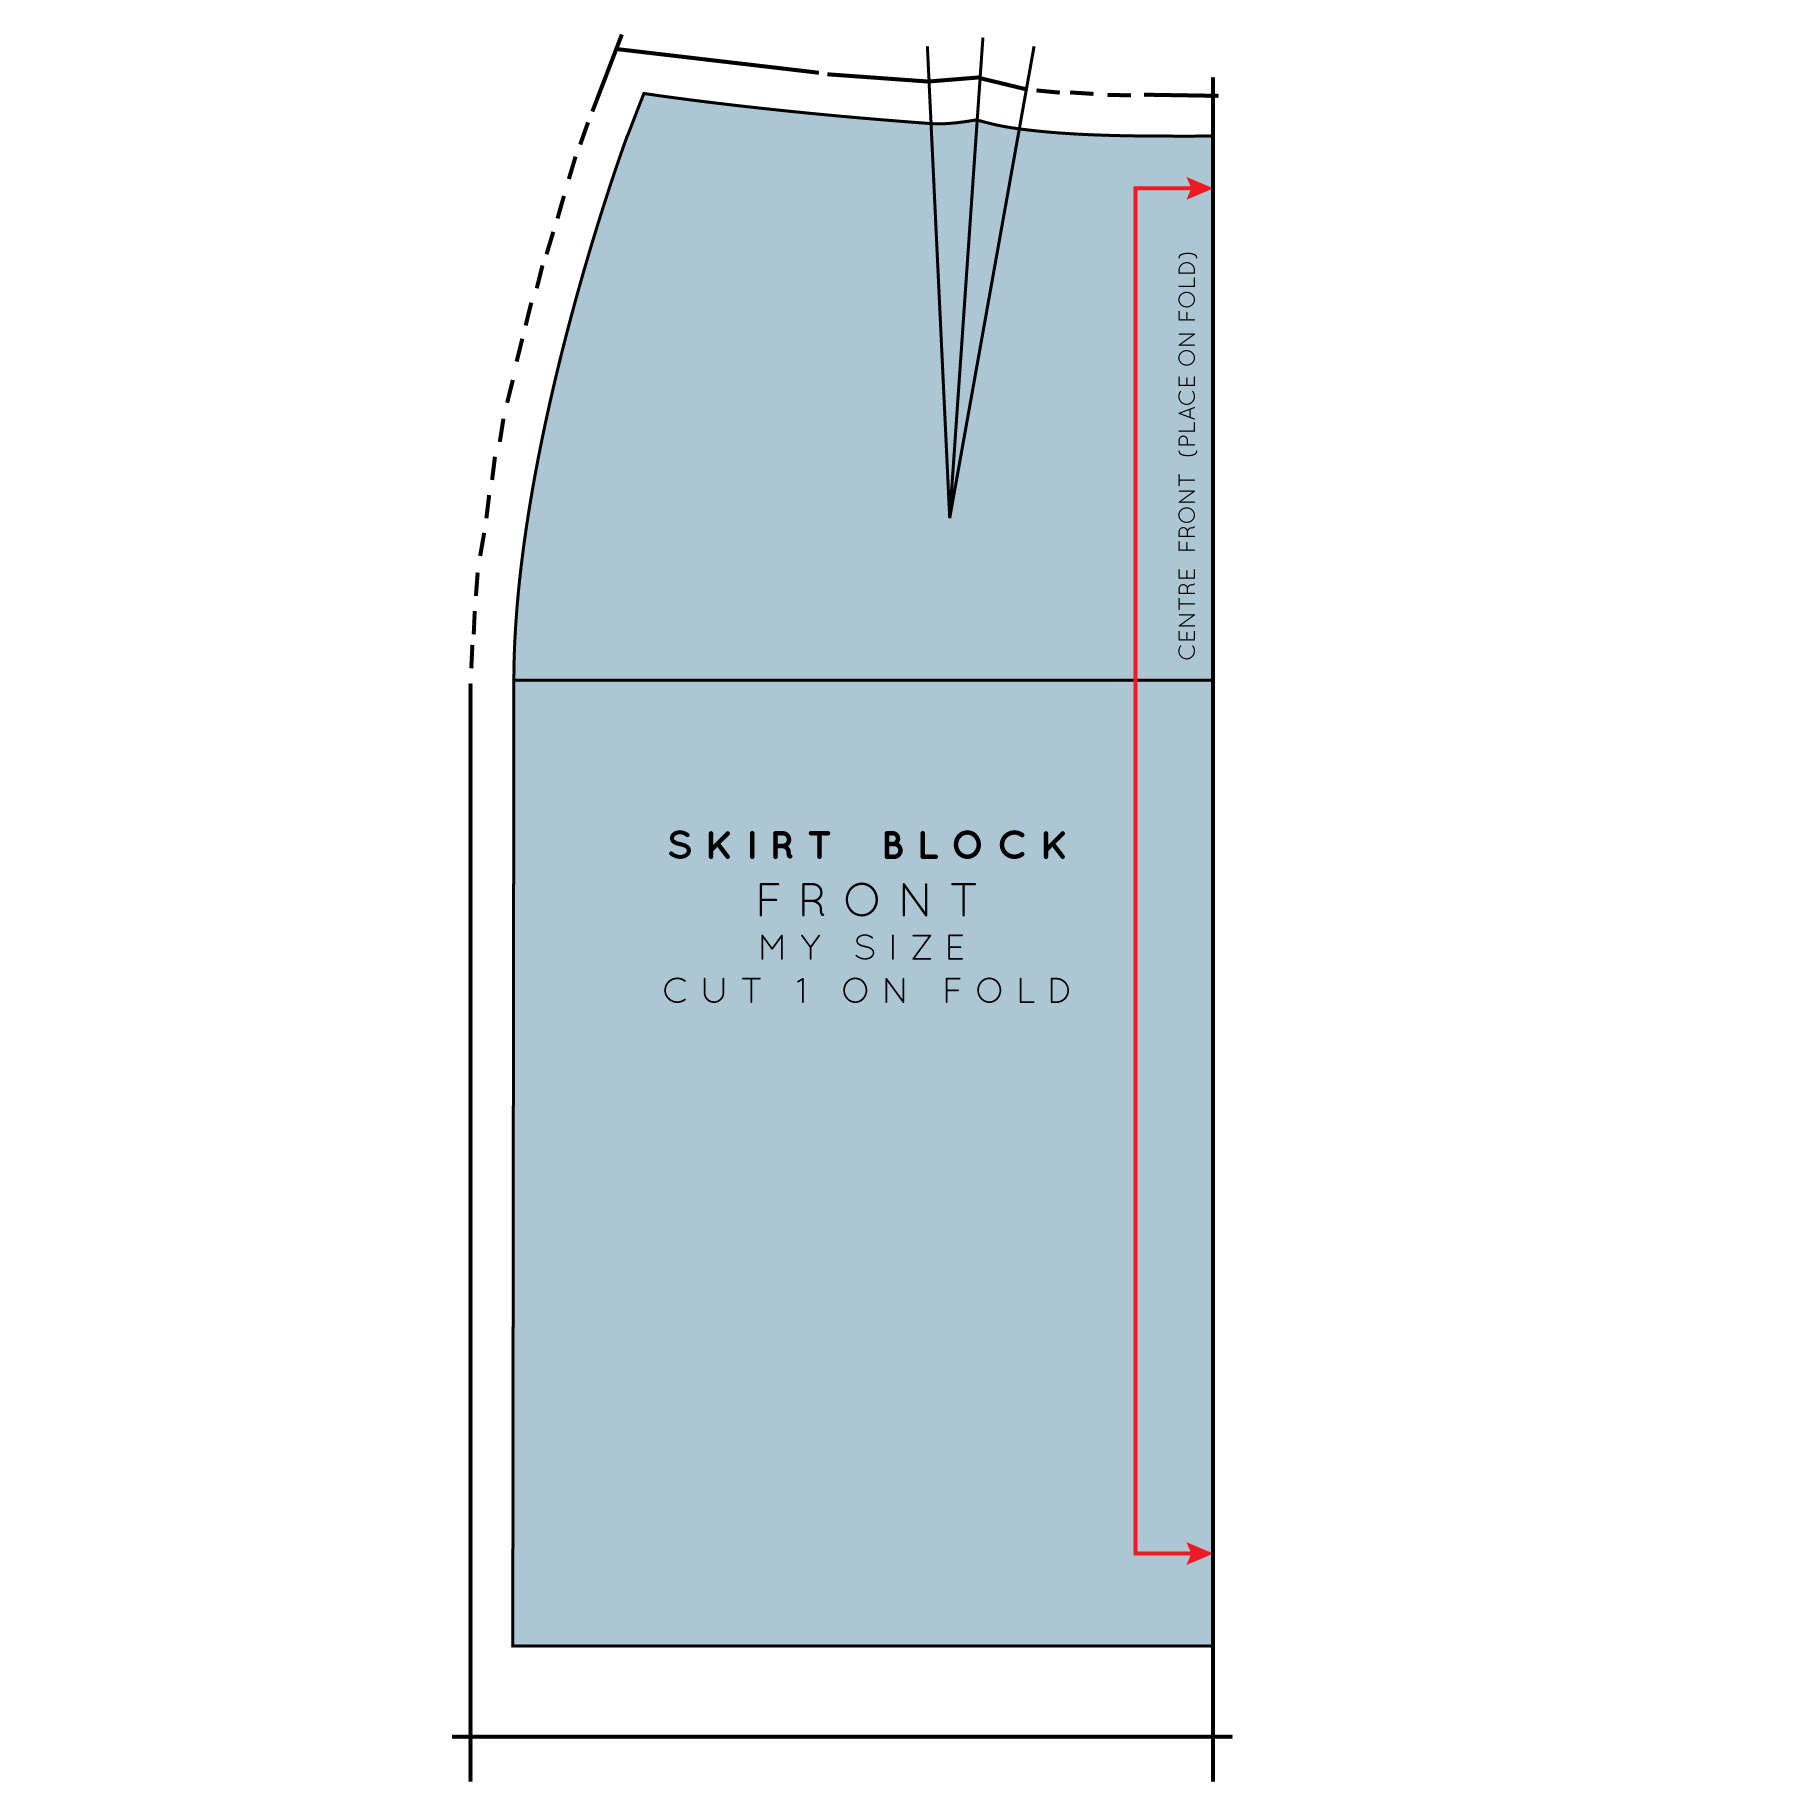
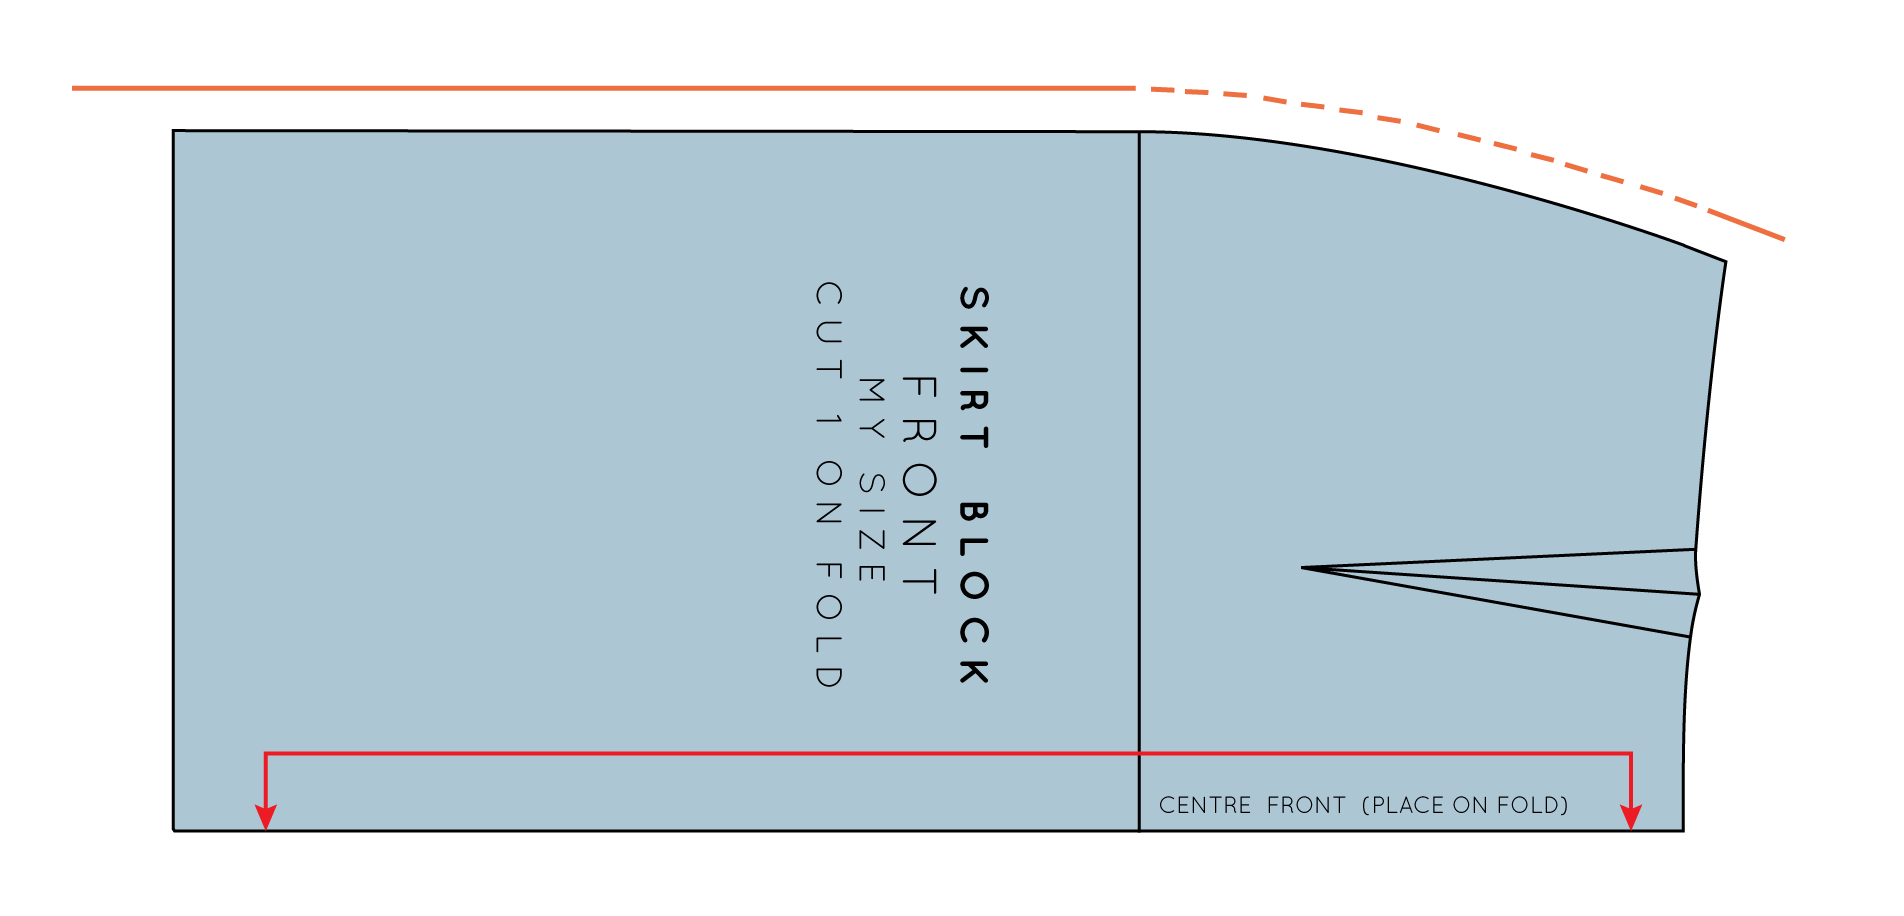
1. Take your skirt pattern and draw a line from the tip of the dart to the hemline, ensuring it is parallel to the centre front (or entre back if you are working on the back pattern piece).

2. Add notches to the line. This will help when you are matching the two pieces together later. I suggest putting one in line with the dart point and another on the straight part of the line.

Now that you have the line marked, you can cut the pattern into two pieces, or you can trace the pieces onto seperate pieces of paper (my preferred method).

Create side front panel piece

how_to_add_panel_lines_skirt_

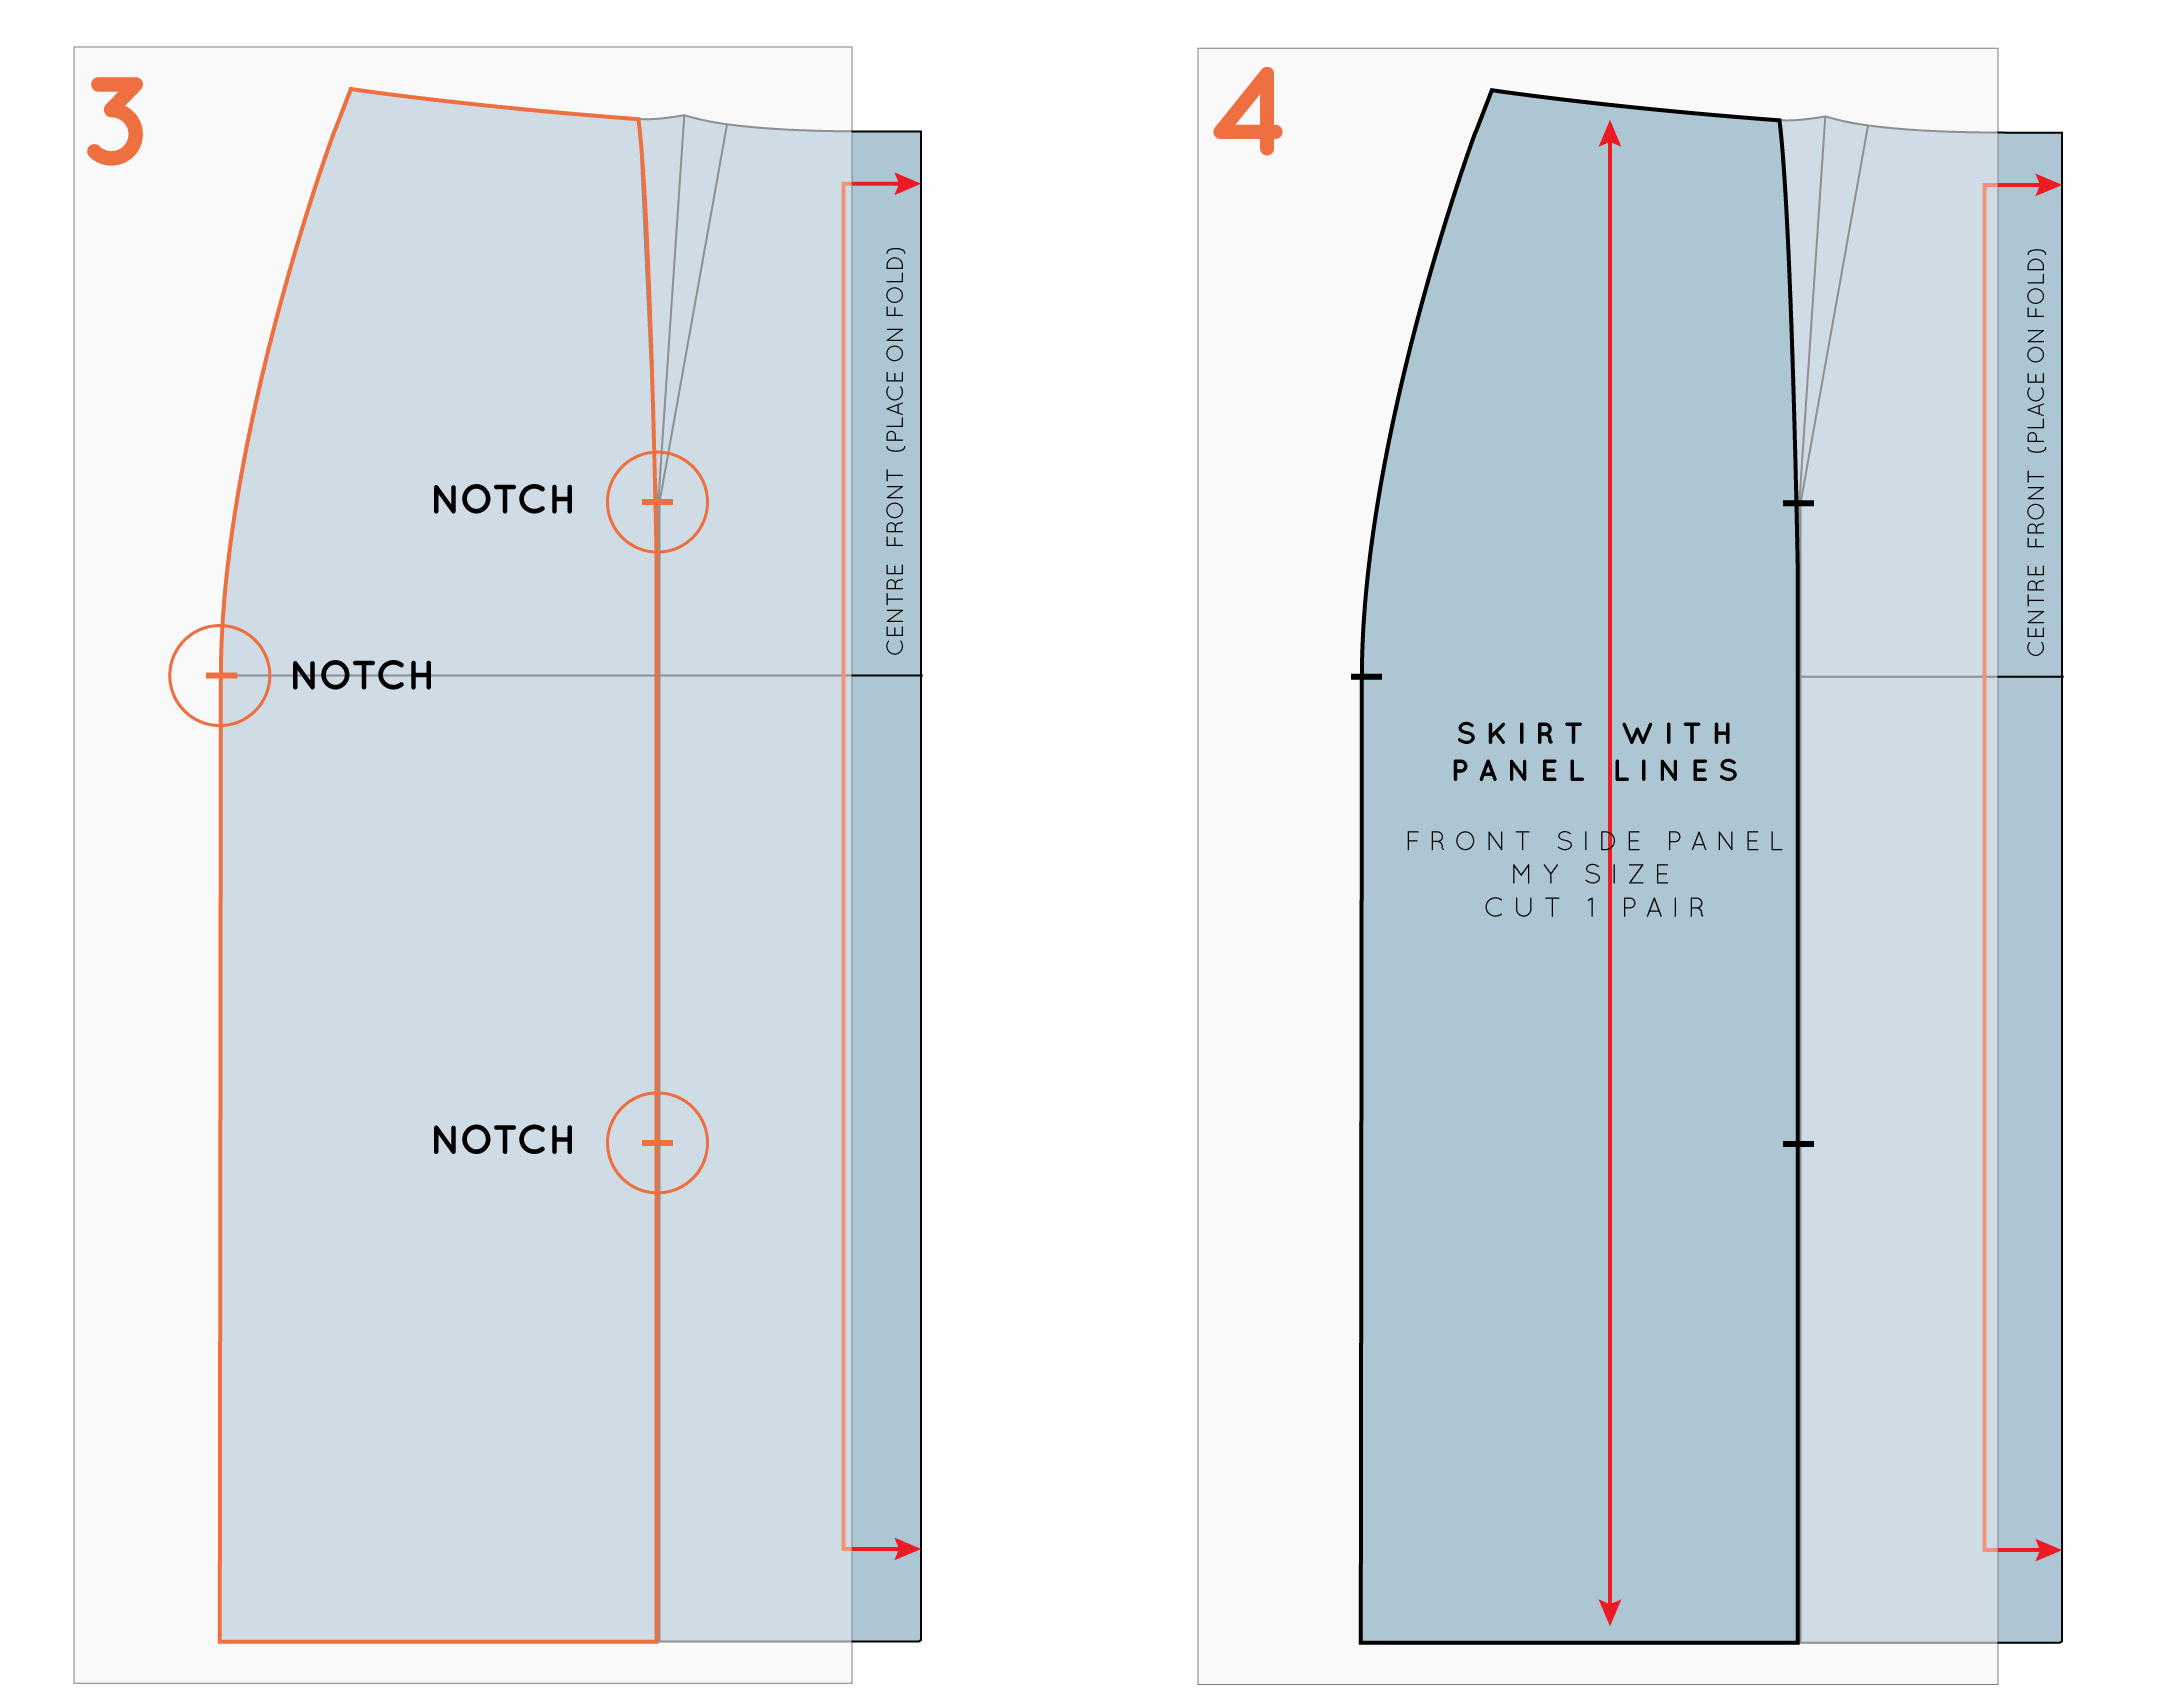
3. Take a separate piece of pattern paper, and place it on top of your skirt block. To start, you will be tracing the left side panel. Trace down the side seam, along the hemline, up the line you drew (Step 1), along the left dart arm (being sure that the transition between line and dart is a smooth curve) and then along the waistline. Transfer the notches from the panel line, and notch the hip line on the side seam.

4. Before removing the tracing, transfer the grainline, which should be parallel to the original grainline. Add pattern information and cutting directions (Front side panel / cut 1 pair).

Create centre front panel piece

how_to_add_panel_lines_skirt_4

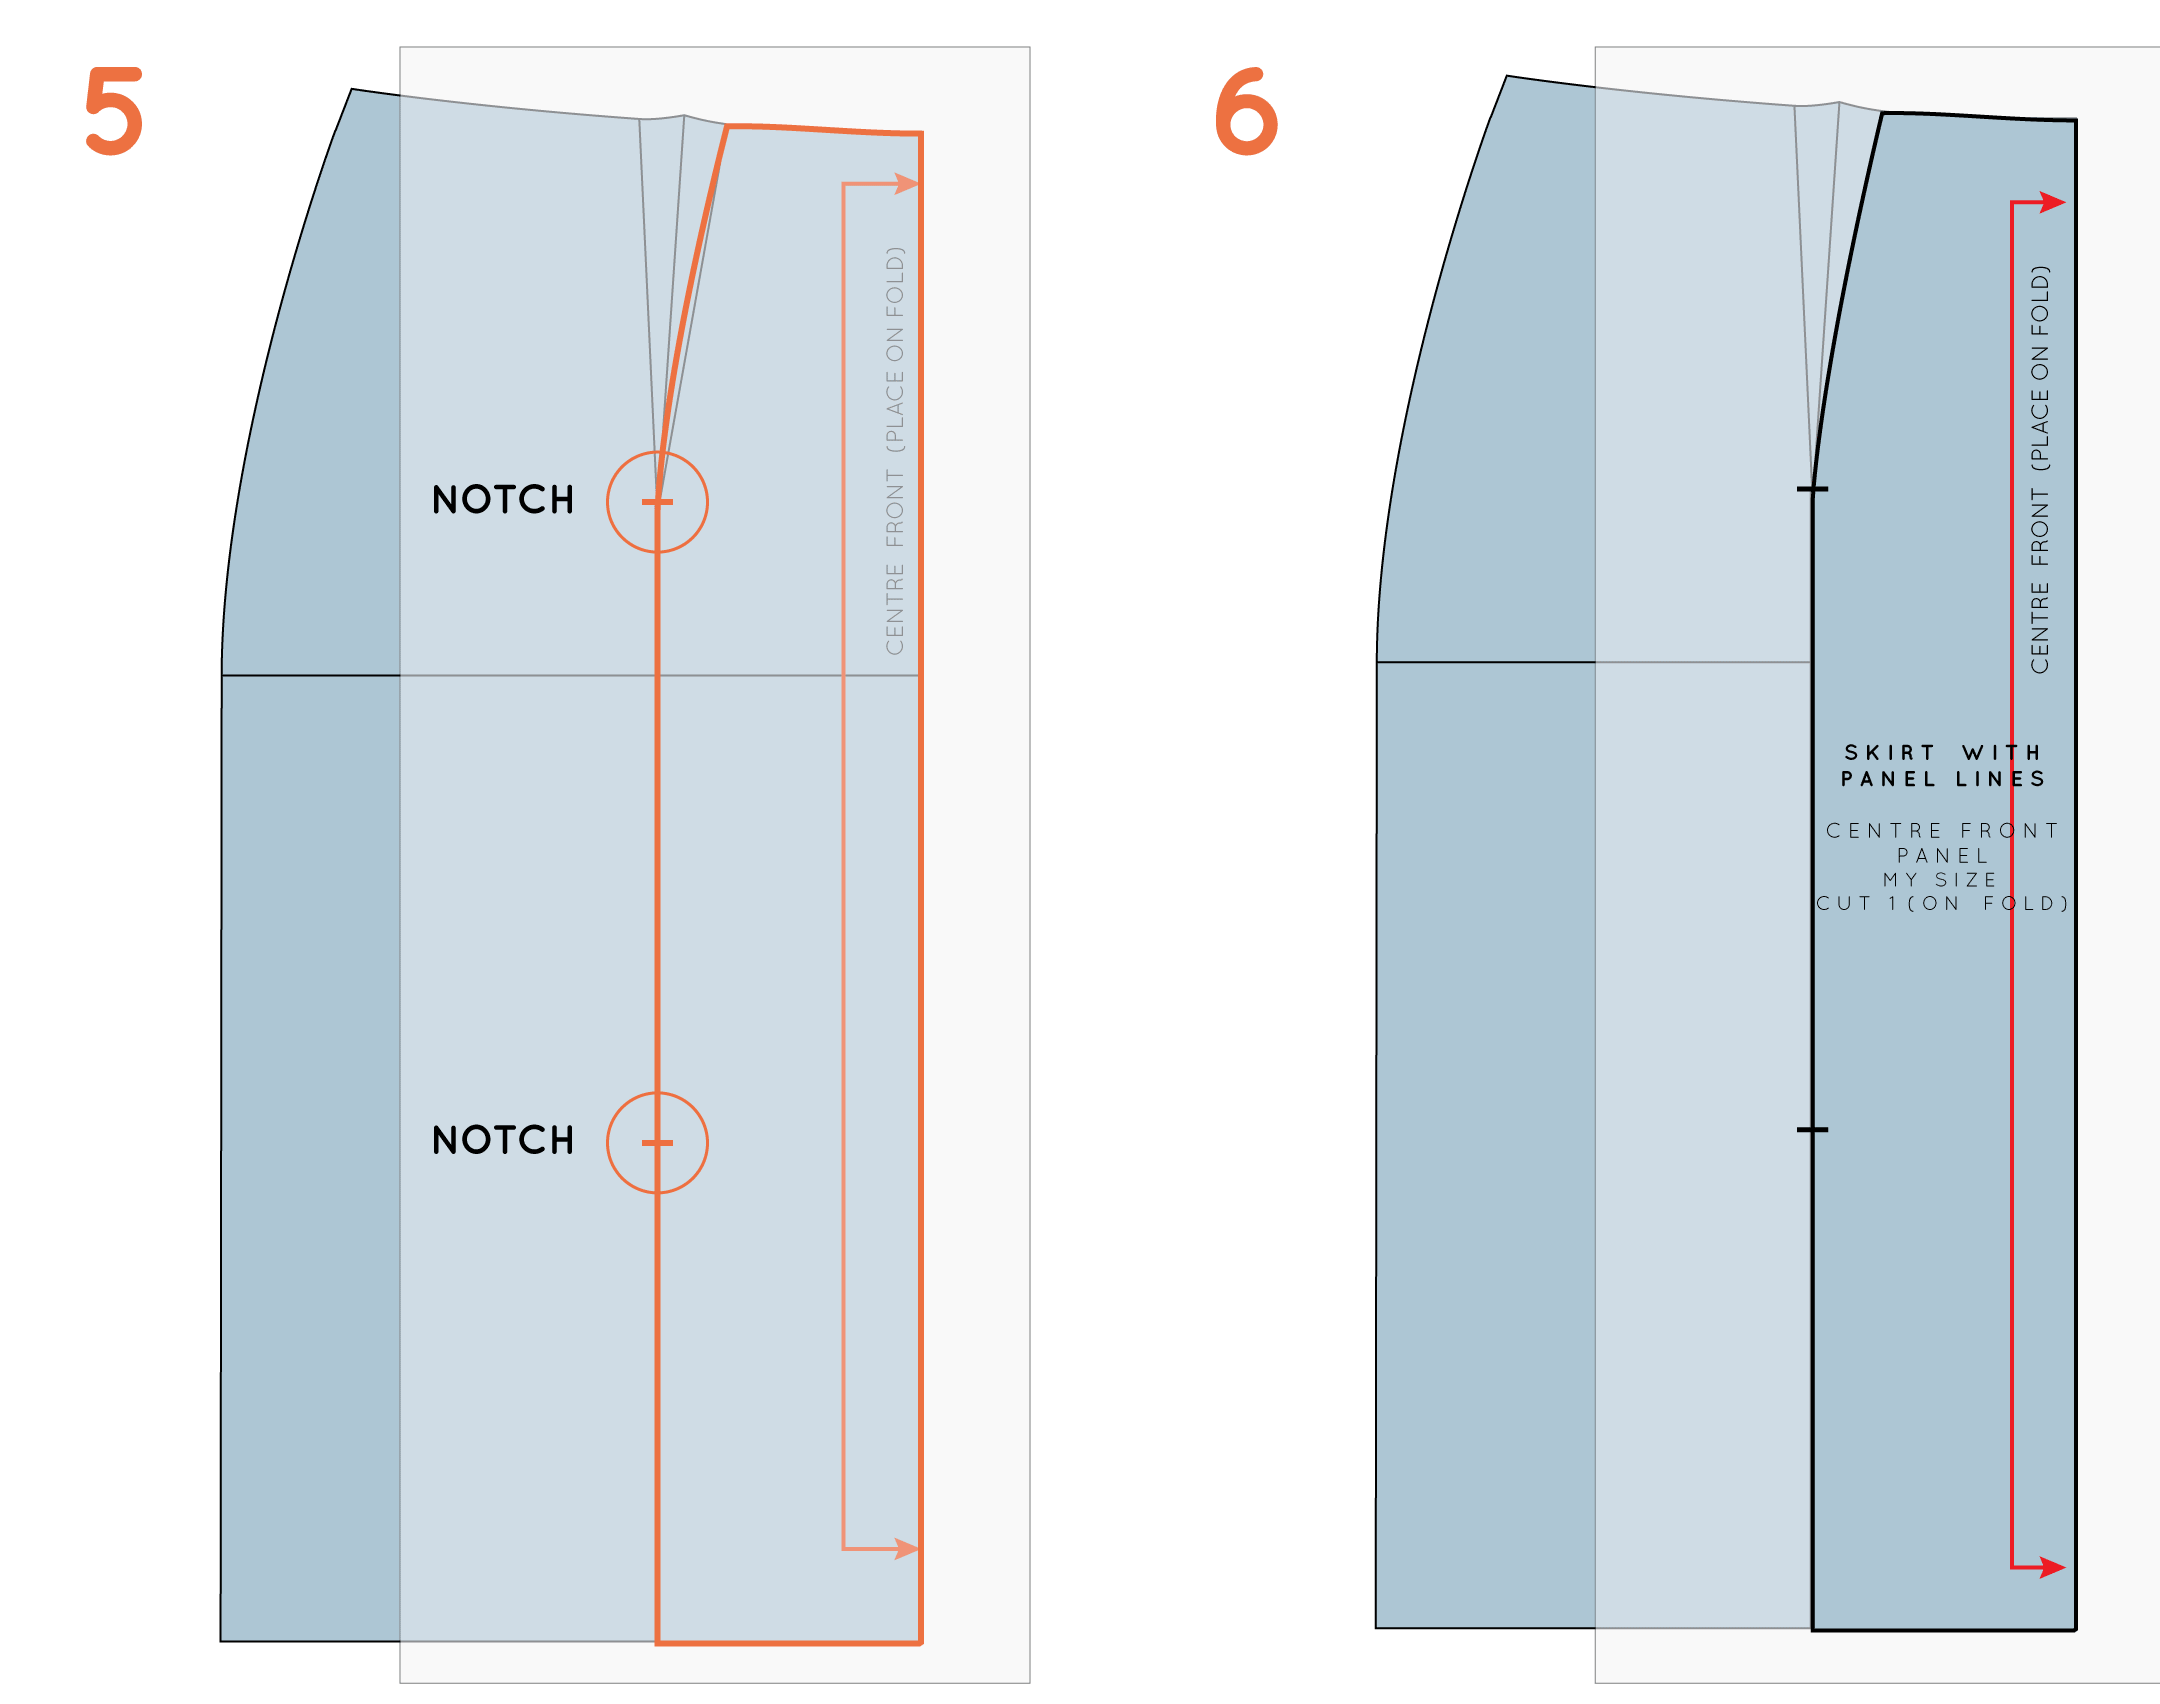
5. Next, you will need to trace the centre front panel. Take another piece of pattern paper and trace down the centre front, along the hemline, up the panel line, up the right-hand dart arm and along the waistline. Once again, make sure your transistion from panel line to dart line is nice and smooth. Transfer the notches on the panel line.

6. Before removing the tracing, transfer the grainline, which should be parallel to the original grainline. Add pattern information and cutting directions (Centre front panel / cut 1 on fold).

Add seam allowance

how_to_add_panel_lines_skirt_5

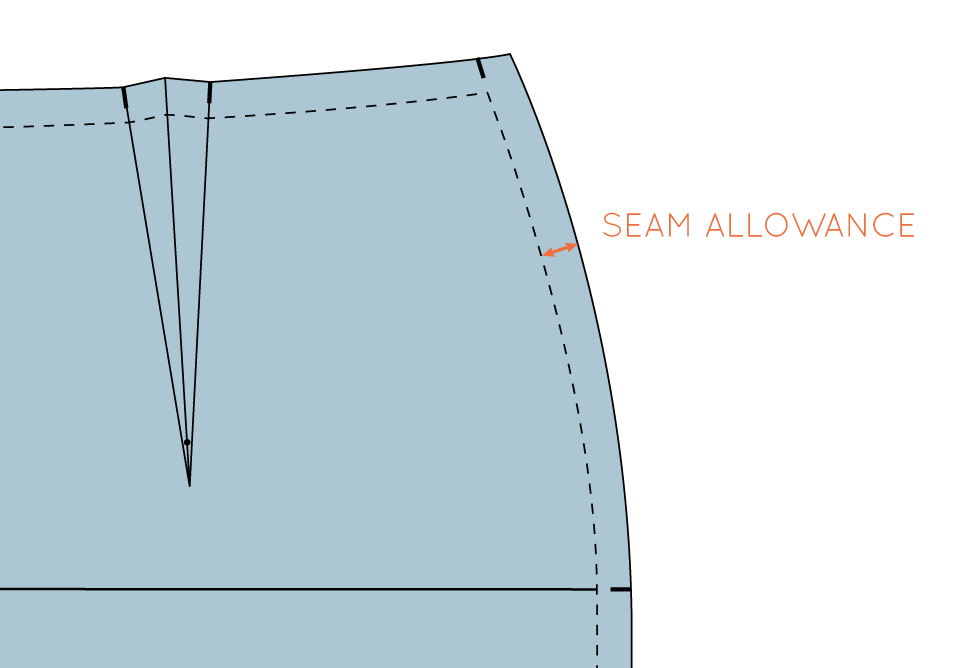
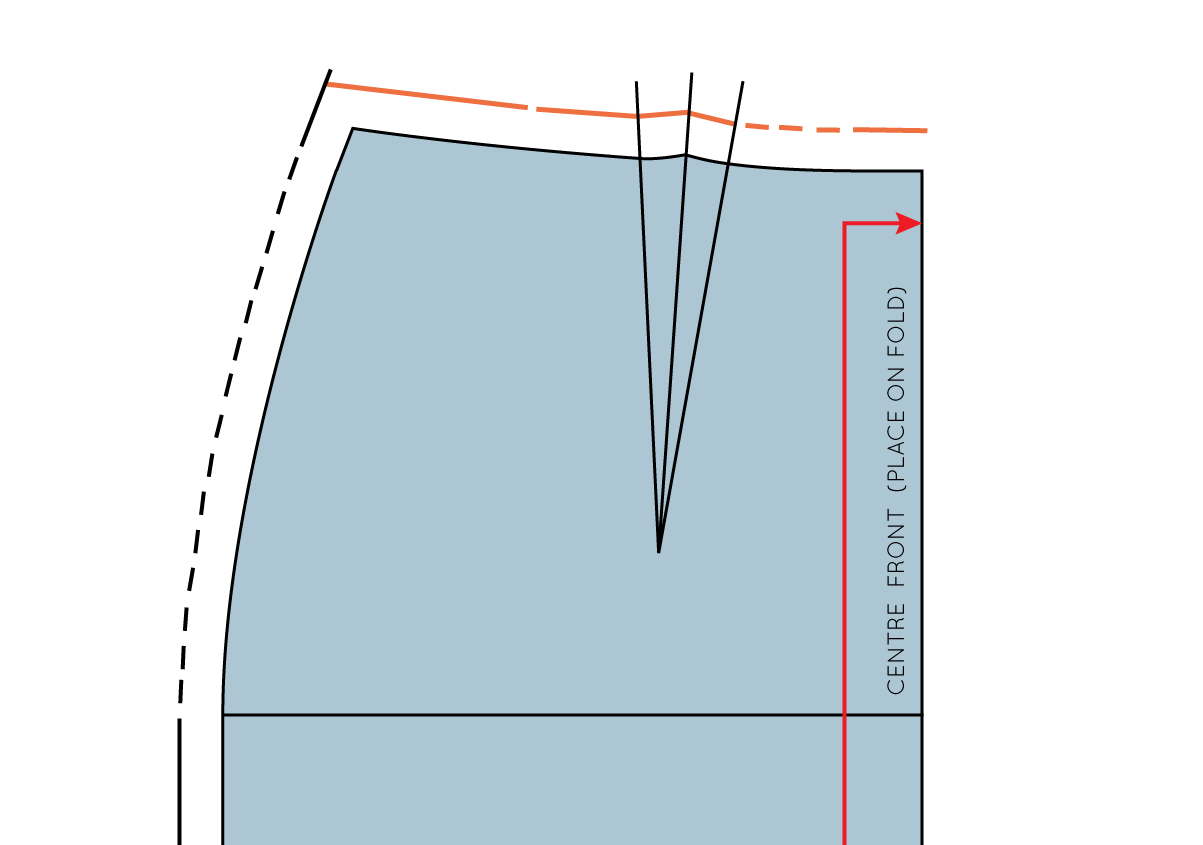
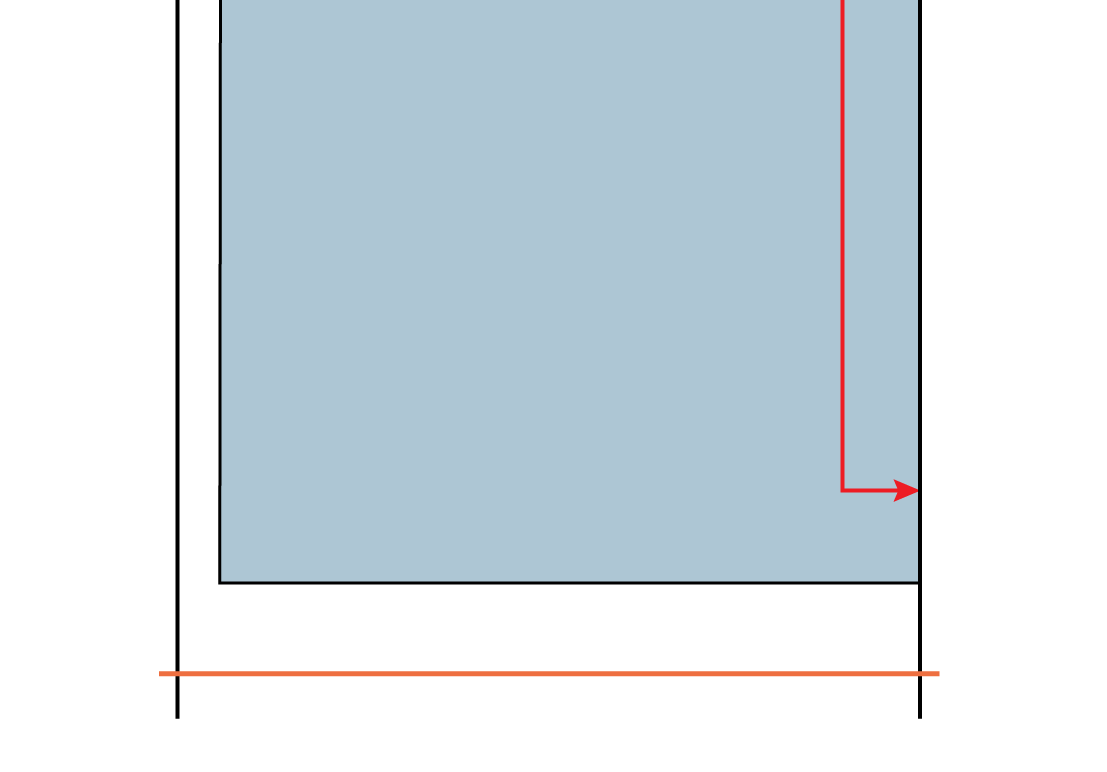
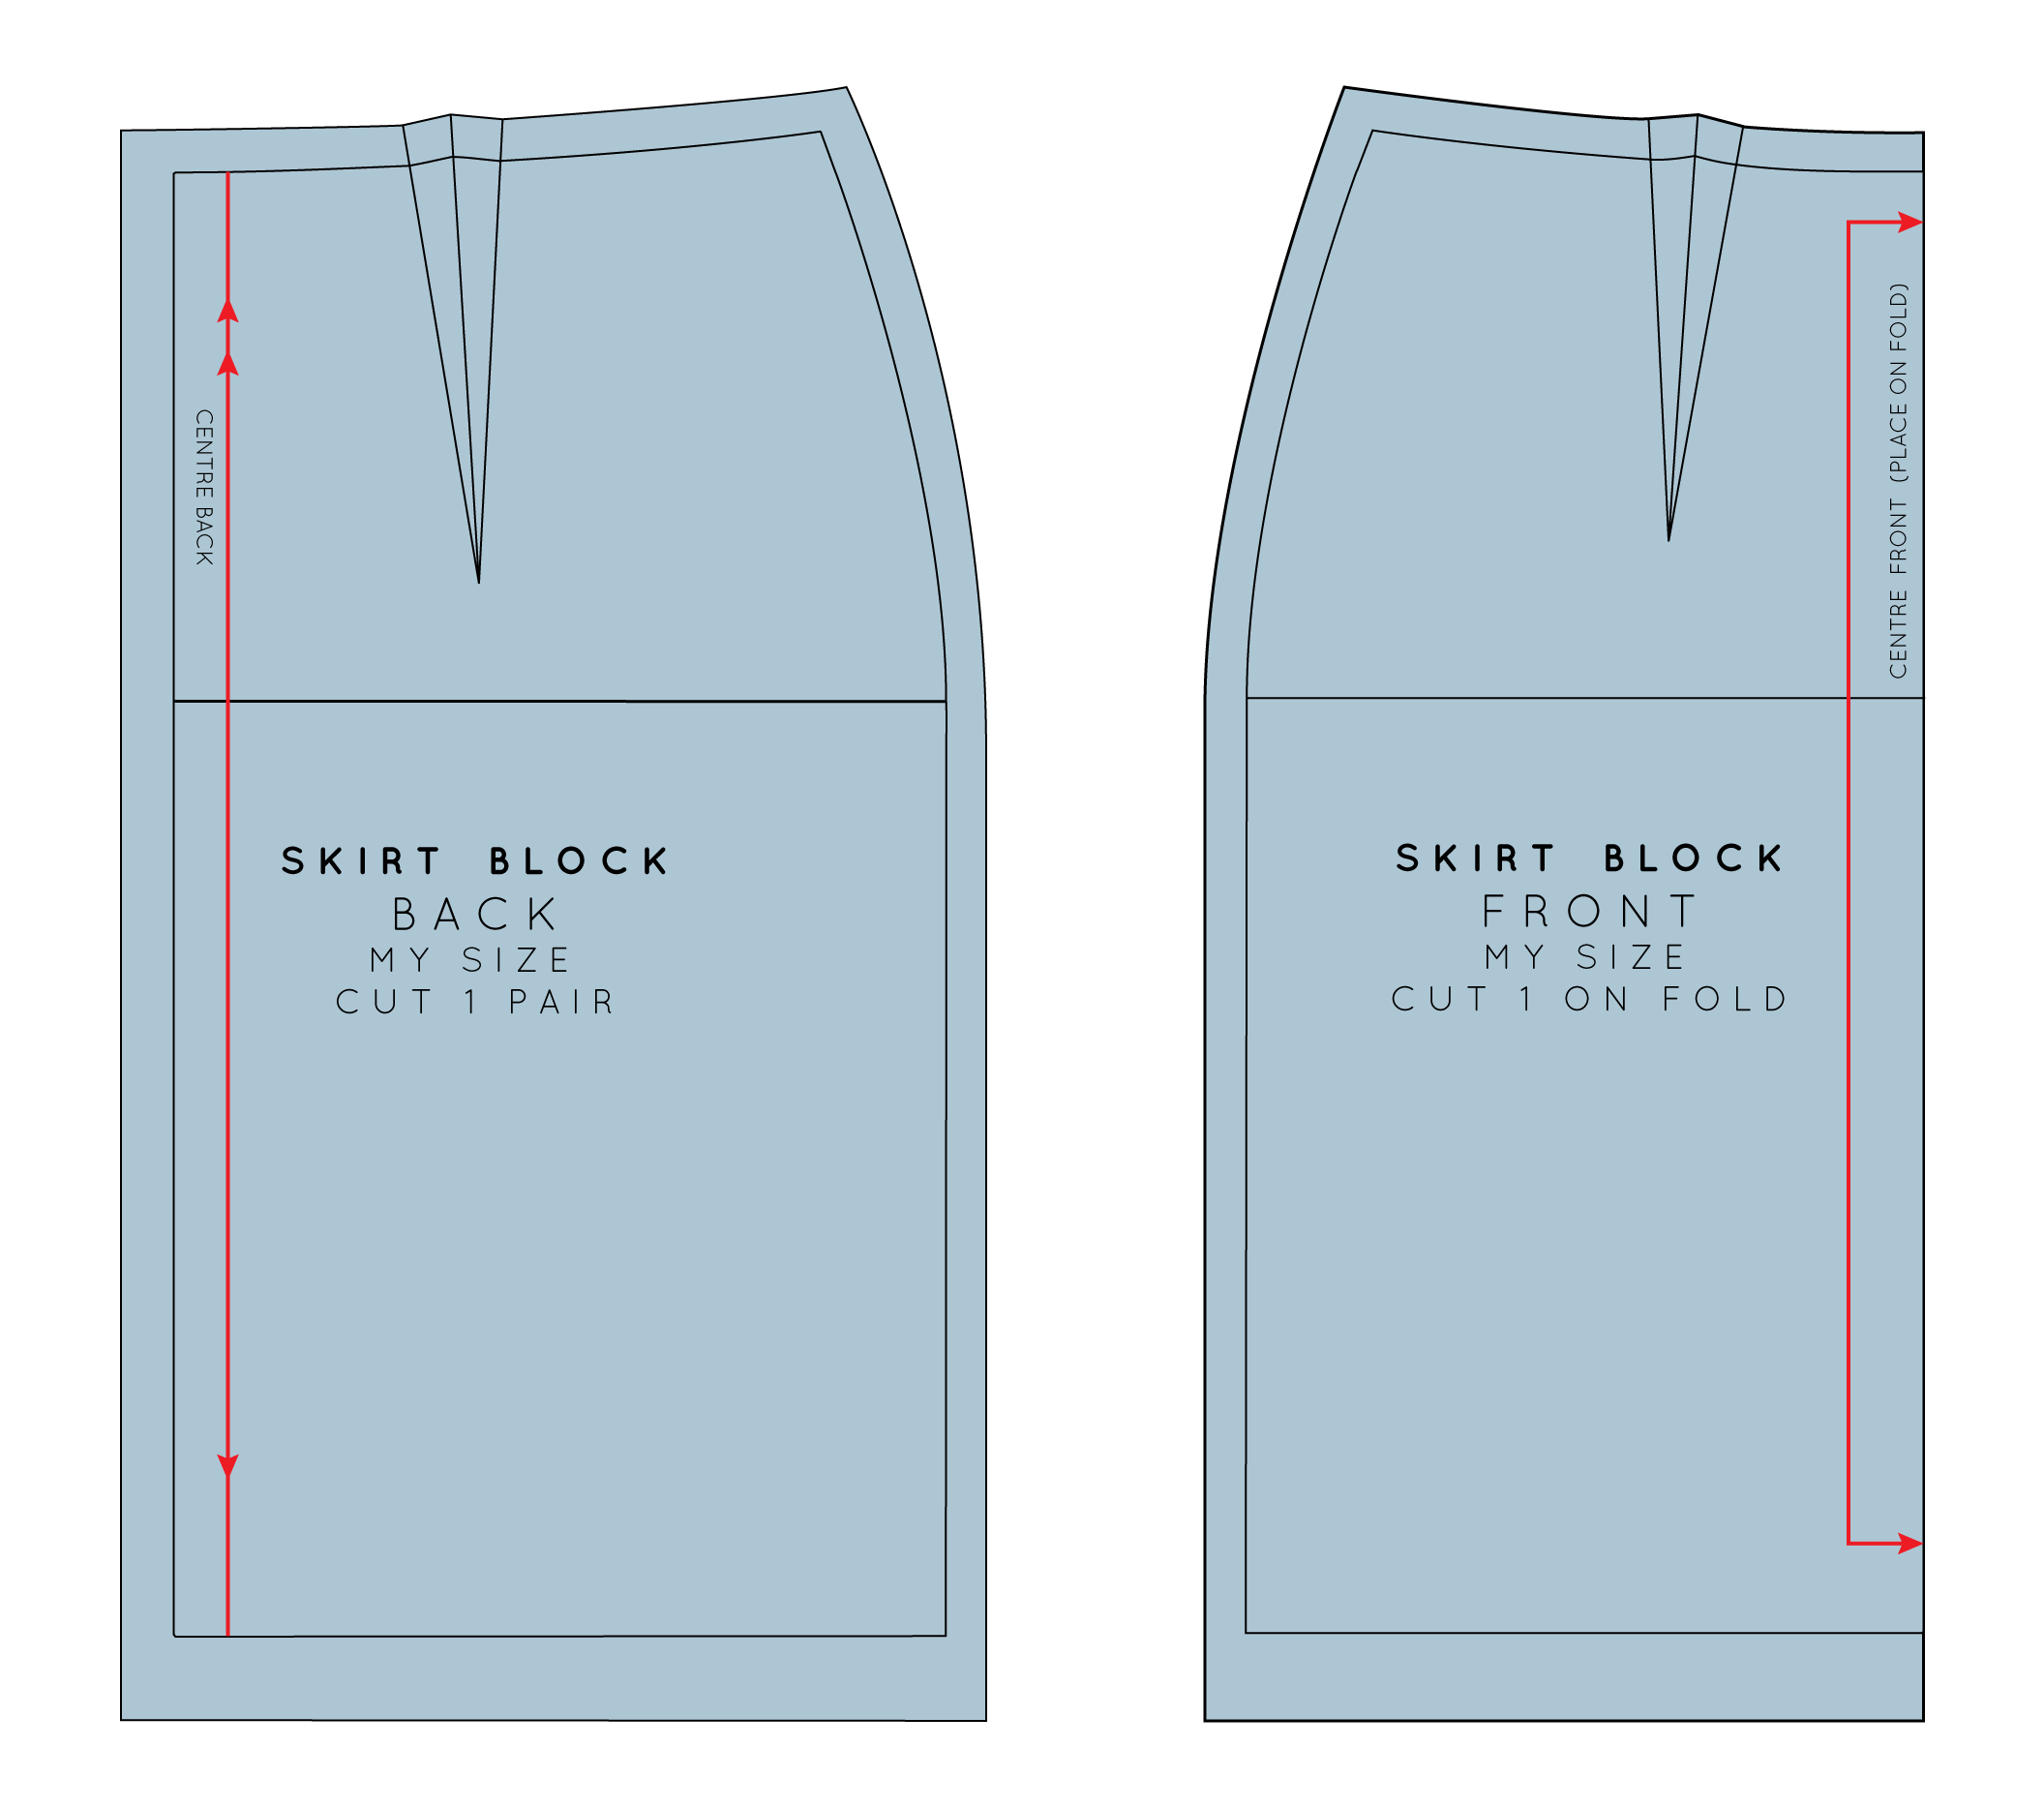
7. Add seam allowance to both pattern pieces. I suggest 1.2cm - 1.5cm (1/2in - 9/16in). You may want to add more to the hemline, but for the sake of the example I have left the seam allowance consistent. Repeat process for the back pattern, and now you have a skirt with panels, instead of darts!

You may also like:

Throwback Thursday: How to draft in-seam pockets

Photo from Corey, one of my lovely pattern testers

Photo from Corey, one of my lovely pattern testers

I love pockets. I really do. I like to put pockets anywhere I can as they are oh so handy for phones and keys, but also very comfortable for hands!

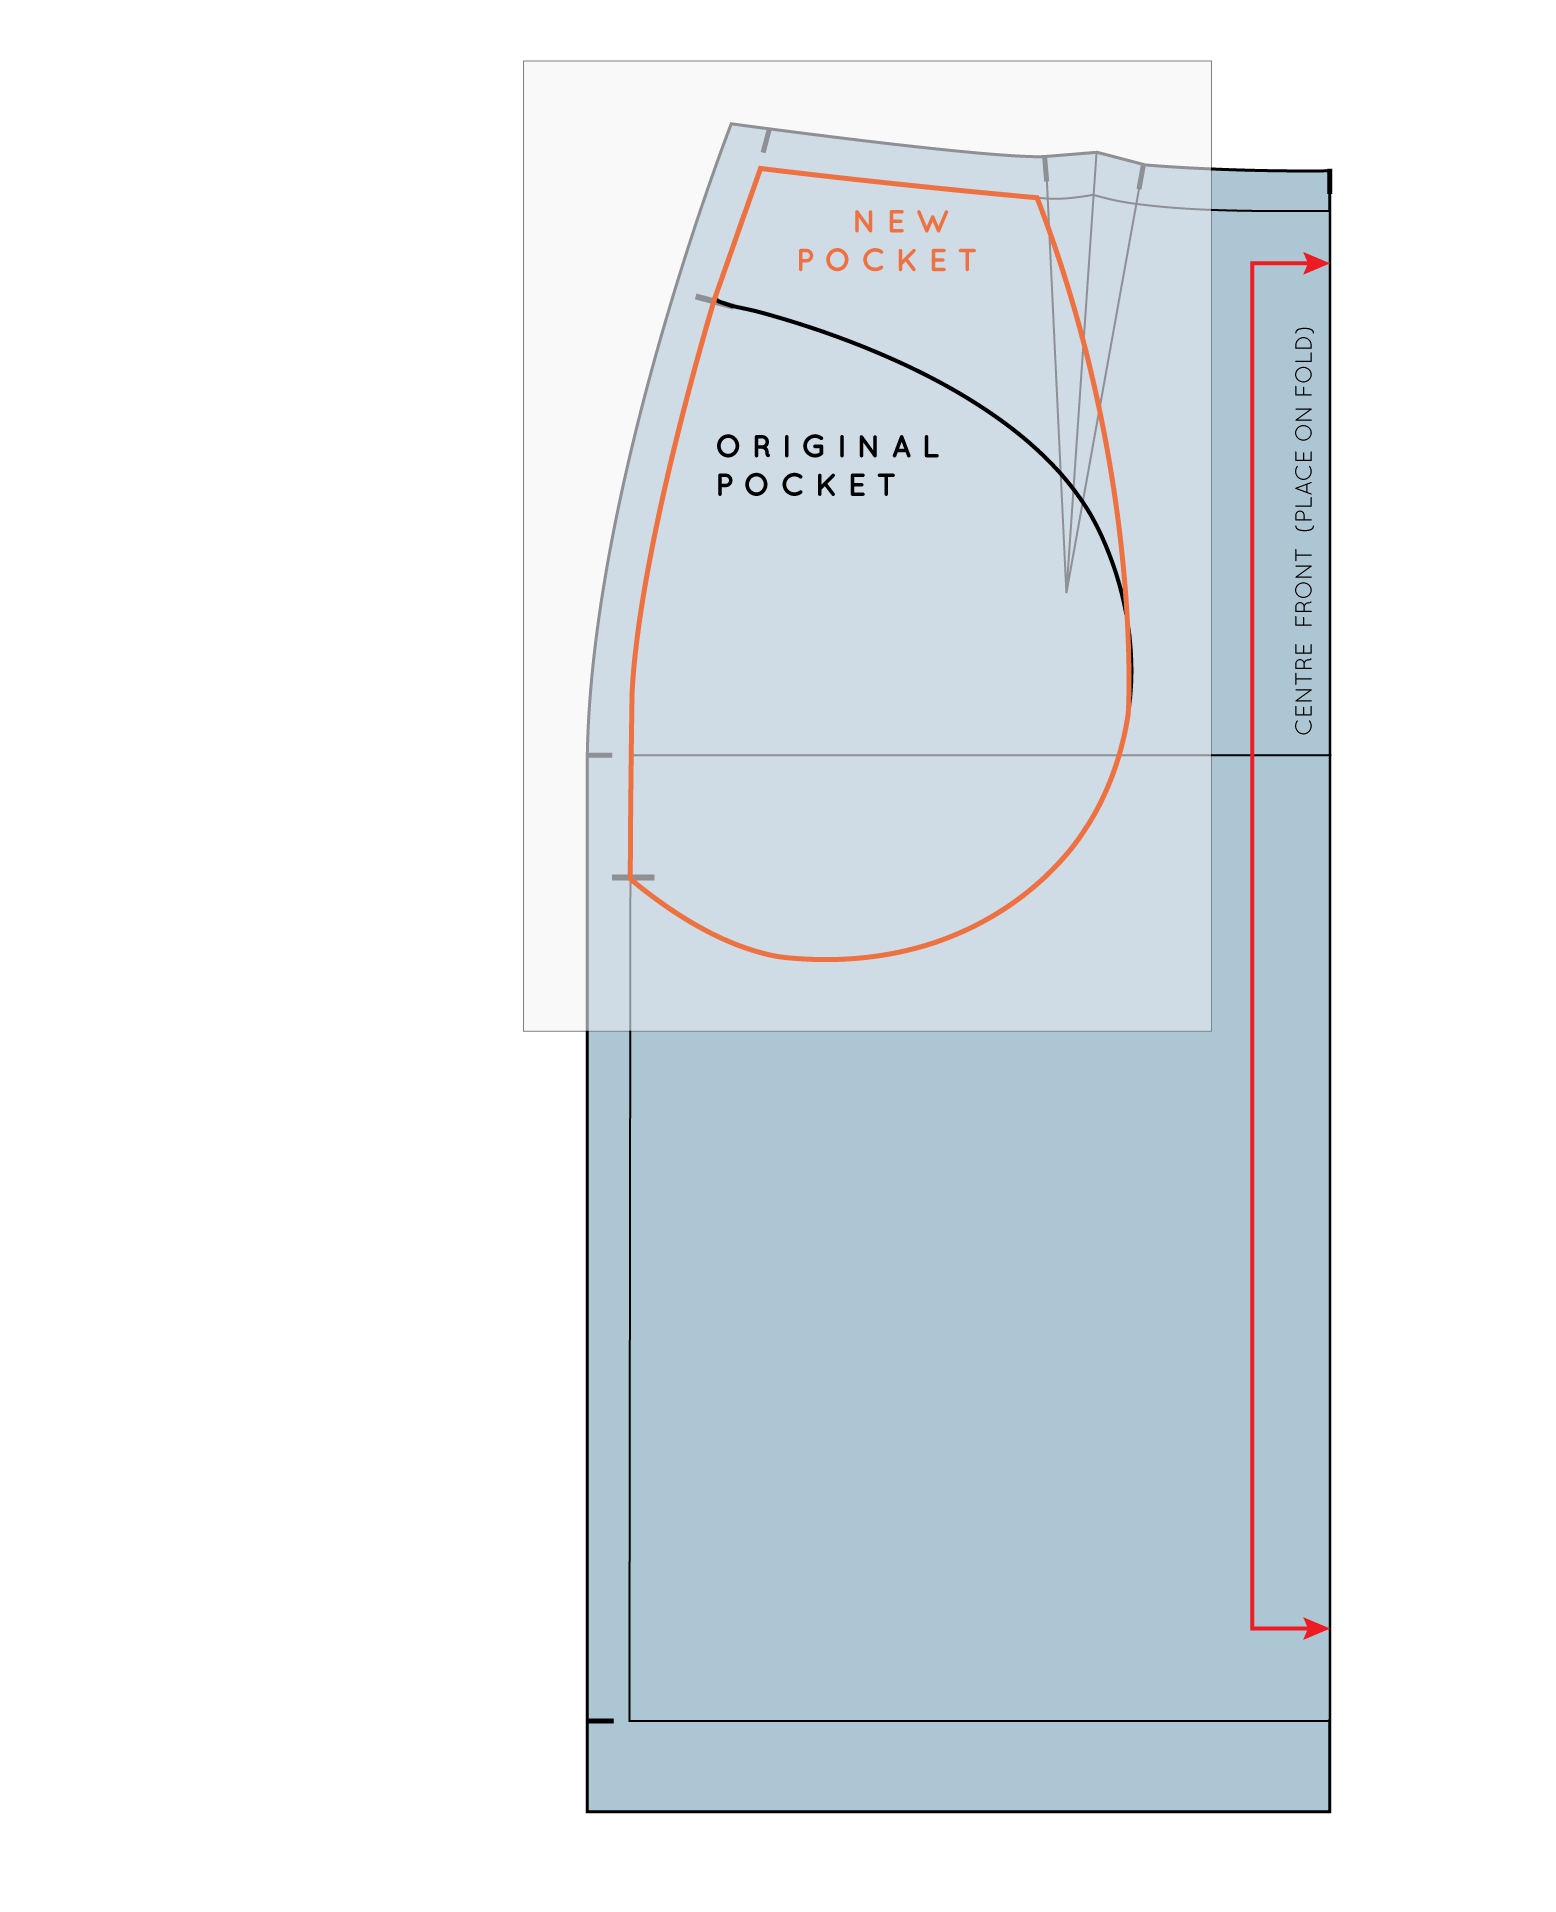
This is a tutorial to help you with "in-seam" pockets - a pocket that is hidden... surprise, surprise... in a seam of your garment (normally the side seam). Yesterday I showed you how to sew in-seam pockets (with french seams), so today I thought I'd show you how to draft the pattern piece as it is a very quick and easy process (both pattern cutting the pockets and sewing them) and once you have a pattern you are happy with, you will be able to use it over and over again, with minimal changes.

Tools

For this tutorial you will need the pattern of the garment you are adding pockets to, as well as some basic pattern cutting equipment: a transparent ruler, a pacer (or pencil), some scissors and a small piece of pattern paper (just bigger than your hand).

LET'S GO!

how_to_draft_in-seam_pockets_2

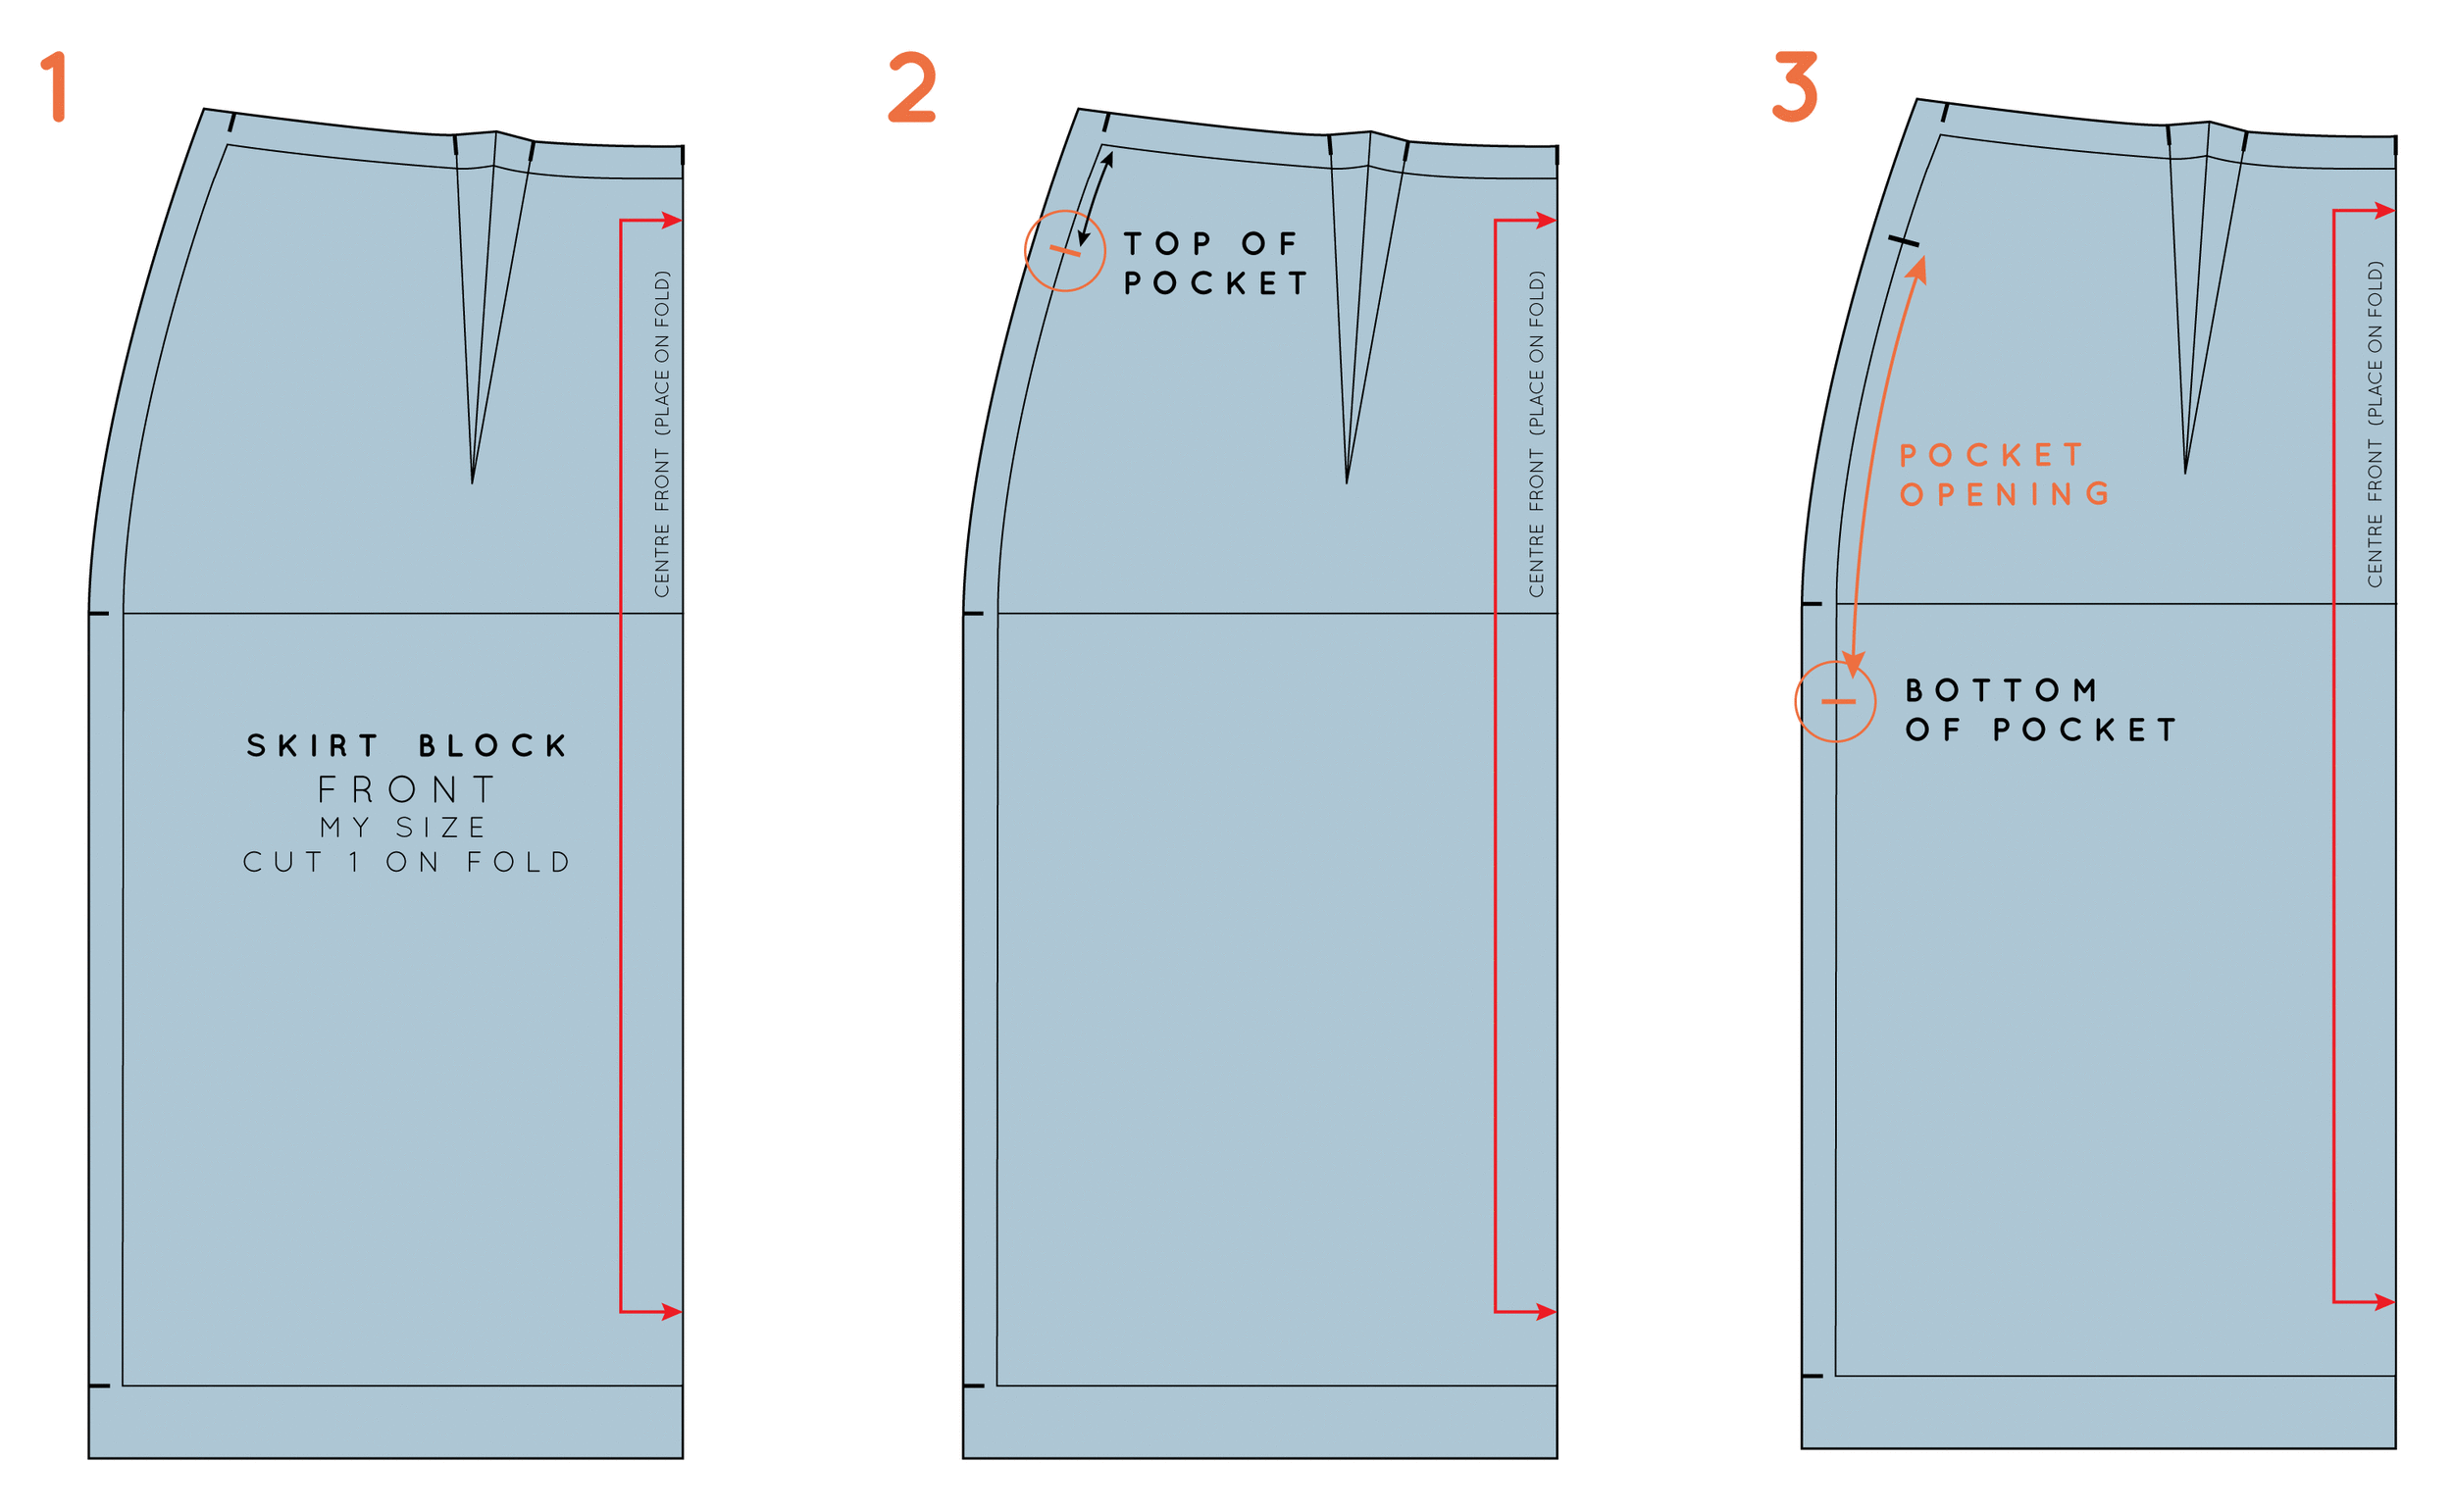
1. Take the front piece of the pattern you are making pockets for. I will be using the basic skirt block (as we are in the middle of The Skirt Series) as an example, but you can use this same method to add in-seam pockets to any garment that has a side seam.

2. Think about where you would like your pattern to sit. A good way to do this is to put on your toile and put your hands where the pockets would feel comfortable. Mark the location with a pin.

If you don't have a toile, you can just measure down from your waist to work out a good spot. For me, if I am adding a pocket to a waisted garment, I will place the pocket 9 - 10cm (3 1/2 - 4in) down from the waist. 

Mark this point on your pattern piece. 

3. Now think about how big you would like the opening to your pocket to be. I suggest around 15-20cm (6 - 8in). Measuring along your stitch line, down from the point you marked in the previous step (the top of the pocket), indicate the bottom of the opening with another notch. 

Draw the pocket bag

how_to_draft_in-seam_pockets_3

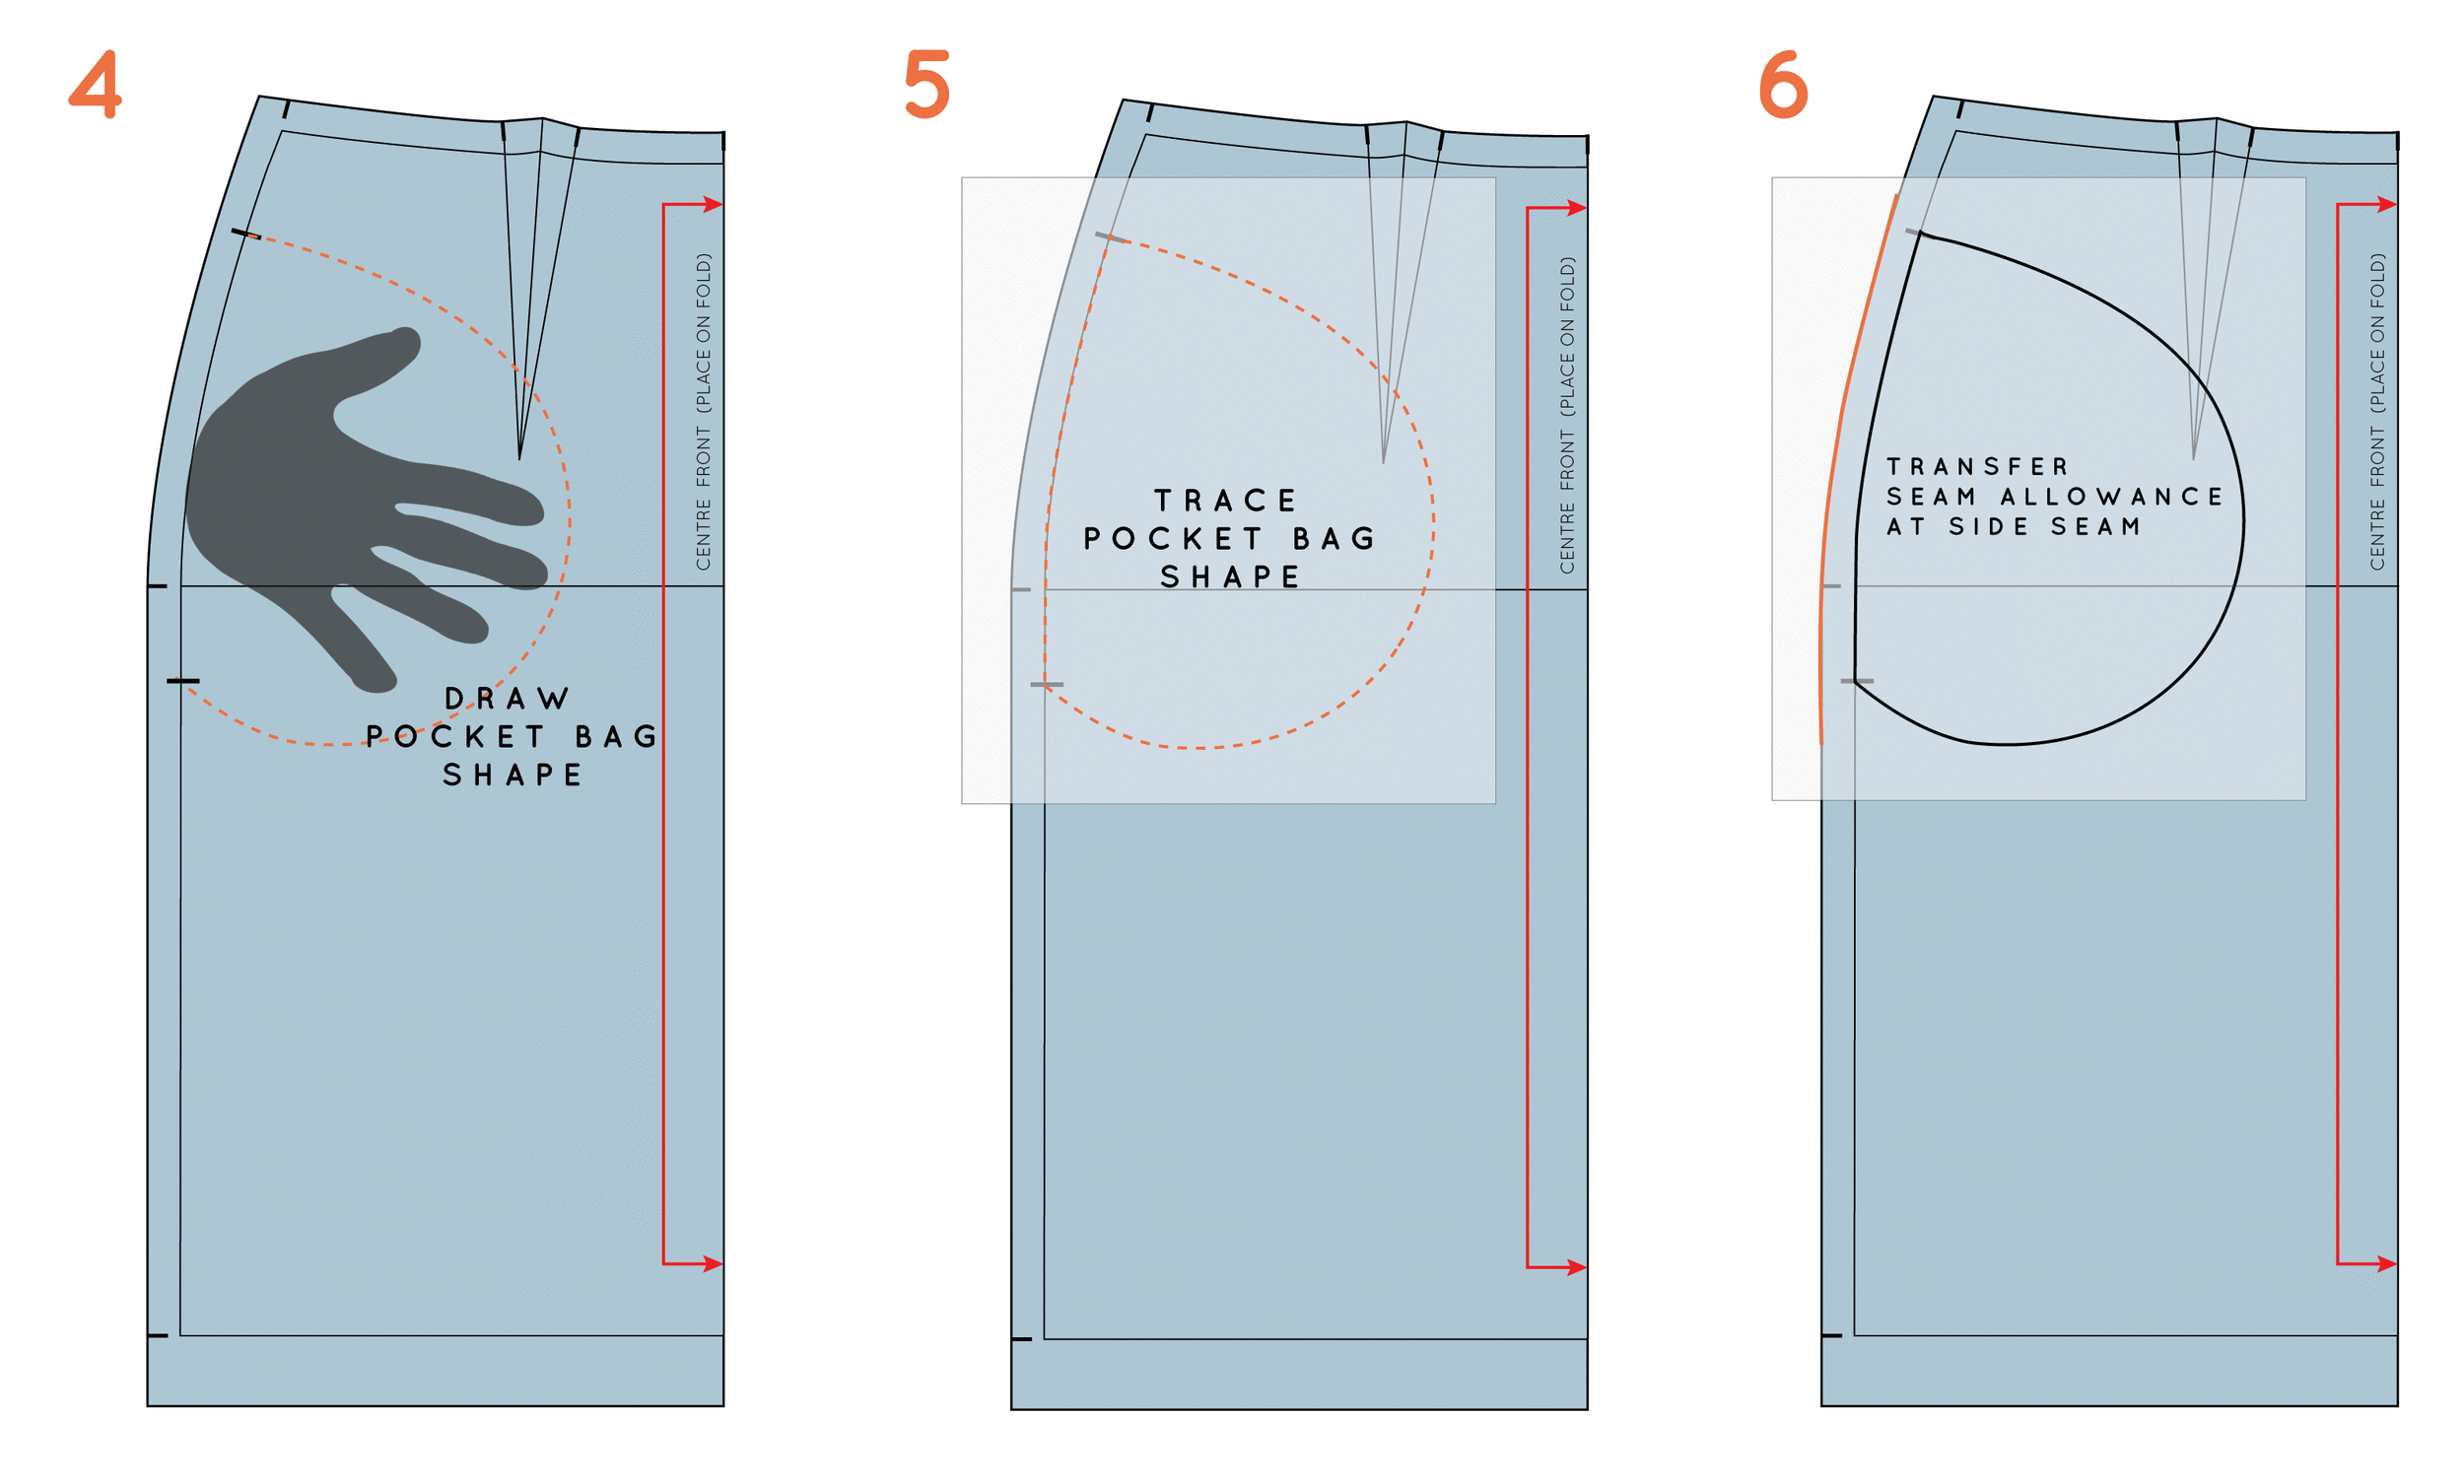
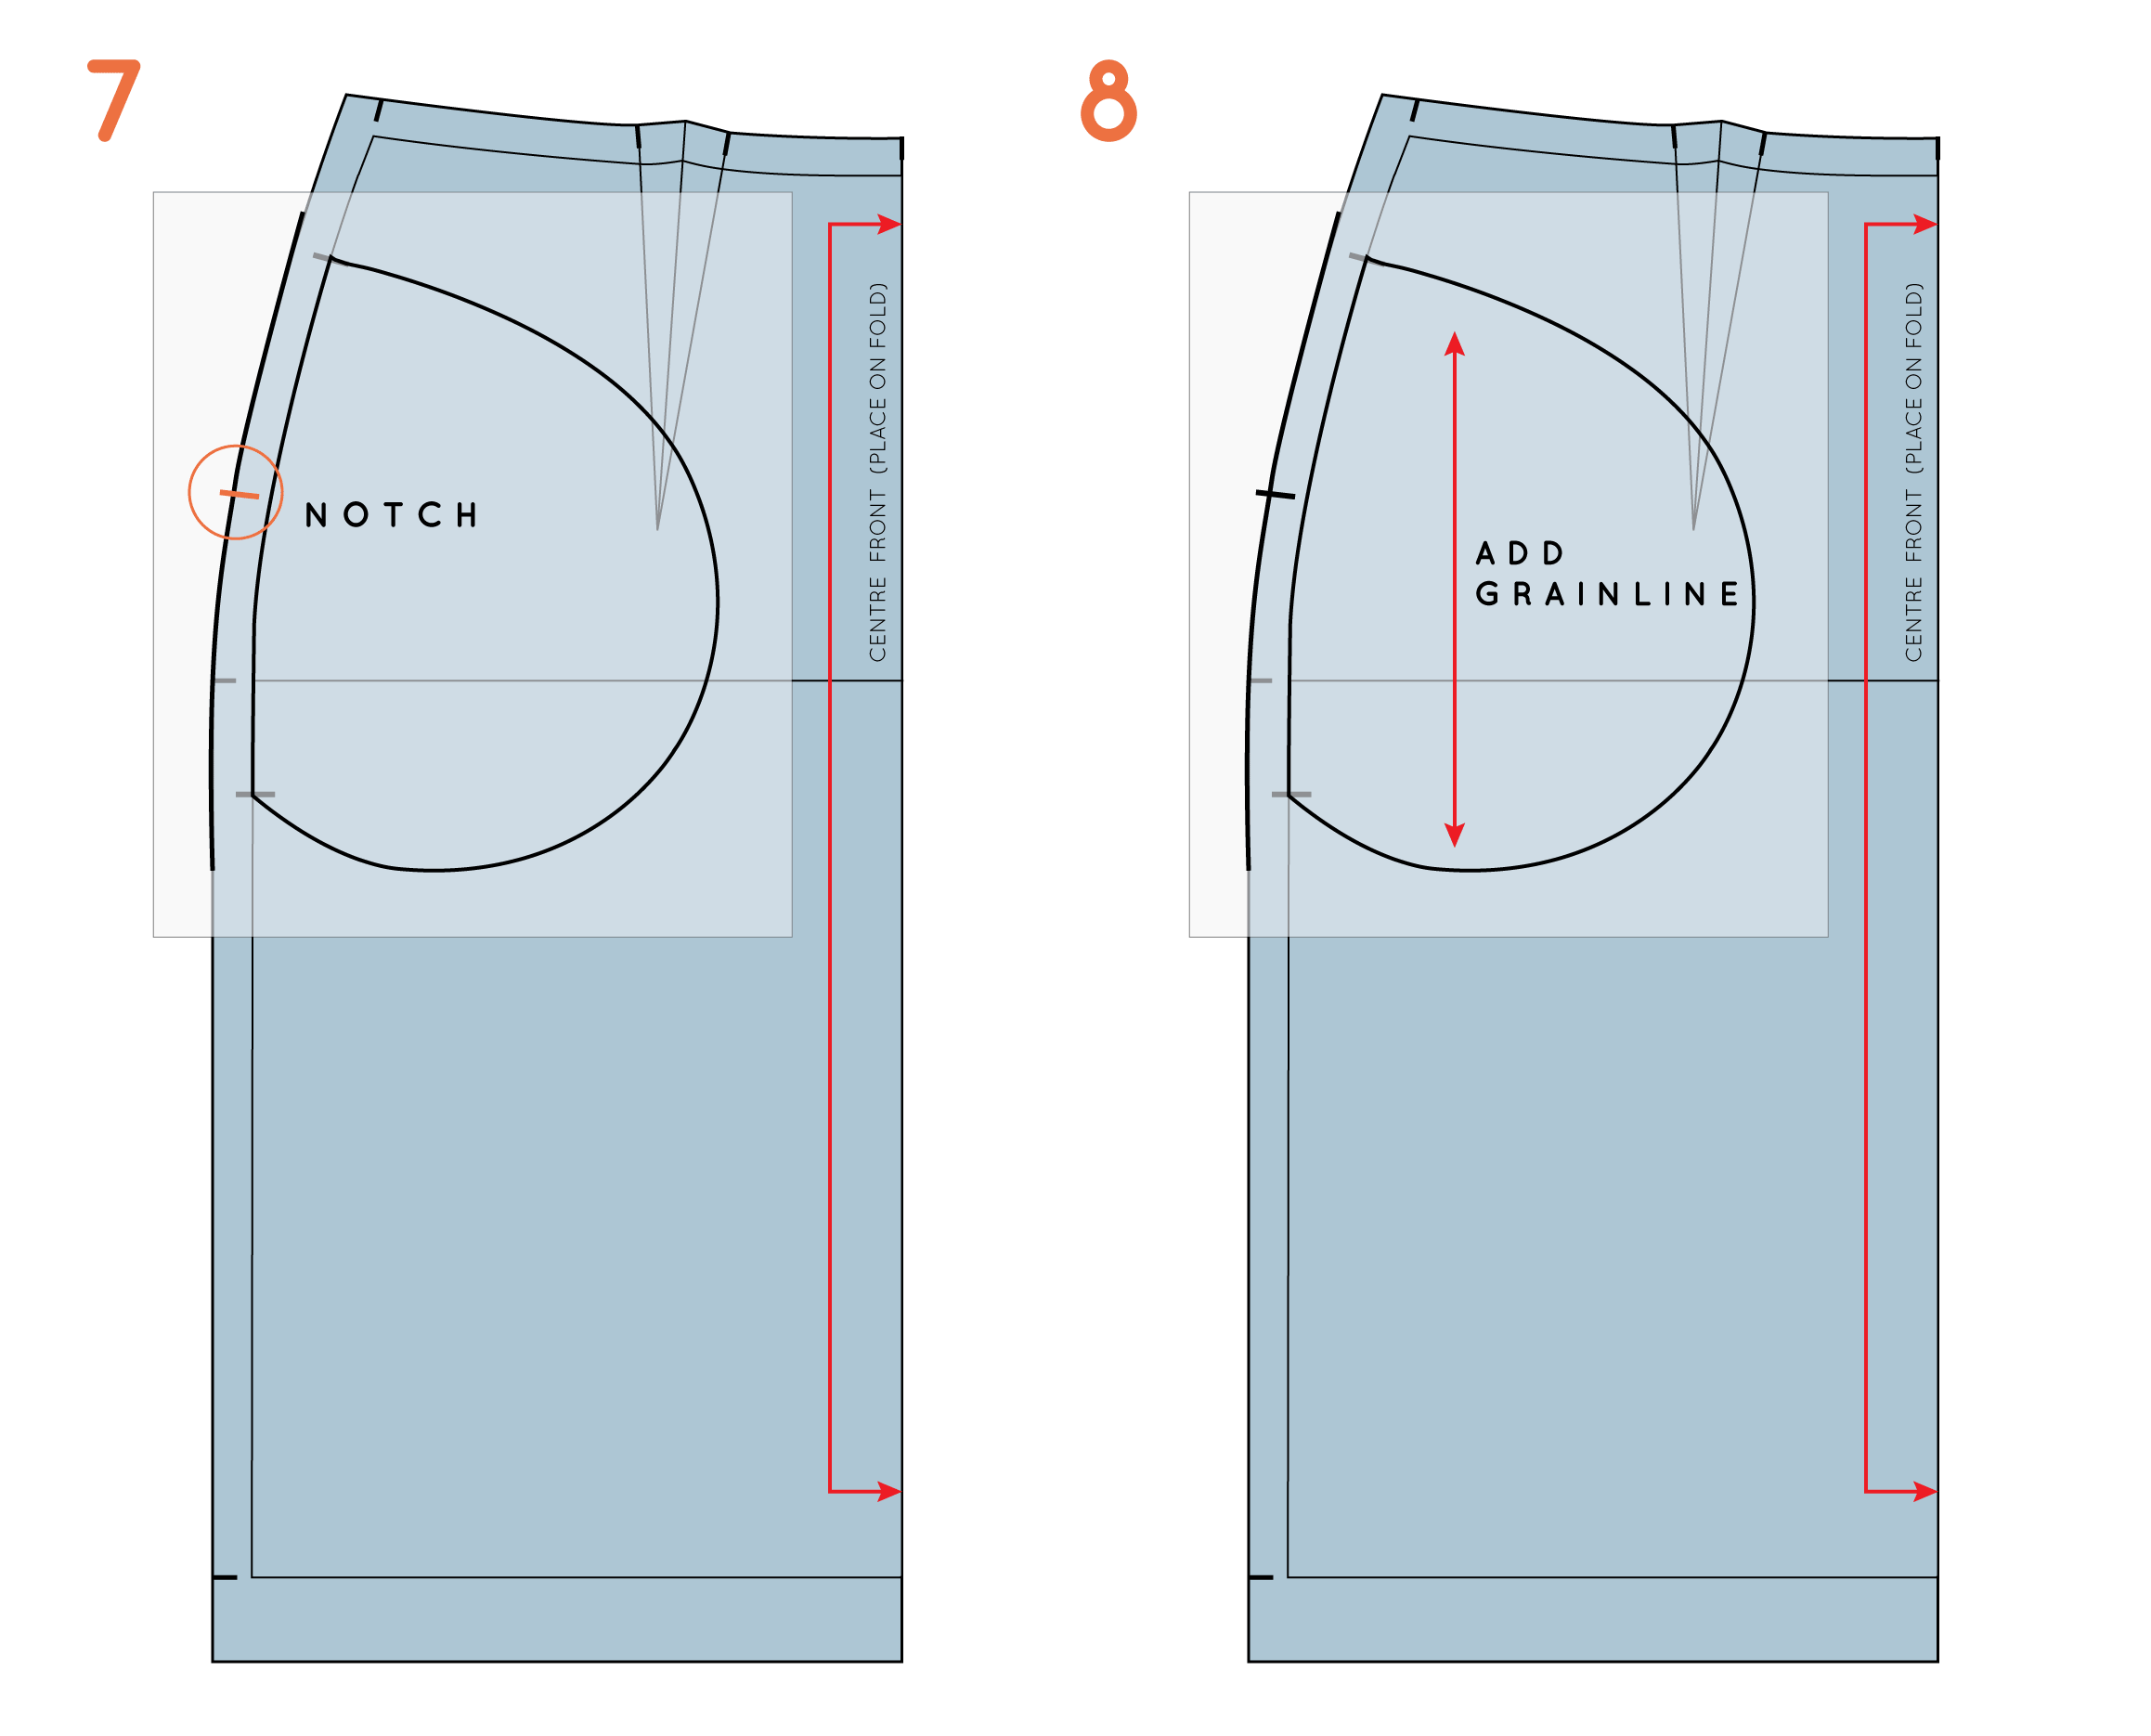
4. I think the easiest way to get a good pocket shape, is by tracing roughly around my hand. To do this, place your hand on your pattern, as if it was in a pocket, and draw around it in the rough shape of a pocket bag (have a look at the in-seam pockets of some of your own clothes if you're not sure about the shape). You don't want it to be too tight around your hand, so leave a little bit of space between your hand and the line you draw.

5. Take a separate piece of pattern paper and, using a weight to hold the pattern in place, trace the shape of the pocket (leaving enough space around it to add seam allowance). 

6. While you are tracing the shape of the pocket, you can also trace the seam allowance at the side seam. 

how_to_draft_in-seam_pockets_4

7. Add a notch, roughly in the centre of the pocket opening, and then using a tracing wheel, transfer that notch onto the front pattern piece. This notch will help when you are positioning your pocket, when it comes to sewing.

8. Add a grainline to your pocket piece, making sure it is parallel to grainline on the pattern you are adding the pocket to (this will ensure that the pocket sits nice and flat, when it is sewn in).

Add seam allowance and pattern details

how_to_draft_in-seam_pockets_5

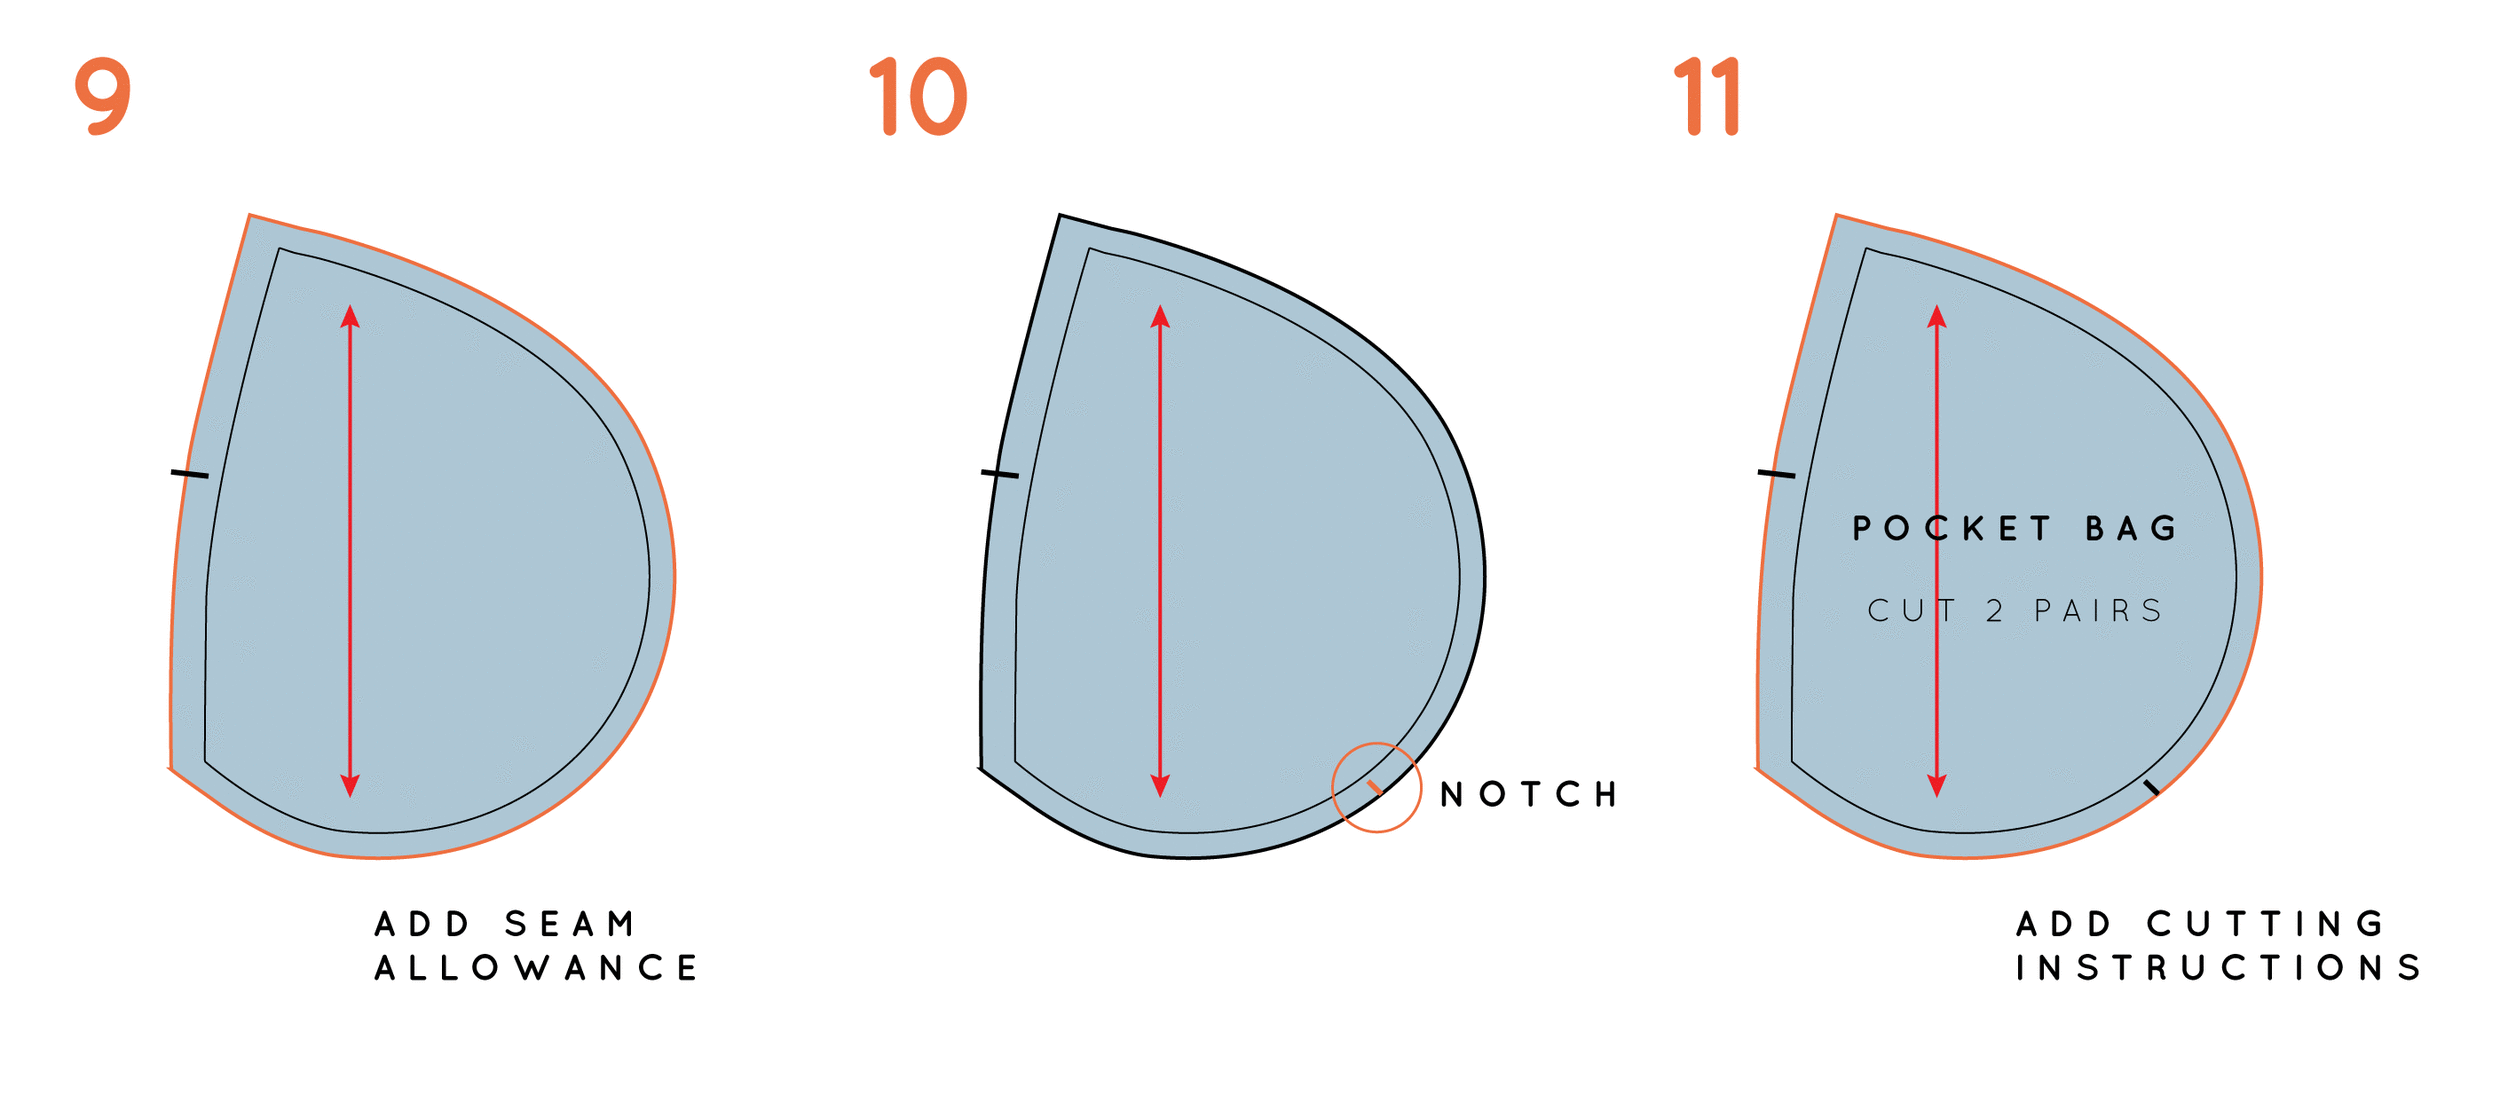
9. Add seam allowance to the curve. I suggest 6mm - 1.2cm (1/4 - 1/2in) to make the curve as easy as possible to sew.

10. Add a notch to be used as a balance point on the curved seam - this helps when sewing the front and back pocket bags together.

11. Add cutting instructions (cut 2 pairs).

When it comes to cutting, you may choose to cut from your main fabric, or something lighter, to minimise bulk.

Transfer notches

how_to_draft_in-seam_pockets_6

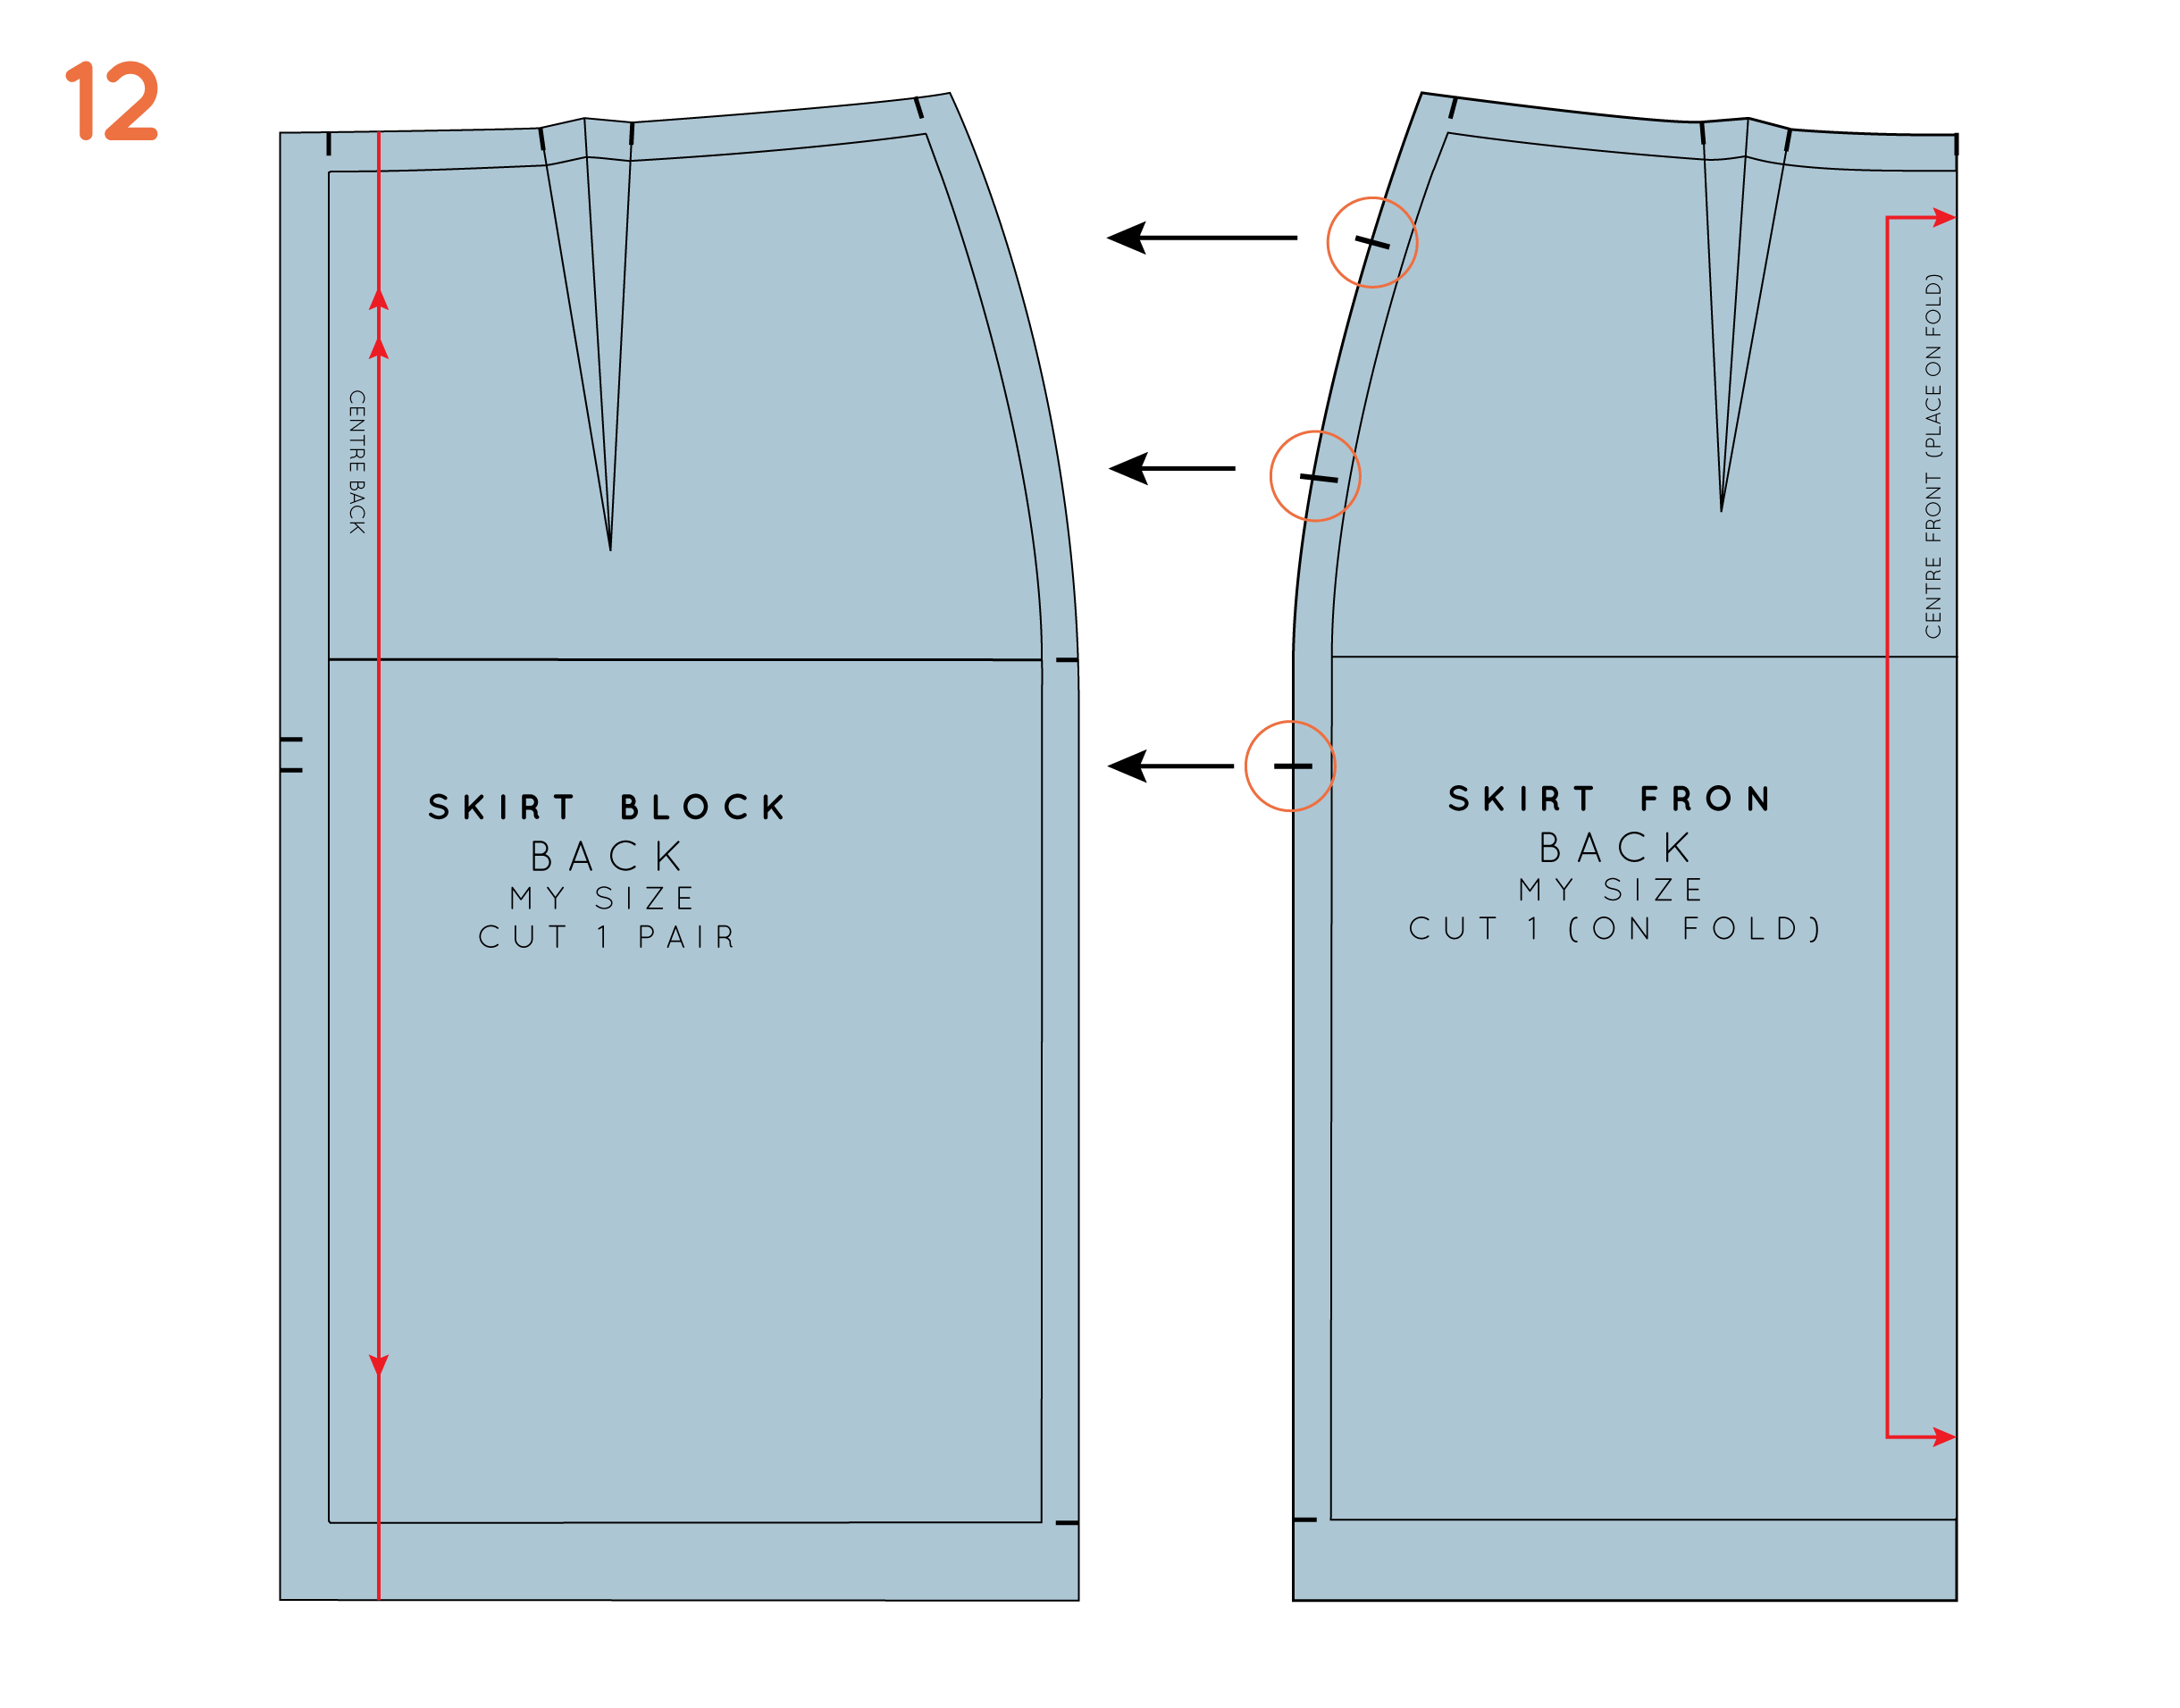
12. The last thing you need to do is transfer the notches from the front pattern piece, to the back, so that you can place the pattern correctly on the back piece when it comes to sewing. 

how_to_draft_in-seam_pockets_7

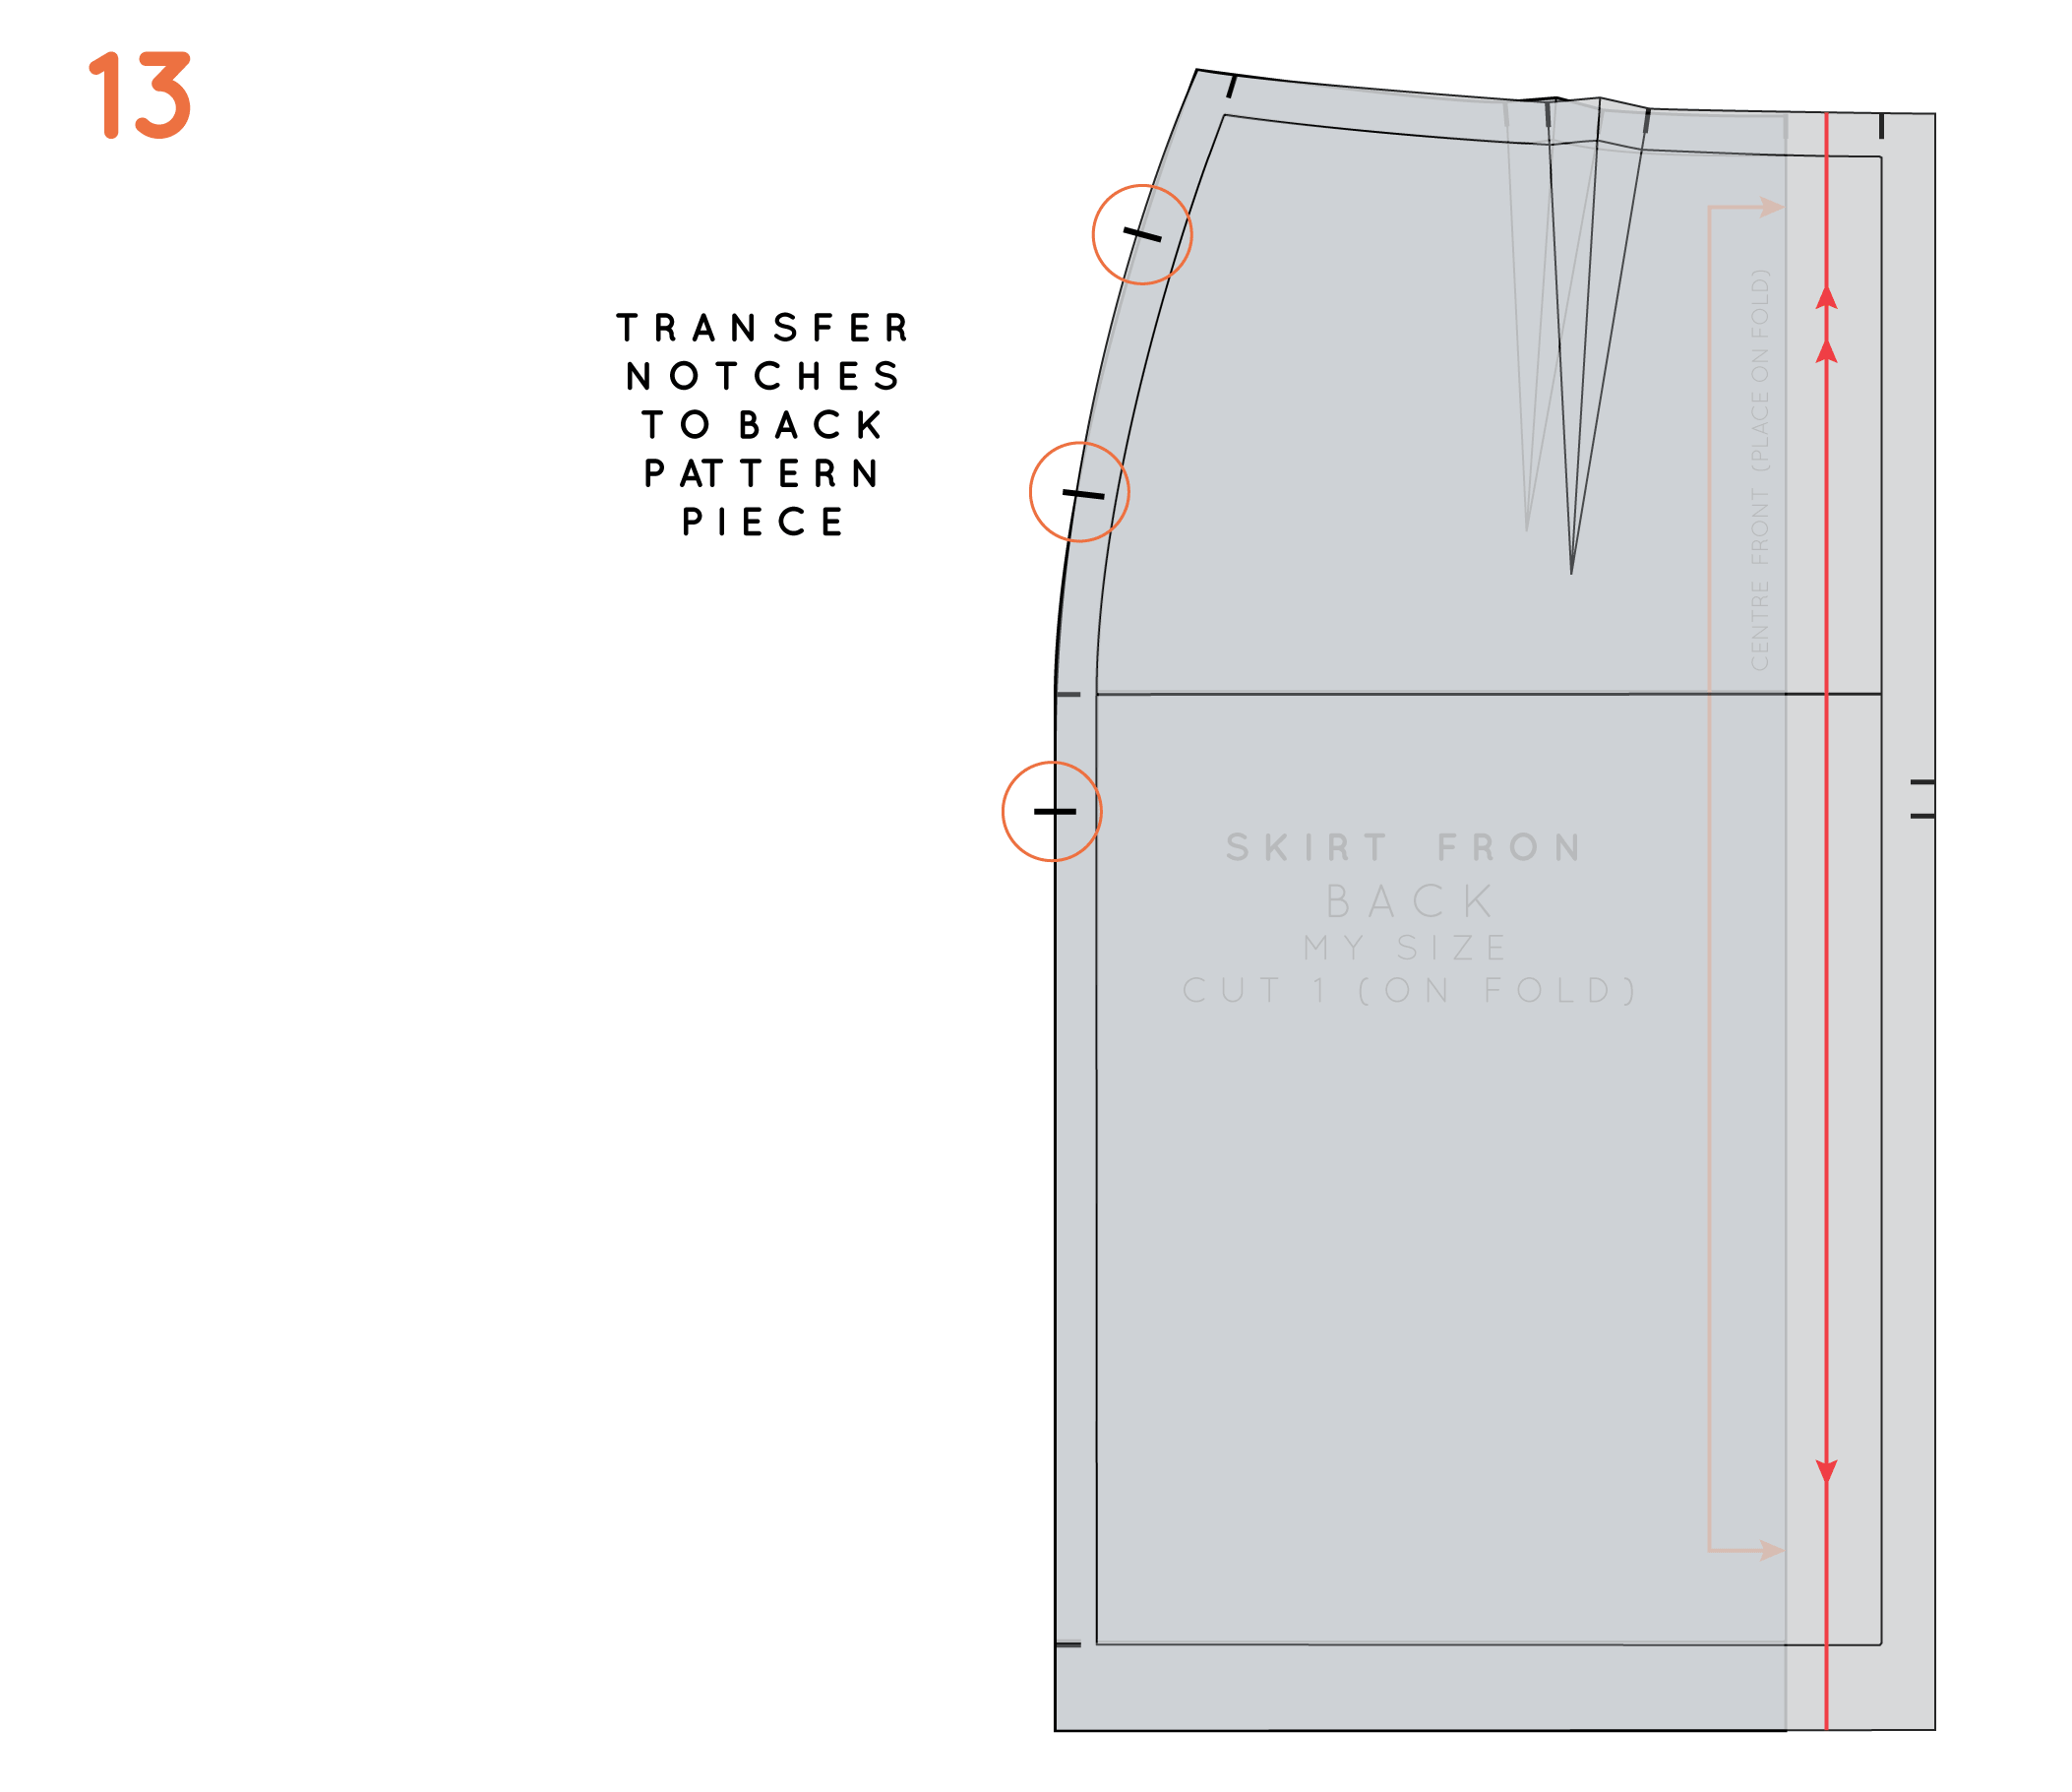
13. Lay the back pattern piece onto the front, matching the side seams at the stitch line. Transfer the three notches onto the back pattern. If your pattern paper is not transparent, you can use a tracing wheel to transfer the notches. And there you have it... You now have in-seam pockets!
ONE LAST THING

how_to_draft_in-seam_pockets_8

If you are creating a pocket pattern for a garment with a waistband (like the skirt in the example), you may want to consider making your pocket piece so that it sits flush with the waistline. This can give you a lovely finish, and can prevent the pocket bags moving. 

To do this, simply draft the pattern piece the same way as the standard pocket bag, but continue to curve up to the waistline. To complete, add seam allowance, notches and pattern markings. 

Download a pocket pattern

Just in-case you'd prefer a printable pattern, instead of drafting your own, I have included one for you to download (just click on the diagram above, to start the download). It is a 2 page PDF, so nice and easy to put together. If you would like some help printing it, check out my tutorial on printing PDF patterns.

Happy sewing!


You may also like:

Finished project : The Rushcutter

the_rushcutter_1

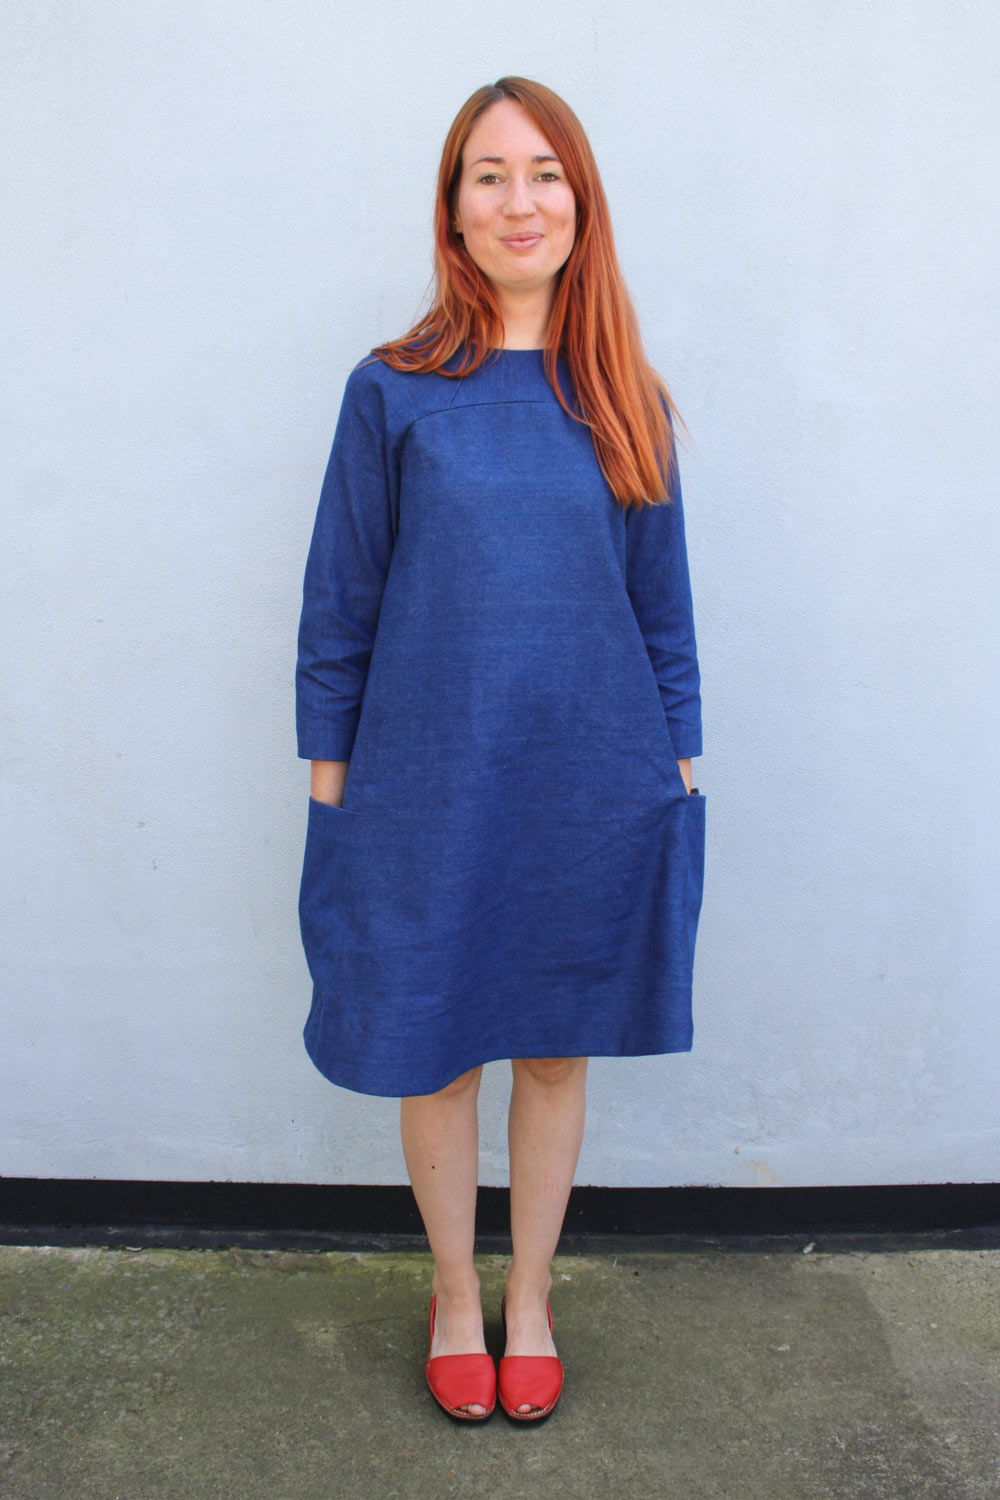
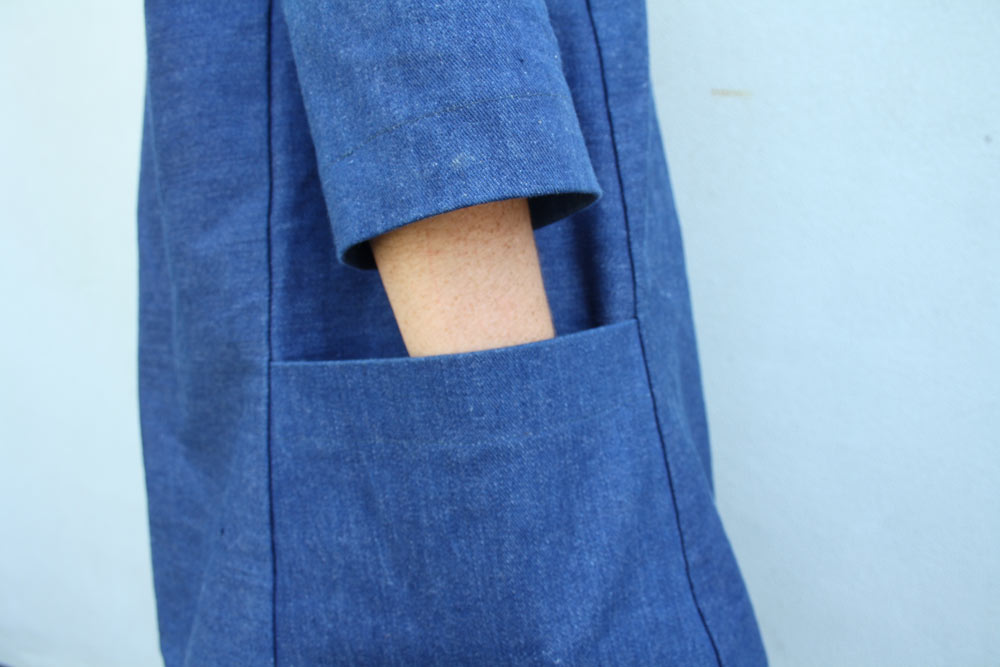
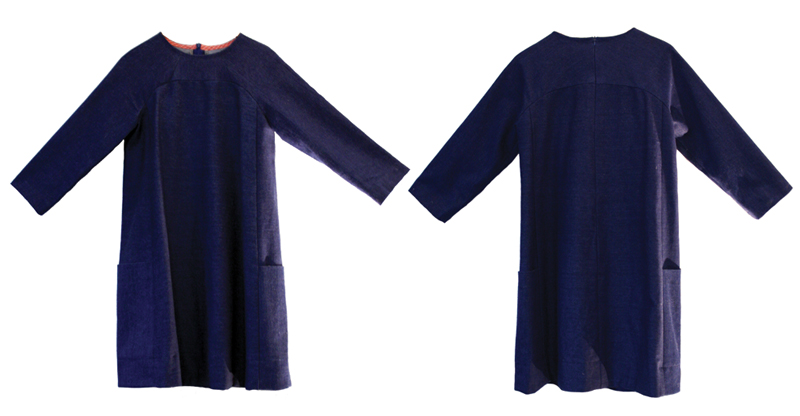
At last, after about four weeks of blog posts, I have completed the sew-along for The Rushcutter (view A)! Before getting on with view B, I thought I'd finally show you some pics of my finished Rushcutter.

the_rushcutter_2

I have made so many versions of this dress, throughout the design process, but this one is my absolute favourite. It is an easy one to just throw on and look put together, and I can easily dress it up or down. It has already become an absolute wardrobe staple!

It's made from a lovely mid-weight denim which I bought second hand (so unfortunately don't have any more details about it). I was a little worried it might be a little too heavy for a Rushcutter, but decided to go with it anyway as it has a clear right and wrong side, which is really great when photographing sewing tutorials. 

the_rushcutter_3
the_rushcutter_4

I got a lovely surprise when I finished making it, as I absolutely love the silhouette the denim creates. It's lovely and boxy and really shows off the details in the pattern.

the_rushcutter_5

I have worn it a lot this spring with a pair of sandals, but also got a lot of wear out of it at the end of winter with tights and brogues. The weather has been awful here in Sydney, so I think I will still get a few more wears out of it before the year is out.

the_rushcutter_6
the_rushcutter_7
the_rushcutter_8
the_rushcutter_9

I couldn't resist finishing up with this funny photo. This is my suspicious glance to see who was about to come and ruin my photo shoot!

Stay tuned, as next week I will be starting on the tutorial for view B of the Rushcutter (the sleeveless version).

Throwback Thursday: Adding volume to a pattern

ADD-VOLUME_cut_and_spread_1.gif

Over the past weeks I have been showing you how to draft a skirt block, as part of The Skirt Series.

Now that it is complete, it is time to start making the pattern your own. 

ADD-VOLUME_cut_and_spread_2

Last week I showed you how to draft an A-line skirt, by relocating the fullness of the dart to the hemline, using the cut and spread technique.

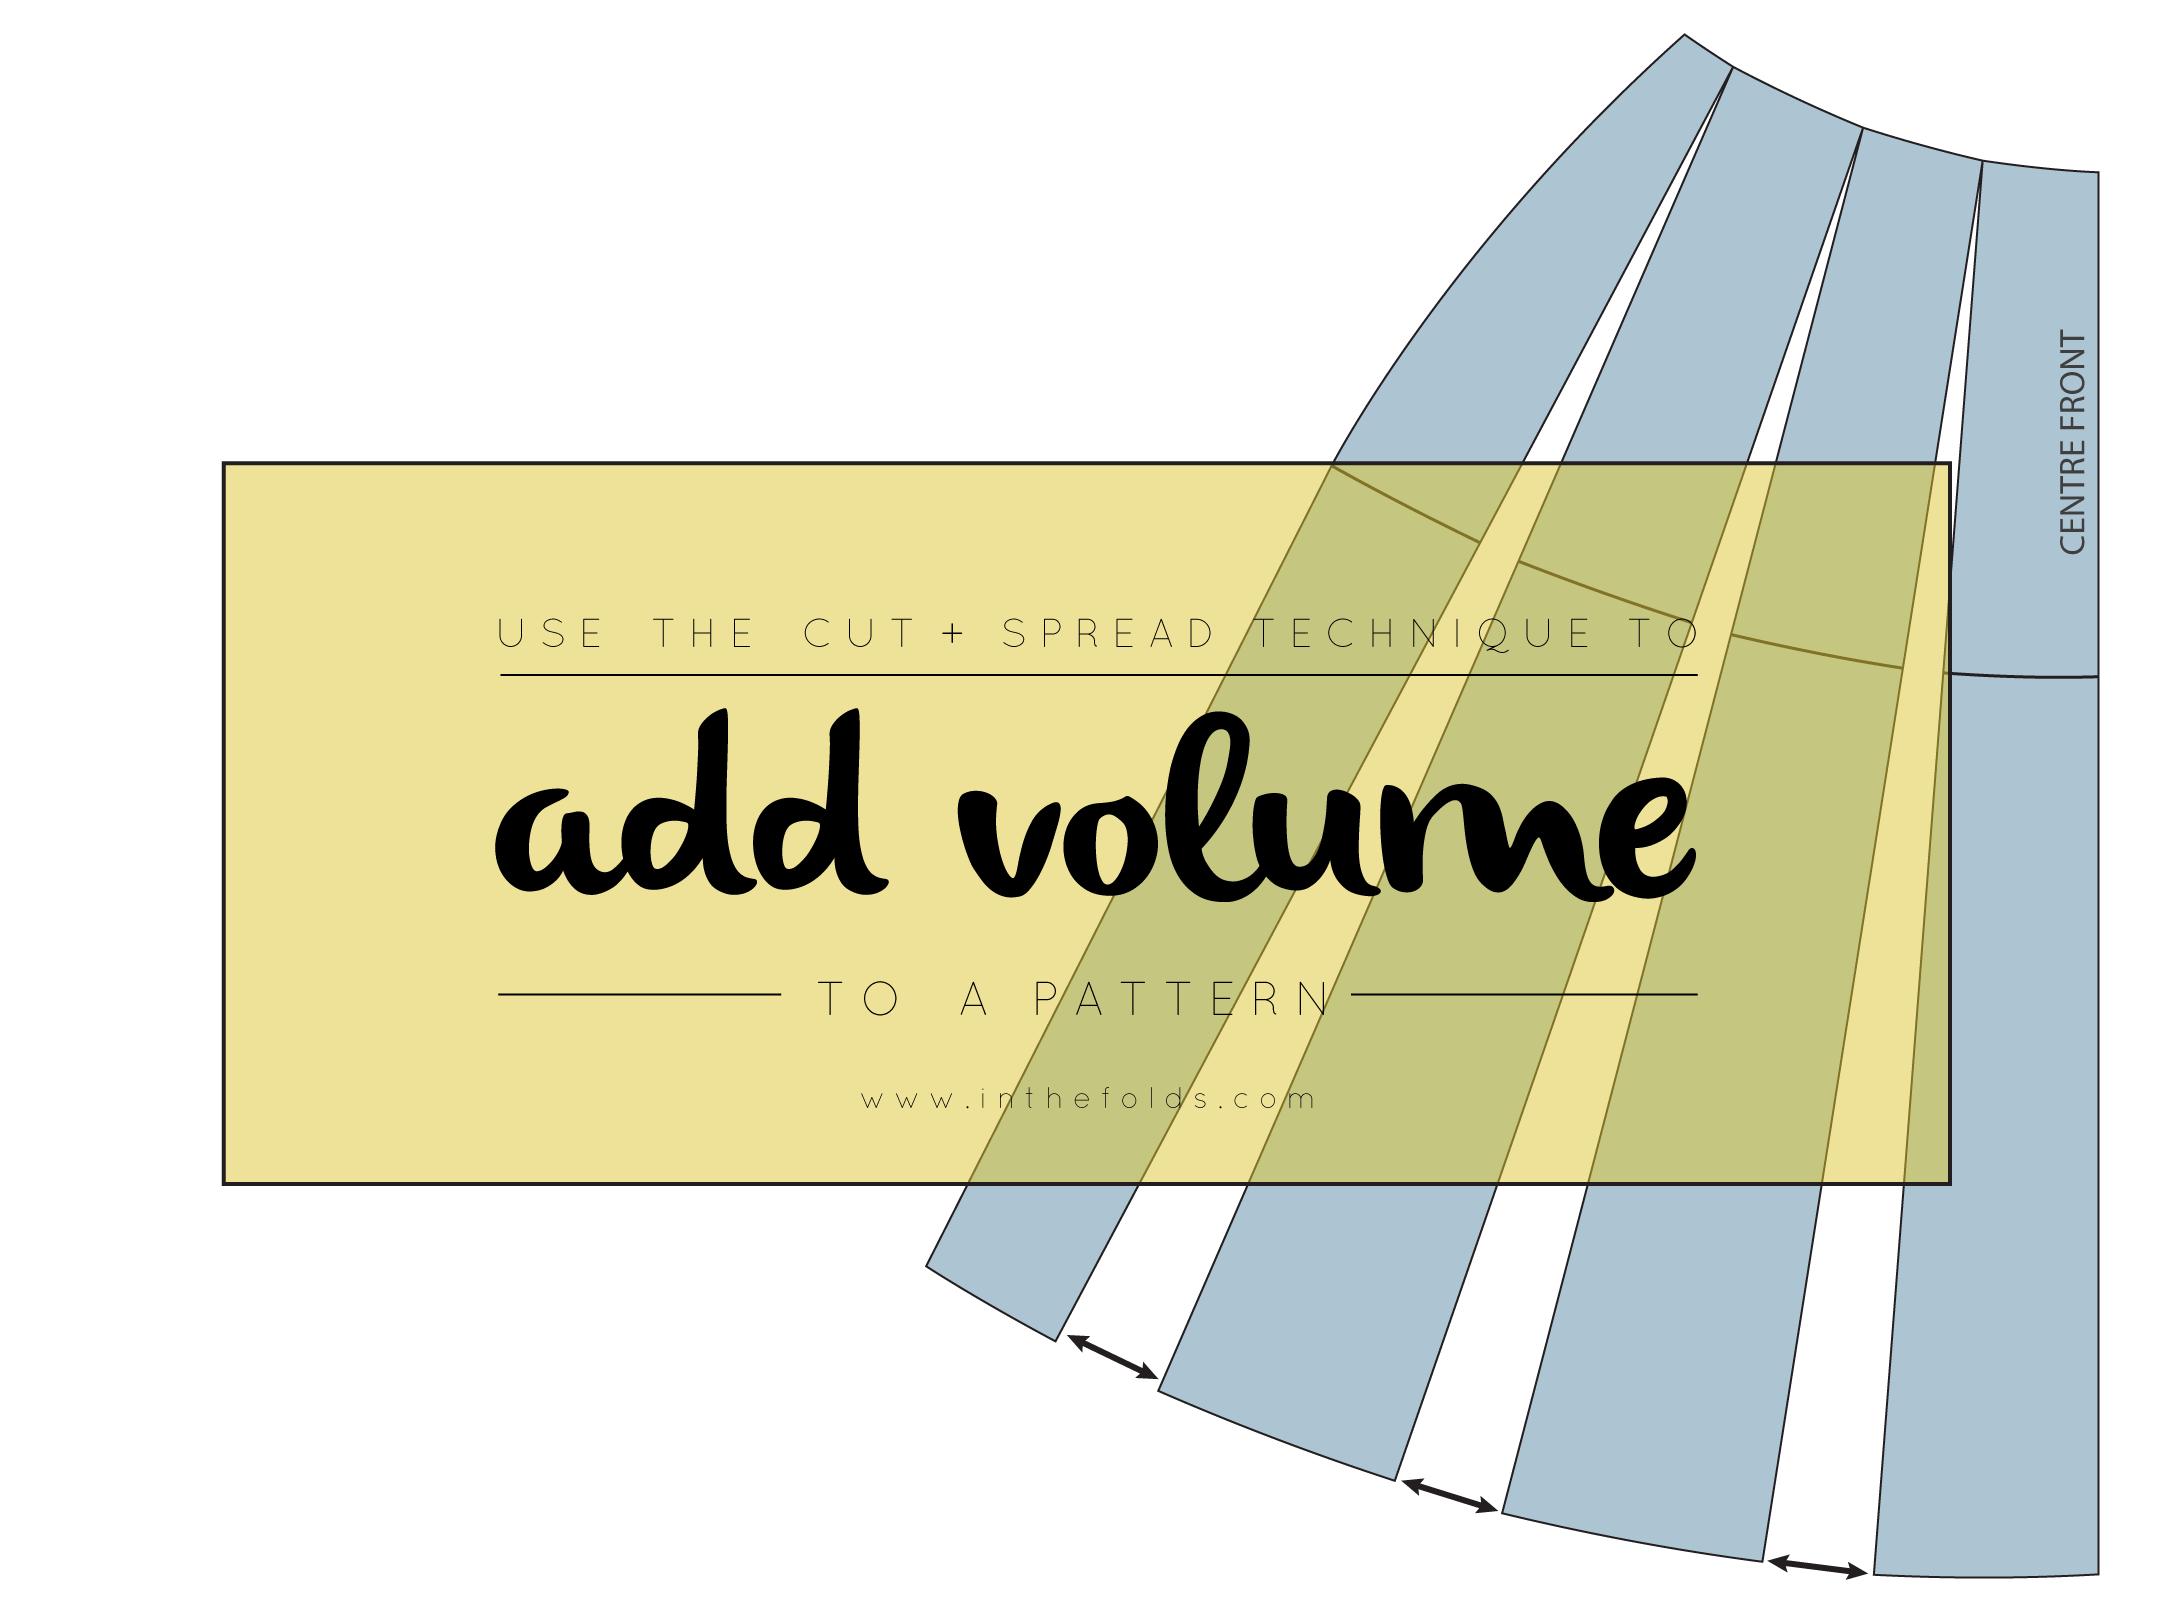
Today I will show you how to add more volume to the skirt block, using this same technique. You can use this same method to add fullness to just about any pattern piece: sleeves, trousers, blouses and jackets, and many more. 

Mark the cut and spread lines

ADD-VOLUME_cut_and_spread_3

1. I am using my skirt block to demonstrate this tutorial. The darts have already been moved, as shown in this tutorial. As always, it is best to have a copy of your pattern, without seam allowance. It is much easier to make adjustments with seam allowance removed.

2. Draw three lines (this is only a suggestion, you could use more or less) down the length of your pattern, roughly parallel to the centre front. Space them out, with roughly even gaps between them.

ADD-VOLUME_cut_and_spread_4

3. You will be cutting these lines, to add volume to the pattern. Wherever there is a line, this is where more fabric will be added - that's why it is best that they are evenly spaced.

4. Take your scissors and cut along the first guideline, from the hemline up towards the waistline.

ADD-VOLUME_cut_and_spread_5

5. Do not cut all the way through the pattern. Stop a few millimeters (1/16 in) from the waistline, leaving a 1-2mm "hinge" to keep the two pieces together.


How much volume to add?

Think about how much volume you are wanting to add to the pattern overall. You may want to do this by eye (just cut along the line and then spread until it looks as though enough volume has been added), or by an exact amount. If you are just opening up a hemline, I would say that doing it by eye is fine. But if, for example, the hip-line of a pattern is too tight and you are spreading the pattern to accommodate this, then I would suggest finding an exact amount so that you don't get any surprises.

If you have found an exact amount, you will need to divide this figure by four, as the volume will need to be distributed between the four pieces that make up the skirt pattern (front right, front left, back left and back right). Then divide the number again, by the number of guidelines you have on your pattern piece.

For example, if you would like to add an overall 30cm to the hemline, you will be adding 7.5cm to each pattern piece. If I was to add this to my pattern used as an example, I would divide this 7.5cm by my three guidelines, meaning I would open up each guideline by 2.5cm.

Cut and spread 

ADD-VOLUME_cut_and_spread_6

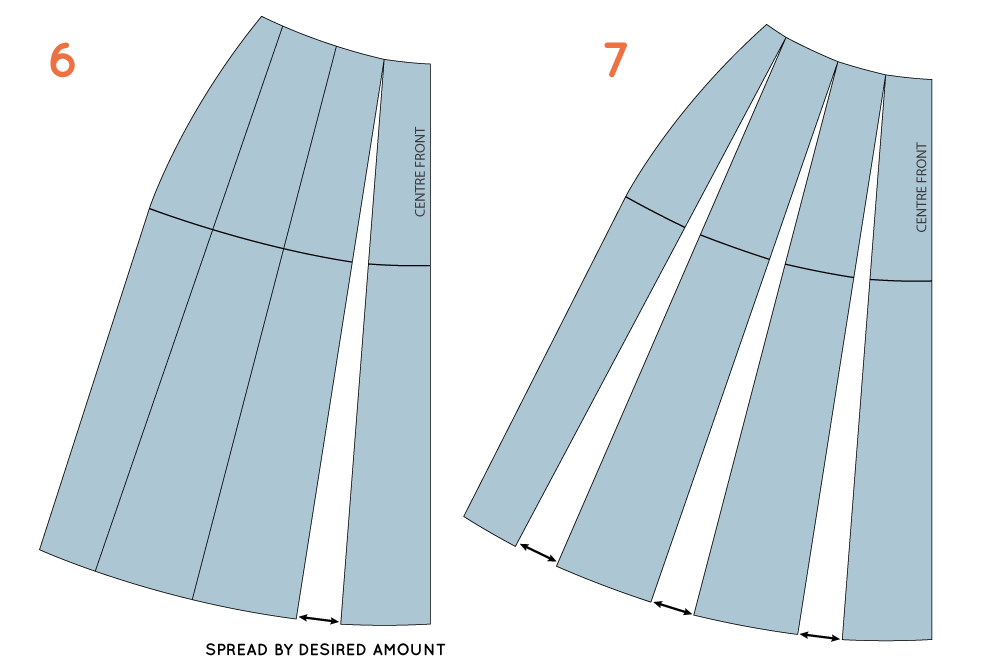
6. Slide a separate piece of pattern paper under your pattern, so that you will have something to stick the pattern to once you make the adjustments. Spread the hemline by the amount worked out in the previous step. Use tape or glue to secure in place.

7. Repeat process for the other lines, spreading each opening by the same amount as the first.

Check pattern

ADD-VOLUME_cut_and_spread_7

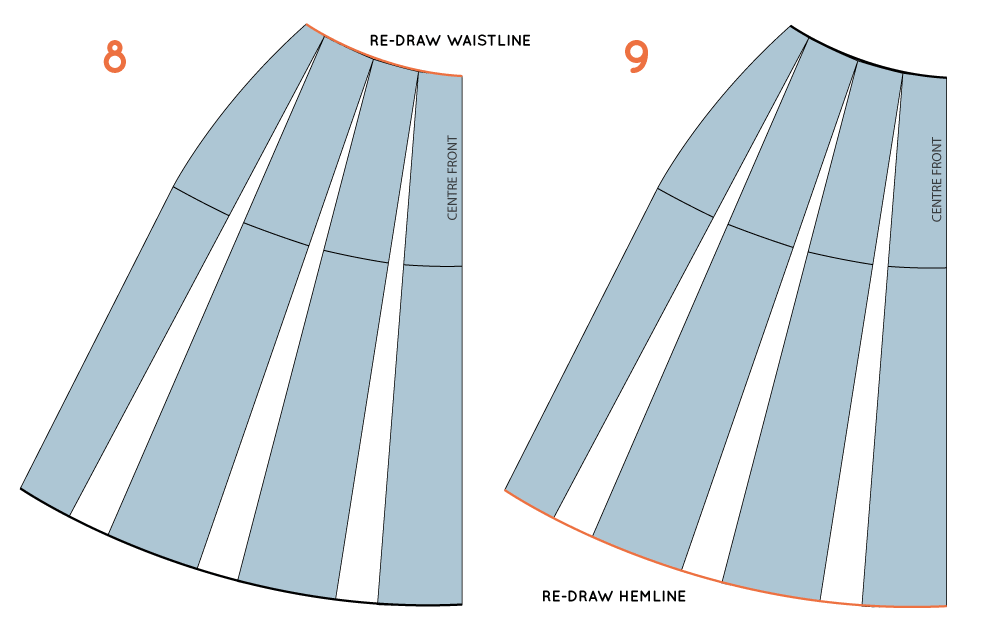
8. Redraw the waistline with a smooth curve.

9. Redraw the hemline with a smooth curve.

ADD-VOLUME_cut_and_spread_8

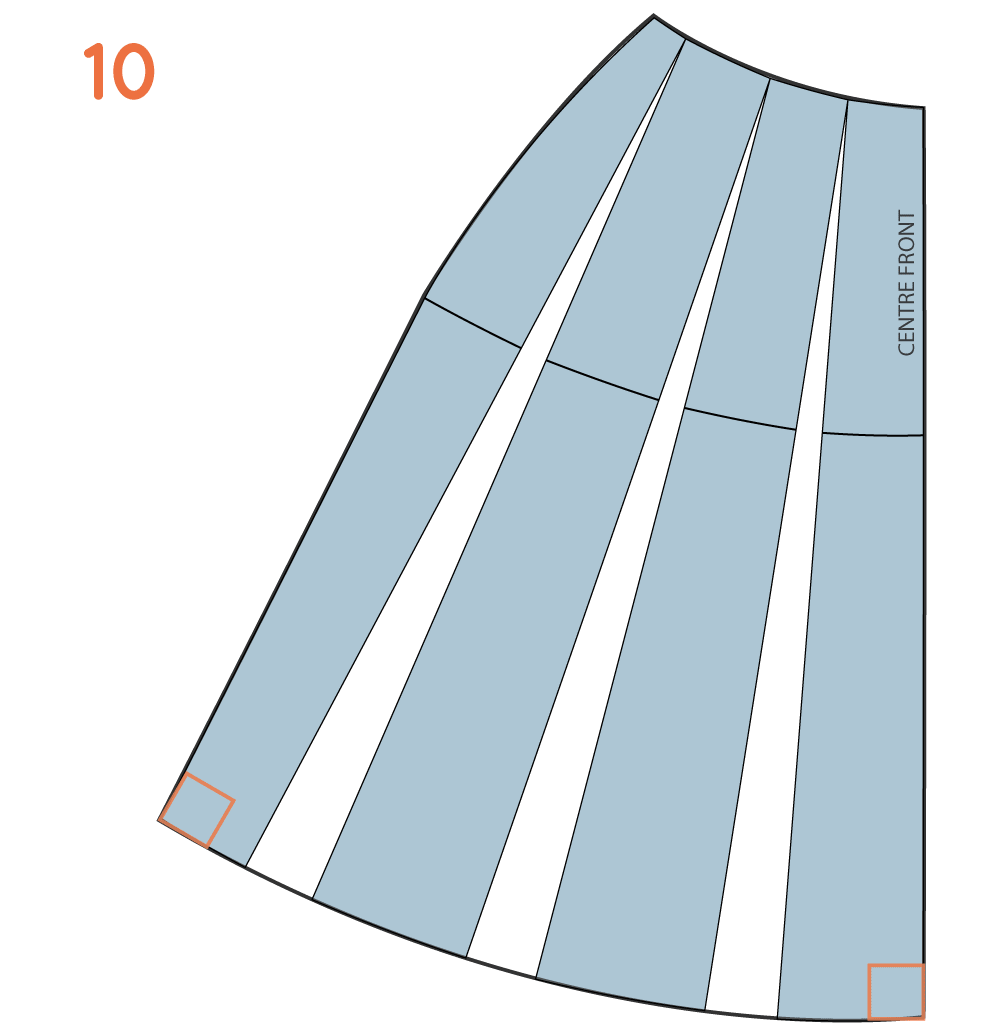
10. Check the the hemline meets the side seam and the centre front with a right angle. This will help you get a nice smooth hemline between front and back pattern pieces.

Complete the pattern

The pattern is done and you can now add seam allowance. If the pattern is a bit of a mess, with all that tape and extra paper, then simply trace a copy onto a seperate piece of paper.


You may also like:

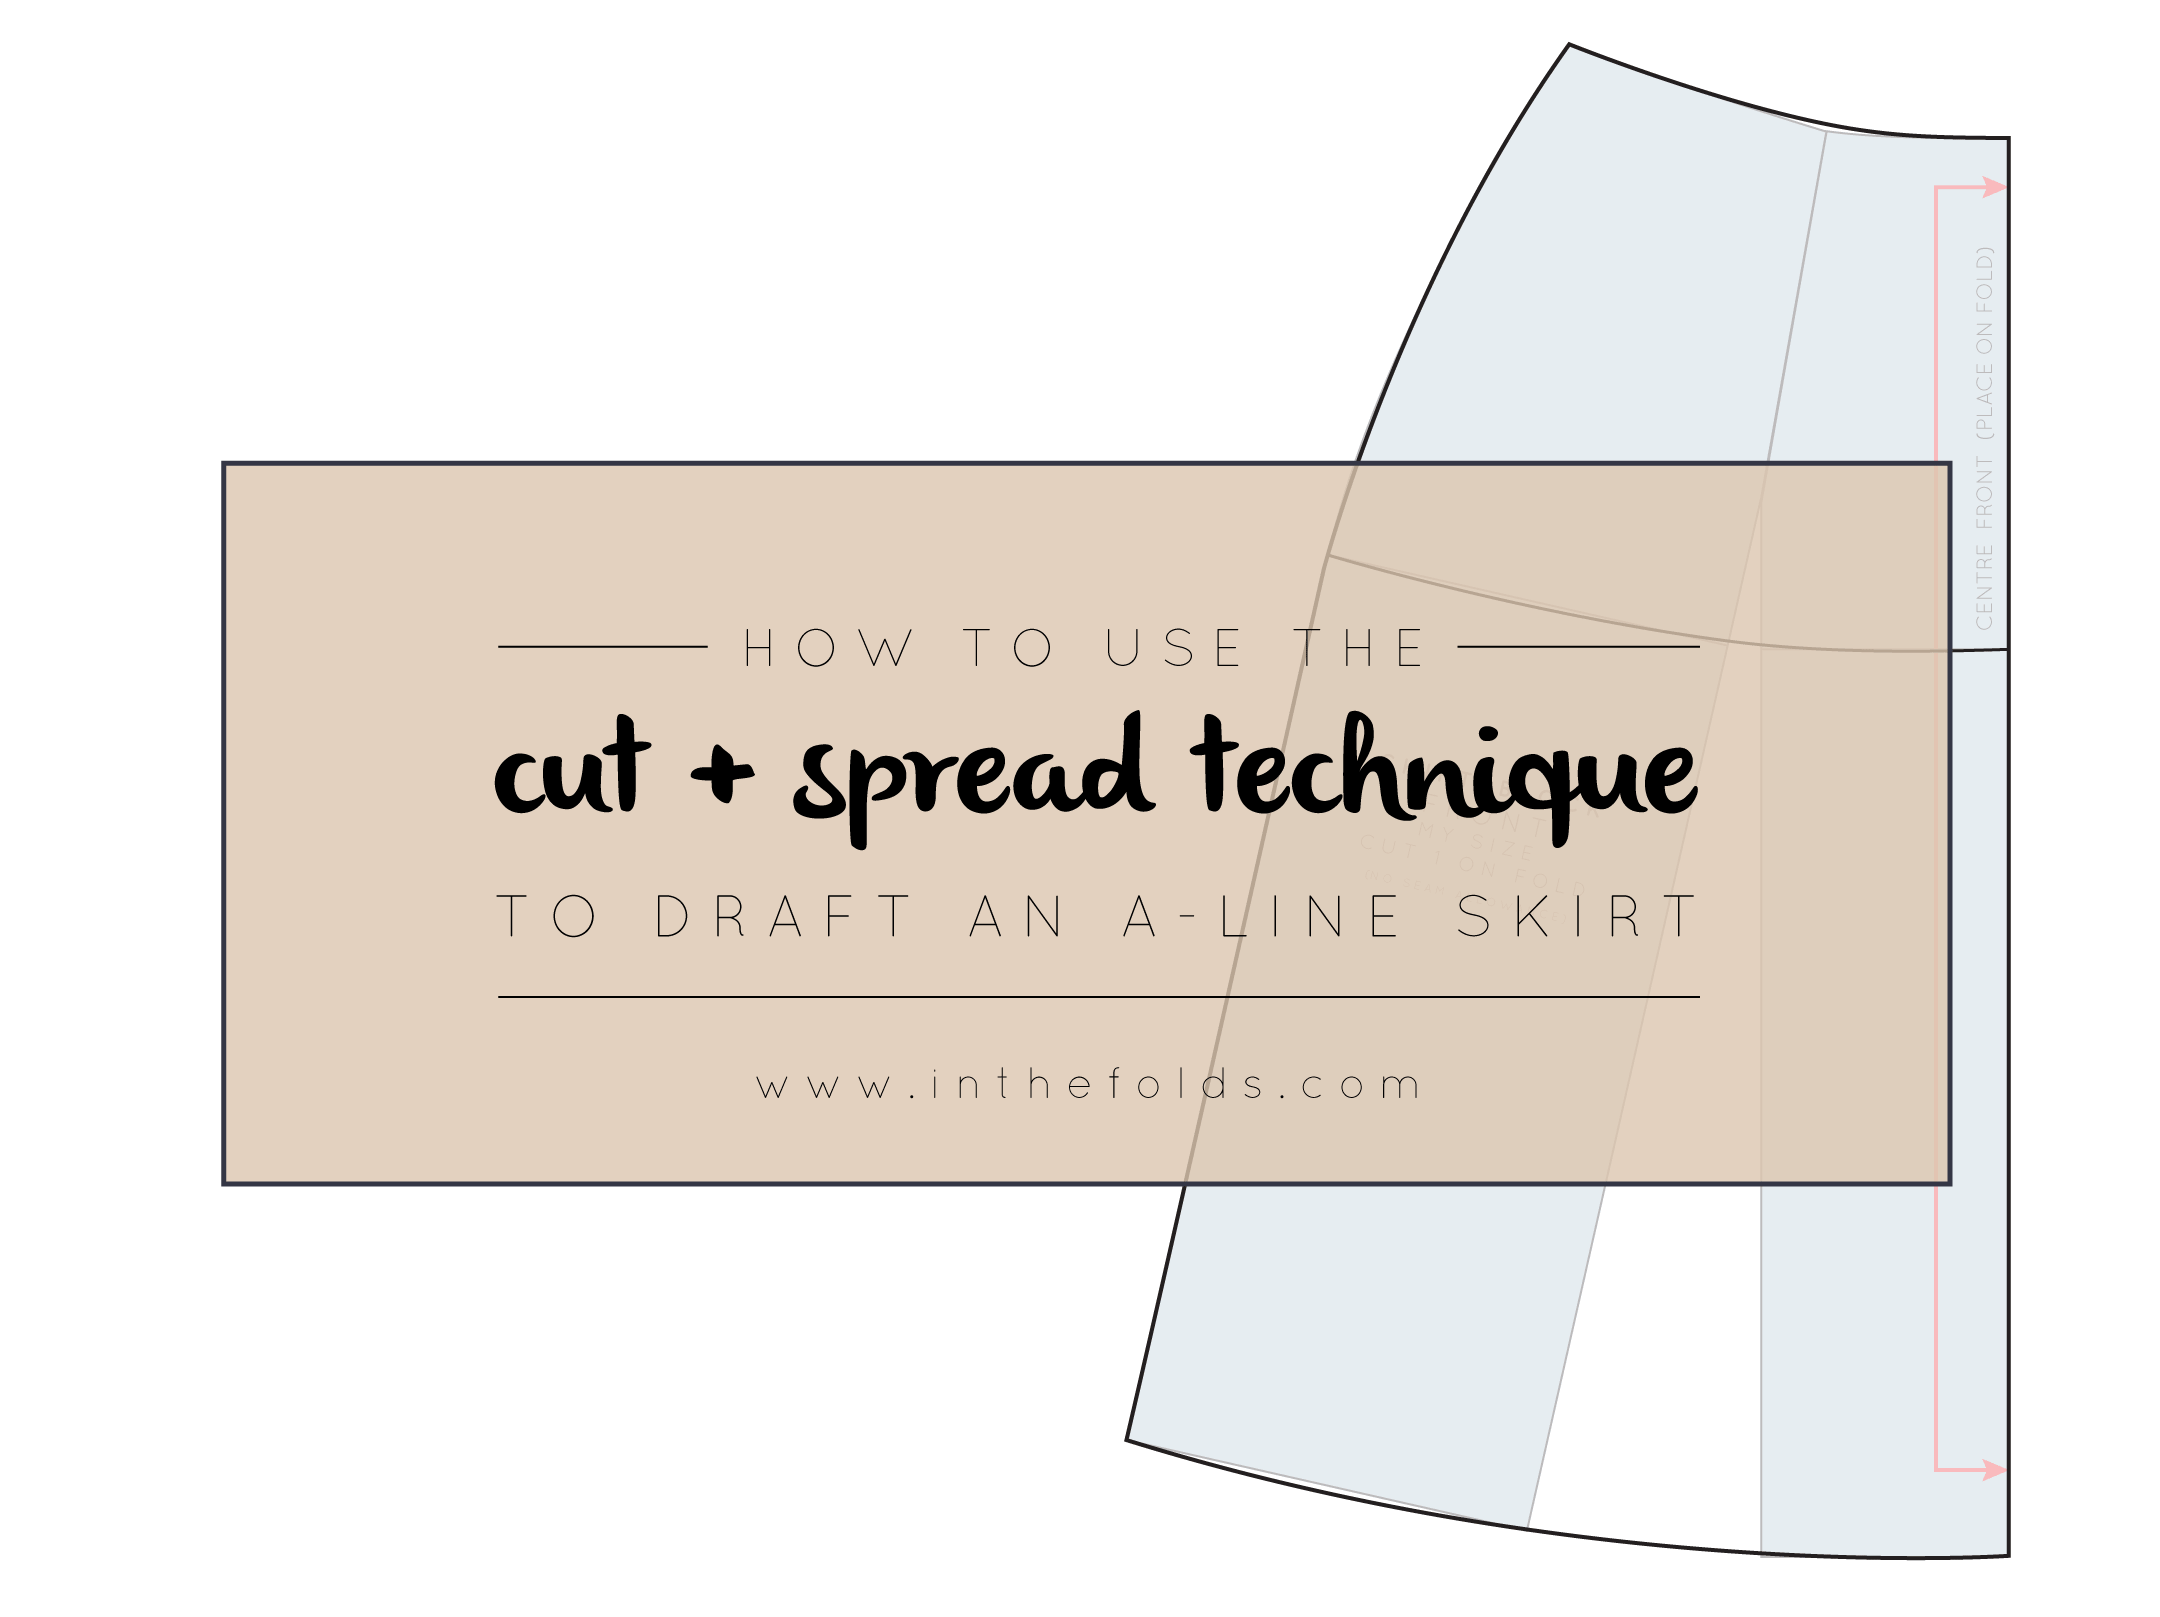
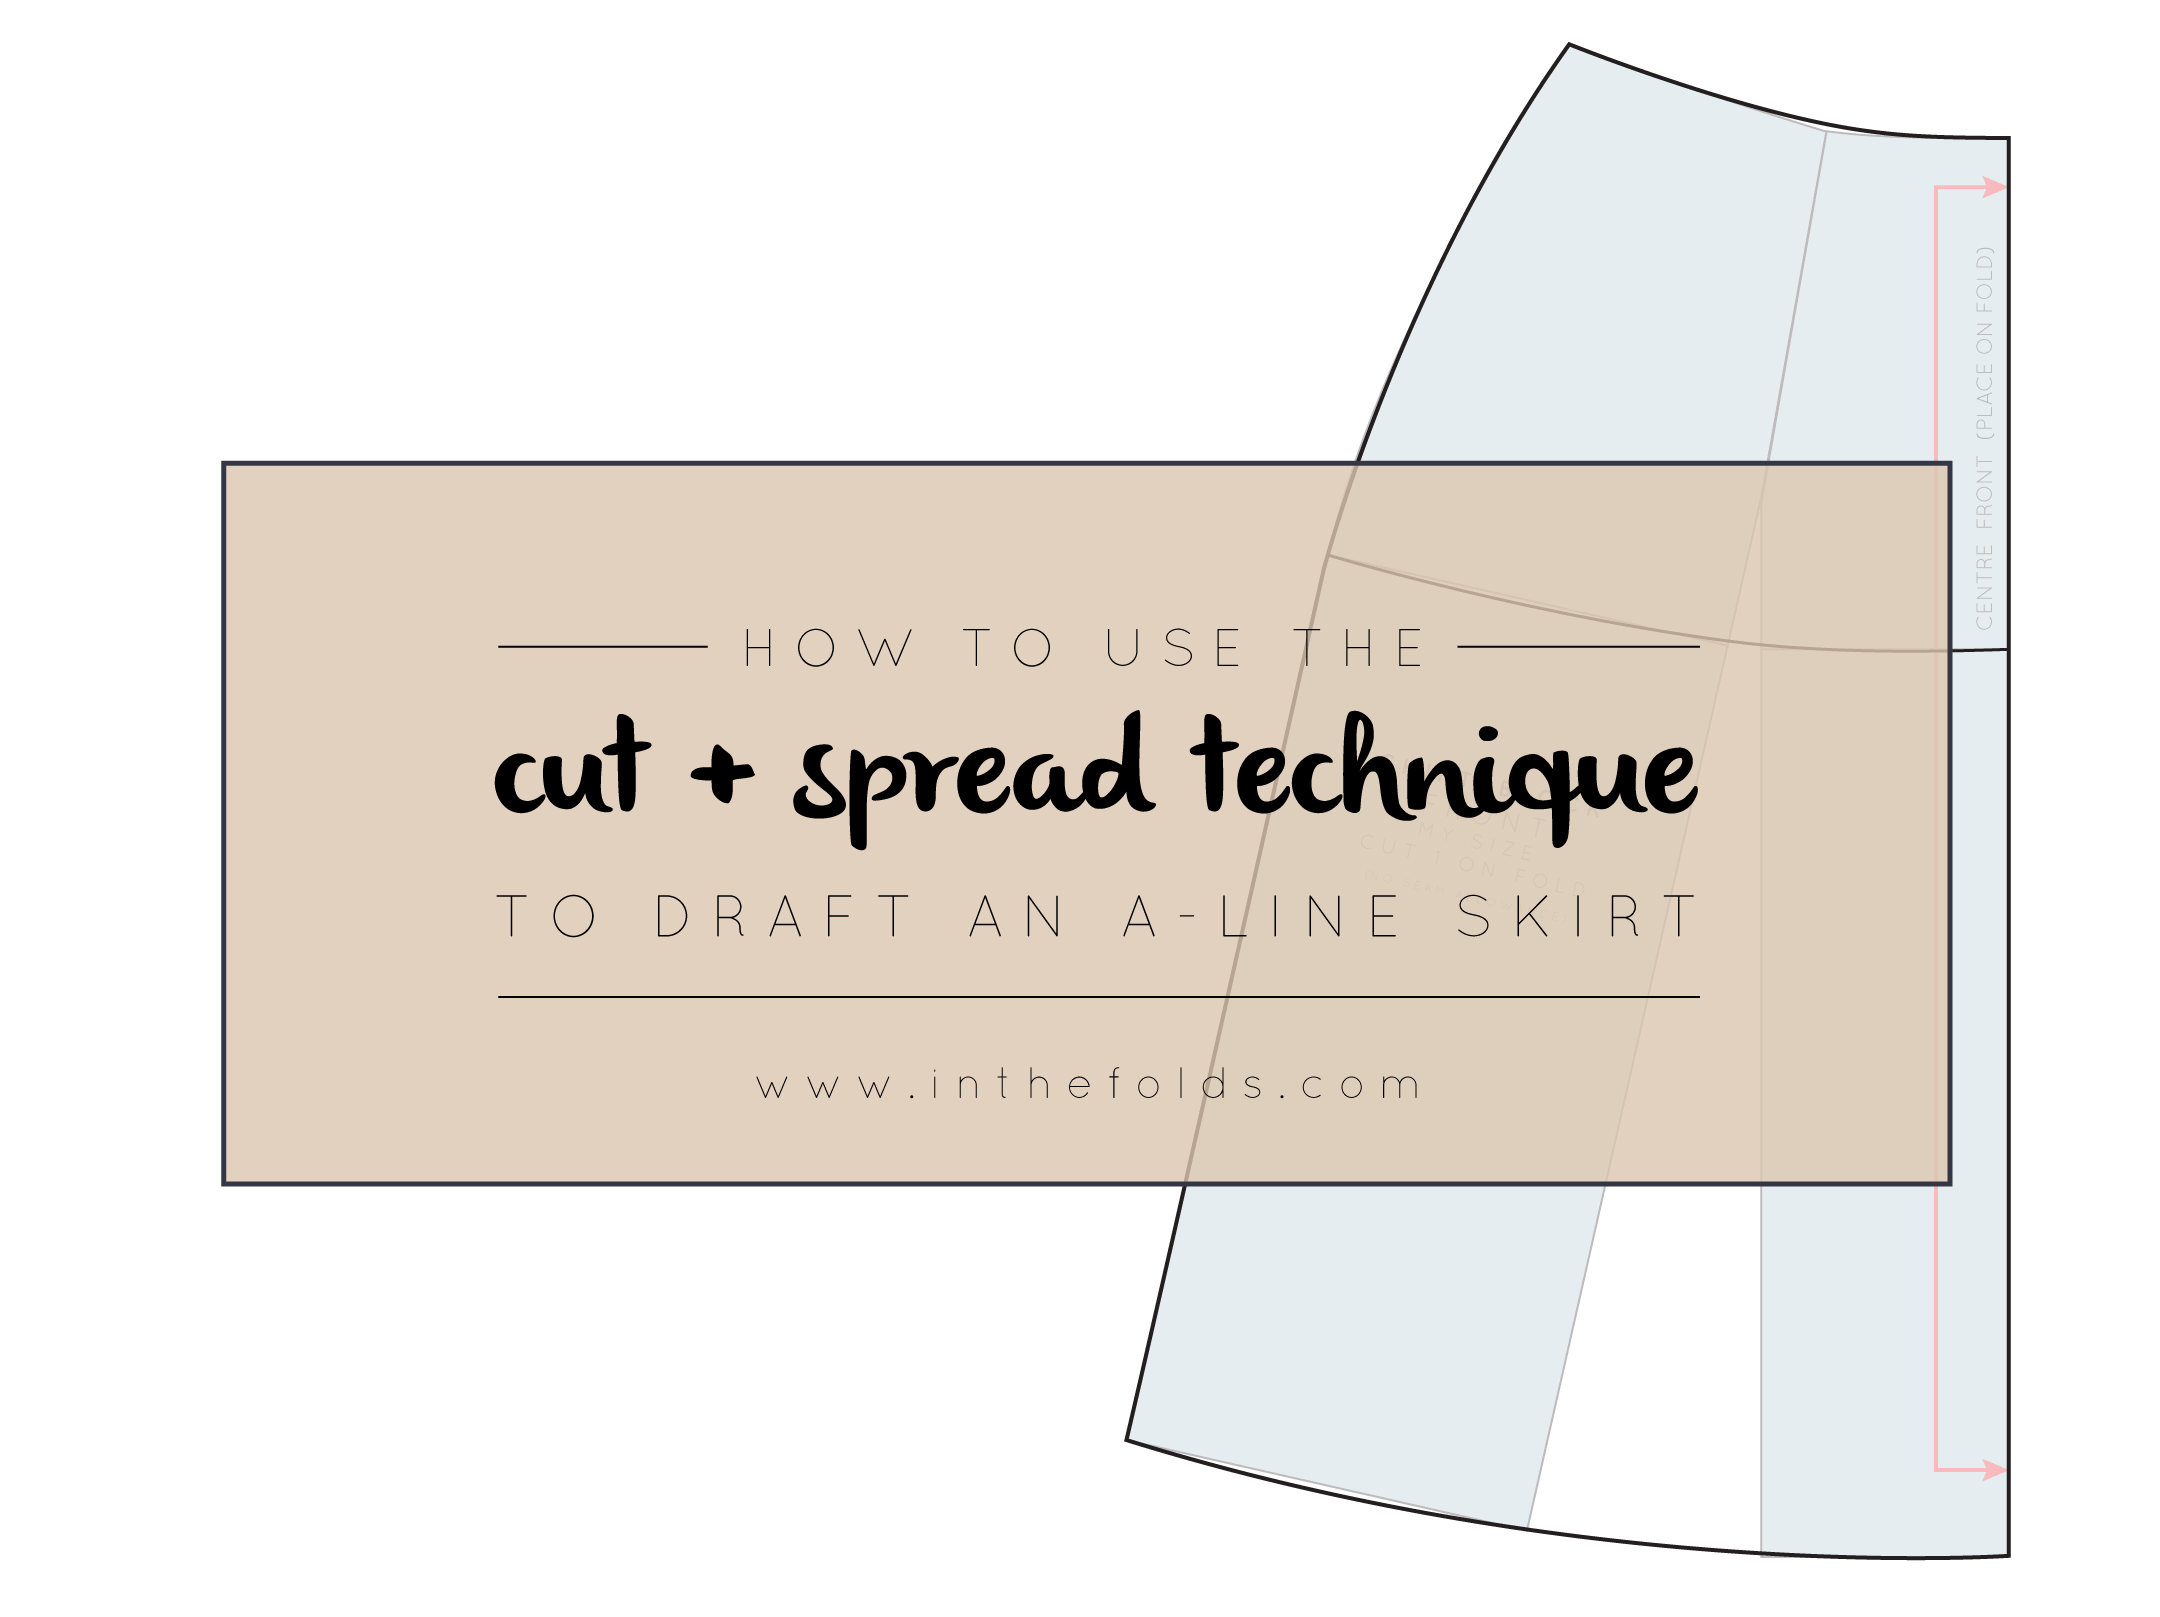
Throwback Thursday: How to use the cut + spread technique to draft an A-line skirt

cut_and_spread_inthefolds

After a few days of Rushcutter pattern alterations, it is time to get back to our skirt blocks, as it is, after all, Throwback Thursday! So Welcome back to The Skirt Series! Now that the pattern is pretty much complete (we just need to create a waistband pattern - which I will cover in tomorrow's post) I think we should have a play around with our new pattern blocks.
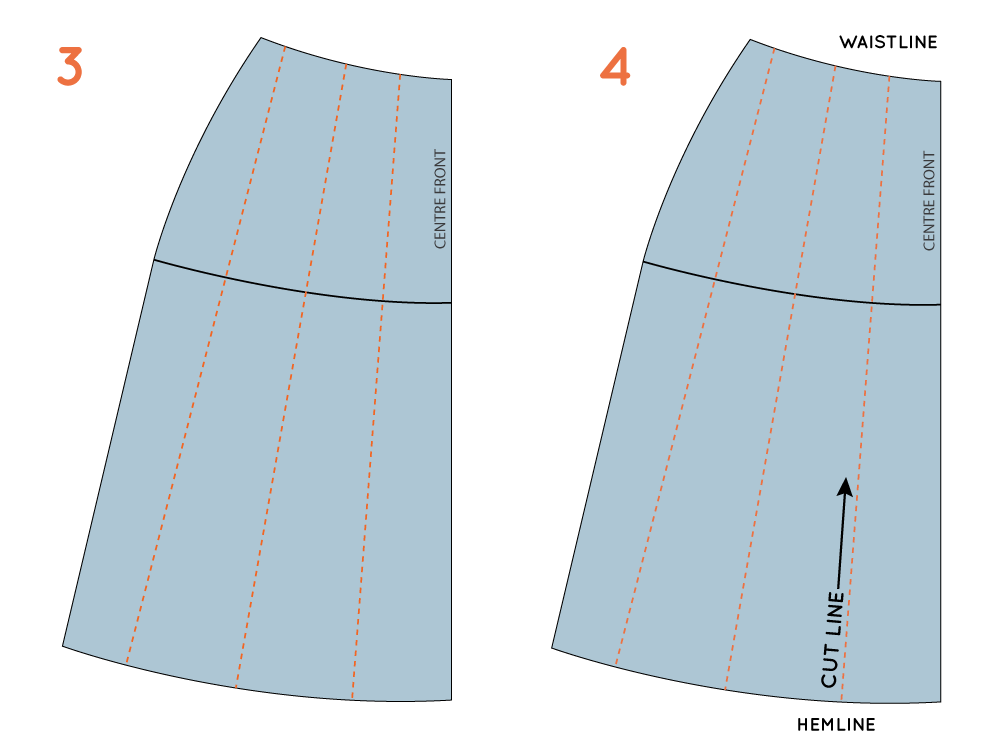
Once you have a skirt block that fits you well, there is just so much that can be done with it, and over the next few weeks I plan to show you some of the techniques you will need to know to transform your block into a skirt. 

One of the techniques I use the most when I am flat pattern-making, is relocating darts. So I think that is a good place for us to start! Once you know how to do it, you will be able to use this technique on any pattern that has darts.
Cut and spread

cut_and_spread_inthefolds_1

So today, I will show you how to relocate the waist darts in the skirt block, to create an A-line skirt. 

1. To start, you will need your skirt block. I will demonstrate by showing the front pattern piece, but the principle is exactly the same for the back pattern piece.

2. Trace a copy of your skirt block, without seam allowance. 

3. Draw a line, parallel to the centre front, from the tip of the dart, down to the hemline. 

cut_and_spread_inthefolds_2

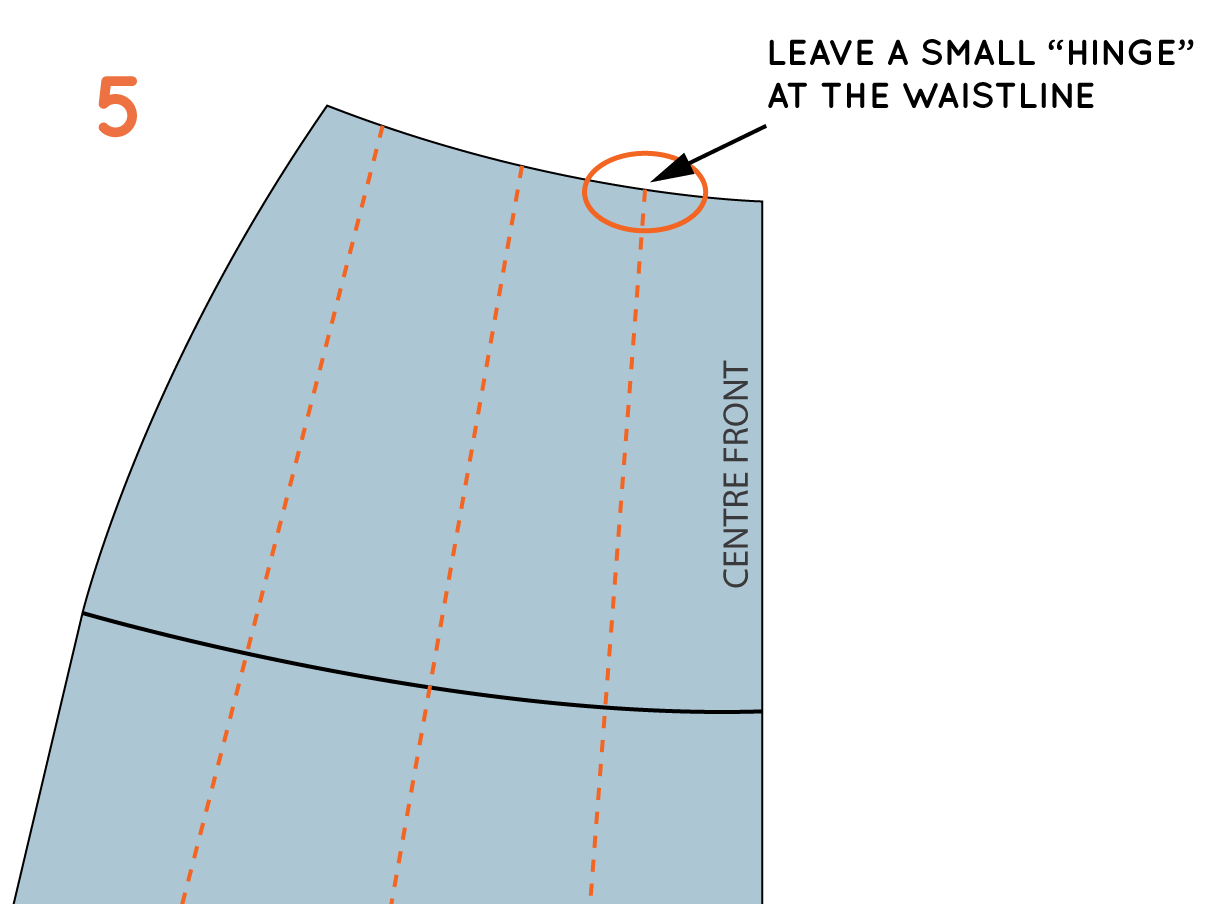
4. Starting at the hemline, cut along this line, until you are 1-2mm from the dart point.

5. Now focusing on the outside dart arm (the dart closest to the side seam), cut down from the waistline towards the dart point, once again stopping 1-2mm from the dart point. This will create a small 'hinge,' so that the two parts of your pattern remain attached. But you will be able to open and close your dart with ease.

cut_and_spread_inthefolds_3

6. Close the waist dart by rotating the pattern, until the cut dart arm sits on top of the inner dart arm.

7. When in position, tape (or glue) in place. You will see that, by closing the dart, you have opened up the hemline, giving the skirt an A-line shape.

Trace the pattern

cut_and_spread_inthefolds_4

8. Take a separate piece of pattern paper and use a weight to hold it in place on top of the pattern. Trace around the pattern. You will see that the waistline has become quite angular since removing the dart, so you will need to redraw it with a soft curve. You will also need to redraw the hem with a smooth curve.

9. Add pattern details, notches and repeat for the back pattern piece.

cut_and_spread_inthefolds_5

10. If you would like a more drastic A-line you can redraw the side seam as a straight line (this will remove any shaping around the waist). To complete the pattern, add seam allowance.

Want to give it a go yourself?

I have created a small scale version of my skirt block that you can download (just click the image above) so that you can have a play around, if you are short of time, paper or space. It is also great to have a small scale version of techniques for your reference, so that you can easily store them for reference. And there will be many more new techniques to come, so print a few copies!


You may also like:

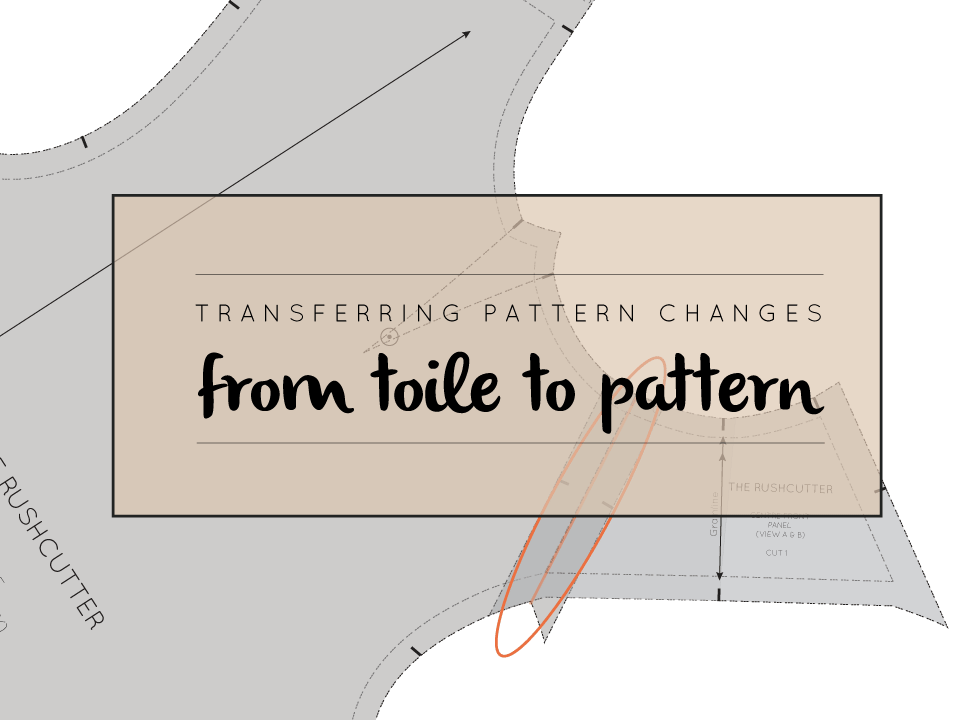
Transferring pattern changes from toile to pattern

transferring_pattern_changes_toile_to_pattern

Last week I showed you how to make a toile, and what you should be looking for when fitting. In today's post, I will show you how to transfer changes from toile to pattern.

Lowering the neckline

The first change that I will show you is how to lower the neckline of The Rushcutter. I am all about the high neck on this dress, but I understand that it's not for everyone. If you'd prefer it to be slightly lower (or even drastically lower) it's not a difficult alteration to make. 

To start, take the sleeve pattern and the centre front panel pattern piece, and put them together. Place one sewing line over the other, so you can see how the pieces fit together when they are sewn. You will notice that on The Rushcutter sewing pattern, both the stitching line and the cutting line are marked, so that making pattern alterations is a little simpler. 

Work out how much you would like to lower the neckline by, by taking the measurement from your toile (measuring down the centre front) and mark it on your pattern piece. Make sure you measure it from the stitch line rather than the edge of the pattern. For the example, I only lowered the neckline at the front, but if you would also like to lower the neckline at the back, place a mark on your centre back too.

Before redrawing the neckline, you will need to fold the dart (so you can get the neckline all in one piece). The easiest way to do this is by placing the dart point on the corner of the table like this. The dart fullness should be folded towards the back.

Starting at the point you marked on the centre front, re-draw the neckline with a smooth curve, gradually easing back into the original neckline (unless you are also lowering the neckline at the back, in which case you will want your new neckline to meet with the point you marked on the centre back).

Before unfolding the dart, take a tracing wheel and trace over the new neck curve at the dart. This will transfer the correct neck shaping onto your dart. If you need some extra help with this, check out this tutorial. You will now just need to add seam allowance to the neckline and you are good to go!

Add or remove volume

The next thing I'm going to show you is how to use the cut and spread technique to add or remove volume from The Rushcutter. You may want to use this technique on the body of the dress, or maybe even the sleeve. 

If you have never used the method of cutting and spreading before, this example will basically show you how to do it. If you want to see it in more detail, check back on the blog later this week, as I am planning to do a post on this technique.

Pattern alterations are much easier to manage if your pattern does not have seam allowance. Remove the seam allowance from the pattern you are altering, or trace a copy of the pattern piece without seam allowance. This is really easy to do with The Rushcutter pattern as the stitch line is marked for you.

1. Draw two vertical lines through the pattern, which will cut the pattern into three equal-ish parts (this does not have to be exact).

2. Starting with one of the lines, cut up from the hemline towards the top of the pattern. Do not cut all the way through the pattern, leave a 1-2mm "hinge." The hinge will give you the freedom to move the parts of the pattern easily, but will still keep the pieces together. Repeat for the second line. 

3. Place the pattern on top of a piece of pattern paper, slightly larger than the pattern piece. Spread the pieces apart, by the desired amount, being careful to distribute the width evenly. When you are happy, tape (or glue) the pieces down carefully.

4. Redraw the hemline with a smooth curve. If the opposite edge has changed shape too drastically you should also re-draw the line.

cut_and_spread_therushcutter_2.gif

The method is the same for reducing volume, you just need to close the cut and spread line, rather than open it.

Shortening pattern

There are two ways of shortening a pattern - the first is to simply remove some length from the hem of the pattern. This method is often used when a garment has been made up and then once it can be tried on and fitted, the length is determined.

The other method is to shorten the pattern piece by removing the length from inside the pattern piece. By using this method, the overall shape of the pattern piece will not be lost.

For this method, you first need to find the 'length and shorten line,' on the pattern piece you would like to shorten. I am using the sleeve from The Rushcutter as an example, but this method can be used on any of the pattern pieces.

Cut along the line to create two separate pieces.

Think about how much length you would like to remove from your pattern piece. Mark this distance on one side of the pattern, measuring from the cut line. Marking this point on the grainline will help ensure the mark remains perpendicular to the cut line. 

Draw a perpendicular line through this point, extending to either side of the pattern piece. 

Move the unmarked pattern piece (in this case, the lower part of the sleeve) to line up with the perpendicular line just drawn, and tape (or glue) in place. 


You can now redraw the seam lines on each side of your pattern with a straight line (or a curve, if your pattern piece has curved seams).

Lengthening a pattern

For lengthening a pattern piece, the concept is exactly the same. Cut up through the 'lengthen and shorten line' and separate the pattern into two pieces.

Open the pattern pieces by the amount you want to lengthen your pattern piece by. Tape a piece of pattern paper onto the back ofthe pieces to fill the gap.

Redraw the side seams with a straight line, and you are done!

I think that's enough pattern altering for today's post, in the next post I'll show you how to slim down the dress by removing some width from the side panel, move the dart on the raglan sleeve (View A), move the shoulder seam (View B) and adjust the pocket.


You may also like:

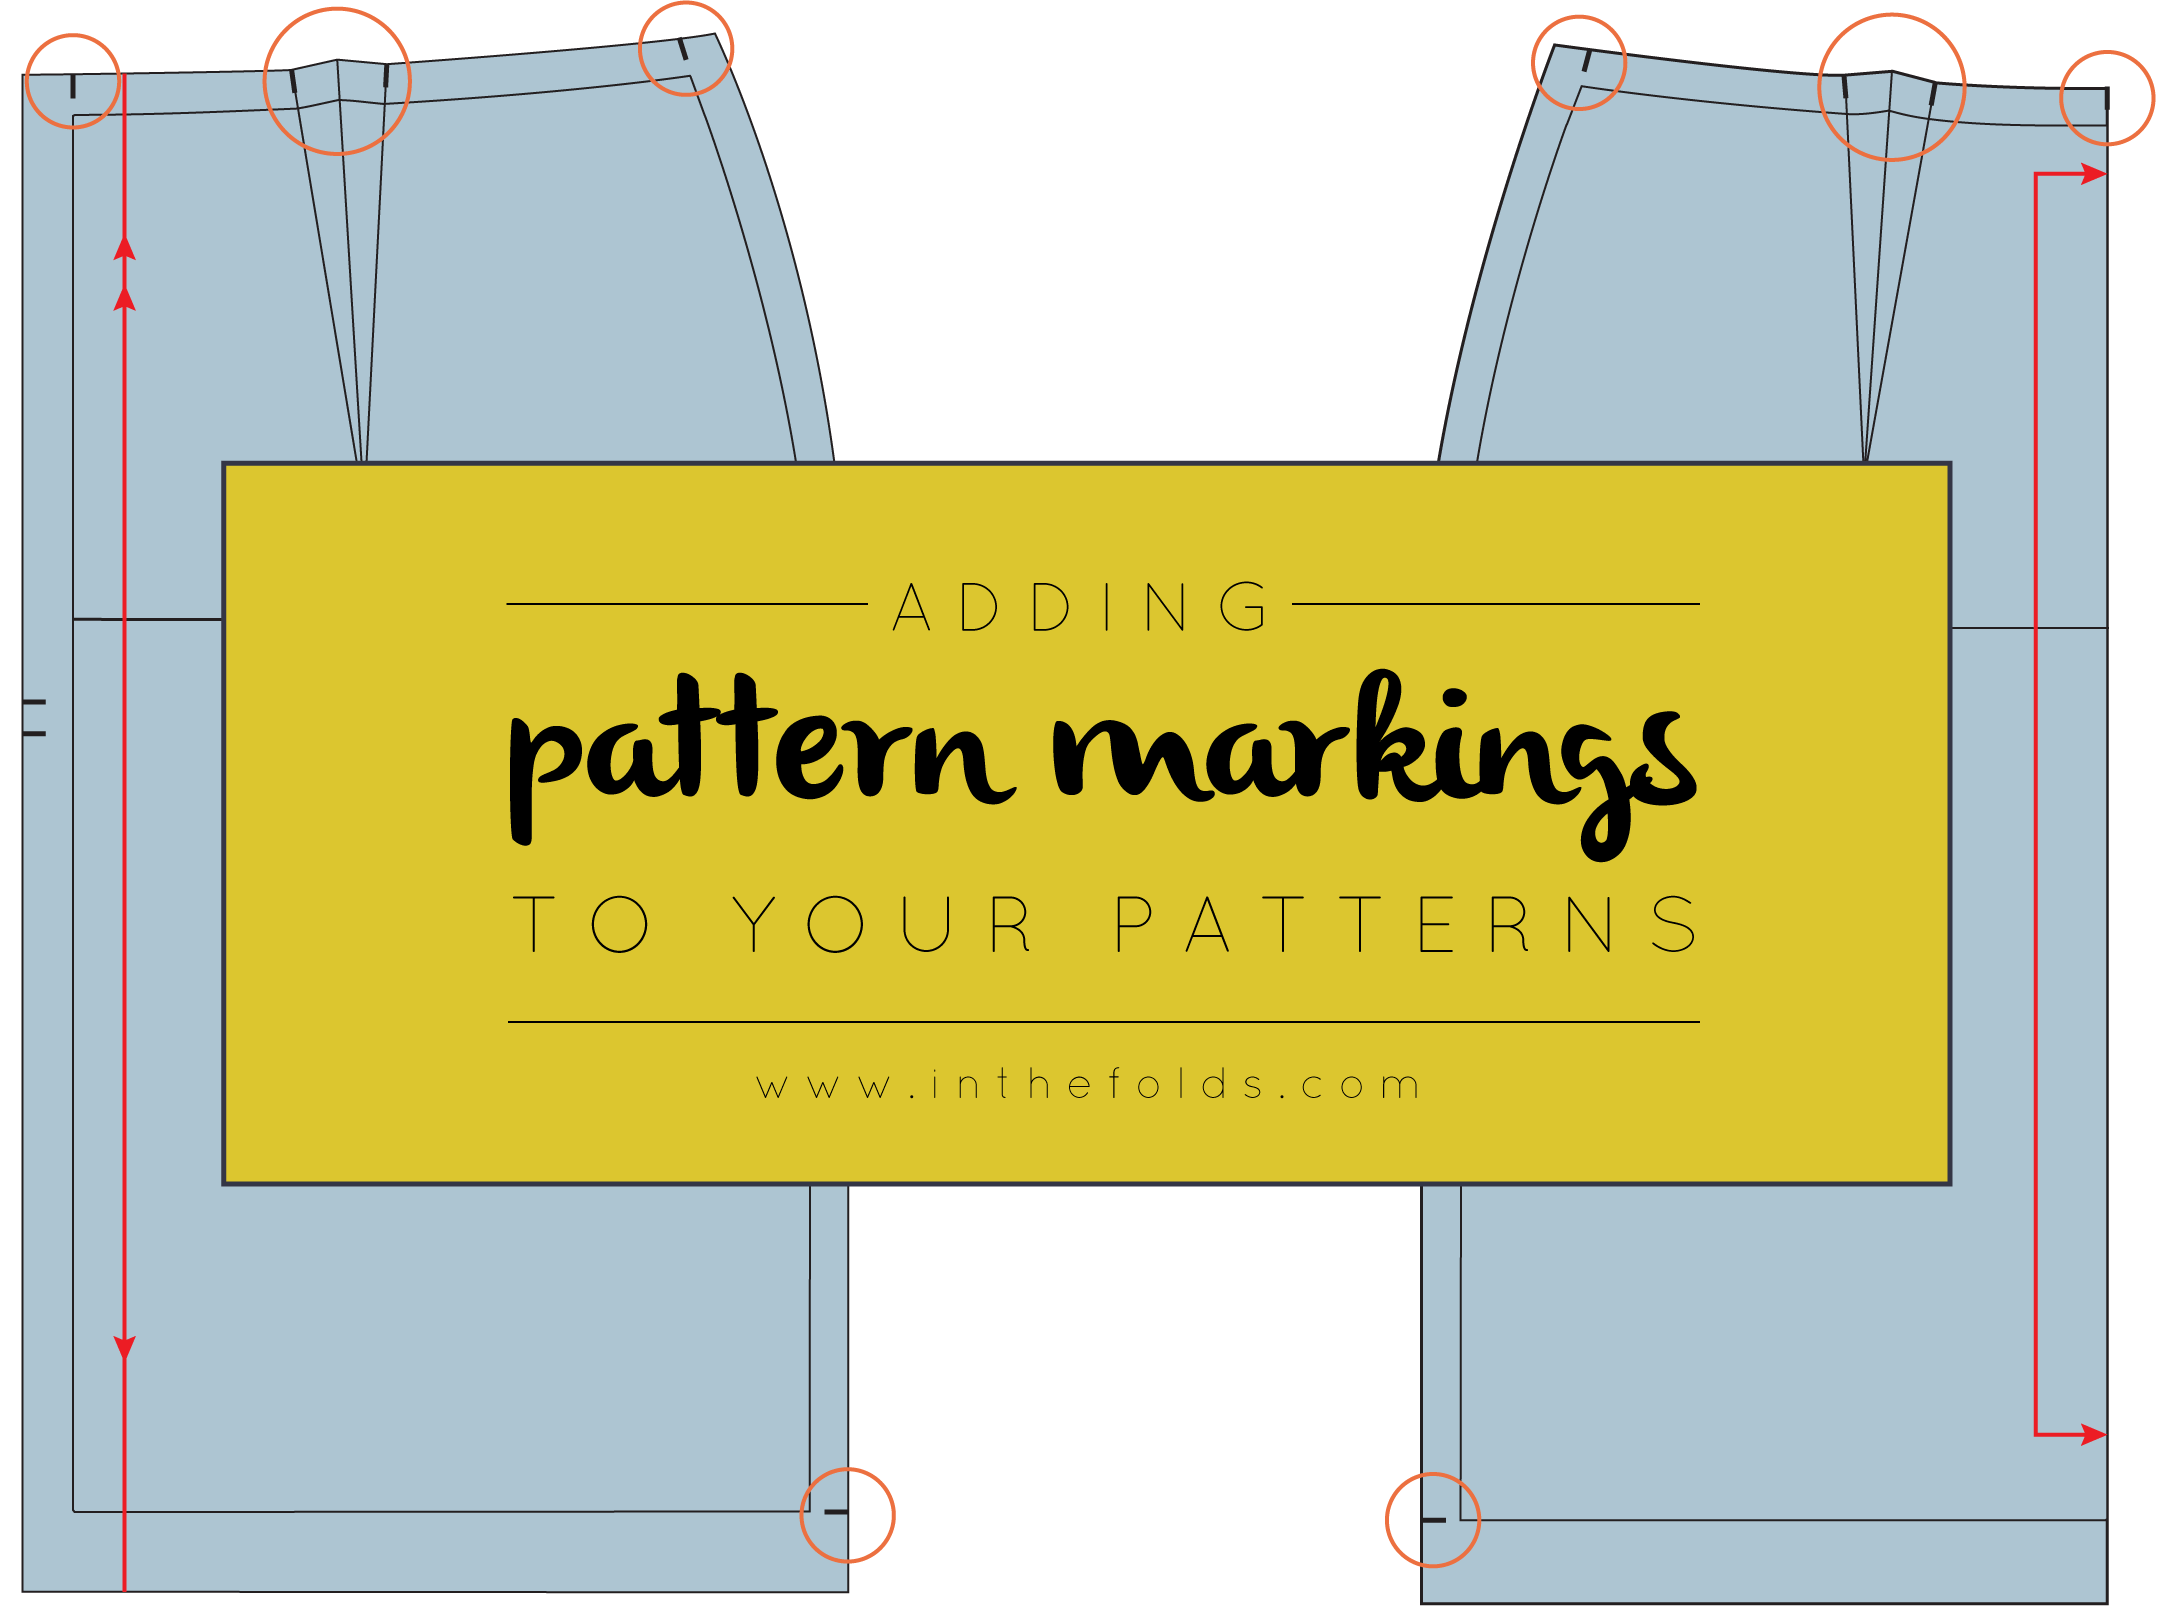
Adding pattern markings to your patterns

adding_pattern_markings_to_you_patterns_inthefolds

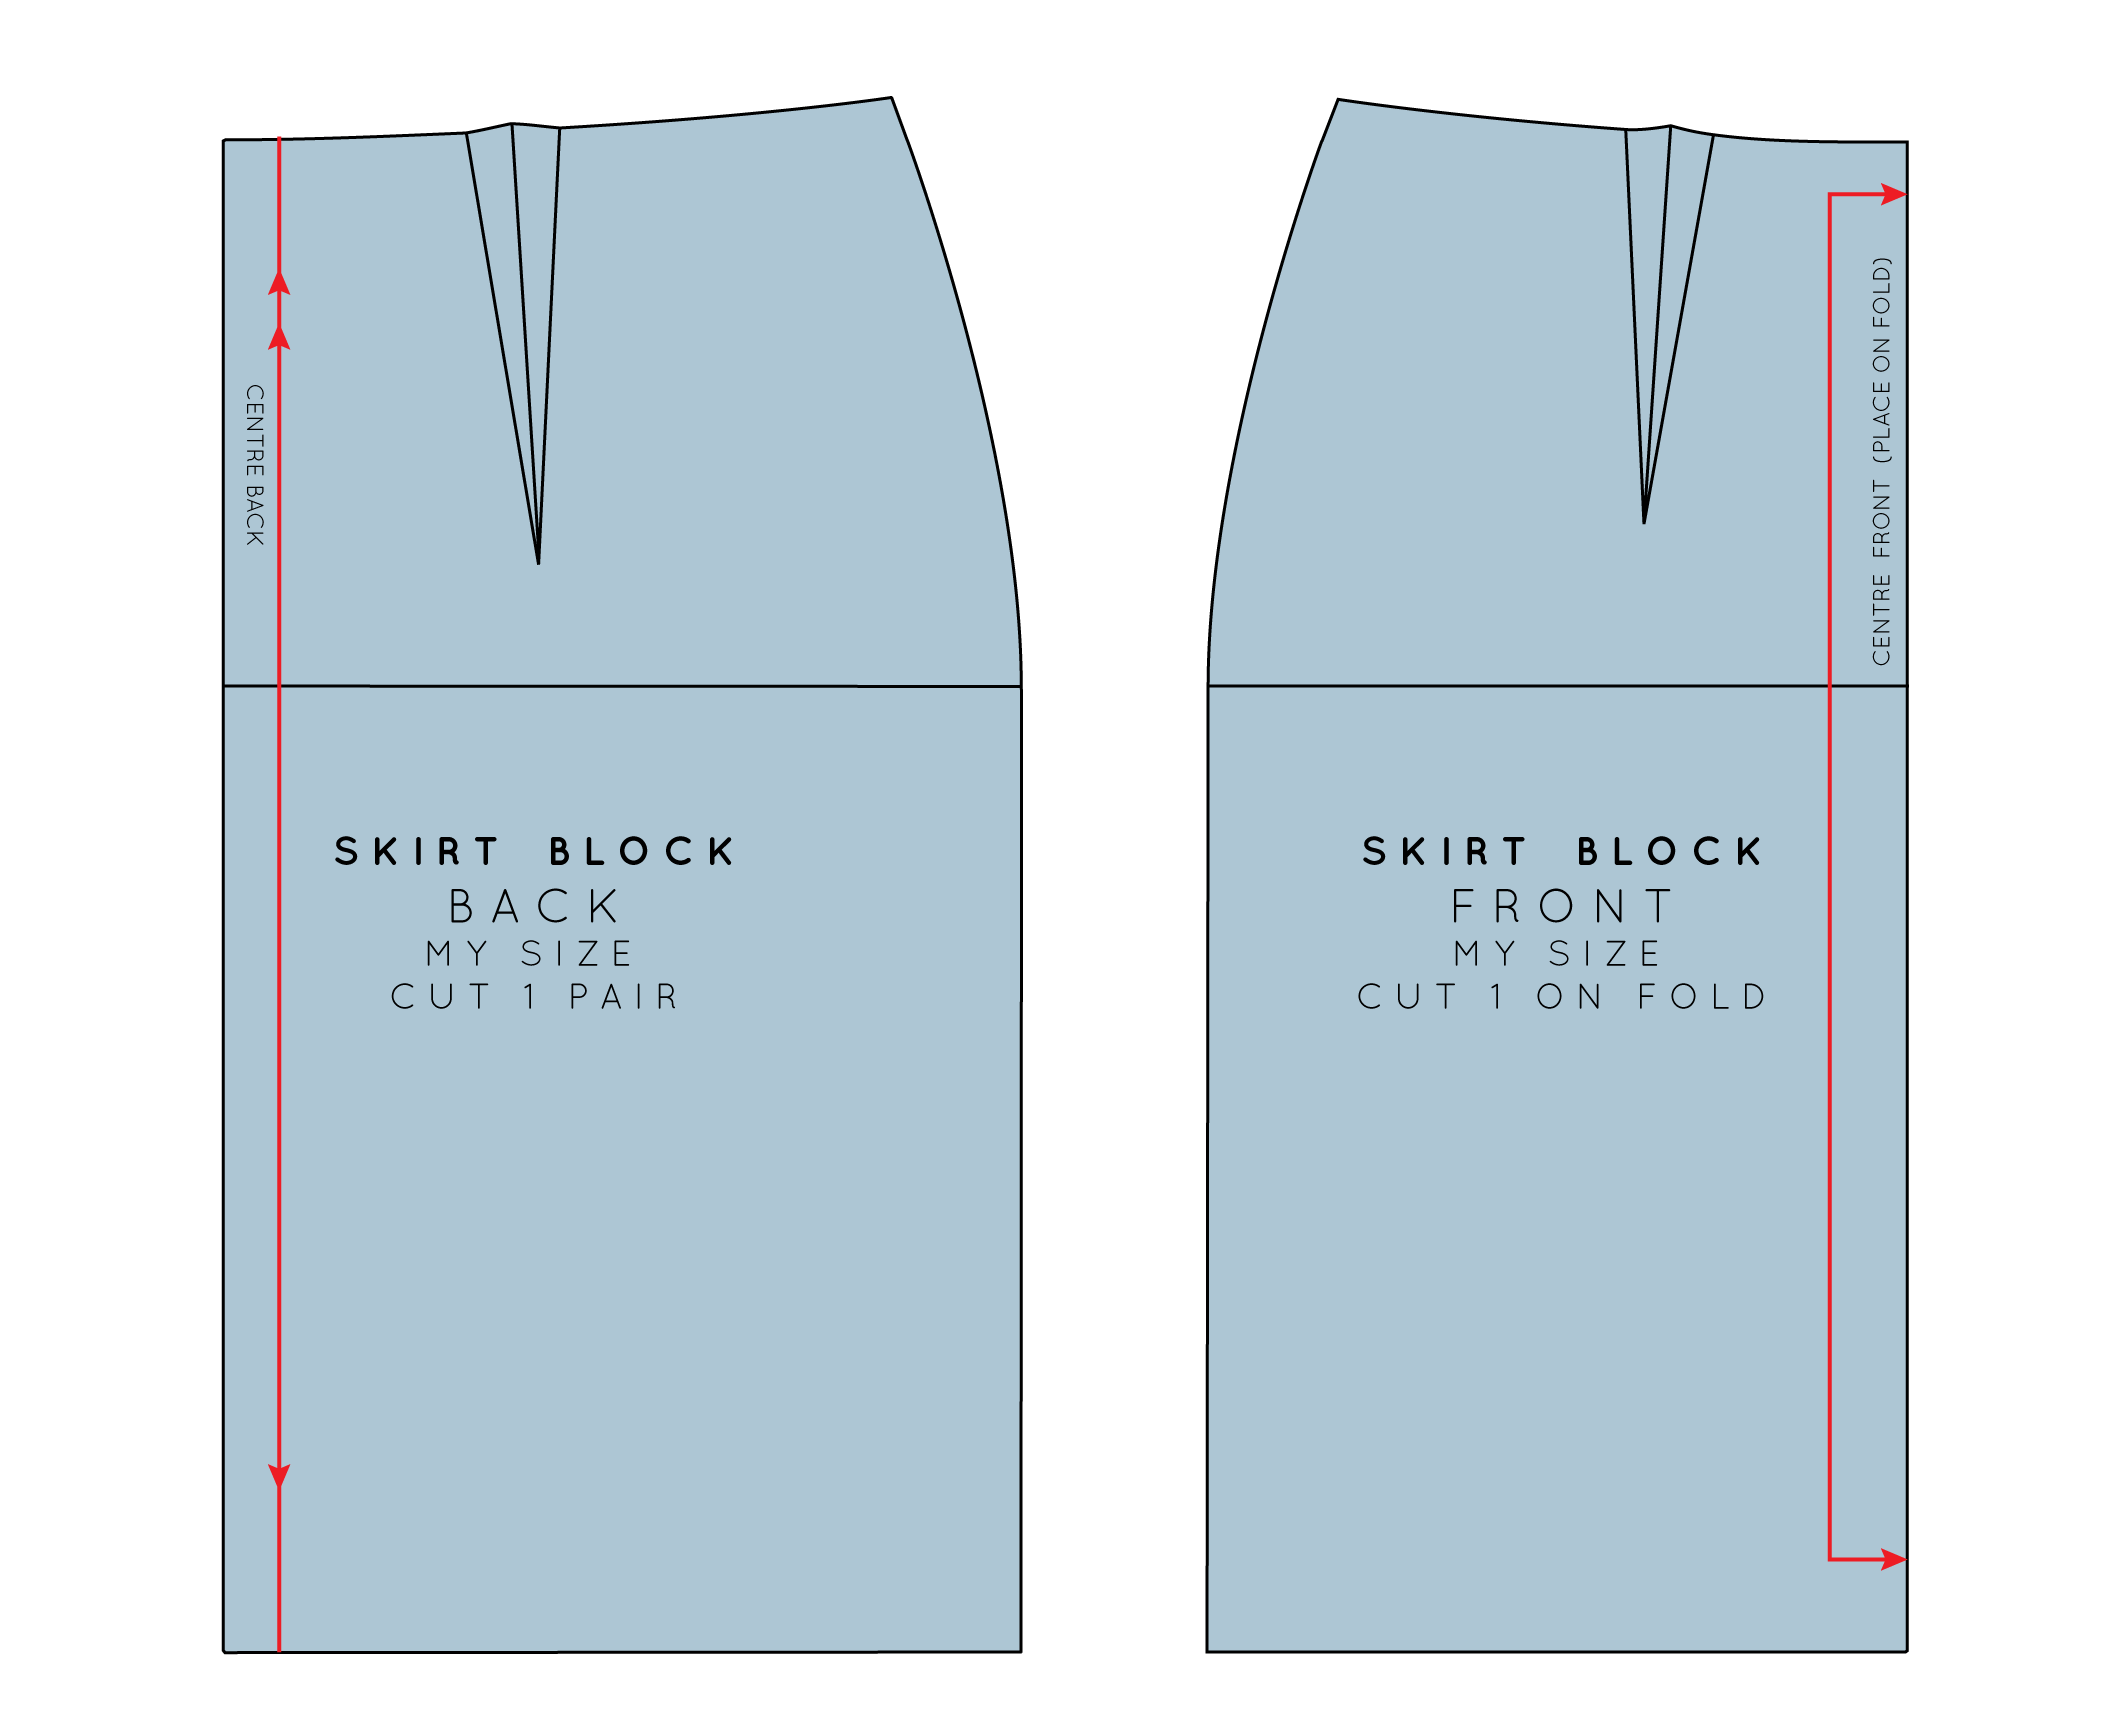
For those of you have been following along with The Skirt Series, we have almost finished our blocks! We have drafted the pattern, added shaping to the darts, added seam allowance, and today we are going to finish it all off by adding pattern markings.

Pattern markings

There are a number of markings you should always add to your pattern pieces. They help you with laying patterns on the fabric correctly when cutting your fabric, and also help when sewing your garment together. 

The grainline

The grainline ensures that the pattern is placed on the fabric the right way. If the grain is not straight (and it is intended to be), you may end up with a badly fitted garment.

The grainline usually runs vertically through a pattern, although in some cases it will run horizontally or even diagonally (bias cut patterns). I like to use arrows to indicate the top and bottom of the pattern - this can help when you have a directional print or a pattern piece that is an unconventional shape. The double arrow points towards the top, and the single arrow points towards the bottom. I also like to draw grainlines so they run from one edge of the pattern to the other, this is really hand when using a striped fabric, to ensure your placement is exactly right. 

Notches

Notches are small cuts in the fabric that guide you while you are sewing (they are also commonly indicated with small triangles). If you have sewn The Rushcutter, you will know how much I love a good notch! 

Notches are used to indicate:

  • seam allowance
  • dart arms
  •  the location of design details such as: pleats, gathers or pockets
  • the centre front
  • the centre back
  • balance points

Balance points are pointers on your pattern that help you put pieces together correctly, as well as help you when you are sewing a very long, or curved seam.

For example, I tend to add a balance point (or even two or three - depending on the length of the seam) part way down a side seam to ensure that the pieces are sewn together correctly and I am not left with excess fabric on one side of the seam at the end. Balance points also help to prevent stretching the seam when sewing. In the skirt block, for example, the notch at the hip line acts as a balance point.

A notching no-no

Try to avoid notching both sides of a corner as this can weaken the fabric (as well as the pattern itself). 

Double notches

Double notches are normally used to indicate the direction a piece should be sewn in (and generally indicate the back of the pattern piece). For example, a double notch is used on a sleeve cap to indicate where the sleeve cap meets the back armhole. In a side panel, a double notch is also often used to show where the piece meets with the back pattern piece.

I also like to use a double notch to indicate the end of a zip (if I am using a zip in the centre back).

Drill holes

Drill holes are used to indicate a dart point. I prefer to place drill holes 1cm - 1.5cm up from the actual dart point, so that when the dart is sewn, the marking is hidden inside the dart.

Drill holes can be used to indicate other design features, such as:

  • placement of patch pockets
  • placement of belt loops
  • or any other design feature that is in an area where you are unable to mark a notch on a seam

Pattern instructions

Pattern instructions are your way of keeping track of, and identifying, pattern pieces.

On each pattern piece, you should include:

  • the name of the pattern
  • the name of the pattern piece
  • size
  • cutting instructions
  • number of pieces
  • date

Some of these things may seem quite obvious, but the clearer your markings are, the easier your pattern will be to use. Particularly if you decide to use the pattern in a month, or even a year! If the instructions are clear, you won't waste any time trying to remember the details of your pattern. 

And that's it! You can go ahead and make a toile of your skirt block and see how it fits!

In the coming weeks I am planning on showing you some different ways to hack the skirt block into a different design. Do you have anything you would like to see in particular?


You may also like:

Throwback Thursday: How to add seam allowance to a sewing pattern

Last week, I showed you how to draft a skirt block from your own measurements, and then how to add shaping to the darts at the waistline, as part of The Skirt Series.

add_seam_allowance_to_a_pattern_inthefolds_2

Before going ahead and making a toile to see how it fits, you will need to add seam allowance and pattern markings (which will be in tomorrow's post). 

What is seam allowance?

add_seam_allowance_to_a_pattern_inthefolds_3

Seam allowance is the extra space you add around the edge of a pattern piece so that it can be sewn together.

If you do not plan to make up a toile of your pattern (in the case of pattern blocks), then there is no need to add seam allowance. When you are using a block to create a pattern it is much easier to use it without seam allowance and then add seam allowance once the pattern is complete. 

How do I add seam allowance?

I find that the easiest way to add seam allowance is with a long transparent ruler. Not to worry if you don’t have one though, you can just use and ordinary ruler and mark the seam allowance width at intervals along the seam and then draw the line through all the points.

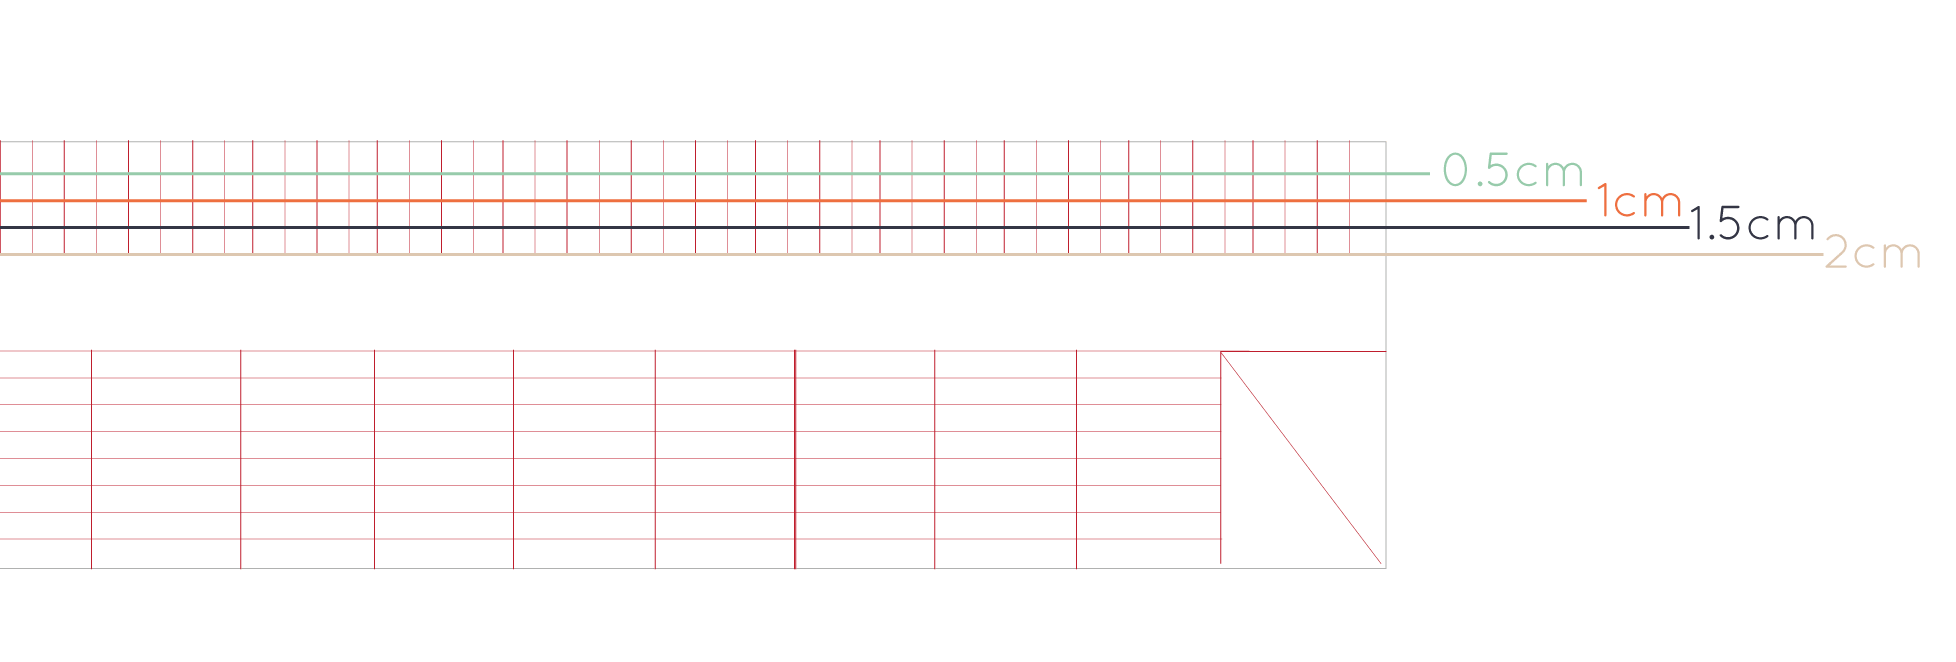
I have two different rulers, which I find super helpful. One only shows centimetres, but also has lines to indicate the millimetres in between. This one is very handy for when I'm adding 6mm seam allowance to a neckline or 12mm to a seam.

add_seam_allowance_to_a_pattern_inthefolds-4

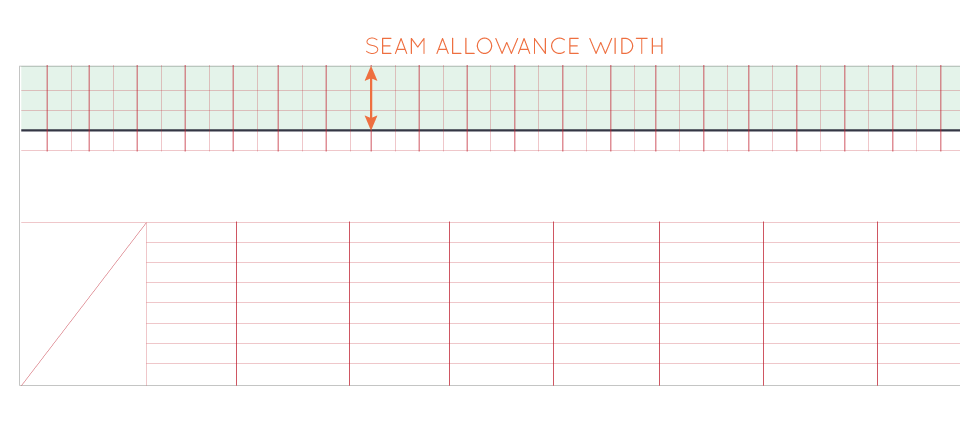
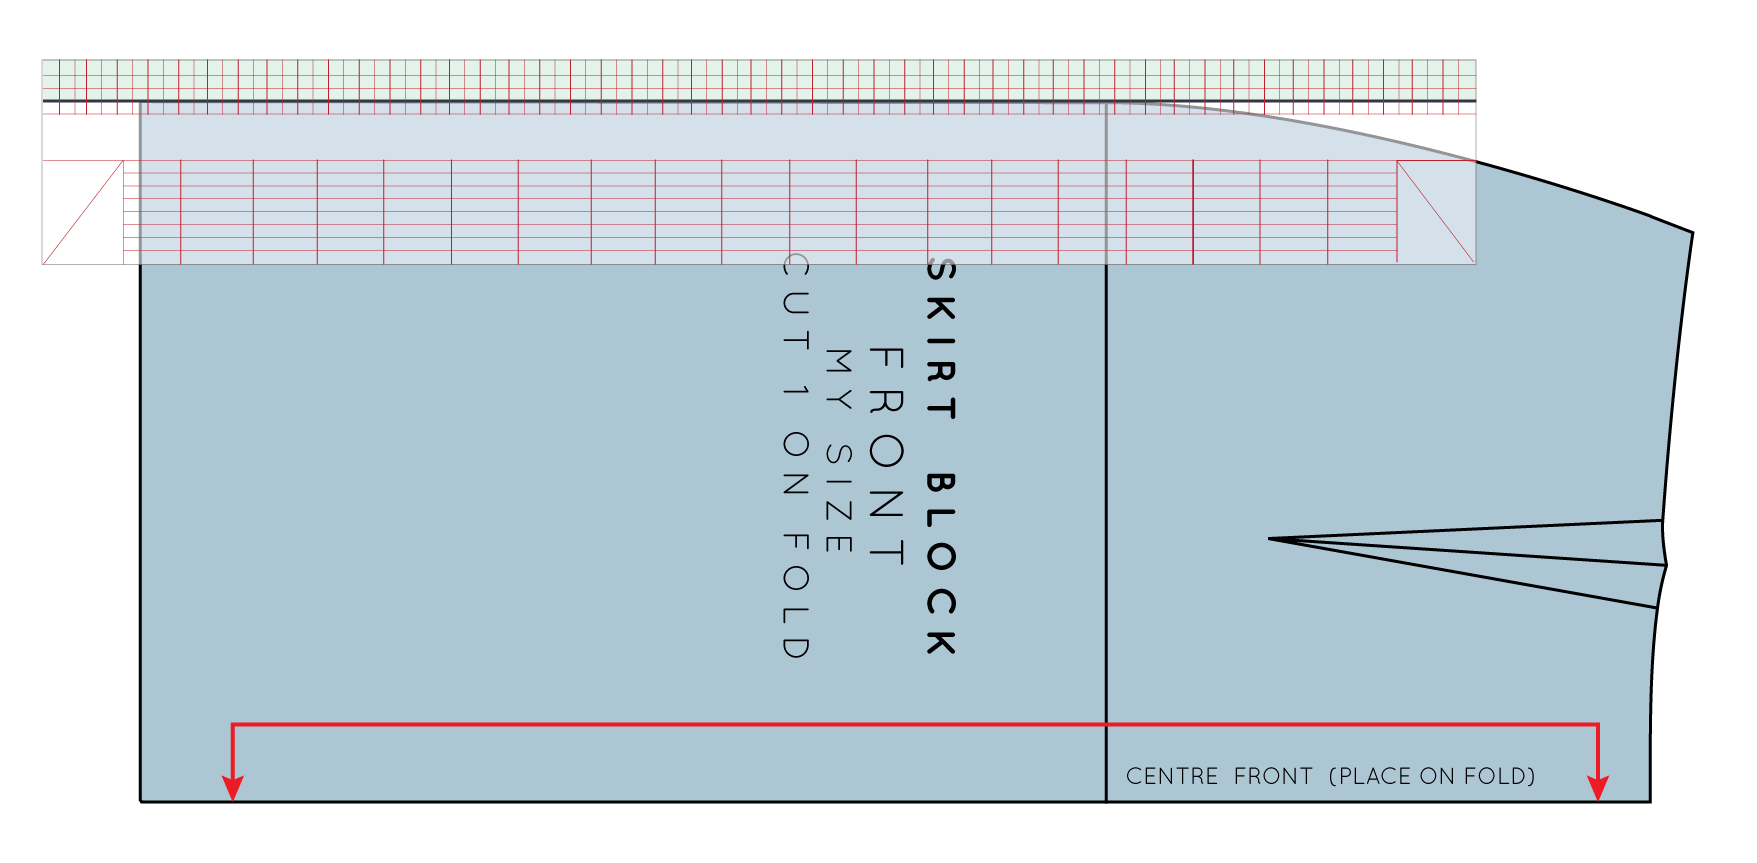
The other, which I have used for this tutorial, only show has a line for every 5mm. If I am using a 1cm / 1.5cm / 2cm seam allowance, then this is definitely the one I reach for, as there are a lot fewer lines to get confused by!

Before getting started

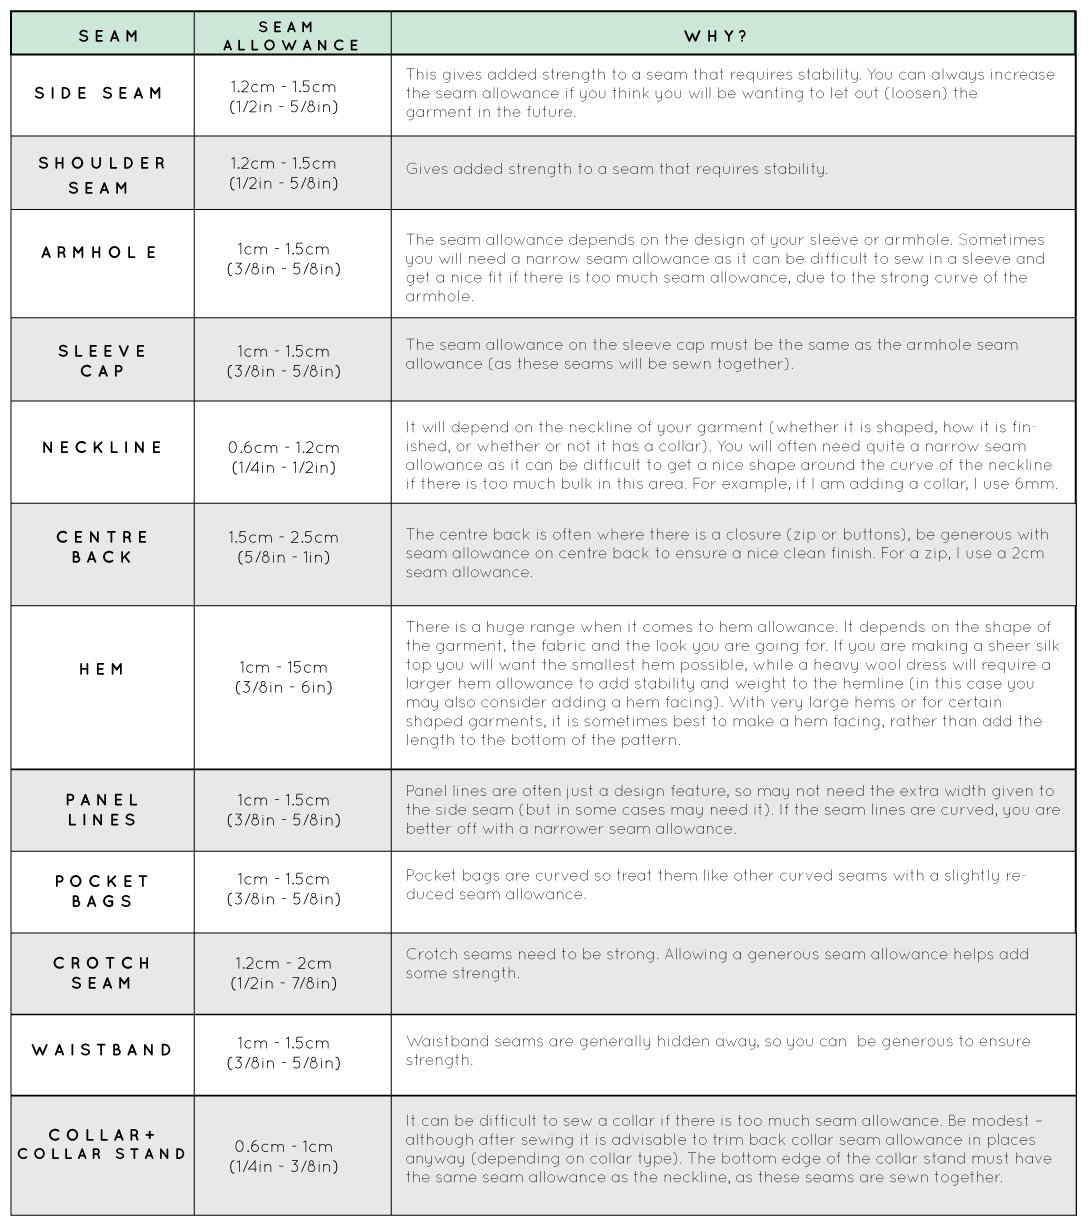
Before getting started, have a think about the seam allowances you plan to use. I know some commercial patterns use the same seam allowance on every seam, but I think you are much better off changing the allowance depending on the seam. This will help you get a much cleaner and more professional finish.

The seam allowance required will have a lot to do with the fabric you are using, and how you will be finishing the seams too. For example, if you are making a silk chiffon top, it is best to use a narrow seam allowance, so you are not left with bulky seams that show through. A silk chiffon top is a delicate piece of clothing, that is not worn everyday and is normally hand washed, so it can afford to have smaller seam allowances. But, if you are making a pair of trousers or a coat, you need seams that a stronger (particularly in places where tension is put on the seams - e.g. the crotch of trousers) and therefore need a seam allowance that is wider than what you would use for your chiffon top. 

Standard seam allowances

I have put together a table to help guide you with how much seam allowance to add, but as I said, it is up to you! If you click on it, you can download a printable version of the table. It may be handy to put up on the wall in your sewing room!

Adding seam allowance to your skirt block

This tutorial will show you the method I use for adding seam allowance to a pattern, using a skirt block as an example. This method can be used to add seam allowance to any pattern.

add_seam_allowance_to_a_pattern_inthefolds-6

Decide on how much seam allowance you will be adding (using the table above if needed) and find where the line is that indicates that width on your ruler. 

add_seam_allowance_to_a_pattern_inthefolds-7

Lay that particular line (the width of your seam allowance) along the side seam of your pattern.

add_seam_allowance_to_a_pattern_inthefolds-8

With a sharp pencil, or pacer, draw in your seam allowance, being careful to keep your ruler in place. Be sure to extend the line past the original line by a couple of centimetres (this helps when we add seam allowance to the other seams).

add_seam_allowance_to_a_pattern_inthefolds-9

After marking the side seam, it's now time to move on to the hip curve.

If the seam you are adding seam allowance to is curved (which it is in this case) you will need to mark the seam allowance with a broken line. Line up your seam with the ruler and draw a small line (in this case, two lines).

add_seam_allowance_to_a_pattern_inthefolds-10

Then pivot your ruler to you next point (I tend to do this every 1 – 1.5cm) and continue marking the seam allowance with a broken line.

For tight curves (such as the bodice neckline) mark your seam allowance guidelines closer together to ensure a smooth and accurate curve.

add_seam_allowance_to_a_pattern_inthefolds-11

Continue pivoting until you have gone around the whole curve.

add_seam_allowance_to_a_pattern_inthefolds-12

Next, on to the waistline. Before starting to add seam allowance, extend both dart arms, as well as the centre line, by a few centimetres. This will help when you are adding seam allowance to the top of the dart.

add_seam_allowance_to_a_pattern_inthefolds-13

Mark the seam allowance on the waistband, and then follow the angle of the dart, when you get to the first dart arm. Repeat for the other side.

add_seam_allowance_to_a_pattern_inthefolds-14

Continue along the waistline, towards the centre front, pivoting the ruler when necessary. 

add_seam_allowance_to_a_pattern_inthefolds-15

The centre front does not need seam allowance, as you will be cutting this piece on the fold. Just extend the centre front line a little beyond each edge, so that it can intersect with the seams on the other sides. 

add_seam_allowance_to_a_pattern_inthefolds-16

Mark the hem allowance by measuring down the centre front and side seam from the stitching line. 

add_seam_allowance_to_a_pattern_inthefolds-17

Join the points to create the hemline. 

add_seam_allowance_to_a_pattern_inthefolds-18

By this stage, you should have worked your way around the whole pattern.

add_seam_allowance_to_a_pattern_inthefolds-18

Now to do something about those broken lines. 

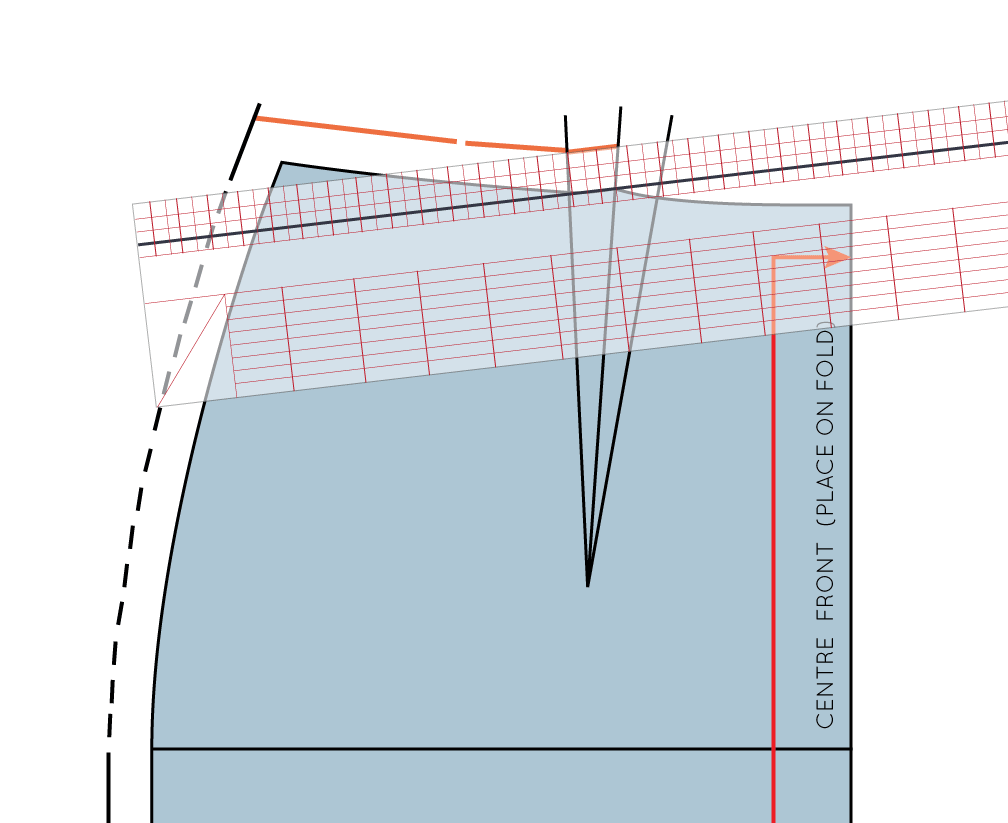
Draw in your curve by joining the broken lines to form a smooth curve. You can do this by carefully pivoting your ruler, using a French curve or something else round (like a large mug or plate depending on the shape of the curve). A good way to check if your curve is smooth is, with the pattern flat on a table, to crouch down and look at the curve at eye level. You will quickly see if there are any sharp points!
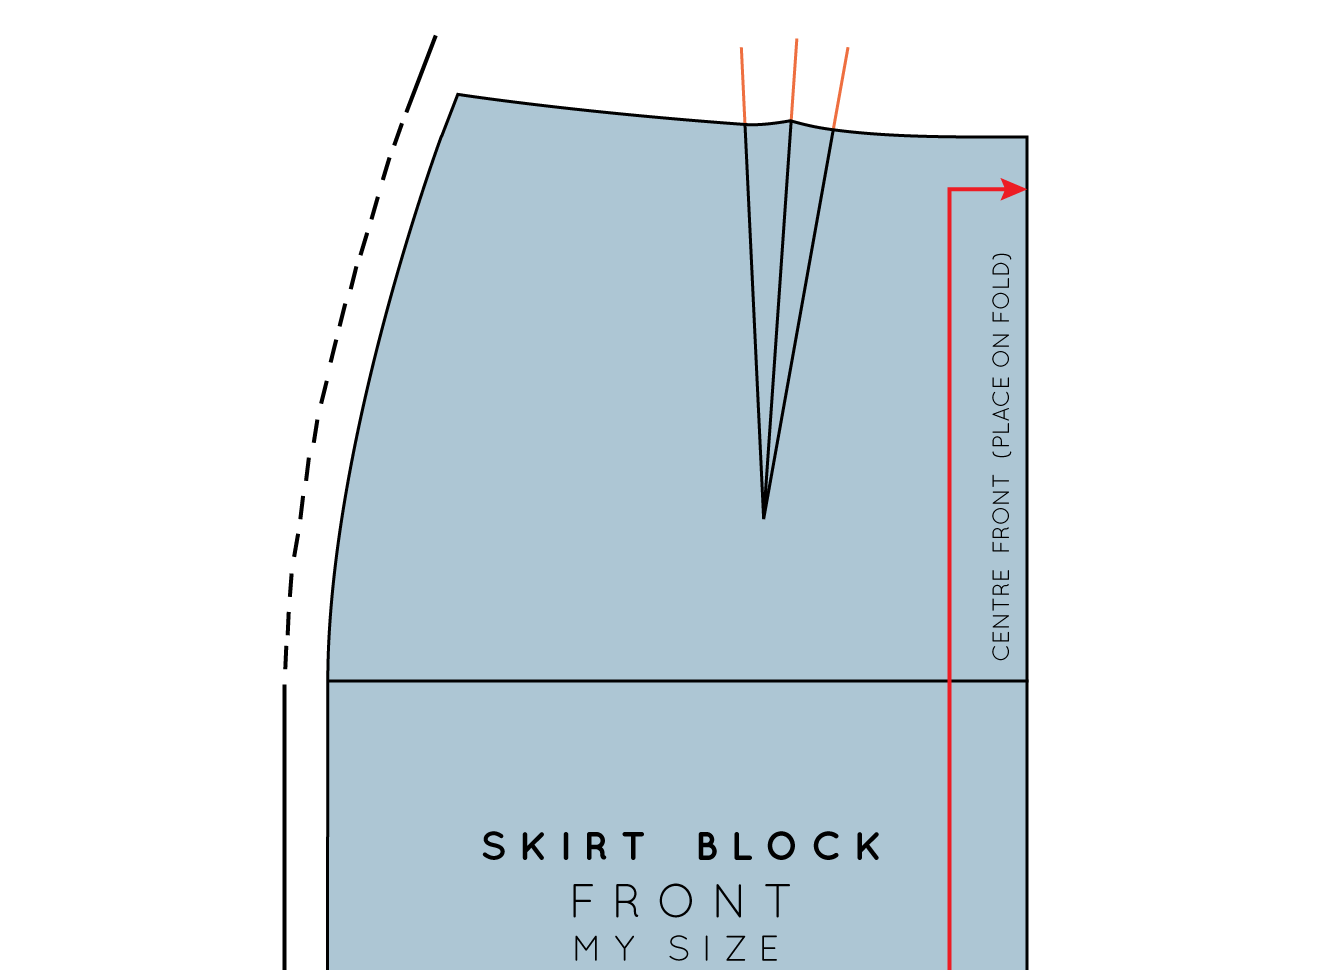
add_seam_allowance_to_a_pattern_inthefolds-19

Repeat for the back pattern piece. And you are done, your pattern now has seam allowance!

I would love to know if I have convinced any of you to try doing some pattern making yet?


You may also like:

A tutorial: How to add dart shaping

inthefolds_dartshaping_1

Welcome back to my latest addition to the blog: The Skirt Series. In yesterday's tutorial, I showed you how to draft a skirt block.

inthefolds_dartshaping_2

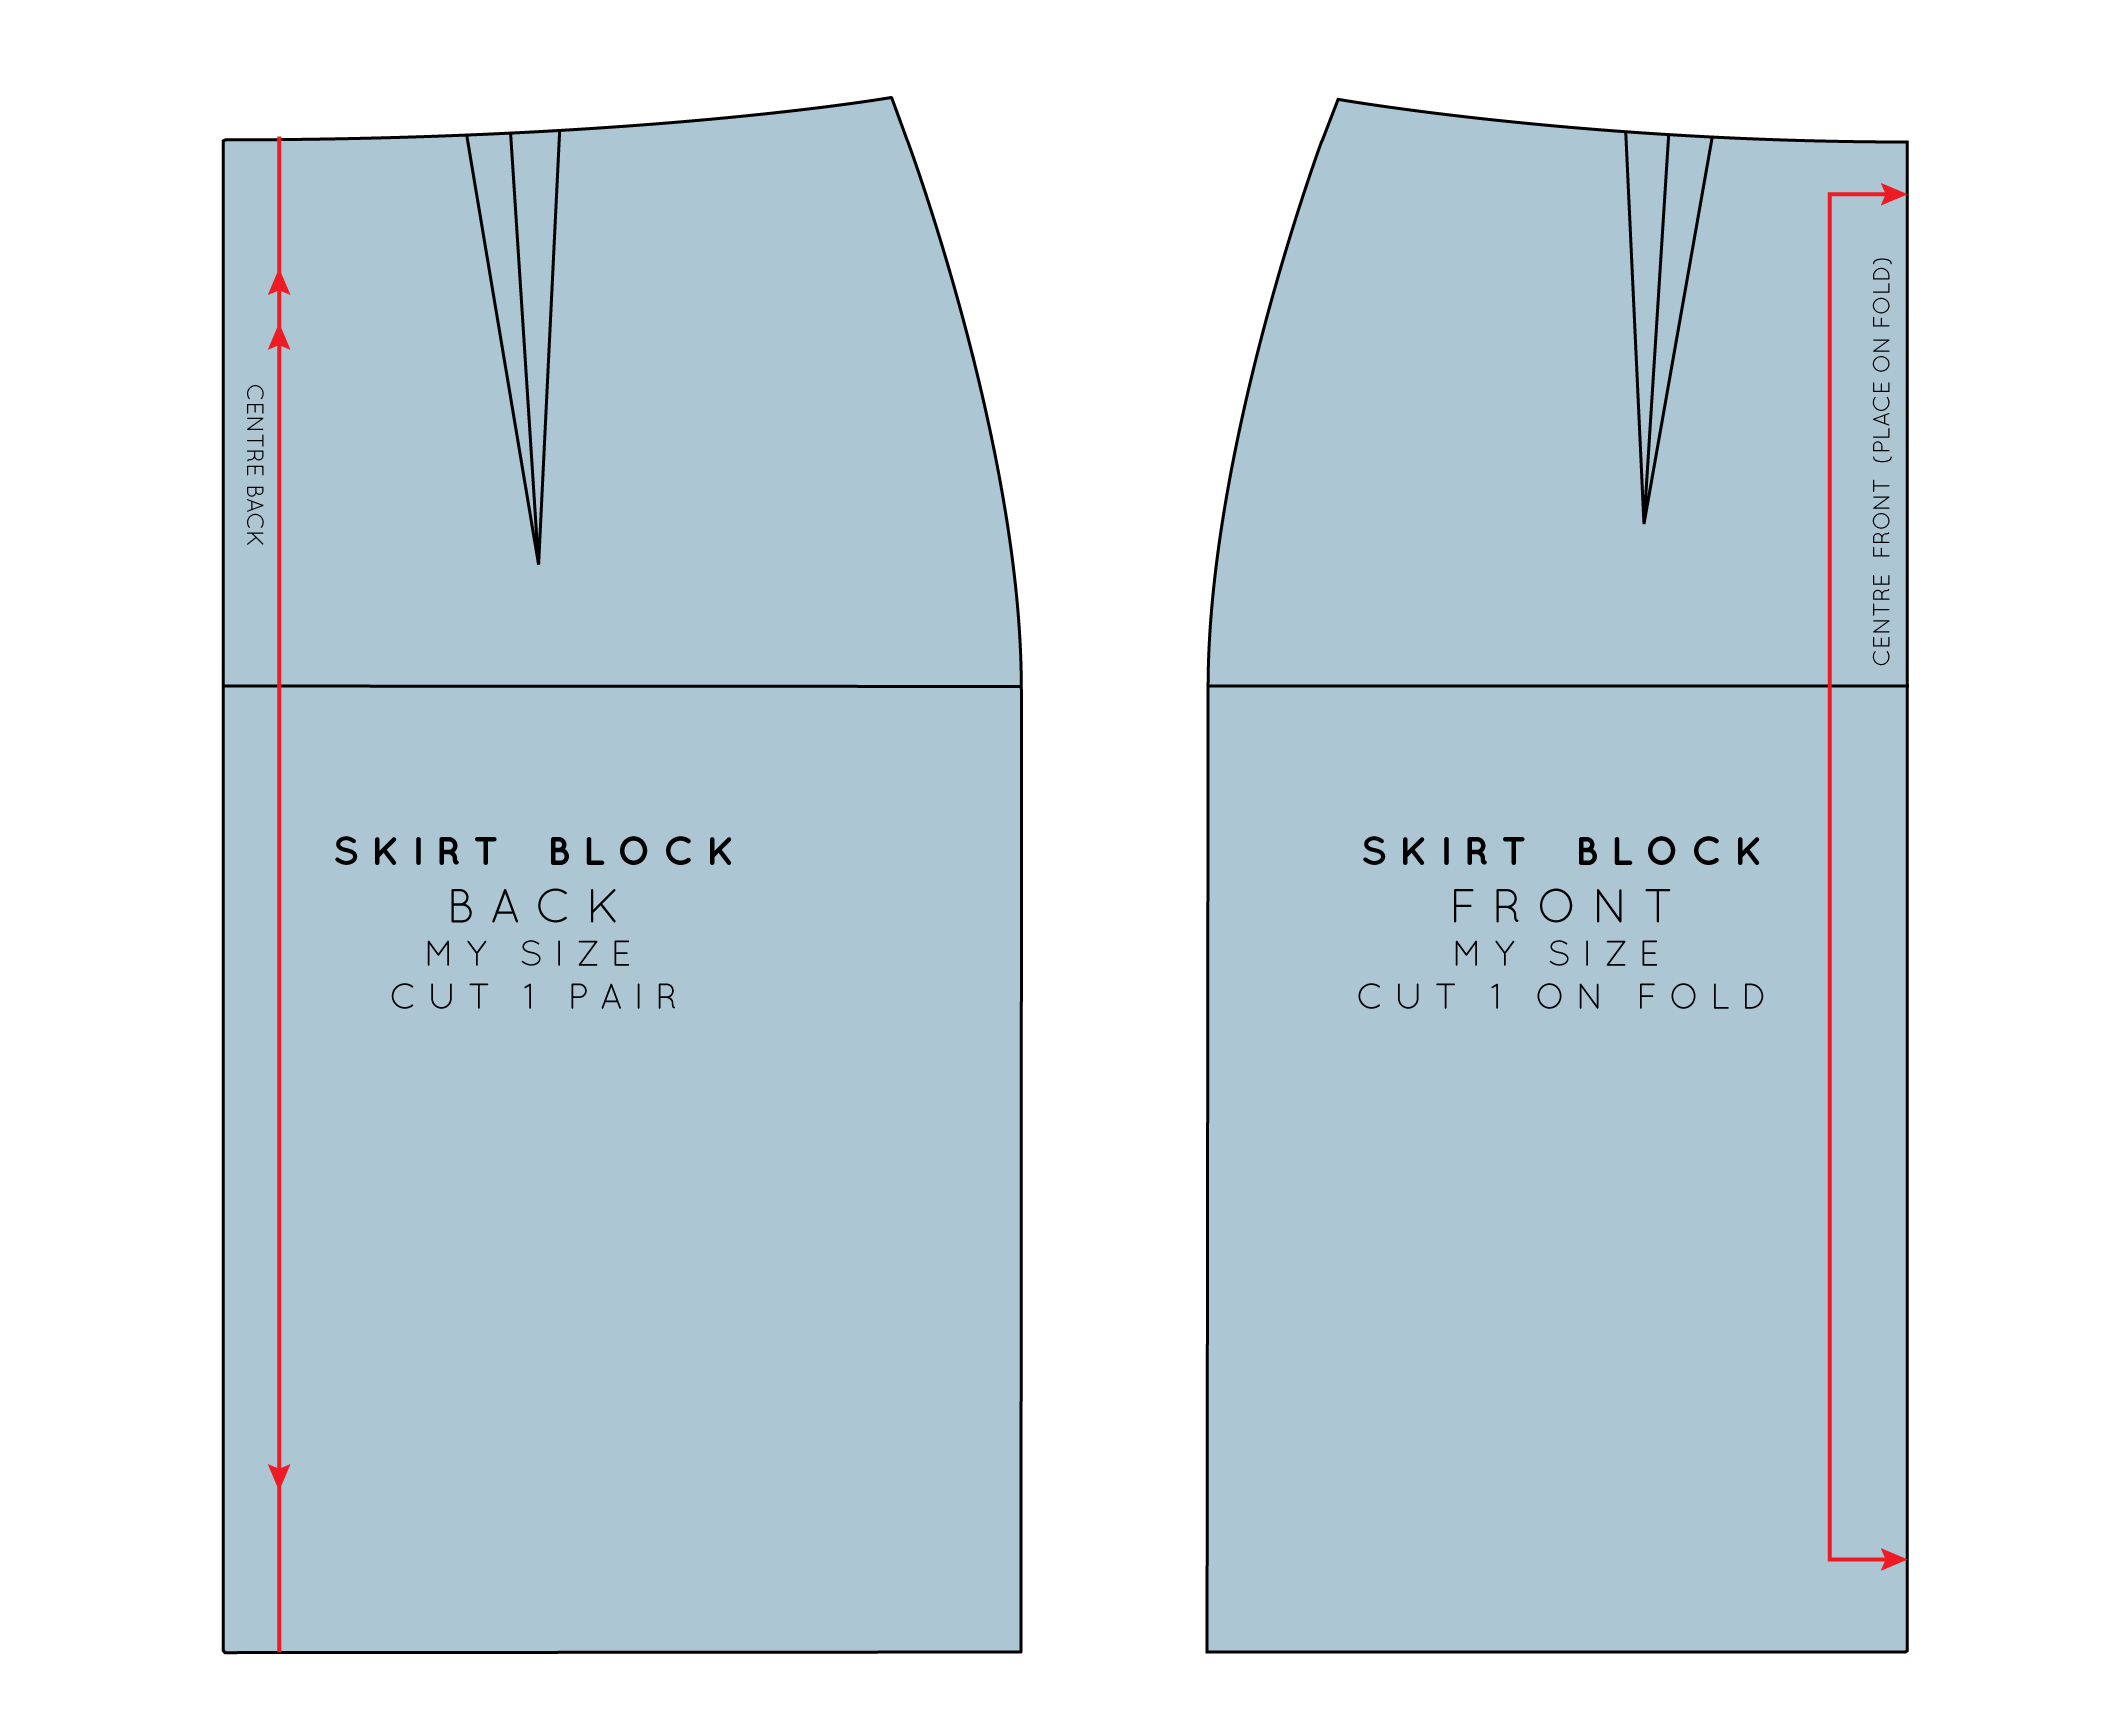
At this stage the pattern is drafted, but it is not yet complete. There are still two things to do before we can go ahead and make a toile - we need to add dart shaping and then add seam allowance. I will cover dart shaping in today's post and then next week I'll get to adding seam allowance.

What is a dart?

Essentially, pattern drafting is the act of making something two dimensional (the fabric) fit around something three dimensional (the body). Darts are a way of doing this and are most commonly used to create shape around areas of the body that are curved - the bust, shoulders, elbows and waist, but can be used pretty much anywhere - whether purely for fit, or also as a design detail.

What is dart shaping and why do I need to think about it?

inthefolds_dartshaping_3

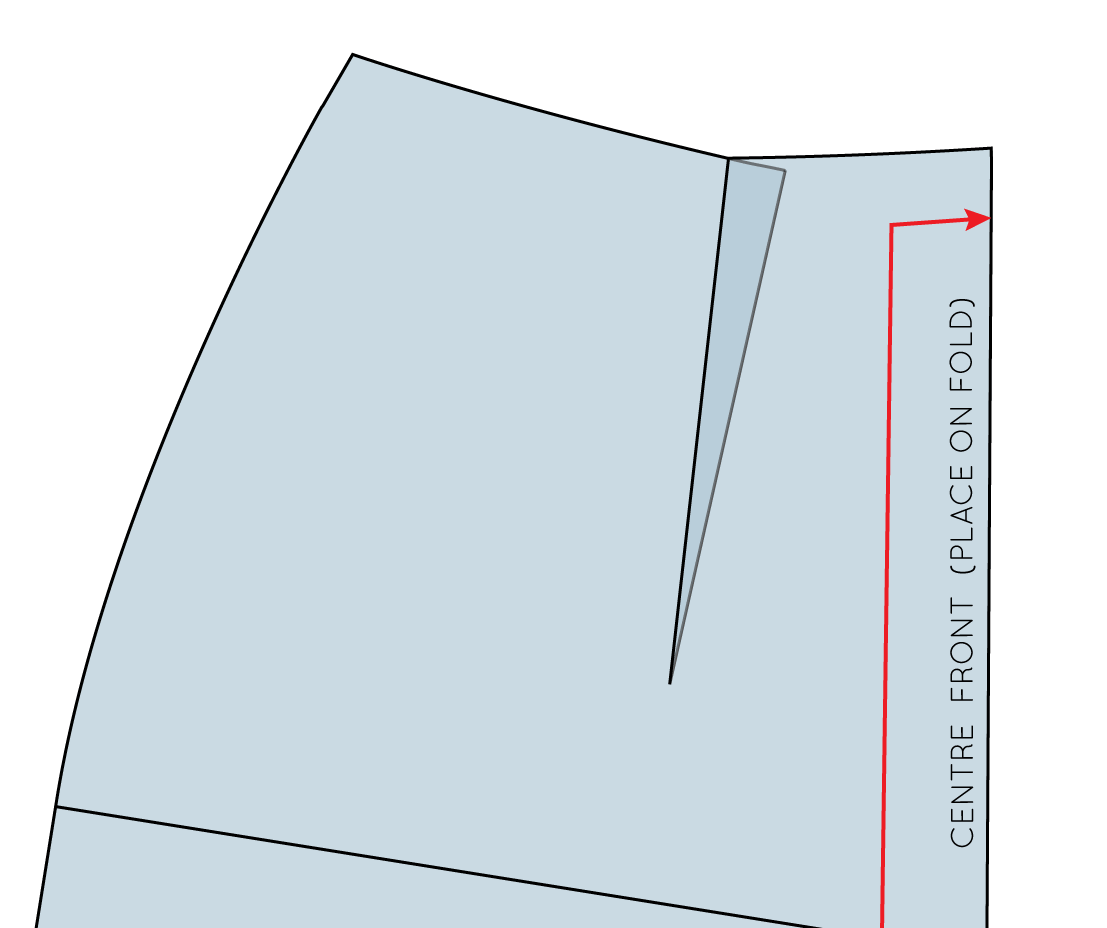
You may have put a dart in something before and noticed that the dart has changed the shape of the seam that it lies on and is no longer the smooth line it once was. In the example, I have folded the dart, and it has caused the waistline to become very sharp and angular. This is because we have lost 3cm to the dart, which is what gave us our nice smooth curve.

inthefolds_dartshaping_4

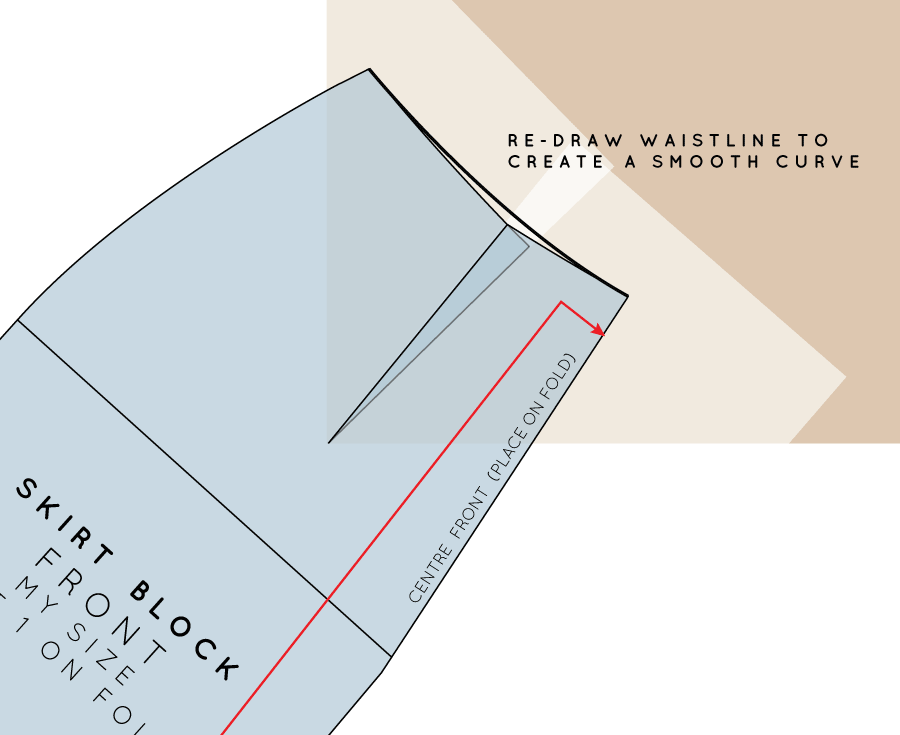
To prevent this from happening, you need to add dart shaping. This will ensure that once your dart is sewn in your waistline (or which ever seam your dart is located) it will remain a smooth line.

Let's get drafting!

Take one piece of your skirt (I will be starting with the front), or any other pattern piece that you are working on, that has a dart. Your pattern should still be on a larger piece of paper (not yet cut out).

inthefolds_dartshaping_5

You will need to fold the dart, so you can predict what will happen when you sew the dart when you get to making it up in fabric. Think about which direction the fullness of your dart will be pressed once it is sewn, this will decide which dart arm you need to fold.

Generally vertical darts are pressed towards the centre front (in the case of front darts) and the centre back (in the case of back darts). It seems reviews can be mixed when it comes to more horizontal darts, but I tend to push mine up up.

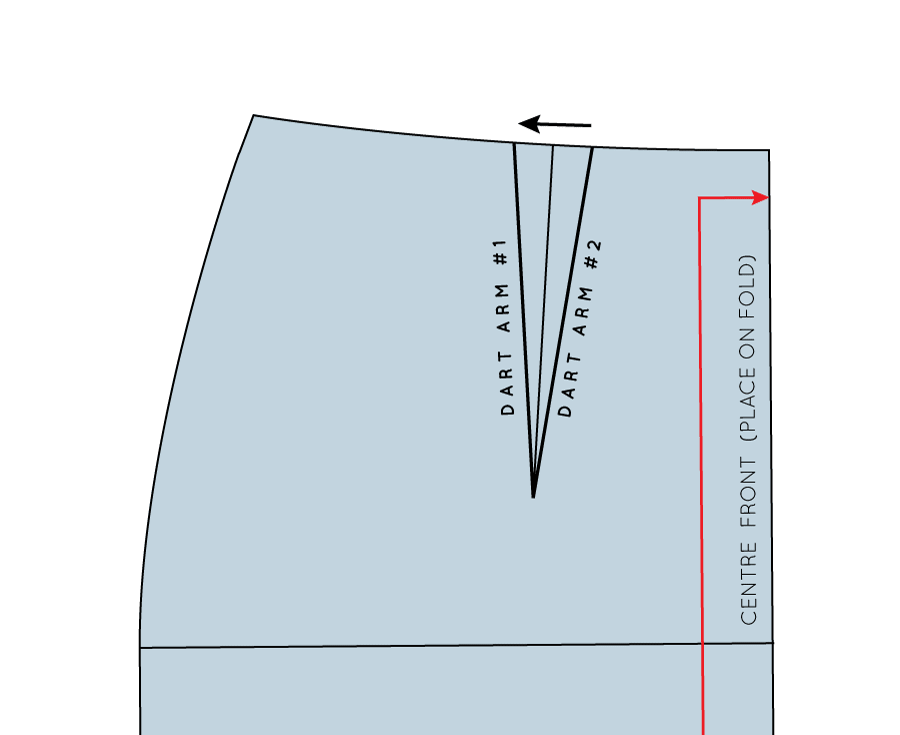
Fold along Dart arm # 2, down to the dart point, being careful to fold right on the line, to make a crease.

inthefolds_dartshaping_6

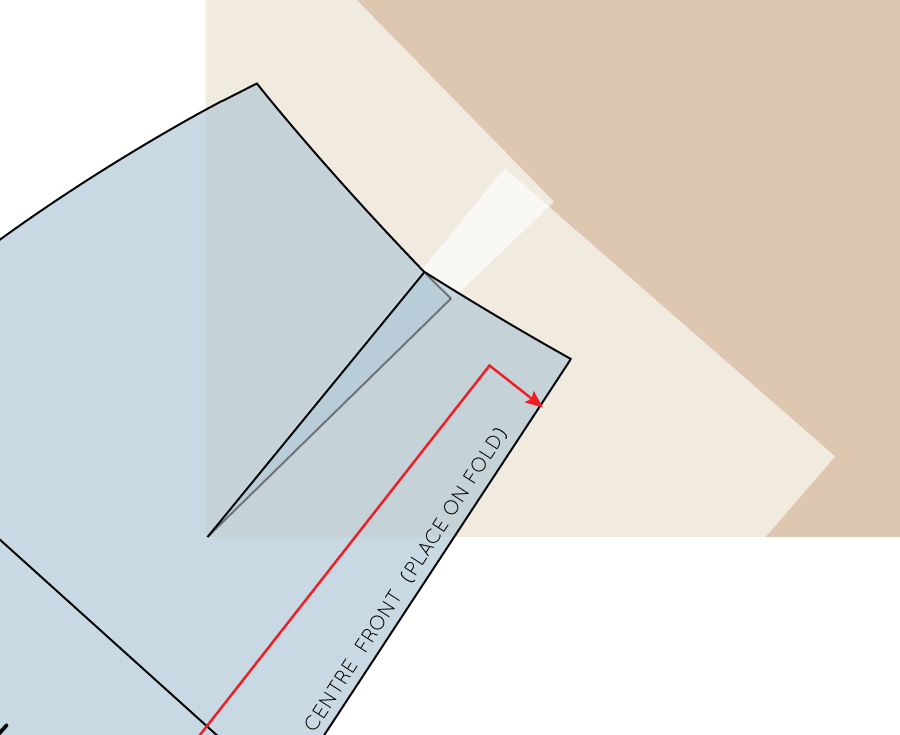
Working with darts on a flat surface can be difficult so move over to the corner of your table (hopefully you have a square or rectangular table like me, otherwise a big book will do the trick), placing the point of your dart on top of the corner of the table.

inthefolds_dartshaping_7

Fold the dart, by placing Dart arm # 2 on top of Dart arm # 1 (this is when that crease comes in handy). You will quickly see that it is much easier to get the dart to sit flat when it is sitting on a corner.

You will see that your seam would look like if you were to sew it without adding dart shaping. Not great, right?

inthefolds_dartshaping_8

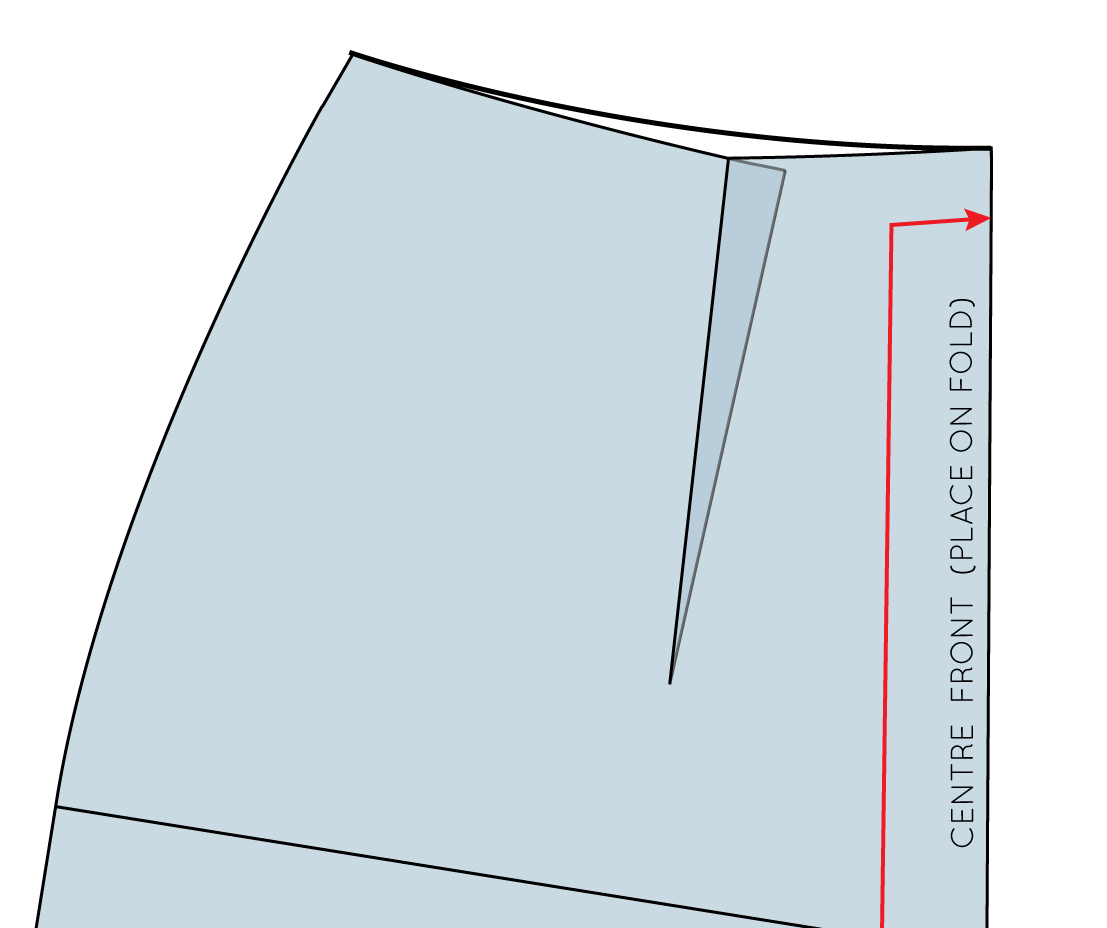
Use a weight to keep your pattern in place on the corner and then take a ruler and pencil and redraw the waistline with a nice smooth curve.

inthefolds_dartshaping_9

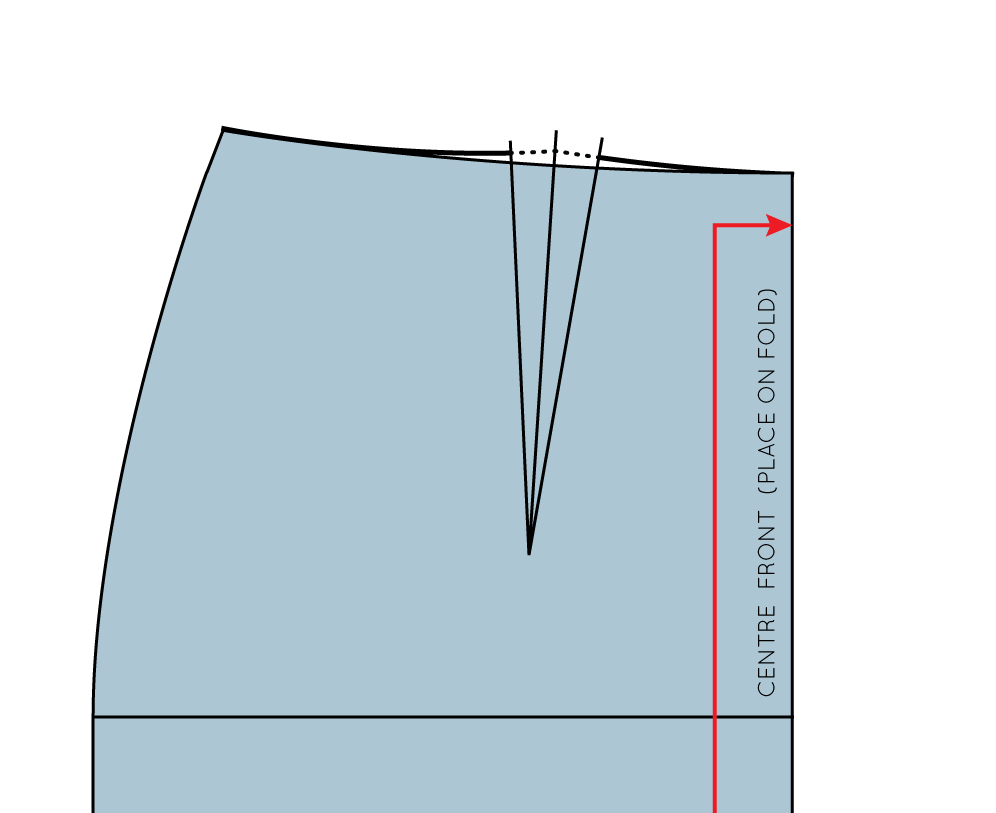
Take your tracing wheel and trace along your new seam line - particularly focusing on where the dart is folded (go over this area a couple of times to ensure the markings transfer through the fold).

inthefolds_dartshaping_10

Unfold the dart and you will see the markings transferred from the tracing wheel.

inthefolds_dartshaping_11

Take a ruler and join the dots to form a nice smooth line.

And there you have it, a dart with shaping!


I must say that this little tip is one of my favourites. Do you have a favourite pattern cutting technique?


You may also like:

Introducing the Rushcutter

theruhcutter_sewingpattern_inthefolds

Yipee!!! I am so pleased to introduce you to my very first sewing pattern! Her name is The Rushcutter and I think she's a bit of a beauty.

She is a relaxed knee length A-line dress, which is flattering to pretty much all figure shapes. My main mission when designing the Rushcutter was to create a dress that is comfortable, wearable, effortlessly cool, and would fit comfortable into many different women's existing wardrobes. She can easily be dressed up and down, and is perfect for all seasons.

She comes in two variations, which means she is perfect for all you people in the northern hemisphere too!

therushcutter_viewA_technicalsketch

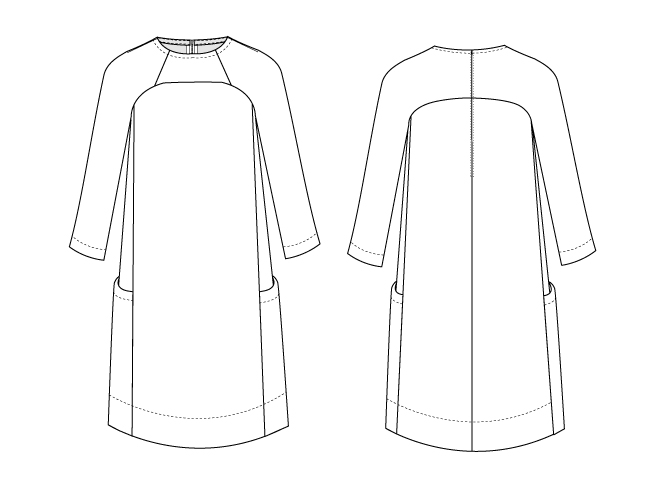
View A has three-quarter raglan sleeves, large pockets on the side (optional), an invisible zip, bound neckline and a large hem facing.

therushcutter_viewb_technicalsketch

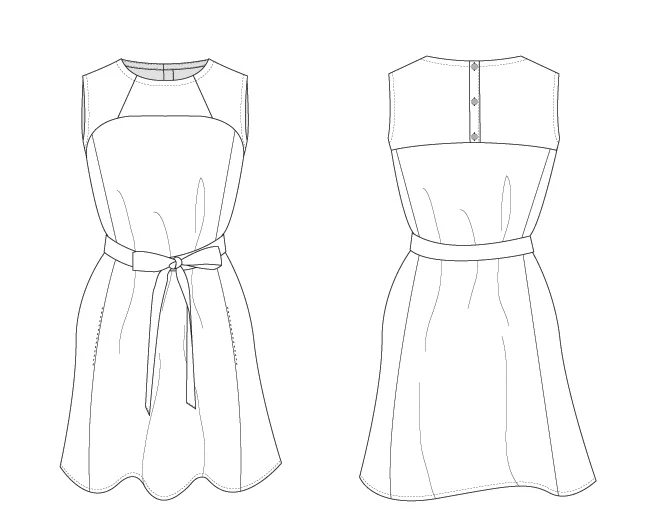
View B is a sleeveless dress with back button closure. It has in-seam pockets and the neckline and armholes are finished with bias binding.

Included in the pattern is an optional waist sash, that is suitable for both styles.

theruhcutter_sewingpattern_inthefolds

The Rushcutter was designed with woven fabrics in mind and is quite a versatile pattern. She makes up beautifully in a wide range of fabrics (and I would know, as I have made at least eight versions over the last two months!). My lovely testers also showed how different this dress can look depending on the fabric - and I will include some of their incredible dresses in the next post

As well as these two variations, I will also be showing you as many hacks as I can possibly come up with (and am open to suggestions, if you want to send an idea through to me), in the coming weeks, so we can get all you sewers pattern making too (and hopefully seeing how un-scary it is - yes, I made up a word)!

theruhcutter_sewingpattern_inthefolds

The pattern is suitable for brave advanced beginners and beyond. I have placed it a 'Level 4' on my skill scale, as I think a sewer with a few projects under their belts, along with some pins and patience (and probably a few cups of tea) would be able to handle this project.

You can make the project as simple or as challenging as you like. Add piping for an interesting detail or play with stripes on the various panels to make it a more challenging sew.

theruhcutter_sewingpattern_inthefolds

The pattern also comes with instructions alongside full colour photographs that hold your hand every step of the way (there is also a 'cheat sheet' available for those of you who don't want your hand held) which can be printed at home, or simply viewed on a computer, tablet or smartphone. 

Would you like to sew your Rushcutter along with me? I will be doing a sew-along over the next few weeks (starting on Monday October 19th) and will be giving you some fitting tips, showing you how to get a lovely clean finish with bias binding, and my method for sewing invisible zips! So stay tuned...

And even if you are not planning on buying the pattern, I'm sure you will find some great tips in the sew-along that can help you with other projects that find their way to your sewing table.


What do you think? I'd love to know what you think. Is there room for the Rushcutter in your wardrobe? 


You may also like: