Barkly skirt

ISSUE 115 - How to add an elastic waist back to the Barkly skirt pattern

THE Q & A SERIES

How to add an elastic waist back to the Barkly skirt pattern

Hi Emily!

I'd like to have a go at making a Barkly skirt, but I'm concerned about putting in a heap of time and effort only to make a skirt that no longer fits me because of my changing waist size. Any thoughts?


Hello!

Sometimes we avoid sewing fitted patterns like the Barkly skirt because we don't want to spend time making an item of clothing that ends up sitting in our wardrobe unworn. 

Fluctuating body measurements is a common experience - so please know that you are not alone! For this very reason, we included how to add an elastic waist back in our latest Curated by ITF project - the Barkly skirt Fit Kit, and I'm so pleased I can share it with you now!

When to add an elastic waist back

Although this is more of a pattern hack rather than a fitting adjustment, we know that for many, skirts without elastic waistbands can cause discomfort, particularly when sitting.

If your waist measurement regularly changes or you have a large difference between your waist measurements when sitting compared to standing, this may be an alteration you would like to try.

With this adjustment, we will be moving the centre back zip to the side seam.

Prepare to make the adjustment

To make this adjustment you will add width to the back panels of the skirt. To determine how much width to add you can do a couple of things:

  • Take your waist measurement when standing and then again when sitting. Note the difference between the two. This is the amount you will need to add to the waist of the pattern.

  • Take your waist measurement a number of times throughout the day or month. This option is good for those of you who know that your waist measurement fluctuates over certain periods of time. Calculate the difference between the smallest and largest measurements. This is the amount you will need to add to the waist of the pattern.

Step 1
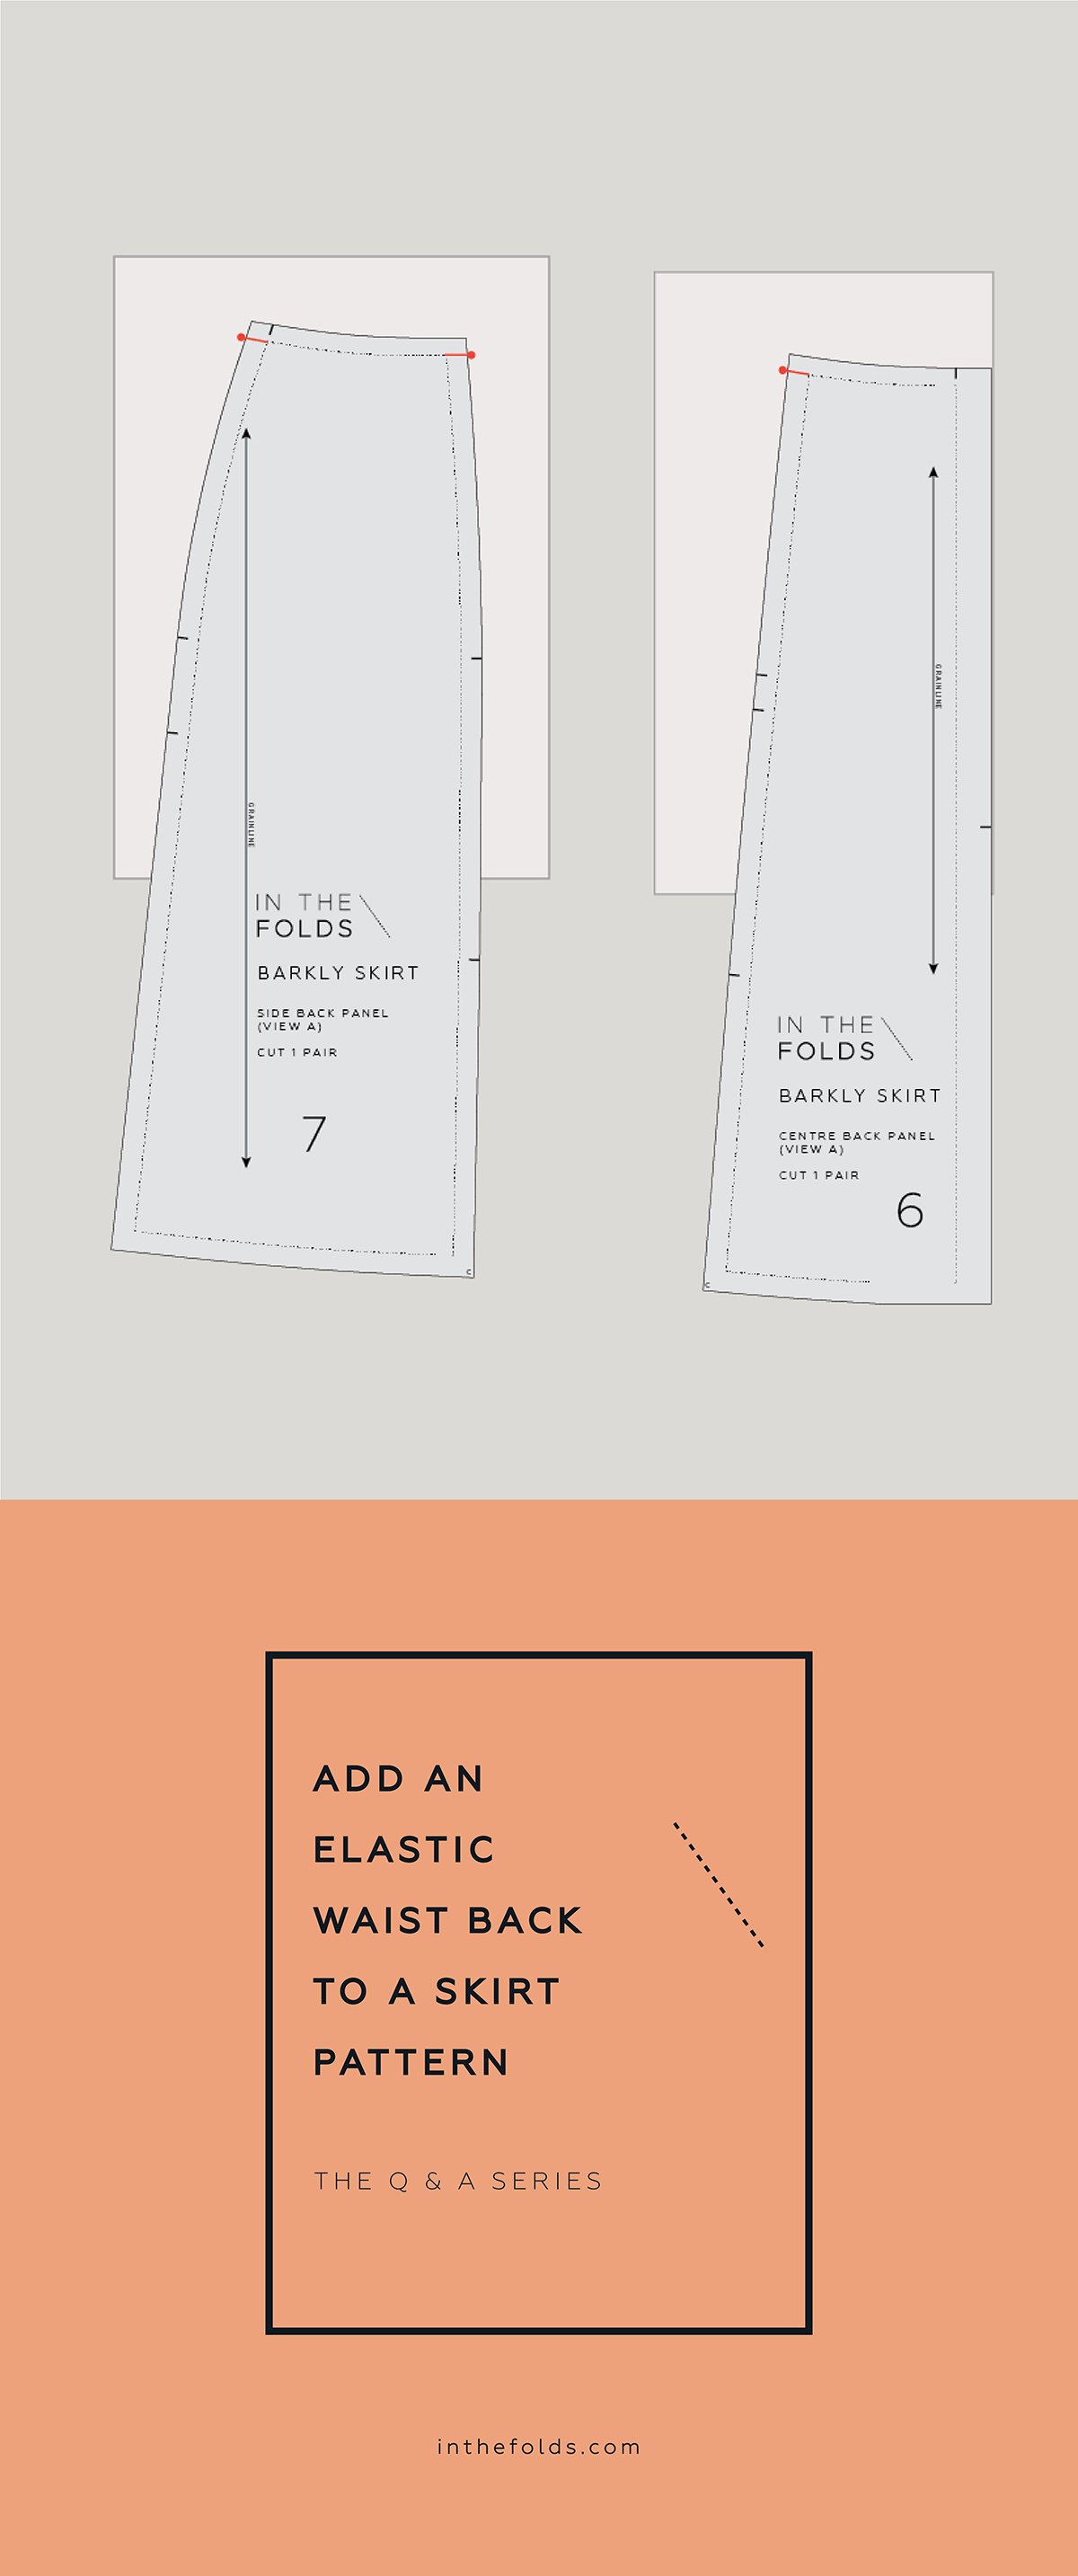
Take the SIDE BACK PANEL [7/16] and CENTRE BACK PANEL [6/15] and attach paper to the upper section of each piece. We won't alter the CENTRE BACK seam so you won't need extra paper there.

Take the amount you need to add to the waist circumference and divide by 2. (We divide by 2 as the pieces are cut as a pair - half is added to one side and the other half added to the other.) Then divide this amount by 3. (We will split the amount to add between the three places - either side of the back panel line and the side seam.) For example, if adding 9cm; 9/2=4.5cm; 4.5/3=1.5cm added per seam.

Extend the waist STITCH LINE by the distance calculated above on each of the seam lines.

Step 2
a  Join the end of each line marked in STEP 1 to the STITCH LINES (side seam, panel seam) on each piece. We recommend aiming to meet the original STITCH LINE below the upper notch so that you have a nice smooth transition between the lines. 

b  If making a large alteration, you may struggle to create a smooth line when working on the CENTRE BACK PANEL. If this is the case, we suggest re-joining the line at the hem. This will add a small amount to the piece but will ensure the pattern piece does not become distorted. 

Step 3
Add seam allowance onto your new lines.

Step 4
Cut along the new CUT LINES.

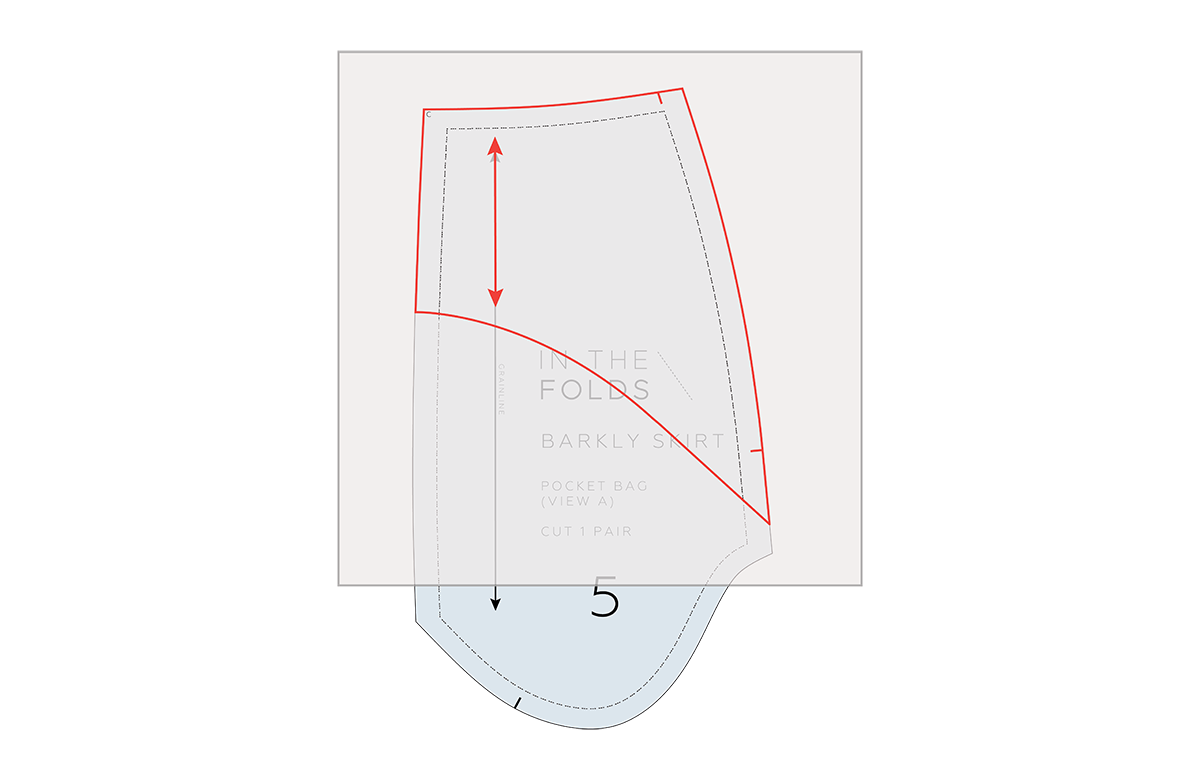
View A: We now need to alter the back waistband piece. Measure the waist STITCH LINE on the altered pieces. To measure a curve, turn your tape measure on its side and follow the curve of the line. Take note of these measurements.

For View B, you will need to re-draft the back facing piece - first finalise the pattern by moving to STEP 6.

Step 5 (VIEW A ONLY)
Take the FRONT WAISTBAND [8] piece and measure the side seam STITCH LINE. This is the height we need our new back waistband piece to be.

b Take a piece of pattern paper and fold it in half. We will draft the piece on the fold of the paper so we can create a full pattern piece.

Make a rectangle in which the height is the measurement determined above in A and the width is the measurement determined in STEP 4. Label the fold as CENTRE BACK.

c Using the CENTRE BACK PANEL [6] waist measurement, make a notch this distance from CENTRE BACK. This will help when you're attaching the waistband to the skirt.

d Add seam allowance to the top and bottom edges (1cm (⅜in)) and side seam (1.2cm (½in)). At this stage, our side seam allowance is the same as it was originally. It is possible to sew a zip with a 1.2cm (½in) seam allowance, but if you are worried you will find this too difficult, we suggest increasing the side seam allowance before cutting the piece (see STEP 7).

e Cut out the piece. You can pin through the layers of paper to prevent it moving around. Unfold the piece and add a grainline at CENTRE BACK. Cutting instructions are now Elastic back waistband / CUT 2. This piece does not require block fusing. 

REMOVE CENTRE BACK SEAM (OPTIONAL)

Step 6 (BOTH VIEWS)
As the zip is moving to the side seam, you no longer need the centre back seam. You can keep it if you like the look of the panel line there. To remove it, cut off the CENTRE BACK seam allowance by cutting along the CENTRE BACK STITCH LINE.

Change the grainline to indicate that the piece is to be cut on the fold (use rectangular grainline instead of straight grainline) and alter cutting instructions to CUT 1 ON FOLD.

INCREASE SIDE SEAM SEAM ALLOWANCE (OPTIONAL)

Step 7 (BOTH VIEWS)
An invisible zip can be sewn with a 1.2cm (½in) seam allowance, but if you are concerned you will find it difficult to sew with this seam allowance, consider increasing your side seam seam allowance to 1.5cm (⅝in) or 2cm (¾in).

If you choose to do this, you will need to make the alteration on the FRONT SIDE PANEL [2/13], pocket pieces and waistband/facing pieces. Remember to move the notches over to the new CUT LINE after making the alteration. This will mean you will have a larger seam allowance on both sides of the skirt although the zip is only on one side. You could trim it back on one side after cutting, although it's not necessary.

For View B, re-draft the back facing piece.


Adding an elastic waist back to our garments makes our wardrobe less restrictive - the clothes we make fit our bodies as they are, they are comfortable to wear and we can wear them whenever we want.

These are all such important elements of our ethos at In The Folds, and we're happy to be able to help you learn how to achieve this on the garments you make!  

Happy sewing!

Emily


RESOURCES MENTIONED IN THIS ISSUE

  • Barkly skirt pattern can be found here.

  • The Barkly skirt Fit Kit is available exclusively in this month's Curated by ITF subscription. You can learn more about our Curated By ITF subscription here.


For more issues of the Q & A series, you can check out the archive here.


WHAT YOU’VE BEEN MAKING


MORE POSTS IN THE SERIES

ISSUE 114 - Grading between sizes on a panelled skirt pattern

Grading between sizes on a panelled skirt pattern.

THE Q & A SERIES

Grading between sizes on a panelled skirt pattern

Hello Emily

I am participating in a denim sew-along this month and plan to make your Barkly skirt again.

I am getting the pattern for view A (the shorter length) printed out again so that I can adjust the pattern more accurately and give a better review.

Could you help me with this, please? I didn't understand grading the sizes on your site. I am size E for the waist and C for the hips, I am 32" waist and 37" hips. What is the best way of adjusting this on a panelled skirt, please?

Do I simply put the ruler straight from the waist size E to the bottom hem size C and not alter the curved of the hip where the pockets lie on the side front and back panels.

I plan to use stretch denim and make a lapped zip and so will alter seam allowances for a centre back 1" seam allowance.

Christine


Hi Christine,

I’m thrilled to hear you’re using the Barkly skirt pattern for a sew-along! It's always so motivating when you're sewing with others, which is one of the reasons why we created our Curated by ITF subscription

In fact, this month in Curated by ITF we are learning all things skirt fitting and the Barkly skirt pattern is our focus. We cover this question exactly (and so much more!) so I can definitely help you out with this!

When to grade between sizes

For many of us, our measurements will range across several pattern sizes, which means we will need to grade between sizes. For example, if our waist measurement is in a smaller size bracket than our hip measurement, we will need to grade up from the waist to the hip on the pattern. 

Getting started

Start by printing the pattern in the sizes that you need.

Once printed, you can draw straight on the pattern or take a large piece of pattern paper and lay it over or under the pieces to trace the pattern (depending on whether your paper is transparent or not).

On the Barkly skirt, the WAIST LINE is the top edge of the pattern (this is what attaches to the waist band / waist facing) and the HIP LINE is at the STYLE VARIATION LINE.

Use these instructions if your waist is in a smaller size bracket than your hip.

a  On the CENTRE FRONT PANEL [1/12] pattern piece, start at the pattern edge of the size you require for the waist. Take a ruler or French curve and draw a smooth line to the hip of the required size at the hip line. This line needs to become a gentle curve as it approaches the HIP LINE. Follow the edge of the pattern from the HIP LINE down. Repeat for the SIDE FRONT PANEL [2/13] , SIDE BACK PANEL [7/16] and CENTRE BACK PANEL [6/15].

b   It is likely that some notches will no longer be in the correct position. Work your way along the new pattern edge and move notches to the new CUT LINE. Adjust the pocket pieces by moving to STEP 2.

Use these instructions if your waist is in a larger size bracket than your hip.

On the CENTRE FRONT PANEL [1/12] pattern piece, start at the pattern edge of the size you require for the waist. Take a ruler and draw a smooth line to the hip of the required size at the HIP LINE. Depending on how many sizes you are grading between, to hit the HIP LINE on the CENTRE FRONT PANEL [1/12], the line may need to become a concave curve. This is not ideal as a seam shape, so we suggest instead drawing the line so it is straight and meets the hem of the smaller size. Follow the CUT LINE of the smaller size from the HIP LINE down to the hem. Move notches to the correct position (see STEP b above).

Repeat for the SIDE FRONT PANEL [2/13], SIDE BACK PANEL [7/16] and CENTRE BACK PANEL [6/15].

Adjust the pocket pieces by moving to STEP 2.

Adjust pocket pieces

Take the SIDE FRONT PANEL [2/13] and trace along the pocket edge of your waist size. We recommend using a coloured pen or highlighter to prevent confusion between sizes.

Trace a copy of the POCKET FACING [4] and POCKET BAG [5] pieces in the larger of the sizes you graded to. Don't cut them out just yet.

Place the POCKET FACING [4] on top of the SIDE FRONT PANEL [2/13] and line up the original notches so it is sitting correctly. Use pins or pattern weights to hold in place. Transfer the new seam lines onto the POCKET FACING [4] and trace the pocket edge. Transfer the correct notches.

With the POCKET FACING [4] still in place, place the POCKET BAG [5] on top, lining up the original notches. Hold in place with pins or pattern weights. Transfer the new seam line onto the piece. Transfer the correct notches.

Cut out your new pocket pattern pieces.

Before cutting your pattern pieces from fabric, check that all the pattern pieces fit together correctly.

Happy sewing,

Emily


RESOURCES MENTIONED IN THIS ISSUE

  • Barkly skirt pattern can be found here.

  • The Barkly skirt Fit Kit is available exclusively in this month's Curated by ITF subscription. You can learn more about our Curated By ITF subscription here.

  • Checking patterns: Curved seams tutorial can be found here.


For more issues of the Q & A series, you can check out the archive here.


WHAT YOU’VE BEEN MAKING


MORE POSTS IN THE SERIES

ISSUE 86 - Tips for cutting pockets

THE Q & A SERIES

Tips for cutting pockets

Hi there,
I'm just in the process of laying out the Barkly Skirt pattern (View A) onto my lovely woollen fabric and find that I'm a bit short. Is there a way I can make the pocket pouch (piece 5) out of some of the main fabric say a third, and the rest out of a lighter fabric the same as I am using for piece 4?

Thanks​!

- Keri,
Williamstown, Australia


Hi Keri,

I am pleased to hear you are making the Barkly skirt! A woollen Barkly sounds like a perfect winter staple.

You can definitely do what you're suggesting to reduce the amount of fabric you need. 

Cut pocket facings in an alternate fabric

To get started, I'd suggest cutting the POCKET FACING [4] from an alternate fabric. This piece will not be seen on the outside of the garment, so is a great one to substitute if you've got limited fabric. In the illustration above I have shown you the piece I am referring to and where it goes in the finished skirt. I have made the front panels transparent so you can see it.

Even if you did enough enough fabric, I often cut pocket facings from an alternate fabric. It's a good way to minimise bulk. I suggest using a fabric that is a similar colour to the main fabric, so it doesn't draw attention when you have your hand in the pocket (unless you want to draw attention with a fun pop of colour!)

Create a pocket shield

As for piece number 5 (the pocket bag), what I suggest you do is sew the pocket in the way that jeans pockets are often done. This creates a "shield" - a piece that can be cut from the main fabric (in this case, wool) that can be attached to an alternate (often lighter weight) fabric. In jeans you will see a pocket shield made from denim attached to a lightweight pocket bag. This minimises bulk in the pocket and gives the illusion that the pocket is cut completely from denim.

Step 1
Place POCKET BAG [5] pattern piece on POCKET FACING [4] - lining up the edges and notches.

Draw in the shape of the shield piece (this will be cut from the main fabric). You want the pocket shield to extend down further than the pocket opening so that when it's sewn in place, you don't see the seam. If you can't see the pocket opening line from the POCKET FACING [4], try putting the pieces up to a window so that you can see through to the piece underneath.

For the Barkly skirt, I'd suggest that the POCKET SHIELD edge be about 4cm (1 1/2in) from the slanted edge of POCKET FACING [4] - as this will allow for the pocket shield to extend 3cm (1 1/4in) past the pocket opening when the pocket is assembled.

You could make the line parallel to the edge on the POCKET FACING [4], but I prefer the curve so that there is more length in the top section of the shield. This is because the top section of the pocket is more likely to open and show the POCKET FACING [4] rather than the lower part. This is up to you though as I know your fabric is limited.

Step 2
Trace the POCKET SHIELD onto some pattern paper. This means tracing the top edge and the sides of the POCKET BAG [5] down to the POCKET SHIELD edge marked in Step 1. When tracing a pattern piece, remember to always transfer the grainline and notches. Cut POCKET SHIELD piece from your main fabric (in this case, the wool). Cut the POCKET BAG [5] from the fabric you are using for the POCKET FACING [4].

Step 3
Overlock / serge bottom edge of the POCKET SHIELD piece. If your fabric isn't too thick or bulky, you could consider adding seam allowance to this edge on the pattern piece (before cutting from fabric) and turning the raw edge under and top stitching, if you don't have an overlocker / serger.

Step 4
Pin POCKET SHIELD to POCKET BAG [5] (wrong side of POCKET SHIELD to right side of POCKET BAG [5]) and stitch close to the edge to keep the two pieces together. This line of stitching will be hidden in the seam once you assemble the pocket. You can now treat this as if it just one piece of fabric.

When the pocket is assembled, you won't be able to see the overlapping fabric. As you can see in the illustration, I have made the POCKET FACING [4] transparent so you can see how the pieces work together.

I hope this cuts down the amount of fabric you need! If you are still coming up short, you could consider cutting one set of waistband pieces in an alternate fabric, as well as the hem facing pieces.

Happy sewing,

Emily


resources mentioned in this issue

  • Barkly skirt pattern can be found here.


For more issues of the Q & A series, you can check out the archive here.


What you’ve been making


More posts in the series