ISSUE 9 - ATTACHING DOUBLE FOLD BIAS BINDING

ISSUE 9 - ATTACHING-DOUBLE-FOLD-BIAS-TAPE.jpg

THE Q & A SERIES - ATTACHING DOUBLE FOLD BIAS TAPE

Hi Emily,

Regardless if i use pre-made bias tape or make my own, I get so confused on how to apply and my garments don't look as neat as I'd like.

Can you please break down the steps to applying bias tape if A) you want the bias tape to SHOW ON THE RIGHT SIDE of your garment and B) you do not want your bias tape to show on the right side of your garment?

Thanks so much!

- RG
Portland, Oregon


SewingSchool36i.jpg

Hi RG,

In last week's issue, I showed you how to sew single fold bias tape (which answers part B of your question - 'you do not want your bias tape to show on the right side of your garment') and today I will be showing you how to sew double fold bias tape.

In case you missed last week's issue, I will include the overview about bias binding again - so just skip through this part if you read Issue 8 of the Q & A series.

WHAT IS BIAS BINDING?

Bias binding is a strip of fabric cut on the bias (diagonal to the grainline / selvedge) that can be used in a variety of applications. By cutting the fabric on the bias, it gives the fabric a small amount of stretch, which makes it ideal for finishing curves and wrapping around seams (in the case of bias bound seams).


SINGLE FOLD & DOUBLE FOLD BIAS BINDING

In the photo above, the Collins top is inside out - showing the finish of the binding on the inside.

In the photo above, the Collins top is inside out - showing the finish of the binding on the inside.

Single fold bias binding is the type of binding you will most often see in ready to wear fashion, as well as most sewing patterns that include a bound neckline or armholes.

This type of binding will give you a clean finish on the right side of the garment (you will just see a stitch line where the binding has been secured), and on the inside of the garment you will be able to see the bias strip neatly finished and stitched along the edge.


Double fold bias binding is what you will use if you want to see the bias binding on both the right side of the garment and the inside of the garment.

There is an extra fold put in the binding (which is what gives it the 'double fold' name) that is used to wrap around the edge of the garment, so it is visible on both sides.

This week's issue will show you how to apply double fold bias binding.


WHAT TYPE OF BINDING TO USE

You can make your own bias binding or purchase it by the metre / yard from a store. If making your own bias binding, I recommend using a lightweight cotton fabric such as cotton lawn or cotton shirting. You can also consider using a contrasting colour or print to add a fun pop of colour to the inside of your garment.

Depending on what instructions you are following, information changes slightly from person to person when it comes to the best way to cut your own binding as well as apply it. The instructions I am giving you today is the way I was taught at university and is the method I continue to use today. Like anything in sewing, find the techniques that work for you!

TAKE 2-5-01.jpg

When choosing which bias binding to purchase / how wide to cut your own, consider how much bias binding you would like to see on the right side of the garment. Keep in mind, that it is easier to get a flatter finish when using narrow bias binding, rather than a wider option. Remember, due to the double fold, you will see half as much bias binding on each side of the garment as you would if you used the single fold method (if using the same width bias binding for each option).

For example, if using 12mm (1⁄2in) binding for the single fold method, your finished binding will be 12mm (1⁄2in) on the inside of your garment. If you were to use this same binding and apply it using the double fold method, you would see 6mm (1⁄4in) binding on the inside of the garment and the other 6mm (1⁄4in) would be seen on the outside of the garment.

For the case of the example, we will use 25mm (1in) bias binding. If purchasing binding, you will need to buy 25mm (1in) bias binding. If you are making it yourself, you will need to cut 4cm (1 1⁄2) strips from a square of fabric and then fold the bias binding with a bias tape maker or fold and press by hand. The reason for the difference in width between the home made and the store-bought is that when buying pre-made bias binding, the width on the label refers to the width of the exposed part of the binding (as this is what you will see when the binding has been sewn on the garment), rather than the width of the binding when it's pressed flat.

For more information on cutting your own binding, you can see this tutorial.


Applying bias binding to a neckline

I will guide you through binding a neckline, as this is one of the most common applications, and once you’ve nailed a neckline, you should be able to apply binding to any curve!

These instructions will guide you through applying double fold bias binding to the neckline of the Collins top. The Collins top has an opening in the back, so the binding does not need to be joined. For a neckline without an opening, you need to join the two ends of the binding (see this tutorial for more information on joining binding).

Please note: when you are applying double fold bias binding (so that the bias binding can be seen on both the right and wrong side of the garment), you will need to remove the seam allowance from the seam you are attaching it to - unless the pattern was designed to have double fold bis binding applied (in which case the seam allowance will have already been removed). In the case of the Collins top, you will need to remove the 1cm (3⁄8in) seam allowance.

Using a tape measure, measure around the neckline of the top, starting from the centre back on one side, and continuing around the neckline until you reach the centre back on the other side of the back opening.

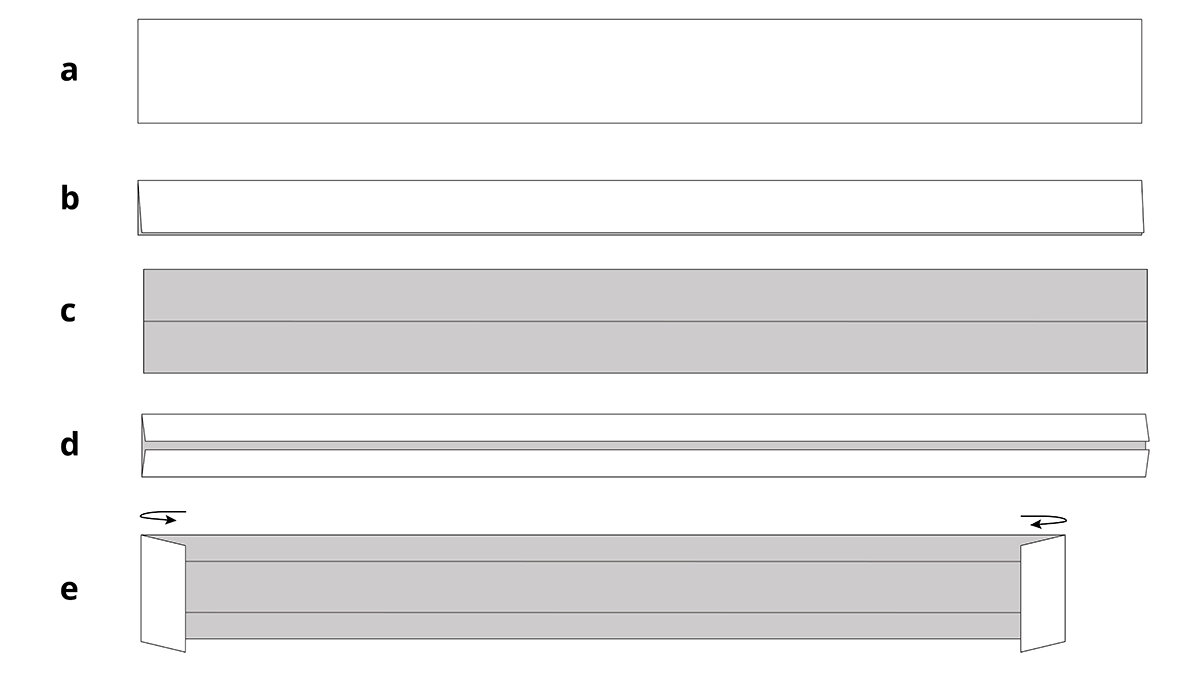
FOLDING BINDING - double-01.jpg

a Cut a piece of bias binding about 4cm (1⅝in) longer than your neck measurement (the neck of the top).

b If you have made your own binding, fold the binding in half with wrong sides together. (If you are using store-bought binding, the binding will already have the folds made in steps b - d).

c Unfold the binding (the crease is there to guide the next folds).

d Fold the outside edges towards the centre fold created in STEP b. Press.

e Unfold the binding for the time being (the creases will help you apply the binding). In the case of the Collins top, fold back the short ends by 2cm (3/4in).

TAKE 2-1-01.jpg

With the top inside out, pin the binding to the neckline (right side of binding pinned to wrong side of top). In the case of the Collins top, you need to have the short ends of the binding folded back at the centre back opening.

Start at one side of the centre back opening and line up the folded edge of the binding with the folded edge of the back opening. The centre back seam allowances of the top need to be folded inside the top.

Work your way around the neckline (being careful not to stretch the neckline or the binding) until you get to the other side.

TAKE 2-2-01.jpg

Stitch the binding in place with a 1cm (3⁄8in) seam allowance (you can stitch along the first crease line). Check that all seam allowances are still pressed in the right direction.

If your fabric is thick or bulky, consider trimming / grading down the seam allowance around the neckline by 6mm (1⁄4in). If working on a curve Like this neckline), you can also clip into the curve (this will help the binding sit nice and flat).

TAKE 2-3-01.jpg

Turn the top right side out. Wrap the bias binding around the raw edge of the neckline, bringing half of the bias binding to the outside of the top - use the creases created earlier to assist you. Adjust the binding, so that the fold just covers the stitch line underneath. Press and pin the bias binding in place.

TAKE 2-4-01.jpg

To secure the bias binding, carefully edgestitch close to the fold with the right side of the top facing up.

TAKE 2-5-01.jpg

Give the neckline a good press from both the right and wrong side of the top.

I hope that demystified the process of applying double fold bias and taught you are new finishing technique to have under your belt!

Happy sewing!

Emily


RESOURCES MENTIONED IN THIS ISSUE

  • Issue 8 of the Q & A series can be found here.

  • How to make your own bias binding (the low tech way) tutorial. Blog post can be found here.

  • Collins top sewing pattern. Pattern can be found here.

  • How to join bias binding - How to finish an armhole with bias binding tutorial. Blog post can be found here.

  • The Rushcutter dress sewing pattern. Pattern can be found here.


P.S. Would you like to know what the Q & A series is all about? This page tells you a little bit more about the motive behind the series.

Don't have a question, but found this newsletter helpful? I'd love to hear from you! Get in touch and say hi.

More posts in the series

ISSUE 8 - ATTACHING SINGLE FOLD BIAS BINDING

ISSUE 8 - ATTACHING-SINGLE-FOLD-BIAS-TAPE.jpg

THE Q & A SERIES - ATTACHING SINGLE FOLD BIAS BINDING

Hi Emily,

Regardless if i use pre-made bias tape or make my own, I get so confused on how to apply and my garments don't look as neat as I'd like.

Can you please break down the steps to applying bias tape if A) you want the bias tape to SHOW ON THE RIGHT SIDE of your garment and B) you do not want your bias tape to show on the right side of your garment?

Thanks so much!

- RG
Portland, Oregon


Collins-top-binding.jpg

Hi RG,

Bias binding can be a beautiful finish for armholes, necklines and finishing seams (among may other applications), but I understand it can also be tricky to get right.

I am more than happy to set out some tips, and then I'd suggest just getting lots of practice! It is one of those things that once you get the hang of it, it will come a lot more easily to you and you will be wanting to reach for the bias binding more and more!

I'm going to split this answer over the next two issues of the Q & A series, so the two applications remain clear and seperate and you will be able to refer to each issue when you need it (and I also don't want to scare you off by writing the longest email of all time!)

WHAT IS BIAS BINDING?

Bias binding is a strip of fabric cut on the bias (diagonal to the grainline / selvedge) that can be used in a variety of applications. By cutting the fabric on the bias, it gives the fabric a small amount of stretch, which makes it ideal for finishing curves and wrapping around seams (in the case of bias bound seams).


SINGLE FOLD & DOUBLE FOLD BIAS BINDING

In the photo above, the Collins top is inside out - showing the finish of the binding on the inside.

Single fold bias binding is the type of binding you will most often see in ready to wear fashion, as well as most sewing patterns that include a bound neckline or armholes.

This type of binding will give you a clean finish on the right side of the garment (you will just see a stitch line where the binding has been secured), and on the inside of the garment you will be able to see the bias strip neatly finished and stitched along the edge.

This issue will show you how to apply single fold bias binding.


Double fold bias binding is what you will use if you want to see the bias binding on both the right side of the garment and the inside of the garment.

There is an extra fold put in the binding (which is what gives it the 'double fold' name) that is used to wrap around the edge of the garment, so it is visible on both sides.

Next week's issue will show you how to apply double fold bias binding.


WHAT TYPE OF BINDING TO USE

You can make your own bias binding or purchase it by the metre / yard from a store. If making your own bias binding, I recommend using a lightweight cotton fabric such as cotton lawn or cotton shirting. You can also consider using a contrasting colour or print to add a fun pop of colour to the inside of your garment.

Depending on what instructions you are following, information changes slightly from person to person when it comes to the best way to cut your own binding as well as apply it. The instructions I am giving you today is the way I was taught at university and is the method I continue to use today. Like anything in sewing, find the techniques that work for you!

If purchasing binding, you will need to buy 25mm (1in) single fold bias binding. If you are making it yourself, you will need to cut 3.2cm (1¼in) strips from a square of fabric and then fold the bias binding with a bias tape maker or fold and press by hand. The reason for the difference in width between the home made and the store-bought is that when buying pre-made bias binding, the width on the label refers to the width of the exposed part of the binding (as this is what you will see when the binding has been sewn on the garment), rather than the width of the binding when it's pressed flat.

For more information on cutting your own binding, you can see this tutorial.


APPLYING BIAS BINDING TO A NECKLINE

I will guide you through binding a neckline as this is one of the most common applications, and once you’ve nailed a neckline, you should be able to apply binding to any curve!

These instructions will guide you through applying bias binding to the neckline of the Collins top. The Collins top has an opening in the back, so the binding does not need to be joined. For a neckline without an opening, you need to join the two ends of the binding (see this tutorial for more information on joining binding).

If you prefer photos (rather than illustrations), you can see the photo tutorial here.

Using a tape measure, measure around the neckline of the top, starting from the centre back on one side, and continuing around the neckline until you reach the centre back on the other side of the back opening.

a Cut a piece of bias binding about 4cm (1⅝in) longer than your neck measurement (the neck of the top).
b If you have made your own binding, place it right side down and press one long edge of the binding under by 1cm (⅜in). (If you are using store-bought binding, the binding will already have these folds made in steps b and c).
c Repeat for the other (long) side.
d Press both short edges under by 2cm (¾in).

Unfold the binding for the time being (the creases will help you apply the binding).

With the top right side out, pin the binding to the neckline with right sides together (top is right side out). In the case of the Collins top, you need to have the short ends of the binding folded.

Start at one side of the centre back opening and line up the folded edge of the binding with the folded edge of the back opening. The centre back seam allowances need to be folded inside the top.

Work your way around the neckline (being careful not to stretch the neckline or the binding) until you get to the other side.

Stitch the binding in place with a 1cm (⅜in) seam allowance (you can stitch along the crease line). Check that all seam allowances are still pressed in the right direction.

Trim down the seam allowance around the neckline by 6mm (¼in), and then clip and grade.

Flip the binding up to show the right side. Using your finger, press the seam allowance up towards the binding and understitch the seam allowance to the binding.

Turn the top inside out and fold the neck binding to the inside of the neckline, rolling the seamline towards the inside of the top slightly. With the raw edge of the binding folded under, press the binding flat around the neckline. Pin in place. Stitch along the folded edge of the binding.

Give the neckline a good press from both the right and wrong side of the top.

I hope that demystified the process of applying single fold bias binding to a curve. Next week I will show you how to finish a neckline with double fold binding!

Would you like to have a practice sewing this finish? Both the Rushcutter dress and the Collins top include a bias bound neckline.

Happy sewing!

Emily


RESOURCES MENTIONED IN THIS ISSUE

  • How to make your own bias binding (the low tech way) tutorial. Blog post can be found here.

  • Collins top sewing pattern. Pattern can be found here.

  • How to join bias binding - How to finish an armhole with bias binding tutorial. Blog post can be found here.

  • The Collins top sew-along: Binding the neckline. Blog post can be found here.

  • The Rushcutter dress sewing pattern. Pattern can be found here.


P.S. Would you like to know what the Q & A series is all about? This page tells you a little bit more about the motive behind the series.

Don't have a question, but found this newsletter helpful? I'd love to hear from you! Get in touch and say hi.


More posts in the series

ISSUE 7 - CUTTING LINEN (OR OTHER TRICKY FABRICS)

ISSUE 7 - CUTTING-LINEN-OR-OTHER-TRICKY-FABRICS.jpg

THE Q & A SERIES - CUTTING LINEN (OR OTHER TRICKY FABRICS)

Hi Emily,

I love sewing with linen, but have real trouble keeping my fabric straight; it always "moves" when I mark it to cut it out. Are there any tricks to keep linen in place?

Thanks


- Jutta
Twickenham, UK.


Hi Jutta,

This is a great question! Linen generally has quite a loose weave - this is what makes it so beautiful to wear, but is also what can make it tricky to cut.

What I suggest you do with any fabrics that are tricky to cut (silks, chiffons, some rayons, some linens etc.) is to cut the fabric sandwiched between layers of paper.

Yep, I said it... paper! A lot of people in the home sewing word freak out at the mere suggestion of this, but in the industry it is common practice. I learned this trick when I studied fashion at university and it was a complete game changer! And yes, my fabric scissors have lived to tell the tale.

So if you're game to give it a go, continue reading...

prepare the paper

The way I do it is I take a large sheet of paper (I use "dot and cross" drafting paper) and draw a straight line along one of the long sides and one of the short sides. Use a long ruler (preferably clear) and use the dots and crosses as a guide.

If you would like to know more about the tools I suggest for patternmaking - please see this blog post from a few years ago.

prepare the fabric

Measure out the amount of fabric you require. If possible tear the amount you need.

Tearing generally ensures that you have got the fabric on grain - sometimes if your fabric is not great quality though, you will notice when you tear it that the grain is not straight.

If your fabric does not tear nicely - or doesn't tear at all (it's always a good idea to check on a small scrap of fabric first), you can find your cross grain by snipping into the edge of the fabric and then pulling a thread or two down from the cross-wise grain. This will create a straight line that you can cut along - continue across the whole width of fabric. Check out this tutorial from Colette if you need more details on how to do it this way.

If it looks like your sides aren't quite straight in comparison to each other, you may need to stretch the fabric on the bias (diagonals).

PIN SELVEDGE

Next, take the fabric and place it on top of the pattern paper, on a flat surface. With the fabric right side up, line up one edge (selvedge side) with the horizontal line on the paper (we'll deal with the vertical line soon).

Pin in place, being careful to check the edge remains straight between each pin.

If you are working on the fold (you will cut a pair of each piece), carefully fold the fabric in half, by bringing the opposite selvedge towards you. Line up the selvedge with the pinned edge, and then pin in place (using the original pins, so that the pins are now holding two layers of fabric and a layer of paper).

If you are cutting flat (single layer of fabric), you can skip this step.

PIN OTHER AXIS

Carefully line up the torn / cut edges on the left side with the vertical axis (marked with the vertical line on the paper). Make sure both layers of fabric are straight on the cross-wise grain, and then pin in place. I generally just pin the two sides (one vertical and one horizontal), but if you feel it will make things easier for you, you can also pin the other two sides of fabric to the paper.

Gently smooth out any wrinkles or bubbles in the fabric. I use a long plastic ruler to do this.

TOP LAYER OF PAPER

Put another layer of paper on top, sandwiching the fabric in between the two layers, before putting pins through all four layers (you can use new pins, or carefully remove the pins from the fabric between the paper and pin through all 4 layers).

Alternatively, if your fabric seems stable enough - you can miss this step and just have one layer of paper underneath the fabric. For example, for linen I would say that normally one layer of paper is enough as it shouldn't shift too much when it's pinned to the paper. For silk, I'd definitely put on the top layer of paper.

MARK/PLACE PATTERN PIECES

Now, place the pattern pieces on top of the paper, and line up the grainline on each pattern piece with the selvedges pinned to the paper.

I normally just pin the pieces in place and then cut. If you have your pattern on card, you can simply trace around each piece, and use a few pins to anchor them. You could also use pattern weights instead.

Carefully cut into each notch, and mark drill holes / darts etc. with a tailor's tack or chalk.

TIP: I find it easier to leave the cut pieces between the layers of paper until I'm ready to sew them. This way, they remain protected, but are also much easier to identify.

This tutorial was originally featured in the blog post 'The Acton Sew-along : 6 tips for sewing with silk (or other delicate fabrics). Check out this post for more tips for working with tricky fabrics!

I hope this solution solves your problem Jutta!

Happy sewing,

Emily


RESOURCES MENTIONED IN THIS ISSUE

  • Dot and cross drafting paper. Can be purchased by the roll here.

  • Tools for pattern making blog post. Blog post can be found here.

  • Finding the grainline. Blog post can be found here.

  • The Acton Sew-along : 6 tips for sewing with silk (or other delicate fabrics). Check out the post here.


P.S. Would you like to know what the Q & A series is all about? This page tells you a little bit more about the motive behind the series.

Don't have a question, but found this newsletter helpful? I'd love to hear from you! Get in touch and say hi.


More posts in the series

ISSUE 6 - SELECTING THE CORRECT SIZE

ISSUE 6 - SELECTING-THE-CORRECT-SIZE.jpg

THE Q & A SERIES - SELECTING THE CORRECT SIZE

Hi Emily

Thank you for sharing your extensive knowledge of all things sewing and drafting with us, I for one soak up everything you post.

I was wondering which size to choose when my measurements fall in the middle of two sizes? My bust is 93cm, do I choose size D or E, and adjust side and shoulder seams for fit later?

This new platform of answering questions is a wonderful way to expand our knowledge of all things sewing and drafting from a trained professional. Thanks again.

- Helen
Scarborough, Australia


Hi Helen,

Thanks for the email.

I am pleased to hear you like the format of this new email series. I am really excited to have the opportunity to connect with more makers through this platform!

This is a great question, and one I can see being very beneficial to a lot of other makers, also struggling with this question - so thank you for asking it!

There is not a straightforward answer to this question, as choosing a size, when you're between sizes (like so many of us are), will often depend on the pattern. In saying that though, it is not a difficult process at all and once you get the hang of what to look for, you will become a natural!

Below I will go through what I think you should consider before selecting a size for some of my patterns (and this should also help you when using other designer's patterns too).

Without all your measurements in front of me, I will take a guess and say that for most of my patterns you will be fine to choose a size D. With a bust of 93cm, your measurement is only 2cm larger than the size D bust measurement, and generally my patterns have a lot of design ease in them, so that 2cm should not make a difference. The only pattern that you would need to adjust would be the Acton dress (due to the fitted nature of the bodice) - more details on this below.

In saying this though, it is always good to know your high bust measurement, as choosing your size based on your high bust measurement will normally give you the best fit (more details on that below).

IN THE FOLDS SIZING

All In the Folds patterns are drafted for a B cup bust. A B cup bust, in sewing terms, is slightly different to what a B cup means when purchasing a ready to wear bra. Basically, it refers to the difference between your high bust measurement and your full bust measurement. I think it's important no matter what pattern you are using, to have an accurate measurement for your cup size, as well as know what cup size the pattern is drafted for. For more information about working out your sewing bust cup size, you can see the introduction section of this post here.

EDIT: 02/02/23 Our latest patterns are now available in two size brackets: sizes A - J and sizes G - P. There is a 4 size overlap (G - J) so that you can grade between pattern sizes when required.

The size A - J pattern is drafted for a B cup bust (5cm / 2in difference between high bust and full bust measurements). The size G - P pattern is drafted for a D cup bust (10cm / 4in difference between high bust and full bust measurements). If your measurements are in the overlap section of our size charts (G - J), w suggest using the G-P range to achieve the best fit.

You can find our updated sizing chart here.


This post from the Curvy Sewing Collective also gives great information about finding your cup size, as well as a list of many designers and the cup size they use when drafting.

Although my patterns are drafted for a B cup bust, most of my patterns have a considerable amount of ease in the bust area (except for the Acton dress), so this also needs to be taken into consideration when selecting a size (and before considering making an alteration).

MAKING A TOILE (MUSLIN)

I am a strong believer in making a toile (some of you might know it as a muslin). Although taking your measurements gives you a really good idea of where to start with selecting a size / making adjustments, nothing beats what you can learn from making a toile. Even though I have been sewing since I was a child, I never make a garment without first making a toile (yes, even for a sack dress!). It means that by the time I get to cutting the "proper" fabric, I can relax and enjoy the process - knowing that the garment I finish with will (most likely) be something that I will love to wear.

For guidance on making a toile, check out this post from the Rushcutter sew-along.

THE RUSHCUTTER

When it comes to making The Rushcutter dress, the your high bust and full bust measurements are the most important measurements to consider. As the dress is slightly A-line in shape (and very boxy), it is most important to get a good fit through the shoulders and neckline, and due to the amount of ease in the waist and hips, it is likely you will be fine to leave the pattern as-is, even if your waist and / or hips are a bigger or smaller size than your bust.

If you have an A cup, B cup or C cup size bust, you should be able to take your high bust measurement and cut the pattern according to that size. If your bust is between sizes it's likely you can afford to go down a size as there is a significant amount of ease at the bust.

To see how much ease is included in a pattern, simply compare the body measurements to the finished garment measurements. For example, the finished garment measurement for a size C is 100cm (39 3/8") and the body measurement for this size is 86cm (33 7/8") - therefore there is 14cm (5 1/2") ease in the bust.

If you have a cup size larger than a C, what you need to do is take your high bust measurement and add 5cm (2in) to it (this 5cm / 2in is the equivalent of a B cup bust - what the pattern is drafted for). Select the size based on your high bust, plus the 5cm (2in). You will need to make a full bust adjustment to change the pattern from the measurement found and your actual bust measurement. A tutorial on doing a FBA can be found here.

The Rushcutter sizing info can be found here.

THE COLLINS TOP

The Collins top is intended to have a substantial amount of design ease in it to create a fun and dramatic shape. For this reason, I suggest focusing on your bust measurements (both high and full bust) when selecting your size, so that you get a good fit through the chest.

Use your high bust measurement to select your size and then your full bust measurement to work out whether or not you need to do a Small Bust Adjustment (SBA) or Full Bust Adjustment (FBA). If your bust is more than a couple of sizes bigger or smaller than your high bust, it might be a good idea to make the alteration (if you have an A cup or C cup bust, you will like be okay to cut the pattern as-is, without making the alteration).

If you have a large bust and decide not to do a FBA, you may want to add some extra length to the front of the pattern to ensure the top doesn't become too short. If your measurements are between sizes, I suggest selecting the smaller size due to the amount of ease in the pattern.

The Collins top sizing info can be found here.

THE ACTON DRESS

affd9547-ad88-4fcb-89e9-0d737c3f3b58.jpg

Unlike the Collins top and the Rushcutter dress, the Acton dress does not have much ease in the bust. It is designed to be a fitted bodice, so selecting the correct size for this pattern is a little more important than the other two patterns discussed.

Again, take your high bust measurement and your full bust measurement to work out if you will need to make a Full Bust Adjustment (FBA) or a Small Bust Adjustment (SBA).

If the difference between your high bust measurement and your full bust measurement is greater than 5cm (2in) you will need to do a FBA. If it is smaller than 5cm (2in) you will need to do a SBA.

You should definitely make a toile of this pattern! Even if it's just of the bodice section. By making a toile, you can check the fit, and make any adjustments before cutting into your “real” fabric. It is also important to make a toile for the Acton, as it is difficult to make adjustments to the fit as you go, as the bodice is fully lined.

The other thing that is important to check on the Acton dress, is the strap length. The length of the straps will significantly impact how your bodice sits, so have a play to make sure the "peak" of the bodice (the fullest part) is sitting directly on the fullest part of your bust. This can be tricky to do on your own, so if possible find someone to give you a hand pinning the straps in position on the back.

ca5d0bb5-c3c5-4991-a25d-b33b9343c12a.jpeg

Detailed instructions about making a toile for the Acton can be found here.

The Acton dress sizing info can be found here.


I hope this helps you with your selecting your size when you're using my patterns, as well as other designers!

Happy sewing,

Emily


RESOURCES MENTIONED IN THIS ISSUE


P.S. Would you like to know what the Q & A series is all about? This page tells you a little bit more about the motive behind the series.

Don't have a question, but found this newsletter helpful? I'd love to hear from you! Get in touch and say hi.


More posts in the series

ISSUE 5 - LENGTHENING THE PEPPERMINT WRAP TOP

ISSUE 1 - LENGTHENING-THE-PEPPERMINT-WRAP-TOP.jpg

THE Q & A SERIES - LENGTHENING THE PEPPERMINT WRAP TOP

Hello

This is my first ever make of one of your patterns, and I love how it turned out. I have a query though, I would like to lengthen it slightly, so where would I do that on the pattern, if I did it from the base of the bodice and back it would also increase the width of the ties.

Thanks for a wonderful pattern and my first ever french seams without any stress.

Julie


(Please note, the photo above shows Julie's original top. Scroll to the bottom to see the lengthened version).

(Please note, the photo above shows Julie's original top. Scroll to the bottom to see the lengthened version).

Hi Julie,

Thank you so much for taking the time to add your submission to the Makers Gallery! I really appreciate it.

I am so pleased you enjoyed using your first In the Folds pattern. It looks fantastic!

I have done a few illustrations to explain how I would go about lengthening the top, as you're right, it's not as straightforward as how you would normally go about lengthening a pattern, due to the wrap sections.

STEP 1 - PREPARE YOUR PATTERN

To start, consider if you would like to make the alteration to the original pattern, or trace a copy. The beautiful thing about PDF patterns is that you can always re-print the original if required, but if you think you will be wanting the original, I'd suggest saving time and tracing a copy now. If tracing, be sure to transfer all important markings, such as dart point and notches.

STEP 2 - MARK LENGTHENING LINE

Mark a horizontal line through the pattern. I suggest marking the line between the two notches. To make sure the line is horizontal - check that it is perpendicular to the grainline.

You will see in the illustration that the line runs directly across the pattern, until it reaches the seam allowance line. At this point I have drawn a line that cuts through the seam allowance at a right angle. This will make it easier when you are using this section as a "hinge" (more details on this technique below).

Take a large piece of paper and mark two horizontal lines, the distance apart you would like to add to the top. For example, if you would like to add 5cm (2in) to the length of the top - draw the lines 5cm (2in) apart.

STEP 3 - CUT PATTERN

Cut through the line on the pattern piece, stopping when you get to the seam allowance line on the wrap side. Cut in to the seam allowance on the wrap side, stopping at the point on the seam allowance - creating a small hinge of paper (2mm or so wide).

STEP 4 - MAKE THE ADJUSTMENT

Place the pattern on top of the piece of paper with the lines marked.

Line up the top section of the pattern with the first line and stick down with glue or tape. Open up a dart in the side seam, using the hinge on the other side and move the lower section of the pattern until it reaches the lower line . Glue / tape in place.

More information about the 'cut and spread' technique can be found here, if this technique is new to you.

STEP 5 - RE-DRAW SIDE SEAM

Re-draw the side seam, by drawing a line of best fit. Move the notch back up to the original location (about 14cm below the first notch).

STEP 6 - ADJUST HEMLINE

You can also add a little more length to the front of the top at the hemline (if you like), by altering the shape of the hem as illustrated.

You can then lengthen the back of the top as you normally would - adding the same amount of length that you added to the front (measured at the side seam) and also moving the notches.

As this is quite a big alteration, I'd suggest making a toile/muslin before making the top, to check you are happy with the length and how the top is now sitting.

As this Q and A series is based on questions that I have received over time, I can let you know how this alteration worked for Julie. Here is her new lengthened top, made using this tutorial!

As this Q and A series is based on questions that I have received over time, I can let you know how this alteration worked for Julie. Here is her new lengthened top, made using this tutorial!

Happy sewing,

Emily


Resources mentioned in this newsletter


P.S. Would you like to know what the Q & A series is all about? This page tells you a little bit more about the motive behind the series.

Don't have a question, but found this newsletter helpful? I'd love to hear from you! Get in touch and say hi.


More posts in the series

ISSUE 4 - MAKING A PLAN FOR THE YEAR / QUARTER

ISSUE 4 - HOW-TO-MAKE-A-PLAN-FOR-THE-YEAR-QUARTER.jpg

THE Q & A SERIES - MAKING A PLAN FOR THE YEAR / QUARTER

Hi Emily,

I messaged you recently about a post you made on Instagram talking about something you’re using to help you stay on top of your work. Would love to know what you’re using!

(The fact that it has taken a week for me to email you should be indicative of my current state of affairs!)

thanks so much,

- Dawn


Hi Dawn,

Thanks for the email.

I am sorry to hear you are struggling to keep on top of things. I totally feel your pain and was definitely in the same state for the first 3 years of running my business!

I am very happy to share with you what I have learned, in the hope it may help you too!

THE SYSTEM

The system I am using is probably something you could do in any project management program, or even in a paper diary, as I think it's more about the concept rather than the tools.

I am currently following this system in the project management system I use (Trello) as well as a paper planner (the planner is something I created myself which has been growing and adapting as I work out what works best for me). I am using the two formats as I do like the ability to sit down regularly and write on paper, particularly for the reflection exercises I do and the weekly planning, but then transferring all the important bits to Trello means that I can access my plan wherever I am, as I have the app on my phone - so that is really handy.

GOAL SETTING

For me, I think the goal setting is one of the most important parts of this system. Having my goals set and sorted means that I have a north star - something to refer to when I have difficult decisions to make or need to prioritise projects or tasks.

I spent a day at the beginning of the year doing some overall goal setting and thinking about what I wanted to work on for the year. I did this by reflecting on the previous year - what worked, what didn't and thinking about how I was feeling about each aspect of my life - things like business, finances, health etc. I used a simple ranking system (1-10) in each area to see what areas needed some work.

I didn't want to overwhelm myself with goals, so came up with just three to focus on for the year. My main goal is pretty simple and something I can keep coming back to when I'm questioning whether I should do something. It is related to the number of patterns I want to produce / release this year. I then have a few secondary goals that are more related to my personal life.

QUARTERLY PLANNING

I then decided to split the year into quarters - and this is probably the thing that has been the game changer for me. I created lists for the 12 weeks of each quarter (plus a 13th week that is a break week) and worked out when things needed to be done to meet the goal for the quarter.

For example, when I was creating patterns in collaboration with Peppermint magazine I put in the deadline for the sample to be made and then for the pattern to be published - these milestones were set in stone so it was very important I could always meet those deadlines. I would put the deadlines in my quarterly plan and then with this information I then worked out at what point I would need to send the pattern to be graded and illustrated (it takes the freelancer I work with 4 weeks to do it, so that helped me work out when it needed to be sent). From that I could go week by week and work out when the design needed to be finalised, when I needed to order fabric etc. I find the easiest way of doing this is by setting the project completion date and then working backwards, week by week, until all aspects of the project are accounted for.

I then did the same thing for my own patterns - working out timing in relation to the Peppermint pattern (as I can't swamp my freelancer with 2 jobs at the same time). I was realistic about how long things actually take me. For example, if I am working on a new pattern, I give myself the full quarter to work on design and development, so that means if there is a week without a more pressing deadline, I set a day aside to work on design and development. I did this for each task I wanted to complete for the quarter - trying to be realistic about what could actually get done.

For pattern releases, I put notes in the weeks before to do things like contact the testers, prepare website pages etc. For sample making, I put things like washing the fabric in my plan - this means I can be a lot more organised and also batch tasks when possible.

BREAKING IT DOWN FURTHER

Once I have a basic idea of what needs to be done when in the quarter, I add more detail. I have a list for each week of the quarter (I don’t plan any further than the quarter ahead, although have a rough idea of what will be happening for the remainder of the year. For a really small business, I think it’s difficult to realistically plan for more than 3 months in advance - so that’s the way I like to do things).

I then break each weekly list up by day and batch tasks together. This way I can see if I am setting myself reasonable amounts of work. For example, I only have 3 days a week to work on my business, so I might say, this week Wednesday is for admin and I batch all my tasks, Thursday is for sample sewing and Friday is for pattern creation and digitsation (computer based work). If something doesn’t fit or I realise I have overloaded myself - I will move the task to another week in the plan where it fits better. I find this the best way to set myself up for success, rather than packing my days to the brim and then feeling frustrated and overwhelmed when I (inevitably) don't manage to get everything done. If there is a conflict, I can look back at my goals and work out what is the priority, or consider getting outside help if it looks like I can't get through everything I need to get done.

I use the previous quarterly plan as a guide each time I sit down to do quarterly planning and tweak as I learn how long things really take. It’s a work in progress and I imagine that it is something that will always be changing and adapting as my business grows. But it's good that after I created my quarterly plan the first time, I have been able to just tweak it each quarter and have not needed to start from scratch.

WEEKLY PLANNING

As well as my 'Quarterly plan,' I have a 'Weekly to do' board in Trello. On a Sunday I do a reflection exercise from the previous week and take note of anything that didn’t get done, anything I’m struggling with etc. I then take a fresh weekly plan and copy down all the tasks from my Quarterly plan - allocating each task to the work days I have available. I do this all in my paper planner before transferring it to Trello (as mentioned earlier, I like having a digital copy so I can always access my plan on my phone, using the Trello app, even when I don’t have my planner with me).

I set a couple of goals / milestones for the week to ensure I am focused on my larger big-picture goals and am focused on doing the right work to get me there. I also add any tasks that I didn’t complete the previous week back into the current weekly plan.

DAILY CHECK-IN

Something I have added to my planner recently is space for a daily check-in. I realised that it was great to feel productive and get everything done, but there wasn’t any space in my day / plan for checking in and taking stock. I now answer a few questions each morning and evening in my planner (such as ‘What is the one thing you would like to get done today?’ ‘What will you do to celebrate completing it?’ 'What are you grateful for today?') and that is really helping me feel good about what I am achieving as well as reminding myself to schedule joyful things in my days too.

SCHEDULED BREAKS

Scheduling a break week has also been a game changer. It was so good last quarter to actually take scheduled time off and see it as a celebration for the hard work I had done. I think as creative business owners this is probably something we struggle with the most.

THE BENEFITS

The thing I have found most beneficial about the plan is that it has given me permission to not do certain things. It gives me a place to dump all the information so that when I am ready to do a particular task it is there. For example, I might suddenly think, 'I have to make a sample of xxx' and then I see it's in the plan for 2 weeks time and I can just forget about it. Prior to this I was just trying to work on everything at the same time and felt like I was never completing anything.

Working this way has also helped me realise that there are only so many hours in the day and to not over-commit myself. I try to be realistic about how long things will take so that I don't always feel like I am behind. I always try to make make my daily task list reasonable and achievable. If you struggle with this - consider writing down how long you expect the task to take next to each item. I often do this when I am feeling overwhelmed and suddenly realise I have scheduled 16 hours worth of things in a day - which is obviously setting myself up for defeat.

Although I try to always follow my plan, I am also working on going easy on myself when things don't go to plan. Most of my deadlines are self-imposed, and pushing something back by a couple of weeks is not going to be the end of the world.

Best of luck with it!

Emily


RESOURCES MENTIONED IN THIS ISSUE

  • Trello can be found here.


P.S. Would you like to know what the Q & A series is all about? This page tells you a little bit more about the motive behind the series.

Don't have a question, but found this newsletter helpful? I'd love to hear from you! Get in touch and say hi.


More posts in the series

ISSUE 3 - ATTACHING A CURVED WAISTBAND - THE WIDE LEG PANTS

ISSUE 3 - ATTACHING-A-CURVED-WAISTBAND-TO-PANTS.jpg

THE Q & A SERIES - ATTACHING A CURVED WAISTBAND (THE PEPPERMINT WIDE LEG PANTS)

Hello,

I am making the free pattern for the wide leg pants. Thank you for making this available.

I am having a problem fitting the waistband to the pants. I have cut out a straight size D. I know that the pants need to be eased into the smaller waistband but it seems like there is too much pant to ease into the band.

I have double checked to see that I have cut out the correct pieces, and I have. I’ve also checked that I have sewn the darts correctly, and I believe I have. I have even reduced the seam allowance on the waistband to 1/4 inch. There still seems to still be over an inch of ease.

Do you have any suggestions that might help me with this, I’m really stumped.

- Donna


Hi Donna,

Thank you for reaching out.

I am pleased to hear you are making the Wide leg pants!

The stitch line on both the pants and the waistband is exactly the same length, but due to the seam allowance, it does take a little bit of easing to get the waistband to fit the pants.

Reducing the seam allowance to 6mm (1/4in) will actually increase the problem. As the curves are two different shapes, the cut edges of the two sections (the pants and the waistband) are different lengths - it is only when you attach them right at the correct point (1cm / 3/8in from the cut edge) that the two curves become exactly the same length.

One question that comes to mind is have you got the waistband the right way up? When I was testing the Darlow pants pattern this was a common mistake testers made, putting the top of the waistband on the pants. Please see the image above, that highlights the edge that is connected to the pants.

If it is the right way up, then I'd be checking your cut pieces against the pattern and making sure that the waist of the pants hasn't stretched out during the process. It is also a good idea to check your darts are sewn at the correct width and also re-check all your seam allowances are correct.

I hope that helps. Let me know how you go!

Happy sewing,

Emily


RESOURCES MENTIONED IN THIS ISSUE


P.S. Would you like to know what the Q & A series is all about? This page tells you a little bit more about the motive behind the series.

Don't have a question, but found this newsletter helpful? I'd love to hear from you! Get in touch and say hi.

More posts in the series

Issue 2 - HOW TO LAUNCH A KICKSTARTER CAMPAIGN

ISSUE 2 - HOW-TO-LAUNCH-A-KICKSTARTER-CAMPAIGN.jpg

THE Q & A SERIES - HOW TO LAUNCH A KICKSTARTER CAMPAIGN

Hi Emily,

I hope this email finds you well?

I'm a quilter/seamstress/designer/teacher and I'm about to launch a Kickstarter campaign for a project I'm very excited about.

I'm wondering if you have any tips you would be willing to share from your successful campaign? I've got a few people in my circle of friends/contacts I'm going to be asking and I hope it's OK that I asked you.

Thank you so much; I look forward to hearing from you,

- L


Hi L,

Thank you for reaching out. How exciting that you are about to launch your own Kickstarter campaign! Although it was a tough slog, I would definitely recommend it and say it was by far one of the best things I've done for my business so far.

It was a great opportunity to connect with my community and meet other makers. It also really validated what I'm doing and gave me the push I needed to get my patterns out into the world. I hope this information doesn't overwhelm you (I'd suggest making yourself a cup of tea, as it's going to be a long one!) - it's just all the things I would have liked to have known before going into it.

understanding the playing field

I started my campaign by researching the Kickstarter platform a lot and finding campaigns that looked great and had been successful. This gave me a good idea of what I needed my campaign to look like and what information to include.

My approach is to always look at the best work (even if it took a whole team to produce it) and model my work against that. My theory is that although I will never be able to make work as polished (I am a one person show), it gets me a lot closer than if I was modelling my work up against projects that weren't as strong. Like the saying goes “Shoot for the moon. Even if you miss, you'll land among the stars.”

I found the Kickstarter creator handbook really helpful. I printed all the information out and worked through it - taking notes as I went. This became the scaffold of my whole campaign.

PLANNING REWARDS

In terms of rewards, I know it's tempting to offer heaps of different things, but I'd say hold back. I thought I'd given just enough options, but then found it difficult to fulfil one of the rewards (a slow sewing planning template) as it took longer than I had anticipated. It would have been easier (and reduced stress) if I had just offered the patterns and tote bags.

I also think it's a good idea to put an option down that is just a donation with no reward. For my campaign I did a $50 reward that was 'nothing but a whole lot of love' and a number of people picked this option as it's good for people who want to support you, but don't sew or need your product.

Also, make sure you've got a broad range of price options. I had rewards from $1 to $150, and probably could have even had an even higher value reward. It was clear that some people who were really excited about it were just scrolling down to the highest reward and picking that one.

THE VIDEO

f4cc2580-1e0a-4f5f-a89b-43641aa0e67f.jpg

I am not sure if you are planning on making a video, but if you can, I'd say it's definitely worth it. I found the video the most stressful part of it all (I'm quite camera shy), but it really did bring it all together, and it's the easiest way to succinctly say what your project is about.

Just like I said in the first point, I watched a lot of videos to see what I liked / didn't like and modelled mine on that. I was also lucky enough to have a trusted friend create the video for me, so I knew he would be able to create a video that was able to tell the story of me and my brand.

I prepared by writing a script that succinctly summed up what my project was about and had my friend ask questions / prompt me during filming.

PHOTOS

If you can, I'd suggest getting some professional photos taken of your product / what you are creating. I had taken some on my phone and at the last minute, decided to get a photographer in and it was a game changer. I also got her to take portraits of me for the campaign and it was good having fresh photos to use on the campaign as well as on social media. These images really brought it all together and gave my campaign a very cohesive and on-brand look. You are really selling yourself as well as the product when you're crowdfunding, so make sure you show people who you are. Also a great excuse to get some photos of your beautiful work!

DESIGN COLLATERAL

The other thing that I also found made a difference to the look of the campaign was to get a graphic designer to design all my collateral. She is the designer I worked with for my branding, pattern envelopes etc. and then she just rolled it out onto illustrations of the rewards, as well as templates for me to use on social media when I hit certain targets (for example, 'We're halfway there').

REWARD FULFILLMENT

TOTE BAG.png

In terms of fulfilling rewards, I had said I would get all my rewards out to people in April and found that a huge struggle. I got all my Australian ones out in time, but the international rewards were a month late. No one seemed worried about it, but I did find it stressful. If I were to do it again, I'd definitely give myself a bit of extra time. I was expecting a certain number of people to pledge and then there were a lot more in the end (which was great), but it did mean it was a lot more work to pack and send the rewards than I had thought.

As for postage, make sure you have a really good idea of how much things are going to cost to send out. I thought I'd estimated well, but quite a surprise when I got to the post office (this especially applies to shipping things internationally)!

FINAL TIPS

When it comes to launching your campaign, keep in mind it needs to be approved. I was on a bit of a deadline and hadn't taken this into consideration. It didn't take long, but I think it could take up to a couple of days - so worth keeping in mind.

To promote the Kickstarter I started by emailing all my friends and family, before I let people on my business social media / email list know. I thought it looked good if a few people had already pledged before I spread the word further.

Also, I'd suggest being as organised as you can. You want to enjoy the campaign period, so be ready to respond to questions and have posts prepared for sharing on social media etc.

Best of luck with your campaign!

Happy sewing,

Emily


RESOURCES MENTIONED IN THIS ISSUE

  • In the Folds Kickstarter campaign can be found here.

  • The Kickstarter Creator Handbook can be found here.


P.S. Would you like to know what the Q & A series is all about? This page tells you a little bit more about the motive behind the series.

Don't have a question, but found this newsletter helpful? I'd love to hear from you! Get in touch and say hi.


More posts in the series

Issue 1 - Lengthening the Collins top (with a FBA)

ISSUE 1 - LENGTHENING-THE-COLLINS-TOP-WITH-FBA.jpg

Welcome the the Q & A series.

Over the last few years of running In the Folds, I have struggled with the idea of sending an email newsletter. At a time when we are constantly bombarded with information from all different directions, I kept wondering what I could create that would be truly valuable to the community that I serve.

I want to create something that you will look forward to receiving, something that will encourage you to sit down with a cup of tea and take it all in, not another piece of content that will interrupt your day, but something that will inspire and encourage you on your handmade journey.

The Q & A series - What it’s all about

The format I settled on is the Q & A series, an opportunity to share the questions I often receive in my inbox, with all of you. I realised that my answer to one person's question is a chance for us all to learn something new and an opportunity to continue the conversation about the many different parts of the process of making our own clothes.

It is my hope that this series takes us to interesting and unexpected places. I will be sending the newsletter weekly for the time-being (this is something I might adjust after seeing what the response to the newsletter is) and I hope you choose to continue on this journey with me.

If you have a question you would like to ask, please scroll to the bottom of this email to find the link to the question page. I look forward to hearing from you!

COLLINS-TOP-LENGTHEN-1.jpg

THE Q & A SERIES - LENGTHENING THE COLLINS TOP (WITH FULL BUS ADJUSTMENT)

I am in the midst of making your lovely Collins top pattern (which is so well drafted!) but I am stuck. I just went through all the steps of a FBA (full bust adjustment), finished truing and then realized I also wanted to lengthen it considerably.

Would it make sense to lengthen the front via your tutorial but true the side seams from below the new dart- maybe the bottom leg? It seems if I true again for lengthening from the top to the hem I’ll mess up the shape of the dart.

- Melissa


Hi Melissa,

Thank you for getting in touch, and for your lovely email. I am more than happy to help you with this! Always a good idea to get a second opinion when you can, and I agree the Collins top FBA does involve a bit of work, so you don't want that going to waste!

I just printed the front piece with the dart added from the FBA tutorial and had a look what happens for both options for lengthening.

OPTION 1

COLLINS-TOP-LENGTHEN-2.jpg

Add the desired length to the pattern using this tutorial. Fold out the dart (the way you would have done in the FBA tutorial to create the dart shaping) and then true the seam from the top of the seam. Cut the new seam line and then open up dart.

OPTION 2

Collins-1-01.png

Add the desired length to the pattern using this tutorial. True the seam from the lower dart arm.

THE VERDICT

COLLINS-TOP-LENGTHEN-4.png

As you will see in the above illustration, the difference between the two approaches is minimal (barely noticeable in fact). By trueing from the top of the seam the dart shaping wasn't impacted. I'd say you can choose whichever option you feel more comfortable with as the difference is only about 2-3 millimetres.

Happy sewing,

Emily


RESOURCES MENTIONED IN THIS ISSUE

  • Collins top FBA (Full bust adjustment) tutorial. Tutorial can be found here.

  • Lengthening the Collins top pattern. Tutorial can be found here.

  • How to check and true sewing patterns. Tutorial can be found here.

  • Collins top sewing pattern. Get the pattern here.


P.S. Don't have a question, but found this newsletter helpful? I'd love to hear from you! Get in touch and say hi.


More posts in the series