Making the Burwood jeans pattern in linen
Q & A - PANTS FITTING: FULL SEAT ADJUSTMENT
Q & A - PANTS FITTING: SWAY BACK ADJUSTMENT
Q&A ELASTIC WAIST BACK PANTS
ISSUE 177 -HOW TO SLIM DOWN THE WIDE LEG PANTS PATTERN

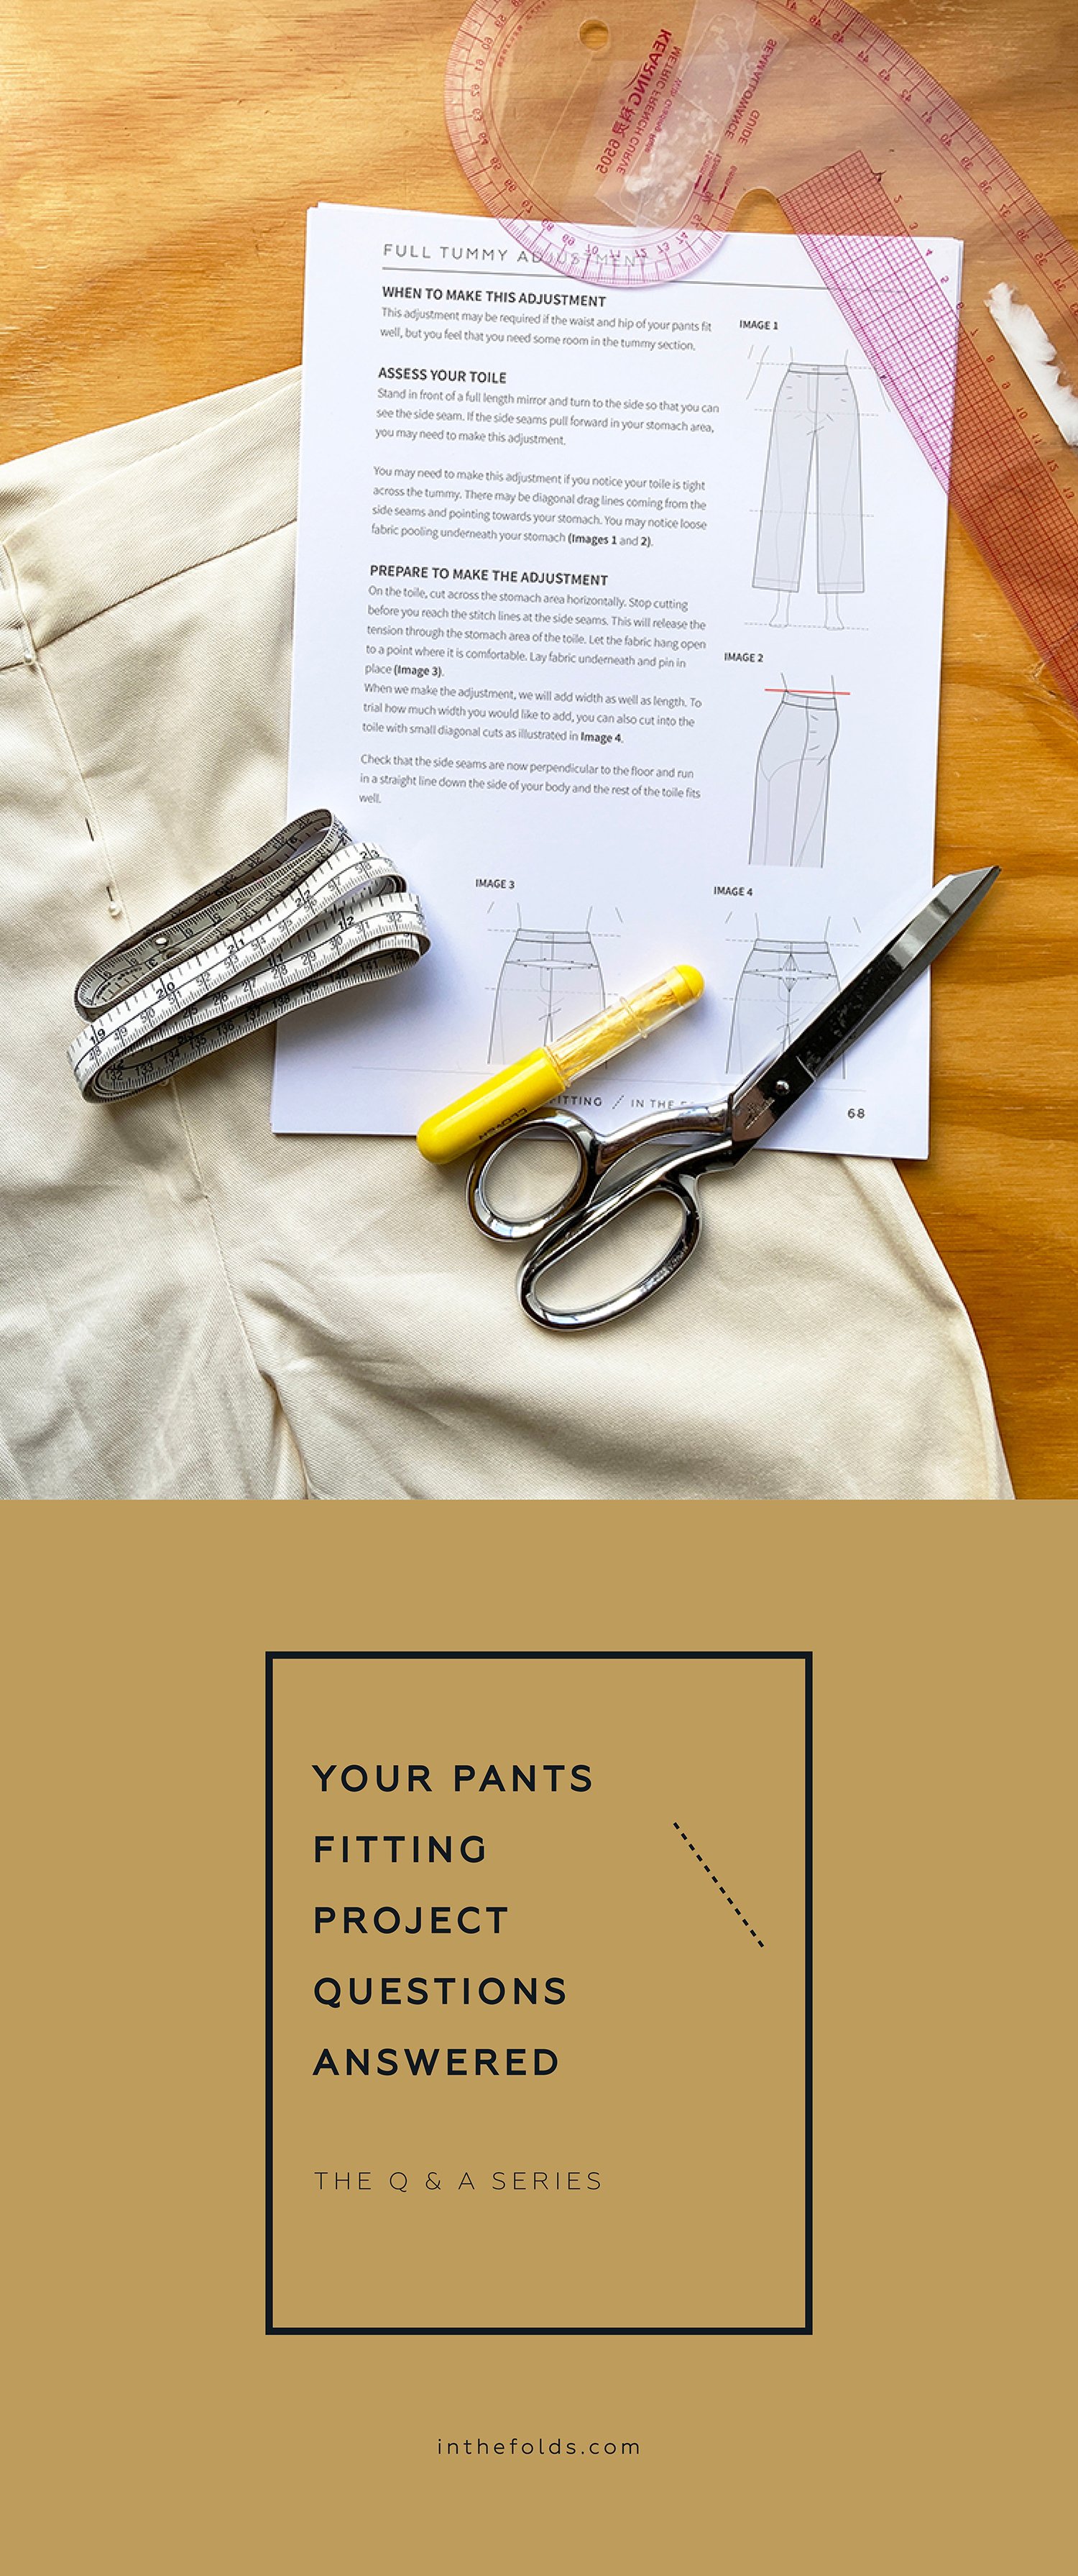
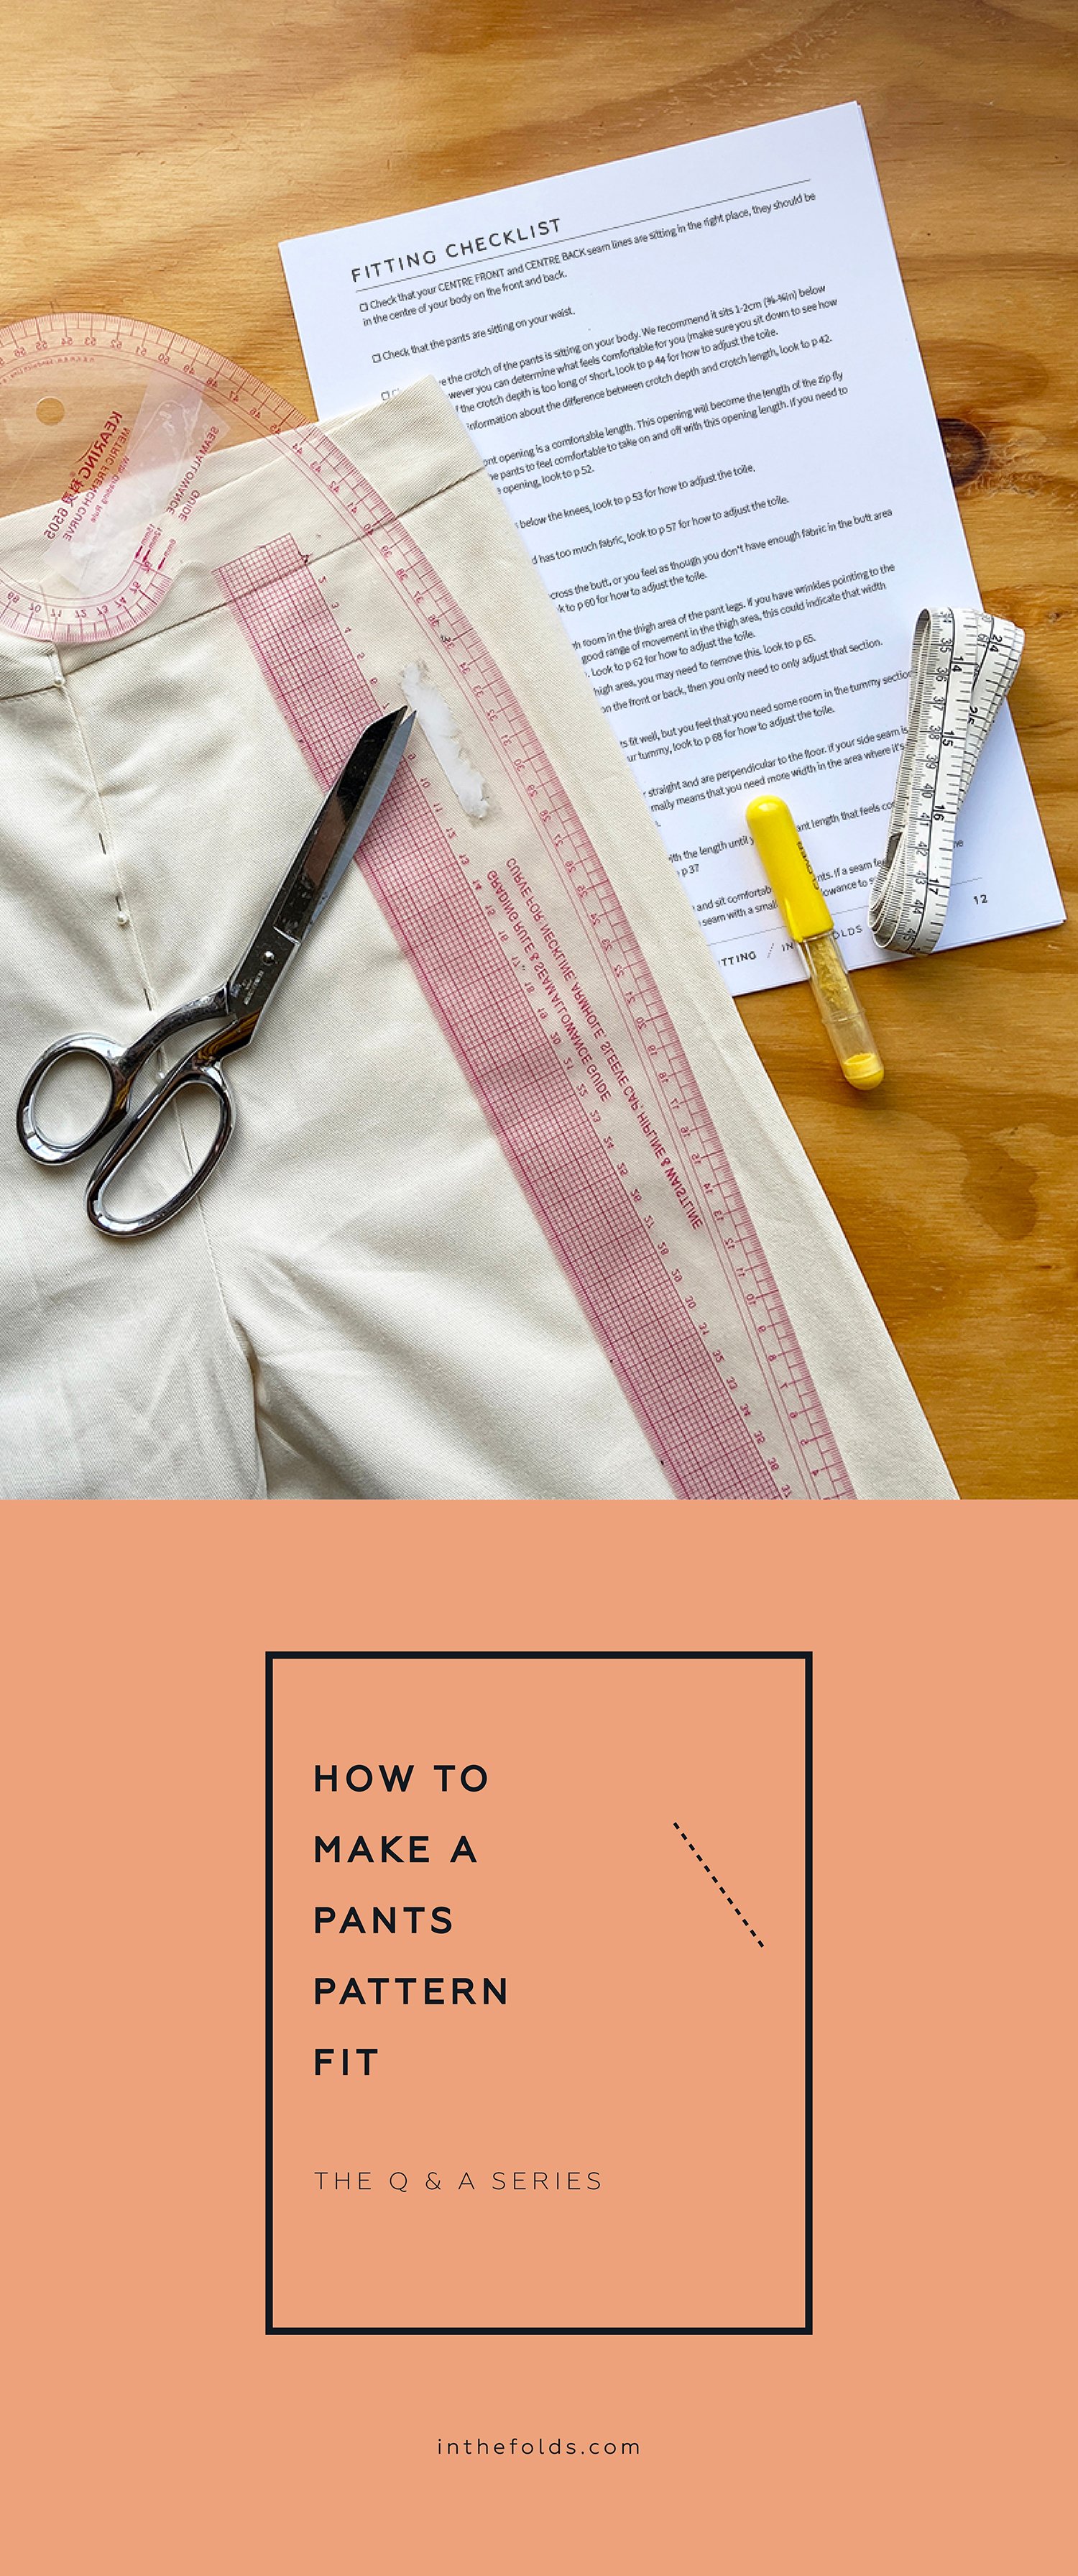
THE Q & A SERIES
HOW TO SLIM DOWN THE PEPPERMINT WIDE LEG PANTS PATTERN
Hi Emily,
I had a question about the Peppermint Wide Leg pants.
They are drafted straight from the hip. If I wanted them to narrow around the thigh and be straight from there down, how would one do that? Might be too complex to tackle, but thought I'd ask!!
(Also, I'm just 2 seams from finishing my first Flynn jacket and I wanted to tell you this much. I completely love and appreciate that pattern and instructions!!! It is probably my favourite pattern to date.)
Nina
Hi Nina,
I have a pair of jeans that I made from this pattern and I also made the exact alteration you are planning to make!
I found the easiest way to get the leg shape I wanted was to first make a toile in calico. So, here’s my tips!
TIPS FOR SLIMMING THE LEG OF THE PEPPERMINT WIDE LEG PANTS PATTERN
I recommend you make the toile with a long stitch length in a contrasting colour so you can easily see and unpick seams needed.
Don't bother putting in the zip.
Just cut one set of waist band pieces so you can pin the pants closed and get them to sit in the correct position on your waist.
Put the pants on inside out so you can see the stitch lines. (This is where the contrasting thread is useful!) Play with the seams until you figure out how much you want to take off the side seams and inner leg seams. With the toile on, use a marker to mark directly onto the fabric. (Alternatively, you could use pins to hold in place, but sometimes this can be a little painful when you’re wearing the toile and fitting on yourself!)
When you take off the pants, use a ruler and marker to mark in your new stitch lines. You will need to unpick the crotch seam either side of the inner leg seam to make any alterations to that seam.
Stitch along the new lines (again with a long stitch length in case you need to unpick them again), and try them on again. Continue this process until you are happy with the shape.
If you have a number of stitch lines by the end, take a coloured marker and trace along the stitch lines to mark the new stitch line on the fabric.
Unpick the pants so you have the front and back piece and then transfer the changes back to the pattern.
It is likely that you will need to skim off some of the pocket pieces at the side seam, so be sure to transfer the shape of your new pattern piece to the pockets too.
And that’s it! Sometimes, making changes to a pattern can take a little time when you do a toile, but in my experience toiling is never something to be regretted.
If you’d like to continue learning more about sewing pants, I highly recommend our very popular Pants Making Series, which the Pants Sewing Skills Kit, Pants pattern and Fit Kit, plus the Pants Design Kit.
Happy sewing,
Emily
For more issues of the Q & A series, you can check out the archive here.
WHAT YOU’VE BEEN MAKING

Acton dress made by @crafty_enthusiast

Sleeveless Flynn jacket made by @damselfly.ca
MORE POSTS IN THE SERIES


ISSUE 154 - HOW TO MAKE A FLAT BUTT ADJUSTMENT

THE Q & A SERIES
HOW TO DO A FLAT BUTT ADJUSTMENT
Hi Emily,
I absolutely LOVE the Q&A series! Finding you and In The Folds has been a game-changer in my sewing journey!
One question which I'm struggling with finding much information about is how to do a 'flat seat' adjustment. I understand that a wedge needs to be taken out from the back crotch seam, but how is that actually done?
Appreciate any guidance you can give!
Thanks, Kimi
New Zealand
Hi Kimi!
Thanks for your question! Firstly, because I know this is a question that many people out there will love to get an answer to as well, but also because making clothes that fit is one of the foundations of In the Folds. Nobody wants to spend hours of their time (not to mention the money!) sewing clothes that don’t fit the way you want them to. And the thing is, with a little practice, these skills can quickly become second nature and just another normal part of your sewing process.
With the release of our Attwood pants pattern, it’s also a timely tutorial to cover in case someone decides their Attwood pants need a bit of adjusting.
However, it’s not quite as simple as removing a wedge from the back crotch seam. In last week’s Behind the Scenes post we discussed why we like to use industrial sewing techniques in our patterns, and I think this is another great example of the difference between professional fitting alterations and those you will find in the home sewing world.
While you might find that taking a wedge out of the back crotch seam gets the job done, it may cause fit issues in other areas and it will probably affect the finished look of the garment.
So, here’s a step-by-step tutorial for correcting this issue using professional fitting techniques so you know exactly how to do it! And, if you’re interested in learning more pants fitting techniques, check out our Pants Fitting pattern & Fit Kit.
HOW TO TELL IF YOU NEED A FLAT BUTT ADJUSTMENT
Also known as a baggy butt adjustment, you’ll know you need to make a fit adjustment to your pants because you’ll notice excess fabric in the back of the pants. You could even say that the back may look a little deflated and saggy.
You can check this easily by standing in front of a full length mirror, using another mirror to look at the back of your garment while being worn. Try to avoid using only one mirror to do this because turning your torso to look in the mirror will cause the garment to twist and will not give an accurate representation of the fit.

If the back is baggy and has too much fabric (Image 1), we will pinch out fabric vertically and evenly throughout the back leg and then add in any extra fabric that is needed at the waist.
PREPARE TO MAKE THE ADJUSTMENT
While wearing the garment, roughly pinch out the excess that needs to be removed in the butt area. (Image 2, below). You may need someone to help you do this if you’re trying to fit them on yourself! We’ll remove fabric throughout the whole leg evenly to stop the pattern from skewing.

Take the toile off and pin out vertically through the whole leg (Image 3), making sure to take an even amount. Unpick side seam at the waist and add in fabric if necessary (Image 4).
IN THE FOLDS PANTS PATTERNS & RESOURCES


HOW TO DO A FLAT BUTT ADJUSTMENT

Step 1
a Draw a line from the top to the bottom of the pattern parallel to the grainline roughly in the middle of the pattern. Make sure to avoid the dart. Let's call this line A.
b Draw another line parallel to line A. The distance between the two should be the amount you'd like to remove from the pattern. Let's call this line B.

Step 2
Add an 'anchor line' perpendicular to lines A and B. This will help you line up the pattern.

Step 3
Cut through line B completely and overlap, aligning line B with line A. Use the anchor line to help realign the pieces. Tape in place.

Step 4
Taking from the pattern evenly means we've also made the waist and leg measurements smaller, so it's likely you'll need to adjust the pattern to add the amount that you took out through the whole leg back to the waist area only to return the waist measurement to the original. We will spread the amount we are adding to the pattern between the CENTRE BACK and the side seam.
i Record the amount you took from the pattern overall, (see STEP 1 b).
ii Divide the amount from (i) by 2 so we can add it evenly on each side.
a Mark in the distance found in ii, out from the STITCHLINE at both the CB and side seam.
Step 5
Re-draw the side seam and CB seam with smooth lines, joining them back to the waist STITCH LINE (a) and CUT LINE (b). Cut off excess paper. Check all seams are the correct length by 'walking' the pattern pieces, as if you were sewing them together.
I hope this helps you get the fit you’re after, and don’t forget to check out our Pants Fitting pattern and Fit Kit for even more in-depth tutorials just like this one!
Happy sewing,
Emily
RESOURCES MENTIONED IN THIS ISSUE
The Attwood pants pattern is the August 2023 project for our Curated by ITF membership, and can be purchased here, or after August by current members in our Past Issues section. More information about the subscription can be found here.
The Pants Fitting pattern + Fit Kit was released in 2023 as part of our Pants Sewing series. It is currently only available to members of our Curated by ITF subscription, but will be released soon as a standalone resource in our online shop.
Checking patterns: Curved seams - blog post here.
For more issues of the Q & A series, you can check out the archive here.
WHAT YOU’VE BEEN MAKING

Barkly skirt made by @curwencrowed
Hacked Jersey dress made by @sewingwithkate
MORE POSTS IN THE SERIES


ISSUE 139 - Checking and truing a self-drafted pattern

THE Q & A SERIES
How to check a self-drafted pattern
Hi Emily,
I’ve been loving the recent pants fitting and designing content and it’s got me feeling confident to give drafting my own pair of pants a go! I have a design in mind and am about to get started on the pattern. I’m still quite nervous though about everything going a bit awry once I alter the pattern.
Any tips or words of wisdom to give me some confidence would be greatly appreciated.
Thanks,
Susan
Hi Susan,
I’m so pleased you have been enjoying our Pants series! This is a great question.
Firstly, with the release of our three month pants sewing project, (check them out here: Pants Sewing Skills, Pants Fitting Pattern and Fit Kit, and Pants Designing) our aim has been to ensure makers feel as confident as possible to make the pants they want to wear! This means really breaking down the process into manageable chunks so you can face one thing at a time.
We started out by concentrating on sewing skills that particularly relate to pants. Think fly fronts, welt pockets and slash pockets, among others! In the second month we focused on pants fitting with the release of our Pants Fitting pattern and Fit Kit. This month we’re bringing it all together with our Pants Designing Kit.
I understand that it can be daunting making your first pattern and to feel confident to cut into your precious fabric to sew it up. That’s why we thought sharing some tips of things to keep in mind when going from drafting your own pattern to sewing it up would be a good way to round-out the series.
3 STEPS TO FOLLOW AFTER YOU’VE DRAFTED OR ADJUSTED A PATTERN

Step 1 - Check and true the pattern.
I teach first year pattern making at a local university here in Sydney and one of the first things we teach is how to check and true a pattern.
What this means is that you need to “walk” your seams together as if they have been sewn to check they come together correctly. At first this seems like a bit of a chore, but once you realise how much time (and fabric) it can save you in the long run, it will become one of the most important skills in your tool belt!
We have two tutorials that show you how to check patterns - this tutorial focuses on straight seams, and this one is for curved seams.

Step 2 - Make a toile.
If you’ve only made small adjustments (such as altered the length or added a pocket) and have already made a toile then you may be able to skip this step.
For any larger alterations - such as raising or lowering the waist on a pair of pants or changing the shape of the pants considerably, we’d suggest making a toile to check you are happy with the changes you have made.
If you have only made changes to the upper section of the pants, you may consider making a shorts version as a toile to save on fabric.
If you’ve added panel lines, or made an alteration that doesn’t change the fit of the pant, but you’d like to see what the new design is going to look like, you might be fine just to make one pant leg, rather than a full toile.
When it comes to designing your own patterns, you no longer have the instruction booklet to guide you through every step. In this situation, making a toile gives you a chance to experiment with the best order of construction. We suggest taking notes and photos as you go so you have a record to refer to when you sew up your final pair.

Step 3 - Sew samplers.
For Issue 13 of Curated by ITF we practiced pants sewing techniques by sewing samplers.
What is a sampler?
A sampler is a piece of fabric, or small portion of a design, used to practice sewing techniques. They’re a great way to create a personal reference of techniques that can be referred to again in the future.
Due to their size, they are easy to store and refer to. Consider stapling them to the printed instructions for each technique and putting them in a binder. Alternatively, you can staple folded cardboard to the top of each sampler, punch a hole in one corner and hang on a ring in your sewing space. Consider transferring the pattern pieces to card so they are durable and able to be used again and again.
Sewing a sampler is a great way to learn a new technique or build confidence before sewing a garment. Trying out skills on samplers is far less intimidating than sewing on an actual garment and allows you to slow down, relax and enjoy the process of learning something new. Like any new skill or hobby, getting good at it will take time. By sewing just a small part of a design, you can gain confidence and have something to refer to when you make your pants.
I hope this gives you the confidence to go from drafting a pattern to sewing a garment!
A QUICK REMINDER…
This will be our last Q&A email for 2022 as our little team takes a pause for some much needed rest and relaxation and I start maternity leave. New Q&As will be back in your inbox in the new year, but if you’re worried you’re going to miss learning with us too much, remember that our whole Q&A archive is on our website. So why not take a deep dive into learning something new these holidays?
Happy sewing,
Emily
RESOURCES MENTIONED IN THIS ISSUE
The Pants Sewing Skills Kit, Pants Fitting pattern & Fit Kit and the Pants Design Kit are the first, second and third parts of our Pants Sewing project series, which is available through our Curated by ITF subscription. Past issues are also now available for purchase by subscribers. More information can be found here.
How to check and true patterns - tutorials for straight seams and curved seams.
How to and why make a toile - tutorial can be found here.
For more issues of the Q & A series, you can check out the archive here.
WHAT YOU’VE BEEN MAKING


MORE POSTS IN THE SERIES
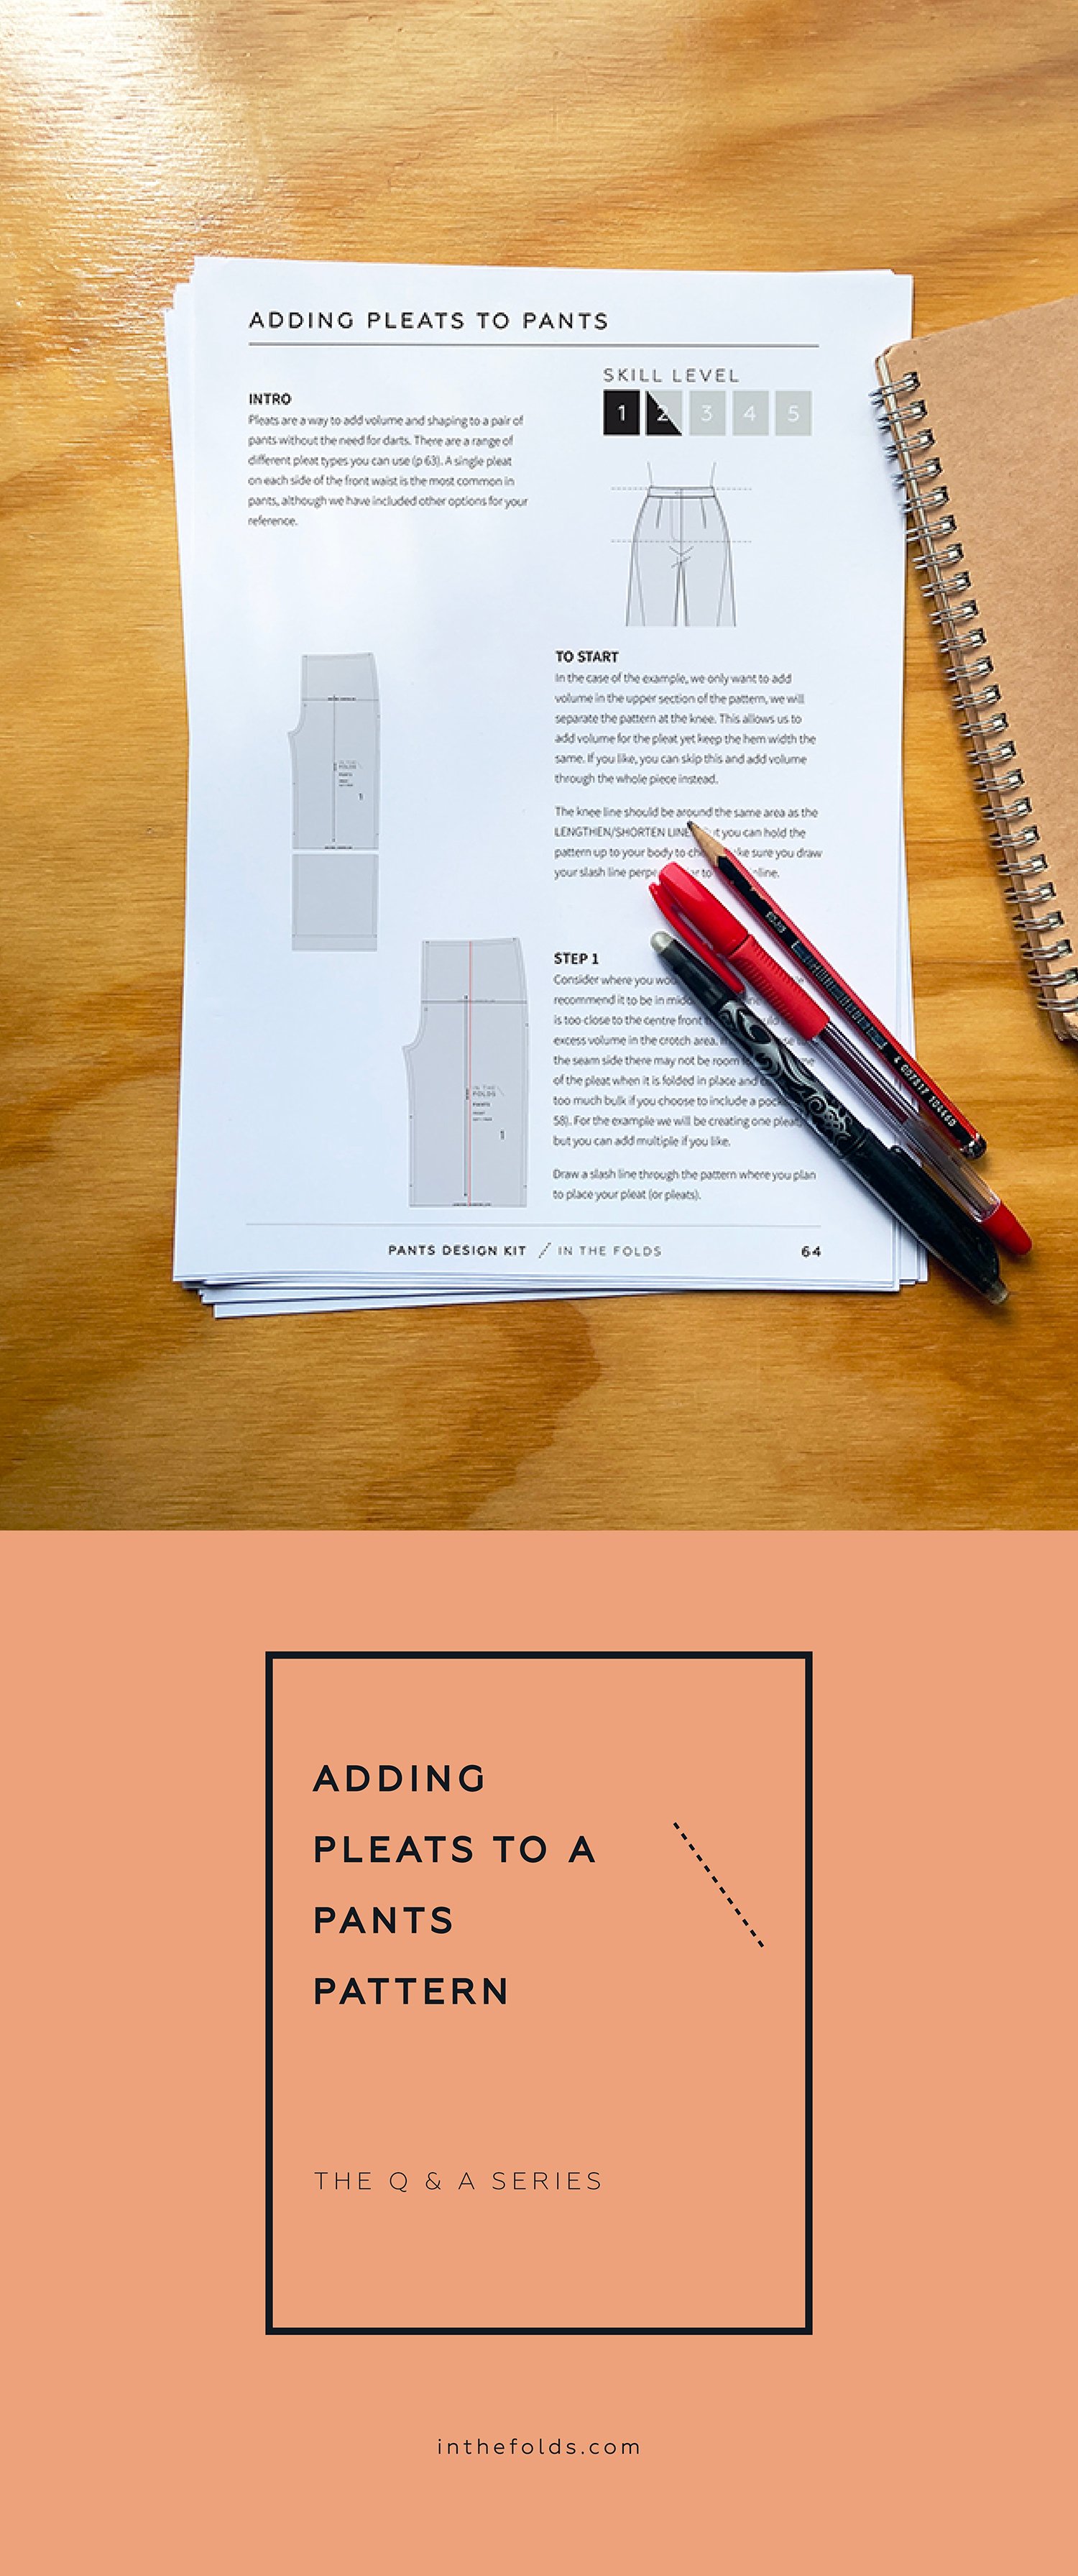
ISSUE 137 - ADDING PLEATS TO PANTS
THE Q & A SERIES
How to add pleats to pants
Hello,
I recently tried adding pleats to your Peppermint Wide Leg pants pattern and although I am happy with my results I think that I should have also added a little more width to the back panels. Is there a particular method that you would recommend for this type of pant pattern alteration?
Thank you.
Sincerely,
Jess
Hi Jess,
Learning how to hack patterns we already have is a wonderful skill to be able to add to your sewing toolbelt, and it’s something we focus on in our sewing subscription, Curated by ITF. This month we’ve been showing our members how to design pants using the pants block we made previously.
Apart from making sewing more economical, knowing how to hack patterns means that we can make clothes that we want to wear, regardless of what fashion trends are in at the moment. It also means our clothes will be unique and we’re not going to walk around a corner and see someone wearing the exact same outfit!
What are pleats?
Pleats are made when fabric is folded over on itself. They are a fantastic way to add volume and shaping to a garment - in this case a pair of pants - without the need for darts.
Pleats in pants
There are a range of different pleats you can use when wanting to add fullness to pants. Forward pleats, reverse pleats, double pleats…
A single pleat on each side of the front waist is the most common approach in pants.
If you want to increase the volume at the back of pants, you can add a pleat there as well, but it is important to consider how much volume you want in the pants overall.
My suggestion is to add pleats in the front, and then use the cut and spread technique to add the extra volume you’d like in the back.
WHAT TO keep in mind when adding pleats to pants
Depending on the pattern you’re hacking, adding more fabric into a design may impact areas of the pattern differently. Here’s two things you should keep in mind when adding pleats to pants:
If it is too close to the CENTRE FRONT this could add excess volume in the crotch area.
If it is too close to the side seam, there may not be room for the volume of the pleat when it is folded in place and could add too much bulk if you choose to include a pocket.

DETERMINING PLEAT WIDTH & DIRECTION
You will need to have a think about the size of the pleat you want to add to your pattern. This is totally up to you, and depends on the look you are wanting to achieve.
If you are struggling to work out the width you would like your pleat to be, have a play around with some fabric (or even a piece of paper). Fold different sized pleats into the fabric to get an idea of how it will look and how much fabric it will use.
Keep in mind where you intend the pleat to be placed in the garment and how much room there is. This will help you determine the best size for the pleat.
It’s up to you which direction you'd like to fold your pleat - it's just a design decision. If you're unsure, have a look at your pleat sample! We like to fold ours towards the side seam as this avoids excess volume flaring into the crotch area.
How to add volume to pants using pleats
In this example, we only want to add volume in the upper section of the pattern, so we will separate the pattern at the knee.
This allows us to add volume for the pleat, yet keep the hem width the same. You can skip this and add volume through the whole piece, if you prefer.
In the case of our Pants block, the knee line should be around the same area as the LENGTHEN/SHORTEN LINES. Hold the pattern up to your body to check.
Take care to draw the slash line perpendicular to the grainline.

Step 1
Consider where you would like to add a pleat/s. We recommend it be in the middle of waistline so you don’t add too much volume to the crotch or bulk to the pocket area. For this example we will create one pleat, but you can add multiple if you like.
Draw a slash line through the pattern where you plan to place your pleat (or pleats).

Step 2
Slide a large piece of pattern paper under your pattern.
Cut along the line from the waist, stopping 1-2mm from the knee line. This should create a hinge in the paper.
Make sure you check that there is room for a pleat this width in relation to the CENTRE FRONT / BACK and side seams (depending on where you have placed your pleat/s).

Step 3
Using the hinge, open the pattern by the amount you'd like to add for the pleat, measuring at the waist STITCH LINE. Remember that the amount needs to be double the width of your finished pleat.
Tape / glue pattern in place.

Step 4
Fold the pleat in the direction you'd like it to be sewn. Press down at the waist area to form creases.

Step 5
When you fold a pleat on a curved edge, you need to adjust the edge of the pleat so that it sits flush with the waistline.
Using a tracing wheel, transfer the waist shaping onto the pleat edge at the waist STITCH LINE. Add seam allowance to the pleat.

Step 6
Add FOLD LINES either side of the pleat. Add notches where the FOLD LINES meet the CUT LINE at the waist.
Mark an arrow to indicate which direction the pleat needs to be folded.

Step 7
Take the lower section of the pattern which you cut off before you started. Place it back on the top pattern by lining up the side seams at the STITCH LINE.
You will have an excess triangle on your pattern where the two meet - don't worry about this! The inseam and side seam are still the same length and the excess will blend into the pleat once folded.
If you've opened up your pattern a large amount, you can smooth the inseam and side seam at the knee area if necessary.
Step 8
Redraw the grainline in the centre of the pleat.

Step 9
Measuring down from the waistline on the FOLD LINES of the pleat, mark drill holes the distance down you would like to stitch your pleat.
In industry, these markings would normally be offset from the fold line by 5mm (¼in) so that the holes would be hidden inside the pleat. In the home sewing world we don't mark drill holes with actual holes in the fabric (we use chalk or a tailor's tack) so we are fine to have these markings on the FOLD LINE.
Happy sewing,
Emily
RESOURCES MENTIONED IN THIS ISSUE
The Pants Sewing Skills Kit, Pants Fitting pattern & Fit Kit and the Pants Design Kit are the first, second and third parts of our Pants Sewing project series, which is available through our Curated by ITF subscription. Past issues are also now available for purchase by subscribers. More information can be found here.
The Wide Leg Pants pattern is a free pattern and can be found here.
Adding volume to a pattern - tutorial for the cut and spread technique can be found here.
For more issues of the Q & A series, you can check out the archive here.
WHAT YOU’VE BEEN MAKING


Neale jumpsuit made by @tracyclt
MORE POSTS IN THE SERIES
ISSUE 135 - HOW TO AVOID HUNGRY BUM IN PANTS
THE Q & A SERIES
HOW TO AVOID HUNGRY BUM IN PANTS
Hi Emily,
How can I avoid the “hungry bum” on trousers ?
Sandie
Hi Sandie,
Thanks for asking this question. It’s something that nobody likes to think happens to them, but I’m sure we’ve all fallen foul of it at some point in our lives!
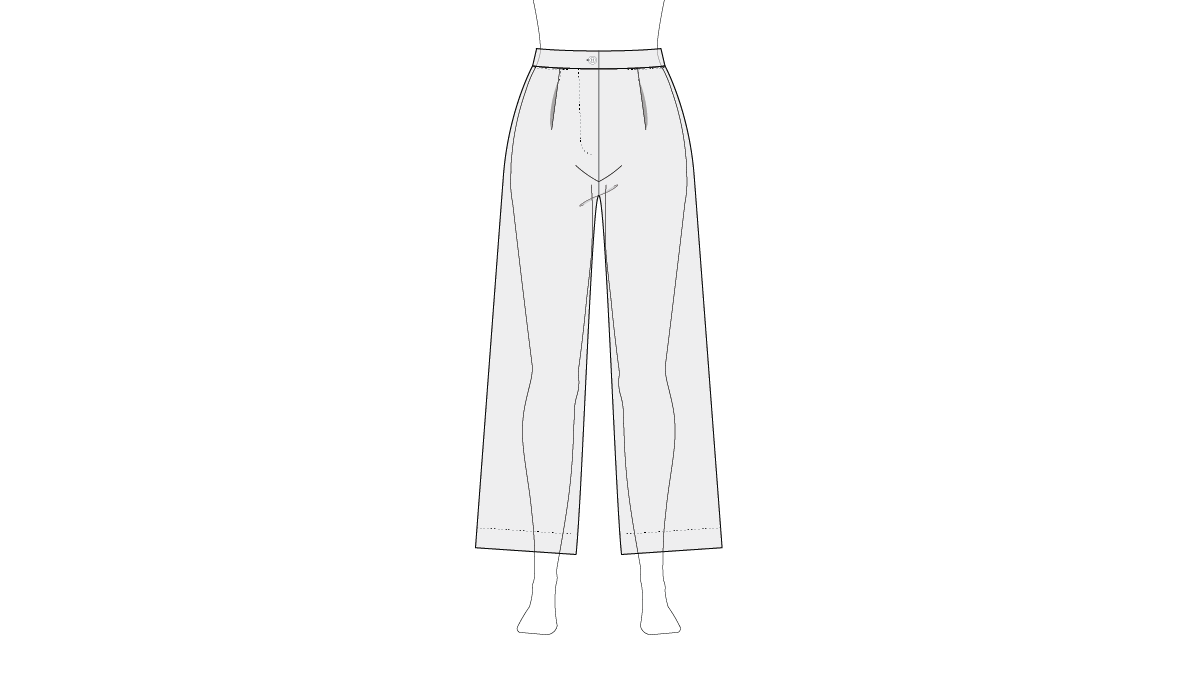
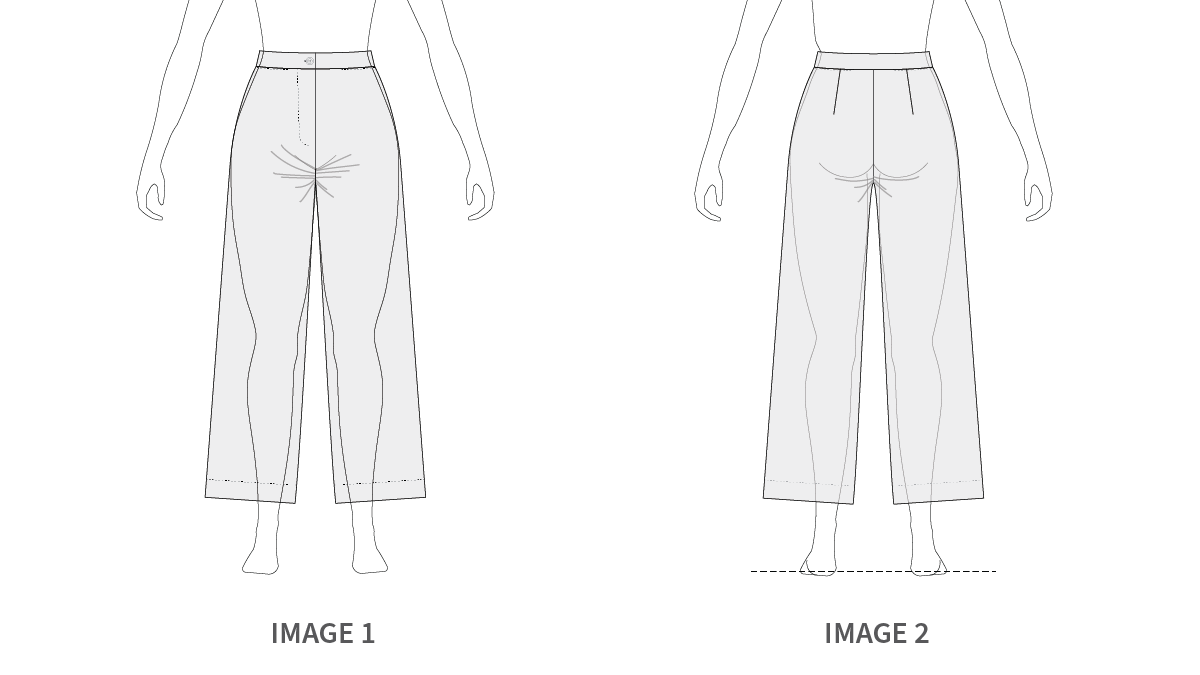
WHAT IS HUNGRY BUM WHEN REFERRING TO PANTS?
For those who’ve never heard the term ‘hungry bum’ you might be more familiar with the term ‘wedgie’. Basically, both terms refer to when your pants creep up in between the thighs and buttocks, and stay there.
SIGNS OF HUNGRY BUM
When we think of ‘hungry bum’ we immediately conjure up worst case scenario images in our head. In reality, the affect of a ‘hungry bum’ can be measured on a scale. For a bit of laugh, let’s say the scale goes from the lower end of ‘feeling peckish’ to ‘absolutely famished’ at the higher end ;)
In all seriousness, if you’ve noticed that you’ve got fabric pulling towards the front or back crotch of your pants, or the fabric is bunching up between your legs, then you’ve probably got a ‘hungry bum’. The fabric around the thighs may also feel tight.
But what causes it, specifically?
the causes of hungry bum
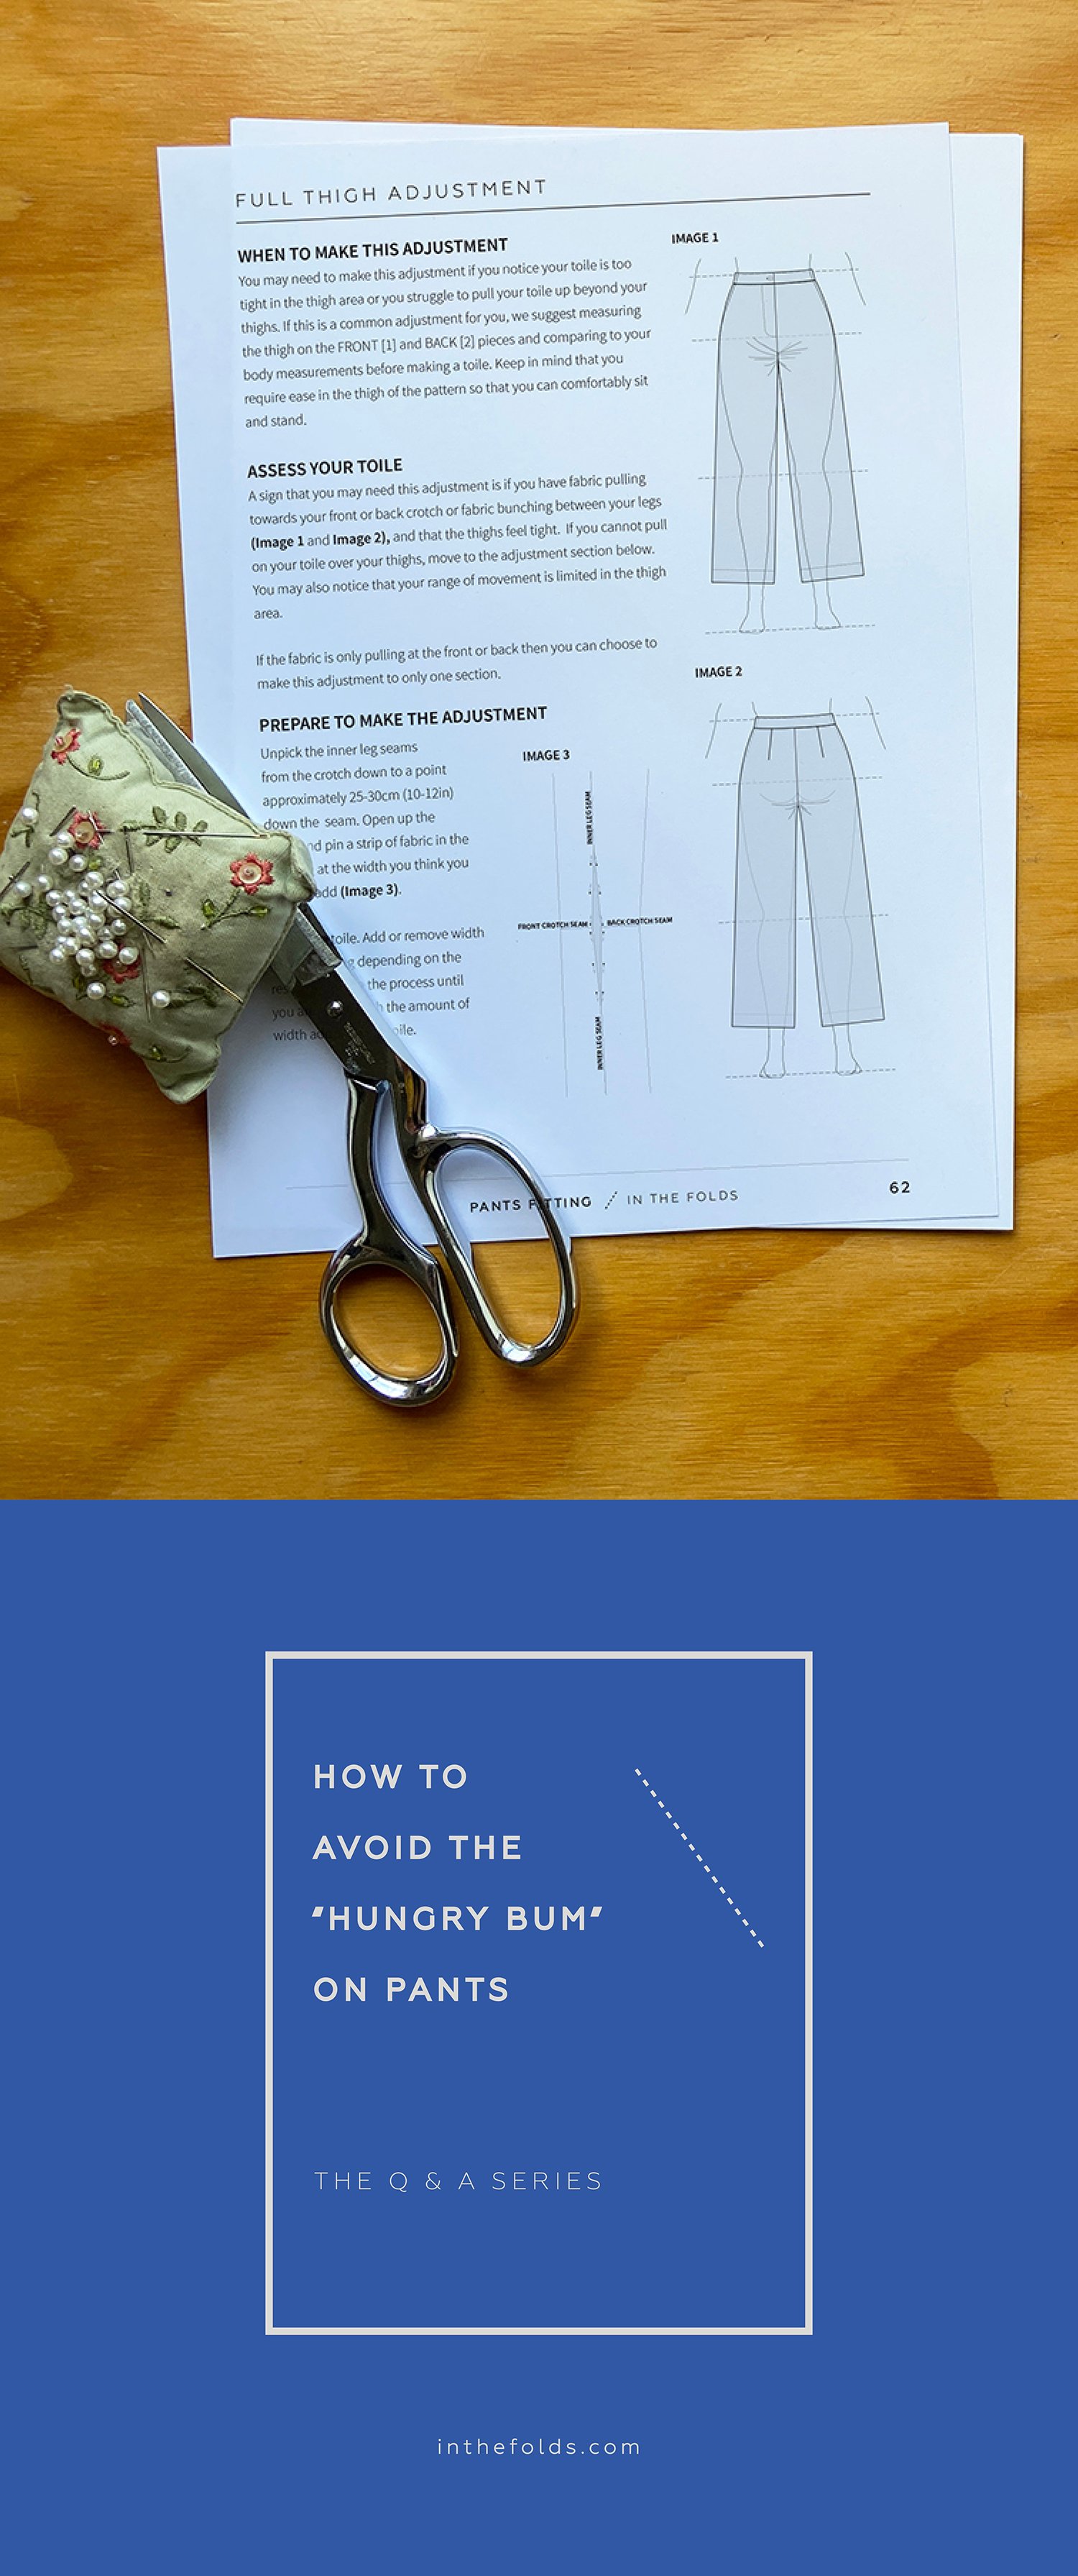
Although it is difficult to say what is causing the ‘hungry bum’ without seeing photos of a toile being worn, it’s commonly a result of a garment not fitting the wearer’s thighs properly. If this is the case, the alteration that needs to be made is a Full Thigh Adjustment. This is just one of the pants fitting adjustments we cover in our Pants Fitting issue of Curated by ITF.
when to do a full thigh adjustment
You’ll know you need to make this adjustment if your toile is too tight in the thigh area or you struggle to pull your toile up beyond your thighs. You may also notice that your range of movement is limited in the thigh area. If you cannot pull your toile up over your thighs you definitely need to include a Full Thigh Adjustment in your pants fitting process.
If a Full Thigh Adjustment is common for you, we suggest measuring the thigh on the FRONT [1] and BACK [2] pieces and comparing that to your body measurements before making a toile.
Keep in mind that you require ease in the thigh of the pattern so that you can comfortably sit and stand.
PREPARATIONS FOR A FULL THIGH ADJUSTMENT
Unpick the inner leg seams of your toile from the crotch to a point approximately 25-30cm (10-12in) down the seam. Open up the seam and pin a strip of fabric in the opening at the width you think you need to add.
Try on the toile. Add or remove width in the opening depending on the result.
Continue the process until you are happy with the amount of width added to the toile.
HOW TO DO A FULL THIGH ADJUSTMENT ON PANTS
Step 1
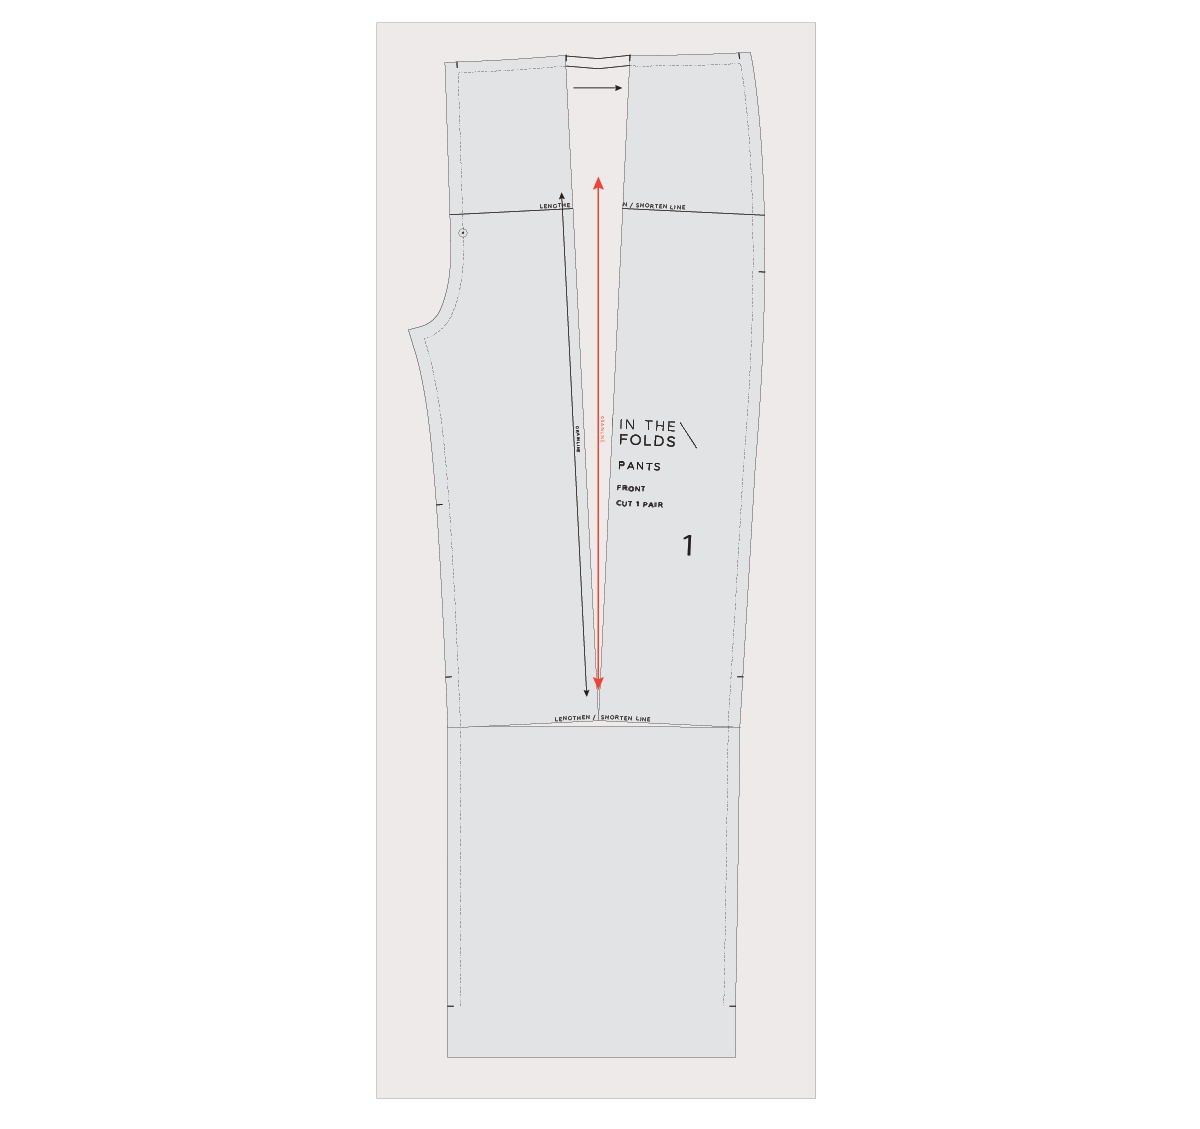
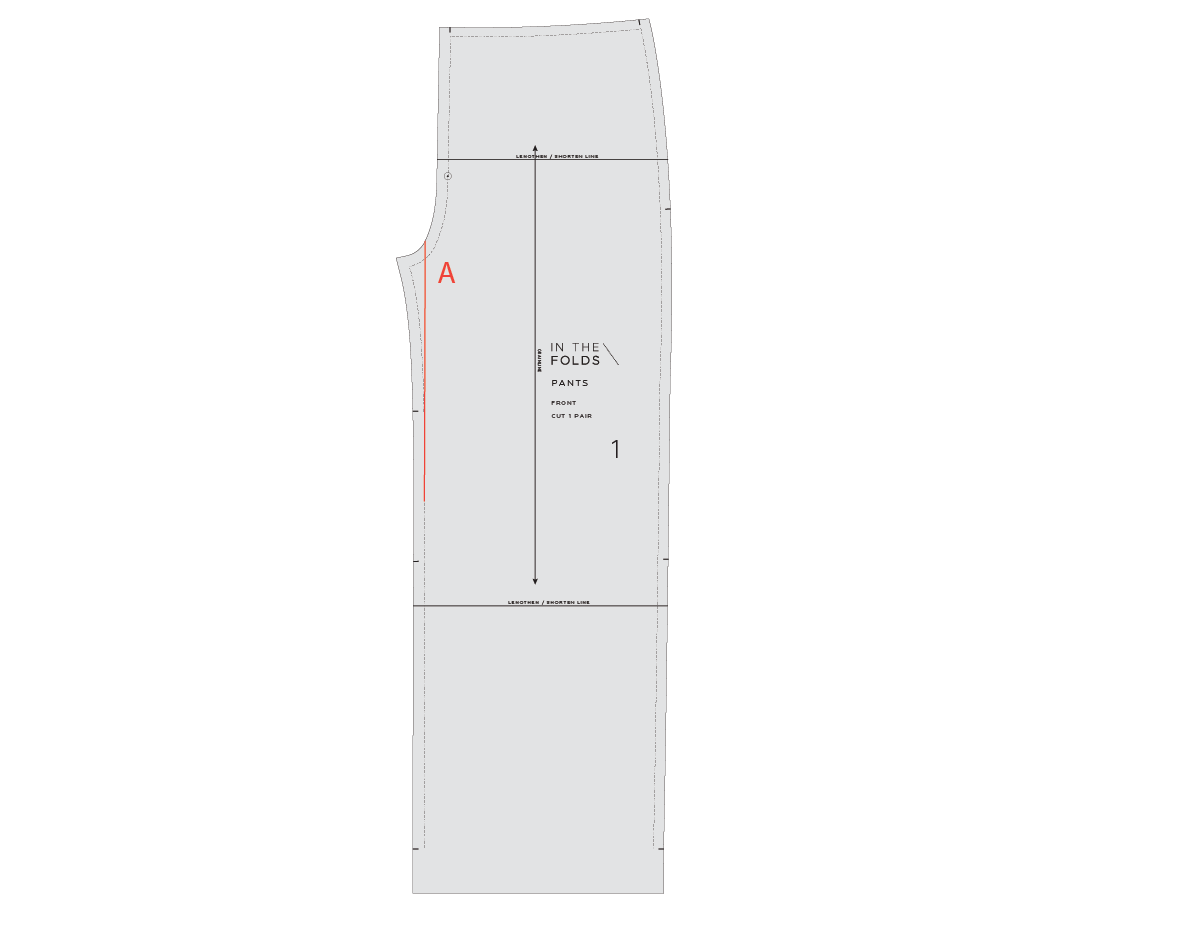
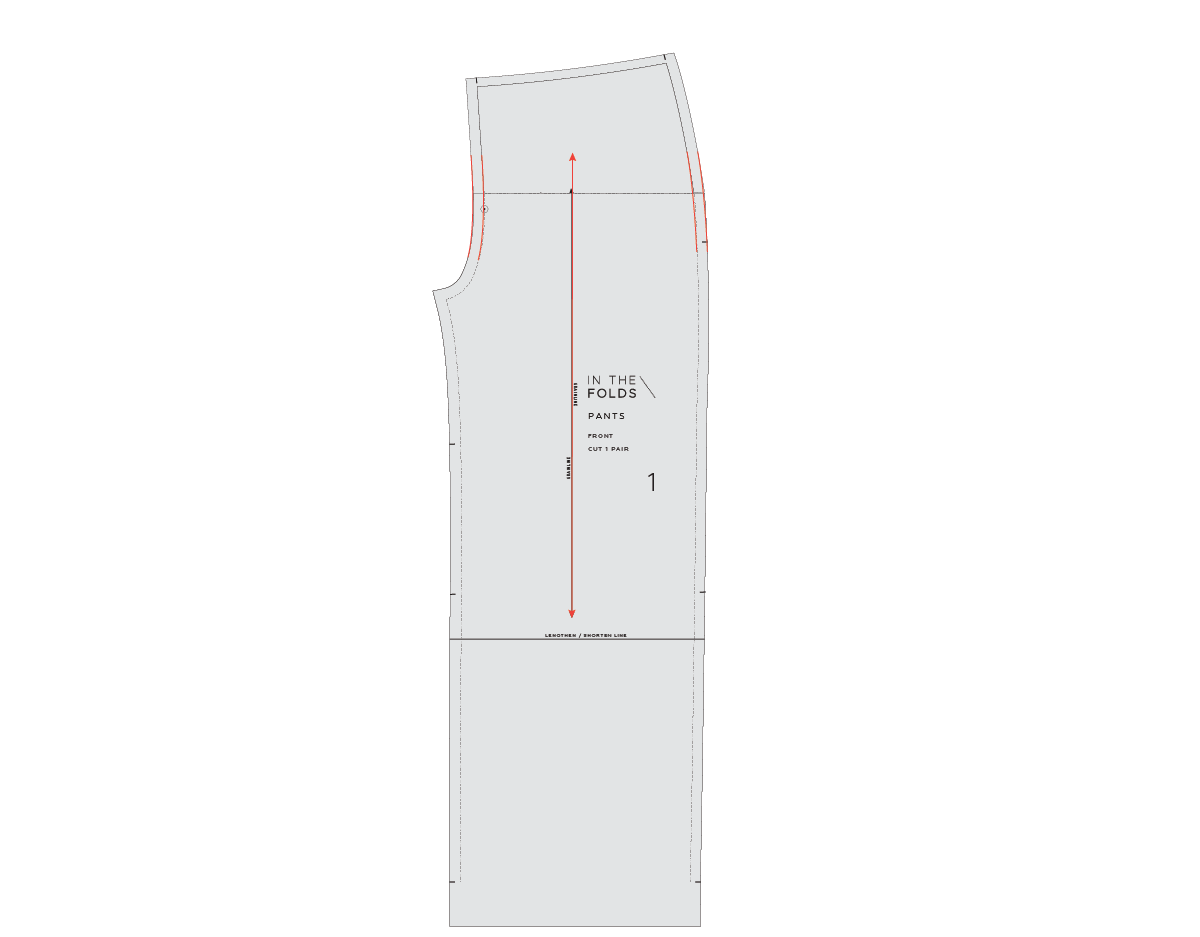
On the FRONT [1], extend the inner leg seam from a point midway between the notches up through the crotch seam. The line needs to be parallel to the grainline. We will call this line A.
At the bottom of line A, draw a perpendicular line through the seam allowance to the CUT LINE.

Step 2
Cut down line A from the crotch seam. Stop 1-2mm from the end of the line at the STITCH LINE. Cut into the seam allowance towards the end of the line, creating a small hinge of paper at the end of line A.
Step 3
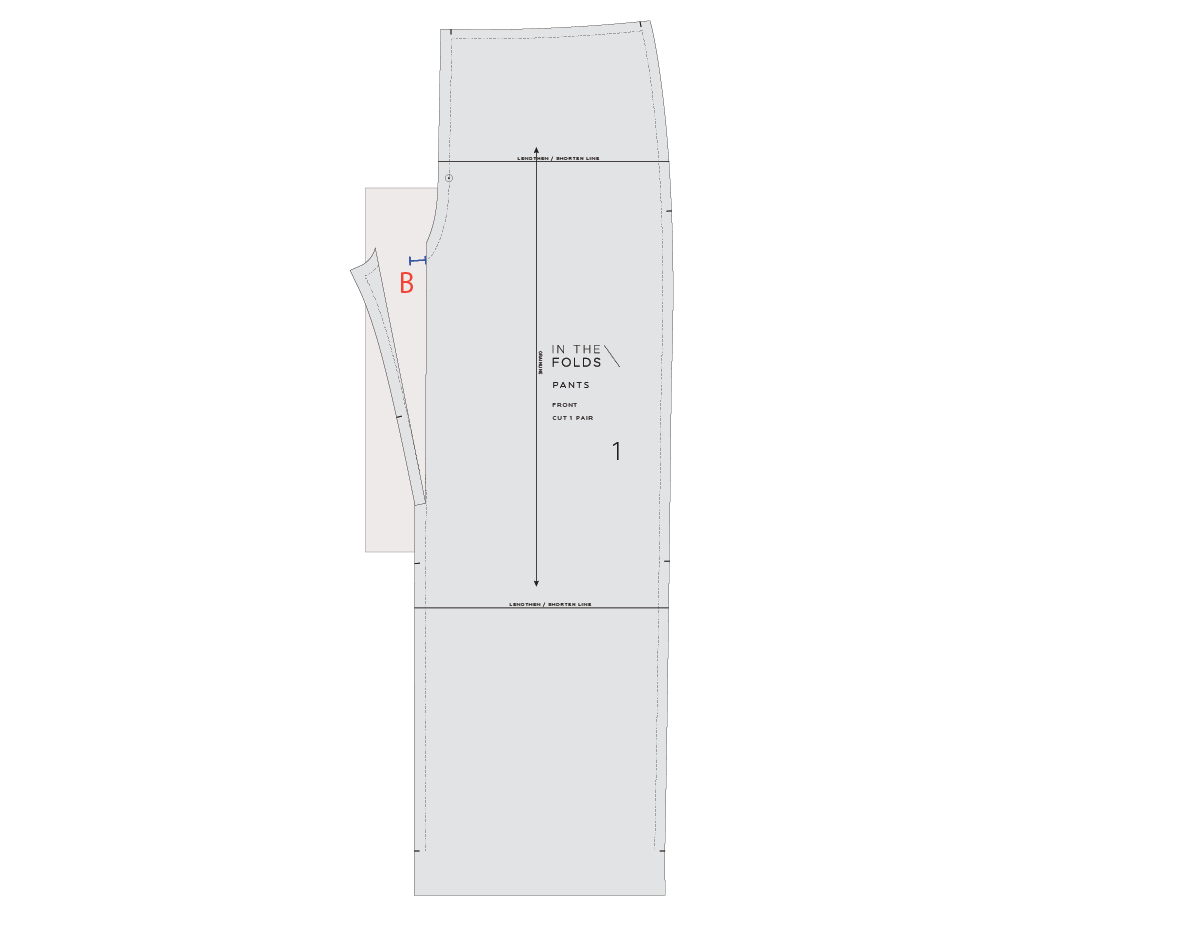
Refer to your toile to work out how much width needs to be added to the thigh of the pattern. We will add half the amount to the FRONT [1] and the other half to the BACK [1].
Slide a piece of pattern paper under the cut section. Swing out the inner leg seam. Mark a point out from the STITCH LINE of the crotch at the width you would like to add. We will call this point B.

Step 4
Swing the inner leg section so that the STITCH LINE meets point B. Tape in place. Redraw crotch seam STITCH LINE and CUT LINE, joining the two sections with a smooth curve that merges into the original crotch seam.

Step 5
Straighten out the top section of the inner leg seam. This will help you retain the nice smooth scoop of the crotch seam when this seam is sewn. Smooth out the inner leg seam where the alteration was made, if required.

Step 6
Repeat STEPS 1 - 5 for the BACK [2]. Add the same amount to the BACK [2] as you did to the FRONT [1].
If you notice on your toile that the fabric is only pulling at the front or back then you can choose to make this adjustment to only one section.

Step 7
Check that the crotch seam is a nice smooth curve by lining up the STITCH LINES of the inner leg seams. For more details on checking curved seams, see this tutorial.
There’s a lot to consider when you’re sewing pants and if you’re just starting out on your pants sewing journey we highly recommend our Pants Sewing series, which is part of our Curated by ITF subscription.
Across three Issues we cover everything you need to know to be able to sew, fit and design yourself a pair of pants you love to wear! As well as the resources we provide in each Issue, you also have access to our online sewing community, where you can ask all your sewing questions and get the support you need to help you on your way!
Happy sewing,
Emily
RESOURCES MENTIONED IN THIS ISSUE
The Pants Sewing Skills Kit, Pants Fitting pattern & Fit Kit and the Pants Design Kit are the first, second and third parts of our Pants Sewing project series, which is available through our Curated by ITF subscription. Past issues are also now available for purchase by subscribers. More information can be found here.
Checking patterns: curved seams - read the tutorial here.
For more issues of the Q & A series, you can check out the archive here.
WHAT YOU’VE BEEN MAKING

Collins top made by @megantheezbornak
MORE POSTS IN THE SERIES
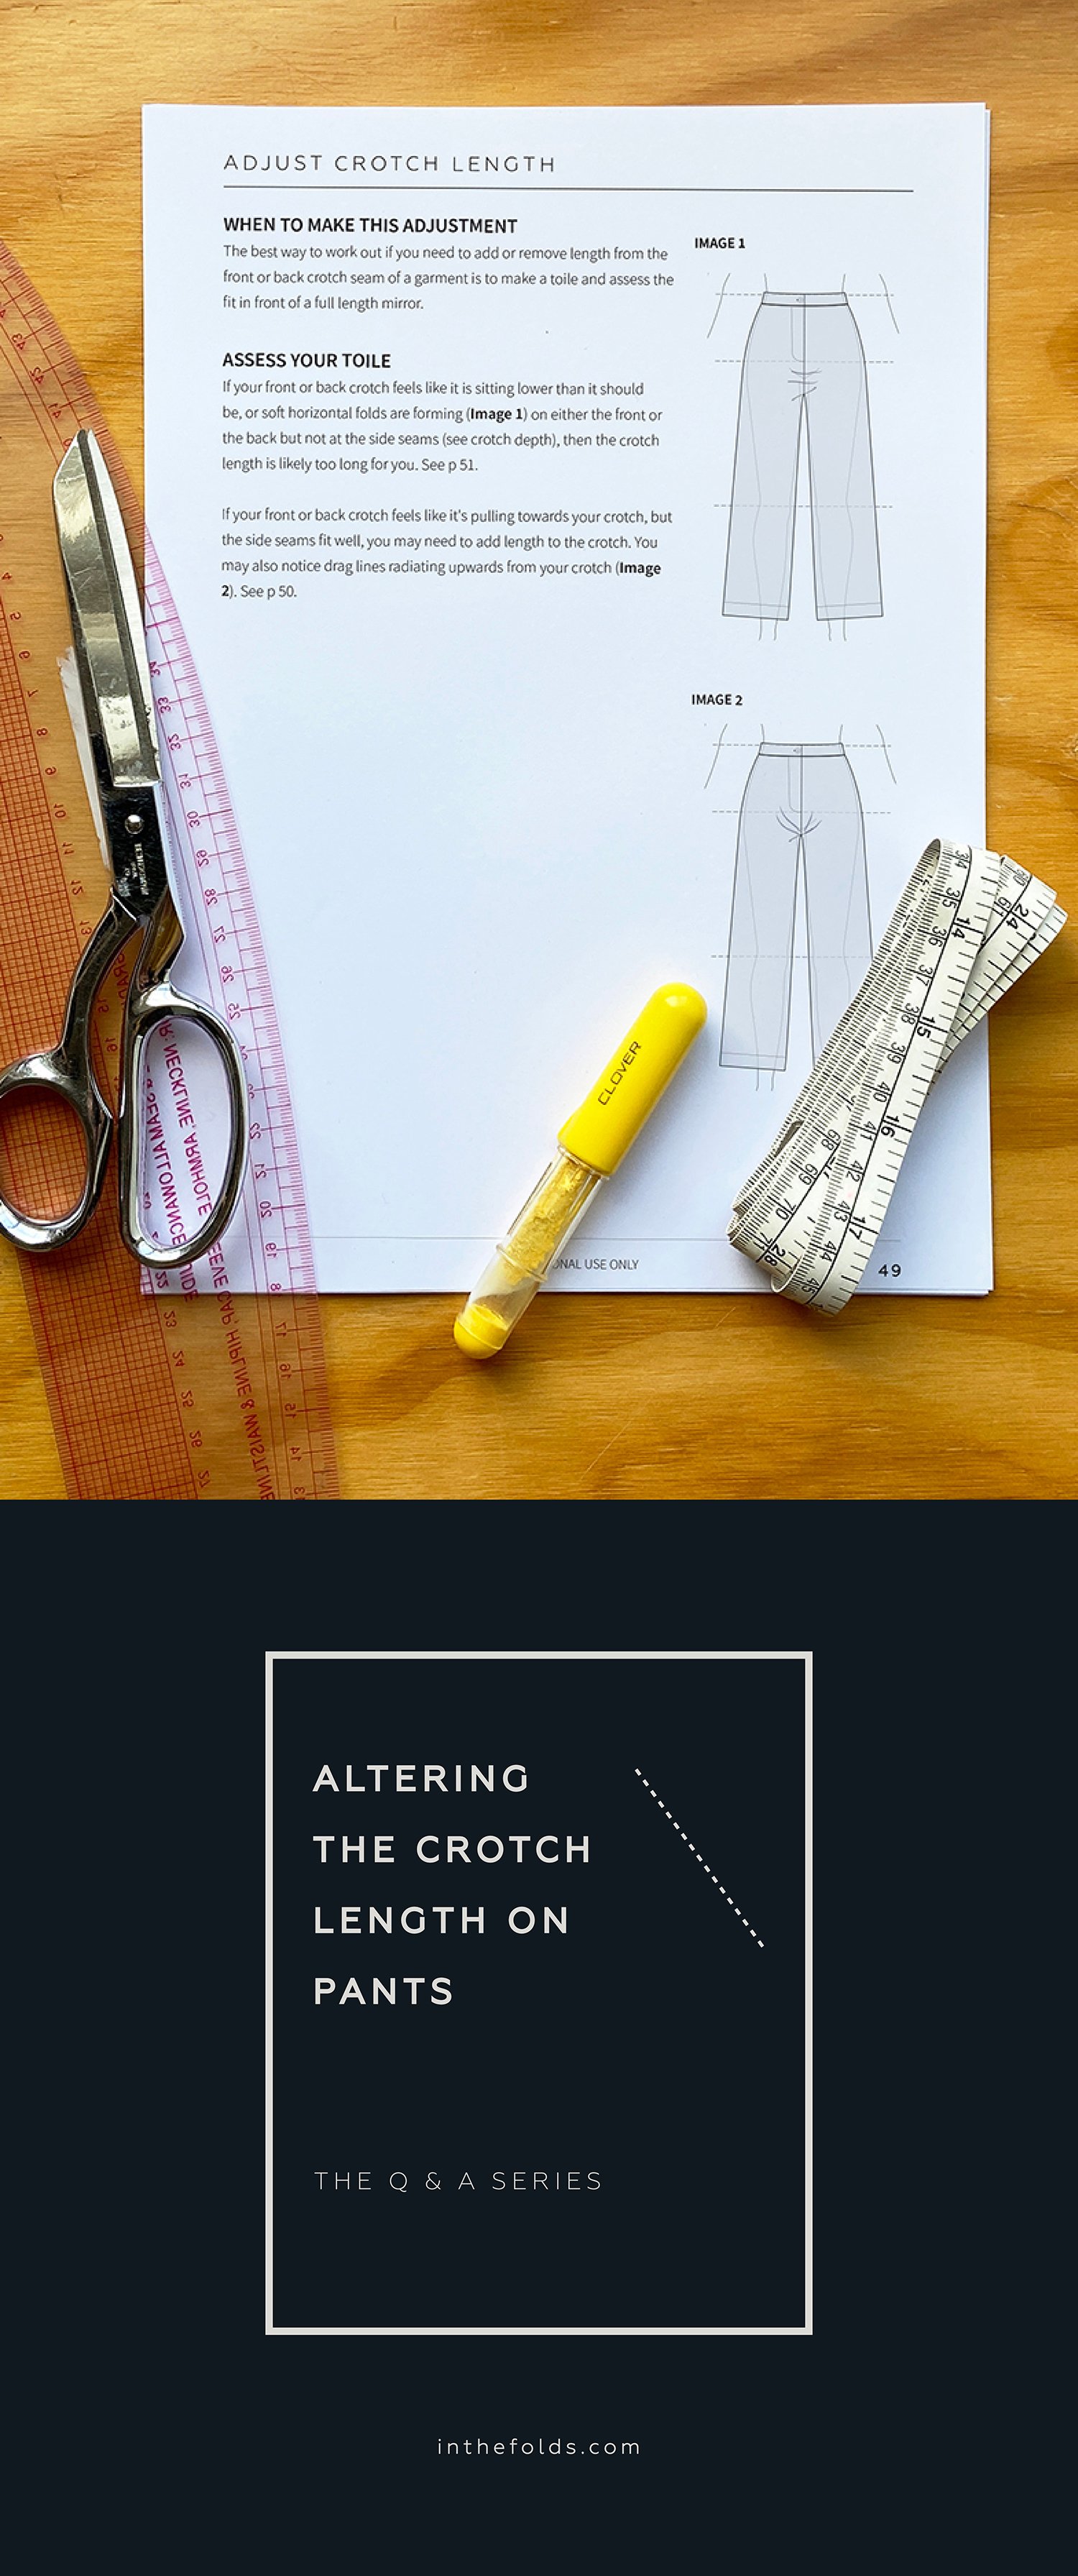
ISSUE 134 - HOW TO ALTER THE CROTCH LENGTH ON PANTS
THE Q & A SERIES
HOW TO ALTER THE CROTCH LENGTH ON PANTS
My biggest challenge is how to alter to crotch/rise in pants. I need to lengthen the crotch in back without adding width and shorten rise in front. I'm a size 6 US / 10 British so the issue for me is not adding more room. It's all about the fit!
Thank you and so grateful for this series.
Best regards,
Mary
Bend, USA
Hi Mary,
What’s great about your question is that you already know what changes you need to make to a pants pattern to achieve a great fit. Often diagnosing the issue is the trickiest part of the pants fitting process. Once you know what you need to do, it’s just a matter of working through the alterations methodically.
You can definitely alter the crotch length in different ways on the front and the back of pants.
As the alteration is made only to the crotch curve (and not the side seam), it’s fine to remove crotch length from the front and then add crotch length to the back.
WHEN TO ADJUST CROTCH LENGTH
The best way to work out if you need to add or remove length from the front or back crotch seam is to make a toile and assess the fit in front of a full length mirror while it’s being worn.

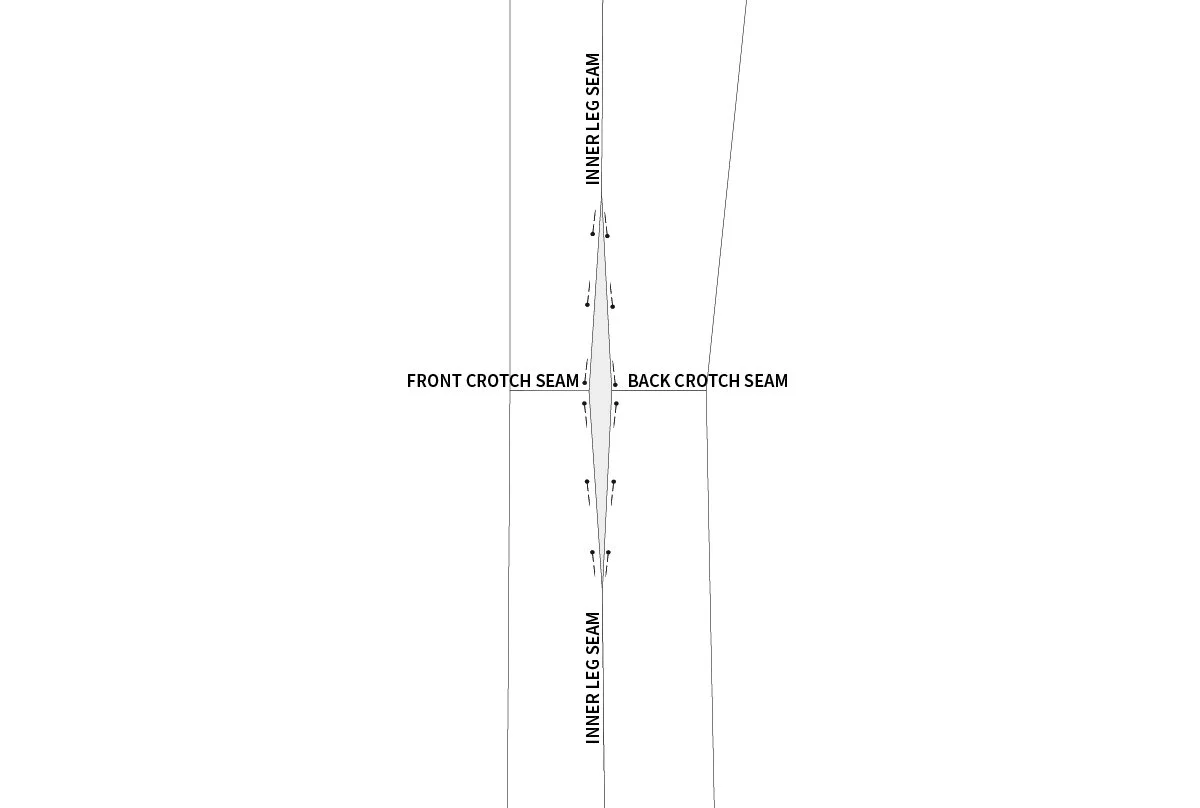
If the front or back crotch feels like it is sitting lower than it should be, or soft horizontal folds are forming (Image 1) on either the front or the back but not at the side seams, then the crotch length is likely too long for you.
If the front or back crotch feels like it's pulling towards you, but the side seams fit well, you may need to add length to the crotch. You may also notice drag lines radiating upwards from your crotch (Image 2).
HOW TO LENGTHEN CROTCH LENGTH
The steps are the same for the FRONT [1] and BACK [2] pattern pieces. You may need to alter one or both.
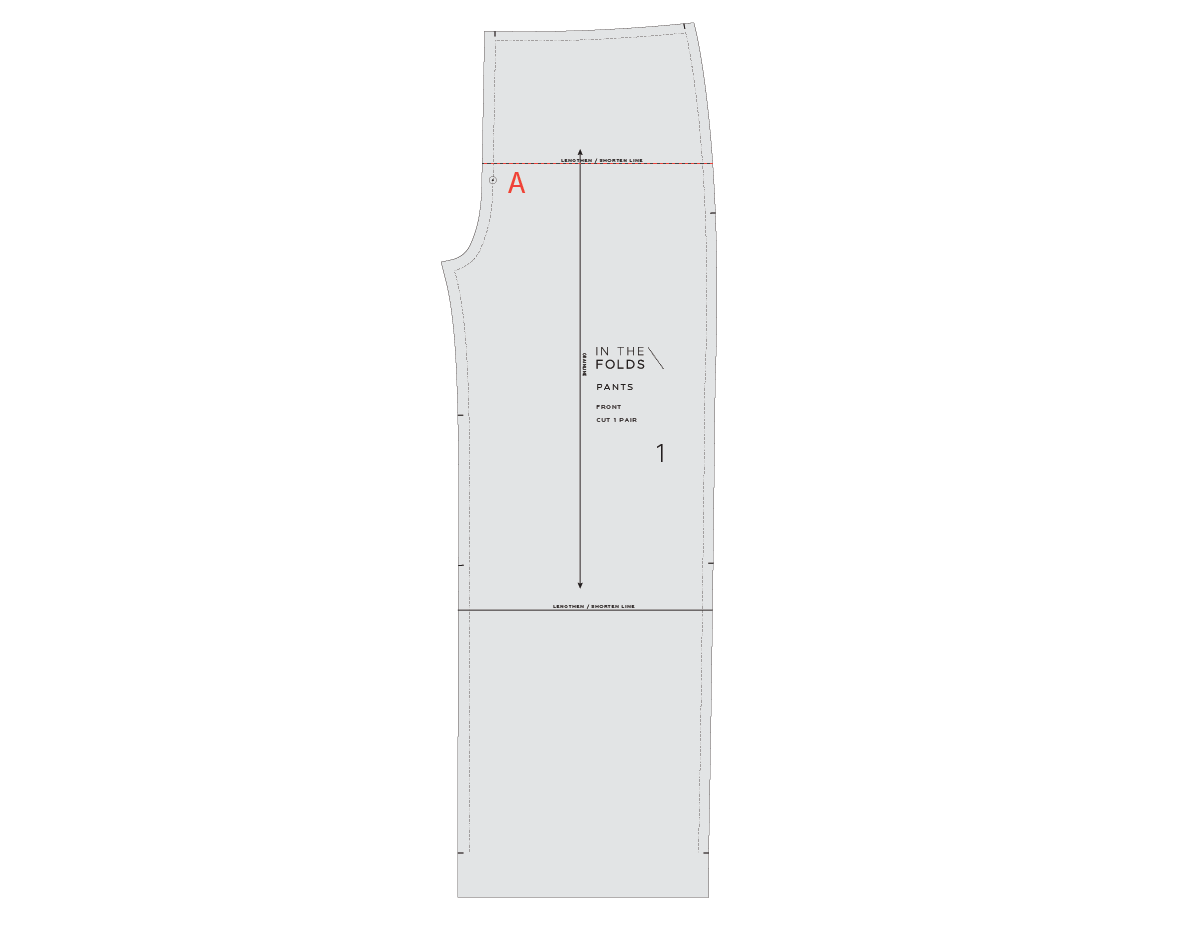
Step 1
Mark a line through the pattern piece perpendicular to the grainline in the section above the crotch curve. We don't want to change the curve, just the length of the CENTRE FRONT / CENTRE BACK seam.
We will refer to this as line A. If your cut line goes through notches (such as for fly placement), keep a note of their original locations so you can redraw them later.
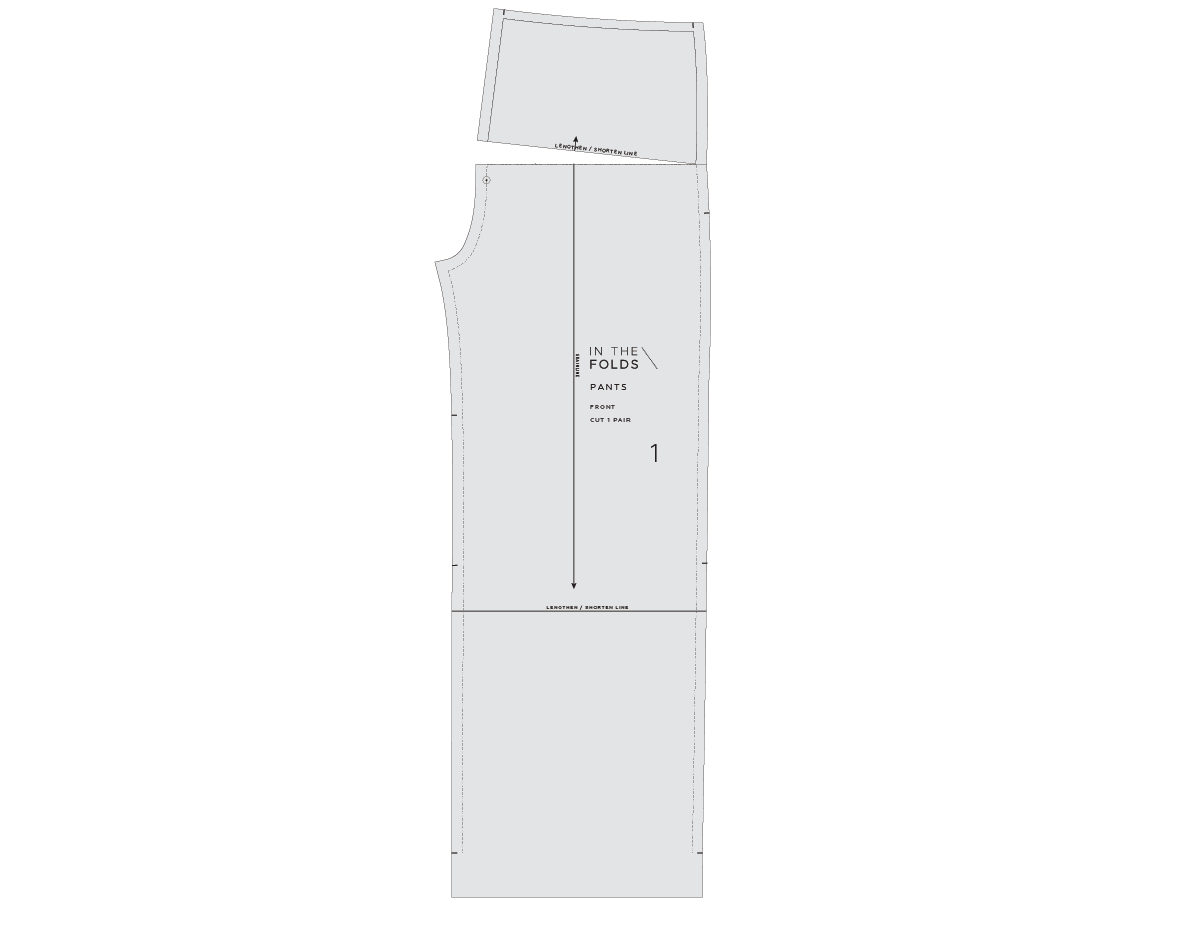
Step 2
Cut along line A from the CENTRE FRONT.
Slow down as you approach the STITCH LINE on the side seam and stop when you are 1-2mm from the STITCH LINE. Cut in from the side seam on line A towards the point where you stopped cutting. Stop cutting when you are 1-2mm from the STITCH LINE to create a hinge.

Step 3
Determine how much you would like to add to the crotch length.
The best way to find this is by making a toile and cutting into the fabric across the crotch. You can pin some fabric into the opening and reassess the fit.
Take a piece of pattern paper slightly larger than the amount you would like to add and mark a horizontal line. We will refer to this as line B. Mark a line below line B, parallel to line B and equal to the distance you will be adding. We will refer to this as line C.

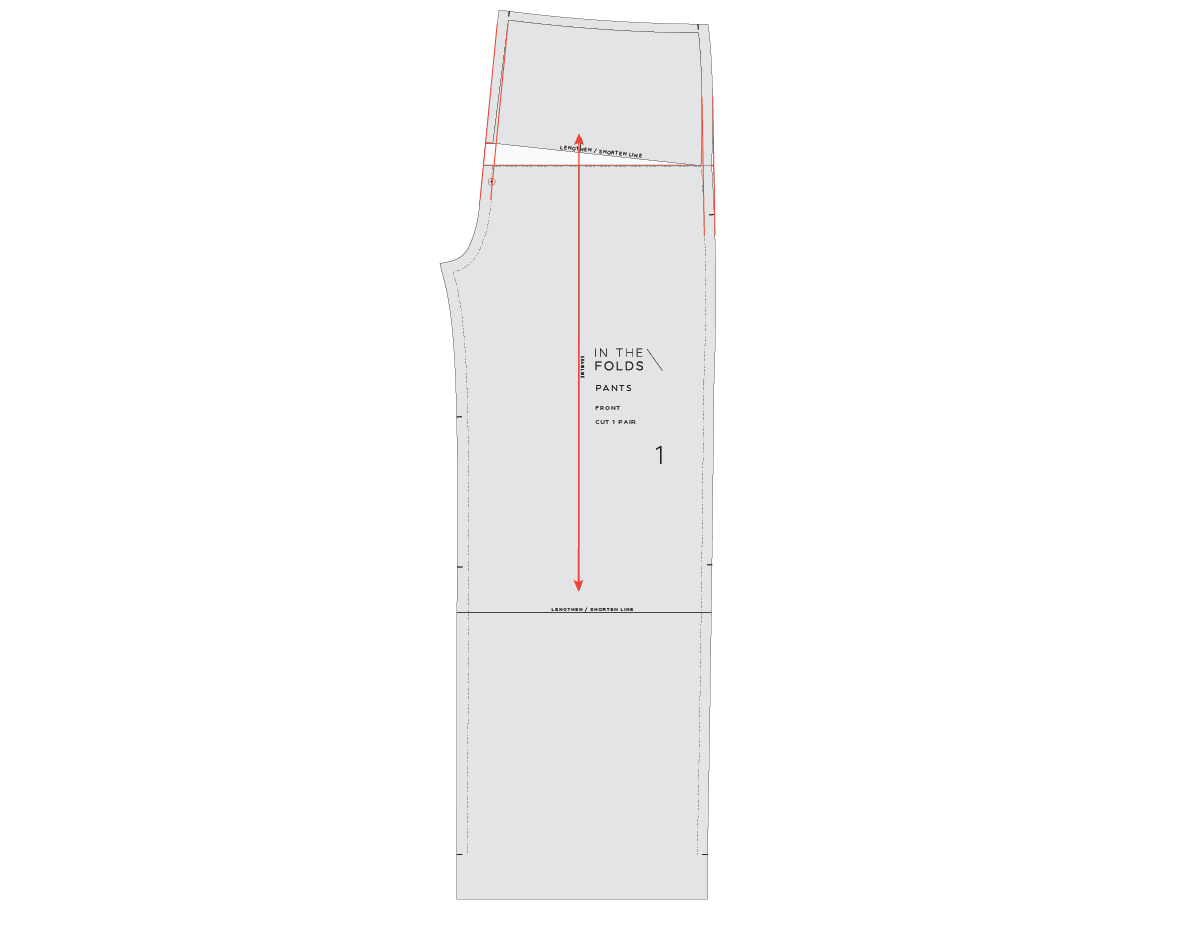
Step 4
Slide the paper under the pattern. Line up line A (pants section) with line C and tape in place.
Carefully rotate the top section of the pattern until the CENTRE FRONT STITCH LINE hits line B. Tape or glue in place.
Step 5
Re-draw the side seam and CENTRE FRONT seam with nice smooth curves.
Redraw the grainline following the grainline on the leg of the pants. Cut off excess paper.
HOW TO SHORTEN CROTCH LENGTH
To shorten the crotch length, the steps are the same for the FRONT [1] and BACK [2] pattern pieces. You may need to alter one or both.
Repeat STEPS 1 and 2 above.

Step 3
Consider how much you would like to remove from the crotch. The best way to find this is by making a toile and assessing the amount by pinning out a wedge from the crotch and checking the fit.
Once you know the amount, measure up from line A on the CENTRE FRONT STITCH LINE and mark a point equal to the amount you would like to remove. We will refer to this as point B.

Step 4
Carefully rotate the top section of the pattern so that point B meets with line A.
Tape or glue in place.
Step 5
Re-draw the side seam and CENTRE FRONT seam (CUT and STITCH LINES) with nice smooth curves. Redraw the grainline following the grainline on the leg of the pants.
This month for our Curated by ITF project we are working with our community to make toiles, conduct fittings and determine what alterations to make.
Our latest issue, the Pants Fitting pattern and Fit Kit, guides you through the whole process and then we’re right there in our online sewing community to answer all your questions, assess your toile photos and guide you through the process. If you’re interested to learn more about the pants sewing, fitting and design process, sign up to Curated by ITF now!
Happy fitting,
Emily
RESOURCES MENTIONED IN THIS ISSUE
The Pants Fitting pattern & Fit Kit is the second part in our Pants Sewing project series, which is available through our Curated by ITF subscription. Past issues are also now available for purchase by subscribers. More information can be found here.
For more issues of the Q & A series, you can check out the archive here.
WHAT YOU’VE BEEN MAKING


Neale jumpsuit made by @len.blueskystitch
MORE POSTS IN THE SERIES
ISSUE 133 - YOUR PANTS FITTING PROJECT QUESTIONS ANSWERED
THE Q & A SERIES
YOUR PANTS FITTING PROJECT QUESTIONS ANSWERED
We’ve had lots of new members join our Curated by ITF community this month who are looking to build their skills in the area of sewing, drafting and fitting pants, and we’re excited to be able to help them learn this valuable garment sewing skill.
We know that, for many people, sewing pants is a no-go zone. Many makers learn the hard way that you’re unlikely to get a pair of well-fitted pants by ‘winging it’. Because pants incorporate the waist, hips, crotch curve and thighs, pants require you to have a good grasp of the fundamentals of the fitting process (or be willing to give it a red hot go!).
Understanding the why, what, where, and when of fitting pants means that when you hit a roadblock you know what adjustment to use to rectify it. It also means you have a process to follow that allows you to troubleshoot the issue, trying different approaches separately, or knowing when to use a combination of adjustments.
We’ve had a few questions come in lately relating to this month’s Pants Fitting Pattern, so this week is a little different to our usual Q&A post. We’re sharing our answers to these questions all at once in the hope that it might also answer any questions you have also had, and get you on the journey to designing, fitting and sewing pants that you love!
Just wondering if this pant pattern is the same as the Wide leg pants, but without the front pocket. I have the Wide leg pants printed out and removed the front pocket to make fitting easier for the first pair. I thought I would save some paper if they are the same draft.
Tracy
Hi Tracy,
The pattern for Issue 14 of Curated is different to the Wide Leg pants pattern, but it is quite similar. The legs are narrower on the new pattern and the back dart is shorter. We also chose not to include pockets in the Pants Fitting pattern, which makes it quicker and easier to toile and make alterations. This also makes it easier to be used as a base pattern that can be used in the future to draft other patterns from (that’s what’s coming for Issue 15 of Curated!)
In saying that though, I think you'd be fine to use the Wide Leg pants pattern you have already printed and started on, as it is very similar and all the resources in the Fit Kit will apply to that pattern. We’re also happy to show you how to remove the pocket, if you’d like to make it more like a block pattern.
You can always make the leg narrower, as we have included a tutorial in the Fit Kit for how to do that.
Happy sewing (and fitting),
Emily

Hello,
I have an existing pant block, but it is from before kids and so my body has changed - mainly bigger and maybe more tummy.
I wonder if I can use this block for my toile and do the fit alterations to it rather than use the pant pattern supplied?
Thanks,
Denise
Hi Denise,
Good question!
We have made the resources so that the techniques apply to other pants patterns and blocks, so you could definitely give it a go.
One thing to note is that when fitting a garment it is much easier to remove fabric, rather than add it in, so I'd be checking that you can make a toile that fits you well enough from the block to conduct a fitting.
If you mainly need more room across the tummy, then you could definitely do a full tummy adjustment to add more room in the tummy area. You could also add a larger seam allowance to the pattern (particularly in the side seams) so that you have more room to play with during the fitting.
It might be worth a go as an experiment. You can see after a fitting how much work is involved in adjusting the block and then decide if you're better off sticking with the block or using our pants fitting pattern.
Happy sewing,
Emily

Hello,
I am interested in joining your community, mainly to learn about pants fitting.
Via Peppermint I got access to you Wide Leg Pants pattern. I really love the style and made already two Wide Leg pants. However, I have the feeling that the fit has room for improvement.
Recently, I bought 3 fabrics for making autumn/winter pants based on this pattern. Would the Pants fitting project of this month work along with the Wide Leg pants pattern or is it compulsory to use the pants pattern that comes with the fitting project?
Thanks in advance for your help.
Kind regards,
Monika
Hi Monika,
You can definitely work along with the fitting content we released this month using the Wide Leg Pants pattern.
The fitting pattern is quite similar to the Wide Leg pants pattern. The main differences are how much width is in the leg and that the fitting pattern doesn't have any pockets (which makes the fitting process easier).
All the resources in the Fit Kit and community group will definitely be helpful to you on your pants fitting journey. Some of our makers (who we like to call ‘Foldies’) are also working on the Wide Leg pants pattern, so you won’t be alone! We created the content to be relevant to a range of different pants patterns so that the resources can be used for different projects.
You will be fine to jump on board and follow the process with this pattern.
Happy sewing,
Emily
RESOURCES MENTIONED IN THIS ISSUE
The Pants Fitting pattern & Fit Kit is the second part in our Pants Sewing project series, which is available through our Curated by ITF subscription. Past issues are also now available for purchase by subscribers. More information can be found here.
The Wide Leg pants pattern can be found here.
How to add seam allowance to a pattern - read the tutorial here.
For more issues of the Q & A series, you can check out the archive here.
WHAT YOU’VE BEEN MAKING

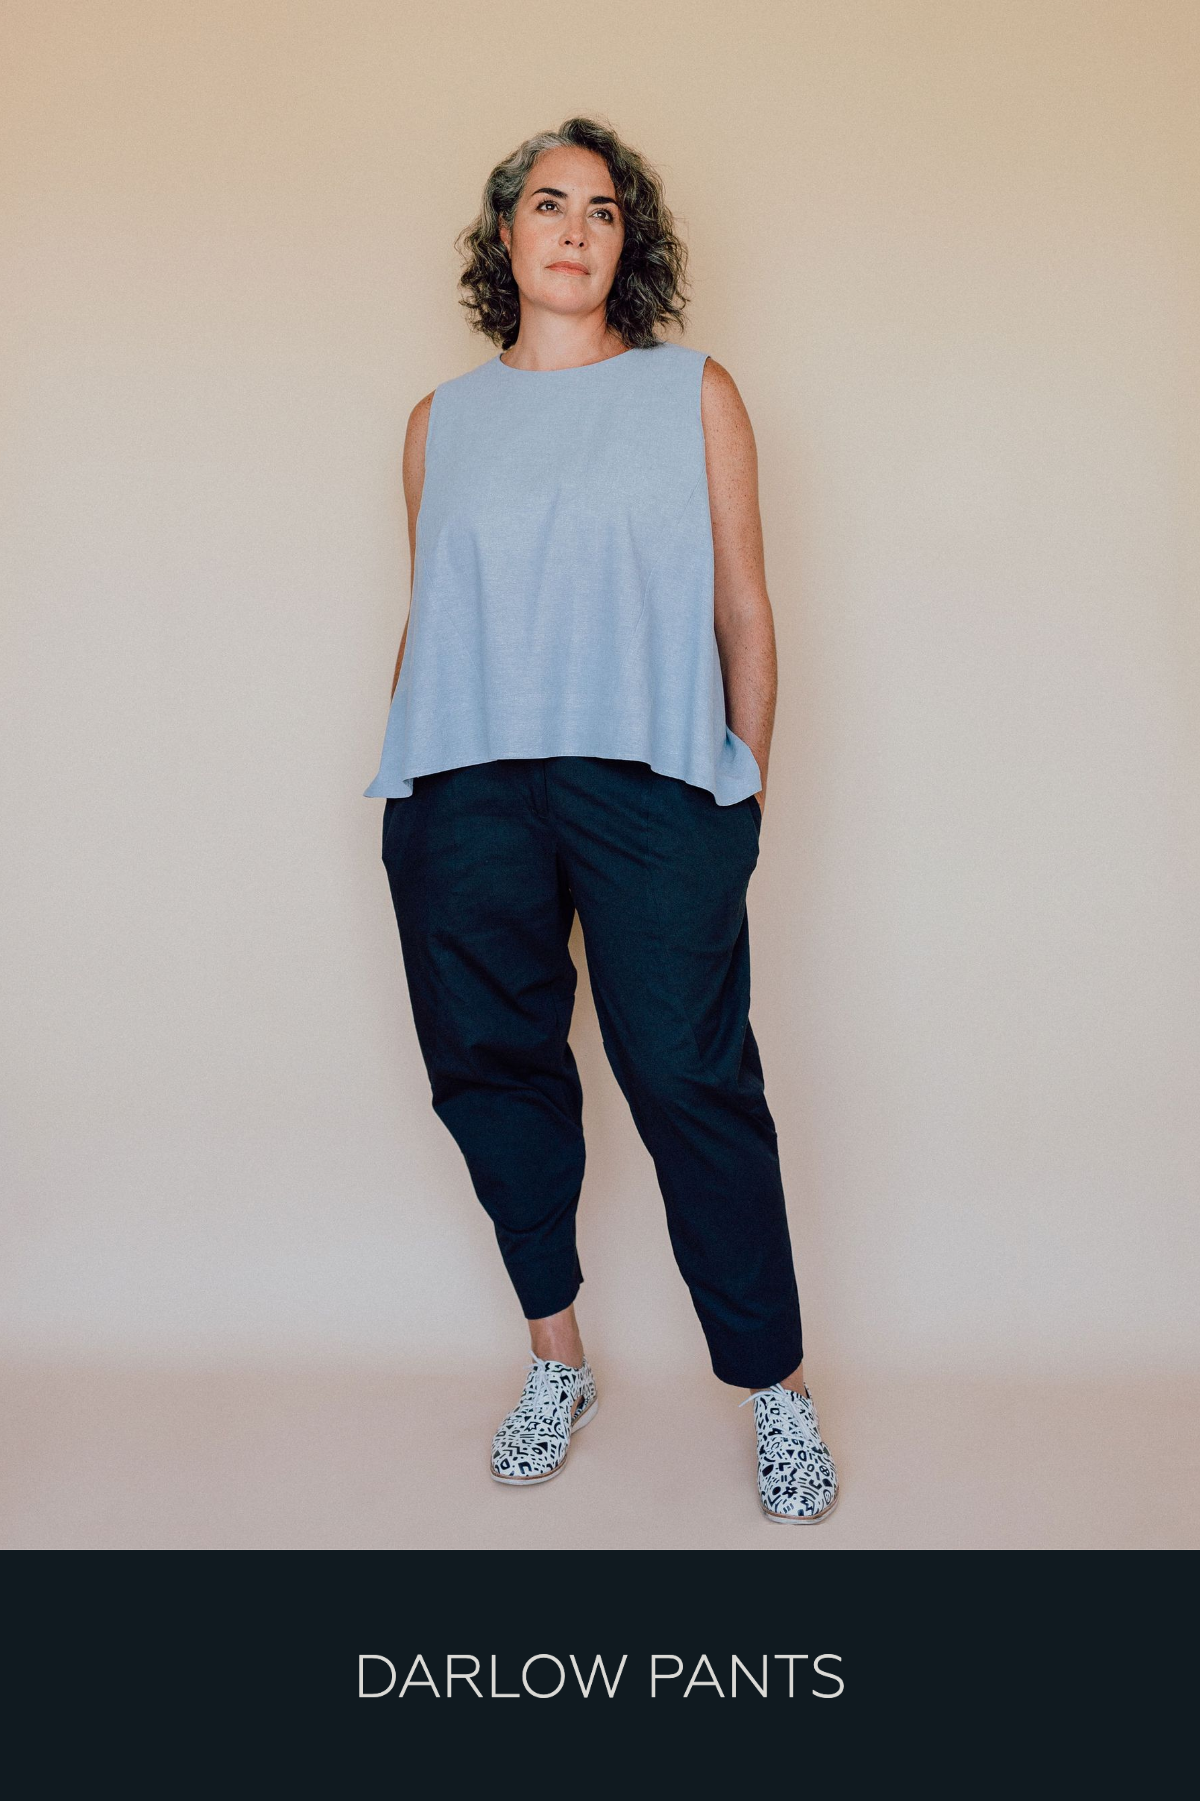
Darlow pants made by @listaylorsthreads

Peppermint wrap top made by @slowaesthetic_
MORE POSTS IN THE SERIES
ISSUE 132 - WHAT YOU NEED TO KNOW TO SEW PANTS THAT FIT
THE Q & A SERIES
WHAT YOU NEED TO KNOW TO
SEW PANTS THAT FIT
How do you make a pants pattern fit?
Thanks,
Nancy
Hampton Georgia, United States
Hi Nancy,
That’s a great question. How to sew pants that fit is a question we have answered in great detail in our Pants Making Series.
We all know that fitting pants can be a little overwhelming. Just like our mantra here at In the Folds, what we suggest you do is slow down, take the pressure off and take it one step at a time. Keep reading to see what we believe you need to know to sew pants that fit, plus we share a Pants Fitting Checklist that you can use whenever you’re working through the fitting process.
BE WARY OF OVER-FITTING
Before getting started with fitting a pair of pants we suggest you get a clear goal in mind.
It is important to remember that the goal is not to make pants that have no creases. This is called “over-fitting” and indicates that the pants have no ease in them. As you can imagine, this would make them very uncomfortable to wear and to move around in! The goal is to make pants that are comfortable to wear and that you like the look of.
It can be easy to get caught up in fitting a garment perfectly - especially as you're standing in a static pose, in front of a mirror, wearing calico.
Try to remember that as you move and use the real fabrics, the creases that seem to stand out while standing still most likely won't show up as much as they do in calico.
TAKE ACCURATE MEASUREMENTS
It’s a very good idea to take accurate body measurements with a tape measure before getting started. To do this, we recommend putting on some tight clothes, like leggings or just your underwear.
Take your waist and hip measurements first. Be sure to measure at the fullest part of your hips. Do this in front of a full length mirror and check from the side that the tape measure is not dipping up or down. It’s also a good idea to take your waist and hip measurements while sitting down, to ensure you will have enough ease while sitting.
If your measurements are between sizes, use the finished garment measurements from the pattern to help you decide if you should select the smaller or larger size. This measurement shows the amount of ease in the pattern. If a pattern is somewhat fitted, we recommend selecting the larger size for your toile, as it is easier to remove fabric from the toile than add fabric in.
ALWAYS MAKE A TOILE
We all know what it’s like... You purchase (or draft) a new pattern and you just want to get into it and make it so you can wear it!
While this approach may work for some garments, when it comes to sewing pants, we strongly recommend you make a toile first. A toile is a test version of a garment, made from a similar, but often cheaper, fabric. You can read more about making a toile here. By making a toile you can check the fit of the garment, and make any adjustments before cutting into your 'real' fabric.
Consider increasing the stitch length on your machine. This makes sewing your toile faster, but also means it's a lot easier to open up seams if you want to make an adjustment during the fitting process. We suggest that you trace a copy of the pattern before making any adjustments. This way you always have a copy of the original pattern to refer to.
FITTING YOUR TOILE
Once you have selected your size and made your toile, you can do a fitting to check if you need to make any alterations.
This is a good time to mention that most of us will require some alterations. This is not to deter you, but to let you know that it’s completely normal to need to make alterations!
Patterns are designed to a standard shape, but most of us are not the standard. By reminding yourself of this you can see pattern alterations as another skill to add to your repertoire and see it as just another part of the sewing process instead of a chore.
When fitting your toile, try to be methodical. It can be easy to be overwhelmed by the process, but just remind yourself that one effective alteration can make a world of difference and will often resolve multiple issues.
Because of this, it’s also good to remember not to make too many changes once. Just make one alteration to your toile and then re-fit before doing anything else you think you need.
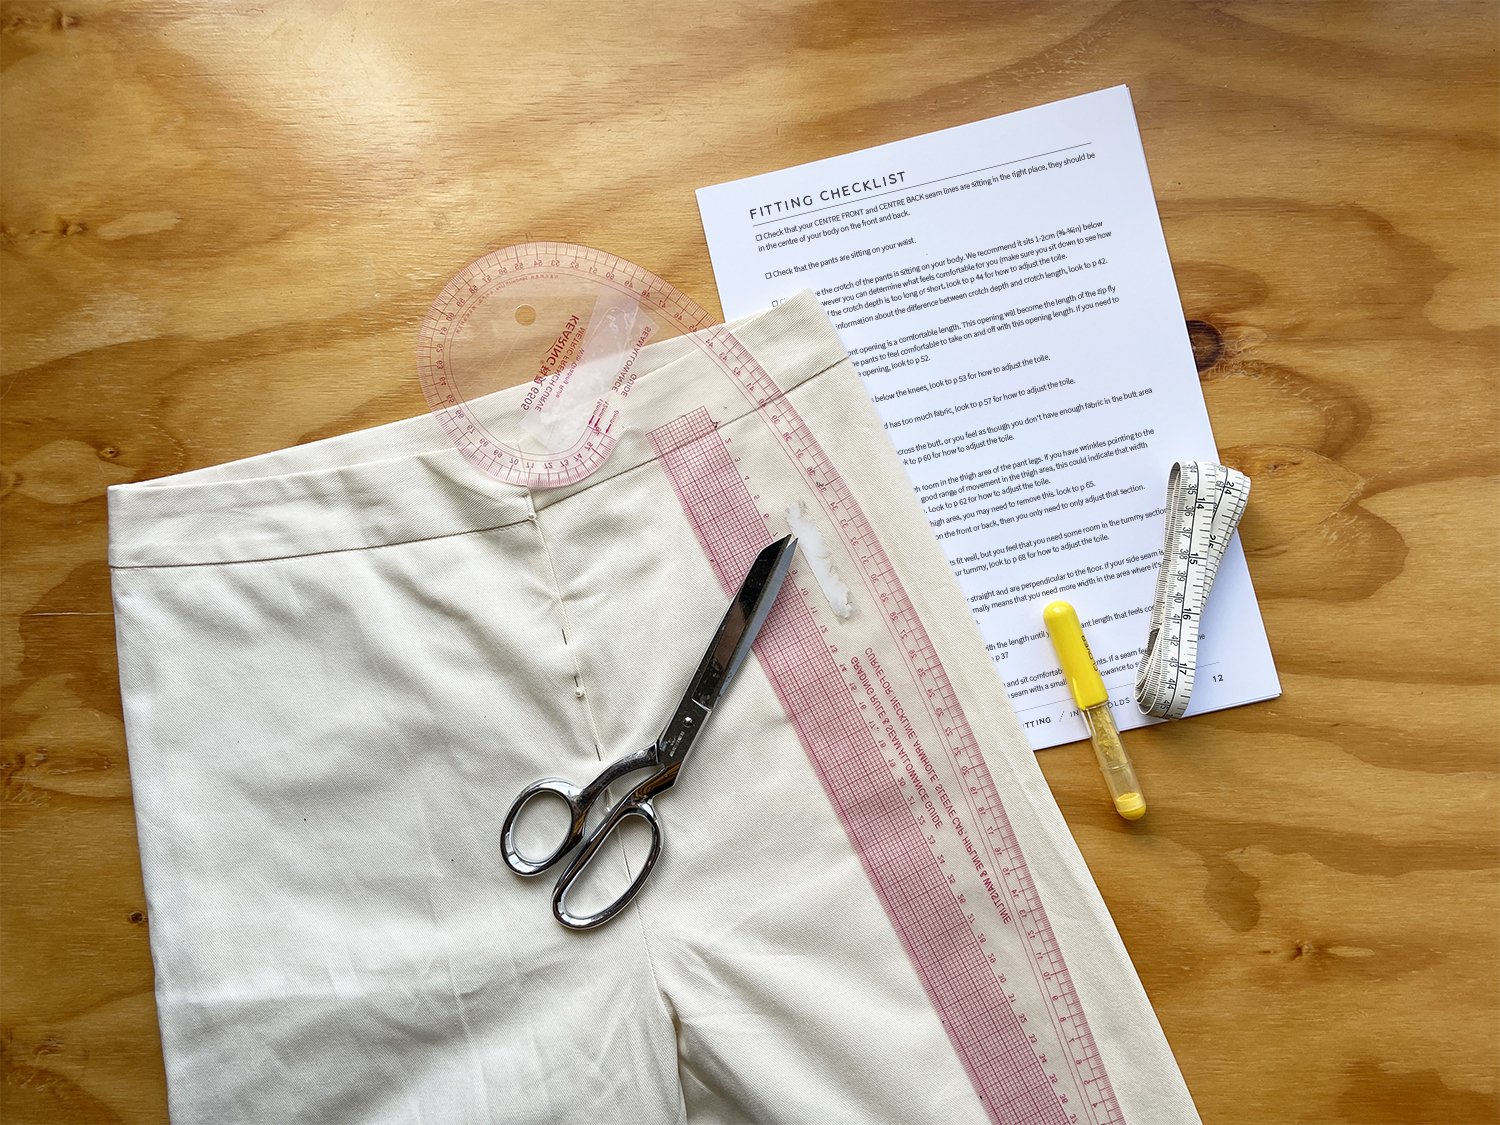
PANTS FITTING CHECKLIST
Our current issue of Curated by ITF includes an extensive Pants Fitting Checklist. We thought we’d share a few of the main things with you so you know where to get started:
Check that your CENTRE FRONT and CENTRE BACK seam lines are sitting in the right place. They should be in the centre of your body on the front and back.
Check that the pants are sitting on your waist (or where they are supposed to be sitting).
Check where the crotch of the pants is sitting on your body. Where this sits will depend on the pattern and how it has been designed.
Check that the opening is a comfortable length and you can get in and out of the pants easily. For example, with our pants fitting pattern it has a front opening for a zip fly front.
Check for drag lines on your toile. Drag lines are lines in the fabric that form when fabric is being pulled across a part of the body. It may indicate that there is not enough length or width in a certain part of the garment. Sometimes it can be easier to spot drag lines by taking a photo of your toile. Ask a friend or family member to take the photos or use a tripod or balance your phone on something and use a self-timer to take photos of yourself. Be sure to take photos from all angles.
Check that you have enough room in the thigh area of the pant legs. It’s a good idea to check while sitting too.
Check that you have enough room in the tummy area. If the waist and hips fit well, but you’re experiencing pulling across the front, you may need some extra room in that area.
Check that your side seams appear straight and are perpendicular to the floor. If your side seam is pulling towards the front or the back, this normally means that you need more width in the area where it's pulling.
Check the hem length. Have a play with the length until you get a pant length that feels comfortable for you.
Check that you can move and sit comfortably in the pants. Move around. If a seam feels tight, let out the seam with your seam ripper and re-pin the seam with a smaller seam allowance to see if this helps.
We hope this helps you get started on your pants fitting journey. Be sure to check out our Pants Making Series for more.
Happy fitting,
Emily
RESOURCES MENTIONED IN THIS ISSUE
How to (and why) make a toile - read the tutorial here.
For more issues of the Q & A series, you can check out the archive here.
WHAT YOU’VE BEEN MAKING

Collins top made by @megmadesewing

Peppermint Peplum top made by @kali.makes