ISSUE 111 - HOW TO SEW A HIDDEN BUTTON PLACKET

THE Q & A SERIES

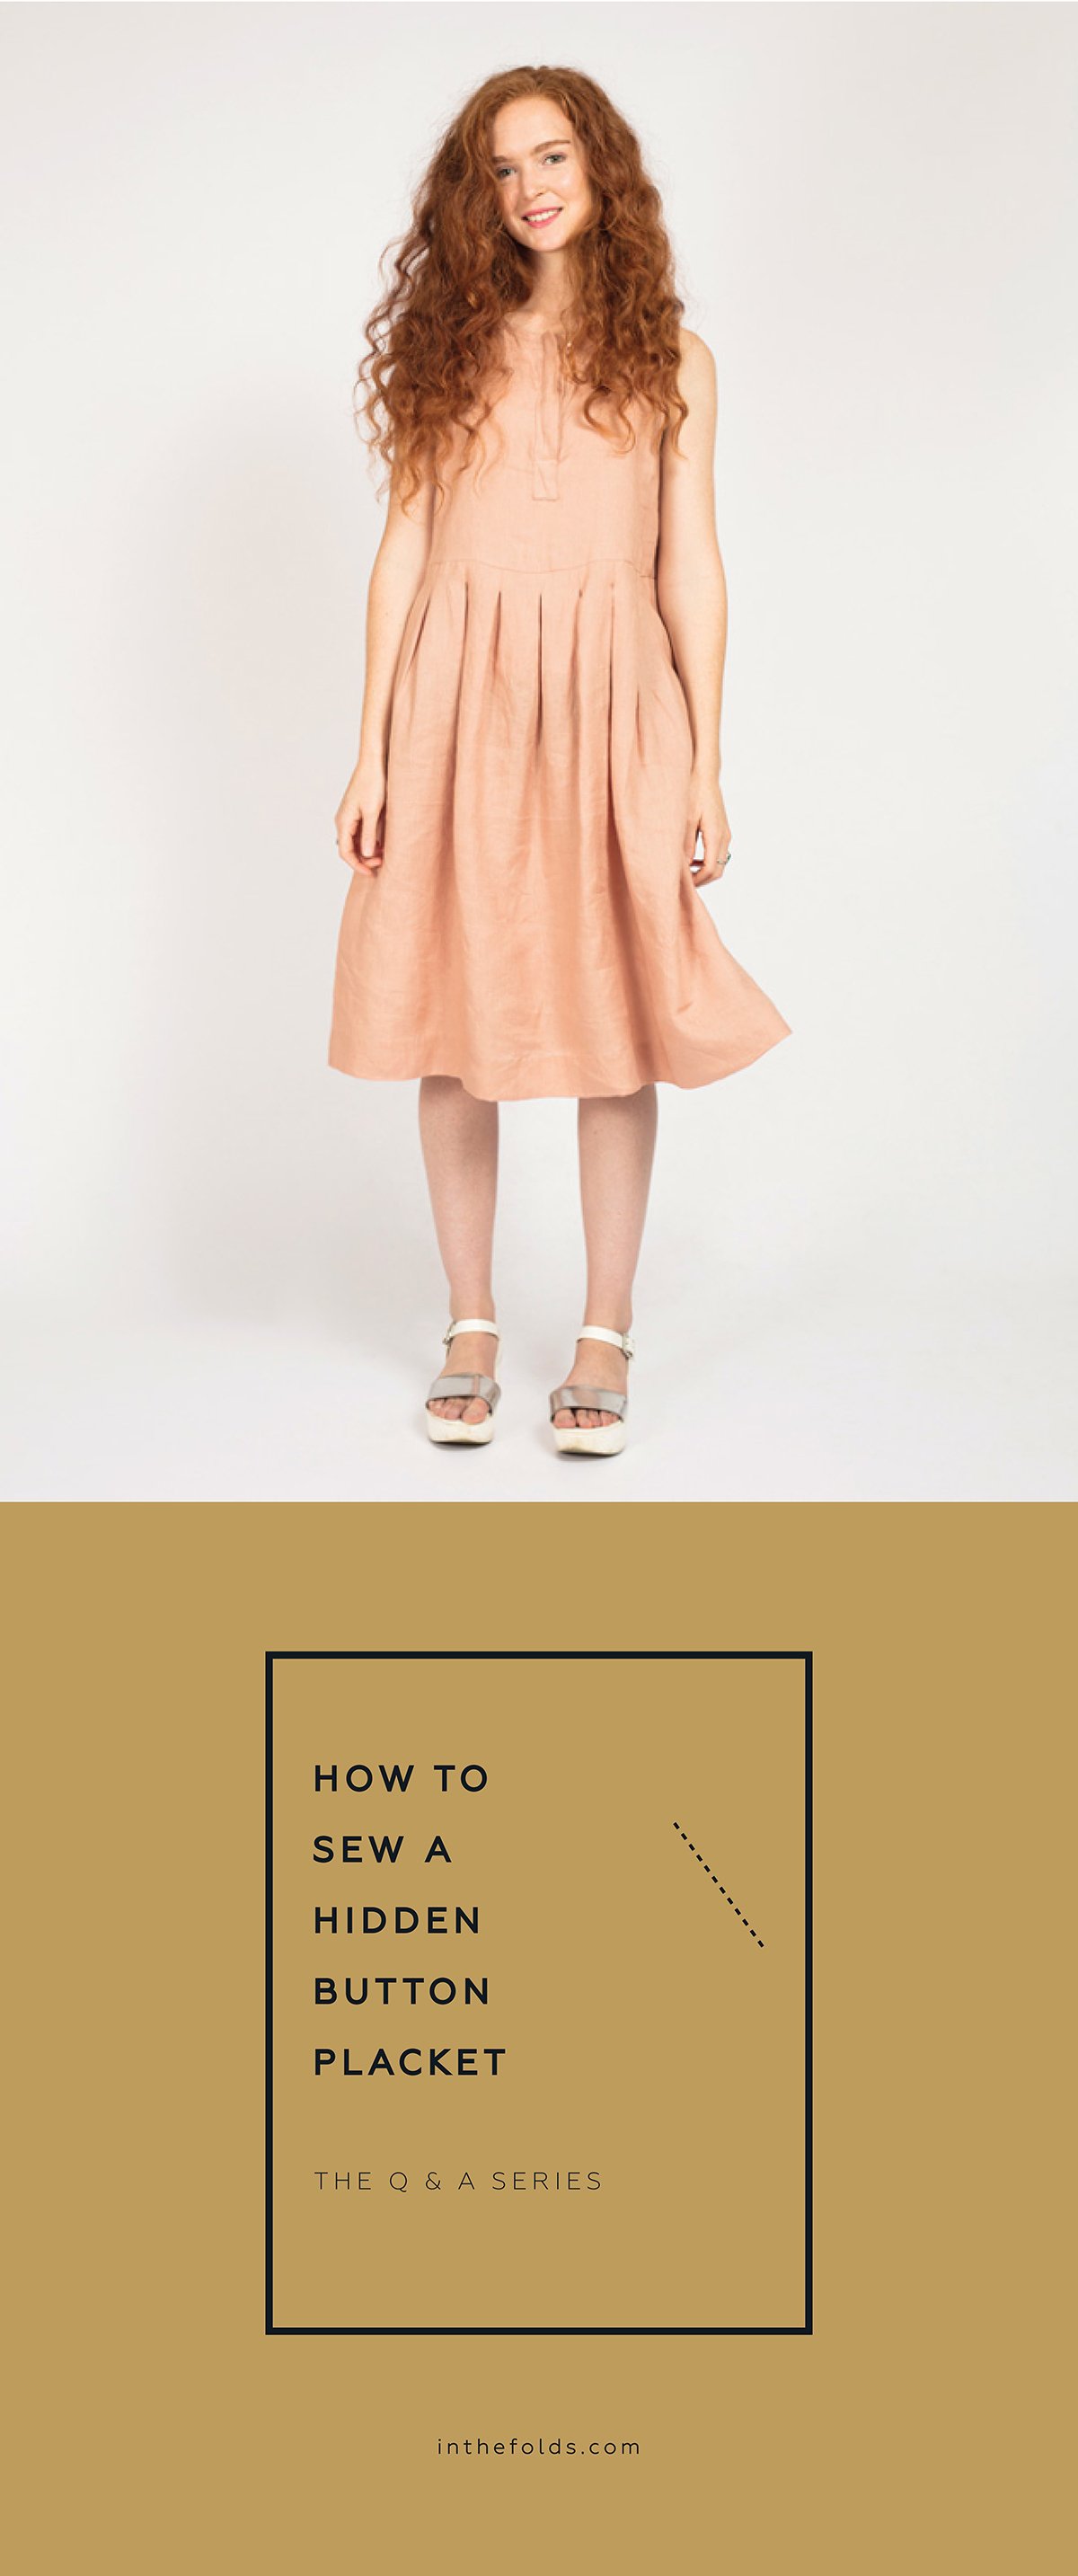
How to sew a hidden button placket

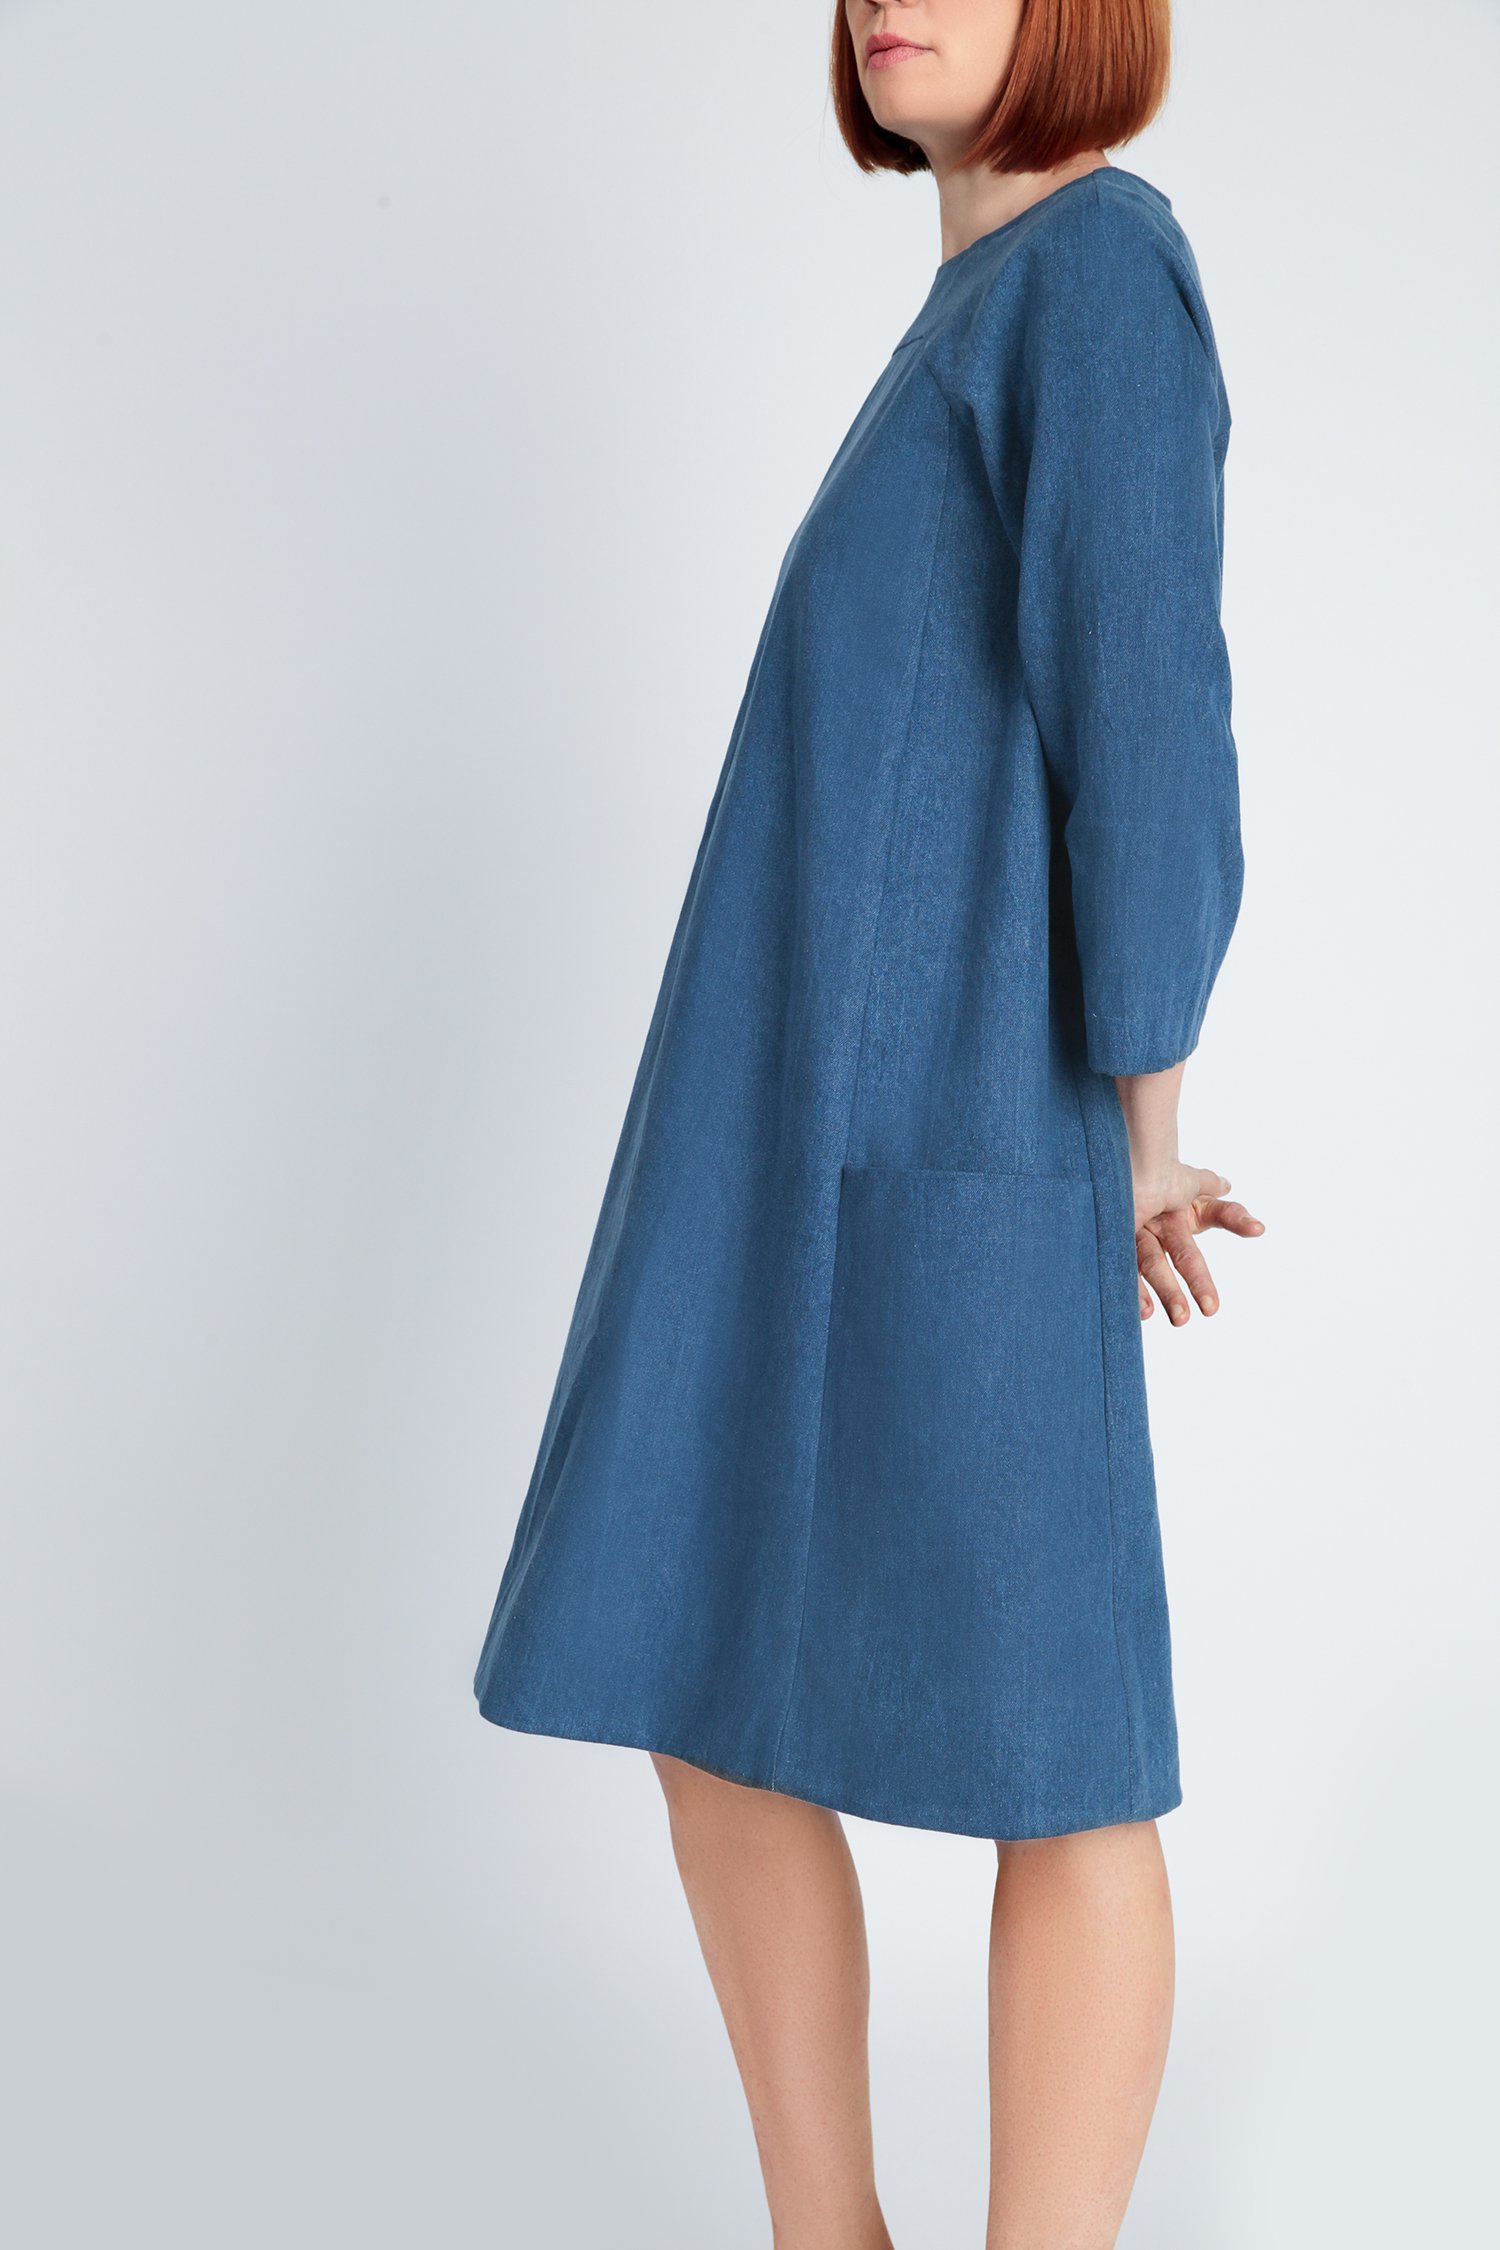
What a lovely pattern the Peppermint Pleated dress is! I've been practicing the placket on some scraps before destroying some pretty linen, but I keep getting stuck on the last three steps. If ever you have a chance, a tutorial on how to make this button placket would be so appreciated.


Hi there,

It's always a good idea to practice new techniques on a scrap of fabric, so well done for doing that!

It's especially important for techniques such as cut-in plackets (like this one) and welt pockets as, due to needing to cut into the fabric, they are much more difficult to fix if you run into strife.

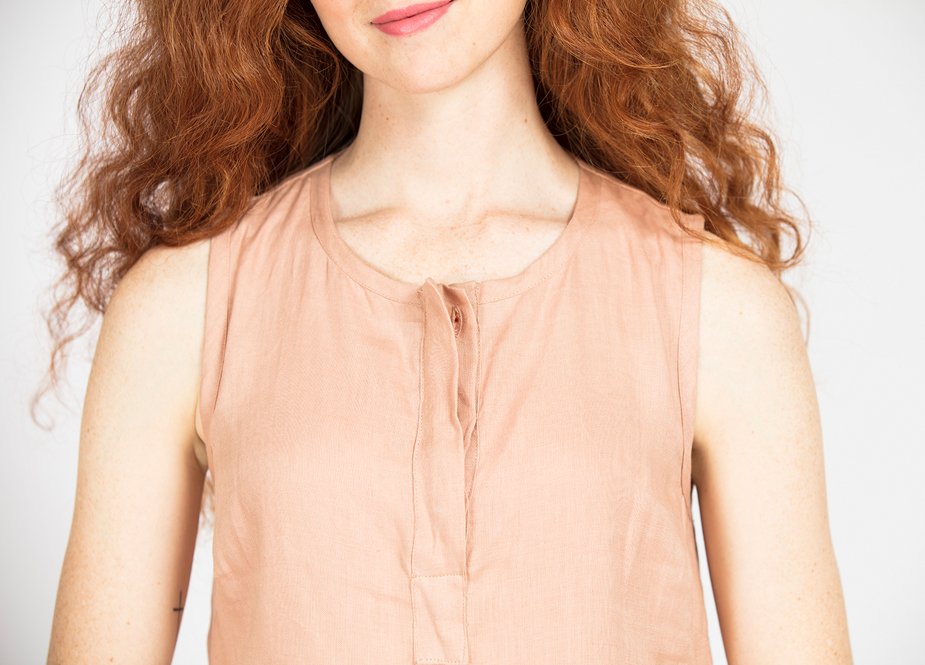
The placket on the Peppermint Pleated dress involves a number of steps and when you're done you will have a really gorgeous placket! Hopefully seeing some photos of the process will help you get your head around it so you can get the dress started!

A note before I get started - we normally only use these type of photos to aid in the instruction illustration process, so we apologise that for a couple of steps we don't have photos. Sometimes as we are photographing the steps we find a better way to do a particular technique, so this sometimes means we don't have a photo of the exact step. This will give you a little behind the scenes of how our instructions come together!

Prepare your placket

To start, prepare your placket according to the instructions (STEPS 7 and 8). Accuracy is very important when it comes to sewing plackets, so by taking these steps at the beginning you will make the sewing process much easier for yourself.

Attach placket

Take your FRONT BODICE [1] and fold the neckline in half. Use a pin to mark the centre front.

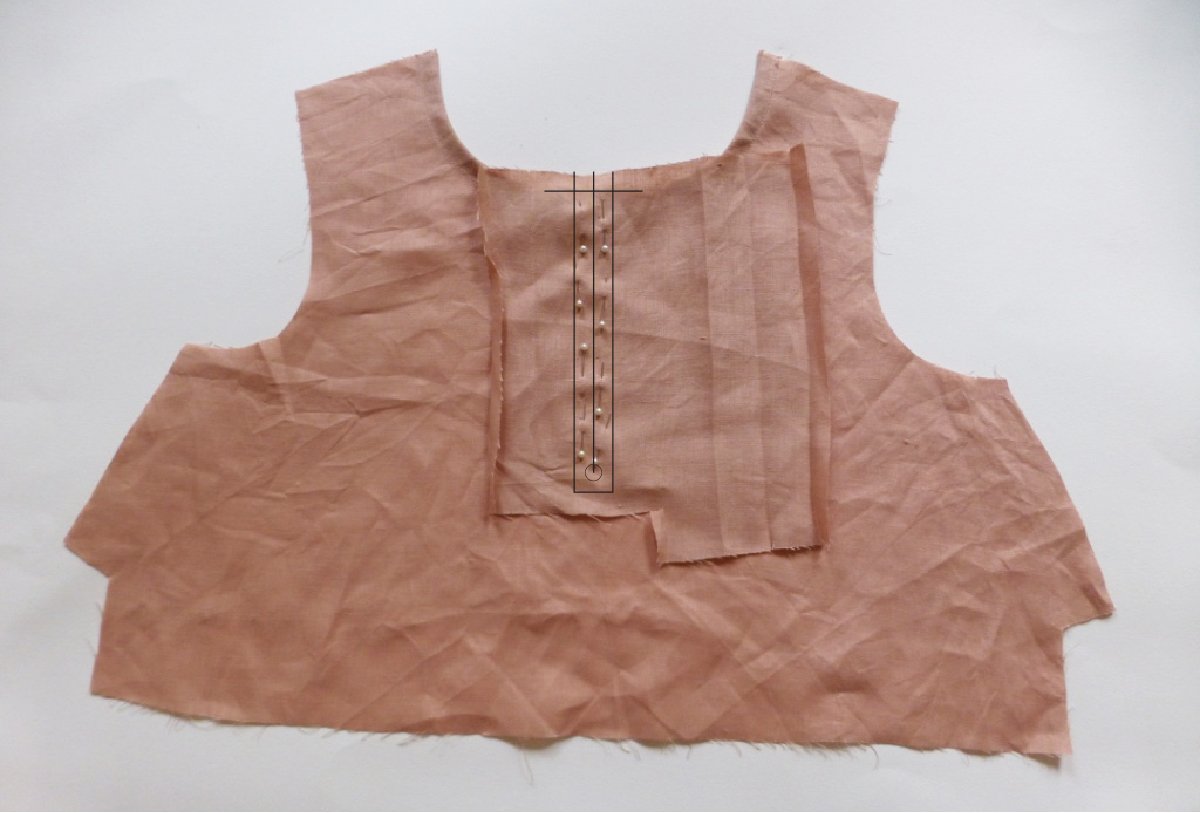
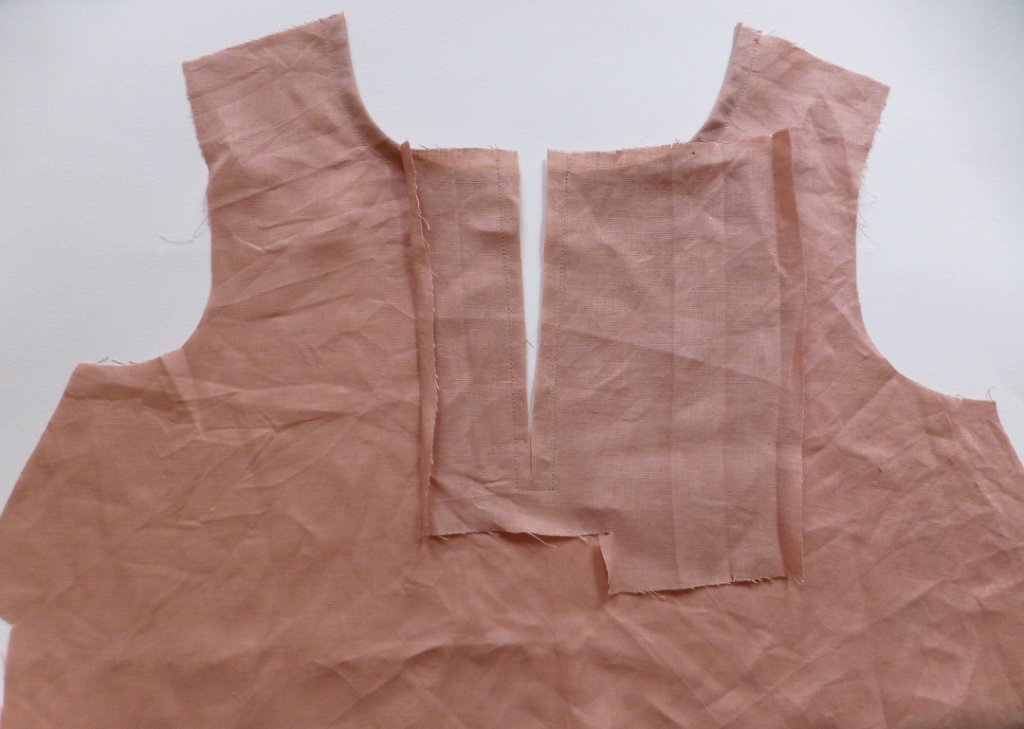
Take the PLACKET [5] piece and place it right side down on the wrong side of the FRONT BODICE [1]. Line up the 1cm (⅜in) guideline on the top of the PLACKET [5] with the neckline of the bodice. Align the cut line marked on the placket with the pin on the bodice and the drill hole underneath. 

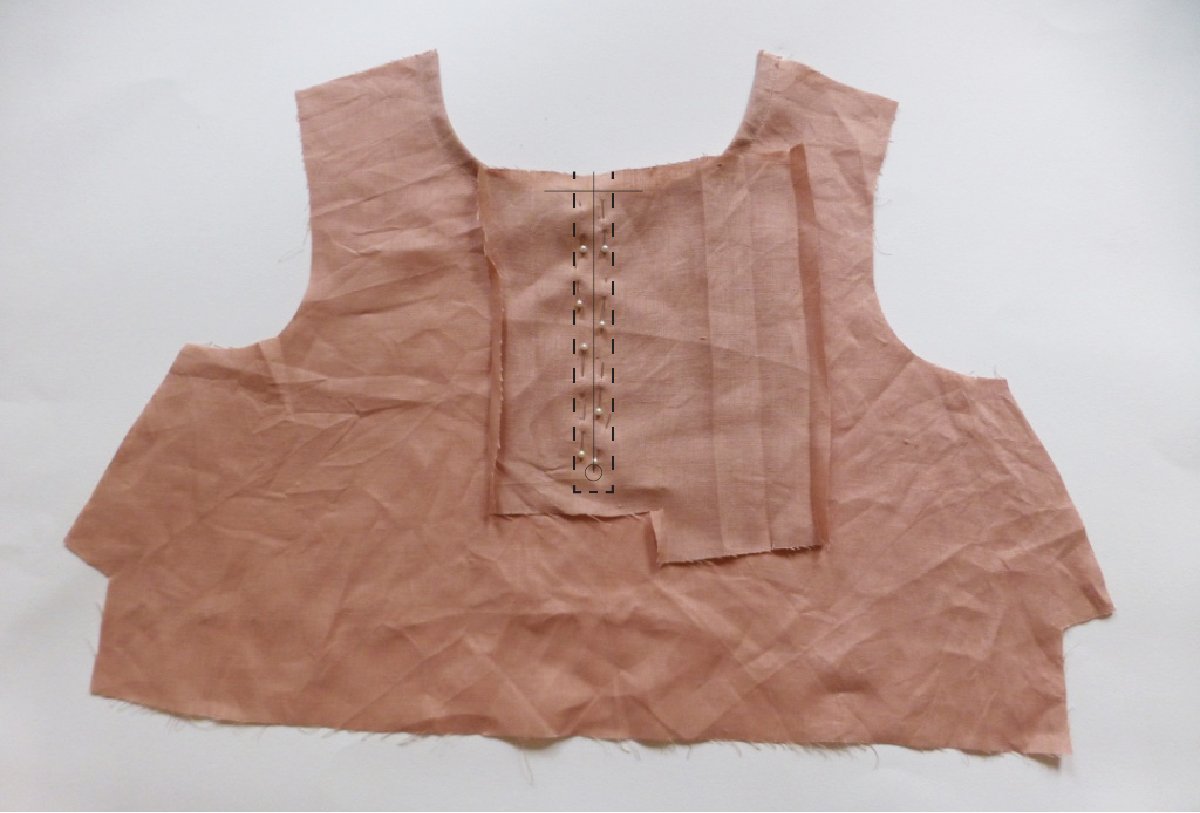
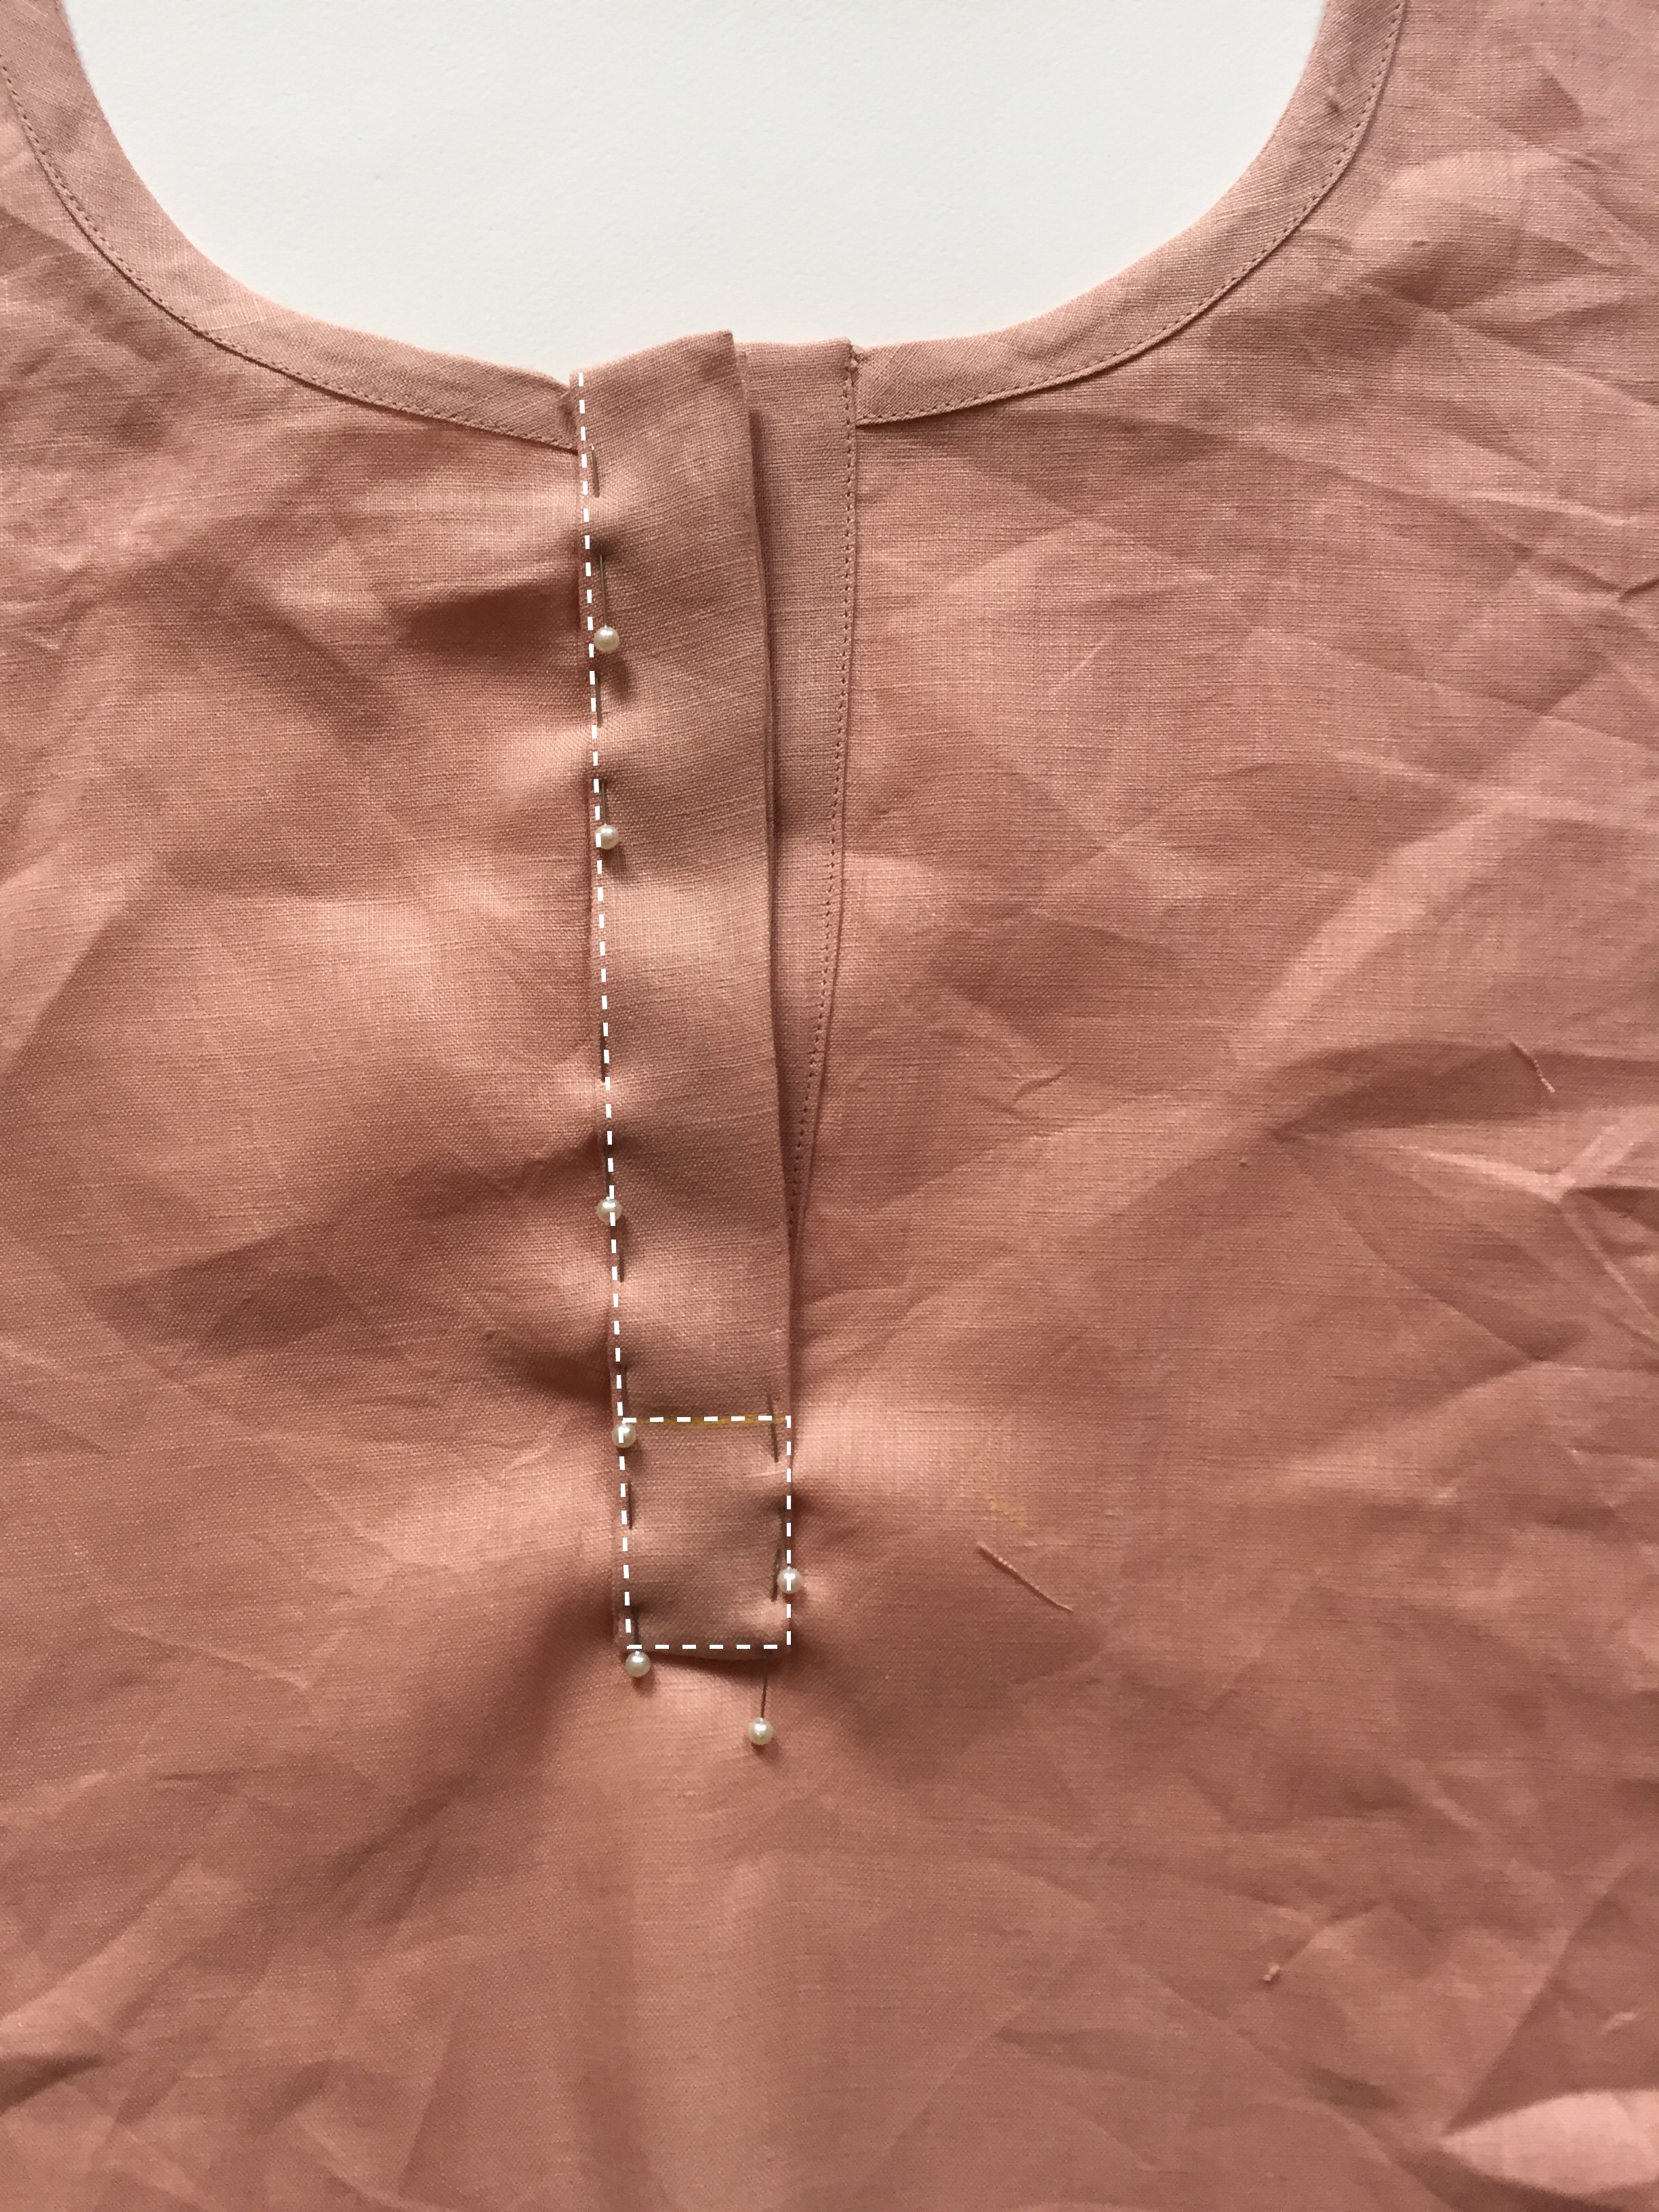
Pin PLACKET [5] in place along the lines of the “box” marked.

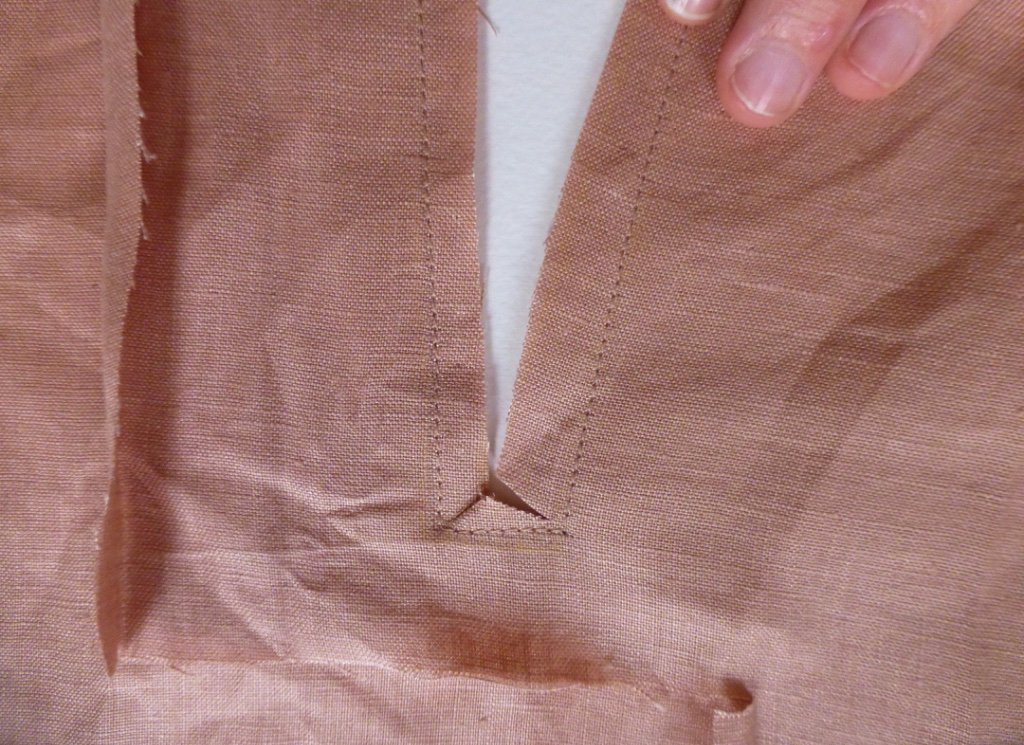
Stitch a box around the cut line (following your guide line marked) - walking in the stitches at each corner to ensure it is sewn precisely.

Carefully cut along the cut line, through the PLACKET [5] and the FRONT BODICE [1].

Cut in to each corner of the rectangle, getting nice and close to the stitch line, but not cutting through it.

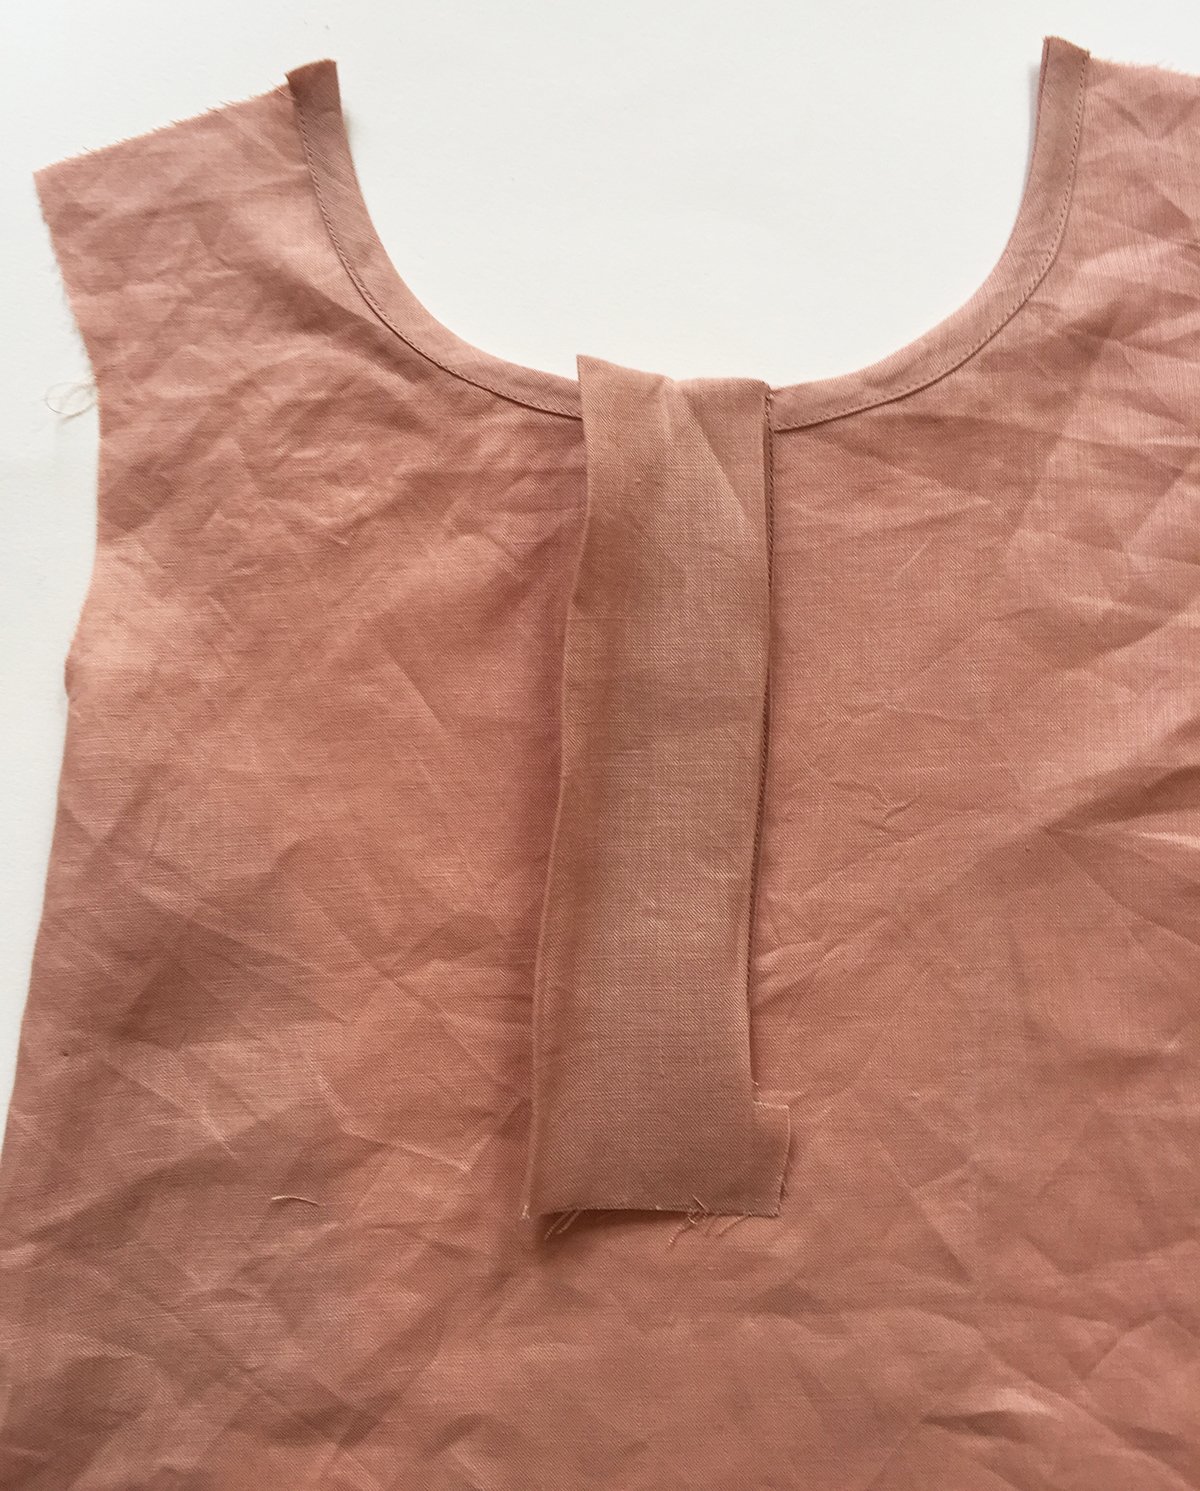
Flip the PLACKET [5] to the right side of the FRONT BODICE [1] and give it a good press along the seams and corners.

We will start by finishing the top edge of the PLACKET [5].

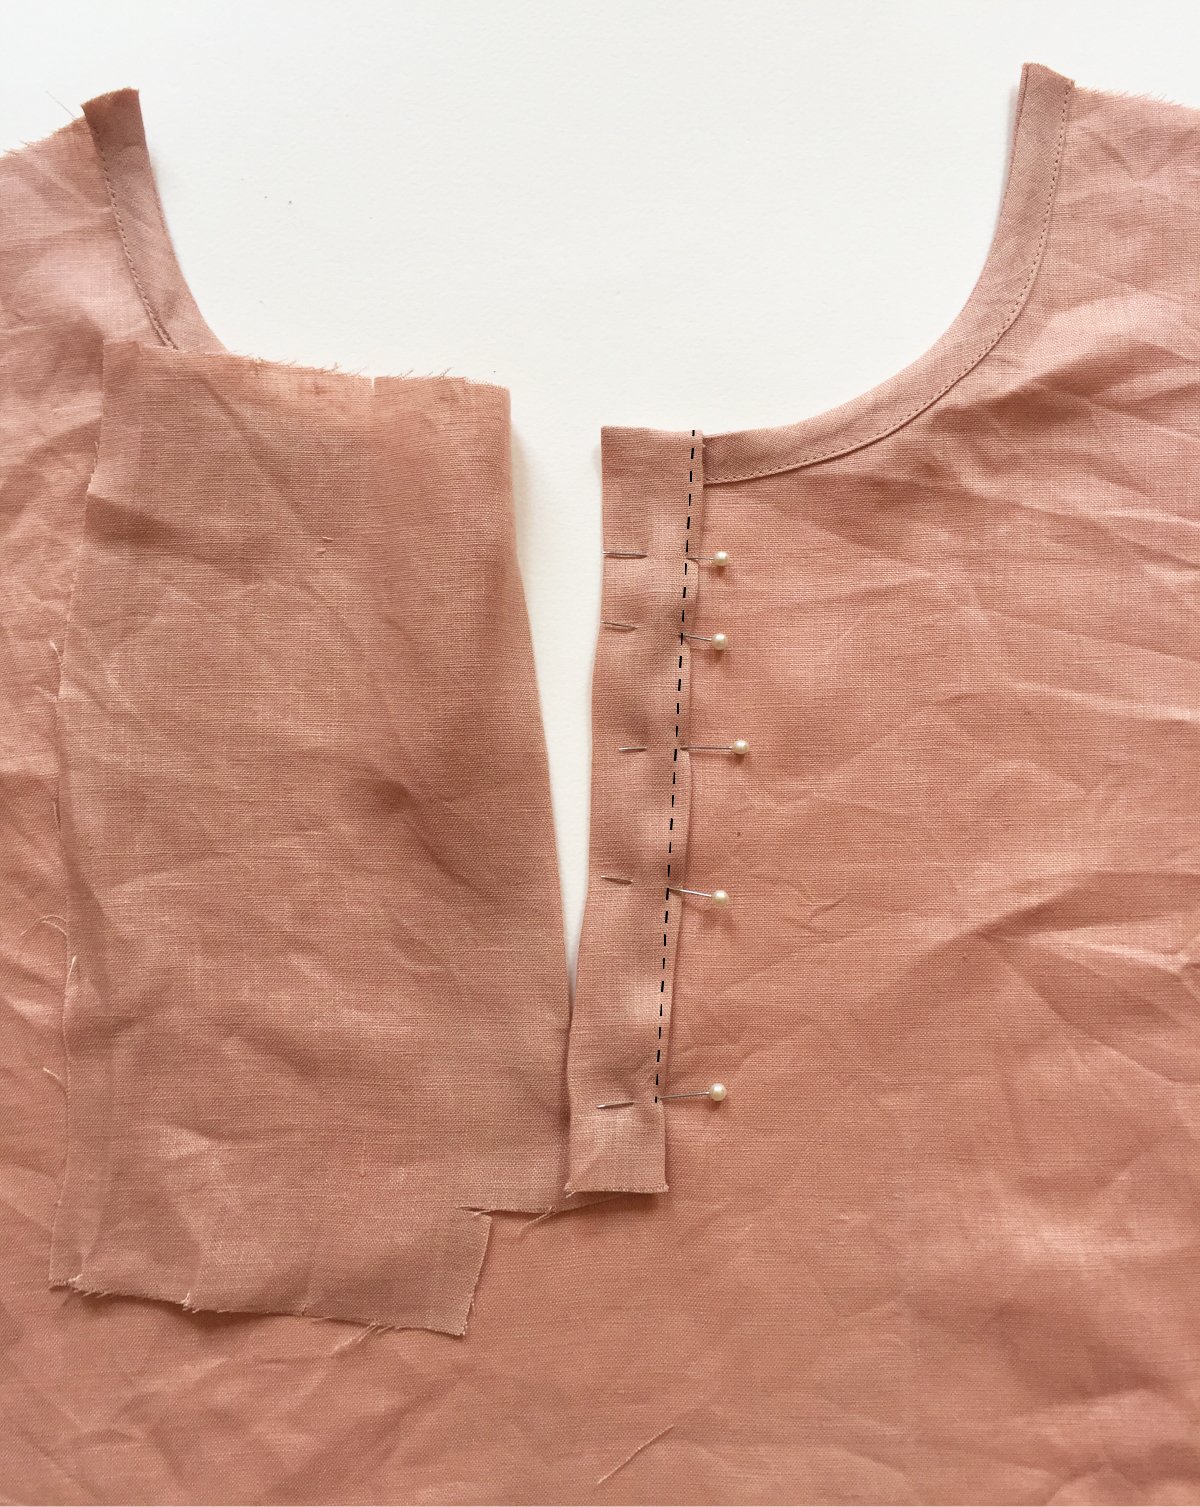
Focussing on the underside of the PLACKET [5], press the folded edge towards the seam of the opening, using the notches to guide you, so that the piece has right sides together.

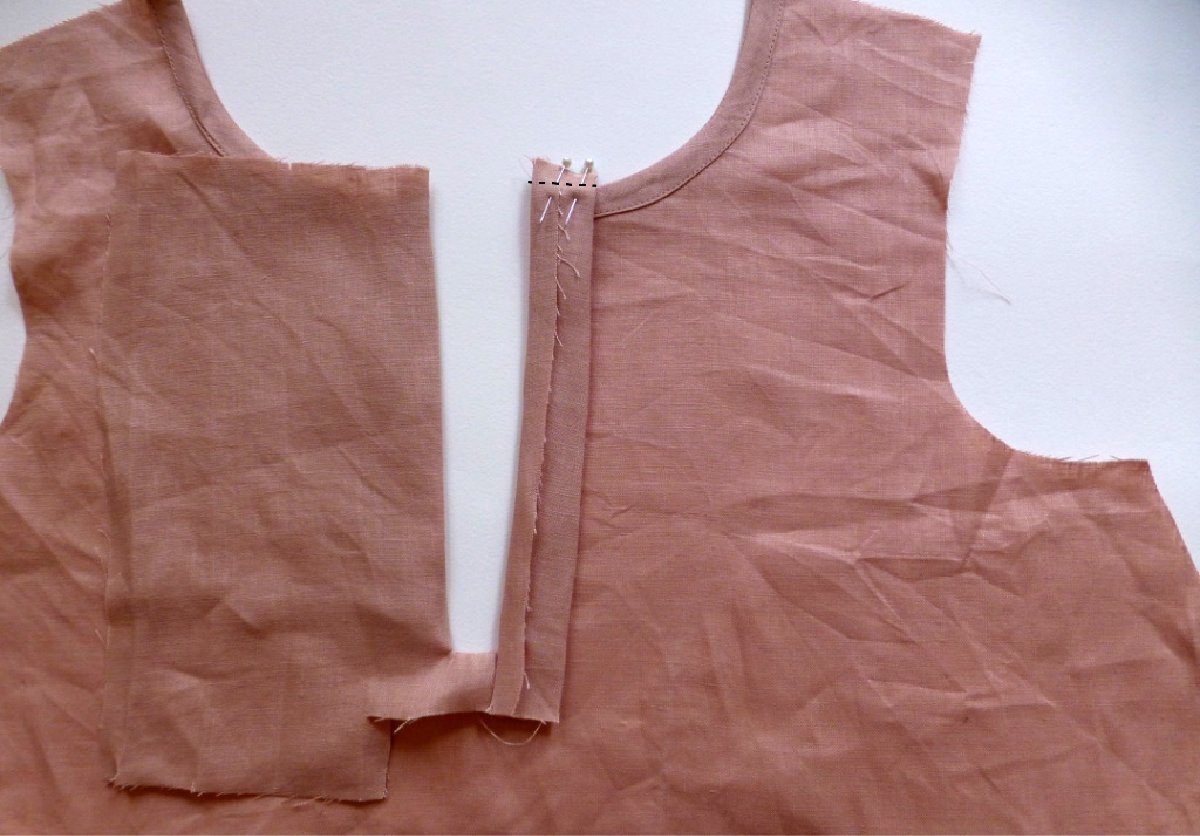
With tailors chalk, mark a straight line along the top of the PLACKET [5], 1cm (⅜in) down from the top edge. Pin in place. 

Stitch along the line, getting as close as possible to the edge of the binding. Trim back the edge to minimise bulk.

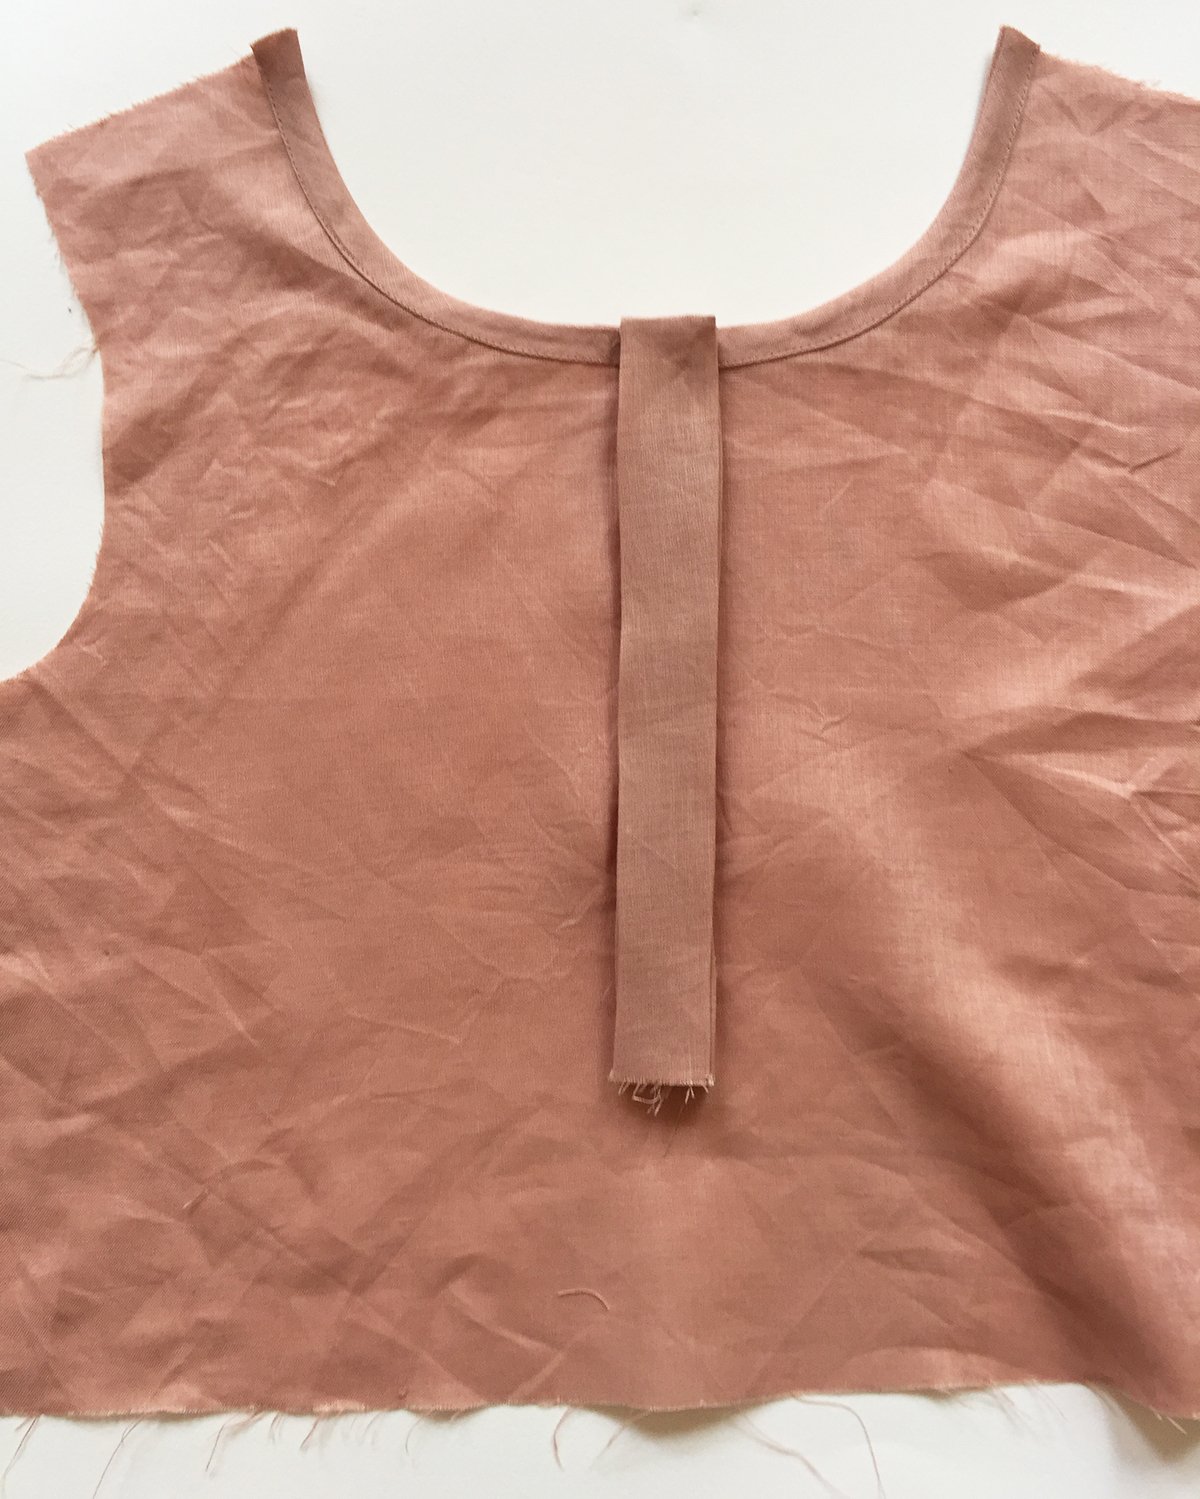
Turn the PLACKET [5] right side out, using a corner turner to turn the point of the PLACKET [5]. Press along the fold line (now in the opposite direction) and press PLACKET so that the fold just covers (by about 1mm) the stitch line underneath. 

Pin in place from the top, down to the point where the opening ends (2cm / ¾in up from the bottom of the placket). 

Stitch down from the top to the last pin, close to the folded edge.

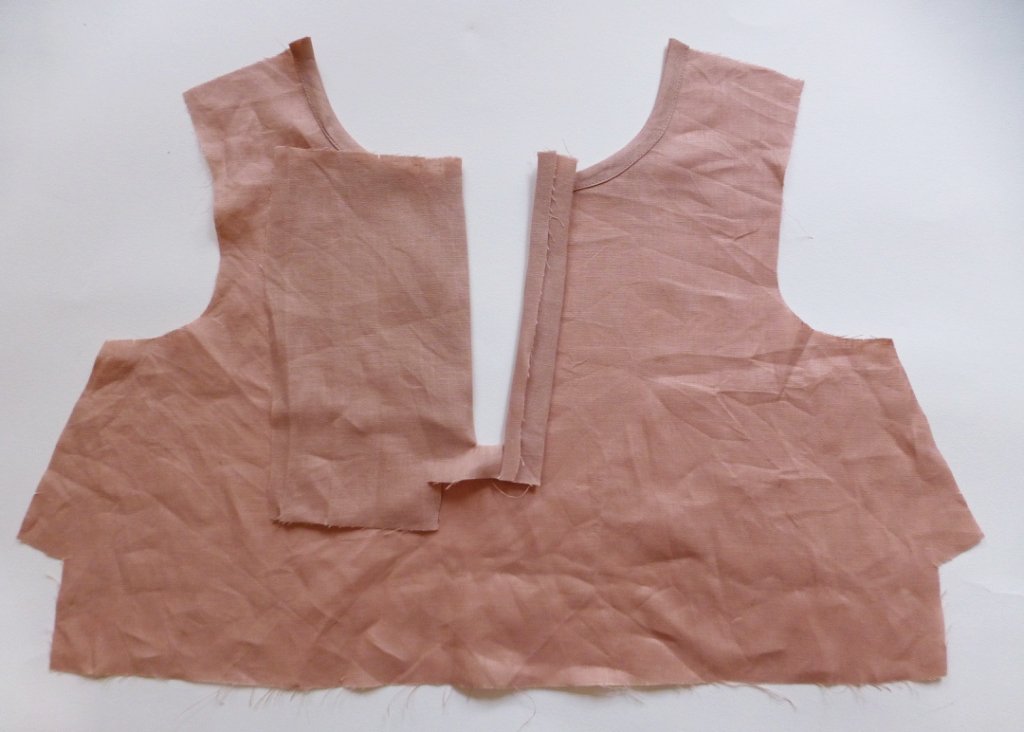
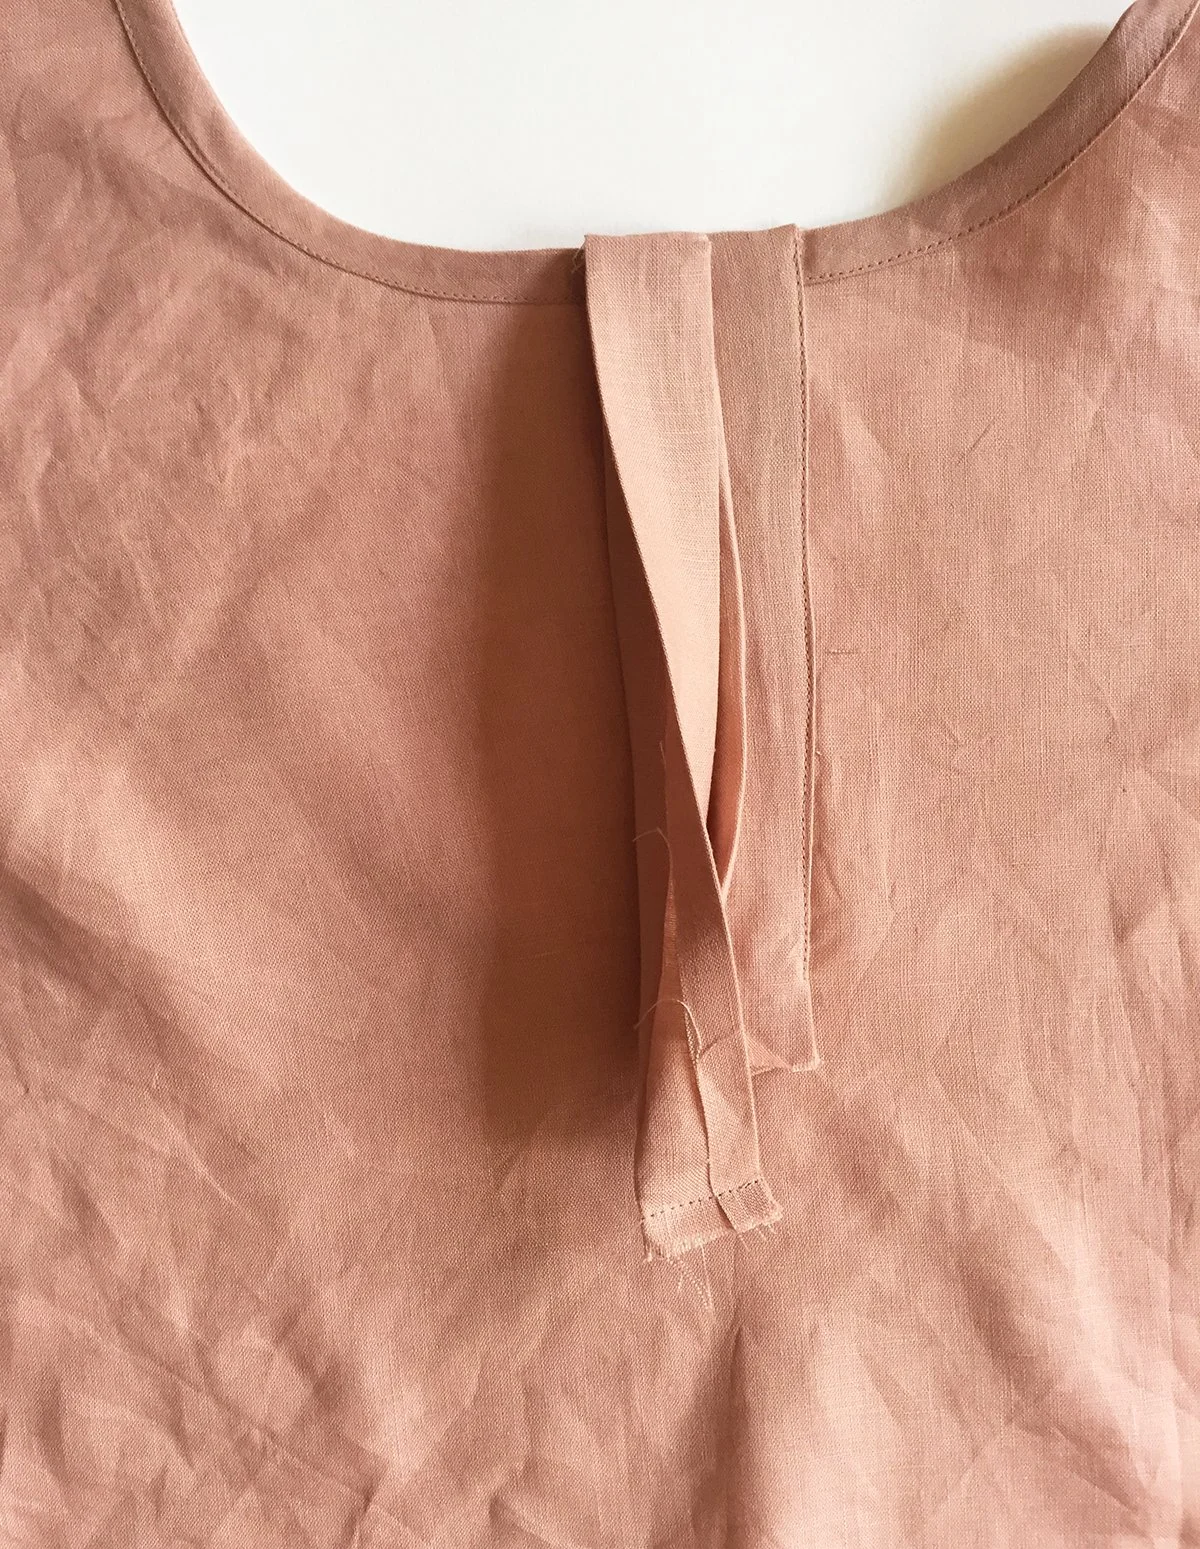
Now it’s time to assemble the other side of the PLACKET [5]. Using the notches closest to the left side, make a crease in the placket. Make sure that the long edge of the PLACKET [5] is still folded under.

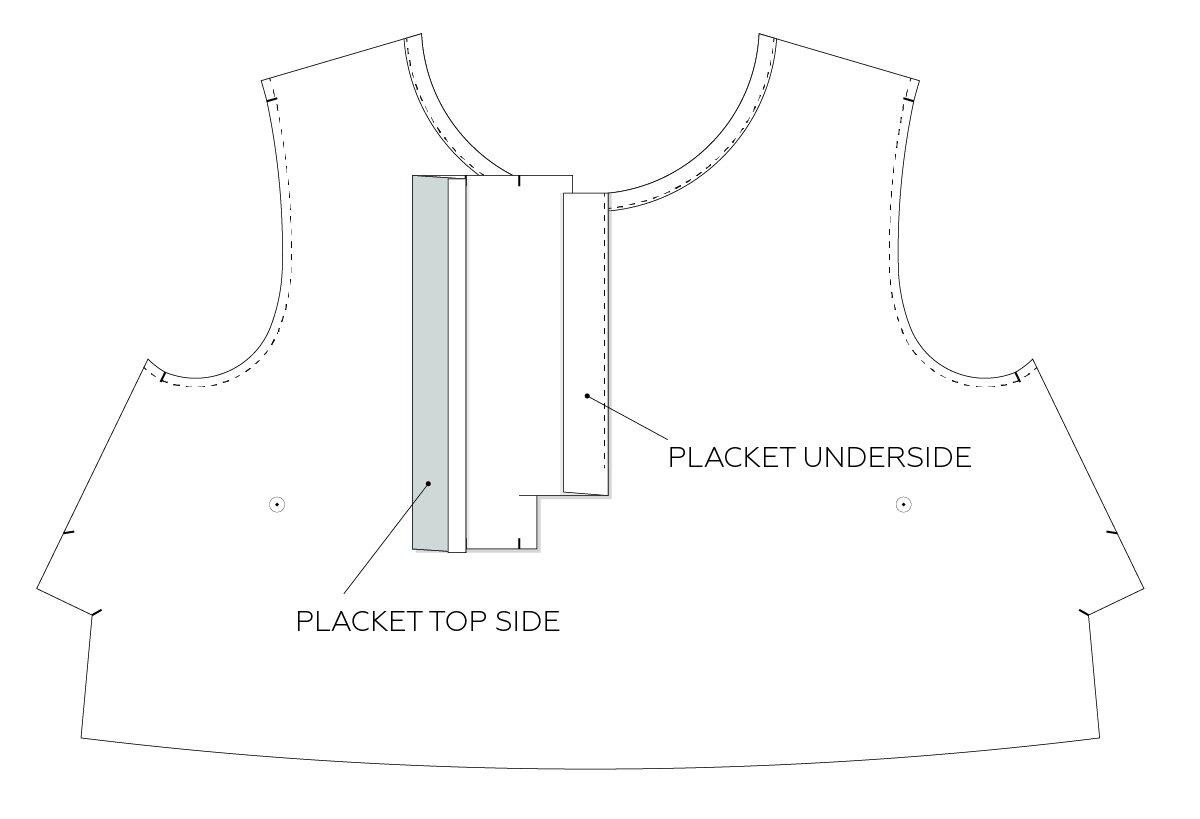
Again we’ll start by finishing the top of the PLACKET [5]. This side is slightly different to the first, as it is made up of two pieces, so that the buttons will be covered by a shield. Flip the FRONT BODICE [1] so that you can access the wrong side. Fold the PLACKET [5] into two sections, using the notches to guide you. Mark a line across the top (1cm / ⅜in from the top) and pin in place.

Stitch along the line. 

Trim back the seam allowance to minimise bulk.

Turn the PLACKET [5] right side out - using a corner turner to help you to get a nice point on each of the corners. Fold the raw edge inside the PLACKET and press flat.

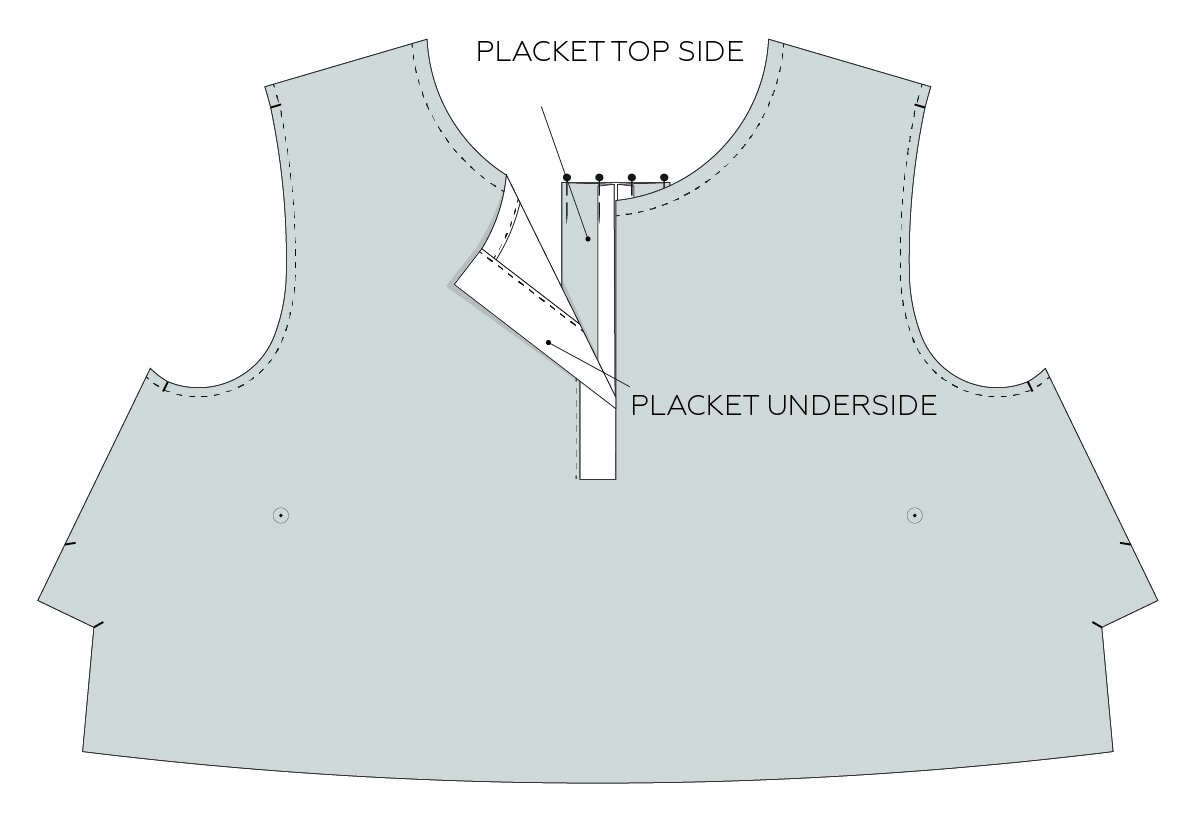
Carefully fold the PLACKET [5] so that each section of the placket is neatly stacked on top of the section underneath (the two sections of the PLACKET TOP SIDE should be sitting on top of the PLACKET UNDERSIDE). The left side of the placket will still be open.

Give it a good press.

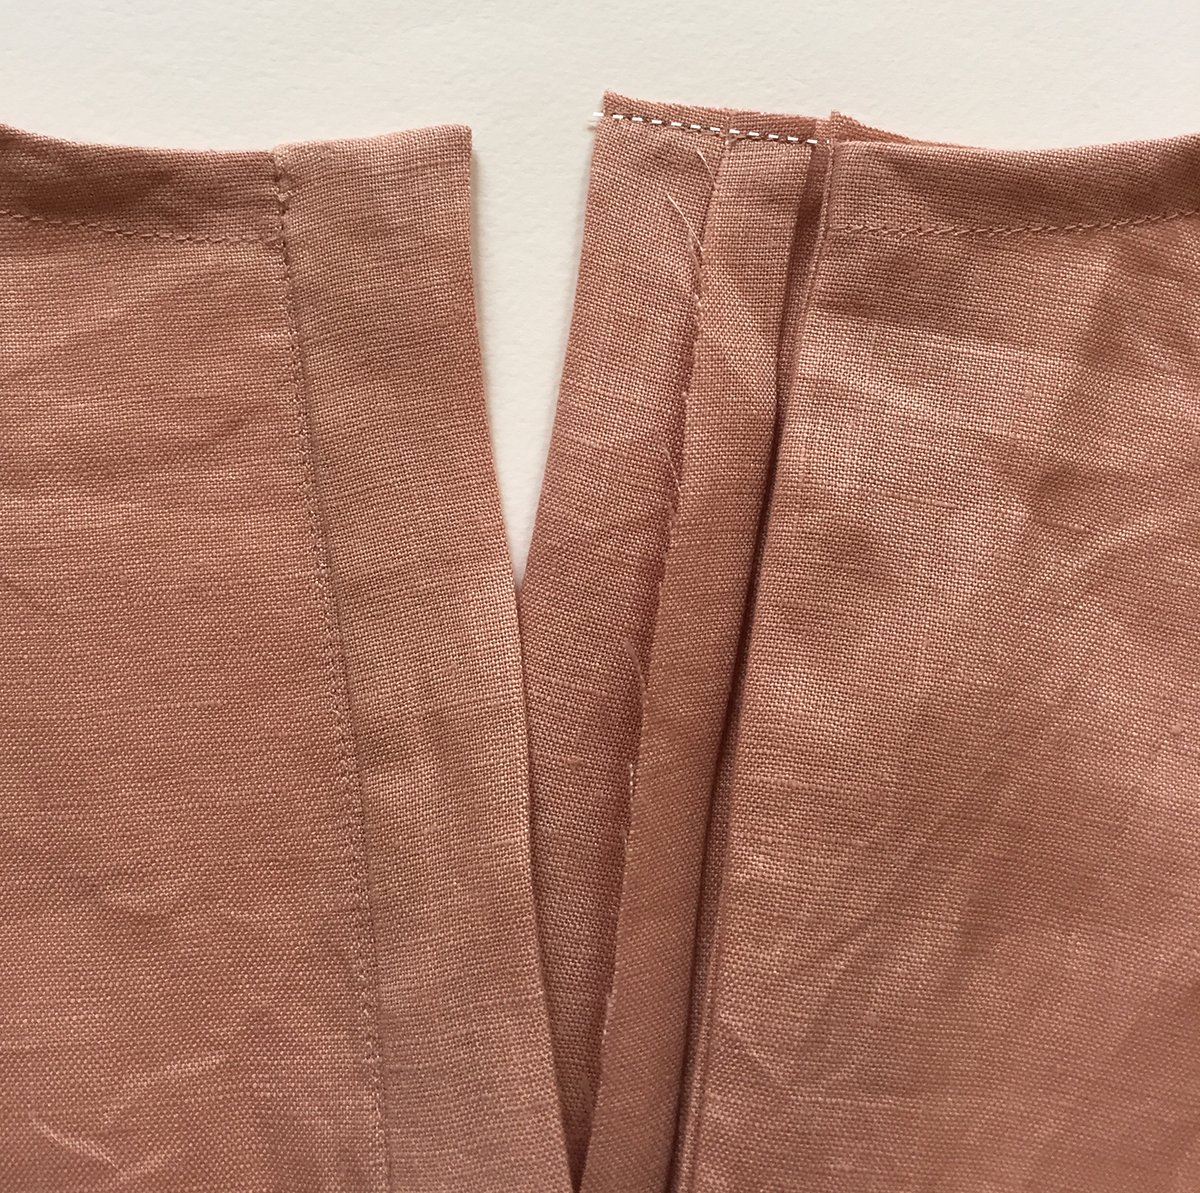
To finish the bottom edge of the PLACKET (top side), with the raw edge still folded back, reverse the direction of the internal fold, so that the right sides come together and you can pin the bottom of the placket together. 

Stitch with a 1cm (⅜in) seam allowance. Draw in the stitch line with tailors chalk before sewing if you feel the need. Trim back the seam allowance and turn corner with a corner turner. 

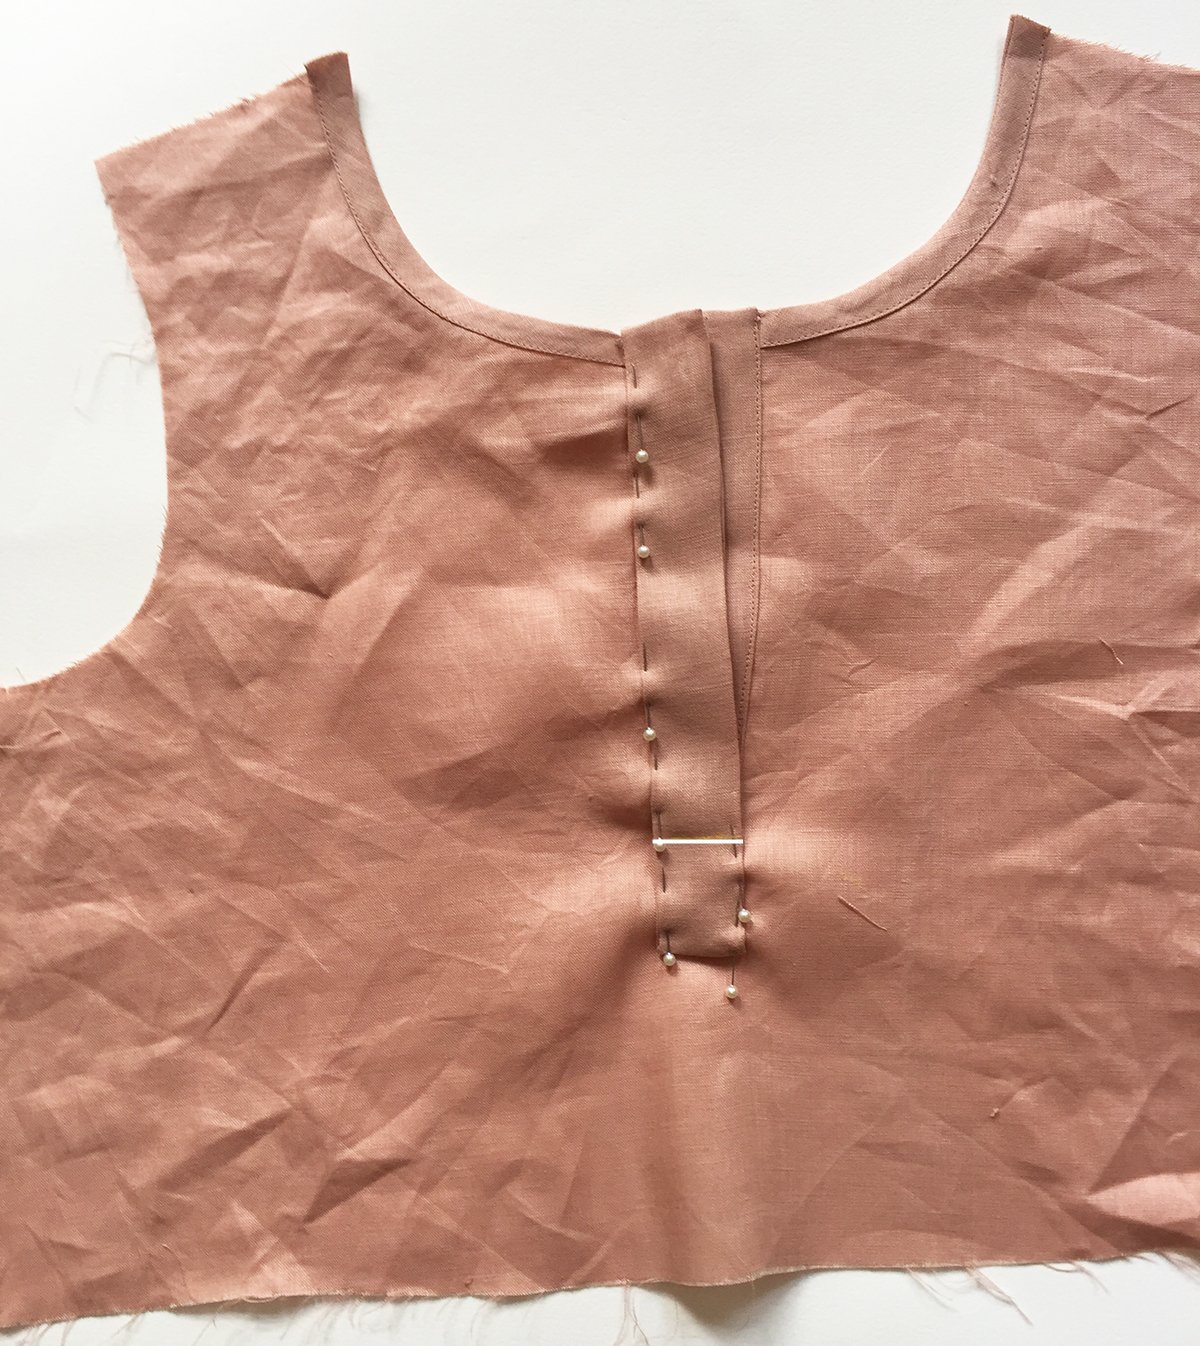
Give the PLACKET [5] a good press and then pin in place. You will want to be pinning through both sections of the top placket and ensuring the fold is covering the stitch line underneath. 

Mark a horizontal line across the PLACKET [5] 5cm (2in) up from the bottom of the PLACKET [5]. 

Carefully stitch the PLACKET [5] in place, through all the layers.

I hope this tutorial gives you the confidence to give it a go!

Happy sewing,

Emily


RESOURCES MENTIONED IN THIS ISSUE

  • Peppermint pleated dress pattern can be found here.


For more issues of the Q & A series, you can check out the archive here.


WHAT YOU’VE BEEN MAKING


MORE POSTS IN THE SERIES

ISSUE 110 - How to line a wrap skirt

THE Q & A SERIES

How to line a wrap skirt

Hi Emily,

Thank you for taking the time to answer our questions and for your contribution to furthering the art of sewing! 😊

I have some light-weight Japanese printed linen which I think would suit the wrap skirt pattern very well, however I would like a bit more coverage and have some navy voile in my stash which would go well for lining.

I would prefer it if the lining was not visible, so thought I could have a facing of the linen fabric on the wrap, so that the lining didn’t show. Your patterns are always finished neatly - any tips for attaching the lining, particularly at the hem?

Thank you,

Donna


Hi Donna,

This sounds like a great idea!

Of all skirt projects to line, the Peppermint wrap skirt is probably the simplest as you don't need to think about a zip closure. 

When it comes to lining a skirt, normally you don’t attach the lining at the hem. What this means is that the outer layer (main fabric) will be able to hang properly and won't be impacted by a lining holding it back. More about that when I show you how to construct the skirt with lining below.

Cutting the wrap skirt pattern pieces

Cut all pattern pieces from the main fabric as instructed in the pattern.

For the lining you will only need to cut the main skirt pieces. You don't need the waistband.

Cut the lining pieces about 2.5cm (1in) shorter than the outer pieces. This will prevent the lining dropping and being visible when the skirt is worn.

On the front lining pieces, trim off the seam allowance at the opening by cutting along the STITCH LINE (grey line on the pattern). The raw edge of the lining will be held in place by the folded edge of the outer layer so we don't need this extra fabric on the lining.

sew the darts

Start by sewing the front and back darts on the outer pieces (steps 1 and 2 of the instructions). Press the darts as instructed.

Repeat for the lining pieces. This time press the darts in the opposite direction. This means that when you join the lining to the skirt you won't end up with too much bulk as the dart bulk won't be sitting on top of each other. 

Skip step 3 of the instructions (finishing the wrap edges). We'll do this after the lining and outer skirt are joined at the top so that the lining becomes enclosed inside the edge finish.

Sew the side seams

Join the front and back pieces together at the side seam.

The Peppermint Wrap skirt instructions guide you to sew this seam with a French seam, but when adding a lining you need to consider how seam finishes are going to impact the overall bulk.

It sounds like your fabric is fairly lightweight, so it's probably fine to sew both your outer and lining fabrics with French seams. If using a bulky fabric (such as a winter weight wrap skirt), I'd suggest sewing the seams with regular seams, overlocking and pressing open.

Lined garments often have unfinished seams, but finishing the seams will encourage longevity in the garment, so we like to finish seams as usual, when possible.

Join the lining pieces at the side seams in the same way. If sewing with French seams, press the lining seams in the opposite direction to the outer skirt (again, this is to minimise bulk in the seams).

Hem the skirt lining using your chosen method. To hem in the same way as the outer skirt, look to Step 16 and 17 of the instructions.

With the outer skirt and lining wrong sides together, pin the two layers together along the waist edge. Stay-stitch the lining to the outer layer with a 6mm (1/4in) seam allowance. 

Flip the skirt so that the lining is facing up. Fold back the front opening raw edges as instructed in Step 3, making sure the raw edge of the lining is enclosed inside the fold on both sides.

At this point you can now continue following the instructions as usual to create and attach the waistband - Step 7 onward.

When you enclose the raw edge of the waistband on the inside (Step 13) the raw edges of lining will be tucked inside for a clean finish.

I hope this tutorial gives you the confidence to give lining the Wrap skirt a go!

Happy sewing,

Emily


RESOURCES MENTIONED IN THIS ISSUE

  • Wrap skirt pattern can be found here.

  • Tips for sewing French seams - tutorial can be found here.


For more issues of the Q & A series, you can check out the archive here.


WHAT YOU’VE BEEN MAKING


MORE POSTS IN THE SERIES

ISSUE 109 - Swapping sleeve styles between patterns

Swapping sleeve styles between patterns.

THE Q & A SERIES

Swapping sleeve styles between patterns

Hello!

Thanks for this forum and for answering our questions.

Do you have any tips for adding sleeves to a sleeveless pattern or changing the style of sleeves on an existing pattern? Do you need to match up curves at the armhole if you have sleeves from another pattern you would like to use?

- Sarah
Auckland, New Zealand


Hi Sarah,

Great question!

We have a tutorial on our blog about how to add sleeves to a sleeveless style. In the tutorial we show how to add sleeves to the Peppermint Peplum top. When adding sleeves to a pattern that normally doesn’t have sleeves, you will need to use a pattern with a similar shape / amount of ease.

In terms of swapping sleeves between styles, that's definitely something you can do too. We included a tutorial about this in a past issue of Curated by ITF and I thought I'd share it with you all today. 

Considerations when swapping sleeves between patterns

You cannot just take one sleeve and attach it to an armhole from another pattern. The sleeve caps are very likely to be different between the styles, which prevents you from being able to simply swap the pattern pieces.

In this tutorial, we will show you how to take one of the Sawtell top sleeves and transfer the design to a sleeve from another pattern - in this case, the Peppermint wrap top.

Trace the sleeve pattern.

Step 1

Trace the sleeve piece from the pattern you will be using for the rest of the garment. Use pencil as you will erase some of these lines later.

For the example, we are making the pattern for the Peppermint wrap top with the gathered sleeve from the Sawtell top, so we will trace the Peppermint wrap sleeve piece on a large piece of paper. The amount of paper required will depend on the type of sleeve you are creating. For a gathered sleeve, you will require room on either side.

We will refer to this sleeve as SLEEVE 1 to prevent confusion.

Mark in bicep line.

Step 2

Extend the grainline through the piece from top to bottom. Mark in the BICEP LINE - joining the top of the underseam STITCH LINE on each side with a straight line, perpendicular to the grainline.

Mark bicep line on other sleeve.

Step 3

Take the sleeve that you are transferring the design lines from, extend the grainline and mark the BICEP LINE as you did in STEP 2.

We will refer to this as SLEEVE 2.

Place sleeve 1 on sleeve 2, lining up grain and bicep lines.

Step 4

If your paper is transparent, place SLEEVE 1 on top of SLEEVE 2, lining up grainlines and bicep lines. Hold in place with a pattern weight.

If your paper isn't transparent, put SLEEVE 2 on top of SLEEVE 1 and use a tracing wheel to transfer the lines.

Create new underseams.

Step 5

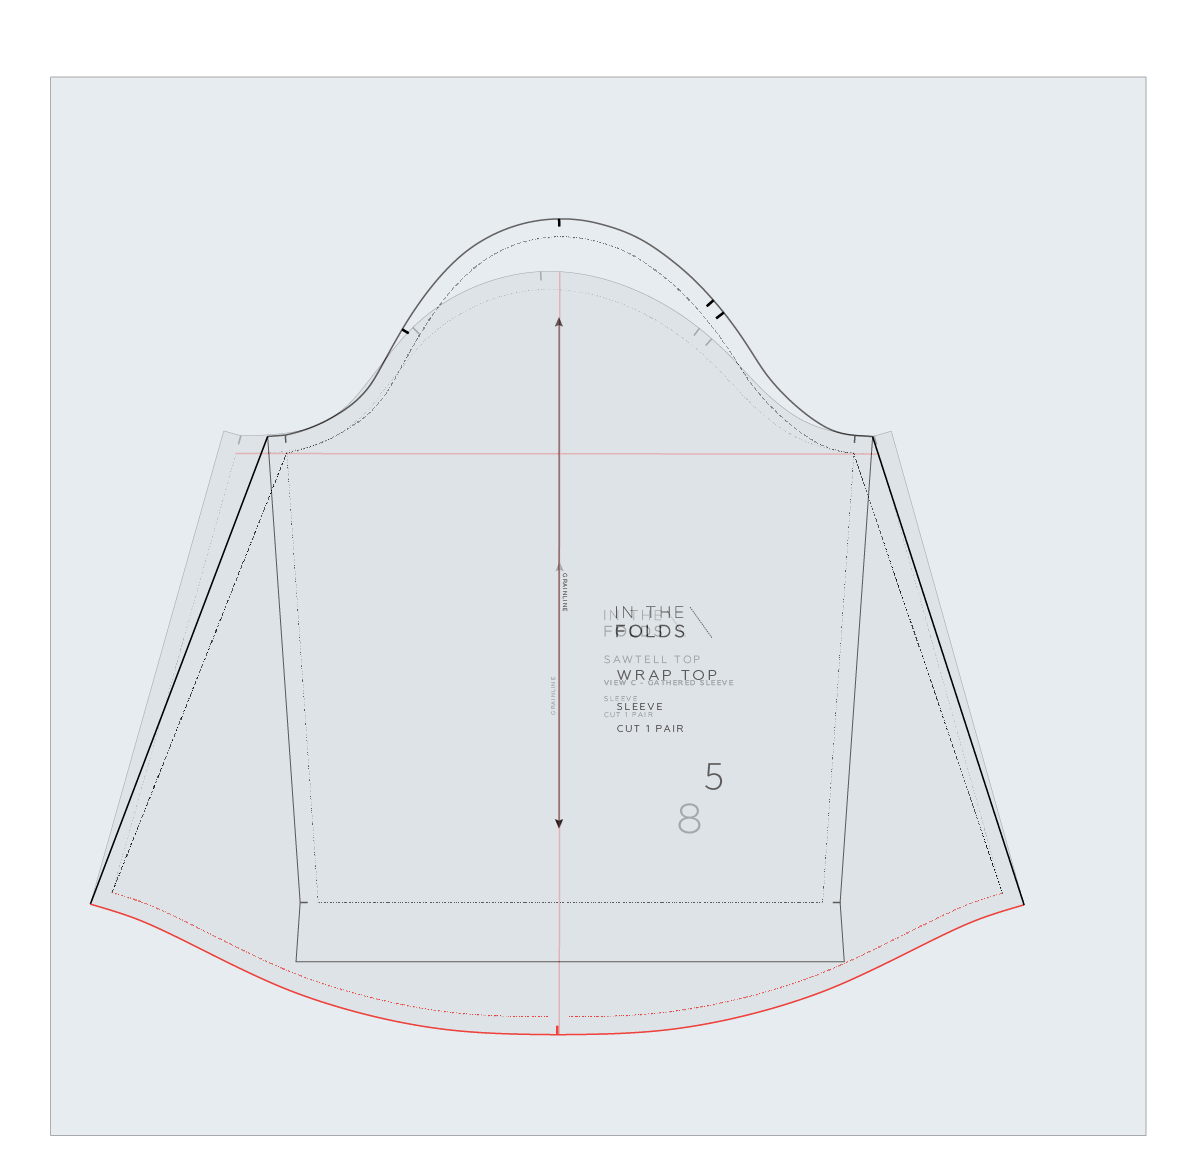
Create the new underseams by joining the top of the seam on SLEEVE 1 to the hem of SLEEVE 2 with a straight line. Do this for the STITCH LINES and the CUT LINES.

Trace hem and transfer notches.

Step 6

Trace the hem from SLEEVE 2 onto SLEEVE 1. Be sure to transfer any notches.

Remove pattern paper once all lines have been transferred. Erase any lines you no longer need. If you traced using a tracing wheel, use a pencil and ruler/French curve to draw in the lines you need.

Check notches are correct.

Step 7

Finalise pattern by checking all notches are correct. In the example you can see we needed to rotate the underseam notches to match the angle of the new sleeve lines. Update sleeve name.

I hope this tutorial helps you make all your sleeve dreams come true.

Happy sewing,

Emily


RESOURCES MENTIONED IN THIS ISSUE

  • Add sleeves to a sleeveless pattern. Tutorial can be found here.

  • Peplum top pattern can be found here.

  • More info about Curated by ITF can be found here.

  • Wrap top pattern can be found here.


For more issues of the Q & A series, you can check out the archive here.


WHAT YOU’VE BEEN MAKING


MORE POSTS IN THE SERIES

ISSUE 108 - Fabrics suitable for facings

THE Q & A SERIES

how to choose Fabrics suitable for facings

Dear Emily,

I’ve nearly finished my first ruffle sleeve top and I’ve really enjoyed making it.

I’ve had some beautiful cheesecloth type fabric in my stash for years. But only 2m of 115cm width, so not enough. Can I make the facing out of a different fabric and if so what? Or do you have any other ‘blouse’ type patterns that would suit this fabric?

Thank you!

Leigh


Hi Leigh,

I am pleased to hear you have enjoyed using the Ruffle sleeve top pattern!

You could definitely use the fabric from your stash.

You could make the facing from a cotton fabric of a similar weight to the cheesecloth (voile for example).

what to keep in mind when using a different fabric for a garment facing

The only thing to keep in mind though is that as the fabric is quite transparent, you will be able to see the facing through the top, so you need to have a think about whether you're okay with that.

To get a feel for it, you could try holding the two fabrics up to your body - with the facing fabric folded so it just shows in one section - like the facing of this pattern. If you're not happy with it showing through, you have two options:

  • Lining or underlining the body of the top instead of just having a facing

  • The other thing you could think about is using bias binding around the neckline and then making a cami / singlet to wear under it. We have a tutorial showing you how to attach bias binding here.

Happy sewing,

Emily


RESOURCES MENTIONED IN THIS ISSUE

  • Ruffle sleeve top pattern can be found here.

  • Binding a neckline. Tutorial can be found here.


For more issues of the Q & A series, you can check out the archive here.


WHAT YOU’VE BEEN MAKING


MORE POSTS IN THE SERIES

ISSUE 106 - HOW TO REDUCE THE SIZE OF A DART

How to make a dart smaller.

THE Q & A SERIES

How to reduce the size of a dart

Hi Emily,

Not a question, but a Thank You!

Sunday's tutorial on removing a bust dart from a pattern is exactly what I have needed without realising it.

As an A-bust person, even B-cup patterns with darts are too big for me. Now that I know how to eliminate darts, I can get to work adjusting some patterns I've been admiring. Thank you!

And thank you also for how much care you put into your instructions. You are one of the most dependable instructors/pattern makers around.

Fiona
- Brunswick, Australia


Hi Fiona,

Thank you for the lovely email. I am so happy to hear you are enjoying our patterns and the information we share!

I know your comment wasn't a question, but it did make me think about a follow-up to my post on how to remove a bust dart.

WHAT ARE DARTS FOR?

Darts are used to create curves over parts of the body that require more shaping.

In the case of a bust dart on a small bust, you may require (or want) some shaping, but not the full amount of shaping that a pattern has that's drafted for a B cup.

HOW TO REDUCE THE SIZE OF A BUST DART

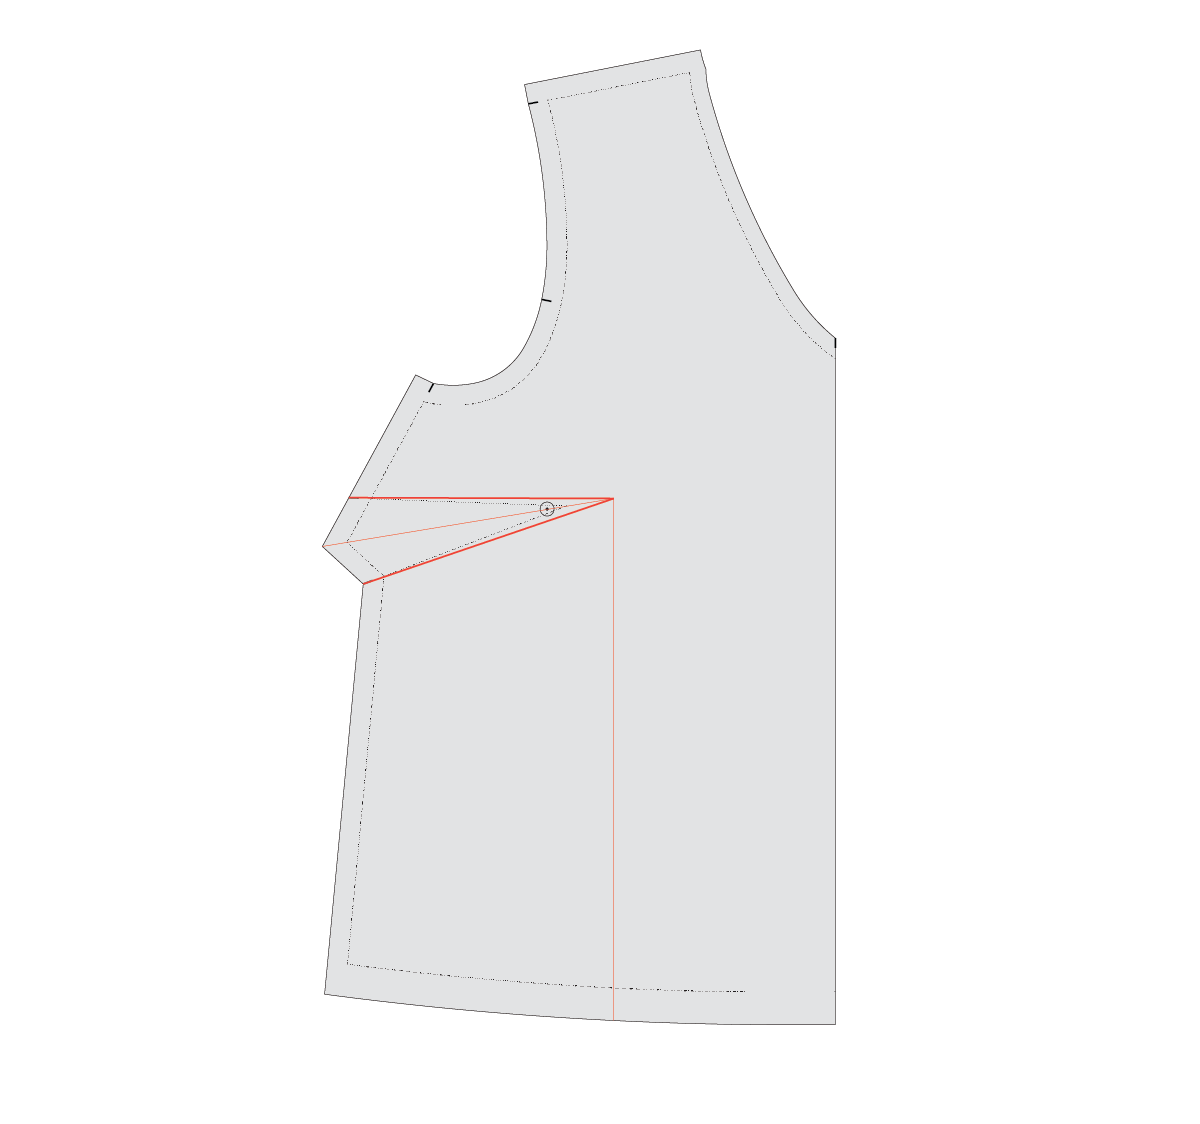
For those of us with a small bust (I am part of this club!), rather than remove the dart altogether, you may just want to reduce the size of the dart.

In today's post I thought I'd show you how you can keep the dart, but reduce the size of it.

PREPARE YOUR PATTERN

Step 1 how to reduce dart size.

Step 1
Draw a line through the dart to the bust apex point (normally 2.5cm / 1inch from the tip of the dart). Check that this corresponds to your actual bust apex point and move if necessary.

Draw a line from the bust apex point to the hemline - parallel to the centre front.

Step 2 how to reduce dart size.

Step 2
Draw in new dart arms - from the notches on the side seam to the bust apex point.

Step 3 how to reduce dart size.

Step 3
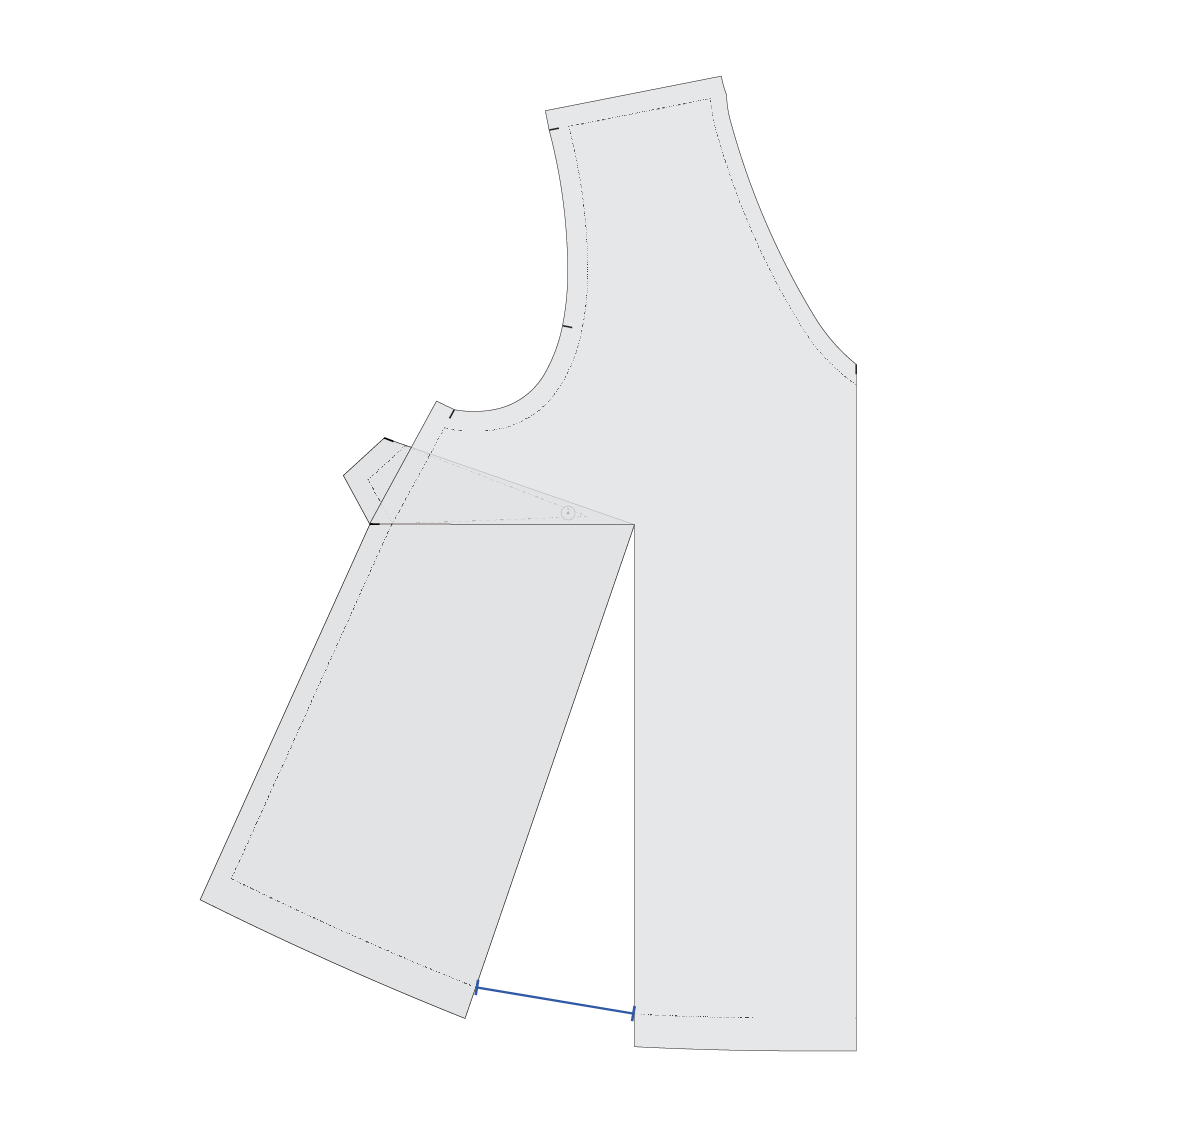
Cut up from the hemline along your vertical line. Stop 1-2mm from the bust apex point.

Cut along the top dart arm towards the bust apex point. Stop 1-2mm from the bust apex point to create a hinge.

Step 4 how to reduce dart size.

Step 4
Carefully rotate the cut dart arm so it meets the centre line of the dart. Through this process you are relocating some of the dart fullness to the hem (this is called the 'slash and spread' technique and you can learn more about it here). Tape dart closed.

Step 5 how to reduce dart size.

Step 5
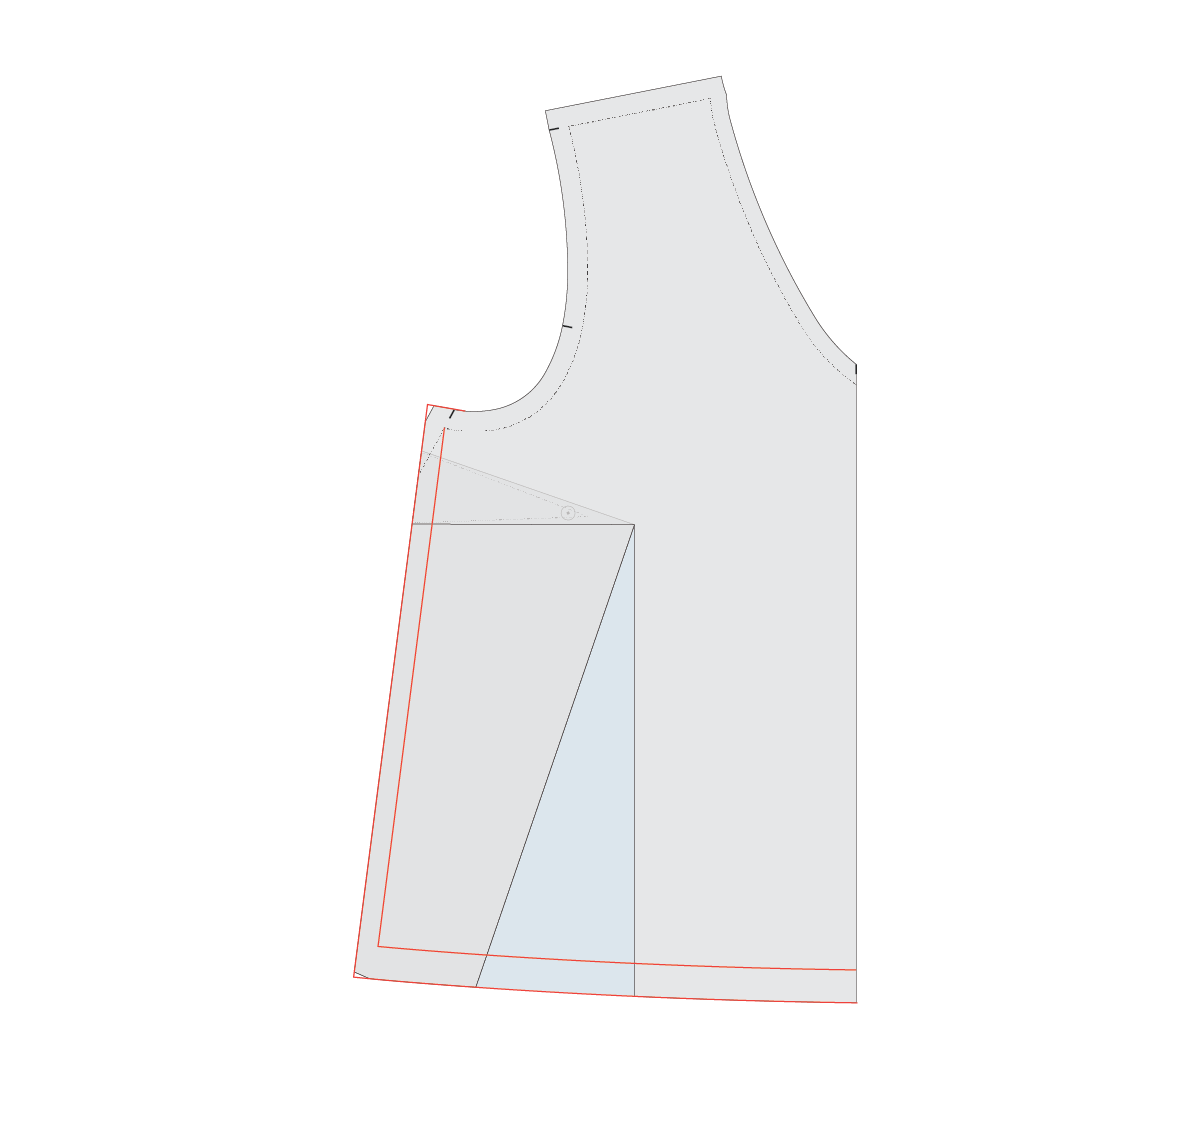
Fill the gap with some paper and tape in place. Draw in your new dart, using the centre dart line and the lower dart arm. Draw your lines all the way to the bust apex point. 

Measure the opening in the hem - measuring on the stitch line on each side of the opening (this is the grey line on In the Folds patterns). Take note of the measurement.

Step 6 how to reduce dart size.

Step 6

We are now going to remove this excess from the side seam. Mark the amount recorded in the previous step on the hem line - measuring from the side seam (on the stitch line). If you want to keep some of the fullness you can, just mark a smaller amount from the side seam.

Before we can go ahead and join this point to the armhole and create a new side seam, we first need to think about dart shaping.

What is dart shaping?

Example of dart shaping.

Dart shaping is the way the end of a dart is shaped so it sits nicely when the seam is sewn. By adding dart shaping, the edge of the dart will sit flush with the seam it is a part of.

You may have put a dart in a garment before and noticed that the dart has changed the shape of the seam that it lies on and is no longer the smooth line it once was. To prevent this from happening, we need to add dart shaping. This will ensure that once your dart is sewn, the seam it's on will remain a nice smooth line.

How to create dart shaping

You will need to fold the dart, so you can predict what will happen to the shape of the seam when you sew the dart from fabric. Think about which direction the fullness of your dart will be pressed once it is sewn. This will decide which dart arm you need to fold.

Generally vertical darts are pressed towards the centre front (in the case of front darts) and the centre back (in the case of back darts). For horizontal darts (like the one pictured), the bulk of the dart is pressed down.

If you'd find it easier to follow a video about adding dart shaping, you can see the process here.

Step 7
Take your pattern and fold the lower dart arm.

Step 8 how to reduce dart size.

Step 8
Folding a dart on a flat surface is not possible, as we are making the two dimensional pattern three dimensional. Place the tip of the dart on the corner of a table (or a large books also works) and fold the lower dart arm so that it meets the upper dart arm. This allows for the dart to wrap around the corner, rather than on the table top where it is forced to remain flat.

Hold folded dart in place with a pin or pattern weight.

Step 9 how to reduce dart size.

Step 9
Create a new side seam, taking a ruler and drawing a straight line from the point marked on the hemline up to the top of the side seam (this line needs to meet the top of the side seam on the stitch line).

Step 10 how to reduce dart size.

Step 10
Use a tracing wheel to transfer the new side seam line onto the folded section of the dart. This will give you the shaping you need for the dart. If you don't have a tracing wheel you can use a pin to make a few holes along the line.

Step 11 how to reduce dart size.

Step 11
Remove pattern weight / pin and trace the markings made by the tracing wheel. Add seam allowance to the new side seam line.

Smooth out the hem line. Due to having less width for the bust, we can also have a little less length - as you can see I have raised the centre front hem slightly.

Step 12 how to reduce dart size.

Step 12
Mark new notches at the dart arms. You can also move the side seam dart over so that it is in line with the angle of the new side seam. For more information on notching patterns, you can see this post.

Happy sewing,

Emily


RESOURCES MENTIONED IN THIS ISSUE

  • Removing a dart from a pattern. Tutorial can be found here.

  • Adding volume to a pattern. Tutorial can be found here.

  • How to add dart shaping. Video can be found here.

  • Notes on adding seam allowance. Tutorial can be found here.


For more issues of the Q & A series, you can check out the archive here.


WHAT YOU’VE BEEN MAKING


MORE POSTS IN THE SERIES

ISSUE 105 - Move the pockets on the Rushcutter dress

THE Q & A SERIES

How to move the position of the pockets on the Rushcutter dress

Hi there,

I have just made a test of the Rushcutter dress. I had to take about 10cm off the length. The dress fits great but the pockets are too low down... my hands jus reach the top couple of inches. What is a good way to raise the position of the pockets on this pattern?

Thank you.

Sue

- Ajijic, Mexico


Hi Sue,

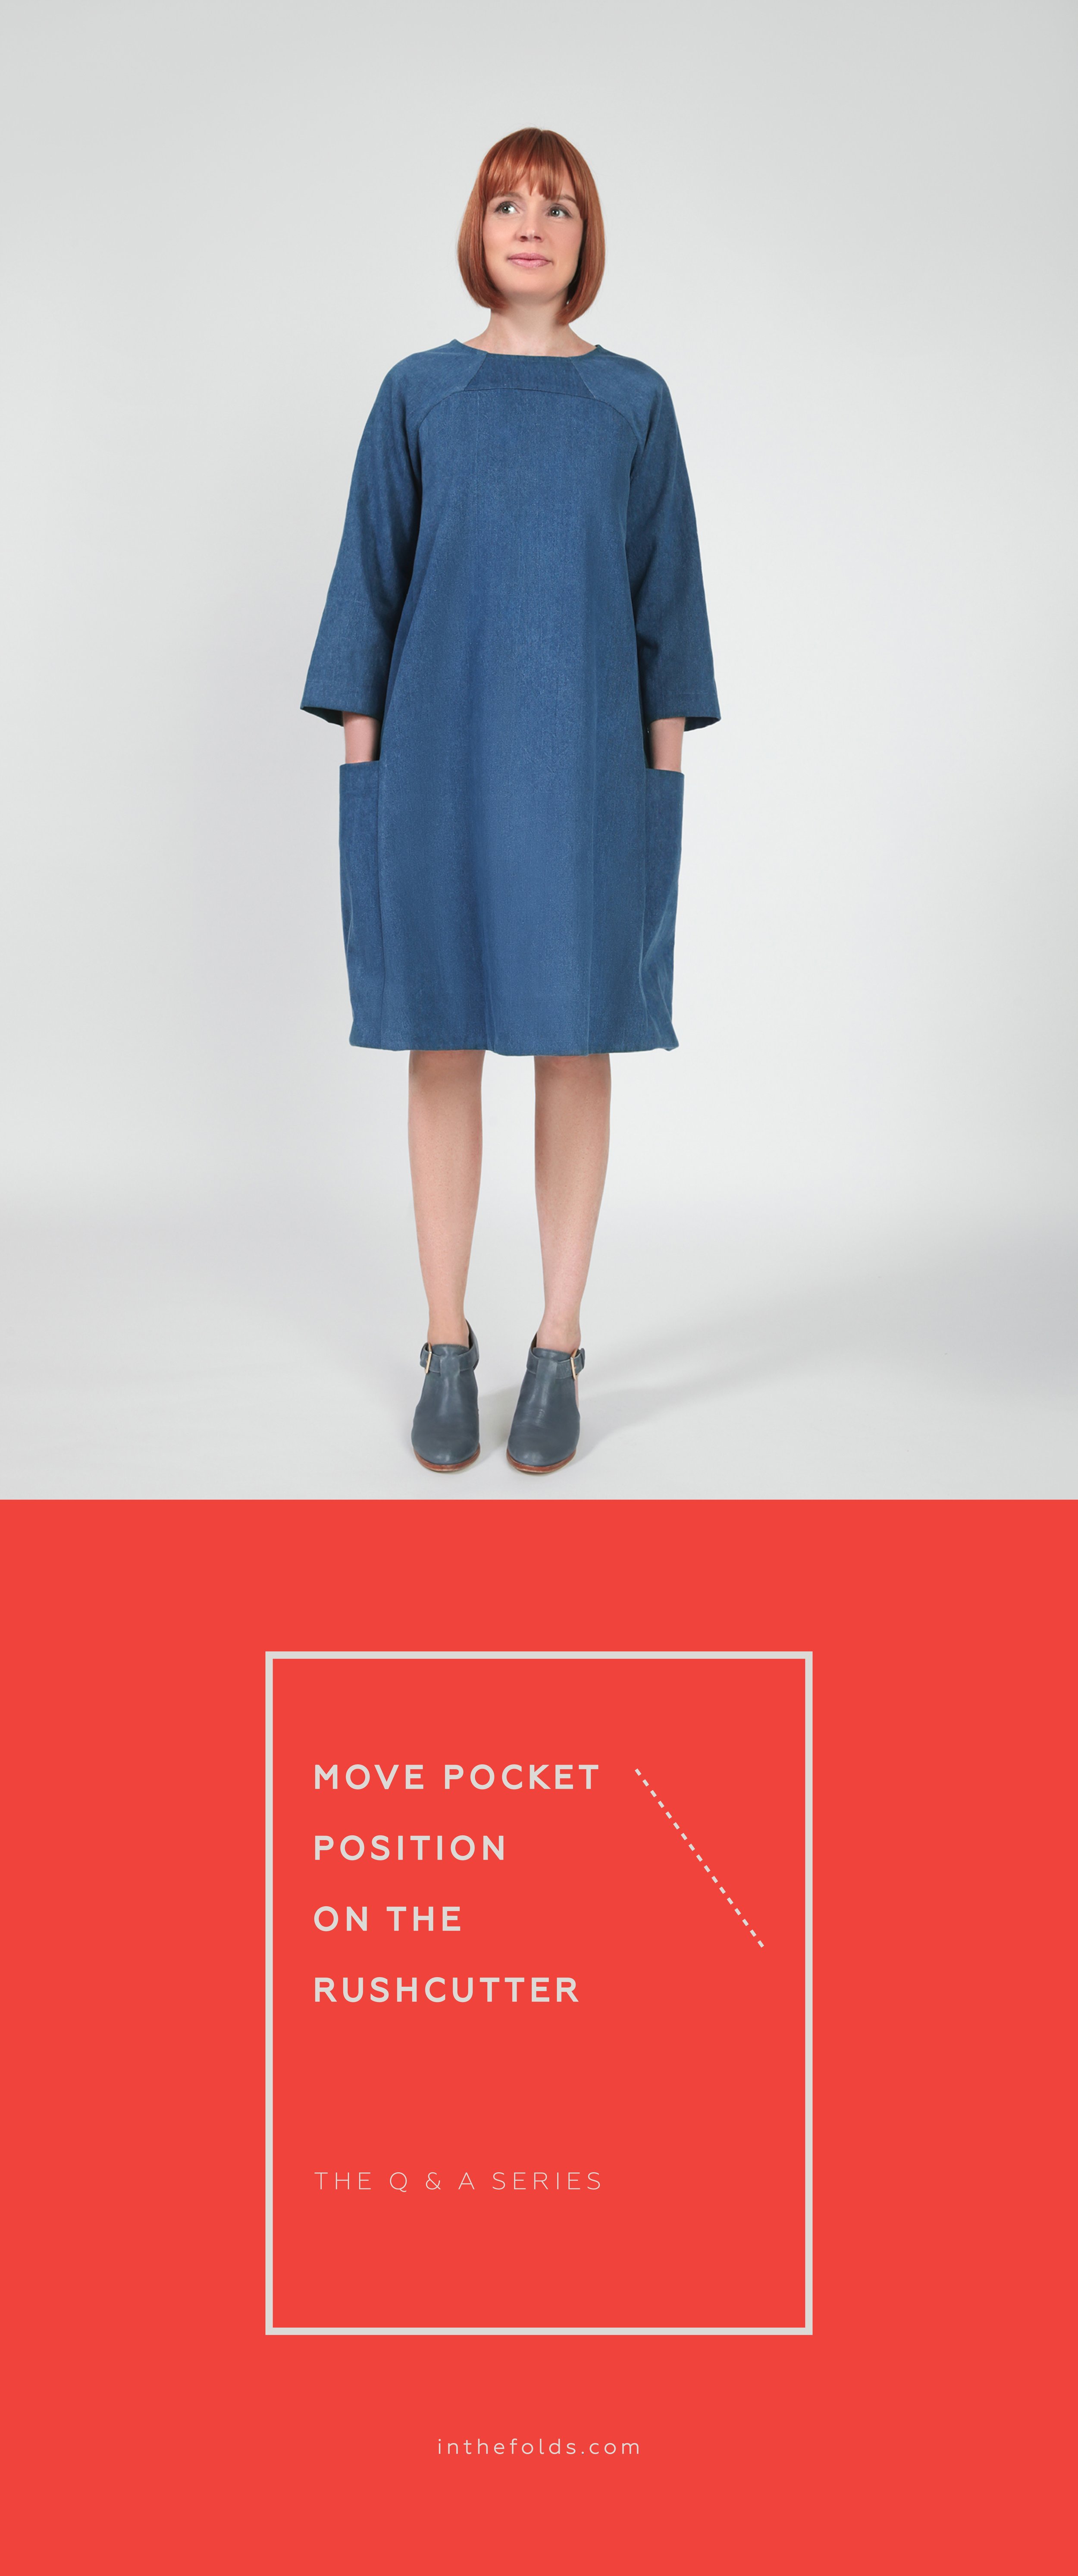
I'm excited to hear you're making the Rushcutter dress! The pockets are my favourite thing about this pattern, so you definitely want to make sure you can use them!

How to alter the pocket will depend on how you have shortened the pattern. There are two ways to alter the length of most patterns - you can remove length from inside the piece using LENGTHEN / SHORTEN line on the pattern (this means the hem circumference will remain the same as it was) or remove from the hem. I'll show you how to alter the pocket for both cases.

Remove length from the LENGTHEN / SHORTEN line

Step 1
I'll just show you this process of shortening the side panel of the dress, as this is the one that impacts the pocket. If altering the length of this pattern, you also need to alter the front and back pieces in the same way.

Cut along the LENGTHEN / SHORTEN line on the pattern.

Step 2
Mark the amount you would like to shorten the pattern by on the upper section of the pattern piece with a line parallel to the cut line. In the case of the example, this is 10cm.

Step 3
Slide the lower section up to meet the line marked in the previous step. Use the grainline to ensure you are lining things up correctly. Tape / glue in place.

Step 4
Re-draw the seam lines by drawing a straight line across the alteration. This will mean shaving off a small amount on the lower section and adding a small amount to the upper section. I normally use masking tape to extend the sides of a pattern by a small amount or to fill gaps - rather than using larger pieces of paper.

Alter the pocket piece

Before altering the pocket piece, it's a good idea to see how the pocket pattern was originally drafted so you can use the same method of altering your pocket piece.

In the illustration I have placed the pocket on top of the side panel - the top edge of the pocket has been folded back as it is when it is sewn. The sides of the pocket extend past the side panel by 0.5cm on each side. This is so that when the pocket is attached to the side panel it has a bit of volume in the top section, rather than sitting completely flat.

Step 5
Take the pocket pattern piece and fold along the top stitch line - using the notches to guide you. This is the top hem allowance which needs to be out of the way while checking how the pockets sits on the altered side panel piece.

Step 6
Place the pocket piece onto the side panel - lining up the hemline and the hemline notch. If you would like to check you are happy with the pocket position, pin the pocket onto the side panel and hold the panel up to your body to check.

When you are happy with the pocket position, hold pocket in position with a pattern weight (or a tin of food) and mark two points on the top edge of the pocket - 5mm from the side panel edge on each side.

Step 7
Re-draw the sides of the pocket by joining the points marked in the previous step to the bottom corners.

Step 8
Mark notches on the side panel at the top edge of the pocket on both sides of the panel.

Step 9
Remove the pocket piece from the side panel. With the top edge still folded, cut along the new seam lines. 

Shortening from the hem

The process is very similar if you have removed length from the hem like in the illustration above.

Step 1
Take the pocket piece - with the top edge folded down like we did earlier - and place on the side panel piece. If you would like to check you are happy with the pocket position, pin the pocket onto the side panel and hold the panel up to your body to check.

When you are happy with the pocket position, hold pocket in position with a pattern weight (or a tin of food) and mark two points on the top of the pocket - 5mm from the side panel edge on each side. 

Step 2
Re-draw the sides of the pocket by joining the points marked in the previous step to the bottom corners of the side panel piece. If you can't see the bottom corners of the side panel through your pocket, try holding the pieces up against a window.

Step 3
Due to removing length from the side panel from the bottom, the notches on the side no longer match up. Transfer the notches from the side panel onto the pocket.

Mark notches on the side panel piece at the top edge of the pocket on both sides of the panel.

Step 4

Remove the pocket piece from the side panel. With the top edge still folded, cut along the new seam lines.

Happy sewing,

Emily


resources mentioned in this issue

  • Rushcutter dress pattern can be found here.


For more issues of the Q & A series, you can check out the archive here.


WHAT YOU’VE BEEN MAKING


More posts in the series

ISSUE 104 - Removing a dart from a bodice

THE Q & A SERIES

How to remove a bust dart from a pattern

Hi Emily,

I am going to make the ruffle top from Peppermint Magazine and I am wondering if it is possible to remove the side darts. Usually by the time I do an SBA (Small Bust Adjustment) and shorten the darts there isn’t much left. If the top is boxier can I just move the dart to the hemline and not sew the dart there and have a wider hemline? 

Thanks!

Shelby


Hi Shelby,

Great to hear you would like to sew the Ruffle Sleeve top!

You can definitely remove the dart from this pattern. When you rotate the dart to the hemline it does look like you are removing the dart, but what you're really doing is relocating it. As you mention in your question, this will make for a fuller hemline which is what will give you the fit required over the bust that was originally created by the bust dart.

I think you're better off removing the dart all together, as it sounds like you don't need that added fullness at the hem. For those of you reading along, I have included details about rotating the dart to the hem, so if you would like to remove the dart, but keep the fullness required for a B cup bust size, keep on reading!
Step 1
Draw a line through the dart to the bust apex point (normally 2.5cm / 1inch from the tip of the dart). If this does not correspond to your actual bust apex point don't worry, you will be removing the dart so it doesn't really matter. For those of you who plan on keeping the fullness, it is a good idea to mark your actual bust apex point.

Draw a line from the bust apex point to the hemline - parallel to the centre front.

Step 2
Draw in new dart arms - from the notches on the side seam to the bust apex point.

Step 3
Cut up from the hemline along your vertical line. Stop 1-2mm from the bust apex point.

Cut along the top dart arm towards the bust apex point. Stop 1-2mm from the bust apex point to create a hinge.

Step 4
Carefully rotate the cut dart arm so it meets the uncut dart arm. Through this process you are relocating the dart fullness to the hem (this is called the 'slash and spread' technique and you can learn more about it here). Tape dart closed. Fill the gap with some paper and tape in place.

If you are happy with the fullness in the hem, you can finalise the pattern at this stage - smooth out the hem with a soft curve and straighten out the side seam. Cut off any excess paper.

This pattern as it is still drafted for a B cup bust. Although we have removed the dart, the fullness at the hem creates shaping that will fit over the bust.

To remove the hem fullness

Step 5
Measure the opening in the hem - measuring on the stitch line on each side of the opening (this is the grey line on In the Folds patterns). Take note of the measurement.

Step 6
We are now going to remove this excess from the side seam. Mark the amount recorded in the previous step on the hem line - measuring from the side seam (on the stitch line). If you want to keep some of the fullness you can, just mark a shorter amount from the side seam.

Create a new side seam, drawing a straight line from the point marked up to the top of the side seam (again, this line needs to meet the top of the side seam on the stitch line).

Step 7
Add seam allowance to the new hemline and new side seam line. Check the side seam length against the back pattern piece to confirm they are the same length. Tweak front side seam if required.

Step 8
Cut off any excess paper to complete the pattern.

A comparison

While creating this tutorial, I was interested to see a comparison between the above method to remove bust shaping and using a Small Bust Adjustment (SBA) to remove the dart. On the left you can see the method we used for this tutorial and on the right you can see the SBA. The two look quite similar. Below you can see the SBA placed on top of the other method. The SBA method has slightly less width, but the other method gives a nicer armhole shape, so I would suggest using the method outlined in the tutorial so that you are not disrupting the armhole curve.

We hope you found this helpful!

Happy sewing,

Emily


resources mentioned in this issue

  • Peppermint ruffle sleeve top pattern can be found here.

  • Adding volume to a pattern. Tutorial can be found here.

  • Notes on adding seam allowance. Tutorial can be found here.


For more issues of the Q & A series, you can check out the archive here.


WHAT YOU’VE BEEN MAKING


More posts in the series

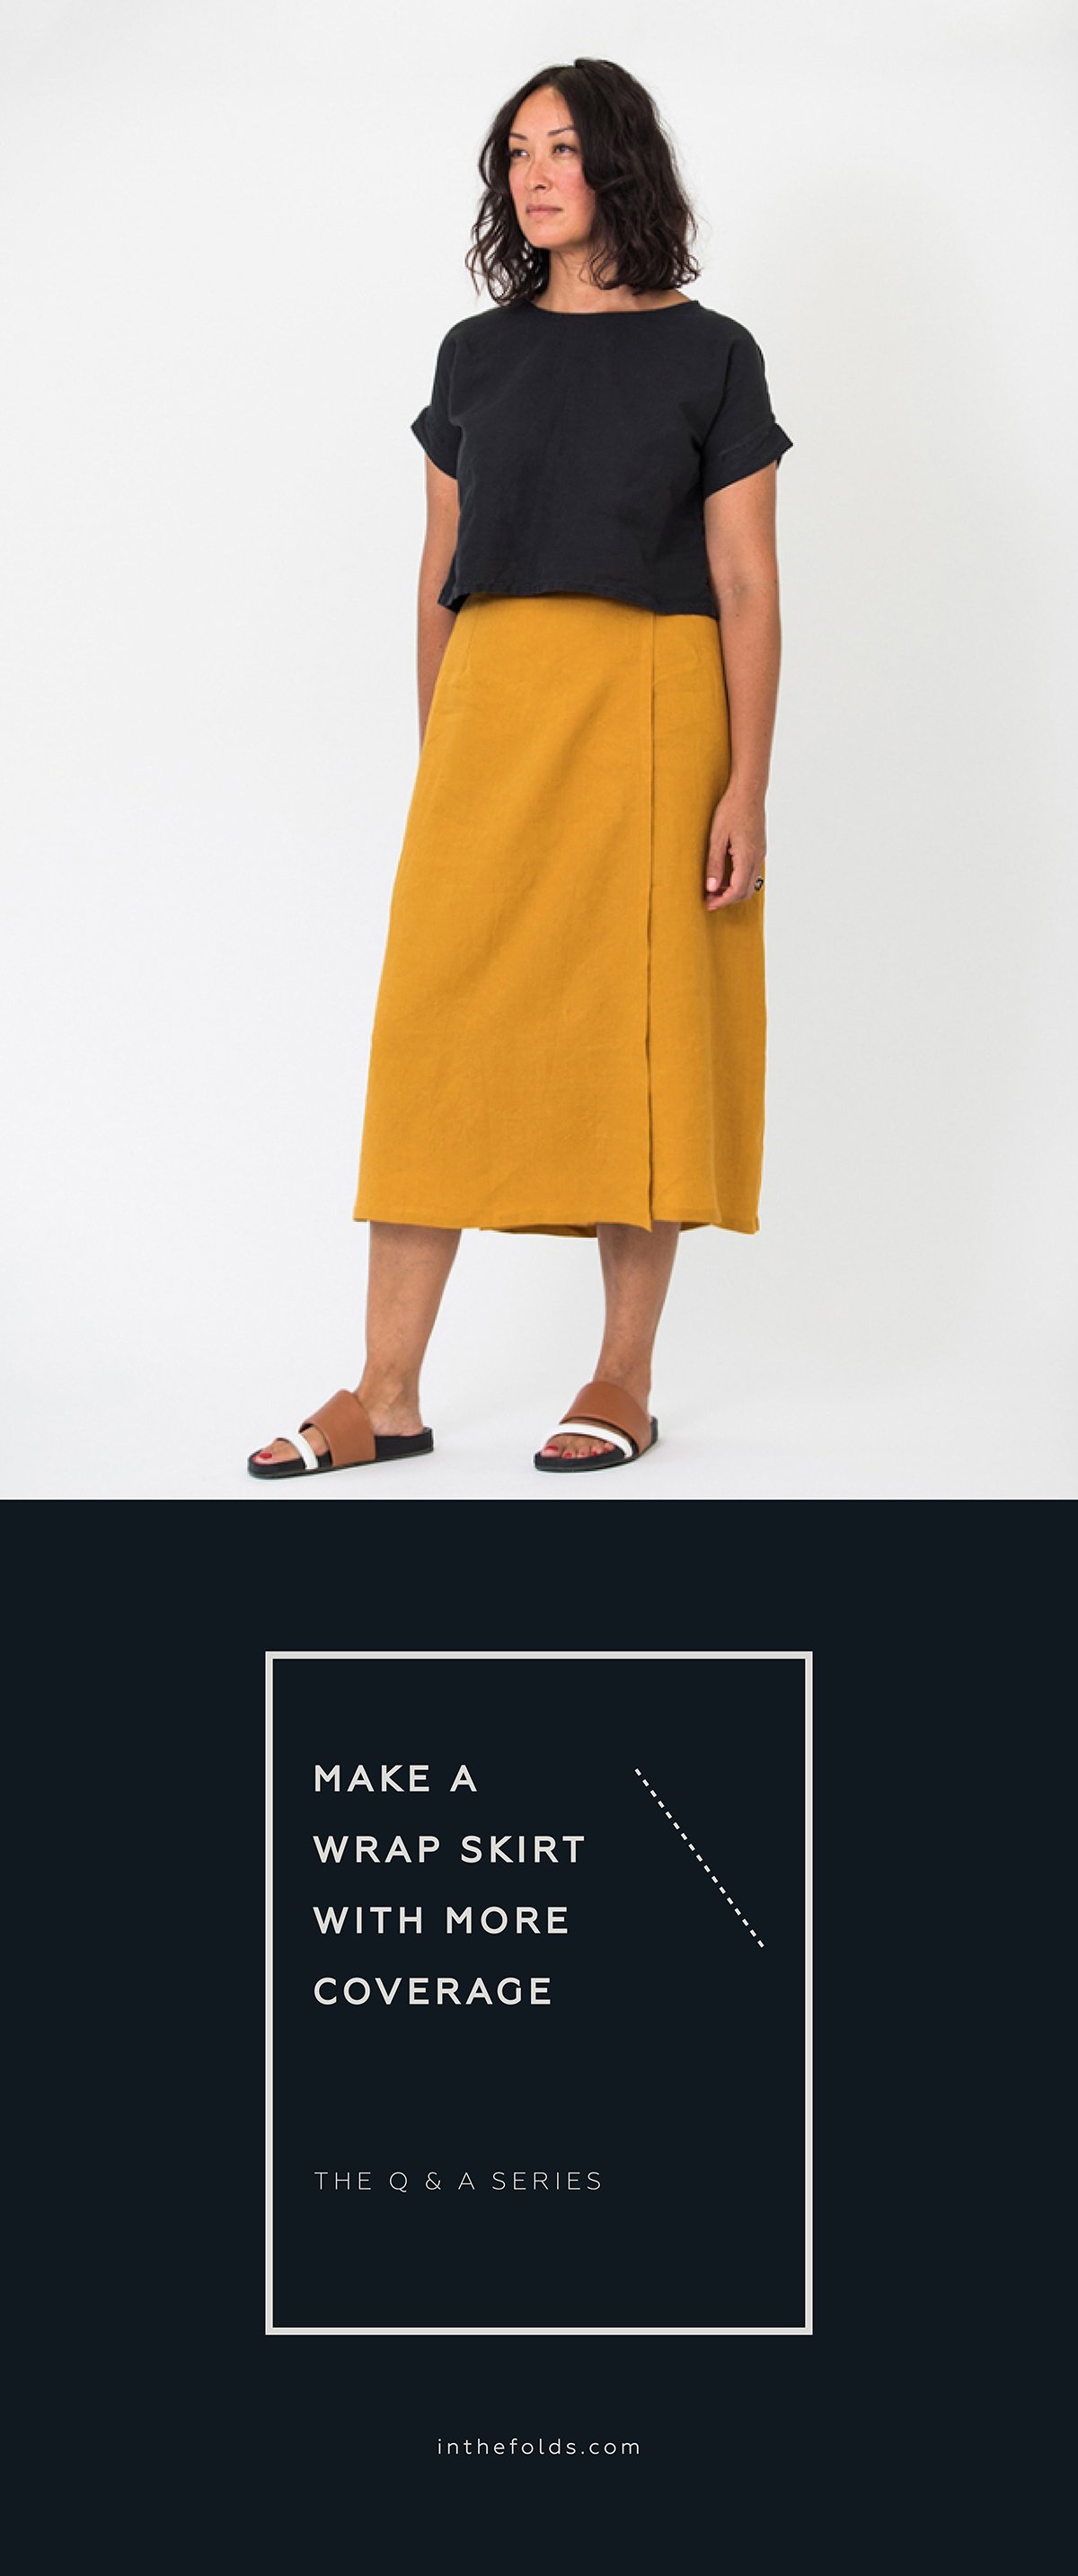
ISSUE 103 - MAKE A WRAP SKIRT WITH MORE COVERAGE

THE Q & A SERIES

Make a wrap skirt with more coverage

Hi Emily,

I've just had the Peppermint wrap skirt pattern printed. I’d like to extend either piece #1 or #2 to give me a bit more coverage as I run after my kiddo at the park. Any thoughts of which piece would work better for that extension?

Thanks!


Hi there,

Great to hear you will be giving the Peppermint wrap skirt a go!

My Peppermint Wrap skirt is probably one of my most worn garments. There is something about this pattern that makes it work with almost everything in my wardrobe.

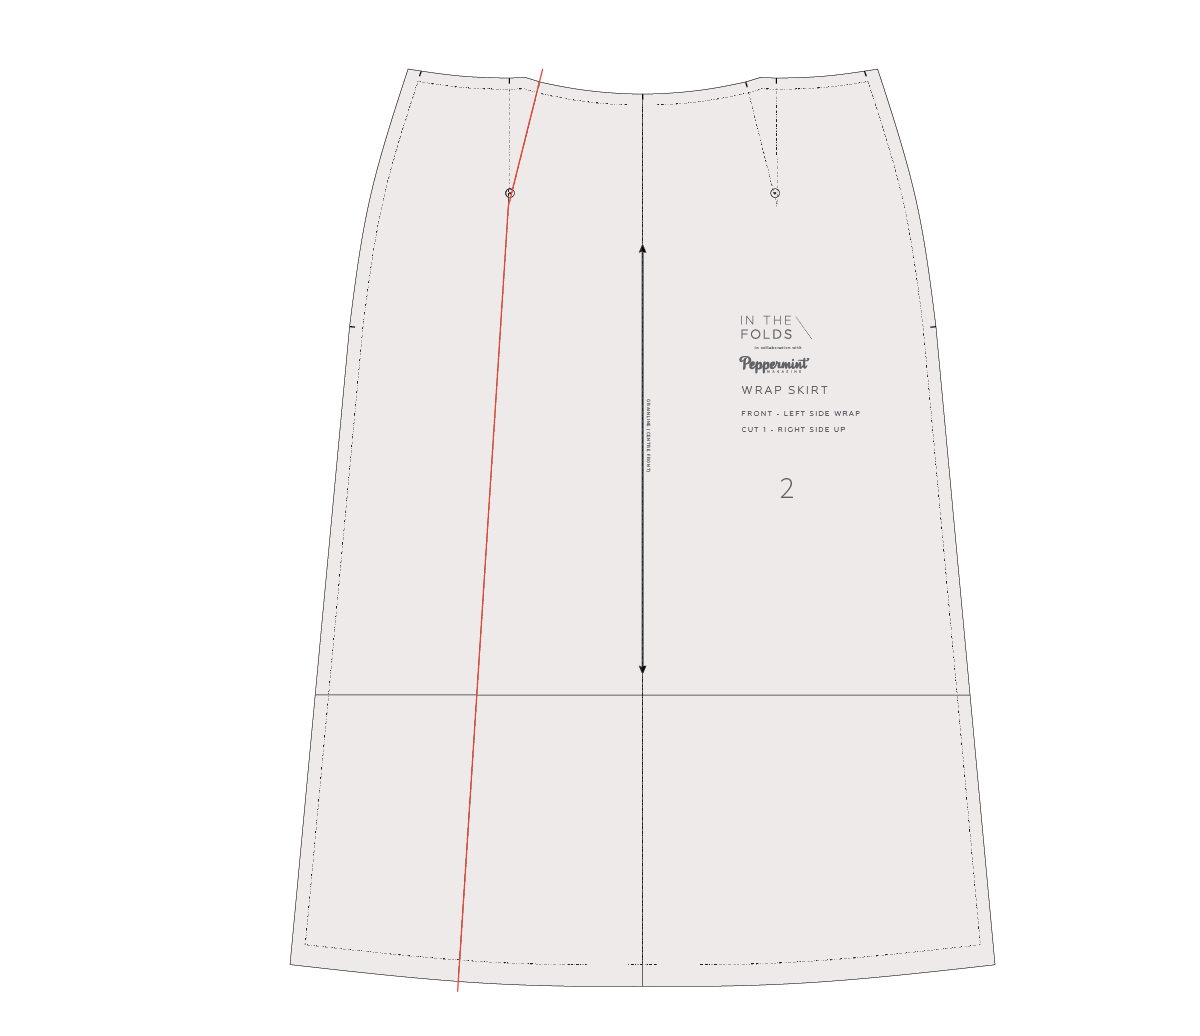
What I love about this pattern - and what makes it so wearable - is that the front pieces are not cut as a pair. The underwrap (the piece of the skirt that goes under the outer piece) has more width than the one on top (the overwrap). In the illustration below I have placed one piece on top of the other so that you can see the difference between the two.

I designed the pattern this way as I'm not a fan of wrap garments that you have to hold in place or constantly check if you're exposing more skin than you'd like. Clothes should be made to be worn and loved, and I believe that making them more comfortable to wear in our daily lives is the best way we can ensure this will happen.

In saying that, you could definitely extend the underwrap more to have more coverage if you like. The reason I suggest altering the underwrap is that this won't impact the look of the skirt. The overwrap remains unchanged and you will just have more fabric width in the piece that sits underneath.

Step 1
Take piece 2 (Front Left Side Wrap) and extend the grainline through to the top and bottom of the pattern piece. This is the Centre Front (CF) of the skirt.

Step 2
Fold along CF so you have just the side with the dart visible.

Step 3
Create a full piece by tracing the right side (side with the dart) onto the other side of CF.

Step 4
The section of the pattern on the left will be the part of the pattern that extends under the overwrap. We do not need the dart in this location and by removing it (using the slash and spread method) we will retain it's shaping whilst also getting more fullness in the hem (which means more coverage) and less fabric bulk in the waist section.

Mark in a slash line from the tip of the left dart down to the hem.

Step 5
Slide a piece of pattern paper under the pattern piece.

Cut down one of the dart arms (on the side we're working on) and stop 1-2mm from the tip of the dart. Cut up from the hem along the slash line towards the tip of the dart. Stop 1-2mm from dart tip to create a small "hinge" of paper.

Slide the uncut dart arm over to meet with the cart dart arm. You will notice that this has opened up the hemline. What we're doing here is relocating the fullness from the dart to the hem - which gives us the waist shaping we need to achieve a good fit. If you would like to see more details about this technique, you can checkout this blog post. Tape / glue in place and attach to the paper underneath.

Step 6
To finalise the pattern, draw in a nice smooth curve at the waist line and hemline. Add seam allowance back onto these new lines.

Step 7
As the left side of this piece hangs free (creating the wrap) we need to straighten out the edge (as it won't be sewn to the back side seam). Draw a straight line from the top of the side seam to the bottom - on the STITCH LINE (grey line on the pattern). Add seam allowance (2cm / 3/4in) to this new line. This is now the edge of the underwrap.

This alteration will impact how the skirt attaches to the waistband. The waistband will still fit, but the notch that indicates the end of this piece will no longer be correct. Take the waist tie piece and move the notch to reflect the alteration.

Happy sewing,

Emily


RESOURCES MENTIONED IN THIS ISSUE

  • Peppermint wrap skirt pattern can be found here.

  • Adding volume to a pattern. Tutorial can be found here.

  • How to use the cut and spread technique to draft an A-line skirt. Tutorial can be found here.

  • Checking curved seams (and moving notches). Tutorial can be found here.


For more issues of the Q & A series, you can check out the archive here.


WHAT YOU’VE BEEN MAKING


MORE POSTS IN THE SERIES

ISSUE 104 - THE COMBINED METHOD FOR SEWING IN SLEEVES

THE Q & A SERIES

How to use the sewing flat and "in the round" techniques together when sewing sleeves

Hi Emily,

I really enjoy your newsletter. Thank you for answering our questions :)

I was wondering about sewing sleeves. There are 2 methods to set the sleeves in, right? Sewing them in when the side seams are already sewn up and when they are not sewn up yet.

When would you choose one over the other? What are the benefits for one or the other in a finished garment? I guess there is a sewing pun for this one as well - what are bene-fits in fitting the sleeves :)

I am looking forward to your answer.

Greetings,
Spela

The Hague | The Netherlands


Hi Spela,

As you may have seen, I answered your question about sewing sleeves in flat or in the round in our last issue of the Q&A series. In this week's issue I want to show you the combined method - sewing part of the sleeve in flat and the rest of it in the round.

The problem with the usual methods of setting in sleeves

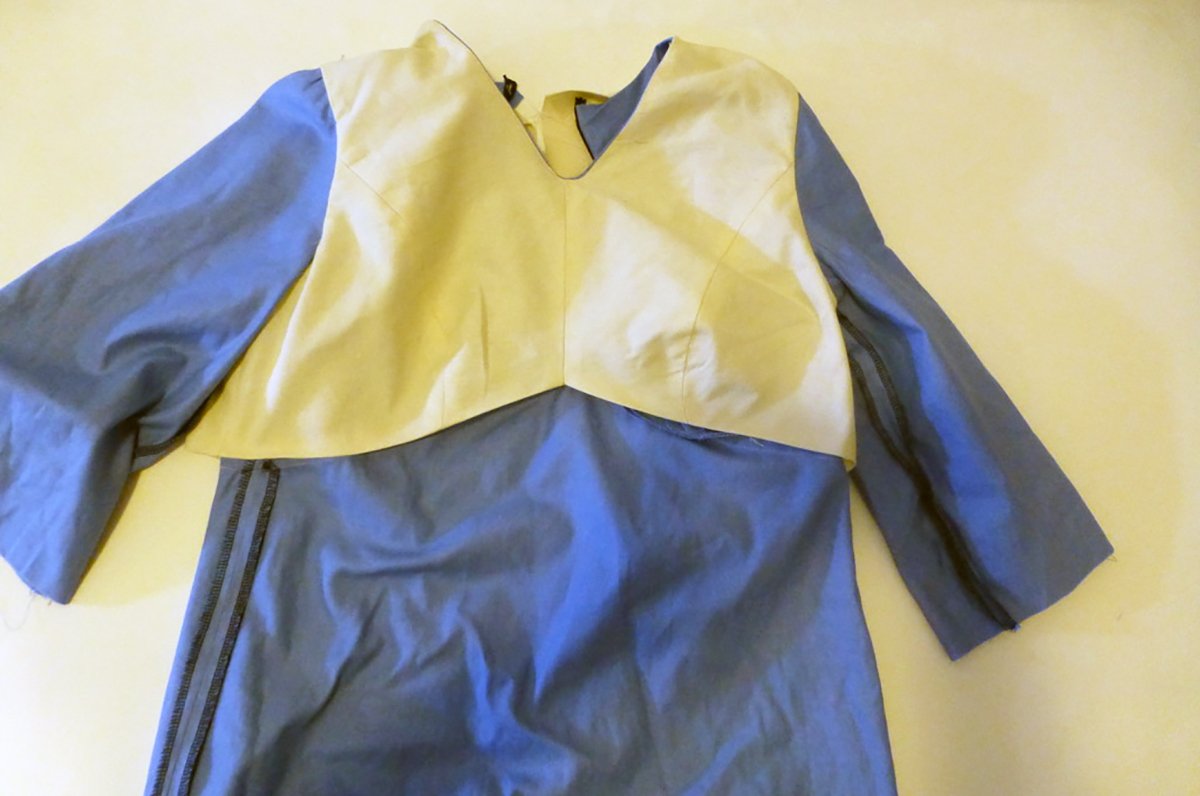
When designing the sleeve expansion for the Acton dress pattern I decided I wanted the bodice to be fully lined, just like the original Acton dress pattern. The problem was that it's not as simple to line a bodice with sleeves as it is to line a sleeveless bodice.

When doing research to work out the best way to approach this, I realised that a lot of sewing resources guided makers to use hand-sewing to enclose the lined bodice. Although I am a fan of all things slow sewing, I don't love the idea of falling back on hand sewing just because it's the simplest way to finish something off.

Drafting patterns and creating the order of construction for our patterns has always been one of my favourite parts of the process as it's like trying to solve a puzzle! So I got to work with the goal of finding the best way to fully line a bodice with sleeves and to do it all on the sewing machine.

The solution: a combined method for setting in sleeves

I figured out a way to do it and it became the basis for the instructions of the Acton dress sleeve expansion pattern.

I also realised that this method would work for garments without linings too. Although I think everyone should give sewing sleeves in the round a go a couple of times as it gets easier with practice. But, for those of you who would like to stick to sewing flat, this might be just the method you’ve been looking for!

Prepare sleeves

Step 1

Finish both sides of the sleeve piece with your chosen method. 

With your machine on its longest stitch length, make two lines of stitching along the sleeve cap between the front and back armhole notches. The first row should be 5mm (¼in) from the edge and the next 5mm (¼in) from the first row of stitching. The stitches will be hidden inside the seam allowance when the sleeve is attached to the bodice. Leave the threads long at each end and don't backstitch to start or finish.

Carefully pull on one set of threads to slightly pull in the sleeve cap, allowing it to curve in nicely, but not making gathers.

Step 2

The bodice needs to have the shoulder seams stitched and the seams pressed open. In the case of the Acton, as the bodice is fully lined, these seams haven't been finished.

Pin one SLEEVE to armhole with right sides together, using the notches to guide you and easing in the sleeve cap to fit the armhole. Pin sleeve in place, stopping when you get approximately 4cm (1½in) from the underarm on each side. Leave these sections free. 

Machine baste the sleeve in place with a 6mm (¼in) seam allowance. This row of stitching will just hold the sleeve in place before we stitch the seam properly in the next step. Repeat with the other sleeve.

Flip bodice to the right side and check for puckering in the sleeve cap. If there is puckering, don't worry! Just unpick a small section around the puckering and steam well. Ease the section back into the bodice, pin and re-stitch.

Once you're happy with how its looking, sew the sleeve in (still leaving the gap on each end) with a 1.2cm (½in) seam allowance. 

Tip: If you're working with a sleeve that has a very high sleeve cap, you may need to leave more than a 4cm gap open at each end. You'll know if you need to do this if you have a really hard time pinning the sleeve into the armhole.

Step 3

Pin the SLEEVE underseams together with right sides together. Stitch with a 1.2cm (½in) seam allowance. Press seam allowances open and turn bodice and sleeves right side out.

As you can see in the illustration, at this point the bodice is lined. I don’t go into the details of the lining in this email, as we're just focusing on the method for attaching the sleeves. If you're interested to try the method of the lined bodice with sleeves, grab a copy of the pattern.

Step 4

Pin the side seams of the bodice together with right sides together.

In this case, due to the bodice lining, you will need to flip up the bodice, so you can access the seams on both the bodice lining and outer bodice. Pin the front and back bodice together at the side seams with right sides together.

Repeat on the lining.

Stitch each side seam with a 1.2cm (½in) seam allowance before pressing seam allowances open.

Step 5

Pin the bottom of the sleeve into the bottom of the armhole with right sides together. This is how you will finish the sleeve "in the round."

If the bodice has a lining like ours: From the wrong side of the lining and bodice, sandwich the underarm section of one sleeve between the bodice and lining. Pin the remainder of the sleeve into the armhole. Stitch with a 1.2cm (½in) seam allowance.

Press armholes well.

And that's it! 

Happy sewing,

Emily


RESOURCES MENTIONED IN THIS ISSUE

  • The Acton dress pattern can be found here.

  • The Acton dress sleeve expansion pattern can be found here.

  • The difference between setting in sleeves and sewing flat - tutorial can be found here.


For more issues of the Q & A series, you can check out the archive here.


MORE POSTS IN THE SERIES

ISSUE 102 - THE DIFFERENCE BETWEEN SETTING IN SLEEVES AND SEWING FLAT

THE Q & A SERIES

THE DIFFERENCE BETWEEN SETTING IN SLEEVES AND SEWING FLAT

Hi Emily,

I really enjoy your newsletter. Thank you for answering our questions :)

I was wondering about sewing sleeves. There are 2 methods to set the sleeves in, right? Sewing them in when the side seams are already sewn up and when they are not sewn up yet.

When would you choose one over the other? What are the benefits for one or the other in a finished garment?
(I guess there is a sewing pun for this one as well - what are bene-fits in fitting the sleeves :)

I am looking forward to your answer.

Greetings,
Spela

The Hague | The Netherlands


Hi Spela,

You're right, there are two methods for attaching sleeves to a garment - sewing them "flat" or sewing them "in the round."

SEWING SLEEVES FLAT

Sewing flat means that the shoulder seam on the garment is sewn and then the sleeve is attached to the armhole. These illustrations from the Slouchy cardi pattern instructions are a good example of what I mean by this.

The side seam is then closed all in one go - from the hem of the sleeve all the way down to the hem of body of the garment. 

Sewing sleeves in flat is mainly used for knit garments such as t-shirts. It's also often used for more casual or relaxed fitting woven garments - such as oversized shirts, or shirts with a dropped shoulder. You will often see sleeves sewn in flat for men's shirts (and some women's) so that the whole side seam can be sewn as a flat-felled seam. 

This approach works best for sleeves that don't have a really high sleeve cap or very little ease in the sleeve cap. It is very difficult (or impossible!) to sew a sleeve with a high sleeve cap in flat.

Due to this lack of ease, normally sleeves sewn in this way are flatter from the shoulder line on the finished garment. This can impact how the sleeve hangs - causing the sleeve to stick out, rather than relaxing down.

Another thing to consider is that with sewing a sleeve in flat, the side seam becomes the predominant seam and it will determine the shape of the garment under the arm.

SEWING SLEEVES IN THE ROUND

Sewing in the round means that the shoulder seams and side seams of the garment are joined before the sleeve is attached, with seams pressed in the direction suggested in the pattern.

The sleeve underseam is joined before it is inserted into the armhole of the garment.

Normally when sewing a set-in-sleeve there will be ease in the sleeve cap (more about that below). Basting stitches are sewn along the head of the sleeve to assist with easing the sleeve into the armhole.

The sleeve is then pinned inside the armhole with right sides together.

The notches on the sleeve are used to help position the sleeve correctly. Normally (and on all In the Folds patterns), the single notch indicates the front of a sleeve and the double notch indicates the back of a sleeve. The single notch between the two notches on the sleeve indicates where the sleeve will meet the shoulder seam.

With the help of your basting stitches, you can ease the sleeve so that it fits nicely into the armhole. The seam is then sewn in the round with the required seam allowance.

When sewing sleeves in the round you have more control over which direction to press the seams under the arm. You will get a smoother finish under the arm as it will wrap around the curve of the underarm, rather than sit flat.

Sewing sleeves in the round is required for sleeves that have a high sleeve cap (normally required for a fitted or semi-fitted sleeve) and for most sleeves that include ease in a sleeve cap.

Ease is the difference between the armhole measurement and the sleeve cap measurement. The amount will depend on the design and who drafted the pattern, and could be anywhere from about 6mm - 2cm.

The reason ease is required on a sleeve cap is that the top of the sleeve needs to curve over the shoulder. In womenswear the end of the shoulder seam / top of the sleeve will generally sit slightly back from the shoulder point. This means that the top of the sleeve needs to accommodate the curve over the shoulder before extending along the arm.

Which sleeve sewing method to use?

I only sew sleeves in flat if I am sewing a knit or relaxed fit garment with a dropped shoulder. For all other sleeves (which is the majority of what I sew), I sew in the round.

Sewing in the round will almost always help you achieve a sleeve that fits and hangs properly and sits nicely under the arm.

I know this is not what a lot of you want to hear, as it does seem that most sewists prefer sewing sleeves in flat as it feels easier to do, so I'll show you a method that gives you the best of both worlds! It allows you to sew the majority of the sleeve in flat (which many people find easier), but finish it in the round - which gives you the nice smooth curve under the arm and the ability to press the seam in the round. I still prefer to just sew my sleeves in the round, but for those of you who want to sew them flat, this will be of interest to you!

I hope this post demystifies things for you when it comes to these two different sleeve sewing methods!

Happy sewing,

Emily


RESOURCES MENTIONED IN THIS ISSUE

  • The Slouchy cardi pattern can be found here.

  • The Sawtell top is a project from a past Issue of Curated by ITF. It is currently only available for purchase to members of the Curated by ITF subscription. Read more about the pattern here.

  • The Sawtell dress is a project from a past Issue of Curated by ITF. It is currently only available for purchase to members of the Curated by ITF subscription. Read more about the pattern here.


For more issues of the Q & A series, you can check out the archive here.


WHAT YOU’VE BEEN MAKING


MORE POSTS IN THE SERIES

ISSUE 101 - COPYRIGHT FOR PDF PATTERNS

THE Q & A SERIES

COPYRIGHT FOR PDF PATTERNS

Hi Emily, 

I've been following your story for a while and have been dying to ask you a couple of questions about your work that have been plaguing my mind. Hope you have a couple of minutes to respond.  

- Aren't you scared of people stealing your PDF patterns and producing them?

- Is In The Folds your full-time gig?

Looking forward to hearing from you!

Cheers, 
Javier


Hi Javier,

Great questions!

I don't really think too much about people taking my PDF patterns and producing them. They obviously easily could and I am sure they have already - but there isn't much I can do about it and worrying about it won't change that.

The sewing community is pretty amazing though and in the past when my patterns have been sold on Etsy or garments made with my patterns to sell, makers have reached out to let me know so that I can contact the seller. Thankfully this hasn't happened too many times over the 6 years I've been in business. It is unfortunate that as patternmakers we need to worry about this, but I guess it's just part of running a business in the digital age!

The other thing is that although it's not ideal that people would take my patterns to produce, this doesn't impact my customer pool. Generally people who sew their own clothes aren't buying that much ready-to-wear, so I'm not likely to lose a customer for a pattern if someone produced that garment from one of my patterns. 

The following copyright statement copyright is included in all In The Folds patterns:

To answer your second question, it was only recently that In the Folds became my full-time gig (since November 2021). Before that I was working 2 days a week outside of my business. I also teach casually at a university in Sydney during semester (one day a week) as I really enjoy it and it feels related to my business and keeping my skills up to date and relevant. 

Happy sewing,

Emily


For more issues of the Q & A series, you can check out the archive here.


WHAT YOU’VE BEEN MAKING


MORE POSTS IN THE SERIES

ISSUE 100 - Celebrating 100 issues of the Q&A series!

THE Q & A SERIES

Celebrating 100 issues of the Q&A series!

Today marks a very exciting ITF milestone. 100 issues of the Q&A series!

We have covered a lot of ground with this series (and will continue to do so, of course) over the last 100 issues. We have covered sewing, fitting, patternmaking and small business and a lot of things in between! We have answered the little questions and the very big questions! We have received countless emails of gratitude (thank you to all of you who have taken the time to write) and feel incredibly grateful to have a community so excited to learn from us and hear from us every Sunday evening. At a time when our inboxes are flooded with information, we know what a privilege it is that you choose to open our emails and read what we have to share with you!

Rather than answering a question this week, we wanted to take a moment to celebrate by asking you a question. Can you help us spread the word about what we do? Use the below graphics on Instagram to let people know what you love so much about the Q&A series or what you have learned from us. 

And for those of you who would like to say thank you for the content we share, do you know you can sign-up as a supporter? For $7 a month you gain access to our Curated by ITF online community and contribute to the work we do! Or you can say thanks with a one-off donation

Feel like visiting the archive of our last 100 posts? You can do so here.

Looking forward to the next hundred!

Happy sewing,

Emily


For more issues of the Q & A series, you can check out the archive here.


SHARE THE LOVE ON INSTAGRAM AND TAG @INTHEFOLDS

Use this graphic for sharing in your grid and tag us @inthefolds

Use this graphic for sharing in your stories and tag us @inthefolds


MORE POSTS IN THE SERIES

ISSUE 99 - Top tips for beginners (that we can all learn from)

THE Q & A SERIES

Top tips for beginners
(that we can all learn from)

Hello Emily,

I just recently discovered your site!

I’ve never used a sewing machine in my life but this Christmas I got my first one. I’ve always loved the idea of being able to make all the clothes I've envisioned instead of looking for something so specific online. However, I should have realised it was going to be a lot harder than I thought.

I live on a very small island in Canada so I don’t have many resources to turn to. I’ve been watching lots of YouTube videos trying to learn how to sew my own clothes but I’m so overwhelmed! I’m so grateful I’ve found your blog, however, I’d love to know any advice you could give for a newbie. I’m so uncertain about how to follow a pattern, how to make seams look nice on the inside, what bias tape is used for, and other things. I’ve found reading about sewing a bit difficult considering I literally know nothing about it! If you have any advice or recommendations I’d love to know!

I’ve heard great things about your blog and I can’t wait to try making something from it!

Cheers,
Gabrielle


Hi Gabrielle,

How exciting! Welcome to the sewing club! 

For today's issue of the Q & A Series I thought I would give you my top tips for learning to sew, but I think they will be useful to anyone who sews.

1. Be patient with yourself

Learning to do new things with your hands is hard! Over time your new-found skills will become muscle memory, but until then it will take some getting used to. Be patient with yourself and celebrate the small achievements along the way! Cut something straight? Celebrate! Sewed your first French seam? Celebrate!

2. Don't do too much too soon

I think one of the main things that scares people away from sewing is biting off more than you can chew right at the beginning. Although it is very exciting to imagine a completely me-made wardrobe in the most beautiful fabrics, the reality is that’s going to take time and practice. A lot of time and practice! So start with something simple and work on building up your skills. Starting with something that is forgiving in regard to fit would be my suggestion. This post is a good place to start if you’re looking to sew an In the Folds pattern.

A hand is attaching a zip to a piece of fabric.

3. Don’t shy away from the “tricky” stuff.

I know I just said not to to take on too much too soon, but the opposite is also true. Don’t let new things scare you off! Sewing is supposed to be fun, so give yourself a chance to experiment and try new things. It might not always go to plan, but I promise you, you will learn more from the mistakes you make than from the things you do right.

I hear of so many sewists who tailor their sewing plans around their fear of sewing zips. Just give it a go! Although the first few might not be as invisible as you hope, after a few goes you will get the hang of it. If you’ve been too scared to give an invisible zip a go, check out this post and just give it a try. What's the worst that can happen?

4. Find ways to enjoy unpicking / seam ripping

Let’s be real. When you sew (whether you are a beginner or an experienced maker) you are going to end up spending a lot of time unpicking seams that didn’t go to plan. It’s all part of the process! Find ways to relax as you do this, rather than spending the whole time regretting the mistake.

I love to put something light on Netflix and get comfy on the couch when I have unpicking to do and then relax into it. I almost look forward to it now that I’ve re-framed it!

5. If it’s not working, PUT IT DOWN

My first sewing teacher (back when I was 7 years old) taught me this. Sometimes things just don’t go to plan and sewing while frustrated just leads to more mistakes. You’re best off putting your project down for a few hours (or even better overnight) and coming back with fresh eyes. 

A sewing bust with a toile.

6. Get comfortable making toiles

A toile is a practice version of a garment. I know a lot of people dread making a toile, but for me it makes me enjoy the process more. It means that I can check the fit and any tricky details before cutting into my “real” fabric. This means that when I’m sewing the final garment I can just relax into the process and won’t get any surprises!

7. Use Instagram hashtags to work out what you’d like to sew

Instagram is a great tool for sewists. Most independent pattern companies use hashtags to identify their patterns. You can search the hashtags of a pattern you are thinking about sewing and see it made up in a range of different fabrics and on a lot of different bodies. You can also see if there are any sewing or fitting tips related to the pattern.

8. Get some sewing friends

If you can, find some people in your local area to chat to about sewing. Is there a social sewing group in your area you could connect with? Or some online options?

By connecting with other makers you can get feedback about patterns you are thinking about trying, get fitting tips and just geek out on all things sewing! We do a lot of this in our Curated by ITF online group, so if you’re looking for a fun space to connect with other makers from all over the world, you might like to join us.

9. Download our e-book ‘The Little Book of Seam Finishes’

If you haven’t downloaded it already, you should definitely check out our ebook. It runs you through the most used seam finishes and where you can apply them.

10. Don't forget to take it one step at a time

Sewing a garment is a lot like following a recipe. If you were learning to cook you would start with the basics and then apply what you learned to other recipes as you continue to learn. Do the same for sewing.

Try not to worry about what you don’t know (I have been sewing for 25 years and there are still plenty of things I don’t know how to do) and focus on what you do know.

If you can sew a straight seam and a curved seam then you can probably make a top. And by making a simple top you can then learn how to understitch and apply bias binding. This leads me to my last tip...

11. Don’t worry about new techniques or skills until you actually need them

My approach to learning has always been to learn the skill when I actually need it. When you need a skill it forces you to take the time to learn it and there is also more at stake (as you want the finished outcome of what this skill brings). This approach has kept me going when sewing, as well as running a business! When you get to that project that has a tricky technique, give it a go then, rather than worrying about it now.

Best of luck on your sewing adventures!

Emily


RESOURCES MENTIONED IN THIS ISSUE

  • Selecting your next project (for beginners and beyond) - Post can be found here.

  • How to sew an invisible zip - Tutorial can be found here.

  • Join Curated by ITF here.

  • Download the Little Book of Seam Finishes here.


For more issues of the Q & A series, you can check out the archive here.


WHAT YOU’VE BEEN MAKING


MORE POSTS IN THE SERIES

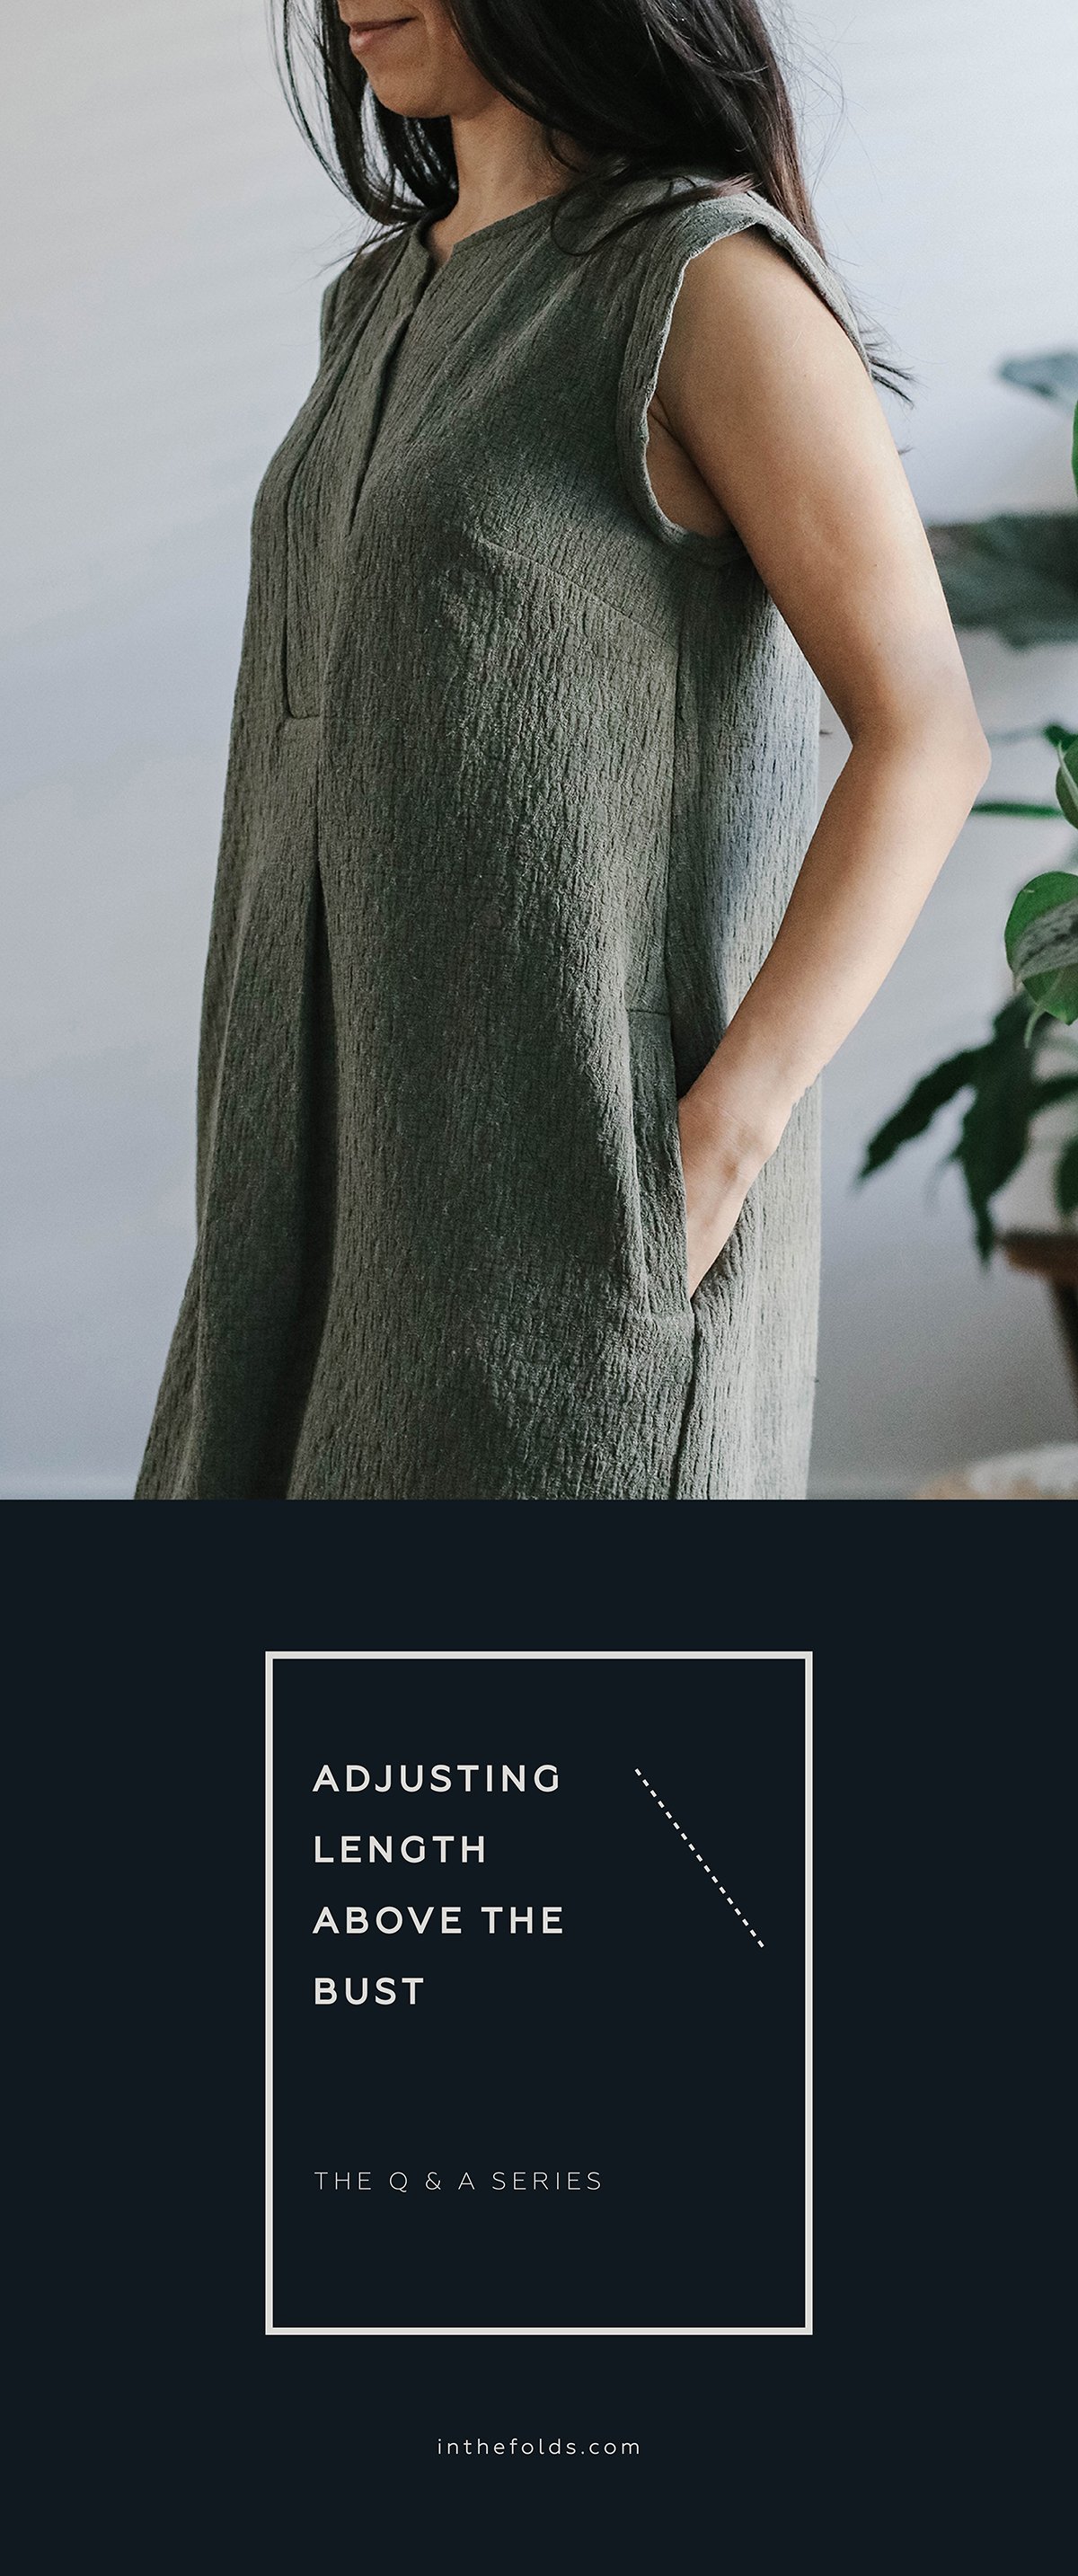
ISSUE 98 - Adjusting length above the bust

THE Q & A SERIES

Adjusting length above the bust

As a petite person (152 cm tall) I often need to make adjustments to the bodice area of a pattern to shorten it, in addition to adjustments at the usual shorten/lengthen line in a pattern.

 
Usually this might be about 2.5 cm above the bust line and a similar adjustment at the usual length adjustment line.
 
Do you have any recommendations for adjusting the Sawtell dress pattern as there are a few more pieces to take into account?


Hi there,

This is a great question! I think a lot of us assume then when thinking about adding or removing length, we are only talking about the hemline. Adding or removing length from other parts of a pattern can make a huge difference and can ensure you achieve a great fit, so I am glad you have found this technique allows for you to achieve a good fit!

Before getting started on this alteration, I'd suggest making a toile (even just of the top section). The fit of the Sawtell dress is fairly forgiving and you might find you don't need to do this. In saying that though, In the Folds patterns are drafted for a height of 170cm (5'7") so it is likely you will need to alter the length for a height of 152cm.

Mark the position of the alteration

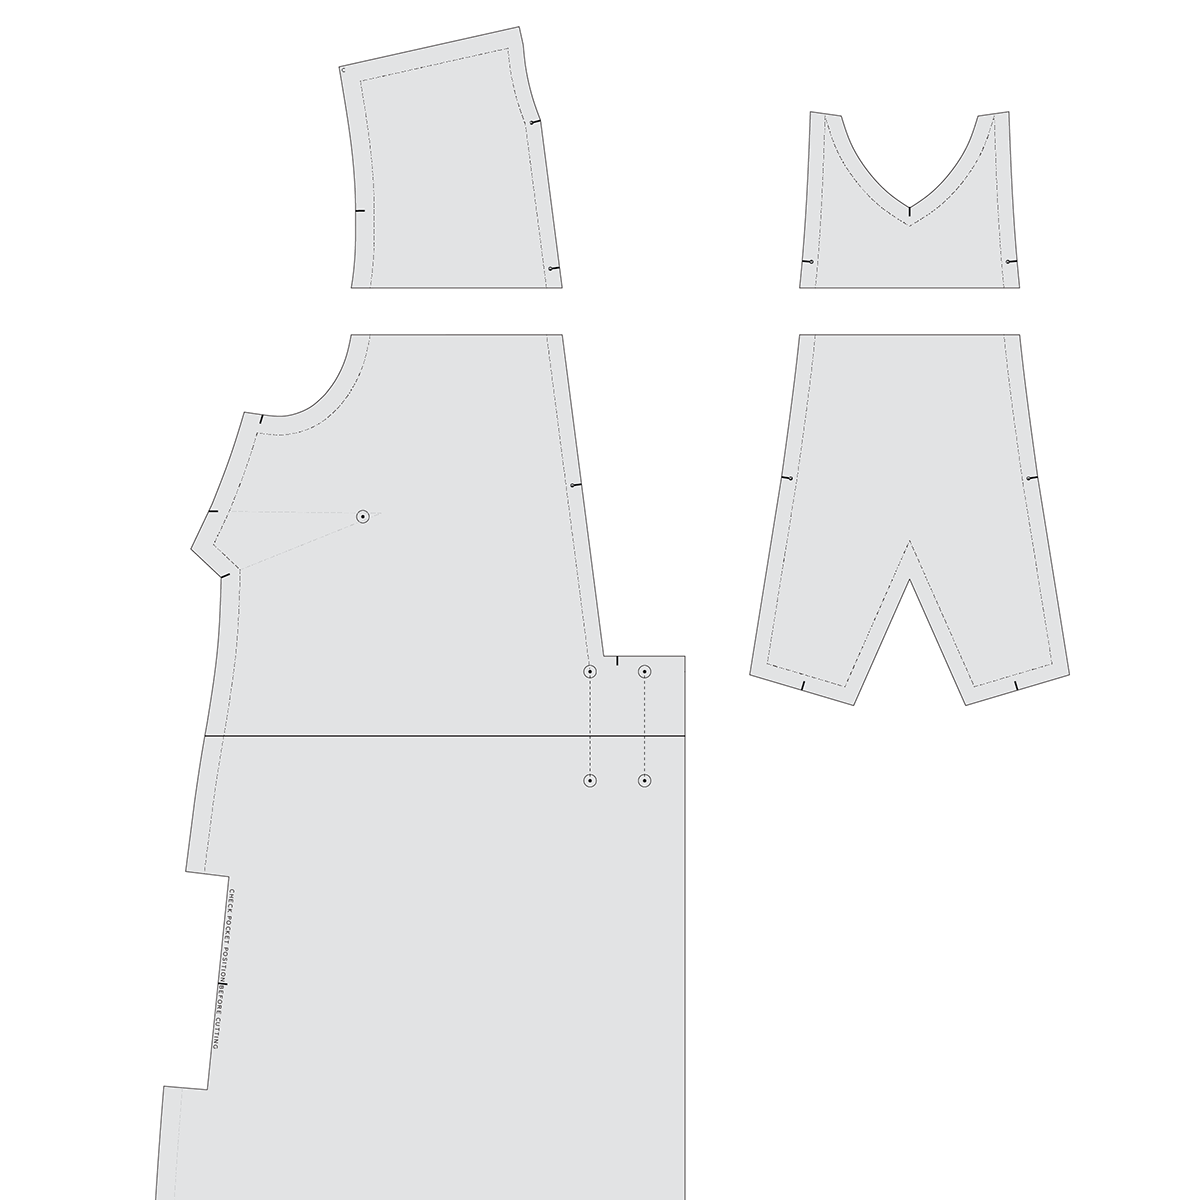
Step 1

Mark a line on the FRONT pattern piece and PLACKET in the position you will be removing length. The position is up to you and having a toile to refer to is handy! As you can see, I have put the line in the same position on the FRONT and the PLACKET (in relation to the notches) so that the alteration is consistent between pieces.

Step 2

Carefully cut through the lines.

Mark the amount you would like to remove

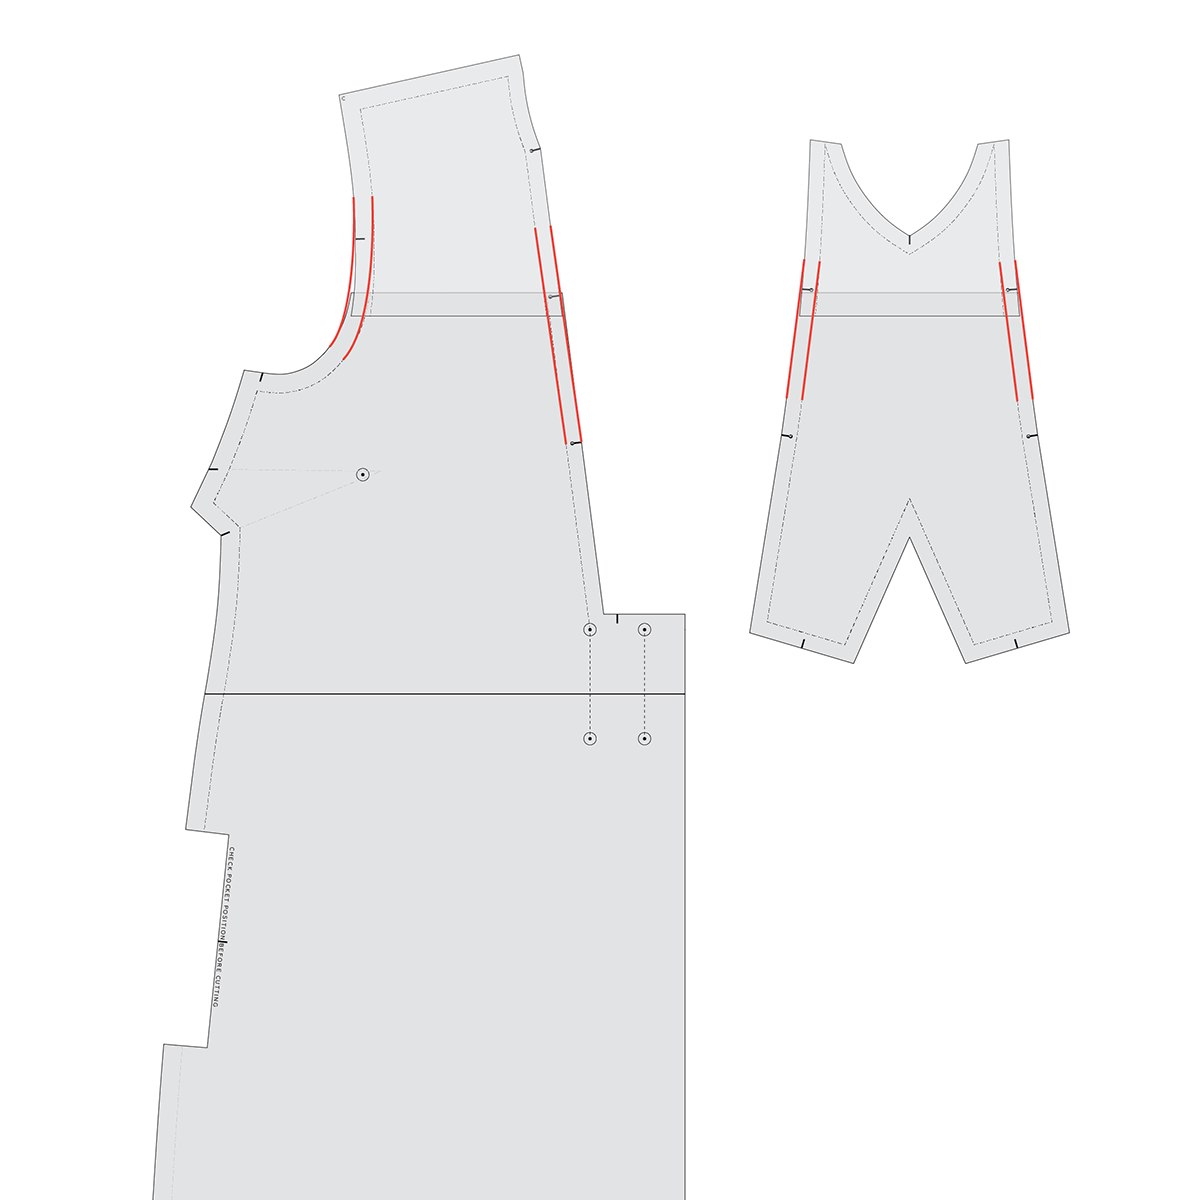
Step 3

On the lower section of the pieces, mark the amount you would like to remove from the pattern. Keep the line parallel to the cut line.

Adding length? Check out this post which shows you how to do the opposite alteration.

Step 4

Slide the top section down to the line marked in the previous step. If making a larger alteration it can be helpful to draw a vertical line across the cut line (or extend the grainline up to the top of the piece) so that you can use it to ensure things are matching up correctly either side of the cut line.

Step 5

Re-draw both the stitch line and cut line on the altered sections, smoothing out the lines over the alteration. More about this technique can be found in the Sawtell dress Fit Kit.

Walk your placket seam into your FRONT dress opening seam to check that the lines match up and the notches are placed correctly.

If you also need to make this alteration to the back, I'd suggest splitting the alteration between the back piece and the yoke piece so that the proportions of the design remain intact.

Step 6

You will also need to alter the sleeve as we have removed length from the armhole. It is helpful to rotate the sleeve of the Sawtell so that it matches the armhole. Place the adjustment line in a similar position as you did on the FRONT (using the notches to guide you). If you have also removed length from the back, you will need to do the same for the back of the sleeve.

The outer single notch on the sleeve indicates the front side of the sleeve, while the double notch indicates the back.

Step 7

Remove length from the sleeve in the same way you removed length from the body of the dress. Walk your altered sleeve into the armhole to check that the pieces match.

Happy sewing,

Emily


RESOURCES MENTIONED IN THIS ISSUE

  • Sawtell dress pattern and Fit Kit was released as part of the Curated by ITF subscription and is not currently available as a standalone product. To stay in the loop about new releases, sign up to our newsletter here, or learn more about Curated by ITF here.

  • How to lengthen a pattern above the bust - tutorial can be found here.

  • Checking curved seams - tutorial can be found here.


For more issues of the Q & A series, you can check out the archive here.


WHAT YOU’VE BEEN MAKING


MORE POSTS IN THE SERIES

ISSUE 97 - Using your bust measurements to select your size

THE Q & A SERIES

Using your bust measurements to select your size

I have a narrow back and upper chest but with an average bust. I try to adjust my toile to reflect this, as often I have to take in 2cm across the back. I'm a size 12/14. There is often excess fabric at the front and back neck whilst everywhere else fits well. The difficulty I have is in knowing how to get rid of the excess at the neck but not affecting the pattern elsewhere. I would value your advice.

- Iola
 Caernarfon, Wales


Hi Iola,

Although it might feel like you are selecting the correct size due to how your garments fit from the bust down, it sounds like you need to start with a smaller size. Rather than making the neck smaller, what you will do is add more width for your bust, while the neck area and back section of the pattern will remain as they are.

SELECT YOUR SIZE

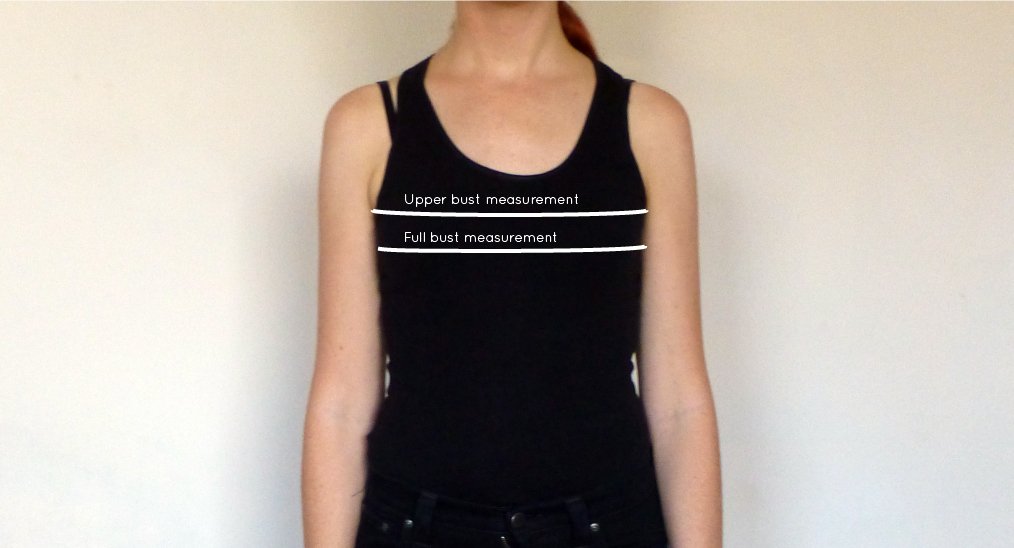
What I suggest you do is select your size according to your high bust measurement, rather than your full bust measurement. Then you can do a Full Bust Adjustment (FBA) to alter the bust section to match your measurements.

Your high bust is the area above your breasts, under your arms and your full bust is the fullest part of your chest. Find the difference between the two measurements. 

If the difference is 2.5cm (1") your bust is an A cup, 5cm (2") it's a B cup, 7.5cm (3") is a C cup and so on. 

Go back to your high bust measurement and add 5cm (2"). This is what your bust measurement would be if you were a B cup and therefore the size you should be choosing from the pattern.

For example, let's say your upper bust measures 81cm (32"). Add 5cm (2") to this measurement to find out what size your bust measurement falls into on the In the Folds sizing chart (and what size you would be if you had B cup breasts). 81cm + 5cm = 86cm which corresponds to a size C. 

As a front piece is normally cut on the fold, you need to take the measurement you will be adding and divide it by two. 

MAKE THE ADJUSTMENT

The FBA process will depend on what pattern you are making. We have a number of FBA tutorials you can take a look at and apply to your pattern:

More fit resources

If fit is something you're working on improving, I recommend joining Curated by ITF. As well as receiving early access to the latest In The Folds patterns, we teach you how to fit your own garments by providing a broad and accessible range of sewing resources. You also gain access to our Mighty Networks group, which is a beautiful online sewing community where you can ask questions about your fitting challenges and our team will be right there with you to help problem solve!

Happy sewing,

Emily


RESOURCES MENTIONED IN THIS ISSUE

  • FBA on a princess panel - tutorial can be found here.

  • FBA on a bodice block - tutorial can be found here.

  • FBA on a jumpsuit - tutorial can be found here.

  • FBA on a dartless pattern - tutorial can be found here.

  • More information about Curated by ITF can be found here.


For more issues of the Q & A series, you can check out the archive here.


WHAT YOU’VE BEEN MAKING


MORE POSTS IN THE SERIES

ISSUE 96 - Forward shoulder adjustment on the Collins top

THE Q & A SERIES

Forward shoulder adjustment on the Collins top

Hi Emily,

I found your post last week about doing a forward shoulder adjustment really helpful! Is it possible to make a forward shoulder adjustment on the Collins top pattern? I just finished one and it slips to the back on my shoulders and after reading your last email, I realised this is the alteration I need!

Thanks,

J


Hi J,

You can definitely make a forward shoulder adjustment on the Collins top pattern. The process is just slightly different due to how the seams work on that pattern.

There is no shoulder seam on the Collins top, but we do need to move the seams there are so that it's balanced across the shoulder.

Step 1

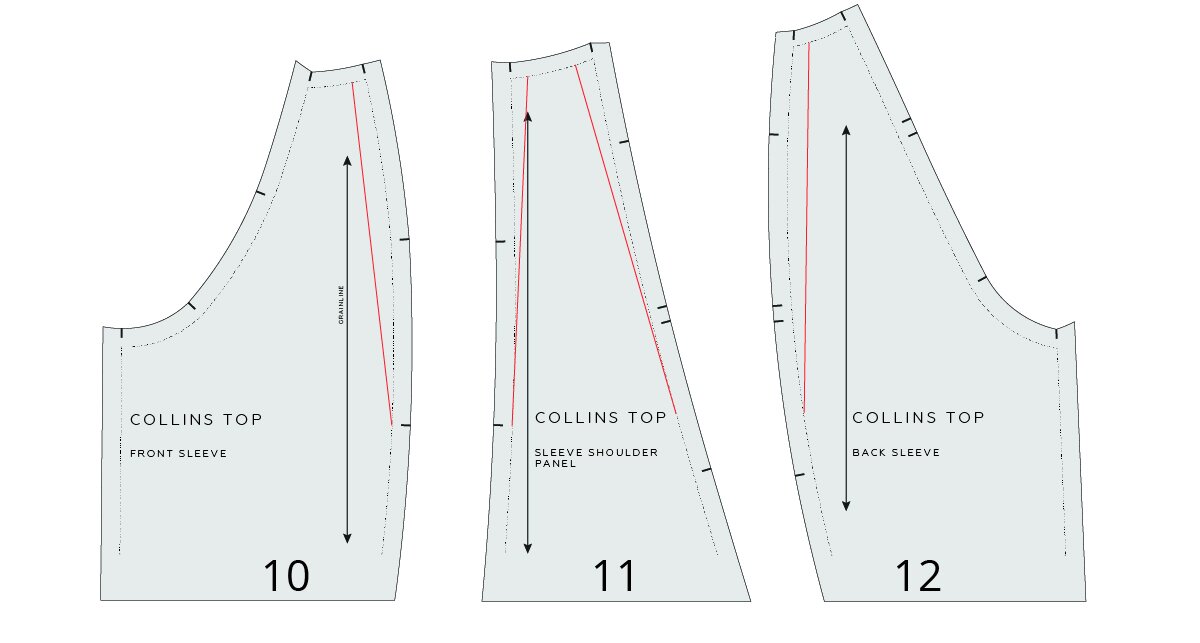
Trace a copy of FRONT SLEEVE [10], SLEEVE SHOULDER PANEL [11] AND BACK SLEEVE [12]. As there is no shoulder seam, for a forward shoulder adjustment, the aim is to move the seam lines forward.

Mark slash lines on each pattern piece as illustrated. Start with the FRONT SLEEVE [10] and draw the line from the neckline STITCH LINE, down to the lower notch. Keep each slash line close to the seam line.

Step 2

a Take the FRONT SLEEVE [10]. Cut down the slash line from the neckline. Stop 1-2mm from the STITCH LINE to create a hinge.

b Cut in from the seam allowance on the seam, towards the point where you stopped cutting on the slash line. Again, stop 1-2mm from the end of the cut line.

Step 3

a Mark the amount you would like to move the front seam by on the neckline STITCH LINE. Mark the line towards the front of the sleeve. If you have made a toile, refer to it to get an idea. For the example, we are moving the seam line 1cm forward.

b Use the hinge created in STEP 2, to slide the cut line over to the point marked. The seam has now been moved forward. Smooth out the seam line at the transition point if required.

Step 4

a Cut into the slash line on the front side of the SLEEVE SHOULDER PANEL [11]. The front of the panel is indicated by single notches. Cut in through the seam allowance to create a hinge.

b Use the hinge top open the slash line.

Step 5

a Slide pattern paper under the slash line. Attach the main section of the piece to the paper. Mark the amount you will be adding at the neckline STITCH LINE. This will be the same amount that we removed from the FRONT SLEEVE [10]. This means that the sleeve will still be the same size when we complete the alteration, as what we remove from one panel, we add to another.

b Use the hinge created to slide the cut line over to the point marked. The seam has now been moved forward.

Step 6

a Cut through the slash line on the back side of the SLEEVE SHOULDER PANEL [11]. Mark the amount you need to move the back seam by on the neck STITCH LINE. In the example, we are keeping this move consistent with the original design, so are moving it 1cm forward.

b Use the hinge created to slide the cut line over to the point marked. The seam has now been moved forward. Smooth out the seam line at the transition points if required.

Step 7

Repeat process for BACK SLEEVE [12]. Move the seam forward by the amount removed from the SLEEVE SHOULDER PANEL[11] in STEP 6a.

Step 8

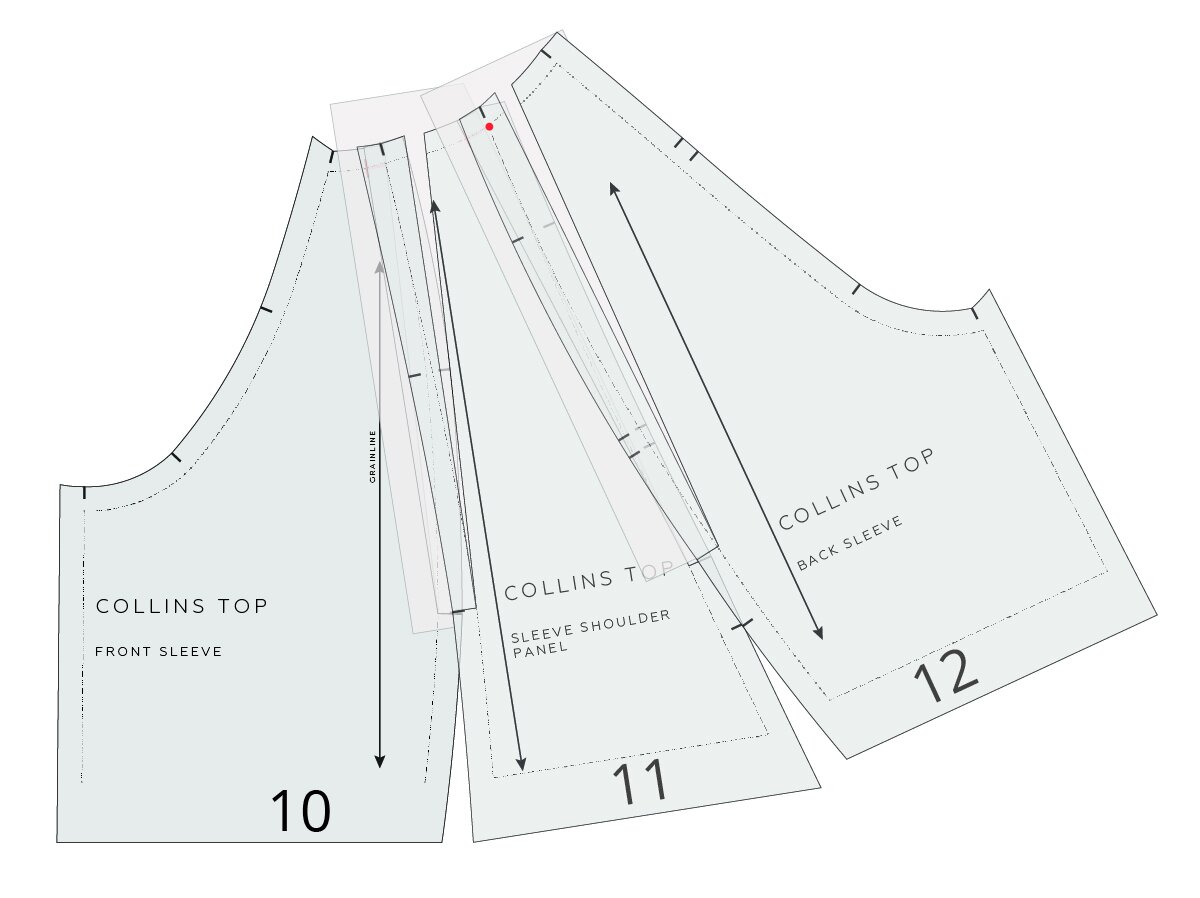
We now need to re-draw the neckline over the altered seams. Line up the STITCH LINE on the FRONT SLEEVE [10] and SLEEVE SHOULDER PANEL [11] at the neckline, as if the two pieces have been joined together. Hold in place with a pattern weight or pins.

Step 9

Line up the STITCH LINE on the BACK SLEEVE [12] and SLEEVE SHOULDER PANEL [11] at the neckline, as if the two pieces have been joined together. Hold in place with a pattern weight or pins.

Step 10

Re-draw the neckline, by drawing a line of best fit through the points of the original STITCH LINE. Use a French curve if you have one.

Step 11

Take a tracing wheel and use it to trace over the new neckline. This will transfer the new line onto the overlapping bits.

Step 12

Separate the pieces and mark in the lines marked by the tracing wheel. Add seam allowance (1cm) on to the new neckline.

Happy sewing,

Emily


RESOURCES MENTIONED IN THIS ISSUE

  • Collins top pattern can be found here.


For more issues of the Q & A series, you can check out the archive here.


WHAT YOU’VE BEEN MAKING


MORE POSTS IN THE SERIES

ISSUE 95 - Forward shoulder adjustment

THE Q & A SERIES

FORWARD SHOULDER ADJUSTMENT

Hi Emily,

I have a fit question about the Everyday Dress. I've made two linen versions that are very comfortable (and a hack with a sleeveless format). As I wear them, I've noticed that the neck will creep up and likewise the shoulder seams will go toward the back. Are there fit adjustments to do to garments to counteract this creeping? I didn't know if it was a matter of just keeping better posture!

Thank you!


Hi there,

Sounds like you need to make a forward shoulder adjustment. Rather than worrying about changing your posture, all you need to do is make this simple alteration to your pattern - in this case, the Everyday Dress. The beauty of sewing your own clothes is that you don't need to change your body, you can change the clothes! Basically, what you are doing with this alteration is moving the shoulder seam forward, so that it reflects where your shoulders actually sit.

Check how much to move the shoulder seam by

Since you already have a couple of versions of the Everyday dress, you can use this as a reference to work out how far you need to move the seam.

Put the dress on and let it sit comfortably on your body. Stand side-on in front of a full-length mirror and check where the shoulder seam is sitting. Put a pin in the position that you would like to move the shoulder seam to. Take off the dress and measure between the shoulder seam and the pin. This is how much you need to move the shoulder seam by.

In some cases, you will realise that rather than moving the whole shoulder seam forward, you only need to move the side closest to the neck or the armhole. This will change the slope of the shoulder seam.

TIP: It can be a good idea to check what's happening on both sides of a toile. For example, for this fitting, you could put a pin on both shoulders and measure them both. If there is a difference in the measurements (which is likely), find the average of the two.

Step 1

Mark in the new shoulder seam. For this example, we want the shoulder seam sitting closer to the front, so this means marking the new seam on the front pattern piece. If you needed to move the seam backwards, you would be marking it on the back piece.

Mark in your new shoulder seam, by measuring from the stitch line (this is the grey line on In the Folds patterns).

If you are changing the slope of the shoulder, because only a part of it is sitting incorrectly, your shoulder seam might look something like this.

Step 2

Cut along the new shoulder seam.

Step 3

Take the piece that was cut and line up the shoulder seam line (the red line) with the back shoulder stitch line. Stick in place.

Step 4

Smooth out the neckline.

Step 5

Return to the front piece. Add seam allowance to the new shoulder seam line by taping some paper in place along the shoulder and marking in the seam allowance. For this pattern, the seam allowance along the shoulder is 1.2cm / 1/2in. For more information about adding seam allowance, see this post.

Happy sewing,

Emily


RESOURCES MENTIONED IN THIS ISSUE

  • Everyday dress pattern can be found here.

  • How to add seam allowance to a pattern - Tutorial can be found here.


For more issues of the Q & A series, you can check out the archive here.


WHAT YOU’VE BEEN MAKING


MORE POSTS IN THE SERIES

ISSUE 94 - How to create a capsule wardrobe

THE Q & A SERIES

CREATING A CAPSULE COLLECTION

I love the idea of creating a spring, summer, autumn and winter collection as the great couture houses do.

Have you ever done this and what would you include?

Thanks 
Georgina

- Baildon, UK


Hi Georgina,

What a great question to kick off the new year! Are you like us and see the new year as a time to feel inspired and plan projects? It was this feeling that inspired us to create the Slow Sewing Planner.

For us, rather than designing a whole new capsule collection and hoping it all works well, we like the idea of taking it more slowly. Taking time to assess what's in our wardrobe already - what's working and what isn't, and then building our wardrobe slowly and intentionally.

With the Slow Sewing Planner, you can go as in-depth as you like through this process, but today we thought we'd guide you through the basics.

Pause & reflect

Before getting started with the planning, it's a good idea to take some time to reflect. This is about reflecting on your handmade wardrobe, the way you feel in it and the skills you have learned and would like to learn in the future.

What are the pieces in your wardrobe that you get the most wear out of? What helps you feel the most like yourself? What are you most proud of and why?

It can be easy to get caught up in the next sewing trend and feel like you need to make what everyone else is making. By taking time from the outset to work out what is important to YOU, you will be able to keep these things in the back of your mind as you assess your wardrobe (that's coming next) and start making plans for the future.

Work out what’s working and what’s not

By knowing what is in your wardrobe, what you wear and how often you wear things, you can begin to get a sense of gaps in your wardrobe and select projects to fill these gaps. Although many of us might dream of sewing a whole new wardrobe, or a capsule wardrobe, the reality is that by sewing pieces that fit into your existing wardrobe, you will have a better chance of getting a lot of wear out of it. You will be amazed how just one perfect piece added to your wardrobe can open up a realm of possibility. It's about being clear about what you hope to get out of your wardrobe and selecting pieces and projects that meet these aims.

Before thinking about what you’d like to sew next, it’s a good idea to get organised. When it comes to sewing your own clothes, there are a few places to keep organised to ensure you are making the things you need, as well as using the things you have. This is your wardrobe, your fabric stash and your pattern library.

At this point, things can get overwhelming. Remember, you don't have to do it all at once! If you struggle to say goodbye to clothes (especially the ones you have made yourself), we have some resources in the Slow Sewing Planner that will help you with the letting go process. We know that there is not a one-size fits all approach to organising your wardrobe, so we have given you 4 different exercises so you can decide what works for you. From nice and simple to delving in and tackling it all!

You then need to get really honest with yourself and work out what's working, what's not working and why. We have some worksheets in the planner that guide you through this process.

Organise your stash

While you're in an organising frame of mind, we'd suggest organising your pattern library and fabric stash too! We love the approach detailed by Helen's Closet in this post. Well worth a look if you are looking for a way to comprehensively organise your fabric and patterns!

Make a plan

Now that you've had a good look at what you have, what you're enjoying wearing (and not enjoying wearing), we hope you are feeling inspired and ready to plan for the future!

There are many ways you can plan your makes. You can plan for the year, the season, or just as you go. Whatever works for you! 

This is the point where you need to get clear about what you want from your wardrobe and start filling those gaps! Do you need more clothes for work? More clothes for working from home? How can you select projects so they work in multiple areas of your life?

We suggest you make a mood board and refine it a number of times so you have a very clear idea of what you'd like to make. We have some resources to guide you through this process in the Slow Sewing Planner. At this point it's also a good idea to start thinking about your ideal colour palette and how your plans for your wardrobe fit within this palette. 

As you think about what you'd like to make, think about how it's going to fit within your wardrobe and adjustments you can make to ensure it fits in. For example, do you want to make a dress longer or shorter so it works with a particular jacket? Would you get more wear out of a pair of pants if you substituted an elastic waistband for a flat-front waistband. Ask yourself what you'll wear each new piece with and what skills you would like to learn from the project.

We've loved seeing our community gain more pattern hacking skills with Curated by ITF and grow in confidence to get exactly what they want out of each pattern.

This email just gives you a simple run-through of the steps we suggest you take when planning  new pieces to add to your wardrobe. If this is a process you're interested in diving into, we suggest purchasing the Slow Sewing Planner, as it guides you through this process (and lots more) with worksheets, exercises and additional resources. We'll also be working together through the process in our Mighty Networks group, so if a bit of external accountability is just what you need to get that wardrobe sorted, we'll be right there with you!

We hope your wardrobe dreams come true in 2022!

Happy sewing,

Emily


RESOURCES MENTIONED IN THIS ISSUE

  • Curated by ITF. More details can be found here.

  • How to organise your patterns using Trello. Post can be found here.


For more issues of the Q & A series, you can check out the archive here.


MORE POSTS IN THE SERIES

ISSUE 93 - Add to or remove fullness from a skirt pattern

The Q&A Series

Add or remove fullness from a skirt pattern

I was thinking of making View A of the Acton dress, with capped sleeves and a slimmer skirt. Don't know how to do either of those things, so expect questions 😬

- KS


KM - I was thinking a more voluminous skirt! 😂  but also was going to have questions.

- KM


Add fullness to a skirt

If you would like to make the A-line of the skirt more full, follow the steps below. If you would like to make the skirt straighter, scroll down to the next section.

An In The Folds skirt pattern in grey with red lines running down its length.

Step 1

To start, trace a copy of the front skirt pattern piece with seam allowance - be sure to also trace the stitch line (the grey line on the pattern) and transfer the notches, grainline and drill hole. Cut out the pattern piece.

We will be using the 'Cut and Spread' method to add the extra fullness to the skirt. For more info on this technique, see this post from our blog.

Mark in your slash lines. You can mark in as many as you like. The more you do the more gradual the transition will be. 2-3 is a good number for a pattern of this scale. Distribute them evenly though the piece and gradually fan them out to follow the angle of the side seam (if the pattern was a straight skirt, these lines would be straight).

A grey In The Folds skirt pattern with red lines with arrows.

Step 2

Starting at the hem of the skirt, carefully cut up each of the lines. Cut up to the stitch line, but do not cut through the stitch line.

Cut the remainder of each line from the top edge (cutting down towards the stitch line). Don't cut all the way through though, stop a few millimetres from the stitch line, leaving a 1-2mm "hinge" to keep the pieces together (if they do accidentally come apart, just tape back in place).

Step 3

Slide a piece of pattern paper under the piece. Hold the centre front in place (you can tape it in place if you like) and slowly open up the hemline by the desired amount. We will be opening up each section by the same amount, so make sure to consider this when adding volume.

If you would like to add 60cm (for example) to the total circumference, you need to split this between the 4 parts of the body (left front, right front, left back, right back). This means that we will be adding 15cm to the hemline of each piece (60cm / 4 = 15cm). As we have 3 slash lines, we need to divide the 15cm by 3 (i.e. 5cm).

If you're not sure how much volume to add, don't worry! Have a play with the piece by sliding the slash lines open and get a feel for the amount of volume you'd like to remove.

Tape the opening in place - leaving the rest loose so you can continue altering the pattern.

Step 4

Repeat for each slash line. Tape in place.

Step 5

Re-draw the hemline with a gentle curve. You need to make sure you are meeting the centre front at a right angle.

Smooth out the top edge stitch line over the alteration.

Step 6

Add seam allowance back onto the altered lines.

Repeat for the back skirt.

Would you like to add more volume?

To add more volume, check out this tutorial from the Acton sew-along here.

Remove fullness from a skirt

You may want to make a straighter skirt than the original A-line shape. In this case we do the opposite with our slash lines. Instead of opening them up to add volume, we close them to remove volume.

Step 1

To start, trace a copy of the front skirt pattern piece with seam allowance - be sure to also trace the stitch line (the grey line on the pattern) and transfer the notches, grainline and drill hole. Cut out the pattern piece.

Mark in your slash lines. You can mark in as many as you like. The more you do the more gradual the transition will be. 2-3 is a good number for a pattern of this scale. Distribute them evenly though the piece and gradually fan them out to follow the angle of the side seam (if the pattern was a straight skirt, these lines would be straight).

Step 2

Starting at the hem of the skirt, carefully cut up each of the lines. Cut up to the stitch line, but do not cut through the stitch line.

Cut the remainder of each line from the top edge (cutting down towards the stitch line). Don't cut all the way through though, stop a few millimetres from the stitch line, leaving a 1-2mm "hinge" to keep the pieces together (if they do accidentally come apart, just tape back in place).

Step 3

Consider how much you would like to remove from the circumference of the skirt. To remove 20cm (for example) from the total circumference, you need to split this between the 4 parts of the body (left front, right front, left back, right back). This means that we will be removing 5cm from hemline of each piece (20cm / 4 = 5cm). As we have 3 slash lines, we need to divide the 5cm by 3 (i.e. about 1.7cm).

If you're not sure how much to remove, don't worry! Have a play with the piece by sliding the slash lines closed and get a feel for the amount of volume you'd like to remove.

Slide the cut section over to centre front section - closing out the hem by the desired amount. Tape in place.

Step 4

Repeat for each slash line. Tape in place.

Step 5

Re-draw the hemline with a gentle curve. You need to make sure you are meeting the centre front at a right angle.

Smooth out the top edge stitch line over the alteration.

Add seam allowance back onto the altered lines.

Repeat for the back.


I hope you enjoy changing up your skirt patterns with this tutorial!

Happy sewing,

Emily


RESOURCES MENTIONED IN THIS ISSUE

  • Curated by ITF. More details can be found here.

  • Acton dress sleeve expansion can be found here (subscription) and here (stand-alone product).

  • Original Acton dress pattern can be found here.

  • Adding volume to a pattern. Tutorial can be found here.

  • How to add a full skirt to the Acton dress. Tutorial can be found here.


For more issues of the Q & A series, you can check out the archive here.


WHAT YOU’VE BEEN MAKING


more posts in this series

ISSUE 92 - Give the gift of sewing

The Q&A Series

Give the gift of sewing


Hi Emily,

My 16 year-old niece recently started sewing. It's her birthday coming up and I'd like to give her one of your patterns but I don't know which one to choose. I'm wondering if you have gift cards available so she can pick the right one for her?

Thanks,

Dave


Hi Dave,

What a great hobby for your niece! It's such a fantastic time to learn to sew as there are so many fantastic patterns and resources available. I love the idea of gifting patterns as they not only get the pattern itself, but the making experience that goes along with it!

I have been meaning to add gift cards to my website for a long time. Thank you for your question as it prompted me to finally get around to it! You can purchase a gift card here. You will be sent an email that you can forward to your niece or you can use the digital gift card template that will be sent to you too so you can add a gift message.

I hope your niece enjoys using our patterns!

Kind regards,

Emily


Hi Emily,

I am a member of Curated by ITF (which I love by the way) and would love to gift a subscription to my daughter-in-law for Christmas as she is also a maker. I think it would be fun to sew the projects together! How would I go about this?

Thanks,

Sue

A pattern sits on a table with various sewing tools.

Hi Sue,

What a fantastic gift idea! I am sure your daughter-in-law will be thrilled! There are two options - you can sign-up for here with a regular membership and pay the recurring charge, or you can purchase a 3 month, 6 month or 12 month Curated by ITF membership here. It's a prepaid membership, so you don't need to worry about a recurring charge each month.

With a Curated by ITF membership she will receive first access to new projects each month. This includes new patterns, fitting resources or hack kits - resources that will empower makers on their sewing, pattern making and fitting journey.

Subscribers will gain access to:

  • New monthly projects: Gift recipient will receive their first project right away and then a new project on the first of every month, straight to their inbox. Each project will teach new skills and build on what the community has been learning each month. New projects will be sent straight to the gift recipient for either 3, 6 or 12 months - depending on the gift selection. Would you like to see what we're making this month? You can see the current project here.

  • Access to our ITF community platform: Gift recipient will be able to connect with other makers by gaining access to our online community platform. A place to share ideas, inspiration and questions. Makers will feel supported as they can work on the same project as other makers.

  • Community-centred content: Sew-alongs, tutorials and sneak peeks of upcoming patterns and projects that we’re working on for you.

Happy sewing,

Emily


RESOURCES MENTIONED IN THIS ISSUE

  • In the Folds gift cards can be found here.

  • Curated by ITF Gifted membership can be found here.


For more issues of the Q & A series, you can check out the archive here.


What you’ve been making


more posts in this series