ISSUE 43 - How to redraft a neck facing - after making an adjustment to a pattern

HEADER_ISSUE_43.jpg
HEADING - V2.png

Hi Emily, 

I’ve noticed that when I make a change to the bust area of a pattern, the facing no longer lines up with the armhole. Should I make the same adjustment to the facing as I do to the pattern, or is there something else I should be doing?

Thanks,

Bonny


Hi Bonny,

The simplest way to deal with this is by redrafting your front facing. You shouldn’t need to touch your back facing if you haven’t made any alterations to the back piece of your pattern.

I will be redrafting the front facing for the Peppermint Jumpsuit pattern, as I think this is a great follow-up question to my last post on lowering a dart (which does change the pattern enough for the front facing piece to need to be altered).

Redraft-facing-1.jpg

Step 1

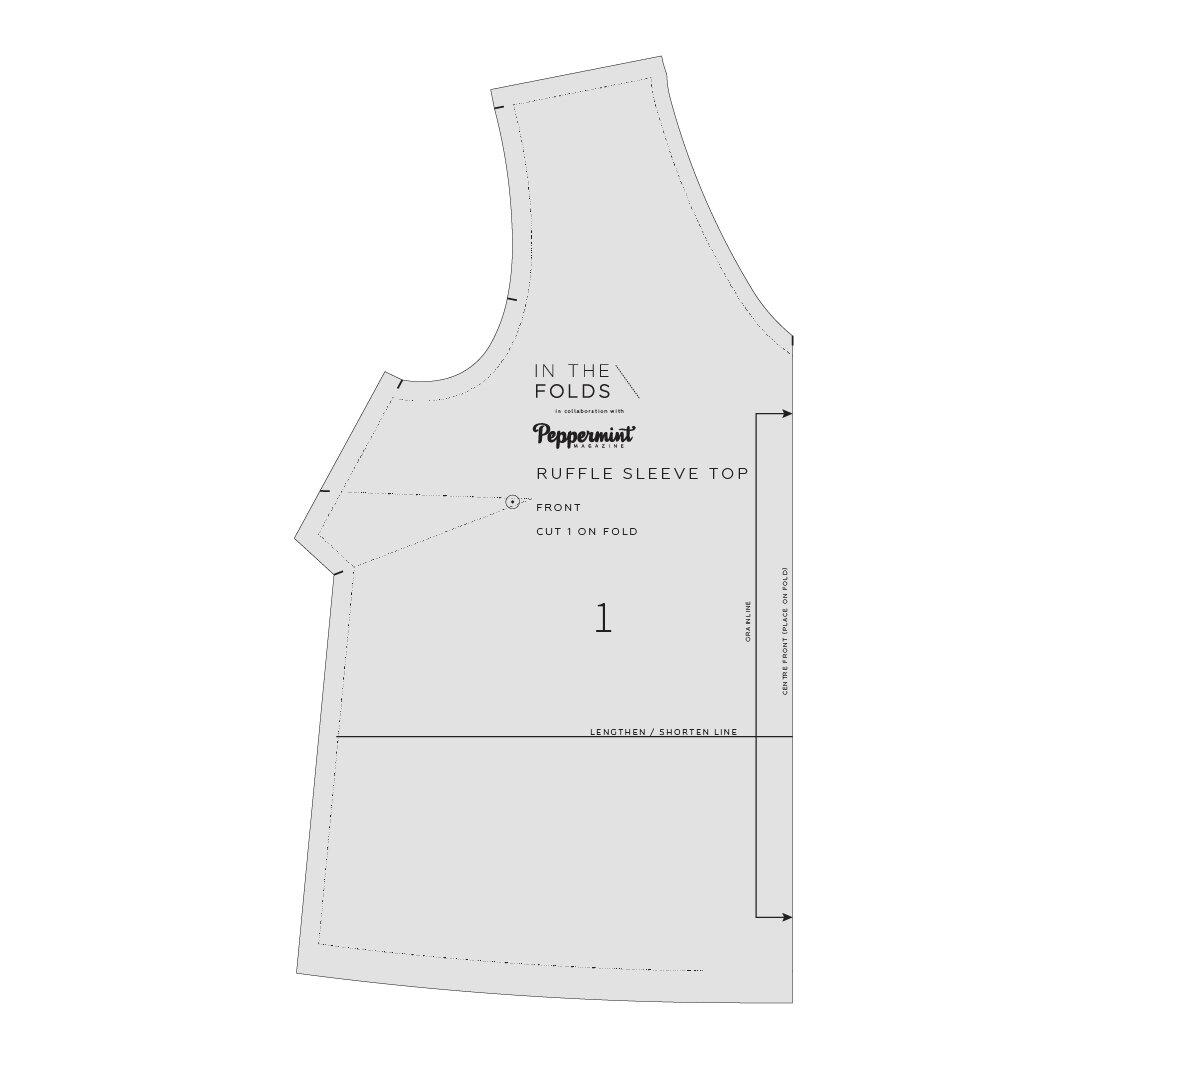
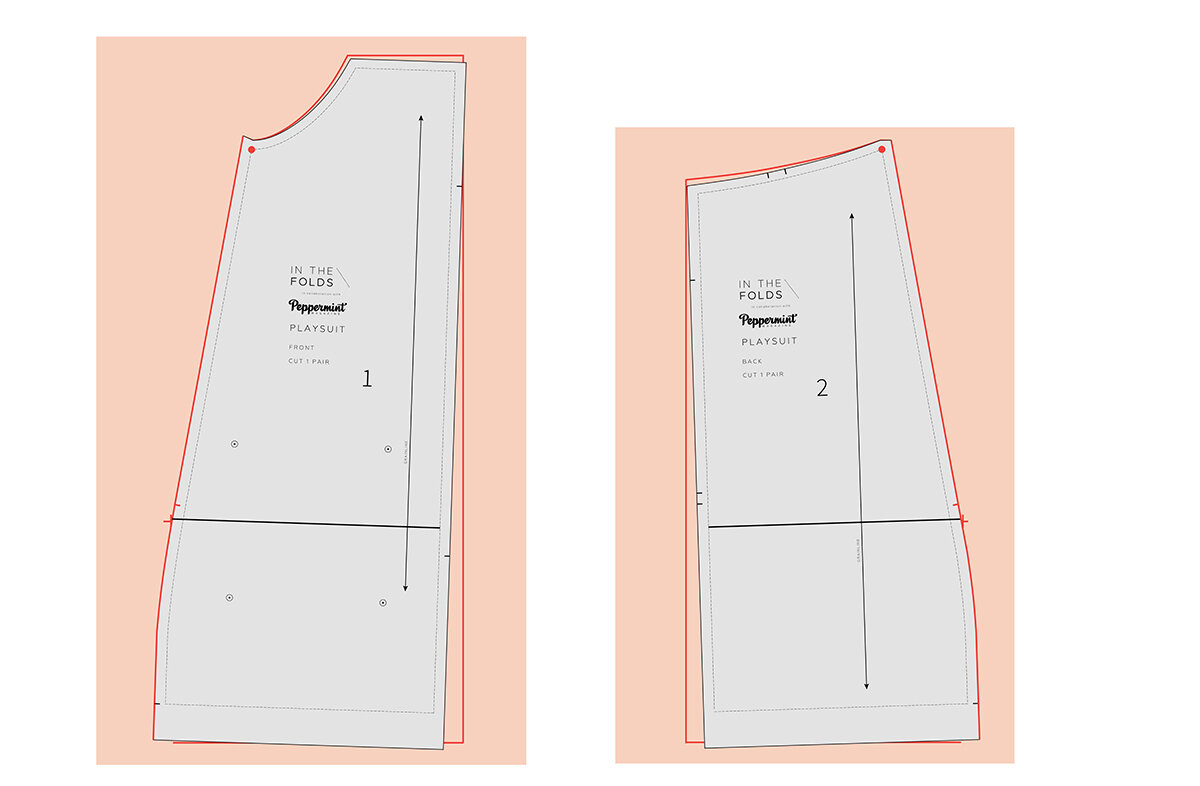
A. Take the FRONT piece and the FRONT FACING piece from the Peppermint Jumpsuit pattern (or the pattern you need to draft a new facing for).

B. Place the FRONT FACING piece on top of the FRONT, lining up the neckline, shoulder seam and centre front (the facing does not have a seam in the centre, so you will need to line up the stitch line on the FRONT with the centre front of the FRONT FACING). You will notice that the front facing no longer matches the piece like it needs to.

Redraft-facing-2.jpg

Step 2
A
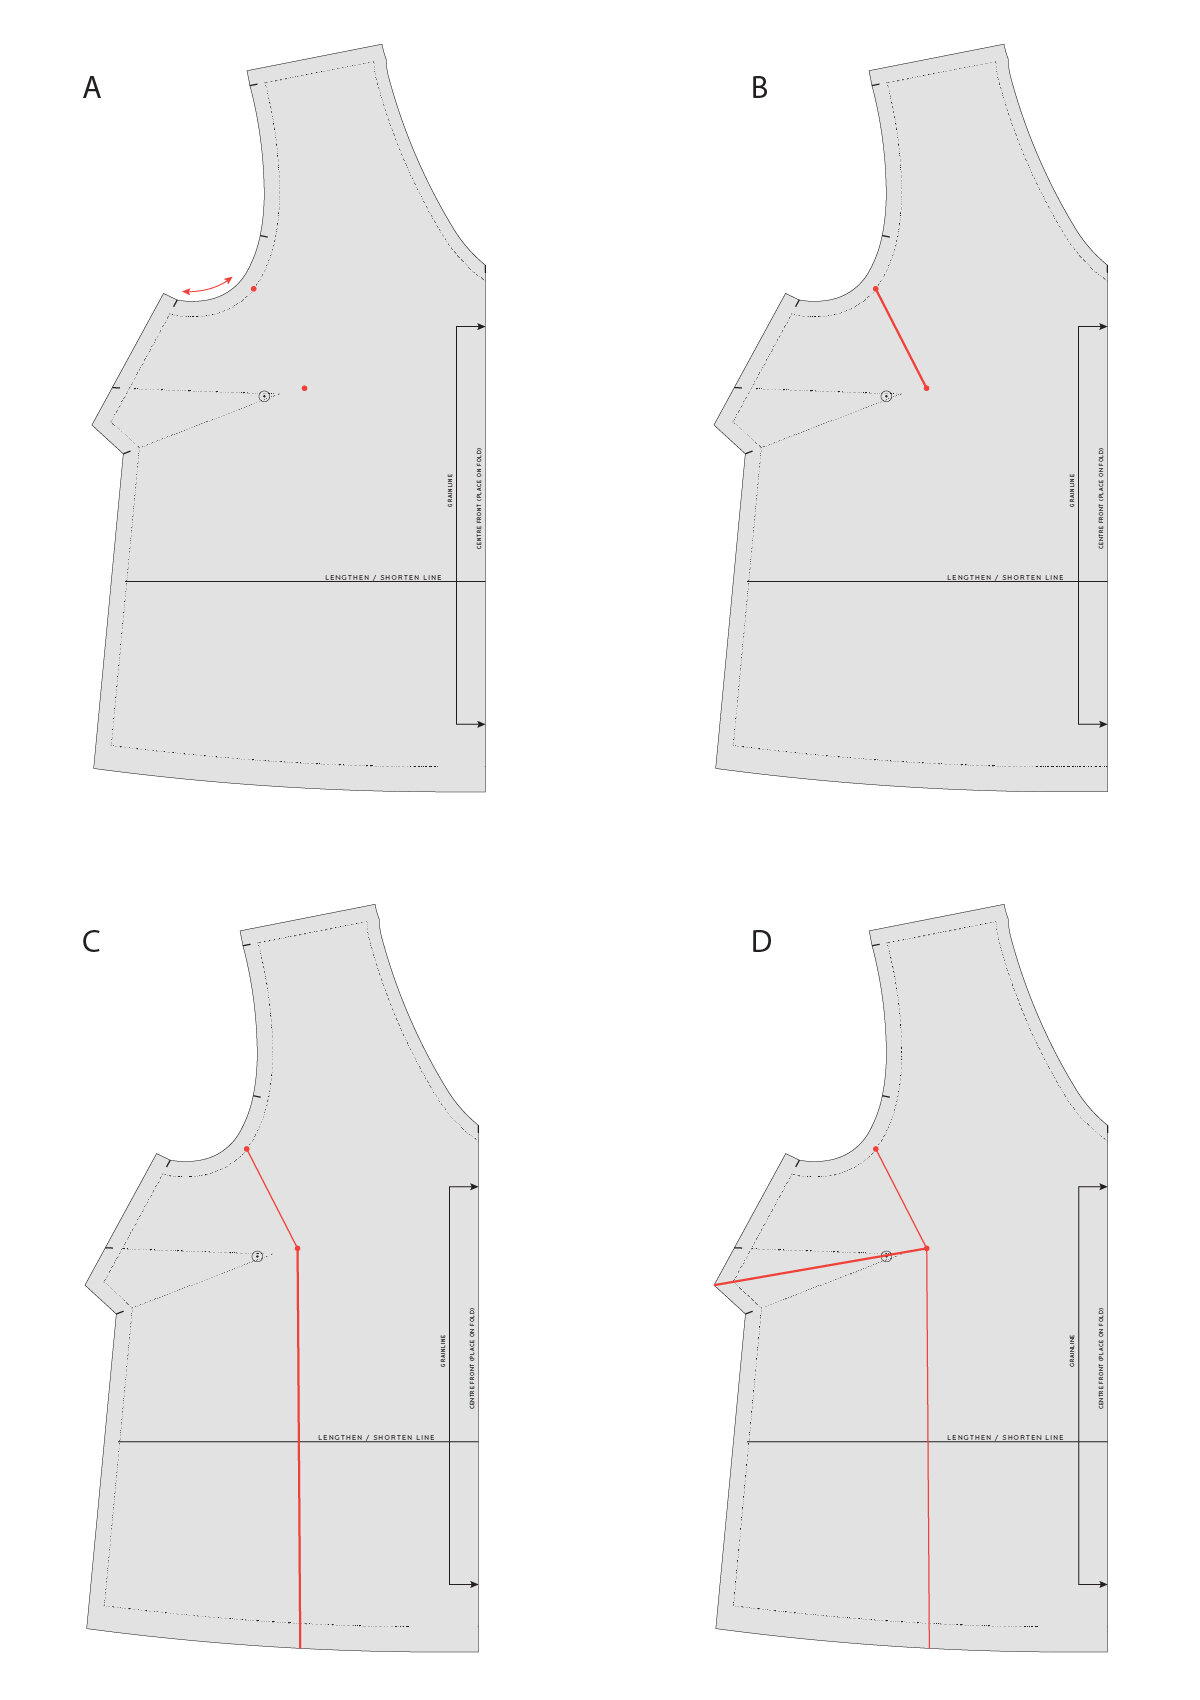
Take the FRONT FACING piece and measure the centre front length and the side seam (on the stitch line). In the Folds patterns include the stitch lines on the pattern (the grey line) - if you are using this tutorial for a pattern that does not include stitch lines, you will need to mark it in so that you can draft the new piece accurately.

We need to know the length of the side seam on the FRONT FACING so that when we make the new piece, it will have the same length side seam as the original piece, so that it still matches correctly with the BACK FACING piece.

B Take the FRONT piece and mark the lengths you found in A on the centre front and side seam (on the stitch line).

C Draw a nice smooth curve from the centre front over to the side seam - you can use the original facing as a reference of the shape.

As you can see, the bottom of the facing would only just line up with the dart point. I prefer the bottom of the facing to sit under the dart point, so will show you how to alter this in the following step.

Redraft-facing-3.jpg

Step 3

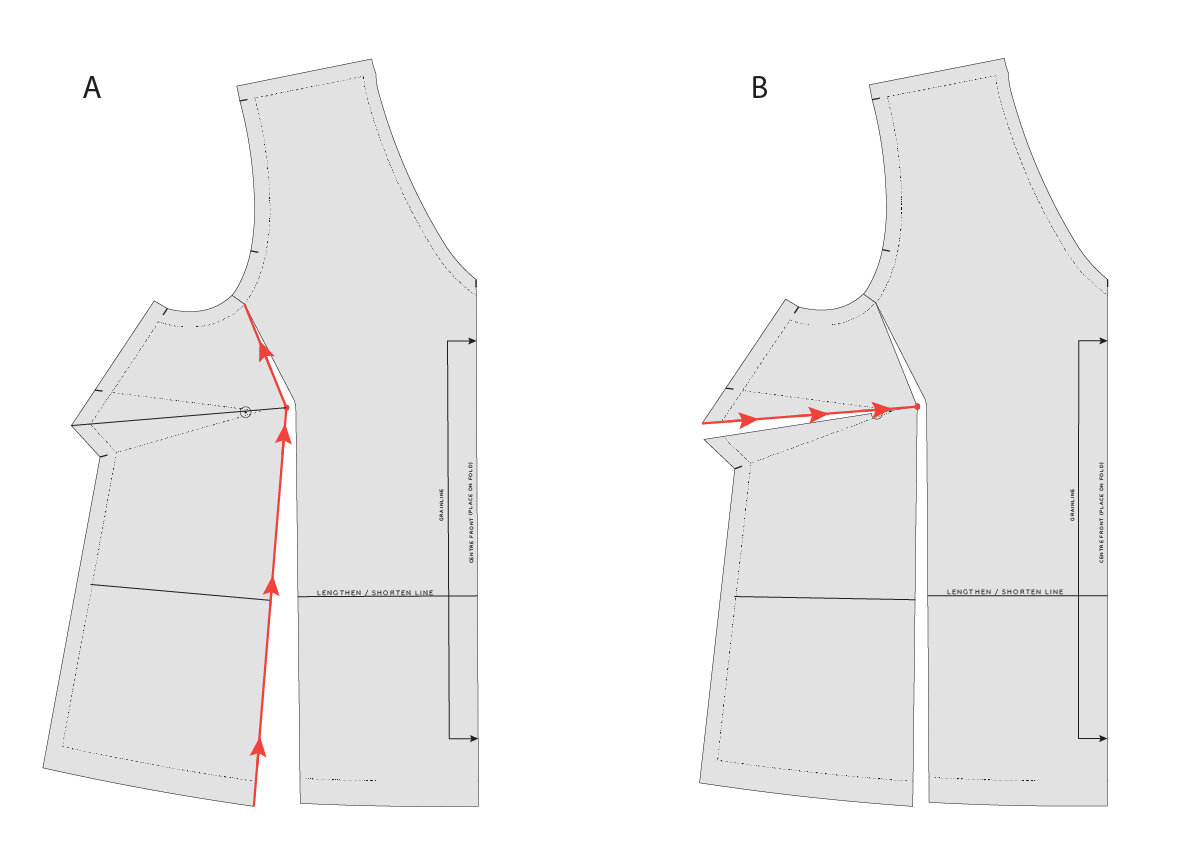
A. To get the bottom of the facing to sit under the dart, we will need to extend the length of the centre front of the facing. This is a fine alteration to make as this line is cut on the fold, so it does not impact another seam.

Extend the centre front facing line and redraw the bottom edge of the facing, meeting the original line at the side seam. You will see that this new line now sits slightly below the dart point.

B. Trace the new FRONT FACING piece onto a piece of pattern paper. Be sure to mark in the stitch line, dart and notches.

C. We will now be removing the dart from the facing. You will always want to remove as much bulk from a facing as possible - so that means removing darts when you can (otherwise you would have the bulk of two darts sitting on top of each other when the garment is made). Cut along the lower dart arm, towards the dart point.

D. Turn the pattern piece around and cut into the facing from the bottom edge towards the tip of the dart - stopping 1-2mm from the dart point and creating a small ‘hinge’ of paper.

E. Close out the dart by sliding the cut edge of the dart up to meet the upper dart arm. Tape in place. If you would like to learn more about closing out darts using this method, you can see this tutorial.

F. Fill in the gap at the bottom with a small piece of paper or masking tape and smooth out the line. Mark a notch on the armscye where the dart has been closed. Finalise the pattern by adding pattern cutting instructions

And that’s it, your facing will now fit your altered pattern!

Happy sewing,

Emily


resources mentioned in this issue

  • The Peppermint jumpsuit can be downloaded for free here.

  • Lowering (or raising) a bust dart by the Curvy Sewing Collective. Tutorial can be found here.

  • How to add dart shaping. Tutorial can be found here.

  • How to (and why) make a toile. Tutorial can be found here

  • How to add seam allowance to a pattern. Tutorial can be found here.


P.S. Would you like to know what the Q & A series is all about? This page tells you a little bit more about the motive behind the series. Past issues from the Q & A series can be found here.

Don't have a question, but found this newsletter helpful? I'd love to hear from you! Get in touch and say hi. 


What you’ve been making


More posts in the series

ISSUE 42 - How to lower an armscye dart

LOWER ARMSCYE DART.jpg

THE Q & A SERIES - HOW TO LOWER AN ARMSCYE DART

Kia ora Emily!

I hope you're well.

I'm just wondering if you have any resources to hand (or able to point me in the direction of some) on how to lower the bust dart in the armscye in the Peppermint jumpsuit. I'm used to moving bust darts in the side seam but the armscye seems to be a different kettle of fish! 

I'm attempting to "tissue" fit the pattern and I think I need to lower the apex by about 4-5cm. It seems a lot, but I am fairly low busted so perhaps it's not. Or is it a matter of just pivoting the dart to point at a slightly different place? I don't think I need to make a small or full bust adjustment, I only need to alter the position. 

Thanks in advance for any help or insight you can provide! I appreciate it.

Rebecca


Hi Rebecca,

I'm excited you are giving the Peppermint jumpsuit pattern a go! This question actually stumped me for a moment too! I printed the bodice section and gave the adjustment a go and after a few attempts I figured it out. It's actually pretty much the same method you would use for moving a dart up or down on the side seam (you can check out this tutorial from Curvy Sewing Collective to see the regular method) - but it's the angle of the dart and the armscye curve that makes it slightly different.

MOVE THE DART POINT ONLY

To start, there are times that you can simply move the dart point and re-draw your dart arms to meet the new dart point (as you suggested). I tried this first, and moved the apex point down 4-5cm. 

Lower-amscye-dart-1.jpg

As you can see in the example, the dart angle changes fairly significantly and I realised that the line of the dart when it was sewn just wouldn’t make a nice line visually.

If you are following along this tutorial at home, and you only need to move the dart point by a couple of centimetres - it might be worth trying this option first (as it shouldn't impact the angle of the dart as much as it did in the example). If it does look like you can afford to do it, just remember that you will need to re-shape the dart at the armscye - this tutorial shows you how to do that.

PREPARE THE PATTERN

Lower-amscye-dart-2.jpg

Step 1
A Take the FRONT piece from the Peppermint Jumpsuit pattern (or the pattern you’d like to make the adjustment to). If you think you’d like to go back to the original in the future, I’d suggest tracing a copy to make the alteration on (although you can always re-print from the PDF later down the track if you need to). As the alteration is only being made to the dart, you can just take the top section of the pattern (you can stick it back to the rest of the pattern after you have made the alteration) - this will make the pattern piece much easier to manoeuvre. 

If you are tracing a copy of the pattern, be sure to transfer the stitch line (grey line on the pattern) as well as the cutting line, as it will help you with this tutorial. As usual, be sure to transfer pattern markings and notches.

Draw a line through the centre of the dart, from the armscye through to the dart point (and extend a few centimetres past the dart point).

C Mark the apex point on the line (the apex point is the peak of your bust). On In the Folds patterns this is normally about 2.5cm (1in) beyond the tip of the dart point. 

MARK NEW APEX POINT

Lower-amscye-dart-3.jpg

Step 2

A Mark your new apex point on the pattern piece. You can find this by checking your toile / muslin and transferring the measurement to the pattern. 

B Draw a line to represent the centre of what will become your new dart. This should go from the new apex point through to the armscye and be parallel to the centre line of the original dart.

C Draw a box around the original dart - using the guideline in the centre of the dart as a reference. Each side of the box should be parallel to the centre dart line and far enough away to not cut through the dart. In the example I marked the lines 2.5cm (1in) from the centre line.

Complete the box at the end closest to the dart point by joining the two lines at the end with a perpendicular line - again, you need the line to not cut through the dart / apex point marking. In the example I drew the short line 1cm (3/8in) beyond the apex point.

D Using the centre line of your new dart as a starting point, draw another box - the same distance away from the centre dart line as you marked on the original dart. For example, if you marked the line 2.5cm from the original dart line, mark the line 2.5cm down from the new centre dart line - ensuring it is also parallel to the new dart centre line.

Do the same for the short side of the box (again, making sure it's perpendicular to the line) - the one that is below the apex point (you won’t need the top line of the box - so there is no need to mark that one in).

MOVE THE DART

Lower-amscye-dart-4.jpg

Step 3

A Mark a line crossways through the original dart - perpendicular to the centre dart line. It doesn’t really matter where you position this line, as long as it’s within the dart.

B Take some scissors and cut out the box that surrounds the original dart.

C Cut along the line marked through the dart (in part A of this step) so that now your dart is in 2 parts.

Lower-amscye-dart-5.jpg

Step 4

A Take the piece of paper that has the tip of the dart on it and line up the corner of this rectangle with the corner of the box that was drawn around the new centre dart line (the blue dotted line in the illustration).

Tape / glue in place.

B Move the other part of the dart to line up with the same guideline. Align the bottom edge of this piece of paper with the guideline and the stitch line on the armscye at the dart legs with the stitch line of the armscye on the main pattern piece. As you can see, this will create a gap in the centre of the dart. This is why the dart had to be cut in half - if we didn’t cut it, the end of the dart would no longer meet the armscye and we would have a distorted armscye. This way we have the correct armscye as well as the correct position for our new apex point.

C Take some scrap paper and fill in the gap in the pattern - using tape / glue to secure in place.

FINALISE THE NEW DART

Lower-amscye-dart-6.jpg

Step 5

A Re-draw the dart arms - joining the notches on the armscye to the dart point. As you can see, you now have a dart that is lower (and longer) than the original, but has the same angle as the original.

B Fold out the dart - as if it has been sewn - with the bulk of the dart pressed down. Doing this over the corner of a table helps (placing the dart point on the corner). More about how to do this can be found here.

C Redraw the armhole with a nice smooth curve (a French curve will be handy here, if you have one). Use a tracing wheel to transfer the armhole shaping onto the dart.

FINALISE THE PATTERN

Lower-amscye-dart-7.jpg

Step 6

A Open the dart and redraw the armscye over the dart - following the markings created by the tracing wheel.

B Add the seam allowance back on (by following the new armscye line). More details about adding seam allowance can be found here

You will also need to redraft your front facing piece to accommodate the change. But I will save that for next week!

Happy sewing,

Emily


resources mentioned in this issue

  • The Peppermint jumpsuit can be downloaded for free here.

  • Lowering (or raising) a bust dart by the Curvy Sewing Collective. Tutorial can be found here.

  • How to add dart shaping. Tutorial can be found here.

  • How to (and why) make a toile. Tutorial can be found here

  • How to add seam allowance to a pattern. Tutorial can be found here.


P.S. Would you like to know what the Q & A series is all about? This page tells you a little bit more about the motive behind the series. Past issues from the Q & A series can be found here.

Don't have a question, but found this newsletter helpful? I'd love to hear from you! Get in touch and say hi. 


What you’ve been making


More posts in the series

ISSUE 41 - Saying thanks for free patterns and resources

header-1.jpg

THE Q & A SERIES - SAYING THANKS FOR FREE PATTERNS + RESOURCES

Hi Emily,

I just downloaded the Peppermint Wide Leg Pants pattern. It was only once I made the download that I realised that it was your pattern! They requested a donation but I think really this should have come to you. So I would be happy to make a donation to your coffers for this pattern. Please let me know how. I have used your amazing resources for some years and I continue to enjoy your posts. 

Miranda


Hi Miranda,

I am thrilled to hear you’ll be making the Peppermint Wide Leg pants pattern!

It’s very kind of you to offer a donation for the work I do in this space, and I appreciate you reaching out to discuss this. It has always been a part of my mission to offer as much free content as possible.

While I was paid a modest sum by Peppermint Magazine to create all of the patterns in this collaboration, this was with the understanding that these patterns would always be free. A number of my supporters have brought to my attention that Peppermint has added a donation button to the In the Folds free patterns and have reached out asking if there is any way to donate to me directly in order to support my business .

By giving makers the option to donate I will be able to continue doing what I'm doing - offering free resources that help you make clothes you will wear, love and cherish.

If you would like to say thanks to In the Folds for the free patterns I have created or any of the other free resources I continue to create, you can give a donation by following the button below. Any amount is appreciated and directly supports In the Folds to keep creating the high quality content and resources that you love.

Happy sewing,

Emily


resources mentioned in this issue

  • The Peppermint wide leg pattern can be downloaded for free here.

  • The full collection of free Peppermint patterns can be found here.

  • Donation to In the Folds can be made here.


P.S. Would you like to know what the Q & A series is all about? This page tells you a little bit more about the motive behind the series. Past issues from the Q & A series can be found here.

Don't have a question, but found this newsletter helpful? I'd love to hear from you! Get in touch and say hi. 


What you’ve been making


More posts in the series

ISSUE 40 - Removing seams from a pattern

REMOVING SEAMS FROM A PATTERN.jpg

THE Q & A SERIES - REMOVING SEAMS FROM A PATTERN

Hi Emily,

I am planning on making the Peppermint jumpsuit and I have a question. If I don't want to have a center cut line for the front of the jumpsuit could I just put the piece for the front on the fold? Of course I would have to adjust a little for the curvature of the front, it would look a little more straight? Any thoughts?

Regards,

Stacy


Hi Stacy,

I am pleased to hear you will be making the Peppermint jumpsuit!

2. REMOVING-SEAM-LINES-PATTERN-1.jpg

I would be hesitant to cut the front of this pattern on the fold, due to the curve of the crotch. You do see some pant styles that do not have a centre front seam to accommodate the crotch (such as low crotch pants and harem pants), but normally there is a lot more volume in this area to accommodate the lack of shaping. If you're still game to give it a go I would suggest making a toile / muslin first.

WHEN CAN YOU REMOVE A SEAM LINE FROM A PATTERN?

There are times when you can very easily remove a seam line from a pattern, to suit your taste or style. The key is learning to work out which seams are there for design or decorative purposes and which are there to create the shape of the garment.

SEAM LINES AND THE COLLINS TOP

Collins-top-In-the-Folds.jpg

For example, you might know the Collins top pattern. This top has a lot of seams! Some are there to make the design fun and interesting, while others are there to create the overall shape of the top.

SEAM LINES THAT CAN BE REMOVED

Artboard 531200.jpg

For example, if you take the CENTRE FRONT PANEL and the SIDE FRONT PANEL pieces, you will see that the seam lines that join the pieces together are straight lines.

5. REMOVING-SEAM-LINES-PATTERN-5.jpg

When you overlap the pieces (stitch line on stitch line - as if the two pieces have been sewn together) you can see that there is no shaping in the seam. This means that you can remove this seam line if you would like. All you need to do is tape the pieces together (stitch line on stitch line) and cut the fabric (or trace a copy of the pattern if you would like to keep the original).

6. REMOVING-SEAM-LINES-PATTERN-6.jpg

It’s not only straight seams that can be removed. Another seam line on the Collins top that could be removed is the seam between the CENTRE FRONT PANEL and the FRONT SHOULDER PANEL. Although the pieces are curved, the two piece fit together like a jigsaw and then are pressed flat, so don’t create any shaping. This means that this seam could also be removed.

7. Collins-top-In-the-Folds.jpg

SEAM LINES THAT CANNOT BE REMOVED

8.+REMOVING-SEAM-LINES-PATTERN-8.jpg

Looking at the version of the Collins top with sleeves, you will see that the sleeve panels have curved seams.

9. REMOVING-SEAM-LINES-PATTERN-9.jpg

To check if these seam lines could be removed, overlap the pieces - stitch line on stitch line - as if they have been sewn together.

Full-bicep-adjustment-part2-5.jpg

You will notice that you can’t get the seam lines to match up - the curves go different ways, leaving gaps. These gaps between the seams is what creates shaping. This shaping allows for the sleeve to fit nicely over the shoulder.

I hope that you now feel free to explore adapting patterns to suit your style by removing seams!

Happy sewing!

Emily


resources mentioned in this issue

  • The Peppermint jumpsuit pattern can be downloaded for free here.

  • The Collins top pattern can be purchased here.

  • How to (and why) make a toile. Tutorial can be found here.


P.S. Would you like to know what the Q & A series is all about? This page tells you a little bit more about the motive behind the series. Past issues from the Q & A series can be found here.

Don't have a question, but found this newsletter helpful? I'd love to hear from you! Get in touch and say hi. 


What you’ve been making


More posts in the series

ISSUE 39 - How to increase bicep width on a sleeve - Part 2

INCREASE BICEP WIDTH ON A SLEEVE part 2.jpg

THE Q & A SERIES - HOW TO INCREASE BICEP WIDTH ON A SLEEVE- PART 2

Hi Emily,

I'd like to know how to increase sleeve bicep width. I've made grainline uniform several times with what I think is the right way to increase the sleeve but am not completely happy with the results.


Thanks,

Kerrie


Kenthurst, Australia.


Hi Kerrie,

Last week I showed you how to make this adjustment for an alteration of up to 3cm (1 1/4in) and today I'm popping in with a tutorial for larger alterations (more than 3cm / 1 1/4in). If you would like a refresher, you can see the first post here.

I will be using the Peppermint wrap top pattern for the example, which you can download for free if you would like to give this technique a go.

PREPARE YOUR PATTERN

Increase-bicep-width-12.jpg

Step 1
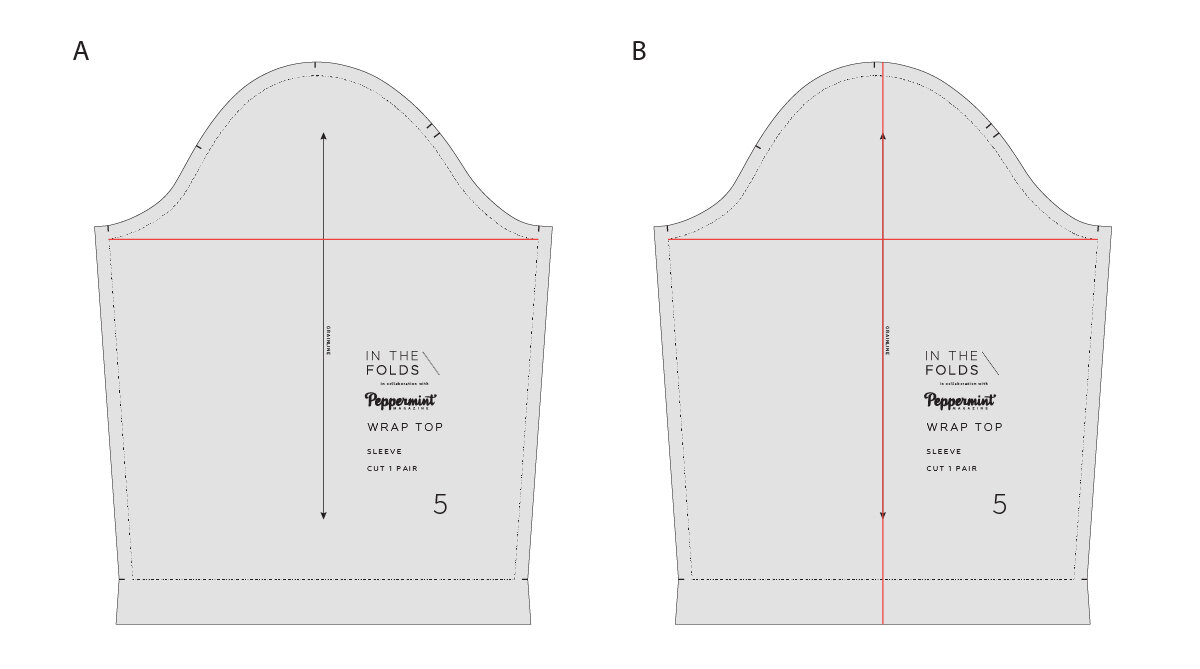
Take the SLEEVE piece from the pattern. As you need to add more than 3cm (1 1/4in) to the bicep width, you will need to take a copy of your pattern - as you will need the original sleeve pattern later on in the tutorial. Alternatively you could print another copy of the sleeve from the PDF.

Increase-bicep-width-1.jpg

Step 2
A.
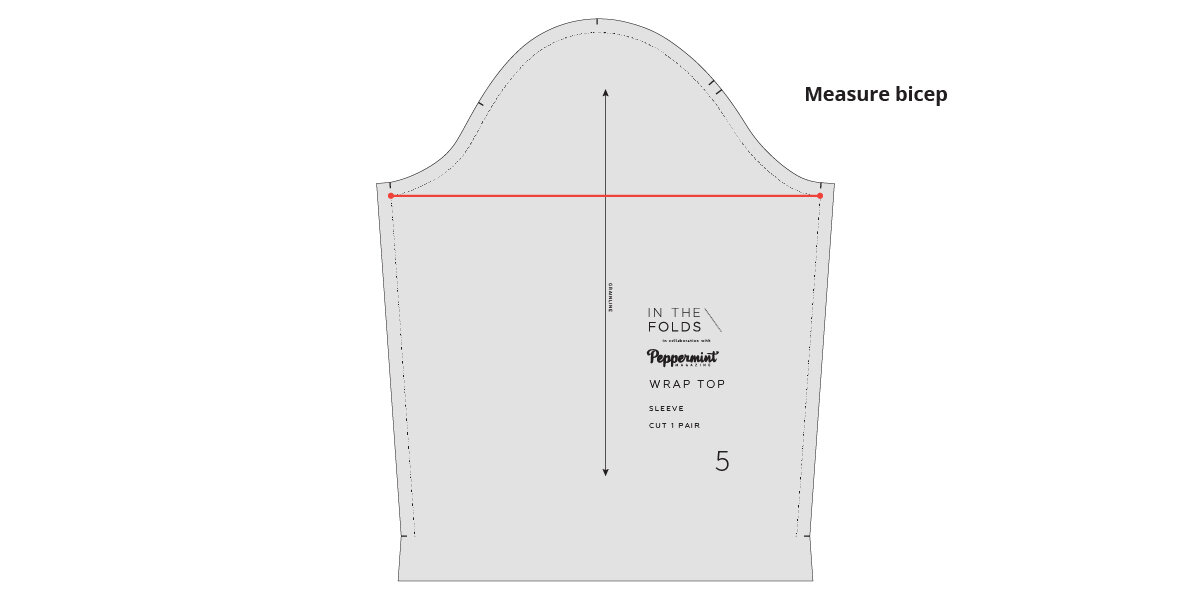
 Mark in your bicep line on the pattern piece. To do this, draw a straight line across your sleeve pattern piece - from the top of the underseam on one side to the top of the underseam on the other. 

B. Mark the centre of the BICEP LINE and draw a vertical line through the centre of the line to each end of the pattern piece (making sure that the new line is perpendicular to the BICEP LINE). On this particular pattern, the grainline is marked in the centre of the sleeve piece, so you can simply extend the grainline.

CUT THE PATTERN PIECE

Artboard 531200.jpg

Step 3
Cut along the vertical line marked on the pattern. You won't be able to just cut through from top to bottom, as you need to leave some small "hinges" of paper intact to make the adjustment. To cut this line, without cutting in from the bottom or top, you may choose to fold the pattern in half to access the line, or use a ruler and rotary cutter. You need to cut from the point where the vertical line on the sleeve meets the sleeve cap (on the stitch line) and meets the hem (also on the stitch line). As you approach the stitch line on each end of the line, go nice and slow and stop 1-2mm from the end.

Artboard 541200.jpg

Step 4
Cut across the BICEP LINE, in the same way you cut along the vertical line - stopping 1-2mm from each end.

Increase-bicep-width-3.jpg

Step 5
Cut into the seam allowance on both the vertical line and the BICEP LINE, towards the points where you stopped cutting. Leave a small 1-2mm “hinge” of paper at each point (a hinge in this sense is a small bit of paper that allows you to adjust patterns, whilst still keeping the outer edge of the pattern piece intact).

Carefully put your sleeve piece to one side for a moment (it will be quite delicate due to the cuts made).

Full-bicep-adjustment-part2-2.jpg

Step 6
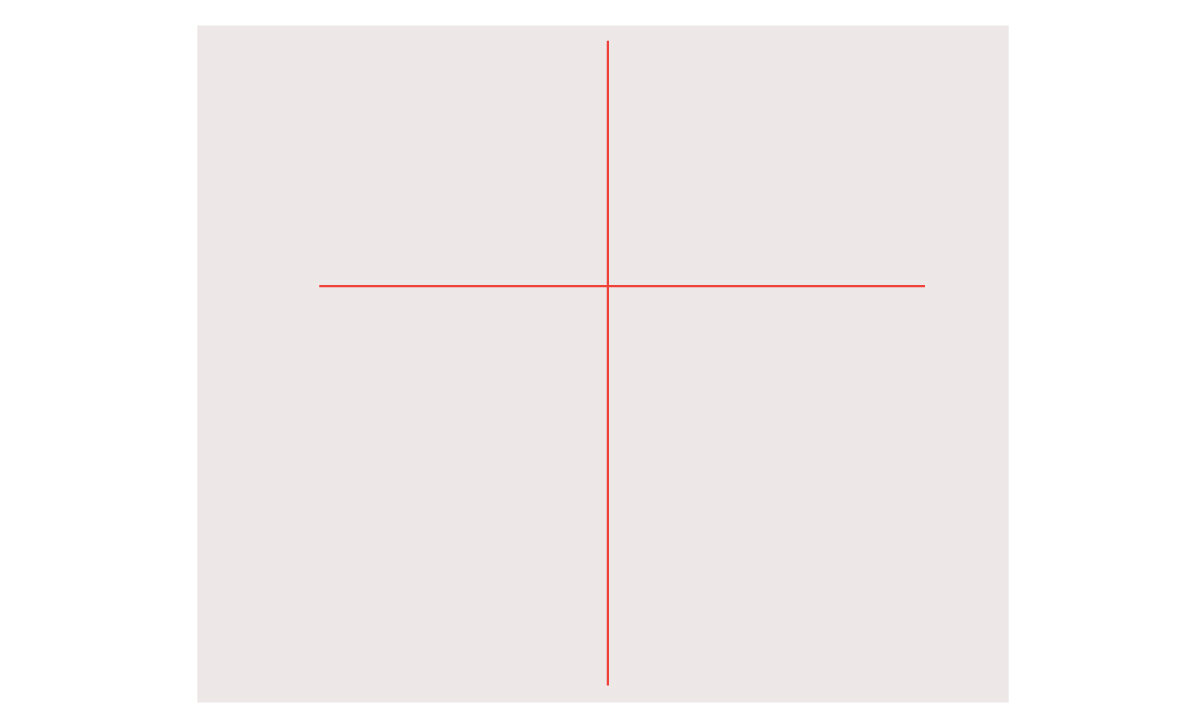
Take a piece of pattern paper and draw a vertical and a horizontal line (that cross over). The lines need to be longer / wider than the sleeve pattern piece. The horizontal line indicates the BICEP LINE.

Full-bicep-adjustment-part2-3.jpg

Step 7
Take the amount you would like to add to the bicep width on your pattern and divide by 2. Distribute this amount evenly on either side of the vertical line at the BICEP LINE.

For example, I will be adding 4cm (1 1/2in) to the bicep width. That means I need to add 2cm (3/4in) on each side of the vertical line. 

MAKE THE ALTERATION

Increase-bicep-width-6.jpg

Step 8
Carefully place your sleeve pattern piece on top of the piece of paper marked in Steps 6-7. Line up the BICEP LINE on the pattern piece with the BICEP LINE on the piece of paper and line up the vertical lines.

Full-bicep-adjustment-part2-5.jpg

Step 9
To make the adjustment, carefully move each side of the pattern out, being very careful to keep everything aligned on the vertical line and BICEP LINE. It can help to put a weight (or just your finger) in the centre of the hem to ensure the pattern remains aligned to the vertical line.

Full-bicep-adjustment-part2-6.jpg

Step 10
As you move the sides of the pattern piece out, you will notice that the top of the sleeve cap starts moving down and the cut sections of your pattern piece begin to overlap - as a space opens up in the centre. Continue moving the sides of your pattern piece out on the BICEP LINE until the edges of the opening meet the points marked in Step 7.

Check that the BICEP LINE is now the desired length. Adjust if necessary.

Tape or glue in place.

RE-DRAFT THE SLEEVE CAP

Full-bicep-adjustment-part2-7.jpg

Step 11
This is the point where this tutorial changes slightly from the last one. As you can see, as more width is added to the bicep in the centre, the more skewed the sleeve cap becomes. You can also see that the height of the sleeve cap keeps reducing, as you add more to the bicep width. 

In the example, I have marked the original sleeve cap height in comparison to the altered sleeve. There is a 3.5cm difference between the two, which is quite a lot when it comes to sleeve caps. I'd say that in most cases, you won't be in a position to lose this much of the sleeve cap height, which is why in the following  steps I will show you how to add this back on. 

Full-bicep-adjustment-part2-8.jpg

Step 12
Take the original sleeve pattern and place it on top of your altered sleeve - lining up the vertical line and the BICEP LINE. Use pattern weights to hold in place.

Full-bicep-adjustment-part2-9.jpg

Step 13
Take a tracing wheel and trace the sleeve cap (stitch line) from the original pattern onto the altered pattern.

If you don't have a tracing wheel, you can trace the outer edge of the original sleeve pattern with a pencil - just remember that you have traced the cutting edge, rather than the stitch line in the following steps.

Full-bicep-adjustment-part2-10.jpg

Step 14
Remove the original sleeve piece and trace over your tracing wheel markings with a pencil and french curve.

Full-bicep-adjustment-part2-11.jpg

Step 15
Take a tape measure (and hold it on its side), and measure the length of your new sleeve cap in two parts. Measure the front sleeve cap (the curve on the left side of the vertical line - marked with a single notch) and take note of the measurement. Measure the back of the sleeve cap (the part of the sleeve cap that is on the right side of the vertical line - marked with a double notch) and take note of the measurement.

You will notice that this alteration has increased the length of the sleeve cap. We now need to adjust the front and back armhole of the pattern so that the new sleeve fits into the armhole of the pattern.

ALTER THE ARMHOLES

Full-bicep-adjustment-part2-12.jpg

Step 16
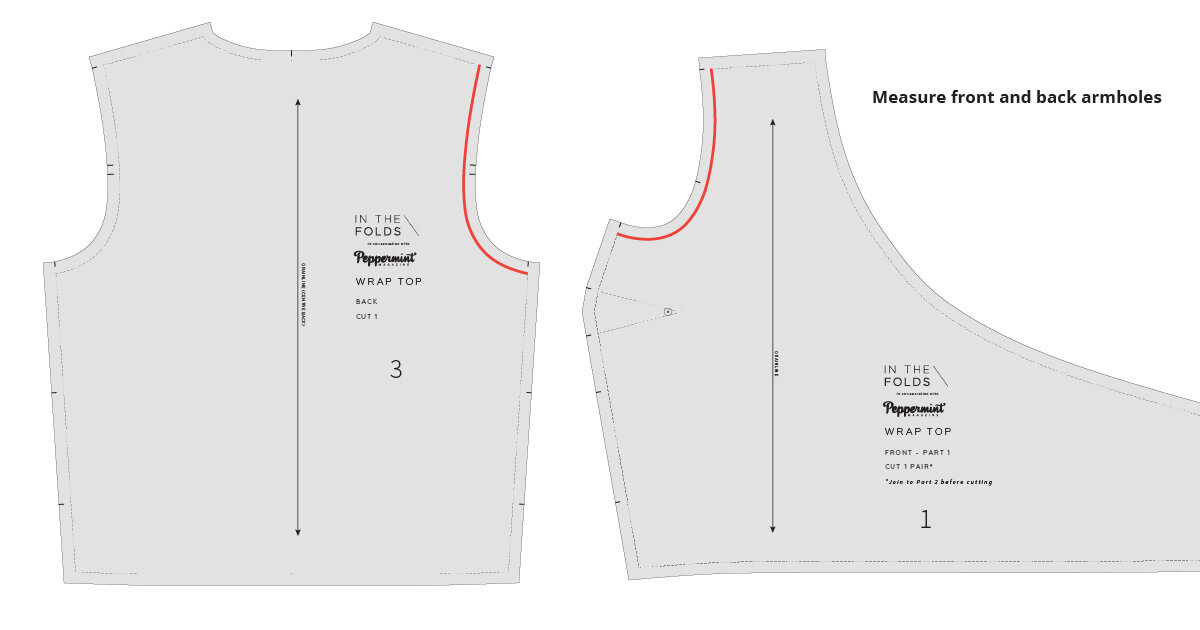
Take the FRONT and BACK pattern pieces from your pattern and measure the front and back armholes (again - use a tape measure placed on it's side to follow the curves). Take note of these two measurements.

The front sleeve cap measurement should be equal to the front armhole measurement plus 6mm (1/4in) ease. The sleeve cap has 1.2cm (1/2in) total ease in the sleeve cap (this means that the sleeve cap is slightly longer than the armhole to allow for a nice shape in the sleeve over the shoulder when the sleeve is set in).

Work out how much you need to add to the length of your front armhole by taking the front sleeve cap measurement (from your altered sleeve) and deducting the 6mm (1/4in) ease. This length is how long you need the front armhole to be.

For example, the front of my altered sleeve cap measures 27.8cm. I need to deduct half the total ease from this (ie. 6mm / 1/2in) which equals 27.2cm. I need to alter my front armhole to measure 27.2cm in length (this is 3cm longer than the original front armhole line).

Repeat process to find the new back armhole length.

Artboard 551200.jpg

Step 17
To re-draw the armholes (at the new longer length), start by taking the amount you added to the bicep and dividing by 2.

Take this measurement and mark a point this far down the side seam - measuring down from the armhole, on the stitch line.

For example, in the example I added 4cm (1 1/2in). Half of this is 2cm (3/4in), so the point I marked is 2cm (3/4in) down the side seam. Next, mark a point this same length out from the point on the side seam (perpendicular to the side seam).

This will create a rough guide for you to re-draw the armhole.

Artboard 491200.jpg

Step 18
Re-draw the armholes by starting the new armhole at the outer point marked, going through the point marked on the side seam and then gradually easing back towards the original armhole line. This is a great opportunity to use a french curve, if you've got one.

Take your tape measure and check that the length of the armhole lines are correct - adjust if necessary (it is more important that the lines are the correct length, rather than being exactly in line with the points marked in Step 17 - these are just guidelines to get you started).

Artboard 501200.jpg

Step 19
Connect the new armhole line to the original side seam, by taking a ruler and marking a diagonal line from the bottom of the original side seam to the new armhole point. To do this on the front side seam you will first need to fold out the dart

FINALISE THE PATTERN

Step 20
It's a good idea to check and true your seams (make sure the front and back side seams fit together nicely and the sleeve fits nicely into the armhole) before adding seam allowance back onto your armholes and side seams.

Transfer any of the notches that have been lost in the process to the new cutting line. 

Artboard 47 copy1200.jpg

Step 21
Go back to your sleeve and do the same - add back on the seam allowance and transfer any notches that were lost in the process.  Be sure to walk your sleeve into the armhole to ensure you have the sleeve cap notches in the correct position. 

I hope that helps you next time you need to adjust the bicep line on a pattern!

Happy sewing,

Emily


resources mentioned in this issue

  • How to increase bicep width on a sleeve - Part 1. Tutorial can be found here

  • The Peppermint wrap top pattern can be downloaded for free here.

  • How to add dart shaping. Tutorial can be found here.

  • Checking patterns : Curved seams. Tutorial can be found here.


P.S. Would you like to know what the Q & A series is all about? This page tells you a little bit more about the motive behind the series. Past issues from the Q & A series can be found here.

Don't have a question, but found this newsletter helpful? I'd love to hear from you! Get in touch and say hi. 


What you’ve been making


More posts in the series

ISSUE 38 - How to increase bicep width on a sleeve - Part 1

INCREASE BICEP WIDTH ON A SLEEVE.jpg

THE Q & A SERIES - HOW TO INCREASE BICEP WIDTH ON A SLEEVE - PART 1

Hi Emily,

I'd like to know how to increase sleeve bicep width. I've made grainline uniform several times with what I think is the right way to increase the sleeve but am not completely happy with the results.


Thanks,

Kerrie


Kenthurst, Australia.


Hi Kerrie,

Thank you for the question. I am happy to show you to do a full bicep adjustment on a sleeve pattern.

WHEN TO MAKE THIS ADJUSTMENT

You will need to make a full bicep adjustment to a sleeve pattern if you feel that the bicep section of your sleeve is too tight or bunching around your bicep. You can work this out by making a toile / muslin to check, or by measuring the bicep on your sleeve pattern piece and comparing it to your bicep measurement (and adding ease).

Increase-bicep-width-12.jpg

To work out the bicep width on your pattern, draw a straight line across your sleeve pattern - from the top of the underseam on one side to the top of the underseam on the other. Be sure to mark this line on the stitch line (the grey line on In the Folds patterns), so that you don't include the seam allowance in your measurement. Measure the line and take note of the measurement.

Wrap a tape measure around your bicep - usually the widest part of your arm.

Compare the two measurements. You will also want to include some ease (the difference between your body measurement and the pattern). The amount of ease will depend on the pattern, the intended fit and the fabric it is designed to be made from. 

For this example, I am using the Peppermint wrap top pattern. The wrap top is intended to be quite relaxed in fit, so there is quite a lot of ease in the pattern overall. There is approximately 10cm (4in) ease in the sleeve. Consider how much ease you would like to have in the bicep area of your sleeve.

For example, if there is only a 2cm (3/4in) difference between your bicep measurement and the bicep measurement on your sleeve and you want 5cm (2in) ease in the bicep of your pattern, you will need to add 3cm (1 1/4in) to your bicep width.

If you would like to add up to 2.5cm/3cm, you can follow this tutorial. If you need to add more than this amount, you can follow this tutorial, but there will be a few extra steps. I had planned to show both methods in this tutorial, but after creating the illustrations, I realised it was going to get far too long! So keep your eye on your inbox for Part 2 of this post next week. 

PREPARE YOUR PATTERN

Increase-bicep-width-13.jpg

Step 1
Take the SLEEVE piece from your pattern. If you think you’d like to go back to the original design in the future, I’d suggest tracing a copy to make the alteration on (although you can always re-print from the PDF later down the track if you need to). If you need to add more than 3cm to the bicep width, take a copy of your pattern, you will need the original pattern later on in the tutorial.

Increase-bicep-width-1.jpg

Step 2
A.
 If you haven't already, mark in your bicep line on the pattern piece. To do this, draw a straight line across your sleeve pattern - from the top of the underseam on one side to the top of the underseam on the other. 

B. Mark the centre of the BICEP LINE and draw a vertical line through the centre of the line to each side of the pattern piece (making sure that the new line is perpendicular to the BICEP LINE). On this particular pattern, the grainline is marked on the centre of the sleeve piece, so you can simply extend the grainline.

CUT THE PATTERN PIECE

Artboard 531200.jpg

Step 3
Cut along the vertical line marked on the pattern. You won't be able to just cut through from top to bottom, as you need to leave some small "hinges" of paper intact to make the adjustment. To cut this line, without cutting in from the bottom or top, you may choose to fold the pattern in half to access the line, or use a ruler and rotary cutter. You need to cut from the point where the vertical line on the sleeve meets the sleeve cap (on the stitch line) and meets the hem (also on the stitch line). As you approach the stitch line on each end of the line, go nice and slow and stop 1-2mm from the end.

Artboard 541200.jpg

Step 4
Cut across the BICEP LINE, in the same way you cut along the vertical line - stopping 1-2mm from each end.

Increase-bicep-width-3.jpg

Step 5
Cut into the seam allowance on both the vertical line and the BICEP LINE, towards the points where you stopped cutting. Leave a small 1-2mm “hinge” of paper at each point (a hinge in this sense is a small bit of paper that allows you to adjust patterns, whilst still keeping the outer edge of the pattern piece intact).

Carefully put your sleeve piece to one side for a moment (it will be quite delicate due to the cuts made).

MAKE THE ALTERATION

Increase-bicep-width-4.jpg

Step 6
Take a piece of pattern paper and draw a vertical and a horizontal line (that cross over). The lines need to be longer / wider than the sleeve pattern piece. The horizontal line indicates the BICEP LINE.

Increase-bicep-width-5.jpg

Step 7
Take the amount you would like to add to the bicep width of your pattern and divide by 2. Distribute this amount on either side of the vertical line at the BICEP LINE.

For example, I will be adding 2.5cm (1in) to the bicep. That means I need to add 1.2cm (1/2in) at each side. 

Increase-bicep-width-6.jpg

Step 8
Carefully place your sleeve pattern piece on top of the piece of paper marked in Steps 6-7. Line up the BICEP LINE on the pattern piece with the BICEP LINE on the piece of paper and line up the vertical lines.

Increase-bicep-width-7.jpg

Step 9
To make the adjustment, carefully move each side of the pattern out, being very careful to keep everything aligned on the vertical line and BICEP LINE. It can help to put a weight (or just your finger) in the centre of the hem to ensure the pattern remains aligned to the vertical line.

Increase-bicep-width-8.jpg

Step 10
As you move the sides of the pattern piece out, you will notice that the top of the sleeve cap starts moving down and the cut sections of your pattern piece begin to overlap - as a space opens up in the centre. Continue moving the sides of your pattern piece out on the BICEP LINE until the edges of the opening meet the points marked in Step 7.

Increase-bicep-width-9.jpg

Step 11
Check that the BICEP LINE is now the desired length. Adjust if necessary.

Tape or glue in place.

FINALISE THE PATTERN

Increase-bicep-width-10.jpg

Step 12
Smooth out your stitch lines at the points where the adjustment was made by re-drawing the lines. You can use a ruler and a french curve if you have one.

Increase-bicep-width-11.jpg

Step 13
Re-draw your seam allowance lines and re-mark notches (if necessary).

And you're done! You now have a sleeve with an extended bicep line. As always, I'd suggest making a toile to check you are happy with the fit of the adjusted pattern.

I'll pop into your inbox next week with Part 2 of this tutorial - how to make the adjustment if you need to add more than 2.5cm-3cm (1in - 1 1/4in).

Happy sewing,

Emily


resources mentioned in this issue

  • The Peppermint wrap top pattern can be downloaded for free here.

  • How to (and why) make a toile. Tutorial can be found here.


P.S. Would you like to know what the Q & A series is all about? This page tells you a little bit more about the motive behind the series. Past issues from the Q & A series can be found here.

Don't have a question, but found this newsletter helpful? I'd love to hear from you! Get in touch and say hi. 


What you’ve been making


More posts in the series

ISSUE 37 - How to draft a straight waistband

DRAFT A STRAIGHT WAISTBAND.jpg

THE Q & A SERIES - HOW TO DRAFT A STRAIGHT WAISTBAND

Hi Emily,

I have plans to make the Peppermint Wide Leg pants. If I were to change this from a curved waistband to a straight one, how would I go about doing that??

Best,

Swetha


Oakland, United States.


Hi Swetha,

This is a great question! All the patterns I have released so far that have a waistband, have a shaped waistband, so for any of you who prefer a straight waistband, this will be a great tutorial for you to have saved.

STRAIGHT OR SHAPED WAISTBAND?

The type of waistband you're going to want to use will depend on your body shape and the way you like your clothes to fit. If your body is fairly straight up and down in the waist / hip area, a straight waistband may be your best bet. If you are quite curvy between your waist and your hip, it is likely that you will achieve a more comfortable fit with a shaped waistband. 

PREPARE YOUR PATTERN

Draft a straight waistband pants-3.jpg

Step 1
Take FRONT LEG [1], BACK LEG [2], POCKET BAG [4] and FLY [6] pieces from the Peppermint wide leg pants pattern.

Please note: if you are using this tutorial for another pattern and it does not have the stitch lines marked, you will need to mark in your stitch lines / seam allowance in the relevant areas.

Draft a straight waistband pants-2.jpg

Step 2
A.
 Place POCKET BAG [4] on the FRONT LEG [1] piece, lining up the front crotch, waistline and side seam (this lines things up as if the pieces have been sewn together). You can hold the pieces in place with masking tape, pins or pattern weights.

B. Flip the FLY [6] pattern piece and place it on the front crotch - lining up the stitch lines (grey lines) along the crotch and waist edge - again, lining things up as if they had been sewn together.

MEASURE FRONT WAIST

Draft a straight waistband pants-4.jpg

Step 3
A.
 Take a tape measure and measure the stitch line on the FLY [6]. Take note of this measurement. I find it handy to write this directly on the pattern piece - close to the stitch line that was measured.

B. Move the FLY [6] piece out of the way and measure the front waistline. First, measure from the front crotch to where the pocket curve intersects the waist line (you might need to put the pattern pieces up to a window or lightbox if your paper is not transparent) - again measuring on the stitch line. Take note of this measurement. Next, measure from this point to the side seam and take note of the measurement.

MEASURE BACK WAIST

Draft a straight waistband pants-5.jpg

Step 4
Take the BACK LEG [2] and measure the waist edge on the stitch line. The dart will be sewn closed, so you need to measure each side of the dart and take note of these two lengths.

DRAFT THE WAISTBAND

Artboard 33 copy 21200.jpg

Step 5
Add all the measurements found in Steps 3 and 4 to find the length of one half of your waistband.

Take a piece of pattern paper and draw a line the length found above - using a ruler. Draw your line on the left side of the paper, as you will need the remainder of the sheet of paper for the right hand side of the waistband. It's always a good idea to cut a piece of paper that is larger than what you need, so that you have some space to work around your pattern piece.

Artboard 461200.jpg

Step 6
At the end of the line (on the right hand side), draw a line that will become the centre back of your waistband - perpendicular to the original line. Make this new line the width you would like the finished waistband, multiplied by 2. For example, I would like the waistband to be 3.5cm wide when the pants are finished, so the perpendicular line will be 7cm.

Label the perpendicular line as the CENTRE BACK.

Draft a straight waistband pants-1.jpg

Step 7
Take the measurement found in Step 4 - the measurement from the back crotch to the dart - and mark this length on the horizontal line - measuring from the CENTRE BACK. I find it really helpful to label these points as I go - they don't need to be on the final pattern, but can be handy during the drafting stage.

Label this point as BACK DART.

Draft a straight waistband pants-7.jpg

Step 8
Take the other measurement found in Step 4 - the measurement from the dart to the side seam - and mark this length on the horizontal line - measuring from the BACK DART point. 

Label this point as SIDE SEAM.

Draft a straight waistband pants-8.jpg

Step 9
Take the measurement found in Step 3B - the measurement from the side seam to the pocket - and mark this length on the horizontal line - measuring from the SIDE SEAM point. 

Label this point as POCKET.

Draft a straight waistband pants-9.jpg

Step 10
Take the other measurement found in Step 3B - the measurement from the pocket to the front crotch - and mark this length on the horizontal line - measuring from the POCKET point. 

Label this point as CENTRE FRONT.

Draft a straight waistband pants-10.jpg

Step 11
Take the measurement found in Step 3A - the fly extension measurement - and mark this length on the horizontal line - measuring from the CENTRE FRONT point (it should get you to the end of the line, if you have done your maths correctly). 

Label this point as FLY EXTENSION.

Draft a straight waistband pants-11.jpg

Step 12
Draw a straight line up from the FLY EXTENSION point, the same length as the centre back line (the width of the waistband multiplied by 2).

Join the top of the FLY EXTENSION line to the top of the CENTRE BACK line, creating a rectangle.

Draft a straight waistband pants-12.jpg

Step 13
Fold the paper in half along the CENTRE BACK line and transfer the markings to the other side of the paper. You can do this by tracing the pattern (if your paper is transparent enough, or you have a lightbox - or a nice bright window), or taking a tracing wheel and transferring the markings. Transfer both the rectangle outline and the markings along the bottom.

Draft a straight waistband pants-13.jpg

Step 14
Unfold the paper. Label each side of the pattern - LEFT HAND SIDE and RIGHT HAND SIDE.

On the right hand side of the waistband, draw a line straight up from the CENTRE FRONT point. The waistband only requires an extension for the fly one one side (the left hand side), so you can remove the extension from the right hand side of the waistband at this point (just use an eraser / cross out the lines, rather than cutting it off, as you will need to add seam allowance on this side in the next step).

ADD SEAM ALLOWANCE

Draft a straight waistband pants-14.jpg

Step 15
Add seam allowance to all edges. The amount will depend on the pattern (as the amount you add to the long edge of the waistband needs to be the same amount as what is on the waist edge of the pants). In the case of the Peppermint Wide Leg pants, the seam allowance on this edge is 1cm (3/8in). For more detail on adding seam allowance to a pattern, see this tutorial.

ADD NOTCHES

Draft a straight waistband pants-15.jpg

Step 16
Add notches to the pattern by turning each of the points marked in Steps 7-11 into notches. Notches should be no more than 6mm (1/4in) long. Also add a notch at the CENTRE BACK and CENTRE FRONT. For more information on marking notches, see this tutorial.

Draft a straight waistband pants-16.jpg

Step 17
Add notches to the other long side of the pattern piece. You won't need all the same notches that are on the bottom edge, as it will be the bottom edge that is attached to the top edge of the pants first (having more notches on one side of the piece will prove helpful when working out which side to attach to the pants first).

On the top edge of the waistband, mark a notch at both CENTRE FRONT points, the CENTRE BACK and on the left side to indicate the 1cm seam allowance on that edge.

ADDING PATTERN MARKINGS + CUTTING INSTRUCTIONS

Draft a straight waistband pants-17.jpg

Step 18
A straight waistband is cut as one piece and then folded in half. Mark the fold line on the pattern - straight down the middle (horizontally). You can find the centre by measuring the midpoint on the CENTRE BACK and CENTRE FRONT lines and joining them with a straight line, or folding the pattern piece in half lengthways. 

Mark the fold line with a broken straight line.

Draft a straight waistband pants-18.jpg

Step 19
Finalise the pattern by adding cutting instructions and grainline.

The cutting instructions should be:
STRAIGHT WAISTBAND
CUT 1 - RIGHT SIDE UP
(BLOCK FUSED).

For more information on cutting instructions, see this tutorial.

If you would like to give this a go yourself, you can download the Peppermint Wide Leg pants pattern here for free. 

Happy sewing,

Emily


resources mentioned in this issue

  • The Peppermint Ruffle Sleeve top pattern can be downloaded for free here.

  • The Collins top pattern can be found here.

  • The Rushcutter dress pattern can be found here.

  • The Acton dress pattern can be found here

  • Full Bust Adjustment (FBA) on princess panels (from the Acton dress sew-along). Tutorial can be found here.

  • The In the Folds sizing chart can be found here.

  • How to : Check and true sewing patterns. Tutorial can be found here.

  • How to: Draft an all-in-one facing. Tutorial can be found here. 


P.S. Would you like to know what the Q & A series is all about? This page tells you a little bit more about the motive behind the series. Past issues from the Q & A series can be found here.

Don't have a question, but found this newsletter helpful? I'd love to hear from you! Get in touch and say hi. 


What you’ve been making


More posts in the series

ISSUE 36 - Using striped fabric for the Darlow pants

DARLOW PANTS - STRIPED FABRIC.jpg

THE Q & A SERIES - USING STRIPED FABRIC FOR THE DARLOW PANTS

Hello!

I have some fine wool that I'm thinking of making the Darlow pants with. The fabric has a very fine stripe. Do you think a stripe would work with this pattern? I'm wondering what the effect would be with many different pattern pieces which all might have the stripes going in slightly different directions!

All the best,

Kirsten


Hi Kirsten,

I'm excited to hear that you're thinking of making the Darlow pants! I think you could definitely use a fine stripe and I think the effect would be really interesting due to all the panel lines.

I have added thin stripes to the pattern pieces below to give you an idea of how stripes will work on the pattern pieces, and then have added the stripes to the technical sketches so that you can see how the pieces will work when sewn together. 

VIEW A PATTERN PIECES

VIEW A PATTERN PIECES.jpg

VIEW B PATTERN PIECES

STRIPED-DARLOW-PANTS-1.jpg

VIEW A TECHNICAL SKETCH

STRIPED-DARLOW-PANTS.jpg

Please note that the stripes on the waistband won't remain straight like this, due to the shaped waistband.

VIEW B TECHNICAL SKETCH

STRIPED-DARLOW-PANTS-4.jpg

I hope that gives you a good idea of what your pants could like like if you were to give them a go using stripes!

Happy sewing,

Emily


resources mentioned in this issue

  • The Darlow pants pattern can be found here.


P.S. Would you like to know what the Q & A series is all about? This page tells you a little bit more about the motive behind the series. Past issues from the Q & A series can be found here.

Don't have a question, but found this newsletter helpful? I'd love to hear from you! Get in touch and say hi. 


What you’ve been making


More posts in the series

ISSUE 35 - How to sew in-seam pockets with French seams

IN-SEAM-POCKETS-FRENCH-SEAMS.jpg

THE Q & A SERIES - HOW TO SEW IN-SEAM POCKETS WITH FRENCH SEAMS

Hi Emily,

I don't have an overlocker, so like to use French seams whenever possible. Do you know if there's a way to sew in-seam pockets with French seams? I feel like it must be possible, but can't wrap my head around how to go about it.

Thank you,

Tammy


Sydney, Australia


Hi Tammy,

I love French seams too! I lived overseas for a couple of years and didn't want to overdo it with what I bought over there, so wanted to make do with a limited number of sewing machines and tools. Not having an overlocker reinstated my love for French seams! It was during this period that I learned how to sew in-seam pockets with French seams, and I ended up including this technique in The Rushcutter dress pattern. 

POCKETS-FRENCH-SEAM.jpg

I'm not sure if there's a more satisfying technique to learn than this! I get a thrill out of doing it every single time! I'm really excited to show you how to do it today!

SEW-POCKET-FRENCH-SEAMS-6.jpg

A. Take one pair of the IN-SEAM POCKET pieces and match them to the notches on the FRONT, with wrong sides together. Pin in place. Before stitching, hold the panel up to your body and check the pocket placement. Move up or down, if necessary.

B. Stitch from the top of the IN-SEAM POCKET to the bottom, with a 6mm (¼in) seam allowance.

SEW-POCKET-FRENCH-SEAMS-5.jpg

Trim back the seam allowance by half, from the top of the pocket to the bottom, leaving the remainder of the side seam untrimmed.

SEW-POCKET-FRENCH-SEAMS-1.jpg

Press the seam allowance towards the IN-SEAM POCKET, before folding the pocket back towards the FRONT PANEL with right sides together - enclosing the raw edges inside the fold.

Stitch from the top of the pocket to the bottom with a 6mm (¼in) seam allowance.

SEW-POCKET-FRENCH-SEAMS-2.jpg

Flip the IN-SEAM POCKETS away from the FRONT. Using your fingers, press the seam allowance towards the IN-SEAM POCKET before understitching* on each side. 

*Understitching is when the seam allowance is stitched to a facing or binding, close to the seam edge. This helps the facing, binding (or similar) roll to the inside of the garment, preventing it from being seen on the outside of a garment.

Repeat process for the back of the dress, or in the case of The Rushcutter dress, the SIDE PANEL.

EXTRA 11200.jpg

With wrong sides together, pin the SIDE PANEL to the FRONT PANEL on both sides. Pin up the seam, around the pocket, and then continue pinning the rest of the seam. 

EXTRA 21200.jpg

Stitch the pieces together with a 6mm (¼in) seam allowance. Clip into the corners between the IN-SEAM POCKET and the body of the dress, before trimming back the whole seam by half.

Please note: The row of stitching should not line up with the seam that joins the FRONT PANEL of the pattern to the IN-SEAM POCKET - it should lie about 6mm (¼in) away. These stitch lines will meet when the seam is complete.

SEW-POCKET-FRENCH-SEAMS-4.jpg

Turn the dress inside out, and press the seams flat, now with right sides together. Pin and stitch the seam with a 6mm (¼in) seam allowance.

Press the seams and IN-SEAM POCKETS towards the FRONT PANEL.

POCKETS-FRENCH-SEAMS-3.jpg

And you're done! Beautifully finished in-seam pockets!

Happy sewing,

Emily

P.S. If you prefer following photo tutorials, you can find a photo version of this tutorial in the Rushcutter sew-along here.


resources mentioned in this issue

  • The Rushcutter dress pattern can be found here.

  • How to sew in-seam pockets with french seams. Tutorial can be found here.


P.S. Would you like to know what the Q & A series is all about? This page tells you a little bit more about the motive behind the series. Past issues from the Q & A series can be found here.

Don't have a question, but found this newsletter helpful? I'd love to hear from you! Get in touch and say hi. 


What you’ve been making


More posts in the series

ISSUE 34 - How to do a Small Bust Adjustment (SBA) on the Ruffle Sleeve top

SBA on Ruffle sleeve top.jpg

THE Q & A SERIES - HOW TO DO A SMALL BUST ADJUSTMENT (SBA) ON THE RUFFLE SLEEVE TOP

Hello,

I have a question about the Ruffle Sleeve Top and darts. In my teen years I would ignore them and just draw a straight line down the sides and deal with it after. Knowing that's not correct I tried the slash and spread and adding paper in.

The gap is so wide and if I add to the back too it becomes a tent. I'm only 5 foot and an A cup. Is there a simpler way that doesn't involve a dress makers class?

Thanks so much!

Lorie


Kapaa, United States


Hi Lorie,

This is definitely an alteration you can make without needing to do a dress makers class! The alteration you are wanting to do is a Small Bust Adjustment (SBA) and I'm happy to show you how to make this adjustment on the Ruffle Sleeve Top pattern.

WHEN YOU’LL NEED TO MAKE A SMALL BUST ADJUSTMENT

Most indie pattern companies (including In the Folds) draft for a B cup bust. There are of course exceptions to this rule (such as Cashmerette and Colette), so make sure you check on your pattern before assuming the bust cup size. Lately a lot of designers have been adding to their size ranges (which is fantastic to see), as well as adding to their cup size offerings - so definitely check before deciding to make any adjustment. In saying that though, if you have a small bust cup size, it is likely you will need to make a SBA, as all the indie pattern companies that come to mind draft for a B cup bust or larger.

For In the Folds patterns, if your bust cup size is smaller than a B cup you will need to do a Small Bust Adjustment, otherwise known as a SBA, and if your bust cup size is larger than a B you will need to do a Full Bust Adjustment or FBA. In saying that though, many In the Folds patterns include a lot of design ease, so you may choose not to make the alteration for some styles (for example, I have an A cup size bust and don't bother with an SBA for the Collins top or the Rushcutter dress, but I do for the Acton dress).

SewingSchool37-DETAIL3.jpg

WORK OUT YOUR CUP SIZE

Your cup size in sewing patterns may not always correspond to the bra size you wear (and normally won't). To be safe, check your measurements before deciding if you need to make any adjustments to the pattern. 

Artboard 1.jpg

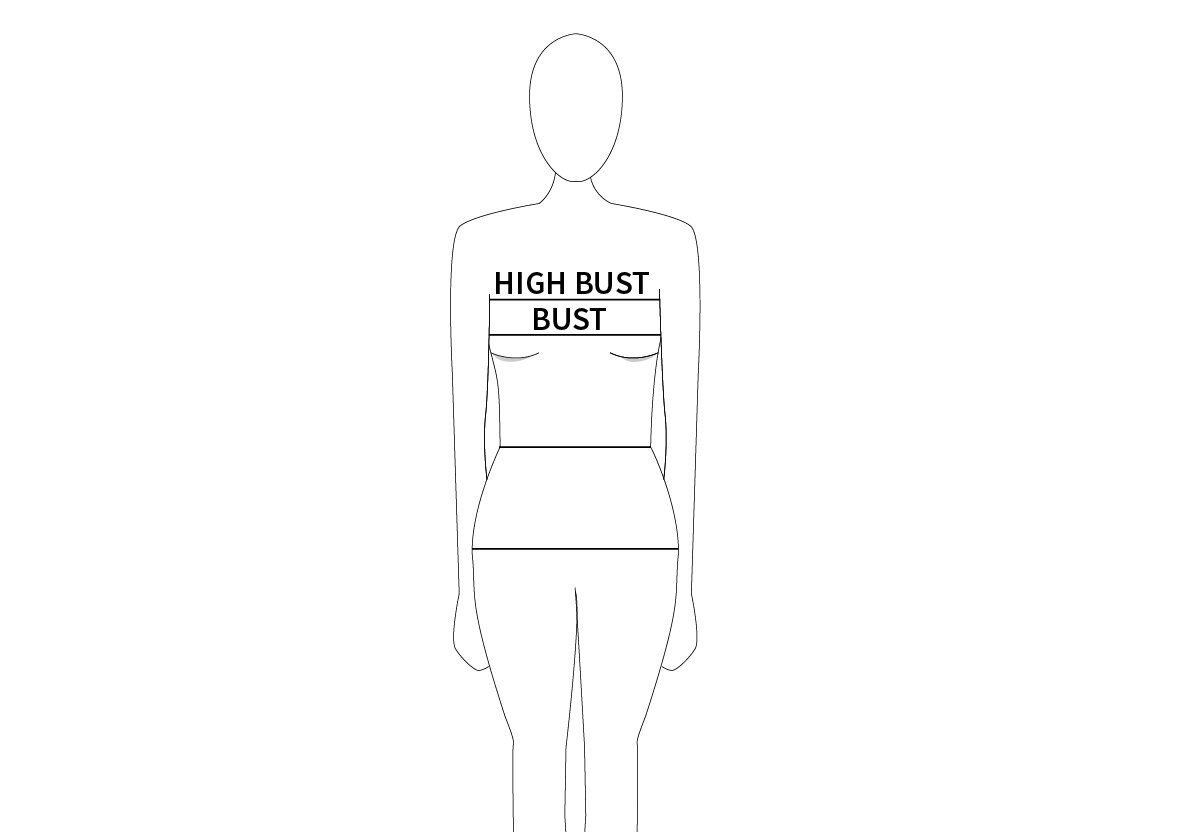
Measure your high bust (the area above your breasts, under your arms) as well as your full bust (the fullest part of your chest / horizontal measurement across your bust apex) and then take note of each measurement, as well as the difference.

If the difference is 2.5cm (1") your bust is an A cup, 5cm (2") it's a B cup, 7.5cm (3") is a C cup and so on.

CHOOSE YOUR SIZE

Now, go back to your high bust measurement and add 5cm (2"). This is what your bust measurement would be if you were a B cup and therefore the size you should be choosing from the pattern.

For example, let's say your upper bust measures 81cm (32"). Add 5cm (2") to this measurement to find out what size your bust measurement falls into on the In the Folds sizing chart (and what size you would be if you had a B cup size). 81cm + 5cm = 86cm which corresponds to a size C. Your actual bust measurement is 83cm though - 3cm (just over 1") smaller than the bust measurement of the pattern. This means you will need to do a SBA and remove this 3cm (1") from your pattern. 

For the sake of the example, I am going to remove 5cm, which will remove the bust shaping (and the dart) all together - as this is what Lorie would like to do -  you can use this same method to alter the pattern to fit an A cup or to remove all bust shaping.

HOW TO MAKE THE ADJUSTMENT

PAGE 1.jpg

Step 1
Take the FRONT [1] piece from the Ruffle Sleeve top pattern. If you think you’d like to go back to the original design in the future, I’d suggest tracing a copy to make the alteration on (although you can always re-print from the PDF later down the track if you need to).

If you are tracing a copy of the pattern, be sure to transfer the stitch line (grey line on the pattern) as well as the cutting line, as it will help you with this tutorial.

PAGE 2.jpg

Step 2
Mark your bust point (the apex of your bust - which basically means your nipple) on the pattern piece. You can find this by holding the pattern piece up to your body (with the dart folded as if it has been sewn), or by marking your bust point on your toile (if you've made one) and then transferring this onto the pattern.

For the sake of the example I have marked the bust point 2cm (3/4in) from the tip of the dart.

PAGE 3.jpg

Step 3
A.
 Mark a point on the armhole (on the grey stitch line), approximately 1/3 the length of the front armhole - measuring from the point where the armhole meets the side seam. 

B. With a ruler, join the point marked on the armhole with the bust point marking.

C. Rule a straight line down from the bust point to the hemline - ensuring that it runs parallel to the grainline / centre front of the pattern.

D. Rule another line - this one from the centre of the dart, over to the bust point. In the case of the example, it is easy to see where the centre of the dart is due to the shape of it, but if you are using a different pattern that has different dart shaping, you may need to fold out the dart to find the centre. 

PAGE 4.jpg

Step 4
A.
 Take a pair of scissors and cut up from the hemline to the bust point along the line marked in the previous step. When you get to the bust point, turn the corner and continue cutting along the line that joins to the armhole. Stop cutting just before you reach the stitch line on the armhole. Turn the pattern around and cut into the seam allowance on the armhole towards the point marked on the armhole, leaving a small 1-2mm “hinge” of paper (a hinge in this sense is a small bit of paper that allows you to adjust patterns, whilst still keeping the piece intact).

B. Cut a second line - from the centre of the dart, over to the bust point. Again, leave a small hinge of paper intact as you approach the bust point.

PAGE 5.jpg

Step 5
Mark a line to indicate how much width you will be removing from the pattern. You should have found how much you need to remove right at the beginning (if you didn't, go back and check your measurements now).

If you need to remove 5cm (2in), like in the case of this example, you need to halve this measurement (i.e. 2.5cm/1in). This is because the front pattern piece is cut on the fold. By removing half the width from one half, when you cut the pattern on the fold, this will equate to the total that needs to be removed. In the example, we are removing 5cm (2in), so we need to remove 2.5cm (1in) from the front pattern piece, which will equal 5cm (2in) when the pattern piece is cut on the fold.

Mark a line - the distance found (eg 2.5cm / 1in) from the cut line (from the hem to the bust point) - ensuring that it runs parallel to the grainline / centre front.

PAGE 6.jpg

Step 6
As well as removing width from the bust section of the pattern, you will also need to remove some length (as the pattern has length built in to go over the bust, and with a smaller bust, you will require less width as well as less length in this area).

Cut along the LENGTHEN / SHORTEN line, only on the centre section of the pattern. 

Loosely put the pieces back together for now (you will need this horizontal cut line a little bit later on in the tutorial).

PAGE 7.jpg

Step 7
Now the fun bit! Carefully swing the left hand side of the pattern so that the bust point marking meets with the line marked in STEP 5. 

PAGE 8.jpg

Step 8
Holding the top section of the pattern in place (the bottom of the armhole and top of the side seam), rotate the lower section (the bottom half of the dart and the lower side seam), so that the cut line lines up to the line marked in STEP 5. 

Once it's all lined up, tape in place. 

PAGE 9.jpg

Step 9
You can now see why we made that horizontal cut line in STEP 6. If you look at the hemline, you can see that it now longer lines up. This is because the length required to go over the B cup bust has been removed from the side section of the pattern piece, but not from the centre section (just yet).

Carefully slide the lower centre front section so that the hemline reconnects, be sure to keep the centre front straight (you can also use the LENGTHEN / SHORTEN line to check that you have got everything lined up nice and straight). 

PAGE 10.jpg

Step 10
It's time to check and true your seams

What does this mean? This means you need to check that the seams you have altered still fit together with the seams they will be joined to. In the case of the example, we will want to check that the  front side seam is still the same length as the back side seam.

If you have drafted your own pattern or made an alteration to a pattern, it is really important that you always check that your patterns fit together correctly before going on ahead and cutting your fabric. It may seem a bit tedious checking each seam, but taking a few minutes to check your patterns at this stage can save you cutting out incorrect patterns and wasting precious time and fabric later on.

A. Start by re-drawing the side seam with a straight line (along the stitch line and the cutting line), then measure the stitch line on the front side seam and check that it's the same as the side seam of the back side seam. Adjust if required.

B. Re-draw the hemline with a nice smooth curve that becomes a right angle at the centre front.

ONE THING TO NOTE

PAGE 10 copy.jpg

Step 11
One thing that you must note when doing a Small Bust Adjustment is that you are removing width from the waist area as well as the bust area. It's unlikely that this will be a problem for you with the Ruffle Sleeve Pattern as the pattern has a lot of design ease in it (it is designed to have a loose fit), but with other patterns, you should definitely check that the waist will still fit you comfortably. If you would like to add what was removed from the hemline in this particular pattern (so that the hem circumference remains the same as the original pattern, you can simply add it to the side seam).

A. Measuring from the side seam, extend the hem line by the amount that was removed (in the case of the example this was 2.5cm / 1in) and then draw a straight line from this point back to the top of the seam line.

B. Re-draw the hemline with a nice smooth curve that becomes a right angle at the centre front.

Now that you have made a change to the front pattern piece, you will also need to change the front facing piece. I would suggest re-drafting it, as it is a lot quicker than doing another SBA.

And that's it! Now you can reduce the bust cup size (or remove it all together) on the Ruffle Sleeve Top (or similar patterns).

Happy sewing,

Emily


resources mentioned in this issue

  • The Peppermint Ruffle Sleeve top pattern can be downloaded for free here.

  • The Collins top pattern can be found here.

  • The Rushcutter dress pattern can be found here.

  • The Acton dress pattern can be found here

  • Full Bust Adjustment (FBA) on princess panels (from the Acton dress sew-along). Tutorial can be found here.

  • The In the Folds sizing chart can be found here.

  • How to : Check and true sewing patterns. Tutorial can be found here.

  • How to: Draft an all-in-one facing. Tutorial can be found here. 


P.S. Would you like to know what the Q & A series is all about? This page tells you a little bit more about the motive behind the series. Past issues from the Q & A series can be found here.

Don't have a question, but found this newsletter helpful? I'd love to hear from you! Get in touch and say hi. 


What you’ve been making


More posts in the series

ISSUE 33 - Understanding seam allowances

UNDERSTANDING SEAM ALLOWANCES.jpg

THE Q & A SERIES - UNDERSTANDING SEAM ALLOWANCES

Hello Emily,

I am working on the free Wide Leg Pants pattern and I am confused by the seam allowance.

Instructions say 1/2” seam allowance, but there is also a “stitch line” on the pattern pieces. One of the waistline pieces seems to have a 3/8” stitch line... is that correct? Or should I be using 1/2” on all pieces?

Long story short, need to know if I should check the seam allowance on each pattern piece or not.

Thank you!

Hanna


Hi Hanna,

Thanks for getting in touch. I am pleased to hear you are making the Wide Leg Pants pattern!

Peppermint-SewingSchool38.jpg

Let's start with a little definition of seam allowance, for those of you who might be just starting out, or are thinking of learning to sew!

Seam allowance is the space between the cutting line (the edge) on the fabric and the stitch line. It is the part of the garment that will be on the inside of the finished garment and can be finished in a range of different ways (for some inspiration you can check out my free e-book, The Little Book of Seam Finishes). 

Artboard 1.jpg

I include the stitch line on my patterns (PDF only - they are not on printed patterns) so that you can easily make alterations to the patterns without needing to draw in the stitch lines yourself (it is recommended that when making pattern alterations you work from the stitch line and then add back on the seam allowance for accuracy). The the cut line is marked in black and the stitch line is marked in grey.

Artboard 1 copy.jpg

Seam allowances on In the Folds patterns vary and will always be detailed in each step. Throughout the instruction booklets the seam allowances are marked in bold so that they stand out if you are skimming through. In saying that, although seam allowances vary, I do keep them consistent, so that hopefully once you have used a couple of my patterns you get the hang of my standard seam allowances and don’t need to keep checking back to the instructions.  

For example, the majority of the seams in the wide leg pants pattern have a seam allowance of 1.2cm (1/2"). This is the seam allowance for the side seams, inner leg seams and crotch seams. This is the seam allowance I use for most seams on my patterns.

Peppermint-SewingSchool38e.jpg

The waistband has a 1cm (3/8") seam allowance as it's shaped and a reduced seam allowance helps when sewing curves like this (you will see 1cm (3/8") seam allowance on most of my patterns where there are curves - such as armholes and necklines).

For seams where there are zips (for example a centre back zip), I normally use a 2cm (¾”) seam allowance.
Hem allowance varies on my patterns, because I always see the hem treatment as part of the design. Hem allowances on In the Folds patterns is generally between 1.2cm (½”) and 8cm (3⅛”).

If you are drafting your own patterns and would like to know more about adding seam allowance, you can check out this tutorial here.

I hope this helps!

Happy sewing,

Emily


resources mentioned in this issue

  • The Peppermint Wide Leg pants pattern can be downloaded for free here.

  • The Little Book of Seam Finishes can be downloaded for free here.

  • How to add seam allowance to a sewing pattern. Tutorial can be found here.


P.S. Would you like to know what the Q & A series is all about? This page tells you a little bit more about the motive behind the series. Past issues from the Q & A series can be found here.

Don't have a question, but found this newsletter helpful? I'd love to hear from you! Get in touch and say hi. 


What you’ve been making


More posts in the series

ISSUE 32 - Full calf adjustment on the Darlow pants

DARLOW PANTS - FULL CALF ADJUSTMENT.jpg

THE Q & A SERIES - FULL CALF ADJUSTMENT ON THE DARLOW PANTS

Hi Emily,

I love the 
Darlow pants pattern! The panel lines are so unique and interesting and I have wanted to give the pattern a go ever since you released it.

I made a muslin recently and have managed to get quite a good fit in the waist and hips due to your fantastic 
Fit Kit, but I have realised they're a bit too tight in the calves. I have done a full calf adjustment with other pants patterns in the past, but have no idea where to start with the Darlows due to all those panels! I'd love your help.

Thanks,
Jenna


Melbourne, Australia


Hi Jenna,

I'm really sorry I didn't include the instructions about how to tackle a full calf adjustment in the Darlow Fit Kit! It now seems like quite an oversight as I know this is a common adjustment to make to pants.

Any adjustment made to the Darlow pants isn't that straightforward, but once you see how to go about dealing with the panels, it should make sense and hopefully you will see that there are a couple more steps than with a simpler pair of pants, but overall it isn't any more difficult.

For the sake of the example, I will be showing you how to make the adjustment on View B of the Darlow pants. At the end, I will show you how to get started with View A and then you will be able to follow this same tutorial for either style.

HOW DO YOU KNOW IF YOU NEED TO DO A FULL CALF ADJUSTMENT

There are three main ways you can tell if you are going to need to do a full calf adjustment: 

1. Check your toile
If you have made a toile / muslin and your pants are too tight at the calf or bunching up in your calf area, you may require a full calf adjustment. 

Darlow-pants-2.jpg

2. "Tissue fit" with your pattern
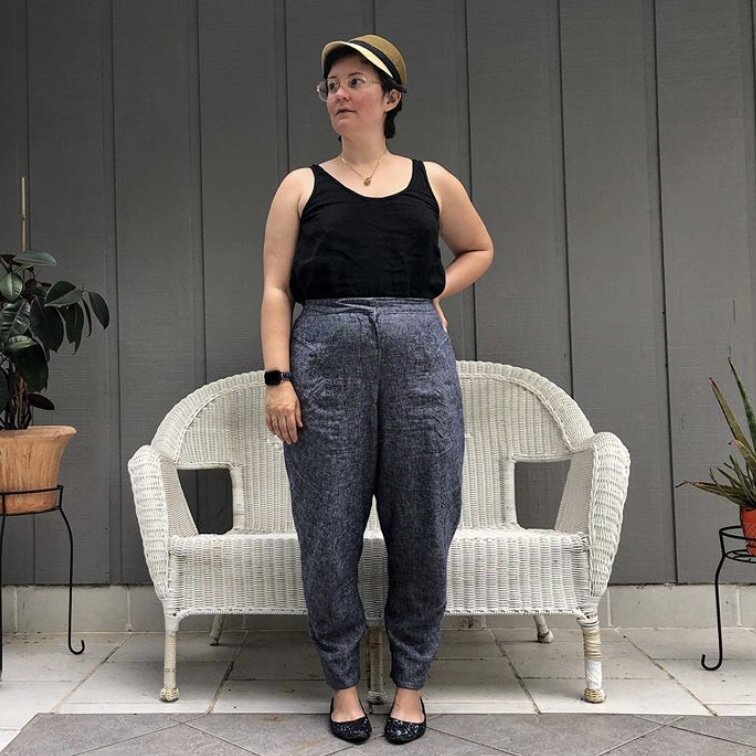
If you’d like to know if you’ll need to make this adjustment before making a toile, simply hold the FRONT LEG [5] piece of the Darlow pants pattern up to your body and wrap the lower section around your calf (you can use a pin to hold in place along the stitch line). You should be able to see if the pants are going to be too tight in the calf area. The Darlow pants are not designed to be tight in the calf - so keep this in mind when deciding whether or not to make the adjustment. 

Darlow pants - intro1200.jpg

3. Compare your calf measurement to the finished calf measurement of the pattern
Alternatively you can measure the calf circumference on the pattern piece (again - hold the piece up to your leg and mark where the fullest part of your calf is). Then lay the pattern piece down and take a curved ruler and draw a line across the pattern that remains roughly parallel to the hemline. Measure the line with a tape measure (remembering to measure from stitch line to stitch line so that you don’t include the seam allowance in the measurement). Compare this to your calf measurement, to work out how much you're going to need to add - more about this later on in the tutorial.

HOW TO MAKE THE ADJUSTMENT

PREPARE THE PATTERN

Darlow pants - STEP 11200.jpg

Step 1
Take the FRONT LEG [5], CENTRE BACK PANEL [13] and SIDE BACK PANEL [14] pieces from the Darlow pants pattern. If you think you’d like to go back to the original design in the future, I’d suggest tracing a copy to make the alterations on (although if you are using the PDF version of the pattern, you can always re-print from the PDF later down the track if you need to).

The first step will be to separate the FRONT LEG [5] piece into a front and back (as the alteration will only be made to the back section of the pants). By looking at the design, you can see that the FRONT LEG [5] panel wraps around the leg, removing the need for a side seam in this section. For the adjustment we will need to create a side seam and then revert to the original design after the adjustment has been made.

A. Mark a point on the hemline (on the grey stitch line), about halfway along the line. This does not need to be exact.

B. Circle the notch on the inside curve on the FRONT LEG [5] that indicates the side seam position (the point where the side seam of piece 14 meets the FRONT LEG [5]. Extend this notch so that it meets the stitch line.

Darlow pants - STEP 21200.jpg

Step 2
A. Join the notch circled in the previous step (where it meets the stitch line) to the point marked on the hemline with a straight line.

B. Mark two sets of notches on this line (one single and one double notch). You can put these anywhere on the line that you like, they will just help you stick these two sections back together correctly later in the process.

C. Cut along the line, separating the FRONT LEG [5] into 2 pieces. We will call the section that we removed from the main section the ‘LOWER FRONT LEG’ for the sake of the tutorial.

Darlow pants - STEP 31200.jpg

Step 3
Now what we need to do is put the panels together to create a full back leg pattern piece. 

A. To do this, line up the seam line that joins the CENTRE BACK PANEL [13] and SIDE BACK PANEL [14] at the top and bottom of the pieces. Place stitch line onto stitch line - as if the two pieces have been sewn together. As you can see, there is shaping through the seam, so you will not be able to line the pieces up through the middle section, but you can at the top and bottom. Tape in place with masking tape or scotch tape.

B. Flip the LOWER FRONT LEG piece and line up the stitch line on this piece with the stitch lines on the bottom of the  CENTRE BACK PANEL [13] and SIDE BACK PANEL [14] pieces. You might not be able to get it lined up exactly, but you should be able to get it fairly close. You will notice that there is seam allowance on the side seam of the SIDE BACK PANEL [14], but we don't have it one one side of the LOWER FRONT LEG. Line up the cut edge of this piece with the stitch line. Tape in place.

Now you can see that the back panels resemble an almost standard pant leg! Which means an adjustment is now much more straightforward to make. 

Darlow pants - STEP 41200.jpg

Step 4
Mark the point on the pattern that lines up with the fullest part of your calf. There are two ways you can do this:

1. Hold the pattern piece up to your body and work out where the fullest part of your calf is, in relation to the pattern (you may have done this earlier to see if you needed to make this alteration). 

2. Take a look at your toile. Mark the point where the pants are too tight on your leg and then transfer this marking to your pattern. 

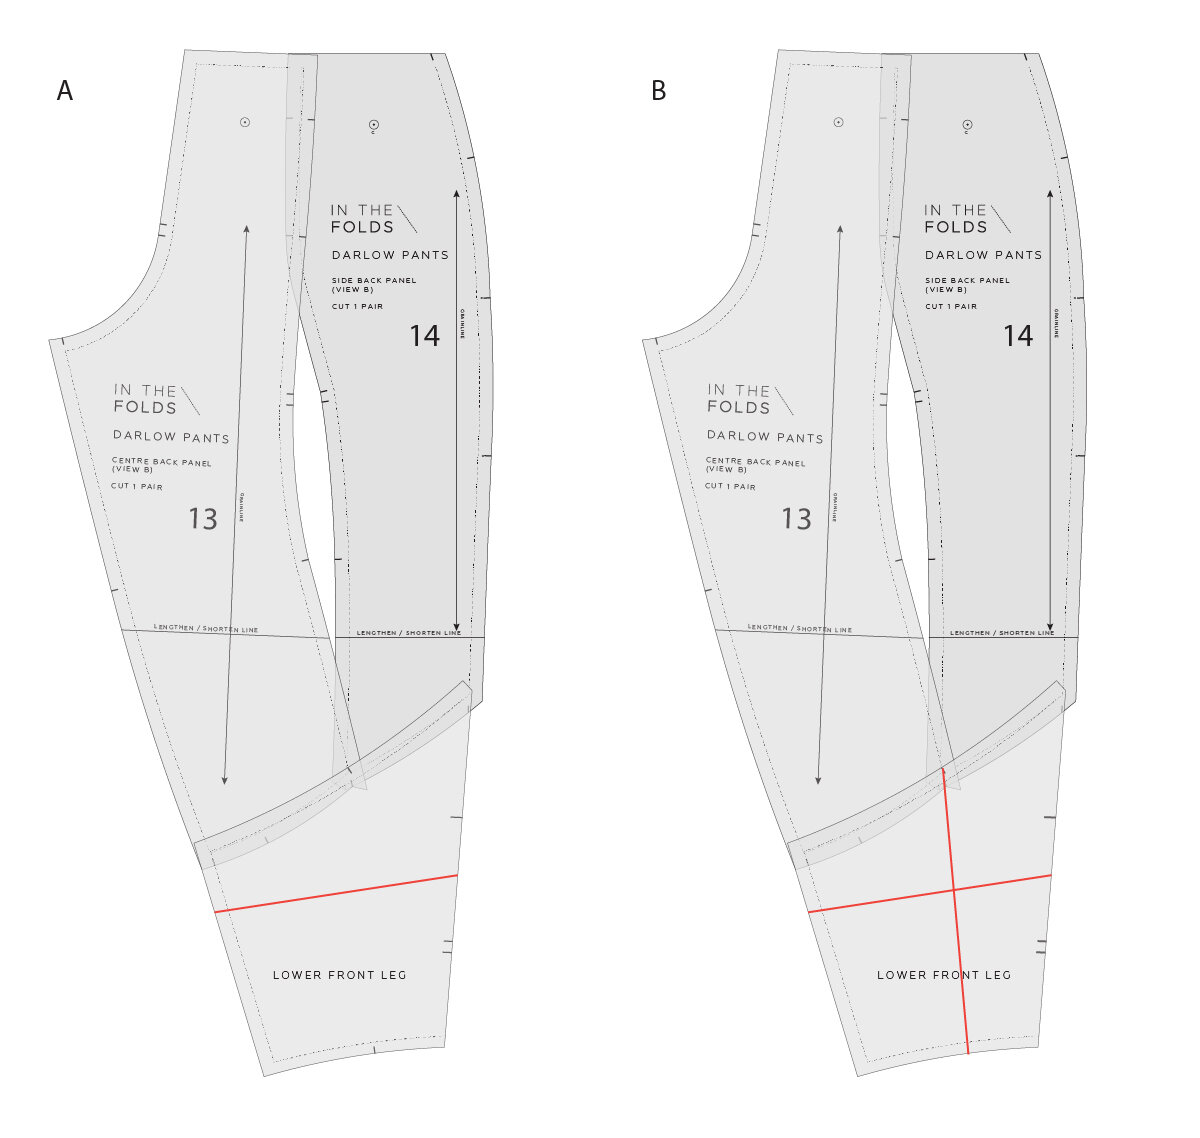
A. Once you have found the fullest part of your calf, mark this line on the LOWER FRONT LEG with a straight line across the piece (running roughly parallel to the hem).

B. Mark another line from the notch on the top edge of the LOWER FRONT LEG (indicating where the panel line meets the LOWER FRONT LEG) down to the hem line. The point where these two lines intersect is where we will be adding width to make the calf circumference larger.

MARK THE CUT LINES

Darlow pants - STEP 51200.jpg

Step 5
Slide a piece of pattern paper under your pant leg. This will help later as you will need something to stick the pattern pieces to when you make the adjustment.  

A. Mark a point on the inner leg seam below the crotch - marking the point on the stitch line. I marked mine about 6cm down from the crotch point. 

Mark another point on the side seam - roughly halfway down the seam. Again, mark the point on the stitch line.

B. Connect the point on the inner leg seam to the top of the vertical line on the LOWER FRONT LEG with a straight line.

Connect the point on the side seam to the same point with another straight line.

C. Cut along the lines - up from the hem line through the LOWER FRONT LEG until you reach the top of the line. Cut along the diagonal lines until you reach the points where they meet the stitching line. Stop there. Cut into the seam allowance towards each point leaving a small 1-2mm “hinge” (a hinge in this sense is a small bit of paper that allows you to adjust patterns, whilst still keeping the piece intact.)

Darlow-pants-4.jpg

HOW MUCH YOU’LL NEED TO ADD TO THE PATTERN

If you have a toile, you may want to cut up from the back hemline towards the calf and pin in a strip of fabric to see how much width you need to add. This is a good way to quickly see how much more width you need. Take note of the width of the strip at the peak of your calf.

Alternatively, take the finished calf measurement from the pants (found at the beginning of the tutorial) and compare to your own calf circumference. Now consider how much ease you would like in this area.

Ease refers to the difference between your body measurement and the finished garment measurements. Some garments have more ease than others. The amount of ease will depend on the style, fit and design of the garment. As mentioned earlier, the Darlow pants are not designed to be tight around the calf area. 

To work out how much ease you’re going to want, take a tape measure and hold it loosely around your calf to get a feel for how much fabric you will want in this area. Then walk, sit and squat to see that you have allowed enough ease to be comfortable. If the tape becomes too tight, loosen it up a bit and try again.

Once you have this measurement, subtract the pattern calf circumference from your own calf measurement and the difference will tell you how much you’re going to need to add when you make the adjustment. 

MAKE THE ADJUSTMENT

Darlow pants - STEP 61200.jpg

Step 6.
A. Slowly open the pieces up - giving more space at the calf point. You will see that the small hinges allow you to move the pieces while still keeping everything nice and flat (when making adjustments, you always need to check that your pattern pieces are remaining flat as fabric is flat and therefore patterns need to be flat too).

B. Open up the calf by the amount required (check by measuring from one side of the opening to the other on the horizontal calf line). When you are happy with how it’s looking, tape or glue in place onto the paper underneath to keep everything in place. 

TRACE YOUR NEW PATTERN PIECES

Darlow pants - STEP 71200.jpg

Step 7.
Take some fresh pieces of pattern paper and trace each adjusted pattern piece. Be sure to mark the grainline (by tracing the original grainline) and transfer drill holes and notches. I like to trace the stitch line and the cutting line, but it’s up to you - you may just want to trace the cutting line. Where the pattern piece has opened up and the lines have been broken, you will need to mark a line of best fit.

Darlow pants - STEP 81200.jpg

Step 8.
When you get to tracing the LOWER FRONT LEG you will need to re-draw the hem line as there will now be an opening. Take a curved ruler and draw in a nice smooth curve. When tracing this piece - be sure to remember to trace the notches on the temporary side seam that were marked in STEP 2B. 

PUT THINGS BACK TOGETHER

Darlow pants - STEP 91200.jpg

Step 9.
A. Flip the LOWER FRONT LEG and line it back up to the FRONT LEG [5] using the notches you marked to help you. Tape in place.

B. Your hemline might be a little skewed after making the adjustment. Smooth out the curve with a straight or curved ruler.

CHECK THE PATTERN

Step 10.
Check that all your new pattern pieces fit together correctly and notches line up. For guidance on how to check patterns, check out this tutorial.

DRAFT A NEW HEM FACING

Step 10.
The Darlow pants have a hem facing piece. You will need to re-draft this piece to accommodate the alteration. You can refer to this tutorial to do this. 

Darlow-pants-1.jpg

MAKING THE ALTERATION TO VIEW A OF THE DARLOW PANTS

Darlow pants - STEP 11200.jpg
Artboard 381200.jpg

Step 1.
As we did for View B, line up the panel lines as if they have been sewn together - stitch line on stitch line. Use the notches to help you. As you will see, it will be impossible to get some parts of the panels to line up (as the panels wrap around the body to make a three dimensional tape) - so don't worry. As long as the parts of the seam that will be impacted are lined up, that's all you need to do. In this case it's the back leg section that needs to line up.

Artboard 391200.jpg

Step 2.
Mark in a temporary side seam. You can do this by drawing a straight line from the side seam on the BACK [3] down to the centre of the hem line.

Artboard 401200.jpg

Step 2.
Mark in the alteration lines as we did in STEP 5 for View A and then use the above instructions to continue the alteration.

Whoa! That was a long one, but we got there! I hope this helped you and inspired you to give the Darlow pants a go!

Happy sewing,

Emily


resources mentioned in this issue

  • The Darlow pants pattern can be found here.

  • The Darlow pants Fit Kit can be found here.

  • Checking patterns: Curved seams. Tutorial can be found here.

  • How to Draft a Hem Facing. Tutorial can be found here.


P.S. Would you like to know what the Q & A series is all about? This page tells you a little bit more about the motive behind the series. Past issues from the Q & A series can be found here.

Don't have a question, but found this newsletter helpful? I'd love to hear from you! Get in touch and say hi. 


What you’ve been making


More posts in the series

ISSUE 31 - Mix & match the Flynn and Hove jacket patterns

HEADER - ISSUE031.jpg

THE Q & A SERIES - Mix & match the Flynn and Hove jacket patterns

Hi Emily,

After reading 
your tutorial on removing the pleats from the Hove jacket I remembered that it and the Flynn were sibling patterns. Is it possible to mix and match them, for example Hove’s back pleats with Flynn’s collar? The front curved seams look the same on your line drawings but I wasn’t certain if they still were after you refined the designs.

Thank you!

Katina


Canberra, Australia


Hi Katina,

Lovely to hear from you!

Yes, you're right, the Hove jacket pattern and the Flynn jacket pattern are sibling patterns. They originally started out as two variations of the same pattern, but over time as I continued to work on the patterns, I realised they were moving further and further apart in terms of design, and it was going to become a mammoth of a pattern that would probably intimidate makers - rather than inspire!

They can be mixed and matched as you suggested, and I'd love to see a Flynn jacket with the Hove pleats. It sounds dreamy!

Mix and match Flynn Hove-1.jpg

As you can see in the illustration above, the curve on the two patterns is the same until you get to the shoulder point (circled in the illustration). The curve then changes course in shape, but is the same length, so still fits with each of the back pieces from the patterns.

Mix and match Flynn Hove-2.jpg

If you do choose to swap out the hood on the Hove jacket for the collar from the Flynn jacket, just be sure to transfer the notches from one piece to the other as they are different between styles to accommodate the difference in pockets. You can do this by laying one piece on top of the other and transferring with a tracing wheel, snipping in with scissors or tracing with a pen / pencil. It's also a good idea to put a small cross next to the notches you won't be using to save any confusion (or covering them up with masking tape). These new notches then need to be transferred to the FRONT piece too (or you can just print the FRONT from the pattern style you are using).

I'd love to see your version if you do go ahead and mix and match these patterns Katina!

Happy sewing,

Emily


resources mentioned in this issue

  • How to remove pleats from a pattern. Tutorial can be found here.

  • The Hove jacket pattern can be found here.

  • The Flynn jacket pattern can be found here.


P.S. Would you like to know what the Q & A series is all about? This page tells you a little bit more about the motive behind the series. Past issues from the Q & A series can be found here.

Don't have a question, but found this newsletter helpful? I'd love to hear from you! Get in touch and say hi. 


What you’ve been making


More posts in the series

ISSUE 30 - How to remove pleats from a pattern

HEADER - REMOVE PLEATS.jpg

THE Q & A SERIES - How to remove pleats from a pattern

Hi there!

I was hoping that you might be able to send me the details on how to remove the pleats from the back of the Hove Jacket?

Thank you kindly!

Amy


Hi Amy,

I’m excited you’re going to be adapting the Hove jacket to better suit your preferences! 

For those of you who aren't looking to remove the pleats from the Hove jacket, you can also use this technique on most patterns with pleats. 

PREPARE THE PATTERN

Hove jacket - remove pleats - 1.jpg

Step 1
Take BACK [2] and BACK HEM FACING [7] pieces from the pattern. If you think you’d like to go back to the original design in the future, I’d suggest tracing a copy to make the alterations on (although you can always re-print from the PDF later down the track - so that’s an option too).

Hove jacket - remove pleats - 2.jpg

Step 2
Place the BACK HEM FACING [7] piece on top of the BACK [2] piece, lining up the centre back lines (the fold line).

Place stitch line on stitch line (the grey line marked on the pattern), as if the pattern pieces have been sewn together. You will notice that you can’t match the seam line all the way along the piece - this is because there is some shaping in the seam - don’t worry about the end section (towards the side seam) where it doesn’t match - as long as the centre back lines match (as this is where the alteration will be made).

Tape pieces in place (with something that can be removed as you will want to separate pieces again in a moment).

EXTEND THE PLEATS

Hove jacket - remove pleats - 3.jpg

Step 3
Take a ruler and draw in the pleat lines by extending the pleat lines on the pattern all the way down to the bottom of the BACK [2] and through to the bottom of the BACK HEM FACING [7] - ensure these lines remain parallel to the centre back (a long clear pattern drafting ruler will really help with this, if you’ve got one).

REMOVE THE PLEATS

Hove jacket - remove pleats - 4.jpg

Step 4
Remove the tape so that you have the two seperate pattern pieces again.

I have shaded the pleats so you can see the parts of the pattern that make up the pleats and what we will be removing.

Hove jacket - remove pleats - 5.jpg

Step 5
a. On the BACK [2] piece, carefully cut along the pleat line closest to the centre back, detaching this section from the rest of the pattern piece.

b. Slide the section you removed across so that it lines up with the other side of the pleat and removes the pleat value. Line up the top and bottom of the piece and then glue / tape in place.

c. You will notice that there is some excess on the right side of the centre back seam (this is because the pleat value is greater than the section of the pattern to the right of it. Trim off the excess pleat value.

Hove jacket - remove pleats - 6.jpg

Step 6
a. Repeat Step 5 for the centre pleat (the next pleat along).

b. Repeat Step 5 for the final pleat.

Trim excess paper from the neckline.

Hove jacket - remove pleats - 7.jpg

Step 7
a. On the BACK HEM FACING [7] piece, carefully cut along the pleat line closest to the centre back, detaching this section from the rest of the pattern piece.

b. Slide the section you removed across so that it lines up with the other side of the pleat and removes the pleat value. Line up the top and bottom of the piece and then glue / tape in place.

c. You will notice that there is some excess on the right side of the centre back seam (this is because the pleat value is greater than the section of the pattern to the right of it. Trim off the excess pleat value.

d. Repeat process for the centre pleat (the next pleat along).

e. Repeat process for the final pleat.

FINALISE THE PATTERN

Hove jacket - remove pleats - 8.jpg

Step 8
Smooth out curves on the cutting line with a curved ruler before trimming off any excess. You can use the pieces as they are, or trace if you would like a fresh copy.

TIP: It’s always a good idea to keep note of the alterations you have made to a pattern, so that you can refer to this information later down the track. You can write this directly on the pattern itself, or download this pattern specification template.

Happy sewing,

Emily


resources mentioned in this issue

  • The Hove jacket pattern can be found here.

  • Pattern specification template can be downloaded here.


P.S. Would you like to know what the Q & A series is all about? This page tells you a little bit more about the motive behind the series. Past issues from the Q & A series can be found here.

Don't have a question, but found this newsletter helpful? I'd love to hear from you! Get in touch and say hi. 


What you’ve been making


More posts in the series

ISSUE 29 - Staying motivated

Q&A STAYING MOTIVATED - HEADER.jpg

THE Q & A SERIES - Staying motivated

Hi Emily,

Is there anything in particular you can point to that has helped you stay motivated in your business when much of the work is self directed? On days when you'd rather rest, what keeps you going?

Thanks,

Amber

- Sydney, Australia


Hi Amber,

As you may have noticed, this is my first email in a while. If you read my last email, you will know that my dad passed away unexpectedly a few months ago. It was a huge shock to my family (he was only in his mid fifties) and we have been dealing with the grief ever since.

I was lucky enough to be able to take the time I needed off work and am slowly easing back into things. It now feels like the right time to get back to writing my weekly newsletter. I love creating this email and it has been an incredible way to connect with makers in our community. At a time when we are all struggling to connect with our loved ones due the restrictions most of us are all living with, an email series like this seems like a small but important way to connect with all of you. 

Q&A STAYING MOTIVATED-1

I thought this would be a good question to restart the series with, as finding motivation is something I have been thinking about a lot lately. I am sure there are a lot of you struggling with it too as we are living through fairly difficult times at present. In my experience, it can be easy to find motivation when all is well, but at times like this it can be difficult. This rings very true for my personal experience over the last few months and although I don’t think I am an expert on it, I do feel like I have learned a few things that helped that I’d be happy to share with you.

I’ll be talking about motivation as it relates to my business, but I’d hope this could apply to whatever you are currently working on - whether that’s a business too, learning a new skill, working towards a goal or sewing a handmade wardrobe.

TAKE A BREAK

Q&A STAYING MOTIVATED-2.jpg

This may seem counter-intuitive, but the first thing I want to talk about is taking a break when you need to. I think it’s easy to get caught up in the “hustle culture” of doing more, more, more, rather than taking a pause when we need to.

I found there were times in the last few years that I have accidentally gotten swept up into this way of thinking (as it can be difficult to avoid this messaging that surrounds us and sometimes you don’t even realise you’re doing it), but losing my dad made me realise that I can stop if I need to and nothing is going to collapse.

A few months ago I felt like I didn’t have time for anything, then suddenly I needed to stop everything, and I did. I spent 6 weeks doing not much more than watching Netflix and I realised that life (and my business) went on. It was a difficult way to learn that we can stop and take a break if we prioritise it.

All this is to say that we are living through a very difficult time. Maybe it’s not motivation that you need right now, but a break. Inspiration and motivation seems to slowly seep back in with time (well at least that is what happened to me). 

I am now being careful about what I re-introduce into my schedule. I definitely don't have the energy to do all the things that I used to do, so it has been a good lesson in boundary setting and getting clear about the things I really want to do and the things that I have to say no to at the moment.

Read / listen to / watch things that inspire you

Q&A STAYING MOTIVATED-3.jpg

Apart from bingeing on Netflix, I did read a lot during my break and have continued to do so. At first I couldn’t stomach my usual go-to motivators (business and self-development books), so I started with fiction.

Eventually I started gravitating back to business books and found these really helped me to re-focus and get back into the habit of thinking about actionable things I can do to grow my business. I think sometimes you can get distracted by the busy day-to-day work, but business books generally make me take a step back and look at the business from a different perspective.

I have also been listening to the podcast How I Built This a lot lately. Hearing about the struggles of other entrepreneurs is a good reminder that it takes a lot of work to have a successful business and there are ups and downs for everyone.

RECONNECT WITH YOUR MISSION

Q&A STAYING MOTIVATED-4.jpg

I think that it can be easy to lose motivation when you have lost track of why you are doing the thing in the first place. Whenever I set goals, I always make sure to write next to it the reason I’m striving towards this particular goal. At the time "the why" seems obvious, but in the weeks and months that follow, often I can lose sight of the why and having it there to refer to is helpful when I need to get back on track (more about my goal setting process can be found here if you are interested).

One of the books I read recently is Building a Storybrand by Donald Miller, and I really enjoyed that it forced me to reconnect with my mission and remember why I created In the Folds in the first place. Simply put, my mission is to help you make clothes that you are going to wear, love and cherish. As soon as I re-focused on that, I felt more inspired to keep serving my customers and making a difference in my own little way.

Now when I look at my to-do list, I’m thinking about what will make the greatest impact in line with that mission, that I'm able to get done today. Taking it one day at a time like that is a good way to break down big goals, but is also all we can do - especially at the moment when the future feels particularly uncertain. 

CONNECT WITH PEOPLE THAT ENCOURAGE AND INSPIRE YOU

Q&A STAYING MOTIVATED-5.jpg

I am lucky enough to have some incredibly inspiring and creative people in my life. When I’m struggling to get in a groove, I have found making a phone call or catching up with one of these people helps a lot.

Getting a second set of eyes on the problem can also be hugely beneficial, and if you have friends from different industries / areas of focus, they can often suggest things you have never even thought of. Also hearing about other people's struggles can give you a change of perspective as you approach what you are facing. The last three months have been particularly hard in my personal life and having amazing people around me is the thing that has been getting me through.

LOOK AT THE PROGRESS YOU HAVE MADE

Q&A STAYING MOTIVATED-6.jpg

It can also be a good idea to look over things that remind you of the progress you have made already. Working on a handmade wardrobe? Make a list of all the pieces you have made in your wardrobe, or the skills you have learned that you didn’t have 12 months ago.

I think reflection plays a huge part in feeling motivated and making sure you are celebrating the wins along the way, rather than just continuously moving back your goal post. For me, I always find looking through the hashtags for my patterns very inspiring. To see that there are people using my patterns to make beautiful garments that are bringing them joy and they are wearing proudly and sharing online feels like a huge win. I also have a file in my inbox called “for smiles.” Each time I get an email from a happy customer I put it in there. Sometimes if I’m feeling low or forgetting why I’m doing this, I look there and it reminds me of the people I’m serving.

LEARN SOMETHING NEW

Q&A STAYING MOTIVATED-7.jpg

Learning something new can sometimes be a good way to inspire you or motivate you. It might be related to the thing you are struggling to motivate yourself to do, or something completely different. Recently I have done this by reading business books, doing an online course, listening to podcasts about things I'm interested in, but don't know much about, and even getting out my old sketchbook. 

FAKE IT TILL YOU MAKE IT

Q&A STAYING MOTIVATED-8.jpg

I didn’t feel like working 6 weeks ago, but there came a point where I just had to (hello bills that need to be paid and a small business that I run on my own) and I decided to just get back on the horse and fake it till I made it.

I think we all dream of showing up to work everyday absolutely loving what we do and overflowing with inspiration and energy, but unfortunately it’s not like that a lot of the time (even when you are doing what you love), and I feel just getting started is often the hardest bit. Once you are on your way, things feel a lot easier and you are reminded of what you love about it.

Lately I have been telling myself that I only need to get through a few hours of work in the studio, and normally by that point I am in the zone and want to keep working. But if I’m not, I’m giving myself permission to say that’s okay too (which takes us back to point number one about taking a break if you need one). A few hours of important work feels like a greater achievement than eight hours of faffing about.

I hope this helps some of you get back on track to do the things you want to do. But as I said, if it doesn’t, that’s okay too. Give yourself some time to just rest or relax - the days are difficult enough to get through at the moment without the added pressure of a never ending to-do list. The motivation will come back, it generally does if you give it time. 

Happy sewing!

Emily


resources mentioned in this issue

  • How I Built This podcast can be found here.

  • Making a plan for the year / quarter. Post can be found here.

  • Building a Storybrand by Donald Miller. Book can be found here.


P.S. Would you like to know what the Q & A series is all about? This page tells you a little bit more about the motive behind the series. Past issues from the Q & A series can be found here.

Don't have a question, but found this newsletter helpful? I'd love to hear from you! Get in touch and say hi. 


What you’ve been making


More posts in the series

ISSUE 28 - Saving inspiration for future use

THE Q & A SERIES - Saving inspiration for future use

Hi Emily,

I love following lots of creative sewists on Insta and blogs. But I often find it frustrating that many of them are in the northern hemisphere. Suddenly everyone is dusting off their linens and sun dress patterns, when what I really need to get working on is a coat.

There were plenty of lovely coat posts 6 months ago...so how do you manage ‘unseasonal hemisphere inspiration’-syndrome? Any tips on filing away favourite patterns & posts to dig out at the right time?

- Melanie
Sydney, Australia


Hi Melanie,

I will do my best to answer this question, but I thought it might be a good one to also open up to the community, as I am sure there are plenty of people out there who have a process for saving projects perfectly!

Instagram-save-01.jpg

There are two main ways I save inspiration for a later date - I save posts to folders on Instagram, as well as taking screenshots on my phone and adding to an inspiration folder on my phone. You mention also looking at blogs for inspiration, so Pinterest could possibly be a good option for you too.

I feel like my system is not the most reliable or fool-proof though, so I just did a bit of searching online and found some great suggestions of some other methods that might inspire you:

  • Colette - 6 Apps to help you plan your sewing

  • Helen's Closet - How to organise your patterns using Trello - this one is about organising patterns, but you could definitely use the same method to organise your inspiration. If you read a previous email of mine, you will know I am a huge fan of Trello. What's great about Trello is that it's free, you can use it across devices and it's really flexible. You can make boards, add tags, attach photos, links and comments (among a range of other things) so can be quite a robust way to organise things - if you are willing to take the time to do it.

PINTEREST BOARD.png

For those of you reading this that might have a good suggestion for Melanie, I'd love to hear from you! Just reply to this email with how you organise your projects for future use and I'll share some responses in a future issue of the Q&A!


Happy sewing until next time,

Emily


resources mentioned in this issue

  • How do I create a collection for posts I save on Instagram? Instructions can be found here

  • Pinterest can be searched here.

  • 6 Apps to help you plan your sewing. Post from Colette can be found here

  • How to organise your patterns using Trello. Post from Helen's Closet can be found here.

  • Making a plan for the year / quarter. Post can be found here.


P.S. Would you like to know what the Q & A series is all about? This page tells you a little bit more about the motive behind the series. Past issues from the Q & A series can be found here.

Don't have a question, but found this newsletter helpful? I'd love to hear from you! Get in touch and say hi. 


More posts in the series

ISSUE 27 - Adding and removing fullness from a sleeve cap

THE Q & A SERIES - Adding and removing fullness from a sleeve cap

Hi Emily!

I’d like to know how to reduce the fullness in a puffed/gathered sleeve - as opposed to slashing a straight sleeve design to add in fullness. I often come across patterns that I love everything about - except for a gathered sleeve cap, or or gathering into a cuff, that makes it difficult to layer under a cardigan or jacket (here in Canada it’s all about layering to stay warm!).

Do I slash & straighten and redraw the sleeve cap?

Thank you!


- Vivian
Fredericton, Canada


Hi Vivian,

What you suggested is exactly right! You need to slash and close to remove the fullness from a sleeve cuff or cap - rather than the usual technique of cutting / slashing and spreading.

As I mentioned in last week's issue of the Q&A series, I had planned to create a tutorial to show you how to both add and remove fullness from a sleeve hem/cuff, as well as from the sleeve cap - but I realised it was going to get way too long! So I'm popping in today to show you how to add or remove fullness from a sleeve cap - and if you would like to know how to add or remove it from the hem/cuff of a sleeve, you can check out the previous post here.

PREPARE PATTERN

Removing fullness from a sleeve-01.jpg

For the example, I will be using the sleeve from the Peppermint Wrap top pattern, although you could use any sleeve pattern that you like.

Take the pattern piece and trace a copy - if you would like to keep the original. The stitch line (the grey line on my patterns) will come in handy for this tutorial. If your pattern does not have the stitch line marked on it, you can mark it with a clear ruler.

I would suggest removing the hem allowance from the pattern - this will make the pattern adjustment easier to manage (as the hem line of the sleeve will be impacted by the change) and then you can add it back later on. 

ADD FULLNESS

MARK CUT + SPREAD LINES

Removing fullness from a sleeve cap-02.jpg

Mark in your slash lines on the pattern. It is up to you how many you mark - but be generous with the number of lines you mark, as this will help the change to the pattern be nice and gradual so that your lines remain as smooth as possible when you make the adjustment. Be sure to keep the slash lines parallel to the grainline and evenly spaced.

When adding gathers to a sleeve cap, you are only wanting to add extra fabric (that will become the gathers when you sew the sleeve) to the sleeve cap, rather than the whole sleeve - this means that the slash lines need to be marked between the front and back notches only.

CUT + SPREAD

Removing fullness from a sleeve cap-03.jpg

It is a good idea to put the pattern on top of a larger piece of pattern paper at this stage, as after you cut the pattern it becomes very delicate and difficult to move.

Take your scissors and cut along the first slash line, from the top of the sleeve down towards the hem. Go nice and slow as you approach the hem line (marked with circles in the illustration) as you will be wanting to leave a small "hinge" of 1-2mm of paper intact to help with the alteration. 

Repeat for each line marked, being careful to keep the pattern intact (although it's not a disaster if you accidentally cut through the hinge - just use a small piece of masking tape to put the sections back together).

Removing fullness from a sleeve cap-04.jpg

With your grainline in the centre (and keeping this section of the pattern straight), gradually start spreading each section of the cut pattern - opening each cut line by a consistent amount.

HOW MUCH VOLUME TO ADD?

Think about how much volume you would like to add to the pattern piece overall. You may want to do this by eye (just cut along the line and then spread until it looks as though enough volume has been added), or by an exact amount. 

You may want to have a play with a scrap of the fabric you are planning to use to see how it gathers. For example, if using something very lightweight like a silk chiffon, you will need to add quite a lot of width to the sleeve cap to create a gathered sleeve cap. For a heavier weight fabric, you will require less fabric to achieve a gathered sleeve. To check this, measure out a strip of fabric before and after gathering to work out the ratio of fabric to gathers. 

If you have found an exact amount that you would like to add to the pattern, you will need to divide this figure by the number of cuts you have made. For example, in the sleeve pictured, I added 18cm to the sleeve cap. I divided this 18cm by the number of slash lines (6) and therefore opened up each slash line by 3cm.

Tape / glue pattern in place to the piece of pattern paper underneath.

TRACE PATTERN

Removing fullness from a sleeve cap-05.jpg

You can either smooth out the lines of the pattern on the original pattern that you have glued / taped, or re-trace on a fresh piece of pattern paper. Sometimes it is good to use the original, as then you can keep track of the changes you made to the pattern - but this is up to you.

When tracing the new pattern piece, you need to make sure all lines are nice and smooth. Use a French curve ruler, or even a straight ruler (that is my preference for drawing curves) to work your way around the pattern. Draw the new hemline by drawing a smooth curve that follows the hem sections of the original sleeve. For the new sleeve cap, draw a line of best fit through the original stitch line, before adding seam allowance

Be sure to also transfer the notches (you won't know exactly where they should be at this point, just mark them so you know which is the front and back of the sleeve) and grainline if you are tracing the pattern.

Check notch placement

Check the placement of the notches by walking your sleeve piece into the front and back armhole of your pattern (starting at the underseam of the sleeve and side seam). You can use this tutorial as a guide

FINALISE PATTERN + ADD PATTERN MARKINGS

Add seam allowance to the hem of the pattern. The amount will depend on your hem treatment - for example, if you are adding a cuff, rolling the hem, or creating a hem facing.

Add pattern details to the new pattern piece. This includes:

  • Pattern name (e.g. Peppermint Wrap Top)

  • Piece name (e.g. Gathered sleeve)

  • Size (e.g. Size E)

  • Cutting instructions (e.g. Cut 1 pair)

  • Number of pieces (e.g. piece 4 / 5)

  • I also like to add notes of the changes I made (e.g. 18cm added to the sleeve cap using cut & spread technique on 16 April 2020)

And you're ready to use your new sleeve pattern! I'd suggest making a toile to check you are happy, before cutting your garment.

REMOVE FULLNESS

MARK CUT + SPREAD LINES

Removing fullness from a sleeve cap-09.jpg

To remove fullness, we will use the sleeve piece created in the previous example. 

Mark in your slash lines on the pattern. It is up to you how many you mark - but as in the first example, be generous with the number of lines you mark, as this will help the change to the pattern be nice and gradual so that your lines remain as smooth as possible when you make the adjustment.

As you will see, due to the shape of the sleeve pattern piece, the slash lines will need to gradually fan out, so that they can remain evenly spaced out (rather than parallel to the grainline like they were in the earlier example).

HOW MUCH VOLUME TO REMOVE?

Removing fullness from a sleeve cap-10.jpg

To work out how much volume to remove from the sleeve cap, you will need to measure the front and back armholes of your pattern pieces. Remember to measure the stitch line and not the cutting line on the pattern.
Take note of your measurements and add them together to find your armhole circumference.

Next, measure your whole sleeve cap (including either side of the notches). Subtract the length of the armhole circumference from the length of the sleeve cap. When you have the answer, deduct another 1.2cm - this is to allow for a small amount of ease to remain in the sleeve cap.

Divide your answer by the number of slash lines that you have on your pattern, and this is the amount you will remove at each point. 

Removing fullness from a sleeve cap-06.jpg

Mark the measurement you found in the previous step on each section of the pattern - being sure to mark it on the stitch line, as this is the line we are adjusting and measured to work out how much to remove. 

Take your scissors and cut along the first slash line, from the top of the sleeve down towards the hem. Go nice and slow as you approach the hem line (marked with circles in the illustration) as you will be wanting to leave a small "hinge" of 1-2mm of paper intact to help with the alteration. 

CUT + CLOSE

Removing fullness from a sleeve cap-04.jpg

Repeat for each line marked, being careful to keep the pattern intact (although it's not a disaster if you accidentally cut through the hinge - just use a small piece of masking tape to put the sections back together).

Removing fullness from a sleeve cap-07.jpg

With your grainline in the centre (and keeping this section of the pattern straight), gradually start overlapping each section of the pattern with the section beside it - lining up the cut edge with the point marked previously - to remove the desired amount. Tape or glue in place.

Repeat for each slash line.

TRACE PATTERN

Removing fullness from a sleeve cap-08.jpg

You can either smooth out the lines of the pattern on the pattern that you have glued / taped, or re-trace on a fresh piece of pattern paper. Sometimes it is good to use the original, as then you can keep track of the changes you made to the pattern - but this is up to you.

When tracing the new pattern piece, you need to make sure all lines are nice and smooth. Use a French curve ruler, or even a straight ruler (that is my preference for drawing curves) to work your way around the pattern. Draw the new hemline by drawing a straight line from one side of the pattern to the other (being sure to check the hemline is perpendicular to the grainline). For the new sleeve cap, draw a line of best fit through the original stitch line, before adding seam allowance

Be sure to also transfer the notches (you won't know exactly where they should be at this point, just mark them so you know which is the front and back of the sleeve) and grainline if you are tracing the pattern.

Check notch placement

Check the placement of the notches by walking your sleeve piece into the front and back armhole of your pattern (starting at the underseam of the sleeve and side seam). You can use this tutorial as a guide. When you get to the shoulder seam, mark the position on the sleeve (it won't meet the centre notch). Do the same one the back section of the sleeve. You should now have two markings on either side of the centre notch. Measure the distance between these two markings, on the stitch line - this is the amount of ease you have in the sleeve pattern.

To mark the shoulder notch, take this measurement and divide by three. Place the centre notch 1/3 in from the front marking, so that 1/3 of the ease is distributed in the front section of the sleeve and the other 2/3 is in the back section of the sleeve.

FINALISE PATTERN + ADD PATTERN MARKINGS

Add seam allowance to the hem of the pattern. The amount will depend on your hem treatment.

Add pattern details to the new pattern piece. This includes:

  • Pattern name (e.g. Peppermint Wrap Top)

  • Piece name (e.g. Sleeve)

  • Size (e.g. Size E)

  • Cutting instructions (e.g. Cut 1 pair)

  • Number of pieces (e.g. piece 4 / 5)

  • I also like to add notes of the changes I made (e.g. 18cm removed from the sleeve cape using cut & spread technique on 16 April 2020)

And you're ready to use your new sleeve pattern! I'd suggest making a toile to check you are happy, before cutting your garment.

I hope that helps you and I will be back next week to show you how to use this technique on a sleeve cap.

Happy sewing,

Emily


resources mentioned in this issue

  • Adding and removing fullness from a sleeve hem. Tutorial can be found here.

  • Peppermint wrap top pattern. Pattern can be downloaded for free here.

  • How to add seam allowance to a sewing pattern. Tutorial can be found here.

  • Checking patterns: Curved seams. Tutorial can be found here.

  • How to draft a hem facing. Tutorial can be found here.

  • How to (and why) make a toile. Tutorial can be found here.


P.S. Would you like to know what the Q & A series is all about? This page tells you a little bit more about the motive behind the series. Past issues from the Q & A series can be found here.

Don't have a question, but found this newsletter helpful? I'd love to hear from you! Get in touch and say hi. 


More posts in the series

ISSUE 26 - Adding and removing fullness from a sleeve hem

THE Q & A SERIES - Adding and removing fullness from a sleeve hem

Hi Emily!

I’d like to know how to reduce the fullness in a puffed/gathered sleeve - as opposed to slashing a straight sleeve design to add in fullness. I often come across patterns that I love everything about - except for a gathered sleeve cap, or or gathering into a cuff, that makes it difficult to layer under a cardigan or jacket (here in Canada it’s all about layering to stay warm!).

Do I slash & straighten and redraw the sleeve cap?

Thank you!


- Vivian
Fredericton, Canada


Hi Vivian,

What you suggested is exactly right! You need to slash and close to remove the fullness from a sleeve cuff or cap - rather than the usual technique of cutting / slashing and spreading.

I thought that for today's post I would show you how to add fullness to a sleeve at the hem (like you would need to do to create a bishop sleeve, gathered sleeve or a flared sleeve - as pictured above) and then show you how to remove this fullness - if you're working the other way - as in the case of the question. The technique is basically the same, so I thought it would be a good opportunity to teach this technique for both uses (adding fullness and removing fullness). 

I had been planning on also including removing fullness from a sleeve cap but realised this was going to become a very long tutorial - so I will split it over two issues and show you how to do that next week!

PREPARE PATTERN

Removing fullness from a sleeve-01.jpg

For the example, I will be using the sleeve from the Peppermint Wrap top pattern, although you could use any sleeve pattern that you like.


Take the pattern piece and trace a copy - if you would like to keep the original. The stitch line (the grey line on my patterns) will come in handy for this tutorial. If your pattern does not have the stitch line marked on it, you can mark it with a clear ruler.

ADD FULLNESS

MARK CUT + SPREAD LINES

Removing fullness from a sleeve-02.jpg

Mark in your slash lines on the pattern. It is up to you how many you mark - but be generous with the number of lines you mark, as this will help the change to the pattern be nice and gradual so that your lines remain as smooth as possible when you make the adjustment. Be sure to keep the slash lines parallel to the grainline and evenly spread.

In the case of the example I will be adding fullness to the centre section of the sleeve, but you can add slash lines across the whole sleeve - it will just depend where you want the fullness and how much fullness you would like to add. You will be cutting these lines, to add volume to the pattern - wherever there is a slash more fabric will be added.

CUT + SPREAD

Removing fullness from a sleeve-03.jpg

It is a good idea to put the pattern on top of a larger piece of pattern paper at this stage, as after you cut the pattern it becomes very delicate and difficult to move.

Take your scissors and cut along the first slash line, from the hemline up towards the sleeve cap. Go nice and slow as you approach the stitch line (marked with circles in the illustration) as you will be wanting to leave a small "hinge" intact to help with the alteration. Then cut in from the seam allowance, leaving 1-2mm uncut. 

Repeat for each line marked, being careful to keep the pattern intact (although it's not a disaster if you accidentally cut through the hinge - just use a small piece of masking tape to put the sections back together).

Removing fullness from a sleeve-04.jpg

With your grainline in the centre (and keeping this section of the pattern straight), gradually start spreading each section of the cut pattern - opening each cut line by a consistent amount.

HOW MUCH VOLUME TO ADD?

Think about how much volume you would like to add to the pattern piece overall. You may want to do this by eye (just cut along the line and then spread until it looks as though enough volume has been added), or by an exact amount. If you are just opening up a hemline, I would say that doing it by eye is fine. But if, for example, you are using this technique on a skirt pattern to increase the hip measurement, then I would suggest finding an exact amount so that you don't get any surprises. 

If you have found an exact amount that you would like to add to the pattern, you will need to divide this figure by the number of cuts you have made. For example, in the sleeve pictured, I added 21cm to the hemline. I divided this 21cm by the number of slash lines (6) and therefore opened up each slash line by 3.5cm.

Tape / glue pattern in place to the piece of pattern paper underneath.

TRACE PATTERN

Removing fullness from a sleeve-05.jpg

You can either smooth out the lines of the pattern on the original pattern that you have glued / taped, or re-trace on a fresh piece of pattern paper. Sometimes it is good to use the original, as then you can keep track of the changes you made to the pattern - but this is up to you.

When tracing the new pattern piece, you need to make sure all lines are nice and smooth. Use a French curve ruler, or even a straight ruler (that is my preference for drawing curves) to work your way around the pattern. Draw the new hemline by drawing a smooth curve that follows the hem sections of the original sleeve. Be sure to also transfer the notches and grainline if you are tracing the pattern.

FINALISE PATTERN + ADD PATTERN MARKINGS

Add seam allowance to the hem of the pattern. The amount will depend on your hem treatment - for example, if you are adding a cuff, rolling the hem, or creating a hem facing.

Add pattern details to the new pattern piece. This includes:

  • Pattern name (e.g. Peppermint Wrap Top)

  • Piece name (e.g. Flared sleeve)

  • Size (e.g. Size E)

  • Cutting instructions (e.g. Cut 1 pair)

  • Number of pieces (e.g. piece 4 / 5)

  • I also like to add notes of the changes I made (e.g. 21cm added to the hemline using cut & spread technique on 12 April 2020)

And you're ready to use your new sleeve pattern! I'd suggest making a toile to check you are happy, before cutting your garment.

REMOVE FULLNESS

MARK CUT + SPREAD LINES

Removing fullness from a sleeve-06.jpg

To remove fullness, we will use the sleeve piece created in the previous example. 

Mark in your slash lines on the pattern. It is up to you how many you mark - like in the first example, be generous with the number of lines you mark, as this will help the change to the pattern be nice and gradual so that your lines remain as smooth as possible when you make the adjustment.

As you will see, due to the shape of the sleeve pattern piece, the slash lines will need to gradually fan out, so that they can remain evenly spaced out (rather then parallel to the grainline like they were in the earlier example).

HOW MUCH VOLUME TO REMOVE?

Work out how much volume you will be removing from the hem of the sleeve, and then divide this by the number of slash lines. For example, I will be removing 21cm from the hem of the sleeve, so will be removing 3.5cm from each slash line. Mark this amount on each section of the pattern - along the hemline. Alternatively you can do this by eye - although this will depend on the hem treatment. For example, if you are going to be attaching a cuff, you will need to carefully check the hem length so that it will fit the cuff. If joining to a sleeve cuff, you will still need a little bit of fullness in the bottom the sleeve, so that you can make a pleat or gathers before joining it to the cuff.

Removing fullness from a sleeve-07.jpg

Take your scissors and cut along the first slash line, from the hemline up towards the sleeve cap. Go nice and slow as you approach the stitch line (marked with circles in the illustration) as you will be wanting to leave a small "hinge" intact to help with the alteration. Then cut in from the seam allowance, leaving 1-2mm uncut. 

Repeat for each line marked, being careful to keep the pattern intact (although it's not a disaster if you accidentally cut through the hinge - just use a small piece of masking tape to put the sections back together).

CUT + CLOSE

Removing fullness from a sleeve-09.jpg

With your grainline in the centre (and keeping this section of the pattern straight), gradually start overlapping each section of the pattern with the section beside it - lining up the cut edge with the point marked previously - to remove the desired amount. Tape or glue in place.

Removing fullness from a sleeve-08.jpg

Repeat for each slash line.

TRACE PATTERN

Removing fullness from a sleeve-10.jpg

You can either smooth out the lines of the pattern on the pattern that you have glued / taped, or re-trace on a fresh piece of pattern paper. Sometimes it is good to use the original, as then you can keep track of the changes you made to the pattern - but this is up to you.

When tracing the new pattern piece, you need to make sure all lines are nice and smooth. Use a French curve ruler, or even a straight ruler (that is my preference for drawing curves) to work your way around the pattern. Draw the new hemline by drawing a straight line from one side of the pattern to the other (being sure to check the hemline is perpendicular to the grainline). Be sure to also transfer the notches and grainline if you are tracing the pattern.

FINALISE PATTERN + ADD PATTERN MARKINGS

Add seam allowance to the hem of the pattern. The amount will depend on your hem treatment.

Add pattern details to the new pattern piece. This includes:

  • Pattern name (e.g. Peppermint Wrap Top)

  • Piece name (e.g. Sleeve)

  • Size (e.g. Size E)

  • Cutting instructions (e.g. Cut 1 pair)

  • Number of pieces (e.g. piece 4 / 5)

  • I also like to add notes of the changes I made (e.g. 21cm removed from the hemline using cut & spread technique on 12 April 2020)

And you're ready to use your new sleeve pattern! I'd suggest making a toile to check you are happy, before cutting your garment.

I hope that helps you and I will be back next week to show you how to use this technique on a sleeve cap.

Happy sewing,

Emily


resources mentioned in this issue

  • Peppermint Wrap top sewing patternPattern can be downloaded for free here.

  • Adding volume to a pattern. Tutorial can be found here.

  • How to add seam allowance to a sewing pattern. Tutorial can be found here.

  • How to draft a hem facing. Tutorial can be found here.

  • Making a toile. Tutorial can be found here.


P.S. Would you like to know what the Q & A series is all about? This page tells you a little bit more about the motive behind the series. Past issues from the Q & A series can be found here.

Don't have a question, but found this newsletter helpful? I'd love to hear from you! Get in touch and say hi. 


More posts in the series

ISSUE 25 - Sewing a zip

THE Q & A SERIES - SEWING A ZIP

I'm wondering what your preferred method is for inserting a side seam (dress) zipper? I inserted one out of necessity recently, but I'm not happy with the method I used. (Desperate times called for desperate measures!)

It worked out but I know there's a better way!

Thanks Emily!

- Lodi Cambridge, Unites States


Hi Lodi,

Thanks for reaching out. Zips can be tricky when you're a beginner, but once you find a method that works for you, they get a lot easier!

I pretty much use invisible zips exclusively (all the patterns that I have released so far that have a zip use an invisible zip - except for pants that have a fly front), as I think they give the cleanest and most modern finish. They are very easy to do - once you get the hang of it. You can use an invisible zip in the centre back of a dress, or in the side seam as you mentioned.

Basting stitches

I think the game changer when getting a perfect finish on an invisible zip is hand basting the zip in place before sewing it.

What you need to do is pin one side of the zip in position and then baste in place. Take a needle and thread (I always use a contrasting thread because it makes it nice and easy to remove the stitches later), and hand baste the zip tape to the garment. It takes a couple of minutes extra to do this, but it will ensure that the zip does not shift while you are sewing it in - and I prefer hand stitching to unpicking any day! When the zip is attached, remove the pins.

I also only ever baste one side of the zip at a time - this way one side is stitched in permanently before you stitch the second side - this ensures nothing wiggles around in the process.

Use the right tools

how_to_sew_an_invisible_zip_2.jpeg

Next thing you want to make sure of is that you have the correct machine foot for the application. For an invisible zip it is best to use an invisible zipper foot (although you can get away with using a regular zipper foot) and for a standard dress zipper you will need to use a regular zip foot. I am not into have fancy sewing tools and attachments and try to keep all that to a minimum, but I think a regular zipper and invisible zipper foot are a must for anyone wanting to make their own clothes.

As you can see in the photo above, the invisible zip foot really helps you get nice and close to the zip coil because of the groove in the foot that lifts the coil. It takes a little practice to get the hang of this and to make sure that your needle is positioned as close as possible to the coil, but it is worth getting it right as this is what helps the invisible zip become 'invisible' on the right side of the garment.

how_to_sew_an_invisible_zip_13.jpeg

You will then need a regular zipper foot to sew the remainder of the seam. As you can see in the photo above, the regular zip helps you get nice and close to the zip.

how_to_sew_an_invisible_zip_9.jpeg

I have a full tutorial available on my website about sewing an invisible zip that can be found here

As mentioned at the beginning of this email, the key is to find a technique that works and makes sense to you. That may or may not be this technique and that is okay!

OTHER TECHNIQUES

Some other techniques that I'd also suggest looking at are:

  • This technique for installing an invisible zip shared by Kenneth King for Threads. 

  • This is the method I use for sewing a lapped zipper - this tutorial comes from Blueprints for Sewing.

  • This is the method I use for sewing a centred zip - this tutorial is from Colette.

I'd love to hear if you have a go-to method for sewing zips that I haven't mentioned!

Happy sewing,

Emily


resources mentioned in this issue

  • How to sew an invisible zip. Tutorial can be found here.

  • A Smart Sewing Technique for an Imperceptible Zipper by Threads can be found here.

  • Sewing a Lapped Zipper from Blueprints for Sewing. Tutorial can be found here.

  • How to Sew a Centred Zipper from Colette. Tutorial can be found here.


P.S. Would you like to know what the Q & A series is all about? This page tells you a little bit more about the motive behind the series. Past issues from the Q & A series can be found here.

Don't have a question, but found this newsletter helpful? I'd love to hear from you! Get in touch and say hi. 


More posts in the series

ISSUE 24 - Transform the Peppermint playsuit pattern into a dress

THE Q & A SERIES - TRANSFORM THE PEPPERMINT PLAYSUIT PATTERN INTO A DRESS

Hi!

Just wanted to say I’ve loved your patterns ever since finding them in Peppermint magazine! They are so detailed and thorough and beautiful!

I’ve made the Peppermint Playsuit before (I love it) but I’m hoping to hack it into a dress. I was just going to remove the curve on the front and back which is for the shorts, however I’m worried if I do that there won’t be any movement for my behind.

Any tips of hacking the pattern? Sewing is how I’ll survive this self isolation period haha. Thank you!

Or would the Peppermint Jumpsuit be easier to hack into a dress I wonder?


- Amy


Hi Amy,

I am so pleased to hear you have been enjoying my patterns

Hacking the Peppermint Playsuit into a dress is a great idea! I actually have a dress that I made from the Peppermint Jumpsuit and it is one of my most worn wardrobe items. It is great to wear over a t-shirt or long sleeve top, or can be worn on its own when it's warmer! I am sure that the Peppermint Playsuit pattern will work just as well!

Both of these patterns - the Peppermint Playsuit and the Peppermint Jumpsuit - can be hacked into a dress. In this tutorial I will show you how to do it using the Playsuit pattern, but you can use the same technique for hacking the Jumpsuit into a dress.

Prepare the pattern

ROMPER TO DRESS-01.jpg

1. To start, take the FRONT [1] and BACK [2] pattern pieces. You can trace them, or just use the original pattern - whichever suits you. If you are tracing the pattern, don't cut it out just yet - the paper around the edge will come in handy in the next step.

Cut / trace the pattern size based on your upper bust / bust measurement, as suggested in the pattern (p 5 in the instructions).

Extend centre front + centre back lines

ROMPER TO DRESS-02.jpg

2. As you suggested in your question - the first thing you need to do is remove the curve of the crotch on both the FRONT [1] and BACK [2] pattern pieces.

As you can see in the illustration (and on the pattern itself), the centre front is straight, so all you need to do is continue the lines down to the hem. You will need the stitch line to work out your hip measurement, so I suggest extending the stitch line (grey line on the pattern), as well as the cutting line (black line).

The centre back of the Peppermint playsuit has some shaping in it to make it more form fitting, so you will need to straighten this out. Mark a straight line from the top of the pattern piece down to the hem (the line needs to be perpendicular to the hem) - once again marking the stitching line and the cutting line. As you can see in the example, you are going to need to stick some paper onto the pattern piece so that you can make the centre back section straight - if you have cut out your pattern already.

Please note: for now we will leave the centre front and centre back seam lines. If you would prefer not to have these seam lines on your dress, I will show you how to remove them at the end of the tutorial.

cut out new pattern pieces

ROMPER TO DRESS-03.jpg

3. You can now cut along your new cut lines to create the new pattern pieces. I would also suggest adding new notches on the centre back seam - as illustrated (only if you plan to keep the centre back seam line).

Check hip measurement

ROMPER TO DRESS-04.jpg

4. Now it's time to check the hip measurement, and ensure that you have enough ease in this area. 

We first need to mark the HIP LINE. To do this you can either hold the front pattern piece up to your body and mark the location of your hip on the pattern, or you can make the marking through the centre of the pockets, which is the approximately where the hip line should be on this pattern.

Mark* the HIP LINE with a straight line that is perpendicular to the grainline. Transfer the HIP LINE on to the BACK [2] pattern piece, measuring up from the hemline so that the HIP LINE is in the same position on both pieces.

*The HIP LINE should only run from stitch line to stitch line, as when finding the finished measurements of a garment, we need to remove the seam allowance. If you have traced the pattern without marking the stitch line, simply take the measurement from edge to edge on the HIP LINE and remove 2.4cm (1in) - the sum of the seam allowance on each side of the pattern piece.

Do the maths

5. Now measure the two HIP LINES (front and back) and add together, then multiply by 2 (as each piece is cut as a pair). For example, in this tutorial I am using a size C. The front HIP LINE measurement is 28.4cm. The back HIP LINE measurement is 26.7cm. Added together this equates to 55.1cm. Multiplied by 2, the total finished garment hip measurement is 110.2cm.

If you are a straight size C (for example), this would give you 16.2cm ease at the hip, which is plenty. If your hip measurement is larger than the size you chose to cut, I will show you how to add width to the pattern at the hip to account for this.

Take your actual hip measurement and compare it to the HIP LINE measurement taken from the pattern. For example, let's say that your hip measurement is 105cm. Although it is less than the finished garment HIP LINE measurement, it only gives you 5.2cm ease at the hip (110.2cm - 105cm = 5.2cm). Although 5cm ease at the hip could be okay for certain patterns, I think this will be a little snug for this pattern - although this is up to you! You can always take a tape measure and measure your hips while sitting down to see if there will be enough ease in a pattern for your preference.

For the example I will show you how to add another 6cm ease to the pattern (although again, this amount will depend on your style and fit preferences).

To add 6cm to the hip circumference you will need to divide 6cm by 4 (as each pattern is cut as a pair - there are 4 pieces in total). 6cm / 4 = 1.25cm. Write that number down. This is how much we will be adding to each pattern piece at the HIP LINE.

Add width at hip (if required)

ROMPER TO DRESS-06.jpg

6. Get two large pieces of pattern paper and put your FRONT [1] and BACK [2] pattern pieces on the paper, using pattern weights (or whatever you have around) to hold them in place.

Partially trace around the pattern pieces.

For the FRONT [1] trace:
 - from the top of the side seam up the armhole
- across the top edfe
- down the centre front
- along the hem

For the BACK [2] trace:
- from the top of the side seam along the top edge
- down the centre back
- along the hem

Do not trace the side seam at this stage.

Use an awl / stiletto (or even just a pencil) to mark the pocket placement markings on the FRONT [1] piece.

extend hip line

ROMPER TO DRESS-06.jpg

7. On the HIP LINE on both the FRONT [1] and BACK [2] extend the HIP LINE so that it reaches the cut edge and continues onto the pattern paper underneath by a few centimetres.

Now, take the measurement that you found in STEP 5. Measuring from the cut edge on the hip line, mark the distance of the measurement (e.g. 1.25cm) on the HIP LINE on both the FRONT [1] and BACK [2].

Pivot pattern

ROMPER TO DRESS-07.jpg

8. Now you need to pivot the pattern so that you can draw a new side seam - that will be adjusted for the new hip measurement. To do this, take a pin, or an awl / stiletto and put it in the corner where the side seam meets the top stitch line - as marked with red circles in the illustration above. Carefully rotate the pattern so that the side seam moves towards the line marked in the previous step. When you reach the point, use pattern weights to hold the pattern pieces in place. Trace the side seam in the new location. Do this for both the FRONT [1] and BACK [2] pattern pieces.

Finalise pattern + add pattern markings

ROMPER TO DRESS-08.jpg

9. Remove the original pattern pieces to show your new pattern lines underneath. You will need to join the hemline to the side seam in the corner of each piece, due to the alteration made. Simply continue the straight line of the hem line and then continue the side seam until the lines intersect.

Transfer the pattern details (Pattern name - re-naming if you like, pattern piece name and number, grainline etc.) from the original pattern to the new pattern pieces. 

Remove centre front / centre back seams

ROMPER TO DRESS-09.jpg

10. If you would like to remove the front and back seam lines (as they are no longer required from a functional perspective) you can remove them by removing the 1.2cm seam allowance from the centre front and centre back.

You will now need to change the cutting instructions to CUT 1 ON FOLD. Adjust the grainline to indicate this, as illustrated.

For more details about pattern markings, you can check out this blog post

If you would like to add more length to the pattern, you can use this tutorial

I'd love to see your finished dress. Please send me a photo or tag In the Folds on Instagram!

I hope you are keeping well at this strange time. I appreciate all the responses I got to my previous email and I feel very lucky to be in a position to offer a bit of joy, inspiration and distraction at such a difficult time. 

Happy sewing,

Emily


resources mentioned in this issue

  • In the Folds patterns can be found here.

  • Peppermint Playsuit pattern can be found here.

  • Peppermint Jumpsuit pattern can be found here.

  • Peppermint Playsuit instructions can be found here.

  • In the Folds sizing chart can be found here.

  • Tools for patternmaking blog post can be found here.

  • Adding pattern markings to your patterns blog post can be found here.

  • How to lengthen a pattern blog post can be found here.

  • In the Folds Instagram account can be found here.


P.S. Would you like to know what the Q & A series is all about? This page tells you a little bit more about the motive behind the series. Past issues from the Q & A series can be found here.

Don't have a question, but found this newsletter helpful? I'd love to hear from you! Get in touch and say hi. 


More posts in the series