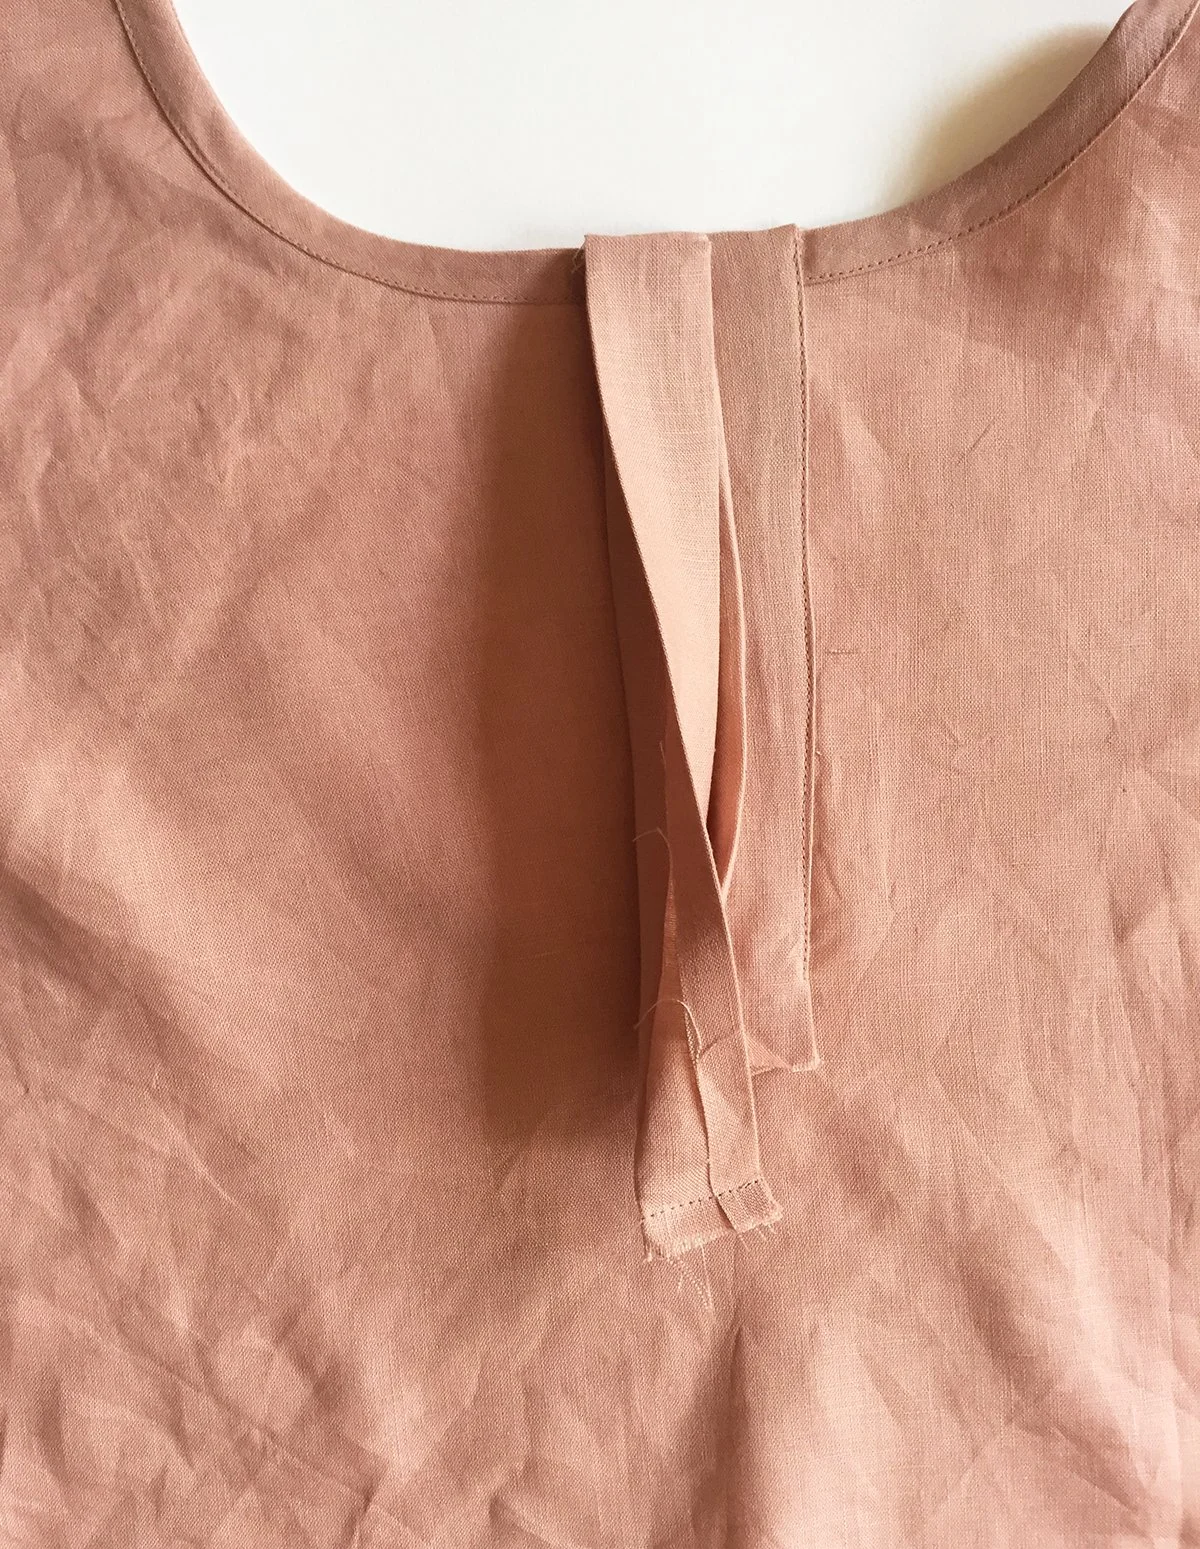
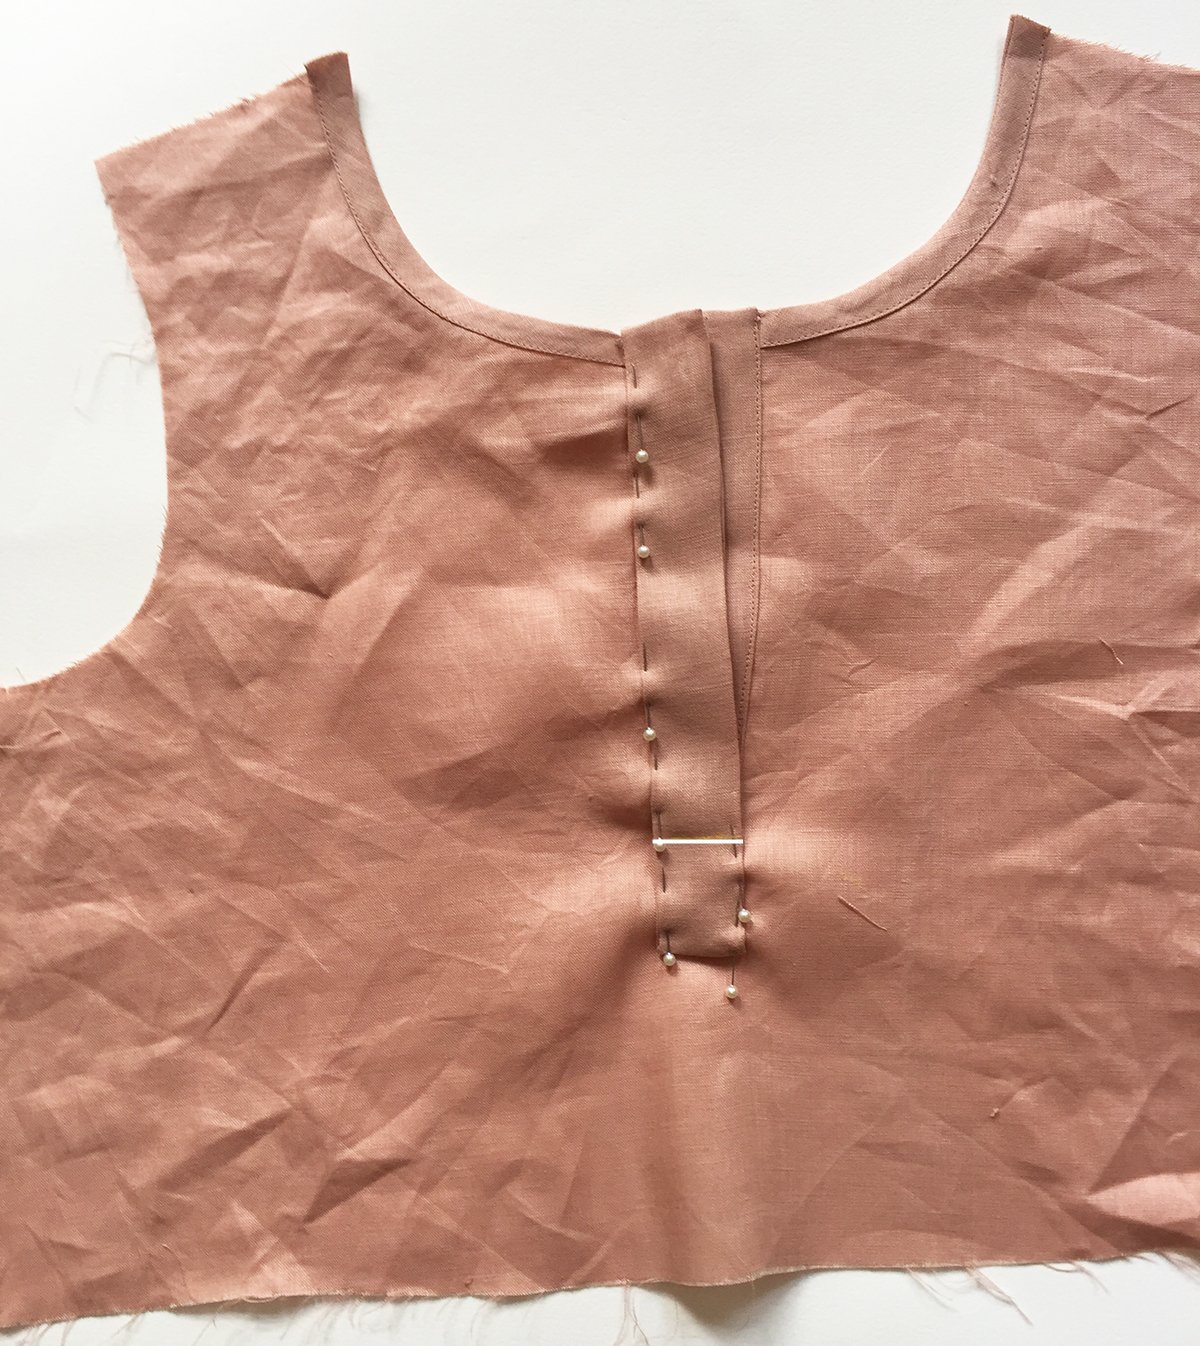
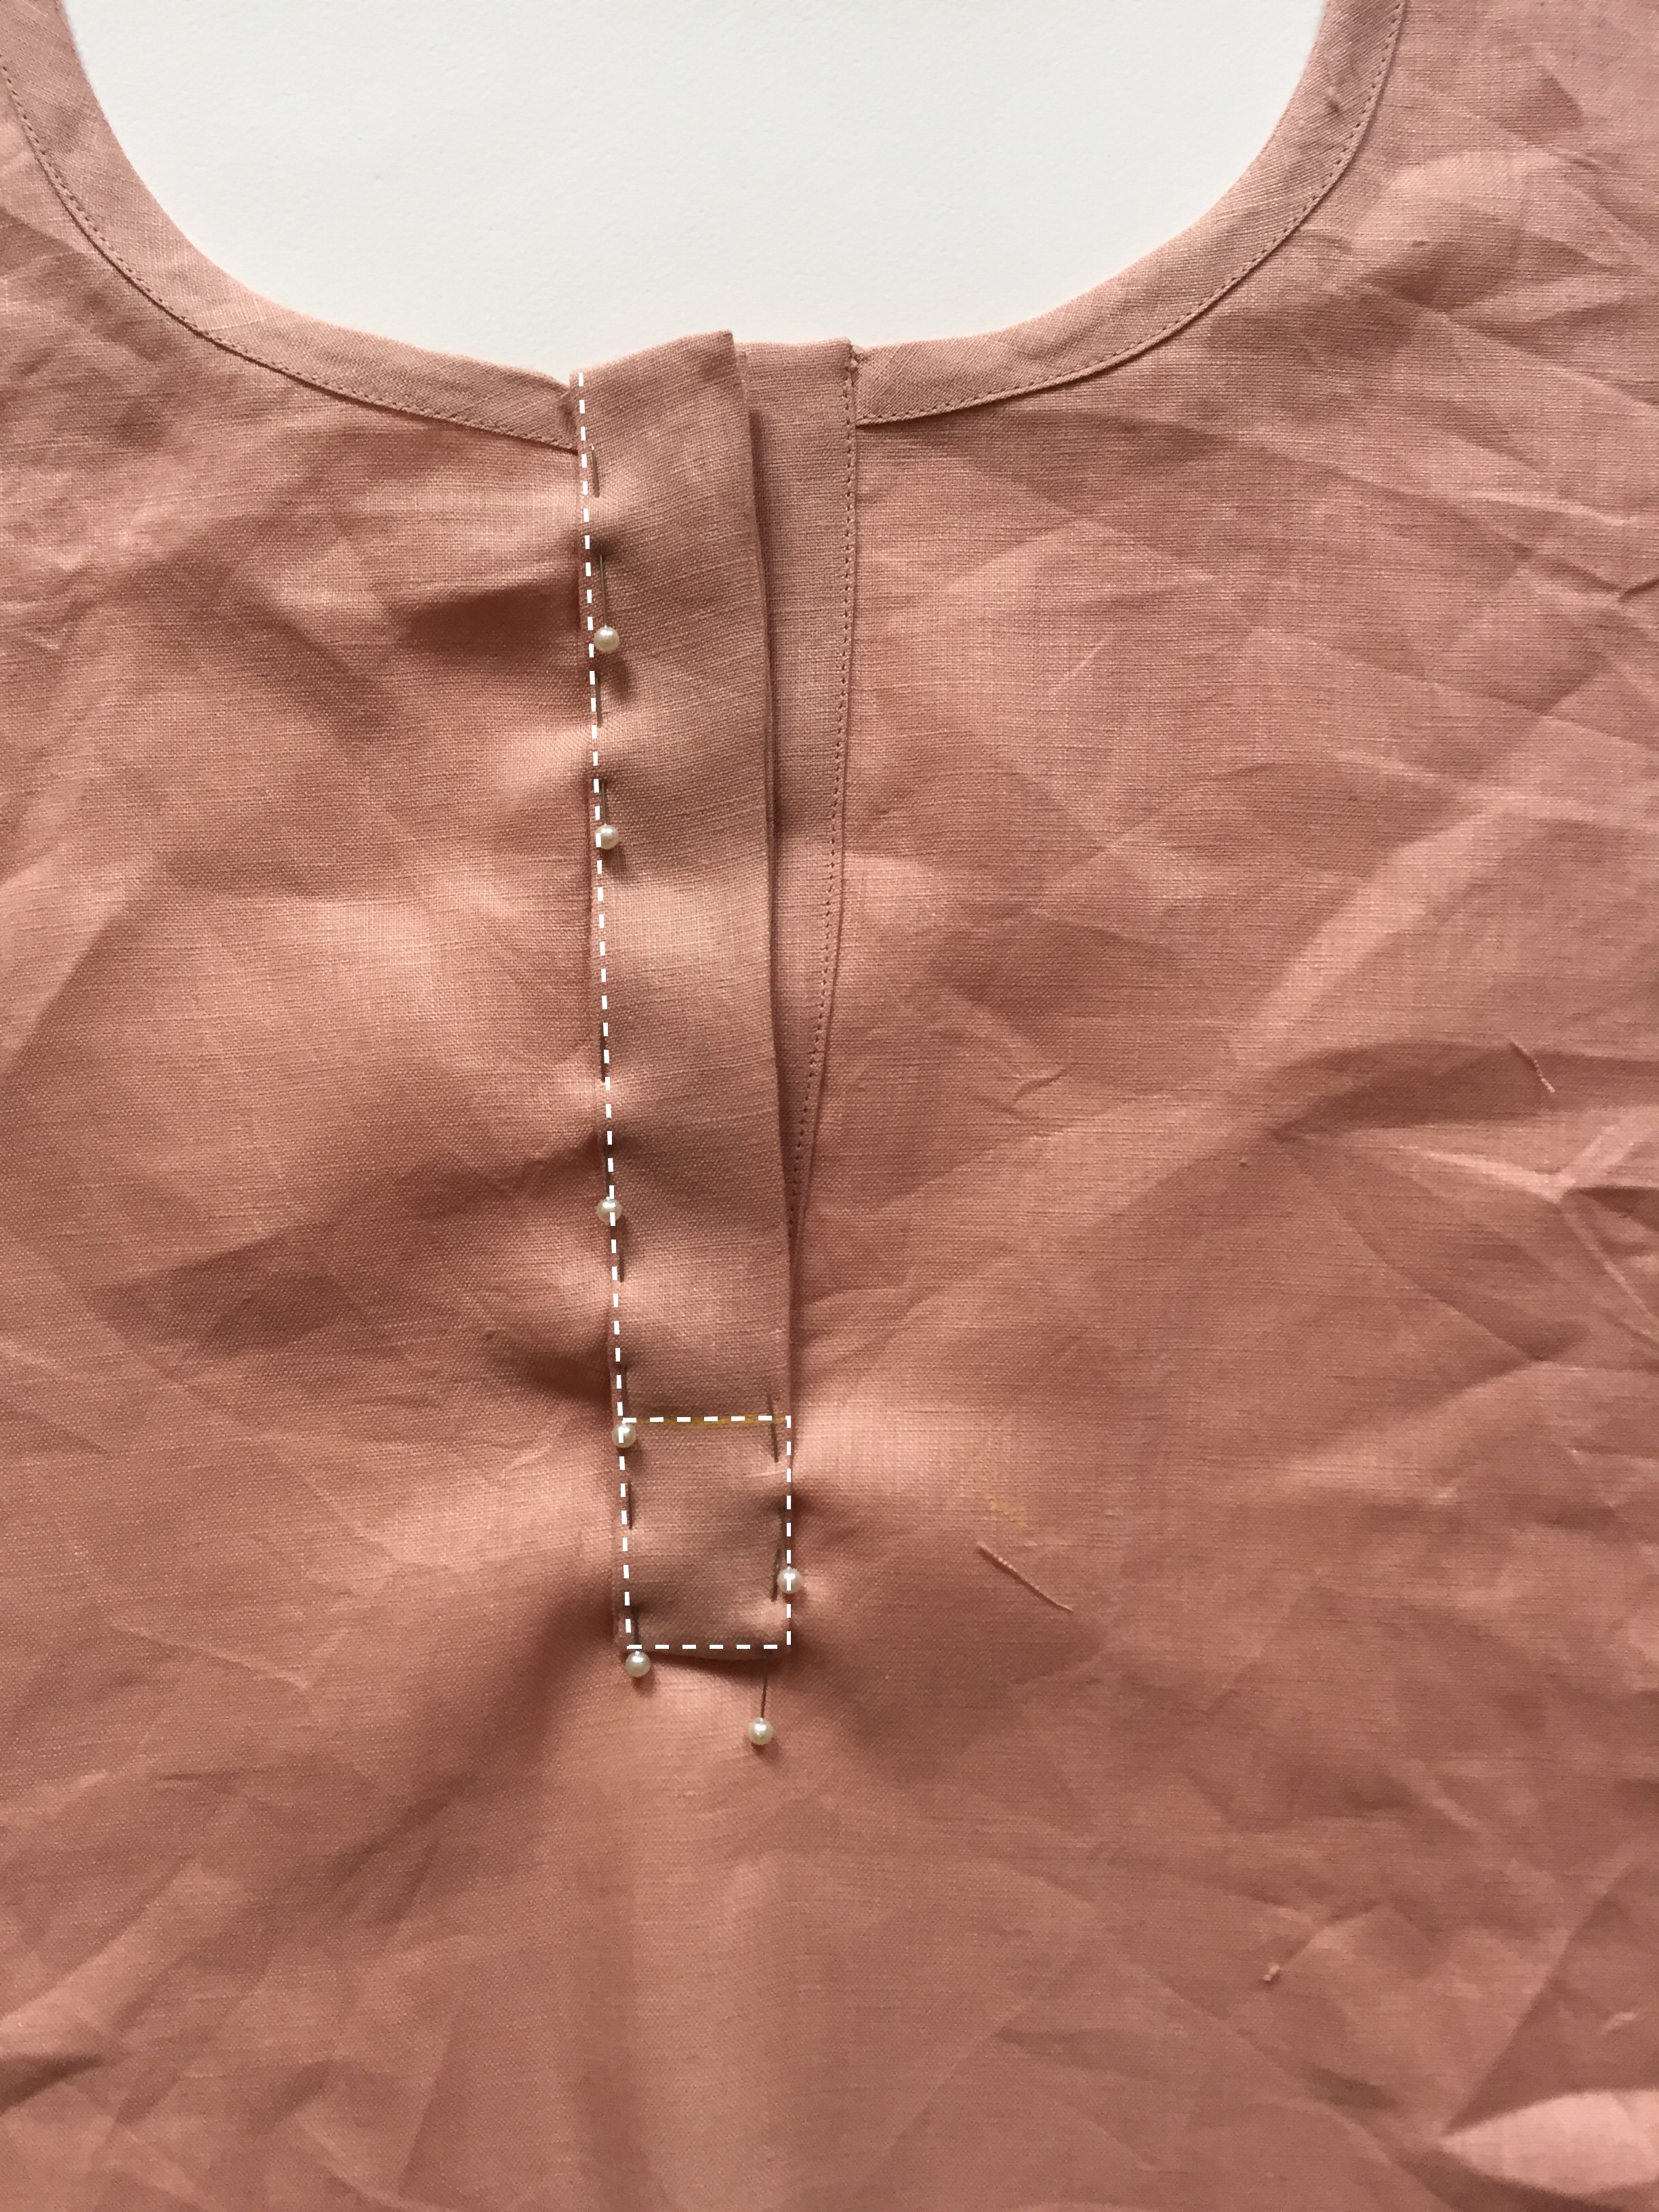
Making a cardigan reversible follows the same process as lining a cardigan. This tutorial gives you a step-by-step and covers everything you need to keep in mind, including what fabrics to choose to avoid bulkiness.
ISSUE 121 - HOW TO MOVE BUST DARTS ON A PATTERN
ISSUE 120 - Changing a high-low hem to a straight hem
THE Q & A SERIES
Changing a high-low hem to a straight hem
Hello from France,
I want to make the Collins top but I would like the front and back to be the same length. Is it possible? How can I make the changes? Can you help me?
Thank you.
Liliane
At In the Folds it is our mission to help sewists make clothes that will be worn, loved and cherished. A big part of this is empowering makers by teaching them the skills to alter pattern fit and style to better suit their needs.
When altering the design of a pattern, we call this ‘pattern hacking'.
What is pattern hacking?
Pattern hacking means that you use an existing pattern to draft a new pattern.
This could mean just making small changes, such as adding a pocket or changing the neckline. It could also mean making large-scale changes, such as adding a sleeve to a sleeveless pattern or combining multiple patterns to create an entirely new design.
Why pattern hack?
The main benefit of pattern hacking is that it saves time! This is because you can take a pattern that you already know fits you well and create a new design. You don't need to dive back into assessing the fit all over again, as you have already done that work with the original pattern.
For large-scale hacks you may still need to make some fit alterations after checking your toile, but these will be far fewer than if you had started with a new pattern.
Pattern hacking also increases the longevity of a pattern, which ultimately saves you money. For example, you may see a garment style that you like somewhere, and with some pattern hacking skills up your sleeve, you will be able to adapt a pattern that you already have in your stash, rather than buying another pattern.
Another reason you might choose to hack a pattern is that sometimes it is difficult to know what changes you would like to make until after you have spent some time wearing it. You may start to think, 'If only it was a bit longer...' or 'If only it had pockets...' Pattern hacking gives you a chance to make the clothing you want to wear without needing to draft patterns from scratch.
Pattern hacking is also a great opportunity to learn patternmaking skills and build on these skills gradually over time. Like any new skill or hobby getting good at it will take time! Be patient and enjoy the process. After all, that's what it's all about!
In the Folds Collins top
The Collins top is a loose-fitting trapeze-shaped top designed for woven fabrics and is perfect for hot summer days!
One of the main features of the Collins top is that it has a high-low hem. This means that the front is shorter than the back. But, with a few pattern hacking skills, you can alter the hem so that it is the same length around the whole top.
You can choose to add length to the front (so that the whole top is the same length as the back) or remove length from the back (so the whole top is the same length as the front). We suggest looking at the product photos to work out your preference. Or, compare the length of the centre front panel pattern piece to a top you already own.
Whatever you decide, this tutorial will show you how to achieve both options.
First steps of changing a high-low hem to a straight hem
Step 1
Due to the panel lines in the top, we first need to put the pieces together as if they have been sewn so that we have a full front piece and a full back piece.
Place the front panels together as if they have been sewn - STITCH LINE on STITCH LINE. (Stitch lines are the grey lines on In the Folds patterns). Tape or pin in place. If taping, use small pieces of tape that can be easily removed (eg. magic tape).
Repeat for the 3 back panel pieces.
Step 2
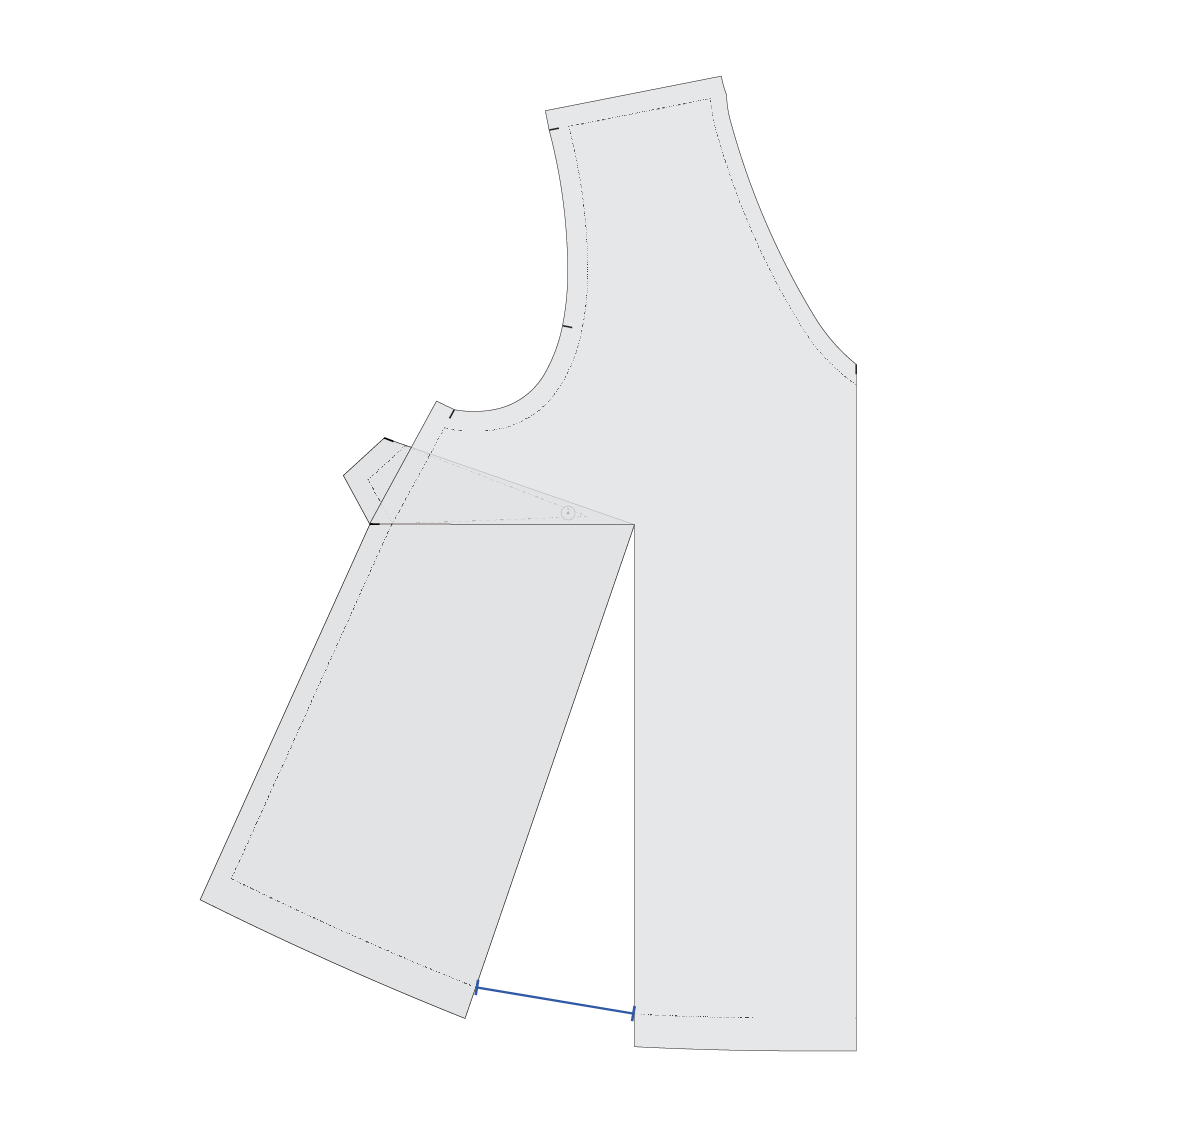
Place the front and back together at the side seam. You will need to flip the front to do this. Line up the pieces at the top of the side seam.
Rotate the front so that the CENTRE FRONT and CENTRE BACK are aligned. Remember the CENTRE BACK has seam allowance - this is why only the pieces that will be cut on the fold line up.
Measure the length between the front and back hems at the CENTRE FRONT / CENTRE BACK. Record the amount.
Step 3
Flip the front back over and line up the pieces at the side seam STITCH LINE as if they have been joined.
If removing length from the back, move to STEP 8. If adding length to the front, continue to Step 4.
Lengthening the front of the Collins top
Step 4
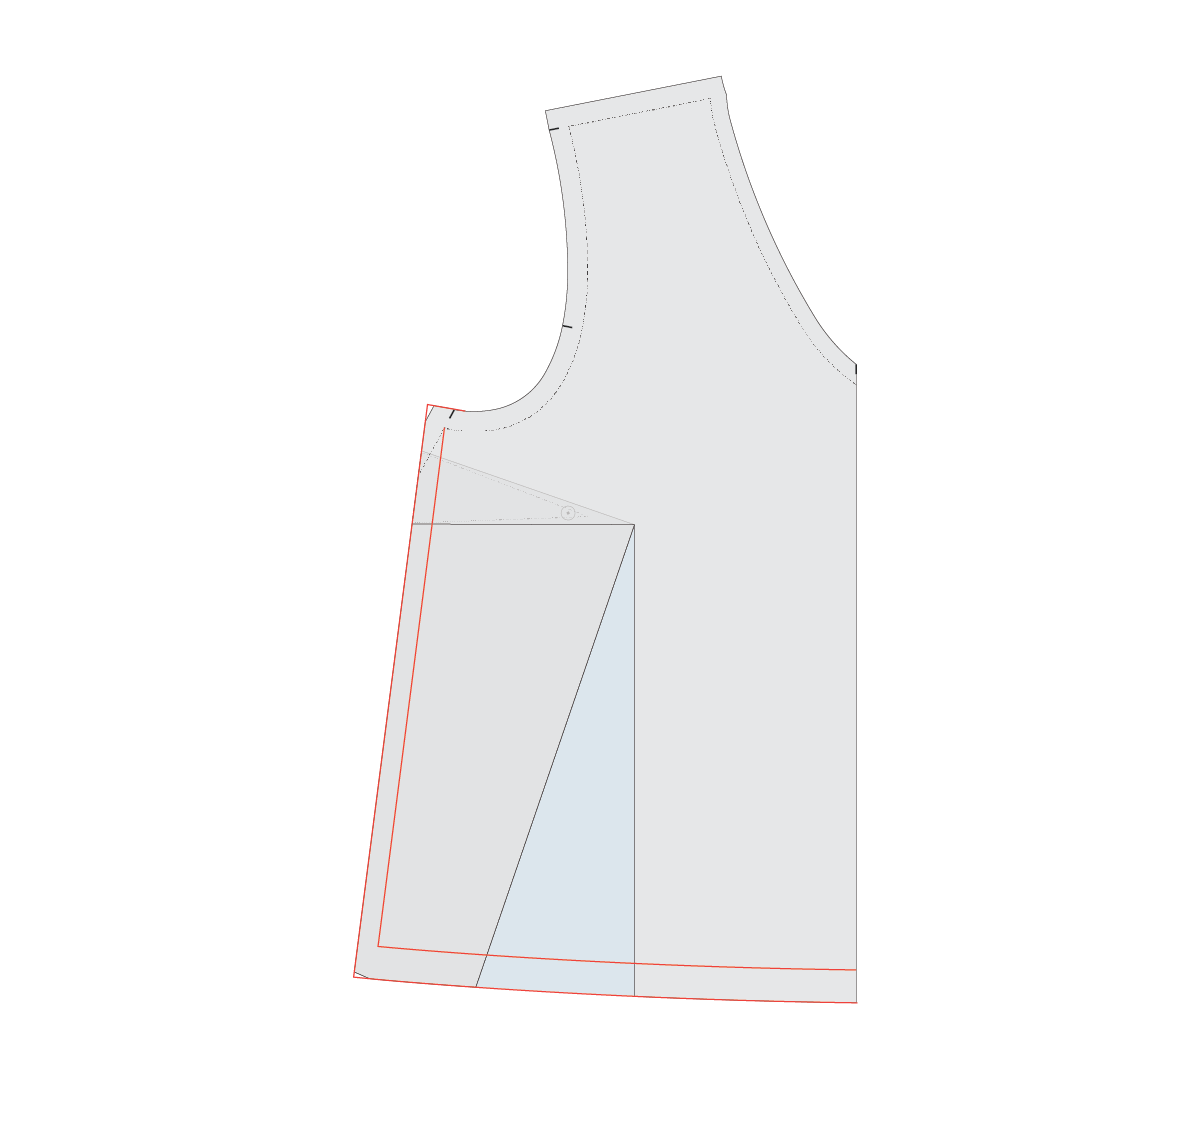
Tape/glue pieces of pattern paper to the bottom of each pattern piece that will be lengthened (front panels and side back panel). Make sure you’re attaching the paper to each individual piece, as you will be separating the pieces back into panels after making the alteration.
Extend the CENTRE FRONT by the amount you will be lengthening the front by (found in Step 2).
Step 5
Re-draw the hemline with a smooth curve from the new CENTRE FRONT hem point. You want the line to transition back into the original hem around the back panel line. The new hemline needs to meet the CENTRE FRONT at a right angle. This ensures a smooth line when the piece is cut on the fold. It might take a couple of attempts to create the curve you want. Use a pencil so you can erase it and try again if you need to. We suggest drawing curves with broken lines as it makes it easier to get an accurate line.
Step 6
Extend the panel lines onto the attached paper. Be sure to extend the STITCH LINE, rather than the edge of the pattern pieces.
Step 7
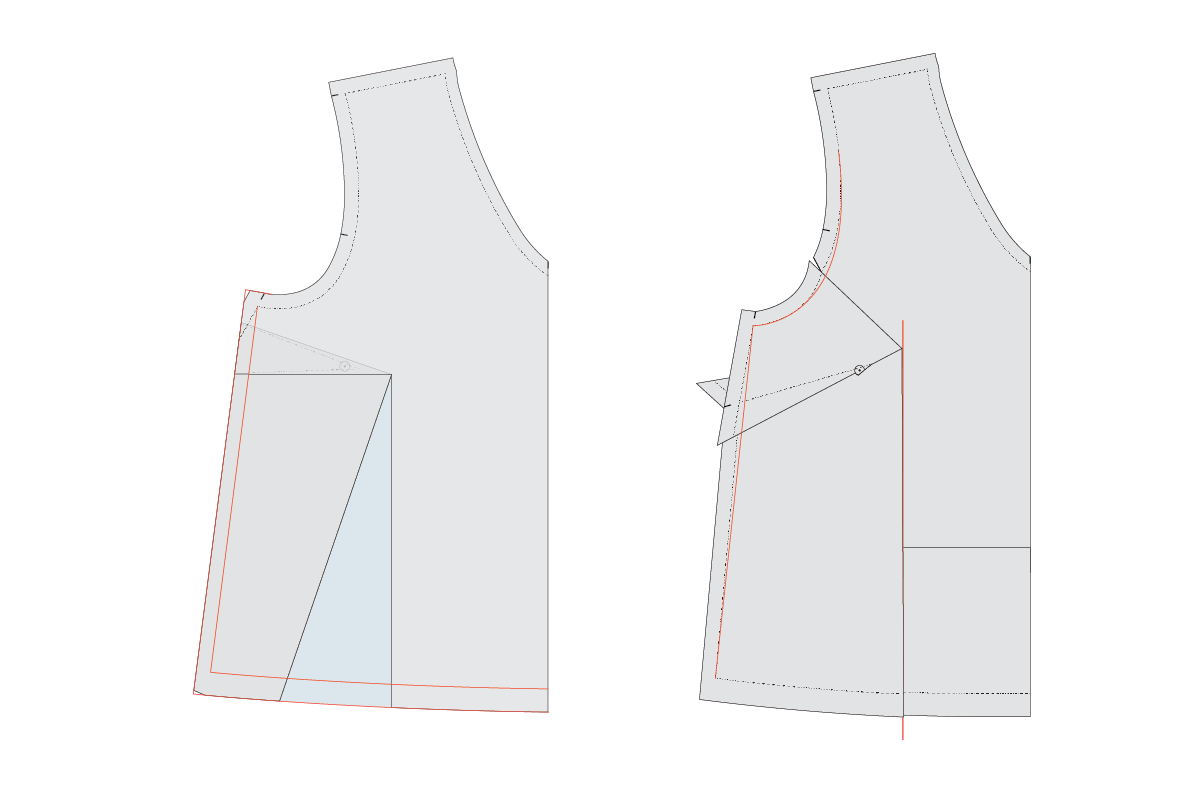
Separate the panel pieces and add seam allowance onto the new lines. Cut along the new lines to remove excess paper.
Due to how much the FRONT SIDE PANEL piece has changed, rotate the piece slightly so that the hem sits closer to a straight line. Alter the grainline to reflect this.
The pattern is now complete and you’re ready to get sewing!
Shortening the back of the Collins top
Step 8
Measuring up from the CENTRE BACK hem, mark the amount to remove from the back length (found in Step 2).
Step 9
Re-draw the hem line with a smooth curve from the new CENTRE BACK hem line. You will want the line to transition back into the original hem around the front panel line.
The new hemline needs to meet the CENTRE BACK at a right angle. This ensures a smooth line when the piece is cut on the fold. It might take a couple of attempts to create the curve you want. Use a pencil so you erase it and try again if you need to. Cut along the new hemline to remove the excess length.
Separate the panel pieces and you’re ready to cut the pattern from fabric.
We hope this tutorial got you thinking about all the different ways you can adjust a pattern to make it your own!
Happy hacking!
Emily
RESOURCES MENTIONED IN THIS ISSUE
More info about Curated by ITF can be found here.
Barkly skirt Hack Kit is currently only available with a Curated by In The Folds subscription for the month of July 2022. During this time it can be found here. It will be released as a standalone resource in the future.
Collins top pattern can be found here.
How to add seam allowance to a sewing pattern tutorial can be found here.
For more issues of the Q & A series, you can check out the archive here.
WHAT YOU’VE BEEN MAKING
Peppermint Everyday dress made by @emilylightly
Barkly skirt hack made by @shuaychong
MORE POSTS IN THE SERIES
ISSUE 119 - How to raise an armscye on a pattern
THE Q & A SERIES
How to raise an armscye on a pattern
Hi there!
I enjoyed seeing your answer to last week's question and I have a follow-up question. Rather than how to lower the armscye on a pattern, how do I go about raising the armscye?
Thanks,
Jenna
WHAT IS AN ARMSCYE ADJUSTMENT?
We’re happy to hear you found last week’s tutorial interesting!
As we explained in last week's email, an armscye (or armhole) adjustment is where you redraw a sewing pattern to make it fit your body. In this case, we need to raise the armscye to accommodate the unique shape of the body.
How do I know if I need to raise an armscye?
You'll know you need to raise the armscye of a garment if:
The armhole sits lower than you would like. In this case you might see the garment sitting lower than the top of your bra.
The armhole feels too long - it feels as though there is too much fabric in the armscye.
How to raise the armscye on a pattern
The first question to ask yourself is - how much would you like to raise the armscye by?
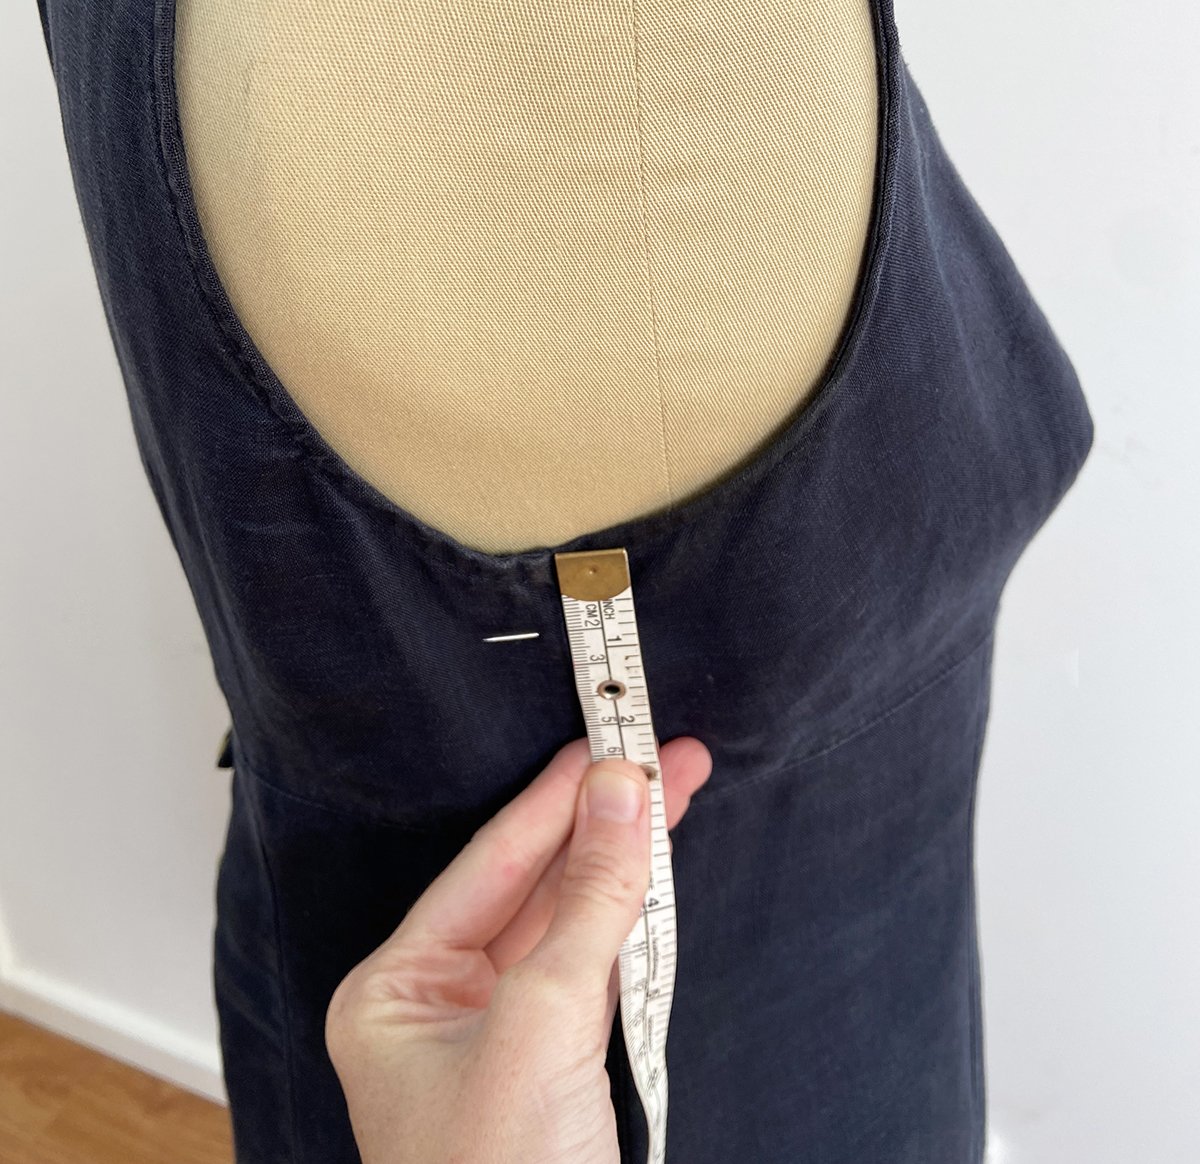
The easiest way to work this out is by trying on the garment. Stand side-on in front of a mirror and lift your arm. Take a ruler and hold the top of it where you would like the bottom of the armscye to sit. Record the distance between the top of the ruler and the original armscye position. You could use a tape measure to do this, but we find it easier to use a ruler as it remains straight - if you have a friend to help you then a tape measure is fine.
It’s also a good idea to visualise how this will change the shape of the armhole, as when you raise the armscye it will also make it smaller. In the illustration above we have marked the new armscye on the garment so you can visualise the alteration before making it.
Make the adjustment on the pattern
Step 1
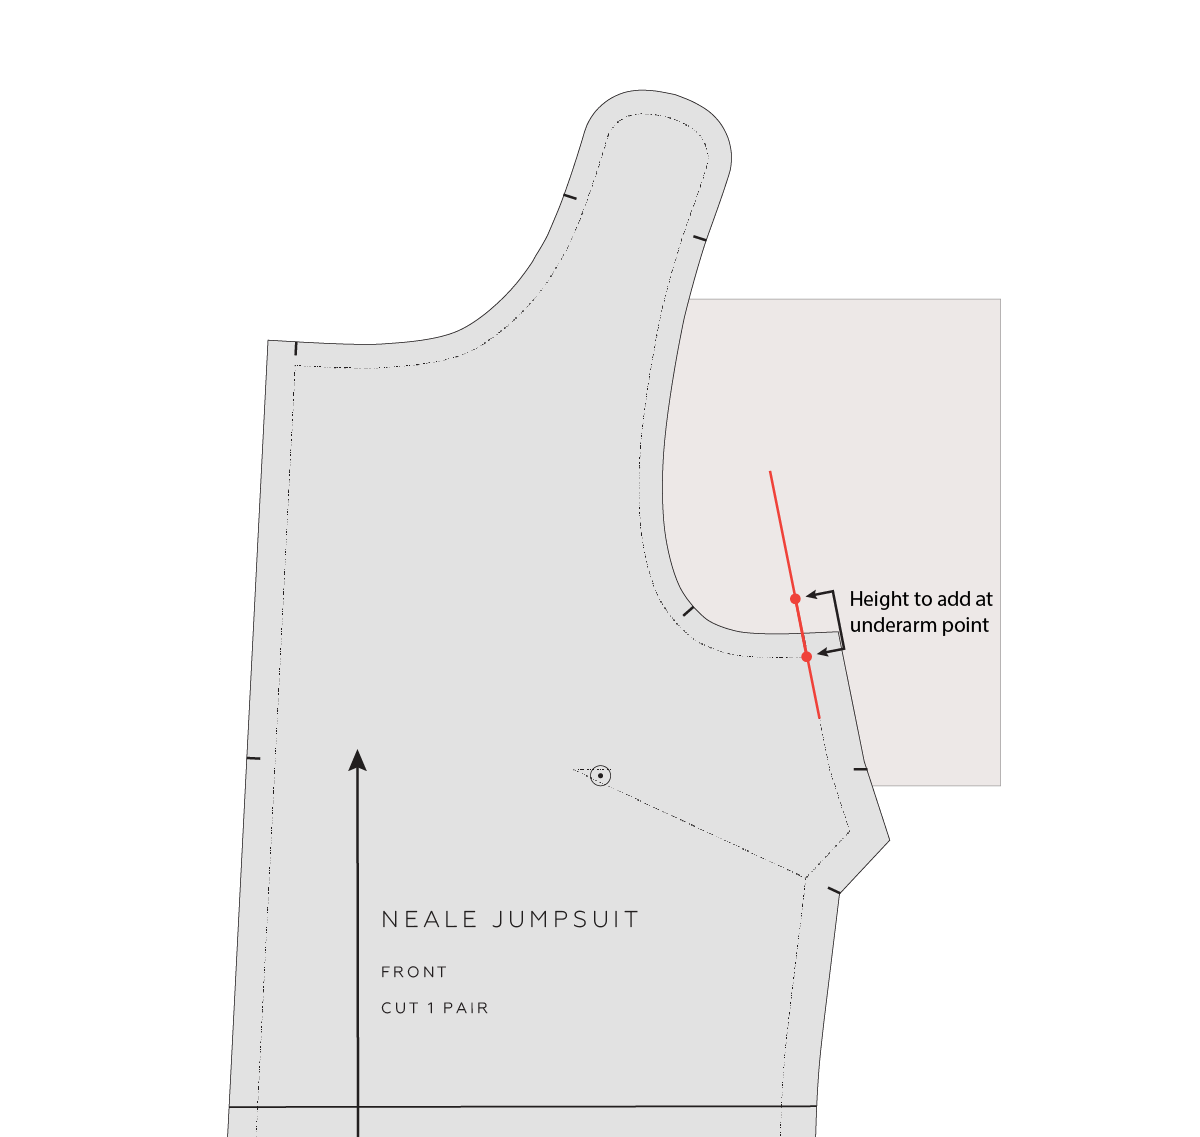
Take some pattern paper and tape / glue to the front armhole. This is the area we will be raising up and filling in with more paper (which means more fabric when we cut the pattern).
Step 2
Take a ruler and pencil. Extend the side seam stitch line up onto the attached paper. Be sure to follow the angle of the original side seam.
On In the Folds patterns the stitch line is marked on the pattern (the stitch line is the pattern without seam allowance), but if your pattern doesn’t have the stitch line marked, you will need to mark it first.
Step 3
On the line marked in the previous step, measure up from the point where the side seam stitch line meets the armhole stitch line, mark the amount you would like to raise the armhole by (this is the measurement you found when you took the measurement from your toile).
Step 4
Redraw the armscye curve - joining the point marked in STEP 3 to the original armscye stitch line. We suggest joining the armscye about one-third of the way around the curve when measuring from the bottom, although this will depend on how much you are raising the armscye by. If you are only raising the armhole by more than 1.5cm (5/8in), you may need to join the new line higher up the armscye to ensure the transition remains nice and smooth.
This will take a bit of trial and error to get a line you are happy with. Take it easy and use a pencil. A French curve or Patternmaster will come in handy for this.
The line that meets the side seam should be fairly flat by the time it meets the side seam stitch line. This will ensure the armscye doesn’t come to a point under the arm. Get it as smooth as you can, but we will check this again in a moment, so the line does not have to be finalised yet.
Step 5
Repeat STEPS 1-2 on the BACK pattern piece. You need to raise the armscye on the FRONT and BACK by the same amount.
Step 6
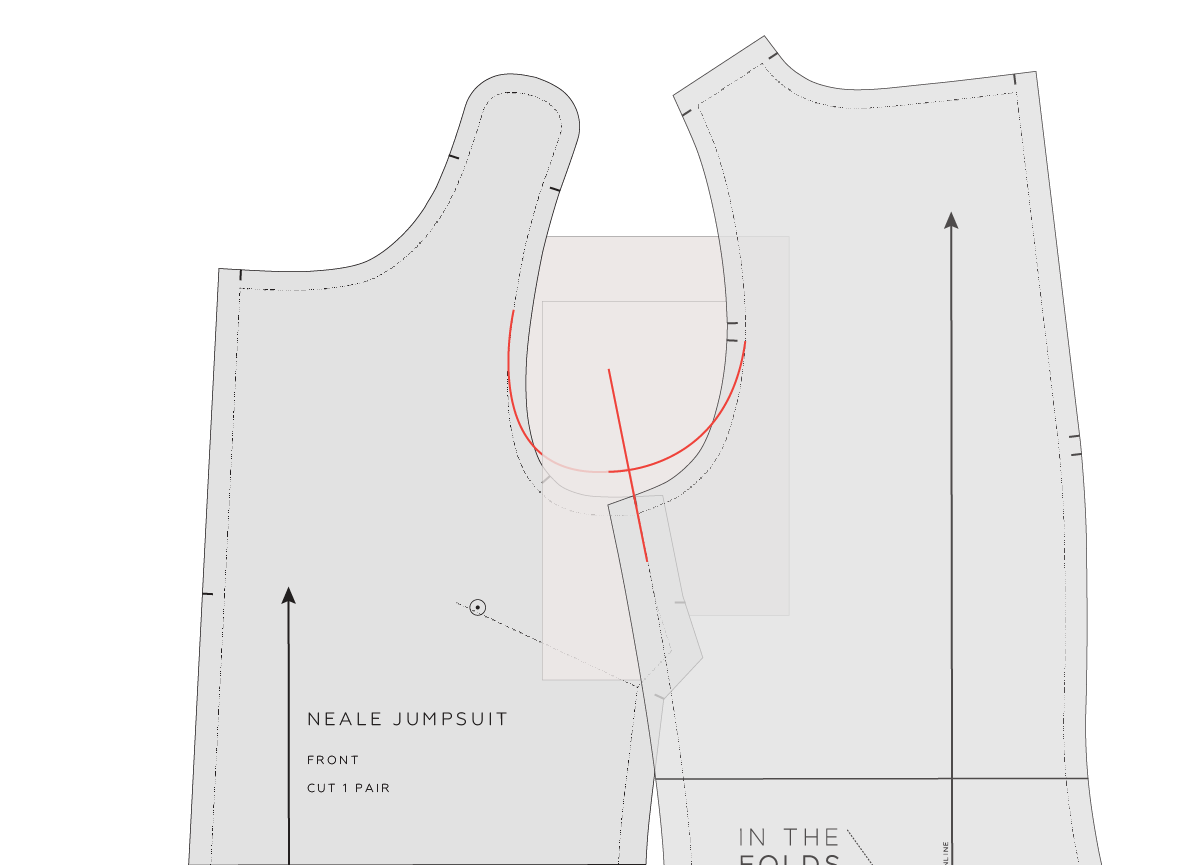
Place the FRONT and BACK pieces together at the side seam, stitch line on stitch line, as if the pieces have been joined.
Check that the curve from the front armscye runs smoothly through the side seam to the back and there are no dips or bumps.
Smooth out the armscye if it needs it and use a tracing wheel to transfer the markings to the overlapped section of the pieces.
Step 7
Add seam allowance onto the new armscye stitch lines on the FRONT and BACK. The seam allowance needs to be the same amount that was on the original armscye line. More information on how to add seam allowance to a pattern can be found here.
Cut along the new armscye seam allowance line to remove the excess paper.
Step 8
Move any notches to the new pattern edge. In this case, it’s the seam allowance notches on the side seam and the FRONT armscye notch.
Step 9
To finalise the pattern, make the same adjustment to the armhole facing pieces (if the pattern has facings).
Happy sewing,
Emily
For more issues of the Q & A series, you can check out the archive here.
WHAT YOU’VE BEEN MAKING
Peppermint Pleated skirt made by @adymadie
Hove jacket made by @sewing_kat
MORE POSTS IN THE SERIES
ISSUE 118 - How to lower the armscye on a pattern
THE Q & A SERIES
How to lower the armscye on a pattern
Hi, I have a question about armscyes. I have a couple of sleeveless dresses and tops which feel uncomfortable in the underarm area - they feel too tight. Is there an easy way to lower the armscye for a more comfortable fit? Or do you have any other suggestions on how to improve the fit?
Thank you!
Jennifer
Thirlmere, Australia
If you've ever worn a garment that doesn't fit correctly under the arms you'll know how uncomfortable (we'd even go as far as to say painful!) it can be. Aside from comfort, wearing ill-fitting garments can actually lead to them wearing out earlier than they should. Unnecessary stress on the armhole can cause seams to break, and in some situations, the fabric may even tear and cause irreparable damage to the item. Sustainability is something we care a lot about so we definitely want our clothes to last as long as they can, especially when we've dedicated many hours to making them by hand.
Thankfully, lowering an armscye is a relatively simple pattern adjustment to make that will have a significant impact on the fit and wearability of your clothes. So let's get to it!
What is an armscye adjustment?
An armscye (or armhole) adjustment is where you redraw a sewing pattern to make it fit your body. In this case, we need to lower the armscye to accommodate the unique shape of the body.
How do I know if I need to make an armscye adjustment?
You'll know you need to lower the armscye of a garment if:
A garment restricts the movement of your arms and shoulders. In this case, the garment will feel tight and you may even find that the armhole seams cut into the front of your armpits.
You notice pulling across the front of a garment.
Sometimes a tight armscye is caused by not having enough length in the area between the shoulder and the bust (rather than indicating the need to lower the armscye). The easiest way to check this is to determine whether the bust darts are in the correct position. If they are sitting too high, this could be an indication that you need more length added to the pattern between the shoulder and bust. In which case you can lengthen the pattern above the bust line using this tutorial. By lengthening the pattern in this way, you will be lowering the armsyce as well as adding more length through the whole chest. If the bust darts are in the correct position then it is likely you just need to lower the armscye.
How to lower the armscye on a pattern
The first question to ask yourself is - how much would you like to lower the armscye by?
The easiest way to work this out is by trying on the garment that feels too tight at the armscye. Place a horizontal pin in the side seam under the arm in the position where you would like the bottom of the armscye to sit.
It’s also a good idea to visualise how this will change the shape of the armhole, as when you lower the armscye it will also make it wider. In the illustration above we have marked the new armscye on the garment so you can visualise what this change will do.
Also, think about the underwear you might wear with the garment, and consider if lowering the armscye will impact this. Will the underwear be visible by making this change?
When you are happy with the amount you will be lowering the armscye by, measure this on the garment from the top of the side seam down to the pin. Record the measurement.
Make the adjustment on the pattern
Step 1
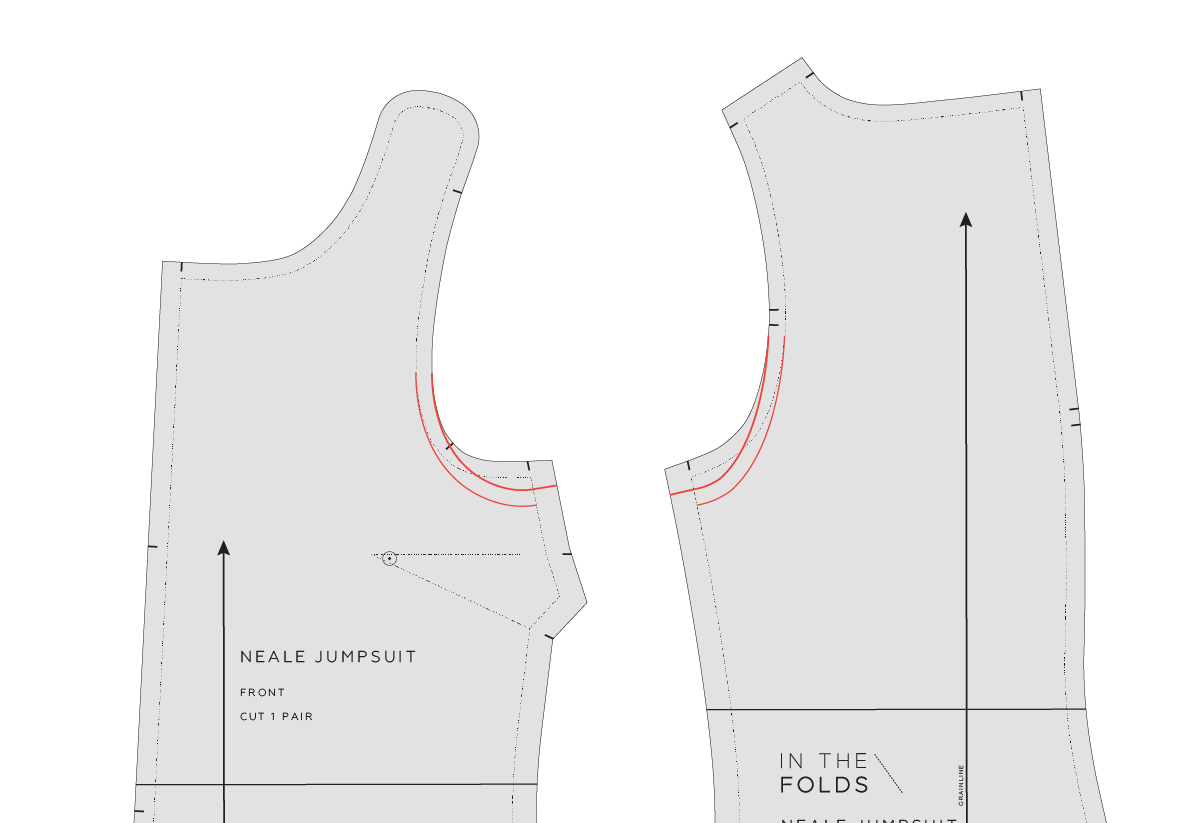
Take the FRONT piece of your pattern and mark the new armscye point on the side seam. Measuring from the point where the side seam stitch line meets the armscye stitch line. On In the Folds patterns the stitch line is marked on the pattern (the stitch line is the pattern without seam allowance), but if your pattern doesn’t have the stitch line marked, you will need to mark it first.
Step 2
Redraw the armscye curve - joining the point marked in STEP 1 to the original armscye stitch line. We suggest joining the armscye about one-third of the way around the curve when measuring from the bottom. If the armscye feels tight in other parts of the curve (not just under the arm), you might choose to join the armscye higher up so that the curve becomes larger.
The line that meets the side seam should be fairly flat by the time it meets the side seam stitch line. This will ensure the armscye doesn’t come to a point under the arm. Get it as smooth as you can, but we will check this again in a moment, so the line does not have to be finalised yet.
Drawing curves takes a bit of practice. If you're planning on making adjustments to patterns regularly, a French curve is a useful sewing tool to add to your collection, and will help greatly in this example.
Step 3
Repeat STEPS 1 and 2 on the BACK pattern piece. You need to lower the armscye on the FRONT and BACK by the same amount.
Step 4
Place the FRONT and BACK pieces together at the side seam, stitch line on stitch line, as if the pieces have been joined.
Check that the curve from the front armscye runs smoothly through the side seam to the back and there are no dips or bumps.
Smooth out the armscye if it needs it and use a tracing wheel to transfer the markings to the overlapped section of the pieces.
Step 5
Add seam allowance onto the new armscye stitch lines on the FRONT and BACK. The seam allowance needs to be the same amount that was on the original armscye line. More information on how to add seam allowance to a pattern can be found here.
Cut along the new armscye seam allowance line to remove the excess paper.
Step 6
Move any notches to the new pattern edge. In this case, it’s the seam allowance notches on the side seam and the FRONT armscye notch.
Step 7
To finalise the pattern, make the same adjustment to the armhole facing pieces (if the pattern has facings).
Learning how to alter patterns is the thing that allows you to really step your 'me-mades' up a notch, whether it’s for achieving a better fit or tailoring a garment to suit your tastes and preferences. This is a key element of our sewing subscription Curated by ITF. Each month we learn loads of different techniques to adjust a pattern to create a myriad of new options. So if you’ve been wanting to learn some pattern making skills but don’t know where to start, check out Curated by ITF today!
Happy sewing,
Emily
RESOURCES MENTIONED IN THIS ISSUE
How to lengthen a pattern above the bust - tutorial here.
How to add seam allowance to a sewing pattern - tutorial here.
More information about Curated by In the Folds can be found here, and details of our latest issue can be found here.
For more issues of the Q & A series, you can check out the archive here.
WHAT YOU’VE BEEN MAKING
Peppermint Wrap skirt made by @gabby_sews
Darlow pants (hacked into shorts) made by @shuaychong
MORE POSTS IN THE SERIES
ISSUE 117 - How to do a forward shoulder adjustment
ISSUE 116 - High bust measurement on In the Folds patterns
THE Q & A SERIES
High bust measurement on In the Folds patterns
Hello there!
I am a member of Curated by ITF which I enjoy. I do, however, tend to look at the patterns that you produce for Peppermint Magazine. I have just downloaded the Pleated Summer Dress and I have a couple of questions:
What cup size has been used for the dress block, please? You quote height but not upper bust size. This helps me understand if I need to do an FBA even before making up a toile.
One of the last instructions is around buttonholes and placing them in the placket. Surely it would be easier to do the buttonholes before actually attaching the skirt so that you have less fabric to wrestle???? (fabric wrestling is popular sport for me!)
I look forward to hearing from you.
Thanks
Zoe
At this stage, all In the Folds patterns are drafted for a B cup bust (except for the Whitlow robe which we recently released in our extended size range). The Pleated summer dress pattern was produced a number of years ago, before we started including high bust measurements in our instruction booklets. The same block was used that we currently use and you can find the high bust measurements here.
Feel free to place your buttons and buttonholes at any point you like. You could even do them as soon as the placket is complete as the neckline is all finished at this point. I just generally do them at the end as it was the way I was taught, but there is no particular reason to do that and it's always a good idea to construct garments in the ways that are comfortable to you (and avoid fabric wrestling if possible).
I think we often can second guess ourselves and assume the instructions know better - but there are often times when you are better off choosing a method or order of construction that suits your preferences. Even I fall into this trap sometimes when I use another company's patterns and then kick myself later for not just doing it the way that I enjoy / that makes me feel comfortable.
Happy sewing,
Emily
For more issues of the Q & A series, you can check out the archive here.
WHAT YOU’VE BEEN MAKING
Everyday dress made by @bymillamutten
Hove jacket made by @easternweston
Hove jacket made by @hsudolly
Darlow pants made by @letitiawinter
MORE POSTS IN THE SERIES
ISSUE 115 - How to add an elastic waist back to the Barkly skirt pattern
THE Q & A SERIES
How to add an elastic waist back to the Barkly skirt pattern
Hi Emily!
I'd like to have a go at making a Barkly skirt, but I'm concerned about putting in a heap of time and effort only to make a skirt that no longer fits me because of my changing waist size. Any thoughts?
Hello!
Sometimes we avoid sewing fitted patterns like the Barkly skirt because we don't want to spend time making an item of clothing that ends up sitting in our wardrobe unworn.
Fluctuating body measurements is a common experience - so please know that you are not alone! For this very reason, we included how to add an elastic waist back in our latest Curated by ITF project - the Barkly skirt Fit Kit, and I'm so pleased I can share it with you now!
When to add an elastic waist back
Although this is more of a pattern hack rather than a fitting adjustment, we know that for many, skirts without elastic waistbands can cause discomfort, particularly when sitting.
If your waist measurement regularly changes or you have a large difference between your waist measurements when sitting compared to standing, this may be an alteration you would like to try.
With this adjustment, we will be moving the centre back zip to the side seam.
Prepare to make the adjustment
To make this adjustment you will add width to the back panels of the skirt. To determine how much width to add you can do a couple of things:
Take your waist measurement when standing and then again when sitting. Note the difference between the two. This is the amount you will need to add to the waist of the pattern.
Take your waist measurement a number of times throughout the day or month. This option is good for those of you who know that your waist measurement fluctuates over certain periods of time. Calculate the difference between the smallest and largest measurements. This is the amount you will need to add to the waist of the pattern.
Step 1
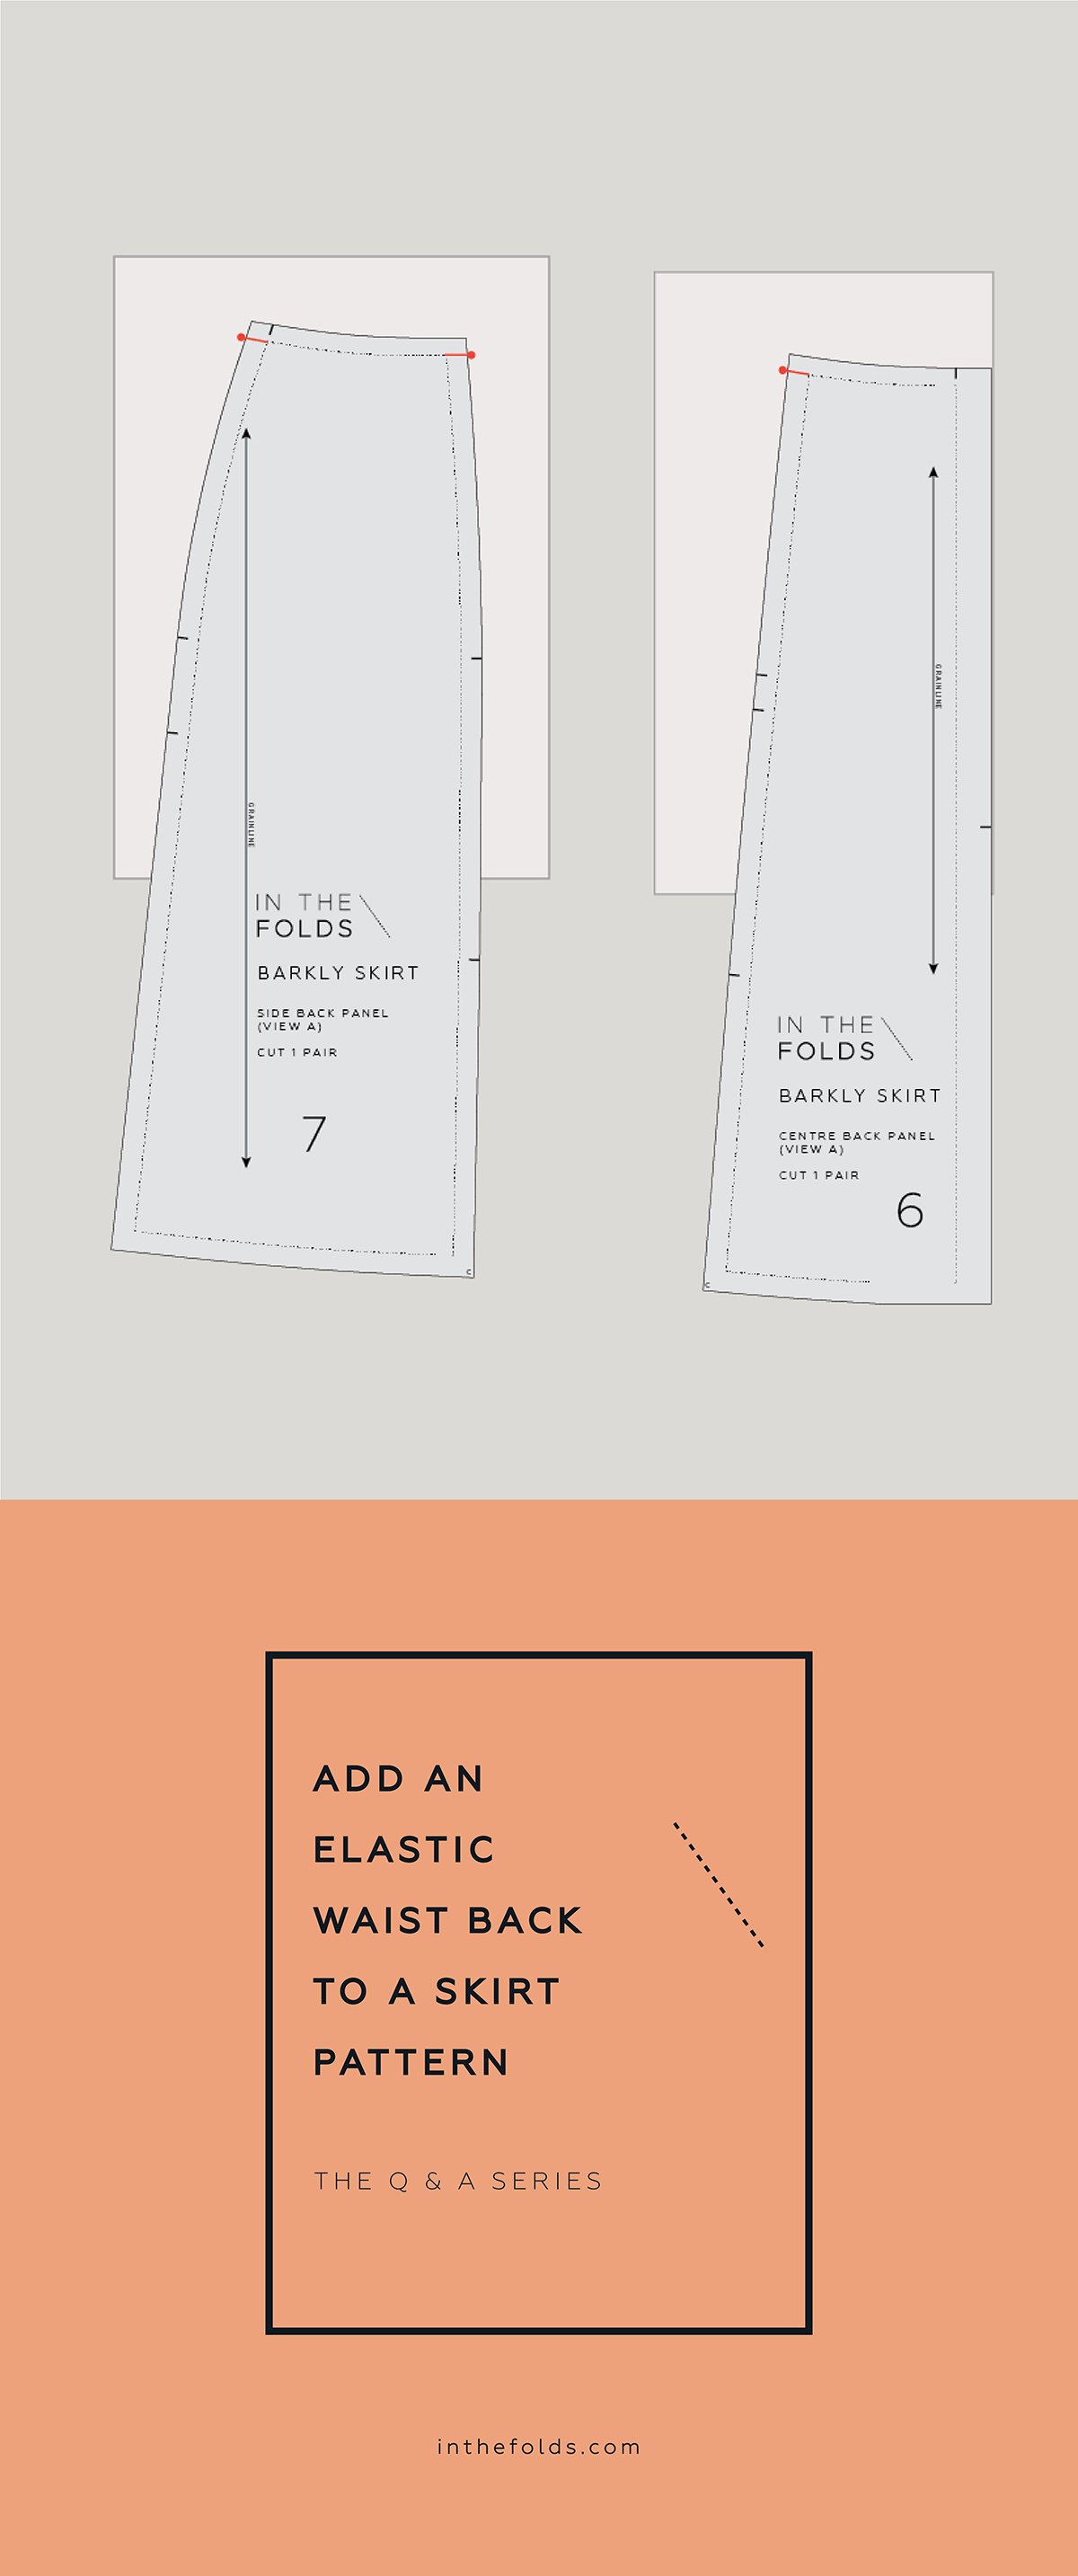
Take the SIDE BACK PANEL [7/16] and CENTRE BACK PANEL [6/15] and attach paper to the upper section of each piece. We won't alter the CENTRE BACK seam so you won't need extra paper there.
Take the amount you need to add to the waist circumference and divide by 2. (We divide by 2 as the pieces are cut as a pair - half is added to one side and the other half added to the other.) Then divide this amount by 3. (We will split the amount to add between the three places - either side of the back panel line and the side seam.) For example, if adding 9cm; 9/2=4.5cm; 4.5/3=1.5cm added per seam.
Extend the waist STITCH LINE by the distance calculated above on each of the seam lines.
Step 2
a Join the end of each line marked in STEP 1 to the STITCH LINES (side seam, panel seam) on each piece. We recommend aiming to meet the original STITCH LINE below the upper notch so that you have a nice smooth transition between the lines.
b If making a large alteration, you may struggle to create a smooth line when working on the CENTRE BACK PANEL. If this is the case, we suggest re-joining the line at the hem. This will add a small amount to the piece but will ensure the pattern piece does not become distorted.
Step 3
Add seam allowance onto your new lines.
Step 4
Cut along the new CUT LINES.
View A: We now need to alter the back waistband piece. Measure the waist STITCH LINE on the altered pieces. To measure a curve, turn your tape measure on its side and follow the curve of the line. Take note of these measurements.
For View B, you will need to re-draft the back facing piece - first finalise the pattern by moving to STEP 6.
Step 5 (VIEW A ONLY)
a Take the FRONT WAISTBAND [8] piece and measure the side seam STITCH LINE. This is the height we need our new back waistband piece to be.
b Take a piece of pattern paper and fold it in half. We will draft the piece on the fold of the paper so we can create a full pattern piece.
Make a rectangle in which the height is the measurement determined above in A and the width is the measurement determined in STEP 4. Label the fold as CENTRE BACK.
c Using the CENTRE BACK PANEL [6] waist measurement, make a notch this distance from CENTRE BACK. This will help when you're attaching the waistband to the skirt.
d Add seam allowance to the top and bottom edges (1cm (⅜in)) and side seam (1.2cm (½in)). At this stage, our side seam allowance is the same as it was originally. It is possible to sew a zip with a 1.2cm (½in) seam allowance, but if you are worried you will find this too difficult, we suggest increasing the side seam allowance before cutting the piece (see STEP 7).
e Cut out the piece. You can pin through the layers of paper to prevent it moving around. Unfold the piece and add a grainline at CENTRE BACK. Cutting instructions are now Elastic back waistband / CUT 2. This piece does not require block fusing.
REMOVE CENTRE BACK SEAM (OPTIONAL)
Step 6 (BOTH VIEWS)
As the zip is moving to the side seam, you no longer need the centre back seam. You can keep it if you like the look of the panel line there. To remove it, cut off the CENTRE BACK seam allowance by cutting along the CENTRE BACK STITCH LINE.
Change the grainline to indicate that the piece is to be cut on the fold (use rectangular grainline instead of straight grainline) and alter cutting instructions to CUT 1 ON FOLD.
INCREASE SIDE SEAM SEAM ALLOWANCE (OPTIONAL)
Step 7 (BOTH VIEWS)
An invisible zip can be sewn with a 1.2cm (½in) seam allowance, but if you are concerned you will find it difficult to sew with this seam allowance, consider increasing your side seam seam allowance to 1.5cm (⅝in) or 2cm (¾in).
If you choose to do this, you will need to make the alteration on the FRONT SIDE PANEL [2/13], pocket pieces and waistband/facing pieces. Remember to move the notches over to the new CUT LINE after making the alteration. This will mean you will have a larger seam allowance on both sides of the skirt although the zip is only on one side. You could trim it back on one side after cutting, although it's not necessary.
For View B, re-draft the back facing piece.
Adding an elastic waist back to our garments makes our wardrobe less restrictive - the clothes we make fit our bodies as they are, they are comfortable to wear and we can wear them whenever we want.
These are all such important elements of our ethos at In The Folds, and we're happy to be able to help you learn how to achieve this on the garments you make!
Happy sewing!
Emily
For more issues of the Q & A series, you can check out the archive here.
WHAT YOU’VE BEEN MAKING
Barkly skirt made by @sosewshaw
Hove jacket made by @mamasuesews
Collins top made by @beckie_girl
Barkly skirt made by @stitch.unpick.repeat
MORE POSTS IN THE SERIES
ISSUE 114 - Grading between sizes on a panelled skirt pattern
THE Q & A SERIES
Grading between sizes on a panelled skirt pattern
Hello Emily
I am participating in a denim sew-along this month and plan to make your Barkly skirt again.
I am getting the pattern for view A (the shorter length) printed out again so that I can adjust the pattern more accurately and give a better review.
Could you help me with this, please? I didn't understand grading the sizes on your site. I am size E for the waist and C for the hips, I am 32" waist and 37" hips. What is the best way of adjusting this on a panelled skirt, please?
Do I simply put the ruler straight from the waist size E to the bottom hem size C and not alter the curved of the hip where the pockets lie on the side front and back panels.
I plan to use stretch denim and make a lapped zip and so will alter seam allowances for a centre back 1" seam allowance.
Christine
Hi Christine,
I’m thrilled to hear you’re using the Barkly skirt pattern for a sew-along! It's always so motivating when you're sewing with others, which is one of the reasons why we created our Curated by ITF subscription.
In fact, this month in Curated by ITF we are learning all things skirt fitting and the Barkly skirt pattern is our focus. We cover this question exactly (and so much more!) so I can definitely help you out with this!
When to grade between sizes
For many of us, our measurements will range across several pattern sizes, which means we will need to grade between sizes. For example, if our waist measurement is in a smaller size bracket than our hip measurement, we will need to grade up from the waist to the hip on the pattern.
Getting started
Start by printing the pattern in the sizes that you need.
Once printed, you can draw straight on the pattern or take a large piece of pattern paper and lay it over or under the pieces to trace the pattern (depending on whether your paper is transparent or not).
On the Barkly skirt, the WAIST LINE is the top edge of the pattern (this is what attaches to the waist band / waist facing) and the HIP LINE is at the STYLE VARIATION LINE.
Use these instructions if your waist is in a smaller size bracket than your hip.
a On the CENTRE FRONT PANEL [1/12] pattern piece, start at the pattern edge of the size you require for the waist. Take a ruler or French curve and draw a smooth line to the hip of the required size at the hip line. This line needs to become a gentle curve as it approaches the HIP LINE. Follow the edge of the pattern from the HIP LINE down. Repeat for the SIDE FRONT PANEL [2/13] , SIDE BACK PANEL [7/16] and CENTRE BACK PANEL [6/15].
b It is likely that some notches will no longer be in the correct position. Work your way along the new pattern edge and move notches to the new CUT LINE. Adjust the pocket pieces by moving to STEP 2.
Use these instructions if your waist is in a larger size bracket than your hip.
On the CENTRE FRONT PANEL [1/12] pattern piece, start at the pattern edge of the size you require for the waist. Take a ruler and draw a smooth line to the hip of the required size at the HIP LINE. Depending on how many sizes you are grading between, to hit the HIP LINE on the CENTRE FRONT PANEL [1/12], the line may need to become a concave curve. This is not ideal as a seam shape, so we suggest instead drawing the line so it is straight and meets the hem of the smaller size. Follow the CUT LINE of the smaller size from the HIP LINE down to the hem. Move notches to the correct position (see STEP b above).
Repeat for the SIDE FRONT PANEL [2/13], SIDE BACK PANEL [7/16] and CENTRE BACK PANEL [6/15].
Adjust the pocket pieces by moving to STEP 2.
Adjust pocket pieces
Take the SIDE FRONT PANEL [2/13] and trace along the pocket edge of your waist size. We recommend using a coloured pen or highlighter to prevent confusion between sizes.
Trace a copy of the POCKET FACING [4] and POCKET BAG [5] pieces in the larger of the sizes you graded to. Don't cut them out just yet.
Place the POCKET FACING [4] on top of the SIDE FRONT PANEL [2/13] and line up the original notches so it is sitting correctly. Use pins or pattern weights to hold in place. Transfer the new seam lines onto the POCKET FACING [4] and trace the pocket edge. Transfer the correct notches.
With the POCKET FACING [4] still in place, place the POCKET BAG [5] on top, lining up the original notches. Hold in place with pins or pattern weights. Transfer the new seam line onto the piece. Transfer the correct notches.
Cut out your new pocket pattern pieces.
Before cutting your pattern pieces from fabric, check that all the pattern pieces fit together correctly.
Happy sewing,
Emily
For more issues of the Q & A series, you can check out the archive here.
WHAT YOU’VE BEEN MAKING
Hacked Acton top made by @factorykingpin
Barkly skirt made by @thread_leaf
Rushcutter dress made by @maker.baker.girl
Collins top made by @intervalsewing
MORE POSTS IN THE SERIES
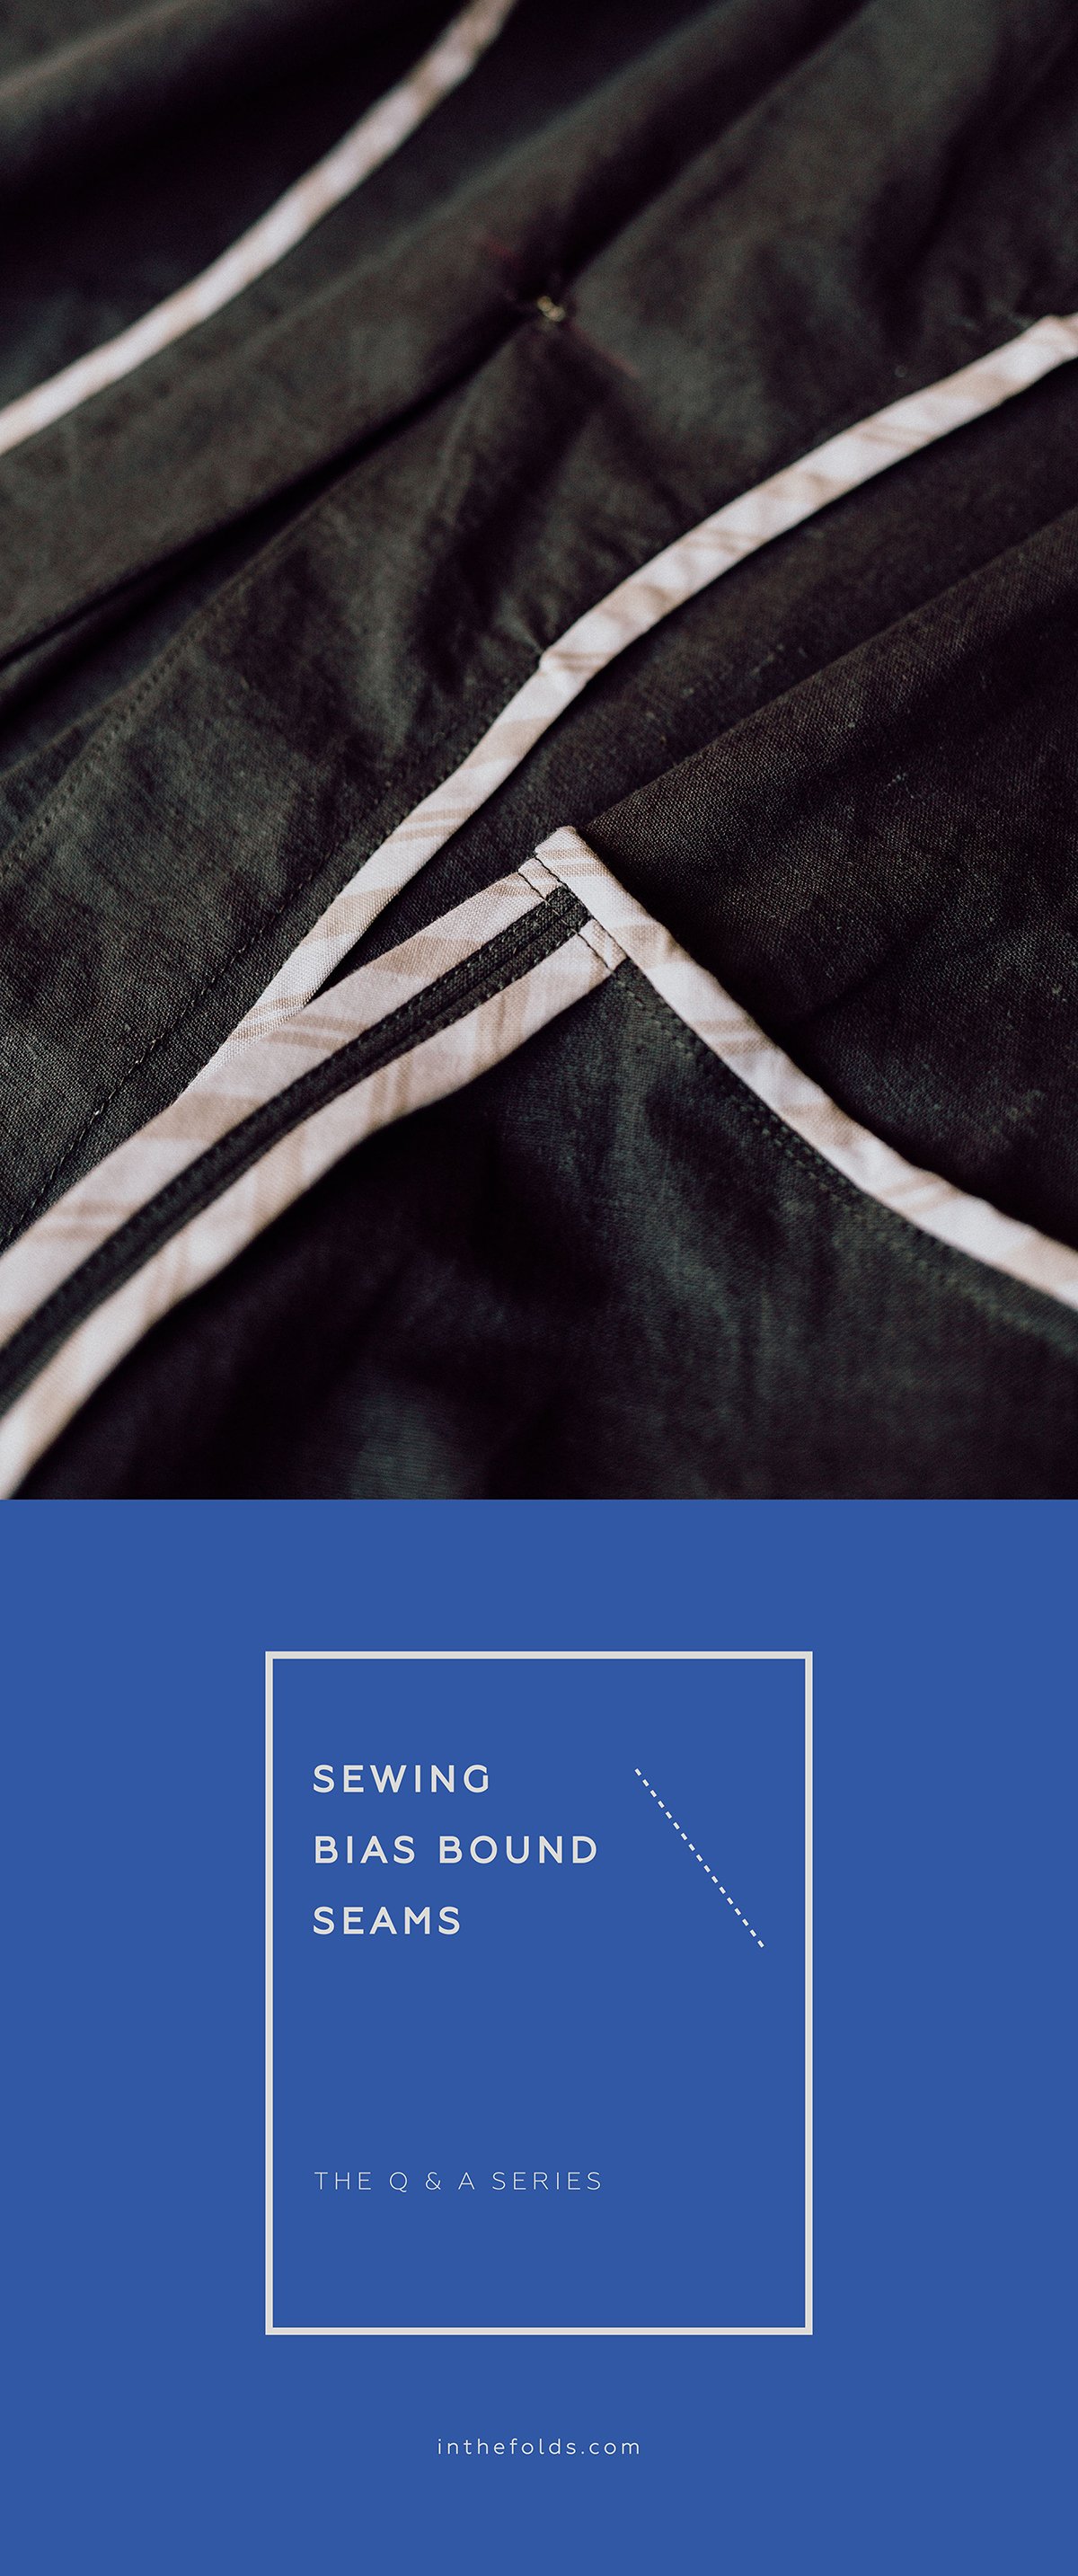
ISSUE 113 - SEWING BIAS BOUND SEAMS
THE Q & A SERIES
how to sew bias bound seams
Hi Emily,
I have a Hove question. Which I guess is also a Flynn question…
For the bindings- what is the basis between deciding between Hong Kong binding, and the other method . Do they look different in the finished garment, or is the decision based on fabric type ? Or have I not read the pattern closely enough yet and it will stipulate which way.
I have never done either method so either way will be fun!
Thanks,
Sue
Hi Sue,
I’m excited that you’re about to give the Hove jacket a go! It’s definitely been the most popular pattern for our ‘Make it With Us’ Curated by ITF project this month.
The instructions tell you which one to use, but I'm happy to give you the logic behind the decisions. It might be helpful when choosing between binding options in the future, or if you’re using binding on a pattern that doesn’t include binding instructions.
Bias bound seams
Bias bound seams are cleanly finished on both sides. This means both edges of the binding are enclosed inside the bind. These finishes are great when you can afford to have that little bit of extra bulk, when you're pressing seams open or when it's likely you will see both sides of the bind. For the Hove and Flynn jackets, the shoulder seams and side seams are finished like this.
To sew a bias bound seam:
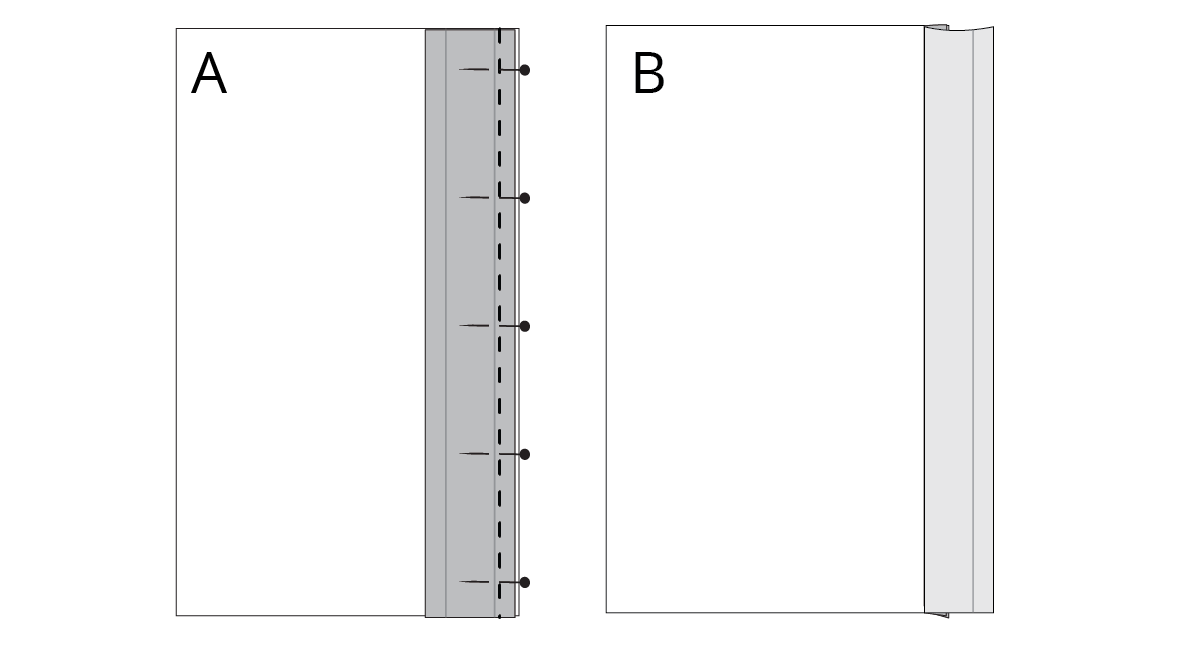
A Take a length of bias binding and place along the edge you will be finishing (right sides together) - lining up the raw edges. Pin in place. Stitch binding in place with a 6mm (¼in) seam allowance (this will be just inside of the first crease line on the binding).
B Turn bias binding to the right side and press seam allowance towards binding.
C Fold the other side of the binding along the crease and press.
D Wrap binding around the seam allowance and press. The folded edge of the binding (on the back of the seam) should overlap the first stitching line by 1-2mm. The seam allowance should fill the binding - but can be trimmed if required. If the seam allowance doesn't fill the binding, stick to the original fold of the binding. Pin binding from the right side - being sure to check that you are catching the folded edge of the binding on the back.
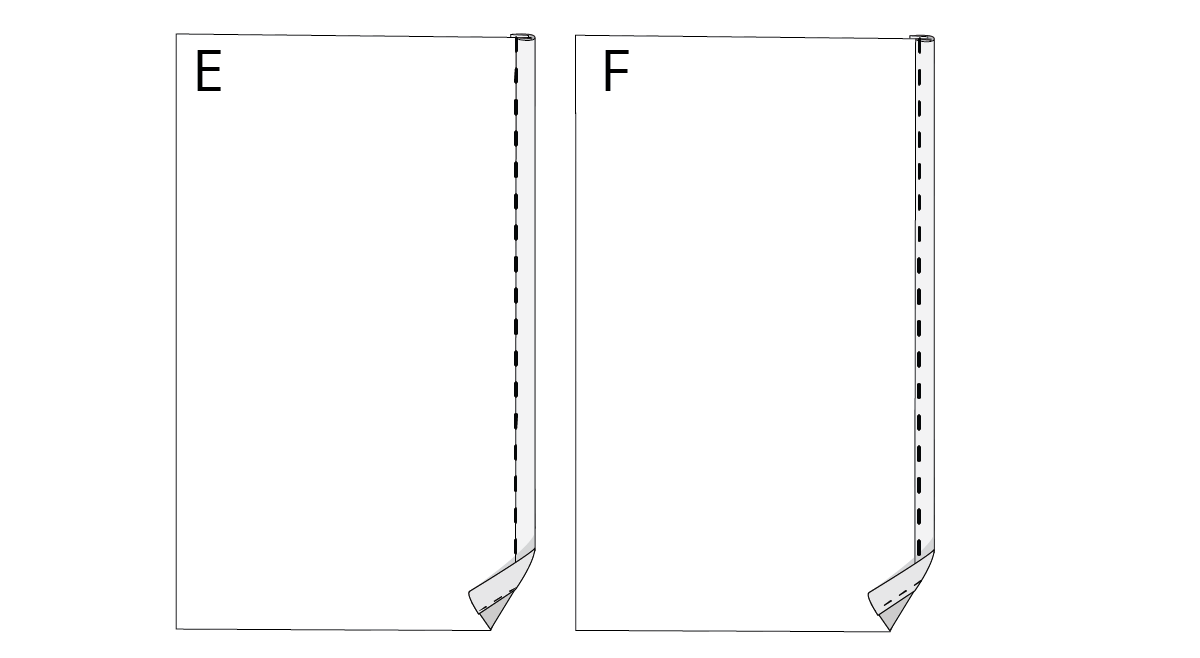
E Carefully stitch binding by stitching in the ditch.
F If you would prefer, you can stitch just to the side of the ditch (on the binding) as illustrated (this is a little easier to do if you are a beginner).
Hong Kong bind
Hong Kong binding leaves one side of the binding flat (not folded back). It won't fray as the fabric has been cut on the bias, but it does mean there is a raw edge on the back side of the finish.
Hong Kong binds are normally used for thick fabrics (think heavy wool coating etc.), when seams need to be pressed together or when the back side of the bind won't be seen.
For the Flynn and Hove jackets, the edge of the facing is sewn with a Hong Kong bind as it will minimise bulk. This is then attached by stitching in the ditch so the back side of the bind is enclosed inside the facing.
To sew a Hong Kong bind:
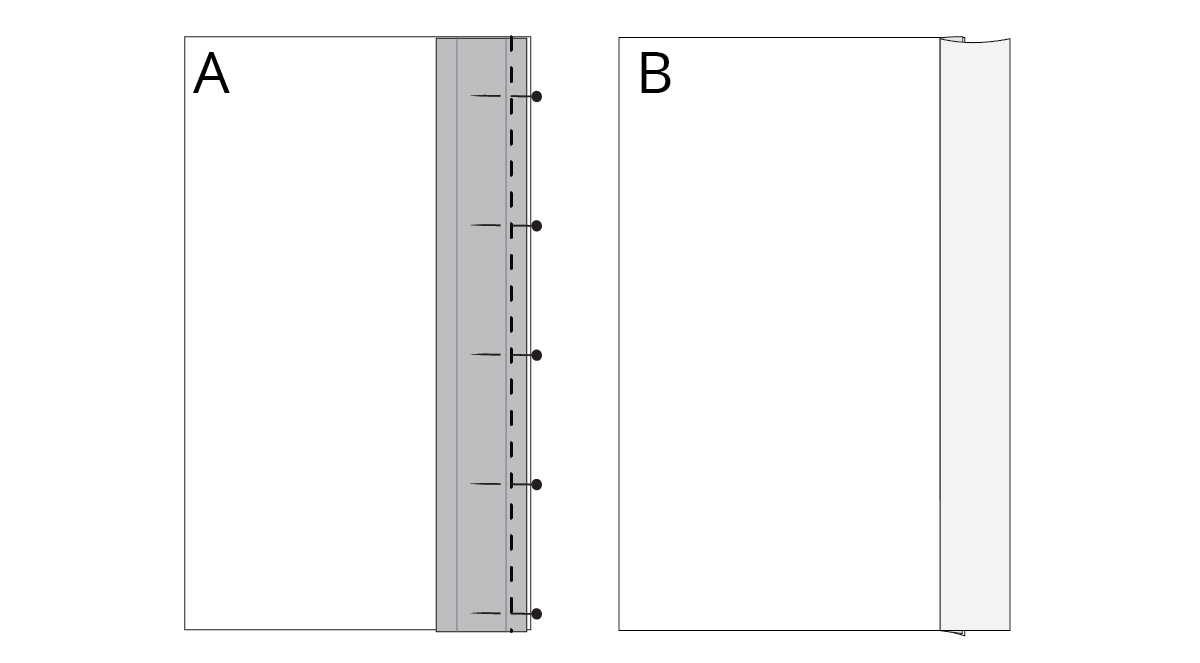
A Take a length of bias binding and place along the edge you will be finishing (right sides together) - lining up the raw edges. Pin in place. Stitch binding in place with a 6mm (¼in) seam allowance (this will be just inside of the first crease line on the binding).
B Turn bias binding to the right side and press seam allowance towards binding. Press the rest of the binding flat.
C Wrap binding around the seam allowance and press - keeping the remainder of the binding flat on the back side of the seam (rather than folded like it was in the previous method). Pin binding from the right side - being sure to check that you are catching the binding at the back at the same time.
D Carefully stitch binding by stitching in the ditch.
E If you would prefer, you can stitch just to the side of the ditch (on the binding) as illustrated (this is a little easier to do if you are a beginner).
Both are very satisfying to sew, and the Hove jacket (or the Flynn jacket) is the perfect opportunity to give these techniques a go!
Happy binding,
Emily
For more issues of the Q & A series, you can check out the archive here.
WHAT YOU’VE BEEN MAKING
Collins top made by @nikasews
Hove jacket made by @tandarady
Rushcutter dress made by @franny_sews_things
Acton dress made by @andrearangelknits
MORE POSTS IN THE SERIES
ISSUE 112 - How to add a drawstring channel to the Hove Jacket
THE Q & A SERIES
how to add a drawstring channel to the hove jacket
Hello,
I just discovered your patterns. The Hove jacket looks to be what I am looking for. I do have a question about the hood. Is there any mechanism to make sure it stays on in the wind and rain? (Possibly wet snow?)
Would appreciate having your thoughts. And if nothing is currently in place for that, could it be hacked to add a tie in the facing/lining of the hood?
When closed, where does the zipper stop line up at the neckline? Pictures make it look rather low. I would perhaps want to extend to zip up to the neck, again for inclement weather.
Looking forward to hearing from you. Now must investigate waterproof fabric and whether they have drape suitable for the pleats.
Thanks,
Sharon
Ontario, Canada
Hi Sharon,
I am thrilled you have recently discovered our patterns and are interested in making the Hove jacket.
These are fantastic questions, and I think with a few minor alterations, you could make a fantastic winter jacket with this pattern.
Firstly, I'd suggest you sew it with a longer zip. As it is, the zip comes to the neck, but I'd imagine you would want it to come up to your chin, or higher. The hood piece for the opening is a gradual curve, so you could definitely just use a longer zip. I just tried on my Hove and measured that with another 15cm the zip would reach my chin. This would mean using a 70cm (28") zip. See the photos below with a pin at the point I suggest. You could also go higher if you wanted. I held it closed up to this point and it still sat nicely.
There isn't a mechanism for keeping the hood in place, but as the hood is already fully lined, I think it would be very easy to sew a channel with buttonholes or rivets so that you could thread a cord through. See marked-up photo below.
How did you go on your fabric search? If you realise you will need to remove the pleats due to the fabric, we have a post about how to do that here.
Happy sewing,
Emily
For more issues of the Q & A series, you can check out the archive here.
WHAT YOU’VE BEEN MAKING
Darlow pants made by @shuaychong
Collins top made by @sewgeorgiesew
MORE POSTS IN THE SERIES
ISSUE 111 - HOW TO SEW A HIDDEN BUTTON PLACKET
THE Q & A SERIES
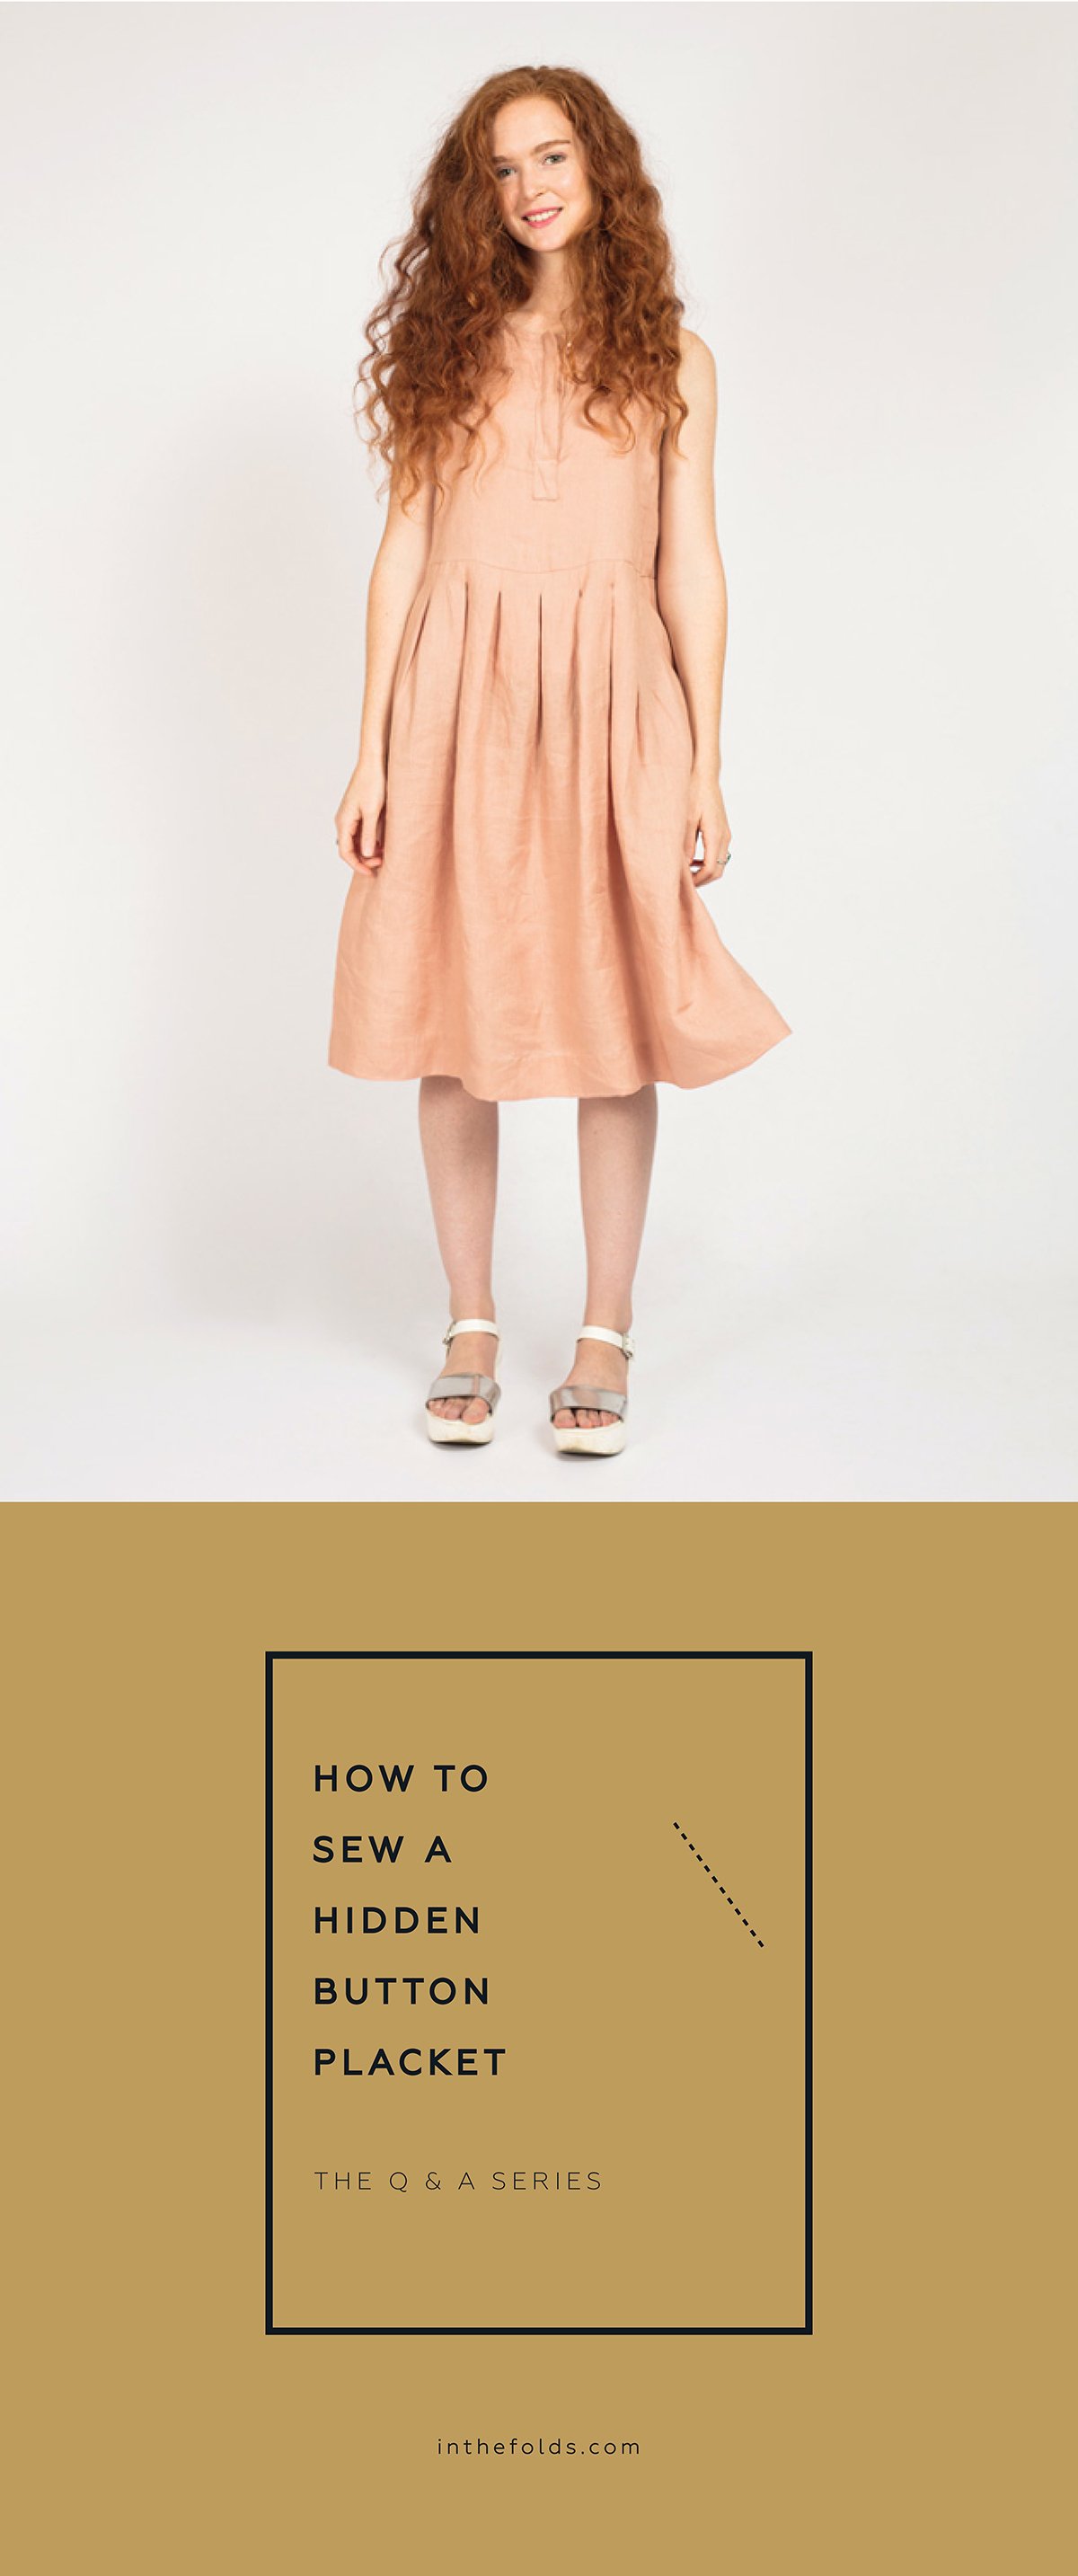
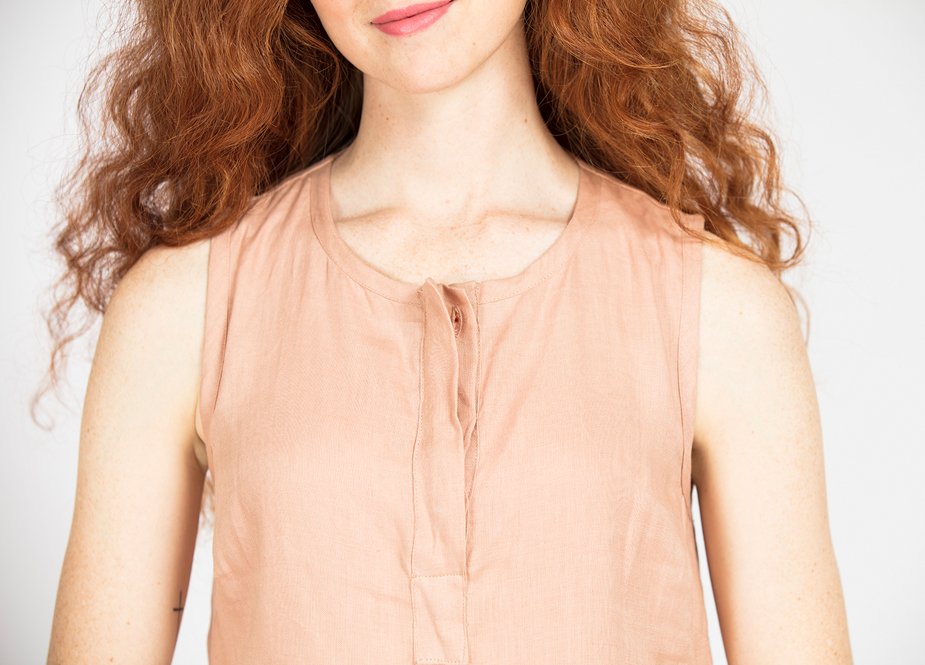
How to sew a hidden button placket
What a lovely pattern the Peppermint Pleated dress is! I've been practicing the placket on some scraps before destroying some pretty linen, but I keep getting stuck on the last three steps. If ever you have a chance, a tutorial on how to make this button placket would be so appreciated.
Hi there,
It's always a good idea to practice new techniques on a scrap of fabric, so well done for doing that!
It's especially important for techniques such as cut-in plackets (like this one) and welt pockets as, due to needing to cut into the fabric, they are much more difficult to fix if you run into strife.
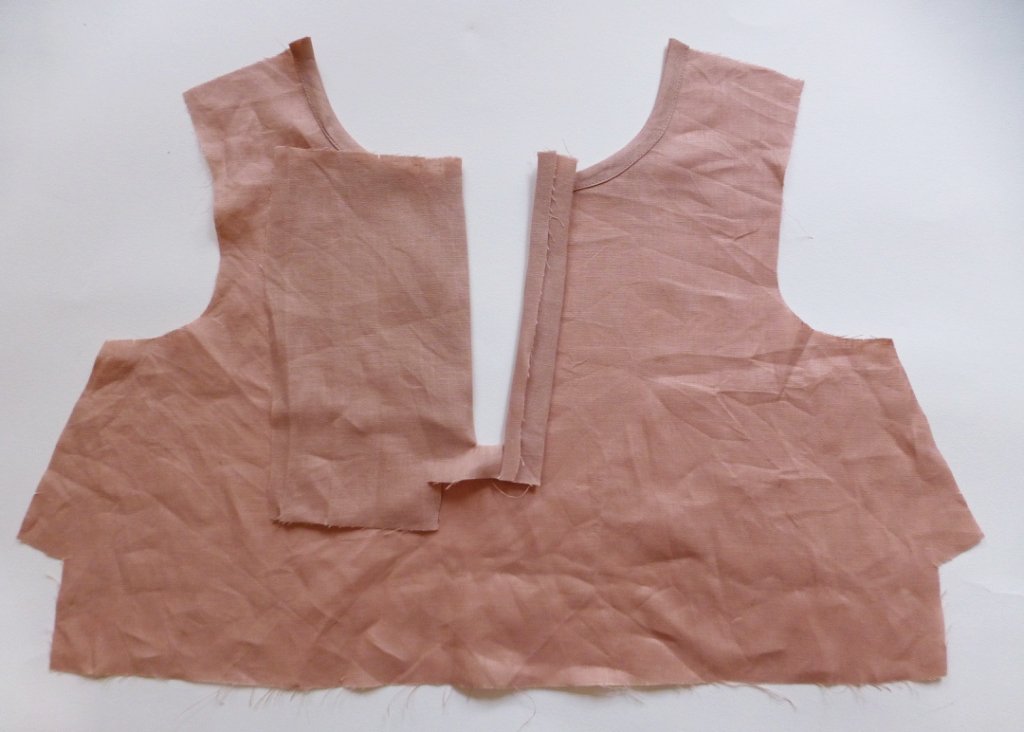
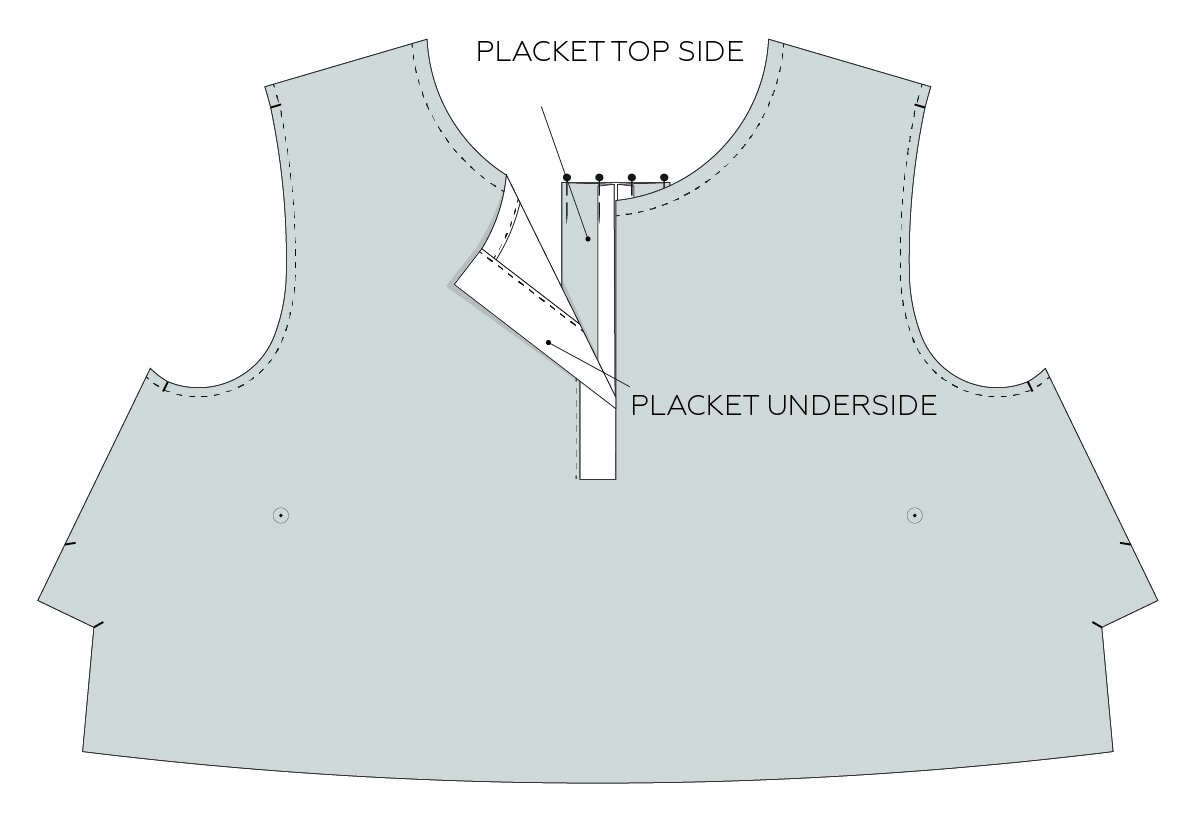
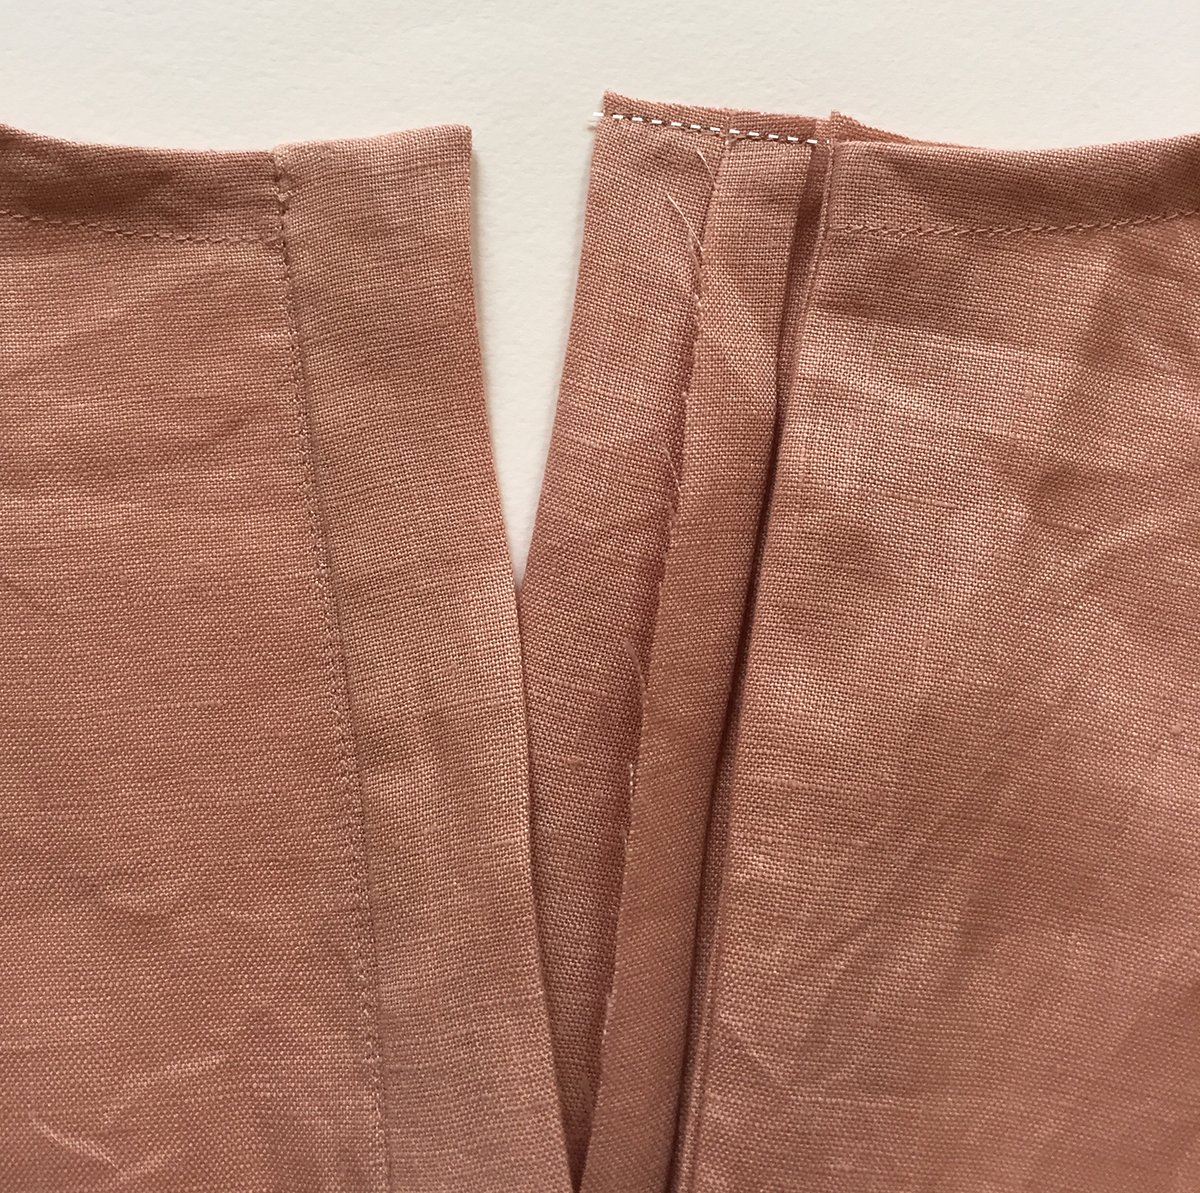
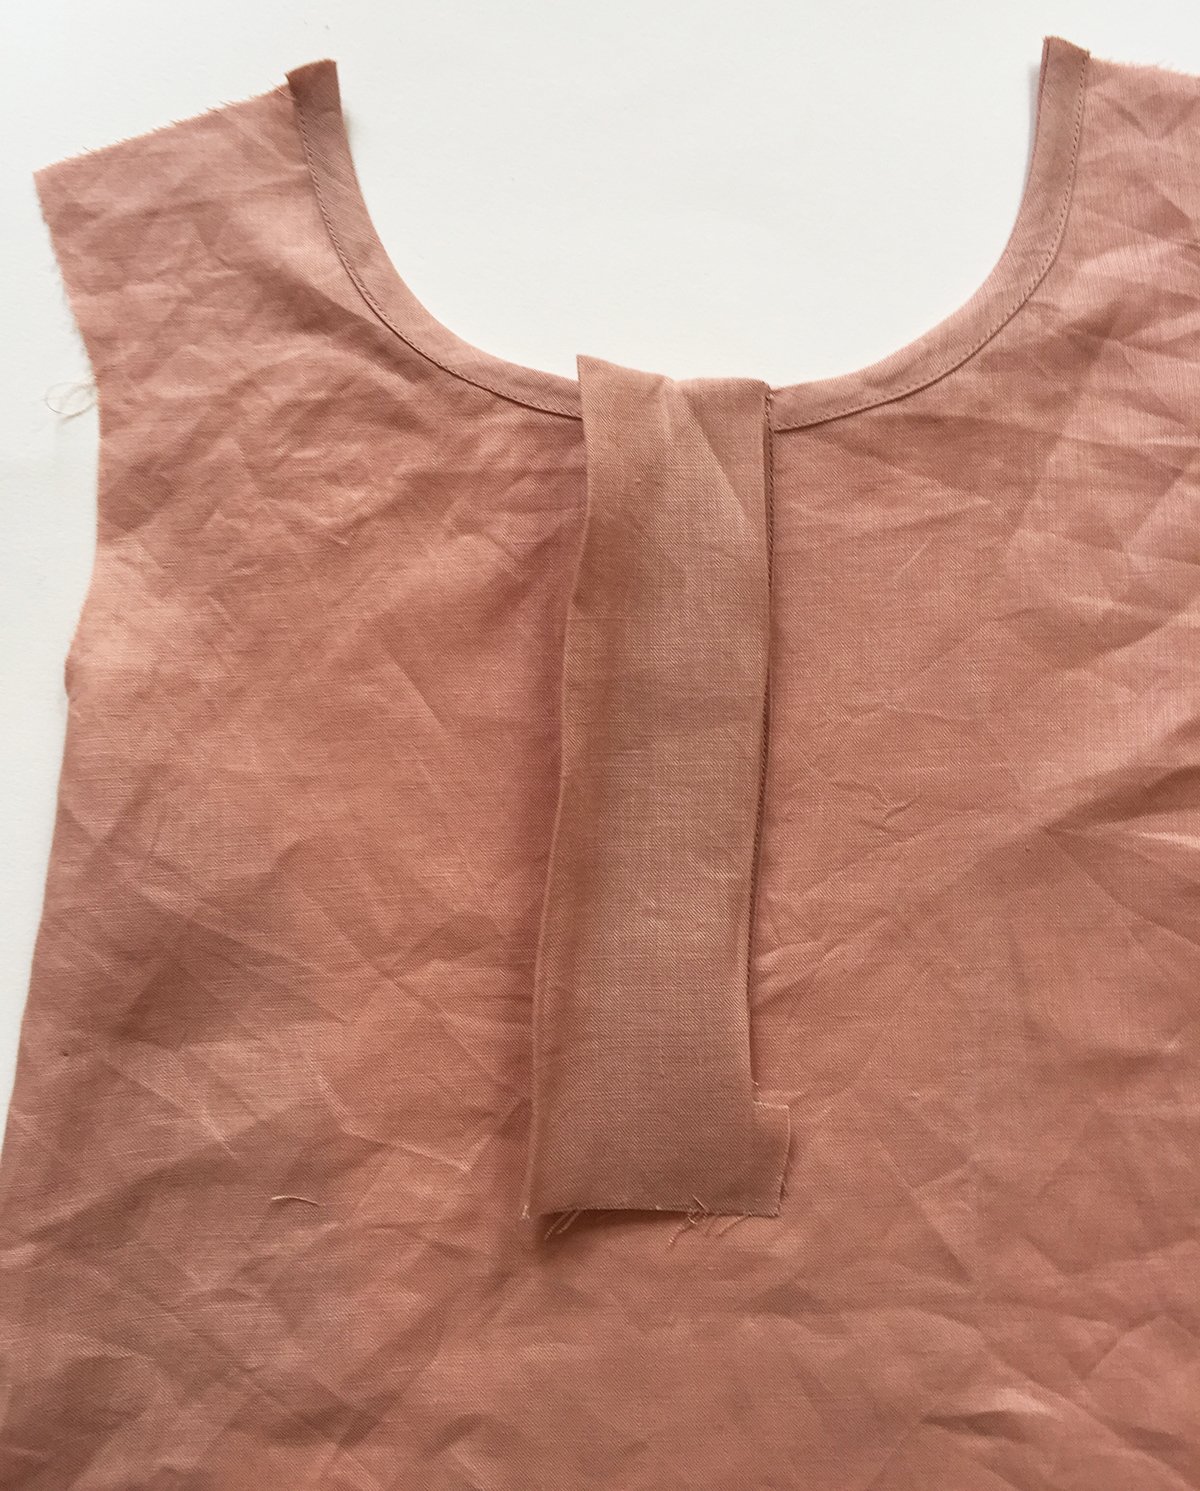
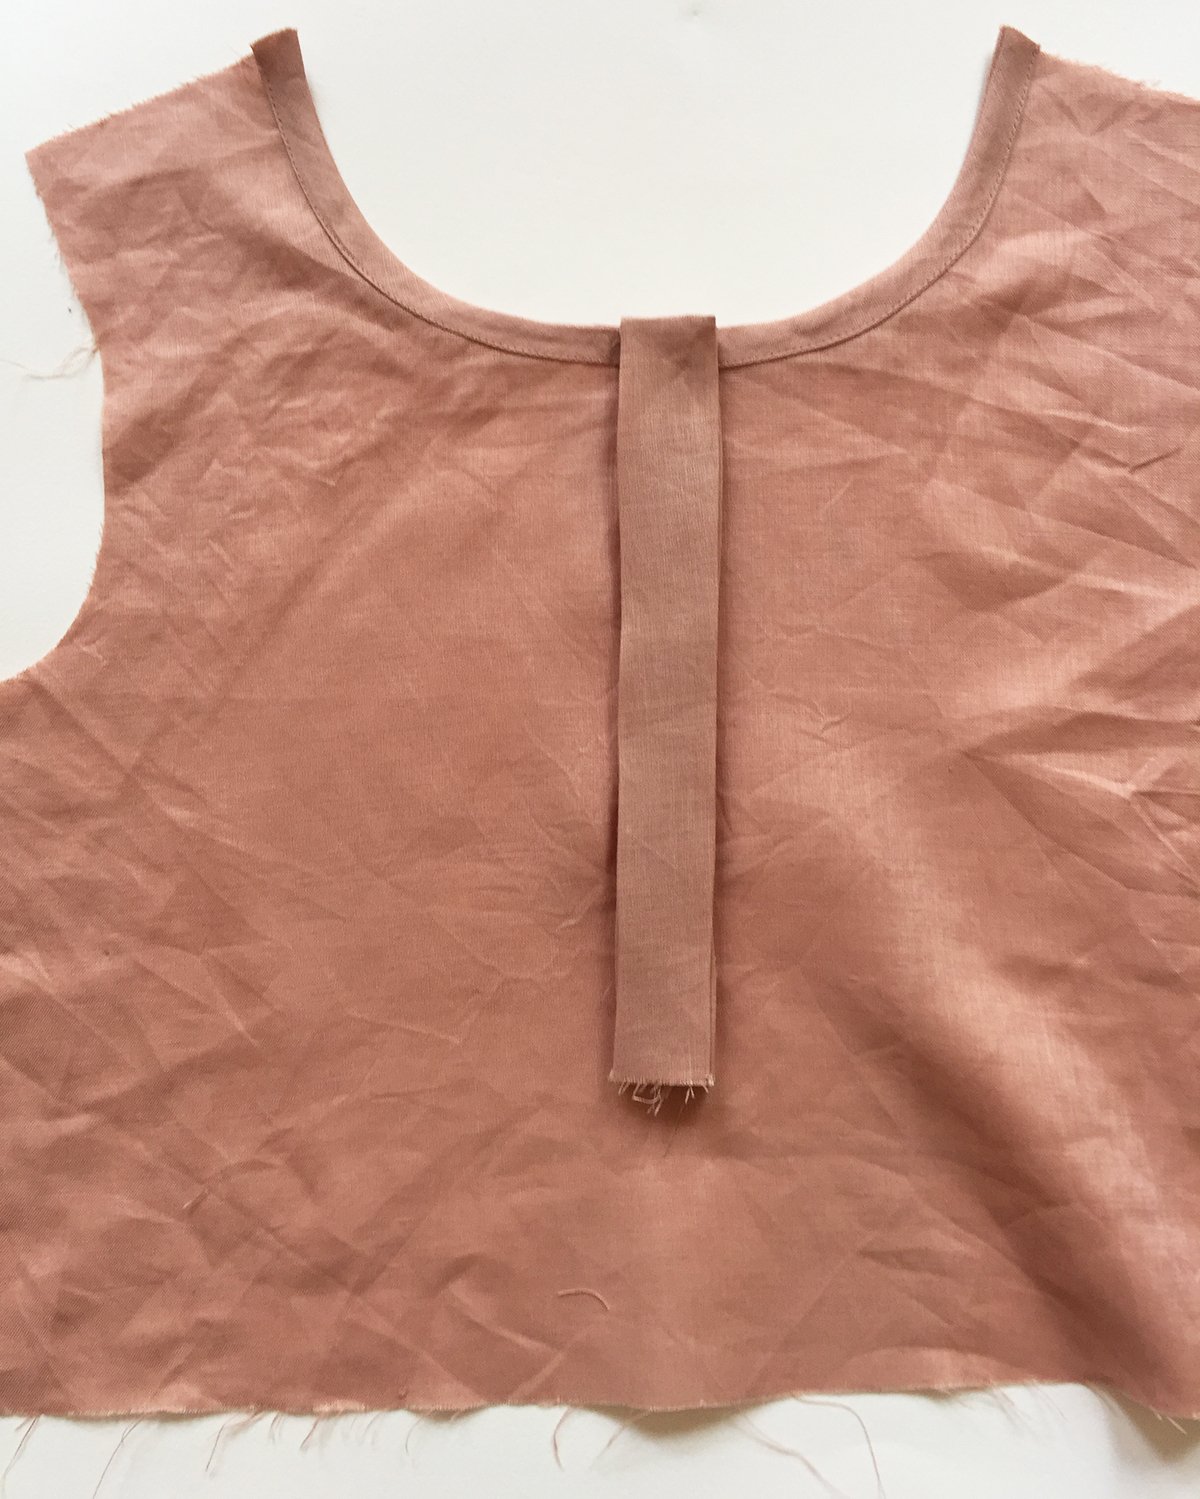
The placket on the Peppermint Pleated dress involves a number of steps and when you're done you will have a really gorgeous placket! Hopefully seeing some photos of the process will help you get your head around it so you can get the dress started!
A note before I get started - we normally only use these type of photos to aid in the instruction illustration process, so we apologise that for a couple of steps we don't have photos. Sometimes as we are photographing the steps we find a better way to do a particular technique, so this sometimes means we don't have a photo of the exact step. This will give you a little behind the scenes of how our instructions come together!
Prepare your placket
To start, prepare your placket according to the instructions (STEPS 7 and 8). Accuracy is very important when it comes to sewing plackets, so by taking these steps at the beginning you will make the sewing process much easier for yourself.
Attach placket
Take your FRONT BODICE [1] and fold the neckline in half. Use a pin to mark the centre front.
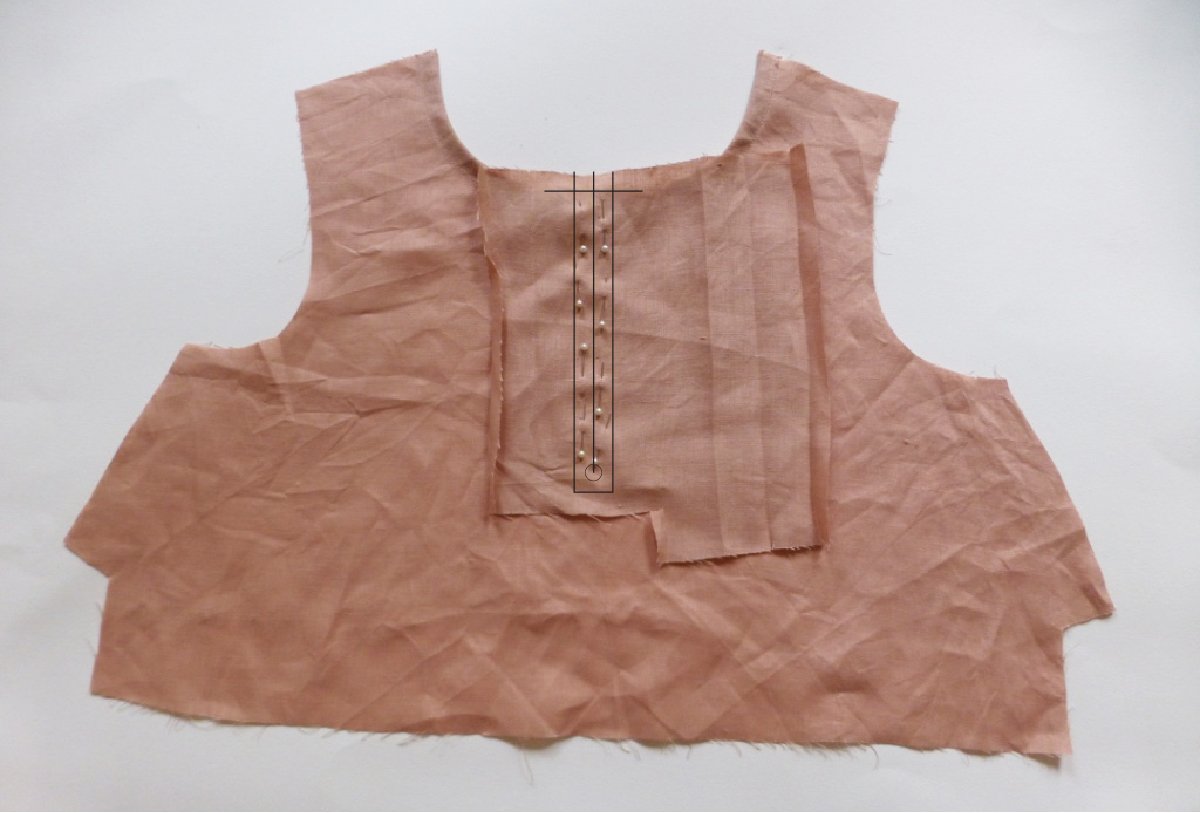
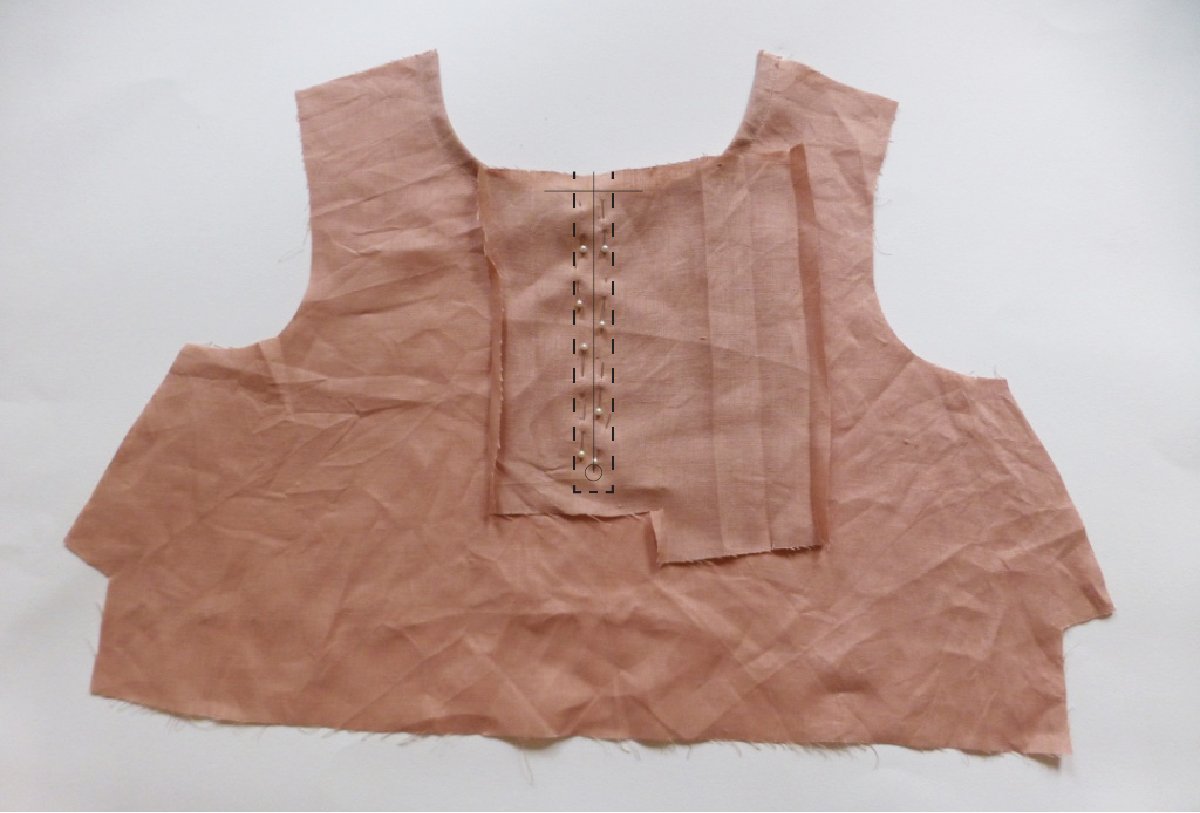
Take the PLACKET [5] piece and place it right side down on the wrong side of the FRONT BODICE [1]. Line up the 1cm (⅜in) guideline on the top of the PLACKET [5] with the neckline of the bodice. Align the cut line marked on the placket with the pin on the bodice and the drill hole underneath.
Pin PLACKET [5] in place along the lines of the “box” marked.
Stitch a box around the cut line (following your guide line marked) - walking in the stitches at each corner to ensure it is sewn precisely.
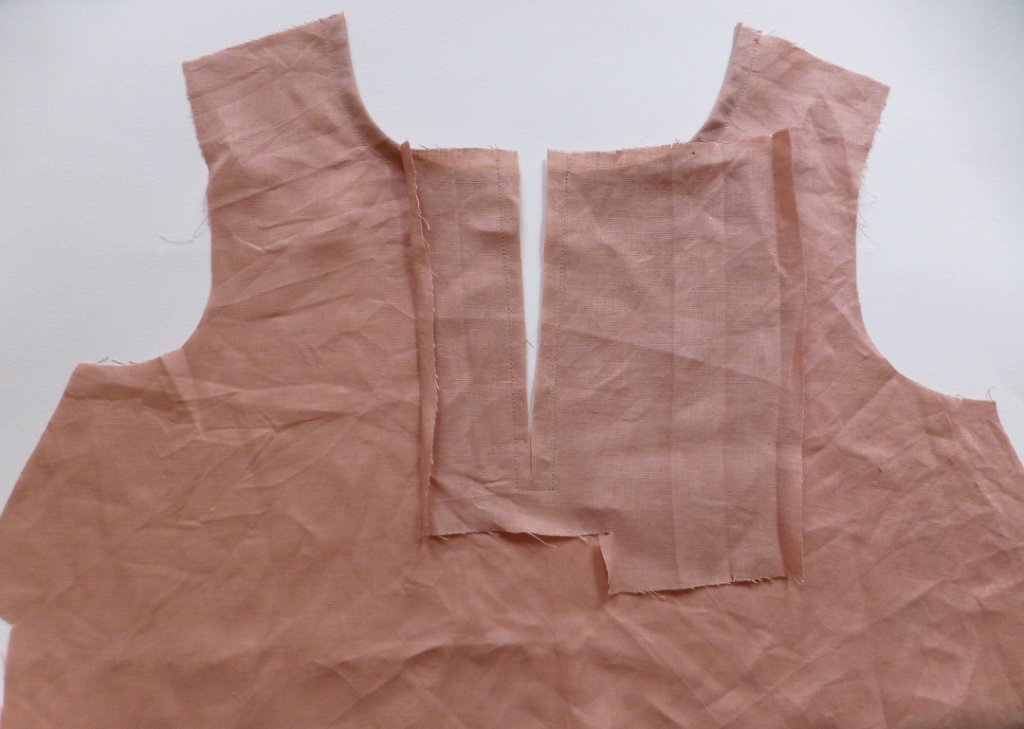
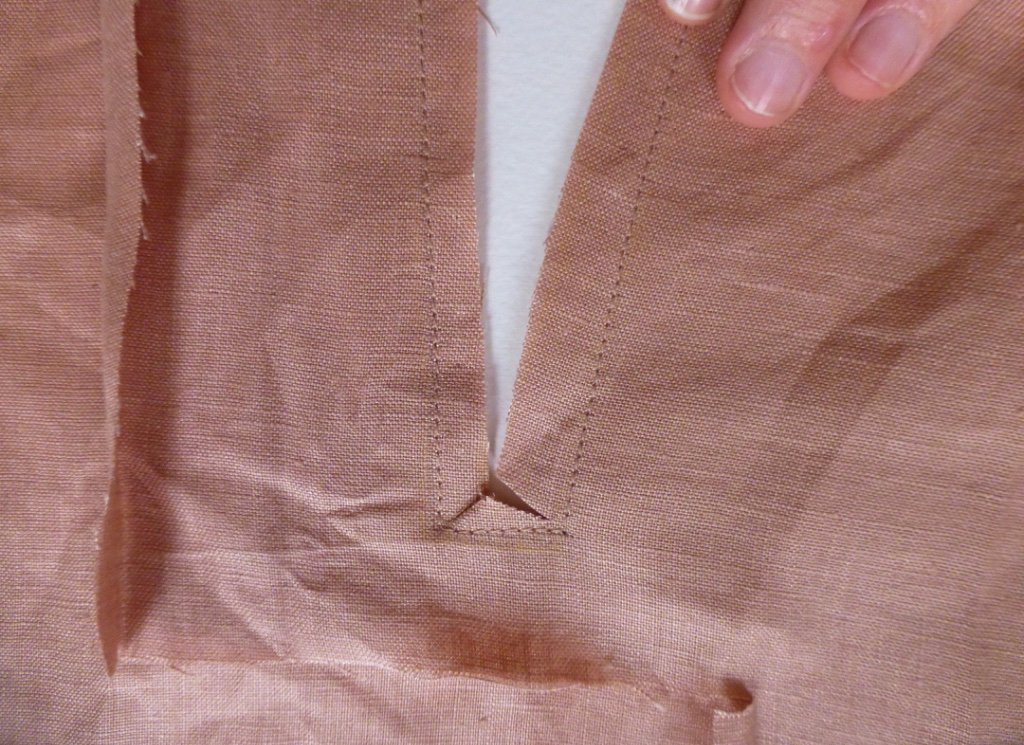
Carefully cut along the cut line, through the PLACKET [5] and the FRONT BODICE [1].
Cut in to each corner of the rectangle, getting nice and close to the stitch line, but not cutting through it.
Flip the PLACKET [5] to the right side of the FRONT BODICE [1] and give it a good press along the seams and corners.
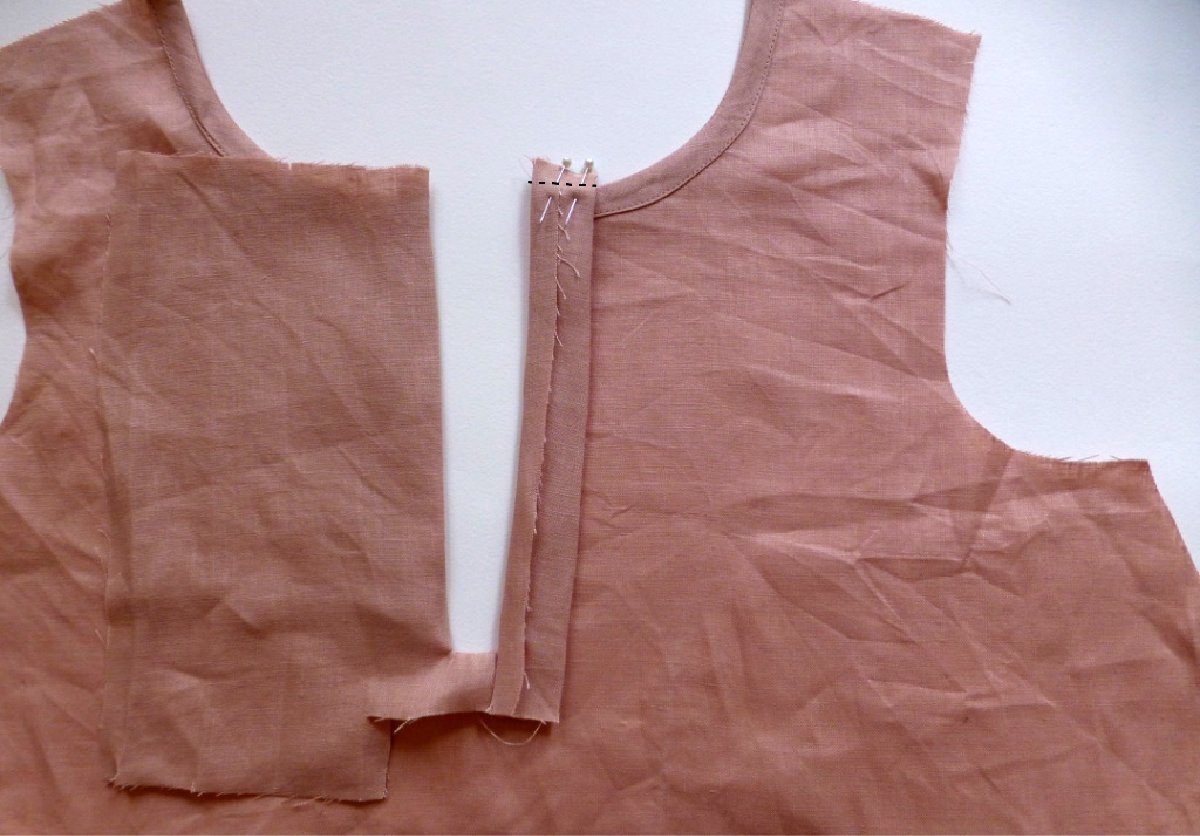
We will start by finishing the top edge of the PLACKET [5].
Focussing on the underside of the PLACKET [5], press the folded edge towards the seam of the opening, using the notches to guide you, so that the piece has right sides together.
With tailors chalk, mark a straight line along the top of the PLACKET [5], 1cm (⅜in) down from the top edge. Pin in place.
Stitch along the line, getting as close as possible to the edge of the binding. Trim back the edge to minimise bulk.
Turn the PLACKET [5] right side out, using a corner turner to turn the point of the PLACKET [5]. Press along the fold line (now in the opposite direction) and press PLACKET so that the fold just covers (by about 1mm) the stitch line underneath.
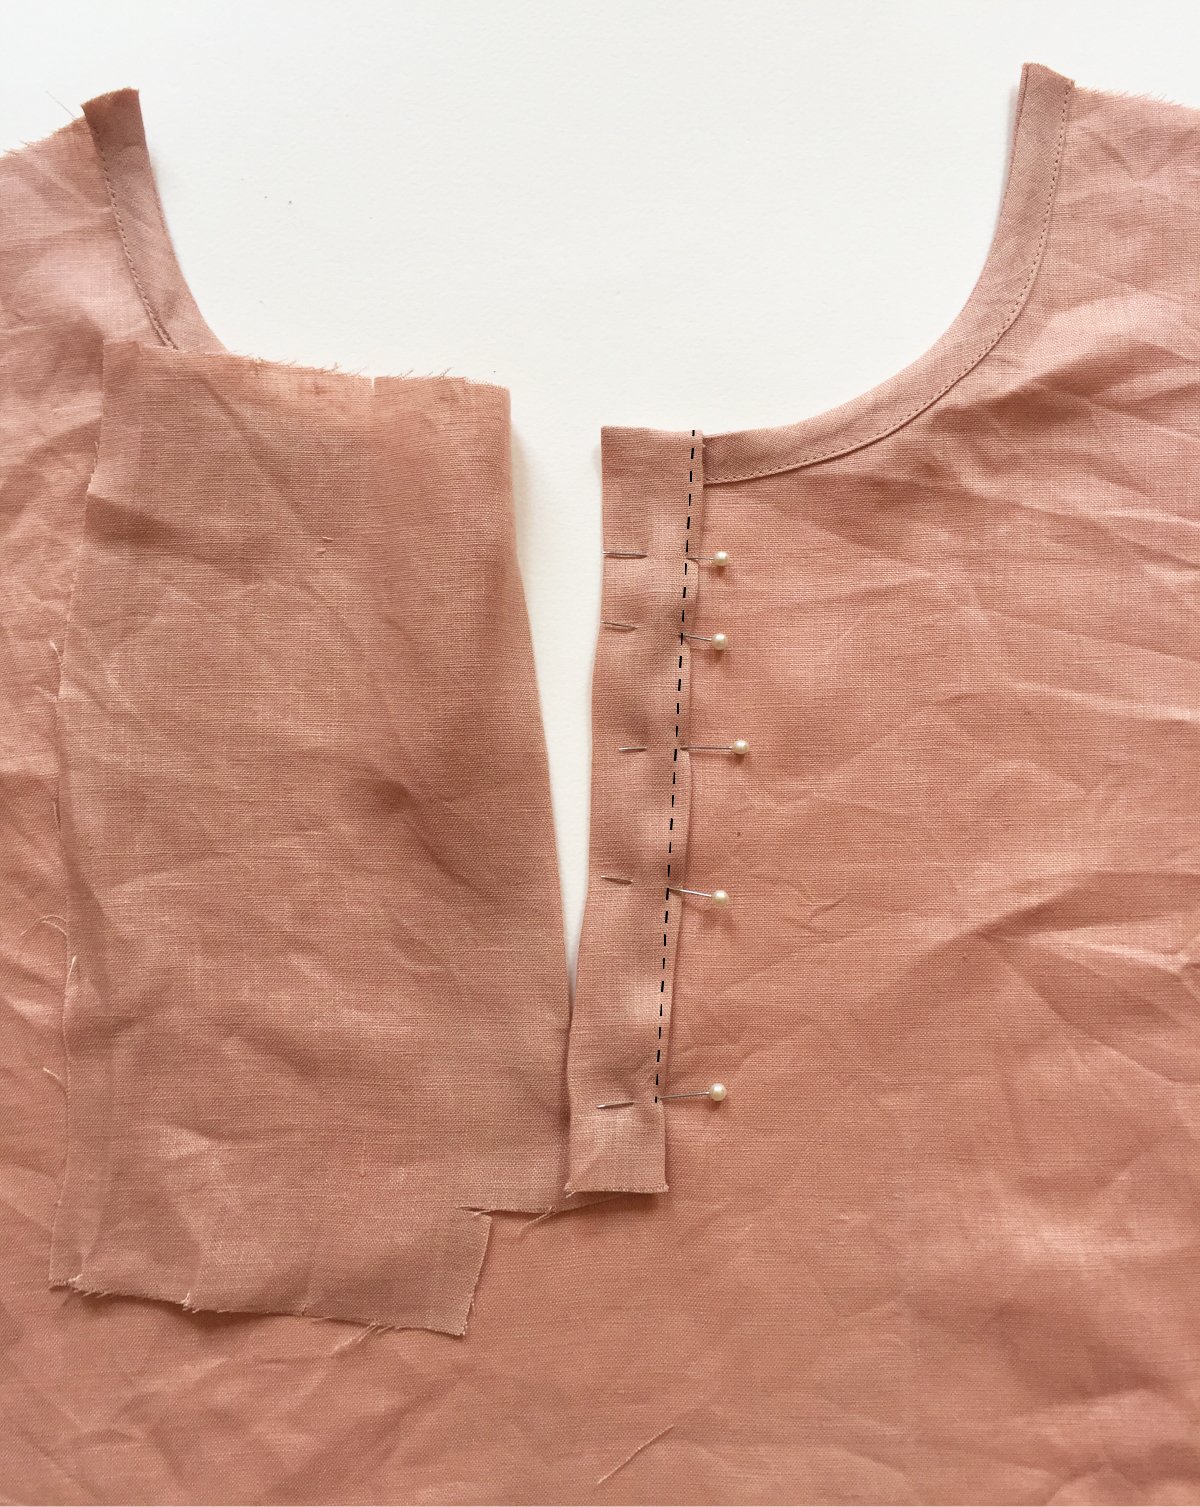
Pin in place from the top, down to the point where the opening ends (2cm / ¾in up from the bottom of the placket).
Stitch down from the top to the last pin, close to the folded edge.
Now it’s time to assemble the other side of the PLACKET [5]. Using the notches closest to the left side, make a crease in the placket. Make sure that the long edge of the PLACKET [5] is still folded under.
Again we’ll start by finishing the top of the PLACKET [5]. This side is slightly different to the first, as it is made up of two pieces, so that the buttons will be covered by a shield. Flip the FRONT BODICE [1] so that you can access the wrong side. Fold the PLACKET [5] into two sections, using the notches to guide you. Mark a line across the top (1cm / ⅜in from the top) and pin in place.
Stitch along the line.
Trim back the seam allowance to minimise bulk.
Turn the PLACKET [5] right side out - using a corner turner to help you to get a nice point on each of the corners. Fold the raw edge inside the PLACKET and press flat.
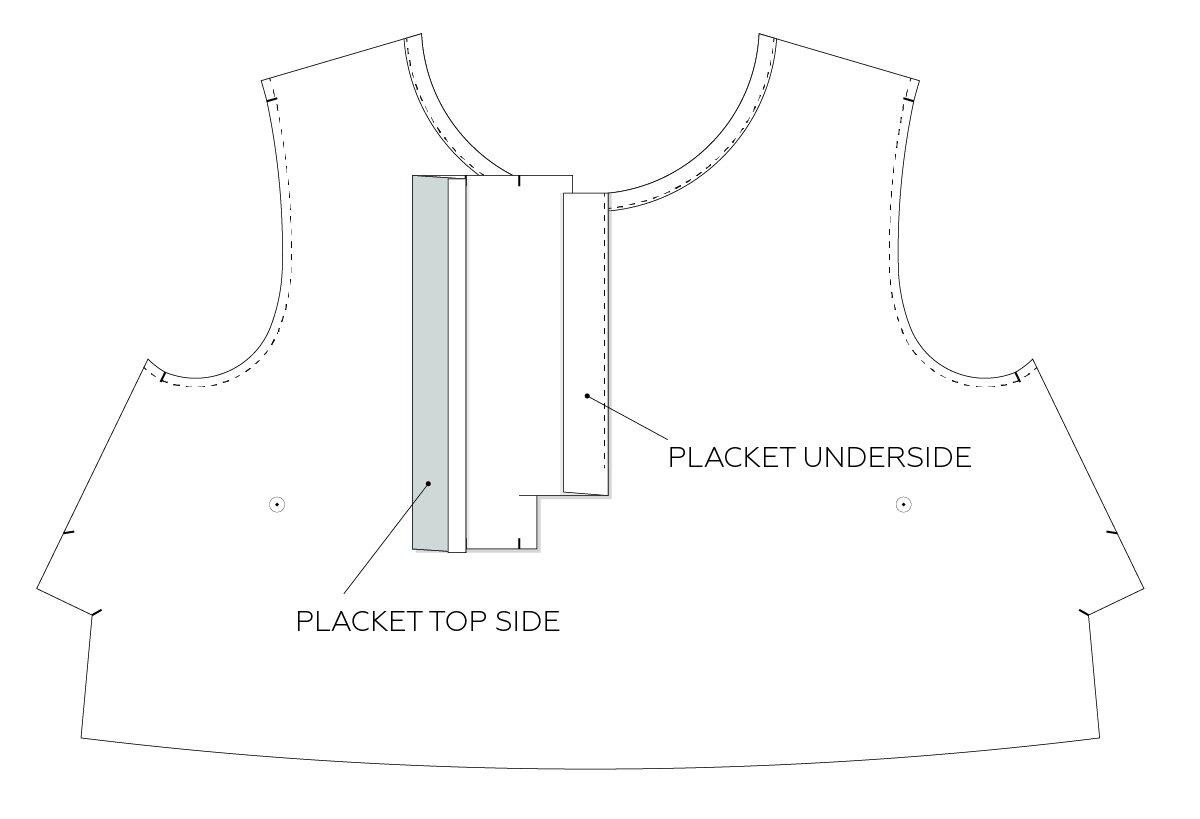
Carefully fold the PLACKET [5] so that each section of the placket is neatly stacked on top of the section underneath (the two sections of the PLACKET TOP SIDE should be sitting on top of the PLACKET UNDERSIDE). The left side of the placket will still be open.
Give it a good press.
To finish the bottom edge of the PLACKET (top side), with the raw edge still folded back, reverse the direction of the internal fold, so that the right sides come together and you can pin the bottom of the placket together.
Stitch with a 1cm (⅜in) seam allowance. Draw in the stitch line with tailors chalk before sewing if you feel the need. Trim back the seam allowance and turn corner with a corner turner.
Give the PLACKET [5] a good press and then pin in place. You will want to be pinning through both sections of the top placket and ensuring the fold is covering the stitch line underneath.
Mark a horizontal line across the PLACKET [5] 5cm (2in) up from the bottom of the PLACKET [5].
Carefully stitch the PLACKET [5] in place, through all the layers.
I hope this tutorial gives you the confidence to give it a go!
Happy sewing,
Emily
RESOURCES MENTIONED IN THIS ISSUE
Peppermint pleated dress pattern can be found here.
For more issues of the Q & A series, you can check out the archive here.
WHAT YOU’VE BEEN MAKING
Peppermint peplum top made by @rena_sewsolo
Rushcutter dress made by @amchan22
Collins top made by @yarnovergirls
MORE POSTS IN THE SERIES
ISSUE 110 - How to line a wrap skirt
THE Q & A SERIES
How to line a wrap skirt
Hi Emily,
Thank you for taking the time to answer our questions and for your contribution to furthering the art of sewing! 😊
I have some light-weight Japanese printed linen which I think would suit the wrap skirt pattern very well, however I would like a bit more coverage and have some navy voile in my stash which would go well for lining.
I would prefer it if the lining was not visible, so thought I could have a facing of the linen fabric on the wrap, so that the lining didn’t show. Your patterns are always finished neatly - any tips for attaching the lining, particularly at the hem?
Thank you,
Donna
Hi Donna,
This sounds like a great idea!
Of all skirt projects to line, the Peppermint wrap skirt is probably the simplest as you don't need to think about a zip closure.
When it comes to lining a skirt, normally you don’t attach the lining at the hem. What this means is that the outer layer (main fabric) will be able to hang properly and won't be impacted by a lining holding it back. More about that when I show you how to construct the skirt with lining below.
Cutting the wrap skirt pattern pieces
Cut all pattern pieces from the main fabric as instructed in the pattern.
For the lining you will only need to cut the main skirt pieces. You don't need the waistband.
Cut the lining pieces about 2.5cm (1in) shorter than the outer pieces. This will prevent the lining dropping and being visible when the skirt is worn.
On the front lining pieces, trim off the seam allowance at the opening by cutting along the STITCH LINE (grey line on the pattern). The raw edge of the lining will be held in place by the folded edge of the outer layer so we don't need this extra fabric on the lining.
sew the darts
Start by sewing the front and back darts on the outer pieces (steps 1 and 2 of the instructions). Press the darts as instructed.
Repeat for the lining pieces. This time press the darts in the opposite direction. This means that when you join the lining to the skirt you won't end up with too much bulk as the dart bulk won't be sitting on top of each other.
Skip step 3 of the instructions (finishing the wrap edges). We'll do this after the lining and outer skirt are joined at the top so that the lining becomes enclosed inside the edge finish.
Sew the side seams
Join the front and back pieces together at the side seam.
The Peppermint Wrap skirt instructions guide you to sew this seam with a French seam, but when adding a lining you need to consider how seam finishes are going to impact the overall bulk.
It sounds like your fabric is fairly lightweight, so it's probably fine to sew both your outer and lining fabrics with French seams. If using a bulky fabric (such as a winter weight wrap skirt), I'd suggest sewing the seams with regular seams, overlocking and pressing open.
Lined garments often have unfinished seams, but finishing the seams will encourage longevity in the garment, so we like to finish seams as usual, when possible.
Join the lining pieces at the side seams in the same way. If sewing with French seams, press the lining seams in the opposite direction to the outer skirt (again, this is to minimise bulk in the seams).
Hem the skirt lining using your chosen method. To hem in the same way as the outer skirt, look to Step 16 and 17 of the instructions.
With the outer skirt and lining wrong sides together, pin the two layers together along the waist edge. Stay-stitch the lining to the outer layer with a 6mm (1/4in) seam allowance.
Flip the skirt so that the lining is facing up. Fold back the front opening raw edges as instructed in Step 3, making sure the raw edge of the lining is enclosed inside the fold on both sides.
At this point you can now continue following the instructions as usual to create and attach the waistband - Step 7 onward.
When you enclose the raw edge of the waistband on the inside (Step 13) the raw edges of lining will be tucked inside for a clean finish.
I hope this tutorial gives you the confidence to give lining the Wrap skirt a go!
Happy sewing,
Emily
For more issues of the Q & A series, you can check out the archive here.
WHAT YOU’VE BEEN MAKING
Peppermint pleated dress made by @annazaubert
MORE POSTS IN THE SERIES
ISSUE 109 - Swapping sleeve styles between patterns
THE Q & A SERIES
Swapping sleeve styles between patterns
Hello!
Thanks for this forum and for answering our questions.
Do you have any tips for adding sleeves to a sleeveless pattern or changing the style of sleeves on an existing pattern? Do you need to match up curves at the armhole if you have sleeves from another pattern you would like to use?
- Sarah
Auckland, New Zealand
Hi Sarah,
Great question!
We have a tutorial on our blog about how to add sleeves to a sleeveless style. In the tutorial we show how to add sleeves to the Peppermint Peplum top. When adding sleeves to a pattern that normally doesn’t have sleeves, you will need to use a pattern with a similar shape / amount of ease.
In terms of swapping sleeves between styles, that's definitely something you can do too. We included a tutorial about this in a past issue of Curated by ITF and I thought I'd share it with you all today.
Considerations when swapping sleeves between patterns
You cannot just take one sleeve and attach it to an armhole from another pattern. The sleeve caps are very likely to be different between the styles, which prevents you from being able to simply swap the pattern pieces.
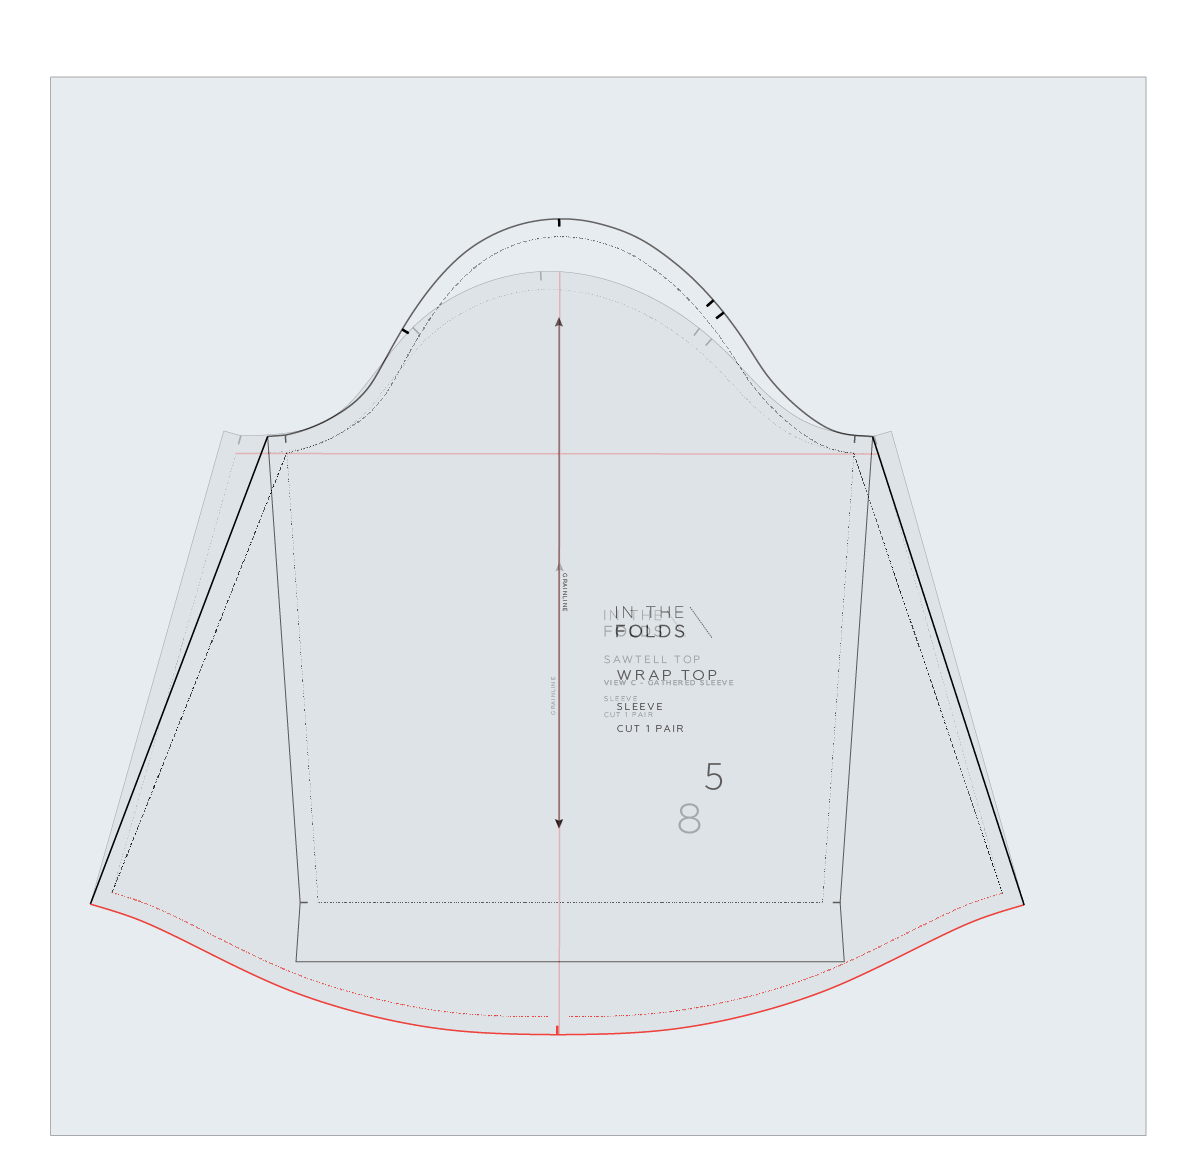
In this tutorial, we will show you how to take one of the Sawtell top sleeves and transfer the design to a sleeve from another pattern - in this case, the Peppermint wrap top.
Step 1
Trace the sleeve piece from the pattern you will be using for the rest of the garment. Use pencil as you will erase some of these lines later.
For the example, we are making the pattern for the Peppermint wrap top with the gathered sleeve from the Sawtell top, so we will trace the Peppermint wrap sleeve piece on a large piece of paper. The amount of paper required will depend on the type of sleeve you are creating. For a gathered sleeve, you will require room on either side.
We will refer to this sleeve as SLEEVE 1 to prevent confusion.
Step 2
Extend the grainline through the piece from top to bottom. Mark in the BICEP LINE - joining the top of the underseam STITCH LINE on each side with a straight line, perpendicular to the grainline.
Step 3
Take the sleeve that you are transferring the design lines from, extend the grainline and mark the BICEP LINE as you did in STEP 2.
We will refer to this as SLEEVE 2.
Step 4
If your paper is transparent, place SLEEVE 1 on top of SLEEVE 2, lining up grainlines and bicep lines. Hold in place with a pattern weight.
If your paper isn't transparent, put SLEEVE 2 on top of SLEEVE 1 and use a tracing wheel to transfer the lines.
Step 5
Create the new underseams by joining the top of the seam on SLEEVE 1 to the hem of SLEEVE 2 with a straight line. Do this for the STITCH LINES and the CUT LINES.
Step 6
Trace the hem from SLEEVE 2 onto SLEEVE 1. Be sure to transfer any notches.
Remove pattern paper once all lines have been transferred. Erase any lines you no longer need. If you traced using a tracing wheel, use a pencil and ruler/French curve to draw in the lines you need.
Step 7
Finalise pattern by checking all notches are correct. In the example you can see we needed to rotate the underseam notches to match the angle of the new sleeve lines. Update sleeve name.
I hope this tutorial helps you make all your sleeve dreams come true.
Happy sewing,
Emily
For more issues of the Q & A series, you can check out the archive here.
WHAT YOU’VE BEEN MAKING
Flynn jacket made by @sew.sand.sew
Hove jacket made by @indexoutofbounds
MORE POSTS IN THE SERIES
ISSUE 108 - Fabrics suitable for facings
THE Q & A SERIES
how to choose Fabrics suitable for facings
Dear Emily,
I’ve nearly finished my first ruffle sleeve top and I’ve really enjoyed making it.
I’ve had some beautiful cheesecloth type fabric in my stash for years. But only 2m of 115cm width, so not enough. Can I make the facing out of a different fabric and if so what? Or do you have any other ‘blouse’ type patterns that would suit this fabric?
Thank you!
Leigh
Hi Leigh,
I am pleased to hear you have enjoyed using the Ruffle sleeve top pattern!
You could definitely use the fabric from your stash.
You could make the facing from a cotton fabric of a similar weight to the cheesecloth (voile for example).
what to keep in mind when using a different fabric for a garment facing
The only thing to keep in mind though is that as the fabric is quite transparent, you will be able to see the facing through the top, so you need to have a think about whether you're okay with that.
To get a feel for it, you could try holding the two fabrics up to your body - with the facing fabric folded so it just shows in one section - like the facing of this pattern. If you're not happy with it showing through, you have two options:
Lining or underlining the body of the top instead of just having a facing
The other thing you could think about is using bias binding around the neckline and then making a cami / singlet to wear under it. We have a tutorial showing you how to attach bias binding here.
Happy sewing,
Emily
For more issues of the Q & A series, you can check out the archive here.
WHAT YOU’VE BEEN MAKING
Mending using An Introduction to Garment Repair by @lady.chickweed
Acton dress made by @anthea.jacklin
Peppermint wrap top made by @what.ella.made
MORE POSTS IN THE SERIES
ISSUE 106 - HOW TO REDUCE THE SIZE OF A DART
THE Q & A SERIES
How to reduce the size of a dart
Hi Emily,
Not a question, but a Thank You!
Sunday's tutorial on removing a bust dart from a pattern is exactly what I have needed without realising it.
As an A-bust person, even B-cup patterns with darts are too big for me. Now that I know how to eliminate darts, I can get to work adjusting some patterns I've been admiring. Thank you!
And thank you also for how much care you put into your instructions. You are one of the most dependable instructors/pattern makers around.
Fiona
- Brunswick, Australia
Hi Fiona,
Thank you for the lovely email. I am so happy to hear you are enjoying our patterns and the information we share!
I know your comment wasn't a question, but it did make me think about a follow-up to my post on how to remove a bust dart.
WHAT ARE DARTS FOR?
Darts are used to create curves over parts of the body that require more shaping.
In the case of a bust dart on a small bust, you may require (or want) some shaping, but not the full amount of shaping that a pattern has that's drafted for a B cup.
HOW TO REDUCE THE SIZE OF A BUST DART
For those of us with a small bust (I am part of this club!), rather than remove the dart altogether, you may just want to reduce the size of the dart.
In today's post I thought I'd show you how you can keep the dart, but reduce the size of it.
PREPARE YOUR PATTERN
Step 1
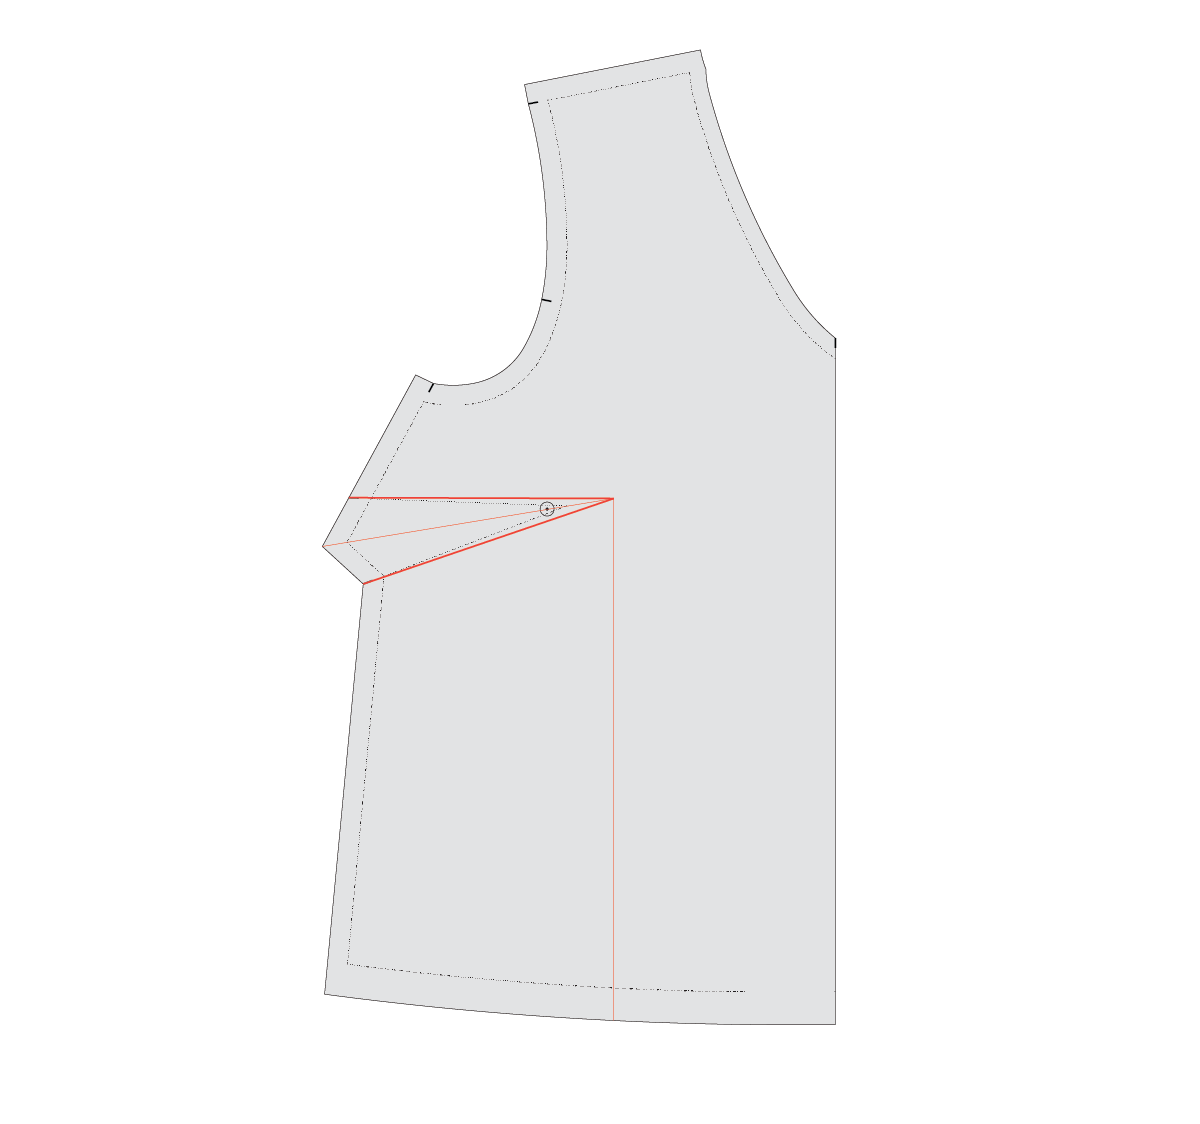
Draw a line through the dart to the bust apex point (normally 2.5cm / 1inch from the tip of the dart). Check that this corresponds to your actual bust apex point and move if necessary.
Draw a line from the bust apex point to the hemline - parallel to the centre front.
Step 2
Draw in new dart arms - from the notches on the side seam to the bust apex point.
Step 3
Cut up from the hemline along your vertical line. Stop 1-2mm from the bust apex point.
Cut along the top dart arm towards the bust apex point. Stop 1-2mm from the bust apex point to create a hinge.
Step 4
Carefully rotate the cut dart arm so it meets the centre line of the dart. Through this process you are relocating some of the dart fullness to the hem (this is called the 'slash and spread' technique and you can learn more about it here). Tape dart closed.
Step 5
Fill the gap with some paper and tape in place. Draw in your new dart, using the centre dart line and the lower dart arm. Draw your lines all the way to the bust apex point.
Measure the opening in the hem - measuring on the stitch line on each side of the opening (this is the grey line on In the Folds patterns). Take note of the measurement.
Step 6
We are now going to remove this excess from the side seam. Mark the amount recorded in the previous step on the hem line - measuring from the side seam (on the stitch line). If you want to keep some of the fullness you can, just mark a smaller amount from the side seam.
Before we can go ahead and join this point to the armhole and create a new side seam, we first need to think about dart shaping.
What is dart shaping?
Dart shaping is the way the end of a dart is shaped so it sits nicely when the seam is sewn. By adding dart shaping, the edge of the dart will sit flush with the seam it is a part of.
You may have put a dart in a garment before and noticed that the dart has changed the shape of the seam that it lies on and is no longer the smooth line it once was. To prevent this from happening, we need to add dart shaping. This will ensure that once your dart is sewn, the seam it's on will remain a nice smooth line.
How to create dart shaping
You will need to fold the dart, so you can predict what will happen to the shape of the seam when you sew the dart from fabric. Think about which direction the fullness of your dart will be pressed once it is sewn. This will decide which dart arm you need to fold.
Generally vertical darts are pressed towards the centre front (in the case of front darts) and the centre back (in the case of back darts). For horizontal darts (like the one pictured), the bulk of the dart is pressed down.
If you'd find it easier to follow a video about adding dart shaping, you can see the process here.
Step 7
Take your pattern and fold the lower dart arm.
Step 8
Folding a dart on a flat surface is not possible, as we are making the two dimensional pattern three dimensional. Place the tip of the dart on the corner of a table (or a large books also works) and fold the lower dart arm so that it meets the upper dart arm. This allows for the dart to wrap around the corner, rather than on the table top where it is forced to remain flat.
Hold folded dart in place with a pin or pattern weight.
Step 9
Create a new side seam, taking a ruler and drawing a straight line from the point marked on the hemline up to the top of the side seam (this line needs to meet the top of the side seam on the stitch line).
Step 10
Use a tracing wheel to transfer the new side seam line onto the folded section of the dart. This will give you the shaping you need for the dart. If you don't have a tracing wheel you can use a pin to make a few holes along the line.
Step 11
Remove pattern weight / pin and trace the markings made by the tracing wheel. Add seam allowance to the new side seam line.
Smooth out the hem line. Due to having less width for the bust, we can also have a little less length - as you can see I have raised the centre front hem slightly.
Step 12
Mark new notches at the dart arms. You can also move the side seam dart over so that it is in line with the angle of the new side seam. For more information on notching patterns, you can see this post.
Happy sewing,
Emily
For more issues of the Q & A series, you can check out the archive here.
WHAT YOU’VE BEEN MAKING
Acton dress made by @stitchedbycaitlin
Shortened Acton dress made by @factorykingpin
Peppermint wrap skirt made by @marco.themaker
Peppermint wrap top made by @popscansew
MORE POSTS IN THE SERIES
ISSUE 105 - Move the pockets on the Rushcutter dress
THE Q & A SERIES
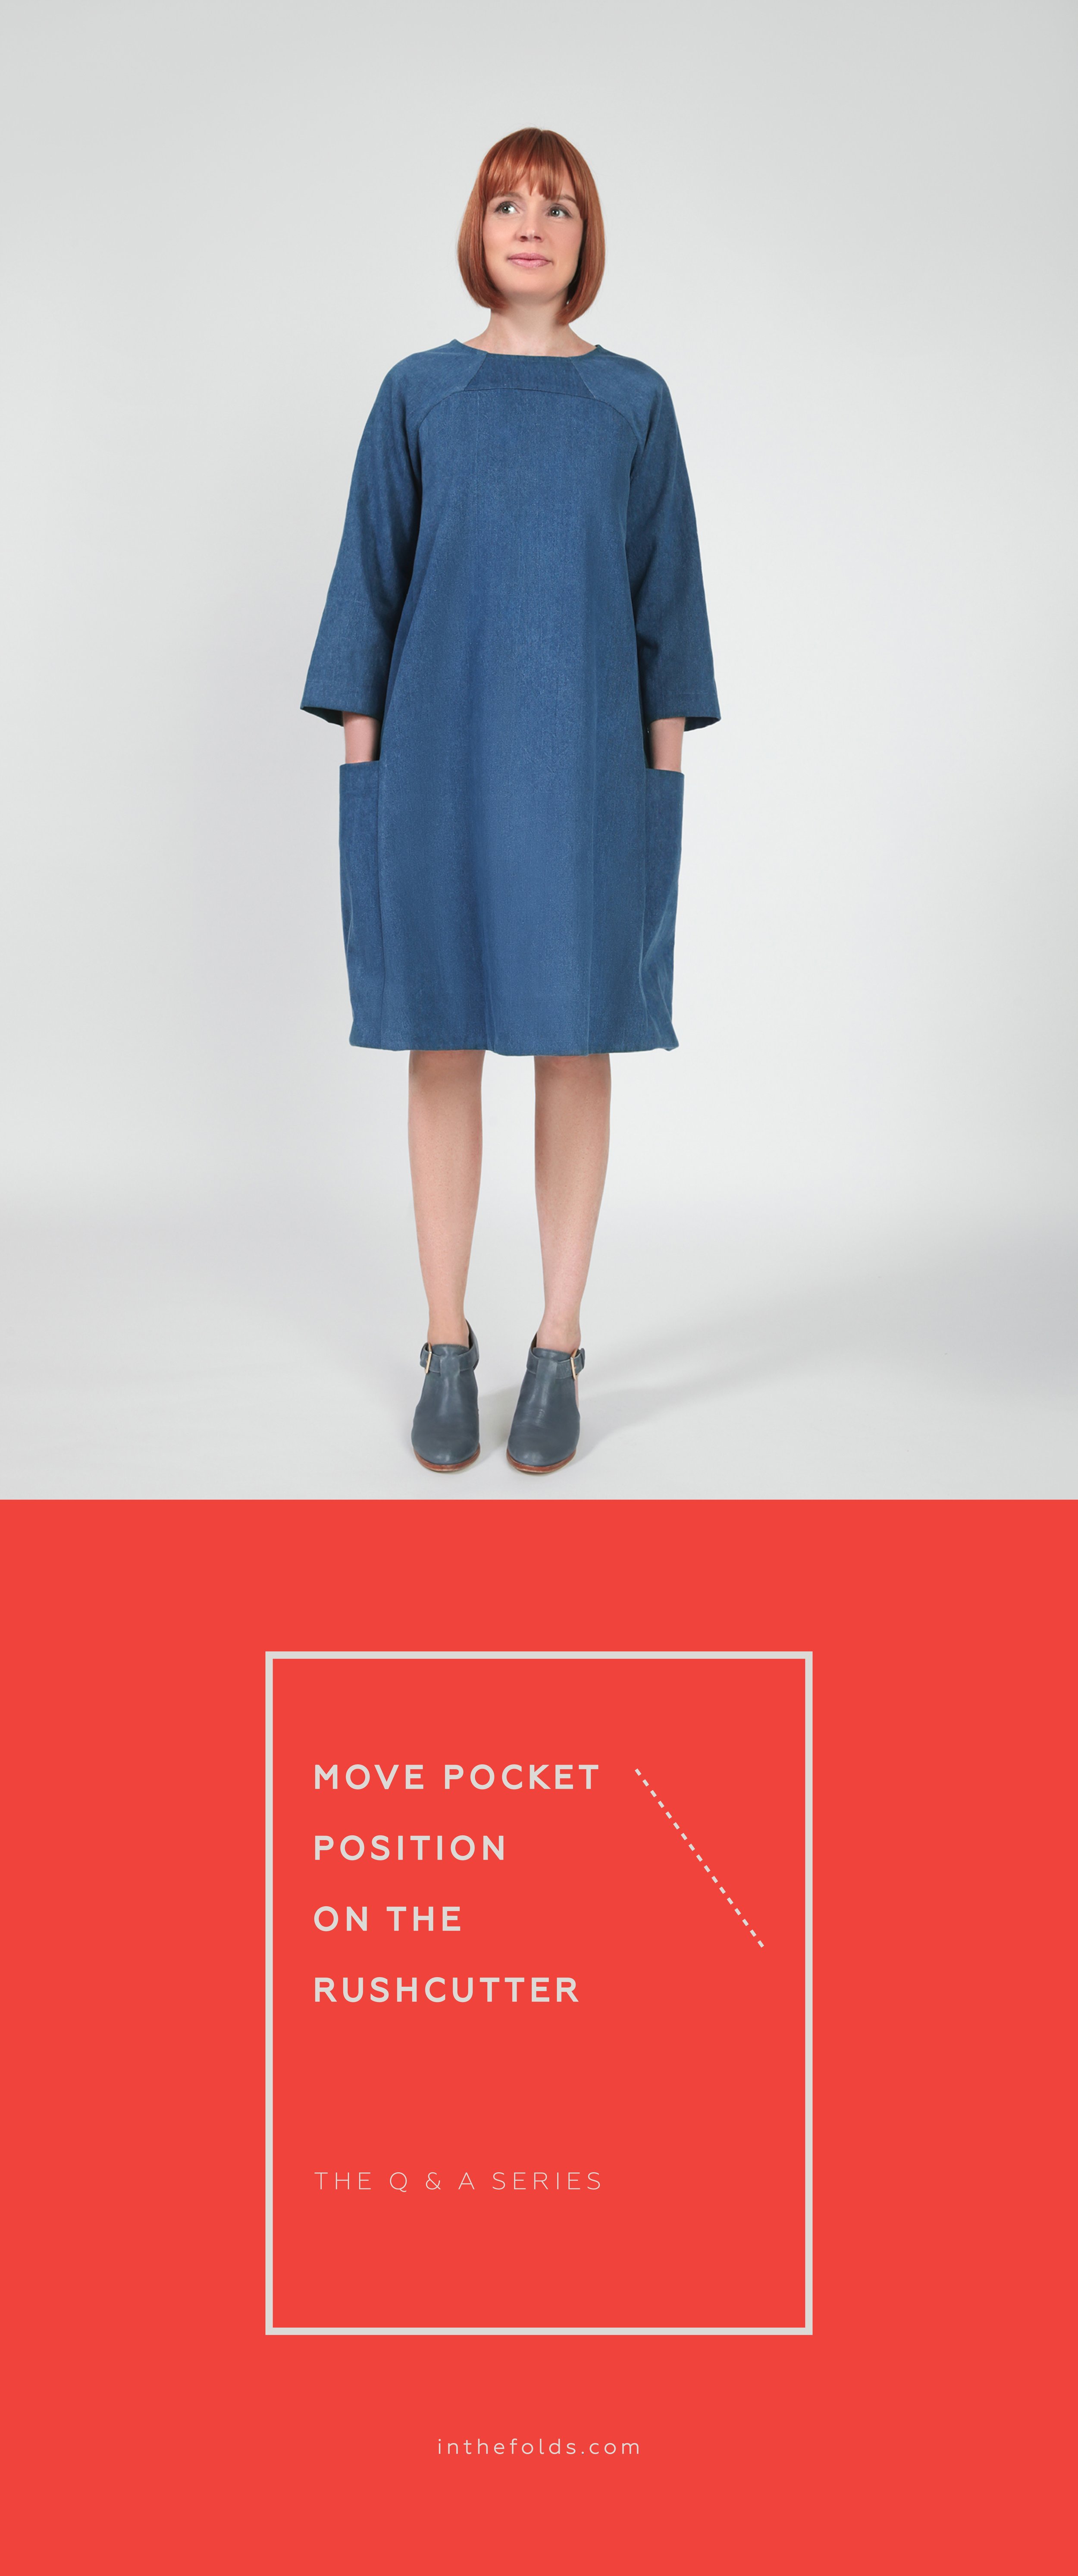
How to move the position of the pockets on the Rushcutter dress
Hi there,
I have just made a test of the Rushcutter dress. I had to take about 10cm off the length. The dress fits great but the pockets are too low down... my hands jus reach the top couple of inches. What is a good way to raise the position of the pockets on this pattern?
Thank you.
Sue
- Ajijic, Mexico
Hi Sue,
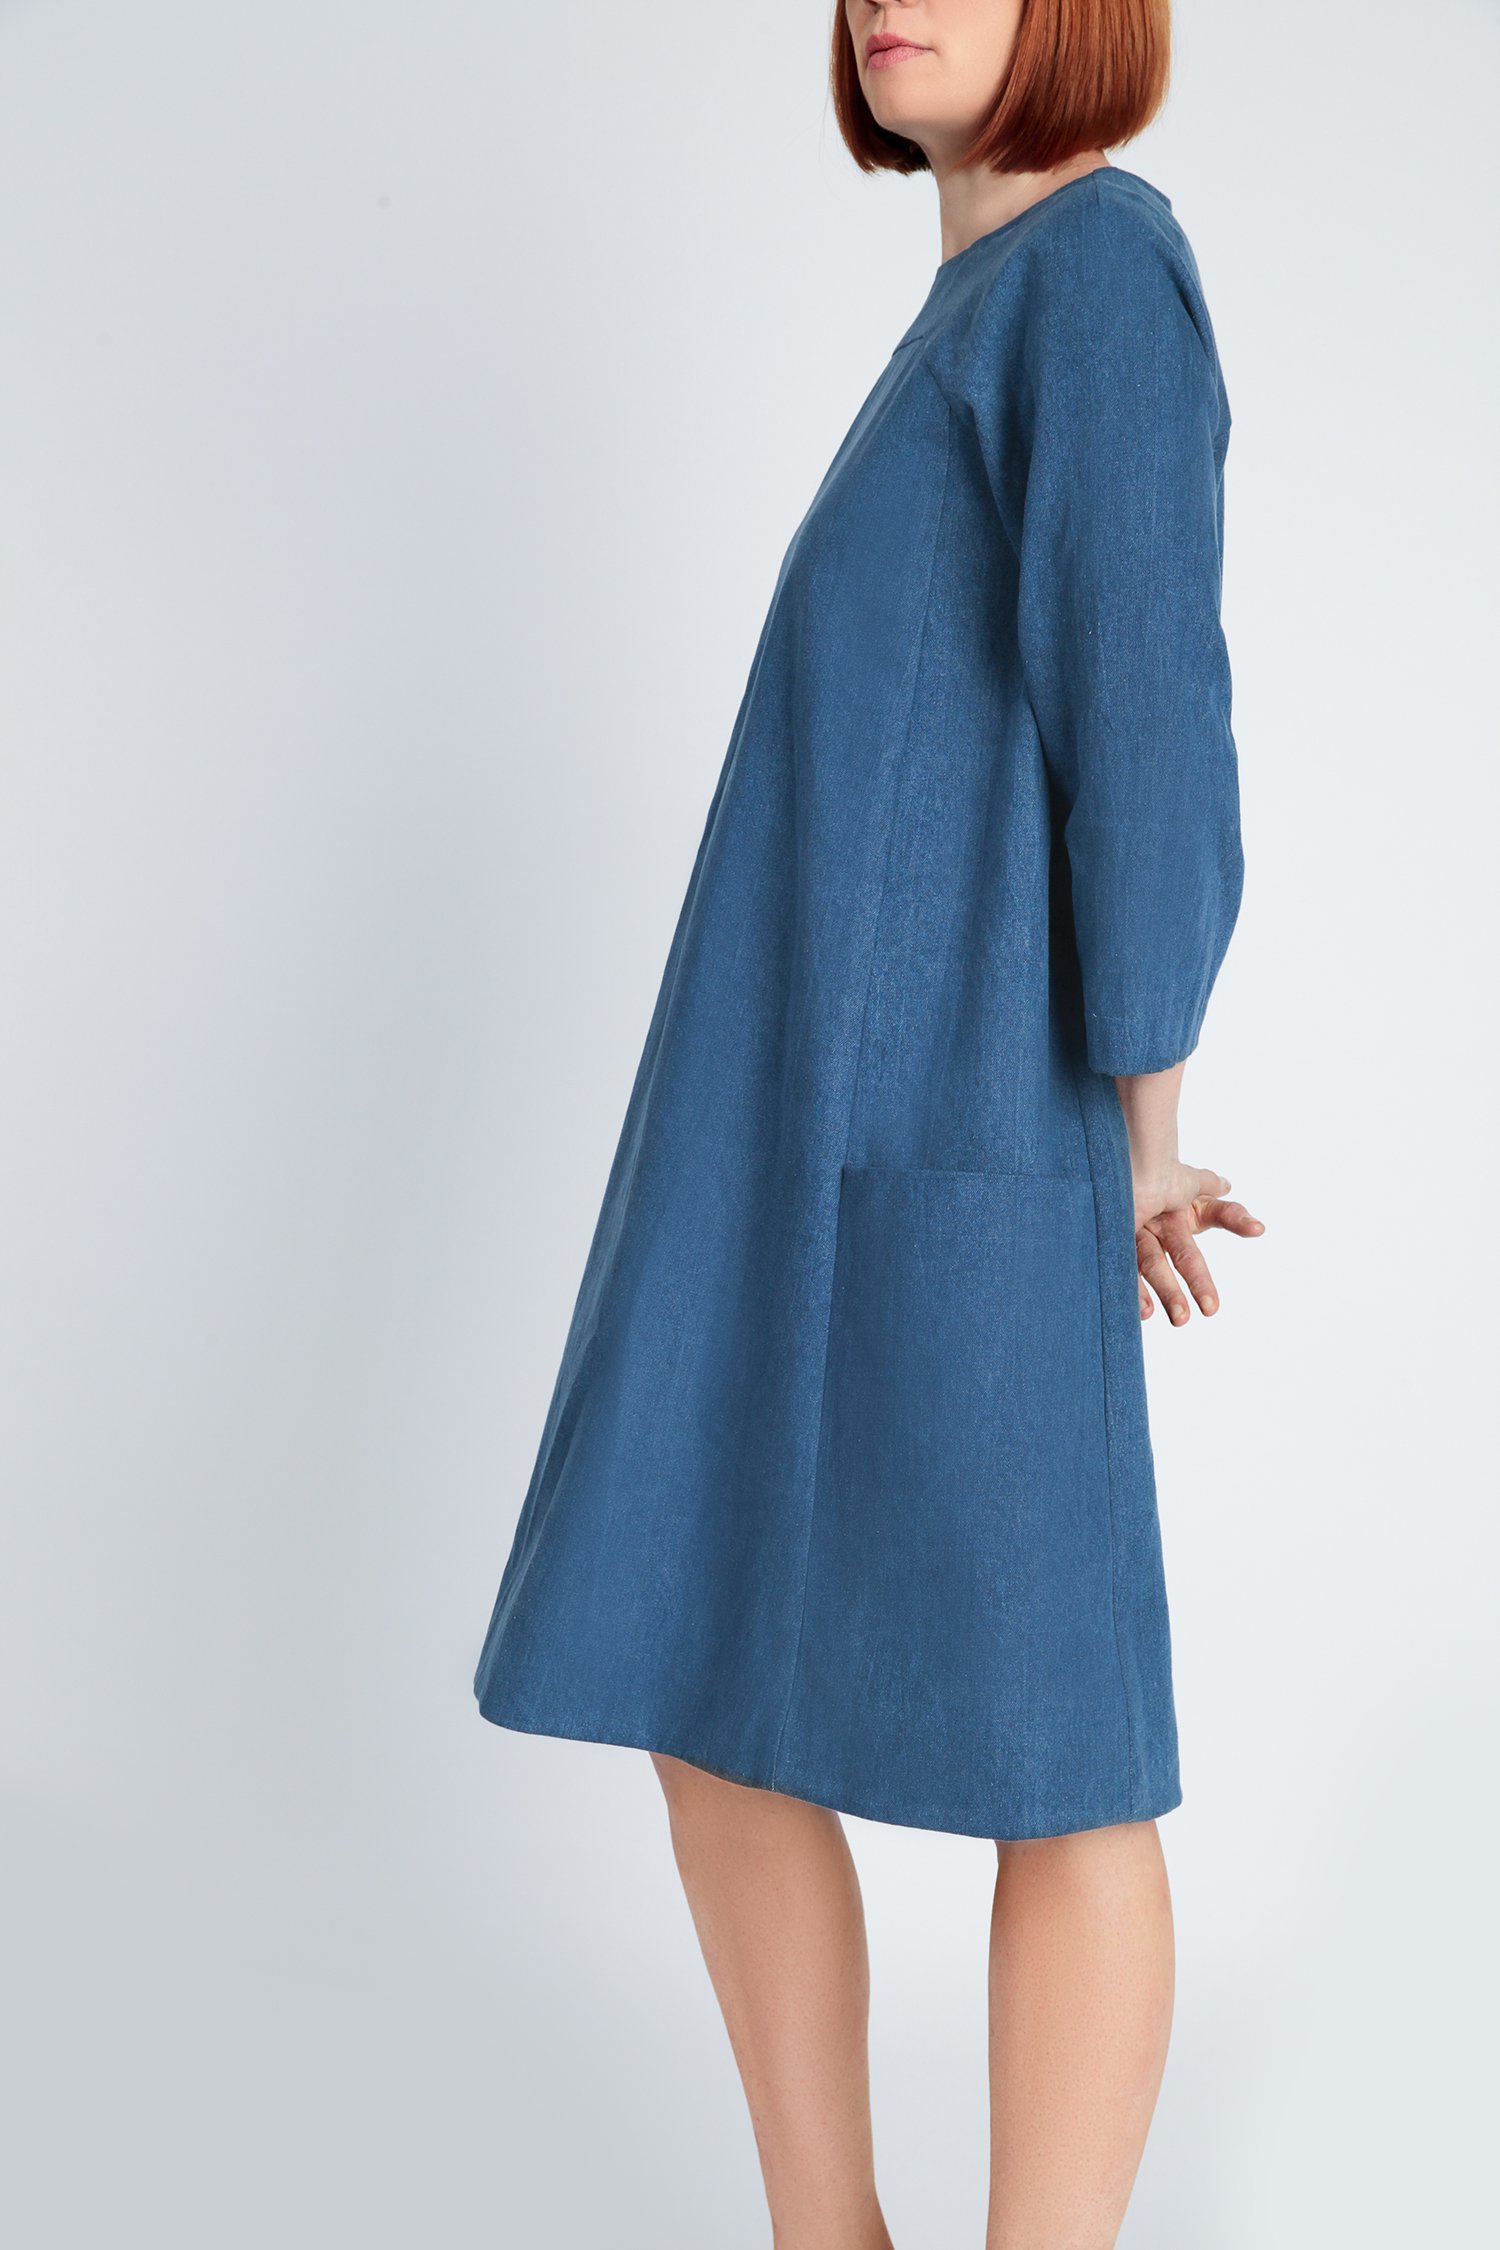
I'm excited to hear you're making the Rushcutter dress! The pockets are my favourite thing about this pattern, so you definitely want to make sure you can use them!
How to alter the pocket will depend on how you have shortened the pattern. There are two ways to alter the length of most patterns - you can remove length from inside the piece using LENGTHEN / SHORTEN line on the pattern (this means the hem circumference will remain the same as it was) or remove from the hem. I'll show you how to alter the pocket for both cases.
Remove length from the LENGTHEN / SHORTEN line
Step 1
I'll just show you this process of shortening the side panel of the dress, as this is the one that impacts the pocket. If altering the length of this pattern, you also need to alter the front and back pieces in the same way.
Cut along the LENGTHEN / SHORTEN line on the pattern.
Step 2
Mark the amount you would like to shorten the pattern by on the upper section of the pattern piece with a line parallel to the cut line. In the case of the example, this is 10cm.
Step 3
Slide the lower section up to meet the line marked in the previous step. Use the grainline to ensure you are lining things up correctly. Tape / glue in place.
Step 4
Re-draw the seam lines by drawing a straight line across the alteration. This will mean shaving off a small amount on the lower section and adding a small amount to the upper section. I normally use masking tape to extend the sides of a pattern by a small amount or to fill gaps - rather than using larger pieces of paper.
Alter the pocket piece
Before altering the pocket piece, it's a good idea to see how the pocket pattern was originally drafted so you can use the same method of altering your pocket piece.
In the illustration I have placed the pocket on top of the side panel - the top edge of the pocket has been folded back as it is when it is sewn. The sides of the pocket extend past the side panel by 0.5cm on each side. This is so that when the pocket is attached to the side panel it has a bit of volume in the top section, rather than sitting completely flat.
Step 5
Take the pocket pattern piece and fold along the top stitch line - using the notches to guide you. This is the top hem allowance which needs to be out of the way while checking how the pockets sits on the altered side panel piece.
Step 6
Place the pocket piece onto the side panel - lining up the hemline and the hemline notch. If you would like to check you are happy with the pocket position, pin the pocket onto the side panel and hold the panel up to your body to check.
When you are happy with the pocket position, hold pocket in position with a pattern weight (or a tin of food) and mark two points on the top edge of the pocket - 5mm from the side panel edge on each side.
Step 7
Re-draw the sides of the pocket by joining the points marked in the previous step to the bottom corners.
Step 8
Mark notches on the side panel at the top edge of the pocket on both sides of the panel.
Step 9
Remove the pocket piece from the side panel. With the top edge still folded, cut along the new seam lines.
Shortening from the hem
The process is very similar if you have removed length from the hem like in the illustration above.
Step 1
Take the pocket piece - with the top edge folded down like we did earlier - and place on the side panel piece. If you would like to check you are happy with the pocket position, pin the pocket onto the side panel and hold the panel up to your body to check.
When you are happy with the pocket position, hold pocket in position with a pattern weight (or a tin of food) and mark two points on the top of the pocket - 5mm from the side panel edge on each side.
Step 2
Re-draw the sides of the pocket by joining the points marked in the previous step to the bottom corners of the side panel piece. If you can't see the bottom corners of the side panel through your pocket, try holding the pieces up against a window.
Step 3
Due to removing length from the side panel from the bottom, the notches on the side no longer match up. Transfer the notches from the side panel onto the pocket.
Mark notches on the side panel piece at the top edge of the pocket on both sides of the panel.
Step 4
Remove the pocket piece from the side panel. With the top edge still folded, cut along the new seam lines.
Happy sewing,
Emily
resources mentioned in this issue
Rushcutter dress pattern can be found here.
For more issues of the Q & A series, you can check out the archive here.
WHAT YOU’VE BEEN MAKING
Rushcutter dress made by @the_sewist
Rushcutter dress made by @shuaychong
Peppermint wrap top made by @laura_made_this
Peppermint wrap skirt made by @juanitaflett
More posts in the series
ISSUE 104 - Removing a dart from a bodice
THE Q & A SERIES
How to remove a bust dart from a pattern
Hi Emily,
I am going to make the ruffle top from Peppermint Magazine and I am wondering if it is possible to remove the side darts. Usually by the time I do an SBA (Small Bust Adjustment) and shorten the darts there isn’t much left. If the top is boxier can I just move the dart to the hemline and not sew the dart there and have a wider hemline?
Thanks!
Shelby
Hi Shelby,
Great to hear you would like to sew the Ruffle Sleeve top!
You can definitely remove the dart from this pattern. When you rotate the dart to the hemline it does look like you are removing the dart, but what you're really doing is relocating it. As you mention in your question, this will make for a fuller hemline which is what will give you the fit required over the bust that was originally created by the bust dart.
I think you're better off removing the dart all together, as it sounds like you don't need that added fullness at the hem. For those of you reading along, I have included details about rotating the dart to the hem, so if you would like to remove the dart, but keep the fullness required for a B cup bust size, keep on reading!
Step 1
Draw a line through the dart to the bust apex point (normally 2.5cm / 1inch from the tip of the dart). If this does not correspond to your actual bust apex point don't worry, you will be removing the dart so it doesn't really matter. For those of you who plan on keeping the fullness, it is a good idea to mark your actual bust apex point.
Draw a line from the bust apex point to the hemline - parallel to the centre front.
Step 2
Draw in new dart arms - from the notches on the side seam to the bust apex point.
Step 3
Cut up from the hemline along your vertical line. Stop 1-2mm from the bust apex point.
Cut along the top dart arm towards the bust apex point. Stop 1-2mm from the bust apex point to create a hinge.
Step 4
Carefully rotate the cut dart arm so it meets the uncut dart arm. Through this process you are relocating the dart fullness to the hem (this is called the 'slash and spread' technique and you can learn more about it here). Tape dart closed. Fill the gap with some paper and tape in place.
If you are happy with the fullness in the hem, you can finalise the pattern at this stage - smooth out the hem with a soft curve and straighten out the side seam. Cut off any excess paper.
This pattern as it is still drafted for a B cup bust. Although we have removed the dart, the fullness at the hem creates shaping that will fit over the bust.
To remove the hem fullness
Step 5
Measure the opening in the hem - measuring on the stitch line on each side of the opening (this is the grey line on In the Folds patterns). Take note of the measurement.
Step 6
We are now going to remove this excess from the side seam. Mark the amount recorded in the previous step on the hem line - measuring from the side seam (on the stitch line). If you want to keep some of the fullness you can, just mark a shorter amount from the side seam.
Create a new side seam, drawing a straight line from the point marked up to the top of the side seam (again, this line needs to meet the top of the side seam on the stitch line).
Step 7
Add seam allowance to the new hemline and new side seam line. Check the side seam length against the back pattern piece to confirm they are the same length. Tweak front side seam if required.
Step 8
Cut off any excess paper to complete the pattern.
A comparison
While creating this tutorial, I was interested to see a comparison between the above method to remove bust shaping and using a Small Bust Adjustment (SBA) to remove the dart. On the left you can see the method we used for this tutorial and on the right you can see the SBA. The two look quite similar. Below you can see the SBA placed on top of the other method. The SBA method has slightly less width, but the other method gives a nicer armhole shape, so I would suggest using the method outlined in the tutorial so that you are not disrupting the armhole curve.
We hope you found this helpful!
Happy sewing,
Emily
For more issues of the Q & A series, you can check out the archive here.
WHAT YOU’VE BEEN MAKING
Flynn jacket made by @elbe_textiles
Hacked Peppermint wrap top made by @sal.sews
Peppermint wrap top made by @sal.sews
Peppermint peplum top made by @makesbykatee
More posts in the series
ISSUE 103 - MAKE A WRAP SKIRT WITH MORE COVERAGE
THE Q & A SERIES
Make a wrap skirt with more coverage
Hi Emily,
I've just had the Peppermint wrap skirt pattern printed. I’d like to extend either piece #1 or #2 to give me a bit more coverage as I run after my kiddo at the park. Any thoughts of which piece would work better for that extension?
Thanks!
Hi there,
Great to hear you will be giving the Peppermint wrap skirt a go!
My Peppermint Wrap skirt is probably one of my most worn garments. There is something about this pattern that makes it work with almost everything in my wardrobe.
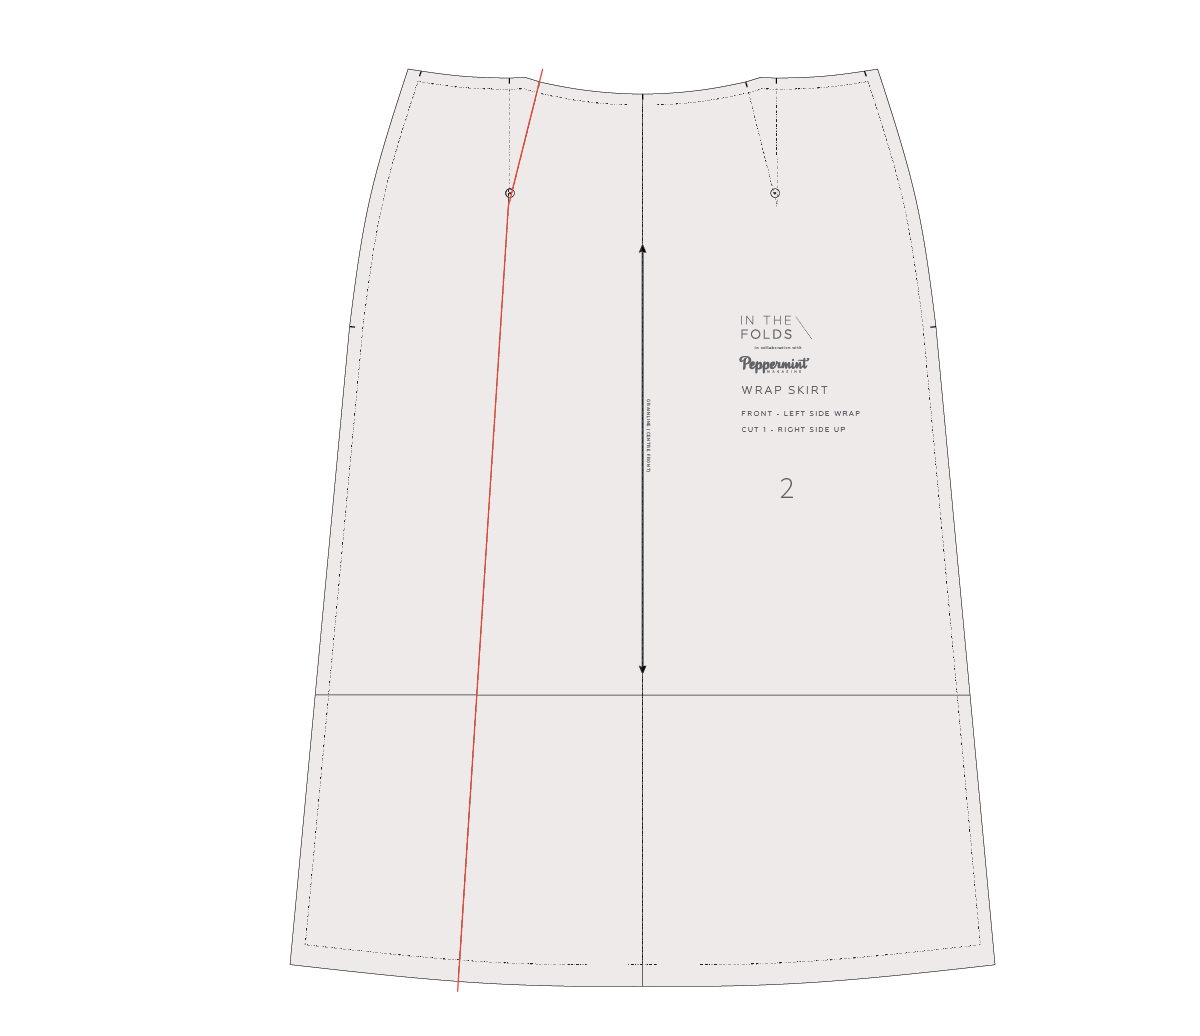
What I love about this pattern - and what makes it so wearable - is that the front pieces are not cut as a pair. The underwrap (the piece of the skirt that goes under the outer piece) has more width than the one on top (the overwrap). In the illustration below I have placed one piece on top of the other so that you can see the difference between the two.
I designed the pattern this way as I'm not a fan of wrap garments that you have to hold in place or constantly check if you're exposing more skin than you'd like. Clothes should be made to be worn and loved, and I believe that making them more comfortable to wear in our daily lives is the best way we can ensure this will happen.
In saying that, you could definitely extend the underwrap more to have more coverage if you like. The reason I suggest altering the underwrap is that this won't impact the look of the skirt. The overwrap remains unchanged and you will just have more fabric width in the piece that sits underneath.
Step 1
Take piece 2 (Front Left Side Wrap) and extend the grainline through to the top and bottom of the pattern piece. This is the Centre Front (CF) of the skirt.
Step 2
Fold along CF so you have just the side with the dart visible.
Step 3
Create a full piece by tracing the right side (side with the dart) onto the other side of CF.
Step 4
The section of the pattern on the left will be the part of the pattern that extends under the overwrap. We do not need the dart in this location and by removing it (using the slash and spread method) we will retain it's shaping whilst also getting more fullness in the hem (which means more coverage) and less fabric bulk in the waist section.
Mark in a slash line from the tip of the left dart down to the hem.
Step 5
Slide a piece of pattern paper under the pattern piece.
Cut down one of the dart arms (on the side we're working on) and stop 1-2mm from the tip of the dart. Cut up from the hem along the slash line towards the tip of the dart. Stop 1-2mm from dart tip to create a small "hinge" of paper.
Slide the uncut dart arm over to meet with the cart dart arm. You will notice that this has opened up the hemline. What we're doing here is relocating the fullness from the dart to the hem - which gives us the waist shaping we need to achieve a good fit. If you would like to see more details about this technique, you can checkout this blog post. Tape / glue in place and attach to the paper underneath.
Step 6
To finalise the pattern, draw in a nice smooth curve at the waist line and hemline. Add seam allowance back onto these new lines.
Step 7
As the left side of this piece hangs free (creating the wrap) we need to straighten out the edge (as it won't be sewn to the back side seam). Draw a straight line from the top of the side seam to the bottom - on the STITCH LINE (grey line on the pattern). Add seam allowance (2cm / 3/4in) to this new line. This is now the edge of the underwrap.
This alteration will impact how the skirt attaches to the waistband. The waistband will still fit, but the notch that indicates the end of this piece will no longer be correct. Take the waist tie piece and move the notch to reflect the alteration.
Happy sewing,
Emily
RESOURCES MENTIONED IN THIS ISSUE
For more issues of the Q & A series, you can check out the archive here.
WHAT YOU’VE BEEN MAKING
Peppermint wrap skirt made by @leila.makes
Peppermint jumpsuit made by @sewingwithkate
Darlow pants made by @capsule.fabric
Shortened Peppermint wrap skirt made by @ap_archives
MORE POSTS IN THE SERIES
ISSUE 104 - THE COMBINED METHOD FOR SEWING IN SLEEVES
THE Q & A SERIES
How to use the sewing flat and "in the round" techniques together when sewing sleeves
Hi Emily,
I really enjoy your newsletter. Thank you for answering our questions :)
I was wondering about sewing sleeves. There are 2 methods to set the sleeves in, right? Sewing them in when the side seams are already sewn up and when they are not sewn up yet.
When would you choose one over the other? What are the benefits for one or the other in a finished garment? I guess there is a sewing pun for this one as well - what are bene-fits in fitting the sleeves :)
I am looking forward to your answer.
Greetings,
Spela
The Hague | The Netherlands
Hi Spela,
As you may have seen, I answered your question about sewing sleeves in flat or in the round in our last issue of the Q&A series. In this week's issue I want to show you the combined method - sewing part of the sleeve in flat and the rest of it in the round.
The problem with the usual methods of setting in sleeves
When designing the sleeve expansion for the Acton dress pattern I decided I wanted the bodice to be fully lined, just like the original Acton dress pattern. The problem was that it's not as simple to line a bodice with sleeves as it is to line a sleeveless bodice.
When doing research to work out the best way to approach this, I realised that a lot of sewing resources guided makers to use hand-sewing to enclose the lined bodice. Although I am a fan of all things slow sewing, I don't love the idea of falling back on hand sewing just because it's the simplest way to finish something off.
Drafting patterns and creating the order of construction for our patterns has always been one of my favourite parts of the process as it's like trying to solve a puzzle! So I got to work with the goal of finding the best way to fully line a bodice with sleeves and to do it all on the sewing machine.
The solution: a combined method for setting in sleeves
I figured out a way to do it and it became the basis for the instructions of the Acton dress sleeve expansion pattern.
I also realised that this method would work for garments without linings too. Although I think everyone should give sewing sleeves in the round a go a couple of times as it gets easier with practice. But, for those of you who would like to stick to sewing flat, this might be just the method you’ve been looking for!
Prepare sleeves
Step 1
Finish both sides of the sleeve piece with your chosen method.
With your machine on its longest stitch length, make two lines of stitching along the sleeve cap between the front and back armhole notches. The first row should be 5mm (¼in) from the edge and the next 5mm (¼in) from the first row of stitching. The stitches will be hidden inside the seam allowance when the sleeve is attached to the bodice. Leave the threads long at each end and don't backstitch to start or finish.
Carefully pull on one set of threads to slightly pull in the sleeve cap, allowing it to curve in nicely, but not making gathers.
Step 2
The bodice needs to have the shoulder seams stitched and the seams pressed open. In the case of the Acton, as the bodice is fully lined, these seams haven't been finished.
Pin one SLEEVE to armhole with right sides together, using the notches to guide you and easing in the sleeve cap to fit the armhole. Pin sleeve in place, stopping when you get approximately 4cm (1½in) from the underarm on each side. Leave these sections free.
Machine baste the sleeve in place with a 6mm (¼in) seam allowance. This row of stitching will just hold the sleeve in place before we stitch the seam properly in the next step. Repeat with the other sleeve.
Flip bodice to the right side and check for puckering in the sleeve cap. If there is puckering, don't worry! Just unpick a small section around the puckering and steam well. Ease the section back into the bodice, pin and re-stitch.
Once you're happy with how its looking, sew the sleeve in (still leaving the gap on each end) with a 1.2cm (½in) seam allowance.
Tip: If you're working with a sleeve that has a very high sleeve cap, you may need to leave more than a 4cm gap open at each end. You'll know if you need to do this if you have a really hard time pinning the sleeve into the armhole.
Step 3
Pin the SLEEVE underseams together with right sides together. Stitch with a 1.2cm (½in) seam allowance. Press seam allowances open and turn bodice and sleeves right side out.
As you can see in the illustration, at this point the bodice is lined. I don’t go into the details of the lining in this email, as we're just focusing on the method for attaching the sleeves. If you're interested to try the method of the lined bodice with sleeves, grab a copy of the pattern.
Step 4
Pin the side seams of the bodice together with right sides together.
In this case, due to the bodice lining, you will need to flip up the bodice, so you can access the seams on both the bodice lining and outer bodice. Pin the front and back bodice together at the side seams with right sides together.
Repeat on the lining.
Stitch each side seam with a 1.2cm (½in) seam allowance before pressing seam allowances open.
Step 5
Pin the bottom of the sleeve into the bottom of the armhole with right sides together. This is how you will finish the sleeve "in the round."
If the bodice has a lining like ours: From the wrong side of the lining and bodice, sandwich the underarm section of one sleeve between the bodice and lining. Pin the remainder of the sleeve into the armhole. Stitch with a 1.2cm (½in) seam allowance.
Press armholes well.
And that's it!
Happy sewing,
Emily
For more issues of the Q & A series, you can check out the archive here.


