ISSUE 63 - Changing the Rushcutter zip to patterns

PINTEREST HEADERS TEMPLATE_LATEST5.jpg
HEADING - V1.png

Hi Emily

A question about the Rushcutter dress pattern: I like the idea of long sleeves, button-up yoke and in-seam pockets, which is essentially a mash-up of views A and B. I haven't yet purchased the pattern and, before I do, would like to know whether these adjustments are achievable. I am comfortable at level 4 degrees of difficulty.

Many thanks,

Denise


Hi Denise,

Thank you very much for getting in touch.

I love the idea of a pattern mash up between the two versions of The Rushcutter.

A LITTLE BIT ABOUT IN THE FOLDS PATTERNS

If you have used the Rushcutter pattern, you will know that both stitching line and cutting lines are marked on the pattern.

WHY IS THE STITCHING LINE MARKED?

When I first decided to start creating sewing patterns for home sewers, one of the first decisions I made, before I even started sketching, was that I wanted to create patterns that would help sewers develop their skills, in both sewing and pattern making.

By including the stitching lines on each pattern piece, it makes it much easier to understand how the pattern was originally made, but also allows for easy adjustments and 'hacking' to the pattern (as all pattern alterations should be done without seam allowance added to the pattern).

Rushcutter_hack_buttons_4.gif

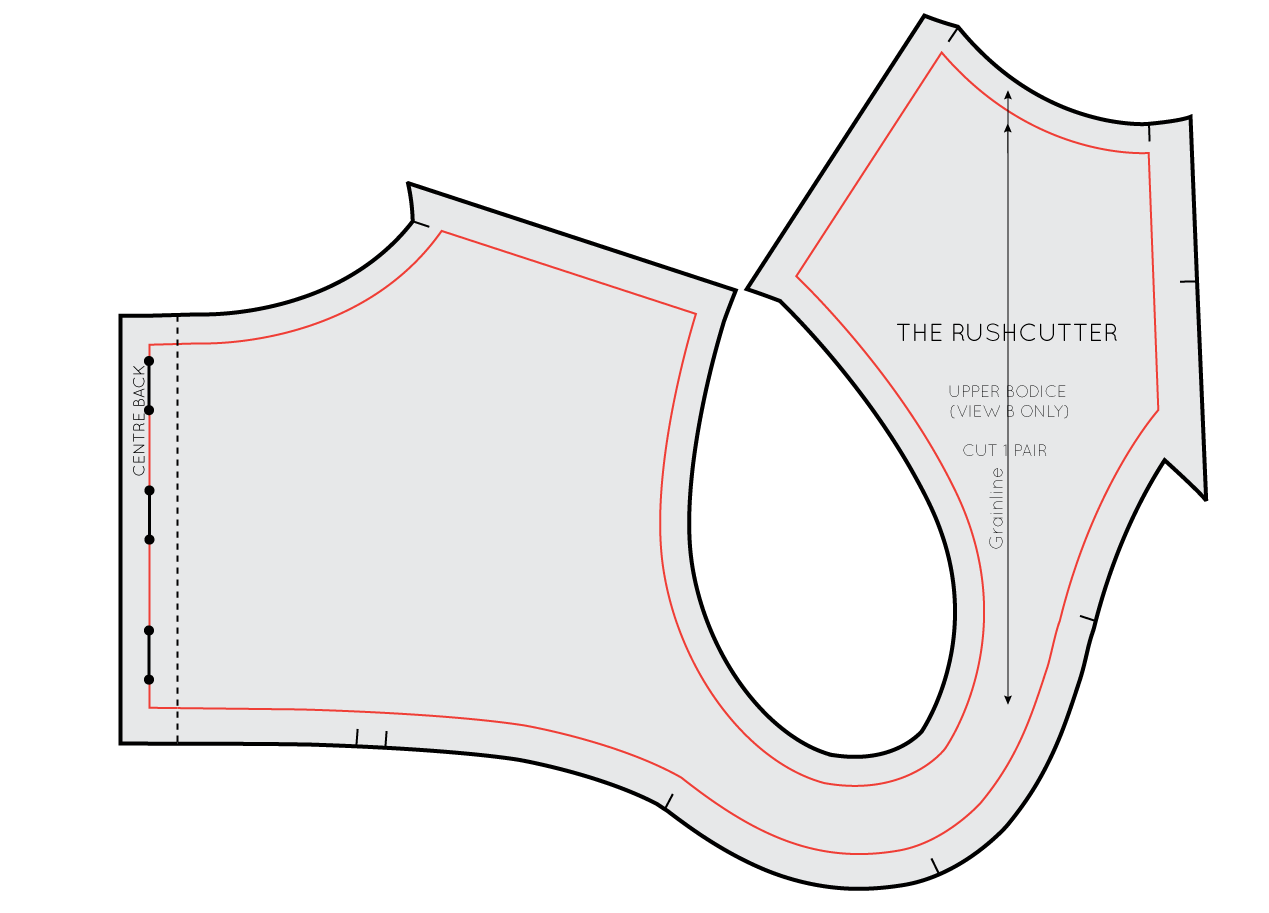
In the image you can see that the stitching line is marked with a red line, while the cutting line (outside edge of the pattern) is marked with a thick black line. If you wanted to make changes to this particular pattern piece, you could simply cut along the stitch line to remove the seam allowance, and the piece would be ready to be altered.

UNDERSTAND YOUR PATTERN

Before making any adjustments to a pattern, I always suggest having a good idea of how the pattern works and fits in its original design.

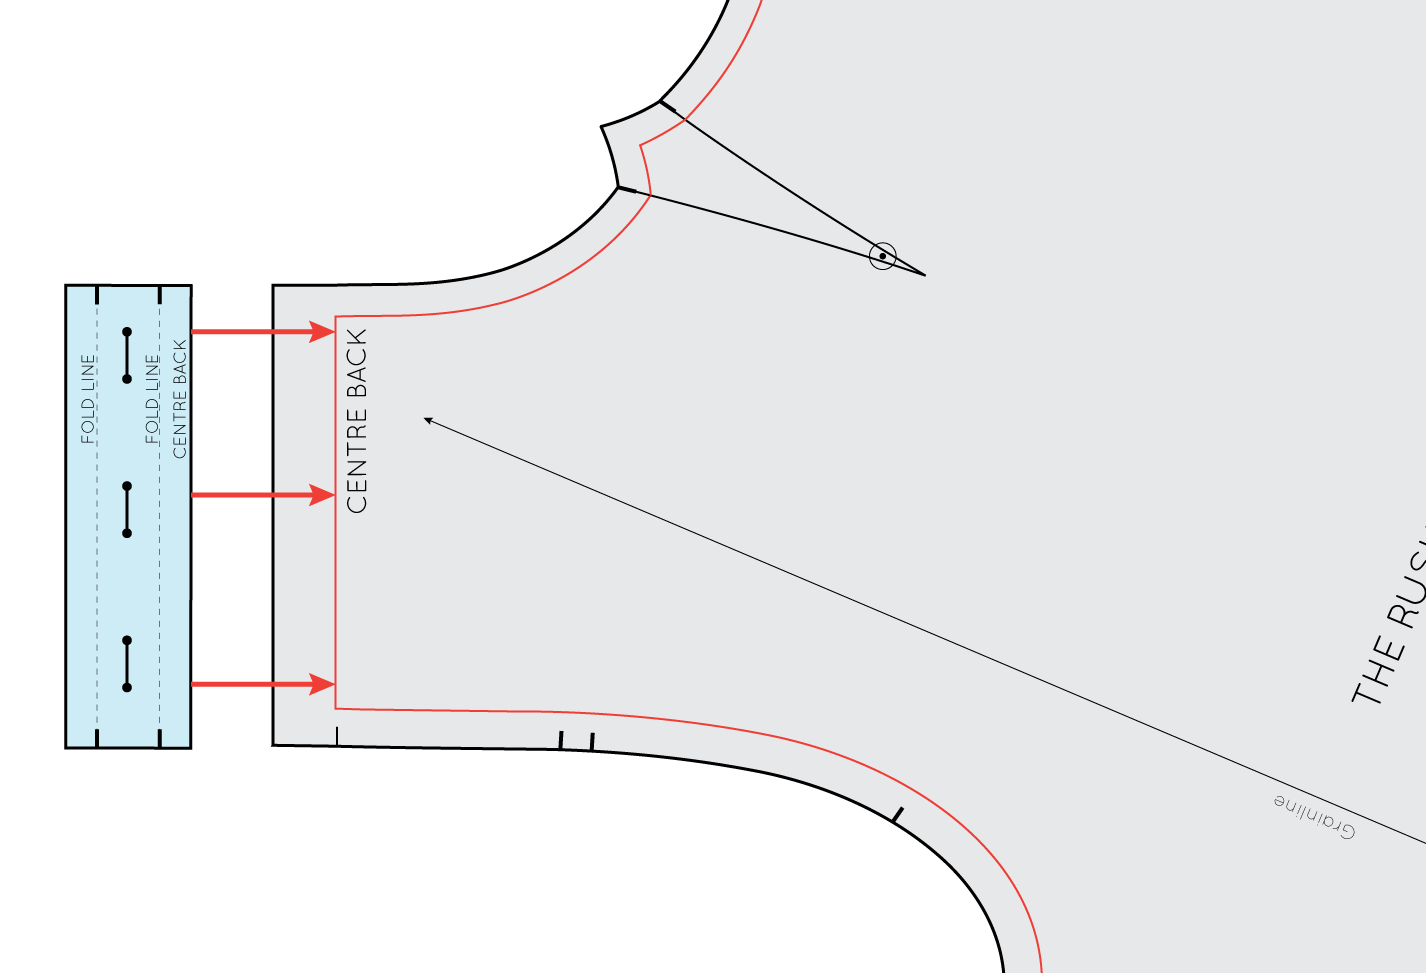
For this example, have a look at how the button placket works on View B, before adding it to View A. This is a photo of how it looks when it is finished, and below you can see how the pattern piece works.

THE BUTTON PLACKET

Rushcutter_hack_buttons_5.gif

As you can see, the button placket is made up of three sections that fold to create the button placket. The first (closest to the centre back) is 1cm (⅜in) from the centre back. This is the first fold line. The next line is 2cm (¾in) from the first fold line and is the second fold line (the buttons and buttonholes will be placed between these two lines). The third line is 1cm (⅜in) from the second fold line and is the edge of the pattern piece.

Rushcutter_hack_buttons_6.gif

When the piece is cut, the first fold line is folded and pressed towards the centre back.

Rushcutter_hack_buttons_7.gif

The second fold line is folded and pressed, enclosing the raw edge inside, creating a button placket.

Rushcutter_hack_buttons_8.gif

To finish, the buttons and button holes are placed on the centre back line.

MAKE THE ADJUSTMENT

Rushcutter_hack_buttons_8 (1).gif

To make the change on your pattern:

STEP 1
Take the 'UPPER BODICE' pattern piece from View B, and cut along the centre back line, removing the placket from the pattern.

If you would like to keep the pattern intact, simply trace a copy of the placket section onto a seperate piece of paper.

Rushcutter_hack_buttons_9.gif

STEP 2
Now that you have removed the placket, you can get your sleeve pattern (from View A) ready.

ATTACH PLACKET TO SLEEVE

You will be placing the right edge of the placket onto the centre back of the sleeve pattern (the stitch line).

STEP 3
Line the placket up with the centre back of the sleeve pattern and tape or glue in place.

You will cut the seam allowance off the back piece so that you can cut the lower back piece on the fold (you no longer need the seam allowance required for the zip).

And that's it... Your Rushcutter is ready for buttons instead of a zip!

IF YOU DON’T HAVE THE PLACKET PIECE FROM VIEW B

If you have already printed your pattern, and then decided to change from zip to buttons, and don't have the pattern pieces from View B, do not worry! It is super simple to create the placket piece, with the help of a pencil and a ruler.

REMOVE THE SEAM ALLOWANCE

STEP 1
Take your sleeve pattern and remove the seam allowance from the centre back seam (by cutting along the stitch line marked on the pattern).

Rushcutter_hack_buttons_13.gif

STEP 2
Take a small piece of pattern paper, and tape it to the centre back of the pattern, creating space for your placket.

CREATE THE PLACKET

Rushcutter_hack_buttons_14.gif

STEP 3
a Draw a line 1cm (in) from the centre back, running parallel to the centre back.

b Drawing a second line, 2cm (¾in) from the first.

c The final line will be drawn 1cm (in) from the second line.

COMPLETE THE PLACKET SHAPE

STEP 4
Extend the top and bottom edges of the sleeve pattern to complete the placket shape.

Cut off any excess paper.

ADD PATTERN MARKINGS

Complete the placket by adding button / buttonhole placement markings.

And you are ready to sew!

Happy sewing!

Emily


resources mentioned in this issue

  • The Rushcutter dress pattern - can be found here.


P.S. Would you like to know what the Q & A series is all about? This page tells you a little bit more about the motive behind the series. Past issues from the Q & A series can be found here.

Don't have a question, but found this newsletter helpful? I'd love to hear from you! Get in touch and say hi. 


What you’ve been making


More posts in the series

ISSUE 62 - Sewing seam allowance

PINTEREST HEADERS TEMPLATE_LATEST4.jpg
HEADING - V1 copy.jpg

Hello!

I’m wondering if you could answer a question for me? I’m currently making the Peppermint Ruffle Sleeve top (beginner sewer!) and am not sure if I need to mark the seam allowances on my fabric before removing the pattern pieces?! I’m not quite sure how to do that through the paper? Or know if it’s necessary?! Any advice would be much appreciated!

Many thanks,
Sophie


In-the-folds-Alys-Emily.jpeg

Some exciting news

Before I get started answering this week's question, I just wanted to know that we have some exciting news here at In the Folds. I now have a very talented and amazing assistant that works with me one day a week.

Alys is a patternmaker with a tonne of experience and is also a sewing teacher (check out her business here if you are in Sydney and interested in sewing or patternmaking classes). So basically the most perfect person for the job! She has been assisting me with all aspects of the business since she got started and will now be helping me tackle some of the questions that have been submitted by the community. Over to you Alys!


Hi Sophie,

Great question! 

You don’t need to draw the seam allowance onto each pattern, however it is important to know what the seam allowance should be and a method to keep your stitching at the right distance from the edge!

HOW TO USE A SEWING MACHINE AS A GUIDE FOR SEAM ALLOWANCE

SEWING ISSUE 62.jpeg

One of the quickest ways to make sure you're sewing the right seam allowance is to use your machine as a guide to know how wide you are stitching.

Have a look on your machine, underneath the needle. Machines are often marked with engraved or drawn lines, these can be used as a guide to stitch a certain seam allowance. Align the edge of the fabric to the appropriate line on the machine. If you are unsure of the distance, use a tape measure and measure the distance from your needle to the line.

Make sure to keep checking the edge of the fabric against the guide parallel to where the needle is stitching.

If you have an old sewing machine, you can stick on some masking tape and mark guidelines on the tape. 

SEAM ALLOWANCE ON PATTERNS

In the folds patterns always have the seam allowance marked onto each pattern in a light grey. We also explain at each section, in the sewing instructions, the amount of seam allowance to sew. Other patterns companies may write on the pattern and instructions what the general seam allowance is and won’t mark the seam allowance on the pattern.

It is always a good idea to check that the pattern you are using has seam allowance included and to know what the seam allowance is for each seam.

WHY THERE ARE DIFFERENT SEAM ALLOWANCES

Sometimes you’ll come across - ‘Xcm seam allowance unless indicated / marked otherwise.’ In these situations, it will usually be explained in the sewing instructions when the seam allowance varies. Depending on the area of the pattern you are sewing, it is often useful to have a smaller or larger seam allowance.

  • For curves there is often a smaller seam allowance, to allow for the seam allowance to sit flatter and therefore create a smoother appearance once it is sewn.

  • When you are turning pieces inside out, a small seam allowance may be used to avoid bulk and again create a smoother finish.

  • Different seams require different seam allowances to help you sew them. For example flat fell and french seam require you to do 2 steps whilst sewing and the seam allowance determines how wide the finished seam or topstitching is.

  • Different fabrics may require a variation - if a fabric is likely to fray you may want to allow more seam allowance.

  • For alterations - often in tailored pieces they allow extra seam allowance for future alterations.

WAYS TO MARK SEAM ALLOWANCE

If you do want to mark the seam allowance there are a few techniques you can use - 

  • Cut notches (this is a small snip into the edge of the fabric) on your stitch line. Make sure your snips are less than 5mm long so they are not visible from the outside.

  • Use chalk and a ruler to draw on the stitch line. You can also use a pattern master which has a guide for varying widths.

  • Erasable pens - pens such as Frixion allow you to draw onto the fabric and then the marks disappear with steam. Again using a ruler or pattern master will help with this method.

If you’d like to hear more about different methods - Love to Sew podcast have recently released a great episode about all things marking tools - check it out here!

I hope this helps, enjoy the start of your sewing journey!

Happy sewing,

Alys


resources mentioned in this issue

  • Love to Sew podcast on marking tools - listen to it here.


P.S. Would you like to know what the Q & A series is all about? This page tells you a little bit more about the motive behind the series. Past issues from the Q & A series can be found here.

Don't have a question, but found this newsletter helpful? I'd love to hear from you! Get in touch and say hi. 


What you’ve been making


More posts in the series

ISSUE 61 - Alternate seam finishes for the wrap top

PINTEREST HEADERS TEMPLATE_LATEST3.jpg
HEADING - V1.jpg

Hello!

I am working on my muslin for the Wrap top and am in need of some advice. I am on Step 16 and am attempting to finish the side seam with the opening for the wrap but do not own a serger. My seam of choice is a French Seam, but it looks like I will need to use a seam method that has the sides pressed open. How do I finish this seam and not seam together the opening?

Thank you,

Lilly


Hi Lilly,

I am pleased to hear you are giving the Wrap top pattern a go!

Artboard 1.jpg

You're right - due to the need for an opening in the side seam of the Wrap top (it's where the tie is inserted so you can wrap it around and secure the top), you will need a seam finish that allows you to press the seam open.

The seam I'd suggest is the one I call 'turn and straight stitch' - it may have a better name, but I don't know it!

One of the simplest ways to finish a seam is to turn back the raw edge of the seam allowance and stitch. This is a good finish for you to try if you don't own a serger / overlocker and don't have a zig-zag stitch on your regular sewing machine (or would like something a little cleaner).

WHAT’S THIS FINISH FOR?

This finish is suitable for almost all fabrics, although will work better on straight seams, rather than curves. This finish will work best for seams that will be pressed open. Be careful applying this finish to heavyweight fabrics as it will add bulk to the seams.

HOW TO SEW THE SEAM

 
Artboard 1SEAM.jpg
 

Pin the pieces you are joining together with right sides together. Stitch with a 1.2cm (½in) seam allowance (or the seam allowance that your pattern specifies).

Artboard 1 copy 2SEAM.jpg

Press seam allowance open. Carefully turn under the raw edge of the seam allowance on both sides and press. Stitch close to the edge to finish (pin before stitching if you feel the need).

You could also consider trimming the seam edge with pinking shears before turning the seam back. This will prevent fraying.

Happy sewing,

Emily


resources mentioned in this issue

  • Wrap top can be found here.


P.S. Would you like to know what the Q & A series is all about? This page tells you a little bit more about the motive behind the series. Past issues from the Q & A series can be found here.

Don't have a question, but found this newsletter helpful? I'd love to hear from you! Get in touch and say hi. 


What you’ve been making


More posts in the series

ISSUE 60 - Printed fabric + The Rushcutter dress

HEADING - V1.jpg

Hi Emily,

I ordered some fabric for the Rushcutter dress - a pepita jacquard. Do you think it is feasible to match the pattern ('the squares') in this fabric nicely when making this dress? If so, do you have any advice how to do that?

Thank you very much in advance!

Kind regards,

Marjon


Hi Marjon,

I'm excited to hear you are planning to make a Rushcutter dress! Unfortunately it's difficult / not possible to match prints like this on A-line dresses, due to the diagonal panel lines in the side section of the dress.

Artboard 1.jpg

I had a play in Illustrator with a print like the one you would like to use, to see how it would look with the various grainlines, and I quite like the look of what it does, due to the nature of the print and the different directions of the pieces.

Artboard 1.jpg

Above is an example of what the pieces might look like when sewn together. I played with the grain on the centre front panel to add a bit of interest - but if your fabric is likely to stretch due to this (it's almost on the bias), I'd suggest interfacing that piece to give it more stability.

In saying this, I would say that if you have your heart set on matching this print, I'd suggest choosing a pattern that has straight side seams / is more boxy in shape.

Happy sewing,

Emily


resources mentioned in this issue

  • Rushcutter dress pattern can be found here.


P.S. Would you like to know what the Q & A series is all about? This page tells you a little bit more about the motive behind the series. Past issues from the Q & A series can be found here.

Don't have a question, but found this newsletter helpful? I'd love to hear from you! Get in touch and say hi. 


What you’ve been making


More posts in the series

ISSUE 59 - Making your own bias binding

PINTEREST HEADERS TEMPLATE_LATEST.jpg
HEADING - V1.jpg

Hi Emily,

I would love some suggestions for making my own (successful) bias tapes for binding necklines, seams, etc.

Thank you!


Ellen
Shelburne, Vermont, United States


Hi Ellen,

Bias binding is one of those things that you can do in countless different ways, so I will show you the method I use for making my own bias binding.

BIAS BINDING - AN INTRO

binding_neckline_4 copy.jpeg

Bias binding is a strip of fabric cut on the bias (diagonal to the grainline / selvedge) that can be used in a variety of applications. By cutting the fabric on the bias, it gives the fabric a small amount of stretch, which makes it ideal for finishing curves and wrapping around seams (in the case of bias bound seams).

You can make your own bias binding or purchase it by the metre / yard from a store. If purchasing, you will need to buy 25mm (1in) single fold bias binding for the following applications.

If you are making it yourself (for the application method I am showing you), you will need to cut 3.5cm (1½in) strips from a square of fabric and then fold the bias binding with a bias tape maker (18mm (¾in) size) or fold and press by hand - more details on this below. The reason for the difference in width is that when buying pre-made bias binding, the width on the label refers to the width of the exposed part of the binding, rather than the width of the binding when it's pressed flat. 

GETTING STARTED

Artboard 3 copy.jpg

Here at In the Folds, we recommend using a lightweight cotton fabric for binding, such as cotton lawn or cotton shirting. Consider using a contrasting colour or print to add a fun pop of colour to the inside of your garment. You can use the same fabric that your garment is being made from, just be careful with heavyweight or bulky fabrics.

The bias grain of the fabric runs at a 45 degree angle to the selvedges. Before cutting binding strips from a piece of fabric, ensure the fabric is square. This will ensure you cut the fabric on the true bias.

Bias binding is a great way to use up small bits of fabric leftover from other projects. Consider cutting binding when you are cutting your project and setting it aside so you have it ready to go the next time you need binding.

CUTTING BIAS BINDING

Artboard 3.jpg

Take your square of fabric and fold along the diagonal. Press and then carefully cut along the crease.

Artboard 5.jpg

Take one of the triangles of fabric and fold in half again and press (you can use the other one if you need more binding - otherwise set aside for next time). The cut edge of the fabric should be running along the bottom of the triangle.

Artboard 6.jpg

Flip back one corner and line up bottom edges. Press.

Artboard 7.jpg

Repeat on the other side.

Check that all layers are lined up neatly along the bottom edge. Mark binding width 3.5cm (1½in) with a clear ruler and chalk. Pin through all layers before cutting with scissors or rotary cutter.

Alternatively, you can just use a long ruler and rotary cutter and skip the pinning. It depends how confident you are and if your fabric will remain in place.

*If you would like narrower binding, calculate by thinking about the seam allowance on the seam you will be attaching the binding to, the amount you would like exposed on the inside of the garment, plus the amount required to fold the raw edge under. You will also need require a little wiggle room to account for the folds in the fabric. This is the reason we cut ours at 3.5cm:

  • 1cm seam allowance to attach to the seam

  • 1cm exposed binding on the inside

  • 1cm seam allowance to fold back the raw edge

  • 0.5cm "wiggle room" to account for the folds (it is always better to need to trim binding down, rather than not have enough to achieve a nice finish).

Artboard 12.jpg

Remove pins and square off each end of the strips by cutting the binding at a right angle.

CUTTING BIAS BINDING FROM DELICATE OR SLIPPERY FABRICS

If you fabric is flimsy or prone to stretching (e.g silk chiffon / organza, viscose, rayon or a knit) I take an extra precaution, by sandwiching the fabric between two layers of paper. I use this same method for cutting garments from these types of fabrics too.

make_your_own_bias_binding_3.jpeg

To start, take a large sheet of paper. I love dot and cross paper, and use it for everything I do, but if all you have is blank paper, that will work fine too!

Draw a line at a 45 degree angle across the page. If you are using dot and cross paper, you just need to follow the dots or the crosses diagonally to create a straight line.
 

If you are using a blank sheet of paper, you can either use a set square to get the correct angle, or you can draw a large square / rectangle and match the diagonals. Either diagonal will work, so take your pick. 

Now you need to consider the width of the binding you would like to make.

make_your_own_bias_binding_6.jpeg

Using your first diagonal line as a guide, draw a second line the width of your binding away from the first line. Continue drawing lines until you have enough binding (I like to cut more than I need so that I always have a bit on stand-by).

make_your_own_bias_binding_7.jpeg

Lay your fabric on top of another sheet of paper, matching the selvedge up with the edge of the paper. If your fabric is really prone to moving (or rolling - in the case of some knits) you can pin the selvedge to the edge of the paper. Next, place your bias guidelines on top of the fabric. Again, line up the straight edge of the paper with the selvedge of the fabric.

Use weights (or whatever you have lying around) to hold the paper in position. Pin in place, along each individual bias strip.

Cut along the diagonal lines, cutting through all three layers, and when they're all done, remove the pins. This can be down with a rotary cutter to speed up the process.

Alternatively, you can use a rotary cutter if you like.

CREATING LONGER STRIPS

Artboard 9.jpg

For longer seams you may need to join pieces of binding together.

With right sides together, align two bias pieces together at a 90-degree angle. Mark a diagonal line, joining the "corners" of the square that has been created by the overlapping binding pieces. Pin along line.

Artboard 9 copy.jpg

Stitch along line. 

Trim seam allowance down to 6mm (¼in).

Press seam allowances open.

You can use the same method to form a loop of bias binding, if you are attaching to an armhole or neckline.

I know that some people prefer the continuous loop method of making long lengths of binding. If you are curious to see what that method is about, look here.

PRESSING BINDING

Artboard 11.jpg

You can use your binding as is, although it does make it more manageable and much easier to sew, if you fold it before sewing.

You can do this by feeding the binding through an 18mm (¾in) size bias maker and press, or press by hand - pressing each long edge in by 1cm (⅜in). You could also try this clever way of folding binding that I saw on the By Hand London blog that involves using a pin on an ironing board that you can feed the binding through.

SEWING BINDING

BINDING HOVE.jpeg

If you're now feeling ready to give using your own binding a try, you can use the below tutorials for some tips on sewing bias binding to your garments.

Happy sewing,

Emily


resources mentioned in this issue

  • Nerdy sewing tips: How to make & store bias binding (without fancy gadgets) - By Hand London can be found here.

  • Q&A Series - Attaching single fold bias binding. Tutorial can be found here.

  • Q&A Series - Attaching double fold bias binding. Tutorial can be found here.

  • Flynn jacket pattern can be found here.

  • Hove jacket pattern can be found here.


P.S. Would you like to know what the Q & A series is all about? This page tells you a little bit more about the motive behind the series. Past issues from the Q & A series can be found here.

Don't have a question, but found this newsletter helpful? I'd love to hear from you! Get in touch and say hi. 


What you’ve been making


More posts in the series

ISSUE 58 - Getting a good fit

PINTEREST HEADERS TEMPLATE_LATEST2.jpg
HEADING - V1.jpg

Hi Emily,

I am several inches shorter than the average "petite" size range, but also curvy. My whole life I've had multiple issues fitting clothes that I buy off the rack, so I've finally decided to make them instead. Given my significant size range and deviations from "average", how would I go about grading a pattern to fit me? Some persistent fit problems are: the shoulder slips off just about every top I own and my trousers go WAY up my belly and land just below my bust. These issues only happen with ready to wear clothing. I just don't know where to start with grading patterns to eliminate the problems.


Shari


Hi Shari,

It sounds like sewing your own clothes is a great solution to the problems you are having with ready to wear! I am sure it will be very liberating for you to be able to make your own clothes and not deal with those frustrating issues anymore.

GETTING STARTED

SewingSchool37-631x878.jpg

What I suggest you do is just start with one pattern and work on getting a really good fit, before moving onto anything else. The reason for this is that it is common to do the same alterations on all sewing patterns. Especially if you are working with the same brand of pattern. So once you know your go-to alterations, it will be much easier to start on new patterns.

If you're new to sewing, I'd suggest starting with a top, as pants can be a little trickier to fit. I'd also suggest starting with something that is not too fitted. This will give you a chance to familiarise yourself with the fitting process, before moving onto more challenging projects. If you were to try an In the Folds pattern to start with, I'd suggest the Ruffle sleeve top. It ticks the boxes for a beginner friendly project, as it's not fitted, but will give you a chance to try out a few things. It also has sleeves - another good thing to learn how to fit.

BUST ADJUSTMENT

Artboard 1.jpg

The first thing you will need to consider when making tops is your high bust adjustment. It sounds like you may have a large bust in comparison to your shoulders (I'd say this is what is causing your shoulder straps to slip off. It sounds like you are needing to go up a size so that a top will fit your bust, but the upper section of the top no longer fits).

By choosing a size in relation to your high bust measurement, you will be getting the fit you need at the neckline and shoulders, and then can add the bust width you need by doing a full bust adjustment. This is a good post that will familiarise you with the concept and give you a range of examples: four essential bust adjustments.

CHECKING LENGTH

3.gif

Before going ahead and cutting your pattern (after making the full bust adjustment), I'd suggest you then look at the length, as that sounds like it is something else that is causing issues for you with ready to wear.

You need to mark the bust line and waist line on the pattern (more info on that here: How to Find the Bust, Waist and Hip on a Sewing Pattern) and then compare this to your own body. What I suggest you do, is just wearing underwear (or tight jersey clothing), tie a thin piece of elastic around these points on your body, then take measurements between them. Record the measurements and then compare these to the pattern.

Be sure to also check the shoulder to bust measurement (to get this one, it can be handy to put on a tight t-shirt, so that you have a seam line on your shoulder to measure from). Then you are going to need to shorten the pattern in relation to your findings. If you find that your shoulder to bust is 1cm (3/8in) shorter than the pattern, then you are going to need to remove 1cm (3/8in) length from this section. You can find guidance on shortening a pattern here. Keep in mind that if you need to shorten the area above the bust on a top with a sleeve, this will also impact the sleeve and you will need to remove this same amount of length from the sleeve cap.

SELECTING THE CORRECT SIZE

4M1A4589-Edit.jpg

For more information about sizing, I'd suggest you have a look at this post on my website: Selecting the correct size.

I hope I haven't overwhelmed you! The key to this will be just focusing on one project at a time and focusing on one fit adjustment at a time. I'd also say that making lots of toiles (rather than finished garments) will help you start to learn what you need to look for.

Happy sewing,

Emily


resources mentioned in this issue

  • Ruffle sleeve top can be found here.

  • Four essential bust adjustments. Tutorial can be found here.

  • How to Find the Bust, Waist and Hip on a Sewing Pattern. Article can be found here.

  • How to shorten a pattern. Tutorial can be found here.

  • Selecting the correct size. Post can be found here.

  • How to (and why) make a toile. Post can be found here.


P.S. Would you like to know what the Q & A series is all about? This page tells you a little bit more about the motive behind the series. Past issues from the Q & A series can be found here.

Don't have a question, but found this newsletter helpful? I'd love to hear from you! Get in touch and say hi. 


What you’ve been making


More posts in the series

ISSUE 57 - How to finish necklines and armholes

PINTEREST HEADERS TEMPLATE_LATEST.jpg
HEADING - V1.jpg

Hi Emily, 

Hello, I have just started learning how to sew and your blog has helped me tremendously. Before beginning working with patterns I have made the bodice block (which I must add is absolutely fantastic and very easy to follow). However, I have decided I wanted to try and attempt to make a top with the bodice block but am slightly confused as to how you would finish the neck of the bodice without leaving a raw edge.

Naveen


Hi Naveen,

Thank you for reaching out. I'm glad you are going to give drafting a top a go!

This is a question that highlights the difference between a pattern block and a pattern. For a pattern block, you are looking at getting a nice close fit, while a pattern is more about the design and will include wearing ease.

GOING FROM BLOCK TO PATTERN

Artboard 1.jpg

If you'd like to know more about the difference between patterns and blocks and how to use a block to draft a pattern, I've linked some useful resources below:

For a pattern you also need to think about how you will finish the seams. Have you downloaded my e-book, The Little Book of Seam Finishes? This is a great place to start if you're trying to familiarise yourself with finishing options.

FINISHING NECKLINES AND ARMHOLES

4M1A4578-Edit.jpg

For finishing the neckline and armhole of a top, my go-to finishes would be bias binding or creating a neck and armhole facing or an all-in one facing.

I think getting familiar with the block is a great idea, but I do think it might be worth sewing a pattern before trying to draft your own. This will allow you to familiarise yourself with the terminology and things to think about when drafting your own patterns.

If you'd like guidance on how to sew either neckline option I suggested above, the Collins top might be a good option for you, as one of these views has an all-in-one facing and the other has a bias bound neckline.

Happy sewing,

Emily

P.S. This week an interview aired on ABC RN's radio show 'Life Matters' about the online sewing moment, that I was interviewed for. If you would like to have a listen, you can find it here.


resources mentioned in this issue

  • What is a pattern block? Article can be found here.

  • How to draft a simple summer top. Tutorial can be found here.

  • Little book of seam finishes can be found here.

  • How to attach bias binding. Tutorial can be found here.

  • How to draft an all in one facing. Tutorial can be found here.

  • The Collins top pattern can be found here.


P.P.S. Would you like to know what the Q & A series is all about? This page tells you a little bit more about the motive behind the series. Past issues from the Q & A series can be found here.

Don't have a question, but found this newsletter helpful? I'd love to hear from you! Get in touch and say hi. 


What you’ve been making


More posts in the series

ISSUE 56 - How to draft a straight hemline on the Hove jacket

PINTEREST HEADERS TEMPLATE_LATEST2.jpg
HEADING - V2.jpg

Hi Emily, 

I am interested in adapting the Hove front to be more like the Flynn, ie even around the hem and not so hi-lo.  I can see it would be easy to redraft the hemline but how would this affect pocket length and placement?

Also - how would you line either jacket?


Many thanks,

Krystyna


Hi Krystyna,

This is a great question, and I think this would work really well! 

GETTING STARTED

Hove-Flynn-front-hem-1.jpg

Above you can see the hood pattern piece from the Hove jacket and the front hem facing from the Flynn jacket.

Hove-Flynn-front-hem-2.jpg

A I have checked the pattern pieces from the Hove and Flynn against each other and as you can see, all you would need to do is extend the centre front seam and hemline with straight lines.

To do this, attach some paper to the back of the Hove front piece, filling the gap in the hemline. Take a ruler and extend the centre front seam. Extend the side seam at the hem with a straight line, meeting the new centre front line at a right (90 degree) angle.

The only thing you will need to check is the zip length. You could have a zip that goes all the way to the bottom (I think a double ended zip could work really well), but just need to check what zip lengths are available in relation to the length of the seam.

Alter the pocket

Hove-Flynn-front-hem-3.jpg

As for the pocket, I would just be straightening it out along the bottom, so that it runs parallel to the hemline. You no longer need the shaping, and it will be fine to have it not go all the way to the hemline (in the Flynn jacket it's like this). If you were to extend it to the hem, like it is in the Hove, you'd end up with very deep pockets, so I'd suggest keeping it the same size that it is.

As for lining the jacket, I have this tutorial on my website with a few suggestions that you can find here.

Happy sewing,

Emily


resources mentioned in this issue

  • The Hove jacket pattern can be found here.

  • The Flynn jacket pattern can be found here.

  • How to line a jacket. Tutorial can be found here.


P.S. Would you like to know what the Q & A series is all about? This page tells you a little bit more about the motive behind the series. Past issues from the Q & A series can be found here.

Don't have a question, but found this newsletter helpful? I'd love to hear from you! Get in touch and say hi. 


What you’ve been making


More posts in the series

ISSUE 55 - What is a pattern block?

PINTEREST HEADERS TEMPLATE_LATEST.jpg
HEADING - V1.jpg

Hello Emily!

Looking through the internet for tutorials about pattern making, to “brush up” my old skills, I found your lovely blog!

I am certainly going to watch your interesting instructions and ideas!

But I have a question:

(I am Dutch, so not a native speaker of your language): what does a Bodice block mean? I cannot find the translation for this term! Is a block a sort of ground pattern?

Maybe you could give me an explanation or description of what you mean by this?

Thank you very much in advance!

Francine


Hi Francine,

I am pleased to hear you came across my website! I hope you enjoy the resources I share.

That's a great question! 

PATTERN BLOCKS

A pattern block is a foundation pattern that patternmakers use as a base or foundation when drafting patterns. In the US a block is referred to as a ‘sloper’ so you may see these terms used interchangeably in books and blocks, depending on where the author is from.

 Patternmakers will normally have a set of pattern blocks that is likely to include:

  • A skirt block

  • A bodice block

  • A sleeve block

  • A trouser block

Patternmakers may also have a dress foundation block and a jacket block. You can also have more specialised blocks for making swimwear, underwear etc.

They will then use the blocks as a way to draft a new pattern. 

Normally a block will:

  • Be on cardboard - so it is nice and strong and can be used over and over.

  • Include only a minimal amount of ease. ‘Ease’ is the difference between your body measurements and the garment measurements. Blocks will normally include enough ease to get the garment on, but not much more.

  • Have no design details - just darts for fitting purposes.

  • Not have seam allowance.

HOW TO GET YOUR OWN PATTERN BLOCK

There are a number of ways to get a pattern block / set of pattern blocks. You can:

GOING FROM BLOCK TO PATTERN

Patterns-blocks-3.jpg

A pattern is often made using a block, but the difference is that a pattern is ready to be cut from fabric and sewn. A completed pattern will:

  • Be on pattern paper or cardboard - depending on your preference. For home sewing, it is most common to have patterns on paper, but if you have a pattern you keep coming back to, it may be worth transferring to cardboard for safe keeping!

  • Include enough ease to make the garment comfortable to wear, sit and stand in. This will depend on the style / design of the garment and your preferences. 

  • Have design details that deviate from the block. The options here are endless. Some patterns are similar to the block and just feature a few design details such as panel lines, while some patterns drafted blocks do not resemble the block at all.

  • Have seam allowance.

To design a pattern from a block, there are a number of common techniques you might use. Some examples of these can be found on the In the Folds blog:

Although these tutorials will show you how to go about the techniques required, you may want to learn more about design principles before trying to apply them to patterns. A good place to start would be The Cutting Class, which has a great combination of fashion and technical content.

PATTERN BLOCKS FOR HOME SEWING

You may be wondering what you would want to do with a pattern block as a home sewist… You can use pattern blocks for drafting your own patterns, but I’d strongly suggest getting an understanding of patterns before trying this. To build up knowledge of patterns, start using patterns! There are so many great independent designers out there that are worth checking out, so this is where I suggest you start. This way you can build up your knowledge about fit, pattern markings and design, without having to do all the work of drafting a pattern from scratch (I can tell you from experience, drafting patterns takes some time!). It will also get you in the headspace of thinking about seam finishes and construction techniques, because remember, if you draft your own patterns, you won’t have an instruction booklet to go alongside it.

The other thing you might use blocks for is to check what fitting alterations you might need to do to a purchased pattern. If you have pattern blocks that fit you well, you can then compare aspects of your blocks to patterns you have purchased to see what alterations you need to make to achieve a good fit. For example, you may check the shoulder length on your block up against a pattern to see if you need to do a broad or narrow shoulder adjustment.

I hope that sheds some light on the differences between pattern blocks and sewing patterns for you!

Happy sewing,

Emily


resources mentioned in this issue

  • How to draft a skirt block. Tutorial can be found here.

  • How to draft a bodice block. Tutorial can be found here.

  • How to draft a simple summer top. Tutorial can be found here.

  • How to create princess panels. Tutorial can be found here.

  • How to draft an A-line skirt. Tutorial can be found here.

  • How to draft a wrap skirt. Tutorial can be found here.

  • How to draft a fit and flare skirt. Tutorial can be found here.

  • Learn about design principles - The Cutting Class.


P.S. Would you like to know what the Q & A series is all about? This page tells you a little bit more about the motive behind the series. Past issues from the Q & A series can be found here.

Don't have a question, but found this newsletter helpful? I'd love to hear from you! Get in touch and say hi. 


What you’ve been making


More posts in the series

ISSUE 54 - Shortening a skirt pattern

PINTEREST HEADERS TEMPLATE_LATEST.jpg
HEADING - V1.jpg

Hi Emily,

This may sound like a really dumb question but I’ll ask anyway, to shorten the Peppermint Vintage-style skirt, would you recommend using the “lengthen/shorten line” or would you just take it off the hem?

I’ve made a toile of this and I want the final skirt to be quite a bit shorter (: 

Thanks!

Mariana


Hi Mariana, 

I am pleased to hear you are making the Vintage-style skirt! 

No question is a dumb question, so no need to worry about that. It is normally best to remove lengthen from the LENGTHEN / SHORTEN line on the pattern, as this does keep the pattern in proportion. 

In saying that though, if you do want to remove a lot (probably anything more than 10cm or so), I'd suggest removing some from the LENGTHEN / SHORTEN line and then the rest from the hem. The reason for this is that if you remove a lot from the middle of the skirt, you will end up with a shorter skirt with quite a lot of volume in the hem (as it will have the same hem circumference length as the original pattern) - that may or may not be what you want to achieve. 

getting started

1.jpg

STEP 1

The pieces you will need for this adjustment are the FRONT and BACK. You can use the actual pattern pieces, or trace a copy if you would prefer to keep the original pieces intact.

using the lengthen / shorten line

2.jpg

STEP 2

You will need to work out how much length you would like to remove from the pattern. You can do this by looking at your toile / muslin (for more details on making a toile / muslin look at this post from the Rushcutter sew-along), or holding the pattern pieces up to your body and getting an idea of where they will sit on your body.

If you would like to remove any more than 10cm (4in), I’d suggest taking 10cm from the mid-section of the pattern (where the LENGTHEN / SHORTEN lines are) and then removing the remainder from the hem band (more on this in STEP 9).

A - Cut through the 'LENGTHEN / SHORTEN' line on the FRONT.

- Measuring up from the cut line, mark a horizontal line on each pattern piece, the distance of the amount of length you would like to remove. In the example, you can see the red line is 10cm (4in) above the cut line and the shaded section shows the amount of length that will be removed from the pattern piece.

3.jpg

STEP 3

- Move the lower part of each pattern piece up to the line marked in the previous step. Use the grainline to ensure that you line the pieces up correctly.

- Glue or tape in place.

truing the side seam

SUB-HEADING 1 copy 5.jpg

STEP 4 

Place the POCKET FACING pattern on top of the skirt, lining up the shape at the top.

5.jpg

STEP 5

A Place the POCKET BAG on top of the POCKET FACING, lining up the rounded shape of the pocket. 

True the seam - this means redrawing the side seam with a straight line from the top of the side seam to the bottom of the hem. You can tape on a piece of paper where you need to fill the gap to complete the seam line. 

6.jpg

STEP 6

Remove the POCKET FACING and POCKET pieces and extend the FRONT pocket line toward the side seam.

Transfer / re-draw any notches that have been misplaced. (Make sure they match the back).

amending the pocket pattern

STEP 7

Lay the POCKET FACING back onto the pattern and add the same amount onto the pattern to match the side seam and new FRONT pocket line.

8.jpg

STEP 8

Lay the POCKET BAG back onto the pattern and add on to the pattern to meet your new side seam line.

removing more length

9.jpg

STEP 9

To remove more length from the skirt, mark the required amount upwards, evenly from the hem and cut away the excess.

If you do choose this option (removing length from both places), remember that you will also need to re-draft the hem facings to match with the new hemline. I have a tutorial on how to do that here.

STEP 10

Repeat for the BACK pattern piece.

finalising the pattern

You can choose to trace the patterns onto fresh pattern paper or keep them as they are. If you trace them, remember to copy all pattern markings across. This includes - grainline, notches, pleat markings and cutting instructions.

Cut off any excess paper that is outside of the new lines.

Check all seams and notches are the correct length by "walking" the pattern pieces, as if you were sewing them together. For more details on how to do this, check out this tutorial.

Happy sewing, 

Emily


resources mentioned in this issue

  • How to redraft a facing. Tutorial can be found here.


P.S. Would you like to know what the Q & A series is all about? This page tells you a little bit more about the motive behind the series. Past issues from the Q & A series can be found here.

Don't have a question, but found this newsletter helpful? I'd love to hear from you! Get in touch and say hi. 


What you’ve been making


More posts in the series

ISSUE 53 - Starting a pattern company (Part three)

PINTEREST HEADERS TEMPLATE_LATEST2.jpg
HEADING - V1 copy.jpg

Hello! 

I’ve really been loving your Q&A series. I am getting ready to start my own pattern company. I would love to know the steps in the process to getting a successful pattern ready for the market. Also I am not a pattern maker and do want to make my own patterns. How do I go about finding someone to help me make sewing patterns? 

Thank you,
May

Fairfax, United States

~

How do you make your gorgeous patterns?

Kate

Camden, UK


Hi May and Kate,

This week is part three of our little mini series of Q&A posts about the process of making an In the Folds pattern from beginning to end. If you missed part one, or two you can find them here and here.

By this stage, we’ve got everything we need to create a digital sewing pattern, so it’s time to pull all the assets together to create the pattern and the instruction booklet.

CREATING THE PATTERN

When the pattern comes back from my grader / illustrator, I format it into A4 / US letter size and A0 and add any notes etc. to the pattern. This always takes a while as I like to try to use as few pages as possible, so it’s the ultimate game of Tetris!

How-to-start-a-pattern-company-3-2.jpg

Next up is to start creating the instruction booklet in Adobe Indesign. I have a template I use and just work my way through it - updating it with the new pattern assets. I had a graphic designer design this for me a few years ago and I am very thankful for that, each time I use the template.

Laying out the instruction booklet can be a little overwhelming at the beginning (as my pattern booklets are normally 30+ pages), but I just break it down into chunks and work my way through page by page. To write the instructions themselves, I refer back to the instruction booklet that I sent to the illustrator and insert the illustrations. 

I normally get the instructions to about 90% complete and then print a copy to go through with a highlighter and red pen. There is only so long that I can look at a document on a screen before I need to print it and I enjoy this part of the process. I always feel like I’m nearing the end when I have a paper version in my hands!

After having a read through, I go back to the documents and update all the things I found and save all the documents as PDFs so that the pattern is ready for pattern testing.

PATTERN TESTING

How-to-start-a-pattern-company-3-3.jpg

Pattern testing time is exciting and a little bit scary. After putting so much work into something, I am always nervous to hear what people think of it, but also relieved to start the process of getting it out into the world. I won’t go into detail about my pattern making process as I have written a post about it in the past, so if this is something that interests you, you can find the post here.

MAKE UPDATES TO THE PATTERN

Once I have received all the pattern testing feedback, it’s time to make updates to the pattern. 

Although I go through the pattern with a fine tooth comb before testing, the pattern testers always have some great suggestions of things I can do to improve the pattern. Most of the time the updates are to the instructions, rather than the pattern pieces themselves. I always find it handy to bring a second monitor to my studio when I’m working on these updates, so that I can have the feedback open on one screen and the pattern open on the other and can just work through the document, one point at a time.

PROOFREADING

Once all the updates have been made to the pattern, I send the pattern and instruction booklets to an editor for proofreading.

PATTERN SHOOT

How-to-start-a-pattern-company-3-4.jpg

Towards the end of this process, I start thinking about shooting the pattern. I need to think about the model I am going to work with and what fabrics I am going to use for the samples. 

Preparing for a shoot involves meeting with the model to take measurements, making samples in their size and then doing a fitting. I then make the final samples for the shoot.

At this point I need to think about shoot location, make-up and hair inspiration and what shoes and accessories the model will wear.

When shooting, we’re always careful to get some nice editorial photos, but to mainly concentrate on getting clear photos of the garment. My photographer and I are quite methodical - front, back, side, detail shots etc. so that I know we will have exactly what we need for the product listing.

PRODUCT LISTING

I have my website built on Shopify, so once I have the photos back from the photographer, I work on creating the product listing. Just like the instructions, I have a template I use for each pattern, so that things remain consistent. I work through the template, updating all details for the new pattern.

I package the pattern into a zip file so that I can attach it to the product listing. In the file I have:

  • A0 pattern

  • A4 / US letter size pattern

  • Instruction booklet

  • Read me file (an overview of the pattern with print details etc.)

PREPARING FOR THE SEW-ALONG

How-to-start-a-pattern-company-3-6.png

If there is going to be a sew-along for the pattern, I start thinking about what tutorials will be helpful for makers as they approach this pattern and start drafting all the posts, so that they are ready when the pattern goes live.

PREPARING FOR LAUNCH DAY

To prepare for a pattern launch, I work on Instagram posts, create a new banner for the website, and schedule an email campaign with details of the new pattern. I contact any companies that wholesale In the Folds digital patterns so that they can also get the pattern onto their website for launch day. Again, I have a template I work through that helps with this process and is easy to replicate each time.

LAUNCH DAY

When launch day finally comes around, I am always ready for a long nap! I plan to do as little as possible on launch day, as all the excitement and adrenaline normally renders me brain fried. I have all my content scheduled so I can just go through the motions and be available to answer any questions as they come in.

MORE RESOURCES

If you are considering starting a pattern company, I’d suggest learning as much as you can by listening and reading about other indie pattern designers. There are a couple of interviews you can look at on The Fold Line that might be of interest:

You can also find a number of interviews with pattern designers on the Love to Sew podcast that are well worth a listen. Like anything, it’s good to do your research and get a feel for the market, but then there is a point that you just need to get started and learn what you need to as you go. 

I hope you have enjoyed this three part series about what goes into drafting and releasing an In the Folds pattern!

Happy sewing,

Emily


resources mentioned in this issue

  • Starting a pattern company Part one and two can be found here and here.

  • How to pattern test. Article can be found here.

  • In the Folds sew-a-longs can be found here.

  • Running an indie pattern company interview can be found here.

  • Love to sew podcast - pattern designer interviews can be found here.


P.S. Would you like to know what the Q & A series is all about? This page tells you a little bit more about the motive behind the series. Past issues from the Q & A series can be found here.

Don't have a question, but found this newsletter helpful? I'd love to hear from you! Get in touch and say hi. 


What you’ve been making


More posts in the series

ISSUE 52 - Starting a pattern company (Part two)

PINTEREST HEADERS TEMPLATE_LATEST2.jpg
HEADING - V1.jpg

Hello! 

I’ve really been loving your Q&A series. I am getting ready to start my own pattern company. I would love to know the steps in the process to getting a successful pattern ready for the market. Also I am not a pattern maker and do want to make my own patterns. How do I go about finding someone to help me make sewing patterns? 

Thank you,

May

Fairfax, United States

~

How do you make your gorgeous patterns?

Kate

Camden, UK


Hi May and Kate,

This week is part two of our little mini series of Q&A posts about the process of making an In the Folds pattern from beginning to end. If you missed part one, you can find it here.

Last week we finished up by talking about preparing the pattern for digitisation, so we will pick up right where we left off.

DIGITISING THE PATTERN

I always feel very excited at this point. I love knowing that the pattern itself is almost complete (I say ‘almost’ as there are always things changing up until the very end) and that it’s time to start digitising the pattern. I start by tracing the pattern onto large format paper and then taking it to my local copy shop for scanning. 

When tracing the pattern onto paper:

  • Trace stitch line (and cutting line if you like)

  • Transfer all notches, drill holes, pattern markings etc.

  • Mark the grainline on each piece

  • Label each pattern piece

  • Write any notes or things to keep in mind directly on the pattern

When I first started my business, I didn’t know I could find a large format scanner at my local copy shop, so I somehow managed to do this by scanning the pattern in piece by piece on my home scanner and then assembling in Photoshop. As you can imagine this was quite a boring and laborious task! There are ways to do this, so that is an option if you don’t have a copyshop nearby, but it is worth ringing around to see if you can find somewhere that does it. The place I go to is very cheap (just a few dollars per page), so it’s definitely worth it.

Once I have the scanned version of the pattern (in PDF format), I import it into Adobe Illustrator. I trace the pattern using the pen tool. When tracing onto paper, I trace the stitch line only, so this is what I trace when I import it into Illustrator. I then use the ‘offset path’ tool to add seam allowance. I add the grainline, notches and pattern markings. I then check and true the seams to check they are all correct, and make any necessary changes.

There are a lot of tools in Illustrator that make life much easier when drafting patterns, that I’ve managed to learn over the years. My mentality is to just learn as I go and aim to continue learning with each new pattern. If you have never used Adobe Illustrator, I’d say that’s something you should work on as it is a big part of the process.

GETTING PROFICIENT ON ADOBE ILLUSTRATOR

How-to-start-a-pattern-company-2-3.jpg

I was lucky enough to study fashion design at university, so I finished my bachelor with skills in Adobe Illustrator, Photoshop and InDesign. These skills have formed the basis of my business and over the last 5 years I have been adding to them as I go. 

If you’d like to start a pattern company, I’d say that this is probably the most important skill you can learn. The Adobe Creative Suite is fantastic and includes everything you need to create a digital sewing pattern, but it’s quite a learning curve if you have not used it before. Consider doing a short course or looking at tutorials online to get the hang of it. I’d suggest starting with Illustrator as it’s the one you will be needing the most, but also gives you a foundation that will help you understand the other software in the suite. 

A friend of mine recently told me about these great tutorials by Pattern Lab that show you how to draft digital sewing patterns using Illustrator. I had a quick look on their website and can’t believe how many great (and free) tutorials they have! These would have been really handy when I was learning - rather than the hours of strange Google searches!

SEWING THE FINAL SAMPLE

How-to-start-a-pattern-company-2-4.jpg

Once the pattern is digitised and checked, I print it on A0 sheets (back to the copyshop I go) and cut the pattern from fabric to make a fully finished sample. This is when I will sew the pattern from beginning to end, making sure I have resolved all parts of the process and check that all seams come together as expected.

How-to-start-a-pattern-company-2-5.jpg

As I sew the final sample, I take photos of each step and take notes in a Google doc as I go. I take note of any issues / problems with the pattern, or things that I think I can improve.

When the sample is  finished, I take all the photos and the instruction notes and turn it into a basic instruction booklet document. The aim of this is not to be pretty or completely resolved, but to be a document I can use as the basis of the instruction booklet and that I can handover to the illustrator I work with.

I make any updates to the pattern that I may have found during the sampling process, and create the instruction booklet document - resolving any issues as I work through the document.

PATTERN GRADING + INSTRUCTION CONTENT

How-to-start-a-pattern-company-2-6.jpg

I am lucky enough to have found a brilliant person to work with on the pattern grading and illustrations for my patterns. When I started In the Folds, I did all these things myself, but eventually I found someone who could do it more efficiently so I could work on other aspects of the business. I am pleased that I used to do these things myself though, because it means that if there are any issues when I get things back, I know how to make tweaks and can also tell if an error has been made. 

I send the pattern and the instruction notes to my grader / illustrator, along with any additional information, and generally about 4 weeks later, I get the pattern assets back.

This feels like a good time to end this issue. Next week I will tell you about the creation of the digital product itself (graded pattern files and instruction booklet) and finalising the pattern for release.

Happy sewing until next time!

Emily


resources mentioned in this issue

  • Starting a pattern company (part 1) can be found here.

  • How to check and true seams. Tutorial can be found here.

  • Pattern Lab can be found here.


P.S. Would you like to know what the Q & A series is all about? This page tells you a little bit more about the motive behind the series. Past issues from the Q & A series can be found here.

Don't have a question, but found this newsletter helpful? I'd love to hear from you! Get in touch and say hi. 


What you’ve been making


More posts in the series

ISSUE 51 - Starting a pattern company (Part one)

PINTEREST HEADERS TEMPLATE_LATEST.jpg
HEADING - V1.jpg

Hello! 

I’ve really been loving your Q&A series. I am getting ready to start my own pattern company. I would love to know the steps in the process to getting a successful pattern ready for the market. Also I am not a pattern maker and do want to make my own patterns. How do I go about finding someone to help me make sewing patterns? 

Thank you,

May

Fairfax, United States

~

How do you make your gorgeous patterns?

Kate

Camden, UK


Hi May and Kate,

Happy (belated) 2021! I hope you all had a good start to the new year and are staying well at this difficult time. I am very excited to be back with the Q&A series for the new year.

I thought I’d start the new year off with a bang, with a big question - that I will answer over three parts over the next three weeks. There is only so much depth I can go into, but I will try my best to cover all the important parts of my pattern making process. I hope it encourages and inspires you!

DESIGN

I’m never sure where my design ideas come from. They seem to just pop into my mind as an idea I would like to explore or play with. They are never even close to fully formed ideas, just a starting point. As the pattern collection grows, I also think about what the collection is missing and what gaps need to be filled. This may be a specific garment type, or it may also be a finishing technique that I’d like to use in the next pattern. 

Sometimes I have an idea of a pattern I would like to create, but it just doesn’t fit the collection or the In the Fold ethos. If that’s the case - it doesn’t make the cut. I also think about what patterns already exist on the market. There are a lot of patterns out there, and I hope to offer patterns that are new and exciting - so it’s always important for me to think about the broader context of my patterns.

Once I have an idea I would like to play with, I get to work. I am not a great drawer, so I rarely draw anything. I just get started on the pattern from whatever picture I have in my mind.

DRAFTING THE INITIAL PATTERN

How-to-start-a-pattern-company-2.jpg

I normally draft my patterns flat initially. This means that I take a pattern block, or an existing pattern, and manipulate it to create the basis of the new design. I always make the first pattern in its most basic form - no pockets, collars, button plackets etc. This is because I just want to get an idea of the shape and see if I’m on the right track. This also keeps things free and open, so that I can design through drape when the toile is on the stand (mannequin / dressmakers form). 

When I have the initial pattern made, I cut it from calico (muslin) and make a toile. For me, this is when the magic happens. So much of my design process happens when I’m drafting a pattern or sewing a sample. As I sew, I often think of design features or things that will make the pattern more interesting to sew.

How-to-start-a-pattern-company-3.jpg

Once I have a toile, I fit it on my mannequin and check how it’s going. I then start playing with seam lines, pockets, closures etc. Sometimes I cut into the toile to play with an idea, add fabric on, or draw directly onto the toile. I usually sew a toile with a long stitch length so that it is easy to unpick seams if I need to at this stage.

Normally I will make a lot of tweaks and then make the updates to the pattern, re-cut and re-toile. This process always goes on for a while! I keep going until I have a garment that I am happy with.

If all this sounds a bit beyond where your pattern making skills are, I’d suggest checking out this post on starting a business without formal training.

drafting patterns if you’re not a pattern maker

Acton dress - border print - 3.jpg

If you are not a pattern maker, but would like to start a pattern company, you will need to find a pattern maker to work with. I have worked with a number of pattern makers over the years in my business for assistance with a range of tasks, and I have found them through word of mouth or simply Googling ‘Pattern maker Sydney.’ Another option would be to contact a university in your area that teaches Fashion Design. They may have some teachers or students they could refer you to. Facebook groups are also another great way to get referrals. If there is a business group in your area, try posting there.

If working with a pattern maker, you will need to get really clear on your designs. It will be helpful if you can draw, but if you can’t, you can find photos of garments you like and annotate the features you like (or even what you don’t like). Prepare to have a bit of back and forth with a pattern maker as you get to know them and they get to know you. 

There are a few things you should work on and consider before working with a pattern maker. This will make the process a bit smoother and help you get on the same page in terms of goals and what you want out of the collaboration. Things to consider before sending your designs to a pattern maker:

  • What size you want the base pattern drafted for - consider bust cup size and height too

  • What your size chart will be (difference between sizes and how many sizes there will be)

  • What format you would like the pattern in when it is returned to you (do you want the paper version as well as digital? What file type will you be able to open with the software you are using?)

  • What is the turnaround time on the project?

  • How will you communicate updates and edits that you would like to make?

WORKING WITH A FIT MODEL

How-to-start-a-pattern-company-5.jpg

As I draft to an Australian size 10 (size C in In the Folds patterns), this is about the point where I need to get my fit model in. Although I can sometimes try things on to get a feel for a garment (especially because the things I draft are normally quite relaxed in fit), it is very important to see how the pattern looks - and feels - on a person with the measurements I draft for. 

Charlotte, my fit model, is great as her measurements put her in an exact size 10, she doesn’t mind slipping in and out of toiles in front of me, and she is also very honest and direct, which is great for getting feedback. 

I like to be organised when conducting a fitting, so that things run smoothly and I don’t miss anything. I make sure to have the following things ready ahead of time:

  • The toile/s I will be fitting

  • A notebook. Here I will also take note of specific things I’d like to check so that I don’t forget.

  • Pen

  • Sharpies in a few different colours

  • Masking tape (this is good to tape directly onto the toile if I need to mark something)

  • Pins

  • Tape measure

  • Scissors

  • Phone for taking photos

  • A chair (so I can check the fit model can sit down in the garment)

During a fitting, I ask her questions about how the clothing feels. Things like:

  • How is the pocket positioning?

  • Is that too tight under your arms?

  • Could you sit down / run / dance in that?

  • Are you comfortable? 

I check that all the seams are sitting correctly on her body and take notes of any changes that need to be made. If a seam needs to be moved, I normally mark it directly on the toile with a Sharpie. I take photos of the front and back and close-ups of any changes I’d like to make.

FINALISING THE PATTERN

How-to-start-a-pattern-company-6.jpg

At this point I might be ready to finalise the pattern (depending on how the fitting goes), although normally I need to make a couple more toiles to finalise the design. 

At this stage I am thinking a lot about the finishes I’d like to include in the pattern, and what I hope makers will learn by working with this particular pattern. I get really clear on the finishing techniques I’d like to use for the pattern, and have a practice run if any of them are new or tricky.

If needed, I get my fit model back for another fitting (most patterns will be fitted on my fit model 2-3 times before they are finalised) and then when I am satisfied with the pattern, I trace the pieces onto large pieces of paper, ready for digitising.

I think that’s a good place to end part one of this issue. Next week I will go into more detail about digitising the pattern and creating the instruction booklet content.

Happy sewing until next time!

Emily


resources mentioned in this issue

  • In the Folds pattern collection can be found here.

  • In the Fold ethos can be found here.

  • How to draft a pattern block - Tutorial can be found here.

  • Starting a business without formal training - Article can be found here.

  • In the Folds size chart can be found here.


P.S. Would you like to know what the Q & A series is all about? This page tells you a little bit more about the motive behind the series. Past issues from the Q & A series can be found here.

Don't have a question, but found this newsletter helpful? I'd love to hear from you! Get in touch and say hi. 


What you’ve been making


More posts in the series

ISSUE 50 - Using a border print on the Acton dress

HEADER_ISSUE_49.jpg
HEADING - V1.jpg

Hi Emily! 

I really love your Q&A series—it has become a highlight of my weekend to receive it!

My question is about using border prints. I recently scored some vintage cotton meterage with a gorgeous border print that I’d love to turn into a dress—perhaps View B of the Acton dress. However I am not sure how to approach the curved hem of the Acton dress with a border print. Any tips? Or is it best to choose a different pattern with a straighter hem? Many thanks!

Meg

Sydney, Australia


Hi Meg,

I am thrilled to hear that you are enjoying the Q&A series and it has become a highlight of your weekend. I love creating it and when I hear from happy readers it makes my heart sing.

This is a great question! I think you could make a border print on the Acton dress work.

I have come up with a couple of options for you: 

add seam lines

You could add some seams into the skirt, so that you could then cut all pieces on the straight grain. This option might not work with all prints and it probably depends on how you feel about cutting the print.

To do this:

SUB-HEADING 6.jpg

Step 1

Draw a line through the pattern as illustrated.

Acton dress - border print - 2.jpg

Step 2
Cut along the line to separate the pattern into two pieces. As you can see. By splitting the piece in two, you can now get the hemline much straighter on both sections of the piece.

Acton dress - border print - 3.jpg

Step 3

Mark a new grainline on the side section of the skirt (you will want it to be perpendicular to the hemline) and label the pattern pieceAdd seam allowance to each side of the cut line (I would suggest the same amount that is on the side seam for consistency). You can also add some notches to the seam so that you know which side connects to the centre panel and which side is the side seam.

You will need to repeat this for the FRONT SKIRT pattern piece too.

change the shape of the pattern piece

Acton dress - border print - 4.jpg

The other option would be to redraft the pattern piece with straighter lines. I haven't done this, so I'd suggest making a toile first to check the wrap still works in the way you want it to, before cutting into your special vintage fabric. I think it would need to look something like the above illustration so that you get a nice straight hemline as well as a fairly straight side seam.

I did a bit of Googling to see if I had missed something with my answer and came across this forum on the topic. One of the ideas that popped up that I hadn't thought of was that you could cut off the border and then add it to the hem line (after you have cut the pattern piece so it is shorter (to allow for the border print to be added back on). It might require some small darts in the border print to get it back on. I think this method would only work with particular types of border prints, but it might be worth considering.

I’d love to see a photo of your Acton dress if you do choose to go ahead with this!

Happy sewing,

Emily


resources mentioned in this issue

  • The Acton dress pattern can be found here.

  • Adding pattern markings to your patterns. Tutorial can be found here.

  • How to add seam allowance to a sewing pattern. Tutorial can be found here.

  • How to add panel lines to a skirt pattern. Tutorial can be found here.

  • How to (and why) make a toile. Tutorial can be found here.

  • Border print on a curved hem. Discussion forum can be found here.

  • The Q&A series archive can be found here.

  • Making a plan for the year / quarter. Issue can be found here.


P.S. Would you like to know what the Q & A series is all about? This page tells you a little bit more about the motive behind the series. Past issues from the Q & A series can be found here.

Don't have a question, but found this newsletter helpful? I'd love to hear from you! Get in touch and say hi. 


What you’ve been making


More posts in the series

ISSUE 49 - Doing a full bust adjustment on the bodice block

HEADER_ISSUE_49.jpg
HEADING - V2.jpg

Hi Emily!

Thank you very much for all these answers about the bodice block.

I have a question - the toile is fitting me really well, but I feel I need more ease around the bust, at the apex level, like I cannot breathe well.

I think I measured it too tight at the drawing step, but now what can I do? The neck and the shoulder are ok, so I don't want to touch my centre front line.

Where can I add ease?

Thank you very much for your help!

Thaïs


Hi Thais,

I am pleased to hear you are giving the bodice block a go and that you have found a few of my questions with answers handy!

It sounds like you need to do a Full Bust Adjustment (FBA).

what is a full bust adjustment?

In the Folds patterns are drafted for a B cup bust. This means that if your bust cup size is smaller than a B cup you may need to do a Small Bust Adjustment (SBA) and if your bust cup size is larger than a B cup you will may to do a Full Bust Adjustment (FBA).

when you’ll need to do a full bust adjustment

Whether or not to make the adjustment will depend on the pattern you are using and the finished design. For example, I have an A cup bust cup size (there is a 2.5cm difference between my full bust and high bust measurements). When I make the Collins top, I don’t bother doing a Small Bust Adjustment, as the top is designed to be oversized. For the Acton dress though, that has a fitted bodice, I need to make the adjustment, otherwise the bust would be loose - not the look I was going with with the design! 

 It is a good idea to check the finished garment measurements in relation to the body measurements before deciding whether or not to make the alteration.

 Today’s question is about the bodice block though, and as it’s a fitted style, it is likely that if you have a larger bust cup size, you will want to make the adjustment. In saying that though, as you are using your own measurements to draft the bodice block, you may only need to make the alteration if you have a bust cup size larger than a C or D - or if like Thais, you realise the fit everywhere else is fine, but the bust is too tight.

5.COLLINS-TOP-ALTER-ARMHOLE.jpg

Work out how much to add

The process of working out how much to add to a pattern is different if you are using a pattern with a particular bust cup size. For more information on that, you can see this post here. As this question is regarding a pattern that you have drafted to your own measurements, there are a couple of ways of finding out how much you need to add to the pattern.

  1. Measure the bust line on the pattern and compare it to your full bust measurement. Remember, you will want at least a couple of centimetres ease, so that the bodice is fitted, but you can breathe comfortably and move around. You might notice that your full bust measurement is 5cm (2in) larger than the bust line on the pattern. This means you need to do a FBA of 2.5cm (1in) - this is because the front piece is cut on the fold and when doubled - this equates to the difference you require.

  2. If you have made a toile / muslin and are happy to cut into it, you can cut through the toile vertically at bust point and put the toile on. Naturally, if the bodice is too tight, the cuts will open and you can measure the width of the opening to see how much needs to be added. An example of this technique can be seen here.

Prepare the pattern

1. Bodice with dart - FBA - 1.jpg

Step 1
Take the FRONT piece from your bodice block draft (or the pattern you’d like to make the adjustment to). If you think you’d like to go back to the original pattern in the future, I’d suggest tracing a copy to make the alteration on.

If you are tracing a copy of the pattern, be sure to transfer the stitch line as well as the cutting line, as it will help you with this tutorial. You will also need to transfer all pattern markings and notches.

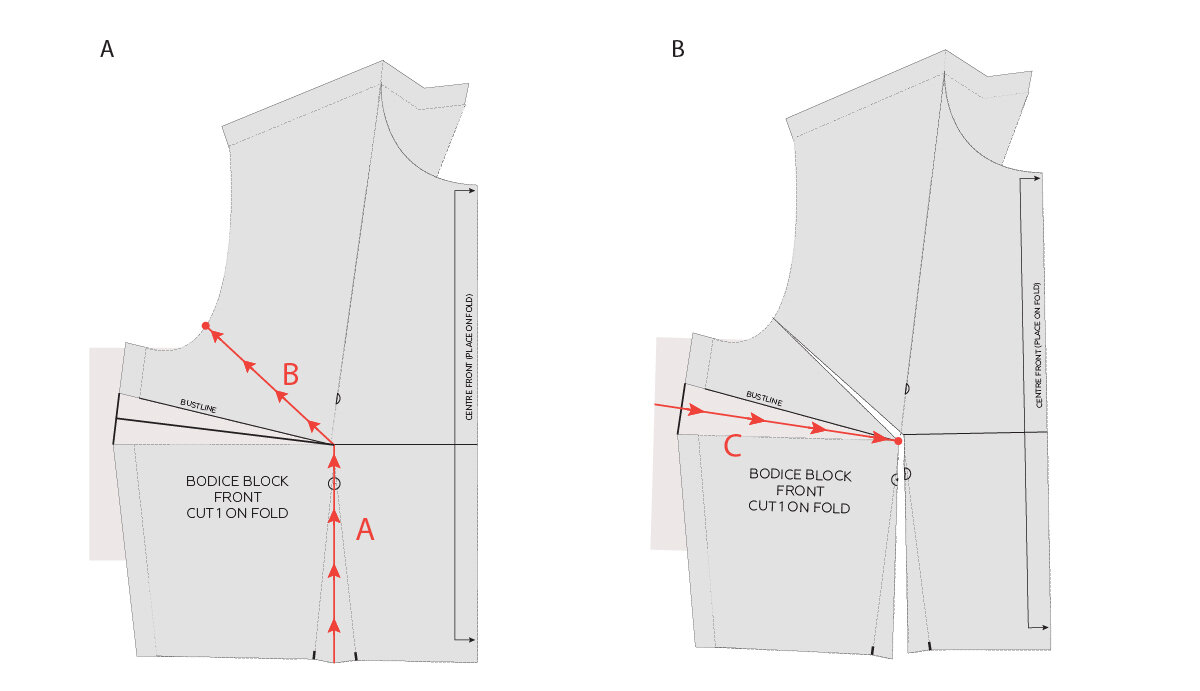
To start, we will be moving the shoulder dart to the side seam. This will make for a simpler adjustment process. You can move the dart back to the shoulder after the alteration is made, or you can choose to leave it in the side seam, whichever option you prefer.

A Draw a straight line down the shoulder dart arm closest to the neck. Continue the line until you hit the bust line.

Draw a line along the bust line from the side seam, through the line you just marked from the shoulder dart arm.

B Cut into the bust line from the side seam. Stop cutting when you get 1-2mm from the point where the two lines we just marked intersect.

Cut down from the shoulder on the dart arm we marked in part A. Again, stop cutting 1-2mm from the intersection point. This will create a small “hinge” of paper that allows you to make changes to the pattern, whilst still keeping the pattern intact.

move the dart

2. Bodice with dart - FBA - 2.jpg

Step 2
A Close the shoulder dart, by carefully rotating the armhole section of the pattern. Rotate the section until the un-cut shoulder dart arm lines up with the cut line - closing out the entirety of the dart. Tape in place. You will notice that as you do this, a dart opens up at the side seam. This is because we have moved the fullness of the dart to another location on the bodice.

B Take a piece of paper and stick it under the opening in the side seam.

Draw a line up from the centre of the waist dart to the bust line (parallel to the centre front of the pattern). Label this as line A.

C Draw a line from the lower section of the armscye (approximately one third of the length of the front armscye - measuring from the side seam) to the bust line. Label this as line B.

D Find the centre of the dart created at the side seam and mark a line from the centre of this dart, to the point where lines A and B intersect. Label this as line C.

make the adjustment

3. Bodice with dart - FBA - 3.jpg

Step 3
A Carefully cut up from the waist along line A. Stop when you get to the bust line and pivot to line B. Cut along line B until you get 1-2mm from the armscye. Leave a small hinge in place.

B Cut along line C from the side seam, through to the bust point. Again, stop cutting 1-2mm from the intersection point, leaving a small hinge of paper intact.

4. Bodice with dart - FBA - 4.jpg

Step 4
A Take a piece of pattern paper (about the size of your front piece) and draw a vertical line in roughly the centre of the paper.

By this stage you should know how much width you need to add to the bust. Take this measurement and divide it by two (you will add half the extra width to either side of the front piece, so in total it equals the whole amount you need when the piece is cut on the fold). Draw a second line - parallel to the first - this distance away from the first line. For example, if you need to add a total of 5cm (2in) to the bust, you will be drawing the line 2.5cm (1in) away from the first line.

B Carefully place your pattern piece on top of the paper.

Now that you have cut through the lines, you will be able to manoeuvre the pattern so that you can add the extra width you need to add around the bust. Carefully place the pattern onto the guidelines you drew in the previous step. Line up the the left-hand side of your pattern with the first line (line on left side).

C Carefully move the right side of you pattern piece until the other side of the waist dart (the cut line) lines up with the second line marked in part A. When everything is lined up, tape in place - leaving the part of the pattern on the right side of the dart unattached (you will see why in the next step).

5. Bodice with dart - FBA - 5.jpg

Step 5
A You will notice that the waist seam is no longer straight. This is because when making a Full Bust Adjustment you need to add extra length, as well as width, so that there is enough fabric to comfortably go over the breasts, without making the garment too short.

Mark a line that is perpendicular to the centre front, within the dart. Label this line as D.

B Carefully cut along line D, detaching that piece of the pattern.

C Take a ruler and extend the centre front line onto the paper underneath. Do the same for the waist line - so the two lines intersect.

D Take the section of the pattern you cut off in part B and line up the corner with the lines marked in part C. When it’s in place, tape or glue in place.

mark the new darts

6. Bodice with dart - FBA - 6.jpg

Step 6
A Find the centre of the waist dart (by measuring the width between the dart legs at the waist line) and mark a line straight up - parallel to the centre front.

B Find the centre of the side seam dart and draw a line from the centre, through the dart point (and extending a few centimetres further).

C Mark the new dart points, by marking points 5cm (2in) back from the intersection point of the two lines, on the centre line of both darts.

D Re-draw the darts by joining the original dart legs to the new dart points. As you can see, you now have a larger waist dart than you had before. This is because width was added to the waist and the bust. By making the waist dart larger we are increasing width at the bust, but not at the waist.

finalise the pattern

If you like, you can move the side dart, back to its original position on the shoulder. You can use this method or this method to move the dart. You will also need to add dart shaping to your new darts (whether you move it to the shoulder or leave it where it is). 

 When you’re done, you can either use the adjusted pattern as it is (just trimming off the excess paper that you do not need), or by tracing a copy onto a new piece of paper. If you choose to trace the pattern, it’s always a good idea to save the adjusted version so that you can refer back to it later down the track. 

I would suggest making a toile to see if you are happy with the adjusted fit. 

 Happy sewing,

 Emily


resources mentioned in this issue

  • How to draft a bodice block. Tutorial can be found here.

  • Drafting a bodice block - Questions and answers. Post can be found here.

  • The Collins top pattern can be found here.

  • The Acton dress pattern can be found here.

  • Small bust adjustment tutorial can be found here.

  • Full bust adjustment on princess panels tutorial can be found here.

  • How to (and why) make a toile. Tutorial can be found here.

  • Full bust adjustment for princess seams from Sew Over It. Tutorial can be found here.

  • How to move a dart using the cut and spread technique. Tutorial can be found here.

  • How to move a dart using the pivot technique. Tutorial can be found here.

  • How to add dart shaping. Tutorial can be found here.


P.S. Would you like to know what the Q & A series is all about? This page tells you a little bit more about the motive behind the series. Past issues from the Q & A series can be found here.

Don't have a question, but found this newsletter helpful? I'd love to hear from you! Get in touch and say hi. 


What you’ve been making


More posts in the series

ISSUE 48 - Raising the Collins top armhole

HEADER_ISSUE_48.jpg
HEADING - V1.png

Hello Emily,

I would just like to say how easy your Collins top pattern was to sew with.

From printing with layers, professional drafting and markings, concise, well written directions, and clear diagrams, this pattern was a pleasure to use.

The high bust measurement is a great inclusion in the instructions, a great basis to begin with for a better fit. Congratulations on the quality of your design and format.

I was wondering if you could take the time to answer an adjustment question, or direct me to a tutorial on making the length/ depth of the armhole smaller.

My daughter also needs the same adjustment necessary to cover her bra under the arm.

I’m not sure how to adjust the length without affecting the top shoulder panel seam joins at the front and back that form part of the armhole edge. Ideally, I would need to raise the armhole by approx 2-3 cm. The shoulders and chest area fit well in length and width.

Thank you in advance for taking the time to reply to my question.

Chris 


Hi Chris,

Thank you for your lovely email. I am thrilled to hear you enjoyed the experience of using the Collins top pattern

I'm more than happy to help you with this question. It's not too difficult, but there are a few more steps involved than if it was a regular sleeveless top without the panel lines.

redraw the armhole

2. WRAP-SKIRT-GRADING-SIZES-3.jpg

Step 1
To start we will be putting all the panels of the top together to make a full front pattern piece. Place SIDE FRONT PANEL [2] on the CENTRE FRONT PANEL [1] - stitch line on stitch line (grey line on the pattern) - as if the pieces have been sewn together.

Hold in place with masking tape (or a tape that is easy to remove).

3.COLLINS-TOP-ALTER-ARMHOLE.jpg

Step 2
Place FRONT SHOULDER PANEL [6] on to the CENTRE FRONT PANEL [1] - again, with stitch line one stitch line (grey line on the pattern) - as if the pieces have been sewn together.

Hold in place with tape.

4.COLLINS-TOP-ALTER-ARMHOLE.jpg

Step 3
Place a scrap piece of pattern paper under your pattern - around the armhole / top of side seam section. Tape in place.

At the armhole point (where the side seam meets the armhole on the stitch line), extend the side seam by the distance you would like to raise the armhole by.

In the example I have extended the side seam by 3cm / 1 1/4, but this will depend on your preference. Make sure the new line runs at the same angle as the side seam.

5.COLLINS-TOP-ALTER-ARMHOLE.jpg

Step 4
Re-draw the armhole with a nice smooth curve - joining the top of the new side seam to the original armhole line on the FRONT SHOULDER PANEL [6]. A french-curve will come in handy if you have one, to draw this curve.

redraw panel lines

6.COLLINS-TOP-ALTER-ARMHOLE.jpg

Step 5
Extend the panel seam line that connects the CENTRE FRONT PANEL [1] and the SIDE FRONT PANEL [2] so that it reaches the new armhole line.

7. GRADING-BETWEEN-WRAP-SKIRT-SIZING.jpg

Step 6
Re-draw the line that joins the CENTRE FRONT PANEL [6] and the CENTRE FRONT PANEL [1]. Again - a French curve will come in handy to get a nice smooth curve.

Mark a notch on the new seam line (in a similar position to the original, although does not need to be exact).

trace copies of new pattern pieces

Page 1 copy 8.jpg

Step 7
Trace your new pattern pieces onto paper by following the new lines and easing back into the original panel lines where they meet. Add seam allowance back on where necessary and be sure to transfer the notches.

Step 8
Repeat the process for the back pattern pieces.

finalising the pattern

Step 9
When making alterations to a pattern, it is always a good idea to check and true the pattern before cutting from fabric.

Step 10
Due to the changes made to the body of the pattern, you will also need to redraft the facing, so it fits the new pattern pieces. You can find a tutorial about how to do that here

Happy sewing!

Emily


resources mentioned in this issue

  • The Collins pattern can be found here.

  • How to add seam allowance to a pattern. Tutorial can be found here.

  • How to check and true sewing patterns. Tutorial can be found here.

  • The Collins top sew-along: Re-draft the facing. Tutorial can be found here.


P.S. Would you like to know what the Q & A series is all about? This page tells you a little bit more about the motive behind the series. Past issues from the Q & A series can be found here.

Don't have a question, but found this newsletter helpful? I'd love to hear from you! Get in touch and say hi. 


What you’ve been making


More posts in the series

ISSUE 47 - Grading between sizes on a wrap skirt

1. GRADING-BETWEEN-WRAP-SKIRT-SIZING.jpg
HEADING - V1.png

Hi Emily,

I hope you're well.

I have a query regarding the body/finished garment measurements for the Peppermint Wrap Skirt. I'm trying to figure out what size to make but the waist measurement body/finished garment measurements are the same and 5cm bigger at the hip? I just want to make sure there's enough overlap so I'm not flashing - lol. My body measurements are waist size I and hips size H.

Thanks, 

Melanie


Hi Melanie,

I'm excited to hear you will be making the Wrap skirt!

You're right - flashing is definitely the biggest concern when it comes to wrap skirts (or wrap anything, for that matter!). This is the reason I designed this skirt pattern to have two different front wrap pattern pieces.

2. WRAP-SKIRT-GRADING-SIZES-3.jpg

As you can see in the illustration above (I have put one piece on top of the other, so you can get a clear idea), the front left side of the wrap is wider than the front right side. This means that there is more coverage in the part of the skirt that makes the "under wrap" - this will give an extra line of defence against unplanned flashing.

3. WRAP-SKIRT-SIZING-CHART.jpg

The reason the waist measurements are the same between body measurement and garment measurement is because it is a wrap garment and you can make it as tight or as loose as you like - which will change the finished waist measurement. The hip has ease built in to give the skirt some shape, but also make it comfortable to move and sit down in.

When it comes to your particular sizing question, I'd suggest cutting a straight size I - as your waist is a size I and hips are a size H. You could grade down to an H at the hip if you like, but there is probably no need for this style of garment.

4. WRAP-SKIRT-GRADING-SIZES-1.jpg

If you do choose to grade between sizes, it is very easy. All you need to do is draw a line from the size I cutting line (black line on the pattern) at the waist to the size H cutting line at the hip, as illustrated above. You will want this line to be nice and smooth, so that the transition between sizes is gradual.

5. WRAP-SKIRT-GRADING-SIZES-2.jpg

You will need to do this to the back skirt pattern piece, as well as both front pieces.

6. WRAP-SKIRT-GRADING-SIZES-4.jpg

If you are following along at home and need to grade the opposite way - smaller size waist and a larger size hip - please see the illustration above for how to do this.

Back to Melanie’s question - if you’re not sure whether you want to grade down at the hip (as this will give you less hip circumference, which potentially is not something you want to lose if you are concerned about showing a bit too much leg), the other thing you could do is cut the pattern in a straight size I. When you get to sewing the side seams, baste* the side seams closed and then try on the skirt (you will need to pin the skirt in place as it won't have a waistband yet).

7. GRADING-BETWEEN-WRAP-SKIRT-SIZING.jpg

Have a look and see how the side seams are sitting - if it feels too big at the hip, or the side seams are too curved, you could always alter the side seam at this point. To alter the skirt to have a size H hip, you will need to remove about 3.7cm from each side seam (half of this from the front and half from the back), as there is a 7.5cm difference between the hip measurement of the size H and size I.

I hope this helps.

Let me know how you go!

Happy sewing,

Emily

*Baste: sew the seam with your machine on the longest stitch length. This makes it quick and easy to try things out as you are able to remove the stitches quickly and easily. You can even change your machine thread to a contrasting colour, as this makes it even easier to remove the stitches after you have checked the fit.


resources mentioned in this issue

  • The Peppermint wrap skirt can be downloaded for free here.


P.S. Would you like to know what the Q & A series is all about? This page tells you a little bit more about the motive behind the series. Past issues from the Q & A series can be found here.

Don't have a question, but found this newsletter helpful? I'd love to hear from you! Get in touch and say hi. 


What you’ve been making


More posts in the series

ISSUE 46 - Accessing the little book of seam finishes

PINTEREST HEADERS TEMPLATE_LATEST.jpg
HEADING - V1.png

Hi Emily,

I'd love a copy of your 'Little book of seam finishes'.

Your instructions are a pleasure to read as they are very clear.

Cheers, 

Kerry


Hi Kerry,

Thanks for reaching out.

Please find a sign up link to the newsletter below, this will give you access to the Little Book of Seam Finishes.

I hope you enjoy it!

Happy sewing,

Emily


P.S. Would you like to know what the Q & A series is all about? This page tells you a little bit more about the motive behind the series. Past issues from the Q & A series can be found here.

Don't have a question, but found this newsletter helpful? I'd love to hear from you! Get in touch and say hi. 


What you’ve been making


More posts in the series

ISSUE 45 - Online retailers in Australia

HEADER_ISSUE_45.jpg
HEADING - V1.png

Woah! I’m Australian- and I want Stephanie’s list!

I’m newly returned to sewing after 20 years (babies, kids, work - finally have a little breathing room) and am struggling to come to grips with the question of where to buy fabric and notions - the sewing world has changed! (Sadly my overlocker exasperates me as much as ever).

I really love your emails - you answer things very thoroughly and obviously put a lot of thought into it.


- Marg


Hi Marg,

I’m pleased to hear you enjoyed the post about online fabric retailers in the US and Canada. I am very happy to share with you a list of retailers here in Australia! I hope some of these are new to you and you can find some lovely fabric for your next sewing project.

I have some fantastic Australian pattern stockists that I'd love to share with you. I reached out to some of them and asked for them to give us an idea of the fabrics they specialise in!

MAAIDESIGN

MaaiDesign.jpg

MaaiDesign is a family-owned, online fabric store based in Victoria, Australia. We specialise in high-quality, modern dressmaking fabrics for those who love to sew fabulous clothes. Our swoonworthy designer collection includes fabric brands like Atelier Brunette, Art Gallery Fabrics, See You At Six, Nani Iro, Lady McElroy, Mind The Maker and more.

Because high-quality basics are hard to find, we have a large range of solid colours in different fabrics to mix and match with our designer collection. Matching sewing threads can be added with just a click of a button, and with our expanding range of sewing patterns you can find everything you need all in one place.

Happy customers are a top priority so we work hard to offer personal customer service and an easy to browse website. New fabrics are released almost every week, so sign up to our newsletter here to be in the know (as some sell out fast).

Find out more:
www.maaidesign.com.au

The drapery

The Drapery.jpg

The Drapery is a real, bricks-and-mortar fabric shop in Adelaide, South Australia - and an online store, too! We specialise in natural fabrics, particularly more sustainable fibres like linen, hemp, wool and organic cotton, plus independent designer patterns and high quality notions. Hand-crafting and sewing are an antidote to a throwaway society, and we believe in using beautiful materials that will last!

Some of our quality, natural fabrics for everyday wear include washed linens from Lithuania, selvedge and organic denims from Japan and Italy and a wide range of modern Japanese fabrics including double gauze by Nani Iro.

Find out more:
www.thedrapery.com.au

pattern scissors frock

Pattern Scissors Frock Image 2.jpg

Pattern Scissors Frock is an Australian online independent fabric store that specialises in quality modern apparel fabrics with a focus on natural and sustainable fibres that will be launching in late December 2020. We stock a beautiful range of independent patterns and fabrics including lyocell, linen, hemp, cotton and knits. Many of the fabrics we have chosen meet global textile standards or certifications.

At Pattern Scissors frock we hope to inspire others to sew, create and feel great in what they wear with beautiful modern fabrics and indie patterns.

Find out more:
www.patternscissorsfrock.com.au

Pattern Scissors Frock Image.jpg
SUB-HEADING 1 copy 2.png

Minerva’s bower

Minervas bower-2.jpg

We are Kylie Crowe and Clare Sanders and our store is Minerva’s Bower, located in Katoomba Blue Mountains NSW.

We have a dressmaking fabric focus and specialise in natural fibres with attention given to appropriate fabrics for our cooler weather. We also aim to be able to tell the story of all of our fabrics so that we are able to provide our customers with as much information as possible.

We stock a wide range of natural fibres; cotton, linen, wool and leather as well as a wide variety of man made natural fibres such as Tencel, Lyocell and viscose. All of these are available online.

In store we have a constantly changing selection of fine vintage fabrics. To complement our fabrics we stock independent Australasian patterns, a wide range of haberdashery, including vintage trims and hard to find notions.

Find out more:
www.minervasbower.com.au

house of cloth

houseofcloth_instagram.jpg

House of Cloth was established in 2010 in Bendigo, Victoria, Australia. We hold a unique place in Bendigo as the only independent fabric store providing fabrics for the home sewist.

House of Cloth is a destination point for anyone looking for high quality fabrics. We are committed to maintaining a strong focus on natural fibre fabrics. We have a diverse range of fabrics across cotton, linen, wool and silk, including suiting fabrics, lawn, voiles, coatings, to name a few. New fabrics arrive throughout the year, especially around autumn/winter and spring/summer.

We have diversified our products to include boutique knitting yarns, knitting accessories, patterns from independent designers, a small range of haberdashery, and Bernina sewing machines and accessories. We are also committed to assisting people to find new homes for their vintage/retro fabric collections.

Find out more:
www.houseofcloth.com.au/

fibresmith

fibresmith.jpg

Fibresmith is a boutique space dedicated to quality, natural cloth yarn and fibre craft supplies in Melbourne’s Inner West, founded by Maze & Vale designer, Leslie Keating.  

“Fibresmith lived in my head for over three years, a little dream of a beautiful shop filled with gorgeous, natural fibre yarn and cloth in modern, graphic prints. Trained as a graphic designer with a life long love of craft, I was naturally drawn to simple, graphic patterns and colour combinations, especially muted, impure or ‘different’ shades. In 2011, I began playing around with block printing on fabric, first with simple shapes and then moving into carving my own stamps and eventually discovered and fell in love with screen printing as a way to cover larger areas of cloth. I enjoyed designing and printing cloth so much that I began selling it, creating a small business called Maze & Vale. Maze & Vale was the most excellent and flexible outlet for my creativity with two small children and over the years, gave me great insight into customers’ wants and needs for modern and interesting textiles. In 2017 that I firmly made the decision to open Fibresmith, to focus on sourcing beautiful, natural fibre cloth and yarn and high quality tools and supplies for sewing, needlecraft, knitting and crochet.”

Find out more:
www.fibresmith.com.au

Some other stores you may like to checkout:


resources mentioned in this issue

  • Online retailers in the US and Canada. Post can be found here.

  • A list of In the Folds pattern stockists can be found here.


P.S. Would you like to know what the Q & A series is all about? This page tells you a little bit more about the motive behind the series. Past issues from the Q & A series can be found here.

Don't have a question, but found this newsletter helpful? I'd love to hear from you! Get in touch and say hi. 


What you’ve been making


More posts in the series

ISSUE 44 - Preparing a pattern for testing

HEADER_ISSUE_44.jpg
HEADING - V1.png

Hi Emily,

I hope that you’re doing well!

I saw that you mentioned using Slack for your testing group and was wondering if you had any tips. I’ve used Slack for work and like the immediacy of it but I’ve mostly done it with just one or two people on a channel.

I’ve used a Facebook group for testing before but I didn’t really like it.

In general, I tend to get a little overwhelmed during testing and have a hard time tracking everything. So, anything that would make testing easier appeals to me.

 Did you have just one group slack channel that everyone was a part of? How many people did you have? 

All the best.


Hi there,

I am pleased to hear you have a new pattern in the works and are almost ready for testing! I can definitely relate to how overwhelming pattern testing can be. I feel like I have almost streamlined my testing process to a point that it feels manageable and not as intimidating as it used to feel, so I would be very happy if it could help you feel less overwhelmed too!

2. In-the-folds-pattern-testing-2.jpg

SLACK VS FACEBOOK

I am definitely pleased I transitioned to Slack rather than Facebook and will continue using Slack in future. Having channels really helps and I like that things stay in chronological order, rather than becoming one endless random thread of posts.

For pattern testing I set it up with just a couple of channels, but recently I used it for my Darlow pants sew-along and tried using more channels and I think that it worked better.

In future I think I will create the following channels:

  • General - I think you have to have this channel in Slack. This can be used as a general conversation space - a place for people to get to know each other. I like having a channel where people can just chat about whatever. Generally people were talking about what they're reading, watching, listening to etc. and was a nice way for participants to connect with each other

  • View A

  • View B - If the styles are quite similar or follow the same construction, I would consider keeping both in one channel, but for the Darlows I had View A and View B so it was quick and easy for people to find what they were looking for.

  • For the Darlows I did separate channels for pattern alterations and sewing. For example: View A alterations / View A sewing. I think this was really helpful for pants as most people needed to make alterations. For a pattern that doesn't need as much tweaking I would probably just keep alterations and sewing in the one channel (e.g. View A).

  • Finished makes - During pattern testing a few people said they would have liked a separate channel just for finished makes, so I did add one in the Darlow sew-along and it seemed to work well

As for numbers, I normally have about 20 people in the testing group - 2 for each size in thesize range - 1 making each of the two views.

I found this article really helpful for things like privacy settings etc. in Slack and just worked my way through it as I set up the workspace and channels.

I wrote an introduction and posted to the General channel. In the post I detailed:

  • An introduction and explained briefly what the channels are for

  • Pattern feedback deadline

  • Asked people not to share the pattern details on social media

  • Attached the pattern files. I attached directly to Slack, which was fine, but I think next time I will also include a Dropbox link.

  • I then pinned the post so it could easily be found in the thread

3. In-the-folds-pattern-testing-3.jpg

COLLECTING FEEDBACK


I have also found that collecting feedback can be overwhelming, so have come up with a few systems that have really helped:

I collect feedback in two ways: 

1. An online form that is completed / submitted at the end of testing for in-depth feedback regarding fit and the experience of using the pattern. I set this up through my website. I ask questions such as:

  • Did you make any modifications to the pattern?

  • What do you like about how the garment fits?

  • What don't you like about how the garment fits?

  • What do you like MOST about the finished garment?

  • What do you like LEAST about the finished garment?

  • Were there any steps that you feel require more detail?

  • Are you happy with the techniques used to assemble the garment or do you think there could be a better way?

2. For general feedback I use a Google Doc which has been a real game changer for me. Using this method means that all the feedback is in one place and I don't have too many notes doubling up as participants can see previous notes - as it's a live / interactive document.

On the Google doc I include instructions for testers and then create a table so there is space to write notes about each section of the pattern. This means that when feedback is added, there is a clear place for each note to go and testers can quickly and easily see what has been mentioned and what hasn’t. This document is basically used for keeping track of any typos, errors, or steps that need further explanation etc.

I have a rule for myself that is that I don't read any of the feedback until testing is over, as I have learned that it just stresses me out and I'd rather just go through it all when testing is finished. I have also learned that any negative feedback, never feels as big or as overwhelming when I can read all the feedback at the same time. This rule also means that I can spend my time in the Slack group just hanging out with the testers, which has to be the best bit about pattern testing!

When testing is done, I go through all the feedback that has been submitted from the online form and add any notes to the Google doc that I have found in the feedback that aren't already in the doc. This is when a second computer monitor helps a lot! I work through all feedback and then the Google doc becomes my checklist for updating the pattern.

4. In-the-folds-pattern-testing-4.jpg

PREPARING THE PATTERN FOR TESTING

One thing I learned recently is that it’s worth getting the pattern copy edited before it goes into testing. I used to just copy edit the pattern myself, but would often miss a few things here or there and these became stumbling blocks for testers, that meant they were spending more time on missed steps / typos than the flow of the order of construction. By getting my patterns professionally edited before I send them out for testing, I noticed a big difference in the types of things the testers were able to focus on, when not distracted by the errors that had slipped through the cracks in the past.

Best of luck with your pattern testing and please do let me know if you have any questions about any of this!

Talk soon,

Emily


resources mentioned in this issue

  • The In the Folds sizing chart can be found here.

  • How (and why) to create a Slack community article can be found here.


P.S. Would you like to know what the Q & A series is all about? This page tells you a little bit more about the motive behind the series. Past issues from the Q & A series can be found here.

Don't have a question, but found this newsletter helpful? I'd love to hear from you! Get in touch and say hi. 


What you’ve been making


More posts in the series